1
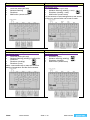
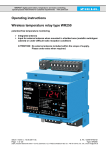
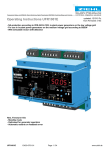
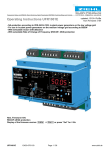
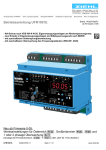
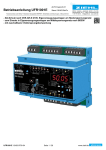
ZIEHL industrie – elektronik GmbH + Co KG Daimlerstraße 13, D – 74523 Schwäbisch Hall + 49 791 504-0, [email protected], www.ziehl.de Temperature Relays and MINIKA® Mains Monitoring Digital Panelmeters MINIPAN® Switching Relays and Controls Measuring Transducers Grid- and Plant Protection updated: 140407 Sc Operating Manual TR440 - Transformer protection temperature relay TR440 12310-0702-04 Seite 1 / 24 www.ziehl.de Table of contents 1 Use and brief description ....................................................................................................................... 3 2 Overview of the functions ...................................................................................................................... 3 3 Connection diagram ............................................................................................................................... 3 4 Display and controls .............................................................................................................................. 5 5 Important information ............................................................................................................................ 6 6 Programs................................................................................................................................................. 7 7 Installation .............................................................................................................................................. 7 8 Start-up operation (commissioning) ..................................................................................................... 8 9 8.1 General instructions on operating .................................................................................................. 8 8.2 Display mode ................................................................................................................................. 8 8.3 Menu mode.................................................................................................................................... 9 8.4 Configuration mode ....................................................................................................................... 9 8.5 Short operating diagram [Program 1] ........................................................................................... 10 8.6 Short operating diagram [Program 2] ........................................................................................... 11 8.7 Short operating diagram [Program 3] ........................................................................................... 12 8.8 Short operating diagram [Program 4] ........................................................................................... 13 8.9 Overview of commissioning ......................................................................................................... 14 8.10 Selection of program number ....................................................................................................... 14 8.11 Switch on device .......................................................................................................................... 14 8.12 Configure the sensors .................................................................................................................. 14 8.13 Configure the alarms ................................................................................................................... 15 8.14 Configure the relay test on K1...................................................................................................... 16 8.15 Configure the Modbus RS 485 interface (option) ......................................................................... 17 8.16 Sensor simulation ........................................................................................................................ 17 8.17 Code block................................................................................................................................... 18 8.18 Tips on operating ......................................................................................................................... 18 8.19 Possible indications in display...................................................................................................... 19 Factory settings .................................................................................................................................... 20 10 Maintenance and repair........................................................................................................................ 21 11 Trouble shooting .................................................................................................................................. 21 11.1 Display of program number, measurand and software version..................................................... 22 12 Technical data ...................................................................................................................................... 23 13 Mounting type SE 2 .............................................................................................................................. 24 TR440 12310-0702-04 Seite 2 / 24 www.ziehl.de 1 Use and brief description Temperature relay to protect transformers against excess temperature and to control a fan. The temperatures in the windings are monitored with three Pt 100 sensors. The core temperature can be monitored with a fourth sensor. The 4 alarms/output relays are used to control the fan, to signal an advance warning and to switch-off the transformer. Various programs facilitate using the alarm ideally for each application. Depending on the program, e.g. an extra relay is available for the fault message or for triggering due to exceeding the maximum core temperature. Other uses: Alternatively, with the fourth sensor the temperature of the room the transformer is located in can be monitored and, with the alarm, the room ventilation can be controlled. The device can also be used for other tasks for temperature monitoring e.g., for motors. 2 Overview of the functions 4 Sensor inputs Pt 100 (RTD), 2 or 3-wire connection Large monitoring range -199…+850°C / -199...+999°F 4 Alarms / Relays 3-digit digital display (resolution 1°C / 1°F) 4 LEDs sensor 4 LEDs relay 4 LEDs alarm 1 LED error Control voltage AC/DC 24-240 V Clear displays and simple programming Min and max sensor values can be saved Code block against unintended / unauthorised changes to the settings Optional RS 485 interface with Modbus RTU protocol EasySimulation for simple sensor value simulation 3 Connection diagram There are various connection possibilities depending on the four adjustable programs. TR440 12310-0702-04 Seite 3 / 24 www.ziehl.de Program 1: 3 sensors in the windings: Fan/FAN (with cyclic test) Advance warning 8alr8 Shutdown 8trp8 Malfunction (sensor error) Program 3: 3 sensors in the windings and 1 sensor in the transformer core: Fan/FAN (with cyclic test) Advance warning (winding) / malfunction combined 8alr8 Shutdown (winding) 8trp8 Shutdown (core) 8Cor8 Alarm 2 simultaneously to reach the advance warning temperature and the fault message. TR440 12310-0702-04 Program 2: 3 sensors in the windings and 1 sensor in the transformer core: Fan/FAN (with cyclic test) Advance warning (winding + core) 8alr8 Shutdown (winding + core) 8trp8 Malfunction (sensor error) For the sensors in the windings and for the sensor in the core, various limits can be set for each. Program 4: 3 sensors in the windings and 1 sensor in the transformer core: Shutdown (core) 8Cor8 Advance warning (winding) 8alr8 Shutdown (winding) 8trp8 Malfunction (sensor error) Seite 4 / 24 www.ziehl.de 4 Display and controls 1 Digital display (3 digits) Display of sensor value Display of error codes Display of menu and configuration mode 2 Right-hand decimal point Off: The device is in the display mode Illuminated: The device is in the menu mode Flashes: The device is in the configuration mode 3, 5 Up key / Down key (in display mode, normal state) Change into the menu mode (see Operating instructions Point 8.3) Press for 2 s: Displays min/max measurement of the selected sensor Additionally pressing key set ≥ 2s deletes all min/max values Press Up and Down ≥ 2s: EasySimulation, jumps into simulation mode for the sensors 1T .. 3T (display 8S1-38) 4 Set/Reset key (in display mode, normal state) Press briefly: Displays the next sensor (sensor LED illuminates) Press for 2 s: Reset function, deletes a locked alarm (=> [Delay time Alarm off] must have expired) Press for 5 s: Displays the program number (e.g. 8PR38) Press for 8 s: Displays the measurand (e.g. 8 °C8) Press for 10 s: Displays the software version (e.g. 8-008) 6 LED (red) error Illuminated: Sensor error in one sensor circuit or an internal device fault has occurred 7 LEDs (yellow) sensors Illuminated: Displays the sensor value belonging to the LED in the digital display Flashes: Sensor error in the corresponding sensor circuit 8 LEDs (red) alarm Illuminated: Alarm (1-4) has occurred Flashes quickly (1:4): [Delay time Alarm on] running Flashes long (4:1): [Delay time Alarm off] running Flashes uniformly (1:1): Ready for reset, reset with key Press "SET/RESET" ≥ 2s LEDs (yellow) relay state Illuminated:The relay belonging to the LED is operating Off: The relay belonging to the LED is released 9 TR440 12310-0702-04 Seite 5 / 24 www.ziehl.de 5 Important information WARNING Hazardous electrical voltage! Can lead to electric shock and burns. Before starting work, switch plant and device voltage-free. The flawless and safe operation of a device requires that it is shipped and stored appropriately, professionally installed and put into operation and operated according to its intended use. Only people who are familiar with the installation, commissioning and operation and who have qualifications corresponding to their job are permitted to work on the device. They must comply with the contents of the operating instructions, the notices attached to the device and the relevant safety regulations for erecting and operating electrical plants. The devices are built and certified in accordance with (DIN / VDE / EN / IEC) and leave the factory in a safe and technically flawless condition. To maintain this state you must comply with the safety regulations indicated with "Caution" in the operating instructions. Non-compliance with the safety regulations can lead to death, bodily injury or property damage on the device itself and on other devices and equipment. If the information in the operating instructions is insufficient in any case whatsoever, please contact us directly or contact the representation responsible for you. Instead of the industrial norms and stipulations stated in the operating instructions and applicable in Europe, you must comply with the valid and applicable instructions in the land of utilisation if the device is used outside of the area of application. ! ! Caution! Devices with reclosing interlock (Reset) do not comply with the conditions for safety circuits according to EN 60204. They must not be used alone for functions in which an independent restart must be prevented. Caution! If the operating current version is programmed for all relays, a failure of the control voltage or the device will not be detected. When using as a monitoring device, the operator must ensure that this error is detected through periodic function tests. We recommend programming at least one relay in closed-circuit current version and to correspondingly evaluate. Attention! (Only devices with RS 485 interface) Sensor-Inputs and Interface RS 485 are the same potential. Please regard. RS 485 interface: Large cable lengths may shift the potential ground and the transmission can be disturbed. Corrective measures can be galvanic separation or an additional ground wire. TR440 12310-0702-04 Seite 6 / 24 www.ziehl.de 6 Programs 4 programs (Pr) can be selected in the factory version. Starting from these programs, it is especially simple to adapt the device to the application. First select the program that fits your application and then change the individual parameters! All parameters are reset with when switching the program to "factory settings" (see "Connection Diagram" and see "Factor Settings"). Selecting the program: Switch off control voltage supply Keep the Set key pressed Switch on control voltage supply Wait at least 10s until 8PR 8 appears in the display Release the Set key Select program (Pr 1... Pr 4) with the Up/Down keys Press the Set key Select the measurand (°C / °F) with the Up/Down keys Press the Set key Display 8---8 appears, settings will be copied, device starts Querying the program number See Point 11.1 Display of program number, measurand and software version 7 Installation Comply with the maximum permissible temperature when installing. Ensure sufficient clearance to other devices or heat sources. If cooling is inhibited, e.g., through close proximity to devices with increased surface temperature or interference with the cooling air current, the permissible ambient temperature is decreased. ! Caution! Wide area power supply The device has a wide area power supply that is suitable for DC and AC voltages. Before you apply mains voltage to the device, make sure that the permissible voltage range of the control voltage Us on the rear of the device matches the mains voltage connected to the device! Push the TR440 into the prepared 91 x 91 mm cut-out according to DIN 43700 from the control side. To achieve the IP 54 degree of protection, install the supplied seal between the housing and the front panel. Push the fastening clasp onto both sides of the guide rails. Screw the fastening clasps tight with a screwdriver. Tighten both clasps uniformly. Connect in accordance with the connection diagram or the rating plate. TR440 12310-0702-04 Seite 7 / 24 www.ziehl.de 8 Start-up operation (commissioning) 8.1 General instructions on operating On the decimal point behind the last 7-segment display one can recognise the device operating mode. 8.2 Display mode Decimal point off (normal state for measurement display) LED yellow (sensor) one is illuminated Display of the current sensor value (corresponds to the illuminated LED) all illuminated Display of the hottest measured temperature of all connected sensors alternating illumination All sensor values are displayed for 2s each consecutively Briefly press the Set key: Displays the next sensor value Displays the hottest sensor value Displays all sensor values consecutively Displays errors on the TR440 with the error code ( 8Er18, 8Er28 8Er88, 8Er98, 8-EE8, 8EEE8 ) Displays alarms (8Alr8, 8trp8,or 8Cor8) LED yellow Relay K1 .. K4 LED red Alarm 1 .. 4 ON OFF = Relay operating = Relay is released Flashes 1:4 Flashes 4:1 Flashes 1:1 ON OFF LED red Error Function key Set/Reset ON = [Alarm delay on] active = [Alarm delay off] active = Ready for reset, reset with key Press "SET/RESET" ≥ 2s = Alarm on = Alarm off = Fault in a sensor circuit (yellow LED for the defective sensor flashes) = internal device error (error code in display) Press briefly: Press for 2 s: Press for 5 s: Press for 8 s: Press for 10 s: Displays the next sensor (sensor LED illuminates) Resets a locked alarm Displays the program number Displays the measurand Displays the software version Press briefly: Press for 2 s: Function keys Up and Down TR440 Change into the menus mode Displays min/max measurement of the selected sensor Additionally pressing the Set key ≥ 2s deletes all min/max values Press Up and Down ≥ 2s: EasySimulation, jumps into simulation mode for the sensors 1T .. 3T (display 8S1-38) 12310-0702-04 Seite 8 / 24 www.ziehl.de 8.3 Menu mode Decimal point on Select the menu items for viewing the parameters Function keys Up and Down Press briefly: Select menu item; change into the display mode Function key Set/Reset Press briefly: Change into the configuration mode 8.4 Configuration mode Decimal point flashes Function keys Up and Down Press briefly/long: Value change of the parameter (slow/fast) Function key Set/Reset Press briefly: Copy the settings and select the next parameter after the last parameter change in the menu mode Hint: If the Set/Reset key is pressed for 2s, one leaves the menu mode / configuration mode and returns to the display mode. The same happens if no key is pressed for 30s. Exception in simulation mode: If a locked alarm is present, it is reset by pressing the Set/Reset key for ≥ 2s. If no locked alarm is present, returns to the display mode. Return to the display mode after 15 minutes without any key activation. TR440 12310-0702-04 Seite 9 / 24 www.ziehl.de 8.5 Short operating diagram [Program 1] Display mode Menu mode Configuration mode Stop bit: from Firmware -04 TR440 12310-0702-04 Seite 10 / 24 www.ziehl.de 8.6 Short operating diagram [Program 2] Display mode Menu mode Configuration mode Stop bit: from Firmware -04 TR440 12310-0702-04 Seite 11 / 24 www.ziehl.de 8.7 Short operating diagram [Program 3] Display mode Menu mode Configuration mode Stop bit: from Firmware -04 TR440 12310-0702-04 Seite 12 / 24 www.ziehl.de 8.8 Short operating diagram [Program 4] Display mode Menu mode Configuration mode Stop bit: from Firmware -04 TR440 12310-0702-04 Seite 13 / 24 www.ziehl.de 8.9 Overview of commissioning Must Can Overview X 8.10 Selection of program number X 8.11 Switch on device X 8.12 Configure the sensors X 8.13 Configure the alarms X 8.14 Configure the relay test on K1 X 8.15 Configure the Modbus RS 485 interface (option) X 8.16 Sensor simulation X 8.17 Code block 8.18 Tips on operating 8.19 Possible indications in display 8.10 Selection of program number Set the program number as described in Point [6. Programs]. 8.11 Switch on device Switch on supply voltage, All LEDs and displays are illuminated Displays the set measurand Displays the set program number After ca. 2s, the TR440 is operable 8.12 Configure the sensors Starting from the display mode: Return into the display mode by pressing Set key ≥ 2s If no entry is made for 30 s, the device also returns to the display mode. Press Down key Display 8S 1.8 Press the Set key Set sensor type using the Up / Down key 8 nc.8 => not connected, no sensor connected 83-L.8 => 3-wire Pt 100 sensor 800.0.8 … 899.9.8 => 2-wire Pt 100 sensor, specification of the entire line resistance from the sensor outgoing and return line Press the Set key Select the next sensor with the Down key (with Up key to the previous sensor or to exit the menu modus in sensor 8S 1.8) Configure the next sensor After Sensor 4 (in program 1 after Sensor 3), change to the next menu item with the Down key (alarms configuration) TR440 12310-0702-04 Seite 14 / 24 www.ziehl.de 8.13 Configure the alarms The following parameters are significant: Alarm value 8FAN.8 8ALR.8 8tRP.8 8Cor.8 Limits for the alarms. Dependent on the selected program, various alarm settings are possible(see short operating diagrams) Hysteresis 8H Reset value is calculated from the alarm value + hysteresis, e.g.: 90°C (limit) + -5°C (hysteresis) = 85°C (reset value) Alarm delay on 8dal.8 An alarm is suppressed for the set time (seconds) Alarm delay off 8dof.8 An alarm is only switched off after the limit is fallen below (alarm value + hysteresis) and this time (seconds) has expired. Closed-circuit current 8 r.8: Relay is operating (attracted) in GOOD state (= alarm value has not been reached) and releases when the alarm value is reached. Advantage: Errors and malfunctions generally lead to an alarm Disadvantage: Alarm also when the control voltage is switched off. Unfavourable, e.g., in transformers, especially when the TR440 control voltage comes from the monitored transformer Relay 8rel.8 .8 Operating current 8 a.8: Relay has released in GOOD state and operates (attracts) when the alarm value has been reached. No alarm when the control voltage is switched off and during faults. Closed-circuit current locked 8 Lr.8: Behaves as with zero signal current, but an alarm remains active until it is reset with the Set/Reset key (press ≥ 2s). Operating current locked 8 LA.8: Behaves as with operating current, but an alarm remains active until it is reset with the Set/Reset key (press ≥ 2s). Error / Malfunction 8Err.8 8rel.8 - 8 r.8 - 8 A.8 - 8 Lr.8 - 8 LA.8 Behaviour of the device during faults (sensor fault / device fault) Involves Relay K4 (not in program 3) Note: A locked alarm is not saved in the device zero-voltage maintained time. That means that if the supply voltage is interrupted, a locked alarm can be reset. Adjustment procedure (procedure as an example based on Alarm 8FAN.8]): Select the menu item with the Up/Down key until … Display 8FAN.8 Press the Set key Display 8FAN.8 / 8100.8 flashes alternately (actual limit, value can be different) Set the desired limit using the Up and Down keys Press the Set key Display 8H .8 / 8-20.8 (hysteresis / value) flash alternately Set the desired hysteresis using the Up and Down keys Press the Set key Display 8dal.8 / 8 0.8 (delay alarm / value) flash alternately Set the desired value with the Up and Down keys Press the Set key Display 8dof.8 / 8999.8 (delay alarm off / value) flash alternately TR440 12310-0702-04 Seite 15 / 24 www.ziehl.de Set the desired value with the Up and Down keys Press the Set key Display 8rel .8 / 8 r.8 (relay / parameter) flash alternately Set the desired value with the Up and Down keys Press the Set key Display 8FAN.8 Select the next alarm with the Down key (with the Up key to previous alarm or menu item) Configure the next alarm After the last alarm setting, change to the next menu item (relay test) with the Down key 8.14 Configure the relay test on K1 Here, you can program so that Relay K1 switches into the alarm state after a certain time 8don8, e.g. 1 week (= 168 hours) for the time 8dof8, e.g. 0.2h. This is required, e.g., to let a fan or a pump run so that it is moved and the bearing does not suffer any damage through long standstill times. The following parameters are significant: Relay test 8tst.8 Relay test menu Test time 8don.8 Specify after how much time the relay test starts (in h), or how often the test repeats (8off.8 = relay test off) Test duration 8dof.8 State how long the relay test runs (in h) Adjustment process: Select the menu item with the Up/Down key until … Display 8tst.8 Press the Set key Use the Up and Down keys to set the desired time during which the relay test is to be repeated,8off .8 – 8 1.8 – 8 999.8 h Press the Set key Set the desired relay test duration using the Up and Down keys, 80.01.8 – 89.99.8 h Press the Set key The expired test time 8don 8 is saved in the device zero-voltage maintained. If the TR440 is performing a relay test, 8tst.8 flashes in the display. The relay test should not be activated for program 4. TR440 12310-0702-04 Seite 16 / 24 www.ziehl.de 8.15 Configure the Modbus RS 485 interface (option) The following parameters are significant: 8bus.8 Modbus Modbus menu Device address 8Adr.8 Device address, can be set from 1 to 247 Baud rate 8bd .8 Baud rate, 9600 8 9.6.8 or 19200 819.2.8 Parity 8par.8 Parity bit: 8evn.8, 8odd.8, 8 no.8 (even, odd, none) Stop 8StP.8 Stop bit: 8 1.8 / 8 2.8 (1 / 2) (-> from Firmware -04) Adjustment process: Select the menu item with the Up/Down key until … Display 8bus.8 Press the Set key Display 8Adr.8 / 8 1.8 (address / value) flash alternately Set the desired address using the Up and Down keys Press the Set key Display 8bd .8 / 8 9.6.8 (baudrate / value) flash alternately Set the desired baudrate using the Up and Down keys Press the Set key Display 8par.8 / 8evn.8 (parity / value) flash alternately Set the desired value with the Up and Down keys Press the Set key Display 8stp.8 / 8 (-> from Firmware -04) 1.8 (stop bit / value) flash alternately Set the desired value with the Up and Down keys Press the Set key Exit the menu item (display 8bus.8) Move to the next menu item with the Up and Down keys For more information on the modbus configuration and programming please go to www.ziehl.com. 8.16 Sensor simulation A temperature can be simulated here. All device functions operate as if this temperature is actually being measured. After 15 minutes without pressing a key, the device automatically switches back to the display mode. The flashing display indicates that the device is currently in the simulation mode (digital display 0.9s on and 0.1s off) Select the menu item with the Up/Down key until … (Alternative: EasySimulation, press Up and Down keys simultaneously ≥ 2s) Display 8Si .8 Press the Set key Use the Up and Down keys to select the desired sensor(s), 8S1-3.8 Sensors 1 to 3 or 8S 4.8 for Sensor 4 Press the Set key Set the desired temperature using the Up and Down keys Press the Set key Exit the simulation (display 8Si.8) Move to the next menu item with the Up and Down keys TR440 12310-0702-04 Seite 17 / 24 www.ziehl.de 8.17 Code block Here, the set parameters can be protected by activating a code block. The device acknowledges an incorrect entry with 8Err8 (flashes three times). Select the menu item with the Up/Down key until … Display 8Cod.8 Press the Set key Display 8Pin.8 / 8 0.8 (pin / pin code) flash alternately Use the Up and Down keys to set the saved pin code (factory setting is 8504.8) Press the Set key Set the desired code block using the Up and Down keys: o 8off.8 off, all parameters can be changed o 8on .8 on, no parameter can be changed Press the Set key Display 8Pin.8 / 8 504.8 (pin / pin code) flash alternately Set the desired new pin code with the Up and Down keys (caution: write down the pin code) Press the Set key Code block on, Code block off, Display 8on 8 flashes three times Display 8off8 flashes three times Exit the menu item (display 8Cod.8) Use the Up key to go to the previous menu item Exit the menu mode with the Down key and return to the display mode (normal state). 8.18 Tips on operating When the right-hand decimal point in the 7-segment display is illuminated, one has exited the display mode and can use Up/Down to select the individual menu points (menu mode). When the right-hand decimal point is flashing, one is in the configuration mode and can change the settings with Up/Down. In the configuration mode: o Pressing Up/Down for a long time accelerates the changes in the display. o Pressing the Up and Down keys simultaneously changes the set values to zero. With reset (press Set/Reset for 2 s), one returns from any position in the configuration mode or menu mode (exception: in the simulation mode there is a locked alarm -> Alarm is reset) back into the display mode (most recently set values are taken on during this). Activate simulation mode (in display mode): o EasySimulation, press Up and Down keys simultaneously ≥ 2s TR440 12310-0702-04 Seite 18 / 24 www.ziehl.de 8.19 Possible indications in display In display mode (normal state) 8alr8 / 8trp8 / 8Cor8 Alarms, dependent on the set program number, Alarm = Advance warning Trip = Switch off Core = Core temperature 8Er18 Short-circuit in temperature sensor Pt 100 8Er28 Interruption in temperature sensor Pt 100 8Er88 Internal device fault in TR440 8Er98 Parameter error (illogical TR440 configuration) 8EEE8 Overrange, measurement too large 8-EE8 Underrange, measurement too small Sensors, menu mode/configuration mode 8S 18 .. 8S 4.8 Sensors 1 to 4 8 nc.8 / 83-L.8 Sensors off / 3-wire Pt 100 8 0.0.8 .. 899.9.8 2-wire Pt 100, specify the total line resistance Alarm value, menu mode/configuration mode 8Fan.8 / 8alr.8 / 8trp.8 / 8Cor.8 Alarm values, Fan = fan Alarm = Advance warning Trip = Switch off Core = Core temperature 8H Hysteresis .8 8dal.8 Time delay until alarm 8dof.8 Time delay until alarm is reset 8rel.8 Relay function Relay function Zero signal current, operating current Zero signal current locked, operating current locked 8 r.8 / 8 a.8 / 8 rL.8 / 8 aL.8 Relay test, menu mode/configuration mode 8tst.8 Relay test 8don.8 Specify after how much time the relay test starts (in h), or the relay test is repeated 8dof.8 State how long the relay test runs (in h) RS 485 interface Modbus, menu mode/configuration mode (Option) 8bus.8 Modbus (RS 485 interface) 8adr.8 Modbus - device address 8bd .8 Modbus - baudrate 8 9.6.8 / 819.2.8 8par.8 Modbus – baudrate, 9600 or 19200 Modbus - parity 8evn.8 / 8odd.8 / no.8 Modbus – parity bit – even / odd / no TR440 12310-0702-04 Seite 19 / 24 www.ziehl.de Simulation, menu mode/configuration mode 8Si .8 Simulation Sensor to be simulated, Sensors S1...S3 Sensor S4 8S1-3.8 / 8S 4.8 Code block, menu mode/configuration mode 8Cod.8 Code block 8Pin.8 Pin code 8on .8 / 8off.8 Code block on / off 9 Factory settings When changing programs (operating instructions point Programs), all parameters are reset to the factory settings. Values Menu item Parameters My data 8PR18 8PR28 8PR38 8PR48 8S 18 Sensor 1 83-L8 83-L8 83-L8 83-L8 Sensor 8S 28 Sensor 2 83-L8 83-L8 83-L8 83-L8 1 .. 4 8S 38 Sensor 3 83-L8 83-L8 83-L8 83-L8 8S 48 Sensor 4 83-L8 83-L8 83-L8 Alarm name --8Fan8 8Fan8 8Fan8 8Cor8 Limit 81008 81008 81008 81708 8-208 8-208 8-208 8 -58 8dal8 (Delay Alarm) 8 8 8 08 8 08 8dof8 (Delay Alarm off) 89998 89998 89998 8 08 8rel8 (Relay function) 8 8 8 8 a8 Alarm name 8Alr8 8Alr8 8Alr8 8Alr8 Limit 81308 81308 81308 81308 8 -58 8 -58 8 -58 8 -58 8dal8 (Delay Alarm) 8 08 8 08 8 08 8 08 8dof8 (Delay Alarm off) 8 08 8 08 8 08 8 08 8rel8 (Relay function) 8 a8 8 a8 8 r8 8 a8 Alarm Relay K1 Alarm Relay K2 8H 8H 8 ( Hysteresis ) 8 ( Hysteresis ) Relay K3 a8 a8 82508 --- --- Alarm name 8tRP8 8tRP8 8tRP8 8tRP8 Limit 81508 81508 81508 81508 8 -58 8 -58 8 -58 8 -58 8dal8 (Delay Alarm) 8 08 8 08 8 08 8 08 8dof8 (Delay Alarm off) 8 08 8 08 8 08 8 08 8rel8 (Relay function) 8 a8 8 a8 8 a8 8 a8 8H 8 ( Hysteresis ) 8Cor8 (Core temperature) TR440 a8 08 --- 8Cor8 (Core temperature) Alarm 08 12310-0702-04 --- 81708 Seite 20 / 24 --- --- www.ziehl.de --- --- --- Alarm Relay K4 Relay test Modbus (Option) Alarm name 8Err8 8Err8 8COR8 8Err8 Limit --- --- 81708 --- --- --- 8 -58 --- 8dal8 (Delay Alarm) --- --- 8 08 --- 8dof8 (Delay Alarm off) --- --- 8 08 --- 8rel8 (Relay function) 8 8 8 a8 8don8 81688 81688 81688 8off8 8dof8 80.208 80.208 80.208 8 0.08 8adr8 8 8 8 8 8bd 8 8 9.68 8 9.68 8 9.68 8 9.68 8Par8 8Evn8 8Evn8 8Evn8 8Evn8 8 8 8 8 8H 8 (Hysteresis) 8stp8 Code (-> from Firmware -04) on / off 8Pin8 R8 18 18 R8 18 18 18 18 8 --- R8 18 18 8off8 8off8 8off8 8off8 85048 85048 85048 85048 10 Maintenance and repair ZIEHL industrie-elektronik GmbH + Co KG Daimlerstr.13 D-74523 Schwäbisch Hall Telephone: +49 791 504-0 Fax: +49 791 504-56 Email: [email protected] Homepage: www.ziehl.com 11 Trouble shooting 8Er18 or 8Er28 appears in the display Cause Sensor short-circuit or sensor interruption in the Pt 100 temperature sensor Remedy Check Pt 100 temperature sensor to see if electrically okay and correctly connected. 8Er88 appears in the display Cause Internal device fault in TR440 Remedy Switch device off and then back on. If the error continues to appear, send the device to the factory for inspection. 8Er98 appears in the display Cause Parameter error (illogical TR440 configuration) Remedy Check the alarm configuration TR440 12310-0702-04 Seite 21 / 24 www.ziehl.de The device cannot be programmed (configured) Cause Remedy Code block The code block provides protection against unauthorised manipulation on the device. When the code block is active, the parameters cannot be change. The pin can be set by the user. Pin code unknown? -> perform a code reset: While switching on the control voltage, keep the "Set" key pressed for 2 s The display changes 88888 – 8Cod8 – 8off8 – 88888 Release the Set key Code block is switched off, Pin code is 504 Displayed temperature does not match the sensor temperature Cause Remedy PT 100 sensor is incorrectly connected False sensor settings False measurand (°C / °F) Check the Pt 100 sensor connection (see connection diagram) Check the sensor settings (3-wire or 2-wire with specification of the line resistance –> Resistance of outgoing and return line) Set the correct measurand (see Programs point) Temperature repeatedly darkens briefly Cause The device is in the simulation mode Remedy Exit the simulation mode, see Point [8.16 Sensor Simulation] 11.1 Display of program number, measurand and software version Keep the Set key pressed: After 5s: Displays the program number After 8s: Displays the measurand After 10s: Displays the software version TR440 12310-0702-04 Seite 22 / 24 www.ziehl.de 12 Technical data Control voltage Us Limits Sensor connection Measuring range Sensor resistance + line res. Sensor current Measurement cycle/measurement time Tolerance Temperature drift Relay data K2, K3 and K4 Switching voltage Switching current Switching capacity Nominal operating current for reversing switch Recommended series fuse Contact service life, mechanical Contact service life, electrical Reduction factor at cos 0,3 Relay data K1 Switching voltage Conventional thermal current Ith Inrush current (at 10 % ED) Nominal operating current Ie (AC 15) Recommended series fuse Contact service life, mechanical Contact service life, electrical Test conditions Rated impulse withstand voltage Pollution level Rated insulation voltage Ui Operating time Permissible ambient temperature EMC compatibility EMC electrical interference Vibration resistance EN 60068-2-6 Galvanic insulation No Galvanic insulation (Only devices with RS 485 interface) TR440 12310-0702-04 AC/DC 24 – 240 V 0/50/60 Hz <2 W < 4 VA DC 20.4 - 297 V AC 20 - 264 V Pt 100 according to EN 60751 (2/3-wire version) -199°C. 850°C / -199°F .. 999°F max. 500 Ohm ≤ 0.7 mA < 2.5 s ± 1°C, ± 1 Digit <0.04°C/K 3 x 1 change-over contact max. AC 415 V max. 6 A max. 2000 VA (Ohmic load) max. 120 W at DC 24 V 3 A AC15 250 V; 2 A DC13 24 V 3.15 A slow-to-blow ( gL ) 3 x 10⁷ operating cycles 1 x 10⁵ operating cycles at 240 V / 6 A 0,5 1 reversing switch max. AC 400 V max. 10 A 30 A max. 4 s 6 A AC 250 V gG/gL 10 A 30 x 106 operating cycles 1 x 10⁶ operating cycles at AC 250 V / 6 A 2 x 10⁵ operating cycles at AC 250 V / EN 50178 / EN 61010-1 4000 V 3 250 V 100 % -40 °C ... +65 °C EN 60068-2-2 dry heat EN 61000-6-2 EN 61000-6-3 2…25 Hz ±1.6 mm 25 ... 150 Hz5 g Us – relays, sensors, (RS 485) relays – sensors, (RS 485) DC 3820 V DC 3820 V RS 485 – sensors Seite 23 / 24 www.ziehl.de Housing Dimensions (W x H x D) Line connection single strand Finely stranded with wire end sleeve Housing internal protection Terminal strip protection type Mounting Panel monitoring housing SE 2 96 x 96 x 80 mm per 1 x 2.5 mm2 per 1 x 2.5 mm2 Front panel IP 54 (with seal), rear IP 20 IP 20 Panel mounting, Cut-out 91+0.7 x 91+0.7 mm approx. 310 g Weight The right to make technical changes is reserved. 13 Mounting type SE 2 Dimensions in mm Panel opening 91+0.7 x 91+0.7 mm TR440 12310-0702-04 Seite 24 / 24 www.ziehl.de