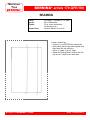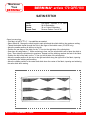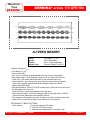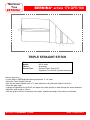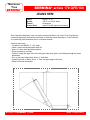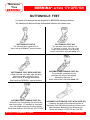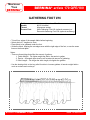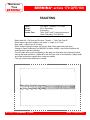
1
MASTERING YOUR BERNINA® BERNINA® artista 170 QPE/180 MASTERING YOUR ® BERNINA artista 170 QPE/180 OWNER’S WORKBOOK MASTERING YOUR BERNINA® 1/10/02 artista 170 QPE/180/1 MASTERING YOUR BERNINA® BERNINA® artista 170 QPE/180 Table of Contents SECTION A Pages 3-16 Care and Feeding of Your Machine SECTION B Pages 17-36 Let’s Start WIth The Basics SECTION C Pages 37-59 On The Edge SECTION D Pages 60-74 Gather It Up and Tuck It Down SECTION E Pages 75-91 Miscellaneous Magic SECTION F Pages 92-99 Creative Sewing SECTION G Pages 100-111 Programming Pizzazz SECTION H Pages 112-121 Fabulous Features SECTION G Pages 122-131 Decorative Directions (180 only) MASTERING YOUR BERNINA® 1/10/02 artista 170 QPE/180/2 MASTERING YOUR BERNINA® BERNINA® artista 170 QPE/180 MASTERING YOUR ® BERNINA artista 170 QPE/180 OWNER’S WORKBOOK Section A Care and Feeding of Your Machine MASTERING YOUR BERNINA® 1/10/02 artista 170 QPE/180/3 MASTERING YOUR BERNINA® BERNINA® artista 170 QPE/180 SECTION A Care and Feeding of Your Machine Machine Set Up Owner’s manual pg.____ • Cover/Storage of foot control, FHS bar, etc. • Accessory storage – how box slides on & opens • Attach foot control; note storage of cords • Power switch – Owner’s manual pg____ • Light - on/off function (in setup) – Owner’s manual pg____ • Extension table + sliding guide • Presser foot lifter - acts as a “third hand” - extra 2mm of presser foot lift - drops feed dog to give extra space between presser foot and feed dog - speeds sewing by 20% - alternate size available for use with a sewing machine cabinet Presser Feet Owner’s manual pgs.____ • Importance of using the correct foot • On-screen indicator • Overview of included presser feet Feed Dog Owner’s manual pg. ____ Threads Owner’s manual pg. ____ • Types of thread • Uses for each type of thread Needles Owner’s manual pg.____ Bobbins Owner’s manual pg.____ • Removing the bobbin case • Winding a bobbin • Use bobbin thread cutter • Quick start bobbin – use thread cutter located in the bobbin area • Clip the thread close to the case before removing the bobbin MASTERING YOUR BERNINA® 1/10/02 Threading the Upper Thread Owner’s manual pg.____ • Spool pins and discs – Owner’s manual pg.____ - vertical spool pin for stacked and decorative threads - horizontal spool pin for crosswound threads - use disc closest to diameter of the spool • Optional supplementary thread guide • Optional BERNINA® thread stand • Thread machine with the presser foot up until ready to thread the needle Threading the Needle • Needle threader – Owner’s manual pg.____ • Side thread cutter – Owner’s manual pg.____ • After the needle is threaded, put the thread under the presser foot • Lower the presser foot • Insert the thread into the cutter; it is cut to the proper length to begin sewing Needle Stop Adjustment • With the foot control – Owner’s manual pg.___ • With the Needle Stop Up/Down function – Owner’s manual pg.___ Needle Positions Owner’s manual pg. ____ • Eleven positions Practical/Decorative Stitches Owner’s manual pgs.____ • Stitches programmed in the machine • Stitches available from CPS software • Uses for the stitches – Owner’s manual pgs.____ • How to select stitches – Owner’s manual pgs.____ - touch screen - scroll arrows - selection by stitch number - external buttons for stitch groups artista 170 QPE/180/4 MASTERING YOUR BERNINA® BERNINA® artista 170 QPE/180 Straight Stitching • Seam measuring – stitch plate marks – Owner’s manual pg.____ - the following measurements are indicated on the stitch plate: ¼”, 3/8”, ½”, 5/8”, ¾”, and 1” - the line just behind the needle is 4mm - the horizontal lines to the far back and the line in front of the needle are 5/8” from needle • Quilting/seam guide is included with the machine • Left seam guide and seam guides with rulers are available as optional accessories • Straight stitch throat plate available • 5.5mm throat plate available for 180 Basting Owner’s manual pgs.____ • Loosening the top tension helps in the removal of stitches. • Using the maximum stitch length gives a 1” stitch. Topstitching/Edgestitching Owner’s manual pgs.____ • Machine sews every second stitch when the Long Stitch function is activated; stitch length is 10mm when using the maximum stitch length. Securing Stitches Owner’s manual pgs.____ • Options • Stitch • Functions Satin Stitches • Tension adjustments - Function icon - must be placed on the function bars (artista 180 only) - TTC button (artista 180 only) - Creative Consultant (artista 180 only) - Setup function (artista 180 only) - Thread bobbin case finger to adjust tension (artista 170 QPE only) • Can taper while sewing • Stabilizer – important to the success of stitches Altering Stitches Owner’s manual pg.____ MASTERING YOUR BERNINA® 1/10/02 Restoring Basic Settings Owner’s manual pg.____ Presser Foot Pressure Owner’s manual pg.____ Speed Controls • Three ways to control – Owner’s manual pg.___ - function box in Setup - function box on the screen - ½ stitch at a time by tapping the back of the foot control Changing the Light Bulb Owner’s manual pg.____ • Use only 12V 5W. W 2.1 x 9.5d bulbs Cleaning the Feed Dog • Periodically remove thread fluff and fabric fuzz which collects under the stitch plate. Refer to manual for step-by-step instructions (pg.___). Cleaning and Lubricating the Hook • Low mass hook system does not require lubrication • See Owner’s manual page ____ for step-by-step cleaning instructions Cleaning the Screen • Wipe only with a damp cloth Cleaning the Outside of the Machine • Wipe with damp cloth. If needed, use a solution of water and a few drops of liquid soap. IMPORTANT: Never use oil, alcohol, or solvents of any kind on any part of the external surface of the machine. Here’s an idea... Use your birthday month as a reminder to have your BERNINA® machine serviced. Take it to an authorized BERNINA® technician during the month of your birthday and you’ll never have to remember when it was last serviced. artista 170 QPE/180/5 MASTERING YOUR BERNINA® BERNINA® artista 170 QPE/180 THREADS Poor quality or the wrong type of thread can cause poor stitches on any machine. Thread passes through the eye of the needle approximately 37 times in a “see-saw” action before it forms a single stitch. Poor quality thread results in crooked and looped stitches, puckered seams, frayed thread, and/or needle breakage. To achieve quality stitches, a sewing machine needs three things: correct thread, correct size needle, and properly adjusted thread tensions. Several factors such as the fiber, twist, ply, finish, and size of thread must be considered for use with today’s fabrics for fine stitches. Staple – refers to the length of fibers used to twist together to form a single ply. Domestic thread fiber lengths are usually 1½” to 2½” long while European threads use 5½” to 6½” lengths. Ply – the number of single strands twisted together to make a single thread. Roll – the tendency of thread to roll to the right or left during stitching, causing the stitch to appear slightly crooked. Poor quality threads are more likely to roll. Twist – the crimping of fibers which causes them to interlock firmly into a single ply. Thread should not untwist during stitching. This will cause skipped stitches, thread breakage, crooked stitches, and weak spots in seams. Right twist – most American threads are twisted to the right, causing some rolling. This gives average stitch quality. Left twist – Most commercial and imported threads are twisted to the left, giving better than average stitch quality. Left twist resists rolling and makes a larger loop for the hook point to enter, reducing skipped stitches. Wearable art embellishment has necessitated the creation and marketing of many new thread types, such as Sulky’s rayons and metallics. Made in West Germany, these are left twist threads; Mettler and Isacord threads are also left twist. To test the twist of a thread: while holding the spool in the left hand, roll the strand of thread towards you with one thumb. Left twist will tighten, right twist will loosen. Fiber – refers to the typ eof material used to produce the thread. Some commonly used threads: • Polyester 2 ply – such as Metrosene 100. Good for clothing construction on man-made, natural or blended fabrics. Will tolerate heat up to 450° Fahrenheit. Also Isacord embroidery thread – excellent for embroidery, very abrasion resistant. • Polyester 3 ply cordonnet – topstitching or buttonhole twist – such as Mettler 30/3. • Cotton 2 ply – such as Mettler 60/2 – excellent for French Machine Sewing, delicate machine embroidery, and darning. • Cotton 2 ply – such as Mettler 30/2 – loose twist for a soft, shiny look in machine embroidery, applique, and buttonholes. • Cotton 3 ply – such as Mettler 50/3 – excellent for clothing construction on natural fibers. Tighter twist than embroidery cotton thread and less puckering on problem fabrics. Cotton thread stretches less than polyester. • Rayon – a lustrous embroidery thread. Weaker than cotton, it is used for decorative work only. MASTERING YOUR BERNINA® 1/10/02 artista 170 QPE/180/6 MASTERING YOUR BERNINA® BERNINA® artista 170 QPE/180 NEEDLES Along with thread, needles are very important to stitch formation. Many “mechanical” problems and damage to fabrics can be traced to a bent, damages, or incorrect size or type needle. Approximately 60% of all needles made are discarded at some stage of production. When selecting the correct needle for any sewing project, three things must be considered: Needle system – 130/705H Needle point – to assure stitch formation and avoid fabric damage Needle size – small size for lightweight fabrics; larger needle for heavier fabrics If the needle is: Too small – the thread can’t stay in the groove to form a loop to be picked up by the hook point Bent – thread loop forms too far away from hook point; hook can’t enter loop to form stitch Blunt – needle won’t pierce fabric so no thread loop forms to make a stitch Need To Know • Needle should be changed every 4-6 hours of sewing. The needle is the most inexpensive part in your sewing machine but is one of the most crucial for getting good results and keeping your machine running well. Don’t let false economy keep you from doing what is best for your sewing projects and your machine. • European needles are chrome-plated to glide in and out of fabric easily. • The selected thread should fit in the groove on the front of the needle. If it isn’t protected by the groove, a needle with a larger groove should be used. • Always make sure the needle is fully inserted as high as possible when installing a new one. MASTERING YOUR BERNINA® 1/10/02 artista 170 QPE/180/7 MASTERING YOUR BERNINA® BERNINA® artista 170 QPE/180 SEWING MACHINE NEEDLES Ball Point 70-90 Has a rounder point. 70 for lingerie, nylon, jersey; 80 for T-shirt; 90 for sweatshirt fleece. Microtex 60-90 Sharp (Schmetz) Stretch 70-90 A stretch needle has a more rounded point and a blue anticling coating which helps to prevent skipped stitches in knits and elastic. Sometimes used on Ultrasuede®, vinyl, and plastic. Microfiber (Lammertz) Stretch Double Universal Double Universal Triple (Drilling) Jeans 2.5/75 4.0/75 Two ballpoint needles on one shank; each needle has a large scarf. Used for hemming and for stitching on knit fabric. 60-110 A compromise between a sharp and a ballpoint needle; can be used on both wovens and knits. 60 – very fine batiste 70 – broadcloth 80 – trigger and gabardine 90 – denim and twill 100 & 110 – canvas 1.6/70- Two needles attached to one 8.0/100 shank. Used for pintucks, hems, and decorative work. Note: The 170 QPE can use up to a 4.0mm and a 180 can use up to an 8.0mm. 3.0/90 70-90 Topstitch assort’d The thin, tapers point of this (75 & needle causes less damage to fabric when seaming and cross 90) seaming. 80-100 A sharp point with a large eye and deep groove. For use with heavier fabrics – the large groove cradles heavier threads. 75-90 Sharp needle with a large eye and groove; also has a coating and a larger scarf. For use with embroidery thread – prevents shredding of rayon or metallic threads. Two threads may be used through the eye of an 80 or 90 needle. Metafil Double 3.0/75 Two Metafil needles attached to one shaft; for double needle work with embroidery threads. Wing 100120 Sharp pointed needle with a noncutting wedge of metal on each side. Needle makes a hole in the fabric without cutting the threads of the fabric. Used for decorative and heirloom work, such as hemstitching. Works best on natural fibers or on the bias. Double Wing 100 One regular needle and one wing needle attached to a single shaft. Use the same as a Wing; makes one large and one regular hole. Leather 80-90 Point is a sharp cutting wedge. Used for sewing leather only. Not for vinyl or simulated leathers. Embroidery (Schmetz) Metafil (Lammertz) Three needles attached to one shank. Used to create mock smocking and other decorative effects. Has a sharp point and a shaft that is less prone to flex. The sharpness of the needles makes it better for use on denim and woven fabrics where a clean stitch is desired. Jeans Double Quilting stitching with metallic thread. A sharp point with a thin shaft. 60-90 corresponds to the weight of the fabric; as the fabric gets heavier, the number is higher. 4.0/100 Two Jeans needles attached to one shank. For topstitching on denim with heavy thread; can also be used for decorative MASTERING YOUR BERNINA® 1/10/02 artista 170 QPE/180/8 MASTERING YOUR BERNINA® BERNINA® artista 170 QPE/180 NEEDLE POSITIONS Fabric: Needle: Thread: Presser Foot: Firmly woven fabric, 4” x 6” 90/14 Embroidery 30 wt. cotton embroidery Contrasting color Reverse Pattern Foot #1/1C Owner’s manual pg.____ • The 170 QPE/180 has 11 fixed needle positions. • Fold fabric in half to 2” x 6”. • Select Straight Stitch. The basic settings are displayed on the screen. The needle position indicator is just below the stitch width scale; the needle should be in center position. • Position the fold of the fabric on the 1” mark on the right side of the stitch plate. • Select Pattern End 3x; sew until the machine stops. • Move the needle one position to the left. • Sew until the machine stops. • Repeat until all six positions have been sewn. • Leaving the fabric under the foot – move the needle position back to center. • Sew until the machine stops. • Move the needle one position to the right. • Sew until the machine stops. • Move the needle one more position to the right – sew until the machine stops. • Repeat until all six positions have been sewn. MASTERING YOUR BERNINA® 1/10/02 artista 170 QPE/180/9 MASTERING YOUR BERNINA® BERNINA® artista 170 QPE/180 SEAMING Fabric: Needle: Thread: Presser Foot: Firm fabric – 2 pieces, 4” x 6” each 90/14 Embroidery 30 wt. cotton embroidery Contrasting color Reverse Pattern Foot #1/1C Owner’s manual pg.____ • Find the 5/8” guide line on the stitch plate. • Place fabric pieces right sides together and align them with the guide line. • Sew a 5/8” seam on one 6” edge. • Attach the Quilting/Seam Guide to the foot and sew a 2” seam on the other side. MASTERING YOUR BERNINA® 1/10/02 artista 170 QPE/180/10 MASTERING YOUR BERNINA® BERNINA® artista 170 QPE/180 Basting Stitch #21 Preprogrammed settings Basting Stitch #21 - 5mm length Long Stitch function engaged BASTING Fabric: Needle: Thread: Presser Foot: Firm fabric – 2 pieces, 4” x 6” each 90/14 Embroidery 30 wt. cotton embroidery Contrasting color Reverse Pattern Foot #1/1C Owner’s manual pg.____ • Place fabric pieces right sides together. • Using Basting Stitch #21 with the preprogrammed length, baste a 5/8” seam along one side of the fabric. • Using the same stitch with a 5.5mm stitch length, engage the Long Stitch function and baste another 5/8” seam along the opposite edge. MASTERING YOUR BERNINA® 1/10/02 artista 170 QPE/180/11 MASTERING YOUR BERNINA® BERNINA® artista 170 QPE/180 TOPSTITCHING/EDGESTITCHING Fabric: Needle: Thread: Presser Foot: Firm fabric – 4” x 6” 90/14 Embroidery 30 wt. cotton embroidery Contrasting color Edgestitch Foot #10/10C (optional accessory) Owner’s manual pg.____ • Cut fabric in half to create 2 pieces each 2” x 6”. • Sew two pieces together with a 5/8” seam on the 6” sides. • Press the seam open. • From the right side, position the blade of the foot in the ditch of the seam. • Select Triple Straight Stitch #6. • Move the needle position 3 places to the left. • Sew the length of the seam. • Select the Long Stitch function. • Move the needle position 4 places to the right. • Start at the top of the seam as before. • Sew down the length of the seam again. MASTERING YOUR BERNINA® 1/10/02 artista 170 QPE/180/12 MASTERING YOUR BERNINA® BERNINA® artista 170 QPE/180 SECURING STITCHES Fabric: Needle: Thread: Presser Foot: Firm fabric – 3 pieces, 3” x 6” each 90/14 Embroidery 30 wt. cotton embroidery Reverse Pattern Foot #1/1C Owner’s manual pg.____ • Fold each fabric piece in half to 1½” x 6”. • Find the 5/8” seam line on the guide plate. • The BERNINA® 170 QPE/180 secures in three ways: 1 – Select stitch #3 and sew a few stitches. Press the Quick Reverse button located on the front of the sewing machine and the machine will sew in reverse until the button is released. Continue stitching the seam and secure the end in the same manner. 2 – Select stitch #5 and stitch. The machine will automatically reverse after five stitches, then continue in a forward motion. Stitch to the end of the seam, then press and release the Quick Reverse button. The machine will stitch backward five stitches, and then continue forward again five stitches and stop. 3 – Select stitch #332. Engage the Securing function to put a securing stitch at the beginning and the end of each pattern repeat. In regular sewing, turn the Securing function off after the first stitch and back on again after the last stitch is taken. MASTERING YOUR BERNINA® 1/10/02 artista 170 QPE/180/13 MASTERING YOUR BERNINA® BERNINA® artista 170 QPE/180 SATIN STITCH Fabric: Needle: Thread: Presser Foot: Firm fabric – 3 pieces, 3” x 6” each 90/14 Embroidery 30 wt. Cotton Embroidery Reverse Pattern Foot #1/1C Owner’s manual pg.____ • Fold fabric in half to 3” x 6”. Use stabilizer as needed. • Select Stitch #2. Change the stitch length to satin stitch and the stitch width to the maximum setting. • Thread the bobbin thread through the hole in the finger of the bobbin case (170 QPE only). • Move the needle position all the way to the left. • Position the raw edge of the fabric on the 3/8” line (on the right side of the stitch plate). • Sew down this edge about 1”. While continuing to sew, turn the stitch width knob to taper the stitch to 0mm. Then widen the stitch back to maximum. Repeat until the stitching reaches the end of the fabric. • Position the fold of the fabric on the 3/8” line (on the left side of the stitch plate). • Move the needle position all the way to the right and stitch along the right side of the fabric, tapering and widening the stitching while sewing. • Move the needle position to the center and stitch down the center of the fabric, tapering and widening the satin stitch while sewing. MASTERING YOUR BERNINA® 1/10/02 artista 170 QPE/180/14 MASTERING YOUR BERNINA® BERNINA® artista 170 QPE/180 ALTERED MEMORY Fabric: Needle: Thread: Presser Foot: Firm fabric – 6” x 6” 90/14 Embroidery 30 wt. cotton embroidery Reverse Pattern Foot #1/1C Owner’s manual pg.____ • Fold fabric to 3” x 6”. • Select stitch #407. • Sew a row of stitching as programmed down the center of the sample. • Alter stitch length to 1mm and sew a 2nd row on one side of the first row. • Touch CLR - this clears alterations made to the selected stitch only. • Select stitch #2 - (the one used for satin stitching in the previous exercise). Notice the computer remembered all the changes made to the stitch. • Select stitch #407 again. • Alter stitch width to 3.5mm (170 QPE) or stitch 6mm (180) and sew a 3rd row on the other side of the first row. • Touch CLR ALL- notice the alterations made are gone. • Select stitch #2 again - notice the changes made to it are gone also. CLR ALL returns all stitch alterations back to default settings. • The computer will remember any and all stitches you alter, as long as the clear buttons are not used and as long as the machine is not turned off. RETURNING TO BASIC SETTINGS • Three options: 1. Press the external CLR button 2. Touch the CLR ALL function. 3. Manually set changes back to the basic mark MASTERING YOUR BERNINA® 1/10/02 artista 170 QPE/180/15 MASTERING YOUR BERNINA® BERNINA® artista 170 QPE/180 WISH LIST Care and Feeding of Your Machine Feet-ures Edgestitch Foot #10/10C Additional bobbin holders for accessory cabinet Additional presser foot holders for accessory cabinet Stabilizers – Sampler Pack or type __________ type __________ Thread – Assortment or size ____ and type ____ size ____ and type ____ Needles – Assortment or size ____ and type ____ size ____ and type ____ size ____ and type ____ size ____ and type ____ Needle Threader Bobbins – Baker’s dozen Spool Bobbin Holders Magnetic Pin Cushion Magnetic Bobbin Holder Straight Stitch Plate Seam Sealant Extra Thread Stand Scissors - 6” or 7” Dressmaker’s shears ____ 4” or 5” Trimming scissors ____ Thread nips ____ Left guide (matches right guide included with machine)____ Seam Guide with Rulers (right and left) ____ Set of Magnifying Glasses MASTERING YOUR BERNINA® 1/10/02 artista 170 QPE/180/16 MASTERING YOUR BERNINA® BERNINA® artista 170 QPE/180 MASTERING YOUR ® BERNINA artista 170 QPE/180 OWNER’S WORKBOOK Section B Let’s Start With The Basics MASTERING YOUR BERNINA® 1/10/02 artista 170 QPE/180/17 MASTERING YOUR BERNINA® BERNINA® artista 170 QPE/180 SECTION B Let’s Start With The Basics Seams Triple Straight Stitch – SL 2-3mm Owner’s manual pg.____ • Jeans Foot #8 prevents needle deflection • Non-Stick Straight Stitch Foot #53 • This stitch sews strong seams on heavy fabrics Zigzag – SL1mm SW1.5mm Owner’s manual pgs.____ Stretch – SL1mm SW2mm Owner’s manual pg. ____ Super Stretch – as programmed Owner’s manual pg. ____ • use to seam curved edges that receive a lot of stress such as the crotch area of pants. Vari-Overlock – SL1mm SW4mm NP right Owner’s manual pg. ____ • Can be used with double needle for a decorative hem on knits • Overlock Foot #2 (optional for 170 QPE) or #2A (included with 180) prevents the seam from rolling as it is being sewn • Engage the Needle Down function Double Overlock – SL2mm Owner’s manual pg. ____ SW5mm Knit Overlock – as programmed Owner’s manual pg. ____ • Use Overlock Foot #2 (optional for 170 QPE) or #2A (included with 180) Reinforced Overlock – SL2mm SW5mm Owner’s manual pg. ____ • The artista has several seaming stitches from which to choose, depending on the type of fabric being used. With the Creative Consultant, you can specify the type of fabric you want to use, and the computer will suggest the appropriate stitch. Stitching Corners • Utilize the FHS system to raise and lower the presser foot when turning corners. • Use the 5/8” markings on stitch plate • Engage the Needle Down function • Press heel on foot control to lower needle Oversewing Edges Blind Hem – Owner’s manual pg.____ • The Blind Hem Foot #5, along with the blindstitch, produces a superior blind hem. The zigzag part of the stitch is formed over the guide on the foot, causing the stitch to be slightly loose, so that the blind hem will not pucker and does not form a tuck in the fabric. Hand Picked – Feet-ures, Unit B pg.____ Triple Zigzag – Feet-ures, Unit A pg.____ • This stitch is used for strong, visible hems on firm, coarse fabrics such as denim and canvas. Double Needle – Feet-ures, Units A and K, pgs__ Neckline Hem – Owner’s manual pg.____ Stretch Overlock – SL2mm Owner’s manual pg. ____ SW4mm Jeans – Feet-ures, Unit B pg.____ • Height Compensation Tool Flat Joining – SL2mm SW4mm Owner’s manual pg. ____ • Good for thick fabrics such as terry cloth which would be stretched by a straight stitch MASTERING YOUR BERNINA® 1/10/02 artista 170 QPE/180/18 MASTERING YOUR BERNINA® BERNINA® artista 170 QPE/180 TRIPLE STRAIGHT STITCH Fabric: Needle: Thread: Presser Foot: Denim, 4” x 6” 90/14 Jeans All-purpose Reverse Pattern Foot #1/1C Edgestitch Foot #10/10C (optional accessory) Owner’s manual pg.___ • Cut the fabric in half lengthwise forming two pieces, 2” x 6” each. • Select the Triple Straight Stitch #6. • Sew the two pieces together with a 5/8” seam allowance using Reverse Pattern Foot #1/1C. • Press the seam open. • Change to Edgestitch Foot #10/10C and adjust the needle position to stitch through the seam allowance. • Adjust the stitch length to 3.5mm. • With the guide of the foot in the ditch of the seam, topstitch the length of the seam on both sides. MASTERING YOUR BERNINA® 1/10/02 artista 170 QPE/180/19 MASTERING YOUR BERNINA® BERNINA® artista 170 QPE/180 ZIGZAG SEAM Fabric: Needle: Thread: Presser Foot: Firm knit – 4” x 6” 80/12 Universal All-purpose Reverse Pattern Foot #1/1C Owner’s manual pg.___ • Cut the fabric piece in half lengthwise, creating two pieces, 2” x 6” each. • Select the Zigzag Stitch #2 – SW 1mm and SL 0.5mm. • Position the fabric to produce a 5/8” seam down one side. • Stitch the seam. • Clip one seam allowance in the middle. • Press one part of the seam open and leave the other half closed, so the stitch is visible. • Trim and mount the sample. MASTERING YOUR BERNINA® 1/10/02 artista 170 QPE/180/20 MASTERING YOUR BERNINA® BERNINA® artista 170 QPE/180 SUPER STRETCH SEAM Fabric: Needle: Thread: Presser Foot: Heavy Double Knit, 4” x 6” 80/12 Universal All-purpose Reverse Pattern Foot #1/1C Owner’s manual pg.___ • Cut fabric in half lengthwise creating two pieces, 2” x 6” each. • Select stitch #11. • Position the fabric to produce a 5/8” seam down one side. • Stitch the seam; lighten the presser foot presure if fabric stretches. • Clip one seam allowance in the middle and press one part of the seam open. • Trim and mount the sample. Note: This stitch is good for an open seam on all knit fabrics; works well for sportswear. MASTERING YOUR BERNINA® 1/10/02 artista 170 QPE/180/21 MASTERING YOUR BERNINA® BERNINA® artista 170 QPE/180 VARI-OVERLOCK SEAM Fabric: Needle: Thread: Presser Foot: Cotton Interlock, 4” x 6” Ribbing, 2” x 4” 80/12 Univeral All-purpose Overlock Foot #2 (optional accessory) /2A Owner’s manual pg.___ • Cut an inside curve in one corner of the fabric to simulate a neckline. • Select the Vari-Overlock Stitch #3. • Engage the Needle Down function. • Place folded ribbing along the curved edge of the fabric (ribbing and fabric, right sides together). • Guide the raw edges of the fabric under the pin of the foot and stitch; stitch length and width can be adjusted, if needed. • Trim the sample and mount with the ribbing pressed to the finished position. MASTERING YOUR BERNINA® 1/10/02 artista 170 QPE/180/22 MASTERING YOUR BERNINA® BERNINA® artista 170 QPE/180 DOUBLE OVERLOCK SEAM Fabric: Needle: Thread: Presser Foot: Single Knit – 4” x 6” 80/12 Universal All-purpose Overlock Foot #2 (optional accessory) /2A Owner’s manual pg.___ • Cut the fabric in half lengthwise, creating two pieces, 2” x 6’ each. • Select the Double Overlock Stitch #10. • Guide the raw edge along the pin of the Overlock Foot. • The right swing of the needle should go off the fabric edge. • Trim the sample and mount. Note: This is a good overlock seam for loosely knit fabrics and for cross seams in other knits and jerseys. MASTERING YOUR BERNINA® 1/10/02 artista 170 QPE/180/23 MASTERING YOUR BERNINA® BERNINA® artista 170 QPE/180 KNIT OVERLOCK SEAM Fabric: Needle: Thread: Presser Foot: Sweater knit fabric, 4”x 6” 80/12 Universal Regular sewing Overlock Foot #2 (optional accessory) /2A Owner’s manual pg.___ • Cut the fabric in half lengthwise, creating 2 pieces 2” x 6” each. • Select the Stretch Overlock stitch #20. • Guide the fabric so the right swing of the needle goes off the edge of the seam; lighten presser foot pressure if seam stretches. • Trim and mount the sample. MASTERING YOUR BERNINA® 1/10/02 artista 170 QPE/180/24 MASTERING YOUR BERNINA® BERNINA® artista 170 QPE/180 STRETCH OVERLOCK SEAM Fabric: Needle: Thread: Presser Foot: Loosely knit fabric, 4”x 6” 80/12 Universal Regular sewing Reverse Pattern Foot #1/1C Owner’s manual pg.___ • Cut the fabric in half lengthwise, creating 2 pieces 2” x 6” each. • Select the Stretch Overlock stitch #13. • Guide the fabric so the right swing of the needle goes off the edge of the seam; lighten presser foot pressure if seam stretches. • Trim and mount the sample. MASTERING YOUR BERNINA® 1/10/02 artista 170 QPE/180/25 MASTERING YOUR BERNINA® BERNINA® artista 170 QPE/180 FLAT JOINING SEAM Fabric: Needle: Thread: Presser Foot: Terry cloth - 2 pieces, 2” x 6” each 90/14 Universal Regular sewing thread to match fabric Reverse Pattern Foot #1/1C Owner’s manual pg.___ • Select the Stretch Overlock stitch #13. • Cut a 5/8” seam allowance off one piece of fabric along the long edge. • Mark a line on the other piece of fabric, 5/8” from one long edge. This will be the right-hand piece of fabric. • Overlap the fabric edges left over right, aligning the left raw edge with the drawn line on the right-hand piece. • Stitch along the raw edge. Turn the fabric over and stitch along the remaining raw edge. NOTE: This is a great seam technique to use on bulky fabrics such as terry cloth. MASTERING YOUR BERNINA® 1/10/02 artista 170 QPE/180/26 MASTERING YOUR BERNINA® BERNINA® artista 170 QPE/180 REINFORCED OVERLOCK SEAM Fabric: Needle: Thread: Presser Foot: Bulky knit fabric, 4”x 6” 80/12 Universal Regular sewing Reverse Pattern Foot #1/1C Owner’s manual pg.___ • Cut the fabric in half lengthwise, creating 2 pieces 2” x 6” each. • Select the Reinforced Overlock stitch #19. • Guide the fabric along the 15mm line for a 5/8” seam; lighten presser foot pressure if seam stretches. • Trim excess seam allowance and mount the sample. MASTERING YOUR BERNINA® 1/10/02 artista 170 QPE/180/27 MASTERING YOUR BERNINA® BERNINA® artista 170 QPE/180 STITCHING CORNERS Fabric: Needle: Thread: Presser Foot: Firm fabric – 2 pieces, 5” x 5” each 80/12 Universal All-purpose Reverse Pattern Foot #1/1C Owner’s manual pg.___ • Select the Straight Stitch #1. • Place fabric pieces right sides together. • Place the fabric under the foot with the top edge even with the horizontal line behind the foot. • The right edge should be even with the 5/8” seam line. • Engage the Needle Down function. • Sew until the bottom edge touches the horizontal line in front of the needle; stop. • Pivot and continue sewing until you come to the next corner and do the same thing. • Stitch only three sides of this sample. MASTERING YOUR BERNINA® 1/10/02 artista 170 QPE/180/28 MASTERING YOUR BERNINA® BERNINA® artista 170 QPE/180 OVERSEWING EDGES Fabric: Needle: Thread: Presser Foot: Heavy Flannel – 3” x 6” 80/12 Universal All-purpose Reverse Pattern Foot #1/1C Owner’s manual pg.___ • Select the Zigzag Stitch #2. • Finish one 6” edge using the following steps. • Guide edge of fabric under the middle of the presser foot. • The needle should go into the fabric on one stroke of the needle and over the edge on the next stroke. • Do not use too long a stitch or too wide a stitch; the edge should lie flat, not roll. • Match the weight of the thread to the weight of the fabric. • Trim and mount the sample. MASTERING YOUR BERNINA® 1/10/02 artista 170 QPE/180/29 MASTERING YOUR BERNINA® BERNINA® artista 170 QPE/180 BLIND HEM Fabric: Needle: Thread: Presser Foot: Heavy Flannel – 6” x 7” 80/12 Universal All-purpose Reverse pattern Foot #1/1C and Blind Hem Foot #5 Owner’s manual pg.___ • Finish one 6” edge of the fabric following the steps of the previous exercise. • Fold a 2” hem to the wrong side of the fabric and press. • Select Basting Stitch #21 and attach Reverse Pattern Foot #1/1C. • Baste the hem in place, sewing about ¼” from the raw edge. • Select the Blindstitch #9 and attach Blind Hem Foot #5. • Fold hem back to the right side over the basting line. • Sew on the extended hem allowance, keeping the folded edge next to the guide on the foot. • Adjust the stitch width if needed so that the needle barely stitches into the fold. • Mount the sample with the edges folded back as shown in the drawing. MASTERING YOUR BERNINA® 1/10/02 artista 170 QPE/180/30 MASTERING YOUR BERNINA® BERNINA® artista 170 QPE/180 HAND PICKED HEM Fabric: Needle: Thread: Presser Foot: Lightweight broadcloth – 6” x 7” 80/12 Universal All-purpose Blind Hem Foot #5 Owner’s manual pg.___ • Turn up a 1” hem along one of the 6” edges and press. • Turn up the depth of the hem again and press. • Fold the entire hem toward the right side of the garment, so that the garment fold is almost even with the top edge of the hem. A scant 1/8” to 1/16” of hem edge should be visible. This will ensure that both folds are caught by the blind hem pick. • Place the fabric under the foot just as a traditional blind hem would be placed. • Sew the hem with Blindstitch #9, making sure that the zigzag pick catches both folds while the straight stitch falls off the edge and stitches in air forming a chain along the upper hem edge. • Press and mount the sample. MASTERING YOUR BERNINA® 1/10/02 artista 170 QPE/180/31 MASTERING YOUR BERNINA® BERNINA® artista 170 QPE/180 TRIPLE ZIGZAG HEM Fabric: Needle: Thread: Presser Foot: Firmly woven – 6” x 7” 90/14 Embroidery 30 wt. cotton embroidery Reverse Pattern Foot #1/1C Owner’s manual pg.___ • Fold a 2” hem to the wrong side of the fabric; press. • Select the Triple Zigzag Stitch #7. • Adjust stitch length and width as desired. • From the right side of the fabric, stitch the hem in place, sewing about 1½” from the fold. • From the wrong side, trim the excess fabric close to the stitches. • Press and mount the sample. MASTERING YOUR BERNINA® 1/10/02 artista 170 QPE/180/32 MASTERING YOUR BERNINA® BERNINA® artista 170 QPE/180 DOUBLE NEEDLE HEM Fabric: Needle: Thread: Presser Foot: Cotton interlock – 6” x 7” Double 3.0/80 All-purpose, 2 colors Reverse Pattern Foot #1/1C Owner’s manual pg.___ • Turn up a 2” hem along one of the 6” edges and press. • Insert a 3.0/80 double needle. • Thread the needles with two different colors of thread. • Place the folded edge of the fabric along the 1” guideline on the right side of the stitch plate. • Select stitch #1; sew half of the hem. Note: To be sure the needles will not strike the foot, turn the handwheel to “walk” the machine through the first stitch. Narrow the width as needed to avoid breaking needles. • Select stitch #9 or experiment with similar stitches; stitch the remainder of the seam. • Trim excess fabric from the wrong side of the hem. • Check Feet-ures, Unit A for detailed information on working with Double and Triple needles. Note: This is a good stitch to use when hemming T-shirts and pajamas. You can use other stitches with a double needle for other types of fabrics. • Press and mount the sample. MASTERING YOUR BERNINA® 1/10/02 artista 170 QPE/180/33 MASTERING YOUR BERNINA® BERNINA® artista 170 QPE/180 NECKLINE HEM Fabric: Needle: Thread: Presser Foot: Single knit cotton – 4” x 6” 80/12 Universal All-purpose Reverse Pattern Foot #1/1C Owner’s manual pg.___ • Cut a curve to simulate a neck edge in one corner. • Sew a line of stay-stitching, 3/8” in from the neck edge using the straight stitch and the Long Stitch function; disengage te Long Stitch function after staystitching. • Turn the raw edge under and press or baste in place. • Select the Honeycomb Stitch #8. • Sew from the right side ¼” from the folded edge. • Trim surplus fabric from wrong side, close to the stitching. Notes: - If the hem stretches, add a strip of Stitch Witchery® to the edge as it is stay-stitched. - Using the Needle Stop Down function will keep the fabric in place when sewing curves. - The Balance function can be used to make the stitches closer together or farther apart. • Press and mount the sample. MASTERING YOUR BERNINA® 1/10/02 artista 170 QPE/180/34 MASTERING YOUR BERNINA® BERNINA® artista 170 QPE/180 JEANS HEM Fabric: Needle: Thread: Presser Foot: Denim – 5” x 7” 100/16 or 110/18 Jeans All-purpose Jeans Foot #8 (optional accessory) Note: Specially designed to sew over heavy seams and fabrics, the Jeans Foot #8 guides the needle through heavy thicknesses and helps to eliminate needle breakage. It is also effective for topstitching with buttonhole twist or cordonnet threads. Owner’s manual pg.___ • Cut fabric in two pieces, 5” x 3½” each. • Insert a Jeans needle and select stitch #1. • Sew a 5/8” seam with right sides together. • Press the seam to one side. • Topstitch, using the edge of the foot along the seam as a guide, and stitching through the seam allowances. • Turn up the lower edge twice, about 3/8” each time. • Topstitch the hem in place, about 1/8” from the upper edge of the hem. • Press and mount the sample. MASTERING YOUR BERNINA® 1/10/02 artista 170 QPE/180/35 MASTERING YOUR BERNINA® BERNINA® artista 170 QPE/180 WISH LIST Let’s Start WIth The Basics Feet-ures, Units A, B, C Overlock Foot #2 Embroidery Foot #6 Jeans Foot #8 Edgestitch Foot #10/10C Straight Stitch Foot #13 Cut and Sew Attachment #80 Double Needles 2.0mm 2.5mm 3.0mm Jeans Needles 90/14 100/16 Double Stitch Witchery - 5/8” roll BERNINA Ironing System Curved Hem Ruler 6” Sewing Gauge Seam Pressing Stick BERNINA Cutting Mat BERNINA 14” Ruler Rotary Cutter MASTERING YOUR BERNINA® 1/10/02 artista 170 QPE/180/36 MASTERING YOUR BERNINA® BERNINA® artista 170 QPE/180 MASTERING YOUR ® BERNINA artista 170 QPE/180 OWNER’S WORKBOOK Section C On The Edge MASTERING YOUR BERNINA® 1/10/02 artista 170 QPE/180/37 MASTERING YOUR BERNINA® BERNINA® artista 170 QPE/180 SECTION C On The Edge Buttonholes Owner’s manual pg.____ Feet-ures, Units A and K • Types and Uses • Preparation - proper stabilizers - sometimes using two or more layers - proper adhesion of iron-on stabilizers • Positioning: - marking - full bust can be beginning point - using spacing tape - using Simpflex • Measuring the Button: - to determine length of buttonhole • Grading Seams - using applique scissors • Height Compensation Tool - keep foot level • Buttonhole Leveler • Tension Adjustments • Testing: - always use same fabric, thread and stabilizer • Cutting Open: - seam sealant - block and cutter • Tricks: - wash-a-way stabilizer for high pile fabrics - Stitch Witchery® for loose wovens or knits • Buttonhole Balance • Programmed Buttonholes • Corded Buttonholes: - with gimp cord - with threads MASTERING YOUR BERNINA® 1/10/02 Sewing Buttons On Owner’s manual page ____ Feet-ures, Unit D • Button Sew-On Stitch - regular - decorative - snaps, hooks, and charms - tie a quilt Edges • Picot – Feet-ures, Unit D • Shell - blindstitch – Feet-ures, Units A and K - hemmer feet #68 or #69 – Feet-ures, Unit I • Rolled and Whipped Edge – Feet-ures, Unit A • Fine Edge – Feet-ures, Units B and K • Corded Edge – Feet-ures, Units B and K - for tucks - for hems • Designer Hem – Feet-ures, Units B and K Attaching Elastics • Types • Methods of applying - turn under - couching over - lingerie artista 170 QPE/180/38 MASTERING YOUR BERNINA® BERNINA® artista 170 QPE/180 BUTTONHOLES AND EYELETS TYPES AND USES STANDARD BUTTONHOLE Fine to medium weight fabrics. Blouses, shirts, trousers, bedlinens. HEIRLOOM BUTTONHOLE Fine to medium weight fabrics. Blouses, shirts, dresses, trousers. children’s and baby clothes, doll clothes, heirloom work. STRETCH BUTTONHOLE All stretch fabrics made from cotton, wool, silk, and synthetic fibers. ROUND BUTTONHOLE WITH NORMAL BARTACK Medium to heavy weight fabrics of all types. Clothing, jackets, coats, rainwear. ROUND BUTTONHOLE WITH HORIZONTAL BARTACK Medium to heavy weight fabrics of all types. Clothing, jackets, coats, rainwear. KEYHOLE BUTTONHOLE WITH NORMAL BARTACK Heavy weight, non-stretch fabrics. Jackets, coats, trousers, leisure wear. KEYHOLE BUTTONHOLE WITH POINTED BARTACK Non-stretch firm fabric. Jackets, coats, leisure wear. KEYHOLE BUTTONHOLE WITH NORIZONTAL BARTACK Firm, non-stretch fabrics. jackets, coats, leisure wear. STRAIGHT STITCH BUTTONHOLE For prestitching buttonholes and pocket openings. For bound buttonholes & welt pockets. BUTTON SEW-ON PROGRAM For flat buttons with 2 and 4 holes. For sewing on snaps, hooks, and charms. NARROW ZIGZAG EYELET Opening for cords and narrow ribbons/bands, other decorative work. STRAIGHT STITCH EYELET Opening for cords and narrow ribbons/bands, other decorative work. MASTERING YOUR BERNINA® 1/10/02 artista 170 QPE/180/39 MASTERING YOUR BERNINA® BERNINA® artista 170 QPE/180 BUTTONHOLE FEET A number of buttonhole feet are available for BERNINA® sewing machines. The descriptions below will help differentiate between the various feet. BUTTONHOLE FOOT #3 The standard 5mm buttonhole foot. ® Works with any BERNINA sewing machine BUTTONHOLE FOOT WITH SLIDE #3B A 5mm foot with a movable slide indicating buttonhole length, making it easy to stitch a series of identical buttonholes. ® Works with any BERNINA sewing machine. AUTOMATIC BUTTONHOLE FOOT #3A Automatic foot for machines with a 5mm and 9mm feed system. “A” indicates an “automatic” foot, with a light sensor for counting stitches. Works with models 1130-1530 and 150-170 QPE. MASTERING YOUR BERNINA® 1/10/02 BUTTONHOLE FOOT #3C The standard 9mm buttonhole foot. “C” indicates a “coded” foot, with a light sensor that allows 9mm wide stitching. Works with models 1630 and artista 180. AUTOMATIC BUTTONHOLE FOOT #3C The automatic buttonhole foot for machines with a 9mm feed system, indicated by the letter “C”. Works with models 1630 and artista 180. AUTOMATIC BUTTONHOLE FOOT WITH SLIDE #3A Combines the handy slide measuring system of Buttonhole Foot #3B with the electronic sensor of the older Automatic Buttonhole Feet #3A and #3C. Works with models 135 PE/145 and 150-180. artista 170 QPE/180/40 MASTERING YOUR BERNINA® BERNINA® artista 170 QPE/180 STABILIZERS Tear-Away Stabilizer: The most commonly used type of stabilizer, designed to provide temporary support of stitching. Placed on the wrong side of the project and carefully pulled away once stitching is complete. Available in three weights – heavy, medium, and light. Multiple lightweight layers may be preferable to one heavy layer, as they are easier to remove. Cut-Away Stabilizer: The most widely used stabilizer in the commercial market. Does not break down under dense stitching, due to the high fiber – rather than paper – content. Excess stabilizer is trimmed away after stitching (leave approximately ¼” of stabilizer around the edges). Web/Poly-Mesh Type Stabilizer: A specially formulated cut-away stabilizer developed for use behind lightweight or light-colored fabrics. Water-Soluble Stabilizer: Used for backing and topping, in single or multiple layers. Available in two weights. Excellent for decorative stitching and cutwork as there are no remnants of stabilizer left after removal (it dissolves). As a topping, it keeps stitches from being lost in heavily napped fabrics such as velvet and corduroy. Knit Fusible Interfacing: A very lightweight, flexible interfacing sometimes used as a stabilizer, it gives permanent support (as an underlining) to a fabric. Perfect for plackets, garment edges, under buttonholes, and anywhere extra body and stability are needed. Woven Fusible Interfacing: This interfacing is sometimes used as a stabilizer and is generally cut on the bias to provide better drape. Gives a firmer hand or finish than knit or non-woven interfacings. Used for lapels, facings, and anywhere a great deal of extra body and stability are needed. Iron-On Stabilizer: A non-woven product similar to paper. Perfect for knits, this tearaway stabilizer is temporarily bonded to the fabric, inhibiting the tendency of the material to stretch. Heat Removable Stabilizer: Woven from strands of fiber that are burned away at a low temperature, heat removable stabilizers are perfect for heirloom stitchery. Liquid/Spray Stabilizers: Wonderful for sheer fabrics from which all stabilizer must be removed after stitching, these products are painted or sprayed onto the fabric. Several light applications of spray stabilizer are preferable to one heavy application. MASTERING YOUR BERNINA® 1/10/02 artista 170 QPE/180/41 MASTERING YOUR BERNINA® BERNINA® artista 170 QPE/180 MANUAL BUTTONHOLES Fabric: Stabilizer: Needle: Thread: Presser Foot: Heavy flannel, 6” x 6” 1 piece, 3” x 6” 90/14 Embroidery 30 weight cotton embroidery Standard Buttonhole Foot #3/3C Owner’s manual pg.____ • Fold the fabric in half to 3” x 6”. Press and insert the stabilizer. • Draw a line 1½” from the fold along the 6” length. • Mark two horizontal lines, running between the fold and the drawn line, spaced about 2” apart. • Select buttonhole #51 – the standard buttonhole — and MAN from the function toolbar. • Position the foot over the first short line, aligning the fold of the fabric with the 5/8” marking behind the foot. • Sew the first side of the buttonhole, engaging box #1 on the screen. • Stop at the drawn line and select box #2. • Continue stitching the remaining steps of the buttonhole; touch esc. • Select stitch #57 and MAN. Place the second short line under the presser foot as before. • Sew the keyhole buttonhole on the second marked line; touch esc. • Cut one buttonhole open. • Trim and mount the sample. MASTERING YOUR BERNINA® 1/10/02 artista 170 QPE/180/42 MASTERING YOUR BERNINA® BERNINA® artista 170 QPE/180 BUTTONHOLE BALANCE Fabric: Stabilizer: Needle: Thread: Presser Foot: Heavy flannel, 6” x 9” 1 piece, 6” x 9” 90/14 Embroidery 30 wt. cotton embroidert Buttonhole Foot with #3A/3C • • • • • Owner’s manual page __. Select buttonhole #51 and decrease bead density by lengthening the stitch to 1. Sew about a 1” buttonhole using the counted stitch method and mark it #1. Adjust the balance toward the closed stitch icon. Sew the buttonhole and mark it #2. Note: This buttonhole bead is very dense. • Turn the balance knob toward the open stitch icon. • Sew another buttonhole; now the stitches are farther apart. • Mark the sample with #3. Note: This buttonhole bead is very open. • Return the balance knob to mormal. #1 MASTERING YOUR BERNINA® 1/10/02 #2 #3 artista 170 QPE/180/43 MASTERING YOUR BERNINA® BERNINA® artista 170 QPE/180 AUTOMATIC BUTTONHOLES Fabric: Stabilizer: Needle: Thread: Presser Foot: Cotton Interlock, 6” x 6” Heavy Flannel, 6” x 6” 2 pieces, 3” x 6” each 90/14 Embroidery 30 weight cotton embroidery Automatic Buttonhole Foot #3A/3C Owner’s manual pg.____ Sample #1 • Fold the knit fabric in half to 3” x 6”. Press and insert the stabilizer. • Draw a line 1½” from the fold along the 6” length. • Mark two horizontal lines, running between the fold and the drawn line, spaced about 2” apart. • Select buttonhole #53 – the stretch buttonhole. • Position the foot over the first short line, aligning the fold of the fabric with the 5/8” marking behind the foot. • Sew a buttonhole on the first drawn line. • Stop at the drawn horizontal line and press the securing button; as you stitch, the word “auto” appears on the screen. • The buttonhole length is programmed and when you start sewing again, the machine completes the buttonhole automatically. • Sew the memorized buttonhole on the second line. Sample #2 • Fold the flannel fabric in half to 3” x 6”. Press and insert the stabilizer. • Draw a line 1½” from the fold along the 6” length. • Mark two horizontal lines, running between the fold and the drawn line, spaced about 2” apart. • Select buttonhole #58 – keyhole buttonhole. • Stitch a buttonhole on the first drawn line • Sew the memorized buttonhole on the second line. Note: To determine the buttonhole length, calculate the bead length only; the eye will sew accordingly. • Trim and mount the sample. MASTERING YOUR BERNINA® 1/10/02 artista 170 QPE/180/44 MASTERING YOUR BERNINA® BERNINA® artista 170 QPE/180 Auto Buttonhole Foot #3A/3C Standard Buttonhole Foot #3/3C CORDED BUTTONHOLES Fabric: Stabilizer: Needle: Thread: Presser Foot: Heavy flannel, 6” x 6” Two 10” lengths of gimp cprd 1 piece, 3” x 6” 90/14 Embroidery 30 weight cotton embroidery Standard Buttonhole Foot #3/3C and Automatic Buttonhole Foot #3A/3C Owner’s manual pg.____ • Fold the fabric in half to 3” x 6”. Press and insert the stabilizer. • Mark a line 1½” from the fold and running the length of the fabric. • Mark two horizontal lines between the fold and the line, spaced about 2” apart. • Select the Standard Buttonhole #51. • Place the fold so it is on the 5/8” line behind the presser foot. • Lower the needle (using the foot control) into the fabric on the first line. • Fold one piece of cord in half; place loop around prong of the Auto Buttonhole Foot #3A or #3C. Note: The cord strengthens the buttonhole on wovens and prevents it from stretching on knits. The thickness of the cord depends on the fabric to be sewn. Suitable cords are perle cord #8, thick hand sewing thread, gimp cord, or crochet cotton. • Sew the buttonhole. • Pull the loop of gimp cord snug and cut tails close to bartack. Note: On knits, pull to back and tie a knot. • Select MAN from the function bar. • Sew another corded buttonhole using the Buttonhole Foot #3/3C on the second line. • The cord may come away from the prong of this foot. Therefore it is advisable to hold the loop of the gimp down lightly with the finger. • Pull the cord ends to the back with a large hand sewing needle and tie. • Trim and mount sample. MASTERING YOUR BERNINA® 1/10/02 artista 170 QPE/180/45 MASTERING YOUR BERNINA® BERNINA® artista 170 QPE/180 BUTTONHOLE LENGTH DIRECT ENTRY Fabric: Stabilizer: Needle: Thread: Presser Foot: Heavy flannel, 6” x 6” 1 piece, 3” x 6” 90/14 Embroidery 30 weight cotton embroidery Standard Buttonhole Foot #3/3C Owner’s manual pg.____ • Fold the fabric in half to 3” x 6”. • Mark two lines perpendicular to the fold, spacing them about 2” apart. • Select buttonhole #54. • Position the foot over the first line, aligning the fold of the fabric with the 5/8” marking behind the foot. • Touch the symbol on the function bar that is the buttonhole with a question mark. • When the length screen appears, program in the buttonhole length of 22 mm. • Touch OK to confirm; the screen changes automatically. The word auto below the buttonhole symbol on the screen indicates that the buttonhole is programmed. • Sew the buttonhole. • Move the fabric to position the needle over the second line and sew a duplicate buttonhole. • Trim threads close and mount the sample. MASTERING YOUR BERNINA® 1/10/02 artista 170 QPE/180/46 MASTERING YOUR BERNINA® BERNINA® artista 170 QPE/180 BUTTONHOLE LENGTH ON-SCREEN MEASURING Fabric: Stabilizer: Needle: Thread: Presser Foot: Heavy flannel, 6” x 6” Two 10” lengths of gimp cprd 1 piece, 3” x 6” 90/14 Embroidery 30 weight cotton embroidery Standard Buttonhole Foot #3/3C and Automatic Buttonhole Foot #3A or #3C Owner’s manual pg.____ • Fold the fabric in half to 3” x 6”. • Mark two lines perpendicular to the fold, spacing them about 2” apart. • Position the foot over the first line, aligning the fold of the fabric with the 5/8” marking behind the foot. • Select the Standard Buttonhole #57. • Open the button measuring screen by touching the button symbol on the function bar; a scale appears on the screen. • Hold a button against the scale at the bottom left corner of the screen. • Use the external stitch width knob to move the vertical line on the screen; the line should be exactly at the right edge of the button. The buttonhle size is shown in mm above the horizontal line. Note: 2mm are added automatically to accommodate thickness of the button. • Sew the buttonhole on the first line. • Sew a memorized buttonhole on the second line. • Trim and mount sample. MASTERING YOUR BERNINA® 1/10/02 artista 170 QPE/180/47 MASTERING YOUR BERNINA® BERNINA® artista 170 QPE/180 STITCH COUNTER BUTTONHOLES Fabric: Stabilizer: Needle: Thread: Presser Foot: Heavy flannel, 6” x 6” 1 piece, 3” x 6” 90/14 Embroidery 30 weight cotton embroidery Standard Buttonhole Foot #3/3C Owner’s manual pg.____ • Fold the fabric in half to 3” x 6”. • Mark a parallel line 2” from the fold and a second one 1” from the fold. • Mark two lines perpendicular to the fold, spacing them about 2” apart. • Select standard buttonhole #51. • Touch the “presser foot 3” symbol on the function bar. • Position the beginning of the buttonhole on the line closest to the fold, aligning the fold with the 5/8” marking behind the foot. • Sew the first bead and stop stitching at the second line. • Press the quick reverse button - as you stitch, the bottom bartack and second bead are sewn. • Stop the machine even with the first stitch of the first bead - press quick reverse. • The machine sews the top bartack, ties the stitches off and stops automatically. • Auto appears on the screen and the buttonhole is programmed. Notes: - The first bead is sewn forward, the second bead backward. - The buttonhole must be reprogrammed after altering stitch length, width or balance. - Practice using the fabric and stabilizer to be used in the finished project. - Stitch buttonholes at consistent speed. • Trim threads close and mount the sample. MASTERING YOUR BERNINA® 1/10/02 artista 170 QPE/180/48 MASTERING YOUR BERNINA® BERNINA® artista 170 QPE/180 STRAIGHT STITCH BUTTONHOLE Fabric: Stabilizer: Needle: Thread: Presser Foot: Linen, 6” x 6” 1 piece, 3” x 6” 90/14 Embroidery 30 weight cotton embroidery Standard Buttonhole Foot #3/3C and Automatic Buttonhole Foot #3A/3C Owner’s manual page___ • Attach Automatic Buttonhole Foot #3A/3C to the machine. • Select stitch #59. • Use any one of the available methods to make a 29mm buttonhole. • Mark three lines perpendicular to the fold, spacing them about 2” apart. • Position the beginning of the buttonhole on the line closest to the fold, aligning the fold with the 5/8” marking behind the foot. • Stitch the buttonhole on the first line - Do not remove the fabric. • Select stitch #51 - sew this buttonhole (the same 29mm size) on top of the straight stitch buttonhole. • Select stitch #59 again and sew another buttonhole on the second line, making it 27mm this time. • Change to foot #3/3C - adjust the width of the buttonhole to 5mm (170 QPE) or 9mm (180). • Sew a second buttonhole about 1” long on the third line. Notes: - Straight stitch buttonholes can be used to pre-sew and reinforce buttonholes on fabrics which fray easily. The buttonhole beads and bartacks will cover the stitching. Any of the methods for determining the buttonhole lengths can be used. - Straight stitch buttonholes can be used as a buttonhole on imitation suede and leather. - The distance between the prestitched lines can be adjusted with the stitch width. MASTERING YOUR BERNINA® 1/10/02 artista 170 QPE/180/49 MASTERING YOUR BERNINA® BERNINA® artista 170 QPE/180 BUTTON SEW-ON STITCH Fabric: Stabilizer: Needle: Thread: Presser Foot: Heavy flannel, 6” x 6” 1 piece, 3” x 6” 90/14 Embroidery 30 weight cotton embroidery Button Sew-On Foot #18 (optional accessory) Owner’s manual pg.____ • Select stitch #60. • Lower the feed dogs. • Fold the fabric in half to 2” x 6”; press. Insert the stabilizer. Notes: - You can sew buttons on to stay! - A low shank can be made for dresses and blouses or a high shank can be made for heavier fabrics such as coats and blazers. - Use the Button Sew-On Foot #18 to sew on waistband closures, hook-and-eye fasteners, snaps, curtain rings, and charms. Tecnique #1 • Use a glue stick to position a button in place. • Adjust the pin on Foot #18 to the highest position for a long shank. • Check the distance between the holes of the button by turning the hand wheel. • Adjust the stitch width if necessary. • Hold the thread tails as you begin to sew. • Machine stops automatically when program is completed; threads are secured as part of program. Technique #2 • Using the lowest shank setting, attach a charm, a length of ribbon, and a hook-and-eye to the same fabric. • Trim threads close and mount the sample. MASTERING YOUR BERNINA® 1/10/02 artista 170 QPE/180/50 MASTERING YOUR BERNINA® BERNINA® artista 170 QPE/180 PICOT EDGE Fabric: Needle: Thread: Presser Foot: Lightweight single knit cotton, 6” x 4” 80/12 Universal All-purpose sewing thread Reverse Pattern Foot #1/1C Owner’s manual pg.____ • Select the Vari-Overlock stitch #3 - SW 4-5mm and SL 1.5mm. • Fold under one 6” edge about ¼” and press. • Place fabric to the left and position it under the foot so that when the stitch swings to the right, it will just pass over the folded edge. • On knit fabrics the surplus can be trimmed from the wrong side close to the stitch. • On woven fabrics it is advisable to first sew a row of small zigzag stitches about ¼” from where the picot edge will be. Then you will be able to trim close to these stitches after the picot has been stitched. • Trim and mount the sample. This stitch is suitable only for fine, soft fabrics and is ideal for lingerie and nightwear. MASTERING YOUR BERNINA® 1/10/02 artista 170 QPE/180/51 MASTERING YOUR BERNINA® BERNINA® artista 170 QPE/180 SHELL EDGE Fabric: Needle: Thread: Presser Foot: Nylon tricot, 6” x 4” 80/12 Universal All-purpose sewing thread Reverse Pattern Foot #1/1C Owner’s manual pg.____ • Select the Blind stitch #9 - SW 2.5-5mm and SL 1.5-2mm. The longer the stitch length, the larger the shells. • Engage the mirror image function. • Fold under one 6” edge about ½” and press. • Place fabric to the left and position it under the foot so that when the stitch swings to the right, it will just pass over the folded edge. • On knit fabrics the surplus can be trimmed from the wrong side close to the stitch. • On woven fabrics it is advisable to first sew a row of small zigzag stitches about ¼” from where the shell edge will be. Then you will be able to trim close to these stitches after the edge is finished. • Trim and mount the sample. This stitch is suitable for fine, lightweight fabrics and is ideal for lingerie and nightwear. MASTERING YOUR BERNINA® 1/10/02 artista 170 QPE/180/52 MASTERING YOUR BERNINA® BERNINA® artista 170 QPE/180 ROLLED AND WHIPPED EDGE Fabric: Needle: Thread: Presser Foot: Lightweight cotton, 6” x 4” 80/12 Universal All-purpose sewing thread Standard Buttonhole Foot #3/3C Owner’s manual pg.____ • Clean one 6” edge of “whiskers” • Select the ZigZag Stitch #2 - SW 2.5mm and SL 1mm or less. • Select the left needle position. • Loosen the top tension if necessary. • Place cut edge of fabric between the center and right toes of the presser foot and sew. Notes: - The left swing of the needle should be in the fabric, while the right swing falls off of the right edge of the fabric. - As the needle swings left, it should roll the fabric into a tiny rolled edge. - The finer the fabric, the finer the needle and thread used. • Trim and mount the sample. This edge finish is used on a single thickness of fine lightweight fabrics. It is also use as a seam finish or as an edge on ruffles, hems etc. MASTERING YOUR BERNINA® 1/10/02 artista 170 QPE/180/53 MASTERING YOUR BERNINA® BERNINA® artista 170 QPE/180 FINE EDGE Fabric: Needle: Thread: Presser Foot: Batiste, 6” x 4” 70/10 Universal 60 wt. needle and bobbin Edgestitch Foot #10/10C (optional accessory) Owner’s manual pg.____ • Select the ZigZag Stitch #2 - SW 2mm and SL 1mm. • Select the left needle position. • Fold under ½” hem allowance on one 6” edge and press. • Place the fabric right side up, to the left of the guide on the foot and sew the edge. • When completed, trim away surplus fabric from the wrong side, close to the stitch. • Mount the sample. Note: Reverse Pattern Foot #1/1C can be used - settings as above but use center needle position. MASTERING YOUR BERNINA® 1/10/02 artista 170 QPE/180/54 MASTERING YOUR BERNINA® BERNINA® artista 170 QPE/180 CORDED EDGE Fabric: Needle: Thread: Presser Foot: Medium weight cotton, 6” x 4” Pearl Crown Rayon cord 80/12 Universal To match cord Edgestitch Foot #10/10C (optional accessory) Owner’s manual pg.____ • Fold under a ½” hem allowance on one 6” edge and press. • Place the folded edge, right side up, against the left side of the center blade. • Select the ZigZag stitch #2 - SW 2mm and SL 1mm or adjust as needed. • Adjust the needle position so the stitch falls on the folded edge. • The right swing of the needle should barely miss the edge of the fold, stitching in air. • Sew 2 or 3 stitches and stop with the needle down. • Raise the foot, insert the cord under the foot from the right, against the needle. • Pull the cord up through the center slot of the foot and hold it against the left side of the guide. • Continue stitching - the cord will feed into the zigzag stitch. • Trim the excess fabric from the wrong side. • Mount the sample. Note: Cord can be a variety of types - pearl rayon works well. MASTERING YOUR BERNINA® 1/10/02 artista 170 QPE/180/55 MASTERING YOUR BERNINA® BERNINA® artista 170 QPE/180 DESIGNER HEM Fabric: Needle: Thread: Presser Foot: Medium weight cotton, 6” x 4” Pearl Crown Rayon cord 80/12 Sharp All-purpose sewing thread Edgestitch Foot #10/10C (optional accessory) • • • • • • Select Straight Stitch #1. Select the left needle position. Turn the raw edge under 3/8” and press. Stitch with the fold against the left side of the guide on the presser foot. Trim away seam allowance as close to stitching as you can get. Turn the first folded edge under again tightly and place the new fold against the left side of the guide on the foot. • Stitch again from the wrong side of the fabric as in the first step. • A successful hem will have two parallel lines of stitching on the wrong side of the hem and one showing on the right side. • Trim and mount the sample. This is a very narrow two-step hem, easily sewn on straight or bias grains. Works great on sheer farbric. MASTERING YOUR BERNINA® 1/10/02 artista 170 QPE/180/56 MASTERING YOUR BERNINA® BERNINA® artista 170 QPE/180 ATTACHING ELASTIC LACE Fabric: Needle: Thread: Presser Foot: • • • • • • • • • Nylon tricot, 6” x 4” 9” of elastic lace 80/12 Universal All-purpose sewing thread Reverse Pattern Foot #1/1C Select the Running stitch #4. Adjust stitch length to 1mm. Engage the needle down function. Position the elastic wrong side down on the right side of the tricot along one of the 6” edges. Leave a tail of elastic at the back of the presser foot for a “handle”. Position the elastic so the stitching is at the bottom edge of the elastic lace. Stretch the elastic lace gently, as it is being sewn. After stitching, trim the surplus tricot from the wrong side of the elastic lace, close to the stitching. Mount the sample. MASTERING YOUR BERNINA® 1/10/02 artista 170 QPE/180/57 MASTERING YOUR BERNINA® BERNINA® artista 170 QPE/180 TURNED UNDER ELASTIC Fabric: Needle: Thread: Presser Foot: Lycra - cotton or nylont, 6” x 5” 9” of cotton swimwear elastic, ½” wide 80/12 Universal All-purpose sewing thread Reverse Pattern Foot #1/1C • • • • Select the ZigZag stitch #2 - SW 2mm and SL 2mm. Position the elastic on the wrong side of the fabric, along one 6” edge. Allow a 2” tail of elastic to extend beyond the fabric. Using the tail of elastic at the back of the presser foot for a “handle”, stretch the elastic a bit to simulate the leg of an exercise leotard or swimsuit. Note: This is the same procedure used to do a turned waistband, using wider elastic. • Sew the elastic to the fabric keeping the edge of the elastic and the edge of the fabric together. • If stopping midway, use the Needle Down function to hold the elastic and fabric in place. • Fold the elastic to the wrong side and overstitch the elastic from the right side using Stitch #16 or #17 with a length of 1mm. • Adjust presser foot pressure and/or stitch length if elastic stretches out as it is sewn. MASTERING YOUR BERNINA® 1/10/02 artista 170 QPE/180/58 MASTERING YOUR BERNINA® BERNINA® artista 170 QPE/180 WISH LIST On The Edge Presser Feet: Buttonhole Foot with Slide #3B Embroidery Foot #6 Edgestitch Foot #10/10C Button Sew-on Foot #18 Feet-ures Gimp or Pearl Crown Rayon Stitch Witchery - roll Water-soluable stabilizer Buttonhole Space Tape Buttonhole Placement Gauge - Simpflex ruler ½” Drafting Tape Marking Pens/Pencils Applique Scissors - for grading seams Height Compensation Tool Seam Sealent Glue Stick Buttonhole Cutter and Block Set Double Needles Cotton elastics Accessory Box MASTERING YOUR BERNINA® 1/10/02 artista 170 QPE/180/59 MASTERING YOUR BERNINA® BERNINA® artista 170 QPE/180 MASTERING YOUR ® BERNINA artista 170 QPE/180 OWNER’S WORKBOOK Section D Gather It Up and Tuck It Down MASTERING YOUR BERNINA® 1/10/02 artista 170 QPE/180/60 MASTERING YOUR BERNINA® BERNINA® artista 170 QPE/180 SECTION D GATHER IT UP AND TUCK IT DOWN Gathering • Gathering With A Basting Stitch - Lengthen stitch all the way - Tighten top tension for easier removal • Gathering Over A Single Cord - Refer to Feet-ures, Unit B - Embroidery Foot #6 with stitch #2 • Gathering Over Two Cords - Standard Buttonhole Foot #3/3C with stitch #12 - Can use elastic thread for shirring • Elastic Thread In Bobbin Case - Refer to Feet-ures, Unit H - Use Black Latch or secondary bobbin case • Narrow Casing Elastic - Refer to Feet-ures, Unit A - Open Embroidery Foot #20/20C with stitch #15 • Wide and Extra-Wide Gathering Feet #16 - refer to Feet-ures, Units D and L - gathering a single layer - gathering to a flat piece - short stitch length for easing • Ruffler Attachment - refer to Feet-ures, Unit J MASTERING YOUR BERNINA® 1/10/02 Tucks • Pintuck Feet and Double Needles - refer to Feet-ures, Unit F - which feet go with which needle - how to thread a double needle - how to use grooves in feet • Corded Pintucks - refer to Feet-ures, Unit F - straight tucks - gimp hole - turning corners • Pleats vs Tucks - refer to Feet-ures, Units C and K - Edgestitch Foot #10/10C - Reverse Pattern Foot #1/1C • Large Tucks and Pleats - refer to Feet-ures, Unit D - Quilting/Seam Guide - Zipper Foot with Guide #14 - Guide Bars with Rulers • Decorative Tucks - refer to Feet-ures, Unit F - sewn with decorative stitches vs straight - corded edges - lace inserted artista 170 QPE/180/61 MASTERING YOUR BERNINA® BERNINA® artista 170 QPE/180 GATHERING WITH A BASTING STITCH Fabric: Needle: Thread: Presser Foot: • • • • • Medium weight cotton, 12” x 4” 80/12 Universal All-purpose sewing Reverse Pattern #1/1C Trim all 4 edges of fabric piece with a wavy rotary cutter. Use all-purpose sewing thread top and bottom. Select stitch #21. Stitch 5/8” from one 12” edge. Tie the threads at the beginning to secure and gather the sample up to 6”. Notes: - The machine sews every fourth stitch. - The maximum stitch length possible is 20mm. - Use a fine darning thread; it is easier to remove after a seam has been sewn. - To secure basting stitches, sew a few normal length straight stitches at the beginning and end of the seam. MASTERING YOUR BERNINA® 1/10/02 artista 170 QPE/180/62 MASTERING YOUR BERNINA® BERNINA® artista 170 QPE/180 GATHERING OVER A SINGLE CORD Fabric: Needle: Thread: Presser Foot: • • • • • • Medium weight cotton, 12” x 4” 18” of cord 80/12 Universal All-purpose sewing Embroidery Foot #6 (optional accessory) Trim all four edges of sample fabric before beginning. Thread the cord through the hole in Foot #6, leaving a 2”-3” tail behind the foot. Select stitch #2 - SW 2.5mm and SL 2-2.5mm. Stitch 5/8” from one 12” edge. Sew over the cord. Secure the cord at the beginning and then pull it to gather the sample to 6”. Notes: - Gathering over cord adds additional strength, eliminates thread breakage and allows better control of gathering. - Drop the feed dog and sew a bartack at the beginning and end of cord for strength. - Do not sew through cording. MASTERING YOUR BERNINA® 1/10/02 artista 170 QPE/180/63 MASTERING YOUR BERNINA® BERNINA® artista 170 QPE/180 GATHERING OVER TWO CORDS Fabric: Needle: Thread: Presser Foot: • • • • • • • • Medium weight cotton, 12” x 4” 30” of cording 80/12 Universal All-purpose sewing Standard Buttonhole Foot #3/3C Trim all 4 edges of the fabric piece with a wavy rotary cutter. Place the fabric under the foot and lower the needle but not the foot. Select the Gathering Stitch #12. Fold cord in half and loop around the middle toe of foot #3/3C; lower it. Lift cord loop from toe and pull cord forward leaving 3” tails behind the foot. Begin to sew, allowing the two grooves of the buttonhole foot to guide the cord. Sew along one 12” edge - 5/8” from the edge. Pull on both cords to gather the sample to 6”. Note: Lower the feed dogs and sew a bar tack at beginning and end of cord for strength. MASTERING YOUR BERNINA® 1/10/02 artista 170 QPE/180/64 MASTERING YOUR BERNINA® BERNINA® artista 170 QPE/180 ELASTIC THREAD IN THE BOBBIN Fabric: Needle: Thread: Presser Foot: Other: Rayon Challis - 12” x 4” 80/12 Universal All-purpose sewing Elastic thread (bobbin) Reverse Pattern Foot #1/1C Black Latch or secondary bobbin case • • • • • • • • Trim all four edges of the sample fabric before beginning. Wind elastic thread on the bobbin. Place in bobbincase and adjust tension if necessary. Select stitch #1 - SL 4mm to 5mm - center needle position - upper tension 7-9. Draw guidelines on the fabric, spacing them evenly apart. Sew from the right side of the fabric. Keep rows flat as sewing. When finished, steam press the sample, holding the iron over the fabric with the elastic side up. Do not touch the iron to the fabric. • Leave the fabric flat until dry. MASTERING YOUR BERNINA® 1/10/02 artista 170 QPE/180/65 MASTERING YOUR BERNINA® BERNINA® artista 170 QPE/180 NARROW CASING ELASTIC Fabric: Needle: Thread: Presser Foot: Medium weight cotton, 9” x 4” 12” of 1/8” or ¼” cotton elastic 80/12 Universal All-purpose sewing Reverse Pattern Foot #1/1C • • • • Trim all four edges of the sample fabric before beginning. Select the Universal Stitch #15; adjust width to clear the elastic. Measure and mark the elastic for amount needed. Allow a 2” tail at both ends. Draw a line on the wrong side of the fabric where the elastic is to go (this could be the line on a pattern where a casing is suggested). • Place the elastic over the line and under the foot and needle - sew a few straight stitches backward and forward to secure the elastic. • Stretch the elastic gently to give the fullness desired. • When you reach the other end, secure in the same manner as the beginning. • Even out the gathers. MASTERING YOUR BERNINA® 1/10/02 artista 170 QPE/180/66 MASTERING YOUR BERNINA® BERNINA® artista 170 QPE/180 GATHERING FOOT #16 Fabric: Needle: Thread: Presser Foot: • • • • Medium weight cotton, 10” x 4” 80/12 Universal All-purpose sewing Wide Gathering Foot #16 (optional accessory) or Extra-wide Gathering Foot #16 (optional accessory) Trim all four edges of the sample fabric before beginning. Select stitch #1 - lengthen to 5mm. Place fabric to be gathered under the foot. Guide the fabric, keeping the raw edges even with the right edge of the foot, or use the seam lines on the throat plate. Notes: - There are three things that effect the amount of gathers: 1. Fabric Weight - The lighter weight the fabric, the easier to gather. 2. Tension - Increased upper tension will increase the amount of gathering. 3. Stitch Length - The longer the stitch length, the tighter the gathers. - Use the basting stitch or the long stitch function to increase gathers in heavier weight fabrics such as woolens and corduroys. MASTERING YOUR BERNINA® 1/10/02 artista 170 QPE/180/67 MASTERING YOUR BERNINA® BERNINA® artista 170 QPE/180 RUFFLER Fabric: Needle: Thread: Presser Foot: Medium weight cotton, 12” x 4” 80/12 Universal All-purpose sewing Ruffler Attachment #86 (optional accessory) • • • • • Trim fabric with wavy rotary cutter before sewing. Select stitch #1 - SL 1mm-5mm. The longer the stitch length, the deeper the pleat. Needle position is center. Set the adjustment lever on the attachment at 1. Place the fabric to be ruffled between the two blades, snugging it against the edge of the seam guide slot, making sure it is slightly beyond the needle. • Lower the foot and begin sewing. • If gathers are too deep, turn the adjusting screw counter clockwise; if too shallow, turn the screw clockwise. Note: Loosening the needle tension to 3-4 will allow some subsequent adjustment of the fullness. MASTERING YOUR BERNINA® 1/10/02 artista 170 QPE/180/68 MASTERING YOUR BERNINA® BERNINA® artista 170 QPE/180 PINTUCKS AND DOUBLE NEEDLES Fabric: Needle: Thread: Presser Foot: Lightweight cotton, 6” x 4”, starched Double (size should correspond to foot) All-purpose sewing Pintuck Foot #30, #31, #32, or #33 (optional accessories) • Select the desired presser foot and corresponding double needle: - Pintuck Foot #30 - 3 groove - 4mm needle - Pintuck Foot #31 - 5 groove - 3mm needle - Pintuck Foot #32 - 7 groove - 2mm needle - Pintuck Foot #33 - 9 groove - 1.6 needle • Insert the double needle and thread with two different colors. • Select the straight stitch #1 - SL 1.75mm-2mm. • Sew at a slower speed and test the movement of the needle. You want to be sure it doesn’t hit the presser foot. • Top tension can be tightened to create more dimension. • Start sewing in one corner and meander across the fabric. • Position the previously sewn tuck in the groove of the foot and sew 6 more rows evenly spaced across the fabric, as desired. • Trim, press and mount the sample. MASTERING YOUR BERNINA® 1/10/02 artista 170 QPE/180/69 MASTERING YOUR BERNINA® BERNINA® artista 170 QPE/180 CORDED PINTUCKS Fabric: Needle: Thread: Presser Foot: Lightweight cotton, 5” x 5”, starched Gimp Cord Double 3.0/80 All-purpose sewing 5 Groove Pintuck Foot #31 (optional accessory) • Thread the cord through the hole in the needle plate. Note: Cord should be colorfast and shrinkproof. • Thread machine - same thread in both needles and the bobbin. • Sew four random corners. Turning Corners: - When turning a corner it is not possible, with a double needle, to turn completely in one operation. - Sew to corner; needle in fabric, drop feed dogs. - Turn ½ way, make 1 stitch, place needles in fabric, turn remainder of corner. - Raise feed dogs and continue. • Sew 2 points as on a leaf or star. Turning Points - Sew to corner; needle up. - Pivot work carefully and lower needles back into same place; needles have changed sides. MASTERING YOUR BERNINA® 1/10/02 artista 170 QPE/180/70 MASTERING YOUR BERNINA® BERNINA® artista 170 QPE/180 PLEATS vs TUCKS Fabric: Needle: Thread: Presser Foot: Medium weight cotton, 8” x 5” 80/12 Universal All-Purpose Reverse Pattern #1/1C Edgestitch #10/10C (optional accessory) Reverse Pattern Foot #1/1C: • Starting at the left edge and working across the 8” width, draw 4 lines for folding and pressing. The first 2 lines are 2” apart, second 2 lines are 1¼” apart. Note: By placing the fold even with the right edge of the foot and placing the needle position all the way to the left to start, it is possible to get 9 different size pleats/tucks. • Select Straight Stitch #1. • Sew the first tuck, on the first line, with needle position all the way to the left. • Second tuck, on second line, with needle position all the way to the right. - Each position makes about a 1mm difference. Edgestitch Foot #10/10C: • Place the fold of the third pleat to the left of the center blade - right next to it. • Move the needle position all the way to the left and sew. • Position the fold of the last pleat in the same manner. Move the needle position to half left and sew. - Very small tucks/pleats are possible with this foot. MASTERING YOUR BERNINA® 1/10/02 artista 170 QPE/180/71 MASTERING YOUR BERNINA® BERNINA® artista 170 QPE/180 LARGE TUCKS/PLEATS Fabric: Needle: Thread: Presser Foot: Medium weight cotton, 10” x 4” 80/12 Embroidery 30 wt. Cotton Embroidery Zipper Foot with Guide #14 (optional accessory) Zipper foot #14 has a movable guide with 9 markings which ensure precise sewing of a variety of different size tucks. • • • • • • • Select stitch #1 - SL 2-5mm. Determine fold line of tuck. Fold on this line and press. Adjust the guide on the foot for the widest tuck possible. Place fabric under foot, positioning fold of tuck under the lip of the guide. Adjust Needle Position to correspond with notch on guide. Stitch tuck, allowing folded edge of fabric to feed into lip of guide. The Seam/Quilting Guide that comes with the machine, when attached to the foot, can create a pleat up to 2¼” wide. Sew one tuck. Notes: - A left guide is available. - Also available is a set of guides with a ruler attached; they can be used to create pleats up to 4” wide. MASTERING YOUR BERNINA® 1/10/02 artista 170 QPE/180/72 MASTERING YOUR BERNINA® BERNINA® artista 170 QPE/180 DECORATIVE TUCKS Fabric: Needle: Thread: Presser Foot: Medium weight cotton, 8” x 4” 80/12 Embroidery 30 wt. Cotton Embroidery, Metallic, and matching cord Depends on technique • • • • • Draw 4 lines about ¼” apart, across the width of the fabric. On the first line - create a tuck, about ¼”, using a decorative stitch. On the second line - sew a ¼” tuck using a metallic thread with a straight stitch. Cord the edge of this tuck with a metallic cord as in Section C - Corded Edge. On the third line create an inverted tuck with lace inserted into it. - Place the edge of the lace against the drawn line, on the right side, and baste in place. - Fold the fabric over the lace and press. - Using Edgestitch Foot #10/10C, place the pressed fold against the left side of the center blade - Move needle position to the left enough to catch the lace; stitch to the left of the basting line. - Open out and press again. • On the fourth line insert the lace with the tuck. - Fold wrong sides together and press the last tuck. - Place the edge of the lace in from the fold a scant ¼”. - Using Foot #37 - the ¼” foot - stitch a tuck, catching the lace as you sew. - Press the tuck toward the lace. MASTERING YOUR BERNINA® 1/10/02 artista 170 QPE/180/73 MASTERING YOUR BERNINA® BERNINA® artista 170 QPE/180 WISH LIST Gather It Up and Tuck It Down Presser Feet: Embroidery Foot #6 Edgestitch Foot #10/10C Zipper Foot With Guide #14 Wide Gathering Foot #16 Pintuck Feet #30 - 3 groove #31 - 5 groove #32 - 7 groove #33 - 9 groove Patchwork Foot #37 (is included with the 170 QPE) Double Needles Ruffler Attachment #86 Feet-ures Guide Bar Set with Rulers Elastic thread Gimp cord Extra Bobbincase Accessory Box GooGone Sewing Iron Metallic Thread and Cord Wavy Rotary Cutter Ruler Cutting Mat Spray Sizing MASTERING YOUR BERNINA® 1/10/02 artista 170 QPE/180/74 MASTERING YOUR BERNINA® BERNINA® artista 170 QPE/180 MASTERING YOUR ® BERNINA artista 170 QPE/180 OWNER’S WORKBOOK Section E Miscellaneous Magic MASTERING YOUR BERNINA® 1/10/02 artista 170 QPE/180/75 MASTERING YOUR BERNINA® BERNINA® artista 170 QPE/180 SECTION E MISCELLANEOUS MAGIC Zipper Insertion Owner’s Manual page ____ Feet-ures, Unit B and D - center insertion Feet-ures, Unit A, F and K - invisible Mending Tears and Holes Owner’s Manual page ____ Feet-ures, Unit C and K Fringing Feet-ures, Unit B Fagoting Feet-ures, Unit B Bundling Feet-ures, Unit B Lace Insertion Feet-ures, Units C and K Outline Quilting Feet-ures, Unit H Hand Look Quilt Stitch Feet-ures, Units A and K Triple Needles Feet-ures, Units A and K Wing Needles and Double Wing Needles Feet-ures, Units A and K Couching Cord Feet-ures, Unit E Bobbinwork Basics Feet-ures, Units B, E, H Piping Feet-ures, Units C and L MASTERING YOUR BERNINA® 1/10/02 artista 170 QPE/180/76 MASTERING YOUR BERNINA® BERNINA® artista 170 QPE/180 CENTERED ZIPPER Fabric: Zipper: Needle: Thread: Presser Feet: Medium weight cotton, 2 pieces, 4” x 8” each 5” or 6” Conventional 80/12 Universal All-purpose sewing Reverse Pattern Foot #1/1C, Zipper Foot #4, and Zipper Foot with Guide #14 (optional accessory) Attaching the Zipper: • Using Foot #1/1C and stitch #1, sew the seam from the bottom to where the zipper stop will be. • Select Basting Stitch #21 and continue to within ½” from the top of the seam. • Change back to stitch #1; sew the rest of the way to secure. • Press the seam open and place the right side of the zipper against the seam allowance, so the zipper teeth are centered over the seam. • Pin or baste (using a temporary spray adhesive) each side of the zipper to the seam allowance only. • Change to Zipper Foot #4; adjust the needle position to the right and to the left as needed to get close to the zipper teeth. • Sew through the zipper tape and seam allowance only, from the bottom to the top on each side. • Pin or baste through all layers. Topstitching the Zipper: • Change to Zipper Foot with Guide #14. Left Side: • Adjust the seam guide on the foot so it is one groove to the right of center and change the needle position to far left. • Sewing from the right side of the fabric and starting at the bottom, sink the needle into the seam. • Sew out from the zipper stop about 3/8”, stop, pivot and make sure the seam guide on the foot is lying in the ditch of the seam. • Sew up the left side of the zipper. Right Side: • Adjust seam guide on the foot so that it is one groove to the left of center and change the needle position to far right. • Repeat the previous steps, starting at the seam and sewing to the right. • Press and trim the sample. Mount it, attaching it only at the top. You can then lift the sample and use it as a reference. MASTERING YOUR BERNINA® 1/10/02 artista 170 QPE/180/77 MASTERING YOUR BERNINA® BERNINA® artista 170 QPE/180 Note: The invisible zipper can be used in place of a conventional zipper when an uninterrupted design line is desired. • Mark the seam lines on the right side of fabric. • Select Straight Stitch #1. • Refer to the instructions with the zipper for placement on the fabric. • Open the zipper and press the coils flat, from the wrong side, using the synthetic setting on the iron. • Do not sew the seam first as with conventional zippers. Zipper tapes are sewn to fabric sections first, then the seam is sewn. • With right sides together, baste or pin right zipper tape to right garment piece, so coil is on the 5/8” seam line. • Using center needle position, place coil in right groove of Foot #3. Sew until foot is stopped by the zipper pull. Note: Needle should sew as close to coils as possible without actually sewing into them. • With right sides together, baste or pin left zipper tape to left garment piece so that the coil is again on the 5/8” seam line. • Check to be sure the zipper is not twisted. • Place the coil in the left groove of the foot and complete as with the right side. •To sew seam: Close the zipper. Using Zipper Foot #4, place the fabric right sides together and stitch as close to the zipper as possible, starting about ½” above the bottom of the zipper. Backstitch to begin and sew about 2”; then change to Foot #1/1C to complete the seam. • Press and trim the sample. Mount it, attaching it only at the top. You can then lift the sample and use it as a reference. INVISIBLE ZIPPER Fabric: Zipper: Needle: Thread: Presser Feet: MASTERING YOUR BERNINA® 1/10/02 Medium weight cotton, 2 pieces, 4” x 8” each 5” or 6” Invisible 80/12 Universal All-purpose sewing Reverse Pattern Foot #1/1C, Standard Buttonhole Foot #3/3C, and Zipper Foot #4 artista 170 QPE/180/78 MASTERING YOUR BERNINA® BERNINA® artista 170 QPE/180 MENDING TEARS AND HOLES Fabric: Needle: Thread: Presser Feet: Denim - 4” x 6” Fusible Knit Stabilizer, 2” x 2” 90/14 Universal or Jeans To suit the fabric Reverse Pattern Foot #1/1C, Automatic Buttonhole Foot #3A/3C, and Darning Foot #9 (optional accessory) Make 2 tears in the fabric, about 1” each. Make one hole about ½” round. 1. Select Automatic Mending Stitch #22 for the first tear. • Attach Reverse Pattern Foot #1/1C. • Engage the “foot 3” symbol from the function bar. • Sew the first row, the length of the tear - press the quick reverse button ([the first length has been programmed). • Sew the second row, the length of the tear - press the quick reverse button again (second length programmed). • Complete the darning program - the machine stops automatically. 2. Select Reinforced Mending Stitch #23 for the second tear. • Use Automatic Buttonhole Foot #3A/3C this time. • Insert the needle in the area to the left of the top of the tear. • Sew the first vertical row - press the quick reverse button and the length is programmed. • The machine will finish automatically. 3. Manual Darning of the hole with Foot #9. • Bond the fusible knit interfacing on the wrong side of the hole. • Select stitch #1 and attach Foot #9. Lower the feed dogs. • Hoop fabric to prevent distortion. Stitch, moving the hoop without pressure. MASTERING YOUR BERNINA® 1/10/02 artista 170 QPE/180/79 MASTERING YOUR BERNINA® BERNINA® artista 170 QPE/180 FRINGING Fabric: Needle: Thread: Presser Feet: Firm fabric - 2 pieces, 4” x 6” each 90/14 Embroidery Rayon Embroidery Tailor Tack Foot #7 (optional accessory) Embroidery Foot #6 (optional accessory) • • • • • • Select stitch #2 - SW 2mm and SL satin - Tension 1 - Tailor Tack Foot #7. Put a contrast all-purpose sewing thread in the bobbin. Turn under ½” seam allowance on both pieces of fabric and press. Butt the folds together under the center of the presser foot, with right sides up. Guide fabric while sewing, so needle swings pierce both fabric pieces. Carefully remove the bobbin thread and gently separate the two fabrics, leaving them joined by strands of the upper thread. • Change to Embroidery Foot #6. • Sew halfway with Stitch #406 and the remainder with Stitch #345. • Engage the Mirror Image function, if needed. • Anchor the fringe to the fabric edge by oversewing it. • After fringe is secured on one side, the other fabric can be pulled away. • Trim excess seam allowance from wrong side if needed. MASTERING YOUR BERNINA® 1/10/02 artista 170 QPE/180/80 MASTERING YOUR BERNINA® BERNINA® artista 170 QPE/180 FAGOTING Fabric: Needle: Thread: Presser Feet: Firm fabric - 2 pieces, 3 ”x 5” each 90/14 Embroidery Embroidery Tailor Tack Foot #7 (optional accessory) Open Embroidery Foot #20/20C • • • • • Select stitch #2 - SW 2mm and SL satin - Tension 1 - Tailor Tack Foot #7. Place fabrics right sides together; sew with a 5/8” seam on a 5” side. Sew slowly - adjust motor to ½ speed. When finished sewing the seam, pull the two layers firmly apart and press open. Change to Open Embroidery Foot #20/20C for better visibility - may need to stabilize the stitching area to prevent tunneling. • From the right side, anchor the fagoting to the fabric on either side with a decorative stitch through the seam allowance. (Stitch #414 and #334 are used in the illustration.) Adjust width and length as desired; engage Mirror Image as needed. • Trim any excess seam allowance if needed. MASTERING YOUR BERNINA® 1/10/02 artista 170 QPE/180/81 MASTERING YOUR BERNINA® BERNINA® artista 170 QPE/180 BUNDLING Fabric: Needle: Thread: Presser Feet: Firm fabric - 2 pieces, 3” x 5” each 90/14 Embroidery Embroidery Tailor Tack Foot #7 (optional accessory) Open Embroidery #20/20C Reverse Pattern Foot #1/1C • • • • • Select stitch #2 - SW 2mm and SL satin - Tension 1 - Tailor Tack Foot #7. Place fabrics right sides together; sew with a 5/8” seam on a 5” side. Sew slowly - adjust motor to ½ speed. When finished sewing the seam, pull the two layers firmly apart and press open. Change to Open Embroidery Foot #20/20C for better visibility - may need to stabilize the stitching area to prevent tunneling. • From the right side, anchor the fagoting to the fabric on either side with a decorative stitch through the seam allowance. (Stitch #337 and #413 are used in the illustration.) Adjust width and length as desired; engage Mirror Image as needed. • Trim any excess seam allowance if needed. • To “bundle” the fagoting stitches into groups: Select the Triple Straight Stitch #6 - change to Reverse Pattern Foot #1/1C; center the foot over the fagoting stitches and sew down the middle. MASTERING YOUR BERNINA® 1/10/02 artista 170 QPE/180/82 MASTERING YOUR BERNINA® BERNINA® artista 170 QPE/180 LACE INSERTION Fabric: Needle: Thread: Presser Feet: Lightweight cotton 4” x 6” 9” insertion lace, ½ ”- ¾” wide 75/11 Universal 60 wt. cotton Edgestitch Foot #10/10C (optional accessory) • Pin or baste the lace in position. First Run: • Select stitch #1 - SL 1.5mm-2mm with the needle position set at half left. • Place the edge of the lace to the left edge of the guide on the foot and sew. • Sew the right side in a like manner using the needle position set at half right. • From the back, carefully cut through the fabric, in the middle of the two rows of stitching. • Press the fabric back against the straight stitch. Second Run: • Select stitch #2 - SW 1.5mm-2mm and SL 0.75mm-1mm with the needle position set at half left. • Place edge of lace first to the left of the blade, with the needle in the half left position, and sew the zigzag stitch over the edge of the lace and the previously sewn straight stitch. • Sew the right side in a like manner using the needle position set at half right. • Trim surplus fabric from the wrong side. MASTERING YOUR BERNINA® 1/10/02 artista 170 QPE/180/83 MASTERING YOUR BERNINA® BERNINA® artista 170 QPE/180 OUTLINE QUILTING Fabric: Backing: Batting: Needle: Thread: Presser Foot: Cheater block or fabric with large design 1 piece coordinating fabric, same size as fabric 1 piece low-loft, same size as fabric 90/14 Quilting Cotton embroidery for bobbin Monofilament for needle Leather Roller Foot #55 (optional accessory) • Foot #55 allows for easy maneuvering of curves and tight areas. • Select stitch #1 - SL 2.5mm-3.5mm - tension is loosened to about 3-4 - needle position is to the left, depending on the desired look. • Engage the Needle Stop Down function. • Sandwich the batting between the top fabric and the backing. Pin or baste in place. • Bring the bobbin thread to the top of the fabric and select the Securing function to secure the beginning stitch. Sew; turn the Securing function off. Clip the thread tails. • Stitch in a continuous line around the outside edge of the design or pattern in the fabric. Move the fabric in any direction to follow the design. MASTERING YOUR BERNINA® 1/10/02 artista 170 QPE/180/84 MASTERING YOUR BERNINA® BERNINA® artista 170 QPE/180 HAND LOOK QUILT STITCH Fabric: Batting: Needle: Thread: Presser Foot: 2 pieces solid cotton - 4” x 6” each 1 piece, low-loft - 4” x 6” 90/14 Quilting Cotton embroidery for bobbin Monofilament for needle Reverse Pattern Foot #1/1C Owner’s manual page___ Note: When using the hand Look Quilt Stitch, the cotton embroidery bobbin thread is pulled to the top of the quilt while the monofilament thread “disappears”, simulating the look of a hand-sewn running stitch. • • • • • Select the Hand Look Quilt Stitch #328. Depending on the fabric you may need to increase the upper tension to 6-9. Balance can be used to adjust the stitch as needed. This stitch can be sewn in any needle position. If monofilament thread breaks, decrease the tension. MASTERING YOUR BERNINA® 1/10/02 artista 170 QPE/180/85 MASTERING YOUR BERNINA® BERNINA® artista 170 QPE/180 TRIPLE NEEDLE WORK Fabric: Stabilizer: Needle: Thread: Presser Foot: Firmly woven - 6” x 5” Firm Tear-away or Cutaway - 6” x 5” Triple Embroidery, 3 different colors Reverse Pattern Foot #1/1C or Open Embroidery Foot #20/20C • Thread each needle with a different color thread. • Select 5 different stitches and sew across the fabric randomly. • When doing decorative needle work you must sew slowly - change motor to ½ speed. Note:To be sure the needles will not strike the foot, turn the handwheel to “walk” the machine through the first stitch. Narrow the width as neede to avoid breaking needles. • Trim threads, then trim sample edges, and mount below. MASTERING YOUR BERNINA® 1/10/02 artista 170 QPE/180/86 MASTERING YOUR BERNINA® BERNINA® artista 170 QPE/180 WINGING IT ONCE AND WINGING IT TWICE Fabric: Needles: Thread: Presser Foot: Broadcloth, 6” x 5”, starched Wing/120 Double Wing Embroidery Reverse Pattern #1/1C or Open Embroidery #20/20C Single Wing Needle • Select Stitch #711. • Stitch from corner to corner; the holes will open better on the bias. Note:To be sure the needles will not strike the foot, turn the handwheel to “walk” the machine through the first stitch. Narrow the width as neede to avoid breaking needles. Double Wing Needle • Use a different color of thread in each needles. • Select the Blindstitch #9 and sew to the right or left of the single wing needle stitch. • Select Stitch #301. • Sew rows on either side of the last ones. • Select Stitch #303. • Sew rows on either side of the last ones. • Play with other stitches to get different effects. MASTERING YOUR BERNINA® 1/10/02 artista 170 QPE/180/87 MASTERING YOUR BERNINA® BERNINA® artista 170 QPE/180 COUCHING CORDS Fabric: Stabilizer: Needle: Thread: Presser Feet: Firmly woven - 6” x 6” Firm Tear-away or Cutaway - 2 pieces, 6” x 5” each 90/14 Embroidery Assorted decorative threads Assorted decorative cords Cording Foot #22 - 3 groove (optional accessory) and Cording Foot #25 - 5 groove (optional accessory) • Select the thread used according to the look that is desired. • Load the feet by moving the black latch away from the top of the foot and placing the cords in the slots. Cords should feed in from the top and go into theg rooves on the bottom of the foot. Load all cords in the same manner. • Secure the latch across the top of the foot to hold the cords in place. • To stabilize the fabric you may need more than one layer of stabilizer. • Try using different colors of cording in each groove. • Select stitches #414, #405, #417, and 2 other stitches of your choice. • Sew in different directions across the fabric. MASTERING YOUR BERNINA® 1/10/02 artista 170 QPE/180/88 MASTERING YOUR BERNINA® BERNINA® artista 170 QPE/180 BOBBINWORK BASICS Fabric: Stabilizer: Needle: Thread: Presser Foot: Firmly woven - 6” x 4” Iron-on, 6” x 4” 90/14 Universal Pearl Crown Rayon and Monofilament Embroidery Foot #6 (optional accessory) or Open Embroidery Foot #20/20C Secondary Bobbincase (optional accessory) • Press the stabilizer onto the wrong side of the fabric. • Wind the decorative thread on the bobbin and insert it into the case. • Thread the needle with monofilament; upper tension may need to be loosened for certain decorative threads. •Sew from the wrong side of the fabric for this technique. •Select stitch #332 and sew randomly across the fabric. Notes: - When using heavier threads the stitch length should be longer. - Never use the sewing bobbin case when using heavier threads, as it may cause the tension spring to stretch and affect regular sewing; use a Black Latch or secondary bobbin case MASTERING YOUR BERNINA® 1/10/02 artista 170 QPE/180/89 MASTERING YOUR BERNINA® BERNINA® artista 170 QPE/180 PIPED PORTIONS Fabric: Stabilizer: Needle: Thread: Presser Foot: Firmly woven - 6” x 4” Cotton - 2” x 15” Cable Cord - 18” 1 piece iron-on 90/14 Universal All-Purpose Bulky Overlock #12/12C • Fabric strips should be cut 1¼” plus the circumference of the cord being used. • Trim the 2” strip, if needed, to work with the cording being used. This should result in a 5/8” seam, once the piping is made. Note: Strips should be cut on the bias; however, crosswise and lengthwise strips may be used if there are no corners to be turned or curves to maneuver. • Fold the wrong side of the fabric around the filler cord and position it under the presser foot with the folded edge to the left and the cord under the center of the foot so it rides in the large groove. • Using a straight stitch and with the needle in one of the right positions, begin stitching. The stitches will be alongside the cord, creating a 5/8” seam. • Once the piping is made, it is ready to be inserted into a seam. • Cut the other fabric piece in half, making two 2” x 6” pieces. • Insert the piping using the same foot. MASTERING YOUR BERNINA® 1/10/02 artista 170 QPE/180/90 MASTERING YOUR BERNINA® BERNINA® artista 170 QPE/180 WISH LIST Miscellaneous Magic Presser Feet and Accessories: Embroidery Foot #6 Tailor Tack Foot #7 Darning Foot #9 Edgestitch Foot #10/10C Bulky Overlock Foot #12/12C Zipper Foot with Guide #14 Cording Foot #22 Cording Foot #25 Leather Roller Foot #55 Blacklatch Bobbincase Feet-ures Spray Stabilizer Decorative Threads Metallic Rayon Cotton Monofilament Thread Smoke Clear Spring Hoops for mending Thread Stand Blunt Point Scissors for lace Needles Single Wing Double Wing Triple Embroidery Cotton Batting Fusible Interfacing BERNINA Ironing System MASTERING YOUR BERNINA® 1/10/02 artista 170 QPE/180/91 MASTERING YOUR BERNINA® BERNINA® artista 170 QPE/180 MASTERING YOUR ® BERNINA artista 170 QPE/180 OWNER’S WORKBOOK Section F Creative Sewing MASTERING YOUR BERNINA® 1/10/02 artista 170 QPE/180/92 MASTERING YOUR BERNINA® BERNINA® artista 170 QPE/180 SECTION F CREATIVE SEWING The following two samplers will introduce you to a few methods of surface embellishment. SAMPLER #1 - Fringed Flower Secure ribbon in one step using a double needle. Feet-ures, Units A and K Create petals for the flower using Tailor Tack Foot #7. Feet-ures, Unit B Sew in circles using the Circular Embroidery Attachment #83! Feet-ures, Unit H SAMPLER #2 - The Many Faces Of Applique Basic Applique skills. Feet-ures, Units A, D, K and L Using eyelets creatively. Feet-ures, Units A and K How to do the Bernina Chain. Feet-ures, Units A and K Sewing with metallic threads. Feet-ures, Units A and K MASTERING YOUR BERNINA® 1/10/02 artista 170 QPE/180/93 MASTERING YOUR BERNINA® BERNINA® artista 170 QPE/180 SAMPLER #1/1C - FRINGED FLOWER MASTERING YOUR BERNINA® 1/10/02 artista 170 QPE/180/94 MASTERING YOUR BERNINA® BERNINA® artista 170 QPE/180 FRINGED FLOWER Fabric: Stabilizer: Needle: Thread: Presser Foot: Other: Denim, 9” x 9” 9” of ribbon, 1/8” wide 2mm and 4mm wide grosgrain ribbon 1 piece tear-away, 9” x 9” 90/14 Embroidery Double/sizes to match grosgrain ribbon. 30 wt. cotton Reverse Pattern Foot #1/1C Tailor Tack Foot #7(optional accessory) Button Sew-on Foot #18 Circular Embroidery Attachment #83 (optional accessory) Large, flat 2-hole button Creating the Leaves - Use different widths of ribbon for the leaves and stem. Ex: use 4mm for stem and 2mm for leaves. - Grosgrain ribbon is recommended for the first try; silk ribbon can also be used. - Using the drawing on the previous page as a guide, position ribbon for the leaves first. Glue or pin in place. - Select a double needle that corresponds to the width of the selected ribbon. - When the tip of the leaf is reached, stop sewing and secure the stitches. - Fold the ribbon over and begin sewing again at fold. - Repeat for the other leaf. Be sure they are close enough so the stem will cover the raw edges. - Position the stem and stitch in place. Creating the Fringe for the Flower - Position the Circular Embroidery Attachment #83 on the machine and set it for a 2.5” circle. - Mark the center of the flower on the fabric and position it on the pin of the attachment. - Attach Tailor Tack foot #7 - select stitch #2 - SW 2mm and SL satin - Tension, 1. - Sew in a circle. When the beginning is reached, overlap the stitching about ½”. - Gently remove the stitches from the foot. - Use a seam sealant to secure the thread tails. - With fine embroidery scissors, cut the loops of the stitches at the top. - Carefully lay the stitches flat and with a narrow, close zigzag, sew down the middle of the cut stitches to secure the threads in place. - Fluff up the fringe around the stitching. Center of Flower - Center a piece of narrow ribbon inside the fringed circle. - Attach it to the fabric with a Stitch #60 and Button Sew-on Foot #18 (drop the feed dog). - Thread the ends of the ribbon thru the holes of a 2-hole button that will become the center of the flower. Tie the ribbon in a bow. MASTERING YOUR BERNINA® 1/10/02 artista 170 QPE/180/95 MASTERING YOUR BERNINA® BERNINA® artista 170 QPE/180 SAMPLER #2 - BASIC APPLIQUE MASTERING YOUR BERNINA® 1/10/02 artista 170 QPE/180/96 MASTERING YOUR BERNINA® BERNINA® artista 170 QPE/180 BASIC APPLIQUE Fabric: Stabilizer: Needle: Thread: Presser Foot: Denim, 9” x 9” 6” x 6” for fish Paper-backed fusible web 1 piece tear-away, 9” x 9” 90/14 Embroidery 90/14 Metallic Double/sizes to match grosgrain ribbon. Silver metallic thread Ivory YLI Designer 6 Opalescent thread 30 wt. Cotton Embroidery thread to match fish Open Embroidery Foot #20/20C Eyelet Attachment #82 with Foot #92 (optional accessory) Basic Applique - Trace the fish onto the paper-backed fusible web. - Fuse the web to the wrong side of the fish fabric. - Cut the fish from the fabric. - Peel paper backing off and press in position. - Use Open Embroidery Foot #20/20C so the edge to be sewn is visible. -Select applique stitch of your choice and sew around the fish. -Use a tiny button for the eye. -Create a mouth with straight stitches and a short stitch length. Fish Line - Use the BERNINA Chain technique - see page 97 for directions. - Use Designer 6 (Ivory) thread. - Pull the thread to the back and use seam sealant. Air Bubbles - Use the Eyelet Attachment #82 or the preprogrammed eyelets. - Create a few bubbles using Yenmet thread. Hook - Use Metallic thread. - Use the BERNINA Chain technique with a short stitch length. - Pull threads to the back and use seam sealant. Writing - Program in “What A Catch !” - These words could go in the upper left of the picture. - Program the word “BERNINA” and sew it in the center of the fish. MASTERING YOUR BERNINA® 1/10/02 artista 170 QPE/180/97 MASTERING YOUR BERNINA® BERNINA® artista 170 QPE/180 BERNINA CHAIN Presser Foot: Stitch: Stitch Width: Stitch Length: Needle Position: Single Pattern: Needle Down: Threads • Needle: • Bobbin: • Cords: Open Embroidery Foot #20/20C Straight Stitch #1/1C 0mm As desired Center Yes Yes rayon, metallic, cordonnet, or polyester; depends on the look desired. lightweight bobbin thread or 60 wt. cotton. Embroidery floss, Pearl Crown Rayon, gold or silver cords, braided cord, yarn, narrow ribbon, etc. Directions • Draw the desired design on the surface of the fabric • Cut decorative threads/cord 3x the desired finished length. • Sink the needle into the fabric. • Fold the decorative thread/cord in half and place the center point behind the needle, pulling the ends forward, one on each side of the needle. • Secure the decorative thread/cord to the fabric by sewing 2-3 forward and reverse stitches over the center point. • Stop sewing with the needle in the fabric in front of the cord. • Pull the cords to the front of the needle, overlapping them to form an “X”. • Stitch over the crossed cords to secure; the machine stops at the end of the pattern repeat. • Continue stitching in this manner, following the drawn design lines. Hints • • • • • Vary the number of stitches to produce different effects. Use Memory or Pattern End for automatic stitching. Fewer stitches and a shorter stitch length = tight, braided look. Use various stitch lengths. Double Needle can also be used. MASTERING YOUR BERNINA® 1/10/02 artista 170 QPE/180/98 MASTERING YOUR BERNINA® BERNINA® artista 170 QPE/180 WISH LIST CREATIVE SEWING Presser Feet and Accessories: Tailor Tack Foot #7 Button Sew-On Foot #18 Circlular Embroidery Attachment #83 Eyelet Attachment #82 with Foot #92 Feet-ures Needles Double_____ Metallic_____ Embroidery_____ Threads 30 wt. Cotton Embroidery Designer 6 - Ivory Metallic - Silver Opalescent Embroidery Scissors Wonder Under paper-backed fusible web Bernina® Ironing System Fabric Glue Stick Bernina® Thread Stand Seam Sealant Feet-ures MASTERING YOUR BERNINA® 1/10/02 artista 170 QPE/180/99 MASTERING YOUR BERNINA® BERNINA® artista 170 QPE/180 MASTERING YOUR ® BERNINA artista 170 QPE/180 OWNER’S WORKBOOK Section G Programming Pizzazz MASTERING YOUR BERNINA® 1/10/02 artista 170 QPE/180/100 MASTERING YOUR BERNINA® BERNINA® artista 170 QPE/180 SECTION G PROGRAMMING PIZZAZZ This section is designed to teach how the memory features of the 170 QPE/180 work by sewing a sampler. Programming enables a group of stitches to be selected, altered, manipulated, combined and stored. Memory Capacity Owner’s manual pages ______ • 255 memory banks • Long term - contents remain until they are deleted Functions Owner’s manual pages ______ • Motor Speed • Needle Stop Down • Pattern End • Balance • Mirror Image • Pattern Extend Monograms & Alphabets Owner’s manual pages ______ • Block letters - upper and lower case • Numbers and characters • Large monograms Programming Owner’s manual pages ______ • Easy touch screen method of programming stitches • Programmed stitches ca be viewed on the screen by scrolling through them. • Programmed stitches can be deleted or overwritten. Buttonhole Memory Owner’s manual pages ______ • Short term memory • Long term memory Buttonhole Balance MASTERING YOUR BERNINA® 1/10/02 artista 170 QPE/180/101 MASTERING YOUR BERNINA® BERNINA® artista 170 QPE/180 PROGRAMMING PIZZAZZ Function Sampler Specific sewing directions for this sampler are on the following page. Balance Double Needle Limitation Pattern Extend Mirror Image, side-to-side Mirror Image, top-to-bottom Half Pattern Securing Function Pattern Begin Pattern End Automatic Basting Long Stitch Reverse Sewing Needle Stop Up/Down Sewing Speed MASTERING YOUR BERNINA® 1/10/02 artista 170 QPE/180/102 MASTERING YOUR BERNINA® BERNINA® artista 170 QPE/180 PROGRAMMING PIZZAZZ Function Sampler Fabric: Stabilizer: Needle: Thread: Presser Feet: Muslin, 12” x 9” Tear-away as needed 90/14 Universal 30 wt. cotton embroidery in a contrasting color Reverse Pattern Foot #1/1C and Open Embroidery Foot #20/20C Row #1 - Sewing Speed • Select Straight Stitch #1; sew down the 9” length of the fabric. • Change speeds as you sew. • The 180 has 4 speeds. • Changing the speed using the Setup Program Row #2 - Needle Stop • Engage the Needle Down function. • Sew half way down, stop, use the foot control to raise the needle. • Sew the rest of the way and stop once more. The machine stops instantly without coasting. • The Clr function does not affect the needle up/down function. Row #3 - Reverse Sewing • Select the Running stitch #4 - sew about 1”. Raise the foot and move the fabric to the left about ¼”. • Select the Reverse Sewing function and continue stitching back to the beginning. • Cut the threads and position the fabric about 1” below what was just stitched. • Disengage Reverse Sewing. • Select stitch #1. Sew about halfway and engage the Reverse Sewing function. The reverse stitches are the same length as the forward ones and the machine tracks perfectly. • Touch Clr to cancel alterations. Row #4 - Basting • Select Long Stitch; it sews every second stitch with a maximum length of 10mm. • Sew halfway down using the preset length; stop and change to the mximum length. • Sew the remainder of the way. • Touch Clr to cancel the alterations. Row #5 - Automatic Basting • Select Stitch #1; sew about 3-4 stitches. • Select Basting Stitch #21. • Sew to within ½” of the end and select Stitch #1 again. MASTERING YOUR BERNINA® 1/10/02 artista 170 QPE/180/103 MASTERING YOUR BERNINA® BERNINA® artista 170 QPE/180 Row #6 - Pattern Begin/Pattern End • Select Stitch #416. • Using Open Embroidery Foot #20/20C, sew until the machine stops. • Sew 1½ scallops; raise the foot and push the fabric back about 1” • Select Pattern Begin and repeat. • This function does not stay highlighted once the pattern is begun. • Engage Pattern End 2x. • Sew until the machine stops. • Touch Clr to cancel alterations. Row #7 - Securing • Select Stitch #119. • Select Pattern End 1x and the Securing function. • Sew until the machine stops. The Securing function takes 3 stitches at the beginning and end of the design. • Raise the presser foot and push the fabric back about 1”. • Select Stitch #308. • Select Pattern End 3x and the Securing function. • Sew until the machine stops. It secured at the beginning of the first pattern and at the end of the third. • Touch Clr to cancel alterations. Row #8 - Half Pattern • Use Reverse Pattern Foot #1/1C. • Select stitch #406 - Pattern End 1x - Needle Down. • Sew until the machine stops. • Move the fabric down to the left of the 3 stars from row #7. • Select Pattern Begin and then Half Pattern. • Place the foot about 1½” to the right of the 3 stitches. • Sew until the machine stops with the needle down. • Raise the foot and turn the fabric ¼ turn clockwise. • Sew until the machine stops with the needle down. • Raise your foot off the foot control and then touch it again and sew until it stops. • Raise the presser foot and turn the fabric 1/4 of a turn clockwise again. • Repeat two and one half more times until the design is completed. • Go back and select stitch #119 - Half Pattern and Pattern End 1x. • Sew - only one leaf is sewn this time. • Touch CLR to cancel alterations. Row #9 - Mirror Image • Use Reverse Pattern Foot #1/1C • Mirror Image affects the stitch as it appears on the screen. It may appear differently in the memory bar than it does in the stitch box. • Select stitch #907 - Pattern End 1x - sew one turtle. • Select the side-to-side Mirror Image symbol and sew one more turtle. • Clear the Mirror Image. • Select top-to-bottom Mirror Image and sew one more. • Both Mirror Images can be used at the same time. • Touch CLR to cancel alterations. MASTERING YOUR BERNINA® 1/10/02 artista 170 QPE/180/104 MASTERING YOUR BERNINA® BERNINA® artista 170 QPE/180 Row #10 - Pattern Extend • Stitch maintains its density when enlarged. • Select stitch #414 and adjust tension for satin stitch. • Engage Pattern End function 1x and sew one. • Engage Pattern Extension 2x and sew one. • Engage Pattern Extension 3x and sew one. • Touch CLR to cancel alterations. Row #11 - Double Needle Limitation • This function restricts the swing of the needle. • As a safety feature, CLR does not clear the Double Needle Limitation function; CLR ALL does. • The 170 QPE can use up to a 5mm double needle; the 180 can use up to an 8mm double needle. • Select stitch #10 and sew for about 1” at preset settings. • Engage Double Needle Limitation 3mm and sew another inch. • Touch the Double Needle Limitation again until it says 6mm (180) or 4mm (170 QPE) and sew another 1”. • Clear the Double Needle Limitation and stitch another 1”. Row #12 - Balance • Same stitch as before - sew about one third the distance at preset and stop. • Select the Balance symbol from the function bar (b). • Touch the down arrow until the number 5 is above it. • Sew the next third. • Clear the balance change and touch the up arrow until it says 5 above it. • Sew the last third. CLR - Does not undo Needle Down, Motor Speed, or Double Needle - Affects only the selected stitch. CLR ALL - Affects all alterations to stitches, except those made in Setup. MASTERING YOUR BERNINA® 1/10/02 artista 170 QPE/180/105 MASTERING YOUR BERNINA® BERNINA® artista 170 QPE/180 PROGRAMMING PIZZAZZ Basic Information for Memory Mania and Sampler Beginning Basics • Finished sampler will be about 11” x 15”. • Fabric should be a linen type - 18” x 18”. • Stabilize the fabric as necessary and mark the size of the finished area (11” x 15”). • Use a color thread that will be visible but create a tone-on-tone look. • Firm muslin will be needed to test the techniques, about ¼ yd. • Find the center of the fabric and chalk a line horizontally. Accessing Memory Owner’s manual page___ • Press the external MEM button on the front of the machine. • Memory ba opens on the screen and is ready for programming. • All changes made in memory are to the left of the cursor. • Functions bar changes automatically to those functions usable in memory. • The open memory bank is indicated by the number in the function bar. Programming Owner’s manual page___ • Touch the stitch picture on the screen and the stitch appears in the memory bar. • The cursor moves to the right. • Continue programming in this way. • Scroll through the programmed memory using the scroll arrows on either side of the memory bar. • Stitches altered can be saved in the memory. • Needle position as well as width and length can be saved. • Delete all unwanted functions before programming. Editing Owner’s manual page___ • Programmed stitches can be altered by using the edit function that is to the right of the memory bar. • Securing, subdivider, mirror image, pattern extend, long stitch, tension, motor speed, and balance are all available in the edit program. Viewing Memory Contents Owner’s manual page___ • By having the cursor at the beginning of the memory bar and by touching Check on the function bar, the contents of that memory appear in a window and everything is visible at one time. Saving and Leaving Memory Owner’s manual page___ • To save the contents touch “STORE”. • If the machine is turned off without storing, changes are not stored. • All stored programs can be recalled at any time - even after the machine is turned off. MASTERING YOUR BERNINA® 1/10/02 artista 170 QPE/180/106 MASTERING YOUR BERNINA® BERNINA® artista 170 QPE/180 Main Memory Storage Screen Owner’s manual page___ • Up to 255 memory banks are available. • All empty banks are white and all occupied banks are grayed. Memory Capacity Owner’s manual page___ • The total capacity used is shown in % at the top of the main memory bank screen. Memory Subdivision Owner’s manual page___ • This icon is found in the editing box. • Contents of a memory bank can be divided up within the same bank. • The divisions belong to one memory bank but are totally independent of each other. • The subdivider is a “wall” - the machine comes to the programmed “wall” and stops there if Pattern End 1x is engaged, or goes back to the beginning if Pattern End is not engaged. MASTERING YOUR BERNINA® 1/10/02 artista 170 QPE/180/107 MASTERING YOUR BERNINA® BERNINA® artista 170 QPE/180 MEMORY MANIA Programming and Editing Practice Fabric: Stabilizer: Needle: Thread: Presser Foot: Muslin - 6” x 6” (folded to 3” x 6”) As needed 90/14 Universal 30 wt. cotton Reverse Pattern Foot #1/1C Row #1 • Select the Alphabet button. • Program “Bernana” and the date in Block letters. • Select Pattern End 1x and stitch. • Edit the memory by changing the first “A” to an “I” and stitch. • Save this grouping in memory bank 1. ROW #2 • Open Memory 2 • Select stitch #308 1x and #717 3x and stitch #308 1x. • Select Pattern End 1x and the securing function. • Sew one group and save in Memory 2. ROW #3 • Select stitch #413 2x - select Mirror Image to turn the second one upside down. • Sew and save in Memory 3. MASTERING YOUR BERNINA® 1/10/02 artista 170 QPE/180/108 MASTERING YOUR BERNINA® BERNINA® artista 170 QPE/180 MEMORY SAMPLER Fabric: Stabilizer: Needle: Thread: Presser Foot: Muslin - 6” x 6” (folded to 3” x 6”) As needed 90/14 Universal 30 wt. cotton Reverse Pattern Foot #1/1C Before stitching this exercise, read the information completely and stitch the Memory Mania exercise from the previous page. -Sew out stitches or motifs on muslin first. -Leave space below and above the center row, where the monogram is. -Draw guide lines to guide the rows of stitches. -Sampler can be laid out as below or use your creative license. -Add or delete rows as needed to create desired look. Row #1: Large motif (180 only) Row #2: Use wing needle and #701 Row #3: #414/1x, #718/3x, #414/1x, #1/6x Row #4: #406/1x, #416/1x, #415/2x #406/1x Row #5: Name/Monogram (180 only)/Date Row #6: #329/1x and Mirror Image and #329/1x again Row #7: #711/1x, #716/1x, Mirror Image and #716/1x, clear Mirror Image and #716/1x again, #711/1x, #1/6x Row #8: Use a double needle and two different colors thread with #714; engage Double Needle Limitation. MASTERING YOUR BERNINA® 1/10/02 artista 170 QPE/180/109 MASTERING YOUR BERNINA® BERNINA® artista 170 QPE/180 BUTTONHOLE MEMORY Fabric: Stabilizer: Needle: Thread: Presser Foot: Heavy flannel, 6” x 9” 1 piece, 6” x 9” 90/14 Embroidery 30 wt. cotton embroidert Standard Buttonhole Foot #3/3C Automatic Buttonhole Foot #3A/3C Short Term Memory • Fold fabric in half to 3” x 9”. • Space the buttonholes evenly across the fabric. • Select Standard Buttonhole #51 and attach Buttonhole Foot #3A/3C • Press the Continuous Reverse button. • Program a 1” buttonhole as for a counted stitch buttonhole. • Notice the word AUTO is now blinking on the screen. • Sew the first bead. Stop at desired length and press the quick reverse button. • Sew the bar tack and second bead until you reach the beginning of the buttonhole. • Press the quick reverse button again. The machine will sew the top bartack and the securing stitches and stop automatically. • The word AUTO appears and the buttonhole has now been programmed in short term memory. • All buttonholes will now be sewn this programmed size. • Sew a second buttonhole. Long Term Memory • Press MEM+ (after the buttonhole has been programmed). • Turn the machine off and wait 60 seconds. Turn the machine back on. • Select Standard Buttonhole #51 and press MEM button. • Sew a buttonhole on the third line. Note: In order to clear a saved buttonhole, a new buttonhole length must be programmed over the previous one. MASTERING YOUR BERNINA® 1/10/02 artista 170 QPE/180/110 MASTERING YOUR BERNINA® BERNINA® artista 170 QPE/180 WISH LIST Programming Pizzazz Feet-ures Chalk Wheel Large Ruler - clear Decorative Thread Rayon___ Cotton___ Metallic___ Sewers Aid Interfacing Fusible Tricot__ Fusible Woven__ Needles Embroidery__ Metallic__ Buttonhole Cutter and Block Buttonhole Space Tape Buttonhole Placement Gauge - Simpflex Ruler Fabric Marking Pen MASTERING YOUR BERNINA® 1/10/02 artista 170 QPE/180/111 MASTERING YOUR BERNINA® BERNINA® artista 170 QPE/180 MASTERING YOUR ® BERNINA artista 170 QPE/180 OWNER’S WORKBOOK Section H Fabulous Features MASTERING YOUR BERNINA® 1/10/02 artista 170 QPE/180/112 MASTERING YOUR BERNINA® BERNINA® artista 170 QPE/180 SECTION H Customization Challenge Setup Program Owner’s manual pg___ • Personalize the machine to suit your requirements and preferences - manual pg. __ • Changes made are saved even when the machine is turned off. • Machine can be returned to factory settings at any time. What Can Be Customized? Functions • Can be deleted, moved or rearranged any way you desire. • Some icons can be added to the function bar if you choose - Tension, Personal Program, and Wing Needle Limitation Let’s Practice Turn the machine on; press the Setup button - touch the Functions box • Adding a function - Owner’s manual page___ - Select the tension icon - touch the down arrow - the tension icon is now the first icon at the left in the bottom rows. • Removing a function - Owner’s manual page___ - Select the motor speed icon in the bottom rows - touch the up arrow - the icon disappears from the bottom rows. • Placing a function - Owner’s manual page___ - An icon can be inserted anywhere on the function bar - select the wing needle icon from the top rows - select the position in the bottom rows where you want to insert the icon. Touch the down arrow - the function will be placed to the left of the selected icon. • F Button - Owner’s manual page___ - Progam your favorite function on the “F” button on the head frame. - Select any function from the top rows - press the “F” button on the front of the machine press the down arrow - the icon at the top of the screen will be the one programmed on the button. -This function can be changed at any time. • Reset - Owner’s manual page___ - Touch reset and all functions return to their original positions. • OK - Owner’s manual page___ - When OK is touched, all changes are saved; the screen closes, and setup menu appears. • Esc - Owner’s manual page___ - Using this icon will take you out of the function program and back to the main Setup screen changes made will not be saved. • Exit Setup MASTERING YOUR BERNINA® 1/10/02 artista 170 QPE/180/113 MASTERING YOUR BERNINA® BERNINA® artista 170 QPE/180 Stitch Settings Owner’s manual page___ • You can permanently change the basic settings of width, length, and needle position for stitches. Let’s Practice • Select stitch #9 to alter. • Press the Setup button and the main Setup screen appears. • Select the Stitch Length/Stitch Width/Needle Position box. • The Change screen appears over the Stitch screen - alter the width to 2mm, the length to 1mm and the needle position to far left (needle position is altered with the external button). • Touch OK to save alterations. • Touching ESC will close Setup and return to the last selected stitch screen. • Select stitch #9 - it now reflects the settings you gave it and those settings will remain even after the machine is turned off. • The stitch can be returned to basic settings or altered anytime you choose. Beepers Owner’s manual page___ • You have the ability to apply audio signals to several machine functions. • Audio signals can be turned off and on at will. • The number of beeps can be set at 1, 2, or 3. Let’s Practice • Touch the Setup button - the main setup menu appears. • Touch the beeper box - the beeper menu appears. • Select Bobbin Winder Motor box - touch on - touch number box until the number “3” is highlighted. • Touch OK and the changes are saved. Screen closes and main Setup screen appears. • ESC will take you out of the beeper menu and back to the main Setup screen and changes will not be saved. • Exit Setup - engage the bobbin winder and touch the foot control - the beeper sounds 3 times to let you know the bobbin winder motor is engaged. • Select Setup and beepers again. • Select the Bobbin Winder Motor again - touch off - the audio signal is now turned off for this feature remember to touch OK to save changes. Motor Speed Owner’s manual page___ • Maximum speed is 880 stitches per minute. Let’s Practice • Touch the Setup button and select the Motor Speed box. • The motor speed menu opens on top of the stitch screen. • Touch the arrow to the left of 880 and this number decreases. • The arrow to the right will increase the number up to 880. • Each touch will alter the number by 10 stitches per minute. • Any change in the maximum speed affects all 4 speeds respectively (¼, ½, ¾, 1 - slower or faster at all 4 levels]. • Touch OK to save the change. • Touch ESC and you will return to the main Setup menu. • Touch RESET to return to factory settings. MASTERING YOUR BERNINA® 1/10/02 artista 170 QPE/180/114 MASTERING YOUR BERNINA® BERNINA® artista 170 QPE/180 Thread Tension Owner’s manual page___ artista 170 QPE • Tension is set manually in the 170 QPE, not in the Setup screen. Owner’s manual page___ • The basic tension is factory-set for best sewing results using 100 wt., 2ply polyester thread (100/2) in the needle and bobbin. Using other types and weights can affect the stitch, causing a need for tension adjustment. • The tensions should be adjusted to suit the thread, fabric and stitch combination. • The basic setting is indicated when the red line on the tension adjustment wheel is in line with the marking to the left of the wheel. • Changes made will remain in effect until you change them again. artista 180 • Temporary tension adjustments to individual stitches can be made using the TTC button or the tension icon on the function bar. These changes will be made using the basic setting as a base - this setting is either the factory setting or an adjusted setting made in Setup. • Overall tension in the 180 is set in the Setup screen. Owner’s manual page___ • The basic tension is factory-set for best sewing results using 100 wt., 2ply polyester thread (100/2) in the needle and bobbin. Using other types and weights can affect the stitch, causing a need for tension adjustment. • The overall tension setting of the machine can be changed up to 20% in the setup program - this will effect all stitches in the machine. • Changes made will remain in effect until changed again, even when the machine is turned off. Let’s Practice • Press the Setup button and the Thread Tension box. • The perfect stitch formation is shown in the middle of the left side of the screen. • The scale to the right shows a possible change of + or - 20%. • The basic setting is indicated by a fine line at 0 - a changed setting is indicated by a black bar. • Touch the up and down arrow to see how the tension is set - touch the arrow up if the stitch looks like the top picture or touch the down arrow if it looks like the bottom picture. • Set the tension at +2. • Touch OK to save the alteration and return to the main Setup screen. • Touch the tension box again - touch RESET - tension will return to factory settings - remember touch OK to save the changes. Start Screen Owner’s manual page___ • The Welcome screen can be turned off. Let’s Practice • To turn off the Welcome screen, press the Setup button and the Start Screen box. • The Start screen appears - touch off. • The Welcome screen will not appear the next time the machine is turned on; yhe practical stitch screen will appear immediately when machine is turned on. • Touch OK to confirm and save the change. • ESC will return you to the main Setup screen. MASTERING YOUR BERNINA® 1/10/02 artista 170 QPE/180/115 MASTERING YOUR BERNINA® BERNINA® artista 170 QPE/180 Sewing Light Owner’s manual page___ • The sewing light can be set to be on or off. Let’s Practice • Press the Setup button and touch the Sewing Light box. • Touch on and the light will be on continuously when the machine is on - touch off and the light will not come on at all. • OK confirms changes and ESC takes you back to the main Setup menu without saving any changes. Service Owner’s manual page___ • The service function of the Setup program gives information about the version of software in your machine and embroidery module. • Calibration adjustments can be made to the screen and hoop adjustments for the embroidery module. (The embroidery module is an optional unit.) Let’s Practice • Press the Setup button and touch the Service box. • Version - Owner’s manual page___ - Select the Version box. Version screen appears - this shows the software version number next to the icon of the machine and also the version number of the embroidery module, if one is connected, next to the icon of the module. The two versions should be the same for optimal results. - Touch ESC to return to the previous screen. • Screen Calibration - Owner’s manual page___ - Calibrating the screen is important for making on-screen selections by touch. If the screen is not calibrated, you might touch one selection and the machine reads one next to it. Note: The screen is calibrated at the factory, but shipping and transporting may affect it. The screen only needs adjusting if the on-screen buttons do not react properly when touched. - If needed, select the “screen” box - the calibration screen appears press each black dot in exactly the middle (use the point of a mechanical pencil - without lead) one after the other - it doesn’t matter which one is touched first - the machine will beep to let you know the dots have been engaged. When both have been engaged the screen will revert automatically to the previous screen. Note: Take care to touch the black dots ONLY. If the screen is miscalibrated by touching any other area, it may require a technical adjustment by an authorized technician. • Embroidery Hoop Adjustment - Owner’s manual page___ - This adjustment calibrates the needle to the center of the embroidery hoop. The hoop adjustment can only be activated if the embroidery module is attached. Note: This exercise will be done in the embroidery module owner’s class. - As with other screens - OK confirms changes and saves them - ESC returns you to the previous screen without saving. MASTERING YOUR BERNINA® 1/10/02 artista 170 QPE/180/116 MASTERING YOUR BERNINA® BERNINA® artista 170 QPE/180 Screen Contrast Owner’s manual page___ • To make your viewing of the screen easy, no matter what the lighting - the contrast can be adjusted. Let’s Practice • Press the Setup button and select the Contrast box. • Touching the “-” will lighten the screen and touching the “+” will darken it. • The original screen is visible to the left to check as adjustments are made. • Touch OK to confirm and save the adjustment. • The screen closes and the main Setup menu appears. Return To Basic Settings Owner’s manual page___ • All changes can be reversed and returned to factory settings simply by touching the Return to Basic Settings box on the main Setup screen. This makes all settings as they came from the factory. • A message appears that says “Are you sure you wish to return the machine to the factory setting?” Select “yes” and the Setup screen appears with a clock on screen indicating that all changes in Setup are being returned to factory settings. • If “no” is selected - the Setup screen appears and all existing changes remain in effect. • When all is returned to basic settings - a message will appear “Please switch off and on your machine” - do so to reset machine. Personal Program Owner’s manual page___ • Use this feature to design a screen with the stitches you use most often. Put the stitches you use most frequently at your finger tips - in one place - easy to access. • When inserting stitches into this program, variations of the same stitch may be entered as well. • Directional stitches and lettering cannot be stored in the Personal Program. Let’s Practice • Press the Setup button and touch the Personal Program box. • The Personal Program screen appears with the basic straight stitch on the screen. It is now ready to add your favorite stitch selections. • Adding Stitches To Personal Program - Press the practical stitch button and select stitch #9. - The screen changes automatically to the Personal Program screen, showing stitch #9 next to the straight stitch. - Touch store to save the stitch in the program. - When a new stitch is programmed it will automatically go after the last stitch programmed. - Select a buttonhole for your program - press the external buttonhole button; select stitch #51. - Screen changes again to the personal program screen and the selected buttonhole is there next to stitch #9. - Touch store again to save the buttonhole in the program. - Continue to program stitches until all desired stitches are selected (choose 8 more stitches to go into the Personal Program). There is room for 5 stitches in the top row on the screen. When it is full the 6th stitch will appear in the second row. As many stitches as desired can be entered into the program. - Using the 0-9 function, select stitch #503 - it will be the 12th stitch in the program. MASTERING YOUR BERNINA® 1/10/02 artista 170 QPE/180/117 MASTERING YOUR BERNINA® BERNINA® artista 170 QPE/180 • Altered Stitches In Personal Program - Select stitch #1 - the first stitch on the PP setup screen - it is the selected stitch. - Touch OK to confirm. You will go to the main Setup screen. - Touch the Stitch Length/Stitch Width/Needle Position box. - The stitch change screen opens on top of the practical stitch screen. - Alter the length to 3, touch OK. The main menu screen appears. - Touch the Personal Program box - the selected stitch has the altered settings. - Program 1 more straight stitches with a different setting and 2 zigzag stitches, each with a different setting. These will be the 13th, 14th and 15th stitches in the program. - Any stitch can be altered before it is saved in the program. That means any stitches you choose can be set so that each time they are accessed from the Personal Program, they are altered exactly as you like them. • Deleting Stitches From Personal Program - Highlight stitch #9 - Press the external CLR button and the stitch is gone. - Touch store to save the changes. • Saving The Stored Stitches In Personal Program - Touch OK - the Personal Program screen closes, saving the programmed stitches, and the main Setup screen appears. - Touch ESC to close Setup and return to the last stitch screen you opened. • Accessing Your Personal Program - To access the Personal Program, place the Personal Program icon on the function bar. This is done just as you did at the beginning of this session - check your notes if needed. - Once the icon is on the function bar, touch that icon and the Personal Program screen appears with your programmed stitches. - If you choose to, you can even place your Personal Program on the Favorite Function button. MASTERING YOUR BERNINA® 1/10/02 artista 170 QPE/180/118 MASTERING YOUR BERNINA® BERNINA® artista 170 QPE/180 FABULOUS FEATURES EXERCISE Altered Memory Sewing manual page ___ • Select stitch #2 - alter width to 6mm and length to satin - Needle position far right and Tension to 1 • Select stitch #327 - alter length to 3mm - Touch the “b” on the function bar; use the down arrow to open the pattern by 5 steps. • Select stitch #120 - alter tension to 2 (180 only) • Select stitch #2 again - all of the alterations are still there • Touch the “b” on the function bar - no change to the stitch - balance is remembered stitch by stitch. • Select stitch #327 again - SL is still there - touch “b” and the balance change is there • Select stitch #120 again - the tension alteration is still there (180 only). • Alter as many stitches as desired. - Can alter width, length, needle position, tension (180 only) and balance. - All alterations are remembered until machine is turned off. CLR vs CLEAR ALL Owner’s manual pages ___ and ___ . • Select stitch #2 - press the external CLR button – the stitch will revert to its basic setting. - Clears selected stitch alterations and deletes most functions. • Touch CLR ALL. - Clears all altered settings except those changed in the Setup program - features affected are listed on page___ of the manual. TENSION (180 only) Owner’s manual page___ • Go to SETUP – select FUNCTION box – place Tension icon on function bars - An icon is available in the function program in Setup. - It will not appear on the different function bars unless it is placed there in Setup. - Touch symbol to access tension screen. - Tension changes in this mode affect selected stitch only. - Touch reset to return to basic setting or value chosen in Setup. MASTERING YOUR BERNINA® 1/10/02 artista 170 QPE/180/119 MASTERING YOUR BERNINA® BERNINA® artista 170 QPE/180 Reset Owner’s manual pages ___ • Select stitch #8 - alter width to 9mm and length to 1mm • Select “b” from the function bar - alter balance by touching the up arrow 4 times. • Touch RESET. - In balance screen, touching RESET will return the stitch to the same condition as when the balance function was opened (any alterations are still there). - In the FUNCTION program, RESET returns screen icons to original positions. - RESET returns changes made on personal screens to original settings remember - OK saves the reset changes. Help Button Owner’s manual page ___ • Press the help button, then touch the stitch or function in question. - A description of the selected stitch or function appears. Smart Button Owner’s manual page ___ This button saves the last active stitch format so that it can be recalled at any time. It is used to toggle between two stitches on two separate screens. • Access the “quilting/directional” button. • Access the Quilting menu • Select stitch #330 • Alter stitch width to 9mm and stitch length to 3mm • Mirror image right/left • Press the Smart button - This has entered the altered stitch into the short-term memory. • Press the Practical Stitch button. • Select stitch #5. • Press the Smart Button. - Notice that the previous stitch is recalled with function and altered stitch width and length. Eco Button Owner’s manual page ___ • This feature powers down the machine and puts it into a sleep mode, cutting energy usage by 50%. - All settings remain active but the screen darkens. - Foot control is inactive. - Screen saver is activated. - Press the ECO button again and the machine turns on, retaining previous stitches and settings. MASTERING YOUR BERNINA® 1/10/02 artista 170 QPE/180/120 MASTERING YOUR BERNINA® BERNINA® artista 170 QPE/180 TTC BUTTON - Tension / Tutorial / Creative Consultant Thread Tension (180 only) Basic tension settings are applied automatically to a selected stitch or program. Changes can be made to the tension of a stitch without affecting other stitches. Place the tension icon on the function bar for easy access. • Press the TTC button and the TTC menu appears. • Select Thread Tension - The tension screen appears - arrows up = more tension and arrows down = less tension - The adjustment affects only the selected stitch; does not remain after machine is turned off. • Touch OK to confirm, save and return to the stitch screen. - You may stitch from this screen, allowing you to continue to sew and adjust before you save. • Touch RESET to return the tensions to the basic settings (either factory or your adjusted settings) • Touch OK to save changes. Tutorial A “self help program” or “on-line manual”, this provides concentrated on-screen information about various aspects of the machine. • Press the TTC button and the menu appears. • Select Tutorial. - The tutorial sub-menu appears with a list of topics about the machine. • Select the FHS system box; touch OK to confirm. - Touching ESC will return you to the TTC menu. - The clock on the screen shows that the computer is searching for the information. - The information about the chosen subject appears on the screen. - Some screens also have graphics to visually explain the subject. • When finished viewing the subject contents, touch ESC to leave the screen. Creative Consultant This feature provides information and help on a variety of sewing needs. • Press the TTC button - the TTC menu appears • Select the Creative Consultant box and the fabric menu appears. - A list of commonly used fabrics are in the menu. • Use the arrows to scroll through the list • Select single knit jersey and touch OK to confirm. -ESC takes you back to the previous screen. -The techniques menu appears with a list of common sewing techniques. • Select “seaming” - confirm with OK. - The information screen appears displaying settings and suggestions for the best way to handle the type of fabric and the technique you have chosen. - The tension is set for the stitch automatically. • Touch OK to confirm and return to the appropriate stitch screen. - The correct stitch is selected and you are ready to sew. - The selected stitch can be changed if you chose. CPS PROGRAM • Used to load languages not programmed into the machine. • Used to exchange embroidery designs in the module. • You can also update your machine with new software using this system. MASTERING YOUR BERNINA® 1/10/02 artista 170 QPE/180/121 MASTERING YOUR BERNINA® BERNINA® artista 170 QPE/180 MASTERING YOUR ® BERNINA artista 170 QPE/180 OWNER’S WORKBOOK Section I Directional Dynamics (180 only) MASTERING YOUR BERNINA® 1/10/02 artista 170 QPE/180/122 MASTERING YOUR BERNINA® BERNINA® artista 170 QPE/180 SECTION I Directional Dynamics • The ability to stitch in 16 different directions allows intricate decorative stitch patterns to form. • Decorative stitches can be connected to one another to create complex designs for adornment and decoration. • Remember that every sewing situation is different. Varying the combination of fabrics, threads, battings, needles, etc. can minutely affect the way a project feeds under the needle. • The artista 180 offers the ability to adjust the movement of the fabric using the variable stitch width and length and the vertical and horizontal balance functions. • When working with any directional stitch pattern, always stitch a practice design using the exact fabric, thread, and stabilizer that will be used in the project. • Programming Tips - Program all decorative stitches into the memory first. - Access the 16 direction menu and insert the compass directions between decorative stitches with a straight (#39) or zigzag (#40) stitch. - Place the cursor to the right of where the directional stitches are to be inserted. - Select the stitch, then select the direction on the compass. • Stitch Length and Width - Stitch length and width can be adjusted using the knobs on the front of the machine. • Mirror Image - When selecting directions from the compass, be aware that the mirror image functions will affect the compass direction chosen. • Proper Presser Foot - Use the Sideways Motion Foot #40 when stitching any multidirectional design. The beveled sole of this foot allows the fabric to move easily in all directions. • Guidelines - Using a fabric marker, draw vertical and horizontial lines on the fabric. As the fabric moves, lightly hold it to keep the front and the side of the foot parallel to these lines at all times. • Balance - When using the directional feed system on the Bernina® artista 180, the balance of the design is very important. Different fabrics, threads and interfacings can influence the feeding and stitch formation, causing designs to be slightly unbalanced. - The artista 180 has an electronic balance function to customize the stitching for various sewing situations. Use the arrows to adjust the balance as indicated in the manual. • Compass Template - Use the compass template when positioning motifs and determining the stitch directions needed to connect individual components of a design. - The distance between each arrow on the template is 9mm and equals one “foot” on the memory screen, which is sewn as three 3mm stitches. - If the long stitch function is engaged, each foot on the screen is sewn as one 9mm stitch. Note: The distance indicated by a “foot” can be altered by adjusting the stitch length before programming the stitch into memory or through the edit program after programming. - The presser foot graphic shown on the memory screen is shown sideways, so the direction of the arrow on the screen may appear to be different than the direction selected. The designs that follow are created using the artista 180. The formulas listed give a starting place, but adjustments may be needed e depending on fabric, thread and stabilizer used. MASTERING YOUR BERNINA® 1/10/02 artista 170 QPE/180/123 MASTERING YOUR BERNINA® BERNINA® artista 170 QPE/180 DIRECTIONAL STITCHING COMPASS Fabric: Stabilizer: Needle: Thread: Presser Foot: Firm Fabric, 4” x 4” 1 piece heavy tear-away, 4” x 4” 90/14 Embroidery 30 wt. cotton embroidery Sideways Motion Foot #40 • Fold fabric into 4” x 4”. • Mark the center and place stabilizer behind the fabric. • Starting at the center – sew all 16 directions on the compass using the pre-programmed zigzag stitch (#40). • Note the changes in stitch formation as the artista 180 sews in different directions. • Trim and mount sample. MASTERING YOUR BERNINA® 1/10/02 artista 170 QPE/180/124 MASTERING YOUR BERNINA® BERNINA® artista 170 QPE/180 EDGINGS LARGE SCALLOPS Fabric: Stabilizer: Needle: Thread: Presser Foot: Chamois, 8” x 10” 1 piece heavy tear-away, 8” x 10” 90/14 Embroidery 30 wt. cotton embroidery Sideways Motion Foot #40 Fold fabric to 4” x 10” Open an empty memory bank. Select stitch #507 - 2x. Close memory. Open the 16 directional stitching screen. Select straight stitch #39. Activate the long stitch function. Open memory. Insert compass direction #2 - 1x between the scallops. • Add compass direction #14 - 1x after the second scallop. • Position the cursor to the right of the second scallop. • Touch the Edit box at the right end of the memory bar. • Select the top/bottom mirror image icon. • Touch the Edit box again to close it. • Deselect the long stitch function. • As you touch the foot control the cursor automatically goes to the beginning of the design group. • Stitch, guiding gently. • Trim and mount sample. • • • • • • • • • MASTERING YOUR BERNINA® 1/10/02 artista 170 QPE/180/125 MASTERING YOUR BERNINA® BERNINA® artista 170 QPE/180 EDGINGS CONTINUOUS SNOW PEAKS Fabric: Stabilizer: Needle: Thread: Presser Foot: Chamois, 8” x 10” 1 piece heavy tear-away, 8” x 10” 90/14 Embroidery 30 wt. cotton embroidery Sideways Motion Foot #40 • Fold fabric to 4” x 10” • Open a memory bank. • Select stitch #511 - 2x. • Close memory. • Open the 16 directional stitching screen. • Select straight stitch #39. • Activate the long stitch function. • Open memory. • Insert compass direction #2 - 2x between the two designs. • Insert compass direction #14 - 2x after the second design. • Deactivate the long stitch. • Sew the continuous design. • Continue to work with and adjust design until it looks like the picture in the box. • Trim and mount the sample. MASTERING YOUR BERNINA® 1/10/02 artista 170 QPE/180/126 MASTERING YOUR BERNINA® BERNINA® artista 170 QPE/180 EDGINGS STACKED BARS BORDER Fabric: Stabilizer: Needle: Thread: Presser Foot: Chamois, 8” x 10” 1 piece heavy tear-away, 8” x 10” 90/14 Embroidery 30 wt. cotton embroidery Sideways Motion Foot #40 • Fold fabric to 4” x 10” • Open a memory bank. • Select stitch #512 - 1x. Note: All designs can be put into memory at one time and then altered through the edit program. • Activate mirror image, top/bottom. • Select stitch #512 one more time. • Cancel mirror image. • Close memory. • Open the 16 direction stitching menu. • Select straight stitch #39. • Activate the Long Stitch function. • Open memory. • Insert compass direction #12 - 1x between the two designs. • Insert compass direction #4 - 1x after the second design. • Fine tune the stitches until the sample looks like the picture in the box. • Stitch; trim and mount sample. MASTERING YOUR BERNINA® 1/10/02 artista 170 QPE/180/127 MASTERING YOUR BERNINA® BERNINA® artista 170 QPE/180 EDGINGS STACKED SCALLOPS Fabric: Stabilizer: Needle: Thread: Presser Foot: Chamois, 8” x 10” 1 piece heavy tear-away, 8” x 10” 90/14 Embroidery 30 wt. cotton embroidery Sideways Motion Foot #40 Fold fabric to 4” x 10” Open a memory bank. Select stitch #416 - 5x. Close memory. Open the 16 directional stitching screen. Select zigzag stitch #40 with a width of 4mm (connecting stitches can be altered in EDIT). • Open memory. • Insert compass direction #4 - 2x between the first and second scallop. • Insert compass direction #4 - 2x between scallops two and three. • Insert compass direction #12 - 2x between scallops three and four. • Insert compass direction #12 - 2x between scallops four and five. • Fine tune the stitches until the sample looks like the picture in the box. • Stitch; trim and mount sample. • • • • • • MASTERING YOUR BERNINA® 1/10/02 artista 170 QPE/180/128 MASTERING YOUR BERNINA® BERNINA® artista 170 QPE/180 DIRECTIONAL STITCHING Monograms Fabric: Stabilizer: Needle: Thread: Presser Foot: Firm fabric, 8” x 8” 1 piece heavy tear-away, 8” x 8” 90/14 Embroidery Embroidery Sideways Motion Foot #40 Create and map out a formation of your 3 initials: • Using the templates in the back of the instruction manual, trace monograms onto tracing paper in a pleasing formation. • Mark the beginning of each letter with ”o” and the end with “+”. • Place the transparent compass over the first letter, positioning the center of the presser foot on the marked ending point (+). • Note the direction of the arrow leading to the beginning of the next letter (o). • Count the number of arrows between the two letters. Each arrow represents one “foot” on the memory screen. • Repeat these steps to determine the direction and number of stitches between each letter of the monogram. Programming the monograms: • Open a memory bank. • Program the desired letters, from the monogram alphabet, into a memory bank. Note: There are 3 sizes of mongrams - the templates are for the largest size. • Activate the Long Stitch function. • Press the “Directional/Quilt button”, then access the 16-direction menu. • Select straight stitch #39 and position the cursor to the right of each letter. • Insert the appropriate number of directional stitches between each letter. • Save in an empty memory. Stitching the monograms: • Position the fabric under the needle and place the Sideways Motion Foot #40 on the machine. • Stitch the monograms using appropriate stabilizer for the fabric. • Clip the connecting threads after all the stitching is complete. • Trim and mount on a separate page. MASTERING YOUR BERNINA® 1/10/02 artista 170 QPE/180/129 MASTERING YOUR BERNINA® BERNINA® artista 170 QPE/180 CONNECTING MOTIFS Creating Continuous Designs Fabric: Stabilizer: Needle: Thread: Presser Foot: Chamois, 8” x 10” 1 piece heavy tear-away, 8” x 10” 90/14 Embroidery 30 wt. cotton embroidery Sideways Motion Foot #40 • Fold fabric to 4” x 10” • Open the memory - select an empty memory bank. • Trace two elephants (stitch #1011) from stitch template onto the tracing paper so they are following each other nose to tail. • Enter the two elephants in the memory. • Using the compass template - plot the direction the machine needs to sew to create a string of elephants. Be sure to add the same stitches to the tail end of both elephants. Possible formula: Activate Long Stitch. Compass direction #8 - 4x Compass direction #4 - 2x • Stitch three elephants as sewn. • Trim and mount sample. MASTERING YOUR BERNINA® 1/10/02 artista 170 QPE/180/130 MASTERING YOUR BERNINA® BERNINA® artista 170 QPE/180 QUILT DESIGNS Using Straight Stitch Fabric: Stabilizer: Needle: Thread: Presser Foot: Cotton fabric, 8” x 10” 1 piece batting, 4” x 10” 90/14 Embroidery 30 wt. cotton embroidery Sideways Motion Foot #40 • Fold fabric to 4” x 10” • Open memory. • Press the Directional/Quilt button. • Select the straight stitch - SL 3mm. • First line - Compass Directions: #8 - 1x #4 - 2x #8 - 3x #12 - 2x #8 - 2x • Second line - Compass Directions: #8 - 2x #12 - 1x #8 - 1x #4 - 1x • Draw a vertical line and use it as a guide for the edge of the presser foot at the beginning of each line of stitching. Use Pattern Begin at the beginning of the second line. • Sew the programmed stitches. • Trim and mount the sample. MASTERING YOUR BERNINA® 1/10/02 artista 170 QPE/180/131