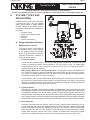
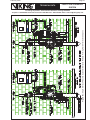
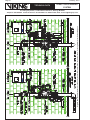
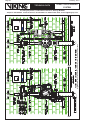
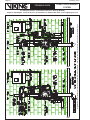
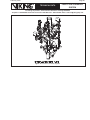
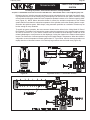
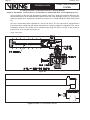
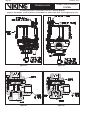
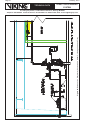
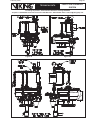
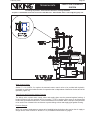
1
Preaction System
Technical Manual for Installation,
Operation and Maintenance
February 19, 2010
Form No. F_010808
February, 2010
Page II
TECHNICAL DATA
PREACTION SPRINKLER
SYSTEM
The Viking Corporation, 210 N Industrial Park Drive, Hastings MI 49058
Telephone: 269-945-9501 Technical Services: 877-384-5464 Fax: 269-818-1680 Email: [email protected]
Table of Contents
I. SYSTEM DESCRIPTION
II. SYSTEM TYPES AND APPLICATIONS
A. Single Interlock Preaction System
1. Pneumatic Release
2. Hydraulic Release
3. Electric Release
B. Double Interlock Preaction System
1. Electric/Pneumatic Release
2. Pneumatic/Pneumatic Release
3. Electric/Pneu-Lectric Release
C. Non-Interlock Preaction System
1. Electric Release
2. Pneumatic Release
D. Trimpac®
E. Trimpac® Surefire®
III. SYSTEM REQUIREMENTS
IV. PLACING THE SYSTEM IN SERVICE
V. PREACTION SYSTEM INSPECTIONS, TESTS, AND MAINTENANCE
A. Quarterly Waterflow Alarm Test
B. Quarterly Main Drain Test
C. Annual Trip Test
D. Maintenance
VI. REMOVING THE SYSTEM FROM SERVICE
VII. TROUBLESHOOTING VIKING PREACTION SYSTEMS
A. System Trouble
B. During Normal Power Supply Conditions, Faults, or Complete Loss of Power
C. Loss of Power During Operation
D. Troubleshooting System Components
1. PORV
2. Pneumatic Actuator
Page
4
8
8
8
8
8
18
18
18
18
28
28
28
35
36
41
55
55
56
56
56
57
60
61
61
62
62
62
62
63
THIS PAGE
INTENTIONALLY
LEFT BLANK
Page 4
February, 2010
TECHNICAL DATA
PREACTION SPRINKLER
SYSTEM
The Viking Corporation, 210 N Industrial Park Drive, Hastings MI 49058
Telephone: 269-945-9501 Technical Services 877-384-5464 Fax: 269-818-1680 Email: [email protected]
NOTE: SPRINKLER SYSTEMS ARE ENGINEERED TO MEET THE STANDARDS OF NFPA 13, FM GLOBAL,
LOSS PREVENTION COUNCIL (FOC), ASSEMBLEE PLENIERE, VERBAND DER SACHVERSICHERER
(VDS) OR OTHER SIMILAR ORGANIZATIONS, AND WILL ALSO NEED TO COMPLY WITH THE PRO
VISIONS OF GOVERNMENTAL CODES, ORDINANCES, AND STANDARDS WHERE APPLICABLE.
THE SYSTEM MUST BE DESIGNED BY QUALIFIED DESIGN PROFESSIONALS IN CONJUNCTION
WITH INSURING BODIES. THE USER IS RESPONSIBLE FOR THE DESIGN AND CONFIGURATION OF
THE SYSTEM, ITS APPROPRIATENESS FOR THE USE INTENDED AND ITS COMPLIANCE WITH ALL
STANDARDS, CODES AND ORDINANCES. VIKING CORPORATION DOES NOT DESIGN SYSTEMS
FOR SPECIFIC INSTALLATIONS AND MAKES NO REPRESENTATION OR WARRANTY CONCERNING
WHETHER ANY SPECIFIC SYSTEM INSTALLATION WILL BE SUFFICIENT FOR THE INTENDED USE
OR WILL COMPLY WITH ANY STANDARD, CODE, OR ORDINANCE. ANY SYSTEM DEPICTED IN THIS
MANUAL IS SHOWN FOR ILLUSTRATIVE PURPOSES ONLY.
I.
SYSTEM DESCRIPTION
A Preaction System is a sprinkler system employing closed automatic sprinklers connected to a piping
system that contains air or nitrogen that may or may not be pressurized. A supplemental detection system
(release line) is installed in the same area as the sprinklers. The basic components of a Viking preaction
system include a Model E or F series deluge valve and conventional deluge trim (Figure 1), or a Model
G-2000P, G-3000P, or G-4000P valve assembly (Figure 2) and trim. The associated release trims are
unique to the specific type of preaction system desired (Figures 3-6). For systems using a Model E or F
series deluge valve, an Easy Riser® Check Valve is also typically added to the riser when supervisory air is
required within the sprinkler system piping network (Figure 7). NOTE: The Model G series valve includes
an internal check valve, eliminating the need for a separate check valve on the system riser. The G series
valve assembly also includes all the necessary trim components for the preaction system operation.
Figure 1
February, 2010
Page 5
TECHNICAL DATA
PREACTION SPRINKLER
SYSTEM
The Viking Corporation, 210 N Industrial Park Drive, Hastings MI 49058
Telephone: 269-945-9501 Technical Services: 877-384-5464 Fax: 269-818-1680 Email: [email protected]
Figure 2
NFPA 13 defines three basic types of preaction systems:
•
•
•
Single Interlocked: Admits water to sprinkler piping upon operation of detection devices only.
Double Interlocked: Admits water to sprinkler piping upon operation of both the detection devices
and automatic sprinklers.
Non-Interlocked: Admits water to sprinkler piping upon either operation of detection devices or
automatic sprinklers.
The supplemental detection system is commonly electric or pneumatic or a combination of both. Detection
systems used with electric release systems are commonly actuated by manual pull stations, fixed-temperature heat detectors, rate-of-rise heat detectors, smoke detectors or other means determined as appropriate
by the specifying engineers or AHJ.
In accordance with NFPA 13, the preaction sprinkler system piping and fire detection devices shall be
automatically supervised where there are more than 20 sprinklers on the systems. This is accomplished
with air or nitrogen gas under pressure within the sprinkler piping. If the integrity of the sprinkler piping
is comprimised, the pressure will be reduced activating a supervisory pressure switch that transmits the
signal to the release control panel and/or fire alarm panel.
Preaction systems are typically utilized where it is desirable to delay the introduction of water into the system piping until appropriate signals are received from the detection system and/or the supervised piping.
Exactly which signals and how many signals have to be received before the valve opens is a function of
the type of preaction system and associated detection.
This technical manual will cover Viking preaction systems, trim components and their functions, as well as
describe the proper operation, maintenance, and repair of valves and system devices.
Page 6
February, 2010
TECHNICAL DATA
PREACTION SPRINKLER
SYSTEM
The Viking Corporation, 210 N Industrial Park Drive, Hastings MI 49058
Telephone: 269-945-9501 Technical Services 877-384-5464 Fax: 269-818-1680 Email: [email protected]
Figure 3: Single Interlock Release Trim for Systems Using a Model E or F Series Deluge Valve
Figure 4: Single Interlock Electric Release System Using a Model G Series Valve
February, 2010
Page 7
TECHNICAL DATA
PREACTION SPRINKLER
SYSTEM
The Viking Corporation, 210 N Industrial Park Drive, Hastings MI 49058
Telephone: 269-945-9501 Technical Services: 877-384-5464 Fax: 269-818-1680 Email: [email protected]
Figure 5: Double Interlock Release Trim for Systems Using a Model E or F Series Deluge Valve
Figure 6: Double Interlock Electric/Pneumatic Release System Using a Model G Series Valve
Page 8
February, 2010
TECHNICAL DATA
PREACTION SPRINKLER
SYSTEM
The Viking Corporation, 210 N Industrial Park Drive, Hastings MI 49058
Telephone: 269-945-9501 Technical Services 877-384-5464 Fax: 269-818-1680 Email: [email protected]
II.
S Y S T E M T Y P E S A ND
APPLICATIONS
Preaction systems are used in areas where
a common wet pipe or dry pipe sprinkler
system would present a greater potential
of facility damage in the unlikely event of
unintentional water discharge. Examples of
this include:
• Computer rooms
• Telecommunications facilities
• Museums
• Libraries
• Coolers and freezers
A. Single-Interlocked Preaction
System (Figures 8a-10c)
This type of system is used where it
is desirable to have water available
at the sprinkler when the sprinkler
fuses. Viking single interlock systems
may have a pneumatic, hydraulic, or
electric detection system:
Figure 7
1. Pneumatic Release
A pneumatically actuated system uses a pneumatic actuator subjected to a minimum 30 PSI
(2 bar) air pressure for system water pressures of 175 PSI (12 bar) or less. For system water
pressures above 175 PSI, up to a maximum of 250 PSI (17 bar), 50 PSI (3.4 bar) air pressure is
required for the pneumatic actuator.
When Using a Model E or F Series Deluge Valve: The pneumatic actuator is installed in the
1/2” release line above the pressure operated relief valve (PORV) and the emergency release.
This is done to establish water pressure in the deluge valve prime chamber from air pressure in
the detection system. Refer to Figures 8a and 8b.
In fire conditions, when a heat activated releasing device opens to cause a loss of air pressure in
the release line, the pneumatic actuator opens to vent the pressure in the deluge valve priming
chamber and release the water faster than it can be replaced through the restricted priming line
connection, opening the deluge valve (see Figure 8c).
2. Hydraulic Release
This requires a hydraulic release system equipped with thermostatic (rate-of-rise) releases, and/or
fixed-temperature releases, and/or pilot heads. The system piping remains empty until the deluge valve
is activated by operation of the release system. When a releasing device operates, pressure in the
priming chamber of the deluge valve is relieved faster than it can be replenished through the restricted
orifice. Supply pressure overcomes the deluge valve clapper differential, forcing the clapper off its seat,
allowing water to flow to the system outlets and sound the water flow alarm. (Refer to Figures 9a-9b).
3. Electric Release
Electrically controlled preaction systems require an eletric solenoid valve controlled by an approved release control panel with compatible detection system. In the SET condition, water supply
pressure is trapped in the priming chamber by check valve and normally closed solenoid valve.
Refer to Figures 10a and 10b. In fire conditions, when the detection system operates, the system
control panel energizes solenoid valve open. Pressure is released from the priming chamber
faster than it is supplied through restricted orifice and the deluge valve opens (Figure 10c).
February, 2010
Page 9
TECHNICAL DATA
PREACTION SPRINKLER
SYSTEM
Figure 8a: Single Interlock Preaction System with Pneumatic Release
The Viking Corporation, 210 N Industrial Park Drive, Hastings MI 49058
Telephone: 269-945-9501 Technical Services: 877-384-5464 Fax: 269-818-1680 Email: [email protected]
Page 10
February, 2010
TECHNICAL DATA
PREACTION SPRINKLER
SYSTEM
Figure 8b: Single Interlock Preaction System with Pneumatic Release - Priming Water in Set Position
The Viking Corporation, 210 N Industrial Park Drive, Hastings MI 49058
Telephone: 269-945-9501 Technical Services 877-384-5464 Fax: 269-818-1680 Email: [email protected]
February, 2010
Page 11
TECHNICAL DATA
PREACTION SPRINKLER
SYSTEM
Figure 8c: Single Interlock Preaction System with Pneumatic Release - Priming Water After Pneumatic Actuator Opens
The Viking Corporation, 210 N Industrial Park Drive, Hastings MI 49058
Telephone: 269-945-9501 Technical Services: 877-384-5464 Fax: 269-818-1680 Email: [email protected]
Page 12
February, 2010
TECHNICAL DATA
PREACTION SPRINKLER
SYSTEM
Figure 9a: Single Interlock Preaction System with Hydraulic Release
The Viking Corporation, 210 N Industrial Park Drive, Hastings MI 49058
Telephone: 269-945-9501 Technical Services 877-384-5464 Fax: 269-818-1680 Email: [email protected]
February, 2010
Page 13
TECHNICAL DATA
PREACTION SPRINKLER
SYSTEM
Figure 9b: Single Interlock Preaction System with Hydraulic Release - Priming Water in Set Position
The Viking Corporation, 210 N Industrial Park Drive, Hastings MI 49058
Telephone: 269-945-9501 Technical Services: 877-384-5464 Fax: 269-818-1680 Email: [email protected]
Page 14
February, 2010
TECHNICAL DATA
PREACTION SPRINKLER
SYSTEM
Figure 10a: Single Interlock Preaction System with Electric Release
The Viking Corporation, 210 N Industrial Park Drive, Hastings MI 49058
Telephone: 269-945-9501 Technical Services 877-384-5464 Fax: 269-818-1680 Email: [email protected]
February, 2010
Page 15
TECHNICAL DATA
PREACTION SPRINKLER
SYSTEM
Figure 10b: Single Interlock Preaction System with Electric Release - Priming Water in Set Position
The Viking Corporation, 210 N Industrial Park Drive, Hastings MI 49058
Telephone: 269-945-9501 Technical Services: 877-384-5464 Fax: 269-818-1680 Email: [email protected]
Page 16
February, 2010
TECHNICAL DATA
PREACTION SPRINKLER
SYSTEM
Figure 10c: Single Interlock Preaction System with Electric Release - Priming Water After Solenoid Opens
The Viking Corporation, 210 N Industrial Park Drive, Hastings MI 49058
Telephone: 269-945-9501 Technical Services 877-384-5464 Fax: 269-818-1680 Email: [email protected]
February, 2010
Page 17
TECHNICAL DATA
PREACTION SPRINKLER
SYSTEM
The Viking Corporation, 210 N Industrial Park Drive, Hastings MI 49058
Telephone: 269-945-9501 Technical Services: 877-384-5464 Fax: 269-818-1680 Email: [email protected]
With the Model G-2000, G-3000, or G-4000 Valve: When the detector operates, the solenoid valve
opens (Figure 10d). Prime water is drained from the prime chamber, causing the G series valve to
open, filling the sprinkler piping with water. Water from the intermediate chamber of the G series valve
pressurizes the sensing end of the PORV, causing the PORV to open, which continually vents
prime water pressure (Figure 10d).
Figure 10d: Single Interlock System with Electric Release System using a Model G Series Valve
Page 18
February, 2010
TECHNICAL DATA
PREACTION SPRINKLER
SYSTEM
The Viking Corporation, 210 N Industrial Park Drive, Hastings MI 49058
Telephone: 269-945-9501 Technical Services 877-384-5464 Fax: 269-818-1680 Email: [email protected]
B. Double-Interlocked Preaction System (Figures 11a-13c)
This system is commonly used in freezers where flooding of the pipe can have serious consequences.
The double interlock preaction system utilizes a detector system and pressurized air or nitrogen in
the sprinkler system piping. This system is arranged so that the deluge valve will open only when
both pressure is reduced in the sprinkler piping and the detection system operates. If the detection
system operates due to damage or malfunction, the valve will not open, but an alarm will sound. If the
sprinkler piping is damaged or sprinkler is broken, the valve will not open but a supervisory alarm will
sound. The operation of both a sprinkler and a detector (or release) is required before the valve will
open, allowing water to enter the system piping. Viking strongly suggests that the detection system
not be hung from or attached to the system piping. This is to help prevent accidental damage to both
systems, which would cause the deluge valve to operate and cause unnecessary water damage.
Viking double interlock systems commonly have a pneumatic or electric detection system:
1. Electric/Pneumatic Release
Refer to Figure 11a and 11b. This system uses the same electrical detection system as previously
discussed. The operation of an electric detection system depends on the activation of a detector,
which signals the release control panel to open a solenoid valve and activate an electric alarm.
However, the system will not trip unless a sprinkler fuses, releasing the air pressure on the pneumatic actuator, allowing it to open, relieving the release line pressure. When that happens, the
deluge valve opens (Figure 11c).
With the Model G Series Valve: With both the pneumatic actuator and solenoid valve open,
prime water is drained from the prime chamber, causing the rolling diaphragm to collapse and the
deluge valve to open, filling the sprinkler piping with water. Water from the intermediate chamber
of the deluge valve pressurizes the sensing end of the PORV, causing the PORV to open, which
continually vents prime water pressure (Figure 11d).
2. Pneumatic/Pneumatic Release
In a pneumatic/pneumatic system, the air pressure is supplied to the release line through two independently controlled pneumatic actuators. One of these is controlled by air pressure maintained
in the pneumatic release system. The other, by air pressure maintained in the sprinkler system.
(Refer to Figures 12a and 12b.) In fire conditions, the release system operates and loss of pressure in that system causes the first pneumatic actuator to open.
When a sprinkler operates, loss of pressure in the sprinkler piping causes the second pneumatic
actuator to open, releasing water in the deluge valve’s priming chamber (Figure 12c). When water
in the priming chamber is released, the deluge valve opens and fills the sprinkler piping.
3. Electric/Pneu-Lectric Release
In double interlock electric/pneu-lectric systems, the first signal is the electrical detection system.
The second signal required to trip the deluge valve is provided by an air supervisory switch on
the sprinkler system piping. The air supervisory switch is connected to the Viking VFR-400 Panel,
which is cross zoned with the detection system. (Refer to Figures 13a-13c).
If system piping is damaged, an alarm will sound, but the system will not actuate. Similarly, if the
electric detection system is damaged, the valve will not open.
February, 2010
Page 19
TECHNICAL DATA
PREACTION SPRINKLER
SYSTEM
Figure 11a: Double Interlock Preaction System with Electric/Pneumatic Release
The Viking Corporation, 210 N Industrial Park Drive, Hastings MI 49058
Telephone: 269-945-9501 Technical Services: 877-384-5464 Fax: 269-818-1680 Email: [email protected]
Page 20
February, 2010
TECHNICAL DATA
PREACTION SPRINKLER
SYSTEM
Figure 11b: Double Interlock Preaction System with Electric/Pnematic Releaes - Priming Water in Set Position
The Viking Corporation, 210 N Industrial Park Drive, Hastings MI 49058
Telephone: 269-945-9501 Technical Services 877-384-5464 Fax: 269-818-1680 Email: [email protected]
February, 2010
Page 21
TECHNICAL DATA
PREACTION SPRINKLER
SYSTEM
Figure 11c: Double Interlock Preaction System with Electric/Pneumatic Release - Priming Water After Solenoid and Pneumatic Actuator Open
The Viking Corporation, 210 N Industrial Park Drive, Hastings MI 49058
Telephone: 269-945-9501 Technical Services: 877-384-5464 Fax: 269-818-1680 Email: [email protected]
Page 22
February, 2010
TECHNICAL DATA
PREACTION SPRINKLER
SYSTEM
Figure 12a: Double Interlock Preaction System with Pneumatic/Pneumatic Release
The Viking Corporation, 210 N Industrial Park Drive, Hastings MI 49058
Telephone: 269-945-9501 Technical Services 877-384-5464 Fax: 269-818-1680 Email: [email protected]
February, 2010
Page 23
TECHNICAL DATA
PREACTION SPRINKLER
SYSTEM
Figure 12b: Double Interlock Preaction System with Pneumatic/Pneumatic Release - Priming Water in Set Position
The Viking Corporation, 210 N Industrial Park Drive, Hastings MI 49058
Telephone: 269-945-9501 Technical Services: 877-384-5464 Fax: 269-818-1680 Email: [email protected]
Page 24
February, 2010
TECHNICAL DATA
PREACTION SPRINKLER
SYSTEM
Figure 12c: Double Interlock Preaction System with Pneumatic/Pneumatic Release - Priming Water After Releases Have Activated
The Viking Corporation, 210 N Industrial Park Drive, Hastings MI 49058
Telephone: 269-945-9501 Technical Services 877-384-5464 Fax: 269-818-1680 Email: [email protected]
February, 2010
Page 25
TECHNICAL DATA
PREACTION SPRINKLER
SYSTEM
Figure 13a: Double Interlock Preaction System with Electric/Pneu-Lectric Release
The Viking Corporation, 210 N Industrial Park Drive, Hastings MI 49058
Telephone: 269-945-9501 Technical Services: 877-384-5464 Fax: 269-818-1680 Email: [email protected]
Page 26
February, 2010
TECHNICAL DATA
PREACTION SPRINKLER
SYSTEM
Figure 13b: Double Interlock Preaction System with Electric/Pneu-Lectric Release - Priming Water in Set Position
The Viking Corporation, 210 N Industrial Park Drive, Hastings MI 49058
Telephone: 269-945-9501 Technical Services 877-384-5464 Fax: 269-818-1680 Email: [email protected]
February, 2010
Page 27
TECHNICAL DATA
PREACTION SPRINKLER
SYSTEM
Figure 13c: Double Interlock Preaction System with Electric/Pneu-Lectric Release - Priming Water After Solenoid Opens
The Viking Corporation, 210 N Industrial Park Drive, Hastings MI 49058
Telephone: 269-945-9501 Technical Services: 877-384-5464 Fax: 269-818-1680 Email: [email protected]
Page 28
February, 2010
TECHNICAL DATA
PREACTION SPRINKLER
SYSTEM
The Viking Corporation, 210 N Industrial Park Drive, Hastings MI 49058
Telephone: 269-945-9501 Technical Services 877-384-5464 Fax: 269-818-1680 Email: [email protected]
C. Non-Interlock Preaction System (Figures 14a-15c)
The non-interlock preaction system utilizes a Viking deluge valve, which may be opened either by the
fusing of a sprinkler in the sprinkler piping or by the operation of the detection system. The sprinkler
piping contains air or nitrogen under pressure. If the detection system does not operate, the sprinkler
system will operate as a dry pipe system. If the sprinkler piping is broken or the sprinkler operates,
the valve will open and water will flow. If the detection system operates due to fire, damage, or malfunction, the valve will open, but the water will be contained in the sprinkler piping. The system is
supervised to indicate low air pressure.
1. Electric Release
For electrical actuation of the deluge valve, a tee is installed between the PORV and the pneumatic actuator and piped to a solenoid valve to an open drain. (Refer to Figures 14a-14c.)
2. Pneumatic Release
For pneumatic detection in non-interlocked preaction systems, a pneumatic actuator is installed
on the 1/2” tee above the emergency release. (Refer to Figures 15a and 15b.) The pneumatic
release system and sprinkler system supervisory air supply are cross connected. Therefore, with
a loss of air pressure in either the release line or sprinkler piping, the pneumatic actuator opens
(Figure 15c) to vent the priming chamber of the deluge valve faster than the water can be replaced
through the restricted orifice in the priming line connection, thus opening the deluge valve.
When a sprinkler system operates before the detection system, the preaction system piping is
cross connected to the pneumatic release line. The deluge valve will operate the same as before
once the pneumatic actuator opens. A check valve is installed in the cross connection so the reaction to release devices is not delayed by the volume of air in the system piping.
February, 2010
Page 29
TECHNICAL DATA
PREACTION SPRINKLER
SYSTEM
Figure 14a: Non-Interlock Preaction System with Electric Release
The Viking Corporation, 210 N Industrial Park Drive, Hastings MI 49058
Telephone: 269-945-9501 Technical Services: 877-384-5464 Fax: 269-818-1680 Email: [email protected]
Page 30
February, 2010
TECHNICAL DATA
PREACTION SPRINKLER
SYSTEM
Figure 14b: Non-Interlock Preaction System with Electric Release - Priming Water in Set Position
The Viking Corporation, 210 N Industrial Park Drive, Hastings MI 49058
Telephone: 269-945-9501 Technical Services 877-384-5464 Fax: 269-818-1680 Email: [email protected]
February, 2010
Page 31
TECHNICAL DATA
PREACTION SPRINKLER
SYSTEM
Figure 14c: Non-Interlock Preaction System with Electric Release - Priming Water After Solenoid or Pneumatic Actuator Open
The Viking Corporation, 210 N Industrial Park Drive, Hastings MI 49058
Telephone: 269-945-9501 Technical Services: 877-384-5464 Fax: 269-818-1680 Email: [email protected]
Page 32
February, 2010
TECHNICAL DATA
PREACTION SPRINKLER
SYSTEM
Figure 15a: Non-Interlock Preaction System with Pneumatic Release
The Viking Corporation, 210 N Industrial Park Drive, Hastings MI 49058
Telephone: 269-945-9501 Technical Services 877-384-5464 Fax: 269-818-1680 Email: [email protected]
February, 2010
Page 33
TECHNICAL DATA
PREACTION SPRINKLER
SYSTEM
Figure 15b: Non-Interlock Preaction System with Pneumatic Release - Priming Water in Set Position
The Viking Corporation, 210 N Industrial Park Drive, Hastings MI 49058
Telephone: 269-945-9501 Technical Services: 877-384-5464 Fax: 269-818-1680 Email: [email protected]
Page 34
February, 2010
TECHNICAL DATA
PREACTION SPRINKLER
SYSTEM
Figure 15c: Non-Interlock Preaction System with Pneumatic Release - Priming Water After Pneumatic Actuator Has Opened
The Viking Corporation, 210 N Industrial Park Drive, Hastings MI 49058
Telephone: 269-945-9501 Technical Services 877-384-5464 Fax: 269-818-1680 Email: [email protected]
February, 2010
Page 35
TECHNICAL DATA
PREACTION SPRINKLER
SYSTEM
The Viking Corporation, 210 N Industrial Park Drive, Hastings MI 49058
Telephone: 269-945-9501 Technical Services: 877-384-5464 Fax: 269-818-1680 Email: [email protected]
D. TRIMPAC®
Figure 16: Viking Trimpac®
Viking’s Trimpac® is a factory assembled trim package including a
specific release device for a single or double interlocked preaction
system, with the standard trim contained in a single cabinet (Figure
16). Trimpac® provides access doors for the emergency release and
alarm test valve for manual operation of these trim valves. Trimpac®
is equipped with priming water pressure and water supply gauge
view-ports for easy monitoring of water pressures. The enclosure
protects trim valves from inadvertent operation, while stainless steel
hoses (or field provided hard piping) from the valve body to the
cabinet allows the assembly to be installed up to 5 ft away from the
deluge/flow control valve.
Figure 17: Trimpac® Air Line Trim
Page 36
February, 2010
TECHNICAL DATA
PREACTION SPRINKLER
SYSTEM
The Viking Corporation, 210 N Industrial Park Drive, Hastings MI 49058
Telephone: 269-945-9501 Technical Services 877-384-5464 Fax: 269-818-1680 Email: [email protected]
Trimpac® can be utilized for systems regardless of valve size. A valve drain package is required for the deluge/flow control valve and is ordered based on valve size.
NOTE: The Trimpac® trim assembly must be installed to facilitate drainage, must be installed an area not
subject to freezing, and must be installed above the elevation of the drip check valve. Refer to the technical
data pages.
Trimpac® Air Line Trim
Trimpac® air line trim is for use with Trimpac® single interlock or double interlock preaction systems including
Surefire® (see Figure 17 for example). The air line connects to the pneumatic sensing line of the Trimpac®
cabinet and includes approximately 10 ft of copper tubing, air gauge, an air maintenance loop (when used with
a tank mounted compressor), pressure switch, check valve, and fittings. Note that the Trimpac® air line trim is
ordered separately from the Trimac®. Refer to technical data pages for additional information.
E. TRIMPAC® SUREFIRE®
Viking’s Trimpac® Surefire® is unique system that provides failsafe operation upon loss of the primary
and secondary power supplies. The Surefire® system is a factory assembled trim package for use
with a deluge valve, with standard trim contained in a Trimpac® cabinet as described on page 35.
Trimpac® eliminates the field assembly of the deluge valve trim and release module piping. Trimpac®
Surfire® Single Interlock or Double Interlock Preaction Systems are designed with an electric release
system.
The system piping is normally dry and pnuematically pressurized to supervise the integrity of the piping, fitting and sprinklers.
1. Trimpac® Surefire® Single Interlock Preaction System (Figure 18a)
System water supply pressure enters the priming chamber of the deluge valve through the 1/2”
(13 mm) priming line, which includes a normally open priming valve, strainer, restricted orifice,
and check valve. In the SET condition, water supply pressure is trapped in the priming chamber
by check valve, normally closed emergency release, pressure operated relief valve, pneumatic
actuator, and normally closed release solenoid valve. Water supply pressure in the priming chamber holds the clapper of the deluge valve on the seat due to the differential design of the valve
pressure. The clapper separates the inlet chamber from the outlet chamber, keeping the outlet
chamber and system piping dry.
In fire conditions, when the detection system operates, the VFR400 Control Panel activates the
system alarm and energizes normally closed release solenoid valve open. Pressure is released
from the priming chamber faster than it is supplied through restricted orifice. The deluge valve
clapper opens to allow water to flow into the system piping and to alarm devices. Water entering
the system piping increases pressure on the PORV, which vents the water supply to the prime
chamber. Water will flow from any open sprinklers or nozzles.
2. Trimpac® Surefire® Double Interlock Preaction System (Figure 18b)
System water supply pressure enters the priming chamber of the deluge valve through the 1/4”
(8 mm) hose and 1/2” priming line which includes a normally open priming valve, strainer, restricted orifice and check valve. In the SET condition, water supply pressure is trapped in the priming chamber by check valve, normally closed emergency release, pneumatic actuator, pressure
operated relief valve (PORV) and normally closed release solenoid valve. Water supply pressure
in the priming chamber holds the clapper of the deluge valve on the seat due to the differential
design of the valve pressure. The clapper separates the inlet chamber from the outlet chamber,
keeping the outlet chamber and system piping dry.
February, 2010
Page 37
TECHNICAL DATA
PREACTION SPRINKLER
SYSTEM
The Viking Corporation, 210 N Industrial Park Drive, Hastings MI 49058
Telephone: 269-945-9501 Technical Services: 877-384-5464 Fax: 269-818-1680 Email: [email protected]
Figure 18a: Trimpac® Surefire Single Interlock Preaction System
Page 38
February, 2010
TECHNICAL DATA
PREACTION SPRINKLER
SYSTEM
The Viking Corporation, 210 N Industrial Park Drive, Hastings MI 49058
Telephone: 269-945-9501 Technical Services 877-384-5464 Fax: 269-818-1680 Email: [email protected]
Figure 18b: Trimpac® Surefire Double Interlock Preaction System
February, 2010
Page 39
TECHNICAL DATA
PREACTION SPRINKLER
SYSTEM
The Viking Corporation, 210 N Industrial Park Drive, Hastings MI 49058
Telephone: 269-945-9501 Technical Services: 877-384-5464 Fax: 269-818-1680 Email: [email protected]
In fire conditions, when the detection system operates, the VFR400 Control Panel activates the
system alarm and initiates the appropriate detection alarms. No water enters the system piping
at this time. When a sprinkler operates, system supervisory air is lost, and the low air pressure
switch is activated. Only after both indicating circuits have operated, the VFR400 Control Panel
energizes normally closed release solenoid valve open and normally open release solenoid valve
closed.
Pressure is released from the priming chamber faster than it is supplied through restricted orifice.
The deluge valve clapper opens to allow water flow into the system piping and to alarm devices.
Water entering the system piping increases pressure on the PORV, which vents off the water supply to the priming chamber. Water will flow from any open sprinklers or nozzles.
F.
SUREFIRE® PREACTION SYSTEM WITH THE MODEL G SERIES VALVE (Figure 19)
Viking supervised Surefire® Preaction Systems utilize the Model G-2000P, G-3000P, or G-4000P
Valve. The system piping is pressurized with air or nitrogen for all Surefire® systems as part of the fail
safe release and to supervise the integrity of the piping under normal power conditions. This feature
serves to prevent undetected leaks in the system piping network and allows automatic fire protection
upon complete loss of power. If the system piping or a sprinkler is damaged, the supervisory pressure
is reduced and a “low air” supervisory alarm is activated.
Surefire® preaction systems require one 24 VDC normally closed electric solenoid valve and one
24 VDC normally open solenoid valve controlled by the Viking VFR-400 Release Control Panel with
a compatible detection system. In addition, a pneumatic actuator is required as part of the release
system.
In the set position, when air pressure is introduced into the sprinkler piping, the sensing end of the
pneumatic actuator is pressurized. This closes the pneumatic actuator. The closed pneumatic actuator, and the normally closed solenoid valve prevent prime water from escaping the prime chamber of
the deluge valve. When prime water enters the prime chamber, the rolling diaphragm is pressurized,
causing it to expand downward onto the water seat.
1. Surefire® Single Interlock Preaction System
When the detection system operates, the normally closed solenoid valve is powered open. Prime
water is drained from the prime chamber, causing the deluge valve to open, filling the sprinkler
piping with water. Water from the intermediate chamber of the deluge valve pressurizes the sensing end of the D-1 PORV causing the PORV to open. The open PORV prevents water pressure
from building in the deluge valve prime chamber.
2. Surefire® Double Interlock Preaction System
When the detection system operates and a sprinkler head operates, the normally closed solenoid
valve is powered open. Prime water is drained from the prime chamber, causing the deluge valve
to open, filling the sprinkler piping with water. Water from the intermediate chamber of the deluge
valve pressurizes the sensing end of the D-1 PORV, causing the PORV to open. The open PORV
prevents water pressure from building in the deluge valve prime chamber.
Page 40
February, 2010
TECHNICAL DATA
PREACTION SPRINKLER
SYSTEM
The Viking Corporation, 210 N Industrial Park Drive, Hastings MI 49058
Telephone: 269-945-9501 Technical Services 877-384-5464 Fax: 269-818-1680 Email: [email protected]
Figure 19: Surefire® Preaction System
February, 2010
Page 41
TECHNICAL DATA
PREACTION SPRINKLER
SYSTEM
The Viking Corporation, 210 N Industrial Park Drive, Hastings MI 49058
Telephone: 269-945-9501 Technical Services: 877-384-5464 Fax: 269-818-1680 Email: [email protected]
III.
SYSTEM REQUIREMENTS
Section 7.3 of NFPA 13† provides the installation rules and characteristics that are unique to preaction systems. Also, refer to NFPA 72 National Fire Alarm Code for specific requirements on the design of electrical
detection systems.
System Size
For single and non-interlock preaction systems, no more than 1,000 automatic sprinklers shall be controlled by any one deluge valve per section 7.3.2.2 of NFPA 13†.
For double interlock systems, system size is determined by ONE of the following, per section 7.3.2.3 of NFPA 13†:
1. The system shall be designed to deliver water to the system test connection in no more than 60
seconds, starting at the normal air pressure on the system, with the detection system activated
and the inspection test connection fully opened simultaneously.
2. System size shall be based on calculating water delivery based on hazard, in accordance with section 7.2.3.6 of NFPA 13† (same as for dry systems), anticipating that the detection system activation and sprinkler operation will be simultaneous. NOTE: Fires in higher hazard materials produce
higher heat release rates are expected to activate a greater number of sprinklers, as reflected in
the table. A larger number of open sprinklers results in water moving faster from the deluge valve
and piping to the open sprinklers.
NFPA 13 requires any calculation program and method to be listed by a nationally recognized
testing laboratory. System is to be sized so that initial water discharge at the system test valve or
manifold outlet is not more than those in Table 1, starting at normal air pressure on the system and
at the time of fully opened test connection.
3. System size shall be designed to deliver water to the system test connection in no more than 60
seconds, starting at the normal air pressure on the system, with the detection system activated
and the inspection test connection, arranged to comply with Table 1, opened simultaneously.
NFPA 13 permits a listed quick-opening device to be used to help meet the above requirements.
†NFPA 13-2007 edition.
TABLE 1: SYSTEM WATER DELIVERY
Hazard
Number of Most Remote Sprinklers Initially Open
Maximum Time of Water Delivery
Residential
1
15 seconds
Light
1
60 seconds
Ordinary I
2
50 seconds
Ordinary II
2
50 seconds
Extra I
4
45 seconds
Extra II
4
45 seconds
High Piled
4
40 seconds
Supervision
Single interlock preaction systems have a minimum pressure requirement of 7 PSI (0.5 bar) per NFPA 13,
while non-interlock and double interlock preaction systems are required to maintain a minimum supervising
air pressure as follows:
1. For Viking non-interlock preaction systems and double interlock preaction systems with pneumatic/
pneumatic release or electric/pneumatic release: Provide 30 PSI (2.1 bar) pneumatic pressure to
the pneumatic release system (or sprinkler system) and pneumatic actuator for system water pressures of 175 PSI (12 bar) or less. For system water pressures above 175 PSI, up to a maximum
of 250 PSI (17 bar), provide 50 PSI (3.4 bar) pneumatic pressure to the pneumatic release system
(or sprinkler system) and pneumatic actuator.
Page 42
February, 2010
TECHNICAL DATA
PREACTION SPRINKLER
SYSTEM
The Viking Corporation, 210 N Industrial Park Drive, Hastings MI 49058
Telephone: 269-945-9501 Technical Services 877-384-5464 Fax: 269-818-1680 Email: [email protected]
TABLE 2: RECOMMENDED PNEUMATIC SUPERVISORY PRESSURES AND SETTINGS
FOR VIKING DOUBLE INTERLOCK PREACTION SYSTEMS WITH ELECTRIC/PNEU-LECTRIC RELEASE
(FOR SYSTEMS USING A MODEL E OR F SERIES DELUGE VALVE)
Device
For Supervisory Pressure of 30 PSI (2.1 bar)
Set to Maintain
For Supervisory Pressure of 10 PSI (.7 bar)
Set to Maintain
Air Maintenance Device
30 PSI (2.1 bar)
10 PSI (.7 bar)
Low-Air Alarm Contact Setting on Release
System Pressure Supervisory Switch
25 PSI (1.7 bar) On Pressure Drop
7.5 PSI (.52 bar) On Pressure Drop
Setting for Contacts on Release System
Pressure Supervisory Switch to activate
Release Control Panel Initiating Circuit
20 PSI (1.4 bar) on Pressure Drop
5 PSI (.34 bar) on Pressure Drop
Set release system air pressure supervisory switch to activate at 25 PSI (1.7 bar) on pressure drop
for system water pressures of 175 PSI (12 bar) or less. For system water pressures above 175 PSI,
up to a maximum of 250 PSI (17 bar), set the air pressure supervisory switch to activate at 45 PSI
(2.4 bar) on pressure drop. Air pressure supervisory switch should be wired to activate an alarm to
signal a low air pressure condition. Activation of an alarm to signal a high pressure condition may be
required. Refer to applicable installation standards and the Authority Having Jurisdiction.
2A. For Viking double interlock preaction systems with electric/pneu-lectric release using a Model E
or F series deluge valve: Refer to the settings in Table 2. Recommended pneumatic supervisory
pressure in the closed sprinkler piping is 30 PSI (2.1 bar). The air supervisory switch should be
equipped with two sets of independently adjustable contacts. On systems with a Model E or F
series deluge valve, use the Viking Pressure Supervisory Switch as air supervisory switch.
For 30 PSI (2.1 bar) supervisory pressure:
Adjust one set of contacts of air supervisory switch to activate at 25 PSI (1.7 bar) on pressure drop.
These contacts should be wired to activate a “Low-Air” supervisory alarm.
The other set of contacts in the air supervisory switch should activate at 20 PSI (1.4 bar) on pressure drop. Wire these contacts to activate the remaining initiating circuit of the system control panel
configured for “cross-zoned” operation. For the VFR400 Release Control Panel, refer to the appropriate
wiring diagram packed with the panel. Activation of an alarm to signal a high-pressure condition may
be required. Refer to applicable installation standards and the Authority Having Jurisdiction.
Installation Standards may allow supervisory pressures lower than those recommended above.
For pneumatic supervisory pressure of 10 PSI (.7 bar), use Viking Alarm Pressure Switch as air
supervisory switch.
For 10 PSI (.7 bar) Supervisory Pressure:
Adjust one set of contacts of air supervisory switch to activate at 7.5 PSI (.52 bar) on pressure
drop. These contacts should be wired to activate a “Low-Air” supervisory alarm.
The other set of contacts in air supervisory switch should activate at 5 PSI (3.4 bar) on pressure drop.
Wire these contacts to activate the remaining initiating circuit of the system control panel configured
for “cross-zoned” operation. For the VFR400 Release Control Panel, refer to the appropriate wiring
diagram packed with the panel. Activation of an alarm to signal a high-pressure condition may be
required. Refer to applicable installation standards and the Authority Having Jurisdiction.
Note: When using supervisory pressures, settings, or equipment other than those recommended
above, verify that air regulation equipment and air supervisory switches used are compatible with
the supervisory pressure setting used.
Supervisory pressures other than the recommended settings noted above may affect operation of
the system.
Release Devices
The release system shall serve all areas that the preaction system protects to ensure that in the event of
a fire, the release system will activate and provide water to the system and the affected area. There are
a number of release system devices that can be used in the detection system. The simplest of these is to
use sprinklers in a pilot line under system water pressure. The pilot line is piped to the area protected with
connections to the emergency release.
February, 2010
Page 43
TECHNICAL DATA
PREACTION SPRINKLER
SYSTEM
The Viking Corporation, 210 N Industrial Park Drive, Hastings MI 49058
Telephone: 269-945-9501 Technical Services: 877-384-5464 Fax: 269-818-1680 Email: [email protected]
Figure 20a: Preaction System with Pilot Line Loss of Air Activates General Alarm
NOTE: Section 6.9.2.3 of NFPA 13† requires the alarm apparatus for preaction systems to consist of
alarms actuated independently by the detection system and the flow of water (Figures 20a-20c). Preaction
systems activated by pilot sprinklers are not required to have an independent detection system alarm.
Page 44
February, 2010
TECHNICAL DATA
PREACTION SPRINKLER
SYSTEM
Figure 20b: Preaction System with Electric Detection Activates General Alarm
The Viking Corporation, 210 N Industrial Park Drive, Hastings MI 49058
Telephone: 269-945-9501 Technical Services 877-384-5464 Fax: 269-818-1680 Email: [email protected]
February, 2010
Page 45
TECHNICAL DATA
PREACTION SPRINKLER
SYSTEM
Figure 20c: Preaction System with Electric Detection - Emergency Release
The Viking Corporation, 210 N Industrial Park Drive, Hastings MI 49058
Telephone: 269-945-9501 Technical Services: 877-384-5464 Fax: 269-818-1680 Email: [email protected]
Page 46
February, 2010
TECHNICAL DATA
PREACTION SPRINKLER
SYSTEM
The Viking Corporation, 210 N Industrial Park Drive, Hastings MI 49058
Telephone: 269-945-9501 Technical Services 877-384-5464 Fax: 269-818-1680 Email: [email protected]
Releasing devices, including automatic sprinklers used as releasing devices, are listed with specific spacing requirements that must be followed. Any listed sprinkler can be used on the system, however, Viking
recommends the Microfast® Model M Fixed Temperature Release because of its maximum spacing allowance (Figure 21). NOTE: Where thermal activation is utilized, the activation temperature of the release
system shall be lower than the activation temperature of the sprinkler to allow the releasing device to operate before the sprinkler system. While simple, using automatic sprinklers as a method of release may not
be fast enough in many situations.
To speed up system operation, the most common release device utilized is the Viking Model C Rate of
Rise Release. The Model C will activate the system when the temperature in the protected area increases
at a rate of more than 15 °F per minute. Pressure from the release line flows through a small hole in the
release’s diaphragm to exert pressure on the diaphragm, forcing the clapper in the release closed against
its seat. The mechanics of release operation begin with a rapid change in temperature. When the release is
subjected to a rate of temperature increase greater than 15 °F per minute, the tube element expands more
rapidly than the rod element because of its relatively large surface area and small mass (Figure 22).
Figure 21
Figure 22: Model C-1 Thermostatic Release
Figure 23
February, 2010
Page 47
TECHNICAL DATA
PREACTION SPRINKLER
SYSTEM
The Viking Corporation, 210 N Industrial Park Drive, Hastings MI 49058
Telephone: 269-945-9501 Technical Services: 877-384-5464 Fax: 269-818-1680 Email: [email protected]
The force pulling on the lever arm depresses a schrader valve stem, sending the pressure above the diaphragm faster than it can be replenished through the small hole in the diaphragm (Figure 23). The pressure
under the clapper lifts it, allowing the release line pressure to be vented through the drain outlet (Figure
24).
The unit is self-resetting when operated as a rate of rise device. The unit may also be equipped with a
fixed temperature release that will release the system at a preset temperature regardless of the rate of
temperature increase. The release can be mounted at any angle and there is no limit on the number of
them that can be on a single line (Figure 25).
†NFPA 13-2007 edition.
Figure 24
Figure 25: Model C-1 Thermostatic Release
Page 48
February, 2010
TECHNICAL DATA
PREACTION SPRINKLER
SYSTEM
The Viking Corporation, 210 N Industrial Park Drive, Hastings MI 49058
Telephone: 269-945-9501 Technical Services 877-384-5464 Fax: 269-818-1680 Email: [email protected]
Device Compatibility
All components of pneumatic, hydraulic, or electrical systems shall be compatible to ensure that all system
components function as an integrated unit. For example, in electrical systems, the solenoid valve must be
listed with the deluge valve, and the fire detection system, including the control panel. Correct coordination of the detection devices, the releasing equipment, and the control panel is imperative for prompt and
reliable operation of the system.
Hydraulic Release System Requirements
Hydraulic release systems may utilize rate-of-temperature rise, fixed-temperature, manual releasing devices, or combinations thereof. Hydraulic release systems are normally the least expensive of possible
release systems; however, they must not be installed in areas that are not subject to freezing.
Release Lines: Use galvanized steel pipe or corrosion-resistant tubing, such as copper or brass for release
lines. Do not exceed 1,000 ft. (304.8 m) of ½” (15 mm) pipe in a release-line system. In systems over this
capacity, larger pipe sizing is required.
Maximum Allowable Height Of Release Line Above The Deluge Valve: Under certain conditions, the deluge
valve may be subject to water columning. To prevent this, hydraulic release system piping must not exceed
the maximum elevation allowed for hydraulic release piping above the deluge valve as indicated in the
listing. Refer to current technical data for the Viking deluge valve used.
Pneumatic Release System Requirements
Pneumatic release systems may utilize rate-of-rise, fixed-temperature, manual releasing devices, or
combinations thereof. Pneumatic release systems may be used in most areas. Valve trip-time may vary
depending on the length of the release line and the air pressure maintained on the release system.
Air is commonly used in the release line where freezing is a concern. However, air systems require a dry
air supply, a means of transitioning from air to water in the release line, and a release line maximum of
1,000 ft. The device used to accomplish the transition is Viking’s Model H-1 Pneumatic Actuator (Figure
26). Its inlet is subject to system water pressure (Figure 27). Its priming chamber is subject to release line
air pressure of 30 PSI minimum and its outlet is open to drain (Figure 28).
Air pressure on the priming chamber of the actuator forces the diaphragm and piston assembly to seal the
inlet from the outlet (Figure 29). With its differential design, the relatively low pressure in the priming chamber will control a higher water inlet pressure. When a pilot line release opens and relieves air pressure in the
actuator priming chamber, the inlet pressure and the spring force the diaphragm and the piston assembly to
move, allowing the inlet water pressure to be relieved through the outlet (Figure 30).
Figure 26
February, 2010
Page 49
TECHNICAL DATA
PREACTION SPRINKLER
SYSTEM
The Viking Corporation, 210 N Industrial Park Drive, Hastings MI 49058
Telephone: 269-945-9501 Technical Services: 877-384-5464 Fax: 269-818-1680 Email: [email protected]
Figure 27
Figure 28
Figure 29
Figure 30
Page 50
February, 2010
TECHNICAL DATA
PREACTION SPRINKLER
SYSTEM
The Viking Corporation, 210 N Industrial Park Drive, Hastings MI 49058
Telephone: 269-945-9501 Technical Services 877-384-5464 Fax: 269-818-1680 Email: [email protected]
Pressure to be Maintained in a Pneumatic Release System: For recommended pneumatic (air or nitrogen)
pressures to be maintained in pneumatic release systems, refer to current Viking technical data for the system
used. For additional information concerning pneumatic release system equipment, devices, and installation
instructions, refer to the Viking Engineering and Design Data book section describing Pneumatic Supplies.
Release Line Restriction: All pneumatic-release systems must be equipped with a restricted orifice in the
air or nitrogen supply to ensure that the automatic air supply cannot replace pneumatic pressure as fast
as it escapes when a releasing device operates.
This restriction is already incorporated in the Viking air maintenance device and release line air supply
assembly. The air maintenance device contains a 1/16 inch (.16 mm) orifice (Figure 31), which restricts
the flow of air into the system so that when a sprinkler opens, air pressure will not enter the system faster
than it will discharge through a sprinkler. The bypass valve is kept closed and opened only to speed up the
filling of the system piping to the required pressure in the required time.
Reducing Trip Time: If the system trip time is excessive, it can be substantially reduced by one or more of
the following:
1. Add a check valve (Circle Seal or equivalent) in branch portions of the release-line system. (Install
so flow is toward releasing device).
2. Install an optional accelerator on the pneumatic release system to provide earlier alarms and/or allow the
system to trip faster. An accelerator may be necessary to meet system discharge time requirements.
Release Line Dehydrator: Due to problems that accumulated condensation can cause, especially on
freezer systems, all pneumatic release systems must be provided with a properly sized and maintained air
dehydrator installed on the air supply (Figure 32). It is important that the color of the desiccant be checked
at regular intervals to ensure its drying capability.
Pneumatic Supply: Refer to Viking technical data, system data, and associated schematic drawings for
the preaction system used. Also, refer to the Viking Engineering and Design Data book section describing
“Pneumatic Supplies” for additional information on pneumatic (air or nitrogen) equipment, devices, and
installation requirements.
Figure 31
Electric Release System Requirements
Viking preaction systems can be activated electrically through the use of a solenoid valve (Figures 32 and
33). The solenoid reacts to device actuation by opening, relieving pressure from the priming chamber of
the deluge valve (Figure 34). Note the electrical characteristics of the solenoid valve, as it must be compatible with the system control panel and other electrical components. Observe all manufacturer’s technical
instructions.
February, 2010
Page 51
TECHNICAL DATA
PREACTION SPRINKLER
SYSTEM
Figure 32: Release Line Dehydrator (Shown with a Model F-1 Deluge Valve and Trim)
The Viking Corporation, 210 N Industrial Park Drive, Hastings MI 49058
Telephone: 269-945-9501 Technical Services: 877-384-5464 Fax: 269-818-1680 Email: [email protected]
Page 52
February, 2010
TECHNICAL DATA
PREACTION SPRINKLER
SYSTEM
The Viking Corporation, 210 N Industrial Park Drive, Hastings MI 49058
Telephone: 269-945-9501 Technical Services 877-384-5464 Fax: 269-818-1680 Email: [email protected]
Figure 33
Figure 34
Figure 35
February, 2010
Page 53
TECHNICAL DATA
PREACTION SPRINKLER
SYSTEM
The Viking Corporation, 210 N Industrial Park Drive, Hastings MI 49058
Telephone: 269-945-9501 Technical Services: 877-384-5464 Fax: 269-818-1680 Email: [email protected]
Location of Release and Pressure Switch: The location of the solenoid valve is shown on the various system data sheets. Flow through the release must be in the direction indicated. The pressure switch in the
release control unit system is located in the alarm line.
Manually-Operated Release System Requirements
Manually operated release systems are usually integrated into one of the other types of release systems.
NFPA 13 requires the manual release device to be a stand-alone arrangement to ensure operation, regardless of the potential failure of the associated detection system. Normally a system will incorporate a
manual (emergency) release at the valve, exits, operator station, or other convenient locations to operate
the system during a fire emergency.
Any time the handle inside emergency release is pulled, pressure is released from the priming chamber;
the deluge valve will open but the water will be contained in the sprinkler piping. Water motor alarm and
alarms connected to alarm pressure switch will activate. If a sprinkler head opens, water will flow from the
system.
Release Control Panel
The release panel is an essential component for system operation and is required to be listed.
Note that NFPA 72 (sections 3.3.64 and 3.3.67) provides the following definitions related to the release
control panel (fire alarm control unit) and fire alarm system:
Release Control Panel
The release panel is an essential component for system operation and is required to be listed.
Note that NFPA 72 (sections 3.3.64 and 3.3.67) provides the following definitions related to the release
control panel (fire alarm control unit) and fire alarm system:
Fire Alarm Control Unit: A component of the fire alarm system, provided with primary and secondary power
sources, which receives signals from initiating devices or other fire alarm control units, and processes
these signals to determine part or all of the required fire alarm system output function(s).
Releasing Service Fire Alarm Control Unit: A protected premises fire alarm control unit specifically
listed for releasing service that is part of a fire suppression system and which provides control
outputs to release a fire suppression agent based on either automatic or manual input.
Fire Alarm System: A system or portion of a combination system that consists of components and
circuits arranged to monitor and annunciate the status of fire alarm or supervisory signal-initiating
devices and to initiate the appropriate response to those signals.
Releasing Fire Alarm System: A protected premises fire alarm system that is part of a fire suppression system and/or which provides control inputs to a fire suppression system and/or which
provides control inputs to a fire suppression system related to the fire suppression systems
sequence of operations and outputs for other signaling and notification.
Devices for Test Purposes and Testing Apparatus
Where detection devices installed in circuits are located where not readily accessible for testing, Section
7.3.1.7 of NFPA 13† requires an additional detection device to be provided on each circuit for test purposes
at an accessible location. The device shall be connected to the circuit at a point that will ensure a proper
test of the circuit.
The testing device used must be capable of producing the heat or impulse necessary to operate any normal detection device and shall be furnished by to the property owner with each installation.
Where explosive vapors or materials exist, other methods of testing that don’t involve an ingnition source
(such as hot water or steam) shall be used.
Page 54
February, 2010
TECHNICAL DATA
PREACTION SPRINKLER
SYSTEM
The Viking Corporation, 210 N Industrial Park Drive, Hastings MI 49058
Telephone: 269-945-9501 Technical Services 877-384-5464 Fax: 269-818-1680 Email: [email protected]
Figure 36
Water Control Valves
Section 7.3.1.2 of NFPA 13† requires the automatic water control valve to be provided with hydraulic,
pneumatic, or mechanical manual means for operation that is independent of detection devices and of the
sprinklers (Figure 36).
Valve Rooms and Protection Against Freezing
The deluge valve, system water control valves and supply pipes must be protected against freezing. A
heated enclosure may be required. NFPA 13 section 7.3.1.8.2† requires valve rooms to be lighted and
heated with a permanent heat source, such as a baseboard or unit heater. Note: Heat tape is not permitted
to be used in lieu of heated valve enclosures to protect deluge valves and supply pipe against freezing.
Pressure Gauges
NFPA 13† requires listed pressure gauges to be installed below the deluge valve and on the air supply to
deluge valves. Refer to NFPA 13 section 8.17.3† for additional information on gauges.
February, 2010
Page 55
TECHNICAL DATA
PREACTION SPRINKLER
SYSTEM
The Viking Corporation, 210 N Industrial Park Drive, Hastings MI 49058
Telephone: 269-945-9501 Technical Services: 877-384-5464 Fax: 269-818-1680 Email: [email protected]
Auxiliary Drains
Section 8.16.2.5.3 of NFPA 13† requires auxiliary drains where a change in piping direction prevents drainage of system piping through the main drain valve. Where the capacity of trapped sections of pipe is less
than 5 gal (18.9 L), the drain shall consist of a valve at least 1/2” (15 mm) and a plug or nipple and cap.
Where the capacity of isolated trapped sections of system piping is more than 5 gal (18.9 L), the auxiliary
drain shall consist of two 1” (25 mm) valves and one 2” x 12” (50 mm x 305 mm) condensate nipple or
equivalent, accessibly located in accordance with Figure 8.16.2.5.3.4 of NFPA 13†. Note that listed equivalent products are now available.
Tie-in drains are not required on preaction systems protecting non-freezing environments. Adjacent trapped
branch lines must be provided with tie-in drains. It is recommended to limited the number of branch lines
tied together; the tie-in drains are restricted to a maximum of 1” (25 mm). Auxiliary drains located in areas
subject to freezing shall be readily accessible.
Systems with low point drains shall have a sign at the preaction valve indicating the number of low point
drains and the location of each individual drain.
NOTE: Auxiliary drains are not for pipe drops supplying dry pendent sprinklers installed in accordance with
section 7.2.2 of NFPA 13†.
†NFPA 13 or NFPA 72-2007 edition.
IV.
PLACING THE SYSTEM IN SERVICE
(Refer to technical data.)
V.
PREACTION SYSTEM INSPECTIONS, TESTS, AND MAINTENANCE
NOTICE: THE OWNER IS RESPONSIBLE FOR MAINTAINING THE FIRE-PROTECTION SYSTEM
AND DEVICES IN PROPER OPERATING CONDITION. THE DELUGE VALVE MUST BE KEPT FROM
FREEZING CONDITIONS AND PHYSICAL DAMAGE THAT COULD IMPAIR ITS OPERATION.
WARNING: ANY SYSTEM MAINTENANCE THAT INVOLVES PLACING A CONTROL VALVE OR DETECTION SYSTEM OUT OF SERVICE MAY ELIMINATE THE FIRE-PROTECTION CAPABILITIES OF THAT SYSTEM. PRIOR TO PROCEEDING, NOTIFY ALL AUTHORITIES HAVING JURISDICTION. CONSIDERATION
SHOULD BE GIVEN TO EMPLOYMENT OF A FIRE PATROL IN THE AFFECTED AREAS.
It is imperative that the system be inspected and tested on a regular basis in accordance with NFPA 25.
During all inspections, testing, and maintenance activities the valve, trim, piping, alarm devices, and connected equipment must be visually inspected for foreign matter, physical damage, freezing, corrosion, or
other conditions that may inhibit the proper operation of the system.
The following recommendations are minimum requirements. The frequency of the inspections may vary
due to contaminated or corrosive water supplies and corrosive atmospheres. In addition, the alarm devices, detection systems, or other connected equipment may require more frequent inspections. Refer to
the system description, sections in this manual specifically for each component of the system and type of
release system, applicable codes, and the authority having jurisdiction for minimum requirements. Prior to
testing the equipment, notify appropriate personnel.
Weekly visual inspection of the Viking deluge valve is recommended.
1. Verify that the main water supply control valve is open and that all other valves are in their normal
operating position and appropriately secured. For normal operating position, refer to trim charts and
system data for the system used.
2. Check for signs of mechanical damage, leakage, and/or corrosive activity. If detected, perform maintenance as required. If necessary, replace the device.
3. Verify that the valve and trim are adequately heated and protected from freezing and physical damage.
Page 56
February, 2010
TECHNICAL DATA
PREACTION SPRINKLER
SYSTEM
The Viking Corporation, 210 N Industrial Park Drive, Hastings MI 49058
Telephone: 269-945-9501 Technical Services 877-384-5464 Fax: 269-818-1680 Email: [email protected]
A. Quarterly Water Flow Alarm Test
Quarterly testing of water flow alarms and performance of a main drain test is recommended and may
be required by the Authority Having Jurisdiction.
1. Notify the Authority Having Jurisdiction and those in the area affected by the test.
2. To test the local electric alarm (if provided) and/or mechanical water motor alarm (if provided),
OPEN the alarm test valve in the deluge valve trim.
a.
b.
c.
d.
Electric alarm pressure switches (if provided) should activate.
Electric local alarms should be audible.
The local water motor gong should be audible.
If equipped with remote station alarm signaling devices, verify that alarm signals were received.
3. When testing is complete, CLOSE the alarm test valve.
4. Verify:
a. All local alarms stop sounding and alarm panels (if provided) reset.
b. All remote station alarms reset.
c. Supply piping to water motor alarm properly drains.
5. Verify that the alarm shut-off valve is OPEN, and the alarm test valve is CLOSED.
6. Verify that the outlet chamber is free of water. No water should flow from the drip check when the
plunger is pushed.
7. Notify the Authority Having Jurisdiction and those in the affected area that testing is complete.
B. Quarterly Main Drain Test
1. Notify the Authority Having Jurisdiction and those in the area affected by the test.
2. Record pressure reading from the water supply pressure gauge.
3. Verify that the outlet chamber of the deluge valve is free of water. No water should flow from the
drip check when the plunger is pushed.
4. Fully OPEN the flow test valve.
5. When a full flow is developed from the flow test valve, record the residual pressure from the water
supply pressure gauge.
6. When the test is complete, SLOWLY CLOSE the flow test valve.
7. Compare test results with previous flow information. If deterioration of the water supply is detected, take appropriate steps to restore adequate water supply.
8. Verify:
a. Normal water supply pressure has been restored to the inlet chamber, the priming chamber,
and the release system. The pressure on the priming chamber water pressure gauge should
equal the system water supply pressure.
b. All alarm devices, and valves are secured in normal operating position. For normal operating
position, refer to trim charts and system data for the system used.
9. Notify the Authority Having Jurisdiction that the test is complete. Record and/or provide notification of test results as required by the Authority Having Jurisdiction.
C. Annual Trip Test
CAUTION! Performing this test results in operation of the deluge valve. Water will flow into the sprinkler
piping and from any open sprinklers and/or nozzles. Take necessary precautions to prevent damage.
1. Notify the Authority Having Jurisdiction and those in the area affected by the test.
2. Fully open the flow test valve to flush away any accumulation of foreign material.
February, 2010
Page 57
TECHNICAL DATA
PREACTION SPRINKLER
SYSTEM
The Viking Corporation, 210 N Industrial Park Drive, Hastings MI 49058
Telephone: 269-945-9501 Technical Services: 877-384-5464 Fax: 269-818-1680 Email: [email protected]
3. Close the flow test valve.
4. Trip the system by operating the release system. Allow a full flow to pass through the deluge
valve. Water flow alarms should operate.
5. When test is complete:
a.
b.
c.
d.
Close the main water supply control valve.
Close the priming valve.
Open the auxiliary drain valve.
Open all system main drains and auxiliary drains. Allow the system to drain completely.
6. Perform Semi-Annual Maintenance.
7. Place the system in service. Refer to INSTALLATION: PLACING THE VALVE IN SERVICE in the
appropriate deluge valve technical data page.
NOTE: Deluge valves supplied by brackish water, salt water, foam, foam/water solution, or any other corrosive water supply should be flushed with good quality fresh water before being returned to service.
8. Notify the Authority Having Jurisdiction that the test is complete. Record and/or provide notification of test results as required by the Authority Having Jurisdiction.
D. Maintenance
Where difficulty in performance is experienced, the valve manufacturer or his authorized representative shall be contacted if any field adjustment is to be made.
After Each Operation
1. Sprinkler systems that have been subjected to a fire must be returned to service as soon as possible. The entire system must be inspected for damage, and repaired or replaced as necessary.
2. Deluge valves and trim that have been subjected to brackish water, salt water, foam, foam/water
solution, or any other corrosive water supply should be flushed with good quality fresh water before being returned to service.
3. Perform SEMI-ANNUAL maintenance after every operation.
Semi-Annual Maintenance for Model E or F Series Deluge Valves
1. Remove the system from service. (Refer to deluge system data that describes systems with the
release system used for additional information.)
a. Close the main water supply control valve and priming valve.
b. Open the auxiliary drain valve.
c. Relieve pressure in the priming chamber by opening the emergency release valve.
2. Inspect all trim for signs of corrosion and/or blockage. Clean and/or replace as required.
3. Clean and/or replace all strainer screens. Note: The screen in the priming line strainer must be
cleaned from time to time and the other devices in the priming line may need to be replaced as
well. The plug on the strainer provides access to visually check the screen. The plug should not
be removed while the system is under pressure.
4. For Halar® coated deluge valves, check the Halar® coating for physical damage. If necessary,
make repairs to the affected area to inhibit potential corrosion. Refer to the paragraph below Halar® Coating Repair instructions.
5. Refer to PLACING THE VALVE IN SERVICE in the appropriate deluge valve technical data page.
Every Fifth Year
1. Internal inspection of deluge valves is recommended every five years unless inspections and
tests indicate more frequent internal inspections are required. Refer to Disassembly instructions
provided below.
2. Internal inspection of strainers and restricted orifices is recommended every five years unless
inspections and tests indicate more frequent internal inspections are required.
3. Record and provide notification of inspection results as required by the Authority Having Jurisdiction.
Page 58
February, 2010
TECHNICAL DATA
PREACTION SPRINKLER
SYSTEM
The Viking Corporation, 210 N Industrial Park Drive, Hastings MI 49058
Telephone: 269-945-9501 Technical Services 877-384-5464 Fax: 269-818-1680 Email: [email protected]
Halar® Coating Repair
If the Halar® coating becomes chipped, immediately repair the damaged area to inhibit the potential
for corrosion. Follow instructions below:
1. Wipe clean and prepare the area to be repaired as instructed.
2. Using a hand held torch, gently heat the Halar® coating around the area needing repair to the
melting point of the Halar®.
3. Allow the heated Halar® to flow together.
4. Allow the coating to cool as directed in the instructions.
Valve Disassembly
1. Remove the valve from service.
a. Close the main water supply control valve and priming valve.
b. Open the auxiliary drain valve.
c. Release the pressure in the priming chamber by opening the emergency release valve.
2. Disconnect and remove necessary trim from the cover and remove cap screws.
For 2” through 8” deluge valves only:
3. Lift cover from body.
4. Remove the clapper assembly by lifting it from body.
5. Inspect seat. If replacement is necessary, do not attempt to separate it from body. The seat is not
removeable.
6. To replace the diaphragm rubber, remove the circle of screws. Remove the clamp ring. The diaphragm rubber can be removed.
7. To replace the seat rubber assembly, the clapper assembly must be removed from the valve (see
Step 3 above). Remove the circle of screws. The seat rubber assembly can be removed.
For 1-1/2” deluge valves only:
3. Lift the cover from the spacer.
4. Remove the spacer and the rolling diaphragm and clapper assembly from the body.
5. To replace the clapper assembly, remove the screw and sealing-washer assembly. Install the new
clapper assembly and discard the old.
6. To replace the lower diaphragm, remove the screw and sealing-washer assembly, and the clapper. Install the new diaphragm and discard the old.
7. To replace the upper diaphragm rubber, remove the screw and sealing-washer assembly, and the
clamp plate. Install the new diaphragm and discard the old.
NOTE: PRIOR TO INSTALLING A NEW DIAPHRAGM RUBBER, SEAT RUBBER OR LOWER DIAPHRAGM, MAKE CERTAIN THAT ALL SURFACES ARE CLEAN AND FREE OF FOREIGN MATTER.
THE SEAT MUST BE SMOOTH AND FREE OF NICKS, BURRS OR INDENTATIONS.
NOTE: THE CLAPPER RUBBER MUST BE INSTALLED WITH THE RIDGE ON THE CLAPPER
RUBBER FACING TOWARDS THE CLAPPER.
Valve Reassembly
1. Prior to reassembly, flush the valve of all foreign matter. The valve seat must be clean and free
from all marks and scratches.
2. To reassemble, reverse disassembly procedure.
For the 1-1/2” deluge valves only:
3. When installing diaphragms, care must be taken to assure all bolt holes are aligned. Also, the
fabric side (rough side) of the diaphragms must be positioned toward piston. Prior to tightening
screws, install the clapper assembly into the spacer.
a. Insert the upper diaphragm through the opening in spacer from the bottom surface of the
spacer to the top. The clapper assembly must be toward the inlet chamber of the valve.
February, 2010
Page 59
TECHNICAL DATA
PREACTION SPRINKLER
SYSTEM
The Viking Corporation, 210 N Industrial Park Drive, Hastings MI 49058
Telephone: 269-945-9501 Technical Services: 877-384-5464 Fax: 269-818-1680 Email: [email protected]
NOTE: THE SPACER’S OUTSIDE DIAMETER IS TAPERED. THE DIAMETER OF THE BOTTOM
IS GREATER THAN THE DIAMETER OF THE TOP.
b. Align bolt holes and tighten screws.
4. Place the cover, with cap screws inserted in the holes, upside down on a work bench.
5. With the top side of the spacer and upper diaphragm toward the cover, place the clapper assembly and spacer, described in Step 3, over the threaded ends of cap screws.
a. Upper diaphragm must be flat between the cover and spacer.
b. The piston should protrude from the spacer, and the clapper assembly should be visible (facing up).
6. Gently roll the lower diaphragm over the protruding piston and position the bolt holes of the lower
diaphragm over the threaded ends of the cap screws.
7. Taking care not to cut the diaphragm, tuck the lower diaphragm between the spacer and piston
around the entire circumference of the piston while gently pushing the piston into the spacer.
8. Carefully position the cover with cap screws and piston assembly on the valve body.
9. Remove the cover with cap screws and verify that upper diaphragm is properly tucked between
the spacer and piston around the entire circumference of the piston.
10. Install cover and cap screws.
a. Lower diaphragm must be flat between the spacer and body.
b. Cross tighten cap screws uniformly. Do not over-tighten.
11. The valve must be operated after reassembly to verify all parts function properly.
Maintenance for the Model G Series Valve (Refer to Figures 37-48.)
1. Close the water supply main control valve (Figure 37), placing the system out of service.
2. Open the flow test valve located in the base of the Model G Series Valve (Figure 38).
3. Close the air (or nitrogen) supply to the preaction system piping and pilot line (Figure 39).
4. Close the priming valve (Figure 40).
5. Relieve all pressure from the preaction system piping and pilot line. If the system has operated
(Figure 41), open the main drain valve to allow the system to drain completely.
6. To remove the cover from the body (Figures 42a-42b):
a.
b.
c.
d.
e.
f.
Remove the coupling from the top of the Model G Series Valve.
Remove the section of pipe directly above the deluge valve, if provided.
Remove the air supply line.
Remove the coupling or open the union below the main drain, if provided.
Remove the cover screws.
The cover and trim that is still connected may now be removed from the body. (It may be necessary to pry the valve open as the diaphragm may bond itself to the cover and body over time.)
7. To remove / replace the check diaghphragm (Figure 43):
a. The check diaghphragm may be lifted from the valve body.
b. If nescessary, replace the check diaphragm.
8. To inspect the prime chamber and coupling for leaks (Figures 44-45):
Note: If desired, it is possible to set the Model G Series Valve and inspect for leaks with the cover
removed.
a. Remove the pneumatic actuator (for pneumatic release systems) and temporarily plug the 1/2”
prime line. (Plug the outlet of the NO solenoid valve on Surefire® Preaction Systems.
b. Slowly open the prime valve.
c. With prime water established, partially open the main water supply control valve.
d. Visually inspect the inside of the deluge valve for leaks.
Page 60
February, 2010
TECHNICAL DATA
PREACTION SPRINKLER
SYSTEM
The Viking Corporation, 210 N Industrial Park Drive, Hastings MI 49058
Telephone: 269-945-9501 Technical Services 877-384-5464 Fax: 269-818-1680 Email: [email protected]
e. Close the water supply control valve.
9. To remove / replace the prime coupling (Figures 46-47):
a.
b.
c.
d.
Remove the 1/4” socket set screw and nylon ball (for the Model G-4000P Valve only).
Open the 1/2” union on the prime line.
Using a wrench on the flats of the coupling, remove the coupling from the valve body.
Inspect the coupling and 2 o-rings. Replace if necessary.
10. To remove / replace the prime chamber assembly (Figure 48):
a. The prime chamber assembly is now held in place by two flanges on the outside diameter of the
assembly. Slide the prime chamber assembly toward the prime line and remove from the body.
b. Inspect and replace if necessary.
c. Inspect the seat. The seat should be clean and free of foreign material. If the seat is damaged,
the Model G Series Valve must be replaced.
11. To re-assemble the valve:
a. Place the prime chamber assembly in the valve body. Make sure the two flanges are positioned in the groove.
b. Thread the prime coupling into the valve body. Make sure the end of the prime coupling is
inserted into the prime chamber assembly.
c. Replace the nylon ball and socket set screw (Model G-4000P Valve only).
d. Tighten the 1/4” socket set screw (Model G-4000P Valve only).
e. Lay the check diaphragm into the valve body.
f. Position the cover on the valve body, and install and tighten the cover screws.
g. Re-install any trim that was removed.
h. Place the valve in service by following the steps below.
12. Set the Model G Series Valve:
a. Open the flow test valve (Figure 49).
b. Establish air pressure on the system (Figure 50).
c. When air pressure has been established, open the priming valve. Prime water pressure will enter
and expand the valve’s internal diaphragm assembly onto the valve seat, effectively closing the
valve (Figure 51). Verify prime pressure has been established on the prime pressure gauge.
d. Verify that no water flows from the drip check when the plunger is pushed (Figure 52).
e. When the priming pressure has been verified as being established, slowly open the water
supply control valve (Figure 53).
f. When flow is developed from the flow test valve, CLOSE the flow test valve (Figure 54).
g. Fully open the water supply main control valve.
h. Secure all valves in their normal operating position.
i. Notify Authorities Having Jurisdiction and those in the affected area that the system is in service.
j. The system is now fully operational.
VI.
REMOVING THE SYSTEM FROM SERVICE
WARNING: The system should be placed out of service only for repairs. The work must be completed in
a manner to minimize the time that the system must be out of service. All hazardous activities in the effected area shall be terminated until the system is placed back in service. Any system impairment shall be
coordinated with the owner, local authority having jurisdiction, and other related parties. Place a roving fire
patrol in the area covered by the system until the system is back in service.
Prior to turning off any valves or activating any alarms, notify local security guards and/or central alarm
station (if used) so that a false alarm will not be signalled and result in a local fire department response.
1. Close the water supply control valve.
2. Close the priming valve.
February, 2010
Page 61
TECHNICAL DATA
PREACTION SPRINKLER
SYSTEM
The Viking Corporation, 210 N Industrial Park Drive, Hastings MI 49058
Telephone: 269-945-9501 Technical Services: 877-384-5464 Fax: 269-818-1680 Email: [email protected]
3. Open all auxiliary drain valves and inspectors test valve.
4. Silence alarms (optional). To silence electric alarms controlled by pressure switch and to silence
water motor alarm, close alarm shut-off valve.
NOTE: ELECTRIC ALARMS CONTROLLED BY A PRESSURE SWITCH INSTALLED IN THE ½” (15
mm) NPT CONNECTION FOR A NON-INTERRUPTIBLE ALARM PRESSURE SWITCH CANNOT BE
SHUT OFF UNTIL THE DELUGE VALVE IS RESET OR TAKEN OUT OF SERVICE.
NOTE: SPRINKLER SYSTEMS THAT HAVE BEEN SUBJECTED TO A FIRE MUST BE RETURNED TO
SERVICE AS SOON AS POSSIBLE. THE ENTIRE SYSTEM MUST BE INSPECTED FOR DAMAGE,
AND REPAIRED OR REPLACED AS NECESSARY.
5. Replace any thermostatic releases that have been damaged. Replace any fixed temperature releases or pilot heads that have operated. To drain the hydraulic release piping (optional), pull the
handle inside the emergency release.
6. Replace any sprinklers and/or spray nozzles that have been damaged or exposed to fire conditions.
7. Perform all maintenance procedures recommended in technical data describing individual components of the system that has operated.
8. Return the system to service as soon as possible. Refer to PLACING THE SYSTEM IN
SERVICE.
VII.
TROUBLESHOOTING VIKING PREACTION SYSTEMS
A. System Trouble
Single Interlock Systems with Pneumatic Release: In the event of an air supply failure and slow leakage of air from the pneumatic release system, alarms connected to air supervisory switch will signal
a low air pressure condition. Failure to restore air supply to the pneumatic release system will result
in operation of the pneumatic actuator and the deluge valve will open. Similarly, if the release system
operates due to mechanical damage or malfunction, the deluge valve will open. Water will flow from
any open sprinklers and/or spray nozzles on the system. Water motor alarm and alarms connected to
alarm pressure switch will activate.
Single Interlock Systems with Electric Release: If a sprinkler opens prior to operation of the detection system, or any time supervisory pressure in the sprinkler piping is lost, the air supervisory switch
will signal a low air pressure condition, but the deluge valve will NOT open. If the detection system
operates due to mechanical damage or malfunction, the deluge valve will open but the water will be
contained in the sprinkler piping. Water motor alarm and alarms connected to alarm pressure switch
will activate.
Double Interlock Systems with Pneumatic/Pneumatic Release: If a sprinkler opens prior to operation
of a releasing device, or any time supervisory pressure in the sprinkler piping is lost, alarms connected
to the air supervisory switch will signal a low air pressure condition, but the deluge valve will NOT
open. If the pneumatic release system (alone) operates due to damage or malfunction, alarms connected to the air supervisory switch will activate, but the deluge valve will NOT open.
Double Interlock Systems with Electric/Pneumatic Release: If a sprinkler opens prior to operation of
the detection system, or any time supervisory pressure in the sprinkler piping is lost, alarms connected
to air supervisory switch will signal a low air pressure condition but the deluge valve will NOT open.
If the electric detection system (alone) operates due to damage or malfunction, alarms connected to
system control panel will activate but the deluge valve will NOT open.
Double Interlock Systems with Electric/Pneu-Lectric Release: If a sprinkler opens prior to operation of
the detection system, or any time supervisory pressure in the sprinkler piping is lost, alarms connected
to air supervisory switch will signal a low-air pressure condition but the deluge valve will NOT open.
If the electric detection system (alone) operates due to damage or malfunction, alarms connected to
system control panel will activate, but the deluge valve will NOT open.
Page 62
February, 2010
TECHNICAL DATA
PREACTION SPRINKLER
SYSTEM
The Viking Corporation, 210 N Industrial Park Drive, Hastings MI 49058
Telephone: 269-945-9501 Technical Services 877-384-5464 Fax: 269-818-1680 Email: [email protected]
B. During Normal Power Supply Conditions, Faults or Complete Loss of Power
During normal power conditions if the system piping and/or the sprinklers are damaged, the low pressure supervisory switch will activate a supervisory alarm at the VFR400 Release Control Panel and
the normally open solenoid valve will be powered closed to prevent the deluge valve from opening.
In the event of a fire during a fault on the input circuit wiring, loss of primary AC power or complete
loss of all power, the deluge valve will open allowing water flow if the following conditions occur:
1. The initiating devices activate causing the VFR400 Release Control Panel to enter an alarm and
release condition. The normally closed solenoid will open allowing water pressure to be relieved
from the priming chamber of the deluge valve. With pressure relieved from the prim-ing chamber,
the deluge valve will open and allow water flow. Water will not be discharge into the protected
area until a sprinkler head operates.
2. During a fault condition on the input wiring which caused a trouble alarm on the VFR400 release
control panel or a complete loss of normal AC power and standby battery backup power the normally open solenoid is prevented from operating. During this condition activation of a sprinkler
head will allow a pneumatic release of the deluge valve. Water pressure will be relieved from the
priming chamber, the deluge valve will open and allow water to flow.
C. Loss of Power During Operation
If all power fails while the system is flowing water, the normally open release solenoid will open and
the normally closed release solenoid will remain closed. The PORV is already pressurized open to
prevent pressure in the chamber from building up. Water from main supply will continue entering the
system, and through any open sprinkler(s).
D. Troubleshooting System Components
1. PORV
The Viking Model C-1 PORV is a field serviceable part that is made up of various components.
This device is essentially a hydraulic latch which holds the valve open, even when using resettable detection devices.
Problem:
The PORV won’t reset after the valve water supply is shut off and the system is drained.
Remedy:
1. There is water pressure still being applied to the sensing end of the PORV. Break the
union in the sensing line to see where the water is coming from, and correct the problem.
There should be no water pressure in the sensing line once the system is shut down and
drained.
2. There are metal shavings, mud or silt caught under the clapper of the PORV. Remove
the drain line from the discharge end of the PORV, then slightly open the priming line
valve. With the eraser end of a pencil, push on the clapper and let some water flow out
the discharge end of the PORV. This may wash the metal shavings, mud, etc, away from
the underside of the clapper. If it does not clear the obstructions, then the PORV must be
removed, disassembled, cleaned, reassembled and installed.
3. There is mud or silt, etc, inside the PORV at the sensing end, keeping pressure on the
diaphragm and schrader core valve. This is very common where river water or non-potable
water is being used. The PORV must be disassembled, cleaned, then reassembled.
4. The valve stem of the schrader core valve is bent, or the diaphragm at the sensing end
is distorted. With the priming valve closed and the system still shut down, remove the six
screws at the sensing end of the PORV, inspect the diaphragm for distortion, and check
the schrader core valve to inspect the stem. If the diaphragm is distorted or the schrader
core valve stem is bent, replace with new.
February, 2010
Page 63
TECHNICAL DATA
PREACTION SPRINKLER
SYSTEM
The Viking Corporation, 210 N Industrial Park Drive, Hastings MI 49058
Telephone: 269-945-9501 Technical Services: 877-384-5464 Fax: 269-818-1680 Email: [email protected]
5. The hole through the diaphragm at the discharge end of the PORV is plugged. The PORV
must be disassembled and the diaphragm checked for obstructions in the diaphragm hole,
by bending the diaphragm back and fourth at the location of the hole. This will break loose
any obstructions.
Problem:
The PORV doesn’t operate when the valve trips, and it doesn’t vent the priming chamber.
(No water flows out of the ¼” drain after the valve trips.)
Remedy:
1. The diaphragm at the discharge end of the PORV is split, and is allowing water to enter the
chamber behind the clapper faster than it can be vented through the schrader core valve.
The PORV must be disassembled and the diaphragm checked for tears, etc.
2. The ¼” drain from the schrader valve is plugged, and is not venting the water from the
chamber behind the clapper. Check the ¼” drain line to see if it is properly piped, and not
obstructed. These outlets are occasionally plugged. Remove the plug and use ¼” steel
piping to run the drain to the drip cup.
3. The hole through the diaphragm at the discharge end of the PORV is plugged. The PORV
must be disassembled and the diaphragm checked for obstructions in the diaphragm hole,
by bending the diaphragm back and fourth at the location of the hole. This will break loose
any obstructions.
4. Some drain piping installations from the ¼” connection of the PORV were run in copper
tubing instead of ¼” steel pipe. Check the tubing for dings or bends because the tubing
may be “pinched.” If the ¼” drain from the schrader valve is plugged or “pinched” off, the
PORV will not function properly.
2. Pneumatic Actuator
The Viking Model H-1 and corrosion resistant Model R-1 Pneumatic Actuators are both spring
loaded to open, rolling diaphragm, piston operated valves. They are used wherever a separation
is required between the detection and operating systems. There is a factory drilled weep hole
drilled into the spacer. The weep hole is there to identify either an air leak or water leak in the
device.
NOTE: THERE ARE SEVERAL VIKING DEVICES THAT LOOK SIMILAR TO THE VIKING
MODEL H-1 PNEUMATIC ACTUATOR, SUCH AS THE PSOV AND THE ANTI-FLOOD DEVICE.
DO NOT REPLACE ONE DEVICE WITH A SIMILAR LOOKING DEVICE. ALWAYS REPLACE
THE DEVICE WITH AN EXACT REPLACEMENT PART.
Problem:
There is air coming out of the weep hole in the pneumatic actuator.
Remedy:
The upper diaphragm is torn, scuffed, or cut, and is leaking air out through the diaphragm. With
the system shut down, remove the air piping from the top of the pneumatic actuator. Unscrew the
3 #10 x 24 x 1 ¼” HHS from the cover, and remover the cover and the upper diaphragm. Inspect
the device inside, and make sure there are no burrs, etc., that could cut the diaphragm. Replace
the diaphragm, and reassemble the device. Place the device back into the valve trim, and re-pressurize the system with air. Check for leaks, then return the system to service as described in the
current applicable technical data pages.
Form No. F_010808