1
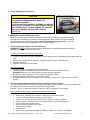
Common Digital Color Printer Issues and Possible Solutions
Valid for printer models: Mach 5, HJ950C and AS-950C
NOTE: The information contained in this document is intended for use by service technicians from our authorized
dealers and branches. This document should not be provided to customers (end-users).
If you have questions; please contact:
Neopost USA Addressing Group
Technical Support: 1-888-350-6686 (direct) or 1-800-339-3456 (Tier 2 Phone Tree)
1. Make Sure the Printer is Place on a Sturdy, Level Surface.
IMPORTANT! LEVEL THE TABLE, NOT THE PRINTER
Why is this necessary? In order for the printer’s ink delivery system, print system and waste ink system to
function correctly; the printer must be placed on a sturdy, level surface. If this rule is not followed you will
experience ink reading inaccuracies, print quality issues (ink-starved nozzles, color mixing, etc…),
improper waste ink drainage (build-up of ink in the Service Station). This could lead to printer damage,
which will void the warranty.
Do’s and Don’ts:
a. Level the Table surface, NOT the body of the Printer.
b. Use an accurate level (i.e. bubble level that is at least 18” long), to check that the table surface is
level (front to back and left to right). It is not acceptable to use your “cell phone app” to check level.
c. Do NOT use the Toolbox utilities “Tilt” readings to level the printer or table.
d. Do NOT shim, raise or otherwise modify the printer, or feet of the printer, in any way.
e. If the table surface can not be leveled then the printer should not be placed on it.
f. If the table is not sturdy then the printer should not be placed on it.
NOTE: Your customer made a large investment in this product. Do not let a poor location choice
hamper the success of your install. If you meet resistance, simply explain that this is required for
proper operation of the printer. Not following this rule could lead to printer damage, which will void the
warranty.
2. Service Station Installation Inspection:
a. Check for proper installation and movement.
IMPORTANT! During initial installation, you need to make sure the leading
edge of the Service Station is perfectly aligned with the drive shaft (BAR).
Look down through open area of the Printhead Cartridge compartment, in the
top of the Print Engine, to make sure the Service Station is aligned with the
“Bar”; as shown. Please see the Operator’s Guide for detailed instructions.
After installing the Service Station; check to be sure the Service Station
moves freely and that the sections (capping, print platen, wiper roller) of the
service station raise and lower freely. If not, eject the Service Station and reinstall properly.
If you hear grinding/motor stalling noises, the Service Station is most likely
installed crooked. Eject the Service Station, via the Toolbox utility, and reinstall as per the Operator’s Guide.
Tip: The removal and installation of the Service Station should be performed
by a qualified service person. If your customer plans to remove the service
station for cleaning; please be sure they are properly instructed
on how to remove and install the service station.
b. Check to be sure that the wicking material (felt), which hangs
from the bottom of the Service Station, is directed into the trough
below this area; as shown. If the wick hangs on the side of the
trough, waste ink will be deposited onto the surface of the service
station slot. This waste ink will eventually make it down onto the
Ink Tanks and into the body of the printer.
Mach 5 (950C) Common Issues and Solutions.doc
Rev. 12-19-11
Neopost USA Addressing Group
1
3.
Proper Handling of the Clamshell
CAUTION
TO PREVENT DAMAGE; HOLD ONTO AND RELEASE BOTH
LATCHES WHEN OPENING AND CLOSING THE
CLAMSHELL ASSEMBLY.
IF YOU ALLOW THE CLAMSHELL ASSEMBLY TO DROP BY
ITSELF OR IF YOU FORCE IT CLOSED, WITHOUT HOLDING
THE LATCHES OPEN, YOU MAY DAMAGE THE LATCHES
AND THE CLAMSHELL SWITCH (DOOR SWITCH).
BE GENTLE!
4. IMPROVED Printhead Priming Procedure.
We have a new procedure that will improve the success of the printhead priming process; thereby
reducing issues caused by not getting the printhead and ink system primed during the first attempt.
Please carefully review the document titled “Improved Printhead Priming Procedure”. It can be
obtained from the Neopost knowledgebase or Rena Dealer Net site.
5. How to Properly Clear Media Jams from the Printer
WARNING! Do NOT pull jammed media from the Print Engine, Antistatic Brush Assembly or Sheet
Separators. Damage to the printer may result.
To safely remove jammed media from the printer:
a. Remove the media stack from the hopper.
b. Loosen, lift and secure the Sheet Separators at their upper position; if jammed media is located under this
area.
c. Remove the Anti-Static Brush Assembly; if jammed media is located under this area.
d. Open the Clamshell.
e. Carefully remove the jammed media.
After jam is removed:
a. Carefully close the clamshell. See Item #3 for details.
b. Carefully reinstall the Antistatic Brush Assembly; as described in the Operator’s Guide.
WARNING! Make sure you don’t pinch the ink tubes during this process.
c. Re-adjust the Sheet Separators; as described in the Operator’s Guide.
d. Reload the media; as described in the Operator’s Guide.
e. Press the CANCEL button on the printer or the “Clear Error” button in the Toolbox utility; to continue
printing.
6. Trouble Installing Software (M Series Driver & Toolbox) or Opening Toolbox
The most common causes for the printer’s software not installing or the Toolbox not opening have been that
the system does not meet the minimum requirements; shown below.
Example: “Java 6” or higher not installed or “Microsoft .NET Framework 3.5” not installed.
Check that the computer system meets these minimum requirements:
•
•
•
•
•
•
•
•
•
Windows XP, Windows Vista, Windows 7. Supports 32 and 64 bit systems.
You must have administrative privileges on the system.
Pentium II, 2 GHz minimum (Pentium Dual Core, 2.5 GHz or better, is optimal)
System memory – 2 GB minimum; or as recommended for your operating system.
At least 10 GB free hard-disk space.
Microsoft Internet Explorer 6.0 or higher.
Java version 6 or higher
CD/DVD drive
USB 2.0 port (ports will be identified as “USB2” or “Enhanced” in the Device Manager)
Mach 5 (950C) Common Issues and Solutions.doc
Rev. 12-19-11
Neopost USA Addressing Group
2
•
"Microsoft .NET Framework 3.5" installed (Even if you have a higher version installed, version 3.5
must also be installed.).
IMPORTANT: Before installing the printer software (Toolbox and Driver); you should temporarily disable all
Antivirus programs and Firewalls. In addition; you must be logged onto the system with full administrative
privileges (admin rights).
We recently received a number of reports that the USB cables, included with printers, were defective. The
factory has found a new source for better quality USB cables, which will be included with all printers. If you
are having communication issues (computer not recognizing printer, driver install issues, connections
dropping, printing garbage, etc…); please try a “known good” USB cable.
How to check your system for the minimum system requirements, shown above:
Right click on "My Computer" and select Properties. The system information, including Operating System,
Processor Info and Memory info will be displayed under the "General" tab.
How to check your system for the versions of "Microsoft .NET Framework” installed.
From the Control Panel; open "Add or Remove Programs" and look for "Microsoft .NET Framework 3.5..." in
the list.
You can obtain "Microsoft .Net Framework 3.5" via the Microsoft website.
http://www.microsoft.com/net/download
How to check your system for the version of "Java" installed.
From the Control Panel; open "Add or Remove Programs". Look for "Java(TM) 6 .." in the list.
You can obtain Java from the following website: www.java.com
There area also tools on the Java site to help you detect if you have java installed and what version is
installed.
7. Scuff Marks and Smudged Images
If the media makes contact with the printhead, there is a chance for image smudging and scuff marks.
Possible Solutions:
a. Try running the media in a different orientation. For example when using a #10 envelope; if you are
feeding long edge first, try feeding short edge first or vice-versa.
b. Install the Envelope Printing Attachment [A] (Part # 42-110-52).
Installation instructions are provided with this device.
This device will help reduce the chance of the media lifting and
touching the printhead.
Beginning with printer S/N 100028128 this device was included
with all Digital Color Printers (Mach 5, AS-950C, HJ950C). In most
cases, you will find it pre-installed in the printer.
For printers below S/N 100028128; one of these devices can be
obtained, free of charge, by placing an order for part # 42-110-52
and provide the serial number of your printer.
NOTES:
- Please be sure the Envelope Printing Attachment is correctly installed.
- Some of these devices were shipped with a "white plastic, protective film” covering the metal surface. If
this “white plastic film” is present; please be sure to remove it before installing.
- Please be sure that the wiper roller and or capping station are not making contact with the edge of the
Envelope Printing Attachment. If this occurs you will normally see ink being deposited on the trailing edge
of this device. This will cause scuff marks on the media and can also cause printhead capping and
priming issues. If this is the case please try re-seating this device and or replacing this device (could be
bent or a little out of spec).
Mach 5 (950C) Common Issues and Solutions.doc
Rev. 12-19-11
Neopost USA Addressing Group
3
8. Toolbox is displaying Tilt Errors
In order for the ink delivery system, print system and waste ink system to function correctly; the printer must
be placed on a sturdy, level surface. Level the Table surface, NOT the body of the Printer.
The accelerometers, located within the printer's electronics, are used to monitor the level of the printer (front
to back and left to right). When the accelerometers read a level that is “out of tolerance” the Toolbox will
display a “Tilt Error” and you will not be able to operate the printer until this issue is resolved.
NOTE: It is normal for the Toolbox to temporarily display a “Tilt Error”, for up to 15 minutes, after the printer
has been powered on using the Main Power Switch. To avoid this issue; leave the printer powered on.
Possible Solutions:
a. To avoid getting a “Tilt Error” at power up; don't power-off the printer. Leave the printer powered-on
(ON/OFF button illuminated); even when the printer is not in-use.
b. Make sure printer is on a sturdy, level table. Level the Table surface, NOT the body of the Printer.
Use an accurate level (i.e. bubble level that is at least 18” long), to check that the table surface is level
(front to back and left to right). It is not acceptable to use your “cell phone app” to check level.
c. After the printer is on for 15 minutes; if Tilt readings are still above 0.5; then you will need to zero out the
tilt sensors. This feature is found in the Toolbox “Service Menus” under “Printer Maint Config”. The
Service Menu is password protected (Current PW = servicepw). Click on the “Zero Tilt Sensor” button.
CAUTION! Do not use the “Zero Tilt Sensor” feature to ignore (work-around) issue causes by a table
surface that is not level. Doing so will mask the printer’s physical tilt condition, which can lead to printer
damage that will not be covered under warranty.
Tip: Since the printer should remain powered-on at all times; it is strongly suggested that the printer and
computer system are connected to a high quality surge/spike protector or UPS (Uninterruptable Power
Supply) with surge/spike protection.
9. The Toolbox displays “Ink_Out_Any”.
Example: Toolbox displays “Ink_Out_Any” even though all of the Ink Tank Levels are reading above 30%.
Possible Cause:
Linear feet of material printed, has exceeded the calculated ability of a Tank or Tanks.
The factory has determined that the current firmware (110513_d) is inadvertently monitoring the linear feet of
material printed for each Tank. They had thought this feature was removed (no longer monitored).
NOTE: In most cases this condition will only be created with the Black Tanks, because they are normally
used more frequently than the other Tanks.
WARNING! Please be sure to power off the printer (using the ON/OFF button) before swapping Ink Tanks.
Possible Solutions:
a. Temporary Work-Around: Power the printer off (using the ON/OFF button). Replace one of the Black
Tanks with a new (full) Black Tank. Power the printer on. If the “Ink_Out_Any” condition goes away; then
you can continue to print. This should allow you to use up the remaining ink in the original Black Tank.
If this message should re-appear; repeat this process for other original Black Tank.
If swapping the Black Tanks out (with new full tanks) does not eliminate the condition; then you will need
to replace each of the remaining Ink Tanks (Yellow, Magenta, Cyan) with new (unused) Tank; one at a
time. Once you have identified the Tank or Tanks that are giving this condition, then you can try reinstalling the Tanks that are not giving this condition.
Tip: Once we have a firmware fix; you will be able to re-use any Tank that is giving this issue.
b. Check for a future firmware update to eliminate this condition. The cause of this issue has been identified
and we are expecting that the next release of firmware will have a fix for this condition.
Mach 5 (950C) Common Issues and Solutions.doc
Rev. 12-19-11
Neopost USA Addressing Group
4
10. The Toolbox displays "… Ink_Low" or “Ink_Out …", but Ink % Levels do not agree.
Example: Toolbox displays “Ink_Out_Magenta”, but it also shows the Magenta Ink Level as 23%.
NOTE: See Item #9 for information on the “Ink_Out_Any” condition.
Possible Causes:
a. One or more Ink Tanks are Low or Empty.
b. Printer was NOT placed on a sturdy, level table. Level the Table surface, NOT the body of the Printer.
If the printer is not placed on a sturdy, level table, the “Visible Ink Level” will not be accurate.
There are two methods the printer uses to monitor and calculate the amount of ink available in each
Tank. These two methods are explained below.
Visible Ink Level: A sensor looks at the prism on the Tank, to determine the visible level of ink in the
Tank. This type of ink level monitoring is present in all five Ink Tank slots. If any of the sensors see no ink
in the Tank; the printer will be stopped and the Toolbox will display “Ink_Out…”.
Drop Count Calculation: The printer calculates ink usage by the number of ink drops fired.
This information is used to display the graphical representation of Ink levels (Ink %) in the Toolbox.
This “drop count” information is also written to the chip on the Ink Tank, so it travels with the Tank; in case
the Tank is removed and re-inserted at some later time.
c. Printer is over-estimating the amount of ink used for some functions.
The factory has determined that the current firmware (110513_d) is over-estimating the amount of ink
used for cleaning, wiping, priming and spitting activities. The “virtual ink level” is depleted each time one
of these activities occurs. In addition to the printer’s automatic use of these activities; if the operator also
uses the Toolbox features to run these activities, this exaggerates the issue.
Example: Frequent system depriming and priming will reduce the drop count level. Each time the system
is primed the drop count level (Ink % shown in the Toolbox and written to Ink Tank) is reduce by 1%.
Possible Solutions:
a. If a specific Ink tank is identified (Example: Ink_Out_Magenta); power-down the printer, using the
ON/OFF button, and replace the Ink Tank that is identified in the Toolbox as low or out. Then power up
the printer.
If a specific Ink Tank is not identified (Example: Ink_Out_Multiple); power-down the printer, using the
ON/OFF button, install a set of new (full) Ink Tanks and power-up the printer. If issue is resolved by
replacing all Ink Tanks; then you can swap the old Tanks back into the printer, one at a time, to identify
the Tank or Tanks that are giving this condition.
b. Make sure the printer is on a sturdy, level table. Level the Table surface, NOT the body of the Printer.
If this rule is not followed, the visible ink level readings will NOT be accurate. See Item #1 for details.
c. Check for a future firmware update to improve the accuracy of “estimated ink usage” for the cleaning,
wiping, priming and spitting activities.
WARNING! Please be sure to power off the printer (using the ON/OFF button) before swapping Ink Tanks.
What to do if an Ink Tank is giving the “Ink_Out” condition, but there is still plenty of ink in the Tank?
Contact the Addressing Group (610-650-9170) and obtain a Credit RA#, to send the Tank back for inspection
and possible partial credit. You will be credited based on the approximate amount of ink left in the Tank.
The following weights can be used to determine the approximate amount of ink left in an Ink Tank
New, Full Color Ink Tank (C,M,Y) = ~15.2 oz (plastic tank with full amount of ink)
New, Full Black Ink Tank (K) = ~15.4 oz (plastic tank with full amount of ink)
Empty Ink Tank = ~5.9 oz (empty plastic tank only)
Therefore the ink in a full Color Tank weights ~9.3 oz. and the ink in a full Black Tank weights ~9.5 oz.
NOTES:
• The only time it should be necessary to deprime the system is when you are planning to transport the
printer.
• Do not use the “System Deprime” feature to remove or replace a printhead cartridge. In this case,
you should use the “Release Printhead” feature or button.
• It is normal for the printer to see the Ink Tank as “out of ink”, when the printer has determined that the
percentage of ink left in the Tank is at 2% or less. This is done in an effort to prevent the Ink from
emptying from the tubes; which would require re-priming (causing ink level differences).
Mach 5 (950C) Common Issues and Solutions.doc
Rev. 12-19-11
Neopost USA Addressing Group
5
11. Can't get System to Prime (One or more Ink Tubes not filling with ink).
Toolbox may or may not display “Printhead: Unprimed”.
There can be multiple causes/reasons for this issue (possible causes and solutions listed below):
a. Printhead or Ink Tanks Missing.
NOTE: The Printhead will normally show as missing until the system has been primed and no other errors
are present. It may also show as missing when the printer is first turned on.
Possible Solutions:
1
- Please be sure to install missing items.
- If all items are physically present (installed), but the
Toolbox still shows one or more Ink Tanks as missing; try
removing and re-installing the missing Tank [2].
- Also make sure the Ink Tank Securing Latches [1] are
securely latched (there are two lock points, located at both
2
sides of each latch).
WARNING! Please be sure to power off the printer (using the ON/OFF button) before installing/replacing
the Ink Tanks.
Tip: The printer will refresh the Ink Tank readings during the power-up process.
After installing the Ink Tank and powering the printer on; if the Ink Tank still shows as missing (“?”
displayed in Toolbox); power the unit all the way OFF (power-down using ON/OFF button, then switch the
main power OFF). Remove the Ink Tank. Using an eraser, carefully clean the electrical contacts on the
Ink Tank and in the printer (at the back of the ink tank slot). Then wipe the contacts with isopropyl alcohol
(make sure contacts are dry before re-inserting the Ink Tank). Re-install the Ink Tank and power-up the
printer. If the Ink Tank is not recognized, replace the Ink Tank with a new Ink Tank.
b. Not wetting the Printhead nozzle surface with enough distilled water, before inserting head and
closing the printhead latch.
Possible Solution:
Carefully review the document titled “Improved Printhead Priming Procedure”. It can be obtained from the
Neopost knowledgebase or Rena Dealer Net site.
c. The Envelope Printing Attachment (Part # 42-110-52) might be interfering with nozzle capping
ability.
In order for the system to prime, the system needs to create a vacuum. If the printhead nozzles are
not wet (with distilled water) or the capping station is not making a good seal against the head; a vacuum
can not be created and priming will fail.
Possible Solution:
Check that the Envelope Printing Attachment has been properly installed. If the installation looks proper;
remove this device, re-wet the printhead nozzles and try to reprime system again. If this works then the
Envelope Printing Attachment is getting in the way of the capping station. In this case the Envelope
Printing Attachment may be improperly formed (deformed/damaged) and may need to be replaced.
d. Toolbox displays “Ink Error”, "… Ink_Low" or “Ink_Out …”
The system will not prime if the Toolbox is showing these messages.
IMPORTANT: You must have at least 30% physical ink in every Tank, to allow for priming.
Just because the Ink Levels are displayed as 30% or higher, this does not mean the physical level of ink,
in the Tanks, is above this level. See item #9 and #10 for more information.
Possible Solution:
Even if the Ink Tanks show more than 30% ink; power-down the printer and install new (full) Ink Tanks. If
issue is resolved; tanks previously removed, that still have ink in them, can be re-installed (as long as
system has already been primed).
e. Pinched or Kinked Ink Tube(s)
A pinched or kinked Ink Tube will not let ink flow. If you notice that some of the ink tubes
are not filled, after the system was primed:
A
Possible Solution:
Check to be sure the Ink Tubes are not being pinched by improper installation of the
Antistatic Brush Assembly [A]. The metal fingers, located at the exit side of the Antistatic
Brush Assembly come very close to the Ink Tubes. We have had a few occurrences
where this device was removed and reinstalled and the metal fingers where pinching the
tubes.
Mach 5 (950C) Common Issues and Solutions.doc
Rev. 12-19-11
Neopost USA Addressing Group
6
f.
Damage to the Ink Couplings (Ink Revolvers)
The Ink Couplings (also known as Ink Revolvers) are the devices that connect the Ink Tubes to the
Printhead Cartridge. We have experienced a few cases where one of these devices was damaged;
causing the connection between the Ink Coupling and the cartridge to be poor.
This can create an inability for the system to create a vacuum, to prime the system.
NOTE: If you were able to prime the system this issue can cause ink to drain back into the tanks after
system has been primed.
Possible Solution:
Replace the damaged Ink Revolver (Ink Coupling).
42-900-10
Ink Revolver, Pump Side
42-900-15
Ink Revolver, Valve Side
g. Problem within Printhead or Ink Tanks
There could be an obstruction within the Printhead Cartridge or Ink Tanks.
Possible Solution:
Replace the Printhead Cartridge and or Ink Tanks.
h. Ink Valve Error
Printer Configuration has been lost, improperly altered, or valve has failed.
Possible Solution:
Check the following Configuration Settings:
Go to Toolbox Services Menu (PW = servicepw), then click on the Commands Help menu.
In the right-hand pane find /config/nvm hw and click on it.
Make sure that: “Wiper_motor shows E and Pump_motor shows B
If not; change to the values, shown above, and click on Submit.
12. Multiple Horizontal Lines Printed on the Media; along with the image. Occurs on every piece.
This occurs when the page width, in the software or driver, is
set wider than 8.5”.
NOTE: 8.5” is the maximum print width of the printer.
Solution:
Set the page width, in the software and M Series Driver, no
Feed
wider than 8.5”.
Direction
13. Heavy Black Line Printed at Trailing Edge of Media.
This occurs when the intra-page spitting (purge between pieces) hits
the trailing edge of the media. This issue can be intermittent.
NOTE: Intra-page spitting is one of the routines the printer uses to
help keep ink nozzles clear.
Possible Causes:
a. Media skewing. This will normally show as a partial, skewed line;
printed at the trailing edge of the media. In this case, any other
images being printed on the media will also be skewed.
b. The printer’s “bottom of form adjustment” (bof_adjustment) is not
set properly. If this value is set too low, this will cause the purge
line to hit the trailing edge of the media.
Possible Solutions:
a. Adjust media stack, side guides and or readjust the sheet
separators; so media feeds straighter.
b. Check that the “bof_adjustment” value is set to 3,000. This
setting can be found in the Toolbox, “Service Menus” (PW =
servicepw), “Printing Control Config”, under the “Printout Control”
column (left side of page). Make sure you press “Submit” after
setting this value.
Mach 5 (950C) Common Issues and Solutions.doc
Rev. 12-19-11
Neopost USA Addressing Group
7
14. Printer stops and Toolbox displays “PaperPath_Printzone_Blocked” or PaperPath_PaperJam, but
there is no physical paper jam.
The PaperPath Entrance or Exit sensors are staying blocked (interrupted) for too long, or not seeing the
leading/trailing edge or the media at the appropriate timing.
Possible Causes:
a. Media is slipping/hesitating as it feeds through the print engine.
b. The PaperPath Entrance or Exit sensors are dirty (not responding properly).
c. Non-reflective areas, on the under-side of media, are traveling over the PaperPath Exit sensor.
Possible Solutions:
a. Check to be sure media meets min/max media specs. Minimum media length is 4.125”.
b. Check to be sure the PaperPath sensors are clean. See the Service Guide for help on locating, cleaning
and checking the condition of these sensors.
c. If possible; rotate the media feed direction (orientation); so the non-reflective areas, on the underside of
the media, don’t travel over the PaperPath Exit sensor.
d. Future solution. Select the "Ignore Exit Sensor" feature, located in the "User" Interface screen of the
Toolbox, and click "submit". Once selected, this feature provides the ability to run media that is nonreflective to the PaperPath Exit sensor.
NOTE: This option is not available in firmware version 110513 or earlier; however it is scheduled to be
included in the next firmware release.
15. Printer intermittently stops and the Toolbox displays the “Data_Path_Underrun” message.
a. Issue is occurring when trying to print a PDF from Adobe Acrobat.
Possible Cause: Image is exceeding max print area of printer or possible Adobe Acrobat issue.
Possible Solutions:
- Verify that the piece size, in the software and driver does not exceed the maximum print area of the
printer. Max = 8.5” wide x 17” long.
- Try printing in a different orientation (portrait vs landscape)
- If using Adobe; try selecting or unselecting auto-rotate and center or select “Scale to fit media” option.
- If using Adobe; try using another PDF reading/printing product (Example: Foxit®).
We have come across a few cases where the printer gives this error when printing from Adobe Acrobat;
but not when printing from “Foxit®”. See www.foxitsoftware.com. At this time; we are not sure why this
issue occurs with some Adobe Acrobat installs.
b. Issue occurs no matter what software program or media is being used.
Possible Cause: Problem reading Encoder Disk (wheel); due
to ink on Encoder Wheel.
Possible Solution: Install the Encoder Shield Kit (part # 42900-20). This shield protects the encoder wheel from ink
splatter. Valid for printer S/N 100027598 and lower. If you
have a printer, in this serial number range, that is
experiencing this problem; one of these kits can be obtained,
free of charge, by placing an order for 42-900-20 and
provide the serial number of your printer.
Mach 5 (950C) Common Issues and Solutions.doc
Rev. 12-19-11
Neopost USA Addressing Group
8
16. Excessive Ink on the Media Transport Rollers within the Print Engine
(Media Transport Rollers transferring Ink onto Media)
If “waste ink” accumulates in the Service Station, under the wiper motor; the gearbox on the wiper motor may
pick up this ink and throw it inside the service station slot. Since the media transport rollers are located above
this area, they will also be coated with ink. This wet ink is then transfers to other rollers in the Print Engine
and then onto the media that is being fed.
Possible Solutions:
a. Check to be sure Printer is located on Sturdy, Level surface. If this rule is not followed; “waste ink” will not
drain properly from the Service Station. Level the Table surface, NOT the body of the Printer.
b. Make sure the wick, which hangs from the bottom of the service
station, is directed into the waste ink channel below the service
station. If the wick is not positioned properly the waste ink may
not drain properly from the Service Station. In addition the waste
ink may be deposited onto the lower surface of the Service
Station slot; which will travel into other places in the unit.
NOTE: On early versions of the Service Station, there is a shorter
wick; which is glued to the bottom of the opening in the Service
Station. In this case you will not have the need or the ability to
redirect the position of the wick.
c. Replace the Service Station (Part # 123-2483, Maintenance Station).
NOTE: Newer versions of the Service Station include additional
“wicking material” under the wiper motor area; that will help
reduce this issue. If you experience this issue with a Service
Station that has a Wiper Motor “Build Day” (date code) earlier
than October 2010, the Service Station should be replaced.
Example: 24/06/10 or 24-JUNE-2010 = 24th day of June, 2010
In this case; place an order for a new Service Station (part #
123-2483) and provide the serial number of the printer you need
this item for, on your order. Then obtain a Credit RA number to
return your original Service Station for inspection and possible
credit. When requesting a Credit RA number; you will need to
provide a description of problem, the dated code off the wiper
motor, and the serial number of printer this service station was removed from.
New Service Station Note: Newer versions of the Service Station
may also include screws that secure the wiper roller latches. These
screws must be removed before the wiper roller latches can be
released.
Mach 5 (950C) Common Issues and Solutions.doc
Rev. 12-19-11
Neopost USA Addressing Group
9
17. Other Issues:
- Multiple “M Series Driver” selections are automatically installed on computer system.
- Printer is pausing between every two pieces that are printed.
Possible Solution:
Verify that the Printer’s Firmware and Driver are up to date. If not; update the Firmware and Driver.
Firmware and Software (Driver and Toolbox) files can be obtained from the Rena Dealer Net and
Neopost Knowledgebase web sites.
At the time of this documents release the current Firmware and Drivers versions were:
- Firmware 110513_d
- Software (Driver and Toolbox) R3 (Available on: Rena Mach 5 CD V1.5, Neopost/Hasler CD v6-11)
How to check Printer’s Firmware Version:
Open Toolbox utility and see left side of Toolbox screen. Example: Firmware: 110513_d
See “firmware release notes” below.
How to check Printer Driver Version (M Series Driver):
Open Printer’s and Faxes (Win7: Devices and Printers) folder.
Right click on “M Series Driver” and select Properties (Win7: Printer Properties).
Click on the “About” tab. See example below.
“R3.0.1_MJ13.2.1 2011/03/22 12:00:00”
Firmware and Driver Update Routine:
When updating the firmware and driver, please be sure to use the following routine:
a. Open Toolbox and use “Firmware Download” feature to update the printer’s Firmware.
b. Disconnect USB cable from computer and then uninstall the current driver from your computer system.
Click on All Programs, Memjet, M Series Driver, Uninstall.
c. Reboot computer.
d. Install new driver.
NOTE: Don’t connect the USB cable until prompted to do so, during the install process.
Mach 5 (HJ/AS-950C) Firmware Release Notes
110325_a (released 3-25-11)
New Features:
- adds new "demo page" with five color bars
- updated Paper/Cancel button functionality. Cancel working better but may still need to press more than once
to cancel job.
110325_d (released 4-19-11)
Improvements:
- fixes issue; priming printhead when latch is closed and no printhead is installed. Now it will only prime if it
sees printhead installed.
110325_e (released 5-6-11)
Improvements:
- fixes issue; loading of multiple printer drivers. Now it only loads one driver.
- fixes issue; not saving TOF adjustment value. Value is now being saved.
In addition; previously -1500 was the TOF value. However we were informed by the factory that the value will
be different from unit to unit.
110513_d (released 5-13-11)
Improvements:
- fixes issue; when feeding media that was 6" or less in length; after cleaning cycle the printer would start the
following routine: printing two, pausing, printing two, pausing.
Mach 5 (950C) Common Issues and Solutions.doc
Rev. 12-19-11
Neopost USA Addressing Group
10