1
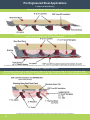
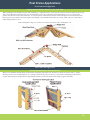
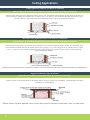
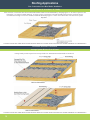
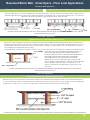
E
S
P
LOW-E REFLECTIVE INSULATION
YOUR
EVERYDAY
INSULATION
SOLUTION
Reduces
your
carbon footprint
INSTALL GUIDE
LOW-E PRODUCTS
copyright ©espincnov1.2011
ESP’s Mission Statement
We the People of Environmentally Safe Products will continue to
provide growth to our company, ensuring personal growth. This will
be achieved by expanding our family worldwide, implementing new
product ideas with customers needs in mind and constantly striving
for perfection within our company.
The customers’ needs will always be our focus. We have the philosophy
that service is the key to success.
At ESP, Customer Service is not a department; it is an attitude!
Every person that is involved in this company will continue to follow
this philosophy and pass it on to every new person that joins us.
One person alone can achieve great things. Many people united can
achieve greatness. We will continue to work as a team from management
to the entry-level position. We will continue to promote from within,
allowing one to reach their personal goals. We will continue to prosper
individually by helping the company to prosper. We will never lose the
drive and motivation that made this company what it is today.
We take great pride in the sacrifices that we personally have made
to create this company.
We began by coming together,
We have progressed by staying together,
We shall succeed by working together!
WE ARE Environmentally Safe Products!
Table of Contents
Table of Contents
Product Specific Install Instructions
Install Instructions Continued
HouseWrap Applications
Pre Engineered Steel Applications
Post Frame Roof Applications
Ceiling Applications
Attic Applications
Roofing Applications
Basement Wall, Crawlspace
& Floor Joist Applications
Wall Applications
Low-E Label & Specifications
Econo-E Label & Specifications
Micro-E Label & Specifications
Thermasheet Label & Specifications
Tab Label & Specifications
HouseWrap Label & Specifications
Attic Floor Insulation Label
& Specifications
Class A White Label & Specifications
Other Important information
Low-E Advantages
1
2
3
4
5
6
7
8
9
10
11
12
13
14
15
16
17
18
19
20
21
This manual is designed to assist you in
understanding the R-values that can be
achieved with the installation of ESP Low-E®
Insulation.
A common misconception of reflective
insulation is that one standard R-value is
applicable for every application. The
following system R-values you could achieve
are based on test data obtained under
controlled conditions and computer
calculations or the ASHRAE Handbook of
Fundamentals using FTC guidelines. The
system R-values in this booklet were
calculated using tested results from
ASTM C-236 or ASTM C-976 test methods
and calculations from the ASHRAE Handbook
of Fundamentals, as well as computer
calculations. To properly apply the data in this
manual to your specific application we suggest
you consult an engineer or architect.
While this information is presented in good
faith and believed to be accurate,
Environmentally Safe Products, Inc. and its
distributors have no control over installation
design, installation workmanship, accessories,
materials or condition of application.
Environmentally Safe Products, Inc. does not
guarantee results from reliance of such
information and disclaims any liability from
any loss or damage arising from its uses.
The reason we created ESP Low-E® Insulation
®
The primary function of ESP Low-E insulation is to reduce the transfer of radiant energy. The materials that Low-E
insulation is made from are polyethylene and aluminum. Our standard product consists of a micro-cell polyethylene core
that will not absorb moisture, is very flexible and extremely strong and the foam core maintains its integrity when punctured
by fasteners. The exterior surfaces are covered with polished aluminum. Our patented Low-E insulation does have
tested "R" values but more importantly, it’s aluminum surfaces have an emissivity of 0.03, which equates to 97% of radiant
heat being stopped and reflected back to its source.
Most common or conventional insulations do their best to slow down the heat transfer, but no matter how thick they
are, they have limited ability to reflect radiant energy. In fact, they can act like a battery, storing heat, then
re-radiating it. Mass insulations can also store moisture which further reduces their capabilities to resist the transfer
of thermal energy. For these reasons, by mid afternoon in the summer, buildings using only mass type insulation can
become unbearably hot. Even large air conditioning units battle against the odds all day and put a serious drain on
utility companies, not to mention your wallet.
By addressing only "R" values, manufacturers and consumers have ignored the major problem facing insulation
today. You guessed it ... radiant heat transfer. By using Low-E, you can reflect the heat back to the source
Therefore, buildings become more temperature consistent and more economical to operate, no matter what the season.
1.
Product Specific Install Instructions
An Air Space is Needed for Efficiency, Please Allow the Insulation to Sag in Your Roof System.
DO NOT PULL TIGHT!!
Wall Application:
This material is designed to be installed from top to bottom, eave strut to the ground or rake angle to the ground, (perpendicular to the girts).
l. Start at one end of the wall you are about to sheet.
2. Make sure the material is square with the wall.
3. Using C-Clamps and a block of wood, secure the material to either the rake angle or eave strut.
4. Place double-sided adhesive tape around entire bottom perimeter of the building on the outside of the metal plate. Steadily, unroll the material
to the ground, adjust roll so seams line up evenly then secure the bottom of the roll to the double-sided adhesive tape.
5. Go back to the top of the wall.
If Product has the Staple Flange Edge:
7. Bring the core edges tightly together with both flanges (no core in them)
towards you.
8. Roll both flanges together securely keeping core edges tightly together.
9. Staple the flanges close to the core with a heavy-duty plier stapler every
2-3 inches.
10. Then put closure strips over insulation and cut off excess.
11. Be sure to leave enough overlap to ensure that the material will not pull apart after panels are installed.
12. Repeat Steps 5 thru 11 until you complete the the area to be insulated.
1. Peel paper from strip.
2. Fold back both tabs.
3. Stick adhesive side to
non adhesive side.
4. Staple
(Staple every 12” for best results)
If Product has the EZ-Seal Edge:
7. Fold back the insulated tab on the leading
4. Engrape
1. Pelar el papel del liston.
2. Doble ambas orillos.
3. Pegue el lado adhesivo
edge of the run you just finished.
(Para mejor resultado engrape cada 12”)
al no adhesivo.
8. Fold back the insulated tab on the trailing
edge of the run you are about to install. It will
contain double-sided adhesive tape.
9. Butt the folded edge of the new run tightly against the folded edge of the run which is already in place.
10. Repeat steps 2 and 3.
11. Peel off the release paper from the double-sided adhesive tape.
IF THE TAPE lSN’T STICKING BECAUSE OF MOISTURE IN THE AIR STAPLE EVERY 2-3 INCHES AND DON’T USE THE TAPE TAB
TO SEAL THE EDGE.
12. Press the two insulated tabs tightly together making certain they are even. Place your thumb and fingers in the groove and use as a guide as
you work down the wall. NOTE: For best appearance and easiest installation it is advisable to complete the process in steps 10 & 11 a foot or
so at a time as you unroll down the wall.
13. Using a heavy-duty plier stapler, staple taped seam every 6 - 12 inches.
14. Steadily unroll the run down the wall, about a foot or so at a time, continue using the process described in steps 10 and 11.
If Product has Trimmed Edge:
7. Butt the edges of the insulation together.
8. Starting at one end of the edges, pull the paper backing off of the tape to apply the seam tape.
9. While applying the seam tape use the plastic squeegee (provided for you) to bond the insulation and the seam tape together. This is done by
taking the plastic squeegee and firmly pressing down, running it the length of the tape. lf done correctly, you will see that the seam tape blends
in with the insulation. (If the squeegee is not used, the seam tape will not adhere itself to the insulation and the seams will possibly come loose
over time.)
l0. Apply small sections at a time, making sure that you are bonding the seam tape to the insulation.
11. Once you reach the end of your length, use a razor knife or a pair of scissors to cut the seam tape. Tearing the tape may stretch it and the
adhesive; this puts an undue strain on the tape and will hamper its performance.
l2. Place closure strips over the insulation.
13. Repeat steps 5 thru ll until you complete the area to be insulated.
2.
Install Instructions Continued
Installation Instructions Cont.
Roof Application: Start by using a double-sided adhesive tape around the roof perimeter or fold a small section of the material back over
and secure to the eave with a fastener every 6-12 inches. It is important to have an airspace between the roof decking and the Low-E. This
is achieved by draping the Low-E, allowing it to sag approx. 3/4 "-1"
NOTE: If any defective or damaged material is encountered simply cut out the bad section and splice the remaining material together.
All splices made on wall sections must be placed behind the girts. This will conceal the splices and help to maintain a completely uniform
appearance.
To do this, go to the girts immediately above and below the defective or damaged material and cut out from these lines. This will allow you to
make your splice behind the girt.
Seams that are exposed to conditioned space must be taped with Low-E Seam tape. This product should not be left exposed in a ceiling that is
10’ high or less. Consult your local building/fire codes to ensure that the proper material is used if this situation does occur. This product should
not be overlapped. Never interfere with the design ventilation of the building when installing any form of insulation. Never expose any insulation
to any fire source. Insulation should be stored in a protected area. Do not let insulation come in contact with wet or damp concrete at any time.
Any tears or punctures in the insulation should be repaired by the appropriate Low-E Seam tape.
Splicing Low-E insulation:
Place double sided tape on last purlin covered by Low-E insulation to secure end. Trim end where it is concealed by purlin. Place double
sided tape on the top of the Low-E insulation and lay new section on the top of the existing one. Procedure for making a splice: 1. Cut a
piece from another roll a little larger than the area to be removed. Overlay the ends of the two pieces to be spliced together. 2. Cut through
the two pieces using a straight edge, to create a common edge. 3. Butt the two edges tight together. 4. Tape the seam on both sides using the
manufacturer provided aluminum seam tape. WHEN APPLYING LOW-E SEAM TAPE BE SURE TO CUT THE TAPE. DO NOT RIP OR
TEAR. RIPPING OR TEARING CAN NEGATIVELY AFFECT THE ADHESIVE. WHEN APPLYING LOW-E SEAM TAPE, BE SURE
TO USE THE MANUFACTURER SUPPLIED SQUEEGEE TO ENSURE THE TAPE IS PROPERLY ADHERED. WHEN USING TAPE
TO MAKE REPAIRS RUN TAPE PARALLEL WITH THE INSULATION. ***NEVER RUN TAPE AT AN ANGLE. NOTE: LOW-E seam
tape can also be used as a patch material to cover up and repair any cracks or tears in the LOW-E. Please refer to the above instructions for the
application of LOW-E seam tape. NOTE: When installing above a framed opening i.e. (a dock door) be sure to wrap the material around the
door header to the inside of the building. The door installers can then trim any excess LOW-E out of the way. This procedure will ensure that
there will not be a gap in the insulation after the door is installed.
NOTE: If any defective or damaged material is encountered, simply cut out the bad section and splice the remaining material together. Local
building codes shall be followed to ensure proper installation. The thermal performance of Low-E Insulation in these installations are based on
the maintenance of a totally enclosed air space adjacent to the low emittance surface(s). Thermal values for this product are defined by typical
installations and are obtained in accordance to accepted test methods and are subject to manufacturing variations. They are supplied as a technical
service and are subject to change without notice. These products should never have a core edge exposed. Seams that are exposed to conditioned
space must be taped with Low-E Seam tape. No insulation products should be left exposed in a ceiling that is 10’ high or less. Add Gypsum
board or another type of fire wall. Consult your local building/fire codes to ensure that the proper material is used if this situation does occur.
These products should not be overlapped. Never interfere with the design ventilation of the building when installing any form of insulation.
Never expose any insulation to any fire source. Insulation shall be stored in a protected area. Do not let insulation come in contact with wet or
damp concrete at any time.
**IT IS EXTREMELY IMPORTANT TO LINE THE SEAMS UP STRAIGHT IN
ALL APPLICATIONS BEFORE YOU SECURE THE INSULATION.
PLEASE DO NOT WALK ON INSULATION WHEN IT IS CUT BEFORE INSTALLATION.
These products should never have a core edge exposed. Seams that are exposed to conditioned space must be taped with Low-E Seam tape.
3.
HouseWrap Applications
System R-Value: R-4.17 Horizontal Heat Flow Only
Installation Method (Existing Walls)
®
1. ESP Low-E Housewrap is installed over exterior wall
sheathing, make sure reflective side faces out: foil flange
faces down.
2. Determine width of ESP Low-E® HouseWrap being used
( 4’,5’, 6’) for initial wrap ( lowest point of wall surface )
3. Measure from sill plate up the wall, mark wall
at level of determined width less 1”
i.e. 5’ ESP Low-E® HouseWrap mark at 59”
4. Snap chalkline around perimeter
5. Starting at the corner of the preferred exterior wall
unroll ESP Low-E® Housewrap in a horizontal manner.
Fasten using corrosion resistant staples having
minimum 1” wide crown, corrosion resistant nails
having minimum 3/8” heads or corrosion resistant
nails having minimum 1” diameter plastic heads.
Fasteners to be spaced a maximum of 16” both
vertically and horizontally.
6. When rolling ESP Low-E® Housewrap over door and
window openings: If windows and doors have been set,
trim ESP Low-E® HouseWrap as close to window or
door opening as possible and perform detailing as
per door / window manufacturer and or code
standards.
7. The bottom side of the ESP Low-E® Housewrap should
extend over sill plate by minimum 1”.
8. When applying second horizontal run of ESP Low-E®
Housewrap butt foam ends together allowing foil
flange to overlap 2”. Make certain foil flange is
to the outside to ensure water drainage plane
downward.
9.Tape all vertical and horizontal flange seam areas
with foil tape.
10. Continue method until ESP Low-E® Housewrap covers
both top plates.
11. Use foil tape to repair areas that have been torn or
compromised.
(See page7)
12. Foil is a conductor of electricity. Use extreme
caution when working with ESP Low-E® Housewrap
around power lines, wiring and electrical devices.
Flange
Tape
1. When coming to the end of existing roll in use,
leave up to 12 inches of product unattached
to wall system.
2. Remove new roll from packaging
3. Unroll ESP Low-E® Housewrap to desired area
making sure that product is plumb and square
with housewrap already in place and also overlap
material past the end of previous material by approx
8 inches.
4. Locate center of overlapped materials and make
common splice through both layers of material using
utility knife.
5. Remove cut material from end of previous roll and
start of new roll
6. Apply Low-E Tape over common splice, then continue
installing ESP Low-E® Housewrap as described in
Figure 1
7. If vertical splice is not performed, product must be
overlapped by minimum of 6”
Vertical Splice of ESP Low-E® Housewrap™
End of previous roll
Common splice
Beginning of new roll
Penetration Installation Diagrams
Step 1
Step 2
Wrap around outside
diameter of pipe
using approved
flashing tape ( for
best seal use
approved caulk
around pipe prior
to flashing tape.
Find horizontal center
of both sides of pipe
and make a 6”cut at
approx 45° angle.
Bend flap up
Flashing Tape
Step 3
Step 1
Place dryer vent in
designated location
allowing vent flashing
to cover housewrap
on lower half ( vent
flashing area to touch
sheathing on top half )
Bend flap back to
position and tape
using Low-E foil
tape
Place housewrap on
top of vent flashing
on top half and cut
around vent. Lift flap
created and cut off
the excess
®
Once ESP Low-E Housewrap has been securely
fastened to exterior sheathing make cuts as
shown in Figure 2.
Try not to cut past exterior side of framed
opening (exception for top of framed opening)
but in the event that occurs use Low-E foil
tape to repair area that was compromised.
1. An additional flap should be cut above
the top exterior side of framed opening
for the installation of head flashing.
2. Bend flap away from
wall to allow installation
of window and flashing
Step 3
Step 2
Framed Openings
When installing ESP Low-E® Housewrap over the exterior of structure be sure to run product horizontally
over entire wall including framed openings. (please refer to page 5 for more detailed instructions)
Tape lateral seam and around
vent obstruction. For best seal
use approved caulk around
vent prior to taping.
3. Apply window and head flashing
4. Reset ESP Low-E® Housewrap and tape seams
Tears and Holes Repair
Step 2
Step 1
For simple tears in ESP Low-E® HouseWrap
apply Low-E foil tape completely over torn
area and squeegee area for best adhesion
For larger tears and
or holes place piece of
ESP Low-E® Housewrap over
compromised area ( Be
sure that piece being placed
on top of compromised area
is larger than damaged area )
Make common splice through
both layers.
Remove excess top layer and
compromised area that was cut out.
Once side and bottom flaps have been cut, bend these flaps toward the interior of structure using staples
or adhesive to attach ESP Low-E® Housewrap to the face of the jamb.
Remove excess
material by
using inside
face of
stud as
cutting guide
Place material into
opening created and
tape using Low-E foil tape
Follow door and window manufacturers
instructions for flashing and installation
relating to their respective products.
SYSTEM R-VALUE CALCULATIONS FOR THIS ASSEMBLY WERE PERFORMED BY R & D SERVICES REPORT # RD03224
4.
Pre Engineered Steel Applications
Commercial Metal Roofing
Average System R-Value: Down R- 11.04, Up R- 7.39
Average System R-Value: Down R- 21.04 (3” Fiberglass), Down R- 30.04 (6” Fiberglass)
Up R- 17.38 (3” Fiberglass), Up R- 26.39 (6” Fiberglass)
SYSTEM R-VALUES FOR ESP LOW-E® INSULATION AS PER ASTM C-976, AIR TO AIR, ADJUSTED TO MEET CRITERIA EQUIVALENT TO ASTM 1224
ASHRAE 90.1 Compliance Application
Average System R-Value: R- 17.85 (3” Fiberglass) *SDR, R- 21.73 (3” Fiberglass) *SSR, R- 18.51 (4” Fiberglass) *SDR
R- 26.31 (6” Fiberglass) *SDR, R- 30.30 (6” + 3” Fiberglass) *SSR, *SDR = Screw Down Roof *SSR = Standing Seam Roof
SYSTEM R-VALUES CALCULATED USING ENVSTD 4.0 ESP LOW-E® INSULATION AS R-11 SHEATHING
5.
Post Frame Applications
Post Frame Roof Application
Average System R-Value: Down R- 11.04, Up R- 7.39
When installing Low-E Insulation in post frame buildings, it is important to have an air space between the metal roof panel and the Low-E.
This is best achieved by draping Low-E over the purlins from eave to eave, allowing it to sag approximately 3/4” to 1” between the
purlins. After the first 4’ run is tack fastened (3 1/2” staples /purlin), install the first section of roof sheeting and work from that to make
the next run of Low-E and so on for the length of the building. It is important that all seams be securely taped with Low-E tape unless a
staple flanged product is used.
If the building has a ridge vent, cut the Low-E loose at the peak before installing the vent.
Post Frame Wall Application
Average System R-Value: Horizontal R- 8.55
Wrap Low-E Insulation around outside of framework, temporarily tack fasten Low-E loosely to outside of each girt with ½” staples
allowing Low-E to bow in approximately 3/4” creating an enclosed air space. To achieve a vapor barrier all adjoining seams must be
securely taped using Low-E tape unless a staple flanged product is used. Then attach metal siding by approved method.
6.
Ceiling Applications
Ceiling Application with Low-E & Blown In Insulation
System R-Value: R- 34.70 Downward Heat Flow, System R-Value R- 33.75 Upward Heat Flow
Measure entire ceiling joist area to determine square footage of Low-E Insulation required (length x width). Roll out material and
fasten to bottom of ceiling joist, stapling with 1/2” staples every 6”. To achieve a vapor barrier, all adjoining seams must be taped
securely with Low-E tape. Secure lathe strips and interior ceiling using approved application methods.
Recessed Ceiling Application with Low-E & Blown In Insulation
System R-Value: R- 38.04 Downward Heat Flow, System R-Value R- 32.87 Upward Heat Flow
Measure entire ceiling joist area to determine square footage of Low-E Insulation required (length x width). We recommend using
Low-E Insulation with tabs. Roll out tab material and fasten by recessing it 1-1/2” into ceiling joist cavity, stapling with 1/2” staples
every 6”. To achieve a vapor barrier, all adjoining seams must be taped securely with Low-E tape. Secure interior ceiling using
approved application methods.
SYSTEM R-VALUES FOR THESE INSTALLATION METHODS WERE CALCULATED USING DATA FROM THE 1989 ASHRAE HANDBOOK OF FUNDAMENTALS
Suggested Cathedral Ceiling Installation
System R-Value: R- 29.74 Downward Heat Flow, R- 23.55 Upward Heat Flow
Install 24” ESP Low-E® Tab Insulation as the baffling under wood deck to insure proper ventilation. Install fiberglass according to
manufacturers recommendation.
Different climates may affect application. Refer to local building codes for placement of vapor barrier. Low-E is a vapor barrier.
7.
Attic Applications
Attic Rafters / 1/8” Low-E Insulation
Low-E Roof Rafter Application
Example of metal banding support
*Do Not Use Attic floor insulation In Rafter Applications
Lathe Strips, Metal Banding or Fireproof
Fiberglass strips for additional support
Micro-E Insulation
Lathe Strips, Metal Banding or Fireproof
Fiberglass strips for additional support
1/8” Low-E Insulation
Roof Rafter
Micro-E Insulation
1/8” Low-E Insulation
Ceiling Joist
Arctic Fox Attic Floor Insulation
This installation below is for retrofitting rafters as an energy upgrade. Low-E Insulation is installed across the bottom face of the rafter. Proper
ventilation must be maintained. Measure rafter area to determine square footage of Low-E Insulation required (length x width). Roll out material and
fasten to bottom of rafter face with ½” staples approximately every 6 inches. We suggest starting at the peak and working down to the eave. Leave
approximately ½” space at the peak for ventilation. All adjoining seams must be taped securely with Low-E tape, unless a staple flange product is
used. To prevent insulation from falling from rafters, ESP recommends using lathe strips, metal banding or fireproof fiberglass strips for added
Note: Drawings are not to scale and are meant to depict possible applications. Exact Specifications may vary
See Attic Floor Insulation Install Guide for further instructions.
Attic Floor Insulation
Low-E Attic Floor Insulation Application
(with mass insulation)
Low-E Attic Floor Insulation
2” x 6” Floor Joist
mass insulation
interior finish
Low-E Attic Floor Insulation can be rolled out over existing mass insulation. The product is perforated and will not trap moisture.
Low-E Attic Floor Insulation can be stapled with 1/2” staples every 6”. Since it is not a vapor barrier taping of seams is optional.
Low-E Attic Floor Insulationt 4’ width
mass insulation
floor joist
roof truss
Low-E Attic FloorInsulation 24” width
mass insulation
floor joist
8.
Roofing Applications
New Construction Over Roof Rafter Installation
System R-Value: R- 11.04 Down, R- 7.29 Up
After roof truss or roof rafters have been located and installed, install Low-E Insulation® by drooping approx. 2” at center of span over the
truss/rafters. Use staples to attach material. To assure a proper vapor barrier, all seams should be taped securely with Low-E tape.
If continuous roof/ridge vent is to be installed, insulation should stop approx. 2” from vent to allow flow of air out of roof system.
SYSTEM R-VALUES FOR THESE INSTALLATION METHODS WERE CALCULATED USING DATA FROM THE ASHRAE HANDBOOK OF FUNDAMENTALS
Residential Metal Roof Installation
Average System R-Value: R- 9.15 Down
Furring boards provide airspace between top of ESP Low-E® Insulation and underside of metal roof.
SYSTEM R-VALUES FOR THESE INSTALLATION METHODS WERE CALCULATED USING DATA FROM THE ASHRAE HANDBOOK OF FUNDAMENTALS
9.
Basement/Block Wall - Crawl Space - Floor Joist Applications
Basement Wall Application
*1
System R-Value: R- 5.7 Horizontal Heat Flow Only
System R-Value: R- 8.12 Horizontal Heat Flow Only
Please note that these are two different applications with different R-values. Measure wall area to determine square footage of Low-E
Insulation required (length x height). Roll out material and fasten as per diagram with ½” staples approximately every 6”. To achieve a
vapor barrier, all seams and stud faces must be taped securely with Low-E tape.
*1
SYSTEM R-VALUES FOR HORIZONTAL HEAT FLOW, WITH ONE ENCLOSED AIR SPACE, INCLUDES AN ADDITIONAL 1.70 STILL AIR FILM
FOR EXPOSED SIDE OF ESP LOW-E®
Crawl Space Application
*2
System R-Value: R- 11 Downward Heat Flow Only
ESP Low-E® can be used under your floor in a crawlspace to stop any air infiltration and add high insulating value to your floors. In a
®
®
crawlspace application ESP Low-E can achieve as high as an R-11. ESP Low-E will not mold, mildew or absorb moisture, so once it’s
®
installed there is virtually no maintenance involved. In areas where flooding is a problem ESP Low-E will eliminate the concern of
your insulation system performing below average.
®
This Installation is for basement / crawlspaces with a 2” x 8” joist minimum. ESP Low-E Insulation is installed across the bottom face
of the joist. ALL R-VALUES ARE SYSTEM R-VALUES. AN
ENCLOSED AIR SPACE MUST BE MAINTAINED TO
ACHIEVE THESE VALUES. IF THE BOTTOM SURFACE OF
THE LOW-E INSULATION MUST BE COVERED BY
ANOTHER SURFACE, R-VALUE MAY BE LOWER.
Measure entire joist area to determine square footage of ESP
Low-E® Insulation required(length x width). Roll out material and
fasten to bottom of floor joist with 1/2” staples every 6”. To
achieve a vapor barrier, all seams must be taped securely with
Low-E tape.
*2
SYSTEM R-VALUES FOR HEAT FLOW DOWN, WITH ONE ENCLOSED AIR SPACE, INCLUDES AN ADDITIONAL 4.55 STILL AIR FILM
FOR EXPOSED SIDE OF ESP LOW-E®
Floor Joist Application
System R-Value: R- 20.20, Downward Heat Flow Only
Measure entire joist area to determine square footage of ESP Low-E® Insulation required(length x width). We recommend ESP Low-E®
16” or 24” tab material. Roll out material and fasten to inside of floor joist in the center of the cavity by stapling 3/4” tabs as per diagram
to right with 1/2” staple every 6”. To achieve a vapor barrier, all seams must be taped securely with Low-E tape.
SYSTEM R-VALUES FOR THESE INSTALLATION METHODS WERE CALCULATED USING DATA FROM THE ASHRAE HANDBOOK OF FUNDAMENTALS
10.
Wall Applications
Wall Application with Low-E & Mass Insulation (2X4) & (2X6)
System R-Value: R- 18.91, Horizontal Heat Flow Only
The first step in this application is to install mass insulation in the wall cavity. Next, install Low-E Insulation Tab Material with the tab
flush to the outside of the stud. It is recommended that ½” staples be applied approximately every 6” along tab to fasten Low-E. All seams
should be taped securely with Low-E Tape. Cover the face of each stud with tape and all seams around electrical boxes should be taped.
System R-Value: R- 22.75, Horizontal Heat Flow Only
SYSTEM R-VALUES FOR THESE INSTALLATION METHODS WERE CALCULATED USING DATA FROM THE ASHRAE HANDBOOK OF FUNDAMENTALS
Wall Application with 1 Layer Low-E Insulation (No Mass Insulation)
System R-Value: R- 9.06, Horizontal Heat Flow Only
Install Low-E Insulation Tab Material with the tab centered within the stud cavity. It is recommended that ½” staples be applied
approximately every 6” along tab to fasten Low-E. All seams are taped securely with Low-E Tape. All seams around electrical boxes are
taped. To achieve a vapor barrier, all seams must be taped securely with Low-E tape.
CALCULATIONS FOR THIS ASSEMBLY WERE PERFORMED BY R & D SERVICES REPORT # RD03224
11.
E
S
P
®
REFLECTIVE INSULATION
Reduces
your carbon
footprint.
YOUR
EVERYDAY
INSULATION
SOLUTION
ESP LOW-E® INSULATION
PRODUCT CODES*: 4LFLT, 6LFLT(trimmed), 4LFLS, 6LFLS(staple flange), 4LMLT (4’ only)
PRODUCT DIMENSIONS & DESCRIPTION*
Double sided scrimmed aluminum foil laminated to polyethylene foam (1/4”or 1/8” nominal thickness) .
Edges can be trimmed or with staple flange
“ESP, Inc strives to provide the most accurate R-value
WIDTH**: 4’, 6’ respectively
data possible. The R-values set forth in this document
LENGTH**: 125’ (stock size 4’width)
84’ (stock size 6’ width)
are the reflection of a combination of industry standard
R-Value*** : R-11 down R-7.55 up
R-7.75 horizontal
testing and conscientious calculation. However, these
numbers, even within specific applications, can
PERM RATING: ASTM E-96 0.008
FLAME AND SMOKE: ASTM E-84 Flame spread <25 Smoke developed <50 fluctuate due to the multiple variables that influence
R-value."
FULL SCALE FIRE TEST: NFPA-286 Passed
EMITTANCE: ASTM C-1371 0.03
* This label refers to the ESP Low-E® line of insulation products supplied by ESP, Inc. and includes information on different widths and
attachment features of the ESP Low-E® line. For information on specific product purchased refer to thermal label affixed to the roll of insulation
** Additional widths and lengths are available upon request and approval by ESP, Inc.
*** R-value results are obtained from ASTM C236.
Specific R-values for specific applications can be obtained from Install Guide at www.low-e.com or by contacting ESP, Inc. at 1-800-289-5693
“R means resistance to heat flow. The higher the R-value, the greater the insulating power.” “To get the marked R-Value, it is essential that this insulation be
installed properly. If you do it yourself, get instructions and follow them carefully. Instructions do not come with this package.” To obtain installation instructions
visit www.low-e.com or call 1-800-289-5693. Like a radiant barrier, Low-E products also block 97% of radiant heat.
NOTE: Do not allow product to become damp or wet while rolled in sealed bag
Do not set product directly on wet or uncured concrete.
WARNING: Although ESP LOW-E® Insulation Products are all fire tested to ASTM and/or NFPA standards; it is
recommended that they or any insulation material should not be exposed to open flame or other
ignition sources of sufficient intensity during shipment, storage or installation.
CAUTION: Aluminum is an electrical conductor. Please use caution when working around electrical sources
including overhead power lines. Carefully inspect electrical junction boxes and check for frayed
wires before beginning installation
ESP Low-E® Insulation is a versatile product for many applications and industries.
Environmentally Safe Products, Inc.
313 W. Golden Ln. New Oxford, PA 17350
Toll Free: 1-800-289-5693 Fax: 717-624-7089
www low-e.com E-mail: [email protected]
Scan code to see
Install Guide copyright©espaug.2012
12.
E
S
P
®
®
Econo-E Insulation
Reduces
your carbon
footprint.
YOUR
EVERYDAY
INSULATION
SOLUTION
®
ESP LOW-E®: ECONO-E INSULATION
PRODUCT CODES*: 4EFET, 6EFET(trimmed), 4EFES, 6EFES(staple flange), 4EFEZ, 6EFEZ(ez seal)
PRODUCT DIMENSIONS & DESCRIPTION*
Double sided scrimless aluminum foil laminated to polyethylene foam (1/4” nominal thickness)
Edges can be trimmed, with staple flange or with EZ-Seal self taped flange feature.
WIDTH**: 4’, 6’ respectively
ESP, Inc. strives to provide the most accurate R-Value data possible.
LENGTH**: 125’ (stock size 4’width)
84’ (stock size 6’ width)
The R-Values set forth in this document are the reflection of a
R-Value*** : R-11 down R-7.55 up
R-7.75 horizontal
combination of industry standard testing and conscientious calculations.
PERM RATING: ASTM E-96 0.008
However, these numbers, even within specific applications can
FLAME AND SMOKE: ASTM E-84 Flame spread <25 Smoke developed <50
fluctuate due to the multiple variables that influence R-Values.
FULL SCALE FIRE TEST: NFPA-286 Passed
EMITTANCE: ASTM C-1371 0.03
* This label refers to the Econo-E® line of insulation products supplied by ESP, Inc. and includes information on different widths and
attachment features of the Econo-E® line. Refer to thermal label affixed to the roll of insulation for information on specific product purchased.
** Additional widths and lengths are available upon request and approval by ESP, Inc.
*** R-value results are obtained from ASTM C236. R-values for Econo-E® materials can be higher or lower depending upon application.
Specific R-values for specific applications can be obtained from Install Guide at www.low-e.com or by contacting ESP , Inc. at 1-800-289-5693
“R means resistance to heat flow. The higher the R-value, the greater the insulating power.” “To get the marked R-Value, it is essential that this insulation be
installed properly. If you do it yourself, get instructions and follow them carefully. Instructions do not come with this package.” To obtain installation instructions
visit www.low-e.com or call 1-800-289-5693. Like a radiant barrier, Low-E products also block 97% of radiant heat.
NOTE: Do not allow product to become damp or wet while rolled in sealed bag
Do not set product directly on wet or uncured concrete.
WARNING: Although ESP LOW-E® Insulation Products are all fire tested to ASTM and/or NFPA standards; it is
recommended that they or any insulation material should not be exposed to open flame or other
ignition sources of sufficient intensity during shipment, storage or installation.
CAUTION: Aluminum is an electrical conductor. Please use caution when working around electrical sources
including overhead power lines. Carefully inspect electrical junction boxes and check for frayed
wires before beginning installation
Note: ESP Econo-E® is a versatile product for many applications and industries.
13.
Environmentally Safe Products, Inc.
313 W. Golden Ln. New Oxford, PA 17350
Toll Free: 1-800-289-5693 Fax: 717-624-7089
www low-e.com E-mail: [email protected]
Scan code to see
Install Guide
copyright©espaug1.2012
E
S
P
®
®
Micro-E Insulation
Reduces
your carbon
footprint.
YOUR
EVERYDAY
INSULATION
SOLUTION
®
ESP LOW-E® MICRO-E INSULATION
PRODUCT CODES*: 4EMET (trimmed), 4EMES (staple flange)
PRODUCT DIMENSIONS & DESCRIPTION*
Double sided scrimless aluminum foil laminated to polyethylene foam (1/8” nominal thickness).
Edges can be trimmed or with staple flange.
“ESP, Inc strives to provide the most accurate R-value data possible.
WIDTH**: 4’
The R-values set forth in this document are the reflection of a
LENGTH**: 125’ (stock size 4’width)
combination of industry standard testing and conscientious calculation.
R-Value*** : R-10 down R-6 up
R-7 horizontal
However, these numbers, even within specific applications, can fluctuate
PERM RATING: ASTM E-96 0.008
FLAME AND SMOKE: ASTM E-84 Flame spread <25 Smoke developed <50 due to the multiple variables that influence R-value."
EMITTANCE: ASTM C-1371 0.03
* This label refers to the Micro-E® line of insulation products supplied by ESP, Inc. and includes information on different widths and attachment
features of the Micro-E® line. For information on specific product purchased refer to thermal label affixed to the roll of insulation
** Additional widths and lengths are available upon request and approval by ESP, Inc.
*** R-value results are obtained from ASTM C236.
Specific R-values for specific applications can be obtained from Install Guide at www.low-e.com or by contacting ESP, Inc. at 1-800-289-5693
“R means resistance to heat flow. The higher the R-value, the greater the insulating power.” “To get the marked R-Value, it is essential that this insulation be
installed properly. If you do it yourself, get instructions and follow them carefully. Instructions do not come with this package.” To obtain installation instructions
visit www.low-e.com or call 1-800-289-5693. Like a radiant barrier, Low-E products also block 97% of radiant heat.
NOTE: Do not allow product to become damp or wet while rolled in sealed bag
Do not set product directly on wet or uncured concrete.
WARNING: Although ESP LOW-E® Insulation Products are all fire tested to ASTM and/or NFPA standards; it is
recommended that they or any insulation material should not be exposed to open flame or other
ignition sources of sufficient intensity during shipment, storage or installation.
CAUTION: Aluminum is an electrical conductor. Please use caution when working around electrical sources
including overhead power lines. Carefully inspect electrical junction boxes and check for frayed
wires before beginning installation
ESP Micro-E® is a versatile product for many applications and industries.
Environmentally Safe Products, Inc.
313 W. Golden Ln. New Oxford, PA 17350
Toll Free: 1-800-289-5693 Fax: 717-624-7089
www low-e.com E-mail: [email protected]
Scan code to see
Install Guide
copyright©espjul1.2012
14.
E
S
P
®
ThermaSheet Insulation
YOUR
EVERYDAY
INSULATION
SOLUTION
Reduces
your carbon
footprint.
ESP LOW-E® THERMASHEET INSULATION
PRODUCT CODES: 4EMEX
PRODUCT DIMENSIONS & DESCRIPTION*
Double sided scrimless aluminum foil laminated to polyethylene foam (1/8” nominal thickness) with 4” foil flange overlap.
WIDTH: 4’
“ESP, Inc strives to provide the most accurate R-value data possible.
LENGTH*: 125’
The R-values set forth in this document are the reflection of a
R-Value** : R-9 downward heat flow only***
combination of industry standard testing and conscientious calculation.
PERM RATING: ASTM E-96 0.008
FLAME AND SMOKE: ASTM E-84 Flame spread <25 Smoke developed <50 However, these numbers, even within specific applications, can fluctuate
EMITTANCE: ASTM C-1371 0.03
due to the multiple variables that influence R-value."
* Additional lengths are available upon request and approval by ESP, Inc.
** SYSTEM R-VALUES FOR THESE INSTALLATION METHODS WERE CALCULATED USING DATA FROM THE ASHRAE
HANDBOOK OF FUNDAMENTALS. Specific R-values for specific applications can be obtained from Install Guide at www.low-e.com
or by contacting ESP, Inc. at 1-800-289-5693
*** With 1.5” airspace
“R means resistance to heat flow. The higher the R-value, the greater the insulating power.” “To get the marked R-Value, it is essential that this insulation be
installed properly. If you do it yourself, get instructions and follow them carefully. Instructions do not come with this package.” To obtain installation instructions
visit www.low-e.com or call 1-800-289-5693. Like a radiant barrier, Low-E products also block 97% of radiant heat.
NOTE: Do not allow product to become damp or wet while rolled in sealed bag
Do not set product directly on wet or uncured concrete.
WARNING: Although ESP LOW-E® Insulation Products are all fire tested to ASTM and/or NFPA standards; it is
recommended that they or any insulation material should not be exposed to open flame or other
ignition sources of sufficient intensity during shipment, storage or installation.
CAUTION: Aluminum is an electrical conductor. Please use caution when working around electrical sources
including overhead power lines. Carefully inspect electrical junction boxes and check for frayed
wires before beginning installation
Note: ESP THERMASHEET is designed for use as a roofing underlayment
primarily for clay tile and/or metal roofing systems.
Environmentally Safe Products, Inc.
313 W. Golden Ln. New Oxford, PA 17350
Toll Free: 1-800-289-5693 Fax: 717-624-7089
www low-e.com E-mail: [email protected]
15.
Scan Code To
See Install Guide
copyright©espjul1.2012
E
S
P
®
Tab Insulation
Reduces
your carbon
footprint.
YOUR
EVERYDAY
INSULATION
SOLUTION
ESP LOW-E® TAB INSULATION
PRODUCT CODES: 16EFEC, 24EFEC, 18EFEC
PRODUCT DIMENSIONS & DESCRIPTION
Double sided scrimless aluminum foil laminated to polyethylene foam (1/4” nominal thickness)
WIDTH: 16”, 24”, 18” respectively
LENGTH: 125’ (16” & 24”widths) 100’ (18”width)
R-Value* : R-11 down R-7.55 up
R-7.75 horizontal
PERM RATING: ASTM E-96 0.008
FLAME AND SMOKE: ASTM E-84 Flame spread <25 Smoke developed <50
EMITTANCE: ASTM C-1371 0.03
* R-value results are obtained from ASTM C236. R-values for tab materials can be higher or lower depending upon
application. Specific R-values for specific applications can be obtained from Install Guide at www.low-e.com or
by contacting ESP, Inc. at 1-800-289-5693
“R means resistance to heat flow. The higher the R-value, the greater the insulating power.” “To get the marked R-Value, it is essential that this insulation be
installed properly. If you do it yourself, get instructions and follow them carefully. Instructions do not come with this package.” To obtain installation instructions
visit www.low-e.com or call 1-800-289-5693. Like a radiant barrier, Low-E products also block 97% of radiant heat.
“ESP, Inc strives to provide the most accurate R-value data possible. The R-values set forth in this document are the reflection of a combination of industry standard
testing and conscientious calculation. However, these numbers, even within specific applications, can fluctuate due to the multiple variables that influence R-value."
NOTE: Do not allow product to become damp or wet while rolled in sealed bag
Do not set product directly on wet or uncured concrete.
WARNING: Although ESP LOW-E® Insulation Products are all fire tested to ASTM and/or NFPA standards; it is
recommended that they or any insulation material should not be exposed to open flame or other
ignition sources of sufficient intensity during shipment, storage or installation.
CAUTION: Aluminum is an electrical conductor. Please use caution when working around electrical
sources including overhead power lines. Carefully inspect electrical junction boxes and
check frayed wires before beginning installation
Note: ESP Low-E® Tab Material is designed for use in stud cavities, joists, and truss/rafter applications.
Environmentally Safe Products, Inc.
313 W. Golden Ln. New Oxford, PA 17350
Toll Free: 1-800-289-5693 Fax: 717-624-7089
www low-e.com E-mail: [email protected]
Scan Code To
See Install Guide
copyright©espaug1.2011
16.
E
S
P
®
Low-E HouseWrap
Reduces
your carbon
footprint.
YOUR
EVERYDAY
INSULATION
SOLUTION
ESP Low-E® HouseWrap
PRODUCT CODES: 4PFNS, 5PFNS, 6PFNS
PRODUCT DIMENSIONS & DESCRIPTION:**
Single-sided scrimmed aluminum foil laminated to polyethylene foam perforated (¼” nominal thickness)
WIDTH: 4’, 5’, or 6’ with overlapping flange
LENGTH: 125', 100', 100'
ESP, Inc. strives to provide the most accurate R-Value data possible.
SYSTEM R-VALUE: R-4* R-VALUE: R-3 (product & reflective air space only) The R-Values set forth in this document are the reflection of a
PERM RATING: ASTM E-96 7 perms or 40 grams/(day-m2)
combination of testing and conscientious calculations. However,
WATER RESISTANCE: ASTM D779 - 9hrs
these numbers, even within specific applications can fluctuate
FULL SCALE FIRE TEST(walls only): NFPA-286 Passed
due to the multiple variables that influence R-Values.
EMITTANCE: ASTM C-1371 0.03
*Includes ESP Low-E Housewrap attached to 1/2 inch wood sheathing and a 0.375 inch reflective airspace behind vinyl siding.
**For actual dimensions of this roll see attached label with manufacturer's lot number
Specific R-values for specific applications can be obtained from Install Guide at www.low-e.com or by contacting ESP , Inc. at 1-800-289-5693
“R means resistance to heat flow. The higher the R-value, the greater the insulating power.” “To get the marked R-Value, it is essential that this insulation be
installed properly. If you do it yourself, get instructions and follow them carefully. Instructions do not come with this package.” To obtain installation instructions
visit www.low-e.com or call 1-800-289-5693. Like a radiant barrier, Low-E products also block 97% of radiant heat.
NOTE: Do not allow product to become damp or wet while rolled in sealed bag
Do not set product directly on wet or uncured concrete.
WARNING: Although ESP LOW-E® Insulation Products are all fire tested to ASTM and/or NFPA standards; it is
recommended that they or any insulation material should not be exposed to open flame or other
ignition sources of sufficient intensity during shipment, storage or installation.
CAUTION: Aluminum is an electrical conductor. Please use caution when working around electrical sources
including overhead power lines. Carefully inspect electrical junction boxes and check for frayed
wires before beginning installation
Note: ESP Low-E HouseWrap is designed for covering of external sheathing only.
Environmentally Safe Products, Inc.
313 W. Golden Ln. New Oxford, PA 17350
Toll Free: 1-800-289-5693 Fax: 717-624-7089
www low-e.com E-mail: [email protected]
17.
ICC EVALUATION
ES SERVICE
I
C
C
ICC-ES Evaluation Report
ESR-3079
Scan Code to See
Install Guide
copyright©espapr1.2011
Most Widely Accepted and Trusted
E
S
P
®
Low-E Attic Floor Insulation
YOUR
EVERYDAY
INSULATION
SOLUTION
Reduces
your carbon
footprint.
ESP LOW-E® ATTIC FLOOR INSULATION
PRODUCT CODES: 4PMPA-SL, 24PMPA-SL
PRODUCT DIMENSIONS & DESCRIPTION
Double sided scrimless aluminum foil laminated to polyethylene foam perforated (1/8” nominal thickness)
“ESP, Inc strives to provide the most accurate R-value data
WIDTH: 4’
possible.
The R-values set forth in this document are the
LENGTH: 125’
reflection of a combination of industry standard testing and
R-Value*: R-5.5 down R-2.3 up
PERM RATING: ASTM E-96: 5.18 perms or 51.55 grams/ (day-m²) conscientious calculation. However, these numbers, even
CRITICAL RADIANT FLUX: ASTM E-970: > .12 w/cm² (no ignition) within specific applications, can fluctuate due to the multiple
EMITTANCE: ASTM C-1371 0.03
variables that influence R-value."
* R-value determined when placed over attic floor joist or existing insulation in joist area. R-value includes core
material value and low emittance air film value for upward and downward heat flow respectively. Specific R-values for specific applications
can be obtained from Install Guide at www.low-e.com or by contacting ESP, Inc. at 1-800-289-5693
“R means resistance to heat flow. The higher the R-value, the greater the insulating power.” “To get the marked R-Value, it is essential that this insulation be
installed properly. If you do it yourself, get instructions and follow them carefully. Instructions do not come with this package.” To obtain installation instructions
visit www.low-e.com or call 1-800-289-5693. Like a radiant barrier, Low-E products also block 97% of radiant heat.
NOTE: Do not allow product to become damp or wet while rolled in sealed bag
Do not set product directly on wet or uncured concrete.
WARNING: Although ESP LOW-E® Insulation Products are all fire tested to ASTM and/or NFPA standards; it is
recommended that they or any insulation material should not be exposed to open flame or other
ignition sources of sufficient intensity during shipment, storage or installation.
CAUTION: Aluminum is an electrical conductor. Please use caution when working around electrical sources
including overhead power lines. Carefully inspect electrical junction boxes and check for frayed
wires before beginning installation
Note: ESP Low-E® Attic Floor Insulation is designed for use in residential attic floor spaces only.
Environmentally Safe Products, Inc.
313 W. Golden Ln. New Oxford, PA 17350
Toll Free: 1-800-289-5693 Fax: 717-624-7089
www low-e.com E-mail: [email protected]
18.
Scan Code to See
Install Guide copyright©espjul1.2012
E
S
P
®
Class A White
Reduces
your carbon
footprint.
YOUR
EVERYDAY
INSULATION
SOLUTION
ESP LOW-E® CLASS-A WHITE INSULATION
PRODUCT CODES*: 4EFWT, 6EFWT(trimmed), 4EFWS, 6EFWS(staple flange), 4EFWZ, 6EFWZ(ez seal)
PRODUCT DIMENSIONS & DESCRIPTION*
One side scrimless aluminum foil, one side scrimless white foil, laminated to polyethylene foam (1/4” nominal thickness).
Edges can be trimmed, with staple flange or with EZ-Seal self taped flange feature.
WIDTH**: 4’, 6’ respectively
LENGTH**: 125’ (stock size 4’width)
84’ (stock size 6’ width)
R-Value*** : R-11.74 down R-8.58 up
R-7.6 horizontal
PERM RATING: ASTM E-96 0.008
FLAME AND SMOKE: ASTM E-84 Flame spread <25 Smoke developed <50
FULL SCALE FIRE TEST: NFPA-286 Passed
EMITTANCE: ASTM C-1371 0.03
* This label refers to the Class-A White line of insulation products supplied by ESP, Inc. and includes information on different widths and
attachment features of the Class-A White line.
Refer to thermal label affixed to the roll of insulation for information on specific product purchased.
** Additional widths and lengths are available upon request and approval by ESP, Inc.
*** R-value results were calculated by GeoScience and were determined from 0.75” airspace and includes air film resistance.
Specific R-values for specific applications can be obtained from installation manual at www.low-e.com or by contacting ESP , Inc.
at 1-800-289-5693
“R means resistance to heat flow. The higher the R-value, the greater the insulating power.” “To get the marked R-Value, it is essential that this insulation be
installed properly. If you do it yourself, get instructions and follow them carefully. Instructions do not come with this package.” To obtain installation instructions
visit www.low-e.com or call 1-800-289-5693. Like a radiant barrier, Low-E products also block 97% of radiant heat.
“ESP, Inc strives to provide the most accurate R-value data possible. The R-values set forth in this document are the reflection of a combination of industry standard
testing and conscientious calculation. However, these numbers, even within specific applications, can fluctuate due to the multiple variables that influence R-value."
ESP Low-E insulation products are covered under a limited warranty. For full details on our warranty please see our website, www.Low-E.com.
NOTE: Do not allow product to become damp or wet while rolled in sealed bag
Do not set product directly on wet or uncured concrete.
WARNING: Although ESP LOW-E® Insulation Products are all fire tested to ASTM and/or NFPA standards; it is
recommended that they or any insulation material should not be exposed to open flame or other
ignition sources of sufficient intensity during shipment, storage or installation.
CAUTION: Aluminum is an electrical conductor. Please use caution when working around electrical sources
including overhead power lines. Carefully inspect electrical junction boxes and check for frayed
wires before beginning installation
Note: ESP Class-A White is a versatile product for many applications and industries.
19.
Environmentally Safe Products, Inc.
313 W. Golden Ln. New Oxford, PA 17350
Toll Free: 1-800-289-5693 Fax: 717-624-7089
www low-e.com E-mail: [email protected]
Scan Code To
See Install Guide
copyright©espaug1.2012
Other Important Information
FLAMMABILITY TESTING & MANUFACTURER’S WARNING
All ESP Low-E® Insulations have been tested in accordance with either the ASTM E-84 Surface Burning Characteristics for Building Materials
®
or the NFPA 286 Full Scale Room Burn Test. The majority of ESP Low-E Insulation product line meet the criteria in the Building Codes
to be used in exposed building applications. Always consult your local building codes and officials before installing Low-E insulation if there
are any questions concerning the building application. If there is any question concerning which product to use in your specific application, call
800-289-5693 and our representatives will be happy to assist you in choosing the correct product for your building.
MANUFACTURER’S WARNING: It is not recommended that these products be left exposed in walls and ceilings where ceiling height is less
than 10 feet. lf the product is to be installed in a building in the walls and ceiling with a ceiling height less than I0 feet, the wall should be
covered with an approved thermal barrier (ex. gypsum board). Always consult your local building codes or officials before installing.
\
ASTM STANDARD TEST METHOD FOR SURFACE BURNING CHARACTERISTICS OF BUILDING MATERIALS:
This standard is used to measure and describe the response of materials, products, or assemblies to heat and flame under controlled laboratory
conditions. ESP Low-E® products are tested within the strict standard of these test methods. This test method is not necessarily representative
of the manner in which the ESP Low-E® products are installed in a typical field installation. The numerical ratings on all ESP Low-E® insulation
products or any other materials are not intended to reflect hazards under actual fire conditions. ESP strives to have tests done as close as possible
to the actual install methods.
Warning:
Aluminum is an electrical conductor. Please use caution when working around electrical sources including overhead power lines.
NOTE: Rolls of insulation shall be packaged in a polyethylene wrapping. Insulation shall be stored in a dry protected area. Do not allow insulation
to come in contact with fresh concrete at any time. Any tears or punctures in the foil shall be repaired with aluminum tape. All seams that
require taping must be taped with ESP approved tape.
PRODUCT GUARANTEE & MANUFACTURER’S WARRANTY
Product Guarantee
ESP Low-E® Insulation products are guaranteed against defects in material and workmanship for 20 years. Blister or bubbles in product surface
will not affect performance. Product thickness for products with foil on both sides may vary +/- l0%. All other products may vary +/- 20%.
Defective Material
The following criteria may be considered a defect; (1.) l inch wide or more of foil delamination on the edges for more than 15 feet of the roll.
(2.) More than l inch of core showing on 20 feet or more of a roll. (3.) Large areas ( more than 1 square foot ) of delaminated foil.
Corrective Instructions
Occasionally there may be imperfections in product that may affect appearance but not performance. In the event this is encountered, the
following solutions are advised; (1.) If there is core showing on one side, either tape the seam on that side when installed or install product with
the core side in. (2.) If there is an edge that is delaminated, either tape the seam on that side when installed or install product with delaminated
edge in. (3.) If there are areas that have a delamination that cannot be installed without correcting this defect, the following may be done with an
iron; set the iron about half to three quarters temperature setting. Make a small slit with a razor knife in the center of the delamination and
carefully, with light pressure, iron the foil towards the slit, allowing trapped air to escape. When finished, cover the slit with a small piece of
Low-E tape.
Return Policy
(1.) It is our opinion that our Distributors should handle customer problems directly and ESP in turn will issue a credit or replace materials to
the Distributor. The Distributor must make available to ESP a copy of the product label or the information on the label [ lot#, initials, product
description], samples of the defect, or the roll of material. Upon inspection of the defect, ESP will credit or replace defective material at ESP`s
discretion. lf a section of a roll is bad, remove the bad area and use the rest of the roll. Retain the bad section and label information for credit. If
label is not available, return the bad section. (2.) All labels on the product must be saved for verification. If label is not sent back with completed
filled out complaint form, the complaint will not be acknowledged. If everything is in order on the complaint form and sheets and ESP requests
the return of the roll, ESP will pay the shipping, however, no material is to be returned without ESP approval. (3.) If the customer elects to
keep all the product that is considered seconds, and the complaint forms and labels are sent back, ESP will credit the customer for the difference
in first quality and second quality pricing. (4.) If the product is shipped out of the continental United States, the representative is totally
responsible for all replacement costs and shipping charges of the material.
DISCLAIMER
R-values in this manual are achieved with ESP Low-E® Products having foil facings with .03 emittance on both sides. Low-E products
with a white foil facing will have a lower R-value. Please consult your manufacturer’s representative for the thermal performance of
these products.
20.
The Low-E Advantages
Stops Heat - Deadens Sound
Does Not Absorb Moisture
H Low-E products offer Class A, Class 1 fire ratings.
H Low-E provides a continuous thermal break around purlins, girts, studs and joists.
H Low-E is so thin that oil canning of your metal roofing/siding is never a problem.
H Low-E is an excellent vapor barrier and helps control condensation.
H Low-E’s low emittance surface keeps buildings cool in summer and warm in winter.
H Low-E’s strong lightweight rolls make installation a breeze.
H Low-E doesn’t easily tear even in windy conditions.
H Low-E can be installed alone and outperform up to 3"- 4" of fiberglass.
H Low-E can be combined with fiberglass for higher R-Value code requirements.
H Low-E rolls are available in various widths and thicknesses with or without a staple flange.
H Low-E closed micro-cell foam seals tightly around fasteners.
H Low-E doesn’t wick moisture into the core of the insulation.
H Low-E deadens sound.
H Low-E is bird, mice and insect resistant.
Low-E, The #1 Choice of Quality Builders
21.
DISCOVER even more ways
to lower energy costs with ESP LOW E®
Green building is not just a trend, but the wave of the
future as more and more homeowners and builders
demand energy efficient homes and products.
ESP LOW-E® Insulation products are designed for
maximum energy and cost efficiency. Whether its under
slab, under roof, around duct work or wrapping the
entire house, ESP LOW-E® Reflective Insulation saves
more money on heating and cooling than regular
insulation and housewrap. Like a radiant barrier,
Low-E products also block 97% of radiant heat.
Check out all the ways ESP LOW-E® Insulation can
help reduce your energy consumption around the home.
For more information on ESP LOW-E® Insulation
products and individual specifications contact
Environmentally Safe Products, Inc. at
1-800-289-5693, or visit us online at
E
S
P
®
REFLECTIVE INSULATION
YOUR EVERYDAY INSULATION SOLUTION
Reduces your carbon footprint.
Environmentally Safe Products, Inc.
313 W. Golden Ln. New Oxford, PA 17350
Toll Free: 1-800-289-5693 Fax: 717-624-7089
www low-e.com E-mail: [email protected]