1
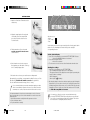
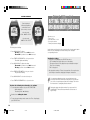
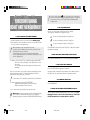
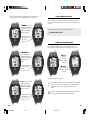
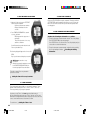
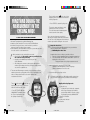
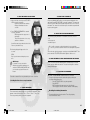
178201 GBR E
QUICK REFERENCE GUIDE
HEART RATE MONITOR • USER’S MANUAL
www.polar.fi
Polar Protrainer XT
Manufactured by:
Polar Electro Oy
Professorintie 5
FIN-90440 KEMPELE
Finland
Tel. +358-8-520 2100
Fax +358-8-520 2300
TM
Recyclable material. Graphic Design CIS, Finland
GBR
FUNCTION
BUTTON
Illuminate the display
SIGNAL/LIGHT
Turn the Target Zone sound
signal off/on
SIGNAL/LIGHT (press and hold)
Stop/start the stopwatch
SET/START/STOP
Check the secondary
measurement mode
Bring the receiver close to the
Polar logo of the transmitter
Swap the heart rate limits
SELECT (when the stopwatch is running)
Check split and lap times
STORE/LAP/RECOVERY
Start recovery calculation
SET/START/STOP (to stop the stopwatch) ->
STORE/LAP/RECOVERY
Start the timers
automatic
Reset the stopwatch
SET/START/STOP (to stop the stopwatch) ->
SET/START/STOP (press and hold)
Stop the heart rate
measurement and enter
the Time of day display
SET/START/STOP (to stop the stopwatch) ->
SELECT -> SELECT -> SELECT
CONTENTS
POLAR PROTRAINER XT HEART RATE MONITOR .................................... 5
Features ................................................................................................ 6
Important to remember ......................................................................... 7
Parts ...................................................................................................... 7
Getting going ........................................................................................ 8
SETTING THE WATCH ................................................................................ 9
Setting the alarm ................................................................................. 10
Setting the time ................................................................................... 11
Setting the date .................................................................................. 12
SETTING THE HEART RATE MEASUREMENT FEATURES ....................... 13
Setting the timers 1 & 2 ....................................................................... 14
Setting the heart rate limits 1, 2 & 3 .................................................... 15
Setting the time for recovery heart rate .............................................. 16
Setting the primary measurement display .......................................... 17
FUNCTIONS DURING HEART RATE MEASUREMENT ............................. 18
Start the heart rate measurement ....................................................... 18
See your heart rate ............................................................................. 19
Turn the target zone sound signal off/on ............................................ 19
Start/stop the stopwatch ..................................................................... 19
Illuminate the display .......................................................................... 19
Check the secondary measurement displays .................................... 19
Swap the heart rate limits ................................................................... 21
Store split time and lap time ............................................................... 21
Start recovery calculation ................................................................... 22
Start the timers .................................................................................... 22
Reset the stopwatch ........................................................................... 23
Stop the heart rate measurement ....................................................... 23
RECALLING THE TRAINING INFORMATION ........................................... 24
SETTING THE CYCLING MODE FEATURES ............................................ 27
Calibrating the wheel size ................................................................... 28
Setting the odometer .......................................................................... 30
Setting the total riding time ................................................................. 31
3
PROXT GBR/E
3
7.2.2001, 09:00
FUNCTIONS DURING THE MEASUREMENT
IN THE CYCLING MODE .......................................................................... 32
Start the cycling measurement ........................................................... 32
Swap the wheel size ........................................................................... 33
See your heart rate and speed ........................................................... 34
Check cycling information .................................................................. 34
Start/stop the stopwatch ..................................................................... 35
Illuminate the display .......................................................................... 35
Swap the heart rate limits ................................................................... 35
Store split time and lap time ............................................................... 35
Start recovery calculation ................................................................... 36
Start the timers .................................................................................... 36
Reset the stopwatch ........................................................................... 37
Reset the cycling information ............................................................. 37
Swap between cycling mode and heart rate mode ........................... 37
Stop the cycling mode ........................................................................ 37
POLAR PROTRAINER XT
HEART RATE MONITOR
CARE AND MAINTENANCE ..................................................................... 38
Taking care of your Polar Heart Rate Monitor ..................................... 38
Batteries .............................................................................................. 38
Congratulations on
PRECAUTIONS ......................................................................................... 40
Polar Heart Rate Monitor in a water environment ............................... 40
Polar Heart Rate Monitor and interference ......................................... 40
purchasing the Polar
Protrainer XT Heart Rate
FREQUENTLY ASKED QUESTIONS ......................................................... 42
Monitor. We are proud to
POLAR GLOSSARY .................................................................................. 45
TECHNICAL SPECIFICATIONS ................................................................. 48
POLAR BOOKS AND ACCESSORIES ...................................................... 49
offer you the most
advanced features and
SERVICE ................................................................................................... 50
Check list ............................................................................................ 50
Sending instructions ........................................................................... 51
Polar service procedure ..................................................................... 51
assist you in achieving
your personal fitness
LIMITED POLAR WARRANTY ................................................................... 52
DISCLAIMER ............................................................................................. 53
INDEX ....................................................................................................... 54
and performance goals.
Wirelessly and
continuously yours,
4
PROXT GBR/E
5
4-5
7.2.2001, 09:00
FEATURES
Your Polar Protrainer XT offers you the following features:
Watch functions
• Time
• Alarm
• Date
• 12/24 h mode
Basic functions
• wireless, continuous and ECG accurate heart rate
• coded transmission of heart rate to avoid crosstalk caused by other
users of heart rate monitors
• stopwatch with split and lap indicator
• three adjustable target zone limits with blinking and sound alarm
• 48 split and lap times with average and maximum heart rates of each lap
• two adjustable, alternating timers
• time based recovery calculation
• display alternative during the heart rate mode: time of day, total
exercising time or lap time
• wireless button for activating the backlight and checking the secondary
measurement display during the exercise
• electroluminescent backlight
• water resistant to 20 metres
Cycling functions (requires a separate Polar Speed Sensor)
• two adjustable wheel sizes (mm)
• continuous display of heart rate and speed
• alternating display of one of the following variables
stopwatch
time of day
average speed
maximum speed
lap number
trip distance
• total riding time (in the time of day display)
• odometer (in the time of day display)
IMPORTANT TO REMEMBER!
• Adjust the strap length snug enough and wet the Polar Coded Transmitter
electrodes to ensure flawless heart rate measurement.
• Do not stretch or bend the transmitter.
• Do not operate the buttons of the wrist receiver under water.
• Wash and dry the transmitter regularly after use; never store it wet.
• Keep the Polar Heart Rate Monitor out of extreme cold or heat.
PARTS
The Polar Protrainer XT consists of three parts:
1. Polar T61™ Transmitter
• Grooved electrode areas.
2. Elastic strap
Recording functions
• maximum and average heart rate for the total exercise session
• time spent above, within and below each target zone
• last recovery heart rate
• lap and split times with average and current heart rates
•
•
average and maximum speed of the exercise
trip distance of the exercise
3. Polar Protrainer XT wrist receiver
6
PROXT GBR/E
7
6-7
7.2.2001, 09:00
GETTING GOING
1. Attach the Polar Coded Transmitter to the
elastic strap.
SETTING THE WATCH
2. Adjust the strap length to fit snugly and
comfortably. Secure the strap around
your chest, below the chest muscles.
Lock the buckle.
3. Pull the transmitter off your chest and
wet the grooved electrode areas
on the back of it.
4. Check that the wet electrode areas are
firmly against your skin and the Polar logo
is in a central upright position.
5. Wear the wrist receiver as you would wear an ordinary watch.
Alternatively, if you go biking, you may attach the Wrist Receiver to a Polar
Bike Mount
Polar Books and Accessories. Keep the Wrist
Receiver within the transmission range (3 feet / 1 metre).
It is recommended that you wear the transmitter against your bare
skin to ensure flawless operation. However, if you wish to wear the
transmitter over a shirt, moisten the shirt well under the electrodes.
It is important that the electrodes are wet during the exercise. However,
after exercising, take good care of the transmitter to save the electrodes
and battery life:
1. Wash the transmitter carefully with mild soap water solution.
2. Rinse it with pure water.
3. Dry the transmitter carefully.
Start here to set:
- Alarm
- Time of day
- Date
In the display each function is represented by a block in the graphic bar in
the above order. A flashing block means that you are setting the
corresponding function.
Set the 12/24 h display
1. In the Time of day display, press and hold SET/START/STOP. Release.
12 h mode with AM/PM indicator is activated.
2. Press and hold again. Release.
24 h mode is activated.
3. The chosen time mode is now used in all watch and alarm functions.
Starting the settings
1. In the Time of day display press SET/START/STOP.
- SET is flashing in the upper right corner of the display.
- The uppermost block of the graphic bar on the right, representing the
setting of Alarm, is flashing.
- ALM is displayed.
- Alarm symbol
is flashing.
2. Go through setting of alarm, time and date step by step by following the
instructions. If you chose the 24 h mode you can skip those parts in the
following instructions, which advise you to set AM or PM. Note also that
changing the Time mode effects several other units as well. For details,
see Polar Glossary, Units of measure.
You can also go directly to set just one particular function by
pressing SET/START/STOP briefly as many times as needed until
you see the corresponding text symbol in the display. Then follow
the instructions for setting that particular function.
8
PROXT GBR/E
9
8-9
7.2.2001, 09:00
SETTING THE ALARM
In the Time of day display, press SET/START/STOP.
Alarm symbol
is flashing.
SETTING THE TIME
AM/PM (alternatively the hours) is/are flashing.
1. Press SIGNAL/LIGHT to select AM or PM.
1. Press SIGNAL/LIGHT to set the alarm on or off.
= alarm is on
= alarm is off
2. Press STORE/LAP/RECOVERY to lock
your selection.
AM/PM is flashing.
3. Press SIGNAL/LIGHT to select AM or PM.
2. Press STORE/LAP/RECOVERY to lock
your selection.
The hours are flashing.
3. Press SIGNAL/LIGHT to select the
desired hour.
4. Press STORE/LAP/RECOVERY to lock your selection.
The hour is flashing.
4. Press STORE/LAP/RECOVERY to lock
your selection.
The minutes start flashing.
The seconds go to zero.
5. Press SIGNAL/LIGHT to select the desired hour.
5. Press SIGNAL/LIGHT to select the desired minutes.
The digits run faster if you press and hold SIGNAL/LIGHT. Release
the button when the desired value is approaching.
6. Press STORE/LAP/RECOVERY to lock your selection.
The seconds start running.
AM/PM or the hours start flashing.
6. Press STORE/LAP/RECOVERY to lock your selection.
The minutes start flashing.
7. Press SIGNAL/LIGHT to select the desired minutes.
8. Press STORE/LAP/RECOVERY to lock your selection.
SET starts flashing.
Alarm symbol
starts flashing.
You have the following two alternatives to continue:
1. To enter the Time of day setting mode, press SET/START/STOP.
TIME is displayed.
AM (alternatively the hour) is flashing.
You have the following two alternatives to continue:
1. To enter the date setting mode, press SET/START/STOP.
DATE is displayed.
The day/month is flashing.
Continue from Setting the date.
2. To stop the watch settings and to return to Time of day display, press
SELECT twice.
Continue from Setting the time of day.
2. To stop the watch settings and to return to the Time of day display,
press SELECT.
When the alarm comes on it will sound for one minute or you can
turn it off by pressing STORE/LAP/RECOVERY.
10
PROXT GBR/E
11
10-11
7.2.2001, 09:00
SETTING THE DATE
Date is displayed
differently depending
on which time mode
(12h or 24 h) is chosen.
SETTING THE HEART RATE
MEASUREMENT FEATURES
24 h time mode:
DAY - MONTH - YEAR
12 h time mode:
MONTH - DAY - YEAR
Start here to set:
- Timers 1 & 2
- Heart rate limits 1, 2 & 3
- Recovery heart rate
- Primary measurement display
The first digits are flashing.
1. Press SIGNAL/LIGHT to adjust:
The day if you have chosen 24 h time mode.
The month if you have chosen 12 h time mode.
In the display each function is represented by a block in the graphic bar in
the above order. A flashing block means that you are setting the
corresponding function.
3. Press SIGNAL/LIGHT to adjust the setting.
The month if you have chosen 24 h time mode.
The day if you have chosen 12 h time mode.
Starting the settings
1. In the Time of day display press SELECT three times.
- SET is flashing in the upper right corner of the display.
- The uppermost block of the graphic bar representing the setting of
Timers 1 & 2 is flashing.
-TIM 1 is displayed.
4. Press STORE/LAP/RECOVERY to lock your selection.
The year starts flashing.
2. Go through the settings of Timers, Heart rate limits, Recovery function
and Primary measurement display by following the instructions.
2. Press STORE/ LAP/RECOVERY to lock your selection.
The middle digits start flashing.
5. Press SIGNAL/LIGHT to select the desired year.
6. Press STORE/LAP/RECOVERY to lock your selection.
You can also go directly to set just one particular function by
pressing SET/START/STOP briefly as many times as needed until
you see the corresponding text symbol in the display. Then follow
the instructions for setting that particular function.
You have the following two alternatives to continue:
1. To enter the alarm setting mode, press SET/START/STOP.
ALM is displayed.
The alarm symbol
is flashing.
During the settings the digits run faster if you press and hold
SIGNAL/LIGHT. Release the button when the desired value is
approaching.
Continue from Setting the alarm.
2. To stop the watch settings and to return to the Time of day display,
press SELECT twice.
12
PROXT GBR/E
13
12-13
7.2.2001, 09:00
SETTING THE TIMERS 1 & 2
SETTING THE HEART RATE LIMITS 1, 2 & 3
Timers
This function helps you to divide your exercise
session into separate phases (e.g. warm-up,
exercise phase, cool down). Timers can be
used individually or sequentially.
Heart rate limits
Heart rate limits can be set in one beat per
minute increment which allows you to monitor
your workouts securing the correct exercise
intensity.
The minutes of Timer 1 are flashing.
LIM 1 is displayed.
The upper reading representing the upper
limit 1 is flashing.
If you don’t want to use the timers, set the
values for Timer 1 to zero. If you want to
use only the Timer 1, set the value for
Timer 2 to zero.
If you pass the digit you wanted to set by accident, press and hold
SET/START/STOP to restart from 00.
1. Press SIGNAL/LIGHT to select the desired minutes.
2. Press STORE/LAP/RECOVERY to lock your selection.
The seconds of the Timer 1 start flashing.
If you pass the digit you wanted to set by
accident, press and hold SET/START/STOP to
restart from the default settings (80-160).
1. Press SIGNAL/LIGHT to select the desired value for the upper limit 1.
You cannot set the upper limit below the lower limit. The range for
the target heart rate zone is 10 - 240.
2. Press STORE/LAP/RECOVERY to lock your selection.
The lower reading, representing the lower limit 1, starts flashing.
3. Press SIGNAL/LIGHT to select the desired seconds.
3. Press SIGNAL/LIGHT to select the desired lower limit 1.
4. Press STORE/LAP/RECOVERY to lock your selection.
5. Press SET/START/STOP to start setting of Timer 2.
The minutes of Timer 2 are flashing.
6. Repeat the steps from 1 to 4 to set the Timer 2.
Timer 1 starts running when you start the stopwatch. You will hear one
beep when the time of Timer 1 is up. Timer 2 will start automatically
after the beep. You will hear two beeps when the time of Timer 2 is
up. If you set only Timer 1, it will not repeat itself after its time is up.
You have the following two alternatives to continue:
1. To start setting the Heart rate limits 1, 2 & 3 press SET/START/STOP.
The second block of the graphic bar representing the setting of
the Heart rate limits is flashing.
LIM1 is displayed.
The reading representing the Upper Limit 1 is flashing.
4. Press STORE/LAP/RECOVERY to lock your selection.
The upper reading starts flashing.
5. Press SET/START/STOP to start setting the heart rate limits 2.
LIM 2 is displayed.
The upper reading representing the upper limit 2 start flashing.
6. Repeat the steps 1 to 4 to set the heart rate limits 2.
7. Press SET/START/STOP to start setting the heart rate limits 3
The upper reading representing the upper limit 3 starts to flash.
8. Repeat the steps 1 to 4 to set the heart rate limits 3.
If you want to use only the Limits 1, set the value for Limits 2 and
Limits 3 to zero.
Continue from Setting the Heart rate limits 1, 2 & 3.
2. To return to the Time of day display press SELECT twice.
14
PROXT GBR/E
15
14-15
7.2.2001, 09:00
You have the following two alternatives to continue:
1. To start setting Recovery time press SET/START/STOP.
- RECO is displayed.
- The third block of the graphic bar representing the setting of
the Recovery function is flashing.
Continue from Setting the time for recovery heart rate.
2. To return to the Time of day display press SELECT twice.
SETTING THE PRIMARY MEASUREMENT DISPLAY
Chrono (alternatively Time or Lap) is flashing.
00:00 0 (alternatively time of day) is displayed.
1. Press SIGNAL/LIGHT to select the desired primary
measurement display. The alternative you
choose will be displayed in the middle
row during the heart rate measurement.
CHOOSE FROM THESE ALTERNATIVES:
SETTING THE TIME FOR RECOVERY HEART RATE
Recovery heart rate
This function measures how much heart rate
decreases during the pre-set period of time.
You define the period of time in minutes and
seconds.
RECO is displayed.
The digits representing the minutes are flashing.
1. Press SIGNAL/LIGHT to select the desired value
for minutes.
If you pass the digit you wanted to set by
accident, press and hold SET/START/STOP to restart from 00.
2. Press STORE/LAP/RECOVERY to lock your selection.
The digits representing the seconds start flashing.
3. Press SIGNAL/LIGHT to select the desired value for the seconds.
4. Press STORE/LAP/RECOVERY to lock your selection.
You have the following two alternatives to continue:
1. To start setting the Primary measurement display press
SET/START/STOP.
- The fourth block of the graphic bar representing the setting of
the Primary measurement display is flashing.
- CHRONO (alternatively TIME or LAP) is flashing.
Continue from Setting the primary measurement display.
2. To return to the Time of day display press SELECT twice.
CHRONO 00:00 0 displays total exercising time.
You can see lap time in the upper row of
the display during the measurement.
TIME
displays time of day (for example 1:52 PM/13:52).
You can see lap time in the upper row of the
display during the measurement.
LAP 00:00 0 displays lap times. Lap times
can be taken by pressing STORE/LAP/RECOVERY.
You can see the number of the lap in the
upper row of the display during the
measurement.
According to the display alternative you choose for
the primary measurement display you can see the
secondary measurement display during the heart
rate measurement by using the wireless button.
For more details see Functions during the heart
rate measurement/Check the secondary
measurement displays.
You have the following three alternatives
to continue:
1. To start setting the Timers 1 & 2 press SET/START/STOP.
The first block of the graphic bar
representing the setting of the
Timers 1 & 2 is flashing.
Continue from Setting the Timers 1 & 2.
2. To return to the Time of day display, press
SELECT twice.
3. To start setting the Cycling features (Wheel size,
Odometer and Total riding time), press
simultaneously SET/START/STOP and SIGNAL/
LIGHT. To be able to use the cycling features
the optional Polar Speed Sensor is required!
16
PROXT GBR/E
17
16-17
7.2.2001, 09:00
FUNCTIONS DURING
HEART RATE MEASUREMENT
If there is a bike symbol
in the lower right corner of the display,
the most recent exercise was done in the Cycling mode. To switch to
the heart rate mode press SET/START/STOP and SIGNAL/LIGHT
simultaneously .
2. SEE YOUR HEART RATE
You can see your heart rate in the bottom line of the display.
The target zone information is displayed as follows:
1. START THE HEART RATE MEASUREMENT
You are exercising within the preset Target Zone.
1. Wear the transmitter and receiver as described in Getting going.
2. Check that there are no disturbances near you as you are about to start
the code search for coded transmission.
You are exercising above the preset Target Zone.
Make sure that the code search will be successful:
• Keep the receiver within 3 feet/1 metre from your Polar Coded
Transmitter, which you are wearing.
• Check that you are not near to other people with heart rate
monitors, high voltage power lines, televisions, mobile phones, cars,
exercise equipment etc.
You are exercising below the preset Target Zone.
Exercising within, above and below the Target Zone is indicated only when
the stopwatch is running.
3. TURN THE TARGET ZONE SOUND SIGNAL OFF/ON
Press and hold SIGNAL/LIGHT for 1 second to toggle between ON/OFF.
3. Start the code search in the Time of day display by pressing SELECT.
The receiver starts searching for coded transmission for max.
20 seconds.
The coded heart rate information appears in the bottom line of
the display.
If the code search was not successful, 00 appears in the display. Restart
the measurement from the Time of day display and follow the above
mentioned precautions during the code search.
Polar Protrainer XT is compatible only with Polar Coded Transmitter.
4. Start the stopwatch by pressing SET/START/STOP.
Stopwatch starts running and you hear a long beep.
Display is illuminated for a few seconds.
5. You can now start exercising with your heart rate monitor.
Quick start for heart rate measurement from the display showing
Time of day: wear the transmitter and receiver as described in
Getting going and press and hold STORE/LAP/RECOVERY. Release.
4. STOP/START THE STOPWATCH
Press SET/START/STOP to stop/start the stopwatch.
Average heart rate, maximum heart rate and time below, within and above
the Target Zone are calculated only when the stopwatch is running.
5. ILLUMINATE THE DISPLAY
Press SIGNAL/LIGHT.
6. CHECK THE SECONDARY MEASUREMENT DISPLAYS
The secondary measurement displays will be seen for a few seconds by
bringing the wrist receiver next to the Polar logo of the Polar
Coded Transmitter for a moment (wireless button).
18
PROXT GBR/E
19
18-19
7.2.2001, 09:00
The secondary measurement displays depend on which of the three
alternatives was chosen for the primary measurement display:
1. If CHRONO was chosen
as the primary measurement
display, the secondary
measurement displays
alternate as follows:
• Heart rate limits in use/
Transmission code
• Time of day
• Heart rate
7. SWAP THE HEART RATE LIMITS
When the stopwatch is running, press SELECT to activate the alternative
Heart rate limits. Release and you see the new limits in the display for a few
seconds.
You can swap limits only if you have set at least the limits 2.
Setting the Limits 1, 2 & 3.
8. STORE SPLIT TIME AND LAP TIME
Press STORE/LAP/RECOVERY to record the lap and split times. The
following information will be displayed successively for a few seconds:
2. If TIME OF DAY was
chosen as the primary
measurement display, the
secondary measurement
displays alternate as
follows:
Display 1:
• Lap time
• Split time
• Average heart rate
of the lap
• Heart rate limits in use/
Transmission code
• Chrono
• Heart rate
Display 2:
• Number of the lap
• Maximum heart rate
of the lap
The lap timer starts again from zero.
3. If LAP was chosen as the
primary measurement
display, the secondary
measurement displays
alternate as follows:
• Heart rate limits in use/
Transmission code
• Time of day
• Heart rate
Polar Protrainer XT allows you to record 48 lap times. After taking 48
lap times FULL appears in the display. You can continue taking the
lap times but they won’t be recorded into the Protrainer XT’s
memory.
You can see the stored lap and split times with current and average
heart rates later when recalling the training information.
20
PROXT GBR/E
21
20-21
7.2.2001, 09:00
9. START RECOVERY CALCULATION
1. At the end of the exercise press SET/START/
STOP to stop the stopwatch.
Heart rate measurement continues.
Display is illuminated for a few
seconds.
11. RESET THE STOPWATCH
First press SET/START/STOP to stop the stopwatch. Then press and hold
SET/START/STOP until all stopwatch digits are back to zero. Release the
button. The current file is deleted and you can start the stopwatch and
recording again.
12. STOP THE HEART RATE MEASUREMENT
2. Press STORE/LAP/RECOVERY to start the
recovery calculation.
RECO appears in the upper row of
the display.
The previously set time for recovery
starts the countdown.
You will hear two beeps when the time for the
Recovery calculation is up.
The following display will appear for a few seconds:
You have the following two alternatives to continue:
1. To stop the heart rate measurement and enter the Time of day display:
Press SET/START/STOP to stop the stopwatch.
Press SELECT 3 times. You are now in the Time of day display and you
can recall the recorded information later.
2. To stop the heart rate measurement and continue directly by recalling
the recorded training information,
Recalling the training
information.
RECO
Drop in your heart rate during the preset time.
Quick way to start the recovery
calculation:
When the stopwatch is running press and
hold STORE/LAP/RECOVERY until you
hear a beep signal. Release the button.
To be able to start the Recovery calculation
you need to set it first.
Setting the time for Recovery heart rate.
10. START THE TIMERS
Timers start running automatically once you start the stopwatch. Timers
alternate in the following order: Timer 1, Timer 2, Timer 1, Timer 2 etc.
Timers stop running as you stop the stopwatch.
If you have set only Timer 1, it will not repeat itself after its time is
up. You will hear six beeps as the time of Timer 1 has run out. This count
down feature is helpful in knowing when exactly a preset exercise time has
come to an end and it is time to stretch and cool down.
To set the timers
Setting the Timers 1 & 2.
22
PROXT GBR/E
23
22-23
7.2.2001, 09:00
By pressing STORE/LAP/RECOVERY you can see the following training
information on the display:
RECALLING THE TRAINING
INFORMATION
Polar Protrainer XT saves one training file at a time. Your latest training
information is in the memory of the Polar Protrainer XT until the next time
you start the stopwatch. You can recall your exercise in the FILE mode.
LIM 1 Settings for Target Zone 1
LIM 2 Settings for Target Zone 2
LIM 3 Settings for Target Zone 3
LIM 1
LIM 1
LIM 1
Exercising time above the Target Zone 1
Exercising time within the Target Zone 1
Exercising time below the Target Zone 1
You will see the same information for LIM 2 and LIM 3.
RECO, the preset time for the recovery and the drop in your heart rate
during the preset time.
Choose from the following two alternatives to enter the FILE mode:
From the measurement mode:
1. Stop the stopwatch by pressing SET/START/STOP.
2. Press SELECT.
From the Time of day display:
1. Press SELECT twice.
FILE is flashing in the uppermost row of the display.
The front pages of the recorded file alternate on the display.
The number of the last LAP
Odometer
reading at
exercise stop
moment with
the trip
distance
Maximum
and average
speed of the
exercise.
Total exercise time
Is displayed only if you have entered the Cycling mode within the file.
Average heart rate (AVG)
Date
Starting time
Lap/split info:
LAP number alternating
with the duration
of the lap.
Maximum heart rate (MAX)
Split time.
Average heart rate of
the lap alternating with
the heart rate at the
end of the lap
Press STORE/LAP/RECOVERY until you come to the end of the file:
FILE END appears in the display.
24
PROXT GBR/E
25
24-25
7.2.2001, 09:00
The displays change faster if you press and hold STORE/LAP/
RECOVERY. Release the button when you want to see a certain
display for a longer time.
To view the file backwards, press SIGNAL/LIGHT instead of STORE/
LAP/RECOVERY.
SETTING THE CYCLING
MODE FEATURES
You have the following two alternatives to continue:
1. To recall the same file again, press STORE/LAP/RECOVERY.
The front pages of the file alternate on the display.
Continue from Recalling the training information.
To be able to use the Cycling mode features,
you need an optional Polar Speed Sensor.
2. To return to the Time of day display, press SELECT three times.
You can set the following features in the cycling mode:
- Wheel size calibration
- Odometer
- Total riding time
You can see the total cycling distance and the total riding time in
the uppermost row of the Time of day display:
1. Press and hold SIGNAL/LIGHT and you can see the odometer
reading.
2. Press and hold SIGNAL/LIGHT again and you can see the hours
for total riding time.
3. To return to the normal Time of day display with a day indicator
press and hold SIGNAL/LIGHT a third time.
To get in to the Cycling feature setting mode:
1. In the Time of day display press SELECT three times.
SET is flashing in the upper right corner of the display.
The uppermost block of the graphic bar representing the setting
of Timers 1 & 2 is flashing.
TIM 1 is displayed.
2. Press SET/START/STOP and SIGNAL/LIGHT simultaneously .
SET, the uppermost block of the graphic bar and the number of
the Wheel size (1 or 2) are flashing.
WHL, the value for wheel size and the bike symbol are
displayed.
3. Go through the Cycling feature settings (wheel size, odometer and total
riding time).
26
PROXT GBR/E
27
26-27
7.2.2001, 09:01
WHL1 2000 is displayed.
1 (alternatively 2) is flashing.
1. CALIBRATING THE WHEEL SIZE
You must calibrate the wheel size of your bike before you can use
your Polar Protrainer XT Heart Rate Monitor to measure distance and
speed. The wheel size must be set in millimetres.
Polar Protrainer XT allows you to set in two wheel sizes (WHL1 /
WHL2). Use this function if you have two bikes. The wheel size which
is displayed when you leave the wheel size setting mode, will be
used next time you start exercising.
TO FIND OUT THE WHEEL SIZE OF YOUR BIKE YOU HAVE
THE FOLLOWING ALTERNATIVES:
METHOD 1. The quick way.
Check the wheel diameter (in inches) which is printed on the front bike
wheel. On the chart below, find your wheel diameter in inches on the left
and match it with the wheel size in millimetres on the right.
1. Press SIGNAL/LIGHT to select the wheel
1 or wheel 2 according to your bike.
2. Press STORE/LAP/RECOVERY to lock
your selection.
Thousands of millimetres is flashing.
3. Press SIGNAL/LIGHT to set the thousands
of millimetres of the wheel size.
4. Press STORE/LAP/RECOVERY to lock your
selection.
The hundreds of millimetres start flashing.
5. Press SIGNAL/LIGHT to set the hundreds of millimetres.
WHEEL DIAMETER
(inches)
WHEEL SIZE SETTING
(mm)
6. Press STORE/LAP/RECOVERY to lock your selection.
The tens of millimetres start flashing.
26.0
27.0 (700*32C)
28.0 (700B)
2080
2155
2237
7. Press SIGNAL/LIGHT to set the tens of millimetres.
8. Press STORE/LAP/RECOVERY to lock your selection.
The millimetres start flashing.
9. Press SIGNAL/LIGHT to set the millimetres.
METHOD 2.
Measure the circumference of the wheel by stretching
a tape measure around the outside of the wheel.
If you measure in inches, convert the value to millimetres
by multiplying the number of inches by 25.4 mm.
Subtract 4 mm to account for your weight on the bike.
The four digit value for the wheel size is
10.Press STORE/LAP/RECOVERY to lock your selection.
mm
- 4 mm
mm
METHOD 3. The most accurate way.
For this method ask your friend to assist you. First, mark the tread of your
front tire with a line. Match this line with a line drawn on the ground. Sit on
your bike and have your friend walk you forward for one complete wheel
rotation. Draw another line on the ground exactly where the mark on the tire
touches the ground. Measure the distance between the two lines on the
ground to get your wheel circumference. If you measure in inches, convert
to millimetres by multiplying the number of inches by 25.4 mm.
mm
You can swap the wheelsizes (WHL 1 / WHL 2) at the beginning of
the measurement in the cycling mode by pressing and holding the
SELECT button until the wheelsize is swapped. Please note that you
can swap the wheelsize only before starting the stopwatch.
You have the following two alternatives to continue:
1. To start setting the odometer press SET/START/STOP.
The second block of the graphic bar is flashing.
ODO is displayed.
The first digit of the odometer reading is flashing.
Continue from Setting the odometer.
2. To return to the Time of day display, press SELECT twice.
28
PROXT GBR/E
29
28-29
7.2.2001, 09:01
2. SETTING THE ODOMETER
3. SETTING THE TOTAL RIDING TIME
ODO is displayed.
The first digit of the ODO reading is flashing.
RTIME is displayed.
The first digit of the total riding time is flashing.
You may want to set the odometer value e.g.
after battery replacement which resets all
values to default settings.
You may want to set the total riding time value
e.g. after battery replacement which resets all
values to the default settings.
1. Press SIGNAL/LIGHT to set the first
digit of the odometer reading (tens of
thousands of kilometres/miles).
1. Press SIGNAL/LIGHT to set the first digit of
the total riding time reading (thousands of
hours).
2. Press STORE/LAP/RECOVERY to lock your
selection.
The second digit starts to flash.
2. Press STORE/LAP/RECOVERY to lock
your selection.
The second digit starts to flash.
3. Repeat steps 1 and 2 until all values are set.
3. Repeat steps 1 and 2 until all values are set.
Resetting the odometer:
You may want to reset the odometer, for example if you place the Polar
Protrainer XT on a new bike or if you are about to start a new training
season.
Resetting the total riding time:
You may want to reset the total riding time, for example if you are about to
start a new training season. To reset the riding time digit by digit, press and
hold SET/START/STOP when the digit is flashing. Release when the reading
has dropped to zero.
To reset the odometer digit by digit, press and hold SET/START/STOP when
the digit is flashing. Release when the reading has dropped to zero.
You have the following two alternatives to continue:
1. To start setting the Wheel size, press SET/START/STOP.
You have the following two alternatives to continue:
1. To start setting the total riding time press SET/START/STOP.
The lowest block of the graphic bar starts to flash.
RTIME is displayed.
The first digit of the total riding time reading is flashing.
2. To return to the Time of day display, press SELECT twice.
Continue from Setting the total riding time.
2. To return to the Time of day display, press SELECT twice.
30
PROXT GBR/E
31
30-31
7.2.2001, 09:01
FUNCTIONS DURING THE
MEASUREMENT IN THE
CYCLING MODE
1. START THE CYCLING MEASUREMENT
1. Wear the Transmitter as described in Getting going.
2. Attach the Polar Protrainer XT receiver on the Polar Bike Mount.
3. Install the Polar Speed Sensor on the front fork of your bike as
instructed in the Polar Speed Sensor manual.
4. Check that there are no disturbances near you as you are about to start
the code search for coded transmission.
Make sure that the code search will be successful:
• Keep the bike still. Do not ride or move your bike before
the code has been picked up.
• Keep the receiver within 3 feet/1 metre from your Polar
Coded Transmitter.
• Check that you are not near to other people with heart rate
monitors, high voltage power lines, televisions, mobile phones,
cars, exercise equipment etc.
5. There are two different ways to start the cycling measurement. Check
whether you have the cycling symbol in the Time of day display or not
and, according to that, start the code search and heart rate
measurement as follows:
There is no bike symbol
in the time of
day display if your most recent exercise
was done in the Heart rate mode.
1. Press SET/START/STOP and
SIGNAL/LIGHT simultaneously in
the Time of day display to start
the Cycling measurement.
There is a bike symbol
in the time of day
display if your most recent exercise was done
in the Cycling mode.
1. Press SELECT to start the Cycling mode.
The receiver starts searching for coded
transmission for max. 20 seconds.
The coded heart rate information appears
in the bottom line of the display.
If the code search was not successful, 00
appears in the display. Restart the measurement
from the Time of day display and follow the above
mentioned precautions during the code search.
Swap the wheel size
If you have two bikes with different wheel sizes you should set
values for both the WHL 1 and WHL 2.
Calibrating the wheel size.
Swap the wheel size according to your bike as follows:
1. Start the cycling measurement but don't start the stopwatch yet.
2. Press and hold the SELECT button until the WHL 1 / WHL 2 is
displayed for a few seconds.
Display will return to the cycling measurement mode.
6. Start the stopwatch by pressing SET/START/STOP.
Stopwatch starts running and you hear a long beep.
Display is illuminated for a few seconds.
7. You can now start your cycling exercise.
Your safety is important to us. While riding your bike, please keep
your eyes on the road to prevent possible accidents and injury.
Display in the Cycling mode
• cycling info loop
Cycling info loop includes: trip, stopwatch,
time of day, average speed, maximum
speed and lap number. Select the cycling
info display by pressing SIGNAL/LIGHT.
• Target Zone indication
• speed
• cycling mode indicator
• heart rate
32
PROXT GBR/E
33
32-33
7.2.2001, 09:01
2. SEE YOUR HEART RATE AND SPEED
You can see your heart rate in the bottom line and the speed in the
middle line of the display. The Target Zone information is displayed
as follows:
You are exercising within the preset Target Zone.
When starting the recording, the stopwatch will always show up for a few
seconds regardless which out of the six available displays was used last.
4. START/STOP THE STOPWATCH
Press SET/START/STOP to stop and restart the stopwatch.
You are exercising above the preset Target Zone.
5. ILLUMINATE THE DISPLAY
You are exercising below the preset Target Zone.
Exercising below, within and above the Target Zone is indicated only when
stopwatch is running.
Target Zone sound signal is not available in the cycling mode. Being
outside of Target Zone is indicated by a flashing heart rate reading.
3. CHECK CYCLING INFORMATION
The following information is available by pressing SIGNAL/LIGHT during
the measurement in the Cycling mode:
Press and hold SIGNAL/LIGHT to illuminate the display.
6. SWAP THE HEART RATE LIMITS
When the stopwatch is running press SELECT to activate new limits.
Release. The new activated limits are displayed for 5 seconds.
You can swap the limits only if you have set them.
Setting the limits 1,2 & 3.
7. STORE SPLIT TIME AND LAP TIME
Press STORE/LAP/RECOVERY to record the lap and split times. The
following information will be displayed successively for a few seconds:
Trip*
Stopwatch
Time of day
Lap number
Maximum speed*
Average speed*
* Trip, average speed and maximum speed are recorded cumulatively.
These values can be reset in the beginning of an exercise.
Reset the cycling information.
Next time you start the measurement in the Cycling mode, on the top line
you will see the feature you used last in your previous workout before
stopping the stopwatch.
Display 1:
• Lap time
• Split time
• Average heart rate of
the lap
Display 2:
• Number of the lap
• Maximum heart rate of
the lap
The timer for the following lap starts again from zero.
You can see the stored lap and split times with current and average
heart rates later when recalling the training information.
TZ symbol in the display indicates that the stopwatch is running.
34
PROXT GBR/E
35
34-35
7.2.2001, 09:01
8. START RECOVERY CALCULATION
1. At the end of the exercise press SET/START/
STOP to stop the stopwatch.
Heart rate measurement continues.
Display is illuminated for a few
seconds.
2. Press STORE/LAP/RECOVERY to start the
recovery calculation.
RECO appears in the upper row of
the display.
The previously set time for recovery
starts the countdown.
You will hear two beeps when the time for the
Recovery calculation is up.
The following display will appear for a few
seconds:
RECO
Drop in your heart rate during the preset
time.
Quick way
to start the recovery calculation:
When the stopwatch is running press
and hold STORE/LAP/RECOVERY until
you hear a beep signal. Release the
button.
To be able to start the Recovery calculation you need to set it first.
Setting the time for recovery heart rate.
9. START THE TIMERS
Timers start running automatically once you start the stopwatch. Timers
alternate in the following order: Timer 1, Timer 2, Timer 1, Timer 2 etc.
Timers stop running when you stop the stopwatch.
10. RESET THE STOPWATCH
First press SIGNAL/LIGHT until you see the stopwatch displayed in the
upper row. Press SET/START/STOP to stop the stopwatch. Then press and
hold SET/START/STOP until all stopwatch digits are back to zero. Release
the button. The current file is deleted and you can start the stopwatch and
begin recording again.
11. RESET THE CYCLING INFORMATION
The following cycling information is cumulative exercise by exercise:
- trip
- average speed
- maximum speed
If you like to measure cycling information for some particular
exercise, you must reset these values before starting the stopwatch.
Select the value, which you want to reset by pressing SIGNAL/LIGHT. Then
press and hold SET/START/STOP until the digits are back to zero.
12. SWAP BETWEEN CYCLING MODE AND HEART RATE MODE
Press SET/START/STOP and SIGNAL/LIGHT simultaneously to enter the
Heart rate mode within the same file. The total exercising time continues
running uninterrupted.
13. STOP THE CYCLING MODE
YOU HAVE THE FOLLOWING TWO ALTERNATIVES TO STOP:
1. To stop the Cycling mode and continue directly by recalling the
recorded training information:
Press SET/START/STOP to stop the stopwatch.
Press SELECT.
FILE is flashing in the uppermost row of the display.
The front pages of the recorded file alternate on the display.
Recalling the training information.
2. To stop the Cycling mode and enter the Time of day display:
Press SELECT three times.
36
PROXT GBR/E
37
36-37
7.2.2001, 09:01
CARE AND MAINTENANCE
Your Polar Heart Rate Monitor is a high-tech instrument of superior design
and workmanship and should be treated with care. The suggestions below
will help you fulfill the warranty obligations and enjoy this product for many
years to come.
POLAR PROTRAINER XT RECEIVER
The estimated average battery life of the Polar Protrainer XT receiver is 1
year in normal use (1h/day, 7 days a week). However, because the battery
is inserted at the factory, the actual life of your first battery once in your
possession may be less than the estimated battery life. Note also that
excessive use of the backlight and the alarm signals will use the battery
more rapidly.
Do not open the Polar wrist receiver yourself. To ensure the water
resistance properties and the use of qualified components, the wrist
receiver battery should be replaced only by a person authorised by Polar
Electro Oy. At the same time a full periodic check of the Polar Heart Rate
Monitor will be done.
Service for detailed instructions.
TAKING CARE OF YOUR POLAR HEART RATE MONITOR
• Wash the Polar transmitter regularly after use with a mild soap and
water solution. Dry it carefully after washing.
• Never store the Polar transmitter wet. Sweat and moisture can keep its
electrodes wet and the transmitter activated, which shortens the battery
life.
• Store your Polar Heart Rate Monitor in a cool and dry place. Do not
store it in any kind of non-breathing material, such as a plastic bag or a
sports bag if it is wet.
• Do not bend or stretch the Polar transmitter. This may damage the
electrodes.
• Keep your Polar Heart Rate Monitor out of extreme cold (below -10 °C/
14 °F) and heat (above 50 °C/122 °F).
• Do not expose the Polar Heart Rate Monitor to direct sunlight for
extended periods, such as by leaving it in a car.
BATTERIES
POLAR T61 TRANSMITTER
The estimated average battery life of the Polar T61 Transmitter is 2500
hours of use. Contact your distributor or dealer for a transmitter
replacement.
Service for detailed instructions.
Polar recycles used transmitters.
38
PROXT GBR/E
39
38-39
7.2.2001, 09:01
2. Move the Receiver around until you find an area in which it displays no
stray reading or flashing of the heart symbol. Interference is often worst
right in front of the display panel of the equipment, while the left or right
side of the display is relatively free of disturbance.
PRECAUTIONS
3. Put the transmitter back on the chest and try to keep the wrist receiver
in this interference free area.
4. If the Polar Heart Rate Monitor still does not work with the exercise
equipment, this piece of equipment may be electrically too noisy for
wireless heart rate measurement.
POLAR HEART RATE MONITOR IN A WATER ENVIRONMENT
Polar Protrainer XT receiver is water resistant to 20 metres. To maintain the
water resistance, do not operate the buttons of the Polar wrist receiver
under water.
Heart rate measurement in a water environment is technically demanding
for the following reasons:
• Pool water with a high chlorine content and seawater may be very
conductive and the electrodes of a transmitter may get short circuited
and ECG signals cannot be detected by the transmitter unit.
• Jumping into the water or strenuous muscle movement during
competitive swimming may cause water resistance that shifts the
transmitter on the body to a location where it is not possible to pick up
the ECG signal.
• The ECG signal strength varies depending on the individual’s tissue
composition. The percentage of people who have problems in heart
rate measuring is considerably higher in a water environment than in
other use.
POLAR HEART RATE MONITOR AND INTERFERENCE
ELECTROMAGNETIC INTERFERENCE
Disturbances may occur near high voltage power lines, televisions, cars,
bike computers, some exercise equipment or cellular phones.
EXERCISE EQUIPMENT
Several pieces of exercise equipment with electronic or electrical
components such as LED displays, motors and electrical brakes may
cause interfering stray signals. To try to tackle these problems, relocate the
Polar wrist receiver as follows:
1. Remove the transmitter from your chest and use the exercise equipment as you would normally.
Minimising possible risks in exercising with a heart rate
monitor
Exercise may include some risk, especially for those who have been
sedentary. To minimise possible risks consider the following advice:
Before beginning a regular exercise program consult your doctor
• if you are over 40 years of age and have not been following a regular
exercise program during the past 5 years
• if you smoke
• if you have high blood pressure
• if you have high blood cholesterol
• if you have any signs or symptoms of any disease
• if you are recovering from a serious illness or a medical treatment e.g.
surgery
• if you use a pacemaker or another implanted electronic device.
Note also that in addition to exercise intensity the heart rate can be
affected by, amongst others, heart, circulation (particularly high blood
pressure) and asthma and other breathing medications, as well as some
energy drinks, alcohol and nicotine.
It is important to be sensitive to your body’s reactions during
the exercise. If you feel unexpected pain or tiredness regarding your
exercise intensity level, it is recommended to stop the exercise or continue
at a lighter intensity.
If you are allergic to any substance that comes into contact
with the skin, check the Polar heart rate monitor materials from the
“Technical specifications” chapter. It is recommended that you wear the
transmitter against your bare skin to ensure flawless operation. However, if
you wish to wear the transmitter over a shirt, moisten the shirt well under the
electrodes.
Notice to persons with pacemakers, defibrillator or other
implanted electronic device. Persons who have a pacemaker use
the Polar heart rate monitor at their own risk. Before starting use, we always
recommend an exercise test under doctor’s supervision. The test is to
ensure the safety and reliability of the simultaneous use of the pacemaker
and the heart rate monitor.
40
PROXT GBR/E
41
40-41
7.2.2001, 09:01
FREQUENTLY ASKED QUESTIONS
WHAT SHOULD I DO IF...
... I DON’T KNOW WHERE I AM IN THE SETTING CYCLE?
Press SELECT several times until you are back in the Time of day display.
... THERE IS NO HEART RATE READING?
1. Check that the electrodes of the transmitter are moistened
and that you are wearing it as instructed.
2. Check that you have kept the transmitter clean.
Care and
maintenance
3. Check that there are no sources of electromagnetic radiation in the
close vicinity of the Polar wrist receiver, such as TV sets, cellular
phones, CRT monitors etc.
Precautions
4. Have you had a cardiac event which may have altered your ECG
waveform? In this case consult your physician.
...HEART SYMBOL FLASHES IRREGULARLY?
1. Check that your Polar wrist receiver is inside the transmission range
and not further that 3 feet / 1 metre from the Polar Coded Transmitter
you are wearing.
2. Check that the elastic strap has not become loose during exercise.
3. Make sure that the electrodes of the transmitter are moistened.
4. Cardiac arrhythmia may cause irregular readings. In this case consult
your physician.
However your training partner may have coincidentally activated exactly
the same code. In this case you have the following alternatives:
1. Keep a distance from your training partner and continue your training
session normally
or
2. Stop the heart rate measurement (
Stop the heart rate
measurement), pull the transmitter off your chest for 15 seconds
(code will be changed) and restart from the beginning (
Start the
heart rate measurement).
In some cases you may need to dry the transmitter electrodes to ensure
that the transmitter is turned off again, as the sweat may keep it active
even when it is off the chest.
... THERE ARE NO REACTIONS TO ANY BUTTONS?
Reset the Polar Heart Rate Monitor. Resetting clears all memory values and
settings will return to the default settings.
1. Press the reset button with a pen tip.
Display becomes full of digits.
2. Press any of the four buttons once.
The Polar Protrainer XT enters the Time of day display.
... THE DISPLAY IS BLANK OR FADING?
Usually the first sign of a discharged battery is the disappearance of the
digits when using the backlight. Have the batteries checked.
Service
... IF THE BATTERY OF THE WRIST RECEIVER MUST
BE REPLACED?
We recommend having all service done by an authorised Polar Service.
This is especially necessary to ensure the warranty remains valid and is not
affected by incorrect repair procedures done by an unauthorised agent.
Polar Service will test your wrist receiver for water resistance after battery
replacement and make a full periodic check of the complete Polar Heart
Rate Monitor.
Care and Maintenance/Batteries and Service
... OTHER PERSON WITH HEART RATE MONITOR OR
EXERCISE EQUIPMENT IS CAUSING INTERFERENCE?
Make sure there are no disturbances such as high voltage power lines,
televisions, cars, cycle computers, exercise equipment or other people
with heart rate monitors near you during the code search. The benefit of
the coding is that you will not normally pick up other people’s heart rate
transmission and certain kinds of disturbances are more efficiently filtered.
42
PROXT GBR/E
43
42-43
7.2.2001, 09:01
... IF THERE IS 00000 MILES/ KM OR 0000 h IN THE
UPPERMOST ROW OF THE TIME OF DAY DISPLAY?
Press and hold SIGNAL/LIGHT and the uppermost row of the time of day
display will change. You may see 00000 MILES / KM which indicates total
cycling distance, 0000 h which indicates total riding time or the current day
(e.g.05). Press and hold for a few seconds as many times as needed until
you can see the current day in the uppermost row.
1.
2.
3.
4.
5.
... THE SPEED READING IS 00 OR THERE IS NO SPEED
READING IN THE DISPLAY DURING THE RIDE?
If the 00 readings appear only occasionally, they may be caused by high
voltage power lines in your surroundings.
If the 00 readings come more often, you probably have ridden more than
2500 hours with the speed sensor, and it’s time for battery replacement.
If you just have started the measurement,you should wait until the code
search is finished and then start riding the bike to succesfully get the
speed signal.
In any case, check the correct positioning of the Polar Speed Sensor.
Also check that the distance between the Polar Speed Sensor and the
bike mounted wrist receiver is between 1'4" - 1'8" / 40-50 cm.
Check that the spoke magnet is installed correctly and the distance
between the spoke magnet and the sensor is not more than 0.2"/5 mm.
Adjust the spoke magnet by rotating it around the spoke before putting
the metal cover on the magnet.
POLAR GLOSSARY
Indicates coded transmission of heart rate. The inner heart flashes to
the beat of your heart.
In the Time of day display indicates that the alarm is on. In the
Measure mode indicates that the sound signal will alarm if you are
exercising outside your target heart rate zone.
- - When starting the heart rate measurement, these flashing lines
indicate the search for coded transmission.
Indicates that you are setting the Cycling mode functions or you are
exercising in Cycling mode. In the Time of day display it indicates that your
most recent exercise was done in Cycling mode.
ALM: Indicates the alarm in watch settings.
... ANOTHER CYCLIST IS CAUSING INTERFERENCE?
To avoid crosstalk from another cyclist with a Polar Speed Sensor, keep the
distance of at least 2'4" / 70 cm between your Polar Protrainer XT receiver
mounted on your Polar Bike Mount and the Polar Speed Sensor of the other
cyclist.
AM/PM: 12 hour mode of time.
Chrono: Displays the total exercising time during the heart rate
measurement.
DATE: Indicates the date in watch settings.
... I AM CAUSING INTERFERENCE TO OTHER CYCLISTS?
You may cause crosstalk to other cycle computers or heart rate monitors.
To avoid this, keep a distance of at least 2'4" / 70 cm between your Polar
Speed Sensor and other person’s cycle computers and a distance of at
least 3 feet / 1 metre between your Polar Coded Transmitter and other
cycle computers.
Electrodes: The grooved areas of the transmitter, against the skin. Pick
up the heart’s electrical impulses.
FILE: Indicates the File mode.
FILE End: Indicates the end of the file you are reviewing.
FULL: After taking 48 lap times FULL appears in the display. You can
continue taking the lap times but they won't be recorded into the
Protrainer XT's memory.
Graphic bar: The graphic bar consists of four blocks and indicates
the settings of watch, heart rate or cycling functions. A flashing block
means that the setting of that particular function is possible.
44
PROXT GBR/E
45
44-45
7.2.2001, 09:01
Heart rate: The number of heart beats per minute (bpm).
KM/H: Kilometres per hour.
LAP: In Measure and File modes, together with a number, indicates how
many lap times are used.
Lap and split times: Time needed to move once around a closed
course or track.
LIM 1 / LIM 2 / LIM 3: Heart Rate Limits for Target Zones 1, 2 and 3.
TIM1 / TIM2: Timers 1 and 2 help you to divide your exercise session
into separate phases (e.g. warm-up, exercise phase, cool down). Timers
can be used individually (only Timer 1) or sequentially.
TIME: Indicates the time of day in watch settings.
TZ, Target Zone: The area between upper and lower target zone limits.
Target Zone selection is based on personal fitness goals.
During heart rate measurement the TZ symbol with a block next to it
indicates that you are exercising within the Target Zone. In File mode this
indicates the time spent within the Target Zone.
Lower Limit: The lower heart rate limit of the target zone
MAX: Together with a reading indicates either maximum heart rate or
maximum speed.
MEASURE: Measure mode
During heart rate measurement the TZ symbol with a upper block
flashing indicates that the heart rate is above the Target Zone. In File mode
this indicates the time spent above the Target Zone.
During heart rate measurement indicates that the heart rate is below
the Target Zone. In File mode this indicates the time spent below the Target
Zone.
MPH: Miles per hour
ODO, odometer: Measures cumulative total distance in Cycling mode.
Polar Coded Transmitter: Automatically locks in a code to transmit your
heart rate to your wrist receiver. In coded transmission the receiver accepts
heart rate data from your Polar Coded Transmitter only. Coding significantly
reduces crosstalk caused by other users of heart rate monitors. However, it
does not necessarily reduce all environmental interference.
Primary measurement display: In the Heart rate mode the middle
row of the display indicates either total exercising time, time of day or lap
time according to your settings.
Units of measure: By changing the Time mode from 12 h display to 24
h display you also change the other units used by the monitor. In the table
below you will find the units which are in use in each alternative.
TIME OF DAY
ALARM
SPEED
DISTANCE
WHEEL DIAMETER
24h mode
12h mode
24 h
24 h
km/h
km
mm
AM/PM
AM/PM
mph
miles
mm (NOTE!)
RECO, Recovery heart rate: Decrease in heart rate during the pre-set
period of time.
Upper limit: The upper heart rate limit for the target zone.
RTIME, total riding time: measures cumulative riding time.
WHL 1 / WHL 2, wheel: wheel size in millimetres.
Secondary measurement displays: The secondary measurement
displays will be seen for a few seconds by bringing the wrist receiver next
to the Polar logo of the Polar Coded Transmitter for a moment. The
secondary measurement display depend on which of the three alternatives
was chosen for the primary measurement display.
Wireless button: During the measurement in the Heart rate mode bring
the wrist receiver next to the Polar logo of the Polar Coded Transmitter for a
moment.
SET: Set mode.
Target Zone limits: Target Zone limits are determined as percentages
of maximum heart rate. The percentages are converted into heart rate in
beats per minute.
46
PROXT GBR/E
47
46-47
7.2.2001, 09:01
POLAR BOOKS
AND ACCESSORIES
TECHNICAL
SPECIFICATIONS
The Polar Heart Rate Monitor is designed to indicate the level of
physiological strain and intensity in sports and exercise. No other use is
intended or implied. The heart rate is displayed as number of heart beats
per minute (bpm).
POLAR CODED TRANSMITTER
Battery type:
Battery life:
Operating temperature:
Built-in Lithium Cell
Average 2500 hours of use
-10 °C to +50 °C / 14 °F to 122 °F
POLAR WRIST RECEIVER
Battery type:
Battery life:
Operating temperature:
Water resistancy:
Accuracy of heart rate
measurement:
CR 2032
Average 1 year (1h/day, 7 days/week)
-10 °C to +50 °C / 14 °F to 122 °F
to 20 metres
± 1% or ± 1 bpm, whichever is larger,
definition applies to steady conditions.
POLAR BOOKS AND BOOKLETS
Roy Benson, MPE
Precision Running
Dr. Matthew Brick
Precision Multi-Sport
Edmund R. Burke, Ph.D.
Precision Cycling
Neil Craig
Scientific Heart Rate Training
Sally Edwards
The Heart Rate Monitor Book
Mark Fenton and
Dave McGovern
Precision Walking
Ute Haas, M.Sc.,
Tarja Suomi, M.Sc. and
Dr. Raija Laukkanen, Ph.D.
Precision Aerobics
Dr. Peter J.G.M. Janssen
Training, Lactate, Pulse Rate
Dr. Katriina Kukkonen-Harjula, MD
and Dr. Raija Laukkanen, Ph.D.
Precision Weight Management
Dr. Raija Laukkanen, Ph.D.
Research Index
Yvonne Lin
Precision Sports Aerobics
Dr. James M. Rippe
Target Your Fitness and Weight
Management Goals
Dr. James M. Rippe
The Polar Fat Free and Fit Forever
Program
POLAR ACCESSORIES
DEFAULT SETTINGS
Timer 1:
Timer 2:
Limits 1:
Limits 2:
Limits 3:
Recovery function:
Primary measurement display:
Wheel size 1:
Wheel size 2:
00 00 (off)
00 00 (off)
80 - 160
00 - 00
00 - 00
off
Chrono
2000 mm
2100 mm
•
•
•
•
•
•
Polar Bike Mount for all bikes and Polar Heart Rate Monitors
Polar Speed Sensor Kit
Polar Sensor Assembly Kit
Extra Transmitter for other family members
Polar Heart Bra for women
Test handle for groups and trainers
Contact your local dealer or distributor for more details.
48
PROXT GBR/E
49
48-49
7.2.2001, 09:01
SENDING INSTRUCTIONS
1. Pack the product carefully to avoid further damage.
SERVICE
2. Include all the parts of the Polar Heart Rate Monitor. A full periodic
check will be done on the whole product.
3. Include proof of purchase (a receipt or its photocopy) if the product is
under warranty.
Polar Service will help you get the most out of your Polar Heart Rate
Monitor. Should your Polar Heart Rate Monitor need service, please follow
the instructions below :
4. Include a detailed description of the problem. Use the return sheet of
the Customer Care Charter.
5. Include your name, return address and daytime telephone number.
CHECK LIST
6. Ship postage prepaid to your dealer or distributor. For contact details
see the Customer Care Charter.
Before you return your Polar Heart Rate Monitor for service, please check
the following:
POLAR SERVICE PROCEDURE
1. Is the transmitter being worn correctly ?
The Polar logo should be right side up and the transmitter flat against the
skin. The elastic strap should be adjusted for a snug and comfortable fit.
2. Are the electrodes moist on the transmitter ?
It is important that the electrodes are wet during the heart
rate measurement.
3. Is the transmitter clean ?
Regular washing with mild soap and water solution and thorough dry
afterwards will ensure that good conductivity remains.
4. Are you having disturbances caused by other people
with heart rate monitors or exercise equipment?
Check that the code search in the beginning of the measurement has been
successful. See Start the heart rate measurement and Frequently
asked questions for details.
Any service is recommended to be done by an authorised Polar service
personnel. Our standard test and check procedure will be performed on all
Polar Heart Rate Monitors. The test includes the following elements:
POLAR TRANSMITTER
1. Visual inspection
2. Check of the transmission range
3. Check of electrode conductivity
4. Wash and clean if necessary
POLAR WRIST RECEIVER
1. Visual inspection
2. Check of battery voltage
3. Check and cleaning of case contacts
4. Re-assembly, including seal renewal if necessary
5. Water resistance test
6. Operational test
Water resistance cannot be guaranteed after unauthorised service.
50
PROXT GBR/E
51
50-51
7.2.2001, 09:01
LIMITED POLAR
WARRANTY
• Polar Electro Oy warrants the original consumer/purchaser of this heart
rate monitor that the product will be free from defects in material or
workmanship for one year from the date of purchase. Please keep
the receipt which is your proof of purchase!
• Warranty does not cover receiver battery, damage due to misuse,
abuse, accidents or negligence of the precautions; improper
maintenance, commercial use, cracked or broken cases.
• Warranty does not cover damage or consequential damage caused by
service not authorised by Polar Electro Oy.
• During the warranty period the product will be either repaired or
replaced at an authorised service centre free of charge.
• This warranty does not affect the consumer's statutory rights under
applicable nationat or state laws in force, or consumer's rights against
the dealer araising from their sales / purchase contract.
DISCLAIMER
• This product is protected by one or several of the following patents:
FI 88223, DE 4215549, FR 92.06120, GB 2257523, HK 113/1996,
SG 9591671-4, US 5491474, FI 88972, FR 92.09150, GB 2258587,
HK 306/1996, SG 9592117-7, US 5486818, FI 96380, US 5611346,
EP 665947, DE 69414362, FI 68734, DE 3439238, GB 2149514,
HK 812/1989, US 4625733, FI 100924, FI 100452, US 5840039, FI 4150,
FI 4069, DE 29910633, FI 104463.
Other patents pending.
• The material in this manual is for informational purposes only. The
products it describes are subject to change without prior notice, due to
manufacturer’s continuous development program.
• Polar Electro Oy makes no representations or warranties with respect to
this manual or with respect to the products described herein. Polar
Electro Oy shall not be liable for any damages, direct or incidental,
consequential or special, arising out of, or related to, the use of this
material or the products described herein.
Copyright © 1997, 2001
Polar Electro Oy, FIN-90440 KEMPELE, Finland
All rights reserved. No part of this manual may be used or reproduced in any
form or by any means without prior written permission of Polar Electro Oy.
Polar logotype is a registered trademark and Polar Protrainer XT is a
trademark of Polar Electro Oy.
0537
This CE marking shows compliance of this product with Directive
93/42/EEC.
52
PROXT GBR/E
53
52-53
7.2.2001, 09:01
INDEX
Calibrating the wheel size ....................................................................................... 28
Care and maintenance ........................................................................................... 38
Checking the transmission code ............................................................................ 19
Disclaimer ............................................................................................................... 53
Features .................................................................................................................... 6
Frequently asked questions .................................................................................... 42
Functions during heart rate measurement .............................................................. 18
Checking the secondary measurement display ............................................ 19
Illuminating the display .................................................................................. 19
Resetting the stopwatch ................................................................................ 23
Seeing your heart rate ................................................................................... 19
Starting/stopping the stopwatch .................................................................... 19
Starting the recovery calculation ................................................................... 22
Starting the timers .......................................................................................... 22
Stopping the heart rate measurement ........................................................... 23
Storing the split/lap time ................................................................................ 21
Swapping the heart rate limits ....................................................................... 21
Turning off/on the target zone sound signal .................................................. 19
Functions during the measurement in the cycling mode ....................................... 32
Checking the cycling information .................................................................. 34
Illuminating the display .................................................................................. 35
Resetting the cycling information .................................................................. 37
Resetting the stopwatch ................................................................................ 37
Seeing your heart rate and speed ................................................................. 34
Starting/stopping the stopwatch .................................................................... 35
Starting the recovery calculation ................................................................... 36
Starting the timers .......................................................................................... 36
Stopping the Cycling mode ........................................................................... 37
Storing the split/lap time ................................................................................ 35
Swapping between heart rate mode and Cycling mode ............................... 37
Swapping the heart rate limits ....................................................................... 35
Swapping the wheel size ............................................................................... 33
Getting going ............................................................................................................ 8
Glossary .................................................................................................................. 45
Parts ......................................................................................................................... 7
Polar books and accessories ................................................................................. 49
Precautions ............................................................................................................. 40
Questions ? ............................................................................................................. 42
Recalling the training information ........................................................................... 24
Service .................................................................................................................... 50
Setting the alarm .................................................................................................. 9,10
Setting the date .................................................................................................... 9,11
Setting the heart rate limits 1, 2 & 3 ................................................................... 13,15
Setting the heart rate measurement features ......................................................... 13
Setting the odometer .............................................................................................. 30
Setting the Primary measurement display ......................................................... 13,17
Setting the recovery heart rate .......................................................................... 13,16
Setting the time .................................................................................................... 9,11
Setting the timers 1 & 2 ...................................................................................... 13,14
Setting the total riding time ..................................................................................... 31
Setting the watch ...................................................................................................... 9
Starting the heart rate measurement ...................................................................... 18
Technical specifications .......................................................................................... 48
Warranty .................................................................................................................. 52
54
PROXT GBR/E
54
7.2.2001, 09:01
HOW TO READ
THIS GUIDE
ROAD MAP
NOTES
Visual cues
Indicates a tip to do things faster.
Time of Day
MEASURE
FILE
SET
Indicates important issue. Please pay attention!
Indicates a useful tip. It’s good to know these things.
press SET/START/STOP
press and hold SET/START/STOP
press SELECT
press STORE/LAP/RECOVERY
See also / Continue from.
You need an optional Polar Speed Sensor.
Setting the watch:
Monitor symbols
Time of Day
12/24 h
Set the alarm
Set the time
A flashing heart rate indicates heart rate measurement.
Target Zone sound signal / Alarm symbol.
Set the date
Indicates you are or you have been in the cycling mode
during the measurement.
MEASURE
Start the stopwatch
Stop the stopwatch
Reset file
TZ
Target Zone indicator.
MEASURE
Indicates you are in the Measure mode.
FILE
Indicates you are in the File mode.
SET
Indicates you are in the Set mode.
FILE
Enter the file
Recall the training information
File End
Monitor buttons
SET
Timers
RESET
Limits
Recovery
Primary
measurement
display
SET/START/STOP
STORE/LAP/RECOVERY
SELECT
SIGNAL/LIGHT