1
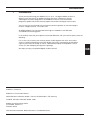
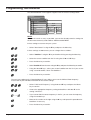
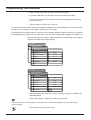
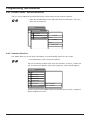
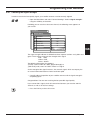
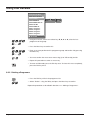
Users Guide
GB
Read these instructions carefully before using this appliance. • Retain for future reference.
RADIX shall not be liable for damages resulting from improper use of this appliance.
RADIX Electronic Vertriebs-GmbH • D-61381 Friedrichsdorf • F.R. Germany
Version 1.0
Page 1
Getting Started
Getting Started ... Quick Start ...
– The following is a brief description of a standard programme search •
•
•
•
Place the batteries in the remote control. Match the batteries to the + and signs inside the remote control.
Press the blue DVB key on the remote control.
Press the Power button to switch on the receiver.
Using the CH key, select the field with your language and press the Menu key.
The Main Menu now appears. You use this screen to make your programme settings. To get you started as quickly
as possible, we will skip the next steps. You should follow all steps, however, if you want to perform an advanced
search.
•
Using the CH key, select Standard Search and press the Menu key.
You now see a window containing settings for two different satellites. You can start the search process immediately
if you receive either or both of the preset satellites.
•
Select Start Search using the CH key.
•
Press the Menu key to begin searching.
While the receiver is searching, you will see the settings for each channel in succession. This process is indicated
by an acoustic signal.
Wait until the search has ended and the receiver displays the first programme.
If nothing appears when the search is finished, please read the following instructions.
Page 2
Version 1.0
Introduction
1
Introduction
Thank you for purchasing your RADIX E P S I L O N 3 ci digital satellite receiver. In
doing so you have chosen an appliance built for the future, allowing you to take
advantage of numerous programmes and additional services such as electronic
programme guides which will eventually replace conventional analogue transmissions.
You can also use the enclosed universal remote control to operate an external analogue
receiver, a digital receiver, a TV and a VCR.
All RADIX products are manufactured to the highest standards at our ISO 9002
accredited manufacturing plants.
In the unlikely event that you experience technical difficulties with your receiver, please note the
following:
If it is necessary to return your receiver, please send it together with all its accessories
and in its original packaging to your local dealer, from which you bought it and include a
copy of your invoice or receipt as well as a detailed description of the problem. Please
ensure you affix adequate postage to the package.
GB
We hope you enjoy using RADIX digital satellite receiver!
Publisher’s statement:
EPSILON 3 ci Instruction Manual
RADIX Electronic Vertriebs-GmbH • D-61381 Friedrichsdorf • F.R. Germany
© RADIX Electronic Vertriebs-GmbH, 1999
Subject to change without notice
Issue 05/99, Version 1.0
Printed in Korea
Technical Documentation: Bartha Docuteam • D-64625 Bensheim
Version 1.0
Page 3
Contents
2
Table of Contents
Section
Content
1
2
3
Introduction
Contents
Important Safety Notes
3
4
5
4
4.1
4.2
Your Receiver and its Functions
Remote Control
Receiver
6
6
7
5
5.1
5.2
Installing Your Receiver
Before You Start
Connecting the Antenna and Other Devices
8
8
9
6
6.1
6.2
6.2.1
6.2.2
6.2.3
6.2.4
6.2.5
6.2.6
6.2.7
6.2.8
Programming Your Receiver
Switching On
The Main Menu
General Settings
Standard Search
Advanced Search – Finding Encoded Programmes
Decoder Status – Clear All Channels
Decoder Status – System Information
Common Interface
Checking the Signal Strength
Editing Transponder Data
10
10
10
10
11
13
15
16
16
17
18
7
7.1
7.2
7.3
7.4
7.5
7.6
Using Your Receiver
Switching Your Receiver On
Switching to an Analogue Receiver
Selecting Channels
Volume Control / Mute Sound
Listening to the Radio
Selecting the Audio Mode
18
18
19
19
19
20
20
8
8.1
8.1.1
8.1.2
8.2
8.2.1
8.2.2
8.2.3
8.3
Programme Lists and Information
Displaying a Programme List
Full-Screen Mode
Compact View Mode
Editing Your Programme Lists (List of Favourites)
Moving a Programme
Deleting a Programme
Changing a Programme Name
Program Information
21
21
21
22
22
22
24
25
25
9
10
11
Programming Your Remote Control
Trouble Shooting
Recycling and Disposal
26
28
28
12
12.1
Appendix
Brand Codes for Universal-RCU
(List of manufacturer setup codes)
Time Zone Table
Technical Specifications
I-IV
12.2
12.3
Page 4
Page
I
III
IV
Version 1.0
Important Safety Notes
3
Important Safety Notes
This appliance is designed exclusively for receiving satellite signals. It must not be used for any other
purpose. Keep the appliance out of reach of children. To avoid injury and to avoid damaging your receiver,
please note the following:
DANGER:
Do not remove cover - risk of electric shock!
All repairs must be carried out by authorised service personnel.
DANGER:
Protect from moisture - risk of electric shock!
DANGER:
Do not place any objects into slots or ventilation holes - risk of electric shock!
WARNING:
Do not cover ventilation holes - risk of fire through overheating!
GB
WARNING:
Only use original spare parts or professionally recommended spare parts. Failure
to do so may result in damage or injury and will cancel the guarantee.
CAUTION:
Switch the appliance off during electrical storms or if it not used for long periods.
Disconnect the antenna cable in an electrical storm.
CAUTION:
Do not use any chemicals to clean the receiver - use a slightly damp cloth only!
Version 1.0
Page 5
Your Receiver and its Functions
4
Your Receiver and its Functions
4.1
Remote Control
Power
Number Keys
Menu
Channel "+"
Volume "—"
Selector (backward)
Volume "+"
Selector (forward)
Channel "— "
LED Indicator
Mute
TV
Digital Receiver
Programme List
No Function
TV/Radio
Analogue/Digital Mode
Set
VCR
External Analogue Receiver
Exit
Last Programme
Audio Mode (Channel Allocation)
Programme Information
Programme Guide
No Function
NOTE:
When fitting batteries, match the + and - signs on
the batteries to the signs on the inside of the remote control
Page 6
Version 1.0
Your Receiver and its Functions
4.2
Receiver
Common Interface Slots
for Conditional Access
Modules (CAM)
4-Digit LED Programme
Number Display
Power
Programme Select
GB
Eject Button
Front of Receiver
Audio Jack for
HI-FI System
(digital)
SCART Socket
for TV
IF INPUT
+13V/+18V
400mA MAX.
DIGITAL
WARNING:
WARNING:
WARNUNG:
WARNUNG:
AC95 265V
50Hz MAX30W
IF Input for Coaxial Antenna
Cable for Digital Signal
TV
AVERTISSEMENT:
AVERTISSEMENT:
L
CAUTION
CAUTION
RS 232
AUDIO
IF OUTPUT
R
AVIS:
AVIS:
VORSICHT:
VORSICHT:
DIGITAL
ANALOG
VCR
Mains Connection
(95 V-265 V~)
SCART Socket
for VCR
Audio Jacks for HI-FI System
(analogue)
RS 232 for
Connection to PC
SCART Socket for
IF Output for
Analogue Receiver Analogue Receiver
Rear of Receiver
Version 1.0
Page 7
Installing Your Receiver
5
Installing Your Receiver
5.1
Before You Start
CAUTION:
Do not place the receiver near any heat sources or in strong sunlight.
Protect all cables from damage caused, for example, by sharp edges.
This appliance must only be used with a mains voltage of 230 V (± 10%), 50 Hz.
Install the antenna in accordance with the manufacturers instructions.
The following information is necessary for programming the digital components:
-
your time zone (= deviation from GMT – see appendix),
-
summer time yes/no,
-
picture format for your TV,
-
The appropriate LNB oscillator frequency (referred to in the “LNB Local-Frequency” menu),
-
Programme frequencies and polarities for manual programming (available in satellite magazines,
specialist stores).
You must program the EPSILON 3 ci before use. Full instructions are provided in Section 6. If you are in a
hurry and if you already have experience programming receivers, you can use the Quick Guide to get
started.
Page 8
Version 1.0
Installing Your Receiver
5.2
Connecting the Antenna and Other Devices
CAUTION:
Do not connect the receiver to the mains until you have correctly connected your
VCR, TV and any other analogue receiver you may have.
Antenna
TV
WARNING:
WARNUNG:
AVERTISSEMENT:
F-Type Connector
CAUTION
AVIS:
VORSICHT:
WARNUNG:
AC95~265V
50Hz MAX30W
AVERTISSEMENT:
RF INPUT
+13V/+18V
400mA MAX.
DIGITAL
WARNING:
~
TV
L
CAUTION
RS 232
AUDIO
GB
RF OUTPUT
R
AVIS:
VORSICHT:
DIGITAL
VCR
ANALOG
F-Type Connector
HI-FI
System
HI-FI
System
(digital)
(analogue)
Video
Recorder
External
Receiver
External
Receiver
(analogue)
(analogue)
• Use double-shielded coaxial cable to connect the LNB to the receiver.
CAUTION:
When assembling the F-type connector, make sure that no part of the inner wiremesh sheath touches the inner core (see diagram below). Failure to do so can
cause a short-circuit and damage your receiver.
Wire Mesh
Bent Wire
Core
• Tighten the safety nut on the F-type connector by hand only. Do not over
tighten!
Version 1.0
Page 9
Programming Your Receiver
6
Programming your Receiver
6.1
Switching On
• Press the blue DVB key to activate your remote control (See Section 8 for
details on programming your remote control).
The red LED indicator flashes briefly.
• Press the Power button on your receiver.
The ON message appears on the receivers display and the following screen
appears:
Press MENU Key
Press MENU Key to Setup
Appuyer sur la touche MENU pour le réglage
Selezionare MENU per l'mpostazione
6.2
•
Select your language using the CH and CH keys.
•
Press the Menu key to confirm your choice.
The Main Menu
The Main Menu appears on your TV screen:
Main Menu
Exit
1
General Setting
2
Standard Search
3
Advanced Search
4
Transponder Edit
5
Decoder Status
6
Common Interface
This menu allows you to programme your receiver. You will only need to do this
when you set up your receiver for the first time or when adding new channels.
6.2.1 General Settings
Page 10
•
Using the CH key, select the first menu option: General Settings.
•
Press the Menu key to confirm.
Version 1.0
Programming Your Receiver
The General Settings menu appears. This contains fields in which you can enter
and change the receivers settings:
Main Menu
General Setting
Previos Menu
1
Language
2
Time Setting
GMT
3
Summer Time
OFF
4
TV Aspect Ratio
4:3
5
Signal Strength
English
• Using the CH key, select the Language field and press the Menu key to
confirm.
• Scroll through the list of languages using the CH and CH keys and choose
”Deutsch”, ”English”, ”Français” or ”Italiano”. Now press the Menu key to
confirm.
• Select the next menu option ”Time Setting” using the CH key and press the
Menu key to confirm.
• Using the CH and CH keys, enter your local time zone to the nearest 30
minutes (deviation from GMT). For more information, refer to the time zone map
at the back of this guide. Press the Menu key to confirm your selection.
• Using the CH key, select ”Summer Time” and press the Menu key to confirm.
• Select either YES or NO using the CH and CH keys and press the Menu key
to confirm.
• Now select ”TV Aspect Ratio” using the CH key and press the Menu key.
• Choose either 4:3 or 16:9 using the CH and CH keys.
• Press the Menu key to confirm your choice.
• Press the Exit key to close this menu.
6.2.2 Standard Search
Before you can receive digital programmes, you must first store them in your receiver.
• Using the CH key, go to the Main Menu and select ”Standard Search”.
• Confirm this using the Menu key.
Version 1.0
Page 11
GB
Programming Your Receiver
The Standard Search menu appears together with the relevant settings fields:
Main Menu
Standard Search
Previos Menu
1
Satellite 1
ASTRA
2
Satellite 2
HOTBIRD
3
LNB Local-Frequency
1
Universal
2
4
DiSEqC
1
A
2
B
5
22kHz
1
AUTO
2
AUTO
Universal
Start Search
NOTE:
To make the search as easy as possible, your receiver already contains settings for
the two most commonly used satellites: ASTRA and HOTBIRD.
If these settings are correct for your system:
• Select ”Start Search” using the key and press the Menu key.
If these settings are not correct, you can change them as follows:
• Select ”Satellite 1” using the key and confirm this by pressing the Menu key.
• Select the correct satellite from the list using the CH or CH keys.
• Press the Menu key to confirm.
• Select ”Satellite 2” from the menu using the key and press the Menu key to confirm.
• Using the and keys, select your second satellite from the list. If you are not
using a second satellite, select ”No Satellite 2”.
• Press the Menu key to confirm.
The next menu option on the ”Standard Search” menu allows you to set the LNB oscillator frequency.
Please refer to your LNB documentation for the correct settings.
• Select ”LNB Local-Frequency” using the and keys and press the Menu
key to confirm.
• Choose the appropriate frequency setting for Satellite 1 with or or the
setting ”Universal”.
…
• If you cannot find the correct frequency in the list, you can enter the frequency
using the number keys.
• Move to the section on the right using the key and repeat this procedure for
Satellite 2 if necessary.
• Press the Menu key to confirm.
Page 12
Version 1.0
Programming Your Receiver
NOTE:
The following settings apply to DiSEqC (Digital Satellite Equipment Control). You
must have a DiSEqC switch installed on your system to carry out these steps.
• Select the field ”DiSEqC” using the or key.
• Press the Menu key to confirm.
• Select the correct setting for Satellite 1 using the or key as specified by the
manufacturer of your switch. If you do not have a DiSEqC switch, choose NO.
• Move to the section on the right using the key and repeat the procedure for
Satellite 2 if necessary.
• Press the Menu key to confirm.
The setting ”22 kHz” is set automatically so you can proceed directly to the next
step.
All of the options (1-5) in the Standard Search menu must be filled. Once you have
done this, you can automatically search for all channels according to the settings
you made:
• Press the or key and select ”Start Search”.
• Press the Menu key to begin searching.
While the receiver is searching, a timer appears on the screen. Above this is a blue
progress bar which indicates the frequencies being searched. In addition, the
following information is also displayed:
DF: ....
SR:....
.../...
New:...
- Satellite frequency
- Symbol rate
- Number of programmes found / Number of programme packages
- Number of stored programmes
When the timer expires, a message appears informing you that the search has
been successful. However, if a message appears stating ”out of range” or that the
search has failed, you must check your settings and correct them where necessary
until the search is successful.
• To close this menu, press the Exit key.
6.2.3 Advanced Search – Finding Encoded Programmes
If you want to receive encoded or encrypted programmes, you must have a Conditional Access Module
(CAM) installed. This module is used to read the contents of you authorisation or access card (Smartcard).
Your receiver has two such slots and you can use them both at the same time for different encryption
modules.
Version 1.0
Page 13
GB
Programming Your Receiver
• Open the flap on the left side of your receivers front panel.
• Insert the CAM all the way into the Common Interface Slot (CI Slot).
• Insert the SmartCard into the module with the chip facing upwards and away
from the receiver.
• Close the flap on the front of the receiver.
The Advanced Search feature allows you to program additional channels individually or to change existing
settings. You must edit each menu option separately for each group.
The procedure for creating settings is exactly the same as before. Simply change the settings as you did for
the Standard Search making sure you have all the necessary information before you begin (see Section 5.1).
Open the Main Menu and select ”Advanced Search”. The following screen appears
together with fields for changing settings:
Main Menu
Advanced Search
Previos Menu
1
Satellite 1
2
LNB Local-Frequency
3
DiSEqC
4
22kHz
5
LNB Polatity
ASTRA
Universal
A
OFF
Horizontal
Next
Main Menu
Advanced Search
Previos Menu
6
Down Frequency
12168
7
Symbol Rate
27.500
8
Video PID
AUTO
9
Audio PID
AUTO
10
PCR PID
AUTO
11
Start Search
• Proceed through each of the menu options making changes as you did for the
Standard Search.
• Select ”Start Search” and press the Menu key to confirm.
You can monitor the search progress visually by means of the blue progress bar or by means of the
acoustic signals.
• Press the Exit key to close this menu.
Page 14
Version 1.0
Programming Your Receiver
6.2.4 Decoder Status – Clear All Channels
Open the Main Menu and select ”Decoder Status”. Press the Menu key to confirm
and the following screen appears:
Main Menu
Exit
0
Previos Menu
1
General Setting
1
Clear All Channels
2
Standard Search
2
System Information
3
Advanced Search
4
Transponder Edit
5
Decoder Status
6
Common Interface
• Select ”Clear All Channels” and press the Menu key to confirm.
Main Menu
GB
Decoder Status
Previos Menu
1
Clear All Channels
2
System Information
Password
CAUTION:
This function deletes all settings and you will have to completely reprogram your
receiver.
…
• Enter the following password using the number keys: 9-8-1-5.
Before you can clear all channels, you must confirm once more that you want to do
this:
• Press (1) for YES or (0) for NO.
• Press the Exit key to close this menu.
Version 1.0
Page 15
Programming Your Receiver
6.2.5 Decoder Status – System Information
You can use this option to get information on the current status of your receivers software.
• Open the Decoder Status menu and select ”System Information”. Press the
Menu key to confirm this.
Main Menu
Decoder Status
Previos Menu
1
Clear All Channels
2
System Information
Date
15.05.1999
Revision
EP_990401
Firmware
2.08A - 0.12.0.30
6.2.6 Common Interface
This option allows you to see which CA modules are currently being used in CI slots 1 and 2.
• In the Main Menu, select ”Common Interface”.
You now see details of which cards are in the card slots - if there is a card in the
slot, its code version appears. If no cards are present, ”Not Installed” appears:
Main Menu
Exit
1
General Setting
2
Standard Search
3
Advanced Search
4
Transponder Edit
5
Decoder Status
Slot 1 : Not Installed
6
Common Interface
Slot 2 : Not Installed
Please note that it takes approximately 30 seconds after you insert a card for its
details to appear on-screen.
Page 16
Version 1.0
Programming Your Receiver
6.2.7 Checking the Signal Strength
In order to receive the best quality signal, your satellite antenna must be correctly aligned.
• Open the Main Menu and select ”General Settings”. Select “Signal strength“
using the CH key and confirm.
Providing you can receive at least one channel, the following menu appears on
your screen:
Main Menu
General Setting
Previos Menu
1
Language
2
Time Setting
GMT
3
Summer Time
OFF
4
TV Aspect Ratio
4:3
5
Signal Strength
English
GB
SNR:10.490 (LOCK)
The signal strength indicator is divided into three separate sections: red, yellow and
green. These colours represent the strength of the signal:
Red: BAD,
Yellow: FAIR,
Green: GOOD.
The following information also appears:
“(LOCK)” and a number for ”SNR” (Signal Strength) or
„(UNLOCK)” and „0.000” for ”SNR” if there is no signal.
As the strength of the signal increases, the acoustic signals which accompany the
on-screen information become shorter and more rapid.
• Carefully adjust the position of your satellite antenna until the signal strength is
completely green.
Congratulations! You are now receiving the best possible signal quality.
If you cannot find a signal, check all connections between your receiver and the
antenna as well as all receiver settings.
• Press the Exit key to close this menu.
Version 1.0
Page 17
Using Your Receiver
6.2.8 Editing Transponder Data
To ensure that future transponders and channels will be included in the Standard Search, you must enter
the relevant information in the transponder list using the Transponder Edit menu.
You do not need to do this if you have entered this information manually using the Advanced Search menu.
Select Transponder Edit from the Main Menu and the following screen appears:
Transponderdate- Edit
01 ASTRA
\
TP
H/V
SR
02 HOTBIRD
41
12663
H
22.000
03 EUTEL_7.0
42
12670
V
22.000
04 EUTEL_10.0
•
•
•
•
05 EUTEL_16.0
•
•
•
•
06 EUTEL_21.5
45
0
07 TURK1B_31.3
08 TURK1C_42.0
09 KOPERNIKUS
3000 ~ 13000 (MHz)
MENU/EXIT
The bar at the bottom of the screen shows which keys are needed for navigation.
• Select the satellite you want to use and press the Menu key to confirm.
• In addition to the preset transponder data, you can also add additional data.
• Repeat this process for all settings. When you have finished, press the Exit key
to return to the Main Menu.
7
Using your Receiver
Once you have finished all of the basic settings described above, you can begin using your receiver.
NOTE:
Digital communications involve the transfer and processing of large amounts of
data simultaneously. This means that there may be a slightly longer delay when
changing channels compared to traditional TV.
7.1
Switching you Receiver On
• Press the Power button on your receiver. Now press the Power key on your
remote control.
Page 18
Version 1.0
Using Your Receiver
7.2
Switching to an Analogue Receiver
If you have an external analogue receiver connected, you can receive channels from it using your digital
receiver.
• Press the A/D key on your remote control to switch from digital to analogue
mode.
The signal from your analogue receiver is carried through your digital receiver to
you TV and VCR (if connected).
The analogue signal is still carried even if your digital receiver is in standby mode.
You can still see and hear analogue programmes.
7.3
Selecting Channels
…
• Use the number keys to select the channel of your choice (see also
”Programme Lists” in Section 7.6).
NOTE:
Each channel has a four-digit number, for example, 0001 and so on. You can also
enter 1, 2 or 3 digits (for example, 1, 13, 135). In this case, the desired channel will
appear in about three seconds.
• Use CH to move to the next highest channel. Use the CH to move to the
next lowest channel.
• To go to the last channel you visited, press the ”Last” key.
Each time you change channel, the channel number, date, time and ”Channel
Change” are displayed on your TV screen.
If the new channel is on the same frequency as the previous one, it will appear and
the information mentioned above will be displayed. If the channel is on a different
frequency, the message ”Tuning HF Signal” appears. The new channel takes
slightly longer to appear.
The information displayed by the receiver remains on your screen for approximately
three seconds or until you press the Exit key.
7.4
Volume Control/Mute Sound
• Use the or keys to adjust the volume.
• Use the Mute key to mute the sound:
• To restore the sound, press the Mute key again or press the key.
The on-screen display disappears after a few seconds.
Version 1.0
Page 19
GB
Using Your Receiver
7.5
Listening to the Radio
In addition to television programmes, many broadcasters transmit their radio programmes in digital HIFI
format.
• Press the Radio key to switch from TV to Radio mode.
• Use the channel keys or to scroll through the channels as you would in TV mode.
• Press the Last key to return to the previous channel.
• To return to TV mode, press the Radio key again.
All programme list functions can be used in both Radio and TV mode.
7.6
Selecting the Audio Mode
Several broadcasters transmit their TV programmes in different languages and audio formats.
• Press the Audio key and select the field on the left using the volume
keys or to choose one of the available languages:
Audio Mode
BL 1:
Stereo (L+R)
• Use the channel keys or to change the language setting.
• Use the volume keys or to select the field on the right.
• Select one of the following options using the channel keys or :
Stereo (L+R)
Mono1 (L+L)
Mono2 (R+R)
Swap (R+L)
– left and right
– left only
– right only
– alternating
• Press the Audio key again to return to TV mode.
Page 20
Version 1.0
Using Your Receiver
8
Programme Lists and Information
Digital television offers you hundreds of channels and it’s easy to lose track of your favourites. To help you
find your favourite programmes quickly and easily, you can create programme lists (Favorite Menu).
8.1
Displaying a Programme List
8.1.1 Full-Screen Mode
• Press the FAV key while watching a programme:
Favorite Video
P0001 DF1 Info-Kanal
P0002 CANAL+
P0003 MOSAICO
P0004 ANDALUCIA TV
P0005 TVC INT.
P0006 CANAL 99
P0007 < Program >
GB
P0008 < Program >
P0009 < Program >
P0010 < Program >
FAV/RADIO/INFO/MENU
NOTE:
The current channel being displayed in the background is changed if the
programme number is selected for more than a few seconds.
You can use the following functions:
• Use the volume keys or to scroll or to place a programme.
• Use the channel select keys or to select or to place a programme.
• Press the FAV key to create or change your list of favourites (see Section 8.2).
• Press the Radio key to switch to radio mode.
• Press the INFO key to see programme information.
• Press the Menu key to store your programme list.
…
Version 1.0
• Use the number keys to select a programme directly.
Page 21
Using Your Receiver
8.1.2 Compact View Mode
• Press the FAV and INFO keys while viewing a programme:
Favorite Video
P0001 DF1 Info-Kanal
TV
P0002 CANAL+
P0003 MOSAICO
P0004 ANDALUCIA TV
P0005 TVC INT.
Information
P0006 CANAL 99
P0007 < Program >
P0008 < Program >
P0009 < Program >
P0010 < Program >
Network name
BetaDigital
Frequenzcy
12450 MHz (V)
Symbol Rate
27500 MHz
FAV/RADIO/INFO/MENU
The same functions are available here as in full screen mode.
8.2
Editing your Programme Lists (List of Favourites)
The following steps apply to both TV and Radio modes. At the bottom of the screen, you can see a list of
function keys for this screen: Change (arrow or number keys), Confirm (Menu key), Close menu (Exit key).
8.2.1 Moving a Programme
• Press the FAV key while viewing a programme to open the Favourite menu:
Favorite Video-Edit
P0001 DF1 Info-Kanal
Move
P0002 CANAL+
P0003 MOSAICO
Delete
Edit service name
P0004 ANDALUCIA TV
P0005 TVC INT.
P0006 CANAL 99
P0007 < Program >
P0008 < Program >
P0009 < Program >
P0010 < Program >
MENU / EXIT
• Select “Move“ and press the Menu key to confirm
• Select the programme you want to move (or the first channel in a group) using
the channel select keys or .
• Press the Menu key to confirm.
Page 22
Version 1.0
Using Your Receiver
Moving a Programme:
Favorite Video-Move
P0001 DF1 Info-Kanal
Move one Program
P0002 CANAL+
Move whole group
P0003 MOSAICO
P0004 ANDALUCIA TV
P0005 TVC INT.
P0006 CANAL 99
P0007 < Program >
P0008 < Program >
P0009 < Program >
P0010 < Program >
MENU / EXIT
• Press the Menu key.
…
• Using the channel, volume or number keys , , or , select the location
where you want to move the programme to.
• Press the Menu key to confirm.
• Repeat this procedure to move other programmes.
• To close the menu, press the Exit key twice.
NOTE:
Your receiver stores the list you edited in its memory. An hourglass appears onscreen while it does so.
Moving a Group of Programmes:
Favorite Video-Move
P0001 DF1 Info-Kanal
Move one Program
P0002 CANAL+
Move whole group
P0003 MOSAICO
P0004 ANDALUCIA TV
P0005 TVC INT.
P0006 CANAL 99
P0007 < Program >
P0008 < Program >
P0009 < Program >
P0010 < Program >
MENU / EXIT
• Select “Move Whole Group“ using the key.
• Press the Menu key to confirm.
Version 1.0
Page 23
GB
Using Your Receiver
Favorite Video-Move
P0001 DF1 Info-Kanal
P0002 CANAL+
P0003 MOSAICO
Group
0002
Move to
0004
0008
P0004 ANDALUCIA TV
P0005 TVC INT.
P0006 CANAL 99
P0007 < Program >
P0008 < Program >
P0009 < Program >
P0010 < Program >
MENU / EXIT
…
• Using the channel, volume or number keys , , or , select the last
programme of the group.
• Press the Menu key to confirm this.
…
• Enter a new start position for this programme group and confirm it by pressing
the Menu key.
• You must confirm the move once more using (1) for YES and (0) for NO.
• Repeat this procedure as often as necessary.
• To return to Edit mode, press the Exit key once. To close this menu completely,
press the Exit key twice.
8.2.2 Deleting a Programme
• Press the FAV key while in the programme list.
• Select “Delete“ using the key and press the Menu key to confirm.
Repeat the procedure as described in Section 8.2.1 “Moving a Programme“.
Page 24
Version 1.0
Using Your Receiver
8.2.3 Changing a Programme Name
Video-Name Edit
P0001 DF1 Info-Kanal
P0002 CANAL+
C A N A L +
P0003 MOSAICO
P0004 ANDALUCIA TV
P0005 TVC INT.
P0006 CANAL 99
P0007 < Program >
P0008 < Program >
P0009 < Program >
P0010 < Program >
MENU / EXIT
• With the programme list open, press the FAV key to rename a programme.
• Select “Edit Service Name“ using the key and press the Menu key to
confirm.
• Select the programme you want to rename and press the Menu key to confirm.
The name of the programme to be changed appears on your screen in a
14 character line.
• Select a character using the volume key and enter a new letter, character or
number using the channel select key or .
• Repeat this procedure until you have changed the name. Press the Menu key to
confirm.
• To return to the Edit menu, press the Exit key once. To close this menu
completely, press the Exit key twice.
8.3
Programme Information
Digital television allows broadcasters to transmit an electronic TV guide and other additional information
along with the signal. Unfortunately this capability is not utilised by all TV broadcasters.
• While viewing a programme, press the GUIDE key to open the following
overview screen:
Program Guide – Video
Data
: 21/2/1998
Video
End time
: 10:30
Audio
:
:
Content
:
EBU data
:
Rating
:
Story
:
Press EXIT to stop search
Version 1.0
Page 25
GB
Programming Your Remote Control
In addition to the programme overview, the following information is also available:
Video:
4:3
16:9
16:9 (pan vector)
> 16:9
Content:
Feature Film / Drama
News
Show / Gameshow
Sport
Kids / Teens
Audio:
Single mono
Dual mono
Stereo
Multilingual
Surround
Music / Dance
Art / Culture
Social / Politics / Economy
Education / Learning
Leisure
Special
EBU Information:
Teletext Subtitles
Teletext
Subtitles
Subtitles (4:3)
Subtitles (16:9)
Subtitles (2.21:1)
Suitability:
Over 7 years of age
• Press the Exit key to stop the programme operation.
• Use the channel select and volume keys , , or to select the appropriate
options and display the additional information.
• Press the Exit key to exit the programme overview.
9
Programming your Remote Control
You can programme the remote control in two ways: you can either use the three-digit manufacturers setup
code (listed by manufacturer at the back of this guide) or you can perform a systematic search.
Method 1: Enter the Manufacturers Setup Code
Step 1:
Press and hold down the SET key for approximately three seconds until
the red LED lights up.
Step 2:
Press one of the following device keys to set the desired device:
SAT
DVB
TV
VCR
Step 3:
Analogue Receiver
Digital Receiver
Television
Video Recorder.
Find the manufacturers code for your device in the list of codes. If there
is more than one code, you will need to try each one until your remote
control works with your device.
Make sure that the device is switched on.
Point the remote control at the device.
Page 26
Version 1.0
Programming Your Remote Control
…
Enter the three-digit code using the number keys. If your device switches off, your
remote control is ready to use.
Step 4:
Press the SET key to store the settings. The LED will blink three times.
If this does not happen, repeat steps 1 to 4.
Method 2: Systematic Search
Step 1:
Step 2:
Step 3:
Press and hold down the SET key for approximately three seconds
until the red LED lights up.
Press one of the following device keys to set the desired device.
SAT
Analogue Receiver
DVB
Digital Receiver
TV
Television
VCR
Video Recorder.
Switch on your device.
Point the remote control at the device.
Press the Power key repeatedly until the device switches off.
NOTE:
Many devices do not switch off immediately - you should wait briefly before
pressing the Power key again.
Step 4:
Press the SET key to store the settings.
The LED will blink three times.
If this does not happen, repeat steps 1 to 4.
When you have finished:
Version 1.0
•
Press the blue key for the device you want to operate.
•
When the LED flashes quickly, you can use the remote control as normal.
Page 27
GB
Trouble Shooting
10
Trouble Shooting Your digital Receiver
Problem
Possible Causes
Solution
No picture but
on-screen menus
appear
Satellite system is faulty
in correctly installed,
Faulty LNB
Check all connections and leads,
adjust satellite antenna,
Check LNB
High levels of signal loss
through cables
Replace cables or use a signal
booster
Faulty LNB
Replace LNB
Faulty connection
(Water/corrosion damage)
Repair connection
No stereo sound
Incorrect cable connecting
TV and receiver
Check SCART cable
Remote control not
working
DVB not selected
Press DVB key
Batteries exhausted
Replace batteries
Incorrect device selected
Press correct device key
Remote control not pointed
at device
When using remote control, make
sure it is pointing at device
Module not fully inserted
into slot
Open Main Menu and check option 6
“Common Interface“. If “Not Installed“
appears remove module and replace
correctly
Faulty module
Replace module
SmartCard not inserted
properly
Make sure that chip is facing
upwards and away from receiver
Faulty SmartCard
Replace SmartCard
CA Module not
working (cannot
receive encrypted
programmes)
11
Recycling and Disposal
Please dispose of the device, packaging such as polystyrene and all batteries in accordance with your local
regulations and recycle wherever possible.
Page 28
Version 1.0
Appendix
12.1 Brand-Codes for Universal-RCU
Producer
ALBA
AMPERE
AMSTRAD
ARCON
ARISTONA
ASTRA
BLAUPUNKT
BUSH
CONNEXIONS
DISKXPRESS
FERGUSON
FINLUX
FRACARRO
FTE
FUBA
GOLDSTAR
GRAETZ
GRUNDIG
HIGH PERFORMANCE
HIRSCHMANN
INGLELEN
ITT-NOKIA
KATHREIN
KRIESLER
LENCO
LUXOR
MAGAI
MARANTZ
MASPRO
METZ
MINERVA
MULTISTAR
NEC
NEIRU
NOKIA
NORSAT
PACE
PANASONIC
PHILIPS
PHONOLA
PROSAT
PYE
QUELLE
RADIOLA
RADIX
REDIFFUSION
SAISHO
SAKURA
SALORA
SAMSUNG
SATPARTNER
SCHAUB LORENZ
SCHNEIDER
SENTRA
SIEMENS
SIERA
SILVA
STARSAT
TANDY
TATUNG
TECHNISAT
TELEFUNKEN
TELEKA
THORN-FERGUSON
TRIAD
UNIDEN
VORTEC
WELA
WISI
WOLSEY
ZEHNDER
Producer
ADMIRAL
AKAI
ALBA
ALBIRAL
AMSTRAD
ARC EN CIEL
ARISTONA
ARTHUR MARTIN
ASA
ATLANTIC
AUTOVOX
BAIRD
BEKO
BLAUPUNKT
BOOTS
BRANDT ELECTRONIQUE
BRION VEGA
BRUNS
BSR
BUSH
CENTURY
CGE
CIHAN
CLARIVOX
COMTEL
CONDOR
CONTEC
Version 1.0
SAT
Code
009 028 034
001 002
001 002 007 035
041
026
033
019
026 028 034
020 021
020
025 026 031 032
005 006
046
042
001 002
041
047
003 019 026 029 032
045
001 002 005
047
032 047
042 043 049
026
041
047
042
014
023 026
003
003
042
010 017 036
041
047
022
024 026 031 032 040
011
013 014
026
028
026
003
026
001 002
017 022
012
027
015 033 047
042
041
047
026
018
003 019
026
041
042
045
016 037
004
044
001 002
008 025 026 031 032
045
030 038 039 042
044
001 002
001 002
045
042
TV
Code
039 114
037 090
076 087
074
004 005
007 016 020 043
029 037 039 045 067 104 106
064 081 086 089 090 098 101
039 044 050 052 071 114 134
029 068
029 044 045 050 103
117
037
013 014 028 031 033 035 056 068 072
125
007 016 020 043
039 122
032 039
065 112
009 087 093 097
039 109 128
013 054 093 109 112 128
066 078
032 074 079
066 078 079 083
029 068
120
CONTINENTAL EDISON
CROSLEY
CROWN
CTC CLATRONIC
DAEWOO
DECCA
DEGRAAF
DIXI
DRYNATRON
DUAL
DUAL-TEC
DUMONT
DUMONT-FINLUX
ELBE
ELBIT
ELCIT
ELMAN
ELTA
EMERSON
ERRES
EUROPHON
FERGUSON
FIDELITY
FINLANDIA
FINLUX
FISHER
FORGESTONE
FORMENTI-PHOENIX
FORTRESS
GBC
GEC
GELOSO
GENEXXA
GOLDSTAR
COODMANS
GORENJE
GRAETZ
GRANADA
GRUNDIG
HANSEATIC
HANTAREX
HEMMERMANN
HIFIVOX
HINARI
HITACHI
118 123 131
HYPER
IMPERIAL
INGELEN
INNO UIT
INTER
INTERFUNK
IRRADIO
ITT-NOKIA
JVC
JAISUI
KENNEDY
KÖRTING
KRIESLER
KTV
LENOIR
LOEWE OPTA
LOGIK
LUMA
LUXOR
MAGNADYNE
MAGNAFON
MARANTZ
MATSUI
McMICHAEL
MEMOREX
METZ
MINERVA
MISTRAL
MITSUBISHI
MIVAR
MULTITECH
MURPHY
NAONIS
NATIONAL
NEC
NECKERMANN
NEI
NIKKAI
NOBLIKO
NOGAMATIC
NOKIA
NORDMENDE
ONCEANIC
ONCEAS
OPTONICA
ORION
OSAKI
OSCME
OTTO VERSAND
P.T. ACTRON
PAEL
PANASONIC
PATHE’ CINEMA
PATHE’ MARCONI
PERDIO
PHILCO
PHILIPS
007 016 020 043
013 039 062
102
026
091 095 107 132
029 060 066 073 084
012 075
037 133
037
029 053
023 029 112
026 039 050 096
010 026 036 044 052 062 071 097
074
066
026 027 039 062 099 112
026 112
133
004 039
037 067
026 027 029 040 073 112
018 042 046 050 061 074 104
029 104
075
010 026 036 044 050 052 062 071 096 097 109 134
032 039 041 062 128
104
029 062 068 098
129
017 062 112
029 060 062 073 114 131
017 062 112 114 133
076
003 029 037 100 133 138
009 037 060
007 128
001 052 062 089 090 101 105 108 114
009 029 037 051 060 067 073 098 114
031 050 051 059 070 072 111
009 029 037 062 064 068
027
099
007 016 020 043
004 009 025 133
009 010 012 029 043 048 062 064 065 080 081 112 114
029
013 093 109 112 128
001 051 062 089 090 101 105 108 114
027 029 133
078
037 039 043 051 062 067 090 101 105 123
017 133
001 051 055 062 089 090 101 105 108 114 115 117 132
009 113 116
076
045 062
039 068
029 037 039 045 067 104 106
029
029
027 037 039 073
084 104
037 086 114
051 064 075 081 086 090 105 115 117 126
026 027 039 062 073 099 112
026 027 029 040 073
037
004 029 058 060 084 087 114 121 133
131
113
030 039 072
031 050 051 072
104
009 011 003 039 063 084 085 110 124
027 029 073
026 029 073 128
114
023 045 065 114
019 062
009 119
029 039 064 086 121 128
037 079
060 076
026 029 050
007 016 020 043
001 051 062 089 090 101 105 108 114
007 016 020 043 123
062 090
029
129
002 004 030 084 087 099 130 133
060
120
009 037 062 064
066
029
008 019 022 057 062 088
029 068 074 112
007 016 020 043
060
008 013 039 062 093 109 112 128
029 037 039 045 067 104 106 131
I
Appendix
PHOENIX
PHONOLA
PIONEER
PRANDONI-PRINCE
PREMIER
PRINCE
PROTECH
PYE
QUASAR
QUELLE
RADIOLA
RADIOMARELLI
RANK
RBM
REDIFFUSION
REX
ROADSTAR
ROBOTRON
RTF
SABA
SAISHO
SALORA
SAMBERS
SAMPO
SAMSUNG
SANYO
SBR
SCHAUB LORENZ
SCHNEIDER
SEG
SEI
SELECO
SHARP
SIAREM
SICATEL
SIEMENS
SIERA
SINGER
SINUDYNE
SONOKO
SONY
STERN
TANDY
TASHIKO
TATUNG
TEC
TELEAVIA
TELEFUNKEN
TELETECH
TELEVIDEON
TENSAI
THOMSON
THORN
THORN-FERGUSON
TOSHIBA
TRANS CONTINENS
TRIUMPH
UHER
ULTRAVOX
UNIVERSUM
UNIVOX
VEGAVOX
VESTEL
VICTOR
VOXSON
WATSON
WATT RADIO
WEGA
WHITE WESTINGHOUSE
YOKO
ZANUSSI
ZOPPAS
Producer
AIWA
AKAI
ALBA
AMSTRAD
ARC EN CIEL
ARISTONA
ASA
BAIRD
BLAUPUNKT
BRANDT ELECTRONIQUE
BUSH
CGE
CONTINENTAL EDISON
CRAIG
CURTISMATHES
DAEWOO
DECCA
DEGRAAF
DUAL
DUMONT
DYNATECH
ELBE
EMERSON
FERGUSON
FIDELITY
FINLADIA
FINLUX
FISHER
II
029 062 058 098
029 037 039 045 067 104 106
037 043 123
027 073 114
093
027 114
037
029 037 039 045 067 104 106
026 027 040
013 014 021 028 029 031 037 044 050 051 052 068 070
071 072 084 090 096 097 101
029 037 039 045 067 104 106
026 027 039 062 063 099 112
097
097
034 063 090 114
023 045 053 065 114
017
032 039
032 039
007 016 020 027 039 043 073 086 123
004 029 047 084 085 087 133
064 081 086 089 090 098 101 115 117 126
026 027 040 073
088
029 128 133
001 009 024 032 060 071 084 094 117 120 128
037 067 104 131
001 051 062 089 090 101 105 108 114
023 029 037 039 041 045 053 062 067 069 098 103 104
106 112
026
004 030
023 045 053 065 114
009 120 129
026 027 039 062 073
074
012 013 014 028 031 056 068 072 120
029 037 039 045 067 104 106
026 039 062
004 026 030 039 062 099
037 133
006 009 015 084
023 045 065 114
029 054 060 076 129
009
029 060 066 073 084
023 029 112
007 016 020 043 123
007 013 018 021 038 043 046 123 127
133
029 062 068 098
037
007 016 020 043 123
061 104
018 042 046 050 061 074 104
009 082 092 097
027 114
004
041 068 098
026 029 039 062 086
003 010
074
109
079
116
039 114
068
026 029 040 062 074 099
009
029 068
029
023 045 065 114
023 045 065 114
VCR
Code
024 028
018 026 028 044 063
019
024
028 063
031 064
036 037
028
002 017 059 064
028 063
019
024 028 063
028 063
006
039 040
007 041
024 028
009 011 024 031 036
028 063
009 024 036
024
023
008 021 024 039 040 047
028 057 058 063 065 070
024
009 036
009 011 024 036
006 009 022
FUNAI
GE
GOLDSTAR
GOODMANS
GRAETZ
GRANADA
GRUNDIG
HARMAN-KARDON
HIFIVOX
HINARI
HITACHI
IMPERIAL
INGELEN
INGERSOL
ITT
ITT-NOKIA
JENSEN
JVC
KENWOOD
KRIESLER
LLOYD
LOEWE OPTA
LOGIK
LXI
MAGNAVOX
MARANTZ
MATSUI
MEMOREX
METZ
MGA
MINERVA
MINOLTA
MITUSBISHI
MTC
MULTITECH
MURPHY
NAONIS
NEC
NECKERMANN
NOGAMATIC
NOKIA
NORDMENDE
NORDMENDS
OPTONICA
ORION
OSAKI
PANASONIC
PATHE’ MARCONI
PENTAX
PERDIO
PHILIPS
PHONOLA
PIONEER
PROLINE
PYE
QUELLE
RADIOLA
RCA
REALISTIC
REX
SABA
SAISHO
SALORA
SAMSUNG
SANAUI
SANYO
SBR
SCHAUB LORENZ
SCHNEIDER
SEG
SEI-SINUDYNE
SELECO
SHARP
SHINTOM
SIEMENS
SIERA
SINUDYNE
SONY
STERN
STS
SUNKAI
SYLVANIA
SYMPHONIC
TASHIKO
TATUNG
TEAC
TEKNIKA
TELEAVIA
TELEFUNKEN
TENOSAL
THOMSON
THORN
THORN-FERGUSON
TOSHIBA
UHER
VECTOR RESERACH
VICTOR
WARDS
YAMAUA
ZANUSSI
ZENDER
ZOOPAS
024
039 040
010 037
019 024 032
028 063
009 036
001 002 003 036 059 064
010
028 063
008 019 046 052
011 024 028 048 050
024 066
028 063
052
028
028 063
028
004 005 028 029 058 063
028 029
031 064
024
036 056 064
019 052
037
039 040
010 032 036 064
021 047 052
006 009 024 031 037
002 064
035
002 059
011
029 035 050
024
019 024
024
028 063
010 023 028 029 063
008 028 063
028 063
009 028 063
001 005 012 013 014 028 063
004
031 032
008 020 021 047 052
024 037
045 061 062
028 063
011
024
027 031 032 036 053 056 064
031 036 056 064
029
024
031 036 056 064
002 008 030
031 064
039 040
006 009 024 031 032
004 028 063
004 005 013 014 028 063
008 021 047 052 060
035
038 039 040 042 043 066
028 029
006 009 025 047
036 053 056
028 063
019 024 031 064 056
066
052
028 063
031 032 049
019
002 059 064
031 064
052
030 033 034 051 055
028 063
011
047
024 035
024 035
024
024 028
024 028
024
028 063
005 015 016 028 063
019
012 028 063
028 058 063
013 014 028 057 058 063 065 070
007 028 035 054 063
028 066
010
028 029
039 040
010 028
028 063
063
028
Version 1.0
+12 -12
-11
-10
-9
-8
-7
-6
-5
-4
-3
-2
-1
GMT
+1
+2
+3
+4
+5
+6
+7
+8
+9
+10
Zeitzonen
-3
-4
-10
+7
-9
-7
+10
+9
12.2 Time table
Version 1.0
+11
+11
+5
+1
+3
-8
+4
-10
-6
+1
-3.30
-5
+8
+2
+6
+3.30
+4.30
+8
+5.30 +6.30
+1
+4
+7
+3
-5
-4
+2
-3
+8
+9.30
+10
23h
Mitternacht
1h
2h
3h
4h
5h
6h
7h
8h
9h
10h
11h
12h
13h
14h
15h
16h
17h
18h
19h
20h
21h
22h
III
Appendix
Zeitzohnen
Landeszeit
Gebiete mit Sommerzeit
17h Ortszeit der jeweiligen Zeitzohne bezogen auf 12h GMT
+7 Zeitunterschied gegenüber GMT in Stunden
Appendix
12.3 Technical specification
TUNER
IF Input frequency
IF Loop through output
IF Bandwidth
920...2150 MHz
920...2150 MHz
8/55 MHz, automat.switching
acc. to symbol rate
Input impedance
75 ohms
Input signal level
- 65 dbm...- 25 dbm
LNB Polarization swiching voltage 13/18 V DC @ max 400 mA, Short
Circuit Protection
Band switching
22 kHz Tone
I/Q Output
Unbalanced Output,
Controlled by AGC Input
FRONT-END DEMODULATOR
Demodulation capacity
Symbol rate
Viterbi decoding rate
Reed solomon decoding
TRANSPORT DEMULTIPLEXER
Demultiplex
max. input stream
PID Handling capability
SI Filtering
QPSK Demodulation
2 ~ 35 Msps (SCPC, MCPC)
1/2, 2/3, 3/4, 5/6, 7/8, 8/9
FEC : 204, 188, t = 8
According to ISO/IEC 13818-1
60 MHz (serial) / 7,5 MHz (parallel)
32 PID
According to DVB-SI
spec (ETS 300 468)
VIDEO DECODING PARAMETERS
Video decoding
ISO/IEC 13818-2 MP@ML
Aspect ratio
4:3, 16:9, Pan&Scan, LetterBox
Resolution
max. 720 x 576
AUDIO DECODING PARAMETERS
Audio decoding
ISO/IEC 13818-3
Layer I & II
Operating mode
Mono, Dual, Stereo, Joint Stereo
Sampling frequency
32, 44.1, 48 kHz
FRONT PANEL
4 digits LED Display
3 Buttons
IR Sensor
PCMCIA Slots
REAR PANEL
Digital IF-Input
Digital IF-Output (Loop-through)
Audio Output
Audio Data Service Port
3 Scart Output
SAT
IR Sensor
Power Cord
VCR, TV SCART OUTPUT
Video Output Impedance
Video Output Level
Audio Output Impedance
Audio Output Level
Channel Numbers Display
Power, Down, Up
38 kHz
2
F-Female Type
F-Female Type
2 RCA (Phono)
9 Pin D-Type Male
1 TV, 1 VCR, 1 Analogue
38 kHz
Europe Flexible Cord
75 ohms
1,0 Vpp by 75 ohms
600 ohms unbalanced
3,0 Vpp with Volume Control
REMOTE CONTROL UNIT (UNIVERSAL)
Universal Remote Control
IR (Carrier Freq. 38 kHz)
for Digital-Sat, Analog-Sat,
TV, VCR
Battery
2 x 1.5 V AA
26 Keys
Power, 0...9, Audio, Mute,
Info, Up, Down, Left,
Right,Menu/Select, Exit,
Guide, Fav, Last, Radio, A/D,
VCR out
MICROPROCESSOR AND MAIN MEMORIES
Microprocessor type
MC 68340-25 (25 MHz)
Processing rate
4.7 MIPS
Flash ROM (for program memory) 1 Mbytes (512 K x 16)
DRAM
4 Mbytes (1 M x 16 x 2)
Flash ROM (for data memory)
256 Kbytes (256 K x 8)
DATA SERVICE PORT
Connector
Protocol
Data rate
9 Pin D-Female Type
RS-232 Asynch
max. 19200 bps
GENERAL DATA
Input power voltage
Power consumption
Dimension
Weight
Operation temperature
AC 230 V, 50 Hz
max. 35 Watts
337 x 240 x 69 mm
2,5 kg
0...40 Deg.
IV
Version 1.0