1
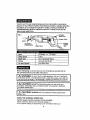
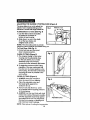
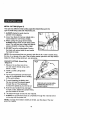
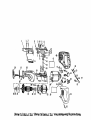
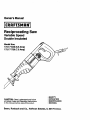
Owner's Manual
Reciprocating
Saw
Variable Speed
Double Insulated
Model Nos.
172.171040 (6.5 Amp)
172.171720 (7.5 Amp)
CAUTION: Read, understand and follow
all Safety Rules and Operating Instructions
in this manual before using this product.
•
•
•
•
SAFETY
OPERATION
MAINTENANCE
ESPAI_IO L
Sears, Roebuck and Co., Hoffman Estates, IL 60179 U.S.A.
Warranty. ....................................................
Safety Instructions .....................................
Safety Symbols ..........................................
Description .................................................
Operation ...................................................
Page
Pages
Page
Page
Pages
2
3-7
7
8
8- 11
Maintenance ..............................................
Accessories ...............................................
Service Numbers .......................................
Pages
Page
Pages
12-13
13
14-16
FULL ONE YEAR WARRANTY ON CRAFTSMAN
RECIPROCATING
SAW
If this CRAFTSMAN Reciprocating Saw fails to give complete satisfaction
within one year from the date of purchase, RETURN IT TO THE NEAREST
SEARS STORE IN THE UNITED STATES, and Sears will replace it, free
of charge. If this CRAFTSMAN Reciprocating Saw is used for commercial
or rental purposes, this warranty applies for only 90 days from the date
of purchase.
This warranty gives you specific legal rights, and you may also have other
rights which vary from state to state.
Sears, Roebuck and Co., Dept. 817 WA, Hoffrnan Estates, IL 60179
SAVE THESE INSTRUCTIONS!
READ ALL INSTRUCTIONS!
Failure to follow all instructions
listed below may result in electric
I shock,
_ WARNING:
BE SURE
to read Injury.
and understand all instructions.
fire and/or serious
personal
WORK AREA SAFETY
1. ALWAYS keep your work area clean and well lit. Cluttered benches and
dark areas invite accidents.
2. DO NOT operate power tools In explosive atmospheres, such as in the
presence of flammable liquids, gases, or dust. Power tools create sparks
which may ignite the dust or fumes.
3. ALWAYS keep bystanders, children, and visitors away while operating a
power tool. Distractions can cause you to lose control.
ELECTRICAL
SAFETY
f. Double insulated tools are equipped with a polarized plug
wider than the other.) This plug will fit in a polarized outlet
If the plug does not fit fully in the outlet, reverse the plug.
not fit, contact a qualified electrician to Install a polarized
Do not change the plug in any way.
(one blade is
only one way.
If it still does
outlet.
2. Double insulation [] eliminates the need for the three wire grounded power
cord and grounded power supply system. Applicable only to Class II
(double insulated) tools.
3. Before plugging in the tool, BE SURE that the outlet voltage supplied is
within the voltage marked on the tool's data plate. DO NOT use "AC only"
rated tools with a DC power supply.
4. ALWAYS avoid body contact with grounded surfaces, such as pipes,
radiators, ranges and refrigerators. There is an increased risk of electric
shock if your body is grounded.
5. If operating the power tool In damp locations Is unavoidable,
ALWAYS use a Ground Fault Circuit Interrupter to supply power to
your tool. ALWAYS wear electrician's rubber gloves and footwear
in damp conditions.
6. DO NOT expose power tools to rain or wet conditions. Water entering
a power tool will increase the risk of electric shock.
7. DO NOT abuse the cord. NEVER use the cord to carry the tools or pull
the plug from the outlet. Keep cord away from heat, oil, sharp edges or
moving parts. Replace damaged cords immediately. Damaged cords
increase the risk of electric shock.
3
ELECTRICAL
SAFETY cont.
8. When operating a power tool outside, ALWAYS use an outdoor extension
cord marked "W-A" or 'W." These cords are rated for outdoor use and
reduce the risk of electric shock.
NOTE: The extension cord must have adequate wire size AWG (American Wire
Gauge) for safe, efficient use. Smaller gauge wires, have greater capacity
(16 gauge wire has more capacity than 18 gauge wire).
Minimum Gauge for Extention Cords (AWG)
Volts
Total Length of Cord in Feet
025 ft.
120V
Ampere Rating
More than
Not more than
More than
Not more than
0
6
6
10
26 50 ft.
51 100 ft.
101 150 ft.
AWG
AWG
AWG
AWG
18
16
16
14
18
16
14
12
More then 10
Not more than 12
16
16
14
12
More than 12
Not more than 16
14
12
PERSONAL
Not Recommended
SAFETY
1. ALWAYS stay alert, watch what you are doing and use common sense
when operating a power tool. DO NOT use tool while tired or under the
influence of drugs, alcohol, or medication. A moment of inattention while
operating power tools may result in serious personal injury.
2. ALWAYS dress properly. DO NOT wear loose clothing or jewelry. Pull
back long hair. Keep your hair, clothing, and gloves away from moving
parts. Loose clothes, jewelry, or long hair can be caught in moving parts.
3. ALWAYS avoid accidental starting. BE SURE switch is "Off" before
plugging in. Carrying tools with your finger on the switch or plugging in tools
that have the switch in the "On" position invites accidents.
4. ALWAYS remove adjusting keys or wrenches before turning the tool on.
A wrench or a key that is left attached to a rotating part of the tool may result
in personal injury.
5. DO NOT overreach. ALWAYS keep proper footing and balance at all
times. Proper footing and balance enables better control of the tool in
unexpected situations.
6. ALWAYS use safety equipment. Always wear eye protection.
Dust mask, non-skid safety shoes, hard hat, or hearing protection must be
used for appropriate conditions
4
TOOL USE AND CARE SAFETY
1. ALWAYS use clamps or other practical ways to secure and support the
workpiece to a stable platform. Holding the work by hand or against your
body is unstable and may lead to loss of control.
2. DO NOT force tool. Use the correct tool and blade for your application.
The correct tool and blade will do the job better and safer at the rate for
which it is designed.
3. DO NOT use tool if switch does not turn it "On" or "Off". Any tool that
cannot be controlled with the switch is dangerous and must be repaired.
4. ALWAYS disconnect the plug from the power source before making any
adjustments, changing accessories, or storing the tool. Such preventive
safety measures reduce the risk of starting the tool accidentally.
5. ALWAYS store idle tools out of reach of children and other untrained
persons.Tools are dangerous in the hands of untrained users.
6. ALWAYS maintain tools with care. Keep cutting tools sharp and clean.
Properly maintained tools with sharp cutting edges are less likely to bind
and are easier to control.
7. ALWAYS check for misallgnment
or binding of moving parts, breakage
of parts, and any other condition that may affect the tool's operation.
If damaged, have the tool serviced before using. Many accidents are
caused by poorly maintained tools.
RECOMMENDED
FOR USE WITH THIS TOOL MAY CREATE
I AAk
WARNING:CONDITION.
USE OF ACCESSORIES THAT ARE NOT
HAZARDOUS
8. ALWAYS use only accessories that are recommended for this tool.
Accessories that may be suitable for one tool can become hazardous
when used on another tool.
SERVICE SAFETY
1. Tool service MUST BE performed only at a Sears Service Center.
Service or maintenance performed by unqualified personnel
could result in a risk of injury.
2. When servicing a tool, ALWAYS use only Identical replacement parts.
Follow Instructions in the Maintenance section of this manual. Use of
unauthorized parts or failure to follow Maintenance instructions may create
a risk of electric shock or injury.
ADDITIONAL
SPECIFIC SAFETY RULES
1. Know your power tool. Read operator's manual carefully. Learn the
applications and limitations, as well as the specific potential hazards
related to this tool. Following this rule will reduce the risk of electric shock,
fire or serious injury.
2. ALWAYS hold tool by insulated gripping surfaces when performing an
operation where the cutting tool may contact hidden wiring or its own
cord. Contact with a 'live" wire will make the exposed metal parts of the tool
"live" and shock the operator.
3. ALWAYS keep your hands away from cutting area. DO NOT reach under
the material being cut because the nearness of the blade to your hand is
hidden from your sight.
4. DO NOT use dull or damaged
or cause kickback,
blades. Bent blades can break easily,
5. ALWAYS wear safety glasses or eye shields when using this saw.
ALWAYS wear a dust mask or respirator for applications which
generate dust.
6. ALWAYS protect your lungs. Wear a face mask or dust mask if the
operation is dusty. Following this rule will reduce the risk of serious
personal injury.
7. ALWAYS protect your hearing. Wear hearing protection during extended
periods of operation. Following this rule will reduce the risk of serious
personal injury.
8. ALWAYS inspect and remove all nails from lumber before sawing.
Following this rule will reduce the risk of sedous personal injury.
9. SAVE THESE INSTRUCTIONS. Refer to them frequently and use them to
instruct others who may use this tool. If someone borrows this tool,
make sure they have these instructions also.
ADDITIONAL
SPECIFICSAFETYRULEScont.
/t_ WARNING: Some dust particles created by power sanding,
sawing, grinding, drilling and other construction jobs contain
chemicals known to cause cancer, birth defects or other reproductive
harm. Some examples of these chemicals are:
• Lead from lead-based paints,
, Crystalline silica from bricks and cement and other masonry products.
• Arsenic and chromium from chemically-treated lumber.
Your risk from these exposures varies, depending upon how often you do this
type of work. To reduce your exposure to these chemicals:
• Work in a well-ventilated area.
• Work with approved safety equipment, such as those dust
masks that are specially designed to filter out microscopic
particles.
Z_ WARNING:
The operation of any saw can
result in foreign objects being thrown into your eyes,
which can result in severe eye damage. Before
beginning power tool operation, ALWAYS wear
safety goggles or safety glasses with side shield
and a full face shield when needed. We recommend
a Wide Vision Safety Mask for use over eyeglasses
or standard safety glasses with side shield, both available
at Sears Retail Stores.
The label on your tool may include the following symbols.
V ...........................................................................
Volts
A...........................................................................
Hz .........................................................................
W ..........................................................................
rain .......................................................................
Amperes
Hertz
Watts
Minutes
_-' ........................................................................
....
...................................................................
Alternating current
Direct current
no ........................................................................
[] ........................................................................
.../min ...................................................................
No-load speed
Class II construction
Revolutions or
reciprocation per minute
Indicates danger, warning
caution. It means attention!!!
Your safety is involved.
/_k ......................................................................
IMPORTANT! READ ALL INSTRUCTIONS
7
Your 6.5 and 7.5-amp reciprocating saws have many built-in convenience
features for fast, efficient cutting. These features include a variable speed dial
that allows you to change the speeds for cutting a variety of materials. An
adjustable/pivoting shoe for maximum control in a variety of cuts and an
easy-to-grip rubber boot.
Rg. 1
_Variable
I tl
B,a o
_5_(_-_t_O
e
-- .---TriggerSwitch
R_ubberBoot
_Ha;dle
Input
Blade Stroke
6.5 Amps
11/8 in.
BladeType
Rating
No-loadSpeeds
I/2 in. Universal Shank
or 7.5 Amps
120 volts, 60 Hz AC
0 to 2400 SPM
Before attempting to use any tool, be sure to familiarize yourself with all
the operating features and safety instructions.
Z_ WARNING: IF ANY PARTS ARE MISSING, DO NOT OPERATE
THIS SAW UNTIL THE MISSING PARTS ARE REPLACED. FAILURE TO
DO SO COULD RESULT IN POSSIBLE SERIOUS PERSONAL INJURY,
Z_ CAUTION:
DO NOT let familiarity with your saw make you
careless. Remember that a careless fraction of a second is sufficient
to cause severe injury.
/_
CAUTION:
ALWAYS wear eye protection while operating this
power tool.
USING THE VARIABLE
SPEED DIAL
Variable speed provides increased cutting versatility.
Simply rotate the dial from the slowest setting (1)
to the highest setting (6) depending upon the material being cut.
8
I
I
Choosing the Correct Speed
The speed you use will depend on the type of materials that you are cutting:
1. Use high speeds for cutting wood.
2. Medium speed is best for non-ferrous materials.
3. Low speed is recommended for cutting metal.
NOTE-Material thickness and blade selection will also affect your speed
selection. As a general rule, as the material thickness increases, the speed
should be slower.
increase speed once the cut is started. Prolonged use at a very slow
i speed
Ak CAUTION:
veryslowspeedwhen beginninga Cut.Then
may damage usa
yourasew.
BLADE INSTALLATION
AND REMOVAL
This saw is designed to use all 1/2-in. universal shank blades.
plug from power source BEFORE assembling parts, making adjustments
I or_changing
WARNING:
blades. To prevent personal injury, ALWAYS disconnect the
Installing the Blade (Figure 2)
1. Unplug the saw.
2. Loosen blade clamp screw with
Allen wrench (included).
NOTE: DO NOT completely remove
the blade clamp screw. Just loosen
it enough to allow the blade to fit
between the blade clamp and the
reciprocating shaft.
3. Insert blade through the shoe
and line it up between the blade
clamp and the reciprocating shaft,
4. Insert the blade far enough in so that
the hole in the blade is positioned
over the "bump' or "stationary pin'.
Tighten screw with wrench.
NOTE: If the blade should break off and
the shank does not come out of the clamp,
loosen the screw. Then use a nail or other
pointed object to pry the blade shank off
of the "bump'or "stationary pin'.
Removing the Blade (Figure 3)
1. See Steps 1 and 2 in Installing the Blade above.
2. When screw is clear of the blade, pull blade shank
out of opening in blade clamp.
9
ADJUSTING
THE SLIDING/PIVOTING
SHOE (Figure 4)
The shoe slides in or out to adjust the
depth of cut to material being cut for
maximum control and _onger blade _ita.
To Slide Shoe In or Out: (See Fig. 4)
1. Use the Allen wrench (included)
to loosen the 2 screws on
bottom of saw housing.
2. Slide shoe in or out to the depth
of cut that you desire and
retighten both screws.
NOTE: The shoe also pivots to provide
maximum control against the surface being cut.
To Pivot Shoe: (See Fig. 4)
1. Firmly hold saw and then pivot
shoe to desired position.
FLUSH CUTTING (Figure 5)
1. The compact design of the motor
housing and the adjustable shoe
on this saw allows you to make
extremely close cuts in floors,
comets and other extremely tight areas.
2. To obtain the maximum flush cutting
capability of this saw, make sure that
the shoe is in its closest position to the
saw housing. And the teeth of the blade
are facing as close as possible to the
work sudace,
WOOD CUTTING (Figure 6)
1. ALWAYS clamp the workpiece
down to prevent it from slipping.
2. P_ace the adjustable shoe and
the blade lightly against the
surface to be cut,
3. Turn on saw and allow it to come
to full speed before applying pressure
to the workpiece.
4. ALWAYS hold the saw firmly with both
hands while cutting. Whenever possible,
hold the adjustable shoe firmly against
the material to be cut. This will prevent
the saw from jumping or vibrating and
help minimize blade breakage.
Fig. 6
NOTE: Wear gloves if cutting for long periods.
10
METAL CUTTING (Figure 7)
This saw has different metal cutting capacities depending upon the
type of blade being used and metal being cut.
1. ALWAYS clamp the work down to
prevent it from slipping.
2. Use a finer blade for ferrous metals and a
coarse blade for non-ferrous metals,
3. When cutting thin gauge sheet metals.
ALWAYS clamp wood on both sides of the
sheet. This will give you a clean cut without
excess vibration or tearing of the metal.
4. DO NOT force the cutting blade, Forcing
the blade will reduce blade life and cause
the blade to break.
NOTE: We recommend that you spread a thin film of oil or other coolant along
the line of cut ahead of the saw. This will allow easier operation and help extend
blade life. When cutting aluminum, use kerosene,
POCKET CUTTING: Wood Only
(Figure 8)
1. Measure the surface area to be
cut and mark it clearly using a pen,
pencil or chalk.
I I_P_.._";_
,_
J
/
i*
2. Install a pocket cutting blade
into saw.
3. Tip the saw backwards until the back
edge of the adjustable shoe is resting
on the work surface.
4. To avoid
the saw
to begin
increase
breaking the blade, start
and use the slowest speed
the cut. Then gradually
the speed as you start to out.
Rod( tool up to normal cutting
positionafter bladehas cut
throughmaterial,
5. Hold the saw handle firmly and begin
to make a slow, deliberate upward swing
with the handle of the saw.
6. The blade will begin to feed into the material.
7. ALWAYS be sure that the blade is completely through the material before
continuing with the pocket cut.
NOTE: in areas where blade visibility is limited, use the edge of the saw
guard as a guide.
11
SERVICE
personnel may result in misplacing of internal wires and components,
I which
A_ WARNING:
maintenance performed by unauthorized
could cause Preventive
a serious hazard.
I
1. Tool service MUST BE performed only by a Sears Service Center.
Service or maintenance performed by unqualified personnel could result
In a risk of injury.
IMPORTANT NOTE: All service that requires opening the saw should only be
performed at a Sears Service Center.
2. When servicing a tool, ALWAYS use only identical replacement parts. Follow
instructions in the Maintenance Section of this manual. Use of unauthorized
parts or failure to follow Maintenance Instructions may create a risk of electric
shock or injury.
TOOL LUBRICATION
Your CRAFTSMAN Reciprocating Saw has been properly lubricated
and is ready to use.
1. In two to six months, depending on use, take your tool to the nearest Sears
Service Center for a complete cleaning, inspection and lubrication.
2. Tools used constantly on production jobs will need lubrication more often.
3. Tools that haven't been used for long periods of time should
be lubricated before you use them.
WHEN SERVICING,
USE ONLY IDENTICAL
REPLACEMENT
PARTS
tool from the power source BEFORE cleaning or performing any
To avoid accidents, ALWAYS disconnect the
I maintenance.
_ WARNING:
1. Only the parts shown on pages 14-15 are intended to be repaired or
replaced by the customer. All other parts represent an important part
of the double insulation system and should only be serviced at a
Sears Service Center.
12
CLEANING
I from
Ak WARNING:
To avoid
accidents,
ALWAYS
disconnect
tool
the power source
BEFORE
cleaning
or performing
any the
maintenance.
to the plasUc parts. These include gasoline, carbon tetrachloride.
cleaningCertain
solvents,
ammonia
and household
detergents
I chlorinated
_ contain
CAUTION:
cleaning
agents
and solvents
cause damage
that
ammonia.
1. Use a clean cloth to remove dirt, carbon dust, etc.
2. Electric tools are subject to accelerated wear and possible premature failure
when they are used to work on fiber glass boats, sports cars, etc. The fiber
glass chips and grindings are highly abrasive to electrical tool parts, such as
bearings, brushes, commutators, etc. Consequently, it is not recommended
that this tool be used for extended work on fiber glass. During any use on
fiber glass, it is extremely important that the tool is cleaned frequently with
compressed air.
I with
_ WARNING:
ALWAYS wear safety goggles when cleaning tools
compressed air.
I
I
IMPORTANT:
To assure product SAFETY and RELIABILITY, repairs, maintenance
adjustment MUST be performed by a Sears Service Center.
The following recommended
your local Sears Store.
accessories
and
are currently available at
BLADES
Sears has a large selection of reciprocating saw blades in a variety of lengths
and teeth per inch that are ideal for a wide variety of cutting needs, Choose
blades for cutting wood only, blades for metal cutting only and general-purpose
blades that cut wood or metal.
EXTENSION
CORDS
Sears offers a large selection of extension cords that help extend your
working range.
I recommended
Z_ WARNING:
use of attachments or accessories that are not
mightThe
be dangerous.
13
I
Reciprocating
Saw-ModelNo. 172.171040(6.5Amp),172.171720(7.5Amp)
The Model Number willbe found on the Nameplate. Always mention the Model No. in all correspondanceregardingyour tool
,Jk
No.
1
2
3
4
5
Part No.
B09.0.05.1
W57.56.0
W57.36.0
W57.57,0
B09.0.09
Delmdptlon
Cover
Screw Set
Screw Set
Screw Set
Bracket
Quantity
1
2
4
2
1
No.
29
30
31
32
33
Pert No.
W57,04.0
W61.52.0
W50.03.3
B09.0.08
TB51.03.01
Description
Quantity
Screw
2
Loop
1
Ball Beedng
1
BearingPressPlate
1
Rotor
1
6
7
8
9
10
11
12
13
14
15
16
17
W57.02.0
B08.3.53
W51.52.0
B09.0.12
T15.02.00
W07,02
B09.2.01
B09.0.11
T14,03.01
B09.1.01
B09.1.02
TB01,01
Screw
Blade Clamp
Roller Pin
Gasket
Seal
Sliding Beadng
RedprocalingShaft
Yoke Plate
Washer
Roller Beadng
Small Shaft
Gear
1
1
1
1
1
1
1
1
1
1
1
1
34
35
36
37
38
39
40
41
42
43
44
45
W50.11.3
T05.02.05
W55.70.0
B00.0.07.1
TB50.03.01
B09.0.15.1
B09.0.01.1
T02.11.00
W55.06.0
T03.09.00
T04.01.01
W02.23
Ball Bearing
Beedng Sleeve
Screw
Fan Baffle
Stator
IdentificationI.abel
Shell
Brush
Screw
Brush Holder
Brush Spdng
Switch
1
1
2
1
1
1
1
2
4
2
2
1
18
19
20
21
22
23
W50.03.0
TB02.01
TA05.04
W50.12.0
T14.01.03
W57,36.0
Bell Bearing
Spindle
Loop
Ball Beadng
Press Plate
Screw Set
1
1
1
1
1
1
46
47
48
49
50
51
W02,24
B09.0.14.1
B09.0.03.1
T08.01.07
W55.58.0
T05.01,06
Speed Adiuster
Nameplate
Right Handle
Cord Clamp
Screw
Cord Protector
1
1
1
1
2
1
24
25
26
27
28
B09.0.06
W55.76.0
B09.0.04.1
B09.0.13
B09.3.00
Gear Case
Screw
Rubber Sleeve
Framework
Baffle Plate
1
4
1
1
1
52
53
54
55
W01.32.21
W05.09
B09.0,02.1
W55,75.1
Cord and Plug
Wrench
Left Handle
Screw
1
1
1
8
SEE BACK PAGEFOR PARTS ORDERING INSTRUCTIONS
27
(dtuv g'Z) 0eL LZL'_/- L '(dtuv S'9) 0t_0LLL'¢/- L "SONIOpOl/_-MeS6up,eooad!ooEI
"%iiii!i!i_iiii!
Your Home
:::;:::::::::2
::::::::
For repair in your home of all major brand appliances,
lawn and garden equipment, or heating and cooling systems,
no matter who made it, no matter who sold itl
For the replacement parts, accessories and
owner's manuals that you need to do-it-yourself.
:::::::::;:;::::
;:::::::::::::
::::::::
i!iiiiiiii ! !
For Sears professional installation of home appliances
and items like garage door openers and water heaters.
1-800-4-MY-HOME
=_
(1-800-469-4663)
Anytime, day or night
(U.S.A. and Canada)
www,sesrs,com
www.sears.ca
::::::,:,:
:?::::::
:::::::::::;:::
::,::,:+:<
::_::::::
_:::::::
::: :+:,:.:
Our Home
::::::_::::::::
::::::::
._.:.:+:.x
::::,::+:
::::::,:
:::::,::
:;::::::
:_:_:::::::::::_
For repair of carry-in products like vacuums, lawn equipment,
and electronics, call or go on-line for the nearest
Sears Parts and Repair Center.
1-800-488-1222
Anytirne,
day or night (U.S.A. only)
www.sears.com
::::_:_:_::::::
:_:_;???::
:_:_::::::
To purchase a protection agreement (U,S.A.) or maintenance
agreement (Canada) on a product serviced by Sears:
::::_:_:_:_'_'
:::
:::::::::::::
1-800-827 -6655 (U.SJ_)
1-800-361 - 6665 (C_ada)
I;EE:I
::::::::
:::;.:::
::::::::::q:
...............Para pedir servicio de reparaci6n
:I:_:E_:I:I:
...............a domicili O, y para ordenar piezas
:::::::
1-888-SU-HOGAR su
::::::::::::
;;::::::
::::::::::;::
Au Canada pour service an f_s:
1-800*LE FOYER _c
(1-8_533_937)
::::::::::::;;
;:::::::::
:::::::h
©Sears, _
and Co
® Registered
® Ma_¢_
_"_ M_fque
TradeMark
Regislr,_d2,
/ ;_,1_rademark
, _'_ Ma_ca
_Je comll_elce
/ s_ Service
de F hrica
/ _u Marque
! s_ M_
depos_e
de
16
Mark
of Sears,
Ca de
Servlt_
Se;_rs,
Roebuck
Roebuck
o de Sears,
arid
Co
8rid
Roebuck
Co
arid
Co
:::::::::
..............
..........
::::::
:...............
:::::