1
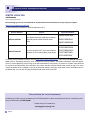
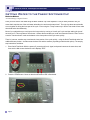
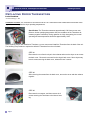
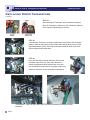
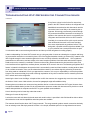
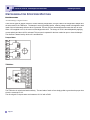
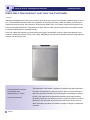
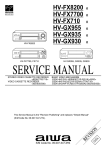
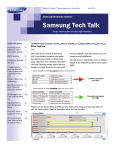
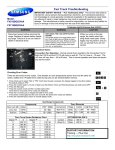
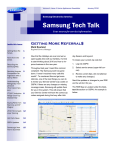
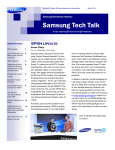
Volume 5, Issue 10 Home Appliances Newsletter October 2011 Samsung Electronics America Samsung Tech Talk Your source for service information First Time Fixes: A Plan to Succeed Inside this issue: First Time Fixes: A Plan to Succeed 1 GSPN Updates 2 Getting Water to the 3 Fabric Softener Cup New: The FX710/510 Gas Ranges 5 Repairing Sealed Systems: 3 Tips for Success 6 Replacing Dryer Thermistors 7 Troubleshooting WiFi Refrigerator Connection Issues 9 Refrigerator Stepper 11 Motors Need Help Diagnosing? Just Ask the Customer 12 2011 RTC Home Appliance Training 14 Wes Sirois Assistant Manager, Triage Lead When it comes to appliance service, multiple trips to customers’ homes are losing propositions. As you know, Samsung, as well as other manufacturers, pay for only one trip per service call, so eliminating extra trips is a key to a business’s profitability. The goal of every service manager, technician, or customer service rep should be to do everything possible to get the job done the first time. Not only will this lead to higher levels of customer satisfaction, it will also lead to higher profits and a successful business. can create a list or flowchart that the reps can follow when speaking with the customers. Many common problems can be identified just by asking the proper questions during the initial call from the customer. Keep all technical bulletins and service tips available where everyone can access them, just in case a customer’s complaint is covered in a bulletin and a repair part is identified. In many instances, a replacement for a suspect part can be brought along on the service call to increase the likelihood of a first time fix. Communication is a major component in the quest for first time fixes. Considering that most people carry a cell phone, it is important to secure more than one phone number when talking with a customer. With an alternate number for most customers, the lines of communication are always open in case the technician or someone else needs to ask a question. Once again, communication is a key. Most customers, if given the opportunity, would prefer to wait a short time if it means that the job can be done in one trip. Nothing diminishes customer satisfaction more than having to reschedule for a part. Using business management software to track fast moving parts can also increase first time fixes by helping technicians build useful truck inventories that are well stocked with commonly used parts. A customer service rep may not be a technical person, but he or she should be prepared to ask the customer some pertinent questions to help pinpoint the service problem with the appliance. Since most of these folks do not have a technical background, the service manager or technicians In conclusion, you can see that taking some extra time to gather information and identifying suspected parts can lead to increased first time fixes, which will lead to increased profits. Volume 5, Issue 10 Home Appliances Newsletter Samsung Tech Talk GSPN Updates Jeff Brutman Senior Staff, Publications We encourage you to use our GSPN site to find the latest service bulletins to aid you with your repairs. http://service.samsungportal.com HA Service Bulletins uploaded to GSPN in September, 2011: Bulletin Number ASC20110912001 ASC20110921001 Subject New damper assembly replacing old damper assembly which caused vibration and/or noise. An overly sensitive “HE” error code detection algorithm on Orca and Big Bang 2 gas dryers. Applicable Models WA5451ANW/XAA, WA5471ABP/XAA WA5471ABW/XAA DV5451AGW/XAA, DV5471AGW/XAA, DV5471AGP/XAA, DV231AGW/XAA To access service bulletins on GSPN, first visit http://service.samsungportal.com. Login using your User ID and Password. Click on “Knowledge” at the top, then “Product Info” in the left column. The Product Information menu will appear. Click on “Service Bulletin (Local) to bring up the Service Bulletins (Local) screen. To search for a bulletin, enter the bulletin number in the Subject field on the left side of the screen, and then click the Search button on the far right. If for some reason the bulletin does not appear, it can still be searched using the “Category” drop-down menus, the Subject field, or the Model field. You can also try using the Search field at the top of the screen. Please Send Us Your Comments! Something you’d like to see in the Samsung Tech Talk Newsletter? If there a topic/issue we haven’t covered that you’d like us to write about, LET US KNOW! Please send your comments to: [email protected] Page 2 Volume 5, Issue 10 Home Appliances Newsletter Samsung Tech Talk Getting Water to the Fabric Softener Cup Nicholas Webert Assistant Manager, Regional Trainer Have you ever tried to view water filling the fabric softener cup of the dispenser? Did you have problems? Are you aware that it requires two of the cold water solenoids to be active at the same time? The only time these two solenoids are on together is during the rinse part of the cycle. Even using the “Temp” button only in Quick Test mode will not make them both active simultaneously. Most of you realized that you could get to the rinse portion by running a “rinse & spin” cycle and just waiting for the softener tray to fill. This only takes a few minutes. Others discovered that you could use instructions from the Fast Track to enter the “fast time down” mode and advance to the rinse portion of the cycle more quickly. There is, however, another way to activate the rinse portion of the cycle quickly – using the Quick Test Mode and a few additional button pushes – that also tests the door lock and the steamer (a pending model has this option). The step by step instructions are below. 1. Enter Quick Test Mode. With the power off, press the soil level, signal, and power buttons at the same time, and then turn the dial counter-clockwise until it displays TEST. 2. Press the TEMP button 3 times so that the warm/warm LED is illuminated. Page 3 Volume 5, Issue 10 Home Appliances Newsletter Samsung Tech Talk Getting Water to the Fabric Softener Cup continued 3. Press the SPIN button once. The lock light will illuminate. 4. Press the SOIL LEVEL button once. The temp lights will go off and the LIGHT LED will illuminate. 5. Press the TEMP button twice. The LIGHT LED goes off and the warm/cold LED illuminates. The rinse portion of the cycle begins. Page 4 Volume 5, Issue 10 Home Appliances Newsletter Samsung Tech Talk New: The FX710/510 Gas Ranges Paul Pieri Trainer—RTSC The first Samsung gas ranges are coming to a store near you! Features: Large Capacity Oven Cavity Giant Griddle Center Burner Self cleaning system Dual Flame Right Front Burner (710 Only) True Convection cooking (710 only) The first gas ranges from Samsung are feature packed. The model FX710 will have true convection cooking, a split oven rack, five surface burners, a dual right front burner, and a warming drawer. The model FX510 will have a storage drawer instead of a warming drawer and all five surface burners will be single burners. Included with each range will be a conversion kit to convert the range to use LP gas. Look for the technical training course outlining specifications, disassembly, and troubleshooting., which will be available on Plus 1 soon. Page 5 Volume 5, Issue 10 Home Appliances Newsletter Samsung Tech Talk Repairing Sealed Systems: 3 Tips for Success Nicholas Webert Assistant Manager, Regional Trainer Sealed system repairs can be tricky, especially with the new dual evaporator units and the addition of TDM valves. Yet, some repair companies consistently repair sealed systems successfully. We have reviewed the repairs done by these companies, and determined that they do three things consistently. To help you repair sealed systems better, we share their tips for success below. Tip 1: No more sweep charges! Most successful repairers are using a 1/4 or 1/3 horse power vacuum pump. (Everyone agreed that if you use too big of a pump, you run the risk of collapsing some of the copper lines.) They are hooking the pump up to both the High side and the Low side and pulling down to about a 30 inch vacuum, and then letting that run 30 to 40 minutes. Once that is complete, they turn off the vacuum pump and monitor the gauges for 8 to 10 minutes to make sure there is no leaks. Any loss of pressure is a problem. Tip 2: Make sure you are weighing your charge! It’s ok to slow charge or dump in liquid, but you must know the amount that is going in while doing so. A. If you like to slow fill the system, you should apply the charge from the Low side. Also, in addition to watching your scale for the correct weight to exit the tank, you should watch your gauges. Look for around 105 psi on the High side and 5 to 2 psi on the Low side B. If you prefer to dump your charge, it is best to do it on the High side. Running the liquid through the filter drier seems to have a higher success rate. Don’t forget to keep your eye on your gauges for the same pressures. Tip 3: Be Aware of the TDM Valve! TDM valves allow refrigerant to travel to just one or both evaporators in the unit. A faulty TDM valve could stop the flow of refrigerant to one compartment, causing, for example, just the fresh food section not to cool. It could also cause both compartments not to cool if the flow is stopped before it enters or leaves the stepper. A quick and easy way to check the TDM valve is to use your temperature gun and shoot all three of its legs. If the refrigerant is passing in and out properly, all three legs will be very close in temperature. Page 6 Volume 5, Issue 10 Home Appliances Newsletter Samsung Tech Talk Replacing Dryer Thermistors Louis Picchione Assistant Manager—HA Thermistor Function: The Thermistor is mounted next to the TH1 Thermostat on the exhaust side of the blower housing and is used to regulate the dryer operating temperatures. Specification: The Thermistor measures approximately 10K ohms at room temperature. As the operating temperature rises, the resistance of the Thermistor decreases (negative coefficient). During operation in a high heat setting, the normal operating exhaust temperatures should be approximately 160°F. When repairing a dryer with a defective Thermistor, you can remove and install the Thermistor from the back of the unit. The following is a procedure to replace the defective Thermistor from the unit’s back. STEP #1 Disconnect the vent from the dryer’s duct exhaust and move the dryer out to access the back cover. Remove the screws from the dryer’s back cover. Some dryers may have 4 screws securing the back cover, others will have 3 screws. STEP #2 After removing the screws from the back cover, remove the cover and duct exhaust together. STEP #3 Disconnect the connector, and then remove the 2 screws securing the Thermistor to the blower housing. Page 7 Volume 5, Issue 10 Home Appliances Newsletter Samsung Tech Talk Replacing Dryer Thermistors continued STEP #4 After removing the Thermistor, take a resistance reading to see if the Thermistor is defective or not. If defective, replace it. If not, further troubleshooting is required. STEP #5 To reinstall the Thermistor (or install a replacement), insert it back into its original position, and then start the top screw by hand. After starting the top screw, insert and start the bottom screw. Once both screws are started by hand, use a screw driver to tighten both screws down. STEP #6 Once the Thermistor has been installed, reconnect the connector and test the unit. If the issue has been resolved, reassemble the duct exhaust, back cover and vent. Reinstall the dryer back into it’s proper location and conduct a final test to ensure everything is operational. Thermostats 1, 2 and 3 on the electric dryer can also be replaced by following this same procedure. Page 8 Volume 5, Issue 10 Home Appliances Newsletter Samsung Tech Talk Troubleshooting Wi-Fi Refrigerator Connection Issues Steve Polzin, HA Product Specialist Jim Swift, HA Product Senior Manager Earlier this year, Samsung launched the new RSG309 side-by-side and RF4289 four-door French door models with WiFi capabilities. These two models come with an 8” LCD screen which is integrated within the water and ice control panel located on the front of the refrigerator. These are the industry’s first Wi-Fi enabled refrigerators and provide easy access to a series of user friendly web based applications. Consumers can check the weather, leave notes for their kids, and keep the family on schedule with the Google calendar. Other useful applications allow quick, easy access to favorite recipes, pictures, music, and yes, they also give customers the ability to Tweet from their refrigerator. From time to time, you are likely to run across connectivity issues in which the customer cannot access the web or perhaps cannot maintain a connection. In this article, we will focus on Internet access, how to evaluate connection issues, and what you need to know to educate the consumer and prevent repeat service requests. Figure 1 Before you run this kind of call, contact the customer and make sure that the following information is available when you arrive at the home: the name of the customer’s network and the password. Without these two bits of information, you cannot service the device properly. Start by clicking the Settings icon located in the bottom right hand corner of the main menu (Figure 2). Next, scroll down and make sure the Wi-Fi is turned on, and then select the customer’s Wi-Fi network. Figure 2 If the network is not listed, it indicates that either the Wi-Fi network is hidden or there is a problem with the wireless router. If this is the case, the customer will need to access the router's configuration page. Assuming the network issues have been corrected, select the network and enter the password as required. After the network handshake occurs, you should see the screen in Figure 3 (on the next page). An easy way to confirm Internet access is to launch the Weather Bug or AP News App from the main menu. If connection was unsuccessful, check the signal strength icon in the Wi-Fi Network window. If the signal strength is low, the problem is with the home Network, not the refrigerator. Another way to check the Network connection is by clicking the IP Address icon located in the Wi-Fi Network window, and then pressing the test button. If the automatic settings are correct, a message will appear indicating that the configuration is correct. Page 9 Volume 5, Issue 10 Home Appliances Newsletter Samsung Tech Talk Troubleshooting Wi-Fi Refrigerator Connection Issues continued A key factor to keep in mind is that if a network appears in the Wi-Fi network window, the refrigerator has established communication with that network and the connection issue is not likely to be caused by the refrigerator. We strongly recommend you work through the process as described, because the next step is to explain to the customer the issue is not caused by the refrigerator and lies within their home Wi-Fi network. Invariably, the customer will be quick to point out that other wireless devices work in the house and they have never experienced any problems before. That being said, a possible solution might be available if you Figure 3 or your customer has a smart phone with a hot spot. You should be able to connect through that device as further proof the refrigerator is working properly. A basic understanding of a home Wi-Fi network can go a long way when it comes to educating the consumer and bringing a successful resolution to a connectivity issue. One of the biggest obstacles to setting up a home Wi-Fi network is the lack of signal strength in some areas throughout the house, commonly referred to as dead zones. Wi-Fi signals are transmitted over radio waves, and are subject to the same reception problems found with radio and television signals. Dead zones can be caused by a multitude of factors such as walls, distance between the device and the router, and even interference from appliances, cordless phones, and other Wi-Fi routers in the area. The Samsung refrigerator Wi-Fi feature is located in the dispenser door panel which is surrounded by metal and foam insulation, creating another obstacle to a reliable connection. Once you have determined that a weak or non-existent signal is preventing a connection from being made or maintained, how do you approach the customer? It is not your responsibility to correct the problem. However, we recommend that you provide a thorough explanation of why their connection issue is caused by the home Wi-Fi network and not the refrigerator. Assuming the issue is not the fridge, a simple solution to offer the customer is to suggest they move the router closer to the kitchen. If this is not a viable solution, the next few paragraphs might offer additional help. Samsung does not endorse nor recommend any particular device or method to extend the Wi-Fi signal, however there are options available that do just that. We do recommend the consumer contact their Internet service provider or a local retailer that specializes in computers and/or Wi-Fi to get a qualified recommendation. Here is what they need to know they make that contact: What type of router do they have? Look at the router and write down the brand name and model number. A specialist in this field should be able to advise them about the router and its capabilities and what options are available. The customer should inquire about a Wi-Fi range extender. The range extender grabs a network connection wirelessly from an existing router and simply extends it further. It is a simple, affordable option for low signal dead zone issues. Page 10 Volume 5, Issue 10 Home Appliances Newsletter Samsung Tech Talk Refrigerator Stepper Motors Bob Shoemaker Assistant Manager, Regional Trainer There are two types of stepper motors in current Samsung refrigerators, one type used for the refrigerator’s damper and the other used for the TDM valve. The damper’s motor is generally bipolar, meaning voltage needs to be applied to both leads of the coil alternately while the other is grounded. The two coils are electromagnets that cause the rotor to move. When 12V is applied to coil A, the rotor turns and aligns with coil B. The charge in coil A is then dissipated by applying reverse polarity and then coil B is activated. This process is repeated for the time needed to open or close the damper. The direction is determined by which coil is activated first. Damper Motor TDM Motor The TDM valve is unipolar and works similarly. The two leads of each coil are simply pulled to ground at the proper time since the center tap is 12V. The drive signal is a square wave and measures 12V AC with a DVM. Page 11 Volume 5, Issue 10 Home Appliances Newsletter Samsung Tech Talk Need Help Diagnosing? Just Ask the Customer. Kurt Schuster Assistant Manager—HA ‘The unit is dead’ or ‘will not start’ have to be among the least helpful customer complaints you could ever roll a truck on. Right after the ever helpful, ‘intermittent’, these customers have to be coaxed, cajoled, and convinced of their ability to observe and accurately describe the operation of their appliances. While doing so might seem more of a chore than just going to their home to see for yourself, between their schedule, your REDO percentage, and the chances you will have the right part on the truck, you’re better off in the long run if you have the conversation. Usually, just asking, ‘what happens when you turn the power on?’ is enough to get the conversation started, even if you get the typical response of ‘nothing’. Having the PDFs of the User Manual and the Service Manual can be helpful to you unless you have photographic memory and a clear picture of the control panel in your mind. If you are lucky enough to be on the phone with the customer while they are at home with the appliance, you might even be able to hear the chimes as the unit turns on, which is almost always a good sign, right? Especially when you consider that you’ve just confirmed the unit isn’t as ‘dead’ as the customer originally reported. Of course, this is where we need the customer to Stop, Look, and Listen. Do any lights come on? Which ones? Is the unit making any kind of noise at all? On a dishwasher, for instance, what happens when you close the door? Obviously, they should hear the drain pump for between thirty and forty seconds, followed by the sound of water, followed by the sound of the water spraying on the dishes. Any interruption of this sequence is usually accompanied by some sort of error code or warning flag. Either way, knowing when whatever happens happens and how long it happens is as important as knowing why it happened in the first place. As we have discussed in the past, (Dishwasher Water Flow and Level Errors, Volume 5, Issue 3), Samsung takes managing the flow and presence of water in the dishwasher seriously. So, it can be frustrating when these units insist there is a water related error and you cannot observe and confirm that error yourself. In such cases, it is often tempting to blame the sensor or the controls on the Main PCB, swap those out, and be on to the next call. Doing so, however, usually only means that you, or somebody else, will be back in a few days or weeks. Another seemingly easy fix involves finding a loose connection. Again, it is usually a good thing, but thinking that this has solved the problem is problematic itself. Keep in mind, for instance, that sensors such as the Overflow Sensor and the Leak Detector in the shutter area are both open circuits. A loose connection on either of these usually means the error would be missed and not triggered falsely. The Low Water Level (9E) errors can be tricky too. If the unit isn’t flagging a Leakage (LE) error, and you’ve confirmed there are no bowls or cups trapping water and preventing water from circulating properly, then where is it going? In this case, the fact that you do not have a Leakage Error means that it is not going through the sump where it would be captured in the shutter area. If the water is not coming from around or through the door, indicating a bad seal around the door, the soap dispenser, or drying fan vent, you can concentrate your search elsewhere. Checking the drain hose, the dishwasher case itself, or checking the case noise insulation for signs of prior leakage is usually your best bet. Page 12 Volume 5, Issue 10 Home Appliances Newsletter Samsung Tech Talk Need Help Diagnosing? Just Ask the Customer. continued Although the dishwashers are quiet, they are not so quiet that an error code for an inoperative circulation pump is necessary. If the dishwasher falls silent when it is supposed to be circulating the water to wash the dishes, you’ll need to be prepared to check the wiring, the connections, and the pump. What’s more, you’ll need to confirm there is power to the pump from the Main PCB when it is supposed to be there, and also make sure the sump is clear of any debris that may be preventing the pump from operating correctly. In the end, making the customer your partner during the repair is as important a part your job as other aspects of your business. Getting the customer to Stop, Look, Listen, and Tell may very well be the difference between fixing it right the first time and returning for redo. Samsung Electronics America 85 Challenger Road Ridgefield Park, NJ 07660 Phone: 201-229-4251 The information in this bulletin is published for experienced repair technicians only and is not intended for use by the public. It does not contain warnings to advise non-technical individuals of possible dangers in attempting to service a product. Only experienced professional technicians should repair products powered by electricity. Any attempt to service or repair the product or products dealt with in this information by anyone else could result in serious injury or death. Information provided in this bulletin is subject to change or update without notice. Page 13 Volume 5, Issue 10 Home Appliances Newsletter Samsung Tech Talk 2011 RTC Home Appliance Training Samsung HA Training 2011 Being held at one of our four Regional Training Centers! Attend in depth, hands-on training at one of our RTCs (Regional Training Centers). You can reserve your seat for training by emailing [email protected]. Additionally, Home Appliance training is available on-demand 24/7 at https://my.plus1solutions.net/clientPortals/samsung/ Training schedule: Date October 4-6, 2011 City Little Ferry, NJ Comments ME/ASC Training October 4-6, 2011 Rancho Dominquez, CA ME/ASC Training October 25-27, 2011 Bensenville, IL ME/ASC Training October 25-27, 2011 Austell, GA ME/ASC Training November 1-3, 2011 Little Ferry, NJ ME/ASC Training November 1-3, 2011 Rancho Dominquez, CA ME/ASC Training November 29-December 1, 2011 Bensenville, IL ME/ASC Training November 29-December 1, 2011 Austell, GA ME/ASC Training November 29-December 1, 2011 Little Ferry, NJ ME/ASC Training Page 14