1
ilsears
owner's
manual
MODEL NO.
358.352320
358.352350
2.3A 2.3PS
o Assembly
® Maintenance
o Operation
o Repair
Parts
CAUTION:
Read Rules for
Safe Operation
and Instructions
Record in the space provided below the Model No. and Serial No.
of your saw, These numbers are located on the starting instructions
decal,
Model No.
Carefully
Serial No,
Retain these numbers for future reference
Sears,
Roebuck
and
Simpsons-Sears
Co.,
Chicago,
Ltd.,
Ill.
60684
Toronto,
U.S.A.
Canada
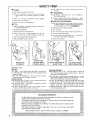
SAFETY RRST
O Keep others
running
DON'T
O Don't use the saw when you are tired
out
of
the
work
area when
the
saw is
BE CAREFUL
O Don't start cutting until you have a clear work area
secure footing, and a planned retreat from a falling
tree
O Don't climb in a tree with
Get professional hetp.
O
O Be careful cutting small branches and bushes -smail
limbs may catch the chain and be whipped toward you
Don't
use a saw that
is damaged or poorly
adjusted
O Don't touch a moving chain
O
[]
Don't use the saw in an enclosed area
O Wear safe footwear, snug-fitting
ing. and head protection
clothing,
and eye, hear-
LOOK
OUT
FOR
a saw - it is very dangerous
KICKBACK
O When the moving chain at the nose of the bar touches
an object, the bar and chain can be thrown upward
with consldelabte force. This is KICKBACK!
O Hold the saw firmly
with both hands
O Be careful handling
fuel
O Don't overreach
C) Hold the saw firmly
with both hands
O Don't let the nose of the bar contact a log.. branch, etc,
O Carry the saw with the engine stopped
the bar and
chain to the rear, and the muffler away from you
O Cut only at high engine speeds
O Shut off the engine before setting it down
O Don't reach above shoulder height to cut too close to your face in this position
O Keep the handles free of o1] and fuel
O
the chain is
Keep your chain sharp
t
• I
)\
,
e
,¢
DO NOT USE
WATCH
FOR
KICKBACK
GENERAL
THE
SAW
IT NEEDS
WHEN
REPAI
R
WHEN
OPERATING
TIPS
Safety First
Dress Safely - Loose clothing may get caught in moving parts.
It's A One Man Job - Keep others out of the work area when the
engine is running
LOOK OUT FOR KICKBACK
- Don't let the tip of the bar
touch anything while the engine is running.
Take care of your saw
Keep the Chain Out of the Dirt -- Even a small amount
on the log will dull the chain quickly
Keep the Chain Sharp - A dull chain is unsafe and will
excessive wear to other parts
of dirt
cause
Don't Force the Saw Out of a ,Jam - Use a wedge, an axe, a
crowbar, or another saw, but don't force it out
o
o
o
o
o
o
o
o
o
o
o
o
o
o
o
o
USE BOTH HANDS
NEVER USE THE SAW
WHEN TIRED
What is good performance?
Wood Chips Tell You A Lot - The chips should , e about the
size of the chain teeth. If they are small and powd • Hke, your
chain is dull. Get it Sharpened!
Don't Press Hard - Light pressure is enough Heavy pr, sure can
cause unsafe conditions
Check for a dull chain or _ rn bar
(See Guide Bar Maintenance and Chain Sharpening).
Cut Only At High Speeds - Keep the throttle wide open when
cutting Don't run the engine at high speed when not cuttingl
It Should Cut Smoothly - if the engine stalls or bogs with light
pressure, check the carburetor
setting and the air filter
Performance and Safety - Keep your saw running well and your
work wiH be easier and safer
For' 90 days from date of purchase, Sears will repair any defect in material or workrnanship in this gasoline chain saw at no charge,
If the chain saw is used for commercial
or rental purposes, the warranty applies for
only 30 days from the date of purchase,
Warranty service is available by contacting the nearest Seats store or Service Center
throughout the United States.
This warranty gives you specific legal rights, and you may also have other rights
which vary from state to state.
,t0_j_Sears,
Roebuck
and
Co.,BSC41-3
Sears Tower,
Chicago,
ILL
60684
C
o
o
O
o
<CC)
<cC_
<:CC_
O
TABLE OF CONTENTS
INSTALLING
THE BAR AND CHAIN ..............................................................
OPERATING
INSTRUCTIONS
MAINTENANCE
........................................................................................
GUIDE
BAR MAINTENANCE
....................................................................
CHAIN
SHARPENING
......................................................................
"TEMPERATURE
LIMITING
MUFFLER
INSTRUCTIONS
................................
* See m_portant notice ot_ page 19 regarding states requiring temperature /#mitfng
muffler
........
4
5
7
8
8-9
19
.........................................................................
cover
SPECI F ICAT IONS
358.352320
(Craftsman 2,,3 A)
SPARK PLUG
SPARK PLUG' 'GA'P
MODULE
AIR GAP
IGNITION
c J8
Champio n CJ8
.023 to .027"
.023 to ,027"
,008 to .012"
.008 to .012"
Solid State
Solid State ....
(16:1) ½ Pt,, O'il to ............(!6:t) ½ Pt. oil to
....
iChampion
FUEL MIX
GUIDE
BA'R
358 °352350
(Craftsman 2.3 PS)
...........
CHAIN
MUFFLER
I Ga!. Re 9. Gasol!,,ne
,,,!, Gal. Re£_ Gasolin e
16" Low Ki£!£ SN ............. 16" Low Kick SN
LowProfile
3/8 Pitch
Low Profile Barracuda
Chrome Cutters
3/8 Pitch Chrome Cutter._
Spark Arresting
.
Spark Arresting
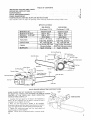
Serial and Model
No
Oil PUmp Button
Choke
Guide Bar Nose
Starter
Chain
Handle
_hrottle
Trigger
_tart Stop Switch
,_Gas
Ct_oke Knob
Oil Pump
Throttle
Button
Trio
Gulde Bar Nose
_.
HAND
Guide Bar
GUARD
HAND
GUARDS
DO NOT ELIMINATE
THE
OF INJURY
AS A RESULT
OF KICKBACI{
CONTROL
OF THE
CHAIN
SAW
READ
INSTRUCTIONS
MOUNTING
POSSIBILITY
OR LOSS OF
OPERATING
Do not tighten
sure the hand
the screws
guard is parallel
to
the
handlebar
Alternately
tighten
each hand guard mounting
screw maintaining an even gap between the hand guard and mounting
cap
3 Tighten
the mounting
screws until
the hand guard and
mounting
cap are pulted together
Caution:
Screws must be tightened
evenly to prevent
breakage
CAP
SCREWS
e_
HANDGUARD
CAREFULLY
1 Assemble
the hand guard to the bend in the handlebar
as
shown
Be sure alignment
pin on guard is inserted
in hole in
handlebar
2 Make
INSTRUCTIONS
Cap
INSTALLING
Always
I
THE
Remove
the
bar wrench
bar
(I) of the two
2
Setting
place
mounting
3.= Fit
plates
the adjusting
the guide
the
chain
sure
the
the
drive
screw
supplied
guide
CHAIN
with
(Figure
the chain!
washer,
your
and
saw
bar clamp
Remove
one
I ),,
pin all the way to the rear (Figure
5),
bar slot over the guide bar studs and slide it
to the rear (Figure
BarClamp
AND
wear gloves when handling
It is sharp!
with
the
BAR
2}
over
cutters
link
the
clutch
face the
tangs
and
way
engage
the
man 2 3PS engage chain drive
onto
shown
the guide
in Figure
sprocket
links
bar
Be
3 and that
teeth,
On Crafts-
in groove of _im sprock-
et teeth
Figure 1
4, With
the adjusting
guide
plate,
ing screw
5
Holding
bar clamp,
FINGER
the tip
Lift
tensioned
Figure
7
_ight,
6 shows
like this
Holding
the
below
chain
the chain
near the middle
it looks
The
washer,
the chain
will
the correct
bar tip
should
the bar mount-
5) turn
the adjusting
is snug on the bar,
of the bar (Figure
lift
tension,
up, tighten
move
freely
about
1/8"
Adjust
6) When
from
your
the bar
chain
unti!
the bar clamp screw firmly,,
around
the bar but
not
sag
it
CHAIN
STRETCHES
TENSION
OFTEN!
Figure 2
and tighten
3)0 replace
TIGHT,
until
the chain
into the bar (Figure
of the bar up (Figure
screw clockwise
6,
pin fitted
WHEN
USED,
CHECK
THE
: : :::
:
:
:
Adjusting Screw
Figure 5
Figure 3
Adjusting
l: la_'_g_ out
Ot
Pin
_lway Ito_l'i gu=dl_
bat o_ both _ede_
Guide Plate
Figure 4
Figure 6
OPERATING
INSTRUCTIONS
Before Starting
4.
O Check the chain tension
5, Push
Is the chain sharp?
Hold the starter
the
O Are the handles clean of gas and oil?
quickly
O Did you fill the fuel AND
HOLD
oil tanks?
FUEL and OIL
Fuel
Mix:
gallon
mix
16 parts
gasoline)
gasoline
Use air
to
1 part oil
cooled
(1/2
two cycle
pint
engine
oil
oii
to one
for fuel
before
Chain
Oil:
straight
Craftsman
weather
Bar and
operation,
Chain
above
Lubricant
30 °
F,
Bar
and
Chain
Lubricant
is not
diluted
system of the chain saw will not pump
lubrication
of Bar and Chain
A WORD ABOUT
CHAIN
enough
oil
for adequate
Fill the oil lank each time
oit on the chain will quickly
2
You wilt use at least 1/3 tank of oil for each tank of gas If
you use less, check for a plugged oil hole in the guide bar
Clean
oil
the oil
Do
not
the starter
a few
puIls,
and let the rope rewind
8,
Pull until the engine starts, Allow
8 to 10 pulls
unit or one which has been stored for time,
the engine will
the choke
to its original
If engine does not fire after
Push
choke
while
holding
to
10
of
off
fuel
restart
trigger
8 to
fire
engine
for one or two
engine
been
engine,
at wide open
When
has just
move
refueled,
(counter
you
for
a new
idles., See main-
it may be flooded
starter
throttle
choke
restarting
several
times
If saw has run
on may be required
a hot
may
engine,
or one
have to choke
the
pulls
switch
may also be stopped
the right
6pulls,
and pull
10 puns with
engine
which
To stop
5to
(clockwise)
snap
slowly
position
The chain must not move when the engine
tenance section
9.
starter
back
to "stop"
by pushing
position
the choke
The
lever to
clockwise)
OILING
I
Use clean
let
Return
use
ti_e oil
not
the
After
30 ° F to 0 ° F,
adequately,
Do
pulling
7
use 5% diesel fuel #:1 or kerosene and 95% Lubricant;
below
0 ° F, use 10% diesel fuel if' I or kelosene and 90% Lubricant
If
FIRMLY
while
6
out
cold
left hand.
you
the handle
using
For
SAW
in your
from
Hold
When preparing
fuel mixture,
mix only the amount needed for
the job you are to do.. Do not use fuet mixture
that has been
mixture
THE
away
back
CAUTION:
stored tonger than two (2) months.
Fuel mixture
stored longer
than this will cause hard starting
and poor performance
of
your saw If fuel mix has been stored in your saw longer than
this time it should
also be removed
and filIed with a fresh
handle
saw
you fill the fuel tank Lack
ruin the bar and chain
let sawdust
or dirt
cap and the area around
of
into the oi! tank
it before
removing,
A little oil will pump out after the engine stops Oil on
the_oar and
chain will drip off after use
Let the saw
stand and cool off Wipe the bottom
clean before storing
STARTING
Move bystanders and obstructions
the trigger after the engine starts
1
Move ignition
2
Push choke
3
Hold
the
switch
lever "on"
rear handle
well
forward
out of reach!
Release
to "start"
(to right)
in your
right
hand
and squeeze
the
trigger
CUTTING
_'
Read the
keep your
Plan
safety tips in the
chain sharp,
TIPS
front
of this
manual.
If it is strong enough to move
CUT! Come back another day!
Check The Lean-Tie
a weight to a
long. Hang the weight
in your
good vertical
line to help you
The tree witl try to fall the way
Always
the top of
The Work
Area
-
You
_q3
piece of string about 3 feet
line o_ sight The string is a
iudge the lean of the tree
it is leaning.
Check The Weight Distribution
- A tree is heavier on the side
with
the most limbs. It will try to fall on its heavy side
Trim a few limbs to "balance"
the tree
need a clean area all around
the
tree for good footing
Get everything
out of the area where
the tree will fall People, pets, cars, etc
Find
you while pulling
Ahead
Check The Wind the tree, DONT
Clear
Push the saw away from
a Retreat Path - Know which way you
the tree starts to fall Make sure it is clear.
are going
when
Direction
<--
of Fall'
the starter quickly
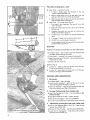
FELLING
A
Fellin
Cut
(Cutting down a tree)
Small Trees
recti0n
Less than 8" across
If there is doubt
about
"notch"
method described
fatl,
use
2..
Make a single felling
cut on the side away from
direction
of fall. Don't cut all the way through!
the
3,
When
down
of Fall
B
-
1
the direction
in B
the tree starts to fall, turn
and GET AWAY QUICKLY!
Large Trees -
8" or larger
The notch is very
"into"
the notch
2..
Make the bottom
into the tree
3
Complete
the
wedge of wood
4,
The felling
notch
5
It is made
6.
DO NOT
7.
Asthe treestartsto
fall, turn
and GET AWAY QUICKLY!
Fig. X
important
notch
cut first,
2" higher
Make
than
tree will
about
try
to fall
1/3 to 1/2 way
cut
Remove
the
it on the side opposite
the
the bottom
to cut through
put the saw
X)
The
notch
with the slant
before going on,
cut is next
try
saw off,
across (Fig
1.
of
of the notch
to the notch..
saw off, put thesaw
clown
BUCKING
Fig. Y
Bucking
[]
is the sawing of a log or fallen
Use Both
forefinger
O Stand
tree into smaller
Hands - grip the saw firmly
wrapped around the handle
Uphill
- a log that
with
is cut loose wilt
[]
Keep The Chain Out Of The Dirt
A dull chain is unsafe,
[]
Stand
- dirt
pieces_
the thumb
and
roll downhill.
will
dull
the chain.
to the left of the saw_
How To (Fig_ Y)
A
In area "A", come up from the bottom
Finish by coming down from the top,
B
In area "B', come down from the top t/3
Finish by coming up from the bottom
PRUNING
1
of the way.
AND DEBRANCHING
Be Careful
O Use Both
O Look
touch
O Don't
chain
2
1/3 of the way.
Hands
Out
For
anything
- keep a firm
Kickback
while
grip.
-- don't
let the
tip
of
the
bar
the engine is running=
Cut Overhead - keep the saw below chest high° The
is too close to your face in this position
Pruning
(Cutting
limbs from standing tree)
O Don't Use The Saw in A Tree - It is very dangerous_Get
professional help,.
O Keep Both Hands On The Saw - keep a firm grip
O Be Sure Of Your Support - don't cut off balance,
O Cut Up From The Bottom,
3
Debranching
(Cutting
Finish Down From The Top°
the limbs
from
a fallen
tree)
O Cut On The Opposite Side Of The Tree - keep the tree
between you and the chain,
O Be Sure Of Your Footing - work slowly and deliberately
O Look Out For Springpoles wilt snap up at you when cuL
limbs bent under pressure
MAINTENANCE
Carburetor
_t
Adjustment
BE CAREFUL!
procedure
Figure 7
The chain will be moving during this
1
Stop
2
Remove
the carburetor
cover (Figure
7) Turn
the high
speed
(Figure
8)
and
low
speed
mixture
screws
clockwise
_
(Figure
8) until they stop
Don't
tighten
them, you may damage the needle seats!
the engine
3.
Turn the high speed and low speed mixture
turn counterclockwise
4
Start the engine
If it stops, increase the idle speed !Figure
8) by turning
the idle speed screw clockwise
_
, Keep
dirt and sawdust away from the carburetor
while the cover
is removed,
5,
Run the
operating
6
Set the idle speed as fast as possible without
the chain
moving
Turn
the idle speed screw clockwise
_=_
for
faster idle. counterclockwise
_
for slower idle
7
Squeeze the trigger quickly
If the engine stops, restart it
The engine should accelerate without
hesitating
when the
trigger
is squeezed
If it does not, turn the tow speed
mixture
screw counterclockwise
_
1/16 of a turn and
engine
for
temperature
a
few
minutes
to
screws
bring
one full
it
up
to
I /
Figure 8
Choke Closed
check the acceleration
again If the idle speed slows while
adjusting
the low speed mixture,
reset the idle speed as in
step 6 Continue
step 7 until acceleration
is smooth
8
Make a test cut
carburetor!)
with
the
saw (keep
sawdust
9
If the engine seems to smoke excessively
the high speed mixture
screw clockwise
out
of
in the cut,
_
1/16
turn
Repeat step 8 and 9, if necessary WARNING:
high speed needle must never be less than 7/8 turn
Too lean of a setting will quickly
ruin the engine
10
open
from
The
high
speed
mixture
screw
should
more
than
tY& turns (counterclockwise
the stopped position
in step 2
High Speed
Mix Screw
The
open
not
be
_
Low Speed
Mix Screw
Idle Speed
Screw
)
Reset the idle speed (see step 6)
Replacing
_'
turn
of a
If the engine
seems to weaken
or lose power
in the
cut,
turn
the high speed mixture
screw counterclockwise
_
1/16 of a turn at a time until the saw cuts
smoothly
11
the
carburetor
cover
Incorrect
placement
from working
the
choke
of the cover will prevent
t
Move
knob
a[t the way
2
Move the choke
Figure 8)
3
Place the cover on the saw and tighten
4
Check
won't
above
shutter
the operation
move, remove
in the choke
to the choke
of the choke
the cover and
the choke
direction
closed position
(See
the screws
If the
repeat
Air Filter
knob sticks or
the procedure
Air Filter
Clean the air filter after every
5 hours of operation.
carburetor
Remove
the
(Figure 9)
2
DO NOT clean your filter in gasoline or other flammable
solvent
Blow
the dirt off with compressed
air or wash
filter in soap and water
3.
Replace
and carburetor
and
tanks of gas or every
1
the filter
cover
t0
cover
pull
out
Figure 9
the
filter
Starter
Rope
If your rope breaks near the pulley, it can be repaired by this
method. Otherwise, replace the rope,.
Figure 10
1
Remove the pulley screw and pulley very carefully. The
recoil spring ties beneath the_pulley
Twist the pulley
gently as you pull up to release the spring° The spring
must stay in the housing, flat against the bottom,
2.
Burn the rope end and run it through a rag before it cools.
An enlarged end will keep the rope from fitting onto the
pulley.. Don't touch the burned end,. It is hot!
3
Feed the rope through the housing, into the pulley, and up
through the pulley hole as in Figure 10..A sharp objen_tor
stiff wire will help you get the rope through the hOler.
4.. Tie a knot in the end of the rope Pull it very tight against
the pulley
/
5,
Replace the pulley in the housing, Be sure the pulley isall
the way down and the spring is engaged Replace and
tighten the putley screw.
6
Rewind all the rope
counterclockwise lf_
7.
Putl about 5 inches out as shown in Figure 11 and set the
rope in the pulley slot
8
Make
three complete turns of the pulley clockwise _=_ . Pul! the starter handle to the full extent of
the rope and let the rope rewind slowly.
Figure 11
GUIDE
V
Figure
12
P
Correct
Rollover
Raiis &
Groove
Figure 13
Worn
Uneven
Rails
Rails
Figure 14
File Guide
BAR
onto
the
pulley
"by
MAINTENANCE
Check the condition of the guide bar often, A worn
bar will damage the chain and make cutting harder
1
Figure 12 shows a cross-section
of the guide bar
edges square as in 1 with a flat file
2
Roltover
is shown
hard when cutting,,
3
Worn
rails are shown
guide
bar nose
4.
turning
Uneven
rails
in 2 . This wili
in 3
are shown
This
in
4
Keep the
cause you to press extra
occurs
This
will
most often
at the
cause the saw to
cut on an angle
5
Keep
the rails flat and square
CHAIN
O
SHARPENING
Keep Your
as shown
(Refer
in
1 ,.
to page 10 for tools)
Chain Sharp
Dirt will duel a chain instantly
dirt,
Keep the chain out of the
if the chain cuts to one side, it is dull
\
Extra rough cutting is a sign of a dul_ chain,,
Powder-like wood chips mean a dull chain
Align ]'he File Holder
Figure
Figure 16
15
'\
File In One Direction
/
Only
Cutting is much easier and safer with a sharp chain_
Press Hard
Always Check Depth Gauges
O To Sharpen 358.352320
(Craftsman
1
Set the chain tension right
the chain around the bar,
You
2
Clamp
Clamp
3
Use 5/32"
4,
Sharpen
all the cutters away from you first, Then turn
saw around and sharpen the cutters on the other side_
5.
AIign
13.
the guide bar in a vise,
in the center of the bar
Don't
still be able to move
clamp
the chain!
file only
the file
Using
must
2°3 A Only)
holder
marks
30 ° mark
on file
with
holder.
the bar as shown
the
in Figure
6. Holdthefilelevel,perpendicular
tothebar,Figure14
7 FileinONEdirection only! Figure 15
8.
Press hard!
Two
SHARPENING
1
With
strokes
358.352350
engine
(Figure
or three
"OFF",
adjust
should
Always
check the depth gauge with the depth gauge filing
guide after filing:
If the depth gauge sticks out, file it off
with a flat file, Figure 16
do it
('Craftsman
2.3PS Only)
the
fit
chain
to
snug
on bar
6, page 4).
2..
Rotate depth adjustment
knob counterclockwise
direction
of arrow on knob) until tight (Figure
3o
Start engine,
allow
it to warm
up, then with
engine at
HALF
throttle,
push oscillating
knob
(Figure
_7) to the
extreme
left out of locking
slot and pull back on knob_ If
sparks do not appear coming from top of g_ide bar in front
of bar clamp release knob and turn depth adjusting
knob
one click
in direction
of arrow.
Pull back on oscillating
knob again. Repeat above procedure
until a small shower
of sparks can be seen.
4_
(opposite
17)
Oscillating
Figure
Knob
Adjusting
Knob
18
About
plates
every
should
DO NOT oversharpen.
is illustrated
in Figure
4th or 5th
be filed
power
sharpening,
A
18.
properly
the cutter
side
Top View of Cutter
Top Plate
_,,_ _.
(358.352350
FILING
Craftsman
Only)
2,3PS
Io
Set the chain to proper tension.
move the chain around the bar.
2,
Clamp
Clamp
3.
Use 5/32"
4
Align the file holder marks with the bar as shown
21, using 22 ° mark on file holder
5_
Hold
the guide bar in a vise,
in the center of the bar°
You
Don't
must
still
clamp
the file
File in ONE direction
Sharpen all the cutters away from you first. Then turn the
saw around
and sharpen
the cutters
on the other side.
Press hard! Two or three strokes should do it
YOUR CHAIN
Figure
fuel from
the tank
19
Figure
20
Figure
21, ,
Figure
22
Holder
/
22,
SAW
Once you have finished
using the saw and it is to be idle for
several months, follow these steps before storing the saw
Drain
File Guide
Figure
2 I.
7.
STORING
only!
to the bar, Figure
in Figure
___ _22%_/
o
7,
the chain!
Side Plate
level, perpendicular
Cutting
Tooth
be able to
file only.
/
A Correctly
Shaped
_.-
6.
1
,pth
When
sparks appear,
move the oscillating
knob rapidly
from side to side.. It should take about 5 to 10 seconds to
sharpen
a dull chain..
sharpened chain cutter
5.
Figure t7
2
3
Start Engine and allow
used.
Drain oil from oil tank
4
Coat
5.
Store
guide
bar and chain
Direction
File
in One
Only
t_
Press Hard
to run at idle speed until
with
oil to prevent
in a dry area and cover to protect
from
rust.
dust,
all fuel
is
10