1
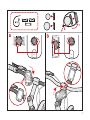
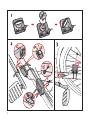
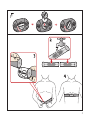
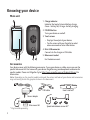
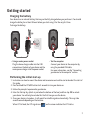
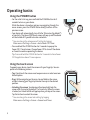
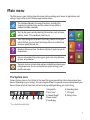
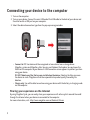
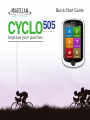
Quick Start Guide
505
CYCLO
Brought to you by Navman
™
Bicycle computer
Improve your position
1
2
3
Knowing your device
Main unit
1. Charge indicator
Indicates the level of internal battery charge: Green - battery full; Orange - battery charging.
2. POWER button
Turns your device on and off.
3. Touch screen
• Displays the output of your device.
• Tap the screen with your fingertip to select
menu commands or enter information.
4. Mini-USB connector
Connects to the charger or USB cable.
5. Bike mount socket
For the device mount.
Accessories
Your device comes with the following accessories. To use your device on a bike, ensure you use the
specific bike mount kit that came with your device. Magellan may provide optional accessories for
specific models. Please visit Magellan Cyclo (http://www.magellan.com.au/Products/Fitness) for
information.
Note: Depending on the specific model purchased, the colour and look of your device and accessories
may not exactly match the graphics shown in this document.
USB cable
Heart rate belt*
Power adapter
Bike mount kit
* May be sold separately.
4
Speed and cadence sensor kit*
Getting started
Charging the battery
Your device has an internal battery that may not be fully charged when you purchase it. You should
charge the battery for at least 8 hours before you start using it for the very first time.
To charge the battery:
• Using a mains power socket
Plug the home charger cable into the USB
connector on the back of your device and the
mains power charger into the power socket.
• Via the computer
Connect your device to the computer by
using the provided USB cable.
For more information, see the "Connecting your device to the computer" section.
Performing the initial start-up
1. Instructions on how to mount the device and accessories on to a bike can be found at the start of
this guide.
2. Press and hold the POWER button for 3 seconds to turn your device on.
3. Follow the prompts to personalise your device.
4. Enter the Startup Key (which is printed on the bottom of the box) and then tap OK to unlock
your device. You will only have to do this the first time you use the device.
5. Once your device is turned on, it will search for satellite signals automatically. This may take
several seconds depending on the location.
When GPS is fixed, the GPS signal icon (
) on the screen indicates the GPS status.
5
Operating basics
Using the POWER button
• For the initial start-up, press and hold the POWER button for 3
seconds to turn on your device.
While the device is turned on and you are navigating through the
menu screens, press the POWER button briefly to return to the
previous screen.
• Your device will automatically turn off after 10 minutes (by default*)
of inactivity. The Power Off/Cancel screen will pop up and the device
will be turned off if you do not make a selection.
* You can change the auto power off setting by tapping Main menu > Settings > Screen > Auto Power Off Timer.
• Press and hold the POWER button for 3 seconds to pop up the
Power Off / Cancel screen. Choose Power Off to turn off the device
or Cancel to continue operating the device.
Tip: Press and hold the POWER button for 5 seconds to force Power
Off if application doesn’t have response.
Using the touch screen
To operate your device, touch the screen with your fingertip. You can
perform the following actions:
• Tap: Quick touch the screen once to open menus or select onscreen
button/option.
• Drag: While navigating on the map, tap and hold on the screen
without releasing your fingertip to move the map to the desired
position.
• Unlocking the screen: Your device will automatically lock the
screen after 5 minutes (by default*) of inactivity. When the screen
is locked, an Unlock button will pop up when you tap on the screen.
Tap the button to unlock the screen.
* You can change the screen lock setting by tapping
Main menu > Settings > Screen > Screen Lock Timer.
6
Main menu
The Main menu is your starting place for various tasks, providing quick access to applications and
settings. Tap a button to start a task or open another menu.
The Dashboard displays the view of functions, including the
compass/navigation screen and the workout screen (when a
workout has been selected).
Start to plan your route by selecting the locations, such as home,
address, tracks, POI, coordinate, favorite, etc.
Your trip/training can be saved in the history records. When your
ride is finished, you can check the history data such as date/time,
distance, speed, altitude, etc.
Based on distance or time, the device will plan 3 routes for you to
choose from.
You can set workouts by entering your goals, such as by distance,
by time, or by calories.
There are various customisation options available to enhance your
riding experience. You can customise the system settings, user
profiles and more.
The System icons
Various System icons on the title bar at the top of the screen provide the status information of your
device. Depending on your settings, the icons may be different to provide various information of your
device. Please note that these icons will not be always displayed during your trip/training.
1
2
3
4
5
6
7
8
1. User profile
2. Heart rate*
3. Cadence/Speed*
4. Power sensor*
5. Time display
6. Recording status
7. GPS signal
8. Battery status
* For selected models only.
7
Connecting your device to the computer
1. Turn on the computer.
2. Turn on your device. Connect the mini-USB end of the USB cable to the back of your device and
the other end to a USB port on your computer.
3. Select the desired connection type from the pop-up message window:
• Connect to PC: Your device will be recognised as two external mass-storage drives:
Magellan_system and Magellan_data. You can use Windows File Explorer to copy/move the
files from the computer to your device. A USB Connection screen appears to prevent you from
using your device.
DO NOT delete any files that are pre-installed on the device. Deleting the files can cause
the device to crash. Magellan will not be responsible for product quality caused by file
deletion.
• Charge only: You will be able to continue using your device with the battery in charging mode
via the computer.
Sharing your experience on the Internet
By using Magellan Cyclo, you can easily share your experiences with other cyclists around the world
through the Internet when your device is connected to the computer.
For more information, visit: http://www.magellan.com.au/Products/Fitness
8
For more information
Online support
For 24/7 help and support with Magellan products, visit our Technical Support website at:
www.magellangps.com.au (Australian residents); or
www.magellangps.co.nz (New Zealand residents)
IPX7
The IEC 60529/IPX7 is a European system of test specification standards for classifying the degrees
of protection provided by the enclosures of electrical equipment. An IPX7 designation means that the
unit withstands immersion in one meter (approx 3ft) of still water for up to 30 minutes. Magellan
guarantees this grade provided the battery door and all jack covers are properly and securely closed.
Magellan Cyclo is not IPX8 grade; water-pressure such as washing the unit with running water may
cause damage to the unit and voids warranty.
Declaration of Conformity
For regulatory identification purposes, Magellan Cyclo 505 series is assigned a model
number of N429.
The user needs to switch off the device when exposed to areas with potentially explosive
atmospheres such as petrol stations, chemical storage depots and blasting operations.
Bluetooth
Bluetooth QD ID B020485
WEEE
This product must not be disposed of as normal household waste, in accordance with the
EU directive for waste electrical and electronic equipment (WEEE - 2002/96/EC). Instead,
it should be disposed of by returning it to the point of sale, or to a municipal recycling
collection point.
9
5 6 1 5 N 4 2 9 0 0 0 5
R 0 0
Disclaimer
Specifications and documents are subject to change without notice. MiTAC Intl
does not warrant that this document is error-free. MiTAC Intl assumes no liability
for damage incurred directly or indirectly from errors, omissions, or discrepancies
between the device and the documents.
Notes
Not all models are available in all regions.
Depending upon the specific model purchased the colour and look of your device
and accessories may not exactly match the graphics shown in this document.
The screenshot and other presentations shown in this document are for reference
only. They may differ from the actual screens and presentations generated by the
actual product.
MiTAC International Corporation. No. 211 Jiang Chang San Rd.,
Zha Bei District, Shanghai, China. Made in China.