1
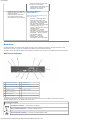
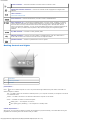
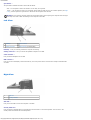
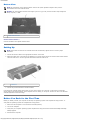
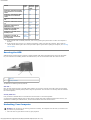
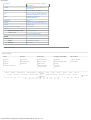
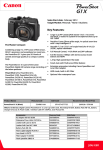
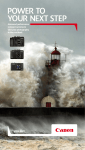
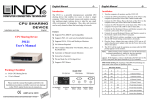
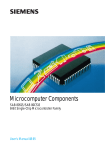
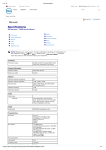
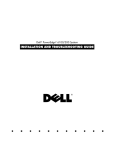
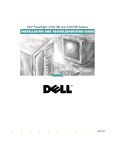
Documentation
United States
Contact Us; Live Chat
Shop
Support
Premier Login
Community
Sign In
Cart
Search
Support Home Page
My Account
Back to Contents Page
Using the APR
Dell™ D/Port Advanced Port Replicator User's Guide
Finding Information
Overview
Setting Up
Before You Dock for the First Time
Docking Your Computer
Securing the APR
Undocking Your Computer
Dell Diagnostics
Specifications
Finding Information
What are you looking for?
Find It Here Drivers for my computer
My computer documentation
My device documentation
Drivers and Utilities CD that
came with your computer
Information on using and setting
up my other D-Family devices
Documentation that came with
your devices
Service Tag and Express Service
Code
Service Tag
Use the Service Tag to identify
your device when you use
support.dell.com or contact
technical support.
http://support.dell.com/support/edocs/acc/dapr/en/7u874eb1.htm[04/07/2011 16:11:32]
Feedback
Documentation
Enter the Express Service Code
to direct your call when
contacting technical support. The
Express Service Code is not
available in all countries.
Latest drivers for my computer
Answers to technical service and
support questions
Online discussions with other
users and technical support
Documentation for my computer
Dell Support Website —
support.dell.com
The Dell Support website provides several
online tools, including:
Solutions — Troubleshooting
hints and tips, articles from
technicians, and online courses
Community — Online discussion
with other Dell customers
Upgrades — Upgrade information
for components, such as
memory, the hard drive, and the
operating system
Customer Care — Contact
information, order status,
warranty, and repair information
Downloads — Drivers, patches,
and software updates
Reference — Computer
documentation, product
specifications, and white papers
Overview
The APR integrates your Dell computer quickly and easily into a desktop environment. Use the instructions in this
document to connect, or dock, the computer to the APR and to attach external devices.
The Dell™ D/Port APR supports Dell D-Family portable computers and runs with the AC adapter provided with the APR.
APR I/O Connectors
1 AC adapter connector
8
serial connector
2 RJ-11 modem connector
9
video connector
digital-video interface connector
3 RJ-45 network connector
10
4 parallel connector
11
S-video connector
5 PS/2 connectors (2)
6 USB connector
7 S/P DIF connector
The following table shows the icons for each of the connectors on the back of the APR and indicates the type of
external device(s) that you can attach to each connector.
Connector Description
AC adapter connector — Connects the AC adapter.
RJ-11 modem connector — Connects a telephone line.
RJ-45 network connector — Connects a network interface cable.
http://support.dell.com/support/edocs/acc/dapr/en/7u874eb1.htm[04/07/2011 16:11:32]
Documentation
S-video connector — Connects a television or devices such as a camera or VCR.
digital-video interface connector — Connects an external monitor equipped with a digital video
interface.
video connector —
Connects an external monitor.
serial connector — Connects serial devices, such as a mouse or handheld device.
PS/2 connectors (2) — Connect PS/2-compatible devices, such as a mouse, keyboard, or external
numeric keypad. Shut down the computer before attaching or removing a PS/2-compatible device. If
the device does not work, install the device drivers from the floppy disk or CD that came with the
device, and restart the computer. You can use the integrated keyboard and an external keyboard at the
same time. When you attach a PS/2 keyboard or PS/2 numeric keypad, the integrated keypad is
disabled.
S/P DIF connector — Connects an audio (S/P DIF) cable.
USB 2.0 connectors — Connect up to three USB 2.0 compliant devices, such as a USB mouse. A
fourth USB connector can be found on the left side of the expansion station.
parallel connector — Connects a parallel device such as a printer.
Docking Controls and Lights
1
power button
2
undock request button
3
eject button
power button —
Press
to turn a docked computer on or off. The power button light indicates the power status of the APR or a
docked computer as follows:
Off — The APR is either not connected to electrical power or, if a computer is docked, the computer is turned off
or in hibernate mode.
Amber — The APR is connected to an electrical outlet but the computer is not docked.
Green — Indicates the status of a docked computer:
Steady green — The computer is turned on.
Slow-pulsing green (breathing) — The computer is in standby mode.
undock request button —
When green, you can press the button to prepare the computer for physical undocking. The button blinks during the
preparation for undocking and turns off when ready to undock.
http://support.dell.com/support/edocs/acc/dapr/en/7u874eb1.htm[04/07/2011 16:11:32]
Documentation
eject button —
The eject button indicates the status of the APR as follows:
Off — The computer is either not docked or is not ready to be ejected.
Green — The computer is ready to be undocked. Ensure that the slide lock is in the unlocked position (see Right
View), and then press the eject button to disconnect the computer from the APR.
NOTICE: Do not eject the computer unless the eject button light is green. Ejecting the computer while the light
is off may cause loss of data and damage to the computer or the APR.
Left View
1
backstop
3
audio connector
2
docking connector
4
USB connector (for Dell D/Bay)
backstop — Lets you correctly position the computer for docking.
docking connector — Lets you connect the portable computer to the APR.
audio connector —
Lets you attach headphones to the APR.
USB connector —
Lets you connect a Dell D/Bay external module bay. The lower portion of the connector also accepts a standard USB
2.0 cable.
Right View
1
slide lock
2
security cable slot
slide lock —
Lets you lock the APR to secure the computer in the APR.
security cable slot —
Lets you attach an antitheft device to the APR when the slide lock is in the locked position. The red color in the
security cable slot indicates the unlocked position.
http://support.dell.com/support/edocs/acc/dapr/en/7u874eb1.htm[04/07/2011 16:11:32]
Documentation
Bottom View
NOTE: For information on the optional monitor stand or the D/View portable-computer stand, see the
documentation that came with the stand.
NOTICE: The stand supports monitors that weigh up to 45.3 kg (100 lb). Heavier monitors may damage the
stand, computer, or APR.
1
monitor stand connector
monitor stand connector —
Connects the APR to the optional monitor stand.
Setting Up
NOTE: If the cable connector of the external device has thumbscrews, tighten them to ensure a proper
connection.
1. Connect the device's cable to the appropriate connector on the APR.
2. Attach the cable cover to the back of the APR after you connect all the devices so that the cables remain hidden
under the cable cover. See the engraved instructions inside the cable cover.
1
cable cover
3. Connect any external devices to electrical outlets.
If you attach an external monitor to the APR, you may need to press <Fn><F8>one or more times to switch the
screen image to the desired location. If the computer cover is closed, you can press <Scroll Lck><F8>on an attached
external keyboard to switch the image.
Before You Dock for the First Time
Before you initially connect your computer to the APR, the operating system must complete its setup process. To
verify that the operating system has completed the setup process:
1. Ensure that the computer is not connected to the APR (docked).
2. Turn on the computer.
3. Verify that your computer operating system completes the setup process and that the Microsoft® Windows®
desktop appears.
4. Shut down the computer.
http://support.dell.com/support/edocs/acc/dapr/en/7u874eb1.htm[04/07/2011 16:11:32]
Documentation
Docking Your Computer
You must attach an AC adapter to the APR before you dock and turn on the computer. The AC adapter powers the APR
and the computer at the same time. Any battery installed in the computer charges while you are using the APR.
NOTICE: To avoid the possibility of losing data, save any open files before you dock the computer.
NOTICE: Always use the Dell AC adapter that came with the APR. If you use any other commercially available
AC adapter, you may damage the APR or the computer.
1
AC adapter
2
AC adapter connector
1. Complete the steps in Before You Dock for the First Time.
2. Save and close any open files and exit any open programs.
3. If you have not already done so, connect the AC adapter to the AC adapter connector on the APR, and plug the
AC adapter power cable in to an electrical outlet.
4. Place the APR so that there is enough flat space in front of it to completely support the computer when the
computer is docked.
5. Ensure that the slide lock is in the unlocked position (toward the back of the APR).
6. Hold the computer by its sides and center it against the backstop at the front of the APR.
7. Lower the computer and move it slightly from side to side until you feel it seated on the alignment posts.
NOTICE: To avoid damaging the computer display, press down only over the hinges.
8. Push over the hinges until the docking connector clicks into place.
NOTICE: Do not pick up the computer or the APR when the computer is docked. Doing so can damage the
connectors on the computer and on the APR.
After docking, if the computer is turned on, the power button light on the APR turns from amber to green. See
the following table for more information on docking control lights. If the light behavior does not match the table,
perform the undock process and then dock the computer again.
Docking Control Light Activity
http://support.dell.com/support/edocs/acc/dapr/en/7u874eb1.htm[04/07/2011 16:11:32]
Documentation
States
Power
Light
Undock
Request
Light
Eject
Light
Computer undocked and APR
not connected to an electrical
outlet
Off
Off
Off
Computer undocked but APR
connected to an electrical
outlet
Amber
Off
Off
Computer docked and turned
off
Off
Off
Green
Computer docked and turned
on
Green
Green
Off
Computer docked and in
hibernate mode
Off
Off
Green
Computer is docked and
undock is requested
On
Blinks
Off
Computer is docked and in
standby mode
Pulses
Off
(breathes)
Off
Computer is docked, in
standby mode, and undock
was requested
Pulses
Off
(breathes)
Green
9. If the computer was not already turned on, turn it on by pressing the power button on either the computer or
the APR.
10. If the computer does not turn on or awaken successfully, undock and reseat the computer. Ensure that the
undock request button light is off and the eject button light is green before ejecting the computer (see Undocking
Your Computer).
Securing the APR
Antitheft devices usually include a segment of metal-stranded cable with an attached locking device and associated
key. For instructions on installing this kind of antitheft device, see the documentation that came with the device.
1
slide lock
2
security cable slot
The APR has the following security features:
slide lock —
Move the lock toward the front of the APR (locked position) to secure the computer in the APR. Move the lock toward
the back of the APR (unlocked position) before using the eject button. The red color in the security cable slot indicates
the unlocked position.
security cable slot —
Lets you attach an antitheft device to the APR when the slide lock is in the locked position.
A commercially available antitheft device usually includes a metal cable with an attached locking device and key. For
instructions on installing an antitheft device, see the documentation that came with the device.
Undocking Your Computer
NOTICE: If the computer is not receiving power from a battery, the computer turns off when you undock it and
you will lose any unsaved data.
1. Save and close any open files and exit any open programs.
http://support.dell.com/support/edocs/acc/dapr/en/7u874eb1.htm[04/07/2011 16:11:32]
Documentation
NOTICE: Never undock the computer without first preparing the computer to undock. If you undock before
preparing the computer, you will lose data. If you accidentally undock the computer without first preparing to
undock and your computer stops responding, press the power button until the computer turns off and restart
the computer. Any unsaved data will be lost.
2. You can undock the computer from the APR while the computer is either in a power management mode or
turned off.
3. Before you physically remove the computer from the APR, prepare the computer for undocking:
If you are using the Windows 2000 operating system, click the Start button and click Eject PC. If you are
using Windows XP, click the Start button and click Undock Computer.
or
Press the undock request button on the APR. The undock request light turns from steady green to blinking
green and then turns off.
When the eject button light turns green, the computer is ready to be undocked.
1
undock request button
2
eject button
3
slide lock
4. Push the slide lock back to the unlocked position.
5. Press the eject button to undock the computer from the APR, and then lift the computer away from the APR.
NOTICE: Do not pick up the computer or the APR when the computer is docked. Doing so can damage the
connectors on the computer and on the APR.
Dell Diagnostics
The Dell Diagnostics that came with your Dell computer includes tests that help you troubleshoot the controllers in
your APR.
The subtests in the Network Interface test group of the Dell Diagnostics verify the basic operation of the network
controller in the APR.
The subtests in the Serial/Infrared Ports test group check the basic operation of the APR Serial/Infrared ports. The
subtests in this test group are not intended as a diagnostic test for the external device itself.
The subtests in the USB test group check the basic operation of the external devices (such as a mouse). The subtests
in this test group are not intended as a diagnostic test for the external device itself.
For complete instructions on using the Dell Diagnostics, see the documentation that came with your computer.
Specifications
Physical
Height:
53 mm (2.09 inches)
Depth:
142 mm (5.59 inches)
Width:
276 mm (10.87 inches)
I/O Connectors http://support.dell.com/support/edocs/acc/dapr/en/7u874eb1.htm[04/07/2011 16:11:32]
Documentation
Serial (DTE)
one 9-pin connector, 16550-compatible,
16-byte buffer
Parallel
one 25-pin unidirectional, bidirectional, or
ECP connector
PS/2
two 6-pin mini-DIN connectors
USB
four 4-pin, USB 2.0-compliant connectors:
three standard USB and one powered USB
Audio
Audio line-out connector for
headphones/speakers
Digital audio
S/PDIF
Network
one RJ-45 port; 10/100/1000 GB Ethernet
Modem
one RJ-11 port
Docking (to connect to computer)
one connector
Video :
Digital video interface (DVI)
one 24-pin connector
S-video TV-out
one 7-pin mini-DIN connector
Power AC Adapter Input:
Voltage
100–240 VAC, 50–60 Hz
Amperage
up to 1.5 A
Back to Contents Page
Support Home Page
Shop
Support
Community
Company Information
My Account
Solutions
Home Users
Join the Discussion
About Dell
Sign-in / Register
Services
Small Businesses
Share Your Ideas
Corporate Responsibility
Order Status
Systems
Enterprise IT
Read our Blog
Careers
Ratings & Reviews
Investors
Community Home
Newsroom
Software & Peripherals
Laptops
AT
snWEB5
|
Desktops
|
Business Laptops
|
Business Desktops
|
Workstations | Servers | Storage | Services | Monitors | Printers | LCD TVs |
Electronics
© 2011 Dell | About Dell | Terms of Sale | Unresolved Issues | Privacy | About Our Ads and Emails | Dell Recycling | Contact | Site Map |
Feedback
| AU | BE | BR | CA | CH | CL | CN | CO | DE | DK | ES | FR | HK | IE | IN | IT | JP | KR | ME | MX | MY
NL | NO | PA | PR | RU | SE | SG | UK | VE | ALL
http://support.dell.com/support/edocs/acc/dapr/en/7u874eb1.htm[04/07/2011 16:11:32]
Large Text
|