1
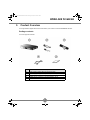
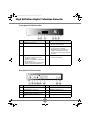
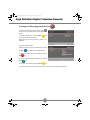
Draft 1.2 - 11/3/10
LU 253311796A RTI90-320 T2 HD UK.book Page 1 Jeudi, 8. avril 2010 8:06 08
RTI90-320 T2 HD UK
Terrestrial High Definition
Digital Television Recorder
User Manual
LU 253311796A RTI90-320 T2 HD UK.book Page 2 Jeudi, 8. avril 2010 8:06 08
High Definition Digital Television Recorder
Congratulations!
This High Definition Digital Television Recorder (DTR) is an innovative product from the latest generation
of Sagemcom digital TV recorders, dedicated to Digital Terrestrial Television. Equipped with a silent hard
disk drive, it allows easy reception and recording of digital programmes, including those broadcast in High
Definition.
Once you have connected your recorder and performed the initial installation, you will be able to watch
and enjoy all the FREEVIEW channels available in your geographical area. Thanks to its embedded ’over
the air’ upgrade feature, you can update your recorder with new features or services when they become
available.
The Sagemcom recorder follows a continuous development strategy. Therefore, we reserve the right to
make changes and improvements to the product described in this user manual without any prior notice.
This product complies with EMC directive 89/336/EEC.
CE Marking :
The CE marking certifies that the product complies with the essential requirements of the Directive
1999/5/EC concerning radio equipment and telecommunication equipment, and of Directives 2006/95/EC
concerning safety and 2004/108/EC concerning electromagnetic compatibility, defined by the European
Parliament and Council to reduce electromagnetic interferences and protect the health and safety of
users.
The CE marking also certifies that the product complies with the following harmonised standards:
EN60065, EN55013, EN55020, EN61000-3-2, EN61000-3-3.
The CE declaration of conformity can be viewed in the support section of the Sagemcom site
www.sagemcom.com, or it can be obtained from the following address:
Sagemcom - Customer relations department
250 route de l’Empereur
92848 Rueil-Malmaison Cedex - FRANCE
Copyright © Sagem Communications SAS
All rights reserved
Sagemcom is a registered trademark.
This "HD TV" Television Receiver complies with the "HD TV" Minimum Requirements. The "HD TV" Logo
is a trademark of EICTA. HDMI, HDMI logo and High-Definition Multimedia Interface are trademarks or
registered trademarks of HDMI Licensing LLC.
DTS is a registered trademark of Digital Theater Systems, Inc.
The FREEVIEW and FREEVIEW+HD words and logos are trademarks of DTV Services Ltd and are used
under licence.
Manufactured under license from Dolby Laboratories. Dolby and the double-D symbol are registered
trademarks of Dolby Laboratories Inc.
Telephone number for your local store is on your till receipt.
Should your Store be unable to help, please check the following Websites for
Digital Television Terrestrial signal coverage:
http://www.dtg.org.uk/consumer/freeview.html
http://www.freeview.co.uk
http://www.bbc.co.uk/digital
Please note: In order to receive digital signal of good quality you may need an antenna upgrade.
2
LU 253311796A RTI90-320 T2 HD UK.book Page 3 Jeudi, 8. avril 2010 8:06 08
RTI90-320 T2 HD UK
Contents
1. Safety recommendations............. 5
Connection to a hi-fi unit ................................... 15
Where to put your recorder? .............................. 5
5. First installation.......................... 16
Warnings and safety instructions ....................... 5
Language Selection .......................................... 16
Batteries ............................................................. 6
Country Selection ............................................. 16
Interference ........................................................ 6
Video Settings................................................... 16
Hard disk ............................................................ 6
Parental code.................................................... 17
USB Storage devices ......................................... 6
Channel Search ................................................ 17
Cleaning the recorder......................................... 6
6. Everyday use .............................. 18
2. Environment ................................. 7
Selecting a TV channel ..................................... 18
Meaning of logos present on the product or
its packaging..................................................... 7
Using the keys PROG+ and PROG-, or
keys 0-9 ................................................................ 18
Using the channel list ............................................ 18
Programme information banner ............................ 18
Detailed programme information ........................... 19
Product recycling and disposal........................... 7
European Directive on Waste Electrical and
Electronic Equipment (WEEE).......................... 7
Selecting a Radio channel ................................ 19
Directive on the Restriction of use of certain
hazardous substances in electronic
equipment (ROHS) ........................................... 8
Adjusting the audio volume............................... 19
Changing the favourites list .............................. 20
Temporarily selecting audio languages
and subtitles.................................................... 20
Electrical consumption of the recorder ............... 8
3. Product Overview......................... 9
Activating and Using Audio description ................. 20
Teletext and interactive services ...................... 21
Package contents............................................... 9
Temporarily selecting display formats .............. 21
Front panel of the Recorder ............................. 10
Electronic programme guide ............................ 22
Rear panel of the Recorder .............................. 10
Live mode/Deferred mode ................................ 23
Remote control ................................................. 11
4. Connections ............................... 12
Pause / Play .......................................................... 23
Rewind .................................................................. 23
Fast forward .......................................................... 23
Stop ....................................................................... 23
Connection to the terrestrial antenna ............... 12
7. Video Recordings ...................... 24
Standard outdoor antenna .....................................12
Indoor antenna ......................................................12
Connection to the antenna ....................................13
Immediate recording (Live or Deferred
programme) .................................................... 24
Connection to the TV set.................................. 13
Recording programmes from the menu ........... 25
Connection to a High-Definition television set
using a HDMI lead ................................................13
Connection to a Standard-Definition
television set .........................................................14
Scheduling a recording manually .......................... 25
Editing scheduled recordings ................................ 25
Batteries ................................................................11
Recording programmes from the Electronic
programme guide............................................ 26
Connection to a VCR/DVD recorder................. 14
Recording List .................................................. 27
Connection to a home theatre system.............. 15
Accessing Locked Recordings .............................. 27
3
LU 253311796A RTI90-320 T2 HD UK.book Page 4 Jeudi, 8. avril 2010 8:06 08
High Definition Digital Television Recorder
Managing the Recording list............................. 28
Selecting recorded programmes ...........................28
Sorting your recordings .........................................28
Creating folders .....................................................29
Erasing recordings .................................................29
Moving recordings .................................................29
Renaming recordings ............................................29
Merging recordings ................................................30
8. Installation menus...................... 31
Icons................................................................. 31
User settings ................................................... 31
Setting your language options ...............................31
Setting your User Preferences ..............................32
Recorder Locking and Parental control
options ..................................................................33
Changing your Parental code ................................33
Creating and Managing favourite lists ............. 34
Recorder settings ............................................ 35
Searching for channels ..........................................35
Searching manually for channels ..........................35
Picture settings ......................................................36
Audio settings ........................................................36
Resetting the recorder ...........................................37
Information Menu ............................................ 38
Antenna Signal Information ...................................38
Recorder Information .............................................38
Hard disk drive Information ....................................38
9. Troubleshooting ......................... 39
Using the recorder............................................ 39
Updating the software ...................................... 40
10. Customer Support...................... 41
11. Guarantee Terms........................ 42
12. Specifications ............................. 44
4
LU 253311796A RTI90-320 T2 HD UK.book Page 5 Jeudi, 8. avril 2010 8:06 08
RTI90-320 T2 HD UK
1. Safety recommendations
Use of the recorder is subject to safety measures designed to protect users and their environment.
Where to put your recorder?
In order to guarantee the correct operation of your recorder, you must:
• place it indoors to protect it from lightning, rain, and sun rays,
• place it in a dry and well ventilated area,
• keep it away from heat sources such as radiators, candles, lamps,
etc.
• protect it from dampness, place it on a flat surface from where it will
not fall and is out of reach of the children,
• do not place anything on top of your recorder (as it would restrict
ventilation): the ventilation slots located on the casing prevent your
recorder from overheating. If you place the recorder in a
compartment, leave a space of at least 10 cm on each side and
20 cm on the front and back of the recorder,
• connect it directly to the mains with the provided cords, the socket
must be near the recorder and easy to access. The use of an
extension cable (with multi-points) is not recommended.
Warnings and safety instructions
NEVER OPEN THE RECORDER OR THE POWER SUPPLY UNIT! YOU RISK GETTING AN
ELECTRIC SHOCK.
•
•
•
•
•
•
•Use only the power supply unit supplied with the recorder to connect it to the mains.
Other practice may be dangerous.
•As a precaution, in case of danger, the power supply unit acts as a disconnecting
mechanism for the 230V power supply. That is why it is imperative that you connect the
recorder to a power outlet located nearby and easily accessible.
•You must imperatively connect the power supply unit to the recorder before connecting
the power supply unit to the power socket.
To avoid short-circuits (fire or electrocution hazard), do not expose your recorder to dampness. Do
not place any object containing liquid (vase for example) on the appliance. The recorder must not be
splashed with liquid. If liquid is spilled onto the recorder, unplug it immediately from the mains and
consult your supplier.
Take care not to allow liquids or metal objects to enter the recorder through the ventilation slots.
Avoid reconnecting the recorder after it has been subjected to large changes in temperature.
The recorder must be disconnected from mains supply (from the power outlet or rear panel) before
any modification of connection between TV, VCR or antenna.
In the event of a storm, it is advisable to unplug the antenna. Even if the recorder and the television
set are disconnected from the power supply, lightning can still damage them.
Only personnel approved by the manufacturer can repair the recorder. Failure to comply with these
safety precautions will invalidate the guarantee.
5
LU 253311796A RTI90-320 T2 HD UK.book Page 6 Jeudi, 8. avril 2010 8:06 08
High Definition Digital Television Recorder
Batteries
Batteries are easily swallowed by young children. Do not allow young children to play with the remote
control.
To avoid damaging the remote control, only use identical batteries or batteries of an equivalent type. The
batteries provided are not rechargeable.
Interference
Do not place the recorder near appliances that may cause electromagnetic interferences (for example
loudspeakers). This could affect recorder operation and distort the picture or sound.
Hard disk
This unit contains a hard disk drive. Please wait for the unit to go into standby mode before unplugging
and moving it.
USB Storage devices
Please wait until the recorder is in standby mode before disconnecting your storage devices. Else, you
could lose data or damage your storage device.
Cleaning the recorder
The outer casing of the recorder can be cleaned with a soft and dry cloth. Do not use any type of abrasive
pad, scouring powder or solvents, such as alcohol or turpentine, as they could damage the surface of the
recorder.
6
LU 253311796A RTI90-320 T2 HD UK.book Page 7 Jeudi, 8. avril 2010 8:06 08
RTI90-320 T2 HD UK
2. Environment
Preservation of the environment is an essential concern of the manufacturer. The desire of the
manufacturer is to operate systems observing the environment and consequently it has decided to
integrate environmental performances in the life cycle of its products, from manufacturing to
commissioning, use and elimination.
Meaning of logos present on the product or its packaging
The crossed-out dustbin sign stuck on the product or its accessories means that at the end of its
life, the product is subject to selective collection and must not be thrown away in unsorted
household waste.
The looped arrow sign means that the packaging may be recycled and must not be disposed of
with household waste.
The green logo means that a financial contribution is paid to an approved national organisation to
improve packaging recovery and recycling infrastructures.
The logo with three arrows shown on the plastic parts means that they may be recycled and that
they must not be disposed of with household waste.
Product recycling and disposal
To facilitate recycling, please respect the sorting rules set up locally for this kind of waste.
If your product contains batteries, they must be disposed of at appropriate collection points.
European regulations ask you to dispose of products belonging to the family of electrical and electronic
equipments (
) selectively:
• At the collection points made available to you locally (drop-off centre, selective collection, etc.),
• At sales points in the event of the purchase of similar equipment.
In this way you can participate in the re-use and upgrading of Electrical and Electronic Equipment Waste,
which can have an effect on the environment and human health.
European Directive on Waste Electrical and Electronic
Equipment (WEEE)
In the context of sustainable development, the reduction of wastes to be eliminated by reusing, recycling,
composting and energy recovery is strongly advised.
In order to comply with this directive which is applicable to EEEs sold after 13/08/2005, your recorder will
be taken back free of charge and recycled by the distributor of the EEE within the limits of the quantity and
types of equipment bought from them. These appliances which contain substances potentially dangerous
to human health and the environment will be recycled.
7
LU 253311796A RTI90-320 T2 HD UK.book Page 8 Jeudi, 8. avril 2010 8:06 08
High Definition Digital Television Recorder
Directive on the Restriction of use of certain hazardous substances
in electronic equipment (ROHS)
Your recorder along with the batteries supplied comply with the directive relating to the RoHS –
dangerous materials such as lead, mercury or cadmium are not used. This avoids environmental hazards
and any risks to the health of personnel at the recycling centres. The batteries of the remote control can
be removed simply.
Note: When the batteries of the remote control are worn out, please dispose of them at a collection point
and not with household waste.
Electrical consumption of the recorder
To reduce the consumption of your recorder, you are recommended to place it in standby mode when not
in use. We recommend that you turn off the recorder or unplug it from the mains if you will not be using it
for a prolonged period of time.
8
LU 253311796A RTI90-320 T2 HD UK.book Page 9 Jeudi, 8. avril 2010 8:06 08
RTI90-320 T2 HD UK
3. Product Overview
Your High Definition Digital Television Recorder allows you to watch and record FREEWIEW channels.
Package contents
Your new equipment includes:
Item
Description
1
1 High Definition Digital Television Recorder (DTR)
2
1 power supply unit (power adaptor and power cord)
3
1 remote control with 2 batteries (AAA)
4
1 HDMI lead for connection to an High Definition TV set
5
this user manual
9
LU 253311796A RTI90-320 T2 HD UK.book Page 10 Jeudi, 8. avril 2010 8:06 08
High Definition Digital Television Recorder
Front panel of the Recorder
Item
1
Description
Item
USB port (for future use)
4
Description
P• Change channel (Down)
2
Status indicator
5
Standby button
• Put the recorder in standby
mode/Wake up the recorder from
standby mode (press and let go)
• Restart the recorder (press and hold
for 5 sec.)
3
Digital display
6
• Shows the current time when the
recorder is in standby.
• Shows the programme number when
the recorder is on.
• Shows hard disk activity (recording in
progress, programme playback, ...)
P+
• Change channel (Up)
Rear panel of the Recorder
Item
Description
Item
Description
7
Power supply unit connector
11
Digital audio connector (S/PDIF)
8
Ethernet port (for future use)
12
SCART connector (to TV)
9
HDMI Digital video audio connector
13
Antenna input
10
Analogue audio connectors (to hi-fi
unit)
14
Antenna output
10
LU 253311796A RTI90-320 T2 HD UK.book Page 11 Jeudi, 8. avril 2010 8:06 08
RTI90-320 T2 HD UK
Remote control
Key(s)
Description
1
Put the recorder in standby mode/Wake up the
recorder from standby mode.
2
Access channels and various on-screen options
3
Display the electronic programme guide (EPG)
4
Turn the sound off/on
5
Increase or decrease the audio volume
6
Access menus
7
Move in a page, a menu…
8
Display the channel list, confirm a selection
9
Go back to the previous channel, screen or mode
10
Select subtitles
11
This key is by default deactivated. Becomes active
when Audio description is activated in your User
Preferences, and allows then to set Audio
description on the current programme (see Setting
your language options, page 31).
12
Display programme information and options
13
Change channel
14
Video resizing (if TV set connected via HDMI).
15
On-screen options (MHEG, Teletext pages and
menu)
16
Access the recording list
17
Exit a screen, a mode
18
Display Teletext pages when available
19
Switch from TV mode to Radio mode
20
Skip backward / Rewind / Fast forward / Skip forward
21
Stop / Play / Pause
22
Launch immediate recording, Schedule a recording
from the electronic programme guide (EPG)
Undocumented keys are not used on this product.
Batteries
The remote control needs two batteries (AAA) to operate. The drawing in the battery compartment
indicates how to install them. The batteries provided are not rechargeable.
11
LU 253311796A RTI90-320 T2 HD UK.book Page 12 Jeudi, 8. avril 2010 8:06 08
High Definition Digital Television Recorder
4. Connections
Before installing your recorder:
• Please check that the delivery is complete (see Package contents, page 9).
• Please ensure that the appliances to be connected together (recorder, TV set, VCR…) are unplugged
before making any connections.
• Please ensure that Digital Terrestrial Television (DTT) is available in your area.
Connection to the terrestrial antenna
Very often to get the best reception, you may simply need to adjust your antenna. Alternatively, you can
connect an indoor antenna to your system. For more information, please contact your specialised
distributor.
Standard outdoor antenna
Preferably use an outside roof antenna that is designed to receive UHF channels (21 to 69). However:
• if your building is equipped with an old antenna model, digital channels may be difficult or even
impossible to receive. The problem can only be resolved by changing the antenna.
• if your building is equipped with a common antenna which contains selective filters devised for
analogue channels, reception will most probably not work correctly. In this case, you will have to
contact the administrator of the building.
• some antennas directed towards an analogue TV transmitter must be re-adjusted towards a digital TV
transmitter. If you encounter reception problems, you can also try placing the antenna at different
heights.
Indoor antenna
In ideal reception conditions, this type of antenna is sufficient. Here, however, are some useful tips:
• use an antenna designed to receive channels 21 to 69.
• install the antenna close to the window and direct it towards the digital TV transmitter.
• if possible, use an antenna with an amplifier. The recorder can provide remote power supply to your
indoor antenna (see Antenna Signal Information, page 38).
12
LU 253311796A RTI90-320 T2 HD UK.book Page 13 Jeudi, 8. avril 2010 8:06 08
RTI90-320 T2 HD UK
Connection to the antenna
1. Plug the antenna cable (not supplied) into the ANTENNA IN input connector on your recorder.
2. You can connect the RF output connector of your recorder to the antenna input of the television set or
VCR/DVD recorder (cable not supplied).
Connection to the TV set
Connection to a High-Definition television set using a HDMI lead
1. To take advantage of High Definition picture quality, you must connect the HDMI connector of your
recorder to the HDMI connector on your television set (cable supplied).
2. To connect other devices to the recorder (VCR, home theatre cinema...), refer to the following pages.
3. Connect the power adaptor to the power cable. Then, connect the power cable into the 12V connector
on the recorder.
4. Plug the power cord into the wall socket.
13
LU 253311796A RTI90-320 T2 HD UK.book Page 14 Jeudi, 8. avril 2010 8:06 08
High Definition Digital Television Recorder
Connection to a Standard-Definition television set
1. You must connect the television set to your recorder using a SCART connector (not supplied).
2. To connect other devices to the recorder (home theatre cinema...), refer to the following sections.
3. Connect the power adaptor to the power cable. Then, connect the power cable into the 12V connector
on the recorder.
4. Plug the power cord into the wall socket.
Connection to a VCR/DVD recorder
See the diagram below to connect your recorder to a VCR/DVD recorder.
Note
If your VCR/DVD recorder has more than one SCART connector, choose the
TV or EXT1 socket.
14
LU 253311796A RTI90-320 T2 HD UK.book Page 15 Jeudi, 8. avril 2010 8:06 08
RTI90-320 T2 HD UK
Connection to a home theatre system
Some programmes are broadcast with a high quality multichannel digital sound. The connection of your
recorder to a home theatre system will give you a cinematic surround sound experience when watching
these programmes.
This can easily be done by connecting with a coaxial cable (not supplied) the DIGITAL AUDIO output of
your recorder to the digital audio coaxial input of your home theatre amplifier
Dolby® Digital Plus is one of the latest innovations of Dolby Laboratories in high quality digital audio.
Compatible with Dolby Digital systems, it addresses the expectations of most demanding viewers, and is
scalable to the diverse world of content delivery, such as, for instance, High Definition TV broadcast.
Note
For more information, please visit the following website:
http://www.dolby.com/consumer/setup/index.html
Connection to a hi-fi unit
To make the most of the digital quality sound and listen to radio channels with the TV turned off, just
connect the right and left audio outputs of the recorder to the auxiliary input of your hi-fi system (cable not
supplied).
15
LU 253311796A RTI90-320 T2 HD UK.book Page 16 Jeudi, 8. avril 2010 8:06 08
High Definition Digital Television Recorder
5. First installation
Once the recorder is physically connected, you need to go through the setup procedure to get your
FREEVIEW channels.
1. Switch on your TV.
2. Press the Standby
button on your remote control to wake the recorder up from standby mode.
3. The first installation screen should appear.
Language Selection
4. Select your language with the
Press
or
key.
to continue.
Country Selection
5. Select your country with the
Press
or
key.
to continue.
Video Settings
6. Select the settings better suited to your needs.
Use the up and down keys to highlight a setting, use
the left and right arrows to select a value.
• HDMI Output: If your TV set is connected to the
recorder with an HDMI cable, select YES. If you
have a standard TV set, select NO.
• TV Format: select the display mode for your TV:
16/9 (widescreen TV), 4/3 (Traditional TV) or Auto
(programme format will be respected - 16:9 or
4:3).
• TV SCART: select the video standard (RGB,
CVBS) for the TV output.
Press
to continue.
16
LU 253311796A RTI90-320 T2 HD UK.book Page 17 Jeudi, 8. avril 2010 8:06 08
RTI90-320 T2 HD UK
Parental code
7. Enter a parental four-digit code using the remote
control (0000 is not accepted).
8. Enter the same code to confirm it.
9. To hide adult genre channels, select HIDING ADULT
CHANNELS and set it to ENABLE.
Press
to continue.
Note
The parental code is used to lock access to the recorder and channels. Make
sure you remember it for future use. You can change the code at any time (see
Changing your Parental code, page 33).
Channel Search
10.The recorder automatically searches for available
FREEVIEW TV and radio channels.
11.Press
to save the channels found.
Note
If the recorder cannot find any channels, you will be asked to adjust the
antenna. Select YES to view the reception strength and quality of the antenna
signal. Check the antenna cable connections.
When the signal level is satisfactory, press
to resume the installation.
If the level and quality of reception remain insufficient, contact your antenna
installer.
You recorder is now set. You can start watching and enjoying all your FREEVIEW channels.
Should any problem that prevents you from completing the installation arise, please contact your retailer
or the Sagemcom Hotline.
UK Hotline: 08450 900 316
17
LU 253311796A RTI90-320 T2 HD UK.book Page 18 Jeudi, 8. avril 2010 8:06 08
High Definition Digital Television Recorder
6. Everyday use
Selecting a TV channel
Using the keys PROG+ and PROG-, or keys 0-9
Press PROG+ or PROG- on your remote control to change channel or enter its number on the numeric
keypad to switch to the channel you want.
Using the channel list
Press
to display the channel list, select your channel then press
again to confirm.
Programme information banner
Each time you switch channels, the information banner appears onscreen. You can also display it by
pressing
once while watching a programme.
You can set the display time of the information banner in your User Preferences (see Setting your User
Preferences, page 32).
-
A : Channel number and name
-
B : Name of programme
-
C : Start time of programme
-
D : Elapsed time
-
E : Current time
-
F : End time of programme
-
G : Signal level
-
H : Number of subtitle languages available
-
I:
-
J : Dolby or Dolby + audio output information
-
K : Audio description available
-
L : Multiaudio available
-
M : Programme resolution
-
N : Programme broadcast in HD
-
O : Parental Guidance
-
P : Favourite list
Teletext service available
Note
The availability and accuracy of the programme information depend on the
channel broadcaster.
18
LU 253311796A RTI90-320 T2 HD UK.book Page 19 Jeudi, 8. avril 2010 8:06 08
RTI90-320 T2 HD UK
Detailed programme information
If you want more information on the current and following programme, press
programme to display the extended information banner.
Press
/
programme.
twice while watching a
to view information on the next/current
Use
and
to see information on the current/next
programme on other channels.
To switch to the selected channel, press
Press again
or
information banner.
.
to hide the extended
Selecting a Radio channel
Press
to switch to RADIO mode. You can also
access it by pressing
CHANNELS LIST.
Use
and
and selecting RADIO
to select a radio channel.
To switch to the selected channel, press
.
Press again
or
to exit the RADIO mode and
switch back to TV mode.
Adjusting the audio volume
Volume: Use VOL+ and VOL- to turn the volume up and down.
Mute mode: Use
to turn the sound off. Press the same key again to turn the sound back on.
Note
These operations do not affect the sound on the Scart socket if you set it to
Recorder mode (see Picture settings, page 36).
19
LU 253311796A RTI90-320 T2 HD UK.book Page 20 Jeudi, 8. avril 2010 8:06 08
High Definition Digital Television Recorder
Changing the favourites list
You can create and manage favourite channels lists in the FAVOURITE LISTS menu (see page 34).
To switch from one channel list (main channel list included) to an existing favourite list, press
display the detailed information banner.
Press the blue
twice to
key to switch to the next available favourite list.
Repeat this operation until the favourite list of your choice is selected, or to return to the main channel list.
Temporarily selecting audio languages and subtitles
Note
All modifications take place immediately. However, temporary adjustments are
not retained when you change channel.
While watching a programme, press
once to
display the programme information banner. Press
to display the options banner.
You can also display the audio tracks, subtitles or audio
description screen by pressing
Use
,
,
or
.
to select your settings then press
to confirm.
Activating and Using Audio description
If you want to use the Audio description feature, activate it first in your User Settings (see Setting your
language options, page 31). Programmes providing this service will be broadcast in the selected audio
preferred language if available.
You can then use
to temporarily deactivate the audio description feature, change the language and
adjust the audio description volume. Please note that the
description is activated in the User settings.
20
key will only respond if the audio
LU 253311796A RTI90-320 T2 HD UK.book Page 21 Jeudi, 8. avril 2010 8:06 08
RTI90-320 T2 HD UK
Teletext and interactive services
Whenever Teletext or interactive services are available (news, local weather information, etc.), an
invitation to press the red key appears on screen.
You can then press
or the red
key on your remote control to access available services.
You can then browse the services, teletext pages and local information available following the onscreen
indications.
Temporarily selecting display formats
Note
All modifications take place immediately. However, temporary adjustments are
not retained when you change channel.
This feature is only available if you connected the recorder to an HD TV set via
the HDMI connector.
Press the
key to toggle between the display formats available for the programme you are
watching:4/3, 14/9 zoom, 16/9 zoom or Full screen.
21
LU 253311796A RTI90-320 T2 HD UK.book Page 22 Jeudi, 8. avril 2010 8:06 08
High Definition Digital Television Recorder
Electronic programme guide
The electronic programme guide displays programme information for all available channels (depending
on the information provided by channel broadcasters). You can also record programmes directly from the
electronic programme guide (see Recording programmes from the Electronic programme guide,
page 26).
Press
to access the electronic programme guide. You can also access it by pressing
selecting ELECTRONIC PROGRAM GUIDE.
and
The electronic guide shows programme information on all available channels.
You can PIN-lock access to adult genre using the parental control feature (see Recorder Locking and
Parental control options, page 33).
To toggle between the Grid and List display
modes, use the red
key.
To help you navigate in the electronic programme
guide, a vertical line shows the current time.
You can perform the following actions:
• To select a channel/programme, use the
,
,
or
keys. You can also directly enter
the channel number on the remote control.
• To see extended information on a programme,
highlight it and press
.
• To zap to a selected channel, select it and
press
.
• To jump to the next/previous day, press the
/
key.
• To record a programme that is currently
broadcast, select it and press the
key
(see Recording programmes from the Electronic programme guide, page 26 for more
information on this feature). To schedule the recording of a future programme, select it and press the
green
key (see Recording programmes from the Electronic programme guide, page 26 for
more information on this feature).
• To see programme information for a specific genre on all available channels, press the blue
key
and select the genre you are interested in (ex : news).
• You can also search for a specific programme based on its genre or its title. To access this search
feature, press the yellow
key.
You can at any time go back to the current programme and channel information by pressing the
To exit the electronic programme guide, press the
22
key.
key.
LU 253311796A RTI90-320 T2 HD UK.book Page 23 Jeudi, 8. avril 2010 8:06 08
RTI90-320 T2 HD UK
Live mode/Deferred mode
The recorder automatically saves the previous minutes of the channel that is watched (last 60 to 120
minutes depending on the signal characteristics).
This sliding recording mode makes it possible to stop live mode, rewind and review the programme that
was recorded moments before.
Press
recording.
,
,
and
to enter the time shift
A banner with the Deferred/Live time shift is displayed on the
screen.
Pause / Play
You can pause a programme without missing what’s next by pressing the
current programme where you left it, press the
key. To resume the
key.
Rewind
You can rewind by pressing the
key.
You will then see the Deferred/Live delay increase. By pressing the key several times, you can increase
the rewind speed (up to 300 times the normal speed).
Therefore, it is possible to rewind 1 or 2 hours. Please note that to do so, the current programme must
have been watched for that period of time at least.
Fast forward
You can fast forward by pressing the
key.
You will then see the Deferred/Live delay decrease. By pressing the key several times, you can increase
the fast forward speed (up to 300 times the normal speed).
If you remain in fast forward, you will finish by reaching the live programme.
Stop
You can exit the Deferred mode at any time and go back to the live programme.
To do so, press the
key.
23
LU 253311796A RTI90-320 T2 HD UK.book Page 24 Jeudi, 8. avril 2010 8:06 08
High Definition Digital Television Recorder
7. Video Recordings
The recording capacity of your recorder depends on the selected programme. On average, one hour of
recording requires from 1 GB (SD programme) to 2.5 GB (HD programme) of hard disk space.
You can simultaneously:
• record a programme and watch another programme,
• record 2 programmes and watch any of them.
In the same way, you can simultaneously:
• watch a programme in deferred mode while recording another programme,
• watch a recorded programme and record one or 2 programmes.
Please note if MHEG services are available on the programme you are recording, they will be discarded.
Immediate recording (Live or Deferred programme)
To record a live programme, select the desired channel and
press
.
The name of the channel channel being recorded is displayed on
the screen.
The recorder will by default record the programme until its announced end time.
You can then change channel without the recording being affected.
To stop a recording, press the
key.
In the same way, if you decide to record a programme that you have been watching for a certain time (1 to
2 hours maximum), enter the deferred mode using
,
,
and
, then press
you want to start recording.
Note
You can then put the recorder in standby: the recording will stop automatically
at the end of the recording time.
When recording in deferred mode, the recorder can add a few seconds of
video at the beginning.
Once a recording is launched, you can no longer rewind before the start time.
24
when
LU 253311796A RTI90-320 T2 HD UK.book Page 25 Jeudi, 8. avril 2010 8:06 08
RTI90-320 T2 HD UK
Recording programmes from the menu
Press the
TIMERS.
key to access the main menu. Once you are in the main menu, select RECORDING
The event timer screen shows the list of your scheduled
recordings.
There are two types of recordings:
• recording scheduled from the EPG (the last column
displays the programme name)
• recordings that you schedule manually (the last
column displays the ’Timer’ mention)
Scheduling a recording manually
To manually schedule a recording:
1. Select a blank New line and press
.
An edition screen appears allowing you to select your
recording options.
2. Select the channel you want to record.
3. Select the recording repetition:
• Single: only once at the scheduled time.
• Weekly: once a week at the scheduled time.
• Daily (Mon-Fri): at the scheduled time, every day
from Monday to Friday.
• Daily (Mon-Sat): at the scheduled time, every day
from Monday to Saturday.
• Daily (Mon-Sun): at the scheduled time, every day and every week.
4. Enter the recording date.
5. Enter the recording start and end time.
6. If you want to PIN-lock access to the recording from the recording list, set LOCKING to YES. Locked
recordings are hidden in the Recording list (see Accessing Locked Recordings, page 27).
7. Confirm the schedule by pressing
.
Editing scheduled recordings
To modify an existing scheduled recording, just select it in the list and press
: the edition screen
then appears allowing you to modify the recording options. Please note that changing the repetition
cannot be undone.
Note
Editing a recording scheduled from the EPG is possible, but by doing so, you
will lose all automatic information update (automatic reschedule, series
recording, etc...). We recommend that you delete instead the event in the
Recording Timer list and reschedule the recording from the EPG.
25
LU 253311796A RTI90-320 T2 HD UK.book Page 26 Jeudi, 8. avril 2010 8:06 08
High Definition Digital Television Recorder
Recording programmes from the Electronic programme guide
The advantage of recording from the electronic programme guide is that you can record specific
programmes instead of choosing channel time slots. You can only do this if the programme information is
provided by the channel broadcaster.
By default, the recorder records a programme based on its announced time. To avoid missing parts of the
programme, you can customise timers margins in your User Preferences (see Setting your User
Preferences, page 32).
Press
to access the electronic programme guide.
1. Select the channel and programme you want to
record.
2. Press
to schedule the recording of the selected
programme.
The programme cell (grid mode) or name (list mode)
become red.
3. Repeat the operation for all the programmes you
want to record.
• If a recording is conflicting with another recording
(scheduled at the same time), the recorder will
ask you to resolve the schedule conflict.
• If the programme you want to record is part of a series (symbolised by a multipage icon above the
programme start time), the recorder will ask if you want to record the single episode or all
announced forthcoming episodes.
4. To cancel the recording of a programme, press
again.
The scheduled recordings appear in the Timer list, as ’Once’ or ’Series’ depending on your repetition
choice.
Please note that if you edit a recording that has been scheduled from the EPG, you will lose all automatic
information update made available by the EPG (automatic reschedule, series recording, etc...).
26
LU 253311796A RTI90-320 T2 HD UK.book Page 27 Jeudi, 8. avril 2010 8:06 08
RTI90-320 T2 HD UK
Recording List
Press the
key to access the recording list. You can also access it by pressing
RECORDING LIST.
and selecting
You will be able to create folders to organise your recordings, and control the disk space available.
The left panel displays the existing folders, and the
programmes you recorded (locked recordings
excluded).
Highlight a recording using the navigation arrows, then
press
to play it.
Depending on the genre of the recorded programme,
you may be asked to enter the parental PIN-code
before you can play it.
In Play mode:
• Use
• Press
,
and
to move in the recorded programme.
to stop and return to the list.
To exit this menu, press
.
Accessing Locked Recordings
If you want to access the complete list of recordings, and view therefore the recordings you PIN-locked,
press the yellow
key. You will be asked to enter the parental PIN-code before you can view them.
Press the yellow
key again to switch back to the restricted list of recordings.
27
LU 253311796A RTI90-320 T2 HD UK.book Page 28 Jeudi, 8. avril 2010 8:06 08
High Definition Digital Television Recorder
Managing the Recording list
The coloured keys let you manage the recording list and offer you the following actions:
• red
: select an operation
• green
• blue
: select the highlighted recording
: sort the recordings by date or name
Selecting recorded programmes
You can work with several recordings at the same time. To handle several files simultaneously, it is
preferable to select them beforehand.
To select several recordings:
• Highlight one recording.
• Press the green
key, a ’check mark’ symbol
appears next to the recording.
• Perform the same action to select other recordings.
• Once all the desired recording are selected, press
the red
key to
management menu.
access
the
recording
Note
The operations described in this section apply to recordings and folders.
Sorting your recordings
Press the blue
key to sort your recordings by date or name.
28
LU 253311796A RTI90-320 T2 HD UK.book Page 29 Jeudi, 8. avril 2010 8:06 08
RTI90-320 T2 HD UK
Creating folders
You can create folders to organise your recordings.
• Press the red
key.
• Select the action "New folder" and press
.
• Use
to delete the default name, then enter the desired name using the numeric keypad on the
remote control.
Note
All folders created will be saved at the root of the hard disk. You can not create
a folder in a folder.
Use alphanumeric characters (letters and numbers) when naming folders. Do
not use special characters. Accepted signs are ".", "_" and "-".
• Press
to confirm the creation.
Erasing recordings
• Select the recording(s) or folder(s) you want to erase with the green
• Press the red
key.
key.
• Select the action "Delete" and press
.
A warning message appears for each item to erase.
• Press
to confirm.
Moving recordings
• Select with the green
• Press the red
key the recording(s) you want to move.
key.
• Select the action "Move" and press
• Use
and
.
to select the new location then press
.
Renaming recordings
• Select with the green
• Press the red
key the recording or folder you want to rename.
key.
• Select the action "Rename" and press
.
29
LU 253311796A RTI90-320 T2 HD UK.book Page 30 Jeudi, 8. avril 2010 8:06 08
High Definition Digital Television Recorder
• Use
to delete the existing name, then enter the desired name using the numeric keypad on the
remote control.
Note
Use alphanumeric characters (letters and numbers) when naming folders. Do
not use special characters. Accepted signs are ".", "_" and "-".
• Press
to confirm.
Merging recordings
You can merge two recordings to create one single recording.
• Select the first recording and press the green
key.
• Select the second recording and press the green
• Press the red
key.
key.
• Select the action "Merge 2 records" and press
.
A confirmation message appears onscreen.
• Select YES and press
to confirm.
The merged recording will carry the title of the second recording.
30
LU 253311796A RTI90-320 T2 HD UK.book Page 31 Jeudi, 8. avril 2010 8:06 08
RTI90-320 T2 HD UK
8. Installation menus
To move around the screens and change various settings, just use the keys
your selections, press
to confirm, and
,
,
and
to highlight
to leave a screen.
Icons
Recording timers
Recording list
Favourite lists
Electronic
Programme Guide
User settings
Receiver settings
Information
Radio Channels list
User settings
To access the user settings screen, press
SETTINGS.
.
Once you are in the main menu, select USER
Setting your language options
In USER SETTINGS, select LANGUAGE SETTINGS.
Select the menu language, audio language and subtitle
language you want.
Programmes will be broadcast in the selected audio
language, provided it is available. Your choice of subtitle
language will be applied if available.
You can also activate the audio description and subtitles
for the deaf and hard of hearing features. Programmes
providing these services will be broadcast in the
selected audio main language if available, and in the selected subtitle main language if available.
31
LU 253311796A RTI90-320 T2 HD UK.book Page 32 Jeudi, 8. avril 2010 8:06 08
High Definition Digital Television Recorder
Setting your User Preferences
In USER SETTINGS, select USER PREFERENCES.
Display preferences
• Banner time-out: You can set how long you want
the zapping and information banners to stay
onscreen.
• Volume bar time-out: You can set how long you
want the volume bar to stay onscreen when you
turn the volume up, down, or mute it.
• User Country: Initially defined during the first
installation, it is used to give you access to
programmes and service available in your
geographical location. To change the country, you will need to reset the default settings and
reconfigure your recorder (see Resetting the recorder, page 37). Some services or channels may
become unavailable.
• Network monitoring: By activating this feature, you will be automatically informed when any new
channel or service become available.
Recording preferences
By default, the recorder records programmes based on their announced time. This recording mode is
identified as PROGRAMME type.
You can programme recording margins which will be automatically added to the recordings carried out via
the electronic programme guide. You can thus set the recorder so that it starts to record a programme
before its announced start time, and stops after its announced end time. To activate this feature, just set
the recording type to TIMER, and select the desired starting and ending times (0,1,2,5, 10 or 15 minutes).
Note
In TIMER mode, the series recording function is not available.
Sleep Timer
You can set the recorder to automatically switch to standby mode at a specific time. If you activate this
feature, set the desired SLEEP TIME in 24H format.
32
LU 253311796A RTI90-320 T2 HD UK.book Page 33 Jeudi, 8. avril 2010 8:06 08
RTI90-320 T2 HD UK
Recorder Locking and Parental control options
In USER SETTINGS, select LOCKING.
Recorder locking
You can lock access to the recorder. If you activate the
recorder lock, you will need to enter the parental code
every time you switch the recorder on, or want to access
the recorder menus (Recorder settings, Channels, etc.).
Channel locking
You can lock access to specific channels. If you activate
the channel lock, you will need to enter the parental
code every time you switch to a locked channel.
To set the list of channels you want to lock, select Channels to lock and press
select/unselect the channels of your choice by pressing
. You can then
.
Hiding Adult channels
This feature lets you hide adult genre channels. If you activate this feature, all adult genre channels will be
hidden: you will not be able to switch to an adult genre channel, or browse this category in the electronic
programme guide.
Use this feature to protect your children from this type of exposure.
Changing your Parental code
In USER SETTINGS, select CHANGE PARENTAL
CODE.
The parental code is initially defined during the first
installation, and is used to lock access to the recorder
and channels.
To change your parental code, enter the current fourdigit code using the remote control.
Then enter your new parental code and confirm it (0000
is not accepted).
33
LU 253311796A RTI90-320 T2 HD UK.book Page 34 Jeudi, 8. avril 2010 8:06 08
High Definition Digital Television Recorder
Creating and Managing favourite lists
To access the favourites settings screen, press
.
Once you are in the main menu, select FAVOURITE
LISTS.
To create a favourite list, press the yellow
to select an empty list (list A to D).
key
Select the type of lists you want to create: TV or
Radio list.
An edition screen appears.
Highlight a channel in the All channels list and press
the blue
key to add it into your favourite list.
To remove a channel from the favourite list, use the
red
key.
To move a channel within the favourite list, use the
green
key.
To save your favourite list, press the yellow
key.
To edit or empty a list of favourite channels, select it and carry out the desired modifications.
34
LU 253311796A RTI90-320 T2 HD UK.book Page 35 Jeudi, 8. avril 2010 8:06 08
RTI90-320 T2 HD UK
Recorder settings
To access the recorder settings screen, press
SETTINGS.
. Once in the main menu, select RECEIVER
If the recorder lock is activated, enter your parental code (to change your parental code, see Changing
your Parental code, page 33).
Searching for channels
This menu lets you search for all available FREEVIEW channels and update the channel list.
In RECEIVER SETTINGS,
CHANNEL SEARCH.
Press
select
AUTOMATIC
to launch the channel search.
A bar shows you the search progress.
Once the search is complete, select YES and
press
to save the channel list.
Searching manually for channels
This menu lets you manually search for a specific channel, on a specific frequency or with a specific
modulation.
In RECEIVER SETTINGS, select MANUAL CHANNEL
SEARCH.
Set your search criteria: enter a channel number (21 to
69), a frequency, or select a modulation.
Press
to launch the channel search.
35
LU 253311796A RTI90-320 T2 HD UK.book Page 36 Jeudi, 8. avril 2010 8:06 08
High Definition Digital Television Recorder
Picture settings
In RECEIVER SETTINGS, select VIDEO SETTINGS.
Check the manuals of your video equipment to know what settings you need.
• HDMI Output: If your HD TV set is connected to the
recorder with an HDMI cable, select YES. If you
have a standard TV set, select NO.
• HD RESOLUTION: select the output resolution for
your HD TV set (1080i, 720p or 576p).
• TV Format: select the display mode for your
standard TV set: 16/9 (widescreen TV), 4/3
(Traditional TV) or Auto (programme format will be
respected - 16:9 or 4:3).
• Video resizing: if your standard TV format is 4/3,
select the desired resizing mode: Pan & Scan or
Letterbox.
• SCART: If you connected your standard TV set to
the recorder with a Scart cable, select TV mode. If
instead, you connected a DVD recorder to the Scart
connector, select the RECORDER mode. In TV
mode, audio volume changes and onscreen messages will be sent to the TV set. In Recorder mode,
none of these operations are sent to the external recording device so that they do not affect your
recordings.
• Video Standard: select the video standard (PAL or S-Video) best suited for the TV/AUX output.
Audio settings
In RECEIVER SETTINGS, select AUDIO SETTINGS.
Check the manuals of your audio equipment to know what settings you need.
If you have connected your recorder to a home theatre
cinema via the Digital audio connector, set DIGITAL
AUDIO OUTPUT to MULTICHANNEL. Otherwise, leave
it to STEREO.
If the audio volume varies noticeably between
programmes because of the audio type broadcast
(Stereo, multichannel, etc.), adjust the volume (default
value is 0 decibel) using
and
.
If the sound and picture are not synchronized, adjust the
AUDIO/VIDEO DELAY setting (default value is 0
millisecond) using
and
.
These settings will apply to all programmes watched on all channels.
36
LU 253311796A RTI90-320 T2 HD UK.book Page 37 Jeudi, 8. avril 2010 8:06 08
RTI90-320 T2 HD UK
Resetting the recorder
Note
If you reset the default settings, you lose the channels and settings you made.
This operation does not erase the recordings saved in the recording list.
In RECEIVER SETTINGS, select RESET FACTORY
DEFAULT.
Enter your parental code and press
.
A warning message appears.
To cancel the operation, press
To confirm the reset, press
or
.
.
Once the default settings are restored, the recorder
installation screen is displayed. You can then
reconfigure your recorder (see First installation,
page 16).
37
LU 253311796A RTI90-320 T2 HD UK.book Page 38 Jeudi, 8. avril 2010 8:06 08
High Definition Digital Television Recorder
Information Menu
The information contained in this menu may be requested if you contact your supplier or another technical
service.
You will find here important information about the recorder, the hard disk drive and the embedded
software.
To access the recorder technical information, press
Antenna Signal Information
In INFORMATION,
INFORMATION.
select
ANTENNA
SIGNAL
This menu lets you find out the signal level and quality of
your antenna, for the currently watched programme.
If you use an active antenna with an amplifier and if you
want the recorder to supply it with power (5V power
voltage -50mA max.), set Antenna power supply by DTR
to YES. Otherwise, set it to NO.
Recorder Information
In INFORMATION, select PRODUCT DATA.
This menu provides information on the recorder
software and hardware.
Hard disk drive Information
In INFORMATION, select HARD DISK.
This menu provides information on the hard disk.
38
. In
the main menu, select INFORMATION.
LU 253311796A RTI90-320 T2 HD UK.book Page 39 Jeudi, 8. avril 2010 8:06 08
RTI90-320 T2 HD UK
9. Troubleshooting
Using the recorder
Symptom
Action
The remote control is not working.
• Point the remote control at the recorder.
• Check the battery life and check the batteries are inserted
properly.
The recorder display shows no
information (no time, no channel
number, etc.).
• Switch the recorder on by pressing the On/Off button.
• Check all the connections (see Connections, page 12).
The recorder displays - -: - - in
standby mode.
• Take the recorder out of standby mode by pressing the
key.
• Check that the antenna signal is correctly detected (see Antenna
Signal Information, page 38).
The recorder displays a black
screen or an error message.
• Check that the antenna signal is correctly detected (see Antenna
Signal Information, page 38).
• Search for programmes (see Searching for channels, page 35).
The picture is frozen ./ unclear.
• Check all the connections, check the antenna and search for
programmes again (see Searching for channels, page 35).
The recorder cannot find any
channels.
• Check the antenna reception (see Antenna Signal Information,
page 38).
• Search for programmes (see Searching for channels, page 35).
• Contact your antenna installer/dealer for more information on your
antenna installation.
The TV set does not switch to the
recorder when it leaves standby
mode.
• Check that your TV set is correctly connected to your recorder
(see Connection to the TV set, page 13).
• Select the appropriate input on your TV set.
There is no sound in HOME
CINEMA mode on some channels.
• Check that the recorder is connected to a Home Theatre amplifier
with a digital link (see Connection to a home theatre system,
page 15).
Black and white video on TV/AUX
output (during VCR/DVD
recording).
• Check that the signal type chosen for TV/AUX SCART output is
compatible with your VCR (select PAL on VCR, see Picture
settings, page 36).
I cannot channel-surf between all
my channels during a double
recording.
• In the case of a double simultaneous recording, you can only
channel-surf between a restricted number of channels. You will be
able to channel-surf between all your channels again when at
least one of the recordings ends.
A black screen (no video) appears
at the end of a recording.
• Some channels stop their broadcast with a fixed image or no
video. When a recording ends on such programmes, the video
recording stops but the time counter continues until the end of the
scheduled recording time. Make sure that you set your manual
recordings with the correct end time.
For any other problem.
• Perform a default factory reset (see Resetting the recorder,
page 37).
39
LU 253311796A RTI90-320 T2 HD UK.book Page 40 Jeudi, 8. avril 2010 8:06 08
High Definition Digital Television Recorder
Updating the software
The recorder automatically downloads ’over the air’ new software and services when they become
available.
If a problem is encountered during the download, the recorder displays on its front panel an error code.
Error code
Er00
Meaning/Action
The software currently in the recorder is identical to the software
available.
Recorder updating is therefore not necessary.
Er02
Er05
Er10
• The signal quality does not enable the software to be correctly
acquired. Press the OK key to continue the process.
• Check the signal strength and quality (see Antenna Signal
Information, page 38).
Er11
For any other error messages, contact our customer services team on 08450 900 316.
40
LU 253311796A RTI90-320 T2 HD UK.book Page 41 Jeudi, 8. avril 2010 8:06 08
RTI90-320 T2 HD UK
10. Customer Support
At Sagemcom we believe that a high quality product should come with the highest quality customer
service.
In the design of this product we have taken great care to ensure the maximum quality possible and are
sure that you will be delighted with your purchase.
However, in the rare event that you have any problems with the product and need advice or support you
can be confident that we will do our best to help you.
Our dedicated technical helpdesk can be contacted from 09:00 – 17:00, Monday to Friday and will offer
expert guidance on your product.
In the event of any trouble, please do not hesitate to call them on:
08450 900 316
41
LU 253311796A RTI90-320 T2 HD UK.book Page 42 Jeudi, 8. avril 2010 8:06 08
High Definition Digital Television Recorder
11. Guarantee Terms
ATTENTION
In order to apply the guarantee, you should contact your retailer
or Sagemcom helpdesk at 08450 900 316.
Proof of purchase will be required. Should any malfunctioning arise,
the retailer or Sagemcom helpdesk will advise you what to do.
If you bought your equipment from Sagem Communications SAS directly, the following shall apply:
1) Sagem Communications SAS undertakes to remedy by repair, free of charge for labour and
replacement parts, any defects in the equipment during a period of twelve (12) months from the date of
original delivery of the equipment, where those defects are a result of faulty workmanship.
During this twelve-month guarantee period, the defective equipment will be repaired free of charge; the
customer must however return the defective equipment in its original package with all accessories at his/
her own expense, to the address given by Sagem Communications SAS After Sales Department, the
phone number of which can be found on the delivery slip. Unless the customer has concluded with
Sagem Communications SAS a maintenance contract for the equipment which specifically provides for
repairs to be carried out at the customer's residence, the repairs will not be carried out on the equipment
at the customer's residence.
The following sentence applies to purchases of equipment for the customer's trade, business or
profession.
Except as otherwise expressly provided in this Document and to the extent permitted by law, Sagem
Communications SAS makes no representations or warranties, express or implied, statuette or otherwise,
and to such extent, all terms and conditions implied by law are hereby excluded.
This guarantee does not affect the Customer's statutory rights.
2) Exclusions from Guarantee
Sagem Communications SAS shall have no liability under the guarantee in respect of:
• damage, defects breakdown or malfunction due to:
- failure to properly follow the installation process and instructions for use, or
- an external cause to the equipment (including but not limited to, lightning, fire, shock or water
damage of any nature), or
- modifications made without the written approval of Sagem Communications SAS, or
- a failure or neglect to maintain the equipment or inappropriate maintenance, or
- unsuitable operating conditions, particularly of temperature and humidity, or
- repair or maintenance of the equipment by persons not authorised by Sagem Communications
SAS,
• the removal and/or destruction of the label positioned on the fixation screw of the lower plastic cover,
• wear and tear from normal daily use of the equipment and its accessories,
• damage due to insufficient or bad packaging of equipment when returned to Sagem Communications
SAS,
• supply of new versions of software,
• work on any equipment or software modified or added without the prior written consent of
Sagemcom SAS,
42
LU 253311796A RTI90-320 T2 HD UK.book Page 43 Jeudi, 8. avril 2010 8:06 08
RTI90-320 T2 HD UK
• malfunctions not resulting from the Equipment or from software installed in user workstations for the
purpose of use of the equipment,
• communication problems related to an unsuitable environment, including:
- problems related to access and/or connection to the Internet such as interruptions by access
networks or malfunction of the line used by the subscriber or his correspondent,
- transmission faults (for example poor geographical coverage by radio transmitters, interference or
poor line quality),
- the local network fault (wiring, servers, workstations) or the failure of the transmission network,
• the normal servicing (as defined in the user guide supplied with the equipment) as well as
malfunctioning due to servicing not being carried out, servicing costs are in any event always borne by
the customer.
43
LU 253311796A RTI90-320 T2 HD UK.book Page 44 Jeudi, 8. avril 2010 8:06 08
High Definition Digital Television Recorder
12. Specifications
DUAL DVB-T/T2 FRONT END
VIDEO DECODING
RF INPUT
MPEG2
2 RF tuners (w. internal splitter)
Input frequency range: UHF470-862 (8MHz bandwidth)
Input signal level: -90 to -20 dBm
Input impedance: 75 Ohms unbalanced
Tuning step 166,66kHz
Standard MPEG-2 MP@HL for 50 Hz
Input rates (max): 15 Mbit/s
MPEG-4 Part 10 / H.264
MPEG-4 AVC HP@L4 (HD) for 50 Hz
Input rates (max): 20 Mbit/s for HP@L4
MPEG-4 AVC HP@L3 (SD) for 50 Hz
Input rates (max): 10 Mbit/s for HP@L3
CABAC and CAVLC decoding
Supports all intra/inter prediction modes and block sizes
I,P and B picture types
Fidelity range extensions (8x8 Transforms, 8x8 Spatial
Prediction Mode, Dynamic Quantization Matrix)
DVB-T DEMODULATOR
Transmission mode: FFT 2k & 8k, MFN and SFN network
supported
Constellation: QPSK, 16-QAM & 64-QAM
Guard interval: 1/4, 1/8, 1/16 & 1/32
Mode: Non hierarchical
Code rate: 1/2, 2/3, 3/4, 5/6 & 7/8
Outer decoder: Reed Salomon (204, 188, 8)
AUDIO DECODING
DVB-T2 DEMODULATOR
Transmission mode: FFT 1K, 2k, 4K, 8k, 8K EXT,16K,
16K EXT, 32K & 32K EXT
MFN and SFN network supported
Constellation: QPSK, 16-QAM, 64-QAM & 256-QAM
Guard interval: 1/4, 19/128, 1/8, 19/256, 1/16, 1/32 & 1/128
Single and multiple-PLPs
LDPC Code rate: 1/2, 3/5, 2/3, 3/4, 4/5 & 5/6
Outer decoder: BCH
DATA PORT
ETHERNET 10/100BT
Fully integrated IEEE 802.3/802.3u 10/100 base T-Physical
layer
Auto-negotiation 10/100, Full/Half Duplex
Adaptive equaliser, Baseline wander correction
USB
Host USB 2.0 High speed (480 Mbits/s)
PROCESSOR AND MEMORIES
Processor: STi7105 - 800MIPS
RAM memory 256 Mbytes
Flash memory 32 Mbytes
EEPROM emulated into Flash
2½’’ HARD DISK DRIVE
Capacity: 320 GB
Interface S-ATA
Noise under operation (typ.): <30dBA
Stereo 2.0
MPEG-1 layer I & II (Musicam)
MPEG-2 layer II
AAC
Mode: Mono, stereo, joint stereo
Sampling rates 32, 44.1 or 48 KHz
Multicanal 5.1
DOLBY Digital
Mode : pass through and down mixing
DOLBY Digital+
Mode : pass through, transcoding Dolby Digital, and down
mixing
OUTPUT RESOLUTION FORMAT
For HD broadcast
1280x720 @ 50 Hz (progressive)
1920x1080 @ 25 Hz (interlaced)
Unscaled (original format) or scaled
576i and 720p by set up menu
Zoom function on HDMI: 4/3, 14/9 zoom, 16/9 zoom and
Full screen
For SD broadcast
720x576 @ 50 Hz interlaced
Unscaled (original format) or scaled
720p and 1080i by set up menu
Zoom function on HDMI: 4/3, 14/9 zoom, 16/9 zoom and
Full screen
Format function on TV SCART
4/3 and 16/9 with conversion Pan and Scan, Letter box
44
LU 253311796A RTI90-320 T2 HD UK.book Page 45 Jeudi, 8. avril 2010 8:06 08
RTI90-320 T2 HD UK
SD INPUT/OUTPUT
SCART (TV setup configuration)
FRONT PANEL
4 digits 7 segments blue color display
IR sensor: 38 KHz
RGB out, PAL in/out, volume control Audio R/L, Fast
blanking out, Slow blanking out
1 x bicolour led
3 x buttons: On/Off, P+, PSCART (Recorder setup configuration)
RGB in, PAL out , S-video out, fixed volume Audio R/L, Slow 1 x USB 2.0 (Type A Host)
blanking in
REAR PANEL
HDMI OUTPUT
1 x RF input (IEC169-24-F)
1 x RF output (IEC169-24-M)
HDMI 1.3 and HDCP 1.1
1 x RJ45 (ETH 10/100BT)
VIDEO: YCrCb
1 x TV SCART (IEC60807-9)
AUDIO
2 x RCA (Stereo L/R)
- 2 channels PCM in case of MPEG1-layer II
1 x RCA (S/PDIF)
- 2 channels PCM in case of HEAAC
1 x HDMI with HDCP
- Dolby Digital or PCM in case of Dolby Digital beat stream(*)
- Dolby Digital Plus, Dolby Digital or PCM in case of Dolby POWER SUPPLY
Mains supply voltage 220-240 V ~50 Hz
Digital Plus beat stream (*)
External AC/DC adaptor
(*) according of E(EDID) information
Power (IEC 62087 Ed2): 25W
AUDIO OUTPUT
Standby consumption: < 2W
HiFi audio output
PHYSICAL SPECIFICATIONS
Adjustable audio level
- Mono/stereo in case of MPEG1 layer II,
Recorder:
- Two channnels down mixed in case of Dolby Digital, Dolby - Size (wxdxh): 260x160x48 mm
Digital Plus, HEAAC audio stream
- Weight: ~0.8 Kg
Coax S/PDIF
Stereo audio setup:
Fixed audio level -20 dBLKFS
- Two channels PCM in case of MPEG1-layer II stream,
- Two channels PCM downmix in case of Dolby Digital /
Dolby Digital Plus/HEAAC streams
Multicanal audio set up:
Fixed audio level -31 dBLKFS
- Two channels PCM in case of MPEG1-layer II stream,
- Originally received bit stream in case of Dolby Digital
- Transcoded Dolby Digital in case of Dolby Digital Plus
- Operating temperature: 0°C to +40°
- Storage temperature: -25°C to +65°C
ACCESSORIES
1 x EU Power cable
1 x Remote control (range: 10.5m/33 feet)
2 x Saline AAA-R03 batteries
1 x HDMI cord
1 x User manual
45
LU 253311796A RTI90-320 T2 HD UK.book Page 46 Jeudi, 8. avril 2010 8:06 08
High Definition Digital Television Recorder
Memo
46
LU 253311796A RTI90-320 T2 HD UK.book Page 47 Jeudi, 8. avril 2010 8:06 08
253311796-A
Sagemcom Broadband SAS
Headquarters: 250, route de l’Empereur
92848 Rueil-Malmaison Cedex - FRANCE
Tel : +33 (0)1 57 61 10 00 - Fax : +33 (0)1 57 61 10 01
www.sagemcom.com
All rights reserved. The information and specifications included are subject to change without prior notice. Sagem Communications SAS tries to ensure that all information in this document is correct, but does not accept liability for error or omission.
Non contractual document. All trademarks are registered by their respective owners. Simplified joint stock company - Capital 158.291.895 Euros - 440 294 510 RCS Nanterre.
LU 253311796A RTI90-320 T2 HD UK.book Page 48 Jeudi, 8. avril 2010 8:06 08