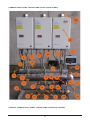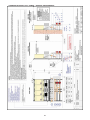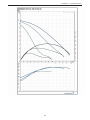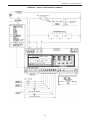
1
Owner’s Guide and Installation Instructions Rheem Commpak® CP02-CP06 Commercial Hot Water Systems This water heater must be installed and serviced by a qualified person. Please leave this guide with a responsible officer. Please read this manual prior to installing this product, it contains all the necessary technical and installation information that will be required by the contactor to correctly install & commission this system. This product must be installed & commissioned in accordance with the Rheem installation instructions, AS/NZS 5601, AS/NZS 3500.4, the relevant electrical & local authorities’ requirements. Operational design of this Hot Water System is protected by Australian Patent No: 2007201101. PATENTS This water heater may be protected by one or more patents or registered designs. Operation design of the Hot Water System is protected by Australian Patent No 2007201101 ® Registered trademark of Rheem Australia Pty Ltd. ™ Trademark of Rheem Australia Pty Ltd. 2 CONTENTS RESPONSIBLE OFFICER - We recommend you read pages 4 to 12. The other pages are intended for the installer but may be of interest. About your water heater ............................................................................................................. 4 Water Supplies........................................................................................................................... 10 Save A Service Call ................................................................................................................... 11 Commpak – Specifications ....................................................................................................... 13 Installation – Water Heater ....................................................................................................... 15 Connections - Plumbing ........................................................................................................... 19 Connections - Electrical ........................................................................................................... 20 Commpak - Commissioning ..................................................................................................... 30 Rheem Continuous Flow Gas Water Heater Warranty – Australia Only .............................. 71 3 ABOUT YOUR WATER HEATER The Rheem Commpak is a bank of two, three, four, five or six continuous flow water heaters (CFWH), factory manifolded in parallel complete with multi-speed pump/s, temperature sensors and a controller. All components are factory assembled on a lightweight frame suitable for either wall (2 to 3 water heaters) or floor (2 to 6 water heaters) mounting. This water heater is designed for the purpose of heating potable water. Its use in an application other than this may shorten its life. The Rheem Commpak is designed to provide mains pressure performance with a recirculating capacity for small to medium size developments and suitable for: x Outdoor and Indoor installations x Natural Gas or Propane (LPG) x Energy Consumption Control x Domestic Hot Water (DHW) The Rheem Commpak is a fully engineered system; completely factory assembled & tested. Requiring only minimal on-site works to be completed as detailed below: 1. Installation of the package & following service connections. a) Gas In b) Cold Water In c) Hot Water Out d) Hot Water Return (Optional) e) Co-axial Flueing for Individual Internal Water Heaters 2. 240V/1Ph/50Hz Power Supply to the controller. Requires 16A Type C or D curve up front protection. 3. Remote alarm monitoring cabling to the controller (optional) 4. Final commissioning as per the simple instructions provided. COMMPAK – MODELS AVAILABLE & TECHNICAL DATA Commpak Model Input MJ/hr Installation Recovery Rate @ 50°C rise 25°C rise Peak Flow Rate @ 50°C rise 25°C rise Dimensions Height (Ext / Int) Width Depth (Wall / Floor Mount) Front Clearance (Ext / Int) Cold Water CPE02 & CPI02 CPE03 & CPI03 CPE04 & CPI04 CPE05 & CPI05 CPE06 & CPI06 410 615 820 1025 1230 Outdoor or Indoor – Refer to Model Type L/hr 1584 3168 2376 4752 3168 6336 3960 7920 4752 9504 L/min 26.4 52.8 39.6 79.2 52.8 105.6 66.0 132.0 79.2 158.4 mm mm mm mm BSPF 1815 / 1860 1400 350/500 800 / 600 1815 / 1860 1400 350/500 800 / 600 1815 / 1860 1780 500 800 / 600 1815 / 1860 2100 500 800 / 600 1815 / 1860 2500 500 800 / 600 40mm Hot Water BSPF 40mm Return BSPF 25mm Gas BSPTM 40mm 4 ABOUT YOUR WATER HEATER COMMPAK – MODELS AVAILABLE & TECHNICAL DATA CPE02 & CPI02 Commpak Model CPE03 & CPI03 CPE04 & CPI04 CPE05 & CPI05 CPE06 & CPI06 Approx Weight N x pumps 1P 2P 1P 2P 1P 2P 1P 2P 1P 2P Wall Mount kg 110 120 135 145 NA NA NA NA NA NA Floor Mount kg 120 130 150 160 220 230 245 255 270 Wall Mount (WM) Floor Mounting Frame (FMF) Standby Pump Water Supply Pressure 280 standard standard N/A N/A N/A optional optional standard standard standard optional optional optional 800kPa Maximum & 150kPa Minimum optional optional Gas Supply Pressure Natural kPa 1.13 Minimum & 3.5 Maximum Propane kPa 2.75 Minimum & 3.5 Maximum Power Supply 240V/50Hz FL Amps Notes: 1P = Single Pump Ext = External System 3.62 5.24 4.62 6.24 5.62 7.24 6.62 8.24 7.62 9.24 2P = Dual Pump Int = Internal System WATER HEATER OPERATION Automatic safety controls are fitted to the water heater to provide safe and efficient operation. HOW HOT SHOULD THE WATER BE? The water heater has a maximum preset outlet temperature setting of 82°C. For applications requiring sanitising temperatures, the outlet temperature should be set at 82°C. The minimum recommended preset outlet temperature setting is 60°C. maximum outlet temperature setting (82°C) If the water heater is installed as part of a circulated hot water flow and return system in a building, the preset outlet temperature setting of the water heater must be set to at least 60°C. Note: The preset outlet temperature setting of this water heater cannot be adjusted by the householder. The setting can only be adjusted by the installer, Rheem Service or their nearest Accredited Service Agent. Note: AS 3498 requires that a water heater provides the means to inhibit the growth of Legionella bacteria in potable water. When this water heater is used as an in-series booster for a solar water heater it can satisfy this AS 3498 requirement provided it is energised and the booster preset outlet temperature setting is 70°C or higher. minimum recommended outlet temperature maximum recommended supply temperature to bathroom, ensuites and public areas If this water heater is installed as part of a solar water heater system, the system can deliver water at temperatures from 58°C up to 75°C and possibly higher depending upon the model of solar water heater installed. 5 ABOUT YOUR WATER HEATER HOTTER WATER INCREASES THE RISK OF SCALD INJURY This water heater can deliver water at temperatures which can cause scalding. We recommend and it may be required by regulations that an approved temperature limiting device be fitted into the hot water piping to ablution, bathing and public areas when a Commpak water heater is installed. This will keep the water temperature below the maximum permitted by AS/NZS 3500.4 to these areas. The water heater uses 240 Volt AC electrical power for operation of the control systems and the combustion fan. The removal of the front panel will expose 240 V wiring. It must only be removed by a qualified person. The power lead from the water heater must be plugged into a weatherproof electrical outlet. Take care not to touch the power plug with wet hands. SAFETY ® This water heater is supplied with temperature sensors, a FlameSafe protection system and a pressure relief valve. These devices must not be tampered with or removed. The water heater must not be operated unless each of these devices is fitted and is in working order. If the power supply cord or plug is damaged, it must be replaced by a qualified person in order to avoid a hazard. The power supply cord and plug must be replaced with a genuine replacement part available from Rheem. Phone Rheem Service or their nearest Accredited Service Agent to arrange for an inspection. Warning: For continued safety of this water heater it must be installed, operated and maintained in accordance with the Owner’s Guide and Installation Instructions. The Rheem warranty may not cover faults if relief valves or other safety devices are tampered with or if the installation is not in accordance with these instructions. x Do not store flammable or combustible materials near the water heater. Flammable liquids (such as petrol), newspapers and similar articles must be kept well away from the water heater and the flue terminal. x Do not use aerosols, stain removers and household chemicals near the water heater whilst it is working. Gases from some aerosol sprays, stain removers and household chemicals become corrosive when drawn into a flame. x Do not store swimming pool chemicals, household cleaners, etc., near the water heater. x Do not place anything on top of the water heater or in contact with the flue terminal. Ensure the flue terminal is not obstructed in any way at any time. x Do not use Propane / Butane gas mixtures in a Propane model. A Propane model is designed to operate on Propane only. The use of Propane / Butane mixture, such as automotive LPG fuel, in a Propane model is unsafe and can cause damage to the water heater. 6 ABOUT YOUR WATER HEATER PRECAUTIONS Where damage to property can occur in the event of the water heater leaking, the water heater must be installed over a safe tray. Construction, installation and draining of a safe tray must comply with AS/NZS 3500.4 and all local codes and regulatory authority requirements. The water heater must be maintained in accordance with the Owner’s Guide and Installation Instructions. Refer to “General Maintenance” on page 7, “Minor Six Month Maintenance” on page 7 and “Annual Service” on page 7. If this water heater is to be used where an uninterrupted hot water supply is necessary for your application or business you should ensure that you have back up redundancy within the hot water system design. This should ensure the continuity of hot water supply in the event that this water heater were to become inoperable for any reason. We recommend you seek advice from your plumber or specifier about your needs and building back up redundancy into your hot water supply system. GENERAL MAINTENANCE The jacket of the water heater can be cleaned with a soft cloth and warm mild soapy water. Under no circumstances should abrasive materials or powders be used. The area around the water heater can be sprayed with insecticide to rid the area of insects. Insects encroaching into or nesting in the water heater can interfere with the operation of the water heater and also damage components. MINOR SIX MONTH MAINTENANCE It is recommended minor maintenance be performed every six months by the dwelling occupant. The minor maintenance includes: x Inspect around the air inlet, flue terminal and the water heater in general for plant growth. Trim back any shrubs, bushes or other plants which have encroached around the water heater. Plant growth across the air let and flue terminal can interfere with the performance of the water heater. x Inspect around the water heater for insect infestations, such as ants. Spray insecticide around the water heater if necessary to rid the area of insects. Do not spray the surface or into the air inlet or flue terminal of the water heater. Insects encroaching into or nesting in the water heater can interfere with the operation of the water heater and also damage components. x Check the drain line from the safe tray (if one is installed) is not blocked. x Check and clean line strainers on the cold water inlet and hot water return. x Check and clean filter on CFWH cold water inlet. ANNUAL SERVICE For safe and efficient operation, it is recommended an annual service be conducted on the water heater. Only genuine replacement parts should be used on this water heater. Warning: Servicing of a water heater must only be carried out by qualified personnel. Phone Rheem Service or their nearest Accredited Service Agent. The annual service includes the following actions: x Check and if necessary adjust the gas pressure. x Check the operation of and clean the burner. x Visually check the unit for any potential problems. x Inspect all connections. x Check the drain line from the safe tray (if one is installed) is not blocked. x Check and clean line strainers on the cold water inlet and hot water return. x Check and clean filter on CFWH cold water inlet. 7 ABOUT YOUR WATER HEATER TO TURN OFF THE WATER HEATER If it is necessary to turn off the water heater: x Switch off the electrical supply at the circuit breaker isolating switch to the water heater if there is no risk of freezing conditions occurring (refer to note below). x Close the gas isolation valve at the inlet to the water heater. x Close the cold water isolation valve at the inlet to the water heater. x Close the hot water return isolation valve. Note: If there is a risk of freezing conditions, the electrical supply to the water heater should not be switched off unless the water heater is drained, otherwise damage could result (refer to “Frost Protection” on page 9 and “Draining the Water Heater” on page 9). TO TURN ON THE WATER HEATER x Screw in the drain plugs at the cold water inlet and hot water outlet of the CFWH if they have been drained. x Open all of the hot taps. (don’t forget the shower). x Open the cold water isolation valve fully at the inlet to the water heater. Air will be forced out of the taps. x Close each tap as water flows freely from it. x Open the gas isolation valve fully at the inlet to the water heater. x Switch on the electrical supply at the circuit breaker isolating switch. x The water heater will operate automatically. 8 ABOUT YOUR WATER HEATER FROST PROTECTION The water heater has a frost protection system. The frost protection system will protect the water heater from damage, by preventing ice forming in the waterways of the water heater, in the event of freezing conditions occurring. Notes: x The frost protection system will be rendered inoperable if electrical power is not available at the water heater. Damage caused by freezing due to the unavailability of power at the water heater is not covered by the Rheem warranty (refer to “Terms of the Rheem Warranty” on page 71). x If it is necessary to switch the power off to the water heater and there is a risk of freezing, then it is necessary to drain the water heater (refer to “Draining the Water Heater” on page 9). x The water heater is not suitable for installation in areas where the ambient temperature falls below -20°C (including wind chill factor). x Refer to “Terms of the Rheem Warranty” on page 71. DRAINING THE WATER HEATER To drain the water heater: x Turn off the water heater (refer to “Turn Off The Water Heater” on page 8). x Open the pressure relief valve on the Commpak located on the hot manifold. x Unscrew the two drain plugs, one each at the cold water inlet and hot water outlet, on the underside of continuous flow water heater. Water will drain from the water heaters. x When water stops flowing from the water heaters, close the pressure relief valve. Note: It is recommended not to screw the drain plugs back in, until the water heater is to be turned on again. HOW DO I KNOW IF THE WATER HEATER IS INSTALLED CORRECTLY? Installation requirements are shown on pages 15 to 18 The water heater must be installed: x by a qualified person, and x in accordance with the installation instructions, and x in compliance with Standards AS/NZS 3500.4, AS 5601 or AS/NZS 5601.1, as applicable under local regulations, and all local codes and regulatory authority requirements. DOES THE WATER CHEMISTRY AFFECT THE WATER HEATER? The water heater is suitable for most public water supplies, however some water chemistries may have detrimental effects on the water heater, its components and fittings. Refer to “Water Supplies” on page 10. If you are in a known harsh water area or you are not sure of your water chemistry, have your water checked against the conditions described on page 10. HOW LONG WILL THE WATER HEATER LAST? The water heater is supported by a manufacturer’s warranty (refer to page 71). There are a number of factors that will affect the length of service the water heater will provide. These include but are not limited to the water chemistry, the water pressure, the water temperature (inlet and outlet) and the water usage pattern. Refer to “Precautions” on page 7. 9 WATER SUPPLIES This water heater must be installed in accordance with this advice to be covered by the Rheem warranty. This water heater is manufactured to suit the water conditions of most public reticulated water supplies. However, there are some known water chemistries which can have detrimental effects on the water heater and its operation and / or life expectancy. If you are unsure of your water chemistry, you may be able to obtain information from your local water supply authority. This water heater should only be connected to a water supply which complies with these guidelines for the Rheem warranty to apply. CHANGE OF WATER SUPPLY The changing or alternating from one water supply to another can have a detrimental effect on the operation and / or life expectation of a heat exchanger in a continuous flow water heater. Where there is a changeover from one water supply to another, e.g., a rainwater tank supply, bore water supply, desalinated water supply, public reticulated water supply or water brought in from another supply, then water chemistry information should be sought from the supplier or it should be tested to ensure the water supply meets the requirements given in these guidelines for the Rheem warranty to apply. SATURATION INDEX The saturation index (SI) is used as a measure of the water’s corrosive or scaling properties. In a corrosive water supply, the water can attack copper parts and cause them to fail. Where the saturation index is less than –1.0, the water is very corrosive and the Rheem warranty does not apply to a copper heat exchanger in a continuous flow water heater or Commpak pipe work. In a scaling water supply calcium carbonate is deposited out of the water onto any hot metallic surface. Where the saturation index exceeds +0.80, the Rheem warranty does not apply to a copper heat exchanger in a continuous flow water heater Commpak pipe work. Water which is scaling may be treated with a water softening device to reduce the saturation index of the water. Refer to the Saturation Index chart on page 10. 10 SAVE A SERVICE CALL Check the items below before making a service call. You will be charged for attending to any condition or fault, which is not related to manufacture or failure of a part (refer to “Terms of the Rheem Warranty” on page 71). COLD WATER FROM THE HOT TAP x Is the continuous flow water heater plugged in and is the power at the isolating switch on? x Is power available in the premises? Try using another electrical appliance. x Is the isolation valve in the gas line open? x Is there a gas supply to the rest of the premises? Try lighting another gas appliance. x Has the gas line been purged of air after installation? Refer to your plumber. WATER IS TOO HOT OR NOT HOT ENOUGH x Is the preset outlet temperature of the water heater higher than required? NO WATER FROM THE HOT TAP No flow of water from the hot tap may indicate a restriction in or failure of the cold water supply to the water heater. Check for water flow at other taps and that the cold water isolation valve is fully open. WATER TEMPERATURE FLUCTUATES The Commpak is supplied with a water flow compensating device which will activate if the maximum water flow capability of the system is exceeded. This will maintain pressure and flow within the system at the expense of temperature. Temperature fluctuation can also be evident if the Commpak has been installed as an in-series booster to a solar water heater. FAN CONTINUES TO RUN AFTER WATER HEATER OPERATION STOPS It is the normal operation of the water heater for the fan to continue running after heating of the water is finished. The fan may run for up to six minutes after the burners extinguish, to prepare for the next ignition. CLOUDS OF WHITE ‘VAPOUR’ FROM THE FLUE TERMINAL During the heating cycle, it is not unusual to see water vapour clouds steaming from the flue terminal, particularly on cold days. This is normal operation of the water heater. PRESSURE RELIEF VALVE DISCHARGING A pressure relief valve is incorporated into the water heater controls and the Commpak manifold. These valves protect the water heater, by allowing water to escape, in the event of excessive pressure build up in the waterways. x Normal operation A small volume of water may discharge from the bottom of the water heater when a hot tap is suddenly closed. x Continuous dribble A continuous dribble may indicate the water supply pressure is above the design pressure for the water heater. If so, a pressure limiting valve must be installed on the cold water supply pipe to the water heater (refer to “Mains Water Supply” on page 17). 11 SAVE A SERVICE CALL ERROR CODE The water heater provides a diagnostic error code in the event of an interruption to its operation. The error code is displayed on the OK MONITOR on the front of the water heater as a numerical value. If an error code appears: x Close the isolation valve at the outlet of the CFWH and unplug the electrical supply to the CFWH. x Check the gas isolation valve at the gas inlet to the CFWH is fully open. x Wait 5 minutes, then plug in the electrical supply to the water heater, and open the isolating valve. If the error code persists, take note of the numerical code and isolate the CFWH. Phone Rheem Service or their nearest Accredited Service Agent to arrange for inspection. IF YOU HAVE CHECKED ALL THE FOREGOING AND STILL BELIEVE YOU NEED ASSISTANCE, PHONE RHEEM SERVICE OR THEIR NEAREST ACCREDITED SERVICE AGENT. 12 COMMPAK – SPECIFICATIONS DESIGN BASIS One or two water regulation pumps maintain the hot water supply at mains pressure over the Commpak’s design capacity. Pumps are plumbed to the water inlet of the continuous flow water heaters (CFWH) to overcome friction losses inherent within the CFWH. Pumps to provide (if required) an adjustable flow rate for the circulation of water throughout the heated water reticulation system, so as to maintain a consistency of temperature and pressure throughout. A flow compensation device has also been provided to cater for flow rates exceeding the heated water systems designed capability. This device has been installed between the cold water inlet & hot water outlet of the system to automatically provide additional water flow to maintain system pressure during excessive peak demands. A pressure responsive differential bypass valve has also been provided to facilitate for an adjustable recirculation flow rate regulation means. This facility also provides for an internal recirculation means to ensure sufficient flow is always maintained through the CFWH for firing and continuous operation. This feature is especially useful for dead leg (no return) hot water applications or systems suffering from poorly designed / built recirculation loops. UNIQUE FEATURES x Automatic operation of the water regulation pump/s for both primary & secondary water reticulation x Heated water within the reticulation system is supplied at mains water pressure with automatic compensation to cater for flow demands in excess of design requisites x Separate circulating pump/s no longer required x Hot water storage vessel(s) no longer required x Capital & operating cost savings x Smaller space requirements CONTINUOUS FLOW WATER HEATER(S) (CFWH) Required numbers are assembled in parallel & hydraulically balanced. 100% duty achieved by parallel operation on demand. WATER REGULATION PUMP/S Refer to pages 42 to 49 for full details. x Pump wetted parts suitable for potable water application. x Continuous rated to handle hot water up to 110°C. x 1000 KPa Operating Pressure. x 240V/1PH/50Hz Continuous rated IPX4D motor with three speed settings & wired to the controller. x Pump/s integrated in to the hot water system with isolation / check valves & required plumbing / fittings. x loss of water supply pressure switch mounted & wired to the controller. Pressure switch able to be tested in situation without isolating water supply to the Hot water System. x UV Stabilized weather cover for pump provided for external installation applications only. 13 COMMPAK - SPECIFICATIONS PLUMBING & HOT WATER PIPING INSULATION x Complete cold water & hot water piping; valves & fittings all in accordance with AS/NZS3500.4:2003 x Hot Water Piping Insulation details: x Closed cell PE foam clad with a reinforced UV resistant foil facing, suitable for outdoor usage Operating temperature to 105ºC Rated ‘R’ Value of 1.0 or greater Compliance In accordance to AS/NZS3500.4:2003, Amendment 1: 2005; Section 8.2.1 (Piping for Water Heaters) to all climate regions & external locations Complete natural gas piping; valves & fitting as in accordance with AS 5601 or AS/NZS 5601.1 SKID PACKAGE x All water heaters, pump/s, plumbing manifolds & controller mounted on a common base x Package is factory tested & ready for on site installation SYSTEM CONTROLLER: Refer to pages 52 to 66 for full details. 14 INSTALLATION – WATER HEATER THIS WATER HEATER IS FOR OUTDOOR OR INDOOR INSTALLATION, MODEL DEPENDANT. THIS WATER HEATER IS NOT SUITABLE FOR POOL HEATING. Check the water heater is suitable for the gas type available. (refer to the rating label on the water heater) INSTALLATION STANDARDS The water heater must be installed: x by a qualified person, and x in accordance with the installation instructions, and x in compliance with Standards AS/NZS 3500.4, AS 5601 or AS/NZS 5601.1, as applicable under local regulations, and all local codes and regulatory authority requirements. All packaging materials must be removed from the water heater prior to its installation. WATER HEATER APPLICATION This water heater is designed for the purpose of heating potable water. Its use in an application other than this may shorten its life. If this water heater is to be used where an uninterrupted hot water supply is necessary for the application or business, then there should be redundancy within the hot water system design. This should ensure the continuity of hot water supply in the event that this water heater was to become inoperable for any reason. We recommend you provide advice to the system owner about their needs and building backup redundancy into the hot water supply system. Note: AS 3498 requires that a water heater provides the means to inhibit the growth of Legionella bacteria in potable water. When this water heater is used as an in-series booster for a solar water heater it can satisfy this AS 3498 requirement provided it is energised and the booster preset outlet temperature setting is 70°C or higher. WATER HEATER LOCATION The water heater should be installed in a position chosen with safety and service in mind. If this water heater is part of a solar water heater system, it should also be installed close to the solar storage tank. Make sure people (particularly children) will not touch the flue terminal. The flue terminal and air inlet must be clear of obstructions and shrubbery. Clearance must be allowed for servicing of the water heater. The water heater must be accessible without the use of a ladder or scaffold. Make sure the entire front panel can be removed for service. You must be able to read the information on the rating plate. Remember you may have to remove a water heater later for servicing. The water must be installed vertically upright. Wall mounted versions must be installed on a solid wall capable of supporting the weight of the Commpak system. Free standing versions can be mounted in any location on a solid base. The frame must be secured to the floor at all anchor points provided. The water heater must not be installed in an area with a corrosive atmosphere where chemicals are stored or where aerosol propellants are released. Remember the air may be safe to breathe, but when it goes through a flame, chemical changes take place which may attack the water heater. 15 INSTALLATION – WATER HEATER OUTDOOR INSTALLATION If outdoors a secondary flue is not required. The water heater must not be installed indoors or in a confined space. The water heater must be located to ensure that the location of the flue terminal complies with the requirements of AS 5601 or AS/NZS 5601.1, as applicable under local regulations. As a guide the following requirements are extracted from AS 5601. The distances are measured along the wall behind the water heater. x At least 300 mm between the top of the flue terminal and the eaves. x At least 500 mm between the flue terminal and the edge of any opening into the building, such as an openable door or window, measured horizontally*. x At least 1500 mm between the top of the flue terminal and the edge of any opening into the building, such as an openable window, measured vertically. x At least 300 mm between the flue terminal and a return wall or external corner, measured horizontally*. x At least 1500 mm between the flue terminal and any opening into a building, in the direction of the flue discharge. x At least 500 mm between the flue terminal and a fence, wall or other obstruction, in the direction of the flue discharge. Note: * If these horizontal distances cannot be achieved, AS/NZS 5601.1 states an equivalent horizontal distance measured diagonally from the nearest discharge point of the flue terminal to the opening may be deemed to comply. Check with the local regulator. Note: Two or more of this model CFWH can be installed side by side with minimal clearance between them. The AGA has approved the installation of two or more of this model CFWH with an exemption from the 300 mm minimum clearance requirements between flue terminals, as stated in AS/NZS 5601, clause 5.13.6.5 and AS/NZS 5601.1, clause 6.9.3. INDOOR INSTALLATION VENTILATION This water heater is to be installed with a Rheem coaxial flue system. The kit enables a room sealed installation, drawing air for combustion from outside of the building. The ventilation of a room or an enclosure such as a cupboard, where the water heater is installed must comply with the requirements of AS 5601 or AS/NZS 5601.1, as applicable under local regulations. SECONDARY FLUE A secondary flue must be installed with an indoor water heater to discharge combustion products to outside the building. The water heater MUST ONLY be installed with a certified Rheem coaxial flue system. Where more than one water heater is installed, each water heater must be individually flued using a certified Rheem coaxial flue system. A common flue system MUST NOT be used. Refer to the CFWH Owner’s Manual for details of flue installation. SAFE TRAY Where damage to property can occur in the event of the water heater leaking, the water heater must be installed over a safe tray. Construction, installation and draining of a safe tray must comply with AS/NZS 3500.4 and all local codes and regulatory authority requirements. 16 INSTALLATION – WATER HEATER FROST PROTECTION The water heater has a frost protection system. The frost protection system will protect the water heater from damage, by preventing ice forming in the waterways of the water heater, in the event of freezing conditions occurring. The frost protection system will be rendered inoperable if electrical power is not available at the water heater. Damage to the water heater caused by freezing of the pipe work to or from the water heater is not covered under the Rheem warranty. Refer to AS/NZS 3500.4 for precautions to be taken for installations in frost prone areas. The water heater is not suitable for installation in areas where the ambient temperature falls below -20°C (including wind chill factor). MAINS WATER SUPPLY Where the mains water supply pressure exceeds that shown in the table below, an approved pressure limiting valve is required and should be fitted. Relief valve setting 1000 kPa Max. mains supply pressure 800 kPa Min. mains supply pressure * 150 kPa * minimum water supply pressure required to achieve the rated flow and performance Notes: x It is not recommended to install this water heater with a low pressure water supply. x A minimum water supply pressure of 150 kPa is required to achieve the rated flow and performance of the water heater. x If this water heater is installed as an in-series gas booster for a solar water heater, the maximum water supply pressure to the solar water heater, without an expansion control valve (ECV), is generally 800 kPa, however it may be less than this for some models. Refer to the Owner’s Guide and Installation Instructions supplied with the solar water heater for maximum mains supply pressure details. x This water heater is not suitable for connection to bore water or spring water unless a water treatment device is fitted. x Refer to “Water Supplies” on page 10 for further information on water chemistry. PRESET OUTLET TEMPERATURE SETTING The factory preset outlet temperature setting of the water heater is: x 70°C as part of a Commpak system It is usually not necessary to check or adjust the factory preset outlet temperature setting of the water heater, unless the customer or application has a particular requirement for this to be done. For applications requiring sanitising temperatures, such as a commercial kitchen, it will be necessary to adjust the preset outlet temperature setting of the CFWH and the controller to achieve and maintain sanitising temperatures up to 82°C. Refer to page 35 for details. If the water heater is installed as part of a circulated hot water flow and return system in a building, the preset outlet temperature setting must be set to at least 60°C. If the water temperature decreases by more than 5°C through a circulated hot water flow and return system due to heat loss in the ring main, the preset outlet temperature setting of the water heater should be set to at least 65°C. GAS BOOSTER FOR A SOLAR WATER HEATER Note: AS 3498 requires that a water heater provides the means to inhibit the growth of Legionella bacteria in potable water. When this water heater is used as an in-series booster for a solar water heater it can satisfy this AS 3498 requirement provided it is energised and the booster preset outlet temperature setting is 70°C or higher. 17 INSTALLATION – WATER HEATER HOT WATER DELIVERY This water heater can deliver water at temperatures which can cause scalding. It is necessary and we recommend that a temperature limiting device be fitted into the hot water piping to any ablution and public areas such as a bathroom, ensuite or public amenities when a Commpak water heater is installed to reduce the risk of scalding. The installing plumber may have a legal obligation to ensure the installation of this water heater meets the delivery water temperature requirements of AS/NZS 3500.4 so that scalding water temperatures are not delivered to a bathroom, ensuite or other ablution or public area. The temperature limiting device used with a continuous flow gas water heater should have: x a specified ‘minimum temperature differential’ between the hot water inlet and the tempered water outlet of no greater than 10°C, and x a specified ‘maximum permitted pressure variation’ in the supply between the hot water inlet and the cold water inlet of no less than 15%. Refer to the specifications of the tempering valve. TEMPERATURE LIMITING DEVICE A temperature limiting device cannot be installed in circulated hot water flow and return pipe work, unless it is specifically designed to do so, such as the Rheem Guardian warm water system. The tempered water from a temperature limiting device cannot be circulated. Where a circulated hot water flow and return system is required in a building, a temperature limiting device can only be installed on a dead leg, branching off the circulated hot water flow and return pipe. If circulated tempered water were to be returned back to the water heater, depending on the location of the return line connection on the water supply line to the water heater, then either: x water will be supplied to the cold water inlet of the temperature limiting device at a temperature exceeding the maximum recommended water supply temperature, or x when the hot taps are closed no water will be supplied to the cold water inlet of the temperature limiting device whilst hot water will continue to be supplied to the hot water inlet of the temperature limiting device. These conditions may result in either water at a temperature exceeding the requirements of AS/NZS 3500.4 being delivered to the hot water outlets in the ablution areas, or the device closing completely and not delivering water at all, or the device failing. Under either condition, the operation and performance of the device cannot be guaranteed. 18 CONNECTIONS - PLUMBING SITE LOCATION External Systems - Recommended 800mm access clearance from horizontal flue outlets Internal Systems - Recommended 600mm access clearance. Refer: Australian Standard Gas Installations AS/NZS5601 for further requirements. x Secure to wall or secure to the floor as appropriate. Consult with site structural engineer for any specific securing requirements. x Connect both cold water & hot water piping / valves and fittings as per the requirements of AS3500.4 x Water Supply Pressure: 150kPa Minimum to 800kPa Maximum with acceptable pressure fluctuations (±50kPa). x Connect natural gas piping / valves & fitting as per the requirements of AS 5601 or AS/NZS 5601.1 Natural gas working pressure 1.13 kPa minimum to 2.75 kPa maximum Propane working pressure 2.75 kPa minimum - 3.5 kPa maximum A secondary flue must be installed with an indoor water heater to discharge combustion products to outside the building. Each water heater must be individually flued using a Rheem approved coaxial flue system. A common flue system MUST NOT be used. Refer to the Owner’s guide and installation instructions supplied for the 862 series 027 indoor CFWH, model for further details PIPE SIZES The pipe sizing for hot water supply systems should be carried out by persons competent to do so, choosing the most suitable pipe size to ensure adequate flow for each individual application. Reference to the technical specifications of the water heater and local regulatory authority requirements must be made. To achieve true mains pressure operation, the cold water line to the water heater should be the same size or bigger than the hot water line from the water heater. IN-SERIES BOOSTER The pipe work between the solar storage tank (if one is installed) and the in-series gas booster, MUST BE of copper and be fully insulated with a closed cell type insulation or equivalent in accordance with the requirements of AS/NZS 3500.4. The insulation must be weatherproof and UV resistant if exposed. The insulation must be fitted up to the connections on the solar storage tank GAS INLET The gas connection is made on the left hand side of the water heater. The pipe work must be cleared of foreign matter before connection and purged before attempting to operate the water heater. An isolation valve and disconnection union must be installed to allow servicing and removal of the water heater. Note: Refer to the Gas Installations Standard AS 5601 or AS/NZS 5601.1 for the correct method of sizing the gas supply pipe to the water heater. The pipe size selection must take into account the high gas input of this water heater as well as all of the other gas appliances in the premises. Warning: Always isolate the water heater before pressure testing the gas supply system. Disconnect the water heater after the isolation valve to prevent the risk of serious damage to the gas control. The Rheem warranty does not cover damage of any nature resulting from failure to observe this precaution. Refer to rating label for gas types and pressures. 19 CONNECTIONS - ELECTRICAL All electrical work and permanent wiring must be carried out by a qualified person and in accordance with the Wiring Rules AS/NZS 3000 and all local codes and regulatory authority requirements. The water heater will only operate on a sine wave at 50 Hz. Devices generating a square wave cannot be used to supply power to the water heater. HOT WATER SYSTEM CONTROLLER x x Power supply: 240V/1Ph/50Hz Power Supply to the controller. Requires 16A Type C or D curve up front protection Hard wired to the requirements of AS/NZS 3000: Wiring Rules and local regulations. 20 This page is intentionally blank 21 COMMPAK SINGLE PUMP - MAJOR ITEMS LISTING (CPE03 SHOWN) INTERNAL COMMPAK DUAL PUMPS - MAJOR ITEMS LISTING(CPI03 SHOWN) 22 23 COMMPAK – MAJOR ITEMS LISTING Refer to Photographs (Pages 22& 24); Major Items Listings / Identification (Pages 24 & 25) and External & Internal Commpak General Drawings (Pages 2826 & 29). Item No. Description Function P&EES Part No’s. 1 System Controller Starts & Stops Pump/s Displays Outlet & Inlet Water Temperature Refer: System Controller Material Schedule – Pages 37 & 39 For material ordering details 2 Water Heater General Purpose Power Outlet(s) 240VAC – 1 Phase – 10A x 3 Outlets Local power supply for Water Heater(s) B-GPO-3 3 Pump Power Outlet 240VAC – 1 Phase – 10A Dedicated local power supply for Pump P-GPO-1 4 Temperature Sensor Water Inlet Temperature Sensor TSP 4A Temperature Sensor Water Outlet Temperature Sensor TSP Pump/s System water supply & return circulation Refer: Pump Details – Pages 42 - 51 5A Pump Speed Selector Pump is suitable for 3 speed operation Factory default setting No. 3 6 Hot Water Connector 20mm dia. Flexible connection means from the Continuous Flow Water Heater to the Hot Water Outlet manifold. HWFC-20 7 Cold Water Connector 20mm dia. Flexible connection means from the Continuous Flow Water Heater to the Cold Water manifold. CWFC-20 Gas Supply Connector Bi-directional Pressure Balancing Assembly Connector Hot Water Outlet Isolation Valve 20mm dia. Flexible connection means from the Continuous Flow Water Heater to the Gas Supply Inlet manifold. GSFC-20 20mm dia. Flexible connection means from the Bi-directional Pressure Balancing Assembly to the Hot Water Outlet manifold. BPBAC-20 40mm BSP Female Brass Ball Valve System Hot Water Outlet Isolating means HWO40BSPF 11 Cold Water Inlet Isolation Valve 40mm BSP Female Brass Ball Valve System Cold Water Inlet Isolating means CWIN40BSPF 12 Cold Water Inlet Strainer 40mm BSP Female Cold Water Inlet Strainer Protects pump from solids CWIS40BSPF 13 Hot Water Return Isolation Valve 25mm BSP Female Brass Ball Valve Hot Water Return Isolating means RWIN25BSPF 13A Hot Water Return Strainer 25mm BSP Female Hot Water Return Strainer Protects pump from solids RWS25BSPF 14 Hot Water Isolation Valve 20mm BSP Female Ball Valve Continuous Flow Water Heater Hot Water Isolation Means HWI20BSPF 15 Cold Water Isolation Valve 20mm BSP Female Ball Valve Continuous Flow Water Heater Cold Water Isolation Means CWI20BSPF 16 Bi-directional Pressure Balancing Assembly Isolation Valve 20mm BSP Female Ball Valve Bi-directional Pressure Balancing Assembly Isolation Valve Supply Isolation Means BDI20BSPF 5 8 9 10 17 Gas Isolation Valve Single Pump: UP-TCM-1-SP Dual Pumps: UP-TCM-1-DP G-UPS-32-100 Note: In the event of pump failure close valve COMMPAK will operate as per MULTIPAK 20mm BSP Female Ball Valve Continuous Flow Water Heater Gas Supply Isolation Means 24 GSI20BSPF COMMPAK – MAJOR ITEMS LISTING Refer to Photographs (Pages 22& 23); Major Items Listings / Identification (Pages 24 & 25) and External & Internal Commpak General Drawings (Pages 26 & 29). Item No. Description Function P&EES Part No’s This assembly performs 3 functions 1. If hot water outlet pressure is less than coldwater inlet pressure (demand exceeds design capability), assembly allows coldwater flow from inlet to outlet, to maintain mains water pressure. 18 Bi-directional Pressure Balancing Assembly 2. 3. If hot water outlet pressure is greater than coldwater inlet pressure (Nom. Set 50Kpa) low or no demand condition, assembly allows hot water flow from outlet to inlet, to maintain mains water pressure (+ 50Kpa) BDPBA In installations with no return circulation or high resistance, assembly allows hot water to flow from outlet to inlet, to maintain minimum flow requirement for firing of the Continuous Flow Water Heater(s) 18A Bi-directional Pressure Balancing Assembly One Way Valve Allows coldwater flow from inlet to outlet, to maintain constant pressure. OWV-20 18B Bi-directional Pressure Balancing Assembly Regulating Valve Allows hot water flow from outlet to inlet, to maintain constant pressure and minimum flow requirement for firing of the continuous flow water heater(s) Normally Set: 50-60Kpa (Flow & Return Systems) 10Kpa (Dead Leg / No Return Systems) RV-20 Prevents reverse flow of cold water into hot water reticulation system. OWV-20 System safety relief valve - 12 Bar operation PSV-12 19 20 Hot Water Return One Way Valve Pressure Safety Valve 21 Plug & Gauge Cock Hot water manifold 6mm Test point for pressure gauge PGC-6 21A Plug & Gauge Cock cold water manifold 6mm test point for pressure gauge & Isolation means for loss of prime testing PGC-6 Continuous Flow Water Heater Water Heating means. Refer: Rheem 027 Owner’s Guide & Installation Instructions Electronic Continuous Flow Gas Water Heater Model 027 Outdoor - Series 872 & Indoor - Series 862 for further details 22 22A 22B 22C External Continuous Flow Water Heater Flue Outlet Internal Continuous Flow Water Heater Flue Outlet Continuous Flow Water Heater water inlet strainer Recommended 800mm access clearance from Flue Outlets. Clearance measurements for horizontal flue terminals Refer Australian Standard Gas Installations AS5601 – 2004 Fig 5.3 Rheem Supply Item Refer Rheem: ‘Owners Guide and Installation Instructions’ Continuous Flow Gas Indoor Water Heater 862 Series – Models 027 for flueing instructions. Protects the Continuous Flow Water Heater from damage due to ingress of solids. Located on cold water inlet of Water Heater MF ASS CE 040 to CE 120 23 Mounting Frame Hot water System mounting frame assembly Refer Commpak general arrangement drawings for full details 24 Pressure Switch Pump protection against dry running Pump disabled <110kPa & re-enabled > 130kPa 25 Pump Isolation Valve 32mm BSP Female Ball Valve. Pump isolation means PIV32BSPFM 26 Pump Discharge one 32mm Pump one way valve. Prevents back flow circulation through stationary pump way valve POWV32 27 Pump Weather Cover UV stabilized weather cover for the pump. For external installation only. 25 WPS+C PWC COMMPAK INTERNAL SINGLE PUMP – GENERAL ARRANGEMENT 26 COMMPAK INTERNAL DUAL PUMPS – GENERAL ARRANGEMENT 27 COMMPAK EXTERNAL SINGLE PUMP – GENERAL ARRANGEMENT 28 COMMPAK EXTERNAL DUAL PUMPS – GENERAL ARRANGEMENT 29 COMMPAK - COMMISSIONING All water heaters are tested and adjusted before dispatch from the factory, however further adjustments may become necessary because of local conditions. COMMPAK – INITIAL CHECKS 1. Check that the power supply to the system controller(Item #1) is switched OFF. 2. Check that an adequate water supply is available to the Commpak hot water system. Water supply pressure shall not exceed 800kPa. 3. OPEN cold water inlet valve (Item #11), hot water outlet valve (Item #10) & hot water return valve (Item #13) Check all individual water heater isolation valves (Items #14 & #15) are OPEN; Check bi-directional pressure balancing isolation valve (Item #16) is OPEN. 4. Check that the system is fully charged, all the air is bled from the system and no leaks are evident. Air shall be bled by opening the hot water outlets in the building pressure relief valve of the hot water system (Item #20) and .pump bleed disk (item #5) 5. Check the pipe work for leaks 6. OPEN all individual water heater gas isolation valves (Item #17) and purge gas lines. 7. Check the gas pipe work for leaks To complete the installation, it is necessary to check the gas supply pressure at the inlet to the water heater (refer to “Gas Inlet Pressure” on page 30), the minimum test point pressure and the maximum test point pressure (refer to “Burner Gas Pressure” on page 32). Warning: Upon completion of the installation and commissioning of the water heater, leave this guide with the a responsible officer. DO NOT leave this guide inside of the cover of the water heater, as it may interfere with the safe operation of the water heater or ignite when the water heater is turned on. GAS INLET PRESSURE IMPORTANT - CHECK the gas supply pressure at the inlet to the water heater with the water heater and all other gas burning appliances in the premises operating (burners alight). The minimum gas supply pressure is: Natural Gas 1.13 kPa Propane 2.75 kPa If this minimum cannot be achieved, it may indicate the meter or the gas line to the water heater is undersized. It is important to ensure that an adequate gas supply pressure is available to the water heater when other gas burning appliances, on the same gas supply, are operating. 30 COMMPAK - COMMISSIONING GAS INLET TEST POINT PRESSURE To check the gas inlet pressure, select the CFWH at the furthest point in the manifold as the test unit: 1. Ensure the burners are not operating, by turning off the power to the Commpak. 2. Close the gas isolation valve at the gas inlet to the CFWH. 3. Locate the gas inlet test point on the gas connection to the CFWH. 4. 5. Remove the test point screw and washer from the test point orifice. WASHER Connect the manometer. GAS INLET Open the gas isolation valve fully at the gas inlet to the CFWH. INLET TEST POINT ORIFICE TEST POINT SCREW MANOMETER Observe the gas pressure reading on the manometer. If the manometer reading is between the minimum and maximum inlet gas pressure ratings on the rating label, no adjustment is required. If the manometer reading is below the minimum inlet gas pressure rating on the rating label, then either the gas pipe to the water heater is undersized and needs to be rectified or adjustment is required at the gas regulator. If the manometer reading is above the maximum inlet gas pressure ratings on the rating label, then adjustment is required at the gas regulator. 6. Switch on the electrical supply to the Commpak. 7. If installed as part of a recirculation system, the Commpak should start automatically. If on a dead leg system, the unit should start automatically but may shut down before checks are completed. If on a dead leg system open a hot tap fully and ensure all the CFWH are on and the burners are fully ignited. It may be necessary to open several taps. Note: If the Commpak is using 872627 or 862627 model CFWH and is installed as an in-series gas booster for a solar water heater, then the temperature of the water entering Commpak must be at least 2°C below the water heater preset outlet temperature setting. Otherwise the gas burners will not ignite and the test point gas pressures cannot be measured. 8. Observe the gas pressure reading on the manometer. If the manometer reading is between the minimum and maximum inlet gas pressure ratings on the rating label, no adjustment is required. If the manometer reading is below the minimum inlet gas pressure rating on the rating label, then either the gas pipe to the water heater is undersized and needs to be rectified or adjustment is required at the gas regulator. If the manometer reading is above the maximum inlet gas pressure ratings on the rating label, then adjustment is required at the gas regulator. 9. If an adjustment was made during Step 8, repeat this procedure from Step 5. 10. Close the isolation valve on the outlet of the CFWH. 11. Close the gas isolation valve at the inlet to the CFWH. 12. Remove the manometer and refit and tighten the test point screw and washer. 13. Open the gas isolation valve fully at the gas inlet to the water heater. 14. Open the isolation valve again so the burners ignite. 15. Test for gas leaks. 16. Close the hot taps, if open 31 COMMPAK - COMMISSIONING Warning: The removal of the front panel will expose 240 volt wiring. Take care not to touch wiring terminals. Note: If the Commpak is using 872627 or 862627 model CFWH and is installed as an in-series gas booster for a solar water heater, then the temperature of the water entering Commpak must be at least 2°C below the water heater preset outlet temperature setting. Otherwise the gas burners will not ignite and the test point gas pressures cannot be measured. 1. Ensure the burners are not operating, by turning off the power to the CFWH. 2. Remove the screws holding the front panel to the jacket. 3. Gently disengage the front panel and pull forward to remove from the water heater. 4. Locate the burner pressure test point on the main burner manifold. MANOMETER Remove the test point screw and washer from the test point orifice. DIP 1 SET OF DIP SWITCHES Connect the manometer. 5. Switch on the electrical supply at the power outlet to the water heater. 6. Open the gas isolation valve fully at the gas inlet to the water heater, if not already open. 7. If installed as part of a recirculation system, the Commpak should start automatically. If on a dead leg system, the unit should start automatically but may shut down before checks are completed. If on a dead leg system open a hot tap fully and ensure all the CFWH are on and the burners are fully ignited. It may be necessary to open several taps. DIP1 ON 1 2 3 4 1 2 3 4 DIP2 ON 1 2 3 4 1 2 3 4 MIN OFF ON TEST POINT SCREW OFF ON MAX MIN. BUTTON MAX. BUTTON 8. ADJ ADJUSTER BUTTON Press and hold down the MIN button and observe the reading on the manometer. 9. WASHER TEST POINT ORIFICE MINIMUM TEST POINT GAS PRESSURE Refer to the rating label on the water heater for the minimum test point gas pressure. “1L” is shown on the LED display. Release the MIN button. If the manometer reading observed in step 7 agrees with the rating label, no further adjustment is required. 10. To adjust, press and hold the adjuster button. “LH” is shown on the LED display. Note: The adjuster button must be held down continuously through steps 10 to 12. 11. Press and hold the MIN button and observe the reading on the manometer. The manometer reading will change as the test point gas pressure adjusts. Note: While the MIN button is pressed, the gas pressure will at first increase then decrease, cycling between an upper gas pressure limit (39 on the LED display) and a lower gas pressure limit (01 on the LED display). 12. Release the MIN button when the reading on the manometer agrees with the rating label. 13. Release the adjuster button. 32 COMMPAK - COMMISSIONING Notes: x x If the burners extinguish and error code 11 or 12 starts to flash on the LED display: release the MIN and adjuster buttons close the CFWH isolation valve clear the error code (refer to “Clearing Error Code” on page 33) recommence the procedure from Step 7. If the adjuster button is released before Step 12, clear any error code (if displayed) and recommence the procedure from Step 7. MAXIMUM TEST POINT GAS PRESSURE Refer to the rating label on the water heater for the maximum test point gas pressure. Follow Steps 1 to 13 of the “Minimum test point gas pressure” procedure on page 32, but open the hot tap fully and use the MAX button instead of the MIN button. It may be necessary to open two or three hot taps fully, depending upon the model of water heater and the incoming cold water temperature. Note: In Step 7, “3H” (627 models) will be shown on the LED display. After setting the minimum and maximum test point gas pressures: x Close the outlet isolation valve. x Remove the manometer and refit and tighten the test point screw and washer. x Open the isolation valve again so the burners ignite. x Test for gas leaks.. x Refit the front panel and screws to the water heater. CLEARING ERROR CODE If an error code does appear on the LED display during the commissioning process, it will be necessary to clear the error in order to complete the installation. To clear an error code: x switch off the electrical supply at the power outlet to the water heater x check the gas isolation valve at the gas inlet to the water heater is fully open x wait five (5) minutes x switch on the electrical supply at the power outlet to the water heater NOTE: If min/max pressure adjustments were required on the test heater if may be necessary to test all water heaters individually. 33 COMMPAK - COMMISSIONING PRESET OUTLET TEMPERATURE SETTING The factory preset outlet temperature setting of the water heater is: x 70°C as part of a Commpak system It is usually not necessary to check or adjust the factory preset outlet temperature setting of the water heater, unless the customer or application has a particular requirement for this to be done. For applications requiring sanitising temperatures, such as a commercial kitchen, it will be necessary to adjust the preset outlet temperature setting and controller to 82°C. Refer to page 34 for details. If the water heater is installed as part of a circulated hot water flow and return system in a building, the preset outlet temperature setting must be set to at least 60°C. If the water temperature decreases by more than 5°C through a circulated hot water flow and return system due to heat loss in the ring main, the preset outlet temperature setting of the water heater should be set to at least 65°C. GAS BOOSTER FOR A SOLAR WATER HEATER Note: AS 3498 requires that a water heater provides the means to inhibit the growth of Legionella bacteria in potable water. When this water heater is used as an in-series booster for a solar water heater it can satisfy this AS 3498 requirement provided it is energised and the booster preset outlet temperature setting is 70°C or higher. It will be necessary to check and if required to adjust the preset outlet temperature setting of the continuous flow water heater when: x it is installed as an in-series gas booster to a solar water heater x it is an existing continuous flow water heater and a solar water heater is then installed. Note x Consideration must be given to the delivery temperature to any ablution and public areas such as a bathroom, ensuite or public amenities. Refer to “Hot Water Delivery” on page 18 34 COMMPAK - COMMISSIONING TO CHECK OR ADJUST THE PRESET OUTLET TEMPERATURE SETTING The temperature settings will be displayed on the LED display. The preset outlet temperature settings are: x 872/862 series 38°C, 40°C, 42°C, 43°C, 45°C, 50°C, 55°C, 60°C, 65°C, 70°C, 75°C, 82°C It is necessary to have the electrical supply to the water heater switched on during stages of checking or adjusting the preset outlet temperature setting procedure. Warning: The removal of the front panel will expose 240 volt wiring. Take care not to touch wiring terminals. The adjustment must be carried out by a qualified person. Warning: This procedure will involve the adjustment of dip switches. Adjustment of a dip switch should only be made with an insulated tool. 2. Remove the screws holding the front panel to the jacket. 3. Gently disengage the front panel and pull forward to remove from the water heater. 4. Switch on the electrical supply at the power outlet to the water heater. 5. Switch dip switches 3 and 4 to the on (up) position on the DIP 1 set of DIP switches on the I.C. Board. ON 3 2 1 4 OFF Switch off the electrical supply at the power outlet to the water heater. DIP1 1. ON To check or adjust the preset outlet temperature setting: 1 2 3 4 The current preset outlet temperature setting will show on the LED display. If the temperature displayed on the LED display is the desired preset outlet temperature setting, then proceed to step 7, as no further adjustment is necessary. 9. 4 4 1 2 3 4 1 2 3 4 ADJ MAX MIN. BUTTON MAX. BUTTON ADJUSTER BUTTON Switch off the electrical supply at the power outlet to the water heater. Refit the front panel and screws to the water heater. 35 ON Switch dip switches 3 and 4 to the off (down) position. The LED display will go blank. The preset outlet temperature setting is now set. 8. 3 3 MIN DIP1 7. 2 2 ON 872 series The increments are 38, 40, 42, 43, 45, 50, 55, 60, 65, 70, 75, 82. Set the LED display to 82 on an 872 series water heater if it is required to deliver sanitising temperatures. 1 1 ON 1 2 3 4 1 2 3 4 OFF DIP1 The MAX and MIN buttons are located underneath the DIP 1 and DIP 2 set of DIP switches. DIP2 ON Each press of the MAX or MIN button will increase or decrease the preset temperature by one increment. OFF ON Press the MAX button to increase or the MIN button to decrease the preset outlet temperature setting. OFF ON 6. DIP 1 SET OF DIP SWITCHES COMMPAK - COMMISSIONING TO TURN OFF THE WATER HEATER If it is necessary to turn off the water heater on completion of the installation, such as on a building site or where the premises is vacant, then: x Switch off the electrical supply at the isolating switch to the Commpak (refer to note below). x Close the gas isolation valve at the inlet to the Commpak. x Close the cold water, hot water flow and building return isolation valves at the inlet to the Commpak. x Drain each CFWH if there is a risk of freezing conditions occurring (refer to “Draining The Water Heater” on page 36). Notes: x The frost protection system will be rendered inoperable if electrical power is not available at the water heater. x Damage caused by freezing due to the unavailability of power at the water heater is not covered by the Rheem warranty (refer to “Terms of the Rheem Warranty” on page 71). x If the power has been switched off to the water heater and there is a risk of freezing, then it is necessary to drain the water heater (refer to “Draining the Water Heater” on page 36). DRAINING THE WATER HEATER To drain the water heater: x Turn off the water heater (refer to “Turn Off The Water Heater” on page 36). x Open the pressure relief valve on the Commpak located on the hot manifold. x Unscrew the two drain plugs, one each at the cold water inlet and hot water outlet, on the underside of each continuous flow water heater. Water will drain from the water heaters. x When water stops flowing from the water heaters, close the pressure relief valve. Note: It is recommended not to screw the drain plugs back in, until the water heater is to be turned on again. 36 COMMPAK - COMMISSIONING COMMPAK – START-UP CHECKS System Pump/s Warning: Dry running of the Pump/s will result in permanent damage and is not covered under the Rheem warranty 1. Before turning 240VAC power on to the hot water system controller ensure the following checks are undertaken. 2. Check & confirm pump/s speed (Item #5A, factory set on number 3). Note: Read and comply with the instructions as specified on the TAG tied to end of power lead. 3. Check that the pump/s power supply lead is plugged into the dedicated pump power outlet (Item #3) is plugged in and turned ON. 4. Check individual water heater (Item #22) power supply leads are plugged in (Item #2) and turned ON 5. Turn on the power supply to the hot water system controller (Item #1) Check hot water system controller status (as displayed on the control module) (Item #1) LCD display is ON & Pump Run LED(s) are illuminated. Refer to hot water system controller insert (pages 25 - 39) for additional details. 6. Check all water heaters (Item #22) have fired and are operational Note: All hot water units have been factory tested, temperature pre-set and gas pressures adjusted and as such no further adjustments are required. 7. Check hot water outlet temperature display (Item #1) registers a temperature rise. Turn on several hot water outlets (fixtures) on the installation to check that all the individual Water heaters and pump/s are operating correctly. 8. When satisfied, CLOSE hot water outlet isolation valve (item #10) Depress the ‘RESET’ button on the hot water system control module (item #1) and hold ON for 5 seconds. This will enable both the hot water outlet temperature (T1) and the return water temperature (T2) to be displayed simultaneously. The Pump will turn OFF when return temperature (T1) has reached 60°C (nominal default value). Re-open hot water outlet isolation valve (item #10). Pump will restart and CFHW units will fire. Leave running until satisfied with operation. COMMPAK – COMMISSIONING – FINAL CHECKS Loss of water protection test. 1. Test and confirm pump/s loss of water protection pressure switch (Item #24 & Item # 21A): a. Turn off the isolating valve to the pressure switch during the normal operation of the hot water system. Undo the bleed / test plug to relieve the pressure. This will initiate the pump/s shut down timer (user programmable) nominally set at 15 seconds. Check and confirm pump is locked-out on time out. b. Screw back in the bleed / test plug and open the isolation valve to the pressure switch. This will re-instate operation of pump/s. Check and confirm this on the controller. 2. Check system for any leaks (gas & water) 3. Turn system 240VAC power OFF (Item #1). Isolate main water valves (Items #10; #11 & #13); Check and clean the inline cold water supply strainer; hot water return strainer & individual water heater strainers (Items #12; #13A & #22C). 37 COMMPAK - COMMISSIONING 4. Advise customer to check strainers after 1 week usage. Continue to check strainers on a weekly basis until they inspect clean. Continue to check strainers on a monthly basis until they inspect clean. Continue to check strainers on a quarterly basis until they inspect clean. Thereafter check every six (6) months. 5. Re-instate Commpak by repeating steps 1 to 8 on page 37 6. Fill in commissioning sheet (page 41) 7. Rheem Commpak commercial continuous flow water heater can now be left on line. Finish. COMMPAK – PUMP INSTALLATION 1. Pump casing arrow to match the flow direction 2. The shaft of the pump MUST be horizontal as shown 3. Never operate the pump “dry”; 4. Ensure cable gland is tight & cable is looped down on exiting of terminal box. 5. Bleed pump by removing slotted disk while pump is running. 6. Test & confirm loss of water protection pressure switch (Item -#24) is operational as per instructions Refer to page 37 7. Clean cold water inlet and hot water return line strainers regularly. 38 COMMPAK - COMMISSIONING COMMPAK – FAULT FINDING PROCEDURE FAULT: Hot Water System not operating as expected Possible Causes Description & Recommended Corrective Action Check system controller – Is the LCD temperature display ON x No Check controller isolator is turned ON. If not turn toggle to the ON position (UP) Note: The controller isolator is an earth leakage (safety switch) and will: Power Failure x Yes Trip (turn OFF) if an earth fault of 30MA or greater is present To check for fault unplug all leads from their power outlets Turn the isolator ON o If isolator trips? - Faulty control module. Contact supplier for additional assistance o If isolator does not trip? - Plug in each power lead one at a time until isolator trips – leave offending item unplugged & report to supplier Check 240VAC Supply from distribution board powering Controller Is ON Check breaker rating is 16A or greater, as tripping may occur on larger systems if below this value LCD Temperature Display is ON: Power OK Check system Controller – Are any Fault LEDs illuminated x x x Controller Fault x Yes Faulty T1 or T2 Sensor LED Illuminated Check connections are good and no breaks in cable. If Good? Sensor is faulty Replace Sensor Yes High Temperature LED Illuminated Check actual water temperature & compare against controller displayed value. o If displayed value is incorrect replace T2 sensor o If same? Check High Temp setting (refer page 34) set value o If setting value correct? = Faulty CFWH or incorrect DIP Switch setting Refer CFWH manual for details Yes Pump Low Temp Fault LED Illuminated Check all strainers are clear Check Pump is ON & operating Check gas pressure is OK Yes Pump Lock-out LED Illuminated Check water supply is turned on Check pump is On & operational Check pressure Switch (item 24) contacts are open Check gas supply is ON & correct pressure NOTE: Controller RESET button will clear any latched fault. Refer System Controller Pages 25 - 40 for additional information NOTE: If System Controller is faulty un-plug the pump from the dedicated Pump Power Outlet & Plug into a water heater General Purpose Outlet. System will continue to operate until Controller can be replaced 39 COMMPAK - COMMISSIONING Possible Causes Description & Recommended Corrective Action Refer Pump Manual Pages 42- 51 for additional Information Pump Fault CFWH Fault Note: NOTE: If Pump is faulty isolate pump electrically & close valve No. #16. Commpak will operate as per Multipak (Hot water on demand but no return flow) until pump can be replaced. Refer to Rheem Owner’s Guide and Installation Instructions for additional Information CFWH = Continuous Flow Water Heater 40 COMMPAK - COMMISSIONING COMMPAK – COMMISSIONING SHEET Customer : Project & Address: Package Details: Installation OK Comments Overall Installation? Installation Requirements: Individual Water Heaters Co-axial Flueing Compliance to AS/NZS 5601 and AS/NZS 3500.4 is mandatory Refer: Rheem Owner’s Guide & Installation Instructions Models 862627 for fluing requirements. Ventilation Requirements? Compliance to AS/NZS 5601 is mandatory Fuel: Natural Gas / LPG Natural Gas: 1.13 Minimum & Up to 3.5 kPa Propane: 2.75 Minimum & Up to 3.5 kPa Gas Pressure During full Load Operation? Inlet Water Pressure Minimum 150 kPa & up to 800 kPa Inlet Water Pressure? Valves All the Valves are in Open Position? Differential Bypass Valve Position? Flow & Return System: Dead Leg System: Set to No. 6 Set to No. 1 Pump Speed: Factory Pre-set to No. 3 Pressure Safety Valve Operation? Pump/s Operation? Package Controller (In accordance to System Controller – Test Sheet – Refer Pages 64 & 66) Set Temperature Reached? Check Indicators? Overall Operation? System Flow & Return System or Dead Leg System? All Water Heater Operations? System Temperature Reached & Pump/s Shutdown? Differential Bypass Valve Operation? Simulate both Flow/Return or Dead Leg Systems Comments Client to carry out regular preventative maintenance as below: Pump Inlet Strainer; Hot Water Return Strainer & Water Heaters Inlet Strainers: Check & Clean as per the schedule – Refer Steps 3 & 4 of Page 37 - Commissioning – Final Checks Sign Off System Commissioned By: Customer’s Representative: Date: Date: 41 COMMPAK - COMMISSIONING COMMPAK – PUMP MANUAL 42 COMMPAK - COMMISSIONING 43 COMMPAK - COMMISSIONING 44 COMMPAK - COMMISSIONING 45 COMMPAK - COMMISSIONING 46 COMMPAK - COMMISSIONING 47 COMMPAK - COMMISSIONING 48 COMMPAK - COMMISSIONING 49 COMMPAK - COMMISSIONING 50 COMMPAK - COMMISSIONING 51 COMMPAK - COMMISSIONING COMMPAK – SYSTEM CONTROLLER - MODEL UP-TCM-01 HOT WATER CONTROL MODULE OUTLET 60 degC 10:54 am PUMP RUN HIGH TEMP. LOW TEMP. T1 - O/C T1 - S/C SPARE SPARE PUMP L/OUT T2 - O/C T2 - S/C ALARM EXIT ACTIVE TO MUTE STROBE: Press & hold Alarm Mute for 3 seconds. TO DOUBLE MUTE: Press Alarm Mute twice. All alarms will be ignored for 5 minutes. TO TEST ALARM: Press and hold LED Test for 3 seconds. Alarm will activate for 5 sec. ALARM MUTED ALARM MUTE ALARM RESET L.E.D. & ALARM TEST ENTER MODE Model - uP-TCM The uP-TCM-01 Temperature control module is housed in a DIN rail mount enclosure with an equivalent width of 9 poles. This microprocessor based module is designed for reliable temperature control and monitoring. FACIA DISPLAY PANEL x Four Standard LEDs, six bi-coloured LEDs, one sixteen character two line liquid crystal display and four tactile push buttons are incorporated on the facia display panel, covered with a polyester label. OUTPUTS x Five output relays are included in the unit, to provide for control and alarm interface functions. x Two relays are dedicated to pump control and the other three relays are for volts-free monitoring. x The three volts free relays are user programmable for various alarm functions. x One audible alarm output: 12VDC – 20MA (mutable) with user programmable maximum ON time facility x One strobe light visual alarm output: 12VDC – 200MA (extinguishable). x The module also incorporates comprehensive alarm monitoring and annunciation facilities. INPUTS x Interface circuitry accommodates for three different types of temperature sensors. x The module has provision for simultaneous monitoring of two temperature sensors. x Being: x Note: The temperature sensors are pre calibrated and do not require any adjustment. x Eight digital inputs are also provided to enable / disable various controller functions. T1 for the Return Water and T2 for the outlet water. OTHER FEATURES x x A Set-Up mode is incorporated to allow user access to numerous control parameters (if required) for fine tuning of the control module to best suit the required the application. 58mm Pump run hours and No. of starts are recorded for up to two pumps. 156mm 85mm x A real time clock is provided to facilitate up to nine user programmable ON – OFF settings x An alarm fault logger logs up to 40 faults, recording alarm type, time and date. Once 40 faults have been logged, then the oldest fault is over ridden by newest fault. x All set-up parameters and recorded data are stored in non-volatile Eeprom x All cabling to the module is performed through plug in connectors. 52 COMMPAK - COMMISSIONING COMMPAK – SYSTEM CONTROLLER – SPECIAL FEATURES x Powered from 85 to 260v AC x All connections to Module are pluggable with all field wiring on one side of module. x Two channel thermistor interface x Configurable for three different thermistor types x Comprehensive alarm monitoring x Indicator and alarm test facilities x Inbuilt hour run meters for up to two pumps x Inbuilt pump start counters for up to two pumps x Presets menu for viewing set parameters x Set-Up mode for changing set parameters x Temperature sensors are monitored for open-circuit and short circuit condition x Push button beep verification x All Alarms can be muted, with any new alarm condition re-instating the alarm x All alarms can be double muted to provide 5 minutes isolation of alarms (Maintenance & Testing) x Two channel ultra violet unit monitor with selectable lock-out condition x High temperature differential alarm with selectable lock-out condition x Low temperature differential alarm with adjustable time delay x Low temperature differential lock-out with adjustable time delay x Individual pump start and stop settings for up to two pumps. x Bicoloured LEDs to expand controller functionality x 16 character, 2 line LCD with LED back lighting x Real time clock x Two relay outputs provided for pump control x Three fully programmable volts-free relay outputs x Inbuilt code switches to provide additional modes of operation x Solvent resistant polyester film label x Monitoring of up to 8 digital inputs x Provision for external 12v audible alarm (if inbuilt Piezo is inadequate) x Provision for external 12v Strobe Light x Provision for low pressure monitoring (loss of Towns Mains) x Provision for heater resetting. x Comprehensive 50 fault data logger with time and date stamping (disabled in double mute mode) x Selectable Displayed Information during normal mode x Selectable alarm output as continuous or timed (for situations where use of audible alarms is restricted) x Selectable LCD backlight options x Strobe output can be muted independently of alarm output x Selectable P1 to P2 start delay and P1/P2 Overlap time 53 COMMPAK - COMMISSIONING COMMPAK – SYSTEM CONTROLLER - OPERATION TEMPERATURE SENSORS x The module can cater for three different types of thermistors/sensors. x Refer to the diagram for jumper settings. x Sensor T1 is assigned to the return water. sensor T2 is assigned to the outlet water. x The default display shows outlet temperature, if dual temperatures are selected then both the outlet and return temperatures are displayed. x Each sensor is continually monitored, and if an open-circuit or a short-circuit condition is sensed, then the audible alarm is activated. x The alarm is indicated on the LCD and also on the respective sensor LED. Red for o/c, and flashing Green for s/c. x This type of alarm is non latching. Relay outputs are affected if set to Sensor fault or common fault. x If sensor T1 o/c or s/c fault occurs, then the T2 temperature is also assigned to T1, likewise, if sensor T2 o/c or s/c fault occurs, then the T1 temperature is assigned to T1. x If both sensors have o/c or s/c faults then all temperature monitoring will cease, and will replace the temperature reading on the LCD. ULTRA VIOLET UNIT MONITORING x Up to two UV units can be monitored. x The input circuitry can be configured for normally open or normally closed. x Individual On and Off time delays are provided. x The output can set to follower or latched. x Output is in the form of the general audible alarm, and a “UV1 Fault” or UV2 Fault” message on the LCD. x Relay outputs are affected if set to UV fault or common fault. x If the UV Lock-out is enabled, then the lock-out LED will activate and the pumps will turn off. The relay output pump lock-out is also affected. HIGH TEMPERATURE MONITORING x The high temperature monitor can be set to either of the two temperature sensors T1 or T2. x Individual ON and OFF temperature thresholds are provided. x A time delay of 1-99 seconds is provided. x The output can be configured as a follower or latched. x The high temperature LED (if fitted) will flash during the timing process. x Relay outputs are affected if set to high temp, temp fault or common fault. x If the high temperature lock-out is enabled, then the lock-out LED will activate and the pumps will turn off. x The relay output pump lock-out is also affected. LOW TEMPERATURE MONITORING x The low temperature monitor can be set to either of the two temperature sensors T1 or T2. x Individual ON and OFF temperature thresholds are provided. x A time delay of 1-99 minutes is provided. x The output can be configured as a follower or latched. 54 COMMPAK - COMMISSIONING x The low temperature LED will flash during the timing process. x Relay outputs are affected if set to low temp, temp fault or common fault. LOW TEMPERATURE LOCK-OUT x The low temperature lock-out can be set to either of the two temperature sensors T1 or T2. x Individual ON and OFF temperature thresholds are provided. x A time delay of 1-99 minutes is provided. x The output can be configured as a follower or latched. x The pump lock-out LED will flash during the timing process. x Relay outputs are affected if set to pump lock-out, temp fault or common fault. PUMP FAULT MONITORING x Digital inputs are provided for pump Fault monitoring. These are virtually an instantaneous input. x They are disabled on the single pump controller, but the dual pump controller utilises them to swap the pumps over in the event of a fault. x Pump faults are displayed on the respective LEDs. x The faults are latched. To reset the faults press alarm reset. TEMPERATURE CONTROL x Pump control is primarily set in this section. x The Lead start/stop and lag start can be set to either T1 or T2. The lag stop is fixed to T1. x On a single pump system, the on/off function is set by the LEAD ON and the LEAD OFF temperature, and also by the LAG ON (Low) and LAG OFF temperature. x If the pump is started from the lead on setting, then the pump minimum run timer MRT will activate (if enabled) causing the pump to run for the MRT time, unless the lead stop temperature has not been reached. x On a dual pump system, the lead pump control is identical, but the lag pump control differs in that there are two independent start temperatures. x The lag start (High) is enabled when the lead pump start/MRT is active, otherwise the Lag Start (Low) is active. RELAY OUTPUTS Relay Output Options x Three programmable relay outputs, RL1, RL2 and RL3 are provided for volts-free monitoring of the controller. x The relays are a normally open contact set, but the option of setting them individually to non failsafe or failsafe is possible. x Each of the three relays can be set to one of fifteen alarm types, with each relay in addition having a dedicated option. x Refer to the table below for available types. x Note that if relay 3 is set to heater reset, then that function is automatically enabled. x If relay 5 is set to common fault, the output mode is preset to failsafe. CLOCK x P1 Run P2 Run Pump Run P1 Ready P2 Ready Pump Ready P1 Fault P2 Fault Pump Fault Low temp High Temp Temp Fault UV Fault Sensor Fault Pump Lock-Out Heater Reset (RL3 only) Low Pressure Fault (RL4 only) Common Fault (RL5 only) If the clock is not displayed, then it can be read in presets mode. In Set-Up mode the time, day and date can be adjusted. 55 COMMPAK - COMMISSIONING PUMP CONTROL x The Control page provides additional control functions. x In the single pump controller, the only relevant parameters are the MRT and clock control. x The remaining functions pertain to pump alternation in dual pump systems. x Pump run option determines if two pumps are permitted to run together. The lead pump can be fixed as pump 1 or pump 2, or set to alternate. x Pump alternation can be time based from 1-24 hours, or set at up to two fixed clock times. It is possible to set specific days, or any day. x If alternation is time based, then the two clock settings can be utilised for disabling and enabling the pumps. HEATER RESET x If relay RL3 is set to Heater Reset, then the Heater Reset mode is enabled. x This relay is then utilised for switching 240v AC to a contractor, whose contact set is arranged as Normally Closed. x If the low temperature instantaneous input remains active for a period of 4 minutes, then RL3 is activated for a period of 30 seconds, isolating the power to the Water Heaters. x After the 30 seconds has elapsed, RL3 de-activates and power is restored to the Water Heaters causing them to reset. x This cycle will continue as long as the low temperature instantaneous input is active. LOW PRESSURE LOCK-OUT x The module has the provision to monitor a pressure switch monitoring the Towns Mains pressure to the Hot Water System. x The pressure switch will be configured as contact closure on low pressure. x If a contact closure is sensed continuously for a period of 15 seconds, then the pumps will be locked out. “Low Pressure L/Out” will be displayed on the LCD, and the Pump Lock-Out LED will turn on. x The fault is latched, to reset press Alarm Reset once the low pressure fault has been rectified. Note that the pumps will require priming prior to operating the unit. ALARM RESET x Pressing Alarm Reset will reset all latched alarms. If COMMS are enabled, then it will also reset all latched Alarms on all the connected modules. LED TEST x Press and hold the LED & Alarm Test button and all LEDs will eliminate while the button is depressed. The bi-coloured LEDs will toggle between red and green in order to check both colours. 56 COMMPAK - COMMISSIONING LCD BACKLIGHT: The LCD is provided with LED backlighting. The backlight operation can be set to manual or automatic, within the DISPLAY page of the Menu System. In Manual mode the backlight turns on whenever a button is pressed and remains on for X seconds as set in the Backlight On Time. Its range is 10 to 99 seconds. If set to 10 seconds then the Backlight will remain on permanently. In the automatic mode the backlight turns on for any button or alarm operation. The time On function also applies to this mode after all Alarms are cleared. LCD CONTRAST: The LCD contrast is adjustable via a potentiometer, accessed via a hole in the module casing, refer to adjacent drawing. It is adjusted using a small straight bladed screwdriver. Clockwise to increase and anti-clockwise to decrease. Contrast HOT WA ALARM SYSTEM: The Controller incorporates a comprehensive Alarm Monitor. Any given alarm condition can be muted by pressing the Alarm Mute button. If an Alarm condition clears, but there is still one present, then the Alarm will remain muted. If a new Alarm activates then the Alarm will re-activate. All Alarms will be logged unless the Double Mute Mode is active. O When the Alarm is muted the audible alarms will be muted, but the strobe (if fitted) will remain active. to mute the strobe, press and hold the alarm mute button for 5 seconds. If another fault appears the alarm and the strobe will re-activate. Relay outputs are affected with various Alarm conditions, refer to the detailed relay output options available. Alarm output mode is another option available within the DISPLAY page of the Menu System. Options are Continuous and Timed. In continuous mode the alarm output remains active until muted or turned off, in Timed mode the alarm only operates for X minutes then it automatically activates the Alarm Mute mode. If another alarm appears then the alarm will re-activate and start timing again. This mode is handy where audible and visual alarms cause problems with neighbouring residents. It is suggested that remote monitoring be used if this mode is utilised. ALARM TEST: Press and hold the LED and alarm test button for 5 seconds and the LED test function will turn off, and the Alarm Test mode will be enabled. This function will latch so the button can be released. The alarm and strobe (if connected) will operate for 5 seconds. The Alarm Mute function can also be tested also by pressing the Alarm Mute button during the 5 second test period. ALARM DOUBLE MUTE: If the alarm mute button is pressed twice within 1 second, double mute mode is enabled. The alarm muted led will flash, and all alarms will be ignored for a 5 minute period. This mode is handy when commissioning installations where numerous alarms become annoying both locally and remotely on a monitored system. Note that no faults are logged while this mode is active. This mode can be turned off by pressing alarm reset or by activating the alarm test function. STROBE OUTPUT: A 12volt strobe output is provided. This will activate whenever the alarm activates. If the alarm is muted, the strobe will continue to operate. To mute the strobe, press and hold the alarm mute button for 5 seconds. If a different alarm condition arises, the alarm and strobe will re-activate. 57 COMMPAK - COMMISSIONING DISPLAY OPTIONS: Within the DISPLAY page of the Menu System, are display options for the LCD. This information will be displayed unless a fault message needs to be displayed. The display will rotate through all current fault messages at a 3 second refresh rate. There are four options as follows: x Temp & Time: Outlet Temperature and Time of day will be displayed. x Pump Stats: The display will circulate the P1 Hours, P2 Hours, P1 Starts and P2 Starts, with a update time of 3 seconds. x Fault Log: The display will show the status of the logger, i.e. Number of faults logged, and if >50 then Log O/Write. x Dual Temps: Outlet Temperature & Return Temperature will be displayed FAULT LOG: unless the controller is in the double mute mode, where all audible and visual alarms are muted for a 5 minute duration, or set-up mode where alarm parameters can be altered, all alarm conditions are logged to memory. The Logger will Log the LAST 50 faults. Once the fault count exceeds 50, the logger starts overwriting itself. Each logged fault is time and date stamped. Enter the Presets mode by pressing the MODE button. Press the DOWN button and “FAULT LOG will be displayed. Press MODE again, and “VIEW FAULTS” will be displayed, along with “Last 50”. Press MODE again and the number of faults logged will be displayed. Press MODE to display the Last logged fault. Pressing the DOWN button will move down the fault list. Pressing the UP button will move up the Fault List. The logged fault may include one or more faults if they occur simultaneously. The information displayed on the LCD is Fault No., fault description, and the time and date. Pressing the EXIT button three times will exit this mode, or it will auto-exit after 60 seconds of button inactivity. The Fault Log can be cleared from within SET-UP mode. INFORMATION: Within the INFORMATION page of the menu system, is all the relevant information relating to this controller. The following Information can be accessed: DiCon company contact details. x Job Number, which should be provided if seeking additional info, or reporting a fault. x Module Serial Number x Module Software Version PRESETS MODE: x This mode is used to view all current settings, hour meters, start counters, general information and logged faults. x Once in this mode, the controller will auto-exit after 60 seconds of button inactivity. x To enter this mode press the MODE button, PARAMETERS will be displayed. Refer to the attached drawing, you can see that this is the first page of the Menu System. x Pressing UP will move up through the pages, pressing DOWN will move down through the pages. x When you have reached the relevant page, press ENTER (MODE). This will display either the Sub Page Heading x (PARAMETERS page), or the first item within the page. x If within the PARAMETERS page, you will need to press the ENTER button again to select the relevant Sub Page. 58 COMMPAK - COMMISSIONING x Once the display is showing a data item, pressing the UP or DOWN button will move through the available items. x If a particular mode is disabled, then items relating to that mode will not be displayed. x Press EXIT go back one step, or repeat again to exit altogether. x Note that while in this mode, controller operation is unaffected. SET-UP MODE: This mode is to configure the controller to your application. All data viewed within Presets Mode can be altered, except for the following: Hour run meters, Start counters, Job Number, Serial Number, Software version, Firmware version and Contact Details. To enter this mode, press and hold the ALARM MUTE (Ÿ) ALARM RESET (ź) and the buttons for 5 seconds. The power on LED will start flashing, and SET-UP MODE will be displayed on the LCD. Press MODE (ENTER) button to accept. You can exit by pressing EXIT, or the mode will auto-exit after 60 seconds of button inactivity. x Scrolling through the various pages, sub pages and items is identical to the Presets Mode. x When you have an item displayed that you require to be changed, press ENTER and the current value will be inserted into brackets. x Press UP (Ÿ) or DOWN (ź) to change the value, then press MODE again to accept the displayed setting. Pressing UP (Ÿ) or DOWN (ź) will move through the items again. Notes: x If the data to be changed is a 2 digit number, you can press and hold the UP(Ÿ) DOWN (ź) button and it will automatically change, after a short time it will change at a faster rate. x If the data to be changed has more than 2 digits, then the data is changed 2 digits at a time. The current digits will be flashing. To scroll through the pairs of digits press EXIT. x If changing in the USER DEFINED display, brackets will not be displayed, as the full 12 characters x 2 lines are available. On entry the first character will be flashing, you can scroll through all the alphanumeric characters utilising the auto slow/fast mode if desired, and use the EXIT button to scroll to the right. To accept this data press ENTER, and the currently addressed character will no longer flash. x In the INFORMATION page there is an item called CODE. This option is used to input codes to access secure data within the controller. You will be advised should you ever need to use this option. MENU INFORMATION DETAILS: Refer to the respective menu column to determine if a particular option is displayed. If a particular ITEM is disabled, some of the following related ITEMS may not be displayed. 59 COMMPAK - COMMISSIONING COMMPAK – SYSTEM CONTROLLER – PRESETS/SET-UP MODE SELECTION RANGES PAGE SUB-PAGE 1 - TYPE 2 - PARAMETERS 2.1 - UV SYSTEM 2.2 - RESERVED 2.3 - HIGH TEMP. 2.4 - LOWTEMP. 2.5 - LOWTEMP L/OUT 2.6 - TEMP CONTROL 2.7 - RELAYS 2.8 - CLOCK 3 - CONTROL 4 - PUMP STATUS 5 - DISPLAY 6 - INFORMATION 7 - FAULT LOG VIEWFAULTS ITEM OPTIONS 1.1- Hot Water Controller SIngle Pump Hot Water Controller, Dual Pump Hot Water Controller Disable, Enable N/Open. N/Closed 0-99 Seconds 0-99 Seconds Disable, Enable 2.1.1 - UV Monitoring 2.1.2 - Input State 2.1.3 - On Delay 2.1.4 - Off Delay 2.1.5 - UV Lock-Out 2.2.1 2.2.2 2.2.3 2.2.4 2.3.1 - High Temp. Alarm 2.3.2 - Sensor 2.3.3 - Set On Point 2.3.4 - Set Off Point 2.3.5 - Input Delay 2.3.6 - Output Mode 2.3.7 - Lock-Out 2.4.1 - LowTemp. Alarm 2.4.2 - Sensor 2.4.3 - Set On Point 2.4.4 - Set Off Point 2.4.5 - Input Delay 2.4.6 - Output Mode 2.5.1 - LowTemp L/Out 2.5.2 - Sensor 2.5.3 - Set On Point 2.5.4 - Set Off Point 2.5.5 - Input Delay 2.5.6 - Output Mode 2.6.1 - Lead Sensor 2.6.2 - Lead Start 2.6.3 - Lead Stop 2.6.4 - Lag Sensor 2.6.5 - Lag Start (Low) 2.6.6 - Lag Start (High) 2.6.7 - Lag Stop 2.7.1 - RL1 Output 2.7.2 - RL1 Mode 2.7.3 - RL2 Output 2.7.4 - RL2 Mode 2.7.5 - RL3 Output 2.7.6 - RL3 Mode 2.8.1 - Time 2.8.2 - Day 2.8.3 - Date 3.1 - Pump Run 3.2 - Lead Pump 3.3 - Change-Over 3.4 - Change-Over Time 3.5 - Lead/Lag Overlap Delay 3.6 - Lead MRT 3.7 - MRT Time 3.8 - Timed Operation 3.9 - DIsable Time 3.10 - Enable Time 4.1 - P1 Hours Run 4.2 - P2 Hours Run 4.3 - P1 Starts 4.4 - P2 Starts 5.1 - Displayed Data # # # # # # # # # # # # # # # # # # # # # # # 5.2 - Backlight Mode 5.3 - Backlight On-Time 5.4 - AlarmMode # 5.5 - AlarmRun Time 5.6 - Spare 6.1 - DiCon Contact Details 6.2 - Code Entry 6.3 - Job Number 6.4 - Serial Number 6.5 - Software Version 7.1 - Clear Logger Memory 7.2 - ViewLast 50 Faults Disable, Enable T1,T2 0-99 deg.C 0-99 deg.C 0-99 Seconds/Minutes Follower, Latched Disable, Enable Disable, Enable T1, T2 0-99 deg.C 0-10deg.C 0-99 Minutes Follower, Latched Disable, Enable T1, T2 0-99 deg.C 0-99 deg.C 0-99 Minutes Follower, Latched T1, T2 0-99 deg.C 0-99 deg.C T1, T2 0-99 deg.C 0-99 deg.C 0-99 deg.C (T1 Only) see Note 2 below Normal, Failsafe see Note 2 below Normal, Failsafe see Note 2 below Normal, Failsafe Set Time Set Day Set Date One Pump, Both pumps P1, P2, Alternate Time, Clock 1-99 Hours 0-99 Seconds Disable, Enable 0-99 Minutes Disable, Enable Time/Day Time /Day 0-999999.99 Hours 0-999999.99 Hours 0-999999 Starts 0-999999 Starts Time/Temp, Pump Stats,Fault Log, Dual Temps Manual, Auto 10(Always On)-99 Seconds Continuous, Timed 1-99 Minutes Disable, Enable Toggles between 2 screens 0-9999 25 Alpha Numeric Characters 0-9999 8 Alpha Numeric Characters No, Yes Fault 50 - Fault 1 Note 1:- # - Not displayed if respective Mode disabled (Page 5, Item5.8) Note 2: RelayOutput Options: P1 Run, P2 Run, Pump Run, P1 Ready, P2 Ready, Pump Ready, P1 Fault, P2 Fault, Pump Fault, LowTemp, High Temp, Temp Fault, UV Fault, Sensor Fault, Pump Lock-Out Heater Reset (RL3 only), LowPressure Fault (RL4 only) and Common Fault (RL5 only). uP-TCM-01 Menu Details 60 MENU MODE Presets Set-Up * * * * * * * * * * * * * * * * * * * * * * * * * * * * * * * * * * * * * * * * * * * * * * * * * * * * * * * * * * * * * * * * * * * * * * * * * * * * * * * * * * * * * * * * * * * * * * * * * * * * * * * * * * * * * * * * * * * * * * * * * * * * * * * * * * * * * * * * COMMPAK - COMMISSIONING COMMPAK – SYSTEM CONTROLLER – SPECIFICATIONS Power Supply: 100-250v AC, 50Hz Module Load: xx mA max xx mA min Volts Free Contacts: Programmable as Normal or Fail-Safe. Programmable Relays RL3, RL4 and RL5 Rated at 240v AC, 2 amp. Display Indicators/Display: 4 x 3mm Superbright LEDs. 6 x 3mm Bi-Colour LED Contactor Relays: Pump 1 and Pump 2 Contactor/Pump Relays. Rated at 240v AC 10 amp, 3 amp 0.7pf. Switches/Facia Push Buttons: 4 Tactile Pushbuttons provided for Module Operation Hour Meters: 2 provided, P1 Hours and P2 Hours. Resolution: 36sec (0.01 hour). Range: 0.00-999999.99 hours. Control Inputs: P1-Run, P1-Ready, P1-Fault (time delayed) P2-Run, P2-Ready, P2-Fault (time delayed) UV-1Monitor, UV-2 Monitor Referenced to Module Common Pump Manual Run Indication (Run LED flashes) Start Counters: 2 provided, P1 Starts and P2 Starts. Range: 0-99999999 Starts. Analogue Inputs: 2 x Temperature Sensor inputs. 0 0-115 C, with o/c & s/c detection. Real Time CLock: Time, day and date With back-up approx 6 weeks back-up. Temperature Sensor Inputs: Hardware selectable to:Type 1: VDO, Type 2-Rheem, Type 3-DiCon Pump Control Modes: Selectable Lead Pump. Auto Lead Pump change on pump Time/Clock. Pump Run Selection – One/Both. Lead to Lag start delay 0-99 seconds. P1 to P2 Overlap delay. Pump disable/enable clock settings. Lead pump MRT. Low Pressure Input: Utilises one of the Control Inputs, Fixed time delay 0f 15 seconds. UV Monitor Inputs: Configurable inputs. Adjustable ON delay 0-99 seconds. Adjustable OFF delay 0-99 seconds. Pump Lock-out option. Display Modes: LED Test Mode User selectable LCD display options: Temp & Time, Pump Stats, Fault Log status and Dual Temps. High Temperature Alarm: T1 or T2 selectable. Separate ON and OFF set points. Adjustable time delay 0-99 seconds. Configurable as Latching or Self Resetting. Pump Lock-out option. Alarm Output: On Board Piezo provides Audible Alarm and Button/Mode operation verification. Alarm Modes: Continuous and Timed (1-99 minutes) Alarm Mute and Double Mute Modes. Strobe Output (Muteable): Rating: 12 volt, 200mA max Sonalert Output (Muteable): Rating: 12 volt, 20mA max Low Temperature Alarm: T1 or T2 selectable. Separate ON and OFF set points. Adjustable time delay 0-99 minutes. Configurable as Latching or Self Resetting. Display Backlight: Manual and Auto modes, with adjustable on-time Range: 10-99 seconds. Low Temperature Pump Lock-Out: T1 or T2 selectable. Separate ON and OFF set points. Adjustable time delay 0-99 minutes. Configurable as Latching or Self Resetting. Fault Logger: Capacity: Last 50 Faults, all time and data stamped Menu Modes: Presets and Set-Up Modes. Temperature Control: Lead Pump: T1 or T2 selectable. Separate ON and OFF set points. Lag Pump: T1 or T2 selectable. 2 stage (Low & High) ON set points. Separate OFF (T1 only) point. Communications: On board RS485 Communications are provided for applications when this product is utilised with other Dicon modulised products. 61 COMMPAK - COMMISSIONING COMMPAK – SYSTEM CONTROLLER – FAULT/STATUS MESSAGES: x Initialising Eeprom: Controller has rebooted, and loading all default settings into Eeprom. x T1 Sensor Fault: T1 (return water) sensor is faulty, refer to LED for o/c or s/c fault indication. x T2 Sensor Fault: T2 (return water) sensor is faulty, refer to LED for o/c or s/c fault indication. x High Temp Fault: High Temperature Fault Alarm. x High Temp. L/Out: High Temperature Alarm is active and the pumps are locked Out. x Low Press. L/Out: Controller has detected a Low Pressure Situation, restore Water Supply, reprime Pumps and press Alarm Reset to clear lock-out condition. x UV-1 Fault: UV-1 unit has failed, check operation/power supply, tubes etc. x UV-2 Fault: UV-2 unit has failed, check operation/power supply, tubes etc. x Heater Resetting: Low Temperature input has been active for at least 4 minutes, so Heaters are being reset. x SET-UP Mode, press Enter: Set-Up mode has been accessed, press ENTER to enter mode. x Pumps Off Until: The Pumps have been disabled via the time clock, and will be reenabled at the displayed time/day. x Controller Locked-Out: The Controller has been locked-out, contact supplier for further instructions. 62 COMMPAK - COMMISSIONING COMMPAK – SYSTEM CONTROLLER – MODULE BLOCK DIAGRAM: CONNECTION NOTES: All terminations on the module are pluggable. For ease of Module replacement, each connector can be withdrawn, ensuring that cable connections are not transposed. Ensure the external alarm output current limits are not exceeded. The volts free contacts are rated at 240v AC, but be aware of its presence if using some for volts free monitoring. RS485 comms are ONLY for other DiCon control products, and cannot be used for any other purpose. 1 2 3 4 N A 5 6 7 8 485- 1 CON4 2 GROUND RS485 COMMS 485+ P1 Contactor O/Put P2 Contactor O/Put 100-250v AC Supply 3 CON5 RL-1 RS485 Comms 100-250 Vac Power Supply RL-2 Pump Outputs Dicon Electrical Services P/L Temperature Controller Model uP-TCM-01 Programmable Relays Digital Inputs CON3 4 5 6 7 8 Contact Rating 240vAC 2 amp max T1 T2 RETURN OUTLET TEMPERATURE SENSORS STROBE 12 Volt 200mA max SONALERT 12 Volt 20mA max 1 2 3 4 5 6 7 8 9 10 COMMON 3 COMMON 2 INPUT-8 VOLTS FREE OUTPUT 1 INPUT-7 6 INPUT-6 5 INPUT-5 4 + 3 + - 2 INPUT-4 CON2 1 - CON1 Analogue Inputs External Alarms INPUT-3 RL-5 INPUT-2 RL-4 INPUT-1 RL-3 FORDIGITAL INPUT DESIGNATIONPLEASE REFERTOSUPPLIEDSCHEMATIC DIAGRAM AS THEY AREAPPLICATIONSPECIFIC OPTIONAL EXTERNAL AUDIBLE/VISUAL ALARMS The pump relays are configured as isolated contacts in order to provide the option of connecting independent upstream protection for each pump. 63 COMMPAK - COMMISSIONING COMMPAK – SYSTEM CONTROLLER – TEST SHEET 64 COMMPAK - COMMISSIONING 65 COMMPAK - COMMISSIONING SYSTEM CONTROLLER – TIMED OPERATION TIMED OPERATION Example: An office building is only manned between the hours of 8:00AM and 6:00PM Monday to Friday This can be set as: Outside these set hours, the controllers display will show ‘SLEEP MODE’ to indicate the system is ready but disabled. When in ‘SLEEP MODE’ all temperature related alarm outputs are disabled (LED indication remains active). Override: When in timed operation, Digital Input CON3 – 5 (refer connection notes Page 37) can be be utilised to provide an override function. Meaning: When a circuit is made between COMMON CON3 -9 or 10 and Input 5 the Hot Water System is re-enabled. It is recommended that a Local OVERRIDE selector switch be provided to allow for Hot water usage outside the normal pre-set operating hours, this feature is useful for cleaning staff, weekend work, functions etc. Note: This override function can also be used by Building Automation Systems, motion sensors etc. as the sole means of controlling ON & OFF operation. Example: Set all day settings to OFF System will only operate when Digital Input CON3 – 5 circuit is closed Wiring: Digital Inputs are ELV – 12VDC optically coupled Recommended Cable: 0.5mm2 - 1 Pair screened cable Please ensure, as with all instrument cabling that cables are run separate to power cables. Maximum route length 30 metres, For distances exceeding 30 metres it is recommended that an interposing relay be utilised. Timed Operation can be enabled when in ‘Set Up’ Mode Refer: System Controller Test Sheet - Page 3 Control. When enabled ‘Timed Operation Settings’ as per the previous page are displayed. The default setting for all ‘Day’ settings is ‘OFF’ Up to nine (9) OFF & ON settings can be utilised, these times can be selected all in one day or spread across each day of the week. Programming Instructions: OF1 **:**pm Off Once Enabled, press the UP (Ÿ) button until On1 **:**am Off is displayed Press the ENTER (MODE) button, brackets will appear around the text; to indicate that these values can now be changed. (OF1 **:**pm Off) (On1 **:**am Off) The text that can be changed will pulse (OF1 **:**pm Off) (On1 **:**am Off) This value can be incremented UP or Down via the UP (Ÿ) or DOWN (ź) buttons Once the correct TIME setting is reached. Press the EXIT (LED & Alarm TEST) button to step to the next setting point The text that can be changed will pulse ( OF1 **:**pm Off) (On1 **:**am Off) This value can be incremented UP or Down via the UP (Ÿ) or DOWN (ź) buttons Once the correct RANGE setting is reached. Press the EXIT (LED & Alarm TEST) button to step to the next point The text that can be changed will pulse (OF1 **:**pm Off) (On1 **:**am Off) Once all OFF & ON TIMES and RANGES have been set. Press the ENTER (MODE) button to save changes & remove the (brackets) Press the UP (Ÿ) button to move onto the next FUNCTION OF2 **:**pm Off On2 **:**pm Off is displayed Repeat above steps until all FUNCTIONS, TIMES & RANGES have been set. Press the EXIT (LED & Alarm TEST) button twice to return to NORMAL display mode. 66 COMMPAK - COMMISSIONING COMMPAK – SINGLE PUMP WIRING SCHEMATIC 67 COMMPAK - COMMISSIONING COMMPAK – SINGLE PUMP LAY-OUT & MATERIAL SCHEDULE 68 COMMPAK - COMMISSIONING COMMPAK – DUAL PUMPS WIRING SCHEMATIC 69 COMMPAK - COMMISSIONING COMMPAK – DUAL PUMPS LAY-OUT & MATERIAL SCHEDULE 70 RHEEM CONTINUOUS FLOW GAS WATER HEATER WARRANTY – AUSTRALIA ONLY CONTINUOUS FLOW GAS WATER HEATER COMMPAK MODELS CP02 – CP06 1. THE RHEEM WARRANTY – GENERAL 1.1 This warranty is given by Rheem Australia Pty Limited ABN 21 098 823 511 of 1 Alan Street, Rydalmere New South Wales. 1.2 Rheem offer a trained and qualified national service network who will repair or replace components at the address of the water heater subject to the terms of the Rheem warranty. Rheem Service, in addition can provide preventative maintenance and advice on the operation of your water heater. The Rheem Service contact number is available 7 days a week on 131 031 with Service personnel available to take your call from 8am to 8pm daily (hours subject to change). 1.3 For details about this warranty, you can contact us on 131031 or by email at [email protected] (not for service bookings). 1.4 For details about this warranty and what is covered by it are set out in sections 2 & 3 and apply to water heaters st manufactured after 1 August 2014. 1.5 If a subsequent version of this warranty is published, the terms of that warranty and what is covered by it will apply to water heaters manufactured after the date specified in the subsequent version. 2. TERMS OF THE RHEEM WARRANTY AND EXCLUSIONS TO IT 2.1 The decision of whether to repair or replace a faulty component is at Rheem’s sole discretion. 2.2 Where a failed component is replaced under this warranty, the balance of the original warranty period will remain effective. The replacement does not carry a new Rheem warranty. 2.3 Where the water heater is installed outside the boundaries of a metropolitan area as defined by Rheem or further than 25 km from either a regional Rheem branch office or an Accredited Rheem Service Agent's office, the cost of transport, insurance and travelling between the nearest branch office or Rheem Accredited Service Agent’s office and the installed site shall be the owner’s responsibility. 2.4 Where the water heater is installed in a position that does not allow safe or ready access, the cost of that access, including the cost of additional materials handling and/or safety equipment, shall be the owner’s responsibility. In other words, the cost of dismantling or removing cupboards, doors or walls and the cost of any special equipment to bring the water heater to floor or ground level or to a serviceable position is not covered by this warranty. 2.5 This warranty only applies to the original and genuine Rheem water heater in its original installed location and any genuine Rheem replacement parts. 2.6 If the water heater is not sized to supply the hot water demand in accordance with the guidelines in Rheem’s water heater literature, any resultant fault will not be covered by the Rheem warranty. 2.7 The Rheem warranty does not cover faults that are a result of: a) Accidental damage to the water heater or any component (for example: (i) Acts of God such as floods, storms, fires, lightning strikes and the like; and (ii) third party acts or omissions). b) Misuse or abnormal use of the water heater. c) Installation not in accordance with the Owner’s Guide and Installation Instructions or with relevant statutory and local requirements in the State or Territory in which the water heater is installed. d) Connection at any time to a water supply that does not comply with the water supply guidelines as outlined in e) f) g) h) i) j) k) the Owner’s Guide and Installation Instructions. Repairs, attempts to repair or modifications to the water heater by a person other than Rheem Service or a Rheem Accredited Service Agent. Faulty plumbing or faulty gas or power supply. Failure to maintain the water heater in accordance with the Owner's Guide and Installation Instructions. Transport damage. Fair wear and tear from adverse conditions (for example, corrosion). Cosmetic defects. Ice formation in the waterways of a water heater: where the electricity supply has been switched off or has failed and the water heater has not been drained in accordance with the instructions; or due to an ambient temperature below -20°C (including wind chill factor). 2.8 If you require a call out and we find that the fault is not covered by the Rheem warranty, you are responsible for our standard call out charge. If you wish to have the relevant component repaired or replaced by Rheem, that service will be at your cost. 2.9 Subject to any statutory provisions to the contrary, this warranty excludes any and all claims for damage to furniture, carpet, walls, foundations or any other consequential loss either directly or indirectly due to leakage from the water heater, or due to leakage from fittings and/ or pipe work of metal, plastic or other materials caused by water temperature, workmanship or other modes of failure. 71 CONTINUOUS FLOW GAS WATER HEATER COMMPAK MODELS CP02 – CP06 3. WHAT IS COVERED BY THE RHEEM WARRANTY FOR THE WATER HEATERS DETAILED IN THIS DOCUMENT 3.1 Rheem will repair or replace a faulty component of your water heater if it fails to operate in accordance with its specifications as follows: What components are covered The period in which the fault must appear in order to be covered What coverage you receive All components Year 1 Repair and/or replacement of the faulty component, free of charge, including labour. Years 2 & 3 Repair and/or replacement of the faulty component, free of charge, including labour. CFWH (only if the water heater is installed in a single-family domestic dwelling) The heat exchanger (if the water heater is installed in a single-family domestic dwelling) The heat exchanger (if the water heater is not installed in a single-family domestic dwelling) The heat exchanger (with a thermostat setting o greater than 75 C) Years 4 to 10 Years 2 to 5 Year 1 Replacement heat exchanger, free of charge. Installation and repair labour costs are the responsibility of the owner. Replacement heat exchanger, free of charge. Installation and repair labour costs are the responsibility of the owner. Repair and/or replacement of the faulty component, free of charge, including labour. 4. ENTITLEMENT TO MAKE A CLAIM UNDER THIS WARRANTY 4.1 To be entitled to make a claim under this warranty you need to: a) Be the owner of the water heater or have consent of the owner to act on their behalf. b) Contact Rheem Service without undue delay after detection of the defect and, in any event, within the applicable warranty period. 4.2 You are not entitled to make a claim under this warranty if your water heater: a) Does not have its original serial numbers or rating labels. b) Is not installed in Australia. 5. HOW TO MAKE A CLAIM UNDER THIS WARRANTY 5.1 If you wish to make a claim under this warranty, you need to: a) Contact Rheem on 131031 and provide owner’s details, address of the water heater, a contact number and date of installation of the water heater or if that’s unavailable, the date of manufacture and serial number (from the rating label on the water heater). b) Rheem will arrange for the water heater to be tested and assessed on-site. c) If Rheem determines that you have a valid warranty claim, Rheem will repair or replace the water heater in accordance with this warranty. 5.2 Any expenses incurred in the making of a claim under this warranty will be borne by you. 6. THE AUSTRALIAN CONSUMER LAW 6.1 Our goods come with guarantees that cannot be excluded under the Australian Consumer Law. You are entitled to a replacement or refund for a major failure and for compensation for any other reasonably foreseeable loss or damage. You are also entitled to have the goods repaired or replaced if the goods fail to be of acceptable quality and the failure does not amount to a major failure. 6.2 The Rheem warranty (set out above) is in addition to any rights and remedies that you may have under the Australian Consumer Law. RHEEM AUSTRALIA PTY LTD A.B.N. 21 098 823 511 www.rheem.com.au Revision Date: August 2014 FOR SERVICE TELEPHONE 131 031 AUSTRALIA 0800 657 335 NEW ZEALAND Rev: 7