1
_erat0r
_ _ual
Ic-n-sm-nw
I
"
"
-i
g
evolv
I
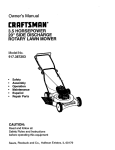
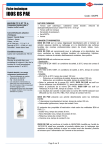
t2Amps 7-1/4-in.
Compact Circular Saw
r
" ½
_
,;.
Model No. 320.18780
\
DOUBLE INSULATED
,_WARRANTY
A-GAUTION F_ ad, understand o:nd_f_How'---_-S_PE_ _ -_ 0
all safety Rule'_:_._idOpe_ating lnst_'ucl]iori,_:
•ASSE_LY_
in this Manual before using this product.
DESCRIPTION
• OPERATION
• MAINTENANCE
Sears Brands Management
Corporation
Visit our Craftsmanviiebsite:Www;craftsman.com
• TROUBLESHOOTING
Warranty
....
Safety
Symbols
Safety
Instructions
Glossary
_
°-.. r_'"_
,page
2.-_
_Page3"
of Terms
Pages
Unpacking
10-14 _
,Rage,l&
L-'
,:_
.
Pages 1 14
Description
..-..
J
Operation
P agesl'_-24
-t c"
Maintenance
"_
"r "
=
c
"
°
Page 25-27
Troubleshooting
~-__
,Pages 27
?
" "
Accessories
Pages 28
Parts List
Pages 29-31
Sears Repair
"_r" '
Parts Phone Number
CRAFTSMAN
EVOLV ONE YEAR
Back Cover
_--.- o
FULL'WARR_.NTY
If this Craftsman.Evolv
product fails' due
material
or workmanship
within one year
it to any Sears ster, e or other Craftsman
free replacement.
to a ma nufacturer's_ defect in
from'.the
date of purchase,
return
Evolv oUtlet.in the United,States
for
_
" : •"
This warranty
which
does
not cover
This warranty
i_:vQid
rental purposes.
if this
the,blade,
product
This warranty gi,_eS you s_ec[fjolegal
rights .which vary frorh s'ta{'e-_o state.
Sears
Roe6u_k
SAVE THESE
is an'.expe
is ever-used
_
.dd_l_ie part.
for commercial
-',,'
_..... --
rigllt_, :_'_and you ....
:_ay-ai&o
.....
-
arfd CO:_,' H£,ffman Estates
or
:"
have
other
"IL 60179 ;,"
INSTRUCTIONSi:
READ ALL INSTRUCTIONS!
WARNING:
d us_t._pr_=iated.
_b._t_'q;_g,.[_.,wer;,.tools:_contains
known _ to ._.the-,",'state,'.. o_C;
olifornia
:_ "
:reproauctlve
_m;.,
. ..
;o
18780 Man ual_Revised_09-0513
_he.m._;
to#au,
se_6ancer
and. ;-,"
birtl_#efe4cts
or qth_r,, .. _;
" --:_:._
_'!-_-;
-'.,_.
_,
_ :
If__
......
"" , . ," .._., : .'_-,. "'_ ....i".,
i, _'' : ....
;_:_:
,J,&
_
-
The purpose
of safety
symbols
is to attract
your attention
to possible
dangers.
_
The safety symbols,
and the explanations
with them, deserve your careful
attention and understanding.
The symbol warnings DO NOT, by themselves,
eliminate any danger. The instructions
and warning they give are no substitutes
for proper accident prevention
measures.
_IL WARNING:
Be sure to read and understand
manual, including
and "CAUTION,"
below may result
SYMBOL
all safety
instructions
in this '_
all safety alert symbols such as "DANGER,"
"WARNING,"
before using this tool. Failure to following_ll
instructions
listed
in electric shock, fire and/or serious personal injury_
MEANING
_i_ SAFETY
ALERT
SYMBOL:
May be used in conjunction
Indicates
DANGER,
with other symbols
WARNING,
OR CAUTIOI_
or pictographs.
_IL DANGER: Failure to obey this safety warning will result in death or serious
injury to yourself or to others. Always follow the safety precautions to reduce the
risk of fire, electric shock and i3ersonal injury.
WARNING:
Failure to obey this safety
warning can result
in death or serious
injury to yourself or to others. Always follow the safety precautions
risk of fire, electric shock and personal injury.
to reduce the
CAUTION:
Failure to obey this safety warning may result.in personal injury
to yourself or others or property damage. Always follow the safety precautions to
reduce the risk of fire, electric shock and personal injury.
DAMAGE PREVENTION
AND INFORMATION
MESSAGES
These
inform
user of important
information
and/or
equipment
or other property damage if not followed.
by the word "NOTE" as in the example below:
NOTE: Equipment
are not followed.
an_i/or
property
damage
_IL WARNING:
WEAR
YOUR
instructions
that could
Each message
may result if these
The operation
lead to
is preceded
instructions
of any power
tools can
result in foreign objects being thrown into your eyeS,
which can result in severe eye damage. Before
beginning power tool operation, always wear safety
les or safety glasses with side shield .and a fullface shield when needed. We recon_mend a Wide _
Vision Safety Mask for use over eyeglasses or. standard
safety glasses withside shield, available at Sears
Stores or other Craftsman outlets. Always use eye
protection that is marked to comply with_ANS! -Z87.1
18780
Manual
Revised_09-0513
Page 3
:
GENERAL
POWER
WARNING:
TOOL
SAFETY
WARNINGS
Be sure to read and understand
all instructions
in this manual
before using the circular saw. Failure to follow all instructions
may result in
hazardous
radiation exposure,
electric shock, fire, arid/or serious personal injury.
_k WARNING:
Do not attempt to operate this tool until you have thoroughly
read all instructions,
safety rules, and Warnings. Failure to comply with themcan"
result in fire, electric.shock,
or serious personal injunj. Save the manual and refer
to it frequently.
SAVE THESE
GENERAL
WORK
INSTRUCTIONS
SAFETY
AREA
PRECAUTIONS
+
SAFETY
•
Keep your work area clean and well lit. Cluttered
areas invite accidents.
•
Do not operate power tools in explosive atmospheres,
such as in the
presence
of flammable
liquids, gases, or dust. Power tools create sparks
which may ignite thedust or fumes.
_+
•
Keep bystanders,
children and visitors away while oPerating
Distractions
can cause you to lose control.
Make your workshop
childproof
tools away when not In use.
"
with padlocks
workbenches
and dark
a power
toq!.
and master' switohes. Lock
Make sure the work area has ample lighting
so you can seethe Work and
there are no obstructions
th,_t will"interfere with safe operation
before, u§ing
your tool.
_
_,
PEI_SONAL
SAFETY
Stay alert, watch what you are doing and use common sense when
• operating a power tool. DO not use tool wh+ile tired or under the influence
of drugs, alcohol, or medication.
A moment of inattention while 0perating
,power toGJSmay result in serious personal injury•. -.
•
Dress properly. Do.not wear loose clothing or jewelry. Contain long hair.
Keep your hair, clothing, and gloves-away
from moving parts. Loose
clothes,
•
jewelry, or long hair can be caught.in
movingparts.
.++
,+/.,
Avoid accidental
Startiing. Be Sure Switch is offbef0_+, pi_,ggi'ng i!_+'.'_. +_:_'_
Carrying t001S with youi" finger oh the switch or plLl_lgi_
_n.to_ol_ _t
_h._ithe
sWitch in the "ON" position invites.accidents.
'
'
-'_: -"- _ + _ °+-_
-_°" ;
•
. ,
.
-.
,
;,
,
.
,
,
Remove adjusting key s or switches before turning the tool on. A wrench
or a key that is left attached to a rQtating part of the tool may result in
•personal injury.
18780 Manual_ReVised_09-0513
Page 4
{,
DO not overreach.
KeeP proper footing and balance at all times. Proper
footing and balance enables better control of the tool in unexpected situations.
Use safety
skid safety
appropriate
"0
equipment.
Always wear eye protection.
Dust mask, nonshoes, hard hat, or hearing protection
mustbe
used for
conditions.
_ _.
Know your power tool. Read this operator's manual carefully. Learn the
saw's applications
and limitations;'as
well as the Specific potential =hazards
related to this tool.
"
'TOOL
USE AND, CARE-
_I_ WARNING:
Be sure to read-and
understand
this router. Failure to follow all instructions
shock; fire _.ndtor serious personal injury.
•
Use clamps
or other
practical
all instructions
listed below
before Operating
may result in electric
°
ways to secure
and support
the workpiece
to a stable platform. Ho!ding the work by hand or against your body is
Liristable and may lead_tb 10ss of €onlErol.
"
"- '".....
"
Do not force the tool, Use the correct tool and bit for your aPP!ication,
Th_
correct tool will do the job better and safer at the rate for which it is designed.
Do not! Use the t_o! _if switch doe,_s.no t turn it on" or off:.Any tQ01 that
.cannotbe cQntro!led _vith.the switch is dangerous and must .be repaired...
•
Disconnect
plug from
the power
source
before
making
any adjustments,
changing aqcessor_ies, or sto$[ng the_too, I. Such preventive
safety me,asures
, i-reduce the risk of starting th e tool accidentally.
_
_.
•
Store idle tools out of the reach of children and other untrained
Tools are dangerous in the; bands of untrained, users.
•
Maintain tools with care. Keep cutting tools sharp andclean.
Properly
maintained tools with sharp cutting edges are !ess like!y to bind and are easiel
to control.
.
•
Check for misalignment
or binding of moving parts; breakage
Of parts,
'and any other condition_hat
may affect the toets operation. If'damaged,
have the tool serviced bef(1re using. Many accidents are caused by: poorly
maintained
•
tools.
Use only accessories
_
;.
that are recommended
....
_
by the manufacturer
model. Accessones that may be suitable_for one tool may become
when used on another toQl_.
:o Never leave the tool running.
" - comes to a complete stop.
18_r80 Manual_Revised_09-0513
Always
persons.
_::_
S_
for yota
hazardous
;turn it off. _--.0,not leave the t0ol until it:
: '_
Page .=
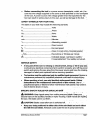
ELECTRICAL
SAFETY
Double insulated tools are equipped with a
polarized plug (one blade is wider than the
other). This plug will fit in a polarized outlet
only one way. If the plug does not fit fully in
the outlet, reverse the plug. If it still does not
fit, contact a qualified electrician
to install a
polarized outlet. Do not change the plug in any
way. Double insulation [] eliminates the need
for the three-wire
grounded
power cord and
grounded power supply system.
is a double insulated tool.
•
This circular
@
Cover of
Grounded ------"
Outlet- Box
saw
Avoid body contact with grounded surfaces such aspipes,
radiators,
ranges and refrigerators.
There is an increased risk of electric shock if your
" _body is grounded.
°
" "
•
Do not expose
power
;"
wet or damp locations.
electric shock. "_
tools to rain or wet conditions
_or use power
tools in
Water entering a power t0ol will increase the risk of
_...... " ' _
_
* _ Do not abuse the cord. Never use the cord to carry the tools Or pull
the plug from the outlet. Keep cord away fron_ heat; Oil, sharp edges
:
or moving parts. Replace d_imaged cords immeCliately. Damaged c()rds
increase the risk of electric shock.
_:,
When operating a power tool outside, use an outdoorextenSiori
€ord
marked "W-A" or" W." These cords are rated for outdoor use and reduce the
risk of electric shock.:.
,_;
_., ,,
Replace damaged
cords immediately.
shock, burn or electrocution.
If an extension cord
to prevent excessive
Using a da:_naged _ord can cause
,--,
_
.
is required; use a cord with the proper size of c-onductor
voltage drop, loss of power, or overheating.
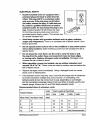
The
following table shows the correct size to use, depending
on cord len.gth
',.and the nameplate
amperage
rating of the too_,When in-doubt_, us e the next
• .heavier gauge. Always use UL andCSA
listedextension
cords.
:
_ _,
Recommended
_ipere
sizes of extension
Rat:ing
_
'
cords
ts.
120V
t_''"
Tatai Length_f,_rd
25ft
_0ft
o-.
..,Feet
100ft
_l'150ft
More Than
Not More Than
0
6
18
16
16
14
6
10
18
16
14
12
10
12
16
16
14
12
12
16
14
12
Not Recommended
,_8780
Manual_Revised_09-0513
AWG
"
•J.,
,,,
Page 6
• - Before connecting
the tool to a power source (receptacle,- outlet, etc.), be
sure that the voltage supplied is the same as that specified
on the nameplate
of the tool. A power source with voltage greater than that specified for the
- tool can result in serious injury to the user, as well as "damage t6-th'e 1_ool. "
SAFETY
SYMBOLS
FOR YOUR
TOOL
The label on your tool may include the following-symbols.
V
Volts
A .............................................
............. Amps
Hz ......... _........... ; ............ . .....................
W .... _i:...: .............................
Hertz
.i
_._.............. Watts
min .......................................................
Minutes
_,.-. ...............
Alternating
--
_.................
.....................
.._. ................................
;....,_ ..... ..... :. Direct
no :_. ...... ,...........................
[]
curr_nt
current
.. .... :. ......... No-load'speed
......................................................
Class II construction,
.../mi n ........ ......... ,...... _............. , ........... Revolutions
_
.......... .., ...... ;..... :;::.3 .....................
_,
SERVICE
_
•
- _
,,
.Indicate_
Doublelnsulated
or Strokes
danger,
It meansattention!
_
per min•_t e
warning_or
cautibrt_'
Your safety
is involved.
,SAFETY
"
..
,
.
-.
o
-
-_
..
- ,.
.
...
_
:
-
,-_
._.
, If- any pa_t_.of,this saw is missing o_ should !_reak, beod_-.,or fail in any _vay;
_.-should_any
electrical .component_fajl. to pe_orm properly:.shut
Off.the.power
:o;switch and ,.remove-thee,saw plug,from, the. po_wer source and have the missing,
damaged or failed parts replaced before resuming operation,
. ..;
Tool service must be pe_fq _rm@der_Jy._byqu.alified re .ip_Jr.pe .rsppnel, S_,_w.Jceo_
main.tenance performed by uDqualified pemQ.nnel Co,uld result -in,a,d .s__
_f inju_,.
When servicing
a tool, use only identibal
replacemen_
parts.
PolIoW"
o.:,,instfuctiens_m the maintenanceinstructionsof,
this manual,. Use-of,...._
_--_vnauthorized p_U'ts, or, failure-to follow maintenance instruc_tions, may_create
_,risk of electric shook or injury.
_
• -.,
,
SPECIFIC
•
: :_.
SAFETY
,
-
_
RULES
_.
-
FOR CIRCULAR
.
-
..
SA_"
,_
"" -'
_
.-,_;
a
-"
.-
..,,_,_,
:"
_..
." :-_,
",
WARNING:
Keep h,qds away from cutting area an_ bl_de.iK_eep:,your-,.
,
second hand on the auxiliary handle.or motor housing. ;l_i60th hands are_h_icling
the saw, the blade cannot cut them.
_
CAUTION--
Blades
•
Keep your body positioned to either Side Of the sa_v blade and not in direct
line with the saw blade. Kickback could cause the saw to jump backwards.
1_780 Manual_Revised_09-0513
coast
after, saw is switched
off.
,_,
;
, ':. _
: -
-,
I_age_7
•
Do not reach underneath
the work.
blade beneath the workpiece.
_1_ DANGER:
The guard
When saw!ng through a workpiece,
cannot
protect
you from the
the lower blade guar d does
not cover the blade on the underside of the workpiece.
and fingers away from the cutting area.
Always
:
keep your hands
•
Check the lower guard for proper closing=before
each rise. Do not
operate the saw if the lower guard does not move freely and close instantly.
Never clamp or tie the lower guard in the open position. If the saw is
accidentally dropped, the lower guard may be bent. Raise the lower guard
with the retracting lever. The guard is operating properly when it moves
freely, does not touch the blade or any other part in all angles and depths of
cut, and readily returns to the closed position.
•
Check the operation
and condition
of the lower guard spring. Ifthe
guard and the spring &Pe not operating
properly, they must be serviced
before use. The lower guard may operate sluggishly, due to damaged parts,
gummy deposits, or a buildup of debris. Do not operate your saw until the
damage has been repaired or replaced.
•
The lower guard should be retracted
manually only formaking
special
cuts, sucl_ as pocket or compound cuts. Always raise the lower guard t_y
retracting its lever. As soon as the blade enters the material, the lower guard,,
must be_released. For all other sawing, the lower guard should operate
automatically.
•
Always make sure that the lower guard is covering the blade" before
,;_ ,placing
the saw down on a work bench or floor.. An unprotected moving
_" blade Will cause the saw to Walk backwards, cuttir_g whatever fs in its path.
_,_ Make note of the timeit takes for the blade tb stopspinning
a/t_r;theswitch
is released.
_
--....Never hold the piece being cut in yotJr hahds :oP_aicPoss youP legs. It,
iS important to support,the wdrkpiece properly in, order to minimize body
exposure,
blade, binding, or loss of control,..
_..
..
"
:
•
Hold tool by inSUlated gripping s_urfaces_(handles)when
pet'f0rming
an
opei'ation
where the cutting tool may c0ntact hidden wiring or itsOwn
cord. Contact with a "live" wire will make the exposed metal parts Of the tool
"live" and shock the operator.
•
Always
•
when
...
clamp
the workpiece
ripping, always
;the accuracy
of thecut
: _
securely
Use _i rip fence
and reduces
_
_; _
or straight
the bhance
':;- - _..
,
'T16780 ManuaLRevised_09-0513
and cause
:
.
Always use blades that have the correct size and shape (diamond
round) arbor holes. Blades that do not match the mounting:hardware
...§a w will run erratically
..", . -
ecige guide. "l-his'impro_;_
of the blade l:)inding.
'.
•
. _ _-
so it will not move when making the Out.
vs.
Of the
loss of controL
:
Page 8
• r Never use damaged
or incorrect
blade washers or bolts. The blade
washers and bolts were specially designed for your saw for optimum
performance and safety of operation.
•
Never cut more than one piece at a time.
workpiece on the worktable at a time.
•
Do not stack more than one
Avoid awkward
operations
and hand positions where a sudden slip could
cause your hand to move into the blade.
•
Never
reach
WARNING:
into the cutting
path of the blade.
Use of this product
can generate
dust
containing
chemicals
known to the state of California to cause cancer, birth defects or other
reproductive harm. Some examples of these chemicals are:
•
Lead from lead-based
•
Crystalline
•
Arsenic
silica from
and chromium,
paints.
bricks
and cement
and other
from chemically
treated
masonry
lumber.
products.
-
-
Yore" risk from these exposures
varies, depending
Upo n how often you do
this type of work. To reduce your exposure to these chemicals:
•__ _Wor_k in a w_lJ-ventilated,_area.
_,,_W_rk
,wlt_, approved
specially designed
_
safety equipment,
such _
to filter out microscopic
those,dust
masks _Hat-are ;%_;_,_
particles.
,
;
Avoid prolonged
contact with dust from .power sanding, Sawing, grinding,
,,
drilling and other Construction
activities.
Wear protective
clothing and wash
exposed areas with soap and water. Allowing dust to geti_t0: your mouth, '_
eyes or lay on the skin may promote
WARNING:
absorption
Use of this tool can generate
of harmful
and/or
disburse
,chemicals.
dust, which md_ ' !_
cause serious and permanentrespiratory
or other injury. Always use NIOSH/
OSHA approved respiratory protection appropriate for the dust exposure. Direct
particles
away from face
ADDITIONAL
RULES
and body.
_.
FOR SAFE OPERATION
A
WARNING"
Be sure to read and understand
all instructions.
Failure tO folloow_
all instructions listed below may result in electric shock, fire and/or serious
_;_°_;°°°_
•
Know
_r
personal _{njUry.
your power
tool. Read this operator's
manual
carefully.
, _!aPplications
and !imitations,
as wel!,as the, specific pgtential
to this tool. Following
this rule will reduce
the risk of electric
serious injury.
•
Always wear
eyeglasseshave
•
Protect
Learn the ';
haza[_s related ,,
shock,_fire
or -......_
safety glasses or eye shields when using this saw. Everyday
only impactLresistant
lenseS-; they are not saf_,
glasses.
°
your lungs. Wear a face mask or dust mask if the operation
18780 Manual_Revised_09-0513
is du_
Page 9
Protect your hearing. Wear appropriate
personal hearing° protectionduring
use. Under some conditions noise from this product may contribute
to
hearing loss.
,
All-visitor and bystanders
operator of the saw wears.
must wear the same safety equipment
that the
.Inspect the tool cords periodically
and if damaged
have them repaired
at your nearest Sears Service Center. Be aware of the cord location.
Always check the tool for damaged
parts. Before further use of the
tool, a guard or other part that is damaged should be carefully checked to
determine if it will operate properly and perform its intended functionl Check
for misalignment
or binding of moving pa_ts, breakage of parts, and any. other
condition that may affect the tool's operation. A guard orother part that is
damaged should be properly repaired or replaced at a Sears Service Center.
Inspect
and remove
all nails from
lumber
before
routing.
Save these instructions.
Refer to them frequently and usethem to instruct
others who may use this tool. If someone, borrows this tool, make sure they
have these instructions
also.
Spindle
-
,"
T he_shaft on Which a bla'de orcuttih_ol'
Reyolutions
Per Minute.(R, RM)
The number-of
Saw-Blade
is hlounted'. Also' called
., r
_
the _,tbor.
•
- _-:._ _:.
turns completedby_:spinning
-object. ir_one minute.
Path.
7'
The area over_ under, behind or in front of the blade, as itapplies
wor._piece. That area which will be or,has, been,cut by. theblade.
to the
Set
The distance
the blade.
I_ter
that the saw blade tooth
is,bent (or-set) outward from
the face ef_'_;.
Cut
A cutting
operation
Compound-Miter
made
with the blade
Cut
....
_,
at any angle
,-.
.... _, ,
other than 90? to the-fenGe.:
._.,.
A_bmpound
miter _i]t is a cut madeusing a miter angle _ihd a beve! ahgleatthe
same time.; "'
'
:'
- _°
•
Cross
cut
o
A _utting
or sl_al_ing ol_eration
B_vel Cut ,
......
macle against ti_e g'rain (_1;the workpiece.
..
:
A cutting operation made wRh the blade at any angle other than 90°to the miter table.
18_._0
Manual_Revised_09-0513
Page 10
Dado;Cd_
- ,;
A non-through
cut that produces a square-sided
w0rkpiece (requiresa
special blbde):
-'
chamfer
Cut
"
-
A cut removing a wedge from. a block
end) is angled at other than 90 °. ..
Ripping
A cutting
Freehand
notch or trough in the
'- "
_ -,
"
of wood
so.that
the end (orpart
of-the
- -. -:_, Y
or Rip Cut
operation
Cut
along
....
the length
" _/,
of the workpiece.
: ,..
.,
"
_-_-
.
Performing
a cutwith0ut
u_ing'a f_hce; _ter
g_Jge, fixtuie; Work clamlf,or
other proper device to' keep the:-Wori_piede"_om
fWistii_g:0r 'moving durihg" the"
cut. Freehand
Through.
cuts
are dangerous
and
must
....
,.,
: _;_ _,
Sawing_-
Any cutting operation
of the workpiece.
Non-Through
where
the blade ext_rids
c0mp{etbly;thtough
the thickdes.,
_ .:_- , --
Cuts
Any cutting operation where the blade does
thickness
of the workpiece,
like a dado cut.
Leading
be,.avoided,_;_
not extend completely
through
tile _
End
The end of the-qvOrkpiece
pushed
into tool first.
Kerf
The material removed-by
the blade in a through cut or the_slot pr@,_uced by the
blade in a non-through
or partial cut.
,,_ _
.:,
Kickback
._
,. _
A hazard that can occur when,.the-b:_d e binds
back toward operator.
.-
0_"stall s, .throwing.the
workpiece
.o-
• Workpiece
or Material-
':_ -_. (_.
.
.
.
/.
The item On which the cutting operation is being done. T"he"surfaces of a
Workpiece
are commonly
referred
to as faces, ends and edges.
Gum
A sticky,
sap-based
residue
from wood
products.
Resin
A sticky, sap-based
substance
1878OManual_Revised_09-0513
that has hardened.
.__
"
_ .
, _-Page-ll
_IL WARNING:
Your saw should
neverbe
€onne_,ted
to_ the power.source
when
you are assembling
parts, making adjustments,
installing or removing blades,
cleaning, or when it is not in use. Disconnecting
the circular saw will'prevent
accidental
Starting,: v_hich c_uld:cause
serious personal injury.
The saw's
cutting
blade
is not installed
The blade wrench is stored
installing a new blade.
at the factory.
on the base. The wrench
: - '_ , : _ -- ........
-
-
_
is used When changing
,
or'
Inspect the saw carefully to make sure that no breakage or damage h-as occurred
during ship, ping. l{ any of the items mer_tioned is missing,, return the sawto your
nearest S.ears store or_Cr;a_sl_laQ Evoly oy_et,to ha_;e the saw replaced..
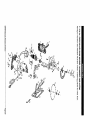
_lk WARNING"
power
cord or operate
do _o, could
PARTS
If any pa_ i_ b_o_
<Or'_is_i_g,
saw until the broken
do not attempt
or missing
to plug in the
part is replaced.
Failure to
_reSu!t i,npos_ble._erious_inju_.
LIST (Fig. 1)
4878.Q,Manual_Revised 09-0513
,,_ Page 12
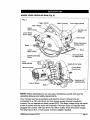
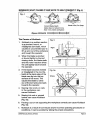
KNOW; _OUR
GIRC ,IJLAR SAW (Fig. 2)
Fig. 2
• Trigger Switch
_o - Motor
Housing-
Front Assist Handle
xJ
Rear Handle
LJpper
Blade
Guard
Spiffdle-Lock
Butt0n_
Lower Blade
Guard LeVer
Bevel Scale
L-Blade
Bev'eI-Acli'ustrfient
._-:-L,.o.c_ki_g
,L,ever
_.
"
Lower
Blade Guard
_-
o.
:,_- _ ,.
o
MOL_'nti:rig
Slots
:
for Edge-Guide
: . _
Spin_die-Clamping
':v _-
Screw
'
"
"
Front
_s_i_t:;Han_die
Depth-of-Cu[
-Look-off-
SCale
Lower Blade-Guard Lever
Motor- Housing
_=
Base...,
adj.usting leyer ,_:
Button
N-O'i'E- Bef()re attempting
tO use your sa.w, familiarize
operating
features and safety requirer_nts..
yourself
With all_f its .....
;!_!::: _ ;_-
Your circular saw has a precision-built
electric motor; it should only be
connected
to a 120-volt, 60-Hz AC only power supply (normal household
current). Do not operate on direct current (DC). This large voltage drop will cause
a loss of power and the motor will overheat.
If the saw does not operate when
plugged into correct 120-volt, 60-Hz AC ONLY outlet, check the power supply.
The saw has an 8-ft., 2-wire power cord (no adapter needed).
18"_.'_B_
Manual_Revised_09-0513
,-,
Page 13
_ThisCircular
Saw_a_ith_fol!owing_-'featu
res: _
i:_;'_12'/_mp,;5500
RPM (n0-1oad sPeed) mo;(or provides power and i_O_Clu_i_6-r
_
fast, sure cuts in wood, plywood,
hardboard,
and wood-based
materi_i's_
.
.
4.
Quick depth-of-cut
adjustments
with a maximum
thick at 90°; 1-3/4-in.
thick at 45 °
Easy-to-read
bevel cut scale adjusts
Heavy-duty,
lightweight
from 0°to
cast-aluminum
depth
of cut_ 2-7/16-in.
45 ° bevel capacity.
blade
guards
for extra
and durability.
.
6.
.
Extended
Large,
,
length
trigger
stamped:steel
switch
for maximum
base provides
sawing applicat_ons_
-....
Rear handle an(_:_front-assiSt
control
stability
handle
grip,
and comfort.
.
Ineludes
._
and comfort.r
for maximum
for positive
strength
control-during-
control,
balance,
,
.Craftsman®
24 tooth
ca[bide-tipped,
steel, general-purpose
blade
for fast, smooth Cuts.
'9.
Sidemounted
10. Built-in
sawdust
11. Permanently
12. Durable
_spindle
ejection
lubricated
machined
Iock'_ for easy-blade
chute_helps
100%
gearing
changes.
' _ _i i
direct dust and chips away from operator.
ball bearings
for efficient
for smooth
power
0perati6n
transmission.
13. Wrench storage located on the base is used to conveniently
wrencll;when it"is not in use.
"
Rating
PRODUCT'SPECl
.r"
No load Speed
Blade
120V-
-
Diamete
st0rethe
:_la,de
FiCATION
60Hz, 12 Amps
5500RPM
7:1/4
in. (184mm)
-:.
5/8 in. (16mm)
Blade Arbor.Cutting
Depth
at 90 °
2 -7/16 in. (62turn)
Cutting
Depth
at 45 °
1 3/4 in. (44.5mm)
Maximum
"a :n'dlong life.
Bevel Angle
45 °
•,
"°'_= T" _
_ -
Tool we[grit
• 187:80 Manual_Revised_09-0513
:
. _, l_.ag_14
_k WARNING:oA 7-1/4-inch
blade is the maximum
blade capacity of your saw.
A blade largerthan
7-1/4 inches will come in contact with the blade guards.
Never usea blade that is so thick that it prevents the outer blade Washer from
engaging with the_flat side of the spindle. Blades that are too large or too thick
can result in anaccident
causing serious_:injury.
SAW BLADES
All saw
blades
need to be kept clean, sharp,
and properly
set in order to cut
efficiently.
Using a dull blade places a heavy load on the saw and increases
the danger of kickbackS-Keep-exti'a-brddes
on hahd.so sharp blades are
always available: Gum or wood pitch that has hardened on the blade slows
the saw. Usegum
and pitch remover, hot water, or kerosene to remove these
substances.
Do not use gasoline.
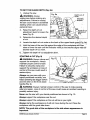
BLADE
GUARD
SYSTEM
(Fig. 3)
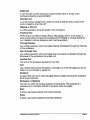
The lower blade guard is there
for your protection
and safety. It
should never be alter-ed.-fo,r any
reason. _t becomes dare_aged
or begir(-_,, o return slo-_]y, dO
not operate your saw_uBtiLthe ..
damaged pa_ has been repaired
or replaced. Always leave the
guard in its correct operating
, position when using the saw.
of workp=ec_;-
-_-CAUTi0N:Never
use-the saw
when the guard is not operating
*
_
properly. The guard ,should be checked for correct _operation
you drop yOur.saw, check the lower blade guard for damage
;
before;each
at. all,depth
use. If
settings
before using it again.
' "
,:
:
NOTE" The auard is operating'pPoperly
when it moves freely and th:en;readily
returns tO the closed p._tlon.
If, for any reason, the lower blad e guar d doesnot
close fre:_,
using it.
take the s.._to
•:18780 ManuaLRevised_09-0513
your nearest
Sears RepairCenter
fop servi_:e before
oPage 15
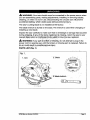
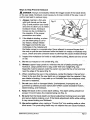
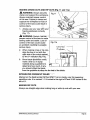
K!CK_-BACK_,WHAT
CAUSESIT
AND WAYS
TO, HELP
PREV_NT
IT (Fig.4)
:
Fig. 4
Blade is Set Too Deep
Correct Blade Depth
blade does not extend more
than 1/4 in; 'below workpiece
The Causes
of Kickback
1.... Kickback
is a sudden
Fig. 5
:
°
reaction
to a pinched,
bound, or
misaligned
saw blade, which
causes,an
uncontrolled
saw to
Right
lift up and out of the workpiece
and towaYd the operator_.
2.
When
the blade
is pinched
or bound tightly by the kerf
closing down, the blade stalls
and the motor reaction drives
the uni_,apidly
back towards
the operator.
o
,°
i
3.
If the blade
becomes
twisted
misaligned
in the cut, the_
-_ _teeth at.the back edgeof
the
blade can dig into the top
surface .of the wood. This
r_.
'
,
.
,
,
_.
Fig. 5a
.
oo
_
Wrong
cause s the blade to climb
_,- out of!he_kerf and jump baok
towards the operator.
.
s
Sawing
into knots or nails
in the workpiece
can
cause Kickback.
Sawing
lumber
into wet or warped
can cause Kickback
(Fig. 5a).
.
m
Forcing a cut or not supporting
(Fig. 5a).
the workpiece
correctly
can cause
Kickback
Kickback
is a result of tool misuse and/or incorrect operating
procedures
conditions.
It can be avoided by taking the proper precautions.
18780; Ma nuaLRevised_09-0513
or
Page 16
Ways to Help Prevent
DANGER:
Always
Kickback
immediately
or the saw stalls. Kickback
control can lead to serious
=
Always maintain
with both hands
,
release the trigger switch if the blade binds
could cause you to lose control of the saw. Loss of
injury.
a firm grip
on the saw
(Fig. 6) and position your body
and arms to allow you to resist
kickback
forces. Kickback
forces can be controlled
by
the operator,
if the proper
precautions
are taken.
.
,
If the blade is binding, or when
you are interrupting a cut for
any reason, always release
the trigger and hold the saw
motionless
in the material until
:
€
the blade comes to a complete stop. Never attempt to remove the saw froth ' _
the work or pull the saw backward while the blade is in motion or Kickback may
occur. Check and take corrective action to eliminate the cause Qf blade binding!
3.
Inspect
or nail.
the workpiece
fox knots
or nails ibefore-cutting,_Never,
4.
Do not cut warped
5,
Always support large panels to minimize the risk_of blade pinChing and _....
kickback.
Large panels tend to sag under their own weight (Fig.Sa). "
Supports
must be placed under the panel: one near tiCk'line of cdt and one:
near the edge of the panel (Fig.5).
_
or wet lumber (Fig. 5&). _
"
saw into a ;knot
'.....
_ _'
6...When
restarting
the saw in the workpiece, center the blade inthe kerf and ._,
'check to be sure that the saw teeth are not eqgaged
into the material, if th9
saw blade is binding, it may walk up or Kickback
from the workpiece
when,.
the saw is restarted:
o _
:_,
7.,, Do not use a dull or damaged
blade. Unsharpened,
improperly
set, or
:
gummed-up
blades produce
narr0w_._eff wliii3h cauSe_s,exCessive friction,
blade binding, and Kickback.
_,
_
8.
.
Keep the blade
exceed 1/4-inch
at the correct depth setting. The depth
below the material being cut (Fig. 4).
setting should
not
Be sure that the blade-depth
and bevel-adjustment
locking levers are tight
and secure before making a cut. If the blade adjustment shifts while cutting,
it may cause binding and Kickback.
10. Use extra caution when making a "Pocket Cut" into existing walls.or other
blind areas. The protruding blade may cut objects that can cause Kickback.
1'8780 Manual_Revised_09-0513
'.
- •
PaSte17
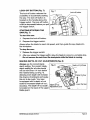
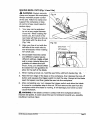
LOCK-OFF
BUTTON
(Fig. 7)
The lock-off
button reduces the
Fig. 7
Lock-o K button
possibility of accidentally starting
the saw. The lock-off button is
located on the handle above the
trigger switch. The lock-off button
must be depressed before you pull
•the trigger switch.
STARTING/STOPP!NG
SAW (Fig. 7)
THE
o
To start the saw:
1°. Depress
the lock-off
2.
the trigger
Depress
Always
allow the blade
button.
switch.
to reach full speed,
and then guide the saw blade into
'theworkpiece.
To stop the saw:
1'.:' Release
,.
thetrigger
switch_
o
....
2. After You release the trigger switch,
_ '_ ""allowtl_e
' ; "Do not remove thesaw
fPom tlNe _oi'kpie_
MAKING
DEPTH-OF-CUT
ADJUSTMENTS
Always use the correct_b[ade
, ,.
depth Setting ¢he.€o[rect
blade-
bladeto
c0me to a compiete
While the'blade
stop.
is moving.
(Fig. 8)
Depth-of-Cut
Scale
depth se_iiig.for
all CLitS should
not bem0re
than 1/4-inch below
the material being cut (Fig. 4).
Allowing more depth will increase
the charice of kickba(_k and;cau§e
the ciJt to be rough. Your saw
is equipped with a depth-of-cut
scale for increased depth_0f-¢ut
_
accuracy. The depth-of-Gut:scale!
_,_
is located on the back of the upper
blacle guard.
_t8780Manual_Revised_09-0513
.
RaiSe the Saw _
Lower the SaW
. Page 18
TO SET THE BLADE
1.
Unplug
_,
WARNING:
DEPTH
(Fig. 8a)
the saw.
Fig. 8a
Always
Depth-cutScale _
•un_plug saw before making any
adjustments.
Failure to unplug
the saw could result in accidental
starting which can c,_use serious
,personal
.
3.
I
Of
Acijustifi;g
injury.
Raise the depth-of-cut
adjustment
lever to loosen
base (Fig. 8).
Determine
the desired
the
depth
of c'ut.
4.
Locate
the depth-of-cut
scale on the back. of the_ upper
blade, guard
S-,
_ _.._(Fig. 8a).
_i,, Hold the:base
of the sawflat
against
the edge pf the workpiece:and
raise or lower the saw until the indicator mark o.n the bracket aligns
desired
depth-of-cut
mark.
6. i'i.Tighten
thee depth-of-cut
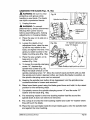
STARTING
A CUT (Fig. 9)
_';WARNING:
adjustment
Alwaysclamp
then _ j _
with ,the
!ever.
and
support the workpiece. Always
maintain proper_control of saw;
Failure•to,securely
clamp,ahd
support the workpiece, or 10ss of
control ofthesaw
could result in
serious injury.
Always use your saw.. with your :;
h_ndsp0sitioned
correctly:
one.
•han,d operating the,.trigger switch
and the other on the front assist
handle (Fig. 9).
_i,
WARNING:
Always
maintain
safer and easier. Loss of control
possibly serious injury.
Never
.....
proper
control
of the saw to make sawing
of the saw could
use the saw with your hands
positioned
:
cause
an accident
as shown
support the workpiece
near the cut.
Always
support
so the cut will be on your right.
Always clamp the workpiece so it will not move during
workpiece with the good side down.
NOTE: The good side of the workpiece
important.
"_.878b Manual_Revised_09-0513
-
-
in
in Fig. 10.
Always
the workpiece
resulting
the cut. Place the
is the side where
appearance
is
-Page19
.
.
Before starting a cut, draw a guideline along the des_ed line of cut, then
place the front edge of the saw base on that part of the workpiece
that is
solidly supported
(Fig. 9).
Fig.10
NEVER place thesaw
on a
part of the workpiece
that will
fall down when the cut is made
(Fig. 10).
.
4.
Always keep the cord away
from the cutting area. Always
place the cord so it does not '
hang up on the wor_piece
when making a cut.
Hold the saw firmly with
hands (Fig 10).
both
wARi_i=NG: If the cord hangs upon the workpiece during a cut, release the
trigger sWitCh imme;diately:'T_
_/bid _njuty, ui_l_g
the saw and move the ;cord to
prev_htitfr0rn-hanging
uiba'g_;air_._
" ':
-_ :_'_
_i, DANGER:
Using the saw with a damaged cord could result in serious injury or
_,._..;..
death. If the cord has been damage_
h_ve'it replaced before using the saw'' again.
"
5.
Depressthe
Iock-offbutton
and squeeze
saw. Always allow the blade to reach.full
into the workpiece.
6':
When making _a cut,,;always
use steady, even_pressure,
cau_ses rough outs ar_d,,cou!d shorten the life of the,saw
7.
the trigger switch to startthe
speed before beginning
the cut ,,
, ,
Forcingthe
saw
:
or, cause ,Kickba(_k.
After comp!eting-_he:cU
t, relea_
the trigger sW{tbh a rtd allow the biade to _
come to a c0mpl_te stop. Do,._nOt remove the Saw-fr6m the"_v0rkpiece while
the blade is moying.
--._
_;,;!;:
,DANGER:
Whe_,sawmg
througha
workplece,-the
Iowe_ blade guard _oes
_t Cover the b!ade.on theunderside
of the _vorkPiece. Alwa_ys k_ep your hands
and fingers away-from
the cutting, arem-Any part of your body-_omingin
contact
with the moving blade wilt-result in-serious injury: "
.-18780-Ma nuaI_Revised_09-0513
:
Page_0
MAKING
CROSS
_1_ WARNING:
CUTS
Always
AND
RIP CUTS
(Fig:. 11 and _11a)
securely
clamp and supportthe
workpiece.
Always maintair_ proper control
of the saw. Failure to clamp and
support the workpiece-o
control of the sa_;could
serious
r loss of
result in
injury.
_ ,.;.
1. Always
use your saw w_h your
hands positioned correct!y
(Fig. 1 1).
_IL WARNING:
proper
sawing
control
Always
maintain:
i:_
control of the saw to make
safer and easier. Loss of ....
of the saw could cause
°,
Fig. 1 la
an accident
restJlti_ig in possible
serious injurY.
'.
.
Une of CU;_' '
0° Indicator
When making Cross or rip cuts,
align the line of cut with the
*
right side of the notch ma_rked
by the 0 ° indicator
(F_g._ _.a).. *_°_"
Since
•
.
°'/'F.
blade thickness
_
varies,
" _'_
"
__
{
.
make a trial cut in sqrap
material along ;a guideline t6. • _p
determinehow
much, if_any, .... /
you should offset the blade
frQm ,the guj_elrne to; a!lQw, fore,the, ke_,of- the :blade.
INTEGRATED
CROSSCUT
Marked on the bas_ across
repetitive
cuts. It is marked
left of 0 °.
MAKING
RULER
_ _'_*
tlie t_ront-(Pig_ 1_1a) is _t haridy Culer for_measunng
1-1/4 inches to the right Of 0_and 3 3_/_inches'*tb
the
RIP CUTS
Always use straight edge when making long or wide rip cuts with your saw.
18780 Manual_Revised_09-0513
.,
P,age,2-1
USING
A STRAIGHT
WARNING:
EDGE =(Fig. 12)-_
Always
securely
clamp and support the workpiece.
Always maintain proper control of
Fig.12
'_
saw. Failure to clamp and support •
the workpiece or loss of controLof
'
the saw could res_ult!n serious'injury.
1.
-
You can make an efficient rip
guide by clamping-i_a_straight
edgeIo your workpiece.
2.
AlWays
let the blade
reach full
speed, and then carefully guide
the sawinto the Wo_kpiece.
3.
Carefully guide the saw along
the straight edge for a straight
rip cut (Fig. 12). DO pot bind
the blade in the cut. Push the
Straight Edge
"
,
;:i:
;Fig. 13
Bey_[ Adjustment,Levey
saw forward at a speed wh_e
the bladejs_nQt _abor, ing ..... _,,
HOW TO SET YOUR.;-B_VEL_,
ANGLE (Fig.!13)
,
_
1.
"_,
Bevel•Pointer
Unplug the saw.
,_k WARNING:
Always
"
Unplug saw-before making any
adjustments.
Failure to unplug the
saw could result in accidental=_t-arting,
-" -_'
-"_'_:
_'_
'
WhiCh can cause sei'i_us personal"iBju_j.
2.
Loosen the bevel-adjustment
3.
Raise .tbe, mQ_pr 13Q:using;end of the saw,until
setting_ o,n the bevels€ale.
,, _
-__,
4.
Securely
tighten
lever (Fig.13)_.
the bevel-adjustment
:tB78e Manual_Revised_O.9-0513
yoU-reach
the:desired
angle.
lever.
- • :, _
,-Page22
MAKING
BEVEL CUTS (Fig. 14 and 14a!
-_
WARNING:
Always securely
Fig.14
clamp and support the w0rkpiece.
Always maintain proper control
of the saw. Failure to clamp and
support the workpiece
or loss
of control of saw could result in
serious
1.
2.
injury.
Your saw can be adjusted
to cut at any angle between
0°and 45 °. When making 45 °
bevel cuts, the notch in the
saw base will help you line up
the blade with the line of cut
(Fig. 14a).
I
Align your line of cut with the
left side of the notch n_xt to
the 45°indicator
45 ° bevel cuts.
3.
Fig.14a
when
' Line of Cet
making
"
-
-" 45 oIndicator "_i.
Since blade thickness
varies
and different angles requir, e
different settings, make a trial
cut in sCrap material _long the_
guideline t0 detetmihe-how
much, if:any, you Should offset
the blade from the guideline 1_6"
allow for the kerf of the blade.
,_, -,
: _-; :. ,-.
_
4.
When making
5.
Rest the front edge of the base on the workpiece,
then depress the lock-off
button and squeeze the trigger switch to start the saw. Always let the blade
reach full speed, and then guide the saw into the workpiece.
6.
After completing
your cut, release the trigger switch and allow the blade
to come to a complete
stop in the cut. Do not remove the saw from the
workpiece
while the blade is moving. It will damage your bevel cut and
cause Kickback.
WARNING:
reaches
resulting
a bevel cut, hold {he saw fi£dlly with:both-hands
If the blade
full speed,
in serious
it could
injury.
18780 ManuaLRevised_09-0513
comes
cause
in contact
(Fig" 1-4).
_'-
with the workpiece
the saw to kickback
towards
before
; ....:
it
you, possibly
,.
'
Page'23
MAKING
POCKET
WARNING:
CUTS
(Fig. 15)
Always adjust the
Fig.15:
__k_l.
/_
if
bevel setting to zero before making
a pocket cut. Attempting a pocket
cut at any other setting can result in
a loss of control of the saw, which
can result in serious injury.
1.
Adjust the bevel setting to
zero, set the blade to the
• Coi're_t blade-depth
getting,
....and Use the lower blade guard
iever to swing the guard up.
;_:
W_.RNING:
Always
raise the lower
blade
guard
with the lever to avoid
serious injury.
2.
While holding the lower blade guard up by the lever, firmly rest the front of
the saw base flat against the workpiece
with the rear handle raised so the
blade does not touch the workpiece
(Fig. 15).
3.
Depress the lock-off button a[ld squeeze the trigger switch to start the saw.
Always le_tthe blade reach full speed, and then slowly lower the blade onto
the workpiece,qntil
the ba_se is flat against the Workpiece. As the blade
enters the material, youmust
i;elease thelower
blade guard lever.
'
4.
After you complete
come to a complete
the cut, release the trigger switch and allow the blade to
stop. After the blade has stopped,
remove_i,t,from
the
workpiece.
If the corners of you r p Qcket cut are not completelycut
use a hand finishing saw to finish the corners._
-
A
WARNING:
Never tie the lower blade
the blade exPoSed CQU!d result in serious
18780 Manual_Revised_09-0513
guard in the raised position.
ini_r;y.
through,
Leaving
-, Page 24
WARNING:
by a qualified
_l,
WARNING:
To ensure
service
safety and reliability,
technician
For your safety,
saw from. the power
source
all repairs
at a Sears Service
performing
be performed
Center.
always turn off the switch
before
should
_: ;
and unplug the circular
any maintenance
or cleaning.
;It has been found that electric tools are subject to accelerated
wear.and
r
possible premature
failure when they are used to work on fiber glass: wa!lboard,
spackling
compounds
or plaster. The chips and grindings from these materials
are highly'abrasive
to electrical tool parts, such as bearings, brushes,
_
commutators,
etc. Consequently,
it is not recommended
that.this toolbe
used
for extended
work on any fiberglass
material, wallboard,
spackling
compound
or
plaster. During any use On these materials, it is extremely
is cleaned frequently
by blowing with an air jet.
importantthat
"the tool
_IL WARNING-AIways
wear safety goggles or safety glasses with side shields
during powert0ol
operations,
or when blowing dust: if operation
is dusty, also
wear a dust mask.
ROUTIN
E MAINTENANCE
-
:_
wARNING:
Do not at any time let brake fluid, gasoline, petrbleum_based
prod_Jcts, penetrating
oi!s, etc. come in contact with plastic parts_ Chemicals can "damage, weaken or de_stroy plastic, which may result in serious personal injury.
Periodic maintenance
allows for long life and trouble-free operation.:A
lubrication and maintenance
schedul_ shouldbe
maintained.
•
As a'Common
prev;_ntive
maintenance
practice,
•
When work has been completed,
of the,,,tool over time.
•
Use clean, damp
•
Check
•
i{ebp the motor air openings free from
and store tool in a dry place.
cloths
to wipe thetool.
the state of all electrical
, LBe c;_rtai'n that all moving
exposure
to damp and/or
-_187.8GManuaLRevised_09-0513
clean
follow
cleaning,
these recommende_d
the tool to a!!ow smooth
_
steps:
functioning
.
Cables.
oil, grease
parts are well lubricated,
dirty conditions.
"
and sawdust
_
particularly
or •woodchip4J,
after lengthy
Page 25
_HANGING
THE BLADE (Figs. 16, 16a)
;wARNING:
Be sure to wear
Fig. 16
protective
work gloves while
handling a saw blade. The blade
Spindle-Lock
can injure unprotected
hands.
1.
Unplug
Button
_
:
t-
the saw.
_i_ WARNING:
To prevent
personal injury, always disconnect
the _plug from power source
before assembling
parts,
adjustments
Or Changing
2.
..
Depth-of-Cut
ustment
Lever
making
blades.
Place the saw on its side on a
flat surface.
Loosen
the depth-of-cut
"A" Spindle-Clamping
.
j
Outer "D" Washer
Fig.16a
_adjustment lever, raise the saw.
up all the way relative to the
base, and tighten the lever. This
gives you easier access to the
b!ade mounting area (Fig. !6a).
4.
Place the saw upright,
base and on a flat
surface
(Fig. 16a).
To loosen the spindle-clamping
screw "A", depress the
spindle-lock
button (Fig.16).
' Place the bla,de wi_ench on the
spindle-clamping
the spindle-lock
Blade Notation t_th
screw
can be removed.
,
Keeping the spindle-!ock
button firmly depressed,
counterclockwise
to loosen and remove it.
J
g.
Raise lower blade guard using the blade-guard
position for tl_e remaining
steps
,_
Completely
remove the spindle-clamping
washer and the blade (Fig. 16a).
The remaining
spindle shaft;
.
r
screw
10. Place the new saw blade
washer
inside the lower
the inner bushing.
187"_0 Manual_Revised_09-0513
blade
?
turn the spindlescrew,
lever and hqldJt
.
in th.e raised
"A" and the outer "D"
washer is the inner bushing washer
it does not need to be removed.
Put a drop of oil onto the inner bushing
they will touch the blade.
and against
point up at front
screw "A". Move the wrench back and forth until you feel
button depress further, as it locks the blade in Position; . so
the spindle-clamping
.
Scre_w
•
on its
5.
.
.
:.
that fits around
the
and outer "D" washer
guard,
where
onto the spindle shaft
- Page 26
1 1.
Replace:the
"13" washer:
12.
Firmly hold down
splhdle-lock
button
as _iou replace
the spindle-clamping-
screw, and hand tighten it in a clockwise
direction.%hen
wrench to securely tighten the spindle-clamlSing shrew.
13.
Release the blade-guard
to positi(_n-.
'
lever to allo_
use'theblade:
,....
the Iowe;r blade guard
.........
tO return
LUBRICATION
All,of the bearings in this.tool are lubricatedwith,a
sufficient
grade lubricant for the life of the tool under normal operating
Therefore,
no further lubrication
is required.
If the blade
does not follow
a straight
amount of highconditions.
line:
•
Teeth are dull. This is caused by hitting a hard object such as a nail, and
dulling the teeth on one side. The blade tends to cut to the side with the
sharpest teeth.
•
Base is out of line or bent.
•
Blade is bent.
•
Edge guide or straight
If the blade
edge is not being used.
binds or smokes
•
Blade is dull.
•
Blade is on backwards.
•
Blade is bent.
•
Workpiece
•
Incorrect
from
friction:
is not properly supported.
blade is being
::L8780Manual_Revised_09-0513
used.
- , ....
.:c
".I_e',27
WARNING:
recommended
The use of attachments
for this tool might
Craftsman,
or accessories
be dangerous
Searsand
other
Craftsman
steel carbide;-tipped
_ade.sdesigned
Contractor
bulk Packs
available.
arealso
outiets._ffer
a-large
Ihat are not
and could
selection
for specific
result
in serious
of 7-1/4 inch
cutting
Sears and other Craftsman
outlets also offer sawhorses,
combination
•framing squares, straight edges, edge guides, and a large assortment
to help you with all your sawing needs.
Visit yQur local Sears store or other Cra_ftsman outlets
18780Ma nual_Revised_09-0513
injury.
applications.
and
of clamps
_
:
or shopsears.com/craftsman.
Page 28
I--
z
_rm
o_
a.
_
o
o
o_
_o
o
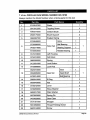
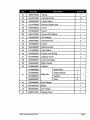
7 1/4-in.
Always
CIRCULAR
mention
SAW MODEL
the Model
Number
NUMBER
320.18780
when ordering
2740247002
Stator
2
5610012000
Tapping
3
4960270000
Carbon
4
5
parts for this tool
1
Scow
4
Brush
2
2800175000
Brush SuppoR
2
3660087000
SnailedSpring
2
Rotor
1
Ball Bearing
1
3402214000
Bearing
1
5700053000
Needle
2750849002
570OO06OOO
Rotor Set
6
Suppo_
1
Bearing
8
31234180OO
Left Housing
1
9
3704010000
Felt Block
1
10
3660326000
Spring
11
3123501000
Lock Button
12
3703999000
Lock Rod
"L
1
;
1
1
%
r
3520310000
13
Gear Set
3550935000
5700014000
Gear
1
Gear Shaft
1
Bali':Bearing
1
---
_,
-
14
5660010000
E Ring
2
15
5630043000
Nut
2
16
_ 3700242000
Lever
2
17
3700283000
Wave Washer
2
18
5650017000
Plain Washer
3
19
5670263000
Spring
Pin
1
20
3420629000
Gear Case
1
21
3121051000
Stopper
_-
1
i
22
5610058000
Thread
23
5620153000
Screw
1.:878_0
•
Manual_Revised_09-0513
" "
FoCming Screw
.
1
2
-Page 30
24
25
3660079000
1
Spring
'5610042000
Tapping
18
Screw
26
3420628000
Lower
Guard
27
3121379000
Moving
28
5620039000
Screw
1
29
3704000000
Cover
1
3O
562041O000
Screw
31
3320845000
Left Handle-
1
32
3550973000
Pendulum
2
Guard
1
1
Lever
With Washer
i,
4
Pin
i
33
4870006000
Switch
1
34
3402386000
Right Housing
1
35
3121050000
Cord
1
36
4810002000
Power
37
5610093000
Tapping
Screw
2
38
3700285000
Cord Anchorage
1
39
3320846000
Right Handle
1
40
3700664000
Wrench
Guard
1
Cord & Plug
j
3703994000
1
Base Plate
i
Depth
1
i
3703998000
Base Set
41
Bracket
1
3703995000
Support
1
5680009000-
Rivet
2
i
42
3550936000
Inner Flange
43
3810397000
Blade
1
1
i
44
3550938000
Out Flange
!
45
5620151000
;Flange Screw
1
18780
Manual_Revised_09-0513
" 'l_age 31
Your Home
For expert troubleshooting and home solutions advice:
manage
home
www.managemyhome.com
For repair - in your home - of all major brand appliances,
lawn and garden equipment, or heating and cooling systems,
no-matter who made it, no matter who sold it !
For the replacement parts, accessories and
owner's manuals that you need to do-it-your.self.
For Sears professional installation of home appliances
and items like garage door openers and water heaters.
1'800-4-MY-HOME
(1-800-469-4663)
www.sears.com
® ca,
.
anytime, day or night
(U.S.A. and Canada)
www.sears;ca
Our Home
For repair of carry-in items like vacuums, lawn equipment,
and electronics, call anytime for the location of the nearest
Sears Parts & Repair Service Center
1-800-488-1222
(U.S,A.)
www.sears,cem
1-800-469-4663
(Canada)
www.sears.ca
To_pumhas_ a protection agreement on a productservicedby Sears:
1-800-827-6655
(u.s._)
_1-800-361-6665 (Canada)
....Para pedir servicio de reparaci6n
.a d0midlio, Y para ordenar piezas:
1-888-SU-H(_AR®
• i.......
-
Au Canada pour service en fr_s:
1-800-LE-FOYER Mc
(1-800-533-6937)
.-
www,sears.ca ......
Sea/rs
© SearsBrands,LLC
® RegisteredTrademark / TMTrademark / SMService Mark of Sears Brands,LLC
__ Mama Regist_rada
/ TMMama de F&brica/ SMMama de Serviciode Sears Brands, LLC
MC Marque de commerce iMDMarque d6pos_ede Sears Brands, LLC