1
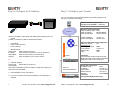
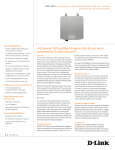
WARRANTY AND SOFTWARE LICENSE
SCOTTY GROUP PLC SOFTWARE LICENSE AGREEMENT
Please read before using your SCOTTY product
By using your SCOTTY product you are indicating (1) your acceptance of the terms of this Software License Agreement (“License”); (2) your promise to use the “Software”, which shall
be deemed to include all software and embedded firmware provided with and incorporated into your SCOTTY product, whether in machine or user readable form, and all subsequent
updates and enhancements thereof, as well as patents, copyrights, trademarks and trade secrets relating thereto, only as permitted by this License; and, (3) your promise to protect the
Software from unauthorized use, duplication, distribution, or publication.
GRANT OF LICENSE: You are hereby granted non-exclusive License to use the Software in conjunction with your use of your SCOTTY product subject to the terms, conditions, and
limitations herein provided. Title to the Software shall remain the property of SCOTTY Group plc hereinafter called “SCOTTY”, or the original licensor as regards included computer
software licensed to SCOTTY for sublicensing. All rights not specifically granted to you are hereby reserved by SCOTTY.
Getting Started
Quick Installation Guide for the eyesite 550
PERMITTED USES: You may (1) use the software only in conjunction with your use of the SCOTTY product with which it was provided; (2) rent, loan, or lease the software, but only in
conjunction with the rent, loan, or lease of the SCOTTY product with which it was provided and only if the recipient accepts the terms of this License; and (3) transfer possession of the
Software but only in conjunction with the transfer of sale of the SCOTTY product with which it was provided and only if the recipient accepts the terms of this License.
PROHIBITED ACTIONS: You may not: (1) make copies of the Software or any documentation accompanying the Software; (2) alter, merge, or modify the Software in any way, nor
decompile, disassemble or reverse-engineer the same; (3) rent, loan, or lease the Software apart from the rent, loan, or lease of the SCOTTY product with which it was provided; (4)
remove, deface or obscure trademarks or copyright notices embedded within the Software or appearing upon the documentation accompanying the same; or (5) transfer possession of
the software separate and apart from the transfer or sale of the SCOTTY product with which it was provided.
TERM: The term of this License shall be indefinite and it shall continue in full force and effect until terminated by either of party as herein provided. You may terminate this license at
any time by destroying the Software. SCOTTY may terminate this Licence at any time upon your breach of the terms of this License. Upon termination by SCOTTY, you agree to
destroy or permit SCOTTY to destroy the software including all copies thereof.
US GOVERNMENT RESTRICTED RIGHTS: The Software and the documentation accompanying the software are provided with RESTRICTED RIGHTS. Use, duplication, or
disclosure by the Government is subject to restrictions as set forth in subparagraph ©(I)(ii) of The Rights in Technical Data and Computer Software clause at DFARS 252.227-7013 or
subparagraphs (c )(1) and (2) of the Commercial Computer Software- rstricted Rights at 48 CFR 52.227-19, as applicable. Contractor/manufacturer is SCOTTY Group of the Americas,
6714 Netherlands Drive, Wilmington, NC 28405.
EXPORT RESTRICTIONS: You agree that you will not export, re-export, resell, ship or divert, directly or indirectly, the Software or a derivative of the same to any country for which the
United States Government or any agency thereof requires a validated export license or other governmental approval for export without first obtaining such license or approval. You also
agree that you will not export, re-export, resell, ship or divert, directly or indirectly, the Software or a derivative of the same to any person, party or entity whatsoever whom you know or
have reason to know will utilize the same in the design, development, or production of nuclear, chemical, or biological weapons, or ballistic missiles.
The SCOTTY logo is a registered trademark of SCOTTY Group plc.
Technical Support:
Web:
1-910-395-6100
http://www.scottygroup.com
ONE YEAR LIMITED PRODUCT WARRANTY
SCOTTY GROUP plc (“SCOTTY”) warrants to the original purchaser (“You”) that your SCOTTY product will be in good working order under normal operating conditions for a period of
one (1) year from the date of purchase as evidenced by a dated sales receipt. If during the warranty period your SCOTTY product is found not to perform as warranted, SCOTTY will
provide all parts and labor necessary to repair or replace it.
SCOTTY will not accept the unauthorized return of any product. To obtain warranty service, You must first call the SCOTTY Customer Support Department during normal working
hours (9A.M to 5 P.M. EST) at 1-910-395-6100 and provide a description of the problem experienced. An “RMA” number will be assigned for each authorized return. You must then:
(1) prominently mark the “RMA” number assigned on the outside of the shipping carton containing the returned product (2) enclose a copy of your dated sales receipt, a brief description
of the problem experienced as well as your name, telephone number and return address. (3) properly package your SCOTTY product in a manner that will ensure its safe arrival , and
(4) prepay the return shipping charges. Failure to comply with any of these instructions may result in a delay of warranty service.
In its sole discretion SCOTTY may use new, used or refurbished parts or products to repair or to replace defective parts or products, and all replaced parts or products shall become the
property of SCOTTY. Replacement parts or products, whether new, used or refurbished, will be warranted for the remainder of the original warranty period or for a period of thirty (30)
days, whichever is longer. Products manufactured by third parties and sold by SCOTTY are specifically excluded from this warranty.
THIS LIMITED WARRANTY IS MADE IN LIEU OF ALL OTHER WARRANTIES, EITHER EXPRESS OR IMPLIED, WRITTEN OR ORAL, INCLUDING WITHOUT LIMITATION THE
IMPLIED WARRANTIES OF MERCHANTABILITY AND FITNESS FOR A PARTICULAR PURPOSE, AND EXCEPT AS HEREIN OTHERWISE PROVIDED, YOUR SCOTTY
PRODUCT IS DELIVERED “AS IS” WITHOUT WARRANTY OF ANY KIND.
Congratulations on
the purchase of
your eyesite 550!
This Quick Installation Guide
provides an easy step-by-step
installation procedure.
For more detailed installation
information please refer to the
eyesite 550 User Manual on
the enclosed CD-ROM.
NEITHER SCOTTY, OR ITS AUTHORIZED RETAIL DEALERS SHALL BE LIABLE TO YOU, OR TO ANY OTHER PARTY, FOR ANY SPECIAL, INCIDENTAL, OR
CONSEQUENTIAL DAMAGES OR FOR ANY LOSS, DAMAGE, OR EXPENSE WHATSOEVER, WHETHER DIRECT OR INDIRECT, ARISING FROM OR OUT OF THE USE, THE
INABILITY TO USE, OR THE MISUSE OF YOUR SCOTTY PRODUCTINCLUDING PERSONAL INJURY OR THE LOSS OR DESTRUCTION OF ANY OTHER PROPERTY
WHICH DAMAGES ARE HEREBY EXPRESSLY WAIVED.
SOME JURISTICTIONS PROHIBIT THE EXCLUSION OR LIMITATION OF DAMAGES AND IMPLIED WARRANTIES; THEREFORE THESE EXCLUSIONS MAY NOT APPLY TO
YOU.
Damage to your SCOTTY product resulting from improper packaging for return shipment, abuse, improper use, negligence, vandalism, accident, such intervening causes as fire, flood,
electrical voltage surge or drop whether due to a lightning strike or other cause, and acts of God are expressly and specifically excluded from coverage under this warranty. Moreover,
this warranty shall become null and voidand of no legal effect if and in the event that your SCOTTY product is used outside of the normal operating environment for which it was
designed, if the product is altered or modified in any manner, if any of the original identification markings, including trademarks or serial numbers, are alterd, defaced or removed, if any
factory seal is broken, or if repairs are attempted by any party other than SCOTTY, and in any event, SCOTTY’s liability shall not exceed the purchase price paid.
REGISTRATION
Please register your SCOTTY product by visiting our web site www.scottygroup.com/registration.
Alternatively, write to the following address with your name, company, address, where purchased, the date purchased, the model and serial
number of the unit.
SCOTTY Group of the Americas, 6714 Netherlands Drive, Wilmington, NC 28405, USA.
SD202581A V4.1.02
Europe › The Americas › Asia › www.scottygroup.com
Europe › The Americas › Asia › www.scottygroup.com
Important Safety Information
›
›
Do not dismantle the eyesite 550. There are no user serviceable parts
inside. Access to the inside of this unit should only be carried out by
approved service personnel.
Keep the eyesite 550 away from water and other liquids (except when
cleaning, as directed below). If you suspect that liquid has entered the
equipment, immediately disconnect the unit from the network and from
the power supply, ensuring first that your hands and the power supply
outlet area are dry. Do not use the eyesite 550 again until it is thoroughly
dry.
Step 1: Unpack and Check Contents
Please unpack the eyesite 550 and check the contents for damage. The
following items are supplied with the eyesite 550:
Eyesite 550 unit
Rackmount Brackets
Remote Control
›
Clean the case only with a soft, lint-free cloth, either dry or slightly
dampened with water. Disconnect the power and the telephone cables
before using a damp cloth to clean the eyesite 550.
Phone Line Cable
Network Cable
›
Before connecting any equipment that was not supplied with the eyesite
550, check the specification to ensure compatibility.
Dual Phono leads
Worldwide AC power adaptor
›
Do not use the eyesite 550 if you suspect a gas leak. Operation of any
electrical equipment can generate sparks which may ignite the gas and
cause an explosion.
AC power cord
›
Do not let cables trail where they might cause someone to trip or pull the
eyesite 550 onto the floor.
›
Use only on a stable surface. The eyesite 550 may be damaged if it falls.
›
Keep the equipment and its packaging out of reach of small children.
›
Do not push objects into the ventilation holes.
›
Do not block the ventilation slots as this could cause the equipment to
overheat and malfunction.
›
Do not place the eyesite 550 in direct sunlight. Do not point any external
cameras directly at the sun as this is likely to cause serious damage to
the unit.
›
1
The eyesite 550 will not function in the event of a power cut. It should not
be relied upon as the only means of contacting the emergency services.
Europe › The Americas › Asia › www.scottygroup.com
CD with User Manual
and
Eyesite for Windows
viewing software
Optional accessories for the eyesite 550 include:
Eyesite for Windows Pro viewing software- Adding multisite viewing, recording, control of outputs, and pre and
post event buffer control for the eyesite 550.
StatIX service- for lines that don’t provide a static IP
address
Interface Module- for wiring to inputs and outputs
including sensors, relays, and audio inputs and outputs.
Europe › The Americas › Asia › www.scottygroup.com
2
Step 2: Physical Installation
Step 3: Connect Video Audio Power
›
The eyesite 550 is shipped in shelf mount configuration.
›
If you wish to rackmount the eyesite 550 it is supplied with a pair of 19”
brackets. For 19” rackmounting the eyesite 550 occupies 1 RMU of
space.
›
The eyesite 550 has no specific ventilation requirements.
›
The brackets may be front or rear mounted depending on your preference
for the cable exit points,
›
To attach the brackets remove and replace the three screws indicated on
both sides of the unit.
›
Connect cameras to the BNC connectors labeled Video in. Cameras or
video inputs must supply a PAL or NTSC composite video signal.
›
If desired connect other video devices that require the signal from the
camera to the Loop connector.
›
Connect the yellow video out connector to the video input of your TV or
monitor and connect the red audio out connector to the audio input of your
TV or monitor.
NOTE: The IR sensor for initial remote control of the eyesite 550 is mounted
at the
front of the unit.
TV or
Monitor
Video
In
Powe
r
Connections to rear
Powering on
The blue LED on the front of the
eyesite 550 unit indicates
power.
Connections to front
3
Europe › The Americas › Asia › www.scottygroup.com
The green LED flashes as it
boots, and goes on
permanently when the boot
sequence is complete.
Video
Loop
Other CCTV Device
Europe › The Americas › Asia › www.scottygroup.com
4
Step 4: Connect to Network
Step 5: Connect to Interface Ports
›
Connect the supplied black Cat5 network cable between the connector
labeled ‘Network’ to a 10 or 100 Mbps network hub or switch.
The table below shows the pin designation of the Interface connectors
on the eyesite 550.
›
The green LED on the front of the eyesite 550 indicates that the
connection has been made correctly.
Connection
›
Connect the supplied white phone line cable between the connector
labeled ‘line’ on the eyesite 550 and the phone line.
Unbalanced Audio Out
›
A country specific adaptor may be required to connect the RJ-11
connector to the phone jack in your country.
1
2
3
4
5
6
Unbalanced Audio In
(+)
(-)
Relay Out
(<150 mA 12VDC)
Audio
Out
-
Coil
(-)
Relay
Out
Gnd
(-)
(+)
(-)
(+)
(-)
Alarm In
Audio
Out
+
8
Gn
d
(+)
Balanced Audio In
Balanced Audio Out
7
Relay
Out
+12V
Common
Gnd
(+)
Coil
(+)
Alarm
In
+
Audio
In
-
Audio
In
+
1 2 3 4 5 6 7 8
Interface
Phone Line
5
Network Hub or Switch
Europe › The Americas › Asia › www.scottygroup.com
Use the optional eyesite 550 Interface Module to connect audio
inputs and outputs in addition to triggers such as door contacts,
PIR sensors, and outputs such as relays, indicator lights, alarm
systems and buzzers.
Europe › The Americas › Asia › www.scottygroup.com
6
Step 6: Configure an IP Address
Step 7: Configure your firewall
If you are connecting from behind a firewall this port forwarding example may
help you to choose the best settings.
How the remote unit places a call
Dial 62.173.119.212:2099 (: = UDP Port)
Router/Firewall Configuration
Public IP Address Type: Static
Public IP Address:
62.173.119.212
Public Subnet Mask:
255.255.255.252
Internet
Obtain an IP address, subnet mask, and default gateway address from your
network
provider or use DHCP to obtain an address automatically.
•
•
•
Private IP address:
Private Subnet Mask:
Press MENU
Press 2 Communications
Press 2 Network
• Manual Address:
Select TYPE
Static using the arrow keys
IP Address
Enter using number keys and “*” key to represent a “.”
Subnet Mask
Enter the subnet mask e.g. 255.255.255.0
Gateway
Enter the address of your router or firewall
Router
Firewall
Or
4. Automatic Address
Select TYPE
DHCP using the arrow keys.
Press ENTER
Now select TYPE Static to prevent IP address changes from making your
eyesite 550 unit inaccessible.
7
Europe › The Americas › Asia › www.scottygroup.com
Advanced Settings/Firewall Configuration
DMZ Host address:
N/A
Forwarding rule
Incoming data on port:
2099
To IP Address:
192.168.1.2
UDP Port No:
2099
Type:
UDP
Comments
Port forwarding provides enhanced security
Multiple forwarding rules possible if a different
UDP port is used on each eyesite 550
Ethernet Switch
All in one
Router/Firewall/Switch
5. Press ENTER 2x to save your address.
6. If you are not working from behind a firewall your IP configuration is
complete.
192.168.1.1
255.255.255.0
eyesite 550
Eyesite 550 configuration
IP Address Type:
Static
IP Address:
192.168.1.2
Subnet Mask:
255.255.255.0
Default Gateway:
192.168.1.1
UDP Port:
Default (2099)
Comments
Using Packet Buddy Protocol only
Europe › The Americas › Asia › www.scottygroup.com
8
Step 8: Access the Web Server
eyesite 550
Step 9: Install eyesite for Windows
PC with Web Browser
›
›
›
Insert the supplied CD in your PC’s CD drive.
Browse to the CD drive and select the setup.exe file.
Follow the on-screen instructions to install eyesite for Windows
Connect
1. Click ‘Connect’
2. Click ‘Add’ and
enter the IP address
of your eyesite 550
Options
Click Options
Check the IP box
Check the
auto answer box
Call Info
For last
call
Diagnosis
Zone and
Camera
Selection
Select zone
from 1-6 or
press SEQ to
cycle through
the cameras.
Help
Use the help
file for
information and
fault finding
The eyesite 550’s web
server provides full access
to configuration menus.
Using the browser on your
PC, type in the local IP
address of the eyesite 550
unit as shown above.
Recorder
Control
Recording and
image control
The web server provides access to full eyesite 550 configuration.
Options you may consider include:
•
Turning on auto answer for analog and IP calls so that the unit will accept
incoming calls.
•
Accessing the phone book and enter a number to dial in the event of an
alarm
•
Configuring the trigger and zone inputs if you wish to attach sensors
•
Entering your user information into the StatIX menu if you use this location
service.
•
Configuring your modem to suit the country you are in. (Analog)
•
Configuring a Max Data Speed to suite the available bandwidth. (Network)
9
Europe › The Americas › Asia › www.scottygroup.com
Snapshots
Drag and
drop snapshots
Right click to view
or save images
Camera
Control
Pan, Tilt,
Zoom
Presets
Access and set
preset camera
positions stored in
your PTZ camera
Zone Control
For monitoring
and controlling
audio and
alarm inputs
and outputs.
NOTE: Certain functions are provided for evaluation purposes and will expire
after 45 days. You may upgrade your software to make these permanent.
Europe › The Americas › Asia › www.scottygroup.com
10