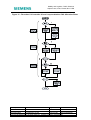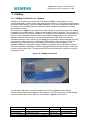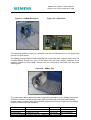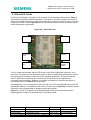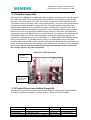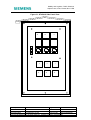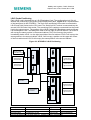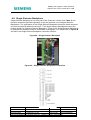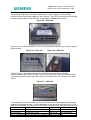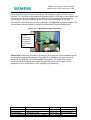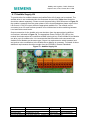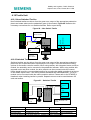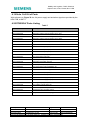
1
Mobility and Logistics, Traffic Solutions
Sopers Lane, Poole, Dorset, BH17 7ER
Controller Configuration Handbook
667/CC/45950/000
for
ST950 Family of Controllers
THIS DOCUMENT IS ELECTRONICALLY APPROVED
AND HELD IN THE SIEMENS DOCUMENT CONTROL TOOL
All PAPER COPIES ARE DEEMED UNCONTROLLED COPIES
Prepared By
Checked and Released
Division/BU
Mobility and Logistics, Traffic
Department
Engineering
Name
Harry Smyth
Function
Senior Product Engineer
Date
December 2014
COPYRIGHT STATEMENT
Mobility and Logistics, Traffic
Engineering
The information contained herein is the property of Siemens plc. and is supplied
without liability for errors or omissions. No part may be reproduced or used except as
authorised by contract or other written permission. The copyright and the foregoing
restriction on reproduction and use extend to all media in which the information may be
embodied.
Copyright
Siemens plc 2014 All Rights Reserved
Security classification
Unrestricted
Version
2
Last Editor
Harry Smyth
Document Name
Configuration Control
Copyright © Mobility 2014. All Rights Reserved.
Page
1 of 83
Status
Released
Date
09/12/2014
Document No.
667/CC/45950/000
Mobility is a division of Siemens Plc
Mobility and Logistics, Traffic Solutions
Sopers Lane, Poole, Dorset, BH17 7ER
Issue Change Reference
Date
1
First Issued
Sep 2013
2
Added the Stratos Outstation
Dec 2014
Security classification
Unrestricted
Version
2
Last Editor
Harry Smyth
Document Name
Configuration Control
Copyright © Mobility 2014. All Rights Reserved.
Page
2 of 83
Status
Released
Date
09/12/2014
Document No.
667/CC/45950/000
Mobility is a division of Siemens Plc
Mobility and Logistics, Traffic Solutions
Sopers Lane, Poole, Dorset, BH17 7ER
1
2
3
4
Contents
Introduction........................................................................................................................ 7
1.1
Purpose ................................................................................................................. 7
1.2
Scope..................................................................................................................... 7
1.3
Related Documentation .......................................................................................... 8
1.4
Pre-Requisites for Field Service Operative ............................................................. 9
1.4.1
Qualifications.......................................................................................... 9
1.4.2
Required Tools ....................................................................................... 9
1.5
Abbreviations and Definitions ............................................................................... 10
ST950 Family of Controllers System Overview ................................................................ 12
ST950 Hardware Allocations and Connectivity ................................................................ 13
3.1
ST950 Outercase Selections ................................................................................ 13
3.2
Rack Assembly .................................................................................................... 15
3.2.1
Rack Assembly Mounting Position ....................................................... 15
3.2.2
Mains Distribution Unit.......................................................................... 16
3.2.3
Lamp Switch Cards .............................................................................. 16
3.2.4
ST950 CPU Card ................................................................................. 17
3.2.5
CPU I/O Card ....................................................................................... 17
3.3
Termination Panel ................................................................................................ 18
3.4
Master Switch Assembly ...................................................................................... 20
3.5
Dimming Transformer........................................................................................... 21
3.6
The Manual Panel ................................................................................................ 22
3.7
Intelligent Detector Backplanes ............................................................................ 23
3.8
Single detector backplane .................................................................................... 26
3.9
SLD4 Detector Cards ........................................................................................... 27
3.10 Loop Termination Cards ....................................................................................... 28
3.11 WiMag.................................................................................................................. 33
3.11.1
WiMag 3U Rack Kit (19”) System ......................................................... 33
3.11.2
WiMag Loop Detector Replacement Card ............................................ 36
3.12 Loop Detector and Ancillary Power ...................................................................... 37
3.12.1
Power Supply Kit 24V (160VA)............................................................. 37
3.12.2
Power Supply Kit 48V (50VA) ............................................................... 37
3.12.3
Power Supply Kit 48V (160VA)............................................................. 37
3.13 Serial I/O Cards.................................................................................................... 38
3.14 Gemini2 ................................................................................................................ 40
3.15 Stratos Outstation ................................................................................................ 41
3.16 Regulatory Sign Supply Kit................................................................................... 42
3.17 Audible Supply Kits .............................................................................................. 43
3.18 Tactile Driver from Audible Supply Kit .................................................................. 43
3.19 Solar Cell ............................................................................................................. 45
3.20 ST950LV Parts Listing.......................................................................................... 45
ST950ELV Hardware Allocation and Connectivity ........................................................... 47
4.1
ST950ELV Outercase Selection ........................................................................... 47
4.2
Rack Assembly, LSLS and HPU .......................................................................... 48
4.2.1
Rack Mounting Position ........................................................................ 48
4.2.2
Logic Power Unit .................................................................................. 49
4.2.3
ST950ELV CPU Card........................................................................... 49
Security classification
Unrestricted
Version
2
Last Editor
Harry Smyth
Document Name
Configuration Control
Copyright © Mobility 2014. All Rights Reserved.
Page
3 of 83
Status
Released
Date
09/12/2014
Document No.
667/CC/45950/000
Mobility is a division of Siemens Plc
Mobility and Logistics, Traffic Solutions
Sopers Lane, Poole, Dorset, BH17 7ER
5
4.2.4
CPU I/O Card ....................................................................................... 50
4.2.5
LSLS and HPU ..................................................................................... 51
4.2.6
Regulatory Sign Monitoring .................................................................. 53
4.3
Cabinet Back Panel.............................................................................................. 54
4.4
Master Switch Unit ............................................................................................... 55
4.5
Mains Transformer ............................................................................................... 56
4.6
Manual Panel ....................................................................................................... 57
4.7
Intelligent Detector Backplanes ............................................................................ 57
4.8
Single Detector Backplane ................................................................................... 62
4.9
SLD4 Detector Cards ........................................................................................... 63
4.10 Loop Termination Cards ....................................................................................... 64
4.11 WiMag.................................................................................................................. 66
4.11.1
WiMag 3U Rack Kit (19”) System ......................................................... 66
4.11.2
WiMag Loop Detector Replacement Card ............................................ 69
4.12 Detector Power and Ancillary Power .................................................................... 70
4.12.1
HPU Power for Detectors ..................................................................... 70
4.12.2
Two Amp Ancillary Power Supply ......................................................... 71
4.12.3
Six Amp Ancillary Power Supply........................................................... 72
4.13 Serial I/O Cards.................................................................................................... 73
4.14 Gemini2 ................................................................................................................ 75
4.15 Stratos Outstation ................................................................................................ 76
4.16 Regulatory Sign Connection................................................................................. 77
4.16.1
HPU Regulatory Sign Connection ........................................................ 77
4.16.2
Additional Regulatory Sign Connection ................................................ 78
4.17 Audible Supply Kit ................................................................................................ 80
4.18 Tactile Unit ........................................................................................................... 81
4.18.1
None Switched Tactiles ........................................................................ 81
4.18.2
Switched Tactiles ................................................................................. 81
4.19 Solar Cell Kit of Parts ........................................................................................... 82
4.20 ST950ELV Parts Listing ....................................................................................... 82
Contact with Technical Support ....................................................................................... 83
Security classification
Unrestricted
Version
2
Last Editor
Harry Smyth
Document Name
Configuration Control
Copyright © Mobility 2014. All Rights Reserved.
Page
4 of 83
Status
Released
Date
09/12/2014
Document No.
667/CC/45950/000
Mobility is a division of Siemens Plc
Mobility and Logistics, Traffic Solutions
Sopers Lane, Poole, Dorset, BH17 7ER
Figure 1 - ST950 Controller overview .................................................................................. 14
Figure 2 - ST950 Rack Assembly ........................................................................................ 15
Figure 3 – CPU I/O Card ..................................................................................................... 17
Figure 4 – Rotated view of the ST950 Termination Panel ................................................... 19
Figure 5 – Master Switch Assembly .................................................................................... 20
Figure 6 – ST950LED Dimming Transformer ...................................................................... 21
Figure 7 – ST950 Manual Panel.......................................................................................... 22
Figure 8 – ST950 – Swing Frame layout ............................................................................. 24
Figure 9 – IDB Serial Connection ........................................................................................ 25
Figure 10 – Single Back Plane wiring positions ................................................................... 26
Figure 11 – Single Detector Backplane Connection Scheme .............................................. 26
Figure 12 – Ordering Sequence for Detector Back Planes and Detector Cards................... 27
Figure 13 – Loop Termination I/O Positions ........................................................................ 28
Figure 14 – Loop Termination I/O Positions ........................................................................ 29
Figure 15 – Loop Termination I/O Positions ........................................................................ 30
Figure 16 - Flow chart LV Controller I/O and Loop termination PAC Allocation Rules ......... 31
Figure 17 – Loop Termination Card..................................................................................... 32
Figure 18 - WiMag Control Unit ........................................................................................... 33
Figure 19 – POE Unit .......................................................................................................... 34
Figure 20 – POE Unit
Figure 21 – POE Unit ................................................................. 34
Figure 22 – POE Unit .......................................................................................................... 34
Figure 23 – WiMag Backplane
Figure 24 – CPU Board ............................................. 35
Figure 25 – WiMag Tray...................................................................................................... 35
Figure 26 – Serial I/O Card ................................................................................................. 38
Figure 27 – I/O Card Position Allocation.............................................................................. 39
Figure 28 - Power for Gemini Unit ....................................................................................... 40
Figure 29 - Power for Stratos Outstation Unit ...................................................................... 41
Figure 30 - ST950 Side Panel ............................................................................................. 43
Figure 31 -ST950LV Side Panel View ................................................................................. 44
Figure 31 – ST950ELV........................................................................................................ 48
Figure 32 –ST950ELV Rack Assembly ............................................................................... 49
Figure 33 – CPU I/O Card ................................................................................................... 50
Figure 34 – ST950ELV LSLS, HPU Selection ..................................................................... 51
Figure 35 –ST950ELV LSLS Positioning ............................................................................. 52
Figure 36 - ST950ELV Back Panel...................................................................................... 54
Figure 37 – ST950 Master Switch Assembly ....................................................................... 55
Figure 38 – ST950 HPU and Transformer
Figure 39 – SKT3 ....................................... 56
Figure 40 – ST950 Manual Panel........................................................................................ 57
Figure 41- IDB Optimisation ................................................................................................ 58
Figure 42 – IDB Optimisation .............................................................................................. 58
Figure 43 - IDB Optimisation ............................................................................................... 59
Figure 44 – IDB Optimisation .............................................................................................. 59
Figure 45 – IDB Optimisation .............................................................................................. 60
Figure 46 – IDB Serial Connection ...................................................................................... 61
Figure 47 – Single Detector Backplane ............................................................................... 62
Figure 48 – Single Detector Backplane connections ........................................................... 62
Security classification
Unrestricted
Version
2
Last Editor
Harry Smyth
Document Name
Configuration Control
Copyright © Mobility 2014. All Rights Reserved.
Page
5 of 83
Status
Released
Date
09/12/2014
Document No.
667/CC/45950/000
Mobility is a division of Siemens Plc
Mobility and Logistics, Traffic Solutions
Sopers Lane, Poole, Dorset, BH17 7ER
Figure 49 – IDB Optimisation .............................................................................................. 63
Figure 50 – Loop Termination Card Optimisation ................................................................ 64
Figure 51 - WiMag .............................................................................................................. 66
Figure 52 - WiMag .............................................................................................................. 66
Figure 53 – POE Unit .......................................................................................................... 67
Figure 54 – POE Unit
Figure 55 – POE Unit ................................................................... 67
Figure 56 – POE Unit .......................................................................................................... 67
Figure 57 – WiMag Backplane
Figure 58 – CPU Card .................................................. 68
Figure 59 – WiMag Tray
60 – Master Switch Unit ...................................................... 68
Figure 61 – HPU Detector Power ........................................................................................ 70
Figure 62 – Detector Power ................................................................................................ 70
Figure 63 – Detector Power
Figure 64 –Detector Power .............................................. 71
Figure 65 – Detector Power ................................................................................................ 71
Figure 66 – Detector Power
Figure 67 – Detector Power ................................................ 72
Figure 68 – Detector Power ................................................................................................ 72
Figure 69 – Serial I/O Card ................................................................................................. 73
Figure 70 – I/O Serial Card Optimisation ............................................................................. 74
Figure 72 – Gemini Connections ......................................................................................... 75
Figure 73 - Power for Stratos Outstation Unit ...................................................................... 76
Figure 74 – HPU Connections............................................................................................. 77
Figure 75 – Additional Reg Sign Power ............................................................................... 78
Figure 76 – Additional Reg Sign
Figure 77 – Additional Reg Sign ................................. 78
Figure 78 – LSLS Monitoring Connections .......................................................................... 79
Figure 79 - Audible Supply Kit ............................................................................................. 80
Figure 80 – Non Switch Tactile ........................................................................................... 81
Figure 81 – Switched Tactile ............................................................................................... 81
Table 1 – ST950 Outercase Selection ................................................................................. 14
Table 2 – Serial Link Connections ....................................................................................... 18
Table 3 – Parts Listing ........................................................................................................ 45
Table 4 – ST950ELV Outercase Selection .......................................................................... 47
Table 5 – Serial Link Connections ....................................................................................... 50
Table 6 – HPU Load Distribution ......................................................................................... 53
Security classification
Unrestricted
Version
2
Last Editor
Harry Smyth
Document Name
Configuration Control
Copyright © Mobility 2014. All Rights Reserved.
Page
6 of 83
Status
Released
Date
09/12/2014
Document No.
667/CC/45950/000
Mobility is a division of Siemens Plc
Mobility and Logistics, Traffic Solutions
Sopers Lane, Poole, Dorset, BH17 7ER
1
INTRODUCTION
1.1 Purpose
This ST950 Family Controller Configuration Document is designed to provide general
guidelines to Field Service Controller Configuration Engineers when configuring
controllers, at both controller requisition time and at final assembly in depots. Additionally,
the document will assist in the manufacture of controllers; including final factory build and
subsequent confirmation, prior to delivery to Field Service.
Ongoing development means that some of the delivered items may differ
in detail from the photographs included in this handbook.
1.2 Scope
This document describes the configuration of the two base units within the ST950 family
of controllers; ST950 mains controller, referred to as the ST900LV and ST950 48V
controller referred to as the ST900ELV. The ST950LED controller is sufficiently like the
ST900LV controller to allow its configuration to be described in this handbook, in the
ST900LV sections. Where necessary the configuration particular to the ST900LED is
detailed.
The configuration of export controllers is not detailed by this document. The ordering and
configuration of Cuckoo unit is not detailed in this document.
Security classification
Unrestricted
Version
2
Last Editor
Harry Smyth
Document Name
Configuration Control
Copyright © Mobility 2014. All Rights Reserved.
Page
7 of 83
Status
Released
Date
09/12/2014
Document No.
667/CC/45950/000
Mobility is a division of Siemens Plc
Mobility and Logistics, Traffic Solutions
Sopers Lane, Poole, Dorset, BH17 7ER
1.3 Related Documentation
Document Number
Document Title
667/LM/55000/000
Controller Ordering Form
667/HE/46950/000
Installation, Commissioning and Maintenance Handbook for the
ST950 Controller
667/HE/45950/000
Installation, Commissioning and Maintenance Handbook for the
ST950ELV Controller
667/HH/46000/000
ST950 Controller Handset Handbook
667/RE/29050/000
Siemens OID Elexon Codes
667/HB/47200/000
WiMag Vehicle Detection System General Handbook
667/GA/27087/000
Equipment Mounting Frame Assembly
667/DZ/30600/000
Gemini Family Tree
667/DZ/52250/ETC
Stratos Outstation Family Tree
667/GA/27006/000
Audible Supply Kit
667/GA/20292/008
24VAC 160VA Supply
667/GA/27067/000
Additional Panel Assembly
667/HB/46000/001
ST950 Facilities Handbook
667/GA/27006/000
Audible Supply kit
Security classification
Unrestricted
Version
2
Last Editor
Harry Smyth
Document Name
Configuration Control
Copyright © Mobility 2014. All Rights Reserved.
Page
8 of 83
Status
Released
Date
09/12/2014
Document No.
667/CC/45950/000
Mobility is a division of Siemens Plc
Mobility and Logistics, Traffic Solutions
Sopers Lane, Poole, Dorset, BH17 7ER
1.4 Pre-Requisites for Field Service Operative
1.4.1 Qualifications
Only skilled or instructed personnel with relevant technical knowledge and experience, who
are also familiar with the safety procedures required when dealing with modern
electrical/electronic equipment, are to be allowed to use and/or work on the equipment. All
work shall be performed in accordance with the Electricity at Work Regulations 1989 or the
relevant local, state and government regulations.
Any personnel working on an ST950 Controller should have completed the following training
courses:
HA Sector Scheme Sector 8 Modules 5XX
M609 – Junction Traffic Controller Maintenance for ST950 ELV, and/or
M609 – Junction Traffic Controller Maintenance for ST950 LV
M703 – IC4 Configuration
Training requirements for non UK users may be different.
1.4.2 Required Tools
In addition to a standard Engineer’s tool kit, the following tools are required when carrying
out any work on the ST900 Controller:
Description
Part Number
Netbook kit
667/1/32380/000
USB cable - standard A Plug to B Plug
Generic
T-bar key
667/2/20234/000
S-18 key – Main Cabinet or
4/MC 289
Serial handset Techterm, or
667/4/13296/001
Old Oyster handset, or
667/4/13296/000
Larger Screened Oyster handset
667/4/13296/002
Manual Panel key Type 900
667/4/13651/000
Security classification
Unrestricted
Version
2
Last Editor
Harry Smyth
Document Name
Configuration Control
Copyright © Mobility 2014. All Rights Reserved.
Page
9 of 83
Status
Released
Date
09/12/2014
Document No.
667/CC/45950/000
Mobility is a division of Siemens Plc
Mobility and Logistics, Traffic Solutions
Sopers Lane, Poole, Dorset, BH17 7ER
1.5 Abbreviations and Definitions
Abbreviation Definition
AC
Alternating Current
CLF
Cableless Linking Facility
CLS
Central Light Source
CPU
Central Processing Unit
DC
Direct Current
DFM
Detector Fault Monitor
ELV
Extra Low Voltage
FT
Fixed Time
GSPI
General Serial Peripheral Interface
GPS
Global Positioning System
HPU
High Power Unit (for ELV Controllers)
I/O
Input/Output
IC4
Intersection Configurator version 4 (UK controller configuration
application)
IRM
Integral Remote Monitoring
LED
Light Emitting Diode
LMF
Lamp Monitor Facility
LPU
Logic Power Unit
LRT
Light Rail Transit
LSLS
Lamp Switch Low-Voltage Serial
LV
Low Voltage (Mains)
mA
milliamps
MDU
Mains Distribution Unit (for Mains Controllers; not ELV)
MOVA
Microprocessor Optimised Vehicle Actuation
ms
milliseconds
MTCS
Master Time Clock System
NTP
Network Time Protocol
OMU
Outstation Monitor Unit
OTU
Outstation Transmission Unit
PCB
Printed Circuit Board
RAM
Random Access Memory
RFL
Reset Fault Log (Handset Command)
RLM
Red Lamp Monitoring
Security classification
Unrestricted
Version
2
Last Editor
Harry Smyth
Document Name
Configuration Control
Copyright © Mobility 2014. All Rights Reserved.
Page
10 of 83
Status
Released
Date
09/12/2014
Document No.
667/CC/45950/000
Mobility is a division of Siemens Plc
Mobility and Logistics, Traffic Solutions
Sopers Lane, Poole, Dorset, BH17 7ER
rms
Root Mean Square
ROW
Right Of Way
SDE
Speed Discrimination Equipment
SDE/SA
Speed Discrimination Equipment / Speed Assessment
SVD
Selective Vehicle Detector
UTC
Urban Traffic Control
VA
Vehicle Actuated
wrt
With Respect To
IDB
Intelligent Detector Backplane
Security classification
Unrestricted
Version
2
Last Editor
Harry Smyth
Document Name
Configuration Control
Copyright © Mobility 2014. All Rights Reserved.
Page
11 of 83
Status
Released
Date
09/12/2014
Document No.
667/CC/45950/000
Mobility is a division of Siemens Plc
Mobility and Logistics, Traffic Solutions
Sopers Lane, Poole, Dorset, BH17 7ER
2
ST950 FAMILY OF CONTROLLERS SYSTEM OVERVIEW
The Siemens ST950 Controller family is the latest in a long line of highly integrated
traffic controllers.
The ST950 family of controllers can be supplied either in a single-door outer case with
a 6U logic rack and equipment mounting frame or as a free-standing logic rack housing
the power supply, CPU Card and Lamp Switch cards.
The main features of the ST950 family are:
Conforms to the UK Highways Agency specification TR2500
32 phases, 32 stages.
8 streams.
8 maximum green sets.
8 hurry calls which are in priority order.
8 uni-directional detector loop units.
Multi-mode operation with stage ripple change facility for improved intersection
capacity.
Fully integrated Light Rapid Transport (LRT) mode for use at Tram / Road
intersections.
Fully configurable lamp sequences for worldwide application.
Fully integral and configurable lamp monitoring of both incandescent and LED signals.
Flexible part-time and start-up modes, allowing any stream to be sent in and out of
part-time mode without affecting any others.
Cableless linking (Plan) facility with sophisticated plan timetables and 32 plan groups.
Event timetable which supports actions based on 32 independent events with easy
programming.
Time system with full date details – automatically time synchronised to central system
where the controller linked to Siemens UTMC central system.
Date stamped rolling log providing detailed history of events and faults, coupled with
improved presentation to aid recognition of entries.
Uncomplicated web browser user interface capable of multi-language support
Support for up to 240 I/O lines via I/O cards and Intelligent Detector Backplanes
RS232 and USB interfaces for handset, modem and GPS
The essential differences between the ST900 and the new ST950 family of controllers
are:
Security classification
Unrestricted
Version
2
Last Editor
Harry Smyth
Document Name
Configuration Control
Copyright © Mobility 2014. All Rights Reserved.
Page
12 of 83
Status
Released
Date
09/12/2014
Document No.
667/CC/45950/000
Mobility is a division of Siemens Plc
Mobility and Logistics, Traffic Solutions
Sopers Lane, Poole, Dorset, BH17 7ER
New CPU Card providing additional functionality and interfaces
Improved user interfaces including web pages
I/O card firmware can be updated in-situ.
Support for existing ST900 equipment such as Gemini and Gemini2
Integral MOVA7 and OTU functionality options
Removable Storage device contains junction specific data allowing fast repair by card
replacement and storage device transfer
Extended features licensed through encrypted license card
Integrated Ethernet interface
USB interfaces for handset, memory devices, and license card readers
The ST800/ST900 Extended System Bus interface is no longer provided on the ST950
which means that the IRM, OTU Card, SDE/SA Card no longer supported
3
ST950 HARDWARE ALLOCATIONS AND CONNECTIVITY
3.1 ST950 Outercase Selections
With reference to Table 1 the ST950 is supplied in a single door large Outercase. The main
functional cards are house in a Rack Assembly which is mounted in a swing frame. The
Rack Assembly forms the base functional unit for the entire controller and can be ordered as
a standalone unit, known as a Cuckoo Unit. Cuckoo Units may be fitted to a number of
different third part cabinets. More often the Rack Assembly will form part of a fully functional
controller. With knowledge of the load, phases, stages, and lanterns to be served, the
following notes will allow configuration engineers to populate a ST950 Low Voltage
Controller with the appropriate components. Note the ST950 low voltage controller may be
referred to as the ST950LV in this document.
It will be recognised that certain components within the ST950 low voltage controller are
standard items, required to make a controller a basic functioning unit and service additional
configurable components. When a controller is ordered it will contain these standard items. A
list of these standard items is set out below.
Please note, to assist configuration engineers in their choice of Outercase the relationship
between Outercase, MDU and Lamp Switch Cards in the ST950LV is detailed in section 3.2,
ST950 Rack Assembly.
Standard Items Included in controller cabinet, chosen from Table 1
Mains Transformer
Master Switch Assembly
Termination Panel
One Lamp Switch Card
Mains Distribution Unit
19"Swing Frame with Rack Assembly
Manual Panel
Security classification
Unrestricted
Version
2
Last Editor
Harry Smyth
Document Name
Configuration Control
Copyright © Mobility 2014. All Rights Reserved.
Page
13 of 83
Status
Released
Date
09/12/2014
Document No.
667/CC/45950/000
Mobility is a division of Siemens Plc
Mobility and Logistics, Traffic Solutions
Sopers Lane, Poole, Dorset, BH17 7ER
Table 1 – ST950 Outercase Selection
Part Number
Description
667/1/46950/010
ST950 Cabinet UK 1.5KVA 8ph wired 8ph - Grey
667/1/46950/011
ST900 Cabinet UK 1.5KVA 8ph wired 8ph - Black
667/1/46950/018
ST950 Cabinet UK 0.5KVA 8ph wired - Grey
667/1/46950/019
ST950 Cabinet UK LED 0.5KVA 8ph wired - Black
667/1/46950/020
ST950 Cabinet UK 3.0KVA 24ph wired - Grey
667/1/46950/021
ST950 Cabinet UK 3.0KVA 24ph - Black
667/1/46950/028
ST950 Cabinet UK LED 0.5KVA 24ph wired - Grey
667/1/46950/029
ST950 Cabinet LED 0.5KVA 24ph wired - Black
Figure 1 - ST950 Controller overview
Security classification
Unrestricted
Version
2
Last Editor
Harry Smyth
Document Name
Configuration Control
Copyright © Mobility 2014. All Rights Reserved.
Page
14 of 83
Status
Released
Date
09/12/2014
Document No.
667/CC/45950/000
Mobility is a division of Siemens Plc
Mobility and Logistics, Traffic Solutions
Sopers Lane, Poole, Dorset, BH17 7ER
3.2 Rack Assembly
3.2.1 Rack Assembly Mounting Position
The ST950 Outercase is configured with a 19 inch swing frame, to which the ST950 Rack
Assembly is mounted. The Rack Assembly will be positioned in the Swing Frame as shown
in Figure 1. Information on exact positioning of the ST950 Rack Assembly should be sought
from manufacturing drawing detailed in the related document section of this handbook. The
ST950 Rack Assembly should not be ordered separately as it is included in the Outercase,
ordered from Table 1. The components mounted within the ST950 Rack Assembly are
shown in Figure 2.
Figure 2 - ST950 Rack Assembly
Please Note, Figure 2 shows the ST950 Rack Assembly with ST950LED Components. The
ST950LV Rack Assembly components appear in the same positions.
Security classification
Unrestricted
Version
2
Last Editor
Harry Smyth
Document Name
Configuration Control
Copyright © Mobility 2014. All Rights Reserved.
Page
15 of 83
Status
Released
Date
09/12/2014
Document No.
667/CC/45950/000
Mobility is a division of Siemens Plc
Mobility and Logistics, Traffic Solutions
Sopers Lane, Poole, Dorset, BH17 7ER
3.2.2 Mains Distribution Unit
The Mains Distribution Unit should not be ordered separately as it is included in the Rack
Assembly, which in turn is part of the Outercase, selected from Table 1. Configuration
Engineers should calculate the load anticipated and select the appropriate Outercase.
Please refer to the ST950 General Handbook for information on calculating controller loads.
The necessary Mains Distribution Unit will be fitted to the controller to accommodate the
required load. All variants of the Mains Distribution Unit contain the Dim/Bright, Relay A,
Relay B and SSR Relay. It also provides the Logic Power Supply, which supplies +5VDC
and +24VDC to the cards in the ST950 Rack Assembly. Incorporated onto the Mains
Distribution unit are two 5A power supply sockets, for use with test equipment. A 10 Amp
regulatory fuse is provided at the Mains Distribution Unit to provide a separate power supply
for sign equipment.
ST950LED
Configuration Engineers should note that the Mains Distribution Unit fitted to the ST950LED
is a modified version of the Mains Distribution Unit fitted to the ST950 Low Voltage
Controller.
3.2.3 Lamp Switch Cards
The Lamp Switch Cards provide the necessary phase output drive for the signal lanterns.
Please refer to Figure 2, which shows typical positioning of Lamp Switch Cards. Termination
strips are mounted to the termination panel, at the rear of the controller, to provide the
necessary connections, so the phase outputs can be distributed to street equipment. Each
Lamp Switch Card is capable of driving 8 distinct phases. The number of Lamp Switch cards
required in the Rack Assembly will be determined by junction configuration and load. Please
consult the ST950 General handbook for advice on calculation loads. Correlation between
the actual hardware mounted to a controller and the Processor’s knowledge of equipment
mounted in a controller is determined in the Configuration Programming Tool IC4.
Configuration Engineers should be fully trained in the use of IC4 in order to configure the
ST950 Controller.
The maximum number of Lamp Switch Cards that can be fitted to the ST950 Controller is
four, providing a potential to drive 32 separate phase outputs. Controller will be wired, at
manufacture, to accommodate the number of Lamp Switch Cards indicated in the table 1
description. The 8 phase wired controllers chose from Table 1 will be configured with one
Lamp Switch Card. The 24 phase wired controllers chose from Table 1 will be configured
with three Lamp Switch Cards. Additional Lamp Switch Cards and associated wiring should
be specified. Please refer to the part listing for these items. Information on routing of looms
and termination of connections should be sought from manufacturing diagrams. With
reference to Figure 2, Lamps Switch Cards occupy specified positions in the Rack
Assembly. The selection of the Outercase from Table 1, in addition to determining the
wiring, number of Lamp Switch Cards and the amount of current available to be drawn by
street equipment also determines the type of Lamp Switch Cards fitted to a controller. Lamp
Switch Cards fitted to the LED controller are specifically designed to operate in conjunction
with and monitor LED CLS NLM signal heads. Controllers without the LED designation
operate and monitor LED signal heads equipped with LMF modules. Further information on
controller selection should be sought from the ST950 Controller General Handbook.
Security classification
Unrestricted
Version
2
Last Editor
Harry Smyth
Document Name
Configuration Control
Copyright © Mobility 2014. All Rights Reserved.
Page
16 of 83
Status
Released
Date
09/12/2014
Document No.
667/CC/45950/000
Mobility is a division of Siemens Plc
Mobility and Logistics, Traffic Solutions
Sopers Lane, Poole, Dorset, BH17 7ER
3.2.4 ST950 CPU Card
The ST950 CPU Card will be mounted to a designated position in the Rack Assembly, as
shown in Figure 2. The CPU Card is holds the controller configuration and performs the
function of configuration, control and management. The main external data interfaces of the
CPU Card are:
Interface to Lamp Switch Cards
Serial Interfaces (GSPI) to IO Cards and Intelligent Detector Backplanes
Manual Panel
RS232 interface to handset, Gemini2 or Stratos Outstation
USB interfaces
Ethernet Interface
3.2.5 CPU I/O Card
The ST950 Controller can be equipped with additional Input/Output cards, remote from the
CPU card. However, the ST950 can also be equipped with a CPU I/O Card, mounted in a
daughter board arrangement on the CPU Card. Please refer to Figure 3.
Figure 3 – CPU I/O Card
The CPU Card I/O is not supplied in the Outercase chosen from Table 1, it is ONLY
supplied with specific Cuckoo kits as an option. Ultimately, all I/O signals are returned to /
derived from the ST950 Processor. The ST950 CPU Card, CPU I/O card, and other
components described later in this handbook (I/O cards on the termination panel and
Intelligent back planes) communicate via a GSPI serial interface. The serial communication
is carried out over Cat5e cable. The serial Link relies on addressing techniques to ensure
that the appropriate information is delivered to the correct component. The order of the serial
link connections does not influence the operation of the serial link. However, for purposes of
consistency the order of connection set out in Table 2 should be used. When a component
is not fitted the serial link continued onto the next component in the sequence.
Security classification
Unrestricted
Version
2
Last Editor
Harry Smyth
Document Name
Configuration Control
Copyright © Mobility 2014. All Rights Reserved.
Page
17 of 83
Status
Released
Date
09/12/2014
Document No.
667/CC/45950/000
Mobility is a division of Siemens Plc
Mobility and Logistics, Traffic Solutions
Sopers Lane, Poole, Dorset, BH17 7ER
Table 2 – Serial Link Connections
Component
Input
Output
CPU card
Serial link derived from RJ45 Serial Link Output
CPU card
Socket
CPU I/O Card
RJ45 Serial Link Input
RJ45 Serial Link Output
Termination Panel Upper RJ45 Serial Link Input
I/O Card
RJ45 Serial Link Output
Termination Panel Lower RJ45 Serial Link Input
I/O Card
RJ45 Serial Link Output
First Intelligent
Backplane
Detector RJ45 Serial Link Input
RJ45 Serial Link Output
Second Intelligent Detector RJ45 Serial Link Input
Backplane
RJ45 Serial Link Output
3.3 Termination Panel
With reference to Figure 4 the mounting of both standard equipment and optional equipment
to a Controller is achieved using Termination Panels. One Termination Panel is fitted to the
1.5KVA 8ph wired version of the ST950 and two are fitted to the 3.0KVA 24ph wired version
of the ST950 controller. The Termination Panels do not need to be ordered separately as
they are contained within the Outercase, selected from Table 1. When upgrading a controller
from 1.5KVA to 3.0KVA Configuration Engineers should consult the parts listing for
additional Termination Panels. Termination panels will be positioned centrally at the rear of
the ST950 cabinet, one above the other when two panels are fitted. Certain large items have
designated positions within the controller, others are subject to optimisation. For this reason
some items may vary slightly in position, from one controller to another. Termination panels
have stencilled graphics to assist in the positioning of equipment.
Security classification
Unrestricted
Version
2
Last Editor
Harry Smyth
Document Name
Configuration Control
Copyright © Mobility 2014. All Rights Reserved.
Page
18 of 83
Status
Released
Date
09/12/2014
Document No.
667/CC/45950/000
Mobility is a division of Siemens Plc
Mobility and Logistics, Traffic Solutions
Sopers Lane, Poole, Dorset, BH17 7ER
Figure 4 – Rotated view of the ST950 Termination Panel
Security classification
Unrestricted
Version
2
Last Editor
Harry Smyth
Document Name
Configuration Control
Copyright © Mobility 2014. All Rights Reserved.
Page
19 of 83
Status
Released
Date
09/12/2014
Document No.
667/CC/45950/000
Mobility is a division of Siemens Plc
Mobility and Logistics, Traffic Solutions
Sopers Lane, Poole, Dorset, BH17 7ER
3.4 Master Switch Assembly
The Master Switch Assembly forms part of the Outercase, chosen from Table 1 and
therefore should not be ordered separately. As shown in Figure 2 the Master Switch
Assembly occupies a position in the bottom right hand corner of the ST950 Controller.
With reference to Figure 5, the mains supply voltage is applied to the main ON/OFF 63A
Switch, within the Master Switch Assembly, for onward supply to the ST950 Traffic
Controller.
The live connection is taken from the main ON/OFF 63A Switch and applied to a 45A main
controller fuse unit; the neutral is applied to a neutral terminal. The output from the fuse unit
is applied to a mains filter, as shown in Figure 5, for onward distribution to the Mains
Distribution Unit.
The ST950 LED has a modified Master switch assembly with a Master fuse rating of 20A
this must not be replaced by a fuse of larger rating.
An additional output is taken from the main fuse unit and supplied a 6A Mini Circuit
Breakers. This additional mini circuit breaker provides a controller working supply, typically
utilised to provide power to an OTU.
The neutral connection for the mains filter unit is taken from the neutral terminal, also
detailed in Figure 5.
Figure 5 – Master Switch Assembly
Mains
Filter
Main
Controller
Fuse unit
Neutral
Terminal
6A Mini
Circuit
Breaker
63A Mains
ON/OFF
switch
Security classification
Unrestricted
Version
2
Last Editor
Harry Smyth
Document Name
Configuration Control
Copyright © Mobility 2014. All Rights Reserved.
Page
20 of 83
Status
Released
Date
09/12/2014
Document No.
667/CC/45950/000
Mobility is a division of Siemens Plc
Mobility and Logistics, Traffic Solutions
Sopers Lane, Poole, Dorset, BH17 7ER
3.5 Dimming Transformer
The dimming transformer for the ST950 is so called because it provides the necessary drive
to the MDU for onward delivery to the Lamp Switch cards. The appropriate transformer will
be contained with the Outercase, specified in Table 1 and should not be ordered separately.
Full details on the procedure for load calculation should be sought form the ST950 General
Handbook.
On those occasions when a 1.5KVA ST950 Outercase is specified the appropriate
transformer will be configured. Similarly, when a 3.0KVA 24ph wired Outercase is specified
the necessary dimming transformer will be configured to the controller.
ST950LED
Note, the ST950 LED has a single variant of dimming transformer rated at 500VA
The Dimming Transformers will occupy a position in the bottom left hand corner of the
controller. Figure 6 shows the transformer fitted to the ST950 cabinet.
To accommodate different input voltage to the Dimming Transformer mains input can be
applied to the Dimming Transformer at the appropriate terminals. Please refer to the ST950
General Handbook for full information.
Figure 6 – ST950LED Dimming Transformer
Security classification
Unrestricted
Version
2
Last Editor
Harry Smyth
Document Name
Configuration Control
Copyright © Mobility 2014. All Rights Reserved.
Page
21 of 83
Status
Released
Date
09/12/2014
Document No.
667/CC/45950/000
Mobility is a division of Siemens Plc
Mobility and Logistics, Traffic Solutions
Sopers Lane, Poole, Dorset, BH17 7ER
3.6 The Manual Panel
The Manual Panel is contained within a secure compartment in the top left hand corner of
the controller cabinet. Access to the manual panel may be gained via the manual panel
access door or by opening the controller cabinet main door. The manual panel forms part of
the Outercase, chosen from Table 1, and therefore should not be specified separately.
The detector fault monitoring LED indicator is repeated from the manual panel to the outer
case by the use of a lens. The lens kit and should be ordered separately, if the unit is
required. Please refer to the parts listing for this item
Instruction on the fitting of the DFM Lens kit should be sought from drawing No.
667/CH/27104/000.
The 34 way ribbon cable from manual panel connects into socket PL3 on the CPU Card;
marked Manual Panel.
Figure 7 – ST950 Manual Panel
Security classification
Unrestricted
Version
2
Last Editor
Harry Smyth
Document Name
Configuration Control
Copyright © Mobility 2014. All Rights Reserved.
Page
22 of 83
Status
Released
Date
09/12/2014
Document No.
667/CC/45950/000
Mobility is a division of Siemens Plc
Mobility and Logistics, Traffic Solutions
Sopers Lane, Poole, Dorset, BH17 7ER
3.7 Intelligent Detector Backplanes
Intelligent Detector Backplanes do not form part of the base Controller Cabinet and therefore
should be specified separately. Each Intelligent Detector accommodates four SDL4 Cards.
Notes on the SLD4 Detector Cards are provided later in this document. Figure 12 provides a
listing of required components when selecting the Intelligent Detector Backplanes and
accompanying SLD4 cards. Please also refer to the parts list for these items.
With reference to Figure 8 and drawing 667/GA/27087/000, Intelligent Detector Backplanes
and associated SLD4 Detector Cards are fitted into 19” Racks Kits. As the numbers of
Intelligent Detector Backplanes increase the number of 19” Racks Kits required will increase.
Unless otherwise stated, in a work specification, the first 19” Rack Kit will be fitted to the 19”
Swing Frame below the Controller Rack Assembly. The first three Intelligent Detector
Backplanes will be fitted to this 19” Rack Kit. If more than three Intelligent Detector
Backplanes are required a second 19” Rack kit should be specified, which will be fitted
below the first 19” Rack Kit. The Intelligent Detector Backplane 4, 5 and 6 will be fitted to this
second 19” Rack kit. For further information on the inter-relationship between Intelligent
Detector Backplanes, SDL4 Cards, Processor Card and I/O Cards please consult the ST950
General Handbook. The area above the Rack Assembly in the 19” Swing Frame is
designated as the area for fitting a 19” Rack Kit, to mount a Gemini or Stratos Outstation
Unit (further information on the Gemini Unit or Stratos Outstation is provided later in this
document). With further reference to Figure 8, the Gemini or Stratos Outstation will be fitted
on the right hand side of a 19” Rack Kit, viewed from the front of the 19” Swing Frame.
Configuration Engineers should note when referencing the cases below that an Infrared
communications link provides automatic set-up between SLD4 cards. This link operates
horizontally but not vertically. To provide this link between vertically mounted SLD4 cards a
link cable should be fitted between Intelligent Detector Backplane on associated horizontal
levels. Please refer to parts listing for link cable. Please also refer to Figure 9 which shows
the required link.
Important Note
Configuration Engineers should read the notes in the WiMag section regarding
Backplane positioning. Important information on the relationship between SDL4
Cards, the Infrared communication link between SLD4 cards and the restrictions this
communication technique has on the positioning of SLD4 Cards is contained in the
that section.
Communications between CPU Card and Intelligent Detector Backplanes are carried out via
GSPI serial link, using Cat5e cable/RJ45 connector. The GSPI serial link communication
protocol relies on addressing techniques to ensure the appropriate information is delivered to
the intended component. This means that the order in which the components are connected
to the link is not imperative to successful communications. However, to maintain consistence
build configuration the sequence of connections set out in Table 2 should be used.
With reference to Figure 9, power is provided to the Intelligent Detector Backplanes from the
Detector Power Supply Kit. Additional power can be provided for Intelligent Detector
Backplanes, refer to paragraph 3.12.
Loop activation signals are passed to the Intelligent Detector Backplanes from the Loop
Terminal Card via PL8. Refer to paragraph 3.10 for information on Loop Termination Cards.
Security classification
Unrestricted
Version
2
Last Editor
Harry Smyth
Document Name
Configuration Control
Copyright © Mobility 2014. All Rights Reserved.
Page
23 of 83
Status
Released
Date
09/12/2014
Document No.
667/CC/45950/000
Mobility is a division of Siemens Plc
Mobility and Logistics, Traffic Solutions
Sopers Lane, Poole, Dorset, BH17 7ER
Figure 8 – ST950 – Swing Frame layout
Gemini2 Unit
or
Stratos Outstation
UTMC OTU 19" x 5U Rack
19" Rack Kit for
Gemini Unit
or
Stratos Outstation
Controller
Rack
Assembly
19" Swing Frame
1
2
3
4
5
6
7
8
9
10 11 12
Intelligent backplane 1, 2, 3
LTB 1
X
Intelligent Detector backplane
4 and 5
X
X
LTB X
LTB 2
X
X
X
X
LTB 3
X
LTB X
1st detector rack
is below the
controller rack
Assembly
Further detector
rack fitted to
667/GA/27087/
000
WiMag Communications
Rack Assembly
See drawing 667/GA/27087/000
Populate further racks, from left to right (viewed from front) in a similar patter
Security classification
Unrestricted
Version
2
Last Editor
Harry Smyth
Document Name
Configuration Control
Copyright © Mobility 2014. All Rights Reserved.
Page
24 of 83
Status
Released
Date
09/12/2014
Document No.
667/CC/45950/000
Mobility is a division of Siemens Plc
Mobility and Logistics, Traffic Solutions
Sopers Lane, Poole, Dorset, BH17 7ER
Figure 9 shows the connections of the serial link to the first Intelligent Detector Backplane.
The sequence of connection set out in Table 2 should be followed. The GSPI serial link is
connected from the first Intelligent Detector Backplane OUT socket into the second
Intelligent Detector Backplane IN socket. This sequence of connections should be followed
for connection between first Intelligent Detector Backplanes and the final Intelligent Detector
Backplane. Please also note that a separate infrared connection is required for SLD4
automatic set-up. This link operates horizontally and therefore SLD4 cards must be mounted
alongside each other to communicate in this fashion. Please refer to Figure 9 which shows
the required connection to continue this infrared link vertically.
Figure 9 – IDB Serial Connection
Serial I/O
Address
Switch
Fast Serial
Link to next
Intelligent
Detector
Backplane
Detector
Power IN
Detector
Power OUT
to next
Intelligent
Detector
Backplane
Connection
from Loop
Termination
PCB PL8
Fast Serial
Link from
I/O card
Backplane
isolation fuse
View Intelligent Detector Backplane with comms PCB removed
Infrared Input
from previous
SLD4 in level
above
Infrared
Output to
next SLD4 in
level below
Security classification
Unrestricted
Version
2
Last Editor
Harry Smyth
Document Name
Configuration Control
Copyright © Mobility 2014. All Rights Reserved.
Page
25 of 83
Status
Released
Date
09/12/2014
Document No.
667/CC/45950/000
Mobility is a division of Siemens Plc
Mobility and Logistics, Traffic Solutions
Sopers Lane, Poole, Dorset, BH17 7ER
3.8 Single detector backplane
If preferred, Single Detector Backplane may be fitted to the ST900. Single Detector
Backplane do not form part of the Outercase, chosen form Table 1, and therefore should be
specified separately, The optimisation of the Single Detector Backplane follows the same
sequence of positioning as that detailed in section 3.7.
Power for the Single Detector Backplanes is obtained from Detector Power Supply Kit, as
detailed in paragraph 3.12. Please refer to Figure 10 and 11 for the Single Detector
Backplane connection scheme. Please also refer to the parts listing for this item.
Figure 10 – Single Back Plane wiring positions
Figure 11 – Single Detector Backplane Connection Scheme
Security classification
Unrestricted
Version
2
Last Editor
Harry Smyth
Document Name
Configuration Control
Copyright © Mobility 2014. All Rights Reserved.
Page
26 of 83
Status
Released
Date
09/12/2014
Document No.
667/CC/45950/000
Mobility is a division of Siemens Plc
Mobility and Logistics, Traffic Solutions
Sopers Lane, Poole, Dorset, BH17 7ER
3.9 SLD4 Detector Cards
As detailed in previous section SLD4 detector cards are inserted into Intelligent Detector
Backplanes. Each Intelligent Detector Backplane will accommodate four SDL4 Detector
Cards. The SDL4 Detector Cards have an infrared facility to communicate with each other;
this allows automatic setup. The infrared beam travels horizontally between SLD4 cards and
therefore only those SLD4 cards that are mounted alongside each other can utilise this
infrared communications technique. Communications between SLD4 Cards mounted
vertically, with respect each other must be connected using a link cable. Please refer to the
parts listing. Please also refer to Figure 9 which shows the required connection.
Figure 12 – Ordering Sequence for Detector Back Planes and Detector Cards
Important Note
Configuration Engineers should read the notes in the WiMag section regarding
Backplane positioning. Important information on the relationship between SDL4
Cards, the Infrared communication technique between SLD4 cards and the
restrictions this communication technique has on the positioning of Detector Cards is
contained in the that section.
Security classification
Unrestricted
Version
2
Last Editor
Harry Smyth
Document Name
Configuration Control
Copyright © Mobility 2014. All Rights Reserved.
Page
27 of 83
Status
Released
Date
09/12/2014
Document No.
667/CC/45950/000
Mobility is a division of Siemens Plc
Mobility and Logistics, Traffic Solutions
Sopers Lane, Poole, Dorset, BH17 7ER
3.10 Loop Termination Cards
The Loop Termination cards are contained within the Intelligent Detector Backplane Kits.
Please refer to the parts listing. Positions, set aside for the Loop Termination cards and I/O
cards, coincide to some degree and this conflict requires that attention be paid to
optimisation of these components. Figure 13 show the positioning of the loop termination
cards when one serial I/O cards is fitted. Figure 14 and 16 detail the sequence of Loop
Termination allocation when one, two, three and four I/O cards are fitted.
Figure 13 – Loop Termination I/O Positions
Panels 1 is always fitted
Card positions are silk screened LT 1 etc
Loop Termination Card 1 allocated to Panel 1, position LT1
Loop Termination Card 2 allocated to Panel 1, position LT2
Loop Termination Card
Loop Termination Card
Loop Termination Card
Loop Termination Card
Loop Termination Card
3 allocated to Panel 1, position LT4
4 allocated to Panel 1, position LT5
5 allocated to Panel 2, position LT1
6 allocated to Panel 2, position LT2
7 allocated to Panel 2, position LT4
Loop Termination Card 8 allocated to Panel 2, position LT5
Loop Termination Card 9 allocated to Panel 2, position LT3
Loop Termination Card 10 allocated to Panel 1, position LT3
Security classification
Unrestricted
Version
2
Last Editor
Harry Smyth
Document Name
Configuration Control
Copyright © Mobility 2014. All Rights Reserved.
Page
28 of 83
Status
Released
Date
09/12/2014
Document No.
667/CC/45950/000
Mobility is a division of Siemens Plc
Mobility and Logistics, Traffic Solutions
Sopers Lane, Poole, Dorset, BH17 7ER
Figure 14 – Loop Termination I/O Positions
Allocation Sequence Rules:
Panels 1 is always fitted
Card positions are silk screened LT 1 etc. With reference to Figure 14 the Loop Termination Boards
Should be allocated in the following order;
Loop Termination Card 1 allocated to Panel 1, position LT4
Loop Termination Card 2 allocated to Panel 1, position LT5
Loop Termination Card 3 allocated to Panel 2, position LT1
Loop Termination Card 4 allocated to Panel 2, position LT2
Loop Termination Card 5 allocated to Panel 2, position LT4
Loop Termination Card 6 allocated to Panel 2, position LT5
Loop Termination Card 7 allocated to Panel 2, position LT3
Loop Termination Card 8 allocated to Panel 1, position LT3
Positions LT1 and LT2 on Panel 1 can NOT be used.
Security classification
Unrestricted
Version
2
Last Editor
Harry Smyth
Document Name
Configuration Control
Copyright © Mobility 2014. All Rights Reserved.
Page
29 of 83
Status
Released
Date
09/12/2014
Document No.
667/CC/45950/000
Mobility is a division of Siemens Plc
Mobility and Logistics, Traffic Solutions
Sopers Lane, Poole, Dorset, BH17 7ER
Figure 15 – Loop Termination I/O Positions
Allocation Sequence Rules:
Panels 1 is always fitted
Card positions are silk screened LT 1 etc
Loop Termination Card 1 allocated to Panel 1, position LT4
Loop Termination Card 2 allocated to Panel 1, position LT5
Loop Termination Card 3 allocated to Panel 2, position LT4
Loop Termination Card 4 allocated to Panel 2, position LT5
Loop Termination Card 5 allocated to Panel 2, position LT3
Loop Termination Card 6 allocated to Panel 1, position LT3
Security classification
Unrestricted
Version
2
Last Editor
Harry Smyth
Document Name
Configuration Control
Copyright © Mobility 2014. All Rights Reserved.
Page
30 of 83
Status
Released
Date
09/12/2014
Document No.
667/CC/45950/000
Mobility is a division of Siemens Plc
Mobility and Logistics, Traffic Solutions
Sopers Lane, Poole, Dorset, BH17 7ER
Figure 16 - Flow chart LV Controller I/O and Loop termination PAC Allocation Rules
Security classification
Unrestricted
Version
2
Last Editor
Harry Smyth
Document Name
Configuration Control
Copyright © Mobility 2014. All Rights Reserved.
Page
31 of 83
Status
Released
Date
09/12/2014
Document No.
667/CC/45950/000
Mobility is a division of Siemens Plc
Mobility and Logistics, Traffic Solutions
Sopers Lane, Poole, Dorset, BH17 7ER
Figure 17 shows a Loop Termination Card. PL2 on the Loop Termination PCB should be
connected to the associated Intelligent Detector Backplane.
Figure 17 – Loop Termination Card
Security classification
Unrestricted
Version
2
Last Editor
Harry Smyth
Document Name
Configuration Control
Copyright © Mobility 2014. All Rights Reserved.
Page
32 of 83
Status
Released
Date
09/12/2014
Document No.
667/CC/45950/000
Mobility is a division of Siemens Plc
Mobility and Logistics, Traffic Solutions
Sopers Lane, Poole, Dorset, BH17 7ER
3.11 WiMag
3.11.1 WiMag 3U Rack Kit (19”) System
WiMag is not included in the Outercase ordered from Table 1 and therefore must be
specified separately. Please refer to the parts listing for this item. The following configuration
procedure details a basic controller WiMag installation. Full system installation details should
be sought from the WiMag Detection System General Handbook, detailed in the related
documentation section.
With reference to Figure 18, the cabinet mounted equipment required as part of the WiMag
installation is mounted to the 19” WiMag Communications Rack Assembly. This unit will be
installed below the ST950 Rack Assembly. The WiMag Communications Rack Assembly will
hold up to three Standard Interface Cards, servicing 20 WiMag sensors each. Each of the
Standard Interface cards plugs into an individual backplane PCB. Sufficient space is
available behind the centre section of the WiMag Communications Rack Assembly to house
the necessary 4/8 port Power Over Ethernet (POE) Switch. A Power Supply Unit will be
installed on the right hand side of the WiMag Communications Rack Assembly. The
standard WiMag Communications Rack Assembly is supplied with one Standard Interface
Card, and associated backplane. Additional Standard Interface Cards should be ordered at
controller configuration time. The appropriate POE unit should also be ordered at controller
configuration time.
Figure 18 - WiMag Control Unit
The selected POE device should be installed prior to the installation of the WiMag
Communication Rack being installed in the controller. The POE is secured into the WiMag
Communications Rack on the DIN rail, as illustrated in Figure 19, 20 and 21.
Security classification
Unrestricted
Version
2
Last Editor
Harry Smyth
Document Name
Configuration Control
Copyright © Mobility 2014. All Rights Reserved.
Page
33 of 83
Status
Released
Date
09/12/2014
Document No.
667/CC/45950/000
Mobility is a division of Siemens Plc
Mobility and Logistics, Traffic Solutions
Sopers Lane, Poole, Dorset, BH17 7ER
Figure 19 – POE Unit
Connect a non-POE Ethernet port to the user maintenance Ethernet port using a supplied
Ethernet cable.
Figure 20 – POE Unit
Figure 21 – POE Unit
48V DC Power is provided to the Power Over Ethernet switch from the WiMag
Communications Rack Power Supply. The Grey wire from the PSU will be connect to the
+VE terminal and the white return wire will be connected to the –VE terminal of the POE
switch.
Figure 22 – POE Unit
The backplane is used to provide power to the interface card. Backplanes are connected
together using Ethernet cable. The first Backplane is connected to the PHS (PL2 or PL4)
PCB at the controller’s Processor PCB. On those occasions when the Ethernet ports on the
PHS PCB occupied an output port on an Intelligent Detector Backplane will be utilised.
Please refer to Figure 23 and 24.
Security classification
Unrestricted
Version
2
Last Editor
Harry Smyth
Document Name
Configuration Control
Copyright © Mobility 2014. All Rights Reserved.
Page
34 of 83
Status
Released
Date
09/12/2014
Document No.
667/CC/45950/000
Mobility is a division of Siemens Plc
Mobility and Logistics, Traffic Solutions
Sopers Lane, Poole, Dorset, BH17 7ER
Figure 23 – WiMag Backplane
Figure 24 – CPU Board
The Standard Interface Cards are connected from the front Ethernet port to the appropriate
ports on the POE switch.
The WiMag Communications Rack Assembly will be provided with unfiltered mains from the
controller Master Switch Unit. Live is to be taken from the 6amp auxiliary miniature circuit
breaker, marked as ‘AUX1 MCB’, Neutral from the neutral block and Earth from any main
earthing stud.
Figure 25 – WiMag Tray
The instructions above details the basis configuration procedure for the WiMag system into
a ST950 Controller The final configuration and commissioning of the Standard Interface
outputs and the interface with street installed equipment should be sought from the WiMag
Detection System General Handbook.
Security classification
Unrestricted
Version
2
Last Editor
Harry Smyth
Document Name
Configuration Control
Copyright © Mobility 2014. All Rights Reserved.
Page
35 of 83
Status
Released
Date
09/12/2014
Document No.
667/CC/45950/000
Mobility is a division of Siemens Plc
Mobility and Logistics, Traffic Solutions
Sopers Lane, Poole, Dorset, BH17 7ER
3.11.2 WiMag Loop Detector Replacement Card
Under normal circumstances WiMag Detection signals will be processes by components in
the WiMag system, detailed in section 3.11.1.
However, to allow the minimum amount of equipment to be installed in a controller the
WiMag loop detector replacement card has been developed to provide up to 4
magnetometers.
The WiMag Loop Detector Replacement Card plugs into either an individual detector
backplane or a dedicated intelligent Detector Backplane. Configuration Engineers should
configure controllers to ensure that the WiMag Loop Detector Replacement Cards are
inserted into their own Intelligent Detector Backplane or Single Detector Backplane. This is
because the WiMag Loop Detector Replacement Card has particular power requirement that
are not compatible with the SLD4 Detector Cards. Additionally, WiMag Loop Detector
Replacement Cards should not be mounted between SLD4 Cards as this would interrupt the
infrared communications link between SLD4 Cards; referred to in the sections detailing
Intelligent Detector Backplanes and SLD4 Cards.
Security classification
Unrestricted
Version
2
Last Editor
Harry Smyth
Document Name
Configuration Control
Copyright © Mobility 2014. All Rights Reserved.
Page
36 of 83
Status
Released
Date
09/12/2014
Document No.
667/CC/45950/000
Mobility is a division of Siemens Plc
Mobility and Logistics, Traffic Solutions
Sopers Lane, Poole, Dorset, BH17 7ER
3.12 Loop Detector and Ancillary Power
Detector Power General
With reference to Figure 31 an additional mounting panel is provided on the left hand side of
the ST950 controller. This mounting panel will be utilised for mounting 48V (160VA) Wait
Drive Kits, 48V (50VA) Wait Drive Kits, 24V (160VA) Supply Kits and Audible Supply Kits.
3.12.1 Power Supply Kit 24V (160VA)
All detectors will be powered from 24v (160VA) Supply kit. With reference to Figure 31 the
transformer, part of the 24V (160VA) Supply Kit, will be mounted to position 13. The rectifier
and terminal block will be mounted on the left hand side of the left hand mounting plate.
Figure 31 also shows the sequence in which additional 24V (160VA). Supply Kits will be
positioned. Additional reference should be made to drawing 667/GA/27067/000. The first
position to be utilised should be position 13, followed by position 14 and 15 etc.
The transformer supplied in the kit will be configured with conventional mains leads. Main
input for the Supply Kit should be obtained from the Mains Switch Assembly, as described
on drawing 667/GA/20292/008. The output voltage from the Supply Kit should be connected
to the Intelligent Detector Backplane as shown in paragraph 7 of this document and drawing
667/GA/20292/008.
3.12.2 Power Supply Kit 48V (50VA)
The 48V (50VA) may be specified to provide power to Wait Drives. The rectifier and terminal
block will be mounted on the left hand side of the left hand mounting plate. Figure 31 shows
the sequence in which additional 48V (50VA) Supply Kits will be positioned. Main input for
the Supply Kit should be obtained from the Mains Switch Assembly. Additional reference
should be made to drawing 667/GA/27067/000. The first position to be utilised should be
position 4, followed by position 5 and 6 etc. The position of the 48V (50VA) transformers
should be optimised while also optimising the position of the 48V (160VA).
3.12.3 Power Supply Kit 48V (160VA)
The 48V (160VA) may be specified to provide power to Wait Drives. The rectifier and
terminal block will be mounted on the left hand side of the left hand mounting plate. Figure
31 show the sequence in which additional 48V (160VA) Supply Kits will be positioned. Main
input for the Supply Kit should be obtained from the Mains Switch Assembly. Additional
reference should be made to drawing 667/GA/27067/000. The first position to be utilised
should be position 1, followed by position 2 and 3 etc. The position of the 48V (160VA)
transformers should be optimised while also optimising the position of the 48V (50VA).
Security classification
Unrestricted
Version
2
Last Editor
Harry Smyth
Document Name
Configuration Control
Copyright © Mobility 2014. All Rights Reserved.
Page
37 of 83
Status
Released
Date
09/12/2014
Document No.
667/CC/45950/000
Mobility is a division of Siemens Plc
Mobility and Logistics, Traffic Solutions
Sopers Lane, Poole, Dorset, BH17 7ER
3.13 Serial I/O Cards
The Serial Input/Output (I/O) Kits do not form part of the Outercase selected from Table 2
and therefore should be ordered separately. Two types of I/O cards, remote from the CPU
Card, are available one with 4 outputs/16 inputs and one with 16 outputs/16 inputs. Four I/O
cards can fit in the ST950. Figure 26 sets out the stencil indications on the Terminal Panel,
which aids position optimisation.
Figure 26 – Serial I/O Card
Inputs
Inputs
Serial Link
OUT
Outputs
Serial Link
IN
Serial I/O
Address
Switch
The I/O cards communicate with the CPU card via the RJ45 Cable/Cat5 connector, as a
serial link. The serial link communication protocol relies on addressing techniques to ensure
the appropriate information is delivered to the intended component. This means that the
order in which the components are connected to the serial link is not imperative to
successful communications. However, to maintain consistency of build the sequence of
connections set out in Table 2 should be used.
As stated above, once connected into the serial link, the CPU card indentifies the I/O by the
appropriate address. The address is set on the I/O card, shown Figure 26. Controller special
instructions will provide details on assigned inputs and outputs.
Figure 13, 15 and 27 illustrate the mutual optimisation that must be carried out when
allocating space to both I/O card and Loop Termination Cards.
Security classification
Unrestricted
Version
2
Last Editor
Harry Smyth
Document Name
Configuration Control
Copyright © Mobility 2014. All Rights Reserved.
Page
38 of 83
Status
Released
Date
09/12/2014
Document No.
667/CC/45950/000
Mobility is a division of Siemens Plc
Mobility and Logistics, Traffic Solutions
Sopers Lane, Poole, Dorset, BH17 7ER
Figure 27 – I/O Card Position Allocation
I/O 1
Panels 1 and 2 illustrated without LoopI/OTermination
Board Silk screen, detailing
Card 3
Panel No. 2
(Optional fit)
I/O 2
I/O Card 4
Panel silk
screen
labelling
I/O 1
I/O Card 1
Panel No. 1
(Always fitted)
I/O 2
I/O Card 2
Figure 1 LV Cabinet I/O card allocation and no
LT Cards Fitted
Card positions are silk screened I/O 1 etc
I/O Card 1 allocated to Panel 1, position I/O 1
I/O Card 2 Allocated to Panel 1, position I/O 2
I/O Card 3 allocated to Panel 2, position I/O 1
I/O Card 4 Allocated to Panel 2, position I/O 2
Security classification
Unrestricted
Version
2
Last Editor
Harry Smyth
Document Name
Configuration Control
Copyright © Mobility 2014. All Rights Reserved.
Page
39 of 83
Status
Released
Date
09/12/2014
Document No.
667/CC/45950/000
Mobility is a division of Siemens Plc
Mobility and Logistics, Traffic Solutions
Sopers Lane, Poole, Dorset, BH17 7ER
3.14 Gemini2
The ST950 Outercase is configured with a 19” Swing Frame and a Rack Assembly. With
reference to Figure 8 the area above the Rack Assembly is set aside for 3U sized Gemini
unit. Please also reference document 667/GA/27087/000, detailed in the related document
section of the document. A 19” Rack Kit will be fitted to the ST950 as standard and need not
ordered separately. When a 3U sized Gemini is specified it will be fitted on the right hand
side of the 19” Rack Kit, as seen from the front of the 19” Swing Frame in Figure 8.
The Master Switch Unit has one OTU Supply Kit fitted to provide power for the Gemini Unit.
A second kit may be fitted please refer to the parts listing for the appropriate part number.
The position of the kit is shown on diagram 667/GA/27121/000. The Gemini unit has several
applications; full information on the required configuration should be sought from the Gemini
Family Tree, detailed in the Related Document section. With reference to Figure 29, power
for the Gemini unit should be applied to PL1. It will be noted that the 19” Rack Assembly set
aside for the Gemini Unit will be largely empty when the Gemini is specified and completely
empty when Gemini Unit is not specified. Configuration Engineers and Production staff
should note that if this space is utilised to fit Backplanes the controller may require
substantial re-configuration at a later stage and should only be carried out if the work
specification directs this activity.
Figure 28 - Power for Gemini Unit
Mains
Connection
to Gemini2
Unit PL1
Warning! It is important that the Gemini Last Gasp Dial Battery, within the Gemini Power
Supply Unit, is orientated correctly; the battery terminal must be facing up. If the unit is to be
mounted in such a way that the battery terminals are not facing up then it is necessary to
implement certain modifications to ensure that the battery is not operating upside down.
Please refer to document 667/HB/32600/000 for the necessary modifications.
Security classification
Unrestricted
Version
2
Last Editor
Harry Smyth
Document Name
Configuration Control
Copyright © Mobility 2014. All Rights Reserved.
Page
40 of 83
Status
Released
Date
09/12/2014
Document No.
667/CC/45950/000
Mobility is a division of Siemens Plc
Mobility and Logistics, Traffic Solutions
Sopers Lane, Poole, Dorset, BH17 7ER
3.15 Stratos Outstation
The ST950 Outercase is configured with a 19” Swing Frame and a Rack Assembly. With
reference to Figure 8 the area above the Rack Assembly is set aside for Stratos Outstation.
Please also reference document 667/GA/27087/000, detailed in the related document
section of the document. A 19” Rack Kit will be fitted to the ST950 as standard and need not
be ordered separately. When a Stratos Outstation is specified it will be fitted on the right
hand side of the 19” Rack Kit, as seen from the front of the 19” Swing Frame in Figure 8.
The Master Switch Unit has one OTU Supply Kit fitted to provide power for the Stratos
Outstation. A second kit may be fitted, please refer to the parts listing for the appropriate part
number. The position of the kit is shown on diagram 667/GA/27121/000. The Stratos
Outstation has several applications; full information on the required configuration should be
sought from the Stratos Outstation Family Tree, 667/DZ/52250/ETC. With reference to
Figure 29, mains supply power for the Stratos Outstation is connected via a standard IEC
C13 mains lead. The other boards in the system are powered over the RJ45 GSPI cables.
To provide Lamp Supply monitoring on the Stratos Outstation the Lamp Supply Monitor Port
is used.
It will be noted that the 19” Rack Assembly set aside for the Stratos Outstation will be largely
empty when the Stratos Outstation is specified and completely empty when Stratos
Outstation is not specified.
Figure 29 - Power for Stratos Outstation Unit
Lamp
Supply
Monitor
Port
Mains
Connection
to Stratos
Outstation
If the internal backup battery is fitted the Stratos Outstation can be mounted in
any orientation apart from front panel facing down.
Security classification
Unrestricted
Version
2
Last Editor
Harry Smyth
Document Name
Configuration Control
Copyright © Mobility 2014. All Rights Reserved.
Page
41 of 83
Status
Released
Date
09/12/2014
Document No.
667/CC/45950/000
Mobility is a division of Siemens Plc
Mobility and Logistics, Traffic Solutions
Sopers Lane, Poole, Dorset, BH17 7ER
3.16 Regulatory Sign Supply Kit
The Mains Distribution Unit provides the power supply output for regulatory signs. The
outputs to power the signs are provide at the bottom right of the Termination Panel. The
controller comes equipped and wired with a lamp monitoring sensor as standard, which can
monitor up to seven regulatory signs. If the junction contains more than seven signs in total
additional current monitoring sensors must be fitted. The feeds to the signs must be split so
that no more than seven signs are monitored through one sensor. The red wire from the
sensors should be connected to the ‘Sens’ inputs at the rear of the first Lamp Switch card
Sens33 is the first monitoring channel, Sens34 is the second etc. If more than 28 signs are
present, additional sensors may be added to the second Lamp Switch card (if fitted). The
white wires should be joined together and connected to the ‘COMMON’ input
Security classification
Unrestricted
Version
2
Last Editor
Harry Smyth
Document Name
Configuration Control
Copyright © Mobility 2014. All Rights Reserved.
Page
42 of 83
Status
Released
Date
09/12/2014
Document No.
667/CC/45950/000
Mobility is a division of Siemens Plc
Mobility and Logistics, Traffic Solutions
Sopers Lane, Poole, Dorset, BH17 7ER
3.17 Audible Supply Kits
With reference to Figure 31 an additional mounting panel is provided on the left hand side of
the ST950 controller. This mounting panel will be utilised for mounting 48V (160VA) Wait
Drive Kits, 48V (50VA) Wait Drive Kits, 24V (160VA) Supply Kits and Audible Supply Kits.
The Audible Drive Kit contains a 48V (1500VA) transformer. The output from the transformer
is rectified and made available at a terminal block. The terminal block forms part of the
Audible kit and attached to the left hand side panel providing three outputs. If more than
three Audible outputs are required it is possible to order individual ancillary items (terminal
block etc) from the kit to provide an additional three outputs. If more than three additional
outputs are required an additional full kit must be ordered. The position of the transformer in
the Audible Supply kit is linked to the optimisation of the other supply kits positions. The
sequence of kit positioning is set out in paragraph 7.17. Drawing 667/GA/27006/000 details
the full wiring scheme. The Audible kit may occupy any spare position on the left hand
mounting plate however the rectifier component and terminal block should be mounted in the
same row as the transformer. Input Supply for the Audible Kit is provided from the pedestrian
green phase. Please note the negative input supply wire should not be connected to
the common input of any other equipment.
Figure 30 - ST950 Side Panel
Terminal Block
providing
Audible supply
Audible supply
kit rectifier and
transformer
3.18 Tactile Driver from Audible Supply Kit
Tactiles are driven from the Audible Supply Kit as detailed in Drawing 667/GA/27006/000.
The same restrictions of number of outputs exist for Tactile as that for Audibles.
Security classification
Unrestricted
Version
2
Last Editor
Harry Smyth
Document Name
Configuration Control
Copyright © Mobility 2014. All Rights Reserved.
Page
43 of 83
Status
Released
Date
09/12/2014
Document No.
667/CC/45950/000
Mobility is a division of Siemens Plc
Mobility and Logistics, Traffic Solutions
Sopers Lane, Poole, Dorset, BH17 7ER
Figure 31 -ST950LV Side Panel View
12
10
11
6
3
15
Security classification
Unrestricted
Version
2
Last Editor
Harry Smyth
Document Name
Configuration Control
Copyright © Mobility 2014. All Rights Reserved.
8
9
7
5
4
2
14
1
13
Page
44 of 83
Status
Released
Date
09/12/2014
Document No.
667/CC/45950/000
Mobility is a division of Siemens Plc
Mobility and Logistics, Traffic Solutions
Sopers Lane, Poole, Dorset, BH17 7ER
3.19 Solar Cell
The Mains Distribution Unit provides the power supply output for Solar Cell. The output to
power is provided at the bottom right of the Termination Panel.
3.20 ST950LV Parts Listing
Table 3 – Parts Listing
Part Number
Description
667/1/46950/010
ST950 Cabinet UK 1.5KVA 8ph wired 8ph - Grey
667/1/46950/011
ST900 Cabinet UK 1.5KVA 8ph wired 8ph - Black
667/1/46950/018
ST950 Cabinet UK 0.5KVA 8ph wired - Grey
667/1/46950/019
ST950 Cabinet UK LED 0.5KVA 8ph wired - Black
667/1/46950/020
ST950 Cabinet UK 3.0KVA 24ph wired - Grey
667/1/46950/021
ST950 Cabinet UK 3.0KVA 24ph - Black
667/1/46950/028
ST950 Cabinet UK LED 0.5KVA 24ph wired - Grey
667/1/46950/029
ST950 Cabinet LED 0.5KVA 24ph wired - Black
667/1/32900/000
Expansion cabinet kit - Grey
667/1/32900/001
Expansion cabinet kit - Black
667/1/27056/001
Manual Panel Full Kit
667/1/27110/000
Manual Panel RS232 kit
667/1/27002/000
8 Phase UK Lamp Switch Kit
667/1/27008/001
16 - 32 phase controller upgrade kit
667/1/27072/001
Phase Driver Cableform
667/1/46085/002
ST950 I/O Card Kit (4 Output)
667/1/46085/001
ST950 I/O Card Kit (16 Output)
667/1/46014/000
ST950 CPU I/O kit (4 outputs)
667/1/45952/001
ST950 CPU I/O kit (4 outputs) Cableform
667/1/20690/000
19” Detector Rack
667/1/32910/000
ST900 Intelligent detector backplane kit (contains Loop Termination
Card)
6671/27690/000
Second Termination Panel
667/1/15990/003
Single Detector Backplane
Security classification
Unrestricted
Version
2
Last Editor
Harry Smyth
Document Name
Configuration Control
Copyright © Mobility 2014. All Rights Reserved.
Page
45 of 83
Status
Released
Date
09/12/2014
Document No.
667/CC/45950/000
Mobility is a division of Siemens Plc
Mobility and Logistics, Traffic Solutions
Sopers Lane, Poole, Dorset, BH17 7ER
Part Number
Description
667/1/47210/100
WiMag standard interface card kit
408/4/54224/000
4 Port POE Switch
408/4/54225/000
8 Port POE Switch
667/1/47280/000
WiMag loop detector replacement card
WiMag loop detector replacement card
995/4/88351/005
linking ethernet cable
667/1/27084/500
0.5 KVA Dimming Facility (LED controllers only)
667/1/27084/001
1.5 KVA Dimming Facility (non LED controller only)
667/1/27084/003
3.0 KVA Dimming Facility (non LED controllers only)
667/1/27104/000
DFM lens kit
667/1/27121/000
OTU Supply Kit
667/7/25171/001
Current Monitoring Torroid
667/1/33073/000
Isolator locking kit
667/6/46680/000
Anti graffiti coating
667/2/20234/000
Screw Lock Key
667/1/27006/000
Audible Supply Kit (Note Tactiles Driven from Audible)
667/1/20292/008
24V(160VA) Supply Kit
667/1/21029/003
48V(50VA) Wait Driver Kit
667/1/21029/001
48V(160VA) Wait Driver Kit
667/1/10039/024
Solar Cell
667/1/32994/001
Backplane SLD4 Link Cable (short)
667/1/32994/002
Backplane SLD4 Link Cable (long)
Security classification
Unrestricted
Version
2
Last Editor
Harry Smyth
Document Name
Configuration Control
Copyright © Mobility 2014. All Rights Reserved.
Page
46 of 83
Status
Released
Date
09/12/2014
Document No.
667/CC/45950/000
Mobility is a division of Siemens Plc
Mobility and Logistics, Traffic Solutions
Sopers Lane, Poole, Dorset, BH17 7ER
4 ST950ELV HARDWARE ALLOCATION AND CONNECTIVITY
4.1 ST950ELV Outercase Selection
With reference to Table 4 the ST950ELV can be specified as two base options; the
ST950ELV with 20A load capability or the ST950ELV with 40A capability. Please refer to the
ST950ELV General Handbook, detailed in the Related Documentation section, for full
specifications. With knowledge of the potential load requirement and with reference to
paragraph 4.2 the basic functional cabinet can be selected from Table 4. The Outercases
listed in Table 4 are equipped, at order time for onward configuration, with the following
major items;
Appropriate number of HPU PCBs.
LPU
Appropriate number of Mains Transformers.
Master Switch Assembly
Back Panel
LSLS Backplane Kits and associated LSLS cards
The basic functional units for the controller are contained within the ST950ELV Controller 6U
Rack Assembly. This unit can be ordered as a standalone (Cuckoo) unit and fitted to a
controller cabinet. More often the unit will be ordered as part of a fully functioning controller.
Please note, the involved relationship between choice of Outercase, number HPU Cards and
number of LSLS cards is explained below.
Table 4 – ST950ELV Outercase Selection
Part Number
Description
667/1/45950/020 ST950ELV Cabinet UK 20A Single LSLS - Grey
667/1/45950/040 ST950ELV Cabinet UK 40A Single LSLS - Grey
667/1/45950/021 ST950ELV Cabinet UK 20A Single LSLS - Black
667/1/45950/041 ST950ELV Cabinet UK 40A Single LSLS - Black
667/1/45950/520 ST950ELV 20A Single LSLS Low Inrush -Grey
667/1/45950/521 ST950ELV 20A Single LSLS Low Inrush -Black
Security classification
Unrestricted
Version
2
Last Editor
Harry Smyth
Document Name
Configuration Control
Copyright © Mobility 2014. All Rights Reserved.
Page
47 of 83
Status
Released
Date
09/12/2014
Document No.
667/CC/45950/000
Mobility is a division of Siemens Plc
Mobility and Logistics, Traffic Solutions
Sopers Lane, Poole, Dorset, BH17 7ER
4.2 Rack Assembly, LSLS and HPU
4.2.1 Rack Mounting Position
The ST950ELV Outercase is configured with a 19 inch swing frame, to which the ST950ELV
Rack Assembly is mounted. The Rack Assembly will be positioned in the Swing Frame as
shown in Figure 32. Information on exact positioning of the ST950ELV Rack Assembly
should be sought from manufacturing drawing detailed in the related document section of
this handbook. The whole ST950ELV Rack Assembly should not be ordered separately as it
is included in the Outercase, ordered from Table 4, however, some components in the Rack
Assembly do not come as standard and should be ordered to suit individual configurations.
Components mounted within the ST950ELV Rack Assembly are shown in Figure 32
Figure 32 – ST950ELV
Security classification
Unrestricted
Version
2
Last Editor
Harry Smyth
Document Name
Configuration Control
Copyright © Mobility 2014. All Rights Reserved.
Page
48 of 83
Status
Released
Date
09/12/2014
Document No.
667/CC/45950/000
Mobility is a division of Siemens Plc
Mobility and Logistics, Traffic Solutions
Sopers Lane, Poole, Dorset, BH17 7ER
Figure 33 –ST950ELV Rack Assembly
4.2.2 Logic Power Unit
The LPU (Logic Power Unit) is powered by the Mains 230V AC supply and is contained
within the Rack Assembly, refer to Figure 33 A switch-mode power supply mounted in the
LPU produces +5V and +24V DC supplies used by PCBs within the cabinet. The Logic
power Unit does not need to be ordered separately as it is contained within the Rack
Assembly.
4.2.3 ST950ELV CPU Card
The ST950 CPU Card will be mounted to a designated position in the Rack Assembly, as
shown in Figure 33. The CPU Card holds the controller configuration and performs the
function of configuration, control and management. The main external data interfaces of the
CPU Card are:
Interface to Lamp Switch Cards
Serial Interfaces (GSPI) to IO Cards and Intelligent Detector Backplanes
Manual Panel
RS232 interface to handset, Gemini2 or Stratos Outstation
USB interfaces
Ethernet Interface
Security classification
Unrestricted
Version
2
Last Editor
Harry Smyth
Document Name
Configuration Control
Copyright © Mobility 2014. All Rights Reserved.
Page
49 of 83
Status
Released
Date
09/12/2014
Document No.
667/CC/45950/000
Mobility is a division of Siemens Plc
Mobility and Logistics, Traffic Solutions
Sopers Lane, Poole, Dorset, BH17 7ER
4.2.4 CPU I/O Card
The ST950 Controller can be equipped with additional Input/Output cards, remote from the
CPU card. However, the ST950 can also be equipped with a CPU I/O Card, mounted in a
daughter board arrangement on the CPU Card. Please refer to Figure 34.
Figure 34 – CPU I/O Card
The CPU I/O Card is not supplied in the Outercase chosen from Table 4. Ultimately all I/O
signals are returned to / derived from the ST950 Processor. The ST950 CPU Card, CPU I/O
card, and other components described later in this handbook (I/O cards on the termination
panel and Intelligent back planes) communicate via a GSPI serial interface. The serial
communication is carried out over Cat5e cable. The serial Link relies on addressing
techniques to ensure that the appropriate information is delivered to the correct component,
therefore the order of the connections does not have an influence on the operation of the
serial link. However, for purposes of consistency the order of connection set out in Table 5
should be used. When a component is not fitted the serial link continued onto the next
component in the sequence.
Table 5 – Serial Link Connections
Component
Input
Output
CPU card
Serial link derived from RJ45 Serial Link Output
CPU card
Socket
CPU I/O Card
RJ45 Serial Link Input
RJ45 Serial Link Output
Termination Panel Upper RJ45 Serial Link Input
RJ45 Serial Link Output
I/O Card
Termination Panel Lower RJ45 Serial Link Input
RJ45 Serial Link Output
I/O Card
First Intelligent Detector RJ45 Serial Link Input
RJ45 Serial Link Output
Backplane
Second Intelligent Detector RJ45 Serial Link Input
RJ45 Serial Link Output
Backplane
Security classification
Unrestricted
Version
2
Last Editor
Harry Smyth
Document Name
Configuration Control
Copyright © Mobility 2014. All Rights Reserved.
Page
50 of 83
Status
Released
Date
09/12/2014
Document No.
667/CC/45950/000
Mobility is a division of Siemens Plc
Mobility and Logistics, Traffic Solutions
Sopers Lane, Poole, Dorset, BH17 7ER
4.2.5 LSLS and HPU
LSLS and HPU Selection
Following an evaluation of the stream, phases and lanterns to be served by a controller the
number of required LSLS cards can be calculated. Please refer to ST950ELV controller
General Handbook for further details on load calculations. Figure 35 and Figure 36 also
provide information on the Outercase required to accommodate the load and equipment.
LSLS cards are allocated to specific positions in a specific order, as detailed in Figure 36.
With further reference to Figure 35 and 35 there may be occasions when the combination of
cabinet components required will not be accommodated in one controller cabinet, (e.g. when
more than three LSLS cards are required). To avoid the requirement for an entire additional
controller a Miscellaneous Equipment Cabinet (MEC) can be specified.
Figure 35 – ST950ELV LSLS, HPU Selection
Figure XX
On those occasions when a customer has a specific requirement to ensure that the inrush
current of a controller is kept to a minimum it is possible to specify a low inrush version of the
20A cabinet. Please refer to Table 4.
Security classification
Unrestricted
Version
2
Last Editor
Harry Smyth
Document Name
Configuration Control
Copyright © Mobility 2014. All Rights Reserved.
Page
51 of 83
Status
Released
Date
09/12/2014
Document No.
667/CC/45950/000
Mobility is a division of Siemens Plc
Mobility and Logistics, Traffic Solutions
Sopers Lane, Poole, Dorset, BH17 7ER
LSLS Cards Positioning
Each LSLS card is inserted into an LSLS Backplane Card. The configuration tool IC4 will
allocate the positioning of the phase output identification label. Figure 36 is a representation
of the back panel in the ST950ELV. The first LSLS card Serial Link socket is connected to
LSLS Serial Link Socket on the CPU card. The Serial link OUT socket is connected into the
second LSLS IN Serial Link socket. The remaining LSLS cards are connected into the Serial
Link in the same manner. The position of the LSLS Cards/LSLS Backplane cards as follows;
LSLS Backplane Card 1 will always be fitted in the top right of the first cabinet. LSLS card 4
will occupy the same position in the second cabinet. LSLS 2 will occupy the position
immediately below LSLS 1 on the right hand side of the first cabinet. LSLS 5 will occupy the
same position in the second cabinet. LSLS 3 will occupy a position on the upper left corner
of the first cabinet and LSLS 6 will occupy the same position in the second cabinet.
Figure 36 –ST950ELV LSLS Positioning
Phase output
identification label
1st Cabinet LSLS 3
positioned top
left hand side
1st Cabinet LSLS 1
positioned top
right hand side
2nd Cabinet LSLS 6
positioned top
left hand side
2nd Cabinet LSLS 4
positioned top
right hand side
Reversed board
orientation
1st Cabinet LSLS 2
positioned bottom
right hand side
2nd Cabinet LSLS 5
positioned bottom
right hand side
Normal board
orientation
HPU Load Distribution and LSLS Connection
Security classification
Unrestricted
Version
2
Last Editor
Harry Smyth
Document Name
Configuration Control
Copyright © Mobility 2014. All Rights Reserved.
Page
52 of 83
Status
Released
Date
09/12/2014
Document No.
667/CC/45950/000
Mobility is a division of Siemens Plc
Mobility and Logistics, Traffic Solutions
Sopers Lane, Poole, Dorset, BH17 7ER
With reference to the flow chart in Figure 35 it can be seen that a combination of HPU and
LSLS cards may be fitted to a controller, chosen from Table 4. To ensure that the lamp load
is distributed evenly and ensure maximum power supply flexibility is maintained under
varying circumstances, the following connection scheme should be followed.
With reference to Table 6, in order that the load may be redistributed, at final configuration,
LSLS 3 is connected to HPU 1. The addition loom length required for this connection will
allow the LSLS 3 connection to be removed from HPU 1 PL6 and connected to HPU 2, if
required.
Table 6 – HPU Load Distribution
Cabinet Type
Number
of HPU
Fitted
Number
of LSLS
Fitted
Connection scheme
Single Cabinet
20A Version
One
One
Connect HPU 1 PL4 to LSLS 1 backplane PL3
Single Cabinet
20A Version
One
Two
Connect HPU 1 PL4 to LSLS 1 backplane PL3
Single Cabinet
20A Version
One
Connect HPU 1 PL6 to LSLS 2 backplane PL3
Three
Connect HPU 1 PL4 to LSLS 1 backplane PL3
Connect HPU 1 PL6 to LSLS 2 backplane PL3
Connect HPU 1 PL7 to LSLS 3 backplane PL3
Single Cabinet
40A Version
Two
Single Cabinet
40A Version
Two
Two
Connect HPU 1 PL4 to LSLS 1 backplane PL3
Connect HPU 2 PL4 to LSLS 2 backplane PL3
Three
Connect HPU 1 PL4 to LSLS 1 backplane PL3
Connect HPU 2 PL4 to LSLS 2 backplane PL3
Connect HPU 1 PL6 to LSLS 3 backplane PL3
4.2.6 Regulatory Sign Monitoring
With reference to paragraph 4.16 below, Regularity Sign monitoring is performed (if
required) by LSLS external monitor input channels. It is important that the HPU regularity
sign monitoring connection is made to the same LSLS backplane as the HPU power supply
connection.
Output channels are configured using the appropriate software configuration tools (IC4).
On those occasion when more than 8 regularity signs are required but a second HPU is not
specified please refer to paragraph 4.16.
Security classification
Unrestricted
Version
2
Last Editor
Harry Smyth
Document Name
Configuration Control
Copyright © Mobility 2014. All Rights Reserved.
Page
53 of 83
Status
Released
Date
09/12/2014
Document No.
667/CC/45950/000
Mobility is a division of Siemens Plc
Mobility and Logistics, Traffic Solutions
Sopers Lane, Poole, Dorset, BH17 7ER
4.3 Cabinet Back Panel
Two back panels will be positioned centrally at the rear of the ST950ELV cabinet, one above
the other. These items do not have to be ordered separately as they are contained within
the cabinet chosen from Table 4. Stencil graphic aid the positioning of several components.
Two Back Panes will be fitted to both the 20A ST950 Controller and the 40A ST950
Controller.
Figure 37 - ST950ELV Back Panel
Security classification
Unrestricted
Version
2
Last Editor
Harry Smyth
Document Name
Configuration Control
Copyright © Mobility 2014. All Rights Reserved.
Page
54 of 83
Status
Released
Date
09/12/2014
Document No.
667/CC/45950/000
Mobility is a division of Siemens Plc
Mobility and Logistics, Traffic Solutions
Sopers Lane, Poole, Dorset, BH17 7ER
4.4 Master Switch Unit
The Master Switch Assembly forms part of the Outercase, chosen from Table 4, and
therefore should not be ordered separately. With reference to Figure 38 the main supply
voltage is applied to the main ON/OFF 63A double pole switch, within the Master Switch
Assembly, for onward supply to the ST900ELV Traffic Controller.
The live connection is taken from the main ON/OFF switch and applied to the 30A controller
fuse unit. The output from the fuse unit is applied to a mains filter, detailed in Figure 38, for
onward distribution, via a dedicated 20A MCB, to the mains transformer.
Additional outputs are taken from the fuse unit and supplied to additional 6A Mini Circuit
Breakers. These additional 6A type C mini circuit breakers provide the controller working
supplies, independent of the main controller power - for example, to cabinet illumination or
Gemini unit or Stratos Outstation.
Neutral distribution is provided from the 63A switch by connecting the neutral output terminal
of the 63A switch to a separate neutral terminal, as shown in Figure 38.
Figure 38 – ST950 Master Switch Assembly
Neutral
Terminal
Controller
fuse unit
6A type C
Mini Circuit
Breakers
Mains Filter
and 20A MCB
supplying
Mains
Transformer
63A Double
Pole Switch
Low Inrush Controller
Please note, the configuration of the master switch unit on the Low Inrush Controller
variants will be different from the Master Switch Unit described above. In particular a 6 Amp
type D MCB will be set in place of the 20A MCB on the Low Inrush controller. It is important
to note that the 6A type C MCBs, used to supply the controller working supplies on the
standard Controller, are not interchangeable with the Low Inrush, main supply, 6A type D
MCB. Please refer to the ST950 General Handbook for further clarification on this point.
Security classification
Unrestricted
Version
2
Last Editor
Harry Smyth
Document Name
Configuration Control
Copyright © Mobility 2014. All Rights Reserved.
Page
55 of 83
Status
Released
Date
09/12/2014
Document No.
667/CC/45950/000
Mobility is a division of Siemens Plc
Mobility and Logistics, Traffic Solutions
Sopers Lane, Poole, Dorset, BH17 7ER
4.5 Mains Transformer
The appropriate transformer is contained with the Outer case specified in Table 4 and
should not be ordered separately. The mains transformers will occupy a position in the
bottom left hand corner of the controller. Please refer to Figure 39, which shows one
transformer fitted to the ST950ELV cabinet. On those occasions when a 20A variant of the
controller is chosen one transformer and one HPU will be provided, to supply the appropriate
load. When a 40A Outercase is specified an additional transformer and HPU Card will
installed, alongside the first transformer and HPU Card. Individual leads from the transformer
will be connected to SKT 3 on the high power to the HPU Card. A loom from the transformer
will be connected into PL5 on the HPU. On those occasions when a 40A Outercase is
specified the corresponding connection from the second transformer will be connected to the
corresponding connections on the second HPU Card. If a 40A controller has been specified
and therefore a second HPU PCB is fitted a four way relay connection cable will be inserted
between PL1 on the first HPU Card and PL2 on the second HPU Card.
The input voltage to the Dimming Transformer can be selected by connecting the input
supply leads to the appropriate terminals. Please refer to the ST950 General Handbook
Please note that a low Inrush version of the ST950 controller is available. Please refer to
Table 4.
Bright
Dim
Common
HPU
PL5
Figure 40 – SKT3
Earth
Figure 39 – ST950 HPU and Transformer
HPU
SKT 3
Mains
Transformer
Security classification
Unrestricted
Version
2
Last Editor
Harry Smyth
Document Name
Configuration Control
Copyright © Mobility 2014. All Rights Reserved.
Page
56 of 83
Status
Released
Date
09/12/2014
Document No.
667/CC/45950/000
Mobility is a division of Siemens Plc
Mobility and Logistics, Traffic Solutions
Sopers Lane, Poole, Dorset, BH17 7ER
4.6 Manual Panel
The Manual Panel is contained within a secure compartment in the top left hand corner of
the controller cabinet. Access to the manual panel may be gained via the manual panel
access door or by opening the controller cabinet main door. The manual panel forms part of
the Outercase, chosen from Table 4, and therefore should not be specified separately. The
34 way ribbon cable from manual panel connects into socket manual panel connection on
the CPU Card.
Figure 41 – ST950 Manual Panel
4.7 Intelligent Detector Backplanes
Intelligent Detector Backplanes do not form part of the base Controller Cabinet and therefore
should be specified separately. Each Intelligent Detector accommodates four SDL4 Cards.
Notes on the SLD4 Detector Cards are provided later in this document. Figure 50 provides a
listing of required components when selecting the Intelligent Detector Backplanes and
accompanying SLD4 cards. Please also refer to the parts list for these items.
Optimising the positions of Intelligent Detector Backplanes within the ST950ELV is an
involved but necessary procedure. The four separate cases, detailed in Case 1 – 1
Intelligent Detector Cards (4 Loop detector cards) and a Gemini unit or Stratos Outstation
Figure 42 to 45, define the order of allocation for the Intelligent Detector Backplanes in the
6U Rack, and therefore the positioning of the Detector cards, which are detailed later in this
document. Connection of the twisted ribbon cable between detector loop termination cards
to appropriate intelligent detector backplane is also detailed in Case 1 – 1 Intelligent
Detector Cards (4 Loop detector cards) and a Gemini unit or Stratos Outstation
Figure 42 to 45.
In the following series of case studies it is necessary to install the appropriate Rack
Assembly dividers. Please consult the parts listing for these necessary dividers. Please note,
the position in the rack of the Intelligent Detector Backplanes depends on the number of loop
detector cards required.
Configuration Engineers should note when referencing the cases below that an infrared
communication link provides automatic set-up between SLD4 cards. This link operates
horizontally but not vertically. To provide this link between vertically mounted SLD4 cards a
link cable should be fitted between Intelligent Detector Backplanes on associated horizontal
levels. Please refer to parts listing for link cable. Please also refer to Figure 47 which shows
the required link.
Security classification
Unrestricted
Version
2
Last Editor
Harry Smyth
Document Name
Configuration Control
Copyright © Mobility 2014. All Rights Reserved.
Page
57 of 83
Status
Released
Date
09/12/2014
Document No.
667/CC/45950/000
Mobility is a division of Siemens Plc
Mobility and Logistics, Traffic Solutions
Sopers Lane, Poole, Dorset, BH17 7ER
Important Note
Configuration Engineers should read the notes in the WiMag section regarding
Backplane positioning. Important information on the relationship between SDL4
Cards, the Infrared communication link between SLD4 cards and the restrictions this
communication technique has on the positioning of Detector
Case 1 – 1 Intelligent Detector Cards (4 Loop detector cards) and a Gemini unit or Stratos
Outstation
Figure 42- IDB Optimisation
Case 2 – 2 Intelligent Detector Cards (8 Loop detector cards) and a Gemini unit or Stratos
Outstation
Figure 43 – IDB Optimisation
Security classification
Unrestricted
Version
2
Last Editor
Harry Smyth
Document Name
Configuration Control
Copyright © Mobility 2014. All Rights Reserved.
Page
58 of 83
Status
Released
Date
09/12/2014
Document No.
667/CC/45950/000
Mobility is a division of Siemens Plc
Mobility and Logistics, Traffic Solutions
Sopers Lane, Poole, Dorset, BH17 7ER
Case 3 – 3 Intelligent Detector Cards (12 Loop detector cards) and a Gemini unit or Stratos
Outstation
Figure 44 - IDB Optimisation
Case 4 – 4 Intelligent Detector Cards or more (16 Loop detector cards or more) and a
Gemini unit or Stratos Outstation
Figure 45 – IDB Optimisation
Loop detector cards 5-8 plug in
to intelligent backplane
connected to LTB 2
5 6 7 8
L C
P P
U U
rack
view
from
front
LTB 2
9 10 11 12
LTB 3
Loop detector cards 9-12 plug in
to intelligent backplane
connected to LTB 3
Security classification
Unrestricted
Version
2
Last Editor
Harry Smyth
Document Name
Configuration Control
Copyright © Mobility 2014. All Rights Reserved.
Loop detector cards 1-4 plug in
to intelligent backplane
connected to LTB 1
1 2 3 4
Loop detector card
Numbering
LTB 1
13 14 15 16
LTB 4
If required
Gemini or Stratos
Outstation fitted
to rack in case 4
Loop detector cards 13-16 plug
in to intelligent backplane
connected to LTB 4
Page
59 of 83
Status
Released
Date
09/12/2014
Document No.
667/CC/45950/000
Mobility is a division of Siemens Plc
Mobility and Logistics, Traffic Solutions
Sopers Lane, Poole, Dorset, BH17 7ER
Case 4 Continued – 4 Intelligent Detector Cards (16 Loop detector cards) and a Gemini unit
or Stratos Outstation
First 16 loop detector cards go in main rack as Gemini Unit or Stratos Outstation in an
Additional Rack
Figure 46 – IDB Optimisation
Case 4 – More than 12 Loop detector cards and a Gemini
Security classification
Unrestricted
Version
2
Last Editor
Harry Smyth
Document Name
Configuration Control
Copyright © Mobility 2014. All Rights Reserved.
Page
60 of 83
Status
Released
Date
09/12/2014
Document No.
667/CC/45950/000
Mobility is a division of Siemens Plc
Mobility and Logistics, Traffic Solutions
Sopers Lane, Poole, Dorset, BH17 7ER
Figure 47 shows the connections of the serial link to the first Intelligent Detector Backplane.
Intelligent Detector Backplanes are connected using Cat5e cable. The sequence of
connection set out in Table 5 should be followed. The GSPI serial link is connected from the
first Intelligent Detector Backplane OUT socket into the second Intelligent Detector
Backplane IN socket. This sequence of connections should be followed for connection
between first Intelligent Detector Backplanes and the final Intelligent Detector Backplane.
Please also note that a separate infrared connection is required for SLD4 automatic set-up.
This link operates horizontally and therefore SLD4 cards must be mounted alongside each
other to communicate in this fashion. Please refer to Figure 47 which shows the required
connection to continue this link vertically.
Figure 47 – IDB Serial Connection
Serial I/O
Address
Switch
Fast Serial
Link to next
Intelligent
Detector
Backplane
Detector
Power IN
Detector
Power OUT
to next
Intelligent
Detector
Backplane
Connection
from Loop
Termination
PCB PL8
Fast Serial
Link from
I/O card
Backplane
isolation fuse
View Intelligent Detector Backplane with comms PCB removed
Infrared link
Input from
previous
SLD4 in level
above
Infrared
Output to
next SLD4 in
level below
Security classification
Unrestricted
Version
2
Last Editor
Harry Smyth
Document Name
Configuration Control
Copyright © Mobility 2014. All Rights Reserved.
Page
61 of 83
Status
Released
Date
09/12/2014
Document No.
667/CC/45950/000
Mobility is a division of Siemens Plc
Mobility and Logistics, Traffic Solutions
Sopers Lane, Poole, Dorset, BH17 7ER
4.8 Single Detector Backplane
Single Detector Backplane do not form part of the Outercase, chosen form Table 4, and
therefore should be specified separately; if they be preferred over Intelligent Detector
Backplanes. The optimisation of the Single Detector Backplane follows the same sequence
of positioning as that detailed in section 4.7 The Single Detector Backplanes occupy the
position shown for Intelligent Detector Backplane. Power for the Single Detector Backplanes
is obtained from detector power kit, as detailed in paragraph 4.12. Please refer to Figure 48
and 48 for the Single Detector Backplane connection scheme.
Figure 48 – Single Detector Backplane
Figure 49 – Single Detector Backplane connections
Security classification
Unrestricted
Version
2
Last Editor
Harry Smyth
Document Name
Configuration Control
Copyright © Mobility 2014. All Rights Reserved.
Page
62 of 83
Status
Released
Date
09/12/2014
Document No.
667/CC/45950/000
Mobility is a division of Siemens Plc
Mobility and Logistics, Traffic Solutions
Sopers Lane, Poole, Dorset, BH17 7ER
4.9 SLD4 Detector Cards
SLD4 Detector Cards do not form part of the Outer case, chosen from Table 4 and therefore
must be ordered separately. As detailed previous sections, detector cards are inserted into
Intelligent Detector Backplanes. Each Intelligent Detector Backplane will accommodate four
SDL4 Detector Cards. The SDL4 Detector Cards have a facility to communicate with each
other to allow automatic setup. This communication facility uses an infrared link. The infrared
beam travels horizontally between SLD4 cards and therefore only those SLD4 cards that are
mounted alongside each other can utilise this infrared communications technique.
Communications between SLD4 Cards mounted vertically, with respect each out, must be
connected using linking cables. Please refer to Figure 47 which shows the required
connection.
Figure 50 – IDB Optimisation
Important Note
Configuration Engineers should read the notes in the WiMag section regarding
Backplane positioning. Important information on the relationship between SDL4
Cards, the Infrared communication technique between SLD4 cards and the
restrictions this communication technique has on the positioning of Detector Cards is
contained in the that section.
Security classification
Unrestricted
Version
2
Last Editor
Harry Smyth
Document Name
Configuration Control
Copyright © Mobility 2014. All Rights Reserved.
Page
63 of 83
Status
Released
Date
09/12/2014
Document No.
667/CC/45950/000
Mobility is a division of Siemens Plc
Mobility and Logistics, Traffic Solutions
Sopers Lane, Poole, Dorset, BH17 7ER
4.10 Loop Termination Cards
The following section defines the order of allocation for the detector loop termination Cards
starting at the bottom left of panel No. 2. These boards are directly connected to the
Intelligent Detector Backplanes via a twisted pair ribbon cable Please note the Loop
termination PCB is part of the intelligent Detector Backplane Kit and therefore it is not
required to order this item separately.
Figure 51 – Loop Termination Card Optimisation
Panel silk
screen
labelling
Ribbon cable
11
12
LT5
LT6
9
10
LT3
LT4
7
8
LT1
LT2
5
6
LT5
LT6
3
4
LT3
LT4
1
2
LT1
LT2
Panel No. 1
(Always fitted)
Loop termination
board
Ribbon
cable
Terminal
block
Panel No. 2
(Always fitted)
Figure 2 ELV Cabinet Loop termination PCB allocations
Security classification
Unrestricted
Version
2
Last Editor
Harry Smyth
Document Name
Configuration Control
Copyright © Mobility 2014. All Rights Reserved.
Page
64 of 83
Status
Released
Date
09/12/2014
Document No.
667/CC/45950/000
Mobility is a division of Siemens Plc
Mobility and Logistics, Traffic Solutions
Sopers Lane, Poole, Dorset, BH17 7ER
Notes/Rules:
Panels 1 and 2 are always fitted
Loop Termination PCBs MUST be in the same cabinet as the Detector cards and intelligent
backplanes connected to them i.e. it is NOT permissible to take the twisted ribbon cable
joining the backplane to Loop Termination PCBs from one cabinet to another
PCB positions are silk screened LT1 etc
Loop Termination Board 1 allocated to Panel 2, position LT1
Loop Termination Board 2 allocated to Panel 2, position LT2
Loop Termination PCB 3 allocated to Panel 2, position LT3
Loop Termination PCB 4 allocated to Panel 2, position LT4
Loop Termination PCB 5 allocated to Panel 2, position LT5
Loop Termination PCB 6 allocated to Panel 2, position LT6
Loop Termination PCB 7 allocated to Panel 1, position LT1
Loop Termination PCB 8 allocated to Panel 1, position LT2
Loop Termination PCB 9 allocated to Panel 1, position LT3
Loop Termination PCB 10 allocated to Panel 1, position LT4
Loop Termination PCB 11 allocated to Panel 1, position LT5
Loop Termination PCB 12 allocated to Panel 1, position LT6
Security classification
Unrestricted
Version
2
Last Editor
Harry Smyth
Document Name
Configuration Control
Copyright © Mobility 2014. All Rights Reserved.
Page
65 of 83
Status
Released
Date
09/12/2014
Document No.
667/CC/45950/000
Mobility is a division of Siemens Plc
Mobility and Logistics, Traffic Solutions
Sopers Lane, Poole, Dorset, BH17 7ER
4.11 WiMag
4.11.1 WiMag 3U Rack Kit (19”) System
WiMag is not included in the Outercase ordered from Table 4 and therefore must be
specified separately. Please refer to the parts listing. The following configuration procedure
details a basic controller WiMag installation. Full system installation details should be sought
from the WiMag Detection System General Handbook
With reference to Figure 52, the cabinet mounted equipment required as part of the WiMag
installation is mounted to the 19” WiMag Communications Rack Assembly. This unit will be
installed below the 6U Rack Unit, housing the main controller function Cards. The WiMag
Communications Rack Assembly will hold up to three standard Interface Cards, servicing 20
WiMag sensors each. Each of the standard interface cards plugs into an individual
backplane card. Sufficient space is available behind the centre section of the WiMag
Communications Rack Assembly to house the necessary 4/8 port Power Over Ethernet
(POE) Switch. A Power Supply Unit will be installed on the right hand side of the WiMag
Communications Rack Assembly. The standard WiMag Communications Rack Assembly is
supplied with one standard interface Card, and associated backplane. Additional Standard
Interface Cards should be ordered at controller configuration time. The appropriate POE unit
should also be ordered at controller configuration time.
Figure 52 - WiMag
Figure 53 - WiMag
Security classification
Unrestricted
Version
2
Last Editor
Harry Smyth
Document Name
Configuration Control
Copyright © Mobility 2014. All Rights Reserved.
Page
66 of 83
Status
Released
Date
09/12/2014
Document No.
667/CC/45950/000
Mobility is a division of Siemens Plc
Mobility and Logistics, Traffic Solutions
Sopers Lane, Poole, Dorset, BH17 7ER
The selected POE device should be installed prior to the installation of the WiMag
Communication Rack being installed in the controller. The POE is secured into the WiMag
Communications Rack on the DIN rail, as illustrated in Figure 54, 54 and 55.
Figure 54 – POE Unit
Connect a non-POE Ethernet port to the user maintenance Ethernet port using a supplied
Ethernet cable.
Figure 55 – POE Unit
Figure 56 – POE Unit
48V DC Power is provided to the Power Over Ethernet switch from the WiMag
Communications Rack Power Supply. The Grey wire from the PSU will be connect to the
+VE terminal and the white return wire will be connected to the –VE terminal of the POE
switch.
Figure 57 – POE Unit
The backplane is used to provide power to the interface card. Backplanes are connected
together using Ethernet cable. The first Backplane is connected to the PHS (PL2 or PL4)
PCB at the controller’s Processor Card. On those occasions when the Ethernet ports on the
Security classification
Unrestricted
Version
2
Last Editor
Harry Smyth
Document Name
Configuration Control
Copyright © Mobility 2014. All Rights Reserved.
Page
67 of 83
Status
Released
Date
09/12/2014
Document No.
667/CC/45950/000
Mobility is a division of Siemens Plc
Mobility and Logistics, Traffic Solutions
Sopers Lane, Poole, Dorset, BH17 7ER
PHS PCB are occupied an output port on an Intelligent Detector Backplane will be utilised.
Please refer to Figure 58 and 58.
Figure 58 – WiMag Backplane
Figure 59 – CPU Card
The Standard Interface Cards are connected from the front Ethernet port to the appropriate
ports on the POE switch.
The WiMag Communications Rack Assembly will be provided with unfiltered mains from the
controller Master Switch Unit. Live is to be taken from the 6amp auxiliary miniature circuit
breaker, marked as ‘AUX1 MCB’, Neutral from the neutral block and Earth from any main
earthing stud.
Figure 60 – WiMag Tray
61 – Master Switch Unit
The instructions above details the basis configuration procedure for the WiMag system into a
ST900 ELV Controller The final configuration and commissioning of the Standard Interface
outputs and the interface with street installed equipment should be sought from the WiMag
Detection System General Handbook.
Security classification
Unrestricted
Version
2
Last Editor
Harry Smyth
Document Name
Configuration Control
Copyright © Mobility 2014. All Rights Reserved.
Page
68 of 83
Status
Released
Date
09/12/2014
Document No.
667/CC/45950/000
Mobility is a division of Siemens Plc
Mobility and Logistics, Traffic Solutions
Sopers Lane, Poole, Dorset, BH17 7ER
4.11.2 WiMag Loop Detector Replacement Card
Under normal circumstances WiMag Detection signals will be processes by components in
the WiMag system, detailed in section 4.11.1.
However, to allow the minimum amount of equipment to be installed in a controller the
WiMag loop detector replacement card has been developed to provide up to 4
magnetometers.
The WiMag Loop Detector Replacement Card plugs into either an individual detector
backplane or an intelligent Detector Backplane. Configuration Engineers should configure
controllers to ensure that the WiMag Loop Detector Replacement Cards are inserted into
their own Intelligent Detector Backplane or Single Detector Backplane. This is because the
WiMag Loop Detector Replacement Card has particular power requirement that are not
compatible with the SLD4 Detector Cards. Additionally, WiMag Loop Detector Replacement
Cards should not be mounted between SLD4 Cards as this would interrupt the infrared
communications link between SLD4 Cards; referred to in the sections detailing Intelligent
Detector Backplanes and SLD4 Cards.
Security classification
Unrestricted
Version
2
Last Editor
Harry Smyth
Document Name
Configuration Control
Copyright © Mobility 2014. All Rights Reserved.
Page
69 of 83
Status
Released
Date
09/12/2014
Document No.
667/CC/45950/000
Mobility is a division of Siemens Plc
Mobility and Logistics, Traffic Solutions
Sopers Lane, Poole, Dorset, BH17 7ER
4.12 Detector Power and Ancillary Power
4.12.1 HPU Power for Detectors
The -24v DC detector power supply should be obtained from the 12 way terminal block on
the side panel next to the HPU. This terminal block is marked as DET COM (+) (Orange
wire) and DET SUP (-) (Grey wire) and the power is supplied to these terminals from the 2.8
amps DC RMS supply from 1st HPU Socket SK2 terminals DET COM (+) and DET SUP (-)
and if fitted a further 2.8 amps DC RMS from 2nd HPU (667/1/33040/001). Connect the
Orange wire to terminals DET COM (+) and the Grey wire to DET SUP (-). Then connect the
Orange wire to SK7 IN + and the Grey wire to SK7 IN – on the Intelligent detector
Figure 62 – HPU Detector Power
Figure 63 – Detector Power
Serial I/O
Address
Switch
Fast Serial
Link to next
Intelligent
Detector
Backplane
Detector
Power IN
Detector
Power OUT
to next
Intelligent
Detector
Backplane
Connection
from Loop
Termination
PCB PL8
Fast Serial
Link from
I/O card
Security classification
Unrestricted
Version
2
Last Editor
Harry Smyth
Document Name
Configuration Control
Copyright © Mobility 2014. All Rights Reserved.
Backplane
isolation fuse
Page
70 of 83
Status
Released
Date
09/12/2014
Document No.
667/CC/45950/000
Mobility is a division of Siemens Plc
Mobility and Logistics, Traffic Solutions
Sopers Lane, Poole, Dorset, BH17 7ER
4.12.2 Two Amp Ancillary Power Supply
On those occasions when additional -24 AC power is required, and a second HPU has not
been specified, an additional 2 Amp DC RMS power supply can be provided. This should be
positioned above the HPU on the left hand panel. Additional information on this exact
position may be sought from drawing 667/GA/33075/ETC.
With reference to the Figure 64, 64 and 65 the AC input for the ancillary power supply
should be obtained from the MCB on the master switch unit (Live connected to MCB SW1,
Neutral connected to Terminal N3). The step down transformer will be supplied with
conventional power supply leads, to allow this connection.
The AC output from the transformer is rectified and applied to a terminal block, as detailed in
the figues below. Orange coloured wire will be used to connect the DET COM + output from
the rectifier to the terminal block. Slate wire will be used to connect DET SUP -24V from the
rectifier to the terminal block. Please refer to 667/GA/33075/ETC for a detailed connection
scheme and earth arrangement.
Please Note! 2 Amp power supplies contain both transformer and associated rectifier.
When specifying multiple power supplies care should be taken to ensure that there is
sufficient space within the specified cabinet for the required items.
Please note! If it is anticipated that multiple 2 Amp power supplies will be required, to
service the configured load, AC input for the additional powers supplies should be
provided by configuring the ST950ELV controller with additional MCB.
Figure 64 – Detector Power
Figure 65 –Detector Power
Output from Step
Down
transformer
DET COM +
Orange
DET COM +
Orange
Figure 66 – Detector Power
Mains Power provided from
the Master Switch Unit
MCB
N3
SW1
Live
+ VE
Neutral - VE
Security classification
Unrestricted
Version
2
Last Editor
Harry Smyth
Document Name
Configuration Control
Copyright © Mobility 2014. All Rights Reserved.
Page
71 of 83
Status
Released
Date
09/12/2014
Document No.
667/CC/45950/000
Mobility is a division of Siemens Plc
Mobility and Logistics, Traffic Solutions
Sopers Lane, Poole, Dorset, BH17 7ER
4.12.3 Six Amp Ancillary Power Supply
On those occasions when additional -24 AC power is required, and a second HPU has not
been specified, an additional 6 Amp DC RMS power supplies can be provided. This should
be positioned above the HPU on the left hand panel. Additional information on this exact
position may be sought from drawing 667/GA/33074/ETC.
With reference to the Figure 67, 67 and 68, the AC input for the ancillary power supply
should be obtained from the MCB Supply on the master switch unit (Live connected to MCB
SW1 and Neutral connected to Terminal N3). The step down transformer will be supplied
with conventional power supply leads to allow this connection.
The AC output from the transformer is rectified and applied to a terminal block, as detailed in
the figure below. Orange wire will be used to connect the DET COM + output from the
rectifier to the terminal block. Slate coloured wire will be used to connect DET SUP – 24V
from the rectifier to the terminal block. Please refer to 667/GA/33074/ETC for a detailed
connection scheme and earth arrangement.
Please Note! 6 amp power supplies contain both transformer and associated rectifier.
When specifying multiple power supplies care should be taken to ensure that there is
sufficient space within the specified cabinet for the required items.
Please note! If it is anticipated that multiple 6 Amp power supplies will be required, to
service the configured load, AC input for the additional powers supplies should be
provided by configuring the ST900ELV controller with additional MCB.
Figure 67 – Detector Power
Figure 68 – Detector Power
Output from Step
Down transformer
DET COM + Orange
DET COM + Orange
DET SUP – 24VAC
Slate
DET SUP – 24VAC Slate
Figure 69 – Detector Power
Mains Power provided from
the Master Switch Unit
MCB
SW1
N3
Security classification
Unrestricted
Version
2
Last Editor
Harry Smyth
Document Name
Configuration Control
Copyright © Mobility 2014. All Rights Reserved.
Live
+ VE
Neutral - VE
Page
72 of 83
Status
Released
Date
09/12/2014
Document No.
667/CC/45950/000
Mobility is a division of Siemens Plc
Mobility and Logistics, Traffic Solutions
Sopers Lane, Poole, Dorset, BH17 7ER
4.13 Serial I/O Cards
The Serial Input/Output (I/O) Kits do not form part of the Outercase selected from Table 4
and therefore should be ordered separately. Two types of I/O cards, remote from the CPU
Card, are available one with 4 outputs/16 inputs and one with 16 outputs/16 inputs. Four I/O
cards can be configured to the ST950. Figure 37 sets out stencil indications on the Terminal
Panel to aid positioning optimisation.
Figure 70 – Serial I/O Card
Inputs
Inputs
Serial Link
OUT
Outputs
Serial Link
IN
Serial I/O
Address
Switch
The I/O cards communicate with the CPU card via the RJ45 Cat5e, as a serial link. The
serial link communication protocol relies on addressing techniques to ensure the appropriate
information is delivered to the intended component. This means that the order in which the
components are connected to the fast serial link is not imperative to successful
communications. However, to maintain consistency of build sequence of connections set out
in Table 5 should be used.
As stated above, once connected into the serial link the CPU card indentifies the I/O by the
appropriate address. The address is set on the I/O card, shown Figure 70. Controller special
instructions will provide details on assigned inputs and outputs.
Security classification
Unrestricted
Version
2
Last Editor
Harry Smyth
Document Name
Configuration Control
Copyright © Mobility 2014. All Rights Reserved.
Page
73 of 83
Status
Released
Date
09/12/2014
Document No.
667/CC/45950/000
Mobility is a division of Siemens Plc
Mobility and Logistics, Traffic Solutions
Sopers Lane, Poole, Dorset, BH17 7ER
Figure 71 illustrate the available positions available when allocating space to I/O card.
Figure 71 – I/O Serial Card Optimisation
Notes/Rules:
Panels 1 and 2 are always fitted
Card positions are silk screened I/O 1 etc
I/O Card 1 allocated to Panel 1, position I/O 1
I/O Card 2 allocated to Panel 1, position I/O 2
I/O Card 3 allocated to Panel 2, position I/O 1
I/O Card 4 allocated to Panel 2, position I/O 2
Security classification
Unrestricted
Version
2
Last Editor
Harry Smyth
Document Name
Configuration Control
Copyright © Mobility 2014. All Rights Reserved.
Page
74 of 83
Status
Released
Date
09/12/2014
Document No.
667/CC/45950/000
Mobility is a division of Siemens Plc
Mobility and Logistics, Traffic Solutions
Sopers Lane, Poole, Dorset, BH17 7ER
4.14 Gemini2
This unit is not included in the Outercase ordered from Table 4 and therefore must be
specified separately. Please refer to the family tree document for the Gemini unit
(667/1/32600/ETC) when specifying the make-up of the Gemini unit. Paragraph 4.7 explains
the location the Gemini unit can take within the ST950ELV cabinet. The Gemini unit
communicates with the ST950ELV CPU Card through a serial interface. To establish this
interface connect MCE0141 (667/1/26579/000) to PL4 on Gemini to the RS232 port 25 way
D on ST900ELV CPU. Power for the Gemini unit can be provided by utilising one of the mini
circuit breakers within the Master Switch Assembly. One mini circuit breaker will be installed
for the OTU (Gemini); however, a second and third kit may be fitted using kit of parts
667/1/27121/000. Positions for these additional power facilities are shown on
667/GA/27121/000.
Note: These two additional kits can only be fitted if the 300mA RCD unit is not required.
To provide Lamp Supply monitoring on the Gemini the ‘High V’ Input 2 can be utilised. An
electro-mechanical relay switched from an I/O card output (via Special Conditioning)
provides the lamp supply loss indication into the Gemini unit. Full installation details can be
obtained from drawing 667/GA/32612/000.
If wired at the factory, the wires for connection to an I/O card output will be brought within
reach of the I/O card outputs but left unconnected. The correct output will need to be
identified for each installation, and the wires connected to the output N.O. (violet wire) and
output COM (grey wire). Consult the configuration’s Special Instructions for details of how to
activate the Special Conditioning code to drive the ‘supply monitor’ relay.
Figure 72 – Gemini Connections
Warning! It is important that the Gemini Last Gasp Dial Battery, within the Gemini Power
Supply Unit, is orientated correctly; the battery terminal must be facing up. If the unit is to be
mounted in such a way that the battery terminals are not facing up then it is necessary to
implement certain modifications to ensure that the battery is not operating upside down.
Please refer to document 667/HB/32600/000 for the necessary modifications.
Security classification
Unrestricted
Version
2
Last Editor
Harry Smyth
Document Name
Configuration Control
Copyright © Mobility 2014. All Rights Reserved.
Page
75 of 83
Status
Released
Date
09/12/2014
Document No.
667/CC/45950/000
Mobility is a division of Siemens Plc
Mobility and Logistics, Traffic Solutions
Sopers Lane, Poole, Dorset, BH17 7ER
4.15 Stratos Outstation
This unit is not included in the Outercase ordered from Table 4 and therefore must be
specified separately. Please refer to the family tree document for the Stratos Outstation
(667/DZ/52250/ETC) when specifying the make-up of the unit. Section 4.7 explains the
location the Stratos Outstation unit can take within the ST950ELV cabinet.
Power for the Stratos Outstation can be provided by utilising one of the mini circuit breakers
within the Master Switch Assembly. One mini circuit breaker will be installed for the OTU
(Stratos Outstation); however, a second and third kit may be fitted using kit of parts
667/1/27121/000. Positions for these additional power facilities are shown on
667/GA/27121/000. With reference to Figure 73, mains supply power for the Stratos
Outstation is connected via a standard IEC C13 mains lead. The other boards in the system
are powered over the RJ45 GSPI cables. To provide Lamp Supply monitoring on the Stratos
Outstation the Lamp Supply Monitor Port is used.
Figure 73 - Power for Stratos Outstation Unit
Lamp
Supply
Monitor
Port
Mains
Connection
to Stratos
Outstation
If the internal backup battery is fitted the Stratos Outstation can be mounted in
any orientation apart from front panel facing down.
Security classification
Unrestricted
Version
2
Last Editor
Harry Smyth
Document Name
Configuration Control
Copyright © Mobility 2014. All Rights Reserved.
Page
76 of 83
Status
Released
Date
09/12/2014
Document No.
667/CC/45950/000
Mobility is a division of Siemens Plc
Mobility and Logistics, Traffic Solutions
Sopers Lane, Poole, Dorset, BH17 7ER
4.16 Regulatory Sign Connection
4.16.1 HPU Regulatory Sign Connection
A maximum of 8 regulatory signs can be run from the 1st HPU Socket and these are
connected to SK1 terminals 9 to 16 labelled Reg1 to Reg 8 with the returns also on socket
SK1 terminals 1 to 8 labelled Returns. A further 8 regulatory signs can be supplied from
the 2nd HPU.
Figure 74 – HPU Connections
Security classification
Unrestricted
Version
2
Last Editor
Harry Smyth
Document Name
Configuration Control
Copyright © Mobility 2014. All Rights Reserved.
Page
77 of 83
Status
Released
Date
09/12/2014
Document No.
667/CC/45950/000
Mobility is a division of Siemens Plc
Mobility and Logistics, Traffic Solutions
Sopers Lane, Poole, Dorset, BH17 7ER
4.16.2 Additional Regulatory Sign Connection
If the 2nd HPU PCB is not specified and there is a requirement to power more than 8
regulatory signs an expansion kit (667/1/33070/000) is available to support an additional 12
regulatory signs.
With reference to Figure 76 and 77, the expansion kit is positioned above the HPU on the
left hand side of the cabinet. Additional information on the exact position can be sought from
diagram 667/GA/33070/000 Sheet 1. Please Note! The Additional Regulatory Sign Kit
contains both transformer and associated PCB. When specifying multiple kits care
should be taken to ensure that there is sufficient space within the specified cabinet
for the required items.
With reference to Figure 75, the AC input for the ancillary power supply should be obtained
from the master switch unit (Live connected to MCB SW1 and Neutral connected to Terminal
N3). The step down transformer will be configured with conventional power supply leads to
allow this connection. The AC output from the transformer is applied to a terminal strip TB2,
as detailed in the figure below. Please refer to 667/GA/33070/000 Sheet 2 for a detailed
connection scheme and earth arrangement.
Figure 75 – Additional Reg Sign Power
Figure 76 – Additional Reg Sign
Security classification
Unrestricted
Version
2
Last Editor
Harry Smyth
Document Name
Configuration Control
Copyright © Mobility 2014. All Rights Reserved.
Figure 77 – Additional Reg Sign
Page
78 of 83
Status
Released
Date
09/12/2014
Document No.
667/CC/45950/000
Mobility is a division of Siemens Plc
Mobility and Logistics, Traffic Solutions
Sopers Lane, Poole, Dorset, BH17 7ER
Lamp monitoring is performed (if required) by LSLS backplane external monitor input
channels. PL1 and PL2 on the Additional Regulatory Sign Kit PCB are four way Molex style
connectors. These current outputs are wired to the LSLS backplane module external
(torroid) inputs, using two twisted pair and provide monitoring signals, if required.
An indication of the connections point is provided in the Figure 78 immediately below. The
full connection scheme should be sought from drawing 667/GA33070/000 sheet 2
Figure 78 – LSLS Monitoring Connections
LSLS
backplane
monitoring
connection,
to regularity
sign
Please Note Instructions and specific precautions for making the LSLS backplane torroid
connections are detailed the Siemens Type 900 ELV Installation Commissioning and
Maintenance Handbook, 667/HE/32900/000, Paragraph 4.19. Output terminals are
configured using the appropriate software configuration tools (IC4). Please refer to
paragraph 6.15 for information on HPU regularity sign monitoring.
Security classification
Unrestricted
Version
2
Last Editor
Harry Smyth
Document Name
Configuration Control
Copyright © Mobility 2014. All Rights Reserved.
Page
79 of 83
Status
Released
Date
09/12/2014
Document No.
667/CC/45950/000
Mobility is a division of Siemens Plc
Mobility and Logistics, Traffic Solutions
Sopers Lane, Poole, Dorset, BH17 7ER
4.17 Audible Supply Kit
To provide drive for audible indicators an Audible Driver Kit of parts can be ordered. The
audible driver is not contained within the Outercase chosen form Table 4 and therefore
should be ordered separately. Please consult the parts listing. With Reference to Figure 79,
the module is powered from the green phase of the relevant pedestrian phase output of the
LSLS card. A 12V DC output drives the appropriate audible unit. The module can be
connected to an I/O card to allow operation to be inhibited and to allow switching between
Loud and Quiet sound levels.
Output connection for the Audible units can be taken from the appropriate Loud/Quiet
connections, indicated in Figure 79. The appropriate Power Present (PP) LED on the
module illuminates when the Loud/Quite audible is being driven. Each Audible Driver Module
can drive up to 8 audible units. It is recommended that all audible units connected to an
Audible Driver Module are the same type. If there is a requirement to switch between loud
and quite a minor modification to the Audible Driver Module is necessary. Full detail of these
additional requirements should be sought from the ST950ELV General Handbook.
Figure 79 - Audible Supply Kit
Security classification
Unrestricted
Version
2
Last Editor
Harry Smyth
Document Name
Configuration Control
Copyright © Mobility 2014. All Rights Reserved.
Page
80 of 83
Status
Released
Date
09/12/2014
Document No.
667/CC/45950/000
Mobility is a division of Siemens Plc
Mobility and Logistics, Traffic Solutions
Sopers Lane, Poole, Dorset, BH17 7ER
4.18 Tactile Unit
4.18.1 None Switched Tactiles
Non Switched tactiles are driven from the green man output of the appropriate pedestrian
phase and rotate whenever the pedestrian green is illuminated. Figure 80 illustrates the
necessary connections for non-switched tactiles. Refer to part listing.
Figure 80 – Non Switch Tactile
Blue to TACT
Normally Open
Common
M
J
AUD
Com
Lamp
Returns)
TACT O/P
Brown to Return
Common not
used
Link J to AUD
if not using
with controller
4.18.2 Switched Tactiles
Switched tactiles are also driven from the green man output of the appropriate pedestrian
phase but can be activated when required by the I/O output. There are several mounting
options for the tactile controller module. When using tactiles, with integrated motor and drive
module, the assembly can be mounted in the pedestrian indicator. When using tactiles with
separate motor and drive module, the drive module can be mounted inside the nearest
Helios signal head (the recommended position for mounting the tactile controller is at the top
of the Amber aspect case – see Helios General Handbook 667/HB/30000/000). The drive
module can be mounted inside the traffic controller cabinet. Please refer to the ST950ELV
Handbook when installing tactiles in parallel. Separate returns must be used between I/O
card and tactiles.
Figure 81 – Switched Tactile
Output
TACT O/P
Normally Open
Common
Input
Security classification
Unrestricted
Version
2
Last Editor
Harry Smyth
Document Name
Configuration Control
Copyright © Mobility 2014. All Rights Reserved.
+
Fault Output
Leave fault
o/p open
circuit
Enable Link
Green man
Output
(Lamp Returns)
+
Input
Common
If not using I/O card link
Enable + and Enable – with
link wire
Page
81 of 83
Status
Released
Date
09/12/2014
Document No.
667/CC/45950/000
Mobility is a division of Siemens Plc
Mobility and Logistics, Traffic Solutions
Sopers Lane, Poole, Dorset, BH17 7ER
4.19 Solar Cell Kit of Parts
With reference to Figure 74 the -24 power supply and activation signal are provided by the
HPU PCB, at SKT 2.
4.20 ST950ELV Parts Listing
Table 7
Part Number
Description
667/1/45950/020
ST950 ELV Cabinet UK 20A Single LSLS - Grey
667/1/45950/040
ST950 ELV Cabinet UK 40A Single LSLS - Grey
667/1/45950/021
ST950 ELV Cabinet UK 20A Single LSLS - Black
667/1/45950/041
ST950 ELV Cabinet UK 40A Single LSLS - Black
667/1/32900/000
Expansion cabinet kit - Grey
667/1/32900/001
Expansion cabinet kit - Black
667/1/46085/002
ST950 I/O card kit (4 outputs) - not included in controller build
667/1/46085/001
ST950 I/O card kit (16 outputs) - not included in controller build
667/1/46014/000
ST950 CPU I/O kit (4 outputs) - not included in controller / rack build
667/1/45952/001
ST950 CPU I/O kit (4 outputs) cableform
667/1/32943/001
ELV Lamp switch (LSLS) kit
667/1/32960/001
ELV Lamp switch (LSLS) backplane kit
667/1/32945/000
ST950 ELV rack LSLS wiring kit
667/1/32943/001
ELV Lamp switch (LSLS) kit
667/1/32960/001
ELV Lamp switch (LSLS) backplane kit
667/1/32945/000
ST950 ELV rack LSLS wiring kit
667/1/45952/001
ST950 CPU I/O kit (4 outputs) cableform
667/1/33002/000
ELV detector 6U rack expansion kit
667/1/33075/000
ELV 24 V detector supply Kit (2A)
667/1/33074/000
ELV 24 V detector supply Kit (6A)
667/1/33070/000
ELV Regulatory Sign expansion kit
667/1/32955/000
ELV Audible / Tactile supply kit
667/1/33007/000
ELV LSLS expansion kit (for second cabinet)
667/1/32994/001
Backplane SLD4 Link Cable (short)
667/1/32994/002
Backplane SLD4 Link Cable (long)
Security classification
Unrestricted
Version
2
Last Editor
Harry Smyth
Document Name
Configuration Control
Copyright © Mobility 2014. All Rights Reserved.
Page
82 of 83
Status
Released
Date
09/12/2014
Document No.
667/CC/45950/000
Mobility is a division of Siemens Plc
Mobility and Logistics, Traffic Solutions
Sopers Lane, Poole, Dorset, BH17 7ER
Part Number
Description
667/1/33080/000
ST950 ELV Mains connection kit
667/1/27056/001
Manual Panel Full Kit
667/1/27104/000
DFM lens kit
667/1/47210/100
WiMag standard interface card kit
408/4/54224/000
4 Port POE Switch
408/4/54225/000
8 Port POE Switch
667/1/47280/000
WiMag loop detector replacement card
5 CONTACT WITH TECHNICAL SUPPORT
For any support related questions, queries or problems please contact the Technical Support
Department, Siemens Mobility, Traffic Solutions, Sopers Lane, Poole, BH17 1ER.
Departmental contacts are as follow:
Mike Tonkin
Project Support Manager
[email protected]
(01202) 782108
Craig Cameron
Senior Project Engineer
[email protected]
(01202) 782220
Colin Whipps
Technical Support Manager
[email protected]
(01202)782875
Security classification
Unrestricted
Version
2
Last Editor
Harry Smyth
Document Name
Configuration Control
Copyright © Mobility 2014. All Rights Reserved.
Page
83 of 83
Status
Released
Date
09/12/2014
Document No.
667/CC/45950/000
Mobility is a division of Siemens Plc