1
DIGITAL MULTIFUNCTIONAL SYSTEM
START GUIDE
MODEL: AR-5516S
AR-5520S
AR-5516
AR-5520
AR-5516D
AR-5520D
AR-5516N
AR-5520N
BEFORE USING
This section provides the
safety information to use
the machine and explains
how to use this manual.
SETUP
This section explains
software installation and
connection to a computer.
APPENDIX
This section includes the
troubleshooting and
specifications.
Keep this manual close at hand for reference whenever needed.
.
CONTENTS
BEFORE USING
CAUTIONS......................................................... 2
● CAUTIONS ON USING.....................................2
● IMPORTANT POINTS WHEN SELECTING AN
INSTALLATION SITE .......................................2
● CAUTIONS ON HANDLING .............................3
● CAUTIONS ON LASER ....................................3
● ENVIRONMENTAL INFORMATION.................4
USING THE MANUAL ....................................... 4
● ABOUT THE MANUALS ...................................4
HOW TO USE THE OPERATION GUIDE ......... 5
● THE MEANING OF "R" IN ORIGINAL AND
PAPER SIZE INDICATIONS.............................5
● CONVENTIONS USED IN THIS MANUAL.......6
● SPF (AR-5516S/AR-5520S, AR-5516/AR-5520) ...... 6
● RSPF (AR-5516D/AR-5520D/AR-5516N/AR-5520N) ....6
● DIFFERENCES BETWEEN MODELS..............6
SETUP
BEFORE SOFTWARE SETUP .......................... 7
● SOFTWARE......................................................7
● HARDWARE AND SOFTWARE
REQUIREMENTS .............................................7
● POWER ON THE MACHINE ............................7
INSTALLING THE SOFTWARE
(AR-5516S/AR-5520S/AR-5516/AR-5520/AR-5516D/
AR-5520D) ................................................................ 8
CONNECTING TO A COMPUTER
(AR-5516S/AR-5520S/AR-5516/AR-5520/AR-5516D/
AR-5520D) .............................................................. 10
● CONNECTING A USB CABLE .......................10
● USING THE MACHINE AS A SHARED
PRINTER .......................................................11
INSTALLING THE SOFTWARE
(AR-5516N/AR-5520N) .................................... 12
CONFIGURING THE PRINTER DRIVER ........ 18
SETTING UP BUTTON MANAGER ................ 19
APPENDIX
TROUBLESHOOTING ..................................... 21
SPECIFICATIONS ........................................... 23
INFORMATION ON DISPOSAL ...................... 26
1
BEFORE USING
CAUTIONS
Follow the cautions below when using this machine.
CAUTIONS ON USING
Warning:
• The fusing area is hot. Exercise care in this area when removing misfed paper.
• Do not look directly at the light source. Doing so may damage your eyes.
Caution:
• Do not switch the machine rapidly on and off. After turning the machine off, wait 10 to 15 seconds before turning it
back on.
• Machine power must be turned off before installing any supplies.
• Place the machine on a firm, level surface.
• Do not install the machine in a humid or dusty location.
• When the machine is not used for a long time, for example, during prolonged holidays, turn the power switch off
and remove the power cord from the outlet.
• When moving the machine, be sure to turn the power switch off and remove the power cord from the outlet.
• Do not cover the machine with a dust cover, cloth or plastic film while the power is on. Doing so may prevent heat
dissipation, damaging the machine.
• Use of controls or adjustments or performance of procedures other than those specified herein may result in
hazardous laser radiation exposure.
• The socket-outlet should be installed near the machine and should be easily accessible.
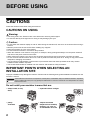
IMPORTANT POINTS WHEN SELECTING AN
INSTALLATION SITE
Improper installation may damage the machine. Please note the following during initial installation and whenever the
machine is moved.
If the machine is moved from a cool place to a warm place, condensation may form inside the machine. Operation
Caution in this condition will cause poor copy quality and malfunctions. Leave the machine at room temperature for at least
2 hours before use.
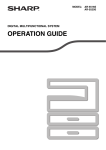
Do not install your machine in areas that are:
• damp, humid, or very
dusty
• exposed to direct sunlight
• poorly
ventilated
• subject to extreme
temperature or humidity
changes, e.g., near an
air conditioner or heater
2
BEFORE USING
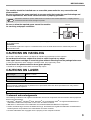
The machine should be installed near an accessible power outlet for easy connection and
disconnection.
Be sure to connect the power cord only to a power outlet that meets the specified voltage and
current requirements. Also make certain the outlet is properly grounded.
Note
Connect the machine to a power outlet which is not used for other electric appliances. If a lighting fixture is
connected to the same outlet, the light may flicker.
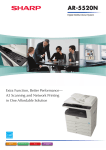
Be sure to allow the required space around the machine
for servicing and proper ventilation.
20 cm
20 cm
20 cm
A small amount of ozone is produced within the copier during operation. The emission level is insufficient to cause
any health hazard.
CAUTION:
It is advisable to place the copier in a ventilated area, since the small amount that is emitted may have an
objectionable odor.
CAUTIONS ON HANDLING
Be careful in handling the machine as follows to maintain the performance of this machine.
Do not drop the machine, subject it to shock or strike it against any object.
Store spare toner cartridges in a cool dry place without removing from the package before use.
• If they are exposed to direct sunlight or excessive heat, poor copies may result.
Do not touch the photoconductive drum (green portion).
• Scratches or smudges on the drum will cause dirty copies.
CAUTIONS ON LASER
Wave length
785 nm ± 15 nm
Pulse times
(10.32 μs ± 10.32 ns)/7 mm
Output power
Max. 0.6 mW
Caution
Use of controls or adjustments or performance of procedures other than those specified herein may result in
hazardous radiation exposure.
This Digital Equipment is CLASS 1 LASER PRODUCT (IEC 60825-1 Edition 1.2-2001)
Trademark acknowledgements
The following trademarks and registered trademarks are used in conjunction with the machine and its peripheral
devices and accessories.
• Microsoft®, Windows®, Windows® 2000, Windows® XP, and Windows Vista® are registered trademarks or
trademarks of Microsoft Corporation in the U.S.A. and other countries.
• IBM, PC/AT, and PowerPC are trademarks of International Business Machines Corporation.
• Adobe, the Adobe logo, Acrobat, the Adobe PDF logo, and Reader are registered trademarks or trademarks of
Adobe Systems Incorporated in the United States and other countries.
• All other trademarks and copyrights are the property of their respective owners.
3
BEFORE USING
ENVIRONMENTAL INFORMATION
Products that have earned the ENERGY STAR® are designed to protect the environment
through superior energy efficiency.
The products that meet the ENERGY STAR® guidelines carry the logo shown above.
The products without the logo may not meet the ENERGY STAR® guidelines.
USING THE MANUAL
This machine has been designed to provide convenient copying features in a minimum amount of office space and
with maximum operational ease. To get full use of all machine features, be sure to familiarise yourself with this
manual and the machine. For quick reference during machine use, keep this manual in a handy location.
ABOUT THE MANUALS
The manuals for the machine are as follows:
Start Guide (this manual)
This manual explains:
• How to install the software that allows the machine to be used as a printer and scanner for your computer
• Troubleshooting for using the machine
• Specifications
• Cautions for using the machine in safety
Operation Guide (on the accessory CD-ROM)
This manual explains:
• Part names of the machine
• Available paper type for this machine
• Basic copy procedure and advanced copy functions
(For example: rotating the image 90 degrees, copying multiple originals onto a single sheet of paper)
• Basic print procedure and other frequently used print functions
(For example: fitting the printed image to the paper, enlarging/reducing the print image)
• Scanning on the machine and from a computer
• Toner cartridge replacement and peripheral devices
Note
• The display screens, messages, and key names shown in the manual may differ from those on the actual
machine due to product improvements and modifications.
• Where "AR-XXXX" appears in this manual, please substitute the name of your model for "XXXX".
SOFTWARE LICENSE
The SOFTWARE LICENSE will appear when you install the software from the CD-ROM. By using all or any
portion of the software on the CD-ROM or in the machine, you are agreeing to be bound by the terms of the
SOFTWARE LICENSE.
4
BEFORE USING
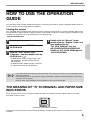
HOW TO USE THE OPERATION
GUIDE
The Operation Guide provides detailed instructions for operating the machine. View the Operation Guide when you
use the machine after the initial setup is completed.
Viewing the manual
The "CD-ROM" that accompanies the machine contains a manual in PDF format. To view the manual in PDF format,
Acrobat Reader or Adobe Reader of Adobe Systems Incorporated is required. If neither program is installed on your
computer, the programs can be downloaded from the following URL:
http://www.adobe.com/
1
Turn on your computer.
4
2
Insert the supplied CD-ROM into your
CD-ROM drive.
3
Click the "Start" button, click
"Computer", and then double-click the
CD-ROM icon ( ).
• In Windows XP, click the "start" button, click
"My Computer", and then double-click the
CD-ROM icon.
• In Windows 2000, double-click "My Computer"
and then double-click the CD-ROM icon.
Note
Double-click the "Manual" folder,
double-click the "English" folder, and
then double-click the
"AR_5516_5520.pdf" icon (for
AR-5516S/5520S/5516/5520/5516D/
5520D) or "AR_5516N_5520N.pdf (for
"AR-5516N/5520N).
5
6
7
8
9
10
11
12
• If you will be viewing the Operation Guide repeatedly, you may find it convenient to copy this Operation Guide
file to your computer.
• The Operation Guide can be printed out using Acrobat Reader. SHARP recommends printing out the sections
which you refer to regularly.
• Refer to "Help" of Acrobat Reader for more details on how to use Acrobat Reader.
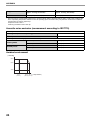
THE MEANING OF "R" IN ORIGINAL AND PAPER SIZE
INDICATIONS
An "R" appearing at the end of an original or paper size (A4R, etc.) indicates that the original or paper is oriented
horizontally as shown below.
<Horizontal (Landscape) orientation>
Sizes that can be placed only in the horizontal (landscape) orientation (B4, A3) do not contain the "R" in their size
indication.
5
BEFORE USING
CONVENTIONS USED IN THIS MANUAL
Warning
Warns the user that injury may result if the contents of the warning are not properly followed.
Caution
Cautions the user that damage to the machine or one of its components may result if the contents
of the caution are not properly followed.
Notes provide information relevant to the machine regarding specifications, functions,
performance, operation and such, that may be useful to the user.
Note
SPF (AR-5516S/AR-5520S, AR-5516/AR-5520)
This manual refers to the Single Pass Feeder as the "SPF".
RSPF (AR-5516D/AR-5520D/AR-5516N/AR-5520N)
This manual refers to the Reversing Single Pass Feeder as the "RSPF".
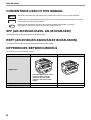
DIFFERENCES BETWEEN MODELS
This manual covers the following models.
Model
AR-5520S/AR-5520/AR-5520D/AR-5520N AR-5516S/AR-5516/AR-5516D/AR-5516N
(With optional SPF/RSPF installed)
(With optional SPF/RSPF installed)
Appearance
The above illustration is used in
instances where a function
and/or the operation of the
machine is the same on both
models.
6
Copy speed
20CPM
16CPM
Paper trays
Two (250 x 2)
One (250 x 1)
SETUP
BEFORE SOFTWARE SETUP
This chapter explains how to install and configure the software that is required for the printer and scanner functions of the machine.
Note
• The scanner function is not available on the AR-5516S/AR-5520S.
• This manual refers to the CD-ROM that accompanied the machine simply as "CD-ROM".
SOFTWARE
The CD-ROM that accompanies the machine contains the following software:
AR-5516N/AR-5520N
AR-5516S/AR-5520S
Printer driver
Printer driver
The printer driver enables you to use the printer function of the
machine.
The printer driver includes the Print Status Window. This is a
utility that monitors the machine and informs you of the printing
status, the name of the document currently being printed, and
error messages.
The printer driver enables you to use the printer function of
the machine.
AR-5516/AR-5520, AR-5516D/AR-5520D
Button Manager
Scanner driver
The scanner driver allows you to use the scanning function
of the machine with TWAIN-compliant and WIA-compliant
applications.
Button Manager allows you to use the scanner menus on the
machine to scan a document.
MFP driver
Printer driver
The printer driver enables you to use the printer function of the
machine.
The printer driver includes the Print Status Window. This is a
utility that monitors the machine and informs you of the printing
status, the name of the document currently being printed, and
error messages.
Scanner driver
The scanner driver allows you to use the scanning function of the
machine with TWAIN-compliant and WIA-compliant applications.
Button Manager
Button Manager allows you to use the scanner menus on the
machine to scan a document.
HARDWARE AND SOFTWARE REQUIREMENTS
Check the following hardware and software requirements before installing the software.
Computer type
AR-5516S/AR-5520S/AR-5516/AR-5520/AR-5516D/AR-5520D :
IBM PC/AT or compatible computer equipped with a USB 2.0*1/1.1*2
AR-5516N/AR-5520N :
IBM PC/AT or compatible computer equipped with a 10BASE-T/100BASE-TX LAN connector
Operating system*3
Windows 2000 Professional, Windows XP Professional, Windows XP Home Edition, Windows Vista
Other hardware requirements
An environment on which any of the operating systems listed above can fully operate
*1 The machine's USB 2.0 port will transfer data at the speed specified by the USB 2.0 (Hi-Speed) only if the Microsoft USB 2.0 driver is
preinstalled in the computer, or if the USB 2.0 driver for Windows 2000 Professional/XP/Vista that Microsoft provides through its
"Windows Update" is installed.
*2 Compatible with Windows 2000 Professional, Windows XP Professional, Windows XP Home Edition, or Windows Vista preinstalled
models equipped with a USB interface as standard.
*3 • The machine does not support printing from a Macintosh environment.
• Administrator’s rights are required to install the software using the installer.
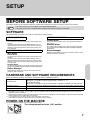
POWER ON THE MACHINE
The power switch is located on the left side of the machine.
Turn the power switch to the "ON" position.
7
SETUP
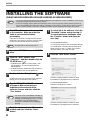
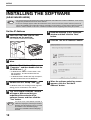
INSTALLING THE SOFTWARE
(AR-5516S/AR-5520S/AR-5516/AR-5520/AR-5516D/AR-5520D)
Note
1
• The screen images in this manual are mainly for Windows Vista. With other versions of Windows, some screen
images may be different from those in this manual.
• If an error message appears, follow the instructions on the screen to solve the problem. After the problem is
solved, the installation procedure will continue. Depending on the problem, you may have to click the "Cancel"
button to exit the installer. In this case, reinstall the software from the beginning after solving the problem.
The USB cable must not be connected
to the machine. Make sure that the
cable is not connected before
proceeding.
7
If the cable is connected, a Plug and Play window
will appear. If this happens, click the "Cancel" button
to close the window and disconnect the cable.
Note
2
3
For AR-5516S/AR-5520S
To connect the machine and a computer directly
via a USB cable, normally click the "Standard"
button and go to step 11. When you click the
"Custom" button, go to the next step.
The cable will be connected in step 12.
Insert the CD-ROM into your CD-ROM
drive.
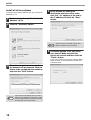
To install all of the software, click the
"Standard" button and go to step 11.
To install particular packages, click
the "Custom" button and go to the
next step.
8
Click the "MFP Driver" button.
Click the "Start" button, click
"Computer", and then double-click the
CD-ROM icon ( ).
• In Windows XP, click the "start" button, click
"My Computer", and then double-click the
CD-ROM icon.
• In Windows 2000, double-click "My Computer",
and then double-click the CD-ROM icon.
4
Double-click the "Setup" icon (
).
In Windows Vista, if a message screen appears
asking you for confirmation, click "Allow".
5
The "SOFTWARE LICENSE" window
will appear. Make sure that you
understand the contents of the
software license, and then click the
"Yes" button.
Note
6
8
You can show the "SOFTWARE LICENSE" in
a different language by selecting the desired
language from the language menu. To install
the software in the selected language,
continue the installation with that language
selected.
Read the message in the "Welcome"
window and then click the "Next"
button.
Click the "Display Readme" button to show
information on packages that are selected.
For AR-5516S/AR-5520S
Click the "Printer Driver" button.
Click the "Display Readme" button to show
information on packages that are selected.
SETUP
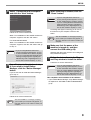
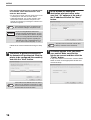
9
Select "Connected to this computer"
and click the "Next" button.
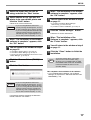
11
When installing is finished, click the
"Close" button.
Caution
A message will appear instructing you to connect
the machine to your computer. Click the "OK"
button.
Follow the on-screen instructions.
When "The installation of the SHARP software is
complete." appears, click the "OK" button.
Note
For AR-5516S/AR-5520S
When "The installation of the SHARP software is
complete." appears, click the "OK" button and go
to step 11.
Caution
• If you are using Windows Vista and a
security warning window appears, be sure
to click "Install this driver software anyway".
• If you are running Windows 2000/XP and a
warning message appears regarding the
Windows logo test or digital signature, be
sure to click "Continue Anyway" or "Yes".
• If you are using Windows Vista and a
security warning window appears, be sure
to click "Install this driver software anyway".
• If you are running Windows 2000/XP and a
warning message appears regarding the
Windows logo test or digital signature, be
sure to click "Continue Anyway" or "Yes".
12
After the installation, a message prompting
you to restart your computer may appear. In
this case, click the "Yes" button to restart your
computer.
Make sure that the power of the
machine is turned on, and then
connect the USB cable (p.10).
Windows will detect the machine and a Plug and
Play window will appear.
13
Follow the instructions in the Plug
and Play window to install the driver.
Follow the on-screen instructions.
10
You will return to the window of step
8. If you wish to install Button
Manager, click the "Button Manager"
button.
If you do not wish to install the Button Manager,
go to step 11.
Caution
• If you are using Windows Vista and a
security warning window appears, be sure
to click "Install this driver software anyway".
• If you are running Windows 2000/XP and a
warning message appears regarding the
Windows logo test or digital signature, be
sure to click "Continue Anyway" or "Yes".
This completes the installation of the software.
• If you installed Button Manager, set up Button Manager
as explained in "SETTING UP BUTTON MANAGER"
(p.19).
Follow the on-screen instructions.
Note
After the installation, a message prompting
you to restart your computer may appear. In
this case, click the "Yes" button to restart your
computer.
9
SETUP
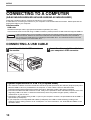
CONNECTING TO A COMPUTER
(AR-5516S/AR-5520S/AR-5516/AR-5520/AR-5516D/AR-5520D)
Follow the procedure below to connect the machine to your computer.
A USB cable for connecting the machine to your computer is not included with the machine. Please purchase the
appropriate cable for your computer.
Interface cable
USB cable
Shielded twisted pair cable, high-speed transmission equivalent (3 m max.)
If the machine will be connected using a USB 2.0 interface, please purchase a USB cable that supports USB 2.0.
Caution
• USB is available with a PC/AT compatible computer that was originally equipped with USB and had Windows
2000 Professional, Windows XP Professional, Windows XP Home Edition or Windows Vista preinstalled.
• Do not connect the USB cable before installing the Printer/MFP driver. The USB cable should be connected
during installation of the Printer/MFP driver.
CONNECTING A USB CABLE
1
Insert the cable into the USB connector on
the machine.
2
Insert the other end of the cable into
your computer's USB connector.
3
4
5
6
7
8
9
10
11
12
13
14
System requirements for USB 2.0 (Hi-Speed mode)
• The machine's USB 2.0 connector will transfer data at the speed specified by the USB 2.0 (Hi-Speed) only if the
Microsoft USB 2.0 driver is preinstalled in the computer, or if the USB 2.0 driver for Windows 2000
Professional/XP/Vista that Microsoft provides through its "Windows Update" Web page is installed.
• Even when the Microsoft USB 2.0 driver is used, it may not be possible to obtain full USB 2.0 speed if a PC card
supporting USB 2.0 is used. To obtain the latest driver (which may enable a higher speed), contact the
manufacturer of your PC card.
• Connection is also possible using a USB 1.1 port on your computer. However, the specifications will be USB 1.1
specifications (Full-Speed).
• If your computer is not compatible with USB 2.0 (Hi-Speed), the "USB 2.0 mode switching" setting in the
machine's system setting must be set to "Full-Speed". For more information, see "SYSTEM SETTINGS" in the
Operation Guide.
10
SETUP
USING THE MACHINE AS A SHARED PRINTER
If the machine will be used as a shared printer on a Windows network, follow these steps to install the printer driver
in the client computer.
Note
1
To configure the appropriate settings in the print server, see the operation manual or help file of your operating
system.
Perform steps 2 through 6 in
"INSTALLING THE SOFTWARE
(AR-5516S/AR-5520S/AR-5516/AR-5520/
AR-5516D/AR-5520D)" (p.8).
2
Click the "Custom" button.
3
Click the "MFP Driver" button.
5
Select the printer name (configured as
a shared printer on a print server)
from the list.
In Windows 2000/XP, you can also click the "Add
Network Port" button displayed below the list and
select the printer to be shared by browsing the
network in the window that appears.
6
Click the "Next" button.
Follow the on-screen instructions.
Note
Caution
Click the "Display Readme" button to show
information on packages that are selected.
For AR-5516S/AR-5520S
Click the "Printer Driver" button.
7
If the shared printer does not appear in the
list, check the settings on the print server.
• If you are using Windows Vista and a
security warning window appears, be sure
to click "Install this driver software anyway".
• If you are running Windows 2000/XP and a
warning message appears regarding the
Windows logo test or digital signature, be
sure to click "Continue Anyway" or "Yes".
You will return to the window of step 3.
Click the "Close" button.
Note
After the installation, a message prompting
you to restart your computer may appear. In
this case, click the "Yes" button to restart your
computer.
This completes the installation of the software.
Click the "Display Readme" button to show
information on packages that are selected.
4
Select "Connected via the network"
and click the "Next" button.
11
SETUP
INSTALLING THE SOFTWARE
(AR-5516N/AR-5520N)
Note
• The screen images in this manual are mainly for Windows Vista. With other versions of Windows, some screen
images may be different from those in this manual.
• If an error message appears, follow the instructions on the screen to solve the problem. After the problem is
solved, the installation procedure will continue. Depending on the problem, you may have to click the "Cancel"
button to exit the installer. In this case, reinstall the software from the beginning after solving the problem.
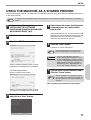
Set the IP Address
1
6
Read the message in the "Welcome"
window and then click the "Next"
button.
7
Click the "Set the IP Address" button.
8
When the software selection screen
appears, click the "Set the IP
Address" button.
Insert the LAN cable into the LAN
connector on the machine.
Use a network cable that is shielded.
2
Insert the CD-ROM into your CD-ROM
drive.
3
Click the "Start" button, click
"Computer", and then double-click the
CD-ROM icon ( ).
• In Windows XP, click the "start" button, click
"My Computer", and then double-click the
CD-ROM icon.
• In Windows 2000, double-click "My Computer",
and then double-click the CD-ROM icon.
4
Double-click the "Setup" icon (
).
In Windows Vista, if a message screen appears
asking you for confirmation, click "Allow".
5
The "SOFTWARE LICENSE" window
will appear. Make sure that you
understand the contents of the
software license, and then click the
"Yes" button.
Note
12
You can show the "SOFTWARE LICENSE" in
a different language by selecting the desired
language from the language menu. To install
the software in the selected language,
continue the installation with that language
selected.
SETUP
9
The printer or printers connected to
the network will be detected. Click the
printer to be configured (the machine)
and click the "Next" button.
10Enter the IP address, subnet mask,
and default gateway.
The settings in the window below are examples.
Be sure to ask your network administrator for the
correct IP address, subnet mask, and default
gateway to be entered.
If a message appears regarding the Windows
firewall, click the "Yes" button.
Note
• The "Ethernet Address" is indicated on the
left side of the machine near the LAN
connector.
• If the machine can not be recognised, enter
the Ethernet Address and click the
"Initialize" button to initialise the IP address.
Follow the on-screen instructions to click
the "OK" button and then the "Search"
button. If the machine is still not recognised,
disable your computer's firewall and then
repeat the installation from the beginning.
Note
When "Get IP Address Automatically" is
selected, the IP address may at times change
automatically. This will prevent printing. In this
event, select "Assign IP Address" and enter
the IP address.
11
Click the "Next" button.
12
When the "Finish" screen appears,
click the "Close" button.
This completes setting the IP Address.
• To install all of the software, go to "Install all of
the software" (p.14).
• To install particular packages, go to "Choose
the option you want to install" (p.15).
13
SETUP
Install all of the software
If you have not set the IP Address yet, go to "Set the IP
Address" (p.12).
1
Perform step 4 through 7 in "Set the IP
Address" (p.12).
2
Click the "Standard" button.
4
In the window for setting the
destination print port name, make
sure that ":lp" appears at the end of
the IP address and click the "Next"
button.
Note
5
Any name can be entered in "Printer Port
Name" (maximum of 63 characters).
A window appears to let you check
your entries. Make sure that the
entries are correct and then click the
"Finish" button.
If any of the entries are incorrect, click the "Back"
button to return to the appropriate window and
correct the entry.
3
The printer or printers connected to
the network will be detected. Click the
printer to be configured (the machine)
and click the "Next" button.
Note
14
If the machine's IP address cannot be found,
make sure the machine is powered on, make
sure the network cable is connected correctly,
and then click the "Search" button.
SETUP
6
Select the model that you will be
using, and click the "Next" button.
Caution
• If you are using Windows Vista and a
security warning window appears, be sure
to click "Install this driver software anyway".
• If you are running Windows 2000/XP and a
warning message appears regarding the
Windows logo test or digital signature, be
sure to click "Continue Anyway" or "Yes".
If a message appears regarding the Windows
firewall, click the "Yes" button.
7
Choose the option you want to
install
If you have not set the IP Address yet, go to "Set the IP
Address" (p.12).
1
Perform step 4 through 7 in "Set the IP
Address" (p.12).
2
Click the "Custom" button.
3
Click the "Printer Driver" button.
4
Select "LPR Direct Print", click the
"Next" button and go to the next step.
When the "Finish" screen appears,
click the "Close" button to finish the
installation.
Note
To use the scanner driver, you need to
connect to the scanner function using
SC-Scan A (see "CONNECTING TO AND
DISCONNECTING FROM THE SCANNER
FUNCTION USING SC-Scan A" in the
Operation Guide).
This completes the installation of the software.
• If you installed Button Manager, set up Button
Manager as explained in "SETTING UP BUTTON
MANAGER" (p.19).
15
SETUP
If the machine will be used as a shared printer
on a network, select "Shared Printer" and
click the "Next" button.
6
• For the port to be used, select the printer name set as
a shared printer, and click the "Next" button.
• In Windows 2000/XP, you can also click the "Add
Network Port" button and select the printer to be
shared (the machine) by browsing the network in the
window that appears.
Note
Caution
If the shared printer does not appear in the
list, check the settings in the printer server.
• If you are using Windows Vista and a
security warning window appears, be sure
to click "Install this driver software anyway".
• If you are running Windows 2000/XP and a
warning message appears regarding the
Windows logo test or digital signature, be
sure to click "Continue Anyway" or "Yes".
Note
Follow the on-screen instructions and go to step
8.
5
The printer or printers connected to
the network will be detected. Click the
printer to be configured (the machine)
and click the "Next" button.
Note
16
In the window for setting the
destination print port name, make
sure that ":lp" appears at the end of
the IP address and click the "Next"
button.
If the machine's IP address cannot be found,
make sure the machine is powered on, make
sure the network cable is connected correctly,
and then click the "Search" button.
7
Any name can be entered in "Printer Port
Name" (maximum of 63 characters).
A window appears to let you check
your entries. Make sure that the
entries are correct and then click the
"Finish" button.
If any of the entries are incorrect, click the "Back"
button to return to the appropriate window and
correct the entry.
SETUP
8
Select the model that you will be
using, and click the "Next" button.
14
When "The installation of the SHARP
software is complete." appears, click
the "OK" button.
9
Select whether or not you wish the
printer to be your default printer and
click the "Next" button.
15
You will return to the window of step 3
on page 11.
Follow the on-screen instructions.
Caution
• If you are using Windows Vista and a
security warning window appears, be sure
to click "Install this driver software anyway".
• If you are running Windows 2000/XP and a
warning message appears regarding the
Windows logo test or digital signature, be
sure to click "Continue Anyway" or "Yes".
10
When "The installation of the SHARP
software is complete." appears, click
the "OK" button.
11
You will return to the window of step 3
on page 15.
• To install the Scanner Driver, go to step 12.
• To install the Button Manager, go to step 16.
• If you do not want to install the Scanner Driver or the
Button Manager, go to step 19.
12
Click the "Scanner Driver (TWAIN)"
button.
13
Click the "Yes" button.
• If you want to install the Button Manager
continuously, go to the next step.
• If you want to end the installation, go to step 19.
16
Click the "Button Manager" button.
Follow the on-screen instructions.
17
When "The installation of the
Software is complete." appears, click
the "Finish" button.
18
You will return to the window of step 3
on page 11.
19
Click the "Close" button to finish the
installation.
Note
To use the scanner driver, you need to
connect to the scanner function using
SC-Scan A (see "CONNECTING TO AND
DISCONNECTING FROM THE SCANNER
FUNCTION USING SC-Scan A" in the
Operation Guide).
This completes the installation of the software.
• If you installed Button Manager, set up Button
Manager as explained in "SETTING UP BUTTON
MANAGER" (p.19).
Caution
• If you are using Windows Vista and a
security warning window appears, be sure
to click "Install this driver software anyway".
• If you are running Windows 2000/XP and a
warning message appears regarding the
Windows logo test or digital signature, be
sure to click "Continue Anyway" or "Yes".
If a message appears regarding the Windows
firewall, click the "Yes" button.
17
SETUP
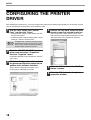
CONFIGURING THE PRINTER
DRIVER
After installing the printer driver, you must configure the printer driver settings appropriately for the number of paper
trays on the machine and the size of paper loaded in each.
1
Click the "Start" button, click "Control
Panel", and then click "Printer".
4
• In Windows XP, click the "start" button and click
"Printers and Faxes".
• In Windows 2000, click the "Start" button, select
"Settings", and then click "Printers".
Note
2
Click the "Set Tray Status" button and select
the size of paper that is loaded in each tray.
Select a tray in the "Paper Source" menu, and
select the size of paper loaded in that tray from the
"Set Paper Size" menu. Repeat for each tray.
In Windows XP, if "Printers and Faxes" does
not appear in the "start" menu, select "Control
Panel", select "Printers and Other Hardware",
and then select "Printers and Faxes".
Click the "SHARP AR-XXXX" printer
driver icon and select "Properties"
from the "Organize" menu.
In Windows XP/2000, select "Properties" from the
"File" menu.
3
Click the "Configuration" tab and set
the printer configuration based on the
options that have been installed.
Set the printer configuration properly. If not,
printing may not take place correctly.
Printer driver screen for AR-5520/AR-5520D
18
5
Click the "OK" button in the "Set Tray
Status" window.
6
Click the "OK" button in the printer
properties window.
SETUP
SETTING UP BUTTON MANAGER
Button Manager is a software program that works with the scanner driver to enable scanning from the machine.
To scan using the machine, Button Manager must be linked with the scan menu on the machine. Follow the steps
below to link Button Manager to scanner events.
When using AR-5516N/5520N, note that you need to connect to the scanner function using SC-Scan A previously
(see "CONNECTING TO AND DISCONNECTING FROM THE SCANNER FUNCTION USING SC-Scan A" in the
Operation Guide).
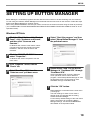
Windows XP/Vista
1
Click the "Start" button, click "Control
Panel", click "Hardware and Sound",
and then click "Scanners and
Cameras".
5
Select "Start this program" and then
select "Sharp Button Manager U" from
the pull-down menu.
6
Repeat Steps 4 and 5 to link Button
Manager to "ScanMenu SC2" through
"ScanMenu SC6".
In Windows XP, click the "start" button, select
"Control Panel" and click "Printers and Other
Hardware", and then click "Scanners and
Cameras".
2
Click the "SHARP AR-XXXX" icon and
select "Properties".
In Windows XP, select "Properties" from the
"File" menu.
3
4
In the "Properties" screen, click the
"Events" tab.
Select "ScanMenu SC1" from the
"Select an event" pull-down menu.
Select "ScanMenu SC2" from the "Select an
event" pull-down menu. Select "Start this
program", select "Sharp Button Manager U" from
the pull-down menu. Do the same for each
ScanMenu through "ScanMenu SC6".
7
Click the "OK" button.
Button Manager is now linked to the scan menu
(1 through 6).
The scan settings for each of scan menu 1
through 6 can be changed with the setting
window of Button Manager.
For the factory default settings of the scan menu
and the procedures for configuring Button
Manager settings, see "BUTTON MANAGER
SETTINGS" in the Operation Guide.
19
SETUP
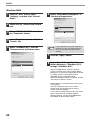
Windows 2000
1
Click the "Start" button, select
"Settings", and then click "Control
Panel".
2
Double-click the "Scanners and Cameras"
icon.
6
Select "Sharp Button Manager U" in
"Send to this application".
ScanMenu SC1
3
Select "SHARP AR-XXXX" and click
the "Properties" button.
4
In the "Properties" screen, click the
"Events" tab.
5
Select "ScanMenu SC1" from the
"Scanner events" pull-down menu.
U
Note
If other applications are shown, deselect the
checkboxes for the other applications and
leave only the Button Manager checkbox
selected.
7
Click the "Apply" button.
8
Repeat Steps 5 through 7 to link
Button Manager to "ScanMenu SC2"
through "ScanMenu SC6".
ScanMenu SC1
U
Select "ScanMenu SC2" from the "Scanner
events" pull-down menu. Select "Sharp Button
Manager U" in "Send to this application" and click
the "Apply" button. Do the same for each
ScanMenu through "ScanMenu SC6".
When the settings have been completed, click the
"OK" button to close the screen.
Button Manager is now linked to the scan menu
(1 through 6).
The scan settings for each of scan menu 1
through 6 can be changed with the setting
window of Button Manager.
For the factory default settings of the scan menu
and the procedures for configuring Button
Manager settings, see "BUTTON MANAGER
SETTINGS" in the Operation Guide.
20
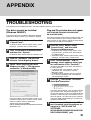
APPENDIX
TROUBLESHOOTING
If the software is not installed correctly, check the following items on your computer.
The driver cannot be installed
(Windows 2000/XP)
If the driver cannot be installed in Windows 2000/XP,
follow these steps to check your computer's settings.
1
Click the "start" button and then click
"Control Panel".
In Windows 2000, click the "Start" button, select
"Settings", and then click "Control Panel".
2
Plug and Play window does not appear
(AR-5516S/AR-5520S/AR-5516/AR-5520/
AR-5516D/AR-5520D)
If the Plug and Play window does not appear after you
connect the machine to your computer with a USB
cable and turn on the machine, follow the steps below
to verify that the USB port is available.
1
Click "Performance and Maintenance",
and then click "System".
• In Windows XP, click the "start" button, click
"Control Panel", and then click "Performance
and Maintenance".
• In Windows 2000, click the "Start" button, select
"Settings", and then click "Control Panel".
In Windows 2000, double-click the "System" icon.
3
4
Click the "Hardware" tab and then
click the "Driver Signing" button.
2
Check "What action do you want
Windows to take?" ("File signature
verification" in Windows 2000).
Click "Device Manager", and if a
message screen appears asking you
for confirmation, click "Continue".
"Universal Serial Bus controllers" will appear in
the list of devices.
• In Windows XP, click "System", click the
"Hardware" tab, and click the "Device
Manager" button.
• In Windows 2000, double-click the "System"
icon, click the "Hardware" tab, and click the
"Device Manager" button.
3
If the option "Block" has been selected, it will not be
possible to install the driver. Select the option "Warn"
and then install the driver as explained in
"INSTALLING THE SOFTWARE
(AR-5516S/AR-5520S/AR-5516/AR-5520/AR-5516D/
AR-5520D)" (p.8).
Click the "Start" button, select
"Control Panel", and then click
"System and Maintenance".
Click the
icon beside "Universal
Serial Bus controllers".
Two items should appear: your controller chipset
type and Root Hub. If these items appear, you
can use the USB port. If the "Universal Serial Bus
controllers" shows a yellow exclamation point or
does not appear, you must check your computer
manual for USB troubleshooting or contact your
computer manufacturer.
4
Once you have verified that the USB
port is enabled, install the software as
explained in "INSTALLING THE
SOFTWARE
(AR-5516S/AR-5520S/AR-5516/AR-5520/
AR-5516D/AR-5520D)" (p.8).
21
APPENDIX
The driver cannot be correctly
installed by Plug and Play
(AR-5516S/AR-5520S/AR-5516/AR-5520/
AR-5516D/AR-5520D)
If the driver cannot be correctly installed by Plug and
Play (for example, Plug and Play takes place without
copying the required files for the driver installation),
follow these steps to remove unneeded devices and
then install the driver as explained in "INSTALLING
THE SOFTWARE
(AR-5516S/AR-5520S/AR-5516/AR-5520/AR-5516D/
AR-5520D)" (p.8).
1
Click "Device Manager", and if a
message screen appears asking you
for confirmation, click "Continue".
• In Windows XP, click "System", click the
"Hardware" tab, and click the "Device
Manager" button.
• In Windows 2000, double-click the "System"
icon, click the "Hardware" tab, and click the
"Device Manager" button.
3
Click the
devices".
icon beside "Other
If "SHARP AR-XXXX" appears, select and delete
the item.
Note
4
22
If you need to remove the software, follow these steps.
1
If "Other devices" does not appear, close the
"Device Manager" window.
Install the software as explained in
"INSTALLING THE SOFTWARE
(AR-5516S/AR-5520S/AR-5516/AR-552
0/AR-5516D/AR-5520D)" (p.8).
Click the "Start" button, and then click
"Control Panel".
• In Windows XP, click the "start" button and then
click "Control Panel".
• In Windows 2000, click the "Start" button, select
"Settings", and then click "Control Panel".
2
Click "Uninstall a program".
• In Windows XP, click "Add or Remove
Programs".
• In Windows 2000, double-click the
"Add/Remove Programs" icon.
Click the "Start" button, select
"Control Panel", and then click
"System and Maintenance".
• In Windows XP, click the "start" button, click
"Control Panel", and then click "Performance
and Maintenance".
• In Windows 2000, click the "Start" button, select
"Settings", and then click "Control Panel".
2
Removing the software
3
Select the driver from the list, and
remove the software.
For more information, refer to your operating
manual or to the help files for your operating
system.
4
Restart your computer.
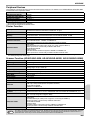
APPENDIX
SPECIFICATIONS
Model
AR-5516S/AR-5516/AR-5516D/AR-5516N
Type
Digital Multifunctional System, Desktop
Photoconductive type
OPC drum
Document glass type
Fixed
Copy system
Dry, electrostatic transfer
Originals
Sheets, bound documents
Original sizes
Max. A3
Copy size
Max. A3
Min. A6 (A6 must be fed from the bypass tray)
Image loss: Max. 4 mm (leading and trailing edges)
Max. 4.5 mm (along other edges in total)
Copying speed
(one-sided copying at
100% copy ratio)
9 copies/min.
10 copies/min.
12 copies/min.
14 copies/min.
16 copies/min.
Continuous copy
Max. 999 copies; subtractive counter
First-copy time*
Approx. 7.2 sec. or less
Warm-up time
Approx. 45 sec.
Copy ratio
Variable: 25% to 400%, in 1% increments (total 376 steps)
(50% to 200% when SPF/RSPF is used.)
Fixed preset: 50%, 70%, 81%, 86%, 100%, 115%, 122%, 141%, 200%
Exposure system
Document glass: Moving optical source, slit exposure (stationary platen) with
automatic exposure
SPF/RSPF:
Moving original
Paper feed
One automatic feeding paper tray (250
sheets) + bypass tray (100 sheets)
Fusing system
Heat rollers
Developing system
Dry-type two-component magnetic brush development
Light source
Cold cathode fluorescent lamp
Resolution
(AUTO/TEXT mode)
Scan: 600 x 300 dpi (Factory default), 600 x 600 dpi
Output: 600 x 600 dpi
(PHOTO mode)
Scan: 600 x 600 dpi
Output: 600 x 600 dpi
Gradation
Scanning: 256
Printing: 2 value
Power supply
Local voltage ±10% (For this machine's power supply requirements, see the name
plate located on the back of the machine.)
Power consumption
Max. 1.2 kW
Typical electricity
consumption
1.71 kWh/week
1.95 kWh/week (AR-5516N)
A3
B4
A4R
B5R
A4, B5, A5
AR-5520S/AR-5520/AR-5520D/AR-5520N
11 copies/min.
12 copies/min.
14 copies/min.
16 copies/min.
20 copies/min.
A3
B4
A4R
B5R
A4, B5, A5
Two automatic feeding paper trays (250
sheets each) + bypass tray (100 sheets)
2.03 kWh/week
2.24 kWh/week (AR-5520N)
23
APPENDIX
Weight
Approx. 28.2 kg
Approx. 28.4 kg (AR-5516N)
Approx. 33.1kg
Approx. 33.3 kg (AR-5520N)
Dimensions
590 mm (W) x 550 mm (D) x 470 mm (H)
590 mm (W) x 550 mm (D) x 555 mm (H)
* First-copy time is measured with original on the document glass with the following settings made, in fully ready condition with
fuser at operating temperature and mirror motor at operating speed, actual time may vary based on environment conditions.
•A4 size paper is fed from paper tray 1
•Exposure mode is AUTO
•Scanning resolution is 600 x 300 dpi
Acoustic noise emission (measurement according to ISO7779)
Sound power level LwA
Printing mode (continuous printing)
6.5 B
Standby mode
3.3 B
Sound pressure level LpA (actual measurement)
Printing mode
Standby mode
Bystander positions
48 dB (A)
Operator positions
49 dB (A)
Bystander positions
18 dB (A)
Operator positions
17 dB (A)
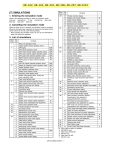
Ambient environment
(Humidity)
85%
60%
20%
10°C
(54°F)
24
30°C 35°C (Temperature)
(86°F) (91°F)
APPENDIX
Peripheral Devices
The following peripheral devices can be connected to the machine. For details, see "PERIPHERAL DEVICES AND
SUPPLIES" in the Operation Guide.
Product name
Model
250-sheet paper feed unit
AR-D34
2 x 250-sheet paper feed unit
AR-D35
Single pass feeder
AR-SP10*1
Reversing Single pass feeder AR-RP10*2
*1 AR-5516S/AR-5520S/AR-5516/AR-5520
*2 AR-5516D/AR-5520D/AR-5516N/AR-5520N
Printer Function
Print speed*
Resolution
Memory
Emulation
Interface connector
Interface cables
AR-5516S/AR-5516/AR-5516D/AR-5516N Max. 16 ppm
AR-5520S/AR-5520/AR-5520D/AR-5520N Max. 20 ppm
600 dpi
AR-5516S/AR-5520S 16 MB
AR-5516/AR-5520, AR-5516D/AR-5520D, AR-5516N/AR-5520N 64 MB
SHARP SPLC (Sharp Printer Language with Compression)
AR-5516S/AR-5520S/AR-5516/AR-5520/AR-5516D/AR-5520D : USB connector (USB 2.0)
AR-5516N/AR-5520N : 10BASE-T/100BASE-TX
AR-5516S/AR-5520S/AR-5516/AR-5520/AR-5516D/AR-5520D :
[USB cable]
Shielded twisted pair cable (max. length 3 m, must support USB 2.0)
Please purchase a commercially available USB cable.
AR-5516N/AR-5520N :
[network cable]
Shielded network cable that supports 10BASE-T/100BASE-TX
Please purchase a commercially available shielded network cable.
* Print speed during printing of the second sheet and following sheets when using A4 plain paper and performing continuous
one-sided printing of the same page.
Scanner Function (AR-5516/AR-5520, AR-5516D/AR-5520D, AR-5516N/AR-5520N)
Type
Scanning method
Light source
Resolution
Original types
Effective scanning area
Scanning speed
Input Data
Output Data
Scanning colours
Protocol
Interface
Drop out colour
Supported operating
systems
Void area
Interface cables
Scanner utilities
Note
Flatbed scanner
Document glass/SPF/RSPF
Cold cathode fluorescent lamp
Factory default: 150 dpi
Setting range: 50 dpi - 9600 dpi
Sheets, bound documents
Approx. 297 mm (Lengthwise) x 431 mm (Width)
0.962 msec/line (300 dpi)
1 bit or 12 bit
1 bit or 8 bit
Black and white 2 value, Greyscale
TWAIN, WIA (Windows XP/Vista), STI
AR-5516S/AR-5520S/AR-5516/AR-5520/AR-5516D/AR-5520D :
USB 2.0 (Full-Speed/Hi-Speed compatible interface)
AR-5516N/AR-5520N :
10BASE-T/100BASE-TX
No
Windows 2000/XP/Vista
(Detailed information can be found in "HARDWARE AND SOFTWARE REQUIREMENTS" (p.7))
Max. 2.5 mm (leading and trailing edges)
Max. 3.0 mm (along other edges in total)
AR-5516S/AR-5520S/AR-5516/AR-5520/AR-5516D/AR-5520D :
[USB cable]
Shielded twisted pair cable (max. length 3 m, must support USB 2.0)
Please purchase a commercially available USB cable.
AR-5516N/AR-5520N :
[network cable]
Shielded network cable that supports 10BASE-T/100BASE-TX
Please purchase a commercially available shielded cable.
Button Manager
As a part of our policy of continuous improvement, SHARP reserves the right to make design and specification changes
for product improvement without prior notice. The performance specification figures indicated are nominal values of
production units. There may be some deviations from these values in individual units.
25
APPENDIX
INFORMATION ON DISPOSAL
A. Information on Disposal for Users (private households)
1. In the European Union
Attention: If you want to dispose of this equipment, please do not use the
ordinary dust bin!
Used electrical and electronic equipment must be treated separately and in
accordance with legislation that requires proper treatment, recovery and
recycling of used electrical and electronic equipment.
Following the implementation by member states, private households within
the EU states may return their used electrical and electronic equipment to
designated collection facilities free of charge*. In some countries* your local
retailer may also take back your old product free of charge if you purchase a
similar new one.
*) Please contact your local authority for further details.
If your used electrical or electronic equipment has batteries or
accumulators, please dispose of these separately beforehand according to
local requirements.
By disposing of this product correctly you will help ensure that the waste
undergoes the necessary treatment, recovery and recycling and thus
prevent potential negative effects on the environment and human health
which could otherwise arise due to inappropriate waste handling.
Attention: Your product is
marked with this symbol. It
means that used electrical
and electronic products
should not be mixed with
general household waste.
There is a separate
collection system for these
products.
2. In other Countries outside the EU
If you wish to discard this product, please contact your local authorities and ask for the correct method of disposal.
For Switzerland: Used electrical or electronic equipment can be returned free of charge to the dealer, even if you don't purchase
a new product. Further collection facilities are listed on the homepage of www.swico.ch or www.sens.ch.
B. Information on Disposal for Business Users.
1. In the European Union
If the product is used for business purposes and you want to discard it:
Please contact your SHARP dealer who will inform you about the take-back of the product. You might be charged for the costs
arising from take-back and recycling. Small products (and small amounts) might be taken back by your local collection facilities.
For Spain: Please contact the established collection system or your local authority for take-back of your used products.
2. In other Countries outside the EU
If you wish to discard of this product, please contact your local authorities and ask for the correct method of disposal.
26
LUOKAN 1 LASERLAITE
KLASS 1 LASERAPPARAT
The above label is affixed to the laser unit inside the machine.
SHARP ELECTRONICS (Europe) GmbH
Sonninstraße 3, D-20097 Hamburg
AR-5516S/AR-5520S/AR-5516/AR-5520/AR-5516D/AR-5520D/AR-5516N/AR-5520N START GUIDE
PRINTED IN FRANCE
TINSE1936TSZ1