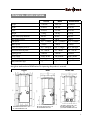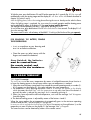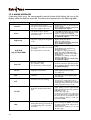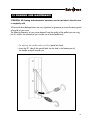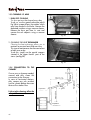
1
h
il s
g
n
E
PELLETS STOVES
Use and maintenance manual
ECOLOGICA IDRO
ECOLOGICA
I.C. MAXI
I.C. MINI
BABYFIAMMA
PREZIOSA
DIVINA
BELLA
BELLA LUX
CONTESSA
Congratulations! You are now the owner of an EXTRA FLAME stove !
The pellet stove EXTRA FLAME is an ideal heating solution. It springs from the most advanced
technology and is manufactured to the highest standards with an up-to-date design, allowing you
to enjoy the fantastic sensation which the heat of a flame can give, in complete safety at all
times.
This manual tells you how to use your stove correctly. Please read it all carefully before using.
IMPORTANT
Ensure that the dealer completes the following box with the details of the authorised specialist
who will help you if you have any problems in using your new pellet stove.
AUTHORISED SPECIALIST
COMPANY
MR./MS.
STREET
POSTAL CODE
PHONE
2
N.
TOWN
FAX
Contents
IMPORTANT ................................................................................................................... 2
1
PRECAUTIONS AND SAFETY .......................................................................….... 4
2
TECHNICAL SPECIFICATIONS........................................................…..............…... 5
3
AIR REQUIRED FOR COMBUSTION..............................................….................…. 11
3.1
External air intake pipe assembly.....................................................................….. 11
4
WHAT PELLETS ARE .........................................................................................…. 12
4.1
Pellet storage.......................................................................................…............. 12
5
SAFETY DEVICES.................................................................................................. 13
5.1
Warm air distribution fan breakdown ................................................................... 13
5.2
Fume extractor breakdown ................................................................................... 13
5.3
Pellet loading motor breakdown ........................................................................... 13
5.4
Lighting failure..................................................................................................... 13
5.5
Temporary power failure ...................................................................................... 13
5.6
Electrical safety.................................................................................................... 13
5.7
Fume exhaust safety ............................................................................................. 13
5.8
Safety for pellet overheating ................................................................................. 13
5.9
Safety plant pressure ( Ecologica Idro) …………………………….............……..…... 13
5.10 Safety water boiling (Ecologica Idro)……...............…………………....……………. 13
6
ASSEMBLY & INSTALLATION INSTRUCTIONS .........................................…............ 14
6.1
Assembly............................................................................................................. 14
6.2
Installation ....................................................................................…................... 14
6.3
Fume exhaust....................................................................................................... 15
6.4
Electrical connection............................................................................................. 16
6.5
Canalisation DIVINS PLUS………………………………………………...............…….16
7
INSTALLATION I.C. Maxi and Mini ……..………………………………..…...........…. 17
8
CONTROL PANEL……………………………………………………………..............… 23
8.1
Description of control panel alarms………………………………............….………… 24
9
USE.............................................................................…................…................. 24
10
LIGHTING......................................................................................……............... 25
11
NORMAL OPERATION – TURNING OFF, REMOTE CONTROL.….................…......... 25
11.1 Normal operation ...............................................................................….…......... 25
11.2 DIVINA PLUS operation………………………………………………............………… 26
11.3 Turning off.................................................................................…....................... 26
11.4 Remote control...........................................................................…....................... 26
12
ROOM THERMOSTAT............................................................................................ 27
12.1 Digital thermostat........................................................................................…...... 27
12.2 Mechanical thermostat (optional)........................................................................... 28
12.2.1 Mechanical thermostat installation (optional).......................................................... 28
12.2.2 Mechanical thermostat operation .......................................................................... 28
12.2.3 Mechanical thermostat operation with energy saving function (Stby)........................ 28
12.2.4 Mechanical thermostat operation for canalis.motor (DIVINA PLUS)……................... 28
12.3 User parameters…………………………………………………………..............……. 30
13
CHRONOTHERMOSTAT……………....................................................................... 31
13.1 “Day/Night” temperature function..................................................................…… 32
13.2 Pellet feeding adjustment…………......................................................................... 32
13.3 Motor parameters for DIVINA PLUS connection ………............…………………..…. 33
13.4 Alarm signalling.................................................................................….......…… 34
14
Operation of the radiofrequency remote control for I.C. Mini…………..............…. 35
15
CLEANING AND MAINTENANCE.....................................................................…. 41
15.1 Cleaning Ecologica,I.C.Maxi, Ecologica IDRO.........................................................42
15.2 Cleaning Bella, Bella Lux, Divina, Contessa,Preziosa, Babyfiamma ……..............…. 44
15.3 Cleaning I.C.Mini................................................................................................. 46
15.4 Chimney connection...........................................................................…............... 46
16
PROBLEMS, CAUSES AND SOLUTIONS................................................................. 47
17
GUARANTEE................................................................……................................. 49
18
QUALITY CONTROL ...............................................................……....................... 50
19
APPENDIX…………………………………………………………….…………........…. 51
3
1 PRECAUTIONS AND SAFETY
The stoves manufactured in our works are built
with the maximum dedication to the individual
components so as to protect both the user and
the installer from accidents. The qualified
personnel are therefore advised to pay special
attention to the electrical connections after
every operation on the product, especially with
regard to the stripped part of the wires which
must not protrude in any way from the terminal
block, thereby preventing possible contact with
the live parts of the wire.
Installation must be carried out by qualified
personnel who must issue a declaration of
compliance of the system with good practice
to the purchaser, who shall assume responsibility for the definitive installation and consequent proper operation of the product
installed. Extraflame S.p.A. shall not be
responsible in the event of failure to
observe these precautions.
This instruction manual constitutes an integral
part of the product: ensure that it always
accompanies the appliance, even if passed to
another owner or user or moved to another
installation. If damaged or lost, ask the local
technical service for another copy.
This stove must be used exclusively for the
applications it was expressly designed for.
The manufacturer shall not be responsible
contractually or extra-contractually for any
damage caused to persons, animals or property
by installation, adjustment and maintenance
errors, or by improper use.
After removing the packaging, ensure that the
contents are intact and complete. If this is not
the case, contact the dealer from whom the
appliance was purchased.
Stove maintenance must be carried out at least
once a year, scheduling it sufficiently in
advance with the service centre.
The following safety precautions must be
observed:
The use of the stove by unattended children and
handicapped persons it not recommended.
Do not touch the stove if you are bare-footed or
if parts of your body are wet or damp.
4
Modifying the safety or adjustment devices
without the manufacturer’s approval or
instructions is forbidden.
Never pull, detach or twist the electric wires
coming out of the boiler even when the electricity
supply is disconnected.
Do not plug or reduce the dimensions of the
aeration apertures of the room in which the
stove is installed.
The aeration openings are indispensable for a
correct combustion.
Never leave the packaging materials within
reach of children or unattended disabled
persons.
ONLY FOR THE MODEL IDRO:
Before installation, we recommend that you
thoroughly wash all the piping in the system to
remove any residues which could affect the
efficiency of the appliance.
During installation, it is necessary to inform
users that:
• If there is any water leakage, they must shut
off the water supply and promptly notify the
technical support service.
• They must periodically check the working
pressure of the plumbing system.
If the stove is not being used for a long period,
users are advised to call the technical
assistance service engineers to carry out at
least the following operations:
• Turn the main switch to position 0
• Close the water cocks of both the heating
and sanitary systems
• Drain the heating and sanitary systems if
there is any risk of freezing
Stove maintenance must be carried out at least
once every year, scheduling it sufficiently in
advance with the service centre.
2 TECHNICAL SPECIFICATIONS
EcoLogica Idro
Ecologica
Height
945 mm.
945 mm.
Width
670 mm.
670 mm.
Depth
670 mm.
670 mm.
Weight
156 Kg.
150 Kg.
Fume exhaust pipe diameter
80 mm.
80 mm.
Max heating volume
/ m3
220 m3
Total power
14,47 kW/h
2,5 - 11 kW/h
Water power
8,5 kW/h
/ kW/h
Pellet consumption per hour
0,6 - 3,0 Kg/h
0,6 - 2,4 Kg/h
Absorbed electrical power
25 - 190 W
25 - 100 W
Lighting power
+280 W
+280 W
Power supply
230 V 50 Hz
230 V 50 Hz
Feed box capacity
~30 kg.
~35 kg.
Inlet/outlet water pipe
“ 3/4
“/
All a.m. data are not binding, but valid just as an indication.
The right to make technical modifications for improving the product is reserved.
EcoLogica Idro
EcoLogica
A
A
B
B
Boiler outlet “3/4
Boiler inlet “3/4
A: FUMES OUTLET PIPE ø 80
B: AIR INTAKE PIPE ø 50
5
TECHNICAL SPECIFICATIONS
I.C. Maxi
I.C. Mini
Height
606 mm.
550 mm.
Width
640 mm.
700 mm.
Depth
717 mm.
450 mm.
Weight
130 Kg.
110 Kg.
Fume exhaust pipe diameter
80 mm.
80 mm.
Max heating volume
190 m3
150 m3
Total power
2,5 - 9,4 kW/h
2,5 - 7,5 kW/h
Water power
/ kW/h
/ kW/h
Pellet consumption per hour
0,6 - 2,0 Kg/h
0,6 - 1,6 Kg/h
Absorbed electrical power
25 - 100 W
25 - 100 W
Lighting power
+280 W
+280 W
Power supply
230 V 50 Hz
230 V 50 Hz
Feed box capacity
~ 28 kg.
~ 12 kg.
Inlet/outlet water pipe
“/
“/
All a.m. data are not binding, but valid just as an indication.
The right to make technical modifications for improving the product is reserved.
I.C. Maxi
97
I.C. Mini
143
141
423***
143
355
141
WITH PELLET FEEDING KIT
6
1109
97
1029
606
1310 (circa)
80
355
A: FUMES OUTLET PIPE Ø 80
B: AIR INTAKE PIPE Ø 50
*** Minimum Height
The detail “ adjustment pipe”
is pre-drilled with 3 holes Ø 8,5 : 90-100.
For other adjustments, drill according to needs.
I.C. Maxi
A
B
*** Minimum Height
The detail “ adjustment pipe”
is pre-drilled with 3 holes Ø 9 :
90-100-90.
For other adjustments, drill
according to needs.
ø
A: FUMES OUTLET PIPE
80
B: AIR INTAKE PIPE
50
ø
7
TECHNICAL SPECIFICATIONS
BabyFiamma
Preziosa
Height
858 mm.
884 mm.
Width
440 mm.
477 mm.
Depth
470 mm.
446 mm.
Weight
100 Kg.
110 Kg.
Fume exhaust pipe diameter
80 mm.
80 mm.
Max heating volume
100 m3
100 m3
Total power
1,7 - 5,1 kW/h
1,7 - 5,1 kW/h
Water power
/ kW/h
/ kW/h
Pellet consumption per hour
0,4 - 1,2 Kg/h
0,4 - 1,2 Kg/h
Absorbed electrical power
25 - 100 W
25 - 100 W
Lighting power
+280 W
+280 W
Power supply
230 V 50 Hz
230 V 50 Hz
Feed box capacity
~ 11 kg.
~ 11 kg.
Inlet/outlet water pipe
“/
“/
All a.m. data are not binding, but valid just as an indication.
the right to make technical modifications for improving the product is reserved.
BabyFiamma
WALL DRILLING
SKETCH
FUMES OUTLET PIPE
AIR INTAKE PIPE
FUMES OUTLET PIPE ø 80
FUMES OUTLET PIPE ø 50
8
Preziosa
TECHNICAL SPECIFICATIONS
Divina
Bella
Divina Plus
Height
1150 mm.
1041 mm.
1150 mm.
Width
610 mm.
520 mm.
610 mm.
Depth
576 mm.
513 mm.
576 mm.
Weight
170 Kg.
130 Kg.
170 Kg.
Fume exhaust pipe diameter
80 mm.
80 mm.
80 mm.
Max heating volume
220 m3
150 m3
220 m3
Total power
2,5 - 11 kW/h
2,5 - 7,5 kW/h
2,5 - 11 kW/h
Water power
/ kW/h
/ kW/h
/ kW/h
Pellet consumption per hour
0,6 - 2,4 Kg/h
0,6 - 1,6 Kg/h
0,6 - 2,4 Kg/h
Absorbed electrical power
25 - 100 W
25 - 100 W
75 - 210 W
Lighting power
+280 W
+280 W
+280 W
Power supply
230 V 50 Hz
230 V 50 Hz
230 V 50 Hz
Feed box capacity
~ 30 kg.
~ 25 kg.
~ 30 kg.
Inlet/outlet water pipe
“/
“/
“/
All a.m. data are not binding, but valid just as an indication.
the right to make technical modifications for improving the product is reserved.
Bella
Divina
Divina Plus
A
A
A
B
B
B
A: FUMES OUTLET PIPE ø 80
B: AIR INTAKE PIPE ø 50
A: FUMES OUTLET PIPE ø 80
B: AIR INTAKE PIPE ø 50
A: FUMES OUTLET PIPE ø 80
B: AIR INTAKE PIPE ø 50
C: CANALISATION PIPE ø 80
9
TECHNICAL SPECIFICATIONS
Bella Lux
Contessa
Height
1041 mm.
1068 mm.
Width
520 mm.
522 mm.
Depth
513 mm.
500 mm.
Weight
130 Kg.
150 Kg.
Fume exhaust pipe diameter
80 mm.
80 mm.
Max heating volume
150 m3
180 m3
Total power
2,5 - 7,5 kW/h
2,5 - 9,4 kW/h
Water power
/ kW/h
/ kW/h
Pellet consumption per hour
0,6 - 1,6 Kg/h
0,6 - 2,0 Kg/h
Absorbed electrical power
25 - 100 W
25 - 100 W
Lighting power
+280 W
+280 W
Power supply
230 V 50 Hz
230 V 50 Hz
Feed box capacity
~ 25 kg.
~ 25 kg.
Inlet/outlet water pipe
“/
“/
All a.m. data are not binding, but valid just as an indication.
the right to make technical modifications for improving the product is reserved.
Bella Lux
A: FUMES OUTLET PIPE Ø 80
B: AIR INTAKE PIPE Ø 50
10
Contessa
A: FUMES OUTLET PIPE Ø 80
B: AIR INTAKE PIPE Ø 50
3 AIR REQUIRED FOR COMBUSTION
Combustion always requires air (oxygen). Stoves therefore remove air from the room they are
installed in and this must be replaced.
Bad combustion can be caused by poor air circulation in the house and this is often the case
in modern homes, which have sealed windows and doors. On the other hand, there are also
problems when there are draughts in the room (caused for example by kitchen or bathroom
ventilators). To prevent this type of problem, we suggest a permanent ventilation grill to be
fitted in a window or near the stove. Alternatively, the air can be taken directly from the
exterior or from another sufficiently aerated room (a cellar, for example) by means of a steel
pipe with a diameter of 48 mm.
3.1 External air intake pipe assembly
a) Measure and make a hole with a minimum diameter of 5 cm. in the wall for the intake
pipe (see drawing here below).
b) Connect the stove with the exterior by means of a steel pipe.
ATTENTION!
• Only use steel pipes.
• Pipes in synthetic materials or aluminium must not be used.
• To ensure sufficient air intake, the pipe must not be longer than 2 m. and must not have
too many bends.
• If the pipe leads outdoors, it must end with a 90º downward bend and be protected
against the wind (see Fig. Here below).
11
4 WHAT ARE PELLETS ?
The pellets are made by applying very high
pressure to sawdust, that is pure timber waste
(without paint), produced by sawmills, carpentry
works and other activities associated with the
working and transformation of timber.
This type of fuel is completely environmentally
friendly as no binders of any kind are used to
keep it compact. In fact, the compactness of the
pellets over time is guaranteed by a natural
substance found in the wood itself: the lignite.
As well as being environmentally friendly, as the
wood residues are exploited to the maximum,
pellets also have technical advantages.
While wood has a calorific power of 4.4
kW/kg. (with 15% humidity, after about 18
months seasoning) the power of pellets is 5.3
kW/kg. The density of the pellet is 650 Kg/m3
and the water content is 8% of its weight.
For this reason, the pellets do not need to be
seasoned to obtain an adequate caloric yield.
Their diameter ranges from a minimum of 5
mm to a maximum of 8 mm.
12
4.1 Pellet storage
To guarantee problem-free combustion, the
pellet must be stored in a dry place.
WARNING
THE USE OF POOR QUALITY PELLETS OR OF
ANY OTHER MATERIAL DAMAGES THE
FUNCTIONS OF YOUR STOVE AND MAY
LEAD TO THE INVALIDATION OF THE WARRANTY
AND ASSOCIATED RESPONSIBILITIES
OF THE MANUFACTURER.
5 SAFETY DEVICES
5.1 Warm air distribution fan breakdown:
If the fan stops for any reason, the stove stops automatically to prevent overheating.
5.2 Fume extractor breakdown:
If the extractor stops, the electronic unit immediately blocks the supply of pellets.
5.3 Pellet feeding motor breakdown:
If the motor stops, the stove continues to operate until the minimum cooling level is reached.
5.4 Lighting failure:
If no flame develops during the lighting stage, the stove automatically makes another attempt to
light and if no flame comes this time either, the stove will show on the display “ NO ACC”.
While attempting to light the stove , on the display you will read “ATTE” which means “WAIT”.
This function remembers that before lighting the stove , you must be sure that the burning pot,
must be completely free and clean.
5.5 Temporary power failure:
The appliance will re-light automatically after a brief power failure. There may be a minimum
quantity of smoke inside the house when there is no power for a period of 3 to 5 minutes.
THIS DOES NOT GIVE RISE TO ANY SAFETY RISK.
5.6 Electrical safety:
The stove is protected against violent power swings by a master fuse on the rear of the stove
(delayed 2A 250V).
5.7 Fume exhaust safety
An electronic pressure switch stops the loading screw in case the exhaust pipe is obstructed, or
in case the door remains opened for some minutes.
5.8 Safety for pellets overheating
In case of overheating inside the pellet hopper, this safety device stops the functioning of the stove,
the resetting is manual and must be done by a qualified technician.
ONLY FOR ECOLOGICA IDRO:
5.9 Plant pressure safety
A mechanical pressure sensor stops automatically eventually overpressure of the plant. The resetting
of this safety is manual and must be done by a qualified technician.
5.10 Safety for water boiling
In case of water shortage or a minimum water quantity, this safety stops the pellet feeding.
The resetting is manual and must be done by a qualified technician.
13
6 ASSEMBLY AND INSTALLATION INSTRUCTIONS
6.1 Assembly
An authorised dealer should assemble the
stove.
The assembling of the ceramics in the stoves
which have majolica tiles, must be done by a
qualified technician.
6.2 Installation
a) Paying attention to the dimes of perforation
and taking into consideration a floor protection plate, if fitted, measure and make
the hole in the chimney for connecting the
fume exhaust pipe with diam. 80 mm.
If the hole has to be done on a wood wall,
the minimum hole diam. must be 130 mm.,
and a min. 20 mm. thickness insulation
material.
b) Connect the stove to the chimney by means
of a steel pipe, sealing it hermetically and
taking care not to obstruct the free section
with the fume pipe. (See fig. 1)
fig. 1
TABLE A: Dimensions of the floor protection
plate and relative safety distances in mm.
REFERENCES
Flammable
objects
Not-flammable
objects
a*
b*
c*
200
800
200
100
400
100
*see fig. 4
PRECAUTIONS
1. The appliance must be placed on a flame
fig. 2
resistant floor.
If it is placed on a flammable floor, a floor protection plate must be used. (See table A)
2. The appliance must be connected to a chimney authorised for solid fuels with a minimum
diameter of 130 mm.
3. The fume exhaust system is based on the depression (draught) in the place of combustion
and a light fume exhaust over-pressure (forced exhaust). This makes it essential for the
exhaust pipe to be installed correctly and hermetically.
4. To seal and insulate the pipes, only use heat-resistant materials (up to 300 °C) such as
adhesive tape in aluminium, rock wool or high-temperature silicone.
5. The stove must be placed, so that the electric cord is easy to reach.
14
6.3 Fume exhaust
In conformity with DPR 412 and UNI
7129-2001, the allowed installations are:
WITH VERTICAL EXTERNAL OR INTERNAL
FLUE
• The Fig. 3 represents the best solution for
discharging the fumes above the roof.
Proceed as in previous chapter with the
installation of a T-fitting with an inspection
plug. The external or internal flue must
be properly fixed and provided with a
chimney pot for protection from rain.
INTERIOR
EXTERIOR
Inspection
Air
intake
fig. 3
Protection from rain
Cover
plate
FUME DISCHARGE THROUGH A CHIMNEY
• Fig. 4 is the classic masonry chimney
system, of course in addition to Fig.1).
Use a T-pipe with an inspection plug and
suitable supporting staffs.
If the chimney is too big, we recommend
reducing it by inserting a porcelain steel
pipe or stainless steel (inox), with a
maximum diameter of 150 mm, and
appropriately sealing the fume inlet and
outlet parts of the fume exhaust from the
part in masonry.
Airtight sealed
steel plate
Inspection
fig. 4
15
Inspection
NOTE:
ALL SECTIONS OF THE FUME FLUE MUST
BE EASY TO INSPECT AND TO REMOVE
TO ALLOW THE INTERNAL CLEANING.
( SEE •)
(SEE FIG. 4 AND 5)
pe
Slo
6.4 Electrical connections
Inspection
The stove is supplied with a power cable
which must be connected to a 230 V /50
Hz socket.
The power absorption is indicated in
chapter 2 (technical specifications).
Make sure that the cable does not come
into contact with the hot surfaces of the
stove.
Height over
If the fume flue is installed in a fixed way , inspections should be provided for internal
cleaning purposes (ashes), especially in the horizontal sections.
Inspection
fig. 5
6.5 CANALISATION DIVINA PLUS
The model DIVINA PLUS is equipped with 2 pipes situated on the back of the stove which
allow the canalisation of the heat issued by the stove. As you can see in the photo here below,
we suggest to make the canalisation by using pipes with the following characteristics:
• Internal diameter 80 mm
• Insulated pipes, that is thermal insulation
• The pipe connection to each nozzle , must not be longer than 2 mt.
MAX PIPE LENGTH
2 MT
MAX PIPE LENGTH
2 MT
INSULATING
MATERIAL
16
7 INSTALLATION I.C.MAXI and I.C. MINI
The Comfort insert is supplied with a sliding base in
iron which allows it to be installed in a pre-existing
fireplace.
This sliding base allows you to slide out the insert
easily for maintenance and cleaning at the end of
the year.
If you do not already have an existing fireplace you
can build one using the insert support pedestal as
its function is to fix the insert to the floor.
Description of the components:
•
•
•
•
•
•
Sliding base
Rail
Fume outlet pipe
Primary air intake pipe
Power plug
Frame
fig. 6
Fitting the Comfort Maxi and Mini with sliding base
Take the sliding base and place it in the pre-existing
fireplace.
Using chalk, mark the base fixing holes on the floor
of the fireplace.
Make the holes for 8 mm steel expansion plugs.
Make a 60 mm hole in correspondence with the air
intake.
N.B. The air intake must be made outside the fireplace, because it must not draw in overheated air.
In case, it is not possible to take air from outside, it
is possible to use air from inside, fitting a steel pipe
Ø 50 mm on the bottom or on the rear of the air
intake box , vacuuming the air outside the chimney.
N.B. The length of the primary air intake pipe
must not exceed 2 metres. There must be sufficient
air circulation in the indoor environment.
Provide a power socket on the rear of the insert, in
order to reach the plug easily once the installation
is made.
Fix the base by means of the fixing screws.
Make the connection to the fume outlet and air
intake, respecting the points described in paragraph
6.
Take the insert, tilt it as in fig. 8 so that the wheels
go into the provided rails, and slide it until the fume
scroll coupling is completely inserted in the fume
conveyor box.
fig. 7
fig. 8
17
Finally, using the provided socket wrench, turn the
screw anticlockwise as shown in figure 11.
In order to see if the insert is correctly coupled with
the base, connect the plug to the power socket: the
display should switch on.
N.B. The bottom grill of the insert must stand at
least 1 cm above the marble fire top of the facing.
Installation with pedestal (optional)
Description of components:
• Comfort maxi and Mini insert (see previous
paragraph)
• Pedestal adjustable in height
• Lateral feeding hopper
• Adjustable hopper support
fig. 9
Installation of Comfort Maxi and Mini with
pedestal
Position the base in the desired point and adjust to
the desired height by means of the feet (the bolts
are located in the four external sides of the pedestal
at the bottom).
Provide a power socket in the rear of the pedestal,
easy to reach once the installation is finished.
Fix the pedestal to the floor using strong steel plugs,
diam. 8 mm.
Take the sliding base and fix it to the frame using
the bolts.
Connect the fume outlet and air intake as explained
in the previous paragraph.
Take the insert, tilt it as in fig. 8 so that the wheels
go into the provided rails, slide it until the fume
scroll coupling is completely inserted in the fume
conveyor box.(Fig.9)
Finally, using the provided socket wrench turn the
screw anticlockwise as shown in figure 11 (for
Comfort Maxi) and as shown in Fig. 11bis (for
Comfort Mini).
In order to see if the insert is correctly coupled with
the base, connect the plug to the power socket: the
display should go on.
Fit the hopper support as shown in fig. 10.
Insert the support in the provided coupling as
shown in fig. 10.
N.B.: In case you use our pedestal, it is necessary
to create an inspection window in the chimney,
allowing to check the pellet level in the hopper,
while filling it up.
18
fig. 10
fig. 11
N.B. The hopper support can be fitted on both
sides of the insert Comfort Maxi while for the
Comfort Mini it can be fitted only on the right side.
Adjust the height and angle of the hopper on the
basis of the fireplace which has to be built.
N.B. The bottom grill of the insert must stand at
least 1 cm above the marble fire top of the facing.
Extraction of Comfort Maxi and Mini
The extraction of the Comfort insert is necessary to
carry out ordinary maintenance (cleaning the ash
pipe at the end of the year) or extraordinary work
(replacement of mechanical parts in the event of
damage).
These operations must be carried out by a qualified
technician, with the insert turned off and the plug
disconnected.
fig. 11 bis
To extract the insert, carry out the following procedure:
1. Take the provided socket wrench and insert it on
the screw at bottom right – Fig. 11 (Maxi) and
Fig.11bis (Mini)
2. Turn the wrench clockwise.
3. Insert the provided pokers in the curved part as
shown in fig. 12.
4. Pull the insert towards you until it is blocked
automatically.
5. Remove the two top screws which fix the lateral
side to the insert, Fig.13 (Maxi)
For the insert Mini, it is necessary first to remove
the insert from its base and then remove the
screws.
6. Release the side, put your hand on the bottom
part and press slightly upwards until it uncouples
(Fig. 14).
fig. 12
fig. 13
Frames fitting
• Frontal frame
• Lateral frames
Fix the frontal frame with both the lateral frames in
such a way as to create the figure as shown in Fig.
15.
Fix the frames to the Comfort insert by means of
self-piercing screws.
N.B. Any wooden beams situated above the insert
must be protected using fireproofing material.
Assembly of the frames is important as it allows a
correct air circulation in the insert and consequently
a very good operation of the stove.
19
Air circulation ducts
It is necessary to create air intakes on the top of the
fireplace for a correct operation.
These can be made in the sides of the hood or in
the front.
It is important that following measurements are
respected:
Air intakes made in both sides of the fireplace
Minimum measurement requested 200 cm2 x side
Air intake made in the front of the fireplace
Minimum measurement requested 400 cm2 x side
The position of the air intakes is shown in Fig. 17
Also in the bottom part of the chimney an air intake
must be created ( for the min. measures see Fig.17)
fig. 14
FIXING SIDE SURROUNDS WITH
TOP SURROUND BY MEANS OF
TWO SCREWS PER SIDE
USE THESE HOLES FOR
FIXING THE SIDE
SURROUNDS ONTO
THE SIDES
WASHER
SCREW
SECT A-A
fig. 15
20
fig. 16
Fig. 17
For a correct and safe operation of the insert Comfort, you have, during the construction of the fireplace,
respect the measures (Fig.17) between insert and internal walls of the fireplace, above all the measure of
7,0 cm must be exact (in order to adapt the equipped frames), while the rest of the measures can be,
in case, increased or decreased at manufacture’s discretion.
NB: The fumes outlet pipe must always keep a min. distance of 5 cm. from inflammable parts.
21
Fig. 18
Air inlet box
Covering top for fumes exhaust box
Fig. 19
Air inlet box
As far as the air inlet box is concerned, there is the
possibility to connect the air inlet pipe above the sliding
base (see pict.18) or under the sliding base (see pict.19)
depending on the needs.
The fumes exhaust box is normally delivered with the relative covering top.
For the annual cleaning of the stove, we suggest to fix
the equipped flange to a suction pipe in order to make the
cleaning easier. (see pict.19).
Nb: All these operations must be carried out by a
specialized technician.
Sliding base
Cleaning
flange for the
fumes exhaust
box
Put high temperature
silicone on the flange
thread and between
flange and sliding base.
ACCESSORY AVAILABLE ONLY ON MODEL MAXI
22
8 CONTROL PANEL
REMOTE CONTROL SENSOR
D2
D1
fig. 20
REMOTE CONTROL SENSOR
D1
D2
1.
fig. 20 bis
ON/OFF BUTTON
The stove can be turned on and off automatically by pressing button 1.
2-3 SETTING THE TEMPERATURE AND TIMER-THERMOSTAT
The buttons 2-3 are used to adjust the room temperature inside the house
(see chap. 12) and program the weekly starts/stops using the timer-thermostat
4-5 ADJUSTING THE FEED RATE
The buttons 4-5 are used to adjust the heating power and warm air ventilation starting
from a minimum setting of :
Ecologica:
I.C.Maxi:
I.C.Mini:
Babyfiamma:
Preziosa:
Divina:
Bella-Bella Lux:
Contessa:
Ecologica Idro:
2,5
2,5
2,5
1,7
1,7
2,5
2,5
2,5
2,5
KW/h
KW/h
KW/h
KW/h
KW/h
KW/h
KW/h
KW/h
KW/h
till
till
till
till
till
till
till
till
till
to
to
to
to
to
to
to
to
to
max
max
max
max
max
max
max
max
max
11 KW/h
9,4 KW/h
7,5 KW/h
5,1 KW/h
5,1 KW/h
11 KW/h
7,5 KW/h
9,4 KW/h
14,47 KW/h
D1 Display for showing the different messages
D2 Display for showing the set heating power
23
8.1 DESCRIPTION OF CONTROL PANEL ALARMS
It is ON when the chronothermostat is activated.
It is ON when the room temperature is lower than the set of the temperature which has been set.
It is OFF when the room temperature is greater than the set of the temperature which has been set.
It is ON when the function day/night temperature is activated.
It is ON when the ignition sparking plug is not connected.
It is ON when an alarm occurs.
It is ON when the smoke exhaust motor is ON.
It is ON when the feeding gearmotor is running.
It is ON when the tangential fan is ON.
Only version Divina Plus. It is ON when the fan for the canalization is ON
It is ON when an additional thermostat is connected
Only Ecologica Idro version. It is ON when the circulator (pump) is ON
It is ON when the display receives the signal from the remote control
9 USE
BASIC INSTRUCTIONS
The stove you have purchased uses pellets as fuel. This type of material is produced from natural waste
from woodworking. Using a special process, which does not require the use of any binder or additive, the
shavings are compressed in industrial machines under high pressure and become solid wooden pellets. The
combustion of raw material which is not pellet, in our stove IS FORBIDDEN.
Failure to respect these instructions annuls all the warranties and could affect the safety of the appliance.
The first two or three times the stove is lit, following recommendations should be observed:
• No children should be present, as the vapours emitted can be harmful for health.
Adults should not stay for very long either.
• Do not touch the surfaces, as they could still be unstable.
• Air the room well several times.
• The hardening of the surfaces is completed after several heating processes.
• This stove must not be used as waste incinerator
• Let the stove functioning for 2-3 days at the med. Power (on the display you read 3) for a good
settlement of the components.
ONLY FOR ECOLOGICA IDRO: We suggest to set the stove on power 5, the stove will drop down
automatically to the lowest level, according to the water temperature.
24
10 LIGHTING
1. Check that the hopper is loaded, that the combustion chamber is clean, that the glass door is
closed, that the power socket is connected and that the switch on the rear is in position 1.
2. Press button 1 for three seconds; for the first 10 seconds, the display D1 will show the message
“Att” with the numbers falling every second. During this stage, the stove will carry out an
auto-control and check the efficiency of every single electrical component.
When this cycle is completed, the display D1 will show the message Acc 15 (the stove attempts
the lighting stage for 15 minutes and the number drops down by 1 every minute that passes).
NOTE:
When the hopper of the apparatus is loaded for the first time, pellets are not distributed to
the combustion chamber for 15 minutes because the worm screw for loading the pellets is
empty. The stove will automatically try another lighting phase for another 15 minutes; if the
pellets do not drop into the burning pot in this case either and the fire does not develop, the
display will show the message “NO acc”.
In this case, press button 1 for three seconds until D1 shows the message “OFF” (note 1)
and then repeat the steps from 1 to 3.
3. If points 1 and 2 are carried out correctly, the stove will enter the lighting stage after 11 minutes
and the display D1 will show the room temperature “20 C°” (“ t on” is displayed by D1 when
you connect a mechanical room thermostat to the stove (SEE CHAP. 10)
4. The desired heating power is adjusted by means of the buttons 4 and 5.
N.B.
In case of continued lighting failures, even if the pellets are coming out from the feeding pipe as
well, the problem could be that the electrical lighting plug is broken (note 2). In this case, contact
an authorised technician.
ATTENTION!
- NEVER USE FLAMMABLE LIQUIDS FOR LIGHTING
- WHEN FILLING, DO NOT BRING THE SACK OF PELLETS INTO CONTACT WITH THE HOT STOVE
Note 1: Check that the burning pot is completely free and clean
Note 2: In any case always check before lighting the stove that the burning pot is completely free and clean.
11 NORMAL OPERATION - TURNING OFF - REMOTE CONTROL
11.1 Normal operation
When the stove has been lit, the user can adjust the heating power by means of buttons 4 and
5. By pressing 4, the heating power and the pellet consumption will decrease, while by pressing
5 it will increase. The feed rate is shown on the display D2 as follows:
CONSUMPTION
Heating power
display D2
Preziosa
BabyFiamma
Ecologica
Divina-Divina Plus
Bella-Bella Lux
I.C. mini
Contessa
I.C. maxi
Ecologica
Idro
1
0,4 Kg/h
0,6 Kg/h
0,6 Kg/h
0,6 Kg/h
0,6 Kg/h
2
0,6 Kg/h
1,0 Kg/h
0,85 Kg/h
0,9 Kg/h
1,2 Kg/h
3
0,8 Kg/h
1,5 Kg/h
1,1 Kg/h
1,3 Kg/h
1,8 Kg/h
4
1,0 Kg/h
2,0 Kg/h
1,35 Kg/h
1,6 Kg/h
2,4 Kg/h
5
1,2 Kg/h
2,4 Kg/h
1,6 Kg/h
2,0 Kg/h
3,0 Kg/h
25
Besides the feed rate , also the room temperature can be set directly from the control panel; this
topic is dealt with in detail in chapter 12.
The stove adjusts itself automatically as far as warm air ventilation is concerned.
The timer-thermostat function allows the user to program the automatic starting and stopping of
the stove.
The contents of the hopper should be monitored to prevent the stove going out because of a lack
of fuel.
ATTENTION!
1. The cover of the pellet container must always be closed, excepting when loading fuel.
2. The sacks of pellets, must be kept at least 1.5 metres away from the stove.
3. A half hopper of pellets should always be constantly kept .
4. Before filling the stove hopper with pellets, make sure that the appliance is off.
11.2 DIVINA PLUS operation
The operation of the model DIVINA PLUS is the same of the other models, in addition it has a second
motor for the canalisation of the air. During normal operation, the second fan follows the running
of the first one.
It is anyway possible to switch on/off the functioning of the second motor as well as increasing
/decreasing the ventilation of the same per cent.
11.3 Turning off
Press button 1 (see fig. 20 and 20bis) for three seconds.
At the end of this operation, the stove automatically starts the shutdown stage, cutting off the feeding
of pellets. The display D1 will show the message “off”.
Both the fume extraction and warm air ventilation motors will run until the stove temperature
drops sufficiently.
N.B.:
In case of a voltage surge during operation , the stove will enter the cooling stage (the message
“RAF” will appear on the display D1) and after reaching a safety temperature, it will automatically
start the lighting cycle.
11.4 Remote control
The heating power, the desired room
temperature
and
automatic
starting/stopping of the stove can be
adjusted by means of the remote control.
P3
P2
Relation between remote control
Buttons and display buttons
1= P3+P5
4= P4
3= P3
5= P5
2= P2
26
fig. 21
P5
P4
To light the stove, press both buttons P3 and P5 at the same time for 3 seconds (fig. 21); the stove will
automatically enter the starting stage and the display D1 will show all the information described in
chapter 10, points 2 and 3.
After the lighting phase, follows the starting phase allowing the stove to develop and to settle the flame.
When the lighting stage is completed, the stove enters the normal operation and the heating power
can be adjusted by means of the buttons P5 (increase heating) and P4 (decrease).
The required room temperature can be +/- adjusted by pressing P3 or P2.
To turn off the stove, press both buttons P3 e P5 at the same time for three seconds. The display D1 will
show the message “Off”.
The remote control works with a battery of the MN21 12 volt type (the kind used for gate openers).
FOR REMOVING THE BATTERY, FOLLOW
THESE OPERATIONS:
• Insert a screwdriver as per drawing and
turn it in a clockwise direction.
• Once the cover up, take it away with the
fingers and remove the batteries.
Once finished, the batteries
must be removed from
the remote control, and
thrown in the due containers.
12 ROOM THERMOST
12.1 Digital thermostat
The stove can control the room temperature by means of a digital thermostat whose function is
to lower the heating power to the minimum when a pre-set temperature is reached.
1. When the stove has been started and it has entered the normal operating mode, a number (f.i.
21 C) appears on the display D1; this value indicates the room temperature.
2. The thermostat is set by pressing the button 2 and 3. A message will appear on the display
which alternates the word “set” with the temperature to set every time one of the buttons is
pressed; the value is reduced by pressing 2 and increased by pressing 3.
3. When you have adjusted the desired temperature, wait until the message “set” disappears
from the display.
4. The desired heating power is adjusted by means of the buttons 4 and 5.
When the stove reaches the set temperature it automatically goes to the minimum operating
condition and the LED 1 on the display D1 will go off.
In case you wish to exclude the functioning of the digital thermostat, set, through button 3, set the
temperature to max till when on the display D1 the message “Hot” will appear.
The same functions can be obtained by means of the remote control.
27
12.2 Mechanical thermostat (optional)
There is the possibility to put a thermostat in the room besides the installed stove: it is enough to
connect a mechanical thermostat (like those for boilers) following the instructions of next point (we
suggest to place the additional mechanical thermostat at a floor level of 1,50 m.)
12.2.1 Installation of the mechanical thermostat (optional)
1. Turn off the appliance using the main switch on the rear of the stove
2. Pull the plug out of the relative power socket
3. By referring to the electric drawing , connect the two thermostat wires to the relative terminals
on the back side of the stove , one red and one black.
N.B.: installation must be carried out by a specialized technician.
12.2.2 Mechanical thermostat operation
1. Set the desired heating power by means of the buttons 4 and 5 (fig. 20 and 21)).
2. Bring the room temperature to minimum by means of button 2 (Fig. 20 and 20bis) and the
display will show “ Low”.
3. Adjust the desired room temperature by means of the thermostat (f.i. 21C°); the display will
show “ t on”
4. When the stove reaches the desired temperature, it goes to the minimum operating condition
(“Low“ will appear on D1). If the temperature drops, the stove will pass to “t on” again,
returning to the setting previously adjusted.
12.2.3 Mechanical thermostat with energy saving function (Stby)
The function Stby is used in order to further reduce the pellet saving, switching off the stove when
the desired temperature has been reached.
On the contrary, if the temperature falls down, the stove will automatically switch on.
1. Set the desired temperature through the button 4 and 5 (Pict. 20 and 20bis)
2. Through the button 2, set the room temperature at the minimum position till when on the display
D1 appears the writing Low and Set blinking.
3. While the writing Low and Set are blinking, press button 1 for 3 seconds and on the display
appears the writing Stby, that means that the function of energy saving is on.
4. Through the mechanical thermostat, increase the temperature till when on the display the writing
Acc15 will appear, that means that the stove is starting the automatic switching on and then
will continue with the normal functioning.
5. When the mechanical thermostat reaches the desired temperature, the stove starts the Stby
function switching off automatically.
12.2.4 Mechanical thermostat operation for canalisation motor (only for DIVINA PLUS)
The connection of an external thermostat allow to share the functioning of the stove from the
functioning of the canalisation motor.
At this point you just have to fix the desired temperature, the mechanical thermostat will control
the functioning of the second motor :
If the temperature has not been reached jet, the second motor will follow the running of the stove
Once the temperature has been reached, the stove will bring the second motor to the first power,
making the pilot light of the control panel blinking ( see chapter 8 control panel ).
28
AMBIENT TEMPERATURE
REGULATOR
CENTRIFUGAL FAN
(DIVINA PLUS ONLY)
CONTROL
PANEL
POWER REGULATOR
ON-OFF
BUTTON
FILLING WORM
SCREW
BROWN
HEATING
TANGENTIAL FAN
BROWN
OPTIONAL EXT. AMBIENT
THERMOSTAT N.A.
FILTER
HEATING
WHITE
FUME EXTRACTION
WHITE
BLACK
BLACK
POWER
SUPPLY
MOTOR
HEAT
PROBE
HOT AIR MOTOR
MOTOR PELLETS
RESISTANCE
RESIST.
PROBE
THERM.
DEPRES.
BLUE
BROWN
CHRONOTHERMOSTAT
ELECTRONIC
BOARD
FUME
DISCHARGE FAN
CONDENSADOR
BLACK
ENCODER
RED
WHITE
YELLOW/GREEN
YELLOW/GREEN
BLUE
THERMOSTAT 85°
WHITE
WHITE
BROWN
BROWN
2-POLE SWITCH
RED
OPTIONAL:
EXTERNAL ROOMTHERMOSTAT
N.O. (ONLY DIVINA PLUS)
BLUE
BLUE
Y/G
FUMES
SENSOR
TRIPLE OUTLET WITH FUSE
TA 5X20 2A
BLUE
Electric drawing Ecologica - Babyfiamma - Preziosa - Divina - Bella - Bella Lux - Contessa
AMBIENT TEMPERATURE
REGULATOR
I.C. MINI VERSION
ONLY
CONTROL
PANEL
POWER REGULATOR
ON-OFF
BUTTON
HEATING
TANGENTIAL FAN
WHITE
WHITE
BLACK
I.C. MINI
VERSION
ONLY
OPTIONAL EXT. AMBIENT
THERMOSTAT N.A.
WHITE
BLACK
FILTER
POWER
SUPPLY
FUME EXTRACTION
REMOTE
CONTROL
RECEPTION
BOARD
WHITE
MOTOR
HEAT
PROBE
HOT AIR MOTOR
MOTOR PELLETS
RESISTANCE
RESIST.
FUME
DISCHARGE FAN
PROBE
THERM.
DEPRES.
BLUE
BROWN
CHRONOTHERMOSTAT
ELECTRONIC
BOARD
FILLING WORM
SCREW
SWITCH
CONDENSADOR
BLACK
ENCODER
RED
WHITE
YELLOW/GREEN
YELLOW/GREEN
BLUE
THERMOSTAT 85°
BROWN
RED
BLUE
2-POLE SWITCH
BLUE
SWITCH
Y/G
FUMES
SENSOR
BROWN
TRIPLE OUTLET WITH FUSE
TA 5X20 2A
BLUE
Electric drawing I.C. MAXI and I.C. MINI
29
AMBIENT TEMPERATURE
REGULATOR
CONTROL
PANEL
FILLING WORM
SCREW
POWER REGULATOR
HEATING
TANGENTIAL FAN
OPTIONAL :
EXTERNAL ROOM THERMOSTAT
(THE CONNECTION MUST BE SET
PARALLEL TO THE “THERMIC PROBE”
TERMINAL)
ON-OFF
BUTTON
WHITE
FILTER
BLACK
BLACK
POWER
SUPPLY
FUME EXTRACTION
WHITE
MOTOR
HEAT
PROBE
HOT AIR MOTOR
MOTOR PELLETS
RESIST.
RESISTANCE
THERMOSTAT 100 °
PROBE
THERM.
DEPRES.
WATER PRESSURE REGULATOR
BLUE
CHRONOTHERMOSTAT
ELECTRONIC
BOARD
BROWN
PUMP
FUME
DISCHARGE FAN
CONDENSADOR
BLACK
ENCODER
WATER PROBE
RED
WHITE
YELLOW/GREEN
FUMES
SENSOR
BLUE
THERMOSTAT 85°
YELLOW/GREEN
BLUE
BROWN
RED
BLUE
BROWN
2-POLE SWITCH
TRIPLE OUTLET WITH FUSE
TA 5X20 2A
BLUE
Electric drawing Ecologica Idro
12.3 USER PARAMETERS
Display D1 Display D2
06:00
B
22:00
25
C
D
20
E
00
F
Off
G
00
H
% Canalisation Fan Setting
Off
1
00:
2
3
:00
00
00:00
00:00
Off 1
00:00
00:00
Off 1
30
Function
Chronothermostat
Start/Stop chronothermostat, setting current day
Current Hour Setting
Current Minutes Setting
Installer Parameter (must not be changed)
First Ignition Time
First Extinction Time
Consents 1st Ignition/Extinction on the weekdays
Second Ignition Time
Second Extinction Time
Consents 2nd Ignition/Extinction on the weekdays
DAY-NIGHT TEMPERATURE FUNCTION
Start Day Phase/End Night Phase
Start Night Phase/End Day Phase
Maximal Temperature Day Phase
Maximal Temperature Night Phase
PELLETS LOADING SETTING
% Pellets Loading Setting
CANALISATION FAN PARAMETERS (DIVINA PLUS)
Canalisation Fan Ignition/Extinction
4
5
6
7
8
9
A
13 CHRONOTHERMOSTAT
This function enables you to program 2 ignitions and 2 extinctions on all the days of the week.
The ignition and extinction times will be included within a daytime, from 0 to 24, and cannot
overlap on more days:
Ex.
Ignition 07:00 / Extinction 18:00
Ignition 22:00 / Extinction 05:00
OK
WRONG
All manual controls, made by remote control or on the display, have priority on programmed
settings.
To enter this setting, please press button 3, and while keeping it pressed, press button 5 on the
display.
ON display
Display D1
Meaning
Sul
D1
Significato
On D1 you will have “OFF”, on
Monday
Day 1
Lunedì
D2 a blinking 1.
Tuesday
Day
2
Martedì
By means of buttons 2 and 3, set
Wednesday
Day 3
Mercoledì
the current day of the week; on
the display D1, the following
Thursday
Day 4
Giovedì
messages will appear and will
Friday
Day 5
Venerdì
change each time you press buttons
Saturday
Day
6
Sabato
2 or 3.
Sunday
Domenica
Day 7
Ex: If today is TUESDAY, Day2 will be set on the display.
Once you set the day, you are going to set the current hour. Press button 5 again. On the display,
the message “00:” will appear.
By means of buttons 2 and 3, set the current hour, then press 5 again.
“:00” will appear, to be set.
If all operations have been carried out correctly, you will have set the current day and time on the
stove.
Please, press 5 again, on the display “00” will be displayed.
N.B: This parameter was meant for the Technical Assistance Service and must not be changed,
as it could compromise the correct functioning of the stove.
Please, bring it back to “00” if you change it by mistake.
Press button 5 again to carry on. The message “07:00” will appear on D1.
You are going to decide here what time you want the stove to light, by means of buttons 2 and 3.
Once you press button 5 again, you are going todecide what time you want the stove to stop, by
means of buttons 2 and 3.
After pressing button 5, you are going to decide on what days of the week you want the stove to
respect the ignition/extinction time you have just set.
On the display D1, you will have “OFF1”, meaning that the chronothermostat will be off on
Monday. By pressing button 1, “OFF1” will become “ON1”, activating the chronothermostat on
Monday.
This procedure must be carried out by going through all the day of the week by pressing button
3 and choosing on what days the stove must light/stop according to the phase you just entered.
By pressing button 5, a second lighting-time will be shown. As described above, it is possible to
set 2 different working-phases.
To activate the second one, you have to repeat the same steps as described so far.
N.B: When the chronothermostat is active, this will be displayed one of these 2 ways:
• Display ➠ Some blinking lines forming a sort of square will flash on D1.
• Display with leds ➠ the chronothermostat pilot light will be on (see display description).
31
To stop the chronothermostat, press button 3, and while keeping it pressed, press button 5 on the
display. Set the value on D1 on OFF (you acces OFF after Day7 or before Day1), then press 1 to
confirm and exit. To see the current time, press button 1 for 1 second, if you press it longer than 1
second, the stove will be switched on/off.
13.1 DAY AND NIGHT TEMPERATURE FUNCTION
This function enables you to light and stop the stove according to 2 pre-set temperatures.
You can choose one temperature for the day and one for the night.
To set these 2 temperatures, please enter the user programming by pressing button 3, keep it
pressed, then press button 5.
On D1, you will have the message “off”, on D2 a blinking “1”. After pressing button 5, you will
have “00” on D1 and 2 on D2. Set the current hour by means of buttons 2 and 3. Press button 5
again. “00” will appear on D1, on D2 the number 3.
These are the current minutes, set them as well by means of buttons 2 and 3.
Press button 5 again, as far as you can see the letter “b” on D2.
You are going to set here the start of the day-phase and, as consequence, the end f the night-phase,
by means of buttons 2 and 3. After pressing button 5, you are going to set the end of the day-phase
and the start of the night-phase, by means of buttons 2 and 3. On D2, the letter “c” will be
displayed. We have so far divided the day into 2 phases, these parameters are meant to distinguish
a temperature for the day- and one for the night-phase. After pressing button 5, you are going to
set the maximal temperature you would like to have during the day-phase, by means of buttons 2
and 3. On D2, the letter “d” is displayed. Then press button 5 again, and choose the temperature
you would like to have during the night-phase, by means of 2 and 3. On D2, the letter “d”
is displayed.
Confirm these settings by pressing button 1, and leave this program.
To activate/desactivate this function, press button 4, and while keeping it pressed, press button 5.
On the display, this function will be confirmed one of these 2 ways:
• Display ➠ you will have a blinking “L” on D2.
• Display with leds ➠ the day-night function pilot light will be on (see display description)
N.B. This operation can be only carried out when the stove is off !
Summary table
You will have the message “doff”
on D1, when the stove turns off
because the pre-set temperature
has been reached. The stove will
turn on again automatically
when the room temperature will
decrease of 3°C under the
maximal preset temperature.
Ex.
Meaning
Display D1
Display D2
00:
2
Current Hour Settino
:00
3
B
Current Minutes Setting
Start Night Phase/End Day Phase
25°C
C
D
20°C
E
Maximal Temperature Night Phase
06:00
22:00
Start Day Phase/End Night Phase
Maximal Temperature Day Phase
Stove mode ➠ doff
Maximal preset Temperature ➠ 25°C
When the room temperature will be under 22°C (25 – 3 = 22°C), the stove will turn on again
automatically.
13.2 PELLET FEEDING ADJUSTMENT
If the stove has any kind of problem caused by the amount of pellets, you can directly set it on the
display. We can divide the problems related to the combustible quantity into 2 categories:
32
1- LACK OF PELLET
• The stove cannot develop a suitable flame, tending to burn very low also at high speeds.
• At lowest speed, the stove tends to burn out/burns out, bringing the message “NO PELL” on the
display.
• When “NO PELL” is displayed, some ‘not burnt’ pellets can still lie in the combustion burner.
2- EXCESS OF PELLET
• The stove develops a very high flame also at low speeds.
• The flame tends to soil the panoramic glass very much, darkening it nearly completely.
• The combustion pot tends to become encrusted, blocking the air intake holes, as pellets are not
completely burnt.
N.B: If the problem occurs only some working-months later, please verify whether the ordinary
cleanings, mentioned in the user manual, have been carried out.
The setting to be carried out is a setting per cent. This means that any change of this parameter will
imply a proportional variation on all loading speeds of the stove.
To enter the proportional variation of the pellets loading, you have to press button 3, and while
keeping it pressed, press button 5.
Now, move by means of button 5 through the menu, as far as you see an “F” blinking on D2.
If you go beyond this value unintentionally, exit by pressing button 1 and repeat this procedure.
The value “00” will be displayed on D1: by means of buttons 2 and 3, you’ ll be able to set an
increasing/decreasing per cent of 5 points (ex 00, 05, 10).
The scale goes from – 50 to + 30. Once you set this value, confirm and leave this program by
pressing button 1.
Adjustment
table
LACK
OF PELLET
Increase the value per cent of 5 points e start the stove with this
new value. If the problem is lightened but not solved, increase of
5 points more. If the problem cannot be solved, please turn to the
Technical Assistance.
EXCESS
OF PELLET
Decrease the value per cent of 5 points e start the stove with this
new value. If the problem is lightened but not solved, decrease of
5 points more. If the problem cannot be solved, please turn to the
Technical Assistance
13.3. DIVINA PLUS CANALISATION FAN PARAMETERS
These parameters enable you to carry out some operations on the canalisation fan in the Divina
Plus.
To access these parameters, please press button 3, and while keeping it pressed, press button 5,
then move by pressing button 5 through the menu as far as a blinking “G” appears on D2.
Parameters Table
off
G
Canalisation Fan Ignition/Extinction
00
H
% Setting of the Canalisation Fan
“G” is to activate/disactivate the canalisation fan: by means of buttons 2 and 3, you’ ll decide
whether you want this fan to turn or not. To confirm and leave this program, press button 1.
If you want to carry on in the program, press button 5.
“F” enables you to make a change per cent on the speed of the canalisation fan in the Divina Plus.
So, this change will proportionally imply all the working speeds of the stove.
“00” will be displayed on D1: by means of buttons 2 and 3, it will be possible to increase/decrease
the original value of 5 points each time (this parameter can be modified on a scale from –50 to
+30).
Once this value is set, you can leave this program either with button 1 or 5.
33
13.4 ALARM MESSAGES
If operating faults occur, the stove provides a control system which informs the user on the
display where the fault has occurred. The alarms are summarised in the following table:
Message on the display D1
Fum Fail
Fum tc
Hight temp
Hight H2O
(only for Mod. IDRO)
Type of problem
- The fume motor is blocked
- The speed control probe is broken
- No power supply to the motor
Replace the motor or check if there is
power supply
These operations must be carried out
by an authorised engineer
- The thermocouple is broken
- The thermocouple is disconnected
from the board
Check that the thermocouple is correctly
connected using the wiring plan on the
hopper or replace the component.
These operations must be carried out by
an authorised engineer
- Too full of pellets
- No power supply to the tangential
motor
Check the power supply
Replace the broken motor
Adjust the pellet feeding
These operations must be carried out
by an authorised engineer
Check that there is power supply in the
pump.
Check that the pump impeller is not
blocked by limestone.
The plant is too big in relation to the
pump flow (add an additional pump).
Fill the plant up by means of the relative
feeding group.
Check there is no leakage causing the
emptying of the plant.
These operations must be carried out by
an authorised engineer.
- The circulation pump is blocked
- The power of the plant is lower than
0,9 m3/h
- The water plant is out of water
Depr Fail
- The flue is obstructed
- The chamber is dirty
- The silicone tube is disconnected
Check that the flue and chamber are clean
Check the connection of the silicone tube
These operations must be carried out by
an authorised engineer
No acc
- No pellets in the hopper
- Lighting for the first time
Fill the stove with pellets
When lighting for the first time,
see chapter 10.
Raf
- Power failure during stove
operation
The appliance will cool down and
then will carry out the lighting stage
automatically.
This message is not an alarm
This function is starting each 3 hours
and 20 minutes making the fumes motor
working at max power for 30 seconds in
order to keep the burn pot clean.
- Automatic burn pot cleaning
Pull
- Low temperature in the fire chamber,
the fire dies and the pellet feeding
stops.
Empty the burn pot and the restart the stove
again. Maybe you have to adjust the pellet
feeding after the running in of the gearmotor.
If the stove is new:
Fill the hopper with pellet.
Set the stove on position 3 or 4 for a min.
period of 30 hours for a good settlement of
the motors and of the mechanical components. During these 30 hours, set the room
thermostat on HOT.
- When the stove is trying another
starting after having just turned off
( normal turning off or caused by
an alarm)
When the stove turns off (normal turning
off or caused by an alarm) it is necessary
to wait its cooling down and provide to
clean the burn pot.
Only after these operations you can start
the stove again.
No Pell
Atte
34
Solution
14. Operation description of the radiofrequency bi-directional remote control with LCD display
for the model INSERTO COMFORT MINI
1. GENERAL DESCRIPTION
The radiofrequency remote control communicates via a bidirectional way with the mother board,
sending commands and displaying the operation status of the stove.
Operation frequency selection
Should more than one device be installed within the range of some meters, it is possible that one
interferes with the other jeopardizing the correct operation. To avoid this, it is possible to assign
a specific coding to each single device:
1.
2.
3.
4.
5.
6.
7.
Disconnect the power supply from the stoves
Remove the batteries from the remote controls
Re-insert the battery in the remote control to be coded
Press simultaneously the keys 4 and 5 for three seconds until the display shows the text “UNIT”
Using the push-button 4 or 5, select the wished coding (from 0 to 3)
Enable the stove to be coded
After the acoustic signal of 2 beeps, press the push-button 1 for 4 seconds until the display
shows the text “extraflame”.
Here below we provide the main characteristics:
The visual interface is supplied as a display by LCD of 24 characters located on 4 lines plus 16 bars.
Capacity in transmission and reception is 4 meters in free air.
Display of the product operational status.
Direct commands for switching ON/OFF, power change.
Setting the weekly programmer (chronothermostat)
Power supply by batteries (2 x 1,5 V type AA).
Size 61 x 150 x 20 (Base x Height x Depth)mm
Display LCD
2. THE KEYBOARD
Here below we indicate the image of the radiofrequency remote control for the dialog with the mother board.
Button 1 – ON/OFF unlock
The key, pressed for two seconds, allows the manual
ignition or the switching OFF of the stove according to
the fact that one is in the ON or OFF status.
When the alarms occur, bringing the stove to the
Block, the button allows the unlock and the following
passage to the status OFF.
During the programming of the user’s parameters
allows to exit returning to the main menu.
Buttons 4 e 5 – Increase / Decrease parameter
In the main screen, the buttons allow to adjust the
power of operation of the stove from a minimum value
of 1 to a maximum value of 5; such a value is indicates
in the upper display.
During the modification of the user’s parameters, the
buttons allow to perform the increase/decrease
desired of the parameter, whose value is displayed on
the first line of the display.
Pulsante 4
Pulsante 1
Pulsante 5
Pulsante 2
Pulsante 3
Buttons Menu 1(3) and Menu 2 (2)
The following buttons allow to enter and set the user’s
programmings.
35
3. THE DISPLAY
The display LCD by 32 characters located on 4 lines by 8 characters each and 16 bars. The displaying of the display changes according to the status of the stove, or the menu displayed.
In standby the display is the following:
HOUR
ROOM
TEMPERATURE
CALORIC
POWER
11:23
33°C
Po 1
OFF
STOVE
STATUS
Hour: it is indicated the current time; it must be set inside the CHRONOTHERMOSTAT (see menu SET
CLOCK).
Ambient Temperature: it indicates the ambient temperature.
Caloric Power: it indicates the power of operation. It is fixed during the work of the stove.
Status of the stove: it indicates the status of the stove, i.e. if this is ON or OFF.
Other displayings: The display provides also information related to the various functions of the stove.
In this tables we list the various displayings:
It is ON when the chronothermostat is activated.
It iIs ON when the room temperature is lower of the set of the temperature which has been set.
It is OFF when the room temperature is higher than the set of the temperature which has been set.
It is ON when the function day/night temperature is activated
It is ON when the ignition spark plug is disabled
It is ON during the cleaning of the stove.
It is ON when an alarm occurs.
It is ON when the smokes expulsion motor is ON.
It is ON when the feeding gearmotor is running.
It is ON when the tangential fan is ON.
36
4. USER’S MENU
In this table we list all various menus available for the user:
N°
1
2
3
4
5
6
Menu
Set temperature
Set clock
Set chrono
Day/Night
Set pellet
Set language
Description
Menu to set the temperature
Menu to set current hour and day
Menu to set programs of ignition/switching OFF
Menu for the day/night temperature function
Menu for the adjustment of pellet drop %.
Menu for the language selection
Here below we indicate a list to access to the various user's menus:
START SCREEN
menù 1
See 4.2
SET TEMPERATURE
menù 1
Menu 2
SET CLOCK
See 4.2
pulsante 5
SET CHRONO
Menu 2
See 4.3
pulsante 5
DAY/NIGHT
Menu 2
See 4.4
pulsante 5
ADJUST PELLET
Menu 2
See 4.5
pulsante 5
SET LANGUAGE
Menu 2
See 4.6
4.1 SET TEMPERATURE MENU
The value of the temperature may be varied in any moment by the user. Pressing the button menu 1(3)
on the display appears “SET TEMPERATURE”; Now through the buttons 4 and 5 select the value
desired to set the temperature: the buttons allow to increase/decrease the value of the ambient
thermostat from a minimum value of 07°C (on the display appears MIN) to a maximum value of
40°C(on the display appears MAS); such a value is indicated on the first line of the display, while
on the third and fourth line appears the message SET AMBIENT TEMP.
Once it is set the value desired confirm with the button 1.
4.2 SET CLOCK MENU
After selecting the menu “SET CLOCK” press the menu button 2(2) to scroll the following submenus(see Fig.1 Pag.5.):
Par.
Display
1
Day clock
2
Hours clock
3 Minutes clock
Description
Setting current day and ON/OFF programming.
Setting current hour.
Setting current minutes.
Settable values
OFF; Day1, ...;Day7
From 00 a 23
From 00 a 59
37
We indicate here below the meaning of some parameters.
Parameter 1:
According to the type of application and use made by the user, such a parameter is used to set
the current day of the week (weekly operation), or disable the weekly scheduling.
If the parameter 1 is set with the current day,
e.g. Tuesday/Day2 it is possible to select the
day of the week to which associate the
ignition of one or more of the programs set.
Pressing the buttons P2 and P3 it is possible
to select the value desired.
4.3 SET CHRONO MENU
Display D1
Day 1
Day 2
Day 3
Day 4
Day 5
Day 6
Day 7
OFF
Meaning
Monday
Tuesday
Wednesday
Thursday
Friday
Saturday
Sunday
Chronothermostat disabled
The function of chronothermostat allows to
program for all the days of the week 2 ignitions and 2 switchings OFF.
After selecting the menu “SET CHRONO” press the button menu 2(2) to scroll the following
submenus(see figure 1 pag. 5):
The parameters of the Chronothermostat are the following:
Par.
1
2
3
4
5
6
Display
Start Program 1
Stop Program 1
Days ON 1
Start Program 2
Stop Program 2
Days ON 2
Description
Timetable first ignition
Timetable first switching OFF
Consents 1st ignit./swit. OFF for the various days
Second ignition timetable
Second switching OFF timetable
Approvals 2nd ignit./swit. OFF for the various days
Settable values
Da 00:00 a 23:50 a intervalli di 10'
Da 00:00 a 23:50 a intervalli di 10'
ON/OFF per tutti i giorni
Da 00:00 a 23:50 a intervalli di 10'
Da 00:00 a 23:50 a intervalli di 10'
ON/OFF per tutti i giorni
The setting of the following parameters is activated only if the parameter 1 of the “SET CLOCK”
is set in modality of weekly programming.
Here below we indicate the meaning of some parameters.
Parameter 1 and parameter 2
These two parameters indicate the timetable of start and end of the first hour timetable of programming.
Parameter 3
Through the button P5 it is selected the day of the week and with the button P4 it is
activated/deactivated the first hour range of programming. For example “off 2” means that on
Tuesday the stove does not perform the first hour range, while if you set “on 6” it means that on
Friday the stove performs the first hour range.
Parameter 4 and parameter 5
These two parameters indicate the timetable of start and end of the second hour range of
programming.
Parameter 6
Through the button P5 it is selected the day of the week and with the button P4 it is
activated/deactivated the second hour range of programming. For example “off 2” means that
on Tuesday the stove does not perform the second hour range, while if you set “on 6” it means
that on Friday the stove performs the second hour range.
38
4.4 DAY/NIGHT MENU
The day-night temperature function allows to start and switch OFF in automatic way the
equipment according to the two temperatures selected. After selecting the “DAY-NIGHT” menu
press the menu button 2(2) to scroll the following submenus(see figure 1 pag. 5):
Par.
Display
1
Day night
2
Day start
3
Day End
4
Max temp. day
5 Max temp. night
Description
Enables/disables the day/night function
Start of the day range/end of the night range
End of the day range/Start of the nigh range
Max temperature day range
Max temperature night range
Settable values
ON/OFF
From 00:00 to 23:50 at intervals of 10'
From 00:00 to 23:50 at intervals of 10'
From 0°C to 35°C
From 0°C to 35°C
When the stove goes into switching OFF due to temperature reached on the display appears the
blinking message “DAY-NIGHT OFF”. The stove shall restart automatically when the ambient
temperature lowers of 3 °C compared to the max temperature which has been set.
Es.
Status of the stove ➠ DAY-NIGHT OFF
Max temperature which has been set ➠ 25°C
When the ambient temperature lowers under 22°C (25 – 3 = 22 °C) the stove restarts automatically.
4.5 PELLET ADJUST MENU
In case the stove shows problems of operation due to the quantity of the pellets you may proceed
directly from the commands panel to the adjustment of the pellets load.
The problems connected to the quantity of fuel may be divided into 2 categories:
1- LACK OF FUEL :
• the stove never manages to develop a suitable flame; it tends to remain always low also with a
high power.
• at the minimum power the stove tends almost to switch OFF bringing the stove to alarm “NO PELL“
• when the stove displays the alarm “NO PELL” there may be some unburnt pellet inside the furnace.
2•
•
•
FUEL EXCESS :
the stove develops a very high flame also with low power
tends to dirt a lot the panoramic glass obscuring it almost totally
the furnace tends to encrust obstructing the holes for air suction due to excessive pellet load
because it is burnt only partially.
N.B. if the problem occurs only after some months of work, verify that the routine cleaning,
indicated on the stove booklet, have been performed correctly.
The adjustment to be performed is of the percentage type, then a modification on this parameter
involves a proportional variation on all the loadings speeds of the stove.
To access to the percentage adjustment of the pellet load it is necessary to select the item “ADJUST
PELLET” and press the menu button 2(2) .
On the display it shall be displayed the value “00”: through the keys 4 and 5 you may adjust the
percentage increase/decrease desired from 5 points to 5 points (the parameter may be varied
with a maximum excursion from –50 to +30). Once the adjustment is performed, press the button 1 to confirm and exit.
39
Adjustment table
FUEL
LACK
Increase the percentage value of 5 points and test the stove with the new
calibration. If the problem is reduced but not solved, increase of further 5
points. Repeat the operation up to the solution of the problem. In case it is
not solved, contact the office of technical assistance.
FUEL
EXCESS
Reduce the percentage value of 5 points and test the stove with the new
calibration. If the problem is reduced but not solved, decrease of further 5
points. Repeat the operation up to the solution of the problem. In case it is
not solved, contact the office of technical assistance.
4.6 LANGUAGE MENU
This menu allows to select the language of the menu. Currently it is available the ITALIAN version only
5 ALARMS DESCRIPTION
We provide here below the table of alarms which may occur :
Alarm
Solution
Fum Fail
- The smokes motor is blocked
- The probe for speed control is broken
- No power supply to the motor
Replace the motor or verify if there is power supply
These operations must be performed by an
authorized technician
Fumi tc
- The thermal couple is broken
- The thermal couple is disconnected
from the card
Check if the thermal couple is correctly connected
using the wiring diagram located in the tank or
proceed with the replacement of the component
These operations must be performed by an
authorized technician
Hight temp
- The tangential fan is broken
- Too much load of pellets
- No power supply to the tangential
motor
No
acc
- No pellets in the tank
- It is the first ignition
Verify if there is power supply
Replace the broken motor
Adjust the load of pellets
These operations must be performed by an
authorized technician
Check if the chimney and the chamber are clean
Check if the sensor is burnt and replace it
These operations must be performed by an
authorized technician
Fill the stove with pellets
If it is the first ignition, see chapter 8
Raf
- Lack of current during the operation of
the stove
The equipment shall cool down and then
automatically shall perform the phase of ignition.
No
Pell
- Low temperature in the fire
chamber, the fire dies and the
pellet feeding stops.
Depr Fail
Atte
40
Type of problem
- The chimney is obstructed
- The chamber is dirty
- The sensor is defective
- When it is started an ignition and the
stove has just gone OFF (normal
switching OFF or caused by an alarm)
Empty the burn pot and the restart the stove again.
Maybe you have to adjust the pellet feeding after the
running in of the gearmotor. If the stove is new: Fill the
hopper with pellet. Set the stove on position 3 or 4 for
a min. period of 30 hours for a good settlement of the
motors and of the mechanical components. During
these 30 hours, set the room thermostat on HOT.
When the stove goes in switching OFF (normal or
caused by an alarm) it is necessary to wait the
cooling of the machine and perform the cleaning of
the furnace. Only after performing these operations
you may proceed with a new ignition.
15 CLEANING AND MAINTENANCE
ATTENTION: All cleaning and maintenance operations must be carried out when the stove
is completely cold.
All herewith described operations are very important to guarantee a correct functioning and
a long life of your stove.
The cleaning frequency of your stove depends from the quality of the pellett you are using,
For this reason we recommend you to make use of tested pellett only.
• For opening the handle make use of the special ash hook.
• Insert the 90° side of the special hook into the hole in the bottom part of
the handle and pull towards you.
41
15.1 Cleaning Ecologica-I.C.MAXI- Ecol.Idro
1 The ash tray must be emptied whenever
necessary. When you carry out this operation, you should check that the chamber
under the burn pot is clean and that the
relative holes for the air are not obstructed.
Use a vacuum cleaner to simplify this
operation. (See fig. 22)
2 To have a constant heat yield all the time,
slide the two scrapers from the top to the
bottom, every day, by means of the two
knobs on the top of the stove. (See fig. 23)
This is for removing the ash, which deposits
on the tubes of the heat exchanger.
fig. 22
3 The glass window in the door should be
cleaned using a cloth moistened with water
(only when the glass is cold). A solvent,
which can be bought from our dealers, can
be used for more stubborn dirt.
4 Clean the heat exchanger chamber every
week, if necessary.
fig. 23
5 On the Ecologica IDRO, the mobile firewall
can be removed once a month ( see Fig.25).
CLEANING PROCEDURE
a) Open the glass door.
b) Using a specific tool, turn the two
screws/bolts, which keep the mobile firewall,
through 90º towards the centre. (See Fig. 24)
fig. 24
c) Remove the mobile firewall, taking care not
to damage the insulating ring.
NOTE: the insulation ring may deteriorate
with the time; when necessary it must be
replaced with a new one, which can be
purchased exclusively from our authorised
dealers.
fig. 25
42
d) If the interior is dirty, use the equipped tool to
scrape the deposited ashes and then remove
them by using a vacuum cleaner (Fig.26).
Insert the mobile firewall again, fixing it with
the two screws/bolts, taking care not to
damage the ring.
e) Monthly, or whenever necessary, we suggest
to provide for a complete cleaning of the
combustion chamber. To do this, unscrew the
four screws on the side of the chamber wall
(Fig.27) and remove it (Fig.28)
Now scrape as described before by using
the equipped tool and then vacuum all the
deposited ashes between the stainless steel
tubes (Fig.29)
fig. 27
f) Duly clean the holes of the burn pot with the
equipped tool, vacuum everything and the
insert it. We recommend carrying out this
operation every day.
g) The positioning of the insulating rings on the
door guarantees the tightness of the stove
and its correct operation. It is necessary for
to check the rings periodically.
If they are damaged, they must be changed
by our authorised dealer . (See fig. 30)
fig. 28
NB.:
For a correct functioning , the stove need an
ordinary maintenance at least once a year by
our authorized dealer.
If the electrical cord is damaged, it must be
replaced by the authorized dealer or by a
special technician, in order to avoid any risk.
fig. 29
fig. 26
fig. 30
43
15.2 CLEANING BELLA- BELLA LUX-DIVINA
CONTESSA – PREZIOSA – BABYFIAMMA
The maintenance operations guarantee a
correct stove functioning in the time.
Failure to respect these operations annuls all
the warranties and could affect the safety of the
stove.
1. BURN POT CLEANING
The burn pot must be cleaned every day.
To do so, use the special poker(see part.B
Fig.31) to scrape off any incrustation which
may have formed in the holes. Remove the
deposited residues using a vacuum cleaner.
Remove the burn pot from its seat and
remove the ash deposits using a vacuum
cleaner.
fig. 31
2. CLEANING OF ASH DRAWER
The ash drawer (A Fig.31) must be emptied
according to need.
To do so, proceed as follows:
a. press the bottom door downwards and
rotate it outwards (see fig. 32).
b. grip the handle (fig. 33).
c. turn the handle 90° as shown in fig. 4 in
order to release the pan from the fixed body
of the stove.
d. pull out the ash drawer and empty the
ashes, Fig.35.
e. Proceed in the inverse order to reassemble.
N.B.: When you hook the drawer back,
ensure that the handle rests on the fixed body
of the stove when it is in the locked position;
if this operation is not carried out correctly,
combustion problems may arise as the stove
may not be properly sealed.
fig. 32
fig. 33
fig. 34
44
3. CLEANING THE HEAT EXCHANGER
Cleaning the heat exchanger allows you to
maintain a constant heat yield over time.
This type of maintenance must be carried out
at least once a day.
To do this, simply use the special scrapers
located in the upper part of the stove.
• see Fig. 36 (Ecologica, I.C.Maxi, Bella,
Divina, Contessa)
• see Fig. 37 (Babyfiamma, Preziosa)
fig. 35
4. DOOR AND ASH DRAWER INSUL. RINGS
The insulating rings ensure the tightness of
the stove and therefore its correct operation.
They must be periodically checked.
If they are worn or damaged, it is necessary
to change them immediately.
fig. 36
This operation must be carried out by an
authorized technician.
NB.: For a correct functioning , the stove need
an ordinary maintenance at least once a year
by Your authorized dealer.
If the electrical cord is damaged, it must be
replaced by the authorized dealer or by a
special technician, in order to avoid any risk.
fig. 37
45
15.3 CLEANING I.C. MINI
1. BURN POT CLEANING
The burn pot must be cleaned every day.
To do so, use the special poker(see part.B
Fig.38) to scrape off any incrustation which
may have formed in the holes. Remove the
deposited residues using a vacuum cleaner.
Remove the burn pot from its seat and
remove the ash deposits using a vacuum
cleaner.
fig. 38
2. CLEANING THE HEAT EXCHANGER
Cleaning the heat exchanger allows you to
maintain a constant heat yield over time.
This type of maintenance must be carried out
at least once a day.
To do this, simply use the special scrapers
situated in the upper frontal part of the
stove. (see Fig.39)
fig. 39
Inspection
Once a year, or whenever needed,
vacuum and duly clean the
connection to the chimney.
In case of horizontal sections,
duly remove any ash residues
(see lat. photo) before these can
obstruct the smokes flow.
pe
Slo
Inspection
Failure to the cleaning, affect the
safety of the stove.
Inspection
46
Height over
15.4 CONNECTION TO THE
CHIMNEY
16 PROBLEMS, REASONS, SOLUTIONS
ATTENTION: All repairs must be carried out exclusively with the stove cold and without power
(plug disconnected) by authorised personnel.
PROBLEM
The pellets are not fed into
the combustion chamber.
REASON
SOLUTION
1. The pellet tank is empty
1. Fill the tank with pellet
2. The fume extractor, the warm air 2. Contact an authorized technician
ventilator, the feed screw or the
the solve the problem.
mother board may be defective. 3. Clean the feed box and the feed
3. The feed screw is blocked
screw.
(foreign body)
The fire goes out or the stove stops 1. The pellet tank is empty
automatically.
2. The pellets are not fed in
3. The overheating safety device
has tripped
4. The door is not closed hermetically
or the rings are worn
5. Poor pellet quality
6. Poor pellet feeding
7. Exhaust obstructed
1. Fill the feed box with pellet
2. See previous section
3. Let the stove cooling down for
an hour. If the problem persists,
call an authorized technician.
4. Close the door or replace the
rings with new ones of the
same type.
5. Use qualified pellet only.
6. Get an authorized technician to
check the pellet feeding
7. Remove the ashes from the
exhaust.
The stove works for 9-10 minutes 1. The exhaust gas has not reached 1. Repeat the lighting operation
and then goes off.
the optimum temperature.
2. If the problem persists call an
2. The heat probe is blocked
authorized technician .
3. The heat probe may be
3. Control the wiring and check
disconected.
that the wires are properly
4. The chimney is obstructed
connected.
4. Clean the exhaust flues.
47
PROBLEM
REASON
SOLUTION
The fire burns a weak orange
flame. The pellets pile up in the
burn pot and the door glass gets
dirty.
1. The air for the combustion is
not enough
1.a Check that all the holes in the
burn pot are open and clean
them if necessary.
1.b Check that the pipes of the
exchanger are not clogged
and clean them if necessary.
1.c Check that the air input is not
obstructed.
1.d Check that the door rings are
still in good condition.
1.e Clean the fume extractor
casing.
1.f Get an authorized technician
to check the stove.
The fume extractor fan does not
work.
1. The stove is not powered.
1. Check that the plug is plugged
2. There is no power in the control in and that the switch on the rear
panel.
is in Pos.1
2. Check that the fuse on the rear
has not blown.
The warm air ventilator does not
go off when the stove is turned off
and cool.
1. The temperature control is
defective ( heat probe)
1. Disconnect the plug and call an
authorized technician.
Dirt or ash around the stove.
1. The door of the stove was open
during operation.
2. The door rings are worn or
broken.
3. The connection between the
fumes extractor and the chimney
flue is not hermetic.
1. Always keep the door closed
and open it only when it is cold.
2. Change the insul. rings with new
ones which must be purchased
from our dealer.
3. Close the openings with adhesive
aluminium tape or with high
temperature silicone (resistant
up to 300°)
48
17 GUARANTEE
All the stoves are guaranteed 24 months.
The warranty will be recognised on condition that the purchaser fills in the attached form
completely and mails it within 8 days.
The date of purchase must be validated by the possession of a fiscally valid receipt provided
by the vendor.
Components, which the manufacturer recognises, as having been defective at origin will be
replaced free of charge and will be substituted by the technician who installed the appliance.
The warranty will be valid on condition that:
a) Technician installs the stove and that he himself completes the guarantee form (see chapter
18) of the instruction manual.
b) The stove is used as instructed in the instruction manual.
The warranty is not valid for damage caused by: atmospheric, chemical or electrochemical
agents, fire, negligence or inexperience, failure to observe the laws in force, defects in the
electrical system, lack of maintenance, tampering with the product, or ineffective
flues/chimneys.
The warranty will cease in the event of overheating, that is the combustion of non-conforming
materials (see manual).
EXCLUSION FROM THE GUARANTEE :
All the parts subject to wear are excluded from the warranty. This category includes: the
gaskets, the grate, the coating of the stove, the ceramic glass, and the painted or gilded parts
and those in ceramics.
Chromatic variations and slight dimensional differences in the ceramic parts shall not
constitute reasons for complaints, as they are natural characteristics of the materials
themselves.
All of any costs (repair, transport, etc.) claimed against the manufacturer or dealer for
improper
exercise of the warranty rights, by the purchaser, will be charged to the user.
Damage caused by transport will not be recognised; you are therefore advised to carefully
inspect the goods on receipt, and immediately inform the dealer of any damage.
The manufacturer will not be liable for direct or indirect damage caused by or depending
on the product.
49
18 QUALITY CONTROL
Model
Serial nr.
Tests carried out:
- Automatic lighting
- Combustion air motor
- Convection air motor
- Aestetic aspect
- Packaging/Technical data label
❏
❏
❏
❏
❏
Operator’s signature:
Dealer’s stamp
Date of purchase:
✁
Cut out and send to the manufacturer within 8 days from purchase
Surname
Adress
Postal code
Living City
Prov.
Phone number
Model
Serial no.
Deale
Dealer’s stamp
Date of purchase
IMPORTANT
50
IMPORTANT
IMPORTANT
Name
19 APPENDIX
CONTROL PANEL
Previous versions
REMOTE CONTROL SENSOR
D2
D1
LED 1
REMOTE CONTROL SENSOR
D2
D1
LED 1
51
EXTRAFLAME S.p.A.
Via dell’Artigianato, 10
36030 MONTECCHIO PRECALCINO
Vicenza - ITALY
Tel. 0445.864488 (3 linee r.a.)
Fax 0445.865243
E-mail: [email protected]
internet: http://www.extraflame.com
9271030
PELLETS STOVES