1
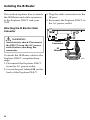
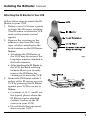
User’s Guide
VCR Commander™ Service
IMPORTANT RULES FOR SAFE OPERATION
CAUTION
RISK OF ELECTRIC SHOCK
DO NOT OPEN
AVIS
RISQUE DE CHOC ÉLECTRIQUE
NE PAS OUVRIR
CAUTION: To reduce the risk of electric shock, do not remove cover
(or back).. No user-serviceable parts inside. Refer servicing to qualified
service personnel.
WARNING
TO PREVENT FIRE OR ELECTRIC
SHOCK, DO NOT EXPOSE THIS
UNIT TO RAIN OR MOISTURE.
This symbol is intended to
alert you that uninsulated
voltage within this product may
have sufficient magnitude to
cause electric shock.
Therefore, it is dangerous to
make any kind of contact with
any inside part of this product.
2
This symbol is intended to alert you of the
presence of important operating and
maintenance (servicing). instructions in the
literature accompanying this product.
IMPORTANT RULES FOR SAFE OPERATION, Continued
1.
Carefully read all safety and
operating instructions before
operating this product, and retain
them for future reference.
2.
Follow all warnings and cautions
in the operating instructions, as
well as those that are affixed to
this product.
3.
Follow all operating instructions
that accompany this product.
4.
Do not use liquid or aerosol
cleaners. Use a damp cloth for
cleaning.
5.
8.
a.
Route all cords so that objects
cannot be placed on or against
them. This can pinch or damage
the cords. Pay particular attention
to the points where the cords exit
the product.
7.
Do not open the cover of this
product and attempt service.
Refer all servicing to qualified
personnel only.
When there is damage to the
cord or plug
b. If liquid enters, or an object
falls on this product
c.
If you expose this product to
rain or water
d. If this product does not
operate normally by
following the operating
instructions
Do not expose this product to
moisture. Do not place this
product on a wet surface, or spill
liquids on or near this product.
6.
For damage that requires service,
unplug this product from the IR
port. Refer service to qualified
personnel under the following
conditions:
e.
9.
When this product exhibits a
distinct change in performance
Upon completion of any service or
repairs to this product, ask the
service technician to perform
safety checks to determine that
this product is in proper operating
condition.
3
In This Guide
Introducing the VCR Commander Service ..................................................... 5
Installing the IR Blaster ..................................................................................... 6
Attaching the IR Blaster Cable Connector ................................................... 6
Attaching the IR Blaster to Your VCR .......................................................... 7
Setting Up VCR Commander Service ............................................................. 8
Searching for Your VCR Code ........................................................................ 11
Setting Up a VCR Recording Test .................................................................. 12
Scheduling a VCR Recording ......................................................................... 13
Using Quick Settings .................................................................................... 13
Using the Interactive Program Guide ........................................................ 14
Using the VCR Timer .................................................................................... 15
Setting the VCR Timer .................................................................................. 15
Clearing a VCR Timer ................................................................................... 17
Manufacturers' VCR Codes............................................................................. 18
Troubleshooting ................................................................................................ 24
FCC Compliance ............................................................................................... 27
4
Introducing the VCR Commander Service
Setting the timer on your VCR
to record programs is now a thing
of the past! With the VCR
CommanderTM service and your
Explorer® Digital Home
Communications Terminal
(DHCT), you simply set up the
VCR Commander service once.
Then, recording a program is quick
and easy. You can either use the
one-touch recording feature to
record your current program, use
the Interactive Program Guide (onscreen program guide) to choose a
future program to record, or use
the VCR Timer feature to record a
program at a specific date and
time.
The VCR Commander service
works with the models of the
Explorer DHCT that have an
infrared (IR) port on the back
panel.
To set up the VCR Commander
service, you must connect the IR
Blaster to the Explorer DHCT, and
then set up the DHCT to recognize
your brand of VCR.
Use this guide for the following
tasks:
• Connecting the IR Blaster to the
Explorer DHCT and to your VCR
• Setting up the VCR Commander
service to work with your brand
of VCR
• Scheduling a program to record
on your VCR
Notes:
• The IR Blaster is compatible with
all Explorer DHCTs except the
Explorer 2000 DHCT. For the
Explorer 2000 DHCT, contact
your cable service provider to
request an earlier version of the
VCR Commander Module and
the VCR CommanderTM Module
User’s Guide, part number 716383.
• Refer to your DHCT user’s
installation guide for information
about setting up your Explorer
DHCT.
• Refer to your remote control
user’s guide for information
about setting up and using your
remote control.
5
Installing the IR Blaster
This section explains how to attach
the IR Blaster and cable connector
to the Explorer DHCT and your
VCR.
Attaching the IR Blaster Cable
Connector
3. Plug the cable connector into the
IR port.
4. Reconnect the Explorer DHCT to
the AC power outlet.
DIGITAL AUDIO
OUT
CATV CONVERTER
MADE IN MEXICO
CABLE
OUT
IR
L
R
WARNING:
Avoid electric shock. Disconnect
the DHCT from the AC power
outlet before attaching the
connector.
To attach the IR Blaster cable to the
Explorer DHCT, complete these
steps.
1. Disconnect the Explorer DHCT
from the AC power outlet.
2. Locate the port labeled IR on the
back of the Explorer DHCT.
6
ETHERNET
1394
S - VIDEO
OUT
VIDEO
OUT
AUDIO
OUT
Cable
Connector
IR
Blaster
T8941
Installing the IR Blaster, Continued
Attaching the IR Blaster to Your VCR
Follow these steps to attach the IR
Blaster to your VCR.
1. Refer to your VCR user’s guide
to locate the IR sensor window.
(The IR sensor is where the VCR
receives the remote control
signal.)
2. Remove the covering on the
adhesive strip from the loop
tape, which is attached to the
hook fastener on the IR Blaster.
Notes:
• Attaching the IR Blaster to
the VCR may be easier if the
loop tape remains attached to
the hook fasteners.
• After attaching the IR Blaster to
the VCR, the hook and loop
fastener allows you to easily
remove the IR Blaster for
cleaning or to move the VCR.
3. Mount the IR Blaster within 3
inches of the IR sensor on your
VCR by pressing the IR Blaster
against your VCR to secure it.
Notes:
• Locations A , B, C, and D are
the typical places where the
IR Blaster can be attached
(within 3 inches of the IR
sensor on your VCR).
• Do not block the tape insert
door on your VCR.
7
Setting Up VCR Commander Service
Use your remote control to set up
the VCR Commander service.
After you connect the IR Blaster,
you must program the code for
your brand of VCR into the
memory of the VCR Commander.
Before you begin, verify the
following status:
• VCR is off
• TV is on and tuned to your
cable channel (3 or 4)
Note: At any time during this
procedure, you can press C or EXIT
to manually record a program on
your VCR.
1. Turn on the power to your
Explorer DHCT.
2. Press SETTINGS twice to display
the General Settings menu.
General Settings
Highlight a Preference, press SELECT to change its setting(s).
PREFERENCE
Set: Bypass
Set: Color Scheme
Set: Output Chan
Set: VCR Comnder
Timer: All
Timer: Remind New
Timer: Sleep
CURRENT STATUS
Disabled
4. Press s or t to scroll to Setup,
and then press SELECT .
Note: The screens that display
during this procedure will
time-out and revert to the
current TV channel after 1
minute of inactivity.
General Settings
Highlight desired VCR Commander setting, press SELECT to change.
PREFERENCE
Set: VCR Comnder
General Settings
STATUS
Disable
Setup
Enable
Highlight a Preference, press SELECT to change its setting(s).
PREFERENCE
Timer: All
Timer: Remind New
Timer: Sleep
Set: Bypass
Set: Color Scheme
Set: Output Chan
Set: VCR Comnder
CURRENT STATUS
Accept
Disabled
Cancel Changes
5. Scroll to VCR Input, and then
press SELECT .
General Settings
Highlight a SETUP, press SELECT to advance to next setting.
3. Press s or t to scroll to the Set:
VCR Commander preference,
and then press SELECT .
Note: If the menu does not
display the VCR Commander
option, contact your cable
service provider to have the VCR
Commander service activated.
8
PREFERENCE
Set: VCR Comnder
Setup
SETUP
VCR Code
VCR Input
VCR Code
Channel 3/4
Accept
Cancel Changes
Setting Up VCR Commander Service, Continued
6. Your VCR is connected to your
DHCT by one of the following
cable types. Locate your cable
type in this step and follow the
instructions:
•
General Settings
Highlight an INPUT, press SELECT to change.
PREFERENCE
Set: VCR Comnder
Setup
VCR Input
For RF/coaxial
cable, choose Channel 3/4,
and then press SELECT .
General Settings
Highlight an INPUT, press SELECT to change.
PREFERENCE
Set: VCR Comnder
Setup
VCR Input
INPUT
S-Video
Channel 3/4
Audio-Video
SELECT
INPUT
Audio-Video
S-Video
Channel 3/4
Accept
Cancel Changes
7. Press SELECT again to display
the Status menu.
8. Press s or t to scroll to Setup
and press SELECT .
General Settings
Highlight desired VCR Commander setting, press SELECT to change.
Accept
•
Cancel Changes
For RCA jacks,
choose Audio-Video, and
then press SELECT .
PREFERENCE
Set: VCR Comnder
STATUS
Disable
Setup
Enable
Accept
Cancel Changes
General Settings
Highlight an INPUT, press SELECT to change.
PREFERENCE
Set: VCR Comnder
Setup
VCR Input
INPUT
Channel 3/4
Audio-Video
S-Video
Accept
9. Press s or t to scroll to VCR
Code, and then press SELECT
to display the VCR Commander
Instructions screen.
General Settings
Cancel Changes
Highlight a SETUP,
press SELECT to advance to next setting.
VCR Commander
PREFERENCE
•
For S-Video
(SVHS), choose S-Video,
and then press SELECT .
SETUP
Instructions
Please power OFF your VCR.
Enter the Model Code for your VCR or 0000,
VCR Input
then press SELECT.
Set: VCR Comnder
000
VCR Code
Setup
VCR Input
Clear VCR Model Code
Accept
Cancel Setup
Cancel Changes
9
Setting Up VCR Commander Service, Continued
10. Turn to the Manufacturers'
VCR Codes section in this
guide to find the code choice(s)
for your brand of VCR. You
will use these codes in step 11.
Notes:
• This is a four-digit code.
• You will have 1 minute to
enter the code. This screen
will return to the General
Settings screen after 1 minute
of inactivity.
11. Enter the code for your brand
of VCR, and then press SELECT .
Notes:
• If more than one code is
available for your brand of
VCR, use the first code listed.
• If you enter an incorrect
number, press A , and then
reenter the code.
General Settings
Highlight a SETUP,
press SELECT to advance to next setting.
VCR Commander
PREFERENCE
SETUP
Instructions
Please power OFF your VCR.
Enter the Model Code for your VCR or 0000,
VCR Input
then press SELECT.
Set: VCR Comnder
VCR Code
000
Setup
0VCR Input0
6
2
Clear VCR Model Code
Accept
Cancel Setup
Cancel Changes
12. Wait for the test process to
complete and the power to
your VCR to turn on.
10
General Settings
Highlight a SETUP,
press SELECT to advance to next setting.
VCR Commander
PREFERENCE
SETUP
Instructions
VCRwait
Inputduring the test process.
Set: VCR Comnder Please
VCR Code
000
Setup
VCR Input
Accept
Cancel Changes
General Settings
Highlight a SETUP,
press SELECT to advance to next setting.
VCR Commander
PREFERENCE
SETUP
Instructions
Please power OFF your VCR.
Enter the Model Code for your VCR or 0000,
VCR Input
then press SELECT.
Set: VCR Comnder
VCR Code
000
Setup
0VCR Input0
0
0
Clear VCR Model Code
Accept
Cancel Setup
Cancel Changes
13. Did the power to your VCR
turn on?
• If yes, press A , and go to
Setting Up a VCR
Recording Test.
• If no, choose one of the
following options:
– There are additional code
choices for your brand of
VCR; press B and repeat
steps 9 through 12 using
the next code in your list
of choices.
– There are no additional
code choices for your
brand of VCR, go to
Searching for Your Code.
Searching for Your VCR Code
If none of the codes lised for your
brand of VCR turn on the power to
the VCR and start the recording,
then follow these steps to scan the
entire VCR code library. The scan
locates the code that will turn on
the power to your VCR and start
the recording:
1. Enter code 0000, and then
press SELECT .
Note: This process can take
several minutes.
2. Wait for the test process to
complete.
General Settings
Highlight a SETUP,
press SELECT to advance to next setting.
VCR Commander
PREFERENCE
3. Press SELECT slowly and
repeatedly, and wait for the
VCR power to turn on.
Note: If the power to the VCR
does not turn on, call your
cable service provider for help.
4. If the power to your VCR turns
on, press A and then go to
Setting Up a VCR Recording
to test the code you selected.
General Settings
Highlight a SETUP,
press SELECT to advance to next setting.
VCR Commander
PREFERENCE
SETUP
Instructions
If your VCR is ON, press "A" to test recording.
VCR Input
Set: VCR Comnder
If your VCR is NOT ON, press SELECT to try the
VCR Code
000
Setup
next VCR model code.
VCR Input
Cancel Setup
VCR is ON
SETUP
Instructions
Accept
Cancel Changes
VCRwait
Inputduring the test process.
Set: VCR Comnder Please
VCR Code
000
Setup
VCR Input
Accept
Cancel Changes
11
Setting Up a VCR Recording Test
Before setting your VCR to record a
program, complete these steps to verify
that the code you selected operates the
recording function of your VCR.
1. Insert a blank tape into your
VCR and turn the VCR off.
2. Press SELECT to begin a
recording test.
General Settings
Highlight a SETUP,
press SELECT to advance to next setting.
VCR Commander
PREFERENCE
SETUP
Instructions
To test RECORD with VCR model 0062:
• Insert a blank tape into your VCR.
• Turn yourVCR
VCRInput
off.
Set: VCR Comnder
• To begin VCR
recording,
Code press SELECT.
000
Setup
VCR Input
General Settings
Highlight a SETUP,
press SELECT to advance to next setting.
VCR Commander
PREFERENCE
Cancel Setup
Accept
• If no, press A and choose
one of the following options:
– There are additional code
choices for your brand of
VCR. Enter the next code
in your list of choices and
press SELECT . Then, go to
step 5.
– There are no additional
code choices for your
brand of VCR, return to
Searching for Your Code.
SETUP
Instructions
Cancel Changes
3. Wait for the recording process
to begin.
VCRforInput
Please wait
the recording process to begin.
Set: VCR Comnder
VCR Code
000
Setup
VCR Input
Accept
Cancel Changes
General Settings
Highlight a SETUP,
press SELECT to advance to next setting.
VCR Commander
PREFERENCE
SETUP
Instructions
VCRforInput
Please wait
the recording process to begin.
Set: VCR Comnder
VCR Code
000
Setup
VCR Input
Accept
Cancel Changes
4. Did the VCR begin recording?
• If yes, the VCR Commander
service setup is complete.
Press SELECT to return to the
General Settings menu, or
press EXIT to return to
watching TV, or go to
Scheduling a VCR Recording
to select program to record.
12
5. Wait for the test process to
complete and the power to
your VCR to turn on.
6. Did the power to your VCR turn
on?
• If yes, press A , and return to
Setting Up a VCR
Recording Test.
• If no, contact your cable
service provider for help.
Scheduling a VCR Recording
This section explains how you can
use Quick Settings and the
Interactive Program Guide, to
schedule a VCR recording. This
section also explains how you can
clear, or cancel, a scheduled VCR
Timer program from the VCR
Timer.
Using Quick Settings
You can instantly record the
program you are currently
watching using your remote
control.
1. Verify that the power to your
Explorer DHCT is turned on.
2. Press SETTINGS once while
viewing a full-screen TV
program.
3. Press s or t to scroll to the
Start Recording...Now option.
Quick Settings
Highlight an option, then press SELECT.
Choose SAP Language
Start Recording HGTV2 Now
Set Sleep Timer
(minutes)
More Settings
EXIT
English
OFF
Return to TV
4. Press SELECT to set up the
recording process. A screen
appears with instructions for
selecting the Input option of
your VCR.
Recording Alert
Be sure there is a tape in your VCR,
set your VCR Input to S-Video or S-VHS,
and then turn your VCR off.
START Recording
Cancel Recording
5. Put a blank tape in your VCR.
6. Turn off the power to your VCR.
Recording Alert
Be sure there is a tape in your VCR,
and then turn your VCR off.
START Recording
Cancel Recording
7. Press SELECT to start recording
the program. The DHCT displays
rEc, which indicates that the
recording process is in progress.
Notes:
• While recording is in process,
most of the keys on the remote
control will not function. This
ensures that your recording will
not be interrupted accidentally,
even if you turn off the power to
the DHCT.
• The volume on the DHCT
will automatically adjust to
the maximum level when
recording begins.
8. Press EXIT to stop recording.
13
Scheduling a VCR Recording, Continued
Using the Interactive Program Guide
You can program your VCR to
record future TV programs,
directly from the Interactive
Program Guide, using your remote
control. You can select up to eight
programs to record.
1. Verify that the power to your
Explorer DHCT is turned on.
2. Press GUIDE . The Interactive
Program Guide appears.
3. Press C for the current time
and channel.
5. Press s or t to scroll to Set a
VCR Timer for..., and then
press SELECT to set the timer.
The programs for which you
set timers now appear in red,
and the red REC icon indicates
that a VCR timer is set.
Note: The red REC icon also
appears on the channel browser
banner of the programs for
which you set timers.
AHN
101
Aerobic Conditioning
Thu 6:00 - 6:30pm
(30 minutes) Exercise Health
CHANNEL
S-A
01
Welcome to...
Thu 2:00 - 6:00pm
Welcome to Scientific-Atlanta
CHANNEL
TVN7
TVN8
S-A
WSB
WATL
4:30pm
101 Thu 9/23
5:00pm
4:52pm
6:00pm
101 Thu 9/23
4:52pm
6:30pm
ATH43 99 Denise Calls Up
ATH42 100 House Doctor
Hands On
AHN 101 Aerobic
The Method
GOOD 102 Tony Orlando and Dawn Rainbow
ZDTV 103 Silicon Spin
Zip File
Browse By
Date THU 9/23
7:00pm
This Old House
Medical Report
Twelve O'Clock Hi
Call for Help
5:30pm
507
A Civil Action A Civil Action
508
The 24 Hour Woman
1
Welcome to Scientific-Atlanta
2
Oprah Winfrey Channel 2 Action News
3
Queen Latifah Ricki Lake
Date THU 9/23
Browse By
4. Press the arrow keys to locate
and highlight the future
program you want to record,
and then press SELECT .
AHN
6. Press EXIT to return to the TV
program.
AHN
101
Aerobic Conditioning
Thu 6:00 - 6:30pm
(30 minutes) Exercise Health
101 Thu 9/23
4:52pm
Future Program Options
Tune Ch 101, AHN, immediately
Set a VCR Timer for "Aerobic Conditioning"
Set a Reminder Timer for "Aerobic Conditioning"
Return to Guide
101
Aerobic Conditioning
Thu 6:00 - 6:30pm
(30 minutes) Exercise Health
101 Thu 9/23
Future Program Options
Set a VCR Timer for "Aerobic Conditioning"
Set a Reminder Timer for "Aerobic Conditioning"
Tune Ch 101, AHN, immediately
Return to Guide
14
4:52pm
7. Verify that there is a blank tape
in your VCR.
Scheduling a VCR Recording, Continued
8. Verify that the power to the
VCR is off.
Notes:
• When you set a timer from
the IPG, you are setting a
one-time only timer for that
program. See Using the VCR
Timer next in this guide for
information about setting
7-day, weekday only,
weekend only, or single-day
timers.
• The power to the DHCT does
not need to be on for
recording to begin at the
scheduled time.
• The volume on the DHCT
will automatically adjust to
the maximum level when
recording begins.
Using the VCR Timer
The VCR Timer sets your VCR
Commander service to record
programs at specific days and
times. Use your remote control to
set the channel, day, start time, and
stop time of the program or
programs you want to record. You
can set up to eight timers including
the timers set from the Interactive
Program Guide.
Important: Do not overlap
program times when setting up the
VCR timer. A program that you set
to record will not begin recording
until the previous VCR timer event
has stopped.
Setting the VCR Timer
You can use your remote control to
set up to eight timers for programs
you want to record.
1. Verify that the power to your
Explorer DHCT is turned on.
2. Press SETTINGS twice while
viewing a full-screen TV
program.
General Settings
Highlight a Preference, press SELECT to change its setting(s).
PREFERENCE
Timer: Turn Off
Timer: VCR New
Timer: Wake-Up
Viewer: Favorites
Viewer: Power On
Audio: Digital Out
Audio: Range
CURRENT STATUS
CURRENT FAVORITES:
37 TWC
1 Total Favorites
15
Scheduling a VCR Recording, Continued
3. Press s or t to scroll to the
Timer: VCR New option, and
then press SELECT .
General Settings
Highlight a Preference, press SELECT to change its setting(s).
PREFERENCE
CURRENT STATUS
Timer: Remind New
Timer: Sleep
Timer: Turn Off
Timer: VCR New
Timer: VCR 1
Timer: VCR 2
Timer: Wake-Up
6 Available
4. Follow the on-screen
instructions to set the recording
time.
5. Press A to accept the timer
settings.
6. Put a blank tape in your VCR,
and then set the Input option
you selected on your VCR.
7. Turn off the VCR.
8. Press SELECT to set the timer,
and then press EXIT to return to
the TV program.
Note: The power to the DHCT
does not need to be on for
recording to begin at the
scheduled time.
General Settings
Highlight a START TIME, press SELECT to go to next setting.
PREFERENCE
General Settings
Highlight a START TIME, press SELECT to go to next setting.
PREFERENCE
Timer: VCR 1
CHAN
DAY
START
STOP
7
8
9
225 SHOE
Sun 2/13 6 : 0 0 pm 8 : 0 0 pm
1
2
Tomorrow Never Dies 6:00pm-8:00pm
Accept
Cancel Changes
Notes:
• Refer to your Interactive
Program Guide for Explorer
Digital Home Communications
Terminal User’s Guide for
detailed instructions to set
the VCR Timer.
• Contact your cable service
provider if you do not have a
copy of this guide.
16
VCR
AlertSTART
CHAN Timer
DAY
STOP
7
Before this program starts:
8
• Put a tape in your VCR.
9
• On your VCR, set the input to Audio-Video
Timer: VCR 1
225 SHOE
Sun 2/13 6 : 0 0 pm 8 : 0 0 pm
• Turn your VCR off.
1
2
Continue
Tomorrow Never Dies 6:00pm-8:00pm
Accept
Cancel Changes
Scheduling a VCR Recording, Continued
Clearing a VCR Timer
You can clear, or cancel, a
scheduled VCR Timer program
from the VCR Timer.
1. Verify that the power to your
Explorer DHCT is turned on.
2. Press SETTINGS twice while
viewing a full-screen TV
program.
4. Press C to clear, or cancel, the
timer, and then press EXIT to
return to the TV program.
General Settings
Highlight a CHANNEL, press SELECT to go to next setting.
PREFERENCE
Timer: VCR 1
CHAN
DAY
START
220 Bravd
222 HGTV2
224 ESPNC
Sun 2/13 6 : 0 0 pm
225 SHOE
226 SH2E2
227 SHO3E
Tomorrow Never Dies 6:00pm-8:00pm
Accept
STOP
8 : 0 0 pm
Cancel Changes
General Settings
Highlight a Preference, press SELECT to change its setting(s).
PREFERENCE
Timer: Turn Off
Timer: VCR New
Timer: Wake-Up
Viewer: Favorites
Viewer: Power On
Audio: Digital Out
Audio: Range
CURRENT STATUS
CURRENT FAVORITES:
37 TWC
1 Total Favorites
Note: The program name
appears in the current CHAN
column.
3. Press s or t to scroll to the
Timer: VCR ... preference
number for the VCR Timer
program you want to clear,
and then press SELECT .
General Settings
Highlight a Preference, press SELECT to change its setting(s).
PREFERENCE
Timer: Sleep
Timer: Turn Off
Timer: VCR New
Timer: VCR 1
Timer: VCR 2
Timer: Wake-Up
Viewer: Favorites
CURRENT STATUS
225 SHOE Sun 2/13 6:00pm 8:00pm
Clear VCR Timer 1
17
Manufacturers' VCR Codes
Find the code for your brand of VCR and use this code in Setting Up the
VCR Commander Service procedure. Start with the first code in the list
and continue through the choices. The most common codes are listed
first.
VCR Brand Name
Code
Action
Admiral
Advantz
Adventura
Aiko
Aiwa
0331
0062, 0562
0370
0014
0292, 0792
0014, 0051, 0420, 0450, 0482, 0551, 0651, 0751,
0851
0067, 0055, 0063, 0075, 0120, 0170, 0256, 0555,
0655, 0755
0049
0254, 0754, 0854
0051, 0551, 0651, 0751, 0851
0254, 0754, 0854
0118, 0618, 0718
0016, 0135, 0198, 0223, 0225, 009, 0375, 0493,
0516, 0635, 0698, 0723, 0893
0086, 0292, 0586, 0792
0051, 0551, 0651, 0751, 0851
0049, 0116, 0181
0034, 0534
0095, 0160
0292, 0792
0051, 0292, 0551, 0651, 0751, 0792, 0851
0086, 0586
0051, 0061, 0086, 0254, 0285, 0551, 0561, 0586,
0651, 0751, 0754, 0851, 0854
0049, 0055, 0069, 0074, 0176, 0555, 0655, 0755
0065, 0254, 0754, 0854
Akai
American High
Asha
Audiovox
Beaumark
Bell & Howell
Broksonic
CCE
Calix
Canon
Capehart
Carver
Cineral
Citizen
Colt
Craig
Curtis Mathes
Cybernex
18
Manufacturers' VCR Codes, Continued
VCR Brand Name
Code
Daewoo
Daytron
Denon
Dynatech
Electrohome
Electrophonic
Emerex
Emerson
0034, 0031, 0059, 0101, 0292, 0534, 0559, 0792
0034, 0534
0056, 0058, 0556, 0558
0014
0051, 0551, 0651, 0751, 0851
0051, 0551, 0651, 0751, 0851
0046, 0546
0014, 0016, 0050, 0051, 0057, 0075, 0082, 0102,
0135, 0198, 0222, 0223, 0225, 0226, 0292, 0308,
0309, 0375, 0493, 0516, 0524, 0551, 0557, 0635,
0651, 0657, 0698, 0723, 0751, 0792, 0824, 0851,
0893
0061, 0068, 0080, 0118, 0561, 0618, 0718
0047, 0049, 0547
0014
0062, 0049, 0069, 0074, 0079, 0216, 0254, 0562,
0754, 0854
0014
0246, 0293, 0364, 0446, 0540
0032, 0051, 0052, 0494, 0551, 0651, 0751, 0851,
0894
0014, 0022, 0422, 0522
0209
0061, 0561
0014
0052, 0089
0082, 0086, 0586
0060, 0560
0014, 0055, 0056, 0058, 0079, 0096, 0119, 0180,
0249, 0306, 0555, 0556, 0558, 0596, 0655, 0755
Fisher
Fuji
Funai
GE
Garrard
Go Video
GoldStar
Gradiente
Grundig
HI-Q
Harley Davidson
Harman/Kardon
Harwood
Headquarter
Hitachi
19
Manufacturers' VCR Codes, Continued
VCR Brand Name
Code
JVC
0081, 0083, 0022, 0055, 0220, 0221, 0398, 0522,
0555, 0581, 0583, 0655, 0720, 0721, 0755, 0898
0055, 0555, 0655, 0755
0051, 0292, 0551, 0651, 0751, 0792, 0851
0086, 0586
0081, 0083, 0052, 0055, 0398, 0555, 0581, 0583,
0655, 0755, 0898
0049, 0051, 0551, 0651, 0751, 0851
0051, 0551, 0651, 0751, 0851
0014, 0222
0086, 0586
0049
0057, 0075, 0254, 0557, 0657, 0754, 0854
0254, 0754, 0854
0014, 0254, 0754, 0854
0292, 0792
0014, 0049, 0053, 0095, 0117, 0163, 0553
0254, 0754, 0854
0049, 0095, 0160, 0175
0051, 0551, 0651, 0751, 0851
0049, 0176
0060, 0062, 0014, 0049, 0051, 0053, 0061, 0118,
0176, 0254, 0282, 0313, 0551, 0553, 0560, 0561,
0562, 0618, 0651, 0718, 0751, 0754, 0851, 0854
0056, 0119, 0058, 0556, 0558
0081, 0083, 0062, 0057, 0075, 0089, 0187, 0228,
0256, 0457, 0557, 0562, 0581, 0583, 0657, 0687
0062, 0049, 0562
0014, 0086, 0586
0072
0081, 0083, 0052, 0054, 0055, 0064, 0096, 0118,
0471, 0555, 0581, 0583, 0596, 0618, 0655, 0718,
0755
Jensen
KEC
KLH
Kenwood
Kodak
LXI
Lloyd’s
Logik
MEI
MGA
MGN Technology
MTC
Magnasonic
Magnavox
Magnin
Marantz
Marta
Matsushita
Memorex
Minolta
Mitsubishi
Motorola
Multitech
NAD
NEC
20
Manufacturers' VCR Codes, Continued
VCR Brand Name
Code
Nikko
Nikon
Noblex
Olympus
Optimus
0051, 0551, 0651, 0751, 0851
0048, 0267, 0548
0254, 0754, 0854
0240, 0049
0072, 0062, 0051, 0118, 0176, 0446, 0551, 0562,
0618, 0651, 0718, 0751, 0851
0076
0016, 0198, 0309, 0493, 0516, 0698, 0893
0240, 0049, 0091, 0116, 0176, 0239, 0241, 0260,
0392
0049, 0051, 0052, 0054, 0056, 0058, 0068, 0254,
0551, 0556, 0558, 0651, 0751, 0754, 0851, 0854
0056, 0058, 0079, 0119, 0556, 0558
0049, 0223, 0493, 0723, 0893
0049, 0076, 0095, 0417
0051, 0551, 0651, 0751, 0851
0081, 0072, 0083, 0176, 0182, 0581, 0583
0034, 0534
0254, 0754, 0854
0069, 0074, 0216
0086, 0586
0053, 0065, 0553
0060, 0560
0060, 0169, 0560, 0669
0049, 0091, 0176
0062, 0049, 0056, 0058, 0069, 0074, 0079, 0091,
0119, 0120, 0163, 0216, 0254, 0291, 0467, 0556,
0558, 0562, 0754, 0854
0014, 0051, 0551, 0651, 0751, 0851
0051, 0551, 0651, 0751, 0851
0051, 0551, 0651, 0751, 0851
Optonica
Orion
Panasonic
Penney
Pentax
Philco
Philips
Pilot
Pioneer
Portland
Profitronic
Proscan
Protec
Pulsar
Quarter
Quartz
Quasar
RCA
Radio Shack
Radix
Randex
21
Manufacturers' VCR Codes, Continued
VCR Brand Name
Code
Realistic
0060, 0062, 0014, 0049, 0051, 0061, 0076, 0080,
0118, 0551, 0560, 0561, 0562, 0618, 0651, 0718,
0751, 0851
0048, 0267, 0548
0053, 0553
0056, 0058, 0556, 0558
0089
0067, 0059, 0065, 0254, 0559, 0754, 0854
0062, 0053, 0553, 0562
0081, 0083, 0014, 0055, 0096, 0285, 0493, 0555,
0581, 0583, 0596, 0655, 0755, 0893
0060, 0061, 0118, 0254, 0282, 0386, 0560, 0561,
0618, 0718, 0754, 0854
0057, 0059, 0135, 0198, 0224, 0225, 0226, 0559,
0635, 0698
0060, 0014, 0049, 0051, 0056, 0058, 0061, 0068,
0071, 0080, 0118, 0119, 0551, 0556, 0557, 0558,
0560, 0561, 0618, 0651, 0657, 0718, 0751, 0851
0059, 0559
0062, 0076, 0562
0086, 0586
0065, 0254, 0754, 0854
0086, 0586
0048, 0047, 0014, 0025, 0036, 0046, 0049, 0267,
0289, 0546, 0547, 0548
0267
0014, 0049, 0057, 0095, 0117, 0557, 0657
0014
Ricoh
Runco
STS
Salora
Samsung
Sanky
Sansui
Sanyo
Scott
Sears
Semp
Sharp
Shintom
Shogun
Singer
Sony
Sunpak
Sylvania
Symphonic
22
Manufacturers' VCR Codes, Continued
VCR Brand Name
Code
TMK
Tatung
Teac
Technics
Teknika
Thomas
Toshiba
0050, 0222, 0254, 0754, 0854
0055, 0555, 0655, 0755
0014, 0055, 0555, 0655, 0755
0049, 0176, 0260
0014, 0049, 0051, 0066, 0551, 0651, 0751, 0851
0014
0057, 0059, 0071, 0080, 0224, 0226, 0380, 0557,
0559, 0657
0051, 0254, 0551, 0651, 0751, 0754, 0851, 0854
0254, 0754, 0854
0059, 0559
0052, 0054
0054, 0059, 0075, 0235, 0559
0254, 0754, 0854
0062, 0014, 0049, 0056, 0058, 0061, 0069, 0074,
0076, 0086, 0095, 0163, 0175, 0226, 0254, 0556,
0558, 0561, 0562, 0586, 0754, 0854
0292, 0792
0014, 0049, 0086, 0586
0052
0048, 0047, 0014, 0053, 0547, 0548, 0553
Totevision
Unitech
Vector
Vector Research
Video Concepts
Videosonic
Wards
White Westinghouse
XR-1000
Yamaha
Zenith
23
Troubleshooting
Check the following list for possible errors. If an error occurs, you may be
able to easily resolve it before calling your cable service provider.
Message or Error
Possible Cause
Check and Correct
VCR Commander
service did not
turn on the power
to the VCR for the
scheduled recording
and/or did not
begin recording.
A blank tape is
not in the VCR.
Insert a blank tape.
The VCR is not off.
Turn the power off to the VCR.
The VCR Commander
Menu option does not
appear on the screen.
After entering your
VCR code, the VCR
will not turn on.
Your DHCT is not
authorized for VCR
Commander service.
The VCR code is
incorrect.
The power to the
VCR turned on
but did not begin
recording.
A blank tape is
not in the VCR.
Insert a blank tape.
The incorrect VCR
code was entered.
You recorded an
on-screen message
(blocked barker),
which states the
channel was not
authorized.
The channel, time, or
rating was blocked
after the program
timer was set.
Try another VCR code for
your VCR brand or enter
0000. See the instructions in
the section on Setting Up
VCR Commander Service.
Blocking should be done
before setting the program
timer.
24
The IR Blaster is
Move the IR Blaster around until
improperly positioned. you are in front of or within 3
inches of the sensor window on
the VCR.
VCR Timer is
See Using the VCR Timer
in the Scheduling a VCR
improperly set.
Recording section.
Program became
blocked after OneTouch recording
started.
Call your cable service
provider.
Try another VCR code for
your VCR brand or enter
0000. See the instructions in
the section on Setting Up
VCR Commander Service.
Verify that Parental Control
is off before starting a OneTouch recording.
Notes
25
Notes
26
FCC Compliance
This equipment has been tested and found to comply with the applicable
limits of Part 15 of FCC Rules. These limits are designed to provide
reasonable protection against harmful interference in a residential
installation.
This equipment generates, uses, and can radiate radio frequency energy
and, if not installed and used in accordance with the instructions, may
cause harmful interference to radio or television reception, which can be
determined by turning this equipment off or on. The user is encouraged
to try to correct the interference by one or more of the following
measures.
• Reorient or relocate the receiving antenna.
• Increase the separation between this equipment and the
receiver.
• Consult your cable service provider or an experienced radio/
television technician for help.
CAUTION:
Any changes or modification to this equipment not expressly
approved by Scientific-Atlanta could void the user’s authority to
operate this equipment.
27
Scientific-Atlanta, Inc., Scientific Atlanta, the Scientific-Atlanta logo and Explorer are
registered trademarks of Scientific-Atlanta, Inc. VCR Commander and “Bringing the
Interactive Experience Home” are trademarks of Scientific-Atlanta, Inc.
All other trademarks shown are trademarks of their respective owners.
Product and service availability are subject to change without notice.
United States
Scientific-Atlanta, Inc., 5030 Sugarloaf Parkway, Box 486447, Lawrenceville, GA 30042;
Tel: 770-903-5000
Europe
Scientific-Atlanta Europe GmbH, Westerbachstrasse 28-32, 61478 Kronberg, Germany;
Tel: 49-6173-928-000
Asia-Pacific
Scientific-Atlanta (Singaopre) Pte. Ltd., 1 Claymore Drive, #08-11 Orchard Towers,
Singapore 229594; Tel: 86-733-4314
Latin America
Scientific-Atlanta Argentina S.A., Carlos Peligrini 1149, Piso 11o, Capital Federal 1011,
Buenos Aires, Argentina; Tel: 54-11-4325-2600
www.scientificatlanta.com
© 2001 Scientific-Atlanta, Inc. All rights reserved.
Part No. 738164 Rev B
Printed in USA June 2001