1
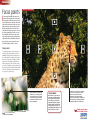
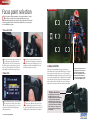
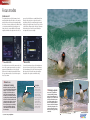
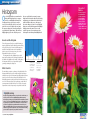
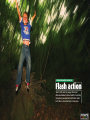
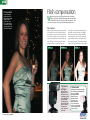
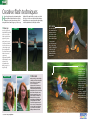
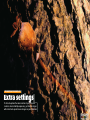
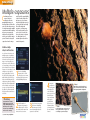
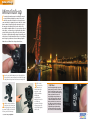
Get more from your
FREE WITH
Practical
Photography
ESSENTIAL
GUIDE
Release
the full
potential of
your camera
✔ Using focus points
✔ AI Servo explained
✔ Depth-of-field preview
✔ Metering mode tips
✔ Histogram advice
✔ Flash technique
REVEALED: THINGS YOU DIDN’T
KNOW YOUR CAMERA COULD DO
Contents
Focusing
■ Focus points
6
■ Focus modes
10
■ Depth-of-field preview
14
Metering & assessment
■ Metering modes
18
■ Exposure lock
22
■ Colour settings
24
■ Custom white balance
26
■ Histogram
28
Flash
This spider’s web was shot wide open
(f/2.8) with the ISO at 800 because it was
in shade. It was the versatilty of the D-SLR
that made taking it pretty straightforward.
2 | Get more from your digital SLR
32
■ Creative flash techniques
34
Extra settings
Welcome from Practical Photography editor Andrew James
HAS A DIGITAL SLR improved your
photography? After a very unscientific
straw poll I’ve concluded that most
D-SLR users have found that owning
one has enabled them to become
better photographers. It’s the chance
to experiment without incurring extra
costs that does it. Therefore, D-SLR
users try things that they’d never
considered in the film days. Of
■ Flash compensation
course, that also means that D-SLR
users also take a lot of rubbish shots
but if they learn from them, so what?
Today’s D-SLRs are complex but it’s a
shame if you don’t use some of the
functions and features that the
designers have seen fit to squeeze
inside the camera body. This field
guide is designed to highlight many
of the handy things that your camera
will do. Some you will have come
across, some may still be hidden
within the mind-boggling manual
that was supplied with your camera.
We’ve mainly used the Canon EOS
350D and Nikon D70s – two of the
most popular enthusiast cameras –
as our default models here. You may
find slight differences in operation if
you own different cameras, so refer
to your manual if in doubt. I hope
you find this guide useful.
■ Multi exposure
38
■ Mirror lock-up
40
■ There’s more...
42
THIS GUIDE IS
BROUGHT TO YOU BY...
Get more from your digital SLR is brought to you by
Practical Photography and is published by EMAP Active
Limited. No part of this booklet can be reproduced without
the publisher’s permission. For more about PP, visit:
www.practicalphotography.co.uk
Field guide editor: Ben Hawkins
Field guide art editor: Chris Rigby
Additional words/photography: Andrew James,
Chris Rutter, Ben Turner & Bob Martin
Additional production: Shane Collins
Thanks to: Sara Berry, Claire Maxted
������������������
���������
�
��������
����������
�
����������
������
��������
���������
�������������
�����������
��������������������
���������������������
�������������������������
�����������������������
������������������
������������������
����������������������������
�������������������������
3
GET MORE FROM YOUR DIGITAL SLR
Focusing
Improve your chances of capturing pin-sharp photos and
find out how to predict the effects of different apertures
by mastering your camera’s focusing options. Here’s how...
?? | Get more from your digital SLR
|5
Focusing
Focus points
CANON EOS 350D AF POINTS
E
ver wondered what the little squares are in
your D-SLR’s viewfinder? These are known as
focus points and allow the camera to focus on
objects in different parts of the frame. The default
setting on most cameras will use the centre focus
point, which is fine if your main subject is in the
middle of the picture. Most cameras also have a
setting where all of the focus points are active and
the camera automatically selects the one to use.
This is usually the subject closest to the camera
and is great for when you can’t predict where the
subject will be. But like all automatic settings this
may not get the expected result as the camera
doesn’t know what you want to be in focus.
Taking control
To avoid relying on either of these settings you can
control the camera by selecting the focus points
individually. Selecting the focus point that is on the
area of the image that you want to be sharp allows
the camera to focus more successfully on off-centre
subjects. People and animals are typical subjects
where focusing on the centre of the frame can give
poor results. It’s usually the eyes that you want to be
in focus, and they are rarely positioned in the middle
of the frame. Selecting the focus point that falls on
the eyes ensures a sharper result.
Using a Canon EOS 5D to take this shot
allowed us to select a focus point that
corresponded to the petals of a single
off-centre bloom. Using an aperture of
f/4 allowed us to blur the rest of the
flowers surrounding it.
6 | Get more from your digital SLR
‹DID YOU KNOW?
Most D-SLRs use a passive autofocus
system that uses the light naturally
reflected by the subject. This system
detects changes in contrast, which
explains why AF systems struggle in
low light conditions or when pointed
at large single-coloured surfaces. In
particularly low light conditions you’ll
find an AF assist beam essential.
For this shot we selected the focus point that
was closest to the eye of the cat to ensure
that the camera focused on the most
important area of the subject. Using an
aperture of f/8 meant that we could keep the
whole head of the leopard sharp, but blur the
background enough to remove distractions.
➥
Turn the page for more
on focus point selection
7
Focusing
Focus point selection
NIKON D2xs AF POINTS
D
ifferent cameras offer various numbers of focus points and ways of selecting
them. The precise detail of how to change them will be given in your
instruction manual, but to give you an idea of how they work we’ve taken two
of the most popular D-SLRs, the Canon EOS 350D and Nikon D70s, to show you how
to select individual focus points…
fiCanon EOS 350D
1
Before you can use this option you have to be in
aperture-priority, shutter-priority, manual or
program mode. You can’t select focus points in
the subject program or automatic (green) exposure
modes. Press the far right button on the back of the
main handgrip to activate the focus point selection.
2
With the focus points activated turn the front
control dial on the handgrip to scroll through the
different focus points. This allows you to select
individual points, which are highlighted in red in the
viewfinder and shown on the rear LCD.
›Group selection
Rather than selecting individual focus points, some higher spec
models (Nikon D2xs & Canon EOS-1Ds Mk II) allow you to use groups
of focus points together. This combines some of the advantages of
both individual area and fully automatic focus point selection. It’s ideal
for shooting moving subjects where it’s difficult to keep an individual
focus point positioned on the subject, but you know approximately
where the subject will be. It still relies on the camera selecting the
exact point of focus, however, which can result in a blurred subject.
fiNikon D70s
Group area selection is ideal for fastmoving subjects such as sports and
action, when you know roughly
where the subject is likely to be. We
knew that the bike would appear
over the rise to the right of our shot,
so we selected the right-hand area.
‹Dioptre adjustment
1
In the Custom menu, option 0, ensure that the
AF-area mode is set to Single area and, like the
Canon, the exposure mode is set to one of the
creative modes rather than the fully automatic or
subject program modes.
8 | Get more from your digital SLR
2
Ensure that the D-pad lock on the rear of the
camera is set to ● and use the D-pad to select
the individual focus point from the five options.
The selected point will be indicated on the top LCD and
highlighted as the darkest brackets in the viewfinder.
Getting any picture in focus will be
impossible if you can’t see clearly
through the viewfinder. Most D-SLRs have
a feature called dioptre adjustment,
which enables you to focus the eyepiece
to suit your eyesight. This is usually either
a slider or wheel next to the viewfinder.
Make sure this is set so that you can see
the image and display clearly through
the viewfinder.
9
Focusing
Focus modes
A
s well as selecting individual focus points, your D-SLR’s autofocus (AF)
system also offers various focus modes. The two main settings are known
as single shot and continuous (or Servo) focusing, and which setting you
choose will depend on whether you’re shooting a static or moving subject.
Single shot mode
€Canon EOS 350D
In single shot mode the AF will lock
onto the subject when you press the
shutter, and stay focused at the
same distance for as long as the
shutter is held down. This is great for
static subjects, but if either you or
the subject moves the camera will
stay focused on the original point,
resulting in a blurred picture. You
have to press the shutter again to
refocus on the subject. In single shot
mode the camera won’t allow you
to take a picture until the focus has
locked onto the subject, which is
usually indicated by a green circle in
the viewfinder display (and often an
audible beep). Here’s how to set
single shot focusing on the Canon
EOS 350D and Nikon D70s…
€Nikon D70s
With the exposure mode of the
camera in one of the creative
options, rather than the subject
program modes, press the right
button on the rear multi-selector
marked AF. Then use the up or
down controls to select the One
Shot option and press Set.
Press the Menu button on the
rear of the camera to bring up
the on-screen menu. Choose the
02 Autofocus option in the
Custom Menu using the D-pad.
Now select AF-S from the two
options and press the right side
of the D-pad to confirm.
‹Focus lock
Single shot AF is also useful when
you want an area to be in focus that
doesn’t match any of the focus
points available. Before you frame
the subject, point the camera so
that the focus point falls exactly on
the area that you want to be in
focus and press the shutter halfway
down until the camera locks onto
the subject. As long as you keep the
shutter half-pressed you can now
re-frame the picture before pressing
the shutter all the way down to
take the picture. This can take a
little practise to ensure that you get
the focus spot-on, as you must
remain the same distance from the
subject, but it means that you don’t
always have to focus where the
focus points are positioned.
10 | Get more from your digital SLR
Place the focus point over the area
you want to be sharp, then half-press
the shutter to lock focus on this point.
Keep the shutter half-pressed,
re-frame your shot and, once happy,
fully press the shutter to take the shot.
➥
Turn the page for
more on focus modes
|5
Focusing
Focus modes
Continuous AF
The continuous focus mode (also known as Servo) is
usually used when either the subject or the camera is
moving. In this mode the camera continuously adjusts
the focus for as long as you half-press the shutter release
so it can track movement. When you fully press the
shutter release the camera will take the photograph
regardless of whether the subject is in focus or not, so
you need to take a little more care with this mode than
the single shot option. You can also use this mode for
static subjects, but it’s less useful than single shot mode
for this type of subject because it doesn’t have to lock on
to the subject to allow you to take the photo. This means
that features such as focus lock are more difficult, or
even impossible, to use successfully.
›Canon EOS 350D
›Nikon D70s
To select the Servo focus mode the camera needs to be
in one of the creative exposure modes, not a subject
program or fully automatic mode. Press the right
button on the rear multi-selector marked AF and use
the up or down controls to select the AI Servo option.
Press Set to confirm.
To access the focusing modes press the Menu button on
the rear of the camera. Use the D-pad to scroll down to
the Custom Menu and select the 02 Autofocus option. In
this menu select AF-C from the two options and press
the right side of the D-pad to confirm this setting.
‹How to use
continuous focusing
Even the best autofocus systems still
need some help when shooting moving
subjects – it’s easy for the camera to
struggle to lock onto the subject, or
focus on the background rather than
the subject you are shooting. The trick
to getting sharp results with continuous
autofocus is to make sure that the focus
point stays on the subject for as long as
you half-press the shutter release. If
the focus point strays onto something
in front of or behind the subject the
camera will focus on that rather than
the main subject.
12 | Get more from your digital SLR
Soft subject
When you’re using
continuous focusing
it’s very easy for the
camera to focus on the
background, rather
than the main subject.
This is often a problem
when the subject is
moving. Unlike the
single shot mode, the
camera will let you fire
the shutter whether
it’s in focus or not.
‹Moving penguins
Because these penguins were
constantly ducking and diving,
single shot AF would have been
impossible to use. Continuous AF
(Servo) has allowed the camera
to track the penguins and keep
them in focus right up until the
shots were taken. This technique
can be tricky and requires some
patience and practise, but once
mastered you can get pin-sharp
action shots.
13
Focusing
Depth-of-field preview
T
he image you see through your D-SLR’s viewfinder
is shown using the lens’ maximum aperture
(usually f/4 or f/5.6), so if you set a smaller
aperture there’ll be more of the scene in focus than
you see when you take the shot. This can mean that
elements in the background or foreground that were
FINAL IMAGE
blurred (or even invisible) in the viewfinder become
visible and distracting in your final shot. Most D-SLRs
offer a useful feature called depth-of-field preview,
which gives you a much better idea of how the final
image will look by stopping the lens down to the
aperture that you’ve set.
Through the viewfinder
Compose your shot through the viewfinder as normal but ensure that you’ve
set the aperture using either manual or aperture-priority exposure mode. At
this stage the image in the viewfinder will be shown at the lens’ maximum
aperture, so you won’t see the effect of the aperture setting.
‹The depth-of-field
preview button
Press the depth-of-field preview button
This will stop the lens down to the aperture that you’ve set on the camera,
but the image will look much darker than the normal viewfinder image. To
allow you to see the effect you need to look through the viewfinder for
some time while keeping the button pressed to give your eyes time to
adjust. After a while you’ll be able to make out more detail in the viewfinder,
so start looking around the subject to check how much of the image is in
focus and whether any distractions are visible. The smaller the aperture the
darker the image, so the longer you need to wait for your eyes to adjust.
On many D-SLRs the depth-offield preview button is located at
the base of the lens mount. On
others it can be located in the
menu or near the on/off switch.
‹Using depthof-field preview
›Viewfinder view
›Depth-of-field preview
Don’t be put off by the image as seen
through your camera’s viewfinder – it’s
shown at the lens’ maximum aperture,
hence the minimal depth-of-field.
Press the preview button and the
image in the viewfinder will darken.
This is because the view is stopped
down to the aperture you’ve chosen.
14 | Get more from your digital SLR
It’s much easier to see the
effects of this feature if the
camera and subject are static,
allowing you to make precise
changes to the settings or
subject before you take the final
shot. While you can use it when
handholding the camera,
mounting it on a tripod will
mean that you can be sure that
it won’t move between you
checking the image and taking
the shot. Once you’ve got used
to the dark image in the
viewfinder you can then use it
to either ensure you’ve got the
right amount of the image in
focus or that there aren’t any
distractions in the shot that you
need to account for before
taking your shot.
15
GET MORE FROM YOUR DIGITAL SLR
Metering &
assessment
There’s a metering mode for every occasion
and feedback at the touch of a button. You
just need to know which mode to use and
when and how to read a D-SLR’s histogram.
?? | Get more from your digital SLR
|5
Metering & assessment
Metering modes
A
ll D-SLRs offer a range of metering modes for
you to choose from, but what are the
differences and when do you use them? All
metering modes base the readings they give on
midtones. Segment and centre-weighted systems take
an average reading across the frame, and give you a
setting based on the fact that most scenes contain a
Metering modes
range of tones that will average out to a midtone.
Spot-metering is also based on this method, but
because it only takes a reading from a tiny part of the
image it assumes that this point will be a midtone. So
point the camera at a scene that’s brighter or darker
than this average tone and the meter will give the
wrong exposure reading. Here are the options...
Multi-segment
The default mode on your D-SLR is the multi-segment option.
Different manufacturers give this metering mode fancy names –
Canon calls its version Evaluative and Nikon’s is called Matrix – but
they all operate in similar ways. They take a number of readings
from different areas of the frame and combine them to produce
the best exposure. As these readings are taken from different
areas of the frame, this metering mode can often recognise (and
take account of) bright or dark backgrounds to give a more
effective exposure than the simpler centre-weighted option.
Mode
When to use it
MULTI-SEGMENT
The default metering mode is
great for general photography,
especially if you don’t have time
to think about the exposure. As
the camera takes readings from
different areas of the image it’s
able to take account of bright or
dark areas in the frame.
CENTRE-WEIGHTED
Centre-weighted metering always
takes a reading from the same
area of the image, so it can
produce more predictable results
than the multi-segment metering
mode. Because of this it’s
especially useful for shooting with
graduated filters.
SPOT
For those who want precise
control over the exposure, spotmetering allows you to take
readings from small areas of the
image. This puts you in full control
over the exposure, but you need
to be able to recognise suitable
subjects to meter from.
fiMetering options
Centre-weighted
Centre-weighted metering takes an average reading from across
the whole frame, but most types take more of the reading from
the centre of the frame than from the edges. This is fine for
average scenes, but bright or dark areas can easily fool centreweighted metering, especially if they’re close to the middle of
the photograph.
Examples of when to use the three
typical metering offered by SLRs.
›Canon EOS 350D
Like many budget models, the metering
modes on the EOS 350D are shown on the
LCD menu. These are changed by pressing
the up and down buttons on the four-way
selector, and the SET button to select them.
Typical example
Spot
Arguably the most accurate and reliable metering mode, spotmetering also takes more time and practise to use effectively. The
camera only takes a reading from a tiny area of the image (around
2-3% of the frame). This is usually from the centre of the image,
although some cameras allow you to link the area that the reading
is taken from to the AF point selected. To use a spot meter reading
to set the exposure, the area that the camera is taking a reading
from needs to contain only midtones. More experienced users can
employ spot-metering to assess highlight and shadow exposure, to
allow them to work out the brightness range of the scene and
adjust the exposure to suit. Some Canon D-SLRs, such as the EOS
350D, don’t offer a spot-metering option. Instead they have a
similar mode known as partial metering, which works just like
spot-metering, but instead takes a reading from a larger area of
the frame (around 9%), so is less precise. Many other Canon
models offer both spot and partial metering modes.
18 | Get more from your digital SLR
›Nikon D70s
The metering modes on the D70s are
accessed by pressing the metering button
to the left of the shutter release. Hold this
button down, then turn the rear control
dial to scroll through the three metering
modes available.
➥
Turn over for more
on spot-metering
19
Metering & assessment
Metering modes
SPOT READING
Spot-metering
How we used spot-metering for this shot
Although most D-SLRs’ multi-segment
metering mode produces good results in
most situations, it can still produce
under or overexposed results when
faced with light or dark scenes. In these
situations you can switch to spotmetering mode for precise control over
your metering and exposure. The key to
using this mode is aiming the meter at
an area that will give you a midtone in
the final image. You can buy a grey card
to take a meter reading from – simply
place the card in the same lighting as
the subject and spot-meter from the
card. However, this isn’t always
practical, especially when shooting
landscapes or distant subjects. Luckily
there are plenty of subjects around that
you can use to spot-meter from – see
the panel below for some examples.
The bright highlights produced by the cascading water of this waterfall,
positioned near the middle of the frame, meant that both the multisegment and centreweighted metering options
STANDARD READING
produced underexposed
images. Switching to spotmetering and manual
exposure, we pointed the
camera so that the centre of
the image, and therefore
also the spot-metering
area, was positioned over
the fresh green foliage to
the top left of the waterfall.
A reading from this area
gave an exposure of 2
seconds at f/22, which we
set on the camera.
Keeping this exposure we
re-framed the shot.
fiWhat to meter from
Deciding what subjects are midtone takes some practise, but here are some examples to get you started...
›Clear blue sky
›Fresh green foliage
›Poppy red
If you’re struggling to find a
midtone in a landscape, a clear
blue sky at around 10 or 11am
is a useful subject.
Not all foliage can be used as a
midtone – make sure that you use
fresh green foliage that’s lit by the
same light as the main subject.
Brightly coloured red flowers such as
poppies are an ideal midtone subject
for both landscapes and close-up
nature shots.
20 | Get more from your digital SLR
21
Metering & assessment
Fill the frame
Exposure lock
B
oth multi-segment and centre-weighted
metering modes will often give poor results
when shooting a subject against a light or dark
background. If the background is very bright the
camera will underexpose, while a dark background
will cause overexposure. While you can use the spot
metering mode to overcome this, it’s not always the
Meter from the main subject
This is the simpler of the two techniques for less
experienced users, as you don’t need to assess the effect
of the background brightness. This technique works by
metering from the main subject rather than from the
whole scene.
1
First set the camera to any of the creative
automatic exposure modes. To make sure that the
camera exposes for the main subject, aim the
camera so that it fills the frame, eliminating as much of
the background as possible.
simplest or quickest method, and you need to be able
to find a midtone to meter from. Two more efficient
ways to compensate for this are using either the
exposure lock or exposure compensation functions.
Both can be used in the creative automatic exposure
modes of most cameras, but not in the fully automatic
subject program modes.
‹Exposure
compensation
You can also increase or
decrease the exposure
to compensate for light
or dark backgrounds.
This takes a little more
practise than the
exposure lock technique,
as you need to be able
to assess how much
exposure compensation
is needed for different
situations. As a rough
guide, if you’re shooting
a subject with a white
background you need to
dial in +1 stop, while for
a subject against a dark
background try using –1
stop. To access the
exposure compensation
on most cameras you
have to press a button
marked +/- then turn
the main input dial.
2
With the camera framed as above press the auto
exposure lock button (AE-L or ). This will set the
exposure for the main subject, and lock this
exposure into the memory of the camera. On Canon
D-SLRs press the exposure lock button and release it to
lock the exposure. On most other manufacturers’ D-SLRs
you need to hold the button in.
3
With the exposure locked for the main subject you
can now re-frame the image and take your picture.
You’ll find that the background will be recorded as
very dark or light, but the main subject should be
correctly exposed.
22 | Get more from your digital SLR
Using a 105mm lens we
filled the frame with the
model’s face, pressed the
auto exposure lock button
and re-framed the shot.
The resulting exposure
was 1/30sec at f/4.
-1 STOP
NORMAL
+1 STOP
The exposure compensation
button is located near the
shutter release button or
the rear LCD screen.
23
Metering & assessment
Colour settings
W
hile D-SLR users who
shoot RAW files have
access to RAW conversion
software that allows for all sorts of
post-capture tweaks, those of you
who still shoot JPEGs have fewer
options when it comes to getting
optimum results. However, if you
want enhanced colours without so
much as a tweak in Photoshop, all
you have to do is use your D-SLR’s
in-camera colour settings. Here are
some of the most common and
more effective options...
€Normal
While there’s nothing
fundamentally wrong
with this shot of a lone
pink geranium, taken at
the normal colour setting,
it lacks saturation and
impact. The petals
especially could do with
an extra burst of colour.
fiSharpness
This setting isn’t going to make your blurred pictures sharper, but it will make
already sharp shots appear even sharper. Many cameras default to an auto
setting that judges how much sharpening should be applied to each image,
which means that some images will occasionally appear sharper than others.
Keep in mind that some labs will also apply sharpening when they print your
images, so if you set the level too high you may end up with some seriously
overcooked prints.
Vivid
One of the most useful colour
settings that D-SLRs offer is
Vivid. It does exactly what its
name suggests, bumping up
the contrast and saturation for
more vibrant results.
Landscapes and macro shots
can really benefit from this
setting – just remember to reset
the colour mode back to normal
when shooting skin tones etc
for more subtle results.
‹Mono/sepia
Too much sharpening will result
in unwanted halos around visible
edges and increased noise, which
is more noticeable in areas of
smooth tones such as greens.
Avoid oversharpening at all costs.
24 | Get more from your digital SLR
These two settings should
be approached with
caution. While being able
to shoot in sepia may be a
novelty to begin with, its
limitations will soon
become apparent. Other
modes just tweak the
colours slightly but the mono and sepia settings
remove colour altogether, so no matter what you
do at a later date you can’t get the colour back.
However, the mono setting has its uses – it’ll help
you to visualise scenes in glorious black & white.
25
Metering & assessment
CUSTOM WB
Custom white balance
W
hen you’re working under difficult lighting
conditions, such as artificial lighting or in
heavy shade, your images can take on a
strong colour cast. This is because ambient light is
actually a different colour to direct sunlight. The naked
eye will struggle to see this because the brain
automatically compensates for this shift in colour, so
objects always look the same colour no matter where
you are. If it wasn’t for this a red berry might look
purple or orange depending on where it was, and this
would obviously be a massive disadvantage in the
wild. Your camera is not so clever though.
What is wrong with using the presets?
SUNNY WB
The preset white balance (WB) settings on your camera are designed to deal
with a number of common lighting conditions to ensure that the colours look
as we see them. However, they are only approximate and not every
eventuality is catered for. When colour accuracy is critical you can use the
custom white balance setting to precisely measure the colour temperature of
the light and ensure the colours are bang on. A common trouble situation is
shooting in mixed lighting conditions, such as artificial and window light, as
recognisable objects like skin tones can take on an unnatural appearance.
How to use the custom white balance
With this toadstool we needed to correct for the strong green cast caused
by the sunlight filtering through the leaves. As there is no ‘deciduous
woodland in strong sunlight’ white balance setting, we can use a sheet of
paper and the custom white balance mode for better colour accuracy.
1
Take a reference shot: First
place a pure white object,
such as an A4 sheet of card or
reflector, next to your subject so it’s
under exactly the same lighting
conditions as your subject. Frame up
on the paper so it fills the viewfinder
then take a shot – there’s no need to
use a tripod or change the white
balance setting here, but you may
need to switch to manual focus so
you can take the shot if the AF won’t
lock on.
26 | Get more from your digital SLR
2
Select the shot: We can now
use this neutral shot as a
reference point for the colour
temperature. To do this on a Canon
350D, go to the Custom WB option
in the menu and select the shot you
just took. On a Nikon D50, go to the
White Balance menu, select Preset
and then Use Photo. Now browse to
select the paper shot. Note that
some cameras can measure the
white balance directly from the
paper so check your manual first.
3
Take the shot: Next, select
the custom white balance
mode from the list of presets.
On most cameras the symbol looks
like a TV screen floating above two
inwardly pointing right-angled
triangles
, but if you’re using a
Nikon, look for the PRE setting. Now
take your shots. The only thing you
need to be aware of is that you’ll
need to update the white balance if
you move to a different location or if
the light changes.
27
Metering & assessment
The perfect
balance
Histogram
O
ne of the biggest mistakes you can make when
shooting with a digital camera is to overexpose
your shots, as vital highlight detail may be lost.
This happens because only a very precise range of
tones can be recorded by the camera’s sensor, and if
parts of the scene are too bright for the sensor using
the exposure settings you’ve chosen, they will appear
as pure white in the captured image – this is known as
highlight clipping. If you’re not careful, large areas of
the scene can fall outside your camera’s exposure
latitude and block out to pure white. This can look ugly
and distracting, not to mention the fact that there’s no
visible detail in these white areas – skin tones and
skies are two things to look out for. To avoid highlight
clipping we can check the histogram and the highlight
warning system on the camera’s LCD screen and
reduce the exposure so the next picture we take is
dark enough to retain the important highlight details.
To ensure every petal
was well defined we
needed to make sure
that the highlights
weren’t clipped out.
However, we didn’t
want the shot to be too
dark either. To get this
image we dialled in -1 stop
exposure compensation.
How to read the histogram
This is a histogram and it can be accessed while viewing an
image in playback mode and also during the preview, directly
after you’ve taken a shot. To view it on a Nikon camera, try
using the left and right directions on the D-pad with the
picture on screen. If you’re using a Canon, press the Info
button while the image is on the screen.
The histogram shows us the distribution of tones in the
image from the shadows on the left through the midtones in
the middle to the highlights on the far right. The tall peaks on
the histogram tell us there are a large number of pixels in
your image containing the relating tone.
What to look for
The main thing to concentrate on, however, is the right-hand side. If the
histogram shows that there are lots of white-toned pixels in the image
touching the very edge of the histogram, this probably indicates that some
tones in your scene have been overexposed and detail has been lost.
Ideally what you want is a small gap at the right of the histogram, as you
can see here. This means that no tones in your image are pure white, so
you can guarantee the detail hasn’t been lost. To do this, use exposure
compensation to reduce the exposure by a stop and take another shot.
This tall peak on
the left-hand side
tells us that there
are lots of very
dark grey tones
in the image.
The gap here
shows us that
there are no pure
white tones, so
the highlights
aren’t blown.
‹Highlight warning
In really contrasty lighting conditions, or if you have the sun in the frame, it
won’t be possible to avoid some highlight clipping without massively
underexposing your image and compromising shadow and midtone detail. In
such cases you can use the highlight warning system to tell you which areas
of your image are pure white. To select this mode use the same controls as
you did for accessing the histogram. When in this review mode the pure
white tones will flash black to grab your attention. From here you can decide
whether the clipped detail is important or not, and if vital detail is flashing,
you can reduce the exposure by a stop and take another shot.
28 | Get more from your digital SLR
29
GET MORE FROM YOUR DIGITAL SLR
Flash action
Your D-SLR’s built-in pop-up flash is an
often overlooked creative tool that can help
to improve your portraits and action shots.
Let’s take a closer look at its many uses...
?? | Get more from your digital SLR
|5
Flash
Perfect portraits
For great results using
flash you need to be in
full control of the amount
of light your camera
produces. The secret to
success is flash exposure
compensation – perfectly
exposed portraits in even
the darkest of conditions.
Flash compensation
W
ith the exception of the top professional cameras, all D-SLRs feature a
built-in pop-up flash so it’s well worth learning a little something about
this under used feature. The obvious use of flash is to illuminate a dark
scene in order to capture a decent exposure, but flash has plenty more uses…
Plus or minus?
While most D-SLRs can accurately calculate the amount
of flash needed, there are times when they will get it
wrong and either over-power or under-power the flash.
To prevent this you will need to use your camera’s flash
exposure compensation function. Your D-SLR will either
have a +- button or a menu option, and this works
pretty much the same as your camera’s exposure
-1 STOP
+
-
NORMAL
+
compensation. If you select minus numbers, the flash
power will be reduced and you won’t lose highlight
details. You can increase the flash power by dialling
towards the plus side of the scale. This is useful when
trying to light subjects that are a little further away or
the metering is being fooled by something bright in the
frame. So bear this in mind next time you’re using flash.
-
€Upgrade to
a flashgun
While your camera’s
pop-up flash can cope
with some shots, if you
are planning on getting
creative with flash you
really need to think
about investing in an
external flashgun. They
give you more power,
extra controls and
features, and produce
better results.
32 | Get more from your digital SLR
+1 STOP
+
-
‹DID YOU KNOW?
Flashguns produce strong directional light
that can sometimes result in unflattering
photos, especially when
shooting portraits. Flash
light can be softened
with diffuse material
such as tissue paper.
While not great in the
rain, it’s certainly cheap
and easy to use. It’ll produce
softer, more flattering results
for just a few pence.
33
Flash
Creative flash techniques
H
ow do pro photographers get stunning outdoor
portraits without any shadows? How do they
capture the evening sky and not just a black
background? How do music snappers get those crazy
‹Slow sync
light trails? The simple answer is creative use of flash.
Let’s take a look at some of the basic flash techniques
that will allow you to expand your outdoor photography
in both bright sunshine and low light conditions.
First curtain
1/60SEC
1/8SEC
In order to capture sky
detail with flash you will
need to use a slower
shutter speed. When in
program or aperturepriority mode you can
select slow sync, which
forces the camera to use
a slower shutter speed
than it usually would.
The slower shutter speed
allows the camera to
capture more
background detail while
still producing the correct
exposure for the
foreground subject.
Make sure you use a
tripod though.
WITHOUT FLASH
Rear curtain
WITH FLASH
€Fill-in flash
When you take a portrait in bright
conditions you’ll often end up with
heavy shadows on the subject’s
face or an overexposed
background. The solution here is
fill-in flash. As the name implies,
rather than using the flash as the
main light source, it’s used to fill in
the shadows and produces more
flattering portraits. Most D-SLRs
produce pretty good attempts at
fill-in flash, but to prevent the
flash blowing out highlight detail
you’ll probably need to dial in
some flash compensation. You’ll
need at least -1/3 but may have to
take out a little more depending
on your camera model and the
lighting conditions at the time.
34 | Get more from your digital SLR
All D-SLRs default to
first curtain flash. This
simply means that
the flash fires at the
start of the exposure.
When combined with
a longer shutter
speed and a moving
subject, this setting
will freeze the subject
at the start of the
exposure with the
light trails leading
away from it.
With this setting the
flash will fire at the
end of the exposure
rather than at the
beginning. Using rear
curtain flash is perfect
for producing shots of
moving subjects with
light trails. It will
freeze the subject at
the end of the
exposure so any light
trails will lead to the
subject, resulting in a
more dynamic image.
35
GET MORE FROM YOUR DIGITAL SLR
Extra settings
It’s time to explore the outer reaches of your camera –
create in-camera multiple exposures, get sharper images
with mirror lock-up and review images on your television.
?? | Get more from your digital SLR
|5
Extra settings
Multiple exposures
C
ombining two or more
exposures isn’t just a
technique for those into
manipulating their images in
Photoshop. High-end D-SLRs allow
you to shoot more than one image
on a single frame using the multiple
exposure function. Unlike combining
images on your computer, this
technique is far less predictable,
and once you’ve taken the images
you can’t do much to change the
composition or how the images
work together. The unpredictability
of the end result is all part of the
fun, however, so if your camera
offers this facility, why not give it a
go? Using this feature successfully
takes a little thought and
preparation, as the two images
need to work together. They also
need to be shot soon after each
other, as the feature is only active
for a limited time before it
automatically reverts back to the
normal shooting mode.
Combine simple
subjects with textures
One of the most effective uses for
multiple exposures is combining a
simple main subject with a texture.
You can also try shooting several
images of a moving subject on a
single frame for a strobe-like effect,
or even producing a soft-focus effect
by de-focusing the lens on different
exposures on a static subject. For our
example we set up a couple of
simple, graphic subjects. We shot
the dried seed head against a plain
white backdrop, then shot the tree
bark as a textured background. The
subjects were positioned so that the
main head of the dried plant would
fall on the darkest area of the bark
to create a focal point. Notice how
the stalk of the plant merges with
the lighter and more textured area
of the bark.
1
First select the Multiple
Exposure mode. To do this
activate the on-screen menu,
scroll through the shooting menu
and highlight Multiple Exposure.
4
‹Photoshop
If your D-SLR doesn’t feature a
multiple exposure option, why
not try combining two images in
Photoshop to create the same
effect? Use Layers and Blending
modes to create a montage.
38 | Get more from your digital SLR
2
Select the number of
exposures that you want to
combine together – the D2x
can combine between two and ten
frames. We chose to use two.
3
Select the Auto Gain option at
the bottom of the Multiple
Exposure menu so that the
camera automatically adjusts the
exposures for each frame.
Frame your
two subjects so
that they work
well together. This
can be a little hit or
miss, so try to look at
how the different
shapes and textures
work together,
especially where
there are areas of
shadow and where
one image becomes
the more dominant
element.
fiSubject
Simple subjects, such as this dried seed
head, are often the most effective. Shoot
them against plain white backgrounds.
›Texture
Look for graphic textures such as tree bark,
stones, pebbles and fine art papers to act
as a backdrop to your chosen subject.
39
Extra settings
Mirror lock-up
E
ven using the normal measures of attaching the camera to
a tripod and firing the shutter by a remote release or selftimer, the movement of the mirror can be enough to cause
some camera shake. To minimise this some D-SLRs offer a feature
known as mirror lock-up. This flips up the mirror used to reflect
the image into the viewfinder before you take the shot. This
means that the viewfinder blacks out, so you can only use this on
static subjects, or at least where you can frame the image before
you start shooting. Because of this you’ll need to fix the camera
in position on a tripod when using the mirror lock-up facility, and
remote release to fire the shutter. After all, there’s no point using
mirror lock-up if you then move the camera when pressing the
shutter. We used a Nikon D2x to show you how its done...
1
Press the mode dial lock button in front of the mode dial on
the top left of the camera and turn the mode dial to the Mup
setting. Mirror lock-up is found in the menu on many D-SLRs.
2
With the camera attached to a
tripod, you need to frame your
shot precisely before you start,
as you won’t be able to re-frame the
shot once you lock the mirror up.
40 | Get more from your digital SLR
3
With a remote
release press the
button once to
lock the mirror in the
up position – at this
point the viewfinder
will black out
completely. After
waiting for a second or
so to allow any
movement or vibration
to disappear, press the
release button again to
take the shot.
‹Self-timer
As well as using this facility to get in the
picture yourself, you can also use the selftimer as an alternative to using a remote
release for certain shots. When using long
shutter speeds with the camera on a
tripod, simply pressing the shutter can
create some camera shake, so using the
self-timer will minimise the movement
when you take the shot. Some cameras
also allow you to alter the length of the
delay. If this is the case, a 2 or 5-second
delay will be long enough for this use,
rather than the lengthy 10 seconds that
most cameras use as the default setting.
41
Extra settings
There’s more...
T
hink we’ve exhausted the creative possibilities of
your D-SLR? Think again. No matter how well you
believe you know your way around your camera,
there’s always another technical marvel waiting to
assist you in your quest for brilliant pictures. Want to
order prints straight from your camera? No problem.
Fancy viewing your pictures on a huge TV screen? Easy.
Let’s take a look at some of the options on offer...
‹LCD panel illumination
The light’s on the wane and there’s a shot to be had, but you’re
squinting at the LCD panel, trying to decide whether the
camera’s set to f/16 or f/22. The solution? Hit the LCD panel
illumination button (well, that or carry a torch). D-SLRs with
separate LCD screens for shutter speed, aperture and ISO info etc
offer LCD panel illumination, which is generally symbolised by a
button. Once pressed the light will stay on for a few seconds,
giving you enough time to check your camera settings, and will
turn off as soon as you press the shutter.
‹DID YOU KNOW?
Custom functions can be
found on even the most
basic D-SLRs. But if you’ve
experimented and can’t
remember the default
settings, fear not. Scroll
through the menu and
select the Clear Custom
Functions or Menu Reset
option. Simple as that.
›Video out
Did you know you can connect your D-SLR
to a TV and scroll through your images?
Beats staring at a 2.5in LCD screen! First
you need to ensure that your camera is
set to the correct video format – select
Video System from the set-up menu and
choose either PAL or NTSC. Then use the
video cable to connect the camera’s Video
Out socket to your TV’s Video In terminal
(make sure both your camera and TV are
switched off while you do this). Now
simply switch your TV on, set its input
switch to Video In/AV, switch your camera
on and hit the
switch. Enjoy.
€Direct printing
›LCD & viewfinder info
High-end D-SLRs such as the Canon EOS-1Ds Mark II
and Nikon D2x allow you to tailor the camera settings
shown on the top and rear LCD panels, as well as that
shown in the viewfinder. The options generally
include displaying the number of shots taken (or, in
the EOS-1Ds Mark II’s case, saved in the designated
folder) rather than the number left, displaying the ISO
speed instead of the number of remaining shots, and
displaying the ISO speed at all times. These options
can be found in your D-SLR’s Custom Functions menu.
42 | Get more from your digital SLR
D-SLRs that are either DPOF or PictBridgeenabled allow you to bypass PCs altogether
when printing images. DPOF (Digital Print
Order Format) allows you to choose which
images are to be printed and how many
prints you want. This info can then be saved
to a CompactFlash card, which can then be
inserted into a printer’s CF slot or taken to a
lab for instant prints. You can also connect
your D-SLR directly to a DPOF-compatible printer.
PictBridge works in a similar fashion. Connect a
PictBridge-enabled camera to a PictBridgeenabled printer and print one or more images,
print using the DPOF info and print index prints.
43