1
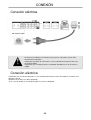
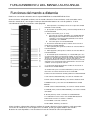
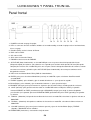
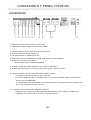
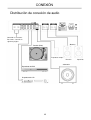
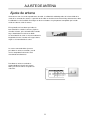
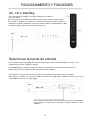
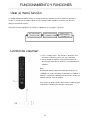
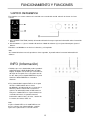
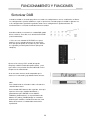
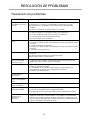
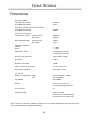
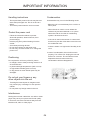
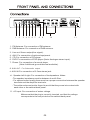
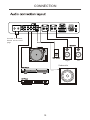
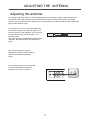
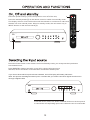
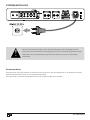
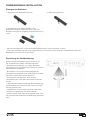
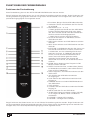
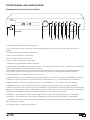
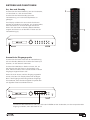
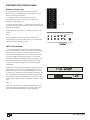
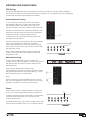
ÍNDICE ÍNDICE Índice AJUSTE DE ANTENA 02 PRECAUCIONES DE SEGURIDAD Precauciones de seguridad 03 04 CONEXIÓN Conexión eléctrica 05 INSTALACIÓN DEL MANDO A DISTANCIA Inserción de las pilas Cómo usar el mando a distancia 06 06 FUNCIONAMIENTO DEL MANDO A DISTANCIA Funciones del mando a distancia 07 08 09 10 02 12 12 13 13 14 14 15 15 16 17 18 18 RESOLUCIÓN DE PROBLEMAS 19 FICHA TÉCNICA Ficha técnica CONEXIÓN Distribución de conexión de audio ON, OFF y Standby Seleccionar la fuente de entrada Usar el menú función Control de volumen Control de bajos Control de agudos Control de balance Información y función Sintonizar DAB Guardar y seleccionar emisoras Sintonizar FM Resetear Resolución de problemas CONEXIONES Y PANEL FRONTAL Panel frontal Conexiones 11 FUNCIONAMIENTO Y FUNCIONES INFORMACIÓN IMPORTANTE Información importante Ajuste de antena 20 PRECAUCIONES DE SEGURIDAD Un triángulo con el símbolo del rayo avisa al usuario de que el "voltaje peligroso" sin aislamiento de la carcasa supone un riesgo de descarga eléctrica. Un triángulo con el símbolo de exclamación aconseja al usuario que estudie las instrucciones importantes sobre el uso y mantenimiento de la unidad que aparecen en el manual suministrado junto a ésta. Símbolo para CLASS II (aislamiento doble) ADVERTENCIA: PARA REDUCIR EL RIESGO DE INCENDIO O DESCARGA ELÉCTRICA, NO EXPONGA ESTE EQUIPO A LA LLUVIA NI A LA HUMEDAD. NO ABRA LA CARCASA YA QUE SU VOLTAJE ES PELIGROSO. SÓLO EL PERSONAL CUALIFICADO ESTÁ AUTORIZADO PARA DESEMPEÑAR LABORES DE REPARACIÓN Y SERVICIO. PRECAUCIÓN: SI TIENE QUE SUSTITUIR EL ENCHUFE DEL CABLE ELÉCTRICO, ES IMPORTANTE QUE EL NUEVO SEA IDÉNTICO AL SUSTITUIDO, O QUE HAYA SIDO RECOMENDADO POR EL FABRICANTE. PARA EVITAR UNA DESCARGA ELÉCTRICA ES IMPORTANTE INTRODUCIR EL ENCHUFE CORRECTAMENTE EN LA TOMA. 03 INFORMACIÓN IMPORTANTE Instrucciones de uso Condensación - Los paneles superior y trasero de la unidad pueden calentarse después de un uso prolongado. Esto no es debido a un fallo. - Desconecte la unidad cuando no la esté usando. Se puede producir condensación en los siguientes casos: - Cuando se traslada la unidad desde un lugar frío directamente a uno cálido. - Cuando se usa la unidad en un lugar donde acaba de encenderse un radiador o donde el aire frío del aire acondicionado llega directamente a la unidad. Proteja el cable eléctrico - Siga las instrucciones facilitadas para evitar un mal funcionamiento, descargas eléctricas, incendio o daños personales: - Sujete el enchufe firmemente cuando lo introduzca en la toma. - Evite dispositivos que generen calor. - No coloque objetos sobre el cable de suministro eléctrico. - No realice trabajos encima de la unidad ni cambie el cable de suministro eléctrico. - Si se utiliza la unidad en verano en una habitación húmeda y calurosa y anteriormente se ha trasladado la unidad desde una habitación con aire acondicionado. - Si hay vapor o un alto nivel de humedad en la habitación. En caso de condensación, la unidad no funcionará correctamente. Desconecte la unidad. Desenchufe la unidad y espere 2-3 horas. La unidad se adaptará al ambiente y la condensación habrá desaparecido. Situación No coloque la unidad en los siguientes lugares: - Bajo el sol, cerca de dispositivos que desprendan calor o en espacios cerrados. - Lugares con temperatura elevada (40C o más) o con alta humedad relativa (90% o más). - En lugares sucios, ya que pueden dañarse las partes internas. No ponga sus dedos ni ningún otro objeto dentro de la unidad Es peligroso tocar las partes del interior y puede causar daños o lesiones. No abra la carcasa. - No coloque cuerpos extraños en la unidad. Interferencia Colocar la unidad cerca de un televisor, radio o vídeo puede causar una mala calidad de sonido e imagen. Si esto ocurre, aleje la unidad del televisor, radio o vídeo. 04 CONEXIÓN Conexión eléctrica 220-240VCA-50HZ No conecte la unidad a la red eléctrica hasta que las conexiones hayan sido correctamente realizadas. Compruebe que todas las conexiones se han realizado correctamente antes de encender el equipo. Compruebe que el voltaje eléctrico es 220-240V CA 50Hz antes de encender el equipo. Conexión eléctrica Compruebe que el resto de conexiones se ha realizado correctamente antes de introducir el enchufe en la toma de la pared. Introduzca el enchufe en la toma apropiada. Si va a usar la unidad en el extranjero, quizás necesite un adaptador. 05 INSTALACIÓN DEL MANDO A DISTANCIA Inserción de las pilas 1 Retire la tapa conforme aparece en el dibujo. 3 Retire la tapa. 2 Coloque dos pilas del tipo AAA/R03/UM4 en el compartimento de pilas. Asegúrese de insertar las pilas en la orientación correcta (vea el dibujo del fondo). - No mezcle pilas nuevas y usadas, ni de diferente tipo. - Si el mando a distancia no se utiliza durante un periodo prolongado, retire las pilas para evitar su corrosión. Cómo usar el mando a distancia Máximo 6m Dirija el mando al sensor que está en el panel frontal de la unidad. Cuando reciba la señal del mando a distancia, la unidad ejecutará la función solicitada. El mando funciona a una distancia de 6 - En ocasiones el mando no funciona cuando hay mucha luz. Deberá desplazar la unidad si esto ocurre. - El mando puede funcionar mal cuando se utiliza cerca de la unidad. - No coloque objetos sobre el mando, ya que las baterías pueden descargarse si se pulsa una tecla prolongadamente. - Asegúrese de que no hay objetos entre el mando y la unidad. - No coloque la unidad tras un cristal polarizado ya que puede reducir la distancia máxima de funcionamiento del mando. 06 FUNCIONAMIENTO DEL MANDO A DISTANCIA Funciones del mando a distancia Podrá usar este mando a distancia con el receptor DAB/FM de la unidad HRE75B de Vieta. Ciertas funciones sólo podrán realizarse con el mando a distancia. Ciertas funciones están conectadas con la fuente de entrada de la señal elegida. Puede que determinados botones no estén disponibles si no ha seleccionado la fuente de entrada de señal apropiada. 1. Power (botón de encendido): Conecta el receptor de la unidad HRE75B en modo standby. 2. Eject (botón de expulsión): Abre y cierra la bandeja del disco de la unidad HCD30B 3. Botones numerados (0,1,2...9~+10): a. Selecciona las emisoras guardadas en la unidad HRE75B. Mantenga pulsado un botón numerado durante más de 2 segundos, y la emisora quedará guardada con el número seleccionado en la HRE75B. b. Selecciona pistas en la unidad HCD30B. 4. Flecha hacia arriba: Búsqueda ascendente de frecuencia en modo FM en la unidad HRE75B. 5. PREV (Anterior): Búsqueda descendente de emisoras DAB en la unidad HRE75B. 6. NEXT (Siguiente): Búsqueda ascendente de emisoras DAB en la unidad HRE75B. 7. AUTOTUNE (Auto-sintonización): en el modo DAB, pulse une vez para activar Quick Scan (Búsqueda rápida) de emisoras, pulse durante 2-3 segundos para activar Full Scan (Búsqueda completa) de emisoras. En el modo FM, pulse una vez para activar la búsqueda automática de emisora, cuando encuentre una emisora, guárdela o pulse AUTOTUNE (Auto-sintonización) de nuevo para continuar con la búsqueda de emisora. 8. Flecha hacia abajo: Búsqueda descendente de frecuencia en modo FM en la unidad HRE75B. 9. ENTER: Pulse para seleccionar Mono/Auto (estéreo) en modo FM o para seleccionar Auto Enter on/off en modo DAB. 10. INFO: muestra información de RDS y DAB en la unidad HRE75B. 11. CD: activa la unidad HRE75B y selecciona la entrada de CD. 12. AUX: activa la unidad HRE75B y selecciona la entrada de AUX. 13. DAB/FM: activa y selecciona el modo DAB/FM de la unidad HRE75B. 14. DVD: activa la unidad HRE75B y selecciona la entrada de DVD. 15. PHONO (Fono): activa la unidad HRE75B y selecciona la entrada de PHONO. 16. MUTE (Silencio): anula el sonido de la unidad HRE75B. 17. FUNCTION: muestra el menú en la unidad HRE75B, donde podrá ajustar los bajos, los agudos y el balance. 18. VOLUMEN + Aumenta el volumen. 19. VOLUMEN - Disminuye el volumen. Ciertas funciones sólo pueden realizarse mediante el mando a distancia. Ciertas funciones están conectadas a la fuente de entrada de la señal elegida. Por este motivo, puede que algunos botones del mando a distancia no estén disponibles si no selecciona la fuente de entrada de señal correspondiente. 07 CONEXIONES Y PANEL FRONTAL Panel frontal 1. POWER: enciende o apaga el equipo; 2. LED: se activa una luz azul cuando la unidad está en modo standby; cuando el equipo está en funcionamiento, la luz se apaga. 3. PHONO (Fono): activa la fuente de Phono. 4. DVD: activa el DVD. 5. CD: activa el CD. 6. AUX: activa la fuente de Phono. 7. FM/DAB: activa la fuente de FM/DAB. 8. AUTOTUNE (Auto-sintonización): en el modo DAB pulse une vez para activar la búsqueda Quick Scan (Búsqueda rápida) de emisoras, pulse durante 2-3 segundos para accionar la búsqueda Full Scan (Búsqueda completa) de emisoras. En el modo FM, pulse una vez para activar la búsqueda automática de emisora, cuando encuentre una emisora, guárdela o pulse AUTOTUNE (Auto-sintonización) de nuevo para continuar con la búsqueda de emisora. 9. INFO: muestra información de RDS y DAB de sintonizadores; 10. ENTER: pulse para seleccionar Mono/Auto (estéreo) en modo FM, o para seleccionar Auto Enter on/off en modo DAB. 11. TREBLE (Agudos): pulse el botón y gire el control del volumen +/- para ajustar los agudos. 12. BASS (Bajos): pulse el botón y gire el control del volumen +/- para ajustar los bajos. 13. BROWSE (Navegar): pulse para mostrar las siguientes preselecciones libres cuando guarde las emisoras. 14. SAVE (Guardar): para guardar emisoras tanto en el modo DAB como en FM pulse SAVE y la pantalla mostrará PRESET 01 FREE, posteriormente pulse BROWSE (navegar) para elegir el número elegido de preselección (en la pantalla aparecerá PRESET05 FREE) posteriormente pulse SAVE (guardar) para guardar la emisora. 15. TUNING - (Sintonizar): búsqueda descendiente de frecuencia en modo FM, selecciona la siguiente emisora en Modo DAB. 16. TUNING + (Sintonizar): búsqueda ascendiente de frecuencia en modo FM, selecciona la última emisora en Modo DAB. 17. VOLUME (Volumen): gire para ajustar el volumen general y ajuste el nivel de BASS (Bajos), TREBLE (Agudos) y BALANCE con los controles. 18. HEADPHONE (Auriculares): conector de clavija de 6mm. 08 CONEXIONES Y PANEL FRONTAL Conexiones 1. FM Antenna (Antena FM): conecta la antena FM. 2. DAB Antenna (Antena DAB): conecta la antena DAB. 3. Line out (Salida de línea): salida Estéreo (señal de línea). 4. AUX: para conectar equipos opcionales 5. CD: para conectar un reproductor de CD 6. DVD: para conectar un reproductor de DVD. Nota: entrada estéreo analógica. 7. Phono: para conectar un tocadiscos. Nota: terminal de tierra adicional disponible. 8. SUB OUT (Salida de altavoz subwoofer): para salida de Subwoofer. 9. AUX IN (Entrada Aux): para conectar un conector de clavija estéreo de 3,5mm. 10. Altavoz izquierdo & derecho: para conectar los altavoces. Notas: -La impedancia del altavoz debe ser entre 4 y 8 Ohm. -Para una calidad buena del sonido debe haber una conexión apropiada entre los terminales del altavoz y los del amplificador. -Las terminaciones del cable no deben estar deshilachadas para evitar que entren en contacto entre ellas o con el panel trasero de la carcasa. 11. Entrada CA: Para conexión de voltaje del suministro. Compruebe que el enchufe ha sido introducido correctamente y que el voltaje corresponde con el indicado en el texto situado en el panel trasero de la carcasa. 09 CONEXIÓN Distribución de conexión de audio Conexión a la antena. Por favor, consulte la siguiente página. Altavoces Turntable (Plato) Reproductor de Mp3 Derecha Subwoofer Reproductor de DVD. Reproductor de CD 10 Izquierda AJUSTE DE ANTENA Ajuste de antena Como ocurre con el resto de reproductores de radio, la calidad del sonido depende de la intensidad de la señal de las entradas de antena. La posición de la radio en relación al transmisor influye directamente sobre la calidad de la señal recibida. Para lograr un buen resultado es muy importante comprobar que la radio recibe una buena señal de antena. En la pantalla verá una barra que indica la intensidad de la señal de la antena. Si quiere visualizar la barra, pulse el botón INFO cuando haya sintonizado una emisora en DAB. La intensidad de la señal se muestra mediante la longitud de la barra. Cuanto más larga la barra, mayor es la intensidad de la señal. La antena conectada debe ajustarse para obtener un buen resultado, para lo cual se comprobará la barra de señal mencionada anteriormente. Para obtener un buen resultado es recomendable que instale una antena DAB y una antena FM en el tejado o en el desván. 11 FUNCIONAMIENTO Y FUNCIONES On, Off y standby Pulse el botón de encendido (1) del panel frontal para encender o apagar la unidad; Pulse el botón (2) de standby del mando a distancia para activar el modo standby. La pantalla se apagará y las funciones se reducirán al mínimo para garantizar que la unidad usa la mínima cantidad de energía. En modo standby, la unidad obedece sólo a los botones INPUT (Entrada) del mando a distancia (3). Seleccionar la fuente de entrada Pulse el botón Power (encendido) del mando a distancia para activar el modo Standby. Para activar esta unidad tiene que pulsar el botón de entrada. Pulse DAB/FM para escuchar la radio, pulse CD para seleccionar la entrada de reproductor de CD, y DVD, Phono y AUX si la unidad ha sido conectada a dichas entradas. Si desconoce la entrada que ha sido seleccionada, la pantalla LCD lo indica con total claridad. Nota: Todas las entradas son entradas analógicas estéreo. Esto significa que no podrá conectar una fuente de sonido digital a través de un cable digital Pulse el botón Phono, DVD, CD, AUX o DAB/FM en el panel frontal para elegir la fuente de entrada correspondiente cuando la unidad esté en el modo ON. 12 FUNCIONAMIENTO Y FUNCIONES Usar el menú función La unidad HRE75B de VIETA incluye un "menú función" que permite ajustar las siguientes opciones a las que se accede con el mando a distancia: Bass (bajos), treble (agudos), y balance (consulte más abajo la estructura del menú). Ofrecemos una descripción de las funciones individuales en las páginas siguientes. Bass control (Control de bajos)+/- 14dB Treble control (Control de agudos) +/- 14dB Balance control (Control de balance) -37,5 -OdB L o R Control de volumen 1 Pulse el botón VOL+ del mando a distancia para aumentar el volumen y pulse VOL- para reducirlo. 2. Gire el control de volumen del panel frontal hacia la derecha para aumentar el volumen y a la izquierda para reducirlo. Nota: El control de volumen del panel frontal puede girarse en sentido de las agujas del reloj o al contrario para cambiar el volumen, el control de volumen tiene 64 niveles, desde el 0, volumen mínimo, hasta el máximo. Si la señal está distorsionada, debe reducir el volumen para evitar dañar la unidad y los altavoces conectados. 13 FUNCIONAMIENTO Y FUNCIONES Control de bajos Este amplificador cuenta con un control de bajos que permite ajustar el nivel de bajos mediante +/- 14dB, de 45Hz a 260Hz. Observe que el nivel alto de bajos ofrecido por el control de bajos puede dañar de modo irreversible su altavoz si usa el volumen alto durante largos periodos. 1 Pulse el botón FUNCTION del mando a distancia para mostrar el menú función. Mantenga pulsado el botón FUNCTION del mando a distancia hasta que aparezca BASS (bajos) en el amplificador 2. Pulse VOL+ y VOL- para ajustar el nivel de bajos. 3. Pulse el botón Bass en el panel frontal y gire el control de volumen a la derecha para aumentar el nivel de bajos y a la izquierda para reducirlo. Nota: Si el control de bajos no está operativo en cinco segundos, la pantalla volverá a mostrar información del volumen Control de agudos Este amplificador incorpora control de agudos que permiten ajustar el nivel de agudos mediante +/14 dB, de 2K Hz a 20KHz. Observe que el nivel alto de bajos ofrecido por el control de bajos puede dañar de modo irreversible su altavoz si usa el volumen alto durante largos periodos. 1. Pulse el botón FUNCTION (función) del mando a distancia para mostrar el menú función. Mantenga pulsado el botón FUNCTION del mando a distancia hasta que aparezca TREBLE (agudos) en el amplificador 2. Pulse VOL+ y VOL- para ajustar el nivel de bajos. 3. Pulse el botón Treble en el panel frontal y gire el control de volumen a la derecha para aumentar el nivel de agudos y a la izquierda para reducirlo. Nota: Si el control de agudos no está operativo en cinco segundos, la pantalla volverá a mostrar información del volumen 14 FUNCIONAMIENTO Y FUNCIONES Control de balance Esta función se usa para compensar la posición no centrada del sonido, además de ajustar el efecto estéreo. 1. Pulse el botón FUNCTION (función) del mando a distancia hasta que aparezca información sobre el control de balance. 2. Gire los botones +/- (2) en el mando a distancia o el botón de volumen (2) en el panel frontal para ajustar el balance. El balance está dividido en 14 niveles a la derecha y a la izquierda. Nota Si el control de balance no está operativo en cinco segundos, la pantalla volverá a mostrar información del volumen INFO (Información) 1 Debido a que este sintonizador puede reproducir radio FM normal y DAB (Radiofusión de Audio Digital), incorpora una función que selecciona los dos tipos de recepción. Para seleccionar una de las dos, debe pulsar el botón DAB/FM en el panel frontal o el botón DAB/FM en el mando a distancia. 2 Este sintonizador incorpora RSD en el receptor de FM. La DAB también ofrece ciertas posibilidades de información que se asemejan a RDS tal y como la conocemos en FM. Para activar esta información tanto en DAB como en FM, pulse el botón INFO en el panel frontal o en el mando a distancia. La pantalla mostrará información sobre la hora y la fecha, nombre de la emisora, del artista, título, etc. Nota: Si pulsa el botón INFO en el modo DAB una vez que las emisoras han sido guardadas, también aparecerá la potencia de la señal de antena. 15 FUNCIONAMIENTO Y FUNCIONES Sintonizar DAB Cuando la unidad se enciende por primera vez, todas las configuraciones son las establecidas en fábrica. Las configuraciones pueden modificarse según su preferencia. Cuando apague la unidad la siguiente vez, estas configuraciones quedarán registradas como nuevas configuraciones predeterminadas. El funcionamiento es el mismo cuando desenchufa la unidad. Cuando la unidad se encuentra en el modo DAB, podrá buscar emisoras. Para ello use la función AUTOTUNE (auto-sintonización). 1. Pulse una vez el botón AUTOTUNE en el panel frontal (1) o en el mando a distancia (2) para Quick Scan (búsqueda rápida) de emisoras o pulse durante 2-3 segundos para búsqueda Full Scan (búsqueda completa). Aparecerá el mensaje FULL SCAN (búsqueda completa) o QUICK SCAN (búsqueda rápida), y verá que la barra en la pantalla aumenta indicando el nivel del proceso de sintonización. Si no encuentra emisoras, debe comprobar que la antena se ha conectada y ajustado de forma correcta. Nota: Para sintonización en la banda L debe seleccionar la sintonización manual. Pulse el botón INFO durante dos segundos, hasta que aparezca el mensaje sintonización Manual, y posteriormente pulse ENTER. Use los botones TUNINGS (sintonizaciones) en el panel frontal o los botones UP (arriba) y DOWN (abajo) en el mando a distancia para sintonizar. Cuando encuentre una señal blanca de frecuencia, el sintonizador comenzará a reproducirla. 16 Full scan 12c FUNCIONAMIENTO Y FUNCIONES Guardar y seleccionar emisoras 1. Cuando encuentra una emisora y quiere gravarla como preselección pulse el botón con el número deseado 1-10 en el mando a distancia durante 2 segundos. Una vez guardada la emisora, si desea escucharla pulse de nuevo el botón donde la guardó. El procedimiento es el mismo para FM y DAB. 2. Las emisoras DAB que no hayan sido guardadas en la preselección pueden ser seleccionadas pulsando los botones UP (arriba) o DOWN (abajo) del mando a distancia, o pulsando los botones TUNING (sintonización) +/- en el panel frontal y pulsar ENTER para seleccionarla. Nota: En el modo DAB pulse el botón ENTER en el mando a distancia o el panel frontal durante 2-3 segundos, posteriormente seleccione AUTO ENTER ON u OFF. Si selecciona AUTO ENTER ON, no tendrá que pulsar ENTER para seleccionar la emisora DAB. Si selecciona AUTO ENTER OFF, tendrá que pulsar ENTER para seleccionar la emisora DAB. 17 FUNCIONAMIENTO Y FUNCIONES Sintonizar FM La unidad HRE75B de VIETA ofrece tanto sintonización manual como automática en banda FM. De este modo, podrá gravar una emisora específica. También podrá ajustar la antena suministrada para obtener una buena señal. Sintonización automática. 1 Para usar la función auto-sintonización desde el panel frontal, debe presionar el botón AUTOTUNE (Autosintonización). La unidad buscará una frecuencia más alta con una señal adecuada. Mantenga pulsado el botón AUTOTUNE (Auto-sintonización) durante dos segundos, y la unidad buscará una frecuencia más baja con una señal apropiada. 2 También podrá activar la función de auto-sintonización mediante el mando a distancia. En la pantalla podrá ver si la frecuencia aumenta o disminuye. Cuando el sintonizador ha encontrado la emisora, el proceso de sintonización parará automáticamente, y escuchará la emisora encontrada. Si no encuentra emisoras, debe comprobar que la antena se ha conectado y ajustado de forma correcta. Sintonización manual Para activar la función de sintonización manual pulse los botones TUNING (sintonización) +/- en el panel frontal o los botones UP (arriba) o DOWN (abajo) en el mando a distancia. Si desea guardar la emisora encontrada como preselección pulse el número deseado 1-10 en el mando a distancia durante 2-3 segundos. Nota: Si desea escuchar las emisoras en banda FM que no hayan sido preseleccionadas, deberá sintonizarlas de nuevo manual o automáticamente. Reset (Resetear) El sintonizador se puede resetear. Esta función se usa para suprimir las emisoras guardadas en la unidad. Mantenga pulsado el botón INFO durante dos segundos. Pulse el botón INFO de nuevo hasta que aparezca el mensaje SYSTEM RESET (resetear el sistema) y pulse Enter. Todas las emisoras guardadas se borrarán de la unidad. 18 RESOLUCIÓN DE PROBLEMAS Resolución de problemas PROBLEMA CAUSA/SOLUCIÓN El amplificador está encendido pero no tiene energía. - Conecte la unidad a la toma de corriente eléctrica. - Compruebe que el enchufe se ha introducido correctamente en la toma. - El fusible interno se ha fundido y un técnico de servicio autorizado debe sustituirlo. - El cable de electricidad está dañado y debe ser sustituido. No hay sonido. - El amplificador no ha sido conectado. - El control de volumen se encuentra al mínimo (vea la página 13). - Los cables del altavoz no han sido conectados correctamente. - Ha seleccionado la fuente de entrada equivocada. - No ha conectado la fuente de entrada. Sólo hay sonido en un canal. - El control de balance no ha sido ajustado correctamente (vea página 15). - Los cables de entrada de audio están dañados o han sido conectados de modo incorrecto. - La fuente de entrada está defectuosa. - Los cables de entrada de audio están dañados o han sido conectados de modo incorrecto. - Los altavoces están defectuosos. Zumbido fuerte. - Los cables de entrada de audio están dañados o han sido conectados de modo incorrecto. - El cable de tierra del tocadiscos no ha sido conectado. -El brazo del tocadiscos está defectuoso. Baja intensidad de bajos y mala calidad del efecto estéreo. - La conexión del altavoz está fuera de fase. Compruebe que los polos negativo y positivo han sido conectados correctamente, tanto en la parte posterior del amplificador como en la parte posterior del altavoz. Sonido distorsionado. - Algún cable conductor del cable del altavoz está en contacto con otro, lo que produce la distorsión del sonido. - La configuración de los controles de Bass (bajos) y treble (agudos) está demasiado alta en relación a las especificaciones del altavoz. - El volumen está demasiado alto. La pantalla LCD no muestra ninguna información. - El amplificador está defectuoso y debe repararlo un técnico cualificado. El mensaje ERROR aparece en la pantalla LCD. - El amplificador está defectuoso y debe repararlo un técnico cualificado. La unidad no cambia entre - El amplificador está defectuoso y debe repararlo un técnico cualificado. modos de entrada. La pantalla no muestra información de DAB. - La unidad VIETA HRE75B no ha encontrado emisoras en DAB. - La emisora seleccionada no ofrece ninguna información. - La señal de la antena es demasiado débil. Consulte el apartado sobre ajuste Leve sonido de goteo/tic-tac en alguna de las emisoras. - Como ocurre con otros medios digitales, la DAB se reproduce con una alta calidad de sonido. Si la señal de la antena es muy débil no escuchará ningún pitido, pero en su lugar escuchará sonido de goteo/tic-tac o interrupciones. En este caso deberá comprobar que la señal de la antena no es demasiado intensa. Consulte el apartado sobre ajuste de antena. 19 FICHA TÉCNICA Ficha técnica Entrada de Phono Impedancia de entrada Sensibilidad de entrada 47 KOhm 3,8mV Entradas de nivel de línea (CD, DVD.AUX) Impedancia de entrada Sensibilidad de Entrada 47 Kohm 200mV Salidas de nivel de línea Impedancia de salida Salida de línea Auriculares 100KOhm 300Ohm Nivel máximo de salida Salida de línea Auriculares 740mV 1,25V Control de tonalidad Agudos: Bajos +/- 14DB +/- 14dB Potencia de salida 2 x 50 Watt para 4 Ohm 2 x 40 Watt para 8 Ohm Respuesta de frecuencia 10Hz a 63KHz (-3dB) Distorsión <0,05% Relación señal-ruido >90dB Voltaje y consumo de energía Vea el panel trasero Dimensiones (WxDxH) 430 x 290 x 75 mm Sección RF: Bandas de sintonizador DAB FM Sensibilidad Banda III, Banda L y DAB+ 87,5-108,0MHz Tipo -96dBm Display: 1 línea de 16 caracteres Luz de fondo de pantalla LED Preselecciones 10 Salidas de Audio Estéreo, 2,5VPP Frecuencia de muestreo 48kHz Resolución de muestreo 16 bit Nos reservamos el derecho a modificar la ficha técnica y el diseño del producto sin previo aviso como consecuencia de futuras mejoras del producto. 20 ADJUSTING THE ANTENNA CONTENTS Contents 02 03 IMPORTANT INFORMATION important information 04 CONNECTION Connection to the mains 05 REMOTE CONTROL INSTALLATION Installation of batteries Using the remote control 06 06 ON, OFF and Standby Selecting the input source Using the function menu Volume control Bass control Treble control Balance control Info and function DAB tuning Saving and selecting channels FM tuning Reset Troubleshooting Remote Control Functions TECHNICAL DATA 07 FRONT PANEL AND CONNECTIONS 08 09 CONNECTION Audio connection layout 10 02 12 12 13 13 14 14 15 15 16 17 18 18 TROUBLESHOOTING REMOTE CONTROL OPERATIONS Front panel Connections 11 OPERATION AND FUNCTIONS SAFETY PRECAUTIONS Safety precautions Adjusting the antenna Technical data 19 20 SAFETY PRECAUTIONS A triangle with a lightning symbol draws the user's attention to "dangerous voltage" without insulation in the cabinet which may be high enough to entail a risk of electric shock. A triangle with an exclamation mark draws the user's attention to important instructions for use and maintenance in the accompanying manual, which should be studied. A symbol for CLASS II (double insulation) WARNING: TO MINIMISE THE RISK OF FIRE OR ELECTRICAL SHOCK, DO NOT EXPOSE THE UNIT TO RAIN OR MOISTURE. DO NOT OPEN THE CABINET AS IT CONTAINS DANGEROUS VOLTAGE. ONLY QUALIFIED TECHNICIANS ARE ALLOWED TO CARRY OUT REPAIR AND SERVICE. CAUTION: IF THE PLUG OF THE POWER CORD NEEDS TO BE REPLACED, IT IS IMPORTANT THAT THE REPLACEMENT IS IDENTICAL TO THE PLUG TO BE REPLACED, OR THAT THE NEW PLUG HAS BEEN RECOMMENDED BY THE TO AVOID ELECTRICAL SHOCK, IT IS IMPORTANT TO INSERT THE PLUG CORRECTLY INTO THE SOCKET. 03 IMPORTANT INFORMATION Handling instructions Condensation - The top and back panel of the unit may become warm after prolonged use. This is not due to a defect. - Turn off the power when the unit is not used. Condensation may occur in the following cases: - When the unit is moved directly from a cold to a warm place. - When the unit is used in a room where the radiator has just been switched on or a place where the cold air from the air-conditioning system is directed at the unit. Protect the power cord - Follow the instructions below to prevent abnormal operation, electrical shock, fire or personal injury: - Hold the plug firmly when inserting it into the socket. - Avoid heat-producing devices. - Do not place objects on the power cord. - Do not carry out service work on or change the power cord. - If the unit is used in the summer in a warm and humid room just after it has been moved from an air-conditioned room. - If there is steam or a high level of humidity in the room. In case of condensation, the unit will not work properly. Turn off the unit. Unplug the unit and leave it for 2-3 hours. The unit will then have adapted to the environment and any condensation will have disappeared. Positioning Do not place the unit in any of the fol. places: - In sunlight, close to heat-producing devices or in an enclosed rack. - In places with high temperatures (40C or more) or high relative humidity (90% or more). - In dirty places as some internal parts may be damaged. Do not put your fingers or any other objects into the unit - Touching the internal parts is dangerous and may cause injury or damage. Do not open the cabinet. - Do not place any foreign matter in the unit. Interference Placing the unit near a television set, radio or video player may cause poor picture and sound quality. In that case, move the unit further away from the television set, radio or video player. 04 CONNECTION Connection to the mains AUX FM Antenna DAB CD DVD PHONO 3.5mm AUX IN 8 SUB OUT - 8 HRE75B USE ONLY WITH 250V FUSE - + + 220-240V AC~50Hz Do not turn on the power before all connections have been made correctly. Check that all connections have been made correctly before turning on the power. Check that the mains voltage is 220-240V AC50Hz before turning on the power. Connection to the mains Check that all other connections have been made correctly before inserting the mains plug into the wall socket. Then insert the plug into a suitable socket. If the unit is to be used abroad, you may need an adapter. 05 REMOTE CONTROL INSTALLATION Installation of batteries 1 Remove the cover as illustrated. 3 Replace the cover. 2 Position two batteries of the type AAA/R03/UM4 in the battery compartment. Make sure that the orientation of the batteries is correct (see drawing at bottom). - Do not mix new and old batteries and do not use different types of batteries. - If the remote control is not used for prolonged periods, remove the batteries from the remote control to avoid corrosion. Using the remote control Direct the remote control at the sensor on the front panel of the unit. When the remote control signal is received, the unit reacts accordingly. The remote control works within a range of 6 metres. HR E7 5B - VO LU ME + IN FO EN TE R BR OW SE SAVE - Sometimes the remote control does not work well in strong light. You may have to move the unit if it is a problem. - Malfunction may occur if other remote controls are used near the unit. - Do not place any objects on the remote control, as the batteries may become flat if a key is depressed constantly. - Make sure that there are no obstacles between remote control and unit. - Do not position the unit behind tinted glass as it may reduce the maximum range of the remote control. 06 REMOTE CONTROL OPERATIONS Remote control functions This remote can be used for VIETA HRE75B DAB/FM receiver. Some functions of the unit can only be performed by means of the remote control. Some functions are connected with the selected input source. Some buttons may therefore not be available if the corresponding signal input source has not been selected. 1. Power: Set HRE75B into standby. 1 2 2. Eject: Open and close the disc tray on HCD30B. 3. Number buttons (0,1,2...9 ~+10): a. Selects stored stations on HRE75B. Keep pressing a numeric button for more than 2 seconds, a station is stored under the number concerned on HRE75B. b. Selects tracks on VIETA HCD30B. 3 4. UP: Searches up the frequency in FM mode on HRE75B. 5. PREV: Scrolls down DAB stations on HRE75B. 4 5 7 6 8 9 10 11 12 13 14 15 16 17 18 19 6. NEXT: Scrolls up DAB stations on HRE75B. 7. AUTOTUNE: In DAB mode press once to perform Quick Scan search for stations, press 2-3 seconds to perform a Full Scan search for stations. In FM mode, press once to perform automatic station search, when station is found, then save the station or press AUTOTUNE again to continue station search. 8. DOWN: Searches down in frequency in FM mode on HRE75B. 9. ENTER: Press to select Mono/Auto (stereo) in FM mode, or to select Auto Enter on/off in DAB mode. 10. INFO: Displays RDS and DAB information on HRE75B. 11. CD: Activates HRE75B and selects the CD input. 12. AUX: Activates HRE75B and selects the AUX input. 13. DAB/FM: Activates and Selects DAB/FM mode on HRE75B. 14. DVD: Activates HRE75B and selects the DVD input. 15. PHONO: Activates HRE75B and selects the PHONO input. 16. MUTE: Mutes the sound on HRE75B. 17. FUNCTION: Enters the menu on HRE75B, where it is possible to adjust bass, treble and balance. 18. VOLUME +: Turns up the volume. 19. VOLUME - : Turns down the volume. Some of the functions of the unit can only be performed by means of the remote control. Some functions are connected with the selected signal input source. Some buttons on the remote control may therefore not be available if the corresponding signal input source has not been selected. 07 HRE75B - VOLUME + INFO ENTER 1 2 3 17 BROWSE 4 10 11 5 12 6 SAVE 7 13 14 9 8 15 16 18 1. POWER: Turn On or OFF the unit; 2. LED: Lights blue when the unit into standby mode; and no light when normal working. 3. PHONO: To activate Phono source. 4. DVD: To activate DVD source. 5. CD: To activate CD source 6. AUX: To activate Phono source. 7. FM/DAB: To activate FM/DAB source . 8. AUTOTUNE: In DAB mode press once to perform Quick Scan search for stations, press 2-3 seconds to perform a Full Scan search for stations. In FM mode, press once to perform automatic station search, when station is found, then save the station or press AUTOTUNE again to continue station search. 9. INFO: Displays RDS and DAB information of tuners; 10.ENTER: Press to select Mono/Auto (stereo) in FM mode, or to select Auto Enter on/off in DAB mode. 11. TREBLE: Press the button and turn volume knob +/- to adjust Treble value. 12. BASS: Press the button and turn volume knob +/- to adjust Bass value. 13. BROWSE: Press to show next free presets when saving stations. 14. SAVE: To store stations in both DAB and FM mode press SAVE and display will show PRESET 01 FREE, then press BROWSE to choose the desired number of preset (display will show is PRESET 05 FREE) and press SAVE to save the station. 15. TUNING - : Search down frequency in FM mode, select next station in DAB Mode. 16. TUNING + : Searches up frequency in FM mode, select last station in DAB Mode. 17. VOLUME: Turn to adjust the master volume, and adjust the level of BASS, TREBLE and BALANCE with the controls. 18. HEADPHONE: 6mm jack connector. 08 AUX FM Antenna DAB CD DVD PHONO 3.5mm AUX IN 8 8 HRE75B USE ONLY WITH 250V FUSE - SUB OUT 1 2 3 4 5 6 7 8 9 - + 10 11 1. FM Antenna: For connection of FM antenna. 2. DAB Antenna: For connection of DAB antenna. 3. 4. 5. 6. 7. Line out: Stereo output(line signal). AUX: For connection of optional equipment. CD: For connection of CD player DVD: For connection of DVD player (Note: Analogue stereo input). Phono: For connection of a record player (Note: Additional ground terminal available). 8. SUB OUT: For Subwoofer output. 9. AUX IN: For connection of 3.5mm stereo jack. 10 . Speaker left & right: For connection of loudspeakers. Notes: -The speaker impedance must be between 4 and 8 Ohm. - For optimal sound quality there must be a proper connection between the speaker terminals and the amplifier terminals. - The cable ends must not be frayed to avoid that they come into contact with each other or the cabinet back panel. 11. AC input: For connection of mains voltage. Make sure that the plug is correctly inserted, and that the voltage corresponds to the text printed on the cabinet back panel. 09 CONNECTION FM Antenna DAB AUX CD DVD PHONO 3.5mm AUX IN 8 8 HRE75B USE ONLY WITH 250V FUSE - SUB OUT - + Connect to antenna, Please see the next page. Right Subwoofer 10 Left ADJUSTING THE ANTENNA Adjusting the antenna As it applies to all other radios, the sound quality depends on the signal strength of the antenna inputs. The position of the radio in relation to the transmitter thus directly influences the quality of the signal received. For an optimal result it is therefore very important that you make sure that the radio receives the best possible antenna signal. It is possible to see a bar in the display which will indicate the strength of the antenna signal. If you wish to have such a bar displayed, you must press the INFO button when you have tuned in to a station on DAB. The signal strength is displayed through the length of the bar. The longer the bar, the stronger the signal. The connected antenna must be adjusted for the best possible result by means of the signal bar described above. For an optimal result it is recommended to install a DAB antenna and a FM antenna on the roof or on the loft. 11 2 Press the power button ( 1 ) on the front panel to turn on / off the unit ; Press the standby button ( 2 ) on the remote control to switch into standby mode . The display will turn off and all functions will be reduced to a minimum to make sure that the unit uses minimal power . When in standby mode , the unit reacts only to INPUT buttons on the remote control ( 3 ). 3 HRE75B - VOLUME + INFO ENTER BROWSE SAVE 1 Press the Power button on the remote control into Standby mode ; you must press the input button to activate this unit . Press DAB / FM to listen to the radio , press CD to choose CD player input , and DVD , Phono and AUX if units have been connected to these inputs . If you do not know which input has been selected, the LCD display will clearly indicate it. Note: AII inputs are analogue stereo inputs. It means that you cannot connect a digital sound source through a digital cable HRE75B - VOLUME + INFO ENTER BROWSE SAVE Press the Phono, DVD, CD, AUX or DAB/FM button on the front panel to choose the corresponding input source when the unit is in ON mode. 12 The VIETA HRE75B features a "function menu" that allows adjustment of the following when accessed via the remote: Bass, treble, and balance (see menu structure below). A description of the individual functions will follow on the next few pages. 1.Press the VOL+button on remote control to increase volume and press VOL- to reduce volume. 2.Turn the volume control on the front panel to the right to increase the volume and turn the volume control to the left to reduce the volume. Note: The volume control on the front panel can be turned both clockwise and anticlockwise to change the volume, volume control includes 64 steps, from level 0 for minimum volume and up to maximum volume. 1 If you have a distorted signal you must turn down the volume to avoid damaging the unit and the connected loudspeakers. 2 - VOLUME + ENTER 13 This amplifier features bass control that allows adjustment of the bass level by +/- 14dB, from 45Hz to 260Hz. Please note that the high bass boost level offered by the bass control may lead to permanent damage to your loudspeakers if the high volume is used for longer periods. - VOLUME + ENTER BROWSE 1.Press the FUNCTION button on the remote control to enter the function menu. Keep pressing the FUNCTION button on the remote until the display on the amplifier shows BASS 2.Press VOL+ and VOL- to adjust the bass level. 3.Press the Bass button on the front panel and then turn the volume knob to the right to increase the bass level and to the left to reduce the bass level. Note: If the bass control is not operated within five seconds, the display will return to the volume information display This amplifier features treble control that allows adjustment of the treble level by +/-14 dB, from 2KHz to 20KHz. Please note that the high treble boost level offered by the treble control may lead to permanent damage to your loudspeakers if the high volume is used for prolonged periods. - VOLUME + ENTER BROWSE 1.Press the FUNCTION button on the remote control to enter the function menu. Keep pressing the FUNCTION button on the remote until the display on the amplifier shows TREBLE 2.Press VOL+ and VOL- to adjust the bass level. 3.Press the Treble button on the front panel and then turn the volume knob to the right to increase the treble level and to the left to reduce the treble level. Note: If the treble control is not operated within five seconds, the display will return to the volume information display. 14 This function is used to compensate for a non-centred listening position, and makes it possible to adjust the stereo perspective. - VOLUME + ENTER BROWSE 1 . Press the FUNCTION button on the remote until information on balance control is displayed. 2. Turn the +/- buttons (2) on the remote control or the volume button (2) on the front panel to adjust the balance. The balance is divided in 14 steps right and left. Note » If the balance control is not operated within five seconds, the display will return to the volume information display 1 2 INFO (Information) 1 As this tuner can receive both normal FM radio and DAB (Digital Audio Broadcasting), it features a function that can switch between the two reception types. To switch between DAB and FM, you must either press the DAB/FM button on the front panel or the DAB/FM button on the remote control. INFO ENTER 2 This tuner features RDS on the FM receiver. DAB also offers some information possibilities that resemble RDS as we know it from FM. To activate this information from both DAB and FM, you must press the INFO button either on the front panel or on the remote control. The display will show information about for instance time and date, name of station, name of artist, title, etc. BROWSE SAVE 2 1 Note: If the INFO button is pressed in DAB mode after channels have been saved, the strength of the antenna signal will also be displayed. 15 OPERATION AND FUNCTIONS DAB tuning When the unit is turned on for the first time, all settings will be default settings. The settings can be changed according to your preference. When the unit is turned off the next time, these settings will automatically be saved as the new default settings. This also applies if you unplug the unit. 1 INFO When the unit has been turned on in DAB mode, channels can be searched. This is done by means of the AUTOTUNE function. BROWSE SAVE 1. Press the AUTOTUNE button on the frontpanel (1) or on the remote control (2) once to perform a Quick Scan search for stations or press 2-3 seconds for a Full Scan search. 2 The message FULL SCAN or QUICK SCAN will be shown on the display, and you will see a bar on the display that grows longer indicating how far the tuning process has come. If no channels are found, you must check if the antenna has been correctly connected and adjusted. Note: In order to tune on the L band manual tuning must be selected. Press the INFO button for two seconds, until the message Manual tune appears, and then press ENTER. Use the TUNING-/+ buttons on the front panel or UP and DOWN buttons on the remote to tune. When a frequency white signal is reached the tuner will start to play. 16 Full scan 12c OPERATION AND FUNCTIONS Saving and selecting channels 1. When you have found the station and want to save a channel under one of the presets you must press the button with the desired number 1-10 on the remote control for 2 seconds. When the channel has been saved and you wish to listen to that channel then press the button again that you saved the channel under. The procedure is the same for both FM and DAB. 1 2 2. DAB channels that has not been saved to preset can be selected by pressing UP or DOWN buttons on the remote control, or by pressing the TUNING +/- buttons on the front panel and press ENTER to select. Note: In DAB mode press ENTER button on remote or front panel for 2-3 seconds then select AUTO ENTER ON or OFF. If AUTO ENTER ON is selected you don’t have to press ENTER to select the DAB station. If AUTO ENTER OFF is selected you need to press ENTER to select the DAB station. INFO BROWSE SAVE 1 17 2 OPERATION AND FUNCTIONS FM tuning The VIETA HRE75B offers both manual and automatic tuning on the FM band. This makes it possible to save just one specific channel. It also makes it possible to adjust the supplied antenna for the best possible signal. 1 Automatic tuning INFO 1 To use the autotune function through the front panel controls, you must press the AUTOTUNE button. The unit will search for a higher frequency with a proper signal. Press and hold the AUTOTUNE button for two seconds, and the unit will search for a lower frequency with a proper signal. 2 You can also activate the autotune function through the remote control. BROWSE SAVE On the display you can see that the frequency increases or decreases. When the tuner has found a channel, the tuning process will automatically stop, and the sound from the channel found will be heard. 2 If no channels are found, you must check if the antenna has been correctly connected and adjusted. Manual tuning To activate the manual tuning function press the TUNING +/on the front panel or UP or DOWN buttons on the remote control. If you wish to save the found station to preset then please press the desired preset number 1-10 on the remote control for 2-3 seconds. 1 Note: If you want to listen to stations from the FM band that have not been preset you must tune them again either manually or Automatically. 2 Reset 1 This tuner can be reset. This is used to delete channel stored in the unit. Press and hold the INFO button for two seconds. Press the INFO button once again until the display shows the message SYSTEM RESET, and the press Enter. All stored channels has now been removed from the unit. 18 INFO ENTER BROWSE SAVE TROUBLESHOOTING Troubleshooting PROBLEM CAUSE/ REMEDY No power when the amplifier is turned on. -Switch on the electric current at the socket. -Check that the plug has been correctly inserted into the socket. -The internal fuse has blown and must be replaced by a qualified service technician. -The power cord has been damaged and must be replaced No sound. -The amplifier has not been turned on. -The volume control is set at a minimum (see page 13). -The speaker cables have not been correctly connected. -A wrong input source has been selected. -No input source has been connected There is sound in one channel only. -The balance control is not correctly adjusted (see page 15). -The audio input cables have been incorrectly connected or damaged. -The input source is defective. -The speaker cables have been incorrectly connected or damaged. -The speakers are defective. High buzzing. -The audio input cables have been incorrectly connected or damaged. -The ground cable for the record player has not been connected. -The record player pick-up is defective. Weak bass and poor stereo perspective -The speaker connection is out of phase. Check that the positive and negative poles have been correctly connected, both at the back of the amplifier and at the back of the speaker Distortion of sound -Some of the conductor wires of the speaker cable are in contact with each other which causes distortion. -Bass and treble controls are set too high in relation to speaker specifications. -The volume is set too high. The LCD display does not display any information -The amplifier is defective and should be serviced by a qualified technician. ERROR is displayed on the LCD display -The amplifier is defective and should be serviced by a qualified technician. The unit does not switch between input modes -The amplifier is defective and should be serviced by a qualified technician. The display does not show DAB information. -The VIETA HRE75B has not found any stations on DAB. -The selected station does not broadcast any information. - The antenna signal is too poor. See the section on adjusting the antenna. I can hear tick/blob sounds at some of the stations. - Like all other digital media DAB is reproduced in a very high sound quality. But if the antenna signal is too weak, you will not hear any whistling but instead you will hear blackouts or "tick/blob" sounds. You must therefore check if the antenna signal is strong enough. See the section on adjusting the antenna. 19 RF section: Tuner bands DAB FM Band III, Band L and DAB+ 87.5-108.0MHz -96dBm type Sensitivity Display: 1 line of 16 characters LED backlight Presets 10 Audio outputs Stereo, 2.5Vpp 48kHz sample rate 16 bit sample resolution 20 HRE75 Benutzerhandbuch HIFI EMPFÄNGER Bitte lesen Sie die Bedienungsanleitung vor der ersten Benutzung des Produktes, und heben Sie sie für zukünftige Fragen gut auf. GARANTIEBEDINGUNGEN VIETA AUDIO S.S. gibt auf seine Produkte eine Garantie von 24 Monaten. Die Garantiezeit beginnt am Datum des Kaufs des vollkommen neuen und nichtbenutzten Produktes durch den ersten Endverbraucher. Diese Garantie deckt mögliche Fabrikationsfehler für alle von Vieta auf dem spanischen Territorium durch zugelassene Händler verkauften Produkte ab. Die in anderen Ländern gekauften Vieta-Produkte werden durch die vom lokalen Händler angebotene Garantie abgedeckt. Diese Garantie ist nur gültig, wenn die Rechnung des Kaufs vorgelegt wird, auf der der Name des Kunden, der Verkäufer und das Datum, an dem der Kauf dieses Produktes abgewickelt wurde, erscheint. VIETA AUDIO S.A. akzeptiert während der Garantiezeit die Reparatur jener Produkte, die bei normaler Benutzung, wie in der Bedienungsanleitung angegeben, Anomalien aufweisen, vorausgesetzt die Produkte werden für Zwecke genutzt, für die sie entwickelt wurden. Wenn ein Austausch von Teilen oder ein Ersatz für das Produkt vorgenommen wird, verlängert sich die Garantiezeit nicht. FÄLLE, DIE NICHT IN DER GARANTIE EINGESCHLOSSEN SIND: 1. Wenn die Garantiezeit die vorgesehene Zeit überschreitet. 2. Wenn das Produkt Änderungen aufweist, die von nicht von der VIETA AUDIO S.S. autorisierten Händlern oder Personen vorgenommen wurden. 3. Wenn das Produkt Schäden aufweist, die durch falsche Behandlung oder unsachgemäße oder nicht bestimmungsgemäße Benutzung entstanden sind und die nicht in der Betriebsanleitung vorgesehen sind. Ebenso Bruch von Teilen, Kratzer, Risse, Verschleiß von Teilen durch die Benutzung, Schäden durch Farbreste, Sand, Wasser oder Essensreste im Gerät. 4. Diese Garantie steht nicht für die entstandenen Transportkosten ein. 5. Verluste, Raub oder Unfälle durch Feuer, Flüssigkeiten, chemische Produkte, überhöhte Temperatur, unzureichende Belüftung, Vandalismus, Überschwemmungen, Blitzschlag, Überspannung oder falsche Spannung, Blitze, Erdbeben, Stöße, andere äußere Einwirkungen, Strahlungen. 6. Jegliche Kosten für Ein- oder Ausbau des Produktes. 7. Produkte, die außerhalb Spaniens oder bei nicht autorisierten Händlern gekauft wurden. 8. Die in unseren Produkten enthaltenen Daten (Archivfotos, Musik, digitale Medien, usw.) werden in keinem Fall von der Garantie abgedeckt. Es liegt in der Verantwortung des Kunden, Sicherungskopien vor der Übergabe des Produktes anzufertigen. Ebenso wenig eine unsachgemäße Konfiguration oder Installation der Software bzw. Inkompatibilitäten mit der Hardware anderer Geräte, einschließlich Treiber u.ä. 9. Wartung, Reparatur oder Ersatz von Teilen aufgrund von Benutzung und Verschleiß. 10. Wieder aufladbare Batterien oder auch Wegwerfbatterien (die Lebensdauer hängt von der Häufigkeit der Benutzung ab). 11. Kleinere Fehler oder Veränderungen der Qualität des Produktes, die den Wert bzw. den Zwecke, für den es geschaffen wurde, nicht beeinflussen. 12. Fahrlässigkeit. 13. Zubehörteile: Etuis und Teile der Stecker. Verbindungskabel. Diademe. Kits für die Kopfhörerstecker, Bezüge für die Ohrstecker. Dekorationen. 14. Jeder Schaden, der bei Erhalt der Ware entdeckt wird, muss dem Kundendienst unter der Telefonnummer +34 902.367.607 oder per E-Mail an [email protected] gemeldet werden. In Übereinstimmung mit dem Artikel 366 des Handelsgesetzes wird VIETA AUDIO S.A. keine Reklamationen bezüglich Bruch, Stoß oder Fehlen von Frachtstücken annehmen, die mehr als 24 Stunden nach Erhalt der Ware aufgetreten sind. KUNDENDIENST / Tel.: + 34 902 367 607 / Fax: 93 574 26 83 / www.vieta.es INHALTSVERZEICHNIS SICHERHEITSMASSNAHMEN 4 WICHTIGE HINWEISE 5 STROMANSCHLUSS 6 FERNBEDIENUNG INSTALLATION 7 FUNKTIONEN DER FERNBEDIENUNG 8 FRONTPANEEL UND ANSCHLÜSSE ANSCHLUSS 11 EINSTELLEN DER ANTENNE 12 BETRIEB UND FUNKTIONEN 13 - 18 FEHLERSUCHE 19 TECHNISCHE DATEN 20 9 - 10 SICHERHEITSMASSNAHMEN Ein Dreieck mit einem Blitz-Symbol weist den Benutzer auf “gefährliche Spannung” ohne Isolierung im Gehäuse hin, die hoch genug sein kann, um einen elektrischen Schlag verursachen zu können. Ein Dreieck mit einem Ausrufezeichen weist den Benutzer auf wichtige Anweisungen zu Verwendung und Wartung in der beiliegenden Anleitung hin, die sorgsam durchgelesen werden sollten. Ein Symbol für KLASSE II (doppelte Isolierung) WARNUNG: UM DIE GEFAHR VON FEUER ODER STROMSCHLAG ZU VERRINGERN, DARF DAS GERÄT WEDER REGEN NOCH FEUCHTIGKEIT AUSGESETZT WERDEN. NICHT DAS GEHÄUSE ÖFFNEN -- GEFӒHRLICHE SPANNUNG. Nur qualifizierte Techniker dürfen Reparatur und Service durchführen. VORSICHT: wenn der Stecker des Netzkabels ersetzt werden muss, ist es wichtig, dass der Ersatz identisch mit dem zu ersetzenden Stecker ist, oder dass der neue Stecker vom Hersteller empfohlen wurde. UM EINEN STROMSCHLAG ZU VERHINDERN IST ES WICHTIG, DEN STECKER RICHTIG IN DIE BUCHSE ZU STECKEN. 4 HIFI EMPFÄNGER WICHTIGE HINWEISE Bedienungsanweisung Kondensation - Die Ober-und Rückseite des Geräts kann nach längerem Gebrauch warm werden. Dies geschieht nicht aufgrund eines Defektes. Kondensation kann in den folgenden Fällen auftreten: - Schalten Sie die Stromversorgung aus, wenn das Gerät nicht benutzt wird. - Wenn das Gerät in einem Raum eingesetzt wird, wo die Heizkörper gerade eingeschaltet sind, oder an einem Ort, wo die kalte Luft der Klimaanlage auf das Stromkabel schützen Gerät gerichtet ist. - Befolgen Sie die Anweisungen unten, um Betriebsstörungen, elektrische Schläge, Feuer oder Verletzungen zu verhindern: - Halten Sie den Stecker fest, wenn Sie ihn in die Steckdose stecken. - Vermeiden Sie Hitze-produzierende Geräte. - Legen Sie keine Gegenstände auf das Netzkabel. - Führen Sie keine Wartungsarbeiten oder Ӓnderungen am Netzkabel durch. Positionierung - Wenn das Gerät direkt von einem kalten in einen warmen Ort gebracht wird. - Wenn das Gerät im Sommer in einer warmen und feuchten Raum benutzt wird, nachdem es aus einem klimatisierten Raum entfernt wurde. - Wenn es Dampf oder eine hohe Luftfeuchtigkeit im Raum gibt. Bei Kondensation wird das Gerät nicht richtig funktionieren. - Schalten Sie das Gerät aus. Ziehen Sie den Stecker aus der Steckdose und lassen Sie das Gerät für 2-3 Stunden ruhen. Das Gerät hat sich dann angepasst an die Umgebung und jegliche Kondensation wird verschwunden sein. Positionieren Sie das Gerät nicht in einem der folgenden Plätze: - in Sonnenlicht, Wärme erzeugenden Geräten oder in einem geschlossenen Rack. - an Orten mit hohen Temperaturen (40 Grad Celsius oder mehr) oder hoher Luftfeuchtigkeit (90% oder mehr). - an schmutzigen Orten, da einige der Innenteile beschädigt werden können. Stecken Sie nicht Ihre Finger oder andere Gegenstände in das Gerät - Das Berühren der Innenteile ist gefährlich und kann Verletzungen oder Schäden verursachen. Öffnen Sie nicht das Gehäuse. - Legen Sie keine Fremdkörper in das Gerät. Störungen Wenn Sie das Gerät in die Nähe eines Fernsehers, Radios oder Video-Player stellen, kann dies die Bildund Tonqualität beeinträchtigen. In diesem Fall positionieren Sie das Gerät weiter entfernt vom Fernseher, Radio oder Video-Player. 5 STROMANSCHLUSS Nicht das Gerät einzuschalten, bevor alle Verbindungen korrekt hergestellt wurden. Prüfen Sie, ob alle Anschlüsse ordnungsgemäß vor dem Einschalten hergestellt wurden. Überprüfen Sie, ob die Netzspannung 220-240V AC50Hz ist, bevor Sie das Gerät einschalten. Stromanschluss Überprüfen Sie, dass alle anderen Anschlüsse korrekt sind, bevor Sie den Netzstecker in die Steckdose stecken. Stecken Sie den Stecker dann in eine geeignete Steckdose. Wird das Gerät im Ausland verwendet, brauchen Sie möglicherweise einen Adapter. 6 HIFI EMPFÄNGER FERNBEDIENUNG INSTALLATION Einlegen der Batterien 1. Abdeckung wie dargestellt entfernen. 3. Abdeckung aufsetzen. 2. Zwei Batterien Typ AAA/R03/UM4 in das Batteriefach einlegen. Stellen Sie sicher, dass die Batterien richtig herum eingelegt sind (siehe Zeichnung am Ende). - Alte und neue Batterien, sowie verschiedene Batterietypen, nicht miteinander mischen. - Wenn die Fernbedienung über einen langen Zeitraum nicht benutzt wird, entfernen Sie die Batterien aus dem Batteriefach, um Korrosion zu vermeiden. Benutzung der Fernbedienung Richten Sie die Fernbedienung auf den Sensor an der Vorderseite des Gerӓts. Wird das Signal der Fernbedienung empfangen, so reagiert das Gerӓt entsprechend. Die Fernbedienung funktioniert bei einer Reichweite bis zu 6 Metern. - Bei starkem Licht ist die Funktionsfӓhigkeit der Fernbedienung einsgeschrӓnkt. Sollte dies ein Problem darstellen, positionieren Sie das Gerӓt um. - Störungen kӧnnen auftreten, wenn andere Fernbedienungen in der Nähe des Geräts verwendet werden. - Legen Sie keine Gegenstände auf die Fernbedienung, da die Batterien leer werden können, wenn eine Taste ständig gedrückt wird. - Vergewissern Sie sich, dass sich keine Hindernisse zwischen Fernbedienung und Gerät befinden. - Stellen Sie das Gerät nicht hinter getöntes Glas, da es die maximale Reichweite der Fernbedienung reduzieren kann. 7 FUNKTIONEN DER FERNBEDIENUNG Funktionen der Fernbedienung Diese Fernbedienung kann für den VIETA HRE75B DAB/FM Receiver benutzt werden. Einige Funktionen des Geräts können nur mit mit Hilfe der Fernbedienung aktiviert werden. Einige Funktionen sind mit der gewählten Eingangsquelle verbunden. Einige Tasten können deshalb nicht verfügbar sein, wenn das entsprechende Eingangssignal nicht angewählt wurde. 1. Einschalten: Bringen Sie das HRE75B auf Standby. 2. Auswerfen: Öffnen und Schließen des Disk-Faches am HCD30B. 3. Zifferntasten (0,1,2 ... 9 -+10): a. Wählt gespeicherte Sender auf dem HRE75B an. Drücken Sie eine Zifferntaste länger als 2 Sekun den, dann wird der Sender unter der betreffenden Nummer auf dem HRE75B gespeichert. c. Wählt Spuren auf dem VIETA HCD30B an. 4. UP: Sucht die Frequenz im FM-Modus auf dem HRE75B nach oben. 5. PREV: Sucht abwärts nach DAB-Stationen auf dem HRE75B. 6. NEXT: Sucht aufwärts nach DAB-Stationen auf dem HRE75B. 7. AUTOTUNE: im DAB-Modus drücken Sie einmal, um eine Sender-Schnellsuche zu starten, drücken Sie 2-3 Sekunden, um eine vollständige Suche nach Stationen zu starten. Im FM-Modus drücken Sie einmal, um eine automatische Sendersuche zu starten; wenn ein Sender gefunden wurde, speichern Sie den Sender oder drücken Sie AUTOTUNE noch einmal, um die Sendersuche fort zuführen. 8. DOWN: Sucht abwärts auf der Frequenz im FM- Modus auf dem HRE75B. 9. ENTER: Drücken Sie Enter, um Mono/Auto (Stereo) im FM-Modus auszuwählen, oder wählen Sie Auto Enter on/off im DAB-Modus. 10. INFO: Zeigt RDS- und DAB-Informationen auf dem HRE75 B an. 11. CD: Aktiviert den HRE75B und wählt den CD-Eingang an. 12. AUX: Aktiviert den HRE75B und wählt den AUX- Eingang an. 13. DAB/FM: Aktiviert und wählt DAB/FM-Modus auf dem HRE75B an. 14. DVD: Aktiviert 15. PHONO: Aktiviert HRE75B und wählt den PHONO- Eingang an. 16. MUTE: Stellt den Ton am HRE75B ab. 17. FUNCTION: Zugang zum Menü auf dem HRE75B, wo es möglich ist, Bässe, Höhen und Balance einzustellen. 18. VOLUME +: Steigert die Lautstärke. 19. VOLUME -: Verringert die Lautstärke. Einige Funktionen des Geräts können nur mit mit Hilfe der Fernbedienung aktiviert werden. Einige Funktionen sind mit der ausgewählten Eingangssignalquelle verbinden. Einige Tasten auf der Fernbedienung können deshalb nicht verfügbar sein, wenn das entsprechende Eingangssignal nicht angewählt wurde. 8 HIFI EMPFÄNGER FRONTPANEEL UND ANSCHLÜSSE Frontpaneel (Vorderseite des Geräts) 1.POWER: Schalten Sie das Gerät an oder aus; 2.LED: Leuchtet blau, wenn das Gerät in den Standby-Modus geht; kein Licht, wenn sich das Gerät normal arbeitet. 3.PHONO: Um die Phono-Quelle zu aktivieren. 4.DVD: Um die Quelle DVD zu aktivieren. 5.CD: Um die CD-Quelle zu aktivieren. 6.AUX: Um die Phono-Quelle zu aktivieren. 7.FM/DAB: Um die FM/DAB-Quelle zu aktivieren. 8. AUTOTUNE: Im DAB-Modus drücken Sie einmal, um den Schnellsuchlauf zu starten, drücken Sie 2-3 Sekunden, um eine vollständige Suche nach Sendern zu starten. Im FM-Modus drücken Sie einmal, um die automatische Sendersuche zu starten; wenn der Sender gefunden wurde, speichern Sie ihn oder drücken Sie AUTOTUNE noch einmal, um den Sendersuchlauf fortzuführen. 9. INFO: Zeigt RDS- und DAB-Informationen des Tuners; 10 ENTER Drücken Sie, um im FM-Modus MOno/Auto (Stereo) oder Auto Enter an/aus im DAB-Modus zu wählen. 11.TREBLE: Drücken Sie die Taste und drehen Sie den Lautstärkeknopf +/-, um den Treble-Wert einzustellen. 12.BASS: Drücken Sie die Taste und drehen Sie den Lautstärkeknopf +/-, um den Bass-Wert einzustellen. 13.BROWSE: Drücken Sie, um die nächsten freien Voreinstellungen zu zeigen, wenn Sie Sender speichern. 14.SAVE: Im Sender sowohl im DAB- als auch im FM-Modus zu speichern, drücken Sie SAVE und das Display zeigt PRESET 01 FREE, drücken Sie dann BROWSE, um die gewünschte Nummer für die Voreinstellung zu wählen (das Display zeigt z.B. PRESET 05 FREE) und drücken Sie SAVE, um den Sender zu speichern. 15.TUNING - : Suche abwärts in der Frequenz (FM-Modus), Auswahl des nächsten Senders im DAB-Modus. 16.TUNING + : Suche aufwärts in der Frequenz (FM-Modus), Auswahl des letzten Senders im DAB-Modus. 17. VOLUME: Drehen Sie, um die Lautstärke einzustellen und um das Niveau für BASS, TREBLE und BALANCE mit den Kontrollen einzustellen. 18. HEADPHONE: 6mm Stecker, Kopfhörer 9 FRONTPANEEL UND ANSCHLÜSSE Anschlüsse 1.FM Antenna: Für den Anschluss einer FM-Antenne. 2.DAB Antenna: Für den Anschluss einer DAB-Antenne. 3.Line out: Stereo Ausgang (Leitungssignal) 4.AUX: Für den Anschluss optionaler Geräte. 5.CD: Für den Anschluss eines CD-Players. 6.DVD: Für den Anschluss eines DVD-Players (Bem.: Analoger Stereo-Eingang) 7. Phono: Für den Anschluss eines Plattenspielers. (Bem.: zusätzlicher Erdungskontakt verfügbar). 8.SUB OUT: Für den Subwoofer-Ausgang. 9.AUX IN: Für den Anschluss eines 3,5 mm Steckers. 10. Lautsprecher links und rechts: Für den Anschluss der Lautsprecher. Bem.: - die Lautsprecher-Impedanz muss zwischen 4 und 8 Ohm liegen. - Für eine optimale Tonqualität muss die Verbindung zwischen den Lautsprecher- Anschlüssen und den Anschlüssen des Verstärkers sauber sein. - Die Kabelenden dürfen nicht ausgefranst sein, um zu vermeiden, dass sie Kontakt untereinander oder mit der Rückseite bekommen. 11. AC Eingang: Für den Anschluss der Stromversorgung. Stellen Sie sicher, dass der Stecker korrekt eingesteckt ist und dass die Spannung der auf der Rückseite des Gerätes aufgedruckten Spannung entspricht. 10 HIFI EMPFÄNGER ANSCHLUSS Layout der Audio-Anschlüsse Mit der Antenne verbinden. Siehe nächste Seite. Speakers Mp3 Player Rechts Links Plattenspieler DVD Player CD Player Subwoofer 11 EINSTELLEN DER ANTENNE Einstellen der Antenne Wie bei allen anderen Radios hängt die Tonqualität von der Signalstärke des Antenneneingangs ab. Die Position des Radios im Verhältnis zum Sender beeinflusst direkt die Qualität des erhaltenen Signals. Für optimale Ergebnisse ist es sehr wichtig, dass Sie sicherstellen, dass das Radio das bestmögliche Antennensignal empfängt. Es ist möglich, dass im Display ein Balken zu sehen ist, der die Stärke des Antennensignals anzeigt. Wenn Sie möchten, dass dieser Balken angezeigt wird, müssen Sie die Taste INFO drücken, wenn Sie einen Sender auf DAB eingestellt haben. Die Signalstärke wird durch die Länge des Balkens angezeigt. Je länger der Balken, umso stärker das Signal. Die angeschlossene Antenne muss auf das bestmögliche Ergebnis eingestellt werden, und zwar mit Hilfe des oben beschriebenen Signalbalkens. Für ein optimales Ergebnis wird empfohlen, eine DAB- und eine FM-Antenne auf dem Dach oder dem Dachboden zu installieren. 12 HIFI EMPFÄNGER BETRIEB UND FUNKTIONEN An, Aus und Standby Drücken Sie die Taste POWER (1) auf der Vorderseite, um das Gerät an- oder auszuschalten. Drücken Sie die Taste Standby (2) auf der Fernbedienung, um in den Standby-Modus zu gelangen. Das Display schaltet sich aus und alle Funktionen werden auf ein Minimum reduziert, um sicherzustellen, dass das Gerät nur minimale Energie verbraucht. Wenn sich das Gerät im Standby-Modus befindet, reagiert das Gerät nur auf die INPUT-Tasten auf der Fernbedienung (3). Auswahl der Eingangsquelle Drücken Sie die Power-Taste auf der Fernbedienung bis zum Standby-Modus; Sie müssen die Taste Input drücken, um das Gerät zu aktivieren. Drücken Sie DAB/FM, um Radio zu hören; CD, um den Eingang des CD-Players auszuwählen, und DVD, Phono und AUX, wenn solche Geräte an diesen Eingängen angeschlossen sind. Wenn Sie nicht wissen, welcher Eingang angewählt wurde, wird das LCD-Display dieses klar anzeigen. Bem.: Alle Eingänge sind analoge Stereo-Eingänge. Das bedeutet, dass Sie keine digitale Tonquelle über ein digitales Kabel anschließen können. Drücken Sie die Taste Phono, DVD, CD, AUX oder DAB/FM auf der Vorderseite, um den entsprechenden Eingang zu wählen, wenn das Gerät an ist. 13 BETRIEB UND FUNKTIONEN Benutzung des Funktionsmenüs Der VIETA HRE75B verfügt über eine “Funktionsmenü”, dass die Einstellung der folgenden Dinge erlaubt, wenn sie über die Fernbedienung angesteuert werden: Bass, Treble und Balance (siehe Menüstruktur unten). Eine Beschreibung der individuellen Funktionen folgt auf den nächsten Seiten. Lautstärkesteuerung 1. Drücken Sie die Taste VOL + auf der Fernbedienung, um die Lautstärke zu erhöhen und drücken Sie VOL -, um die Lautstärke zu reduzieren. 2. Drehen Sie die Volumenkontrolle auf der Vorderseite nach rechts, um die Lautstärke zu erhöhen und drehen Sie die Volumenkontrolle nach links, um die Lautstärke zu reduzieren. Bem.: Die Lautstärkesteuerung auf der Vorderseite kann sowohl im Uhrzeigersinn als auch gegen ihn gedreht werden, um die Lautstärke zu verändern. Die Lautstärkesteuerung hat 64 Stufen, von Null für eine minimale Lautstärke bis hin zur maximalen Lautstärke. Wenn Sie ein gestörtes Signal empfangen, müssen Sie die Lautstärke zurückdrehen, um Schäden am Gerät und an den angeschlossenen Lautsprechern zu vermeiden. 14 HIFI EMPFÄNGER Bass-Steuerung Dieser Verstärker verfügt über eine Bass-Steuerung, die das Einstellen des Bass-Niveaus um jeweils +/14dB ermöglicht, und zwar zwischen 45Hz und 260Hz. Bitte beachten Sie, dass das angebotene, hohe Bass-Boost-Niveau zu bleibenden Schäden an Ihren Lautsprechern führen kann, wenn dieses hohe Niveau für längere Zeit aufrecht erhalten wird. 1. Drücken Sie die Taste FUNCTION auf der Fernbedienung, um zum Funktionsmenü zu gelangen. Drücken Sie weiterhin die Taste FUNCTION, bis das Display auf dem Verstärker BASS anzeigt 2. Drücken Sie VOL + und VOL -, um das Bass-Niveau einzustellen. 3. Drücken Sie die Taste Bass auf der Vorderseite und drehen Sie dass den Lautstärkeknopf nach rechts, um das Bass-Niveau zu erhöhen, bzw. nach links, um den Bass zu verringern. Bem.: Wenn die Bass-Steuerung über 5 Sekunden nicht betätigt wird, kehrt das Display zur Anzeige der Lautstärkeinformationen zurück. Treble-Steuerung Dieser Verstärker verfügt über eine Treble-Steuerung, die das Einstellen des Treble-Niveaus um jeweils +/14dB ermöglicht, und zwar zwischen 2KHz und 20KHz. Bitte beachten Sie, dass das angebotene, hohe TrebleNiveau zu bleibenden Schäden an Ihren Lautsprechern führen kann, wenn dieses hohe Niveau für längere Zeit aufrecht erhalten wird. 1. Drücken Sie die Taste FUNCTION auf der Fernbedienung, um zum Funktionsmenü zu gelangen. Drücken Sie weiterhin die Taste FUNCTION, bis das Display auf dem Verstärker TREBLE anzeigt. 2. Drücken Sie VOL + und VOL -, um das Treble-Niveau einzustellen. 3. Drücken Sie die Taste Treble auf der Vorderseite und drehen Sie dass den Lautstärkeknopf nach rechts, um das Treble-Niveau zu erhöhen, bzw. nach links, um den Treble zu verringern. Bem.: Wenn die Treble-Steuerung über 5 Sekunden nicht betätigt wird, kehrt das Display zur Anzeige der Lautstärkeinformationen zurück. 15 BETRIEB UND FUNKTIONEN Balance-Steuerung Diese Funktion dient dazu, eine nicht zentrierte Hörerposition auszugleichen und ermöglicht es, die Stereo-Wirkung einzustellen. 1. Drücken Sie die Taste FUNCTION auf der Fernbedienung, bis die Information zur BalanceSteuerung angezeigt wird. 2. Drehen Sie die Tasten +/- (2) auf der Fernbedienung oder die Lautstärketaste (2) auf der Vorderseite, um die Balance einzustellen. Die Balance ist unterteilt in 14 Stufen nach links und rechts. Bem.: Wenn die Balance-Steuerung über 5 Sekunden nicht betätigt wird, kehrt das Display zur Anzeige der Lautstärkeinformationen zurück. INFO (Information) 1. Da dieser Verstärker sowohl normales FM-Radio als auch DAB (Digital Audio Broadcasting) empfangen kann, verfügt er über eine Funktion, die zwischen den beiden Empfangstypen hin- und herschaltet. Um zwischen DAB und FM umzuschalten, müssen Sie entweder die Taste DAB/FM auf der Vorderseite oder die Taste DAB/FM auf der Fernbedienung drücken. 2. Dieser Verstärker verfügt über RDS auf dem FMEmpfänger. DAB bietet auch einige Informationsmöglichkeiten, die RDS ähneln, wie wir es vom FM-Band kennen. Um diese Informationen sowohl bei DAB als auch bei FM zu aktivieren, müssen Sie die Taste INFO entweder auf der Vorderseite oder auf der Fernbedienung drücken. Das Display zeigt Informationen über z.B. Uhrzeit und Datum, Name des Senders, Name des Künstlers, Titel, usw. Bem.: Wenn die Taste INFO im DAB-Modus gedrückt wird, nachdem Kanäle eingespeichert wurden, dann wird auch die Stärke des Antennensignals angezeigt. 16 HIFI EMPFÄNGER Speichern und Auswählen von Kanälen 1. Wenn Sie die Station gefunden haben und einen Kanal unter einer der Voreinstellungen speichern möchten, müssen Sie die Taste mit der gewünschten Nummer 1-10 auf der Fernbedienung für zwei Sekunden drücken. Wenn der Kanal gespeichert wurde und Sie diesen Kanal hören möchten, drücken Sie die Taste, unter der der Kanal abgespeichert wurde, noch einmal. Das Verfahren ist für DAB und FM gleich. 2. DAB-Kanäle, die nicht unter einer Voreinstellung gespeichert wurden, können angewählt werden, indem die Tasten UP oder DOWN auf der Fernbedienung gedrückt werden, oder aber durch Drücken der Tasten TUNING +/- auf der Vorderseite des Geräts und durch Drücken von ENTER zur Auswahlbestätigung. Bem.: Im DAB-Modus drücken Sie die Taste ENTER auf der Fernbedienung oder der Vorderseite für 2-3 Sekunden, wählen Sie dann AUTO ENTER ON oder OFF. Wenn AUTO ENTER ON gewählt wurde, müssen Sie ENTER nicht drücken, um die DAB-Station anzuwählen. Wenn AUTO ENTER OFF gewählt wurde, müssen Sie ENTER drücken, um die DAB-Station anzuwählen. 17 BETRIEB UND FUNKTIONEN FM-Tuning Der VIETA HRE75B bietet sowohl manuelles als auch automatisches Tuning auf dem FM-Band. Das macht es möglich, einen bestimmten Kanal zu speichern. Es ermöglicht auch, die mitgelieferte Antenne auf das bestmögliche Signal einzustellen. Automatisches Tuning 1. Um die Funktion Autotune über die Vorderseite des Geräts zu benutzen, müssen Sie auf die Taste AUTOTUNE drücken. Das Gerät wird nach einer höheren Frequenz mit einem sauberen Signal suchen. Drücken und halten Sie die Taste AUTOTUNE für zwei Sekunden und das Gerät wird nach einer niedrigeren Frequenz mit einem sauberen Signal suchen. 2. Sie können auch die Funktion Autotune über die Fernbedienung aktivieren. Auf dem Display können Sie sehen, dass die Frequenz höher oder niedriger wird. Wenn der Verstärker einen Kanal gefunden hat, dann stoppt der Vorgang automatisch und man kann den Ton des Kanals hören, der gefunden wurde. Wenn keine Kanäle gefunden werden, müssen Sie prüfen, of die Antenne korrekt angeschlossen und eingestellt wurde. Manuelles Tuning Im die Funktion Manuelles Tuning zu aktivieren, drücken Sie die Tasten TUNING +/- auf der Vorderseite des Geräts oder die Tasten UP oder DOWN auf der Fernbedienung. Wenn Sie den gefundenen Sender in den Voreinstellungen speichern möchten, drücken Sie bitte die gewünschte Nummer der Voreinstellung (1-10) auf der Fernbedienung für 2-3 Sekunden. Bem.: Wenn Sie Sender auf dem FM-Band hören möchten, die nicht voreingestellt wurden, müssen Sie sie erneut einstellen, entweder manuell oder automatisch. Reset Dieser Verstärker kann resetted werden. Das benutzt man, um im Gerät gespeicherte Kanäle zu entfernen. Drücken und halten Sie die Taste INFO für 2 Sekunden. Drücken Sie die Taste INFO noch einmal, bis das Display die Nachricht SYSTEM RESET zeigt, und drücken Sie dann Enter. Alle gespeicherten Kanäle wurden nun vom Gerät gelöscht. 18 FEHLERSUCHE PROBLEM GRUND UND ABHILFE Kein Strom, wenn der Verstärker - Schalten Sie den elektrischen Strom für die Steckdose an. angeschaltet wird. - Prüfen Sie, ob der Stecker korrekt in die Steckdose gesteckt wurde. - die interne Sicherung ist durchgebrannt und muss von einem qualifizierten Service-Techniker ersetzt werden. - Das Stromkabel wurde beschädigt und muss ersetzt werden. Kein Ton. - Der Verstärker wurde nicht eingeschaltet. - die Lautstärkesteuerung steht auf dem Minimum (siehe Seite 13). - die Lautsprecherkabel wurden nicht korrekt angeschlossen. - eine falsche Eingangsquelle wurde gewählt. - es ist keine Eingangsquelle angeschlossen. Es gibt Ton nur auf einem Kanal. - die Balancesteuerung ist nicht korrekt eingestellt (siehe Seite 15). - die Audio-Eingangskabel wurden nicht korrekt angeschlossen oder sind beschädigt. - die Eingangsquelle ist defekt. - die Lautsprecherkabel wurden nicht korrekt angeschlossen oder sind beschädigt. - die Lautsprecher sind defekt. Helles Summen. - die Audio-Eingangskabel wurden nicht korrekt angeschlossen oder sind beschädigt. - das Erdungskabel für den Plattenspieler wurde nicht korrekt angeschlossen. - der Abtaster (Tonarm) des Plattenspielers ist defekt. Verzerrungen des Tones. - Die Verbindung der Lautsprecher ist außerhalb der Phase. Überprüfen Sie, dass die positiven und negativen Pole korrekt angeschlossen wurden, beide befinden sich auf der Rückseite des Verstärkers und auf der Rückseite der Lautsprecher. Das LCD-Display zeigt - der Verstärker ist defekt und sollte von einem qualifizierten keinerlei Information Techniker gewartet werden. ERROR wird angezeigt auf dem - der Verstärker ist defekt und sollte von einem qualifizierten. LCD-Display Techniker gewartet werden. Das Gerät wechselt nicht zwischen den Eingangs- modi. - der Verstärker ist defekt und sollte von einem qualifizierten Techniker gewartet werden. Das Gerät zeigt keine - Der VIETA HRE75B hat keine Sender auf DAB gefunden DAB-Informationen. - der gewählte Sender übermittelt keine Informationen. - das Antennensignal ist zu schwach. Schauen Sie in das Kapitel über die Einstellung der Antenne. Man hört ein Ticken oder Tropfen - wie alle anderen digitalen Medien wird DAB mit einer sehr hohen bei einigen der Sender. Tonqualität wiedergegeben. Aber wenn das Antennensignal zu schwach ist, können Sie kein Pfeifen hören, sondern Sie hören Unterbrechungen oder ein “Ticken oder Tropfen”. Daher müssen Sie prüfen, ob das Antennensignal stark genug ist. Schauen Sie in das Kapitel über die Einstellung der Antenne. 19 TECHNISCHE DATEN Technische Daten Phono Eingang Eingangsimpedanz 47 KOhm Eingangssensitivität 3.8mV Line-Eingänge (CD, DVD, AUX) Eingangsimpedanz 47 KOhm Eingangssensitivität 200mV Line Ausgänge Line out 100KOhm Ausgangsimpedanz Kopfhörer 3000hm Maximales Line out 740mV Ausgangsniveau Kopfhörer 1.25V Ton-Steuerung Treble +/- 14dB Bass +/- 14dB Ausgangsleistung 2 x 50 Watt bei 4 Ohm 2 x 40 Watt bei 8 Ohm Frequenzgang 10Hz bis63KHz (-3d B) Verzerrung <0.05% Signal/Rauschzahl >90dB Spannung und Stromverbrauch Siehe Rückseite des Geräts Abmessungen (BxTxH) 430 x 290 x 75mm RF-Sektion Bandbreiten des DAB Band Ill, Band Land DAB+ Verstärkers FM 87.5-108.0MHz Sensitivität -96dBm Typ Display: 1 Zeile mit 16 Zeichen Hintergrundbeleuchtung LED Voreinstellungen 10 Audio Ausgänge Stereo, 2,5Vpp 48 kHz Abtastrate 16 Bit Musterauflösung Wir behalten uns das Recht vor, die technischen Daten und das Design des Produkts ohne Vorankündigung als Ergebnis fortschreitender Entwicklungen zu verändern. 20 HIFI EMPFÄNGER www.vieta.es