1
HiPath 1100
Manager
Documentation
*1PA31003-K1270-M100-3-76A9*
1P A31003-K1270-M100-3-76A9
The information provided in this document contains merely general descriptions or
characteristics of performance which in case of actual use do not always apply as described or which may change as a result of further development of the products.
An obligation to provide the respective characteristics shall only exist if expressly
agreed in the terms of contract.
Troubleshooting
If you encounter any problems, first contact first-level or technical System Support. If they
cannot solve your problems contact Technical Assistance!
© Siemens AG 2007 Information and Communication Networks,
Hofmannstraße 51, D-81359 München, Germany
Reference No.: A31003-K1270-M100-3-76A9
Subject to availability. Right of modification reserved.
●
AdminToolTOC.fm
For Internal Use Only
Contents
Contents
0
1 General Information . . . . . . . . . . . . . . . . . . . . . . . . . . . . . . . . . . . . . . . . . . . . . . . . . . .
1.1 General Information on how to work with the HiPath 1100 Manager. . . . . . . . . . . . . .
1.2 Starting Up . . . . . . . . . . . . . . . . . . . . . . . . . . . . . . . . . . . . . . . . . . . . . . . . . . . . . . . . . .
1.3 Functions and Features . . . . . . . . . . . . . . . . . . . . . . . . . . . . . . . . . . . . . . . . . . . . . . . .
1-1
1-3
1-3
1-5
2 User Interface . . . . . . . . . . . . . . . . . . . . . . . . . . . . . . . . . . . . . . . . . . . . . . . . . . . . . . . .
2.1 Menu Bar . . . . . . . . . . . . . . . . . . . . . . . . . . . . . . . . . . . . . . . . . . . . . . . . . . . . . . . . . . .
2.1.1 Profile Manager . . . . . . . . . . . . . . . . . . . . . . . . . . . . . . . . . . . . . . . . . . . . . . . . . . .
2.2 Toolbar. . . . . . . . . . . . . . . . . . . . . . . . . . . . . . . . . . . . . . . . . . . . . . . . . . . . . . . . . . . . .
2.3 Shortcut Bar . . . . . . . . . . . . . . . . . . . . . . . . . . . . . . . . . . . . . . . . . . . . . . . . . . . . . . . . .
2.4 Folder List . . . . . . . . . . . . . . . . . . . . . . . . . . . . . . . . . . . . . . . . . . . . . . . . . . . . . . . . . .
2.5 Status Bar . . . . . . . . . . . . . . . . . . . . . . . . . . . . . . . . . . . . . . . . . . . . . . . . . . . . . . . . . .
2.6 Popup Menu . . . . . . . . . . . . . . . . . . . . . . . . . . . . . . . . . . . . . . . . . . . . . . . . . . . . . . . .
2-1
2-2
2-5
2-6
2-7
2-7
2-9
2-9
3 Basic Configuration . . . . . . . . . . . . . . . . . . . . . . . . . . . . . . . . . . . . . . . . . . . . . . . . . . . 3-1
3.1 Line Attendants . . . . . . . . . . . . . . . . . . . . . . . . . . . . . . . . . . . . . . . . . . . . . . . . . . . . . . 3-1
3.1.1 "Settings" Tab . . . . . . . . . . . . . . . . . . . . . . . . . . . . . . . . . . . . . . . . . . . . . . . . . . . . 3-1
3.1.2 "Day Service" Tab . . . . . . . . . . . . . . . . . . . . . . . . . . . . . . . . . . . . . . . . . . . . . . . . . 3-3
3.1.3 "Night Service" Tab . . . . . . . . . . . . . . . . . . . . . . . . . . . . . . . . . . . . . . . . . . . . . . . . 3-4
3.2 MSN . . . . . . . . . . . . . . . . . . . . . . . . . . . . . . . . . . . . . . . . . . . . . . . . . . . . . . . . . . . . . . . 3-6
3.2.1 Configuration tab . . . . . . . . . . . . . . . . . . . . . . . . . . . . . . . . . . . . . . . . . . . . . . . . . . 3-7
3.2.2 "Day Service" Tab . . . . . . . . . . . . . . . . . . . . . . . . . . . . . . . . . . . . . . . . . . . . . . . . . 3-9
3.2.3 "Night Service" Tab . . . . . . . . . . . . . . . . . . . . . . . . . . . . . . . . . . . . . . . . . . . . . . . 3-10
3.3 System Speed Dialing . . . . . . . . . . . . . . . . . . . . . . . . . . . . . . . . . . . . . . . . . . . . . . . . 3-12
3.4 Extensions . . . . . . . . . . . . . . . . . . . . . . . . . . . . . . . . . . . . . . . . . . . . . . . . . . . . . . . . . 3-13
3.5 Call Charges . . . . . . . . . . . . . . . . . . . . . . . . . . . . . . . . . . . . . . . . . . . . . . . . . . . . . . . 3-14
3.6 Call Timeout. . . . . . . . . . . . . . . . . . . . . . . . . . . . . . . . . . . . . . . . . . . . . . . . . . . . . . . . 3-15
4 Advanced Configuration . . . . . . . . . . . . . . . . . . . . . . . . . . . . . . . . . . . . . . . . . . . . . . . 4-1
4.1 Extensions . . . . . . . . . . . . . . . . . . . . . . . . . . . . . . . . . . . . . . . . . . . . . . . . . . . . . . . . . . 4-2
4.1.1 "General" Tab . . . . . . . . . . . . . . . . . . . . . . . . . . . . . . . . . . . . . . . . . . . . . . . . . . . . 4-2
4.1.2 "Interface CD" Tab . . . . . . . . . . . . . . . . . . . . . . . . . . . . . . . . . . . . . . . . . . . . . . . 4-10
4.1.3 "Key Assignment" Tab. . . . . . . . . . . . . . . . . . . . . . . . . . . . . . . . . . . . . . . . . . . . . 4-10
4.1.4 "Flexible Number" Tab . . . . . . . . . . . . . . . . . . . . . . . . . . . . . . . . . . . . . . . . . . . . 4-13
4.1.5 "ISDN Telephones" Tab . . . . . . . . . . . . . . . . . . . . . . . . . . . . . . . . . . . . . . . . . . . 4-13
4.1.6 "Call forward - no answer" tab. . . . . . . . . . . . . . . . . . . . . . . . . . . . . . . . . . . . . . . 4-14
4.2 PABX Trace . . . . . . . . . . . . . . . . . . . . . . . . . . . . . . . . . . . . . . . . . . . . . . . . . . . . . . . . 4-14
4.3 Service . . . . . . . . . . . . . . . . . . . . . . . . . . . . . . . . . . . . . . . . . . . . . . . . . . . . . . . . . . . . 4-16
4.3.1 "General" tab . . . . . . . . . . . . . . . . . . . . . . . . . . . . . . . . . . . . . . . . . . . . . . . . . . . . 4-16
4.3.2 "Extensions" tab . . . . . . . . . . . . . . . . . . . . . . . . . . . . . . . . . . . . . . . . . . . . . . . . . 4-17
4.3.3 "MSN" tab. . . . . . . . . . . . . . . . . . . . . . . . . . . . . . . . . . . . . . . . . . . . . . . . . . . . . . 4-18
4.3.4 "External lines" tab . . . . . . . . . . . . . . . . . . . . . . . . . . . . . . . . . . . . . . . . . . . . . . . 4-18
A31003-K1270-M100-3-76A9, 03/2007
HiPath 1100 Manager, Documentation
0-1
AdminToolTOC.fm
Contents
For Internal Use Only
4.4 Entry Voice Mail - EVM . . . . . . . . . . . . . . . . . . . . . . . . . . . . . . . . . . . . . . . . . . . . . . . .
4.4.1 "General" Tab . . . . . . . . . . . . . . . . . . . . . . . . . . . . . . . . . . . . . . . . . . . . . . . . . . . .
4.4.2 "Default Mailbox" Tab . . . . . . . . . . . . . . . . . . . . . . . . . . . . . . . . . . . . . . . . . . . . . .
4.4.3 "Message Settings " Tab . . . . . . . . . . . . . . . . . . . . . . . . . . . . . . . . . . . . . . . . . . .
4.4.4 "EVM Access" Tab . . . . . . . . . . . . . . . . . . . . . . . . . . . . . . . . . . . . . . . . . . . . . . . .
4.4.5 "Virtual port" tab . . . . . . . . . . . . . . . . . . . . . . . . . . . . . . . . . . . . . . . . . . . . . . . . . .
4.5 SNMP . . . . . . . . . . . . . . . . . . . . . . . . . . . . . . . . . . . . . . . . . . . . . . . . . . . . . . . . . . . . .
4.5.1 Configuration . . . . . . . . . . . . . . . . . . . . . . . . . . . . . . . . . . . . . . . . . . . . . . . . . . . .
4.5.2 Community . . . . . . . . . . . . . . . . . . . . . . . . . . . . . . . . . . . . . . . . . . . . . . . . . . . . . .
4.5.3 Trap Community . . . . . . . . . . . . . . . . . . . . . . . . . . . . . . . . . . . . . . . . . . . . . . . . . .
4.6 Account code . . . . . . . . . . . . . . . . . . . . . . . . . . . . . . . . . . . . . . . . . . . . . . . . . . . . . . .
4.7 Class of Service (COS) . . . . . . . . . . . . . . . . . . . . . . . . . . . . . . . . . . . . . . . . . . . . . . .
4.7.1 "Day Service Category" Tab. . . . . . . . . . . . . . . . . . . . . . . . . . . . . . . . . . . . . . . . .
4.7.2 "Night Service Category" Tab . . . . . . . . . . . . . . . . . . . . . . . . . . . . . . . . . . . . . . .
4.7.3 "Permission Lists" . . . . . . . . . . . . . . . . . . . . . . . . . . . . . . . . . . . . . . . . . . . . . . . .
4.7.4 "Denied Lists" Tab . . . . . . . . . . . . . . . . . . . . . . . . . . . . . . . . . . . . . . . . . . . . . . . .
4.8 Groups . . . . . . . . . . . . . . . . . . . . . . . . . . . . . . . . . . . . . . . . . . . . . . . . . . . . . . . . . . . .
4.8.1 "Pickup Groups" Tab . . . . . . . . . . . . . . . . . . . . . . . . . . . . . . . . . . . . . . . . . . . . . .
4.8.2 "Call Groups" Tab. . . . . . . . . . . . . . . . . . . . . . . . . . . . . . . . . . . . . . . . . . . . . . . . .
4.8.3 "Hunt Group" Tab . . . . . . . . . . . . . . . . . . . . . . . . . . . . . . . . . . . . . . . . . . . . . . . .
4.8.4 "External MWI Group" Tab . . . . . . . . . . . . . . . . . . . . . . . . . . . . . . . . . . . . . . . . . .
4.8.5 "UCD Groups" Field . . . . . . . . . . . . . . . . . . . . . . . . . . . . . . . . . . . . . . . . . . . . . . .
4.8.6 "Associated Groups" Tab . . . . . . . . . . . . . . . . . . . . . . . . . . . . . . . . . . . . . . . . . .
4.8.7 "Music On Hold Groups" Tab . . . . . . . . . . . . . . . . . . . . . . . . . . . . . . . . . . . . . . . .
4.9 ISDN . . . . . . . . . . . . . . . . . . . . . . . . . . . . . . . . . . . . . . . . . . . . . . . . . . . . . . . . . . . . . .
4.9.1 "Configurations" Tab. . . . . . . . . . . . . . . . . . . . . . . . . . . . . . . . . . . . . . . . . . . . . . .
4.9.2 "Slot S0" Tab . . . . . . . . . . . . . . . . . . . . . . . . . . . . . . . . . . . . . . . . . . . . . . . . . . . .
4.9.3 "Advanced Configuration" Tab . . . . . . . . . . . . . . . . . . . . . . . . . . . . . . . . . . . . . . .
4.10 External Lines . . . . . . . . . . . . . . . . . . . . . . . . . . . . . . . . . . . . . . . . . . . . . . . . . . . . . .
4.10.1 "General" tab . . . . . . . . . . . . . . . . . . . . . . . . . . . . . . . . . . . . . . . . . . . . . . . . . . .
4.10.2 "Line Group" Tab . . . . . . . . . . . . . . . . . . . . . . . . . . . . . . . . . . . . . . . . . . . . . . . .
4.10.3 "Flexible Number" Tab . . . . . . . . . . . . . . . . . . . . . . . . . . . . . . . . . . . . . . . . . . . .
4.11 LCR . . . . . . . . . . . . . . . . . . . . . . . . . . . . . . . . . . . . . . . . . . . . . . . . . . . . . . . . . . . . .
4.12 ACS. . . . . . . . . . . . . . . . . . . . . . . . . . . . . . . . . . . . . . . . . . . . . . . . . . . . . . . . . . . . . .
4.13 System Settings . . . . . . . . . . . . . . . . . . . . . . . . . . . . . . . . . . . . . . . . . . . . . . . . . . . .
4.13.1 "General" Tab . . . . . . . . . . . . . . . . . . . . . . . . . . . . . . . . . . . . . . . . . . . . . . . . . . .
4.13.2 "Caller List" Tab . . . . . . . . . . . . . . . . . . . . . . . . . . . . . . . . . . . . . . . . . . . . . . . . .
4.13.3 "Music On Hold" Tab . . . . . . . . . . . . . . . . . . . . . . . . . . . . . . . . . . . . . . . . . . . . .
4.13.4 "Overflow Extension" Tab . . . . . . . . . . . . . . . . . . . . . . . . . . . . . . . . . . . . . . . . .
4.13.5 "Attendant" Tab . . . . . . . . . . . . . . . . . . . . . . . . . . . . . . . . . . . . . . . . . . . . . . . . .
4.13.6 "Call Charges" Tab . . . . . . . . . . . . . . . . . . . . . . . . . . . . . . . . . . . . . . . . . . . . . . .
4.13.7 "Regional Settings" Tab . . . . . . . . . . . . . . . . . . . . . . . . . . . . . . . . . . . . . . . . . . .
4.13.8 "Feature Codes" Tab . . . . . . . . . . . . . . . . . . . . . . . . . . . . . . . . . . . . . . . . . . . . .
4.13.9 "Date and Time" Tab . . . . . . . . . . . . . . . . . . . . . . . . . . . . . . . . . . . . . . . . . . . . .
0-2
4-19
4-20
4-22
4-23
4-25
4-25
4-26
4-27
4-28
4-29
4-30
4-31
4-32
4-33
4-33
4-34
4-35
4-35
4-36
4-37
4-38
4-38
4-41
4-42
4-44
4-44
4-45
4-46
4-48
4-48
4-52
4-53
4-54
4-59
4-62
4-62
4-70
4-71
4-71
4-72
4-73
4-73
4-75
4-76
A31003-K1270-M100-3-76A9, 03/2007
HiPath 1100 Manager, Documentation
AdminToolTOC.fm
For Internal Use Only
Contents
4.13.10 "Emergency Numbers" Tab . . . . . . . . . . . . . . . . . . . . . . . . . . . . . . . . . . . . . . 4-77
4.13.11 "Software Update" Tab . . . . . . . . . . . . . . . . . . . . . . . . . . . . . . . . . . . . . . . . . . 4-78
4.13.12 "Remote Administration" Tab . . . . . . . . . . . . . . . . . . . . . . . . . . . . . . . . . . . . . 4-79
4.13.13 "Modem" Tab . . . . . . . . . . . . . . . . . . . . . . . . . . . . . . . . . . . . . . . . . . . . . . . . . 4-81
4.13.14 "Passwords" Tab . . . . . . . . . . . . . . . . . . . . . . . . . . . . . . . . . . . . . . . . . . . . . . 4-81
4.13.15 "Tickets" Tab . . . . . . . . . . . . . . . . . . . . . . . . . . . . . . . . . . . . . . . . . . . . . . . . . 4-82
4.13.16 "Message" Tab . . . . . . . . . . . . . . . . . . . . . . . . . . . . . . . . . . . . . . . . . . . . . . . . 4-84
4.13.17 "Holiday" Tab . . . . . . . . . . . . . . . . . . . . . . . . . . . . . . . . . . . . . . . . . . . . . . . . . 4-84
4.13.18 "Virtual port" tab . . . . . . . . . . . . . . . . . . . . . . . . . . . . . . . . . . . . . . . . . . . . . . . 4-85
4.14 Calendar . . . . . . . . . . . . . . . . . . . . . . . . . . . . . . . . . . . . . . . . . . . . . . . . . . . . . . . . . 4-86
4.15 Internal entrance telephone . . . . . . . . . . . . . . . . . . . . . . . . . . . . . . . . . . . . . . . . . . . 4-87
4.15.1 "Interface Slot" Tab . . . . . . . . . . . . . . . . . . . . . . . . . . . . . . . . . . . . . . . . . . . . . . 4-87
4.15.2 "Attendants" Tab . . . . . . . . . . . . . . . . . . . . . . . . . . . . . . . . . . . . . . . . . . . . . . . . 4-87
4.15.3 "Permission to Open" Tab . . . . . . . . . . . . . . . . . . . . . . . . . . . . . . . . . . . . . . . . . 4-88
4.16 Sensor and Relay . . . . . . . . . . . . . . . . . . . . . . . . . . . . . . . . . . . . . . . . . . . . . . . . . . 4-89
4.17 MSN . . . . . . . . . . . . . . . . . . . . . . . . . . . . . . . . . . . . . . . . . . . . . . . . . . . . . . . . . . . . 4-92
4.17.1 "Incoming Day" Tab. . . . . . . . . . . . . . . . . . . . . . . . . . . . . . . . . . . . . . . . . . . . . . 4-92
4.17.2 "Night Service - Incoming" Tab . . . . . . . . . . . . . . . . . . . . . . . . . . . . . . . . . . . . . 4-93
4.17.3 "Day Service - Outgoing" Tab . . . . . . . . . . . . . . . . . . . . . . . . . . . . . . . . . . . . . . 4-95
4.17.4 "Night Service - Outgoing" Tab . . . . . . . . . . . . . . . . . . . . . . . . . . . . . . . . . . . . . 4-95
4.17.5 "Line Assignment" Tab . . . . . . . . . . . . . . . . . . . . . . . . . . . . . . . . . . . . . . . . . . . 4-96
4.18 Fax/DID . . . . . . . . . . . . . . . . . . . . . . . . . . . . . . . . . . . . . . . . . . . . . . . . . . . . . . . . . . 4-97
4.18.1 "Virtual Extension" Tab . . . . . . . . . . . . . . . . . . . . . . . . . . . . . . . . . . . . . . . . . . . 4-98
4.18.2 "Call Answering Menu" Tab. . . . . . . . . . . . . . . . . . . . . . . . . . . . . . . . . . . . . . . . 4-99
4.19 Timers . . . . . . . . . . . . . . . . . . . . . . . . . . . . . . . . . . . . . . . . . . . . . . . . . . . . . . . . . . 4-101
4.19.1 "General" Tab . . . . . . . . . . . . . . . . . . . . . . . . . . . . . . . . . . . . . . . . . . . . . . . . . 4-101
4.19.2 "Extensions" Tab . . . . . . . . . . . . . . . . . . . . . . . . . . . . . . . . . . . . . . . . . . . . . . . 4-102
4.19.3 "Lines" Tab . . . . . . . . . . . . . . . . . . . . . . . . . . . . . . . . . . . . . . . . . . . . . . . . . . . 4-103
4.20 PABX Information . . . . . . . . . . . . . . . . . . . . . . . . . . . . . . . . . . . . . . . . . . . . . . . . . 4-103
4.20.1 "General Information" Tab. . . . . . . . . . . . . . . . . . . . . . . . . . . . . . . . . . . . . . . . 4-103
4.20.2 "PABX Layout" Tab . . . . . . . . . . . . . . . . . . . . . . . . . . . . . . . . . . . . . . . . . . . . . 4-106
4.20.3 "Slot Allocation" Tab . . . . . . . . . . . . . . . . . . . . . . . . . . . . . . . . . . . . . . . . . . . . 4-106
4.20.4 "Board Configuration" Tab. . . . . . . . . . . . . . . . . . . . . . . . . . . . . . . . . . . . . . . . 4-106
5 Status Monitor . . . . . . . . . . . . . . . . . . . . . . . . . . . . . . . . . . . . . . . . . . . . . . . . . . . . . . . 5-1
6 CommServer . . . . . . . . . . . . . . . . . . . . . . . . . . . . . . . . . . . . . . . . . . . . . . . . . . . . . . . . 6-1
6.1 Sys Tray Menu. . . . . . . . . . . . . . . . . . . . . . . . . . . . . . . . . . . . . . . . . . . . . . . . . . . . . . . 6-2
6.1.1 Properties . . . . . . . . . . . . . . . . . . . . . . . . . . . . . . . . . . . . . . . . . . . . . . . . . . . . . . . 6-2
7 Software Update . . . . . . . . . . . . . . . . . . . . . . . . . . . . . . . . . . . . . . . . . . . . . . . . . . . . . 7-1
8 MOH Transfer . . . . . . . . . . . . . . . . . . . . . . . . . . . . . . . . . . . . . . . . . . . . . . . . . . . . . . . . 8-1
8.1 User Interface . . . . . . . . . . . . . . . . . . . . . . . . . . . . . . . . . . . . . . . . . . . . . . . . . . . . . . . 8-1
A31003-K1270-M100-3-76A9, 03/2007
HiPath 1100 Manager, Documentation
0-3
AdminToolTOC.fm
Contents
For Internal Use Only
9 Miscellaneous. . . . . . . . . . . . . . . . . . . . . . . . . . . . . . . . . . . . . . . . . . . . . . . . . . . . . . . . . 9-1
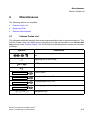
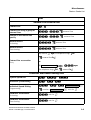
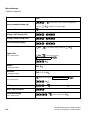
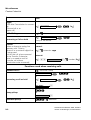
9.1 Feature Codes List . . . . . . . . . . . . . . . . . . . . . . . . . . . . . . . . . . . . . . . . . . . . . . . . . . . . 9-1
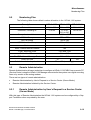
9.2 Numbering Plan . . . . . . . . . . . . . . . . . . . . . . . . . . . . . . . . . . . . . . . . . . . . . . . . . . . . . 9-13
9.3 Remote Administration . . . . . . . . . . . . . . . . . . . . . . . . . . . . . . . . . . . . . . . . . . . . . . . . 9-13
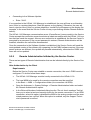
9.3.1 Remote Administration by User’s Request to a Service Center (Server Mode) . . 9-13
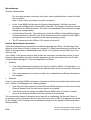
9.3.2 Remote Administration Initiated by the Service Center. . . . . . . . . . . . . . . . . . . . . 9-15
Abbreviations . . . . . . . . . . . . . . . . . . . . . . . . . . . . . . . . . . . . . . . . . . . . . . . . . . . . . . . . . Y-19
Index . . . . . . . . . . . . . . . . . . . . . . . . . . . . . . . . . . . . . . . . . . . . . . . . . . . . . . . . . . . . . . . . . . Z-1
0-4
A31003-K1270-M100-3-76A9, 03/2007
HiPath 1100 Manager, Documentation
For Internal Use Only
1
1_Admin.fm
General Information
General Information
HiPath 1100 Manager is a Windows application used for configuring and managing the HiPath
1100 for programming HiPath 1100 systems by means of a graphical interface that does not
require any programming codes.
The Look and Feel of the user interface is similar to a standard Windows interface like that of
Microsoft Outlook. This makes it is easy and intuitive to navigate the HiPath 1100Manager. The
HiPath 1100 ManagerUser Interface can be displayed in different languages. The language
preference can be changed after installation.
>
Considerations:
●
●
●
The HiPath 1100 Version 6.0 application installation overwrites HiPath 1100
Version 5.2 installation. During installation no message is displayed to warn the
user that HiPath 1100 Version 5.2 is being removed
Both versions are supported; HiPath 1100 Version 6.0 applications can be used
to manage a HiPath 1100 Version 5.2 PABX.
HiPath 1100 Version 5.2 applications and HiPath 1100 Version 6.0 application
cannot both be installed in the same computer. Otherwise, neither will work.
HiPath 1100 Manager can access a switch as follows:
Locally: Connecting a USB interface, an optiPoint 500 UP0/E interface, or a V.24 interface
●
Remotely: The system can be accessed through a LAN as long as there is a network PC
connected to the HiPath 1100 via serial interface, USB interface or one of the ADSL expansion boards (ADSL, SLIMC, SADSLIM, LIMC or ADSLIM modules)
●
>
●
When using remote administration over an ISDN digital line, where no traffic is detected between the system and the remote programmer, the system can be configured to terminate the connection after a specified period of time (1 to 60 minutes) or
to maintain the connection indefinitely. The default timeout setting is 30 minutes.
Offline Programming Mode: Allows you to view, edit and store a HiPath 1100 database
on a PC that is not currently connected to the PABX and later transfer it to it.
Functions
The following functions are provided by the Manager Offline:
1.
New - Creates a brand new offline database (*.bup).
This requires the following information:
●
Filename and target directory:
●
Additional information: company name, author, product and comments
A31003-K1270-M100-3-76A9, 03/2007
HiPath 1100 Manager, Documentation
1-1
1_Admin.fm
General Information
●
PABX Type (HiPath 1100 )
●
Country
For Internal Use Only
No modules are configured in the database generated. All extensions and lines are visible.
2.
Opening this option allows opening a database file (*.bup) on the PC.lData can be defined
by users “offline”. Changes made do not interfere with the PABX operation.Changes only
take effect after they are uploaded onto the PABX.
Manager can open only one file at a time.
3.
Save - The configured database can be saved as a file.The extension *.bup is used for all
files.
4.
Save As - An active database can be saved as a file with a different name.
5.
Close - Closes the active database.
6.
Transfer Database - Send a database backup to the PABX.
The following information is required for transferring a database to a PC:
●
password (same password as the system’s)
●
The modules configured must be connected to the system.
●
There is no conflict between Flexible Numbers. For example, no two group access
codes or extensions can be assigned the same number.
>
If a problem occurs, a message is sent to the user.
Modules can be added or removed from the system. When a module is removed, the
slot position for which it was configured is removed as well.
The Default Password for logging into the HiPath 1100 Manager for the first time is "31994."
7
After logging in for the first time, it is recommended that you change the Default
Password (Access Code for the Manager) in the "Passwords" Tab.
After starting the HiPath 1100Manager and entering the default password, you will be able to
access the system data (default settings) for the HiPath 1100 Manager.
Only the installed hardware and software options can be configured.
>
There is no "Print" option for printing the database for HiPath 1100 Manager on Offline Mode.
The HiPath 1100 software can also be updated using the HiPath 1100 Software Update
and the database can be stored with the system’s configurations.
1-2
A31003-K1270-M100-3-76A9, 03/2007
HiPath 1100 Manager, Documentation
1_Admin.fm
For Internal Use Only
1.1
General Information
General Information on how to work with the HiPath 1100 Manager
General Information on how to work with the HiPath 1100
Manager
After starting the HiPath 1100 Manager by selecting
Start/Programs/Siemens HiPath 1100/Manager
and entering the password, you can access the system data (default settings) for the HiPath
1100 Manager.
All the data that can be edited is accessed by selecting Folders/Subfolders/Folder List tabs, by
clicking on the icons on the shortcut bar and toolbar or by selecting a menu bar function.
If you access a subfolder or a tab, the HiPath 1100Manager will automatically load the default
settings (data) and display them on the tab or subfolder window screen.
The edited data can be exported to the HiPath 1100 using the "Update PABX" option on the
toolbar or Popup Menu (right-click on the screen).
If you open a second subfolder or tab before completing the update, you will be prompted to
confirm or cancel the changes. If no changes are made in the appropriate subfolder/tab, a
prompt will not appear and the "Update" button will be disabled.
For subfolders or tabs with lists you can select multiple lines simultaneously.
You can also import or export records between applications within the different tabs or screens
by using the Copy (Ctrl + C) and Paste (Ctrl+V) commands.
1.2
Starting Up
To start up the HiPath 1100 Manager select:
Start/Programs/Siemens/HiPath 1100/ Services/Manager
When logging into the HiPath 1100 Manager for the first time, use the default password
"31994."
7
The default password (programming password) should be changed after you log
into the
"Passwords" Tab for the first time.
When you first start the HiPath 1100 Manager, the Installation Wizard appears. This Wizard will
guide you through the process of configuring basic system settings.
A31003-K1270-M100-3-76A9, 03/2007
HiPath 1100 Manager, Documentation
1-3
1_Admin.fm
General Information
Starting Up
For Internal Use Only
Use the Next and Back buttons to navigate the input screens. Each time that you make a
change and click on the Next button, a message will appear asking if you would like to update
your changes. You can make changes to the settings in the following screens:
●
●
Regional Settings: Country, Prefix and Numbering Plan.
Settings: For entering your digital line Multiple Subscriber Number (MSN) and configuring
activation time and call signaling mode for each MSN.
●
Day Service: For assigning MSNs to extensions for Day Service mode.
●
Night Service: For assigning MSN to extensions for Night Service mode.
●
System Speed Dialing: Fro creating a System Speed Dialing directory.
●
Extensions: For assigning names to extensions.
●
Call Charges: For assigning call charge limits.
●
Click End to see the default view of HiPath 1100 Manager. This view now appears every
time you open Manager.
Further information for changing the default configuration of your HiPath 1100 system appears
in the following sections.
1-4
A31003-K1270-M100-3-76A9, 03/2007
HiPath 1100 Manager, Documentation
1_Admin.fm
General Information
Functions and Features
For Internal Use Only
1.3
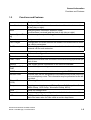
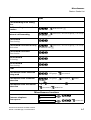
Functions and Features
Basic configuration
Line Attendants
Configuration for the first and second external line attendants and time
of day (day or night).
MSN
Assigning Multi Subscriber Numbers (MSN)
to extensions (received) and the time of day (day or night)
System Speed Dialing
Creates a system speed dialing phonebook.
Extensions
Assignment of names to extensions
Call Charges
Configuration of certain features that enable cost assessment for external calls by extensions.
Call Timeout
This setting specifies a maximum time for the duration of an outgoing
external call for each extension.
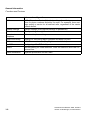
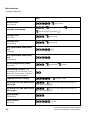
Advanced configuration
Extensions
Extension settings
PABX Trace
Monitors events that have occurred in the PABX during a particular period of time.
Service
This shows general information on the services available.
Entry Voice Mail EVM
Voice Mail system settings
SNMP
Allows you to monitor the switch and manage the PABX.
Account code
External calls can be assigned account codes which provide more control over telephony costs. This information may be presented on the billing ticket.
Class of Service
(COS)
Allocating Class of service
Groups
Creating an extension group (Pickup Group, Call Group, Hunt Group,
MWIe Group, UCD Group, Associated Group, MOH).
ISDN
ISDN line configuration
External Lines
Numbering and group configuration and distribution for external lines
LCR
LCR (Least Cost Routing) settings for carriers
that offer lower rates for calls made at certain days/times.
A31003-K1270-M100-3-76A9, 03/2007
HiPath 1100 Manager, Documentation
1-5
1_Admin.fm
General Information
Functions and Features
For Internal Use Only
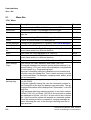
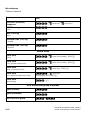
Advanced configuration
ACS
ACS (Alternative Carrier Selection) settings for defining conversion
rules for phone numbers dialed by the user. For example, these settings specify a carrier for all external calls, regardless of the carrier
number dialed.
System Settings
System settings (from regional settings to passwords)
Calendar
Weekly settings for night service
Internal entrance
telephone
Entrance telephone settings
Sensor and Relay
Settings for controlling alarm functions and Music on hold
MSN
MSN Classes of service (Day/Night - received/dialed)
Fax/DID
Configuring a Fax/DID facility
Timers
General setting for Flash detection, Flash on extension and Flash on
external line.
PABX Information
Physical specification for the PABX.
1-6
A31003-K1270-M100-3-76A9, 03/2007
HiPath 1100 Manager, Documentation
2_BOF.fm
User Interface
For Internal Use Only
2
User Interface
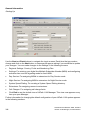
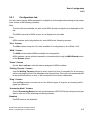
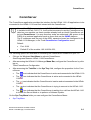
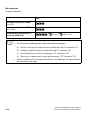
The figure below shows the HiPath 1100 Manager’s main window.
A
B
C
F
D
E
G
H
Structure of the Main Window
A- Menu Bar
B- Toolbar
C- Shortcut Bar – For selecting commands directly from the Basic and Advanced folders
D- Folder List – A group of subfolders sorted by complexity and purpose
E- Folders/Subfolders – Window area for data input (input mask).
F-Tab – For organizing the configuration settings required for related topics in a subfolder/tab
G- Configuration setting
A programmable attribute of the HiPath 1100
List box – a list (e.g., Extensions/Lines/Speed Dialing Entry, etc.) with many settings for a specific configuration.
H- Status Bar
A31003-K1270-M100-3-76A9, 03/2007
HiPath 1100 Manager, Documentation
2-1
2_BOF.fm
User Interface
Menu Bar
2.1
For Internal Use Only
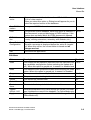
Menu Bar
"File" Menu
Position
Description
Shortcut
Connect
This connects the HiPath 1100 Manager to the PABX.
Disconnect
Disconnects HiPath 1100 Manager from the PABX.
New
Opens a popup window for configuring a new HiPath 1100 Man- Ctrl+N
ager file.
Open
Opens an existing HiPath 1100 Manager *.bup file.
Close
Closes an active HiPath 1100 Manager file.
Ctrl+O
Profile Manager Configures the parameters of a project. (see Profile Manager)
Save Profile
Saves the Profile Manager in a *.bup file.
Save Profile
As...
Allows you to save the Profile Manager as a *.bup file with a different name and/or in a different location.
Save
This saves the PABX database to a *.bup file.
Save As...
Allows you to save the PABX database as a *.bup file with a different name and/or in a different location.
Ctrl+S
Switch database Switches current database from Offline Mode to Online Mode.
Save Backup
Copy
This selects the PABX database and saves it as a file.
The saved database may contain general system settings (e.g.,
Speed Dialing, LCR. etc.) and/or service/feature configurations
for extensions (e.g.: Programming keys).
Important information about the database can be entered and
saved by using the Dialog Box. This is useful and easy to locate
for future reference. For example, company name, author, product and comments.
Restore
backup copy
This opens a backup copy that was previously saved and sends
it to the PABX.
To locate a specific backup file, use the information entered in
the Dialog Box at the time the backup copy was made. The appropriate information will be displayed as "Information:" in the Dialog Box.
If the database has been saved previously in an earlier version
(HiPath 1100 V5.1 or HiPath 1100 V5.2) and you want to update
the database to HiPath 1100 V6.0, all you need to do is restore
the *.bup file and the system will execute an automatic update.
Once the restore process is completed, a popup message appears informing the user of the changes resulting from the restore process.
2-2
A31003-K1270-M100-3-76A9, 03/2007
HiPath 1100 Manager, Documentation
2_BOF.fm
User Interface
Menu Bar
For Internal Use Only
Database converter
Allows you to convert the database from HiPath 1100 version
V6.0 to a later version.
When you select this option, a Dialog box will appear for you to
select the required version of the database.
Save PABX infor- Save general PABX information.
mation.
Print
This prints the PABX database. When this option is selected, a Ctrl+P
Word document is opened displaying all PABX settings. If the
system does not have Word, an HTML document is opened.
PABX Information
This displays information about the PABX (e.g., model, version, Ctrl+I
country, existing extensions, assembly with modules, etc.)
Reset Default
Configuration
This restores the PABX to the factory default settings (a Dialog
Box with a message is displayed before the action is completed). When this occurs, the current folder is closed and all
changes are lost.
Exit
This closes the application.
Edit Menu
Slot
Description
Undo
This undoes the last operation executed from the Edit menu dur- Ctrl+Z
ing a subfolder configuration (before selecting the Update button). When this option is greyed out, it means it is disabled and
Redo
This redoes the last operation that was canceled using the Undo Ctrl+Y
button. When this option is greyed out, it means it is disabled.
Copy
This copies an item from an input field.
Ctrl+C
Paste
This pastes a copied setting to the selected area.
Ctrl+V
Delete
This deletes the selected item.
Del
Select All
This selects all items.
Ctrl+A
Restart
Items
This resets the factory default for the selected item.
F3
Update
HiPath 1100
Sends modified data to the PABX through the HiPath 1100 Man- F5
ager/ Updates the current file’s database. For Online Mode only.
Apply
Applies the changes to the current HiPath 1100 Manager file. For
Offline Mode only.
A31003-K1270-M100-3-76A9, 03/2007
HiPath 1100 Manager, Documentation
Shortcut
2-3
2_BOF.fm
User Interface
Menu Bar
For Internal Use Only
"View" Menu
Slot
Description
Toolbar
Shows/hides the toolbar.
Status Bar
Shows/hides status bar.
Folder List
Shows/hides folder list.
Shortcut Bar
Shows/hides the status bar.
Numbering Plan Validation
Shows the numbering plan validation.
Tools Menu
Item
Description
Configuration
This starts the Microsoft Wizard and displays the extensions
not connected to the system.
HiPath 1100 Configuration
Wizard
This starts the PABX Configuration Wizard.
HiPath 1100 Software Update This starts the HiPath 1100 Software Update for updating the
PABX software (Software Update).
CommServer
Configuration
Opens a Dialog box for setting the port and IP address of the
CommServer.
●
●
The TCP/IP Communication port where the HiPath
1100 Manager will connect to the CommServer for perform operations in the PABX. The valid address is 3100.
The IP address of the place where the CommServer application is installed.
Server Mode
This opens a Dialogue Box showing that the HiPath 1100
Manager is waiting for a remote call from a HiPath 1100 system. which then allows a “Technician” to configure the system
remotely.
Language
This specifies a language of choice for the HiPath 1100 Manager.
2-4
A31003-K1270-M100-3-76A9, 03/2007
HiPath 1100 Manager, Documentation
2_BOF.fm
User Interface
Menu Bar
For Internal Use Only
"Help" Menu
Item
Description
Shortcut
Help Topics
This opens the program’s Help feature.
F1
About Manager ...
This displays information about the HiPath
1100 Manager application.
2.1.1
Profile Manager
The Profile Manager allows the user to create, open, edit or exclude profiles for the connection
or opening of a database. Profiles are structures that help the user to organize different scenarios such as different clients or connections.
To perform these actions, when you the select the Profile Manager option, a Dialog box opens
with the following options:
“Create Profile” button
The Create Profile button creates a new profile. When you select that button, a new Dialog
box opens with the following fields:
"Name" field
Insert the name of the profile into the Name field. The maximum number of characters is
255 and the name may not be left blank.
"Connection type" field
The Connection type field defines how the HiPath Manager will access the PABX.
●
USB connection;
●
optiPoint USB connection;
●
Connection using an external analog modem;
●
S0 ISDN connection;
●
ADSL Connection;
●
Serial Connection;
●
CommServer in another machine.
>
If you select the connection type as “CommServer in another machine”, the configuration of the address and port of the CommServer will be enabled and the CommServer local configuration will not be changed.
A31003-K1270-M100-3-76A9, 03/2007
HiPath 1100 Manager, Documentation
2-5
2_BOF.fm
User Interface
Toolbar
For Internal Use Only
“Properties” button
The Properties button provides information on the "Connection type" field and allows
changes to be made to it.
“Connection status” field
The Connection status field selects the connection mode for the Manager: Offline or Online. If you choose online, you may not configure the database file.
“Database archive” field
The Database archive field inserts the route for the current database.
“Browse” button
The Browse button allows the to search the database files available in the system.
“OK” and “Cancel” buttons
The OK and Cancel buttons save or cancel the data configured in the previous fields.
“Edit Profile” button
The Edit Profile button allows the to edit an existing profile. The window will open where
a profile is created (see “Create Profile” button).
“Delete Profile” button
The Delete Profile button deletes an existing profile.
“Connect/Open” button
The Connect/Open button loads all the selected profile properties.
>
If a connection is established at that time and the connection parameters are not the
same, the parameters are only compared. In this case, the connection is not
changed and the user is informed using a warning box.
“Close” button
The Close button closes the Dialog box.
2.2
Toolbar
The Toolbar contains shortcut icons for accessing frequently used menu items such as:
●
2-6
Connect ("File" Menu)
If no PABX connection is active, only the Connect button is enabled.
A31003-K1270-M100-3-76A9, 03/2007
HiPath 1100 Manager, Documentation
2_BOF.fm
For Internal Use Only
●
Update PABX or Apply (Edit Menu)
●
Undo (Edit Menu)
●
Copy (Edit Menu)
●
Paste (Edit Menu)
●
Redo (Edit Menu)
●
Restart (Edit Menu)
●
Numbering Plan Validation ("View" Menu)
●
HiPath 1100 Configuration Wizard (from Tools Menu)
●
Help Topics ("Help" Menu)
User Interface
Shortcut Bar
The manner in which toolbars are displayed can be changed. To do this right-click on Toolbar
or Menu bar, and select a viewing mode.
2.3
Shortcut Bar
Two Shortcut Bars provide quick access to frequently used functions:
●
Basic – For items located in the Basic folder, described below.
●
Advanced – For items located in the Advanced folder, described below.
You may view icons as thumbnails or maximized. To change the view right-click on Shortcut Bar
and select a view mode.
2.4
Folder List
Configuration items are organized in two folders with the following structure:
Basic
●
Line Attendants (for configuring external line attendants)
●
MSN (for MSN distribution and assignment)
●
System Speed Dialing (for creating a system speed-dial directory)
●
Extensions (for assigning names to extensions)
●
Call Charges (for determining costs for extensions)
Advanced
●
Extensions (for configuring extensions)
A31003-K1270-M100-3-76A9, 03/2007
HiPath 1100 Manager, Documentation
2-7
2_BOF.fm
User Interface
Folder List
For Internal Use Only
●
Entry Voice Mail - EVM (Voice Mail)
●
Class of Service (COS) (for assigning Class of Service)
●
Groups (for creating a group)
●
ISDN (for configuring a S0 interface, external ISDN or internal S0 bus)
●
External Lines (for configuring an external line)
●
LCR (for creating a schedule for LCR, i.e. Least Cost Routing)
●
ACS (for creating a schedule for ACS - Alternative Carrier Selection)
●
System Settings (for configuring the system’s general settings)
●
Calendar (for setting Day or Night Service)
●
Internal entrance telephone (for configuring up to 20 entrance telephone slots)
●
Sensor and Relay (for configuring an optional MOH module for the HiPath 1120)
●
MSN (for assigning MSN to incoming/outgoing Day and Night service)
●
Fax/DID (for configuring a Fax/DID feature)
●
Timers (for setting Flash detection time)
●
PABX Information (for general information about a connected PABX)
2-8
A31003-K1270-M100-3-76A9, 03/2007
HiPath 1100 Manager, Documentation
2_BOF.fm
For Internal Use Only
2.5
User Interface
Status Bar
Status Bar
The following connection status are displayed in the Status Bar:
Progress Bar (appearing on the left side, it indicates the selected command/feature
progress).
●
Online/Offline (this indicates if a system is online or offline)
●
Mode: Normal/Server (Normal - PABX is connected to the application Server means that
there is a remote system connected to the application.)
●
CAP/NUM/SCRL (refer to the Caps Lock, Num Lock and Scroll Lock keys.)
●
The manner in which toolbars are displayed can be changed. To do this right-click on Toolbar
or Menu bar, and select a viewing mode.
2.6
Popup Menu
Right-clicking on a Configuration Item opens a menu containing the same options as those in
the Edit Menu.
Slot
Description
Undo
This undoes the last operation executed from the Edit menu during Ctrl+Z
a subfolder configuration (before selecting the Update button).
When this option is greyed out, it means it is disabled.
Redo
This redoes the last operation that was canceled using the Undo Ctrl+Y
button. When this option is greyed out, it means it is disabled.
Copy
This copies an item from an input field.
Ctrl+C
Paste
This pastes a copied setting to the selected area.
Ctrl+V
Delete
This deletes the selected item.
Del
Select All
This selects all items.
Ctrl+A
Restart Items This resets the factory default for the selected item.
Shortcut
F3
Update
HiPath 1100
Sends modified data to the PABX through the HiPath 1100 Man- F5
ager/Updates the current file’s database. For Online Mode only.
Apply
Applies the changes to the current HiPath 1100 Manager file. For F5
Offline Mode only.
The Restart Items option is available only when you right-click inside the Slot Configuration area. This will reset factory defaults for the selected item.
>
In the different tabs/masks, you can import/export data to and from other applications by using the Copy and Paste commands.
A31003-K1270-M100-3-76A9, 03/2007
HiPath 1100 Manager, Documentation
2-9
2_BOF.fm
User Interface
Popup Menu
2-10
For Internal Use Only
A31003-K1270-M100-3-76A9, 03/2007
HiPath 1100 Manager, Documentation
For Internal Use Only
3
3_Basic.fm
Basic Configuration
Line Attendants
Basic Configuration
The following functions are configured in the Basic folder:
●
Line Attendants
●
MSN
●
System Speed Dialing
●
Extensions
●
Call Charges
●
Call Timeout
3.1
Line Attendants
Extensions for answering incoming calls can be configured In the Line Attendant sub-folder.
Configure the settings using the following three tabs:
The Line Attendants subfolder contains the following tabs:
●
"Settings" Tab
●
"Day Service" Tab
●
"Night Service" Tab
>
3.1.1
If an EVM Mailbox is configured as a Line Attendant, all other external line attendants will be linked to the same mailbox, regardless of the mailbox being configured
for Day or Night service.
"Settings" Tab
Configure external lines by setting the parameter fields within this tab, in the following columns.
Note:
All external lines that are connected are displayed in this tab.
Enter:
The configuration options for each external line in the following columns:
"External Line" Column
The External Line column shows the external lines that can be configured.
A31003-K1270-M100-3-76A9, 03/2007
HiPath 1100 Manager, Documentation
3-1
3_Basic.fm
Basic Configuration
Line Attendants
For Internal Use Only
"Access Code" Column
Use the Access Code column to change the access code (up to 5 digits) for an external
line.
"Waiting Timeout" Column
Use the Waiting Timeout column to select a period of time (in seconds) for an incoming
call to keep ringing at the First Attendant of an external line. If the call is not answered within the specified amount of time, it will be directed to the Second Attendant.
"Ring" Column
Use the Ring column to select one of four different types of rings for an incoming call to
signal an extension.
"Answering Mode" Column
Use the Answering Mode column to configure one of the following answering features:
Disabled
Fax/DID features are disabled.
FAX
In this operating mode the module detects only fax signals. A greeting message is played
for all incoming external calls. If the caller wants to send a fax, the transmission can be
started at the end of the message. If no fax signal is detected within 10 seconds of the
greeting message a second message is played and the call is transferred to an Attendant.
DID
In this operating mode the facility detects fax signals and extensions or digits entered.
When an external call is answered, a greeting message is played to guide the caller.
The following is an example of a recorded message: "You have reached Siemens. Dial the
extension number you would like to reach: 22 for Sales Department or 23 for Technical
Support."
If the DID does not detect a valid MF signal within 10 seconds of the greeting announcement, a second announcement is played and the call is transferred to an Attendant.
Fax/DID
In this operating mode the facility detects fax signals and extensions or digits entered.
When an external call is answered a greeting message is played to guide the caller.
The following is an example of a recorded message: "You have reached Siemens. To send
a fax start transmission now. For Sales Department dial 22. For Technical Support dial 23."
If no valid fax signal, digit or extension is detected within 10 seconds of the greeting message, a second message is played and the call is transferred to an Attendant.
3-2
A31003-K1270-M100-3-76A9, 03/2007
HiPath 1100 Manager, Documentation
3_Basic.fm
For Internal Use Only
Basic Configuration
Line Attendants
Message
When an external call is answered, a greeting message is played and the call is transferred
to an attendant.
The following is an example of a recorded message: "You have reached Siemens. Your call
is being transferred."
Auto-Fax
When this mode is enabled, the system can detect a fax signal during the first ten seconds
of a conversation then transfer the call to a specified extension such as a Fax/DID. When
no signal is detected the conversation proceeds as usual.
"Fax Extension" Column
Use the Fax Extension column to specify which extensions are connected to a fax machine.
"Greeting Message" Column
Use the Greeting Message column to assign a greeting/message to a MSN. Additional
settings can be specified using the "Message Settings " Tab in the EVM subfolder.
3.1.2
"Day Service" Tab
Use this tab to assign Extensions,EVM Virtual Ports, Call Groups, Hunt Groups and UCD
Groups to external lines as First or Second Attendants for incoming calls for Day Service.
Note:
●
Call Groups (CG) - 770 to 779
●
Hunt Groups (HG) - 780 to 789
●
UCD Subscriber Groups - 790 to 799
Enter:
Extensions, Virtual Ports and Groups to be assigned as First Attendants; Extensions and
Virtual Ports to be assigned as Second Attendants for external lines in the "Selected" field. To
make this selection place the cursor in the "Available" field, select the Extension, Virtual Port
or Group, and use the ">" button to move to the "Selected" field. Use the"< " and "<< "
buttons to reset selected items in the "Available" field. You can also make the selection by double-clicking the selected item with the left mouse button.
"External Line" Column
The External Line column shows the external lines that can be configured.
A31003-K1270-M100-3-76A9, 03/2007
HiPath 1100 Manager, Documentation
3-3
3_Basic.fm
Basic Configuration
Line Attendants
For Internal Use Only
"First Attendant" Column
The First Attendant column contains the same information as the First Attendant field. It
also displays Extensions, Virtual Ports and Groups available for answering incoming calls.
"Second Attendant" Column
The Second Attendant column contains the same information in the Second Attendant
field. It also displays Extensions, Virtual Ports and Groups available for answering incoming calls when the First Attendant is unavailable or does not answer a call within the timeout
specified in the "Settings" Tab - "Waiting Timeout" Column.
>
When an EVM virtual port is configured as a Second Attendant and the First Attendant has Call Forwarding - No Answer enabled:
●
●
>
3.1.3
Call Forwarding Timeout for No Answer < Timeout, calls are routed to the
Call Forwarding destination when there is no answer. If a call is answered before
the timeout expires, the call is completed and the timeout is cancelled. If the timeout expires before the call is answered at the destination, the call is routed to
an EVM and a greeting is played.
Call Forwarding Timeout for No Answer >= Timeout: the call is forwarded to
an EVM and a greeting is played.
To add a Second Attendant you must first configure the First Attendant.
The extension configured as a First Attendant cannot be configured as a Second Attendant.
No more than 10 extensions can be configured as Attendants, and no more than one
Group can be assigned to an external line.
A Group cannot be configured as a Second Attendant.
"Night Service" Tab
Use this tab to assign Extensions,EVM Virtual Ports, Call Groups, Hunt Groups and UCD
Groups to external lines as First or Second Attendants for incoming calls during Night service.
Note:
●
Call Groups (CG) - 770 to 779
●
Hunt Groups (HG) - 780 to 789
●
UCD Subscriber Groups - 790 to 799
3-4
A31003-K1270-M100-3-76A9, 03/2007
HiPath 1100 Manager, Documentation
3_Basic.fm
For Internal Use Only
Basic Configuration
Line Attendants
Enter:
Extensions, Virtual Ports and Groups to be assigned as First Attendants; Extensions and
Virtual Ports to be assigned as Second Attendants for external lines in the "Selected" field. To
make this selection place the cursor in the "Available" field, select the Extension, a Virtual Port
or a Group, and use the ">" button to move to the "Selected" field. Use the"< " and "<< "
buttons to reset selected items in the "Available" field. You can also make the selection by double-clicking the selected item with the left mouse button.
"External Line" Column
The External Line column shows the external lines that can be configured.
"First Attendant" Column
The First Attendant column contains the same information as the First Attendant field. It
also displays Extensions, Virtual Ports and Groups available for answering incoming calls.
"Second Attendant" Column
The Second Attendant column contains the same information as the Second Attendant
field. It also displays Extensions, Virtual Ports and Groups available for answering incoming calls when the First Attendant is unavailable or does not answer a call within the timeout
specified in the "Settings" Tab - "Waiting Timeout" Column.
>
When an EVM virtual port is configured as a Second Attendant and the First Attendant has Call Forwarding - No Answer enabled:
●
●
>
Call Forwarding Timeout for No Answer < Timeout, calls are routed to the
Call Forwarding destination when there is no answer. If a call is answered before
the timeout expires, the call is completed and the timeout is cancelled. If the timeout expires before the call is answered at the destination, the call is routed to
an EVM and a greeting is played.
Call Forwarding Timeout for No Answer >= Timeout: the call is forwarded to
an EVM and a greeting is played.
To add a Second Attendant you must first configure the First Attendant.
The extension configured as a First Attendant cannot be configured as a Second Attendant.
No more than 10 extensions can be configured as Attendants, and no more than one
Group can be assigned to an external line.
A Group cannot be configured as a Second Attendant.
A31003-K1270-M100-3-76A9, 03/2007
HiPath 1100 Manager, Documentation
3-5
3_Basic.fm
Basic Configuration
MSN
3.2
For Internal Use Only
MSN
The HiPath 1100 can be equipped with an optional module for basic access (S0 ), E1 CAS access or S2 access. This allows leasing digital lines from a local telephone company or turning
a conventional telephone line into a digital one for faster and more efficient communications
(consult your local carrier).
>
If an MSN DID does not attend an external call, it will be stored in the unattended
calls list, specifying the Name/Number of the call and/or Name/Number called
(MSN). The fields that should appear in the display should be configured in System
Settings -> "General" Tab.
The HiPath 1100 system allows operation with two types of basic access.
Point-to-Multipoint Basic Access
Multiple Subscriber Numbers (MSN) can be assigned to Point-to-Multipoint Basic Access.
With these numbers different systems can be connected to a digital line (e.g., PABX, telephones, PCs, etc.). When a caller dials a MSN, the call rings at the system that is connected
to a digital line that recognizes the number dialed.
Point-to-Point Basic Access
System Access (point-to-point access) consists of a basic access for operating one system
only with the option of direct dialing to specified extensions (DID).
>
Check with your local carrier for information on what type of Access is available for
your PABX.
The type of access is configured in the Advanced → ISDN folder.
Use the MSN (Multi Subscriber Number) subfolder to assign/change MSN numbers on the digital line to extensions, extension groups and mailboxes (via EVM virtual ports) for answering
incoming calls. Configure the settings using the following three tabs:
The MSN subfolder contains the following four tabs:
●
Configuration tab
●
"Day Service" Tab
●
"Night Service" Tab
3-6
A31003-K1270-M100-3-76A9, 03/2007
HiPath 1100 Manager, Documentation
3_Basic.fm
For Internal Use Only
3.2.1
Basic Configuration
MSN
Configuration tab
Use this tab to register MSNs assigned to a digital line and configured according to the parameters shown in the following columns.
Note:
The slots that are available, as well as the MSN already configured, are displayed in this
tab.
The MSN reserved for DISA access is not displayed in this table.
Enter:
MSN numbers and configurations for each MSN in the following columns:
"Slot" Column
The Slot column shows the 140 slots available for configuration in the HiPath 1100.
"MSN" Column
The MSN column shows MSNs available for configuration.
MSN numbers can be entered manually or automatically through theMSN Wizard button
or the Browse button.
"Name" Column
On the Name column, enter the names assigned to MSN numbers.
"Waiting Timeout" Column
Use the Waiting Timeout column to select a period of time (in seconds) for an incoming
call to keep ringing at the First Attendant of an external line. If the call is not answered within the specified amount of time, it will be directed to the Second Attendant.
"Ring" Column
Use the Ring column to select one of four different types of rings for an incoming call to
signal an extension.
"Answering Mode" Column
Use the Answering Mode when the system features a DID/FAX facility configured and you
want to use one of the following answering features:
Disabled
Fax/DID features are disabled.
A31003-K1270-M100-3-76A9, 03/2007
HiPath 1100 Manager, Documentation
3-7
3_Basic.fm
Basic Configuration
MSN
For Internal Use Only
FAX
In this operating mode the module detects only fax signals. A greeting message is played
for all incoming external calls. If the caller wants to send a fax, the transmission can be
started at the end of the message. If no fax signal is detected within 10 seconds of the
greeting message a second message is played and the call is transferred to an Attendant.
DID
In this operating mode the facility detects extensions or digits entered and transfers the
calls. When an external call is answered, a greeting message is played to guide the caller.
The following is an example of a recorded message: "You have reached Siemens. Dial the
extension number you would like to reach: 22 for Sales Department or 23 for Technical
Support."
If the Fax/DID does not detect a valid MF signal within 10 seconds of the greeting message,
a second message is played and the call is transferred to an Attendant.
Fax/DID
In this operating mode the facility detects fax signals and extensions or digits entered.
When an external call is answered a greeting message is played to guide the caller.
The following is an example of a recorded message: "You have reached Siemens. To send
a fax start transmission now. For Sales Department dial 22. For Technical Support dial 23."
If no valid fax signal, digit or extension is detected within 10 seconds of the greeting message, a second message is played and the call is transferred to an Attendant.
Message
When an external call is answered, a greeting message is played and the call is transferred
to an attendant.
The following is an example of a recorded message: "You have reached Siemens. Your call
is being transferred."
Auto-Fax
When this mode is enabled, the system can detect a fax signal during the first ten seconds
of a conversation then transfer the call to a specified extension, such as a Fax/DID. When
no signal is detected the conversation proceeds as usual.
"Fax Extension" Column
Use the Fax Extension column to specify which extensions are connected to a fax machine.
"Greeting Message" Column
Use the Greeting Message column to assign a greeting/message to a MSN. Additional
settings can be specified using the "Message Settings " Tab, in the EVM subfolder.
3-8
A31003-K1270-M100-3-76A9, 03/2007
HiPath 1100 Manager, Documentation
3_Basic.fm
For Internal Use Only
Basic Configuration
MSN
"MSN Wizard" Button
Select this icon to open a Pop-up Window using the Setup Wizard to assign MSN numbers.
This speeds up the MSN sequence entry process in the HiPath 1100 Manager.
"Browse" Button
When using digital lines with Call Forwarding capability on a public network (depending on
the carrier) the Browse button allows you to query available MSNs and record them automatically on the directory.
MSN numbers are automatically entered only if remote operation is configured for POP
(Point-to-Multipoint). If the operation mode is configured for PP (Point-to-Point), only the
system number will be entered in the Advanced -> System Settings -> Regional Settings
folder. MSN numbers will need to be configured in Basic -> MSN -> Settings folder.
3.2.2
"Day Service" Tab
Use this tab to assign Extensions, Call Groups, Hunt Groups, voice mail UCD Groups and
Mailboxes to external lines as First or Second Attendants for incoming calls in Day service.
Note:
The system supports up to 140 MSNs. Each of these 140 numbers can be assigned to a list of
up to 10 extensions, 1 group or 1 mailbox through an EVM Virtual Port. The system allows independent configuration for incoming day and night calls. An MSN can have a maximum of 20
digits.
●
Call Groups (CG) - 770 to 779
●
Hunt Groups (HG) - 780 to 789
●
UCD Subscriber Groups - 790 to 799
●
EVM Virtual Ports - 744 to 747
Enter:
In the "Selected" field the MSNs to be changed or assigned to Extensions and Extension
Groups as First Attendants and Second Attendants for external lines. To make this selection
place the cursor in the "Available" field, select the Extension or Group, and use the ">" button
to move to the "Selected" field. Use the"< " and "<< " buttons to reset selected items in the
"Available" field. You can also make the selection by double-clicking the selected item with the
left mouse button.
A31003-K1270-M100-3-76A9, 03/2007
HiPath 1100 Manager, Documentation
3-9
3_Basic.fm
Basic Configuration
MSN
>
For Internal Use Only
A Voice mail group may only be selected as a second attendant if only one extension
is selected as first DID and the group is configured as EVM
(see System Settings -> "General" Tab, Voice mail field).
If the EVM group is changed and the old group is configured as the second attendant, that group should be removed manually from the second attendant list and the
new group inserted in the list.
"MSN" Column
The MSN column shows MSNs available for configuration.
"First Attendant" Column
The First Attendant column contains the same information as the First Attendant field. It
also displays Extensions, Groups and EVM Virtual Ports (mailboxes) available for answering incoming calls.
"Second Attendant" Column
The Second Attendant column contains the same information in the Second Attendant
field. It also displays Extensions, Groups and EVM Virtual Ports (mailboxes) available for
answering incoming calls when the First Attendant is unavailable or does not answer a call
within the timeout specified in the Configuration tab - "Waiting Timeout" Column.
3.2.3
"Night Service" Tab
Use this tab to assign Extensions, Call Groups, Hunt Groups, voice mail UCD Groups and
Mailboxes to MSN numbers as First or Second Attendants for incoming calls in Night service.
Note:
The system supports up to 140 MSNs. Each of these 140 numbers can be assigned to a list of
up to 10 extensions, 1 group or 1 mailbox through an EVM Virtual Port. The system allows independent configuration for incoming day and night calls. An MSN can have a maximum of 20
digits.
●
Call Groups (CG) - 770 to 779
●
Hunt Groups (HG) - 780 to 789
●
UCD Subscriber Groups - 790 to 799
●
EVM Virtual Ports - 744 to 747
3-10
A31003-K1270-M100-3-76A9, 03/2007
HiPath 1100 Manager, Documentation
3_Basic.fm
For Internal Use Only
Basic Configuration
MSN
Enter:
MSNs to be assigned to Extensions and Groups as First Attendants and Extensions to be
assigned as Second Attendants for external lines in the "Selected" field. To make this selection
place the cursor in the "Available" field, select the Extension or Group, and use the ">" button
to move to the "Selected" field. Use the"< " and "<< " buttons to reset selected items in the
"Available" field. You can also make the selection by double-clicking the selected item with the
left mouse button.
>
A Voice mail group may only be selected as a second attendant if only one extension
is selected as first DID and the group is configured as EVM
(see System Settings -> "General" Tab, Voice mail field).
If the EVM group is changed and the old group is configured as the second attendant, that group should be removed manually from the second attendant list and the
new group inserted in the list.
"MSN" Column
The MSN column shows MSNs available for configuration.
"First Attendant" Column
The First Attendant column contains the same information as the First Attendant field. It
also displays Extensions, Groups and EVM Virtual Ports (mailboxes) available for answering incoming calls.
"Second Attendant" Column
The Second Attendant column contains the same information in the Second Attendant
field. It also displays Extensions, Groups and EVM Virtual Ports (mailboxes) available for
answering incoming calls when the First Attendant is unavailable or does not answer a call
within the timeout specified in the Configuration tab - "Waiting Timeout" Column.
To configure MSN for "Day Incoming/Outgoing" and "Night Incoming/Outgoing" go to the Advanced → MSN folder.
>
●
●
●
●
To add a Second Attendant you must first configure the First Attendant.
The extension configured as a First Attendant cannot be configured as a Second Attendant.
No more than 10 extensions can be configured as Attendants, and no more than
one Group can be assigned to each external line or one EVM Virtual Port (mailbox).
A Group cannot be configured as a Second Attendant.
A31003-K1270-M100-3-76A9, 03/2007
HiPath 1100 Manager, Documentation
3-11
3_Basic.fm
Basic Configuration
System Speed Dialing
3.3
For Internal Use Only
System Speed Dialing
In the subfolder System Speed Dialing you can add or change information related to the System Speed Dialing. Configure the settings in these three columns:
Note:
A maximum of 250 speed dial entries, including name and number, can be entered.
Individual Speed Dialing using abbreviated numbers for each extension cannot be configured using the HiPath 1100 Manager.
You can import/export names and numbers between the System Speed Dialing and other
applications using the Cut and Paste commands.
The last entry in the System Speed Dialing is reserved for the sensor and for the relay of
the HiPath 1120 MOH Module.
Enter:
Enter Names and Numbers into the Phonebook by editing the appropriate field in each
column. It is possible to enter an external number (that requires dialing an access code 0)
or internal numbers. It is recommended that whatever procedure you chose for entering
names in the phonebook (for example, last name, first name) should be applied consistently each time you make an entry. This will help when using the Lookup feature in the System Speed Dial subfolder as well as the "Phonebook Search" for extensions with system
telephones.
"Abbreviated Number" Column
The Abbreviated Number column contains abbreviated numbers that can be used by the
extensions for speed dialing.
"Name" Column
In the Name column enter names linked to phone numbers to facilitate a ’Phonebook
Search" by system telephones or a Browse option.
>
KS-type system telephones (E 822 ST and Profiset 3030) do not support characters
of the type “Ç” and “Ô .
"Number" Column
In the Number column you enter the numbers for the Phonebook. Each number entry may
have up to 20 digits.
"Find" Field
The Find field lets you look for a specific word whenever needed.
3-12
A31003-K1270-M100-3-76A9, 03/2007
HiPath 1100 Manager, Documentation
3_Basic.fm
For Internal Use Only
Basic Configuration
Extensions
"Find" Button
The Find buttons starts a search.
3.4
Extensions
The Extensions subfolder contains names assigned to extensions.
Note:
Up to 20 characters can be used per extension.
Enter:
A Name for each extension by editing the fields in the Name column.
"Extension" Column
The Extension column displays the numbers available for the extensions.
"Name" Column
In the Name column enter names linked to phone numbers to facilitate a "Phonebook
Search" and shown on system telephone displays.
>
KS-type system telephones (E 822 ST and Profiset 3030) do not support characters
such as “Ç” or “Ô .
A31003-K1270-M100-3-76A9, 03/2007
HiPath 1100 Manager, Documentation
3-13
3_Basic.fm
Basic Configuration
Call Charges
3.5
For Internal Use Only
Call Charges
>
On HiPath 1100 systems the Billing facility (Call Cost Limit by Extension) is only
available for digital trunks (ISDN and CAS). Please consult your local carrier to know
if this service is provided.
In the Call Charge subfolder you can configure some features to estimate/limit external line
costs for each extension for a set period of time.
Note:
When this check box has been selected and the extension reaches the specified cost limit,
the extension cannot make any more external calls.
Enter:
The Amount that can be spent, then confirm this amount and set the date to reset the
charges.
"Extension" column
The Extension column displays the numbers available for the extensions.
"Amount" Column
In the Amount column you can specify charge call limits for each extension (up to six digits).
"Current Cost" Column
The Current Cost column displays the currently accumulated call cost totals.
"With Limits" Column
If the With limits check box is not checked (default setting), it means that the extension
may have unlimited call charges.
"Monthly Reset" Field
The Monthly Reset field (one or two digits) is a monthly date when the call charges restart.
When the Monthly Reset (monthly, 00:00) checkbox is selected, you can specify a Day
for the call charge limit.
>
3-14
Enter a value (one or two digits) between 1 and 28 to restart the Day. (Note: If
you enter the value 31, the call charge limit will only be reset for months that
have 31 days.)
The call charge limits are reset at midnight on the day entered.
A31003-K1270-M100-3-76A9, 03/2007
HiPath 1100 Manager, Documentation
3_Basic.fm
For Internal Use Only
3.6
Basic Configuration
Call Timeout
Call Timeout
Use the Call timeout subfolder to set the timeout for making external calls for each extension.
In other words, when the total time of the external calls made reaches the time limit set for calls
underway, these calls will be interrupted and no further calls may be made until more time
"credit" is awarded.
Note:
Calls may also be interrupted if the extension has been configured with these features:
●
●
”Timer for outgoing external call" - the limit also stops counting.
”Billing for an extension " - the call will only be started or can continue if the time and
credit limit have not been reached.
For simultaneous calls, call times will be counted separately.
If the call finishes before 5 seconds have elapsed, the time will be counted as if it were completed.
Enter:
The time limit for making external calls for each extension.
"Extension" field
The Extension field displays the numbers of the available extensions.
“Total time” field
The Total time field sets the timeout for external calls. The time can be set from 0 to 90
hours in 5-second intervals.
“Elapsed time” field
The Elapsed time field shows the time spent by the user on external calls.
“Enable time” field
The Enable time field enables or disables the external call timeout for each extension.
The default setting for the timeout is disabled.
“Monthly reset” checkbox
The Monthly reset checkbox allows the user to define a day of the month on which the
timeout for external calls on all extensions will begin.
Selecting the checkbox will enable the Day field to select the day for the monthly reset. The
default setting for this field is disabled.
A31003-K1270-M100-3-76A9, 03/2007
HiPath 1100 Manager, Documentation
3-15
3_Basic.fm
Basic Configuration
Call Timeout
3-16
For Internal Use Only
A31003-K1270-M100-3-76A9, 03/2007
HiPath 1100 Manager, Documentation
For Internal Use Only
4
4_Advanced.fm
Advanced Configuration
Advanced Configuration
In the Advanced (Advanced Configuration) folder you can configure the following functions:
●
Extensions
●
PABX Trace
●
Service
●
Entry Voice Mail - EVM
●
SNMP
●
Account code
●
Class of Service (COS)
●
Groups
●
ISDN
●
External Lines
●
LCR
●
ACS
●
System Settings
●
Calendar
●
Internal entrance telephone
●
Sensor and Relay
●
MSN
●
Fax/DID
●
Timers
●
PABX Information
A31003-K1270-M100-3-76A9, 03/2007
HiPath 1100 Manager, Documentation
4-1
4_Advanced.fm
Advanced Configuration
Extensions
4.1
For Internal Use Only
Extensions
The Extensions subfolder contains the following four tabs:
●
"General" Tab
●
"Interface CD" Tab
●
"Key Assignment" Tab
●
"Flexible Number" Tab
●
"ISDN Telephones" Tab
●
"Call forward - no answer" tab
4.1.1
"General" Tab
Note:
All connected analog terminals as well as the existing system telephones are shown in
this tab.
The Columns show the current extension configuration status for each item available in
the fields immediately below.
You can import/export the settings to other items using the Copy and Paste functions.
Enter:
The appropriate settings by extension into the corresponding fields.
"Extension" Field
In the Extension field you can select an extension to configure (this can also be done by
selecting a sequence of extensions.)
"Name" Input Field
In the Name field, you can change the name assigned (up to 16 characters) to the Extensions subfolder under Basic Configuration. For system telephones, the name is used instead of a number or with a number.
"Dialing Mode" Field
The Dialing Mode field is available only for analog lines for which the dialing mode can be
configured with one of the following options:
4-2
●
Automatic (default)
●
Pulse (Dial Pulse mode)
A31003-K1270-M100-3-76A9, 03/2007
HiPath 1100 Manager, Documentation
4_Advanced.fm
For Internal Use Only
●
Advanced Configuration
Extensions
Tone (Multifrequency tone dialing)
Note:
By default, the dialing mode for modern telephones is DTMF (Dual-Tone Multifrequency).
For most telephones, however, it is possible to change the dialing mode to Pulse . Older
telephones with a dial operate in Pulse mode.
In Automatic mode (default) the HiPath 1100 system automatically detects the dialing
mode based on the first pulse dialed. This mode is useful in the case of unknown terminals
or extensions where telephones are frequently changed.
Touch-tone telephones usually feature a Consultation button (that causes a brief loop interruption) for placing consultation calls on hold. The loop interruption time can be
changed in Timers, General Tab Flash Detection Timeout.
"Type" field
Use the Type field to specify the type of equipment connected to the A/B extension or S0
by selecting one of the following options:
●
Normal (system telephone, ISDN or analog telephone)
●
Data (Fax/modem)
●
Answering machine
●
External door extension
Note:
The Data (Fax/Modem) option uses the same dial tones and call sequence as the public
network to avoid problems in detecting pauses, internal dial tones and/or duplicate calls.
In addition, the override and call waiting functions are blocked in order to prevent transmission faults.
>
When connecting a fax device, no additional settings (such as Fax Detection)
need to be configured.
The Answering machine option requires the same configuration as in "Data (Fax/Modem)". However, if Auto-answering is activated, you can answer calls.
The External door extension option supports devices connected directly to analog ports
A/B or in the bar of the S0 module, as follows:
●
●
The external analog entrance telephone device must behave like an analog telephone (dialing, detection and DTMF control)
The ISDN External door extension device must behave like an ISDN telephone. It
must also be controlled by DTMF signals.
A31003-K1270-M100-3-76A9, 03/2007
HiPath 1100 Manager, Documentation
4-3
4_Advanced.fm
Advanced Configuration
Extensions
>
For Internal Use Only
Consult External door extension manual to check settings.
"CLIP/COLP" Field
When the CLIP/COLP field is selected, the extension called can receive caller ID information (number and/or name). If a configured extension has a telephone with a display, capable of detecting the signal (DTMF or FSK) from a local carrier, Caller ID information (or
information from forwarded caller) appears on the display.
●
●
●
●
●
●
●
None for telephones without a display and without CLIP feature (default).
DTMF before ringing shows the caller’s number before the phone rings on the display
of analog telephones with CLIP.
DTMF during ringing uses the DTMF protocol to show Caller ID information on the
display of analog telephones with CLIP during the first two rings.
FSK before ringing shows the caller’s number before the phone rings on the display
of analog telephones with CLIP.
FSK during ringing uses the FSK protocol to show Caller ID information on the display of analog telephones with CLIP during the first two rings.
FSK before ringing or during a conversation shows the caller’s number on the display of analog telephones enabled for CLIP, before the phone rings or during a conversation.
FSK during ringing or when a conversation is in progress shows the caller’s number on the display of analog telephones with CLIP while the phone is ringing or during
a conversation.
Note:
The transmission mode for the number and/or name of the extension is specified via DTMF
or FSK protocol. This setting must match the mode supported by the terminal (see telephone documentation).
CLIP/COLP facility for the switch must be provided by a local carrier.
"Call Charges" Field
Use the Call Charges field to specify whether call charges should be assessed for an extension. If charges are to be assessed, specify the Cost Factor to be used (Factor 1, Factor 2) for the calculation as specified under the "General" Tab in the System Settings
folder.
●
4-4
Default, Default Call Charges
A31003-K1270-M100-3-76A9, 03/2007
HiPath 1100 Manager, Documentation
4_Advanced.fm
For Internal Use Only
●
●
Advanced Configuration
Extensions
Factor 1 means call charges are assessed based on regular rates
Factor 2 means call charges are assessed based on higher rates (for example, for pay
phones).
"Override" checkbox
When the Override checkbox is selected, the extension can be configured for overriding
a call or making an urgent call to another extension, allowing the user to talk with the parties having a conversation. When this feature is used, all parties on the line hear a warning
signal.
"Pulse/Charge" checkbox
When the Pulse/Charge checkbox is selected, a call’s pulse charge information can be
sent to an analog extension (12kHz/16kHz). With this feature, an extension’s telephone set
can display the number of pulses or the amount charged for the call. Please refer to the
analog telephone documentation to find out whether it supports a metering display and, in
this case, which transfer method is used.
"DISA Permission" checkbox
When the DISA Permission checkbox is selected, extensions can access system functions from a HiPath 1100 external system through MF dialing (the MSN for DISA is configured in the "General" Tab of the System Settings subfolder). An Electronic Lock password must be entered in the extension itself (the default password is 00000) (see User’s
Manual).
"Auto-Answering" Checkbox
When the Auto-Answering checkbox is selected, the system telephone assigned to that
extension slot will answer calls automatically. When this feature is enabled a microphone
is turned on as soon as there is a warning signal. It is possible then to send a message
through the system telephone speakerphone. The message cannot be answered until the
microphone has been enabled.
7
If the telephone has no microphone (e.g. analog telephones,
optiPoint Entry and basic), the Auto-Answering checkbox will not be enabled.
"Hotline" Field
Use the Hotline field to configure the feature. When this feature is enabled a specified
number stored in the appropriate System Speed Dialing slot is automatically dialed when
the handset is lifted or the speakerphone key is pressed.
A31003-K1270-M100-3-76A9, 03/2007
HiPath 1100 Manager, Documentation
4-5
4_Advanced.fm
Advanced Configuration
Extensions
For Internal Use Only
"Warmline" Field
Use the Warmline field to specify a time delay (0-9 seconds) between the moment the
handset is lifted or the speakerphone key is pressed until the moment the call is connected.
In this case the number stored in the System Speed Dialing is not immediately dialed. As
specified in the Warmline field, there is a delay. This extension then can be used as a normal telephone. If no number is dialed during the specified delay time, the number as configured in the Hotline field and stored in System Speed Dialing, is dialed.
"External-to-External Transfer" Checkbox
The Transfer External - External box allows a specified extension to transfer an external
call (incoming or outgoing) to another external call.
7
An External-to-External Transfer over an analog line is terminated in the following three situations:
Elapsed timeout for external-to-external connection
(code 218);
●
When a busy signal is detected
Polarity Inversion (Code 158)
●
7
An External-to-External transfer can only be made when at least one of the lines
is a digital line and one of the calls is outgoing.
"Silent Monitoring" Checkbox
When the Silent Monitoring checkbox is selected, an extension can override another extension without sending a warning signal to the parties that are having a conversation.
"COS Changeover" Checkbox
When the COS Changeover checkbox is selected, an extension can temporarily transfer
its assigned Class of Service (COS) to another system extension that has a lower COS in
order to make calls as if it were at the first extension.
"Collect Call Barring" Checkbox
When the Collect Call Barring checkbox is selected, all collect calls to the extension in
question are automatically rejected by the system.
"Hide Group Prefix" Checkbox
With the Hide Group Prefix checkbox an extension that receives an external call over an
external line that belongs to a group of external lines can hide the calling number so it does
not show on the display. When a special access call is received and transferred to an extension with this feature is enabled, the external line number does not show on the display.
4-6
A31003-K1270-M100-3-76A9, 03/2007
HiPath 1100 Manager, Documentation
4_Advanced.fm
For Internal Use Only
Advanced Configuration
Extensions
(For example: An analog extension receives an external call over an external line that belongs to Group 890 - number 24987049. When this checkbox is selected, the display show
only 24987049. When this checkbox is clear, the display shows 89024987049, that is, the
number for the group of external lines followed by the external number.
7
To enable this feature, analog extensions must be configured for CLIP.
"Time between Calls" Field
In the Call Timer field you can specify a timeout for each outgoing call made by each extension. The time count starts upon connection of a call and it does not restart while the
call is in progress (e.g., when there is a transfer). Once the time expires, the call is terminated.
"Default Access to a Group of External Lines" Field
Use the Default Access to a Group of External Lines field to specify an access code for
a group of external lines for each extension.
7
Example:
801 and 802 external lines are programmed as part of the 890 group of lines.
When using code 002, Extension 11/101 is assigned to Group 890. This means
that when the "0" access code is entered at this extension a search for a free
line is performed in Group 890.
For code 002, when extension 11/101 is assigned to group 0 and the external
access code "0" is dialed, the search for an available line is done on group "0."
If no available group line is found and the group is programmed with code 099
- "Overflow for a group of External Lines" on page 34 - the system will search a
different specified group.
"Automatic Line Seizure" Checkbox
When the Automatic Line Seizure checkbox is selected, the HiPath 1100 system allows
the user to dial an external call directly once the handset is lifted without requiring an access code (such as 0). When this setting is selected, you must enter an access code or
press the Extension key to make an internal call (see Operator’s Manual for instructions
for different telephone types).
7
When the "Automatic ID" option is selected, the activation of this feature may
impact the programming of the "Dialing Mode" Field. It is recommended that
you reconfigure the Dialing Mode (Pulse or Tone) for the extensions.
A31003-K1270-M100-3-76A9, 03/2007
HiPath 1100 Manager, Documentation
4-7
4_Advanced.fm
Advanced Configuration
Extensions
For Internal Use Only
"Blocked Extensions COS" Field
The Blocked Extension COS field is used for specifying one of eight Classes of Service
(COS) for a blocked extension. When set, even an extension with an electronic lock activated can be changed to any class of service.
●
●
●
●
●
●
●
●
No Permission - external calls can only be made using the System Speed Dialing
phonebook.
Outward-Restricted Trunk Access with Denied List 1 - external calls are allowed
except for the number on the Denied List (4 slots).
Outward-Restricted Trunk Access with Denied List 2 - external calls are allowed
except for the number on the Denied List (10 slots).
Outward-Restricted Trunk Access with Denied List 3 - external calls are allowed
except for the number on the Denied List (35 slots).
Permission List 1 - external calls can only be made using the System Speed Dialing
or the Permission List (4 slots).
Permission List 2 - external calls can only be made using the System Speed Dialing
or the Permission List (10 slots).
Permission List 3 - external calls can only be made using the System Speed Dialing
or the Permission List (25 slots).
Total Permission - all external calls are allowed.
Note:
The system administrator is responsible for maintaining the balance of the Classes of Service used by an extension that is blocked or free. This prevents an extension with a restricted service from having free access when the lock is not activated and then keep an unrestricted category when the lock is activated.
"DTMF Tone for Answering Signal" Field
The DTMF Tone for Answering Signal field allows you to configure a DTMF tone to be
sent to the PABX for each extension with an answering signal for external calls. This allows
ticketing equipment (for example, phone booths) to be connected between an extension
and a PABX.
Types of DTMF tone include: A, B, C, D, and OFF (default) for deactivating this feature.
"Disable Conditional Call Forwarding" Checkbox
When the Disable Conditional Call Forwardingbox is selected, an extension can forward
incoming calls to a list of destinations, according to conditions specified using a TAPI-type
application such as Windows TAPI Browser. The settings of the previous list or Unconditional Call Forwarding will be replaced with the new list settings.
4-8
A31003-K1270-M100-3-76A9, 03/2007
HiPath 1100 Manager, Documentation
4_Advanced.fm
Advanced Configuration
Extensions
For Internal Use Only
7
7
Conditional Call Forwarding Limited by Extension can be configured using a CTI
interface.
●
●
●
The system’s maximum number for Call Forwarding is 50.
Conditional Call Forwarding has priority over an unconditional Call Forwarding.
Conditional Call Forwarding is not available for S0 extensions.
Functions: The extension has permission for Conditional Call Forwarding and
the system is connected to a PC running a TAPI application.
1.
Conditional Call Forwarding rules and conditions for a specified extension
can be defined by using a Windows TAPI application
2.
Apply the settings to the extension desired.
3.
From this moment on the extension is forwarded.
"Call Forwarding - Busy following Call Forwarding - No Answer" Checkbox
When the Call Forwarding - Busy following Call Forwarding - No Answer checkbox is
selected, an incoming call routed to an extension configured for Call Forwarding - No Answer (see Call Forwarding - No Answer in the User Manual) can be forwarded to the same
extension configured for Call Forwarding - Busy.
7
Urgent Call and Callback when Busy facilities do not work when Call Forwarding
- Busy and Call Forwarding - No Answer are activated.
If the extension called is configured to use Do Not Disturb and Call Forwarding
- Busy then the call will be forwarded. If Do Not Disturb is enabled at the destination to which the call is forwarded, the caller will hear a busy signal.
"External CFW" checkbox
With the External CFW checkbox, you can enable and disable Call Forward Unconditional
in the extension.
"Next" Button
Use the Next button to go to the next available external line.
"Delete" Button
The Delete button deletes all settings configured for a selected MSN.
A31003-K1270-M100-3-76A9, 03/2007
HiPath 1100 Manager, Documentation
4-9
4_Advanced.fm
Advanced Configuration
Extensions
4.1.2
For Internal Use Only
"Interface CD" Tab
Note:
All system CD slots available for connecting System Telephones are shown in this manual.
The Columns display the current extension settings for each item available.
You can import/export the settings to other items using the Copy and Paste functions.
Enter:
The assignment of extensions to slots
"Slot" Column
The Slot column shows all CD available slots in the system for connecting System Telephones and Key Expansion Modules.
"Extension" Column
Use the Extension column to select an extension to be assigned a CD slot. A system telephone or Key Expansion Module can then be connected to this extension.
"Function" Column
The Function column shows the function assigned to the CD interface.
●
Main - A system telephone is connected to the slot/extension
●
First Expansion - a Key Expansion Module is connected to the slot/extension
●
Second Expansion - a Key Expansion Module is connected to a second slot/extension
4.1.3
"Key Assignment" Tab
The Key Assignment tab is used for programming System Telephones keys and Key Expansion Modules.
Note:
For details on how to program key features see the chapter HiPath 1100Programming the
Keys in the User’s Manual.
The HiPath 1100 system automatically recognizes system telephones.
Enter:
The Extension to which the system telephone is connected then select a Programmable
Key to be programmed for a specific function.
4-10
A31003-K1270-M100-3-76A9, 03/2007
HiPath 1100 Manager, Documentation
4_Advanced.fm
For Internal Use Only
Advanced Configuration
Extensions
If your HiPath 1100 has Key Expansion Modules installed, you can program the function
keys using the Expansion field.
"Extension" Field
In the Extension field select an extension to be configured.
"Module" Field
In the field Module, select the module to be configured. The Modules of this field are defined on the button Change Options.
"Change Telephone" Button
With the Change Telephone button you can select the type of telephone to be configured.
Note:
If using optiPoint telephones, check to see in which slot the UPN card is installed. The first
extension to be configured for an optiPoint telephone is the one installed in the card’s first slot.
"Type" Field
In the Type field select an extension to be configured.
"Change Options" Button
When the Change Options button is pressed a pop-up window appears for configuring the
telephone.
"Key Modules" Field
The Key Modules field allows you to specify the number of Key Modules to be used for
expanding programmable keys. The maximum number of modules allowed is 2 per telephone.
See also the optiPoint Manual (A31003-H8400-B988-**-6Z19).
"Memory Module" Checkbox
The Memory Module checkbox provides connection for a "Memory Module" that helps
configuring the phonebook.
"TA S0" Checkbox
The TA S0 checkbox lets you configure a connection for devices such as a S0 telephone,
a S0 modem, etc.
"Analog TA" Checkbox
The Analog TA checkbox allows you to configure a connection for an analog telephone.
A31003-K1270-M100-3-76A9, 03/2007
HiPath 1100 Manager, Documentation
4-11
4_Advanced.fm
Advanced Configuration
Extensions
For Internal Use Only
"Telephone TA" Checkbox
The Telephone TA checkbox provides a connection to another optiPoint 500 telephone.
7
The HiPath 1120 requires an additional power supply when using more than
four optiPoint 500 (Master or Slave) telephones. (See Chapter 3 (List of Modules) in the Service Manual - A31003-K1160-S100-*-**20.)
3
"BLF" checkbox
The BLF checkbox enables connections from an optiPoint BLF console. OptiPoint BLF is
an additional terminal that enables status indication for each extension.
"Feature Codes" Field
In the Feature Codes field select a Feature from the list. Depending on the features selected, you may need to set one or two Parameters (First Parameter and Second Parameters fields are enabled).
"Virtual Keypad" Button
The Virtual Keypad button switches between the system’s Main Keypad and KS system
telephones Virtual Keypad.
The Virtual Keypad allows you to expand the number of programmable keys available.
The same key is used to indicate the status of two different features. For example, on the
main keypad it indicates when Night service is enabled, and on the virtual keypad it activates the Room Monitor feature.
"Print Key Label" Button
The Print Key Label button is used for printing labels for programmed features/services
in the "Feature Codes" Field for each key.
When the button is pressed, the Print Key Label button opens a Word-type file (.doc) containing a printable label for features/services programmed for each key. This labels then
can be printed or edited.
"Erase disconnected consoles” button"
The Erase disconnected consoles button should be used if the message "Key memory
is full" is shown on the Display when connecting an optiPoint key module or an optiPoint
BLF console to the optiPoint 500 telephone set or activating a virtual keypad (See User
Manual - A31003-K1270-B102-*-* ) on a system telephone (KS).
7
4-12
If this code is used, all the programmed keys of the disconnected consoles will
be lost.
A31003-K1270-M100-3-76A9, 03/2007
HiPath 1100 Manager, Documentation
4_Advanced.fm
For Internal Use Only
4.1.4
Advanced Configuration
Extensions
"Flexible Number" Tab
In the Flexible Number tab you can change the default settings for internal numbers.
Note:
You can enter up to five digits.
This tab displays all of the extensions that are connected.
The Columns show the name/number assigned to each extension.
You can import/export the settings to other items using the Copy and Paste functions.
Enter:
The new extension number in the Extension column as well as the name in the Name column, if necessary.
"Port" Column
The Port column shows the logical slot for the system’s extensions.
"Extension" Column
In the Extension column select an extension to be configured and enter the new number.
"Name" Column
In the Name column you can change the name (up to 16 characters) entered in the subfolder Extensions for the Basic Configuration. For system telephones, the name is used
instead of a number or with a number.
4.1.5
"ISDN Telephones" Tab
"Extension" Column
The Extension column shows the slots available for connecting ISDN telephones.
"Slot and Physical Port" Column
The Slot and Physical Port field shows the slot where the S0 module is connected as well
as the logical number for the S0 port.
When using Automatic Internal MSN Distribution, many MSN numbers can be configured
for each S0 interface(See Programming Manual - A31003-K1270-U100-X-XX19).
A31003-K1270-M100-3-76A9, 03/2007
HiPath 1100 Manager, Documentation
4-13
4_Advanced.fm
Advanced Configuration
PABX Trace
4.1.6
For Internal Use Only
"Call forward - no answer" tab
The Call forward - No answer tab is used to set a new destination for the call if it cannot be
answered.
"Extension" Field
In the Extension field you can select an extension to configure (this can also be done by
selecting a sequence of extensions).
"Call Forward Configuration" field
"Destination" field
The Destination field allows you to configure the destination of the forwarded call. The
destination can be set as: OFF, Extension, External line groups, Cal groups, UCD group
or Virtual Ports.
7
If the External line groups option is chosen, call forwarding will be enabled even
if the Call Forward Trunk Unconditional checkbox is disabled.
"Number to be called" field
In the Number to be called field, insert a number of up to 20 digits to which calls should
be forwarded. To enable this field, the destination configured should be a Group of external
lines.
Note:
You can set Call Forward Trunk Unconditional for up to 8 extensions. If the user tries to
configure more extensions than the permitted number, a message will appear.
4.2
PABX Trace
PABX Trace is a tool used to monitor the events that have occurred in the PABX during a certain
period.
Note:
This service can also be started/stopped using the feature codes (see User Manual).
Enter:
The items that you wish to analyze:
"Profiles" field
The Profiles field allows you to set the profiles of the PABX to be monitored using the
trace. You may select more than one profile of the PABX.
4-14
A31003-K1270-M100-3-76A9, 03/2007
HiPath 1100 Manager, Documentation
4_Advanced.fm
For Internal Use Only
Advanced Configuration
PABX Trace
Possible profiles are:
●
Custom (this option will indicate that a profile created with the XTracer is stored in the
PABX)
●
Analog extensions
●
Analog trunks
●
optiPoint extensions
●
KS extensions
●
ISDN Phone
●
ISDN trunk
●
Voice mail
●
CLIP/FDW
●
Internal connections
●
Sensor/Relay
●
ISDN/CAS Layer 3
●
ISDN Layers 1 and 2
●
optiPoint Layers 1 and 2.
"Clear" button
The Clear button allows you to delete the profile settings, including the custom option.
"Extended trace" field
The Extended trace field allows you to save the information on the trace in a non-volatile
memory.
"Enable" checkbox
The Enable checkbox allows you to enable the extended trace.
"Trace" field
Use the Trace field to save the information of the trace in a volatile memory.
After switching off or updating data you do not need to reconfigure the trace, although only
the configuration and the status will be saved. The data will be lost when any of these
events occur.
A31003-K1270-M100-3-76A9, 03/2007
HiPath 1100 Manager, Documentation
4-15
4_Advanced.fm
Advanced Configuration
Service
For Internal Use Only
"Start" button
The Start button sends a message for the PABX to start the trace. If the settings are
changed, this will be inserted before starting the trace.
"Stop" button
The Stop button sends a message for the PABX to stop the trace.
"Download" button
The Download button manages the *.dtr file that must be sent to technical support. The
download should be made after the trace is finished.
>
4.3
This option will only be available in Restricted mode (CTRL+SHIFT+F5), where
the support technician should have the development password to access this
option. The Trace tab will not be visible when the Manager is in Offline mode
and will not be printed in the Manager Report.
Consult technical support for further details.
Service
The Service tab provides general information on the services available.
The Service subfolder contains the following tabs:
●
"General" tab
●
"Extensions" tab
●
"MSN" tab
●
"External lines" tab
> You can save a backup copy of the database of the services in a .bup file.
4.3.1
"General" tab
The General tab allows you to see the status of the services (active or not).
"Service" field
The Service field displays the list of services that can be viewed. These services are:
●
Call Forward Trunk Unconditional
4-16
A31003-K1270-M100-3-76A9, 03/2007
HiPath 1100 Manager, Documentation
4_Advanced.fm
For Internal Use Only
●
Call Forward Trunk No Answer
●
Call Forward Trunk on busy
●
Night service
●
Extended trace.
Advanced Configuration
Service
"Status" field
The Status field displays the status of the service (enabled or disabled).
"Destination" field
The Destination field shows the destination of forwarded calls.
4.3.2
"Extensions" tab
The Extensions tab allows you to see the status of the services according to each extension
(enabled or not enabled).
"Service" field
The Service field displays the list of services for each extension that can be shown. These services are:
●
Call forward
●
Call forward - No answer
●
Call forwarding - conditional
●
UCD Group login
●
Handsfree answerback
●
Data transmission
●
Headphone
●
Electronic lock
●
UCD group login
●
Hunt group login
●
Restriction for sending MSN
●
Do not disturb
●
Call Waiting signaling tone.
A31003-K1270-M100-3-76A9, 03/2007
HiPath 1100 Manager, Documentation
4-17
4_Advanced.fm
Advanced Configuration
Service
For Internal Use Only
"Status" field
The Status field displays the status of the service of each extension (enabled or disabled).
"Destination" field
The Destination field shows the destination of forwarded calls.
4.3.3
"MSN" tab
The MSN tab allows you to see the status of the services for each MSN (enabled or not enabled).
"Service" field
The Service field displays the list of services of each MSN that can be viewed. These services are:
●
Call forward
●
Call forward - no answer
●
Call forwarding - busy
●
Busy signal
"Status" field
The Status field displays the status of the service of each MSN (enabled or disabled).
"Destination" field
The Destination field shows the destination of forwarded calls.
4.3.4
"External lines" tab
The External lines tab allows you to see of the status of the services for each line (enabled or
not enabled).
"Service" field
The Service field displays the list of services of each line that can be viewed. The service
that can be viewed is:
●
Internet access.
"Status" field
The Status field displays the status of the service of each line (enabled or disabled).
4-18
A31003-K1270-M100-3-76A9, 03/2007
HiPath 1100 Manager, Documentation
4_Advanced.fm
For Internal Use Only
Advanced Configuration
Entry Voice Mail - EVM
"Destination" field
The Destination field shows the destination of forwarded calls.
4.4
Entry Voice Mail - EVM
EVM (Entry Voice Mail) is a Voice Mail solution for HiPath 1100 systems. Features are controlled by pressing keys on a system telephone or any type of equipment with MF dialing capability.
Feature Overview:
●
24 standard mailboxes, 2 of which can be used as forwarding mailboxes (message/greeting for Day or Night Service).
●
Mailboxes can be configured automatically or by the user.
●
Capability for message/music playback before answering.
●
Up to two different greetings.
●
Manual or Day/Night Service greeting selection.
●
Context-sensitive User’s Guide
●
Messages inform users of current menu options.
●
Two parallel actions are allowed for call transfer and auto-answering (2 message ports).
●
Capability for up to 120 minutes of voice recording.
●
Maximum voice message recording time for each mailbox is 5 minutes, configurable from
1 to 5 minutes. The default setting is 2 minutes.
●
Date and time display for each message.
●
Memory overload alert when it exceeds 80%.
>
During EVM (Entry Voice Mail) configuration both channels are blocked. EVM
settings can only be used after exiting the EVM subfolder.
A31003-K1270-M100-3-76A9, 03/2007
HiPath 1100 Manager, Documentation
4-19
4_Advanced.fm
Advanced Configuration
Entry Voice Mail - EVM
>
For Internal Use Only
When a call to an extension is forwarded to an EVM mailbox (call forwarding No answer or Busy) a message is played, explaining why the call is being forwarded.
These messages are played before the greeting message and cannot be overwritten.
Messages:
●
●
Call Forwarding - Busy after Call Forwarding No Answer: "The line you are
calling is busy".
Call Forwarding - No Answer: "The user you are calling is not answering."
The Entry Voice Mail - EVM subfolder contains the following five tabs:
●
"General" Tab
●
"Default Mailbox" Tab
●
"Message Settings " Tab
●
"EVM Access" Tab
●
"Virtual port" tab
4.4.1
"General" Tab
Note:
The Columns show the current extension configuration status for each item available in
the fields immediately below.
You can import/export the settings to other items using the Copy and Paste functions.
An EVM Module can operate simultaneously with a Fax/DID facility except as follows: An
EVM is not configured for Auto-Answering, since this capability is covered by the Fax/DID
Module.
Enter:
The settings as you want them in the appropriate fields according to the order of the extensions:
"Messaging" Field
Use the Maximum Time list (minutes) in the Greeting Message field, to specify the time
available for the caller to record a message.
Note:
Setting range: 1 to 5 minutes
4-20
A31003-K1270-M100-3-76A9, 03/2007
HiPath 1100 Manager, Documentation
4_Advanced.fm
For Internal Use Only
Advanced Configuration
Entry Voice Mail - EVM
Default setting: 2 minutes
Filed "Backup Copy"
Use the Backup Copy button in the Backup Copy field for storing the mailbox contents
containing personal greetings and messages.
The Reset button can be used to retrieve mailbox contents that were stored in the selected
file.
"Maximum Length of Number" Input Field
Use the Maximum Length of Number field to specify the length of the destination number,
for Auto-Answering purposes.
Note:
Setting range: 2 to 20 digits
Default setting: 5 digits
Maximum Number of Auto-Configurable Mailboxes" Field"
Use the Maximum Number of Auto-Configurable Mailboxes field for specifying how
many mailboxes can be configured by the user. No other settings need to be configured
for the auto-configurable mailboxes. If the number of mailboxes allowed is exceeded, it will
not be possible to configure settings correctly when using the EVM.
If mailboxes have already been configured using the Manager, fewer mailboxes will be
available for auto-configuration. For example, if there are 12 mailboxes and 10 have been
configured through Manager, only 2 boxes will be available for configuration by the user.
Note:
Setting range: 01 to 24 mailboxes
Default setting: 12 mailboxes
"Audio Quality" Field
Use the Audio Quality field to specify the quality for the greeting or message playback.
●
Best - for greetings and messages.
●
High quality for greetings/Best quality for messages
●
High quality for greetings and messages.
"Voice Prompt" Field
Use the Language field to specify the language for the mailboxes.
A31003-K1270-M100-3-76A9, 03/2007
HiPath 1100 Manager, Documentation
4-21
4_Advanced.fm
Advanced Configuration
Entry Voice Mail - EVM
>
For Internal Use Only
If you select a language that is not available for the EVM interface, the setting
will default to English. If English is not available, the setting will default to the
first available language.
"EVM Options" Field
You can do the following in the EVM Options field:
●
Use the Firmware Update button to load new firmware.
●
Use the Update Language File button to add or delete a language.
●
Use the Reset EVM Module button to restart Entry Voice Mail.
●
4.4.2
Use the Reset Default Configuration button to delete all personal messages and
greetings stores in the Entry Voice Mail.
"Default Mailbox" Tab
Use the Default Mailbox tab to configure personal mailboxes.
Note:
The Columns display the current extension settings for each item available.
You can import/export the settings to other items using the Copy and Paste functions.
Enter:
Mailboxes assigned to selected extensions.
Mailbox
The system’s mailboxes that can be assigned to extensions are described in the Mailbox
column, Mailbox field, or the Next Mailbox button.
"Extension" Field
In the Extension field specify the extension to be assigned to a mailbox or, if using MSN
number Attendants, select "EVM Virtual Ports - 744 to 747" to be assigned to a mailbox as
MSN number Attendants.
"Greeting Configuration" Column
The Greeting Configuration column specifies the type of greeting to be used for a specific
mailbox.
●
4-22
In the "Manual" option, select the Type of Greeting (1 or 2) that was specified for the
mailbox in the Greeting column.
A31003-K1270-M100-3-76A9, 03/2007
HiPath 1100 Manager, Documentation
4_Advanced.fm
For Internal Use Only
●
Advanced Configuration
Entry Voice Mail - EVM
For the "Day/Night Service" option a mailbox will use:
●
Greeting 1 - Day
●
Greeting 2 - Night
"Greeting" Column
The Greeting column specifies the type of greeting for a mailbox according to the setting
in the Greeting Configuration column, that is, if "Manual" or "Day/Night" is selected.
"Recording" Column
The Recording column allows you to record a greeting or a message to be played by the
EVM.
"Extension Mailbox Configuration" Field
In the Extension Mailbox Settings field you can select the following options for configuring a mailbox:
Personal greetings
This allows you to save Greetings 1 and 2 saved by the HiPath 1100 system on your PC.
You can also assign greetings that were already saved in the HiPath 1100 system to a specific mailbox.
Reset Password
This allows you to reset the password to its default: 1234.
Backup Copy
Use the Backup Copy button to save personal greetings and messages for the selected
mailbox.
Use the Reset button to reassign a personal greeting and messages to the selected mailbox.
4.4.3
"Message Settings " Tab
In the Message Settings tab you can configure mailbox settings for Call Forwarding (greeting
message with transfer option, day/night service operation, shortcut selection).
Note:
The Columns display the current extension settings for each item available.
You can import/export the settings to other items using the Copy and Paste functions.
A31003-K1270-M100-3-76A9, 03/2007
HiPath 1100 Manager, Documentation
4-23
4_Advanced.fm
Advanced Configuration
Entry Voice Mail - EVM
For Internal Use Only
Enter:
Mailbox settings for Call Forwarding
Mailbox
Call Forwarding mailboxes can be selected using the Mailbox column, Mailbox field or the
Next Mailbox button.
"Message Port" Field
Use the Greeting Message Port column to specify which port is available for the greeting
selected Greeting Message column, and that is going to be used by a mailbox.
"Greeting Configuration" Column
The Greeting Configuration column specifies the type of greeting to be used for a specific
mailbox.
●
●
In the "Manual" option, select the Type of Greeting (1 or 2) that was specified for the
mailbox in the Greeting column.
For the "Day/Night Service" option a mailbox will use:
●
Greeting 1 - Day
●
Greeting 2 - Night
"Greeting" Column
The Greeting column specifies the type of greeting for a mailbox according to the setting
in the Greeting Configuration column, that is, if "Manual" or "Day/Night" is selected.
"Mailbox Settings" Field
The Mailbox Settings field lets you select the following options:
Personal greetings
This allows you to save Greetings 1 and 2 saved by the HiPath 1100 system on your PC.
You can also assign greetings that were already saved in the HiPath 1100 system to a specific mailbox.
Reset Password
This allows you to reset the password to its default: 1234.
4-24
A31003-K1270-M100-3-76A9, 03/2007
HiPath 1100 Manager, Documentation
4_Advanced.fm
For Internal Use Only
4.4.4
Advanced Configuration
Entry Voice Mail - EVM
"EVM Access" Tab
Use the EVM Access tab to configure the access to the mailbox.
Note:
The Columns show the current configuration for the available mailboxes.
You can import/export the settings to other items using the Copy and Paste functions.
Enter:
The information requested for configuring the mailboxes.
"EVM Access" Field
The EVM Access field shows available EVM accesses.
"Access Code" Field
Use the Access Code field to specify the access number for configuring or checking the
auto-configurable EVM mailboxes (default is 790).
"Overflow Timeout" Field
Use the Overflow Timeout field to set a period of time, in seconds, for a call on Hold to be
transferred to an extension specified in the Overflow Destination field.
"Hold Queue" Field
Use the Hold Queue field to specify how many calls must remain on a specific queue.
"Name" Field
Use the Name field to specify the name that shows on the telephone display when a call
to an extension is forwarded to a specific mailbox. When there is no name specified, the
access number will be displayed.
"Overflow Destination" Field
Use the Overflow Destination field to specify an extension for receiving a transfer once
the timeout has expired.
4.4.5
"Virtual port" tab
The Virtual port tab allows you to define a flexible number for the virtual EVM ports and the
virtual Fax/DID ports.
"Virtual port" field
The virtual port field shows the available slots of the virtual ports.
A31003-K1270-M100-3-76A9, 03/2007
HiPath 1100 Manager, Documentation
4-25
4_Advanced.fm
Advanced Configuration
SNMP
For Internal Use Only
"Flexible number" field
Use the Flexible number field to change the numbers of the predefined virtual ports.
Note:
You can enter up to five digits.
7
4.5
Virtual ports:
●
From 0 to 3 - Virtual Fax/DID ports
●
From 4 to 7 - Virtual EVM ports
SNMP
The SNMP - Simple Network Management Protocol - is a TCP/IP protocol that provides a userfriendly platform for managing software for systems connected to the TCP/IP network. In practical terms, the SNMP is used as a "Management agent" on the HiPath 1100, allowing central
monitoring and management of the PABX.
Each PABX managed by the SNMP has a set of variables that store information on its current
state. This volume of data managed by the SNMP is defined in the MIBs - Management Information Bases. MIBs are data models that describe all the information required for managing
the network.
To access this information, install and connect the LAN ports of the SLIMC, SADSLIM, LIMC
or ADSLIM modules to the TCP/IP network. That way, any available information may be accessed from external management applications such as HP Open View. In other words, the
PABX is monitored by management software that is run in a server station. The SNMP service
will provide information to the PABX via the Agent when it receives requests from the Manager
connected via the TCP/IP network. The Agents and Managers communicate using SNMP messages that control the external applications:
SNMP messages
The SNMP messages used for communication between the SNMP management agent (HiPath
1100) and the external applications are controlled by the following commands:
●
●
Get, used when the manager requests the agent to obtain data.
Get Next, used when the manager requests the agent to obtain a sequential reading of
data.
●
Set, used when the manager requests the agent to alter an item of data.
●
Trap, used by the agent to communicate a previously defined event to the manager.
4-26
A31003-K1270-M100-3-76A9, 03/2007
HiPath 1100 Manager, Documentation
4_Advanced.fm
For Internal Use Only
Advanced Configuration
SNMP
There is an integrated mechanism to manage SNMP traps if a class B error occurs. The SNMP
management agent assesses the error messages, and if they have a corresponding definition,
certain traps are put into place and sent to a configurable IP address as groups of data. A maximum of five applications are available that support SNMP version 1.0, such as the HP Open
View.
The SNMP subfolder contains the following tabs:
●
Configuration
●
Community
●
Trap Community
>
4.5.1
This folder will only be enabled if an ADSL expansion board (SLIMC, SADSLIM, LIMC or ADSLIM modules) is configured. (see PABX Information ->
"Board Configuration" Tab).
Configuration
The Configuration tab allows you to configure the properties of the LAN and system identification fields. If the LAN configuration is changed, all the connections of the module will be lost.
"LAN interface" field
In the LAN interface field, insert the IP address of the ADSL expansion board if the Use
the following IP address checkbox is selected. It is also possible to obtain the IP automatically by leaving the Get IP # automatically checkbox selected.
Sub-network mask: The sub-network mask serves to create sub-networks in a network
structure of the system with only one official IP address. To equip each component with its
own IP network, it is possible to divide the official IP address into "different IP networks"
using a sub-network mask. However, this new division is only valid within an internal system network.
"System Identification" field
The System Identification field is where MIB registers are performed. This information
can be sent by reading the MIB (Get) on the Manager’s station. The systems are not subject to content limitations and serve only to identify the communication system being used
by the SNMP.
"Contact person" field
In the Contact person field, insert the name of the technician responsible for the PABX.
A31003-K1270-M100-3-76A9, 03/2007
HiPath 1100 Manager, Documentation
4-27
4_Advanced.fm
Advanced Configuration
SNMP
For Internal Use Only
"System name" field
In the System name field, insert the name of the PABX. The domain name is commonly
used on the SNMP.
"Location" field
The Location field should contain a description of the location of the PABX.
"Service" field
"Enable SNMP" checkbox
The Enable SNMP checkbox enables and disables the SNMP service.
4.5.2
Community
In the Community tab, you can configure the Managers that have administrative rights using
the SNMP on the PABX.
Note:
Access to SNMP data is only granted if the respective IP addresses and Community
names coincide.
The Columns show the current configuration for the available Managers.
You can import/export the settings to other entries using the Copy and Paste functions.
Enter:
The information requested to configure the community.
"Position" field
The Position field shows the five positions available for configuring the Managers.
"Community Name" field
Use the Community Name field to insert the Community Name, which serves as an access password. In order to access the PABX via SNMP, the Manager must indicate the
community name.
Note:
For security reasons, we recommend that default communities be changed according to
client specifications.
4-28
A31003-K1270-M100-3-76A9, 03/2007
HiPath 1100 Manager, Documentation
4_Advanced.fm
For Internal Use Only
Advanced Configuration
SNMP
"Transport Label" field
In the Transport Label field, insert the IP address of the Manager’s machine or a wildcard
(everybody).
●
Everybody;
●
Specific IP address.
If the option selected is a specific IP address, a field will be enabled so that the IP address
can be inserted.
"Access" field
The Access field defines the type of control that can be exercised over the MIBs. These
can be as follows:
●
●
●
4.5.3
Read means that the associated IP address has only read access.
Read/Write means that the associated IP address can have both read and write access.
None means that the associated IP address has no access. You can use this option
to deactivate records temporarily without deleting them completely.
Trap Community
Use the Trap Community tab to configure the destinations for SNMP error messages
(alarms).
Note:
If a trap destination is configured, all the corresponding fields must be filled in.
The Columns show the current configuration for the available destinations.
You can import/export the settings to other entries using the Copy and Paste functions.
Enter:
The information required to configure the destination.
"Position" column
The Position column shows the five positions available for configuring destinations.
"Community Name" column
In the Community Name column, insert the community name to identify which community
the trap is being attributed to. This name also serves as an access password.
A31003-K1270-M100-3-76A9, 03/2007
HiPath 1100 Manager, Documentation
4-29
4_Advanced.fm
Advanced Configuration
Account code
For Internal Use Only
"IP address" field
Use the IP address field to insert the address of the IP of the trap destination. Wildcards
are not permitted for trap.
"Target Owner" column
Use the Target Owner column to store a text with the description of the receiver of the"
trap".
"Target Status Active" column
Use the Target Status Active column to activate or deactivate the destination of the trap
setting temporarily.
4.6
Account code
External calls can be assigned account codes which provide more control over telephony costs.
This information may be presented on the billing ticket. An account code is defined by the user
as a sequence of up to 10 random digits (0...9). For example, the number of a lawsuit.
In system telephones, this feature is selected before or during a call, using the menu, an account code or a programmable key, according to the switch.
You may also define whether the cost code is required to make a call and whether the cost code
to be used should be configured in the system beforehand.
"Position" column
The Position column offers 500 available positions for storing account codes.
"Account code" column
The Account code column is used to insert codes of up to 10 digits. Only numerical characters are permitted for setting codes.
"System Configuration" field
"Account Code" field
The Account Code field includes a definition of whether it is mandatory or optional to put
in a account code in order to make a call and whether the account code used should be
configured beforehand.
"Mandatory" checkbox
With the Mandatory checkbox selected, you must insert the account code at the start of
the call or the call will not be completed.
4-30
A31003-K1270-M100-3-76A9, 03/2007
HiPath 1100 Manager, Documentation
4_Advanced.fm
For Internal Use Only
Advanced Configuration
Class of Service (COS)
"Optional" checkbox
With the Optional checkbox selected, you must insert the account code at the start of the
call to be able to complete it.
"Validate account code entry" checkbox
With the Validate account code entry checkbox selected, only previously configured account codes can be used. If an invalid account code is typed in, a negative tone will sound
or a message will be displayed.
If the checkbox is not selected, any account code can be used.
>
4.7
In analog and S0 telephones, if the checkbox is not selected, only 10-digit account codes will be accepted. Otherwise, the call will not be completed.
Class of Service (COS)
COS consists of the level of access to external lines assigned to an extension. PABX external
lines are grouped in the Extensions subfolder in the "General" Tab "Blocked Extensions
COS" Field. It is possible, therefore, to block outgoing calls to certain external numbers or to
allow calls to some of those numbers only. There are eight categories of external line access.
These categories can be assigned to: Day Service and Night Service.
These categories are designated according to the Night Service feature activation. If Night
Service is not activated, the extension uses a Day Service Class of Service. When Night Service is activated the type of access is a Night Service Class of Service. All classes of service
allow answering external calls and making internal calls.
Categories
●
No Permission
You can only make external calls using System Speed Dialing.
●
Permission List 1, 2 and 3
Extensions can only dial numbers that start with these combinations. If you try to dial one of
these numbers, the extension will answer with a busy signal.
Even though restrictions are set by the lists, the numbers entered in the Speed Dialing directory
can be accessed by dialing the abbreviated number.
●
Permission List 1, 2 and 3
Extensions can only dial telephone numbers beginning with these combinations. When any
other number is dialed, the phone answers with a busy signal.
A31003-K1270-M100-3-76A9, 03/2007
HiPath 1100 Manager, Documentation
4-31
4_Advanced.fm
Advanced Configuration
Class of Service (COS)
For Internal Use Only
Even though restrictions are set by the lists, the numbers entered in the Speed Dialing directory
can be accessed by dialing the abbreviated number.
●
Total Permission
You can make all external calls.
Note:
The Columns show the current extension configuration status for each item available in
the fields immediately below.
You can import/export the settings to other items using the Copy and Paste functions.
Enter:
The settings of your choice in the appropriate fields, for each extension.
The Class of Service subfolder contains the following tabs:
●
"Day Service Category" Tab
●
"Night Service Category" Tab
●
"Permission Lists"
●
"Denied Lists" Tab
4.7.1
"Day Service Category" Tab
In the Day Service Category tab you can assign Classes of Services to extensions for Day
Service hours.
"Extension" Field
In the Extension field select an extension to be assigned a Class of Service for external
lines.
"Line Group" Field
In the Line Group field select the group of external lines to be assigned a Class of Service.
"Category" Field
In the Category field select a category for the Group of External Lines.
4-32
A31003-K1270-M100-3-76A9, 03/2007
HiPath 1100 Manager, Documentation
4_Advanced.fm
Advanced Configuration
Class of Service (COS)
For Internal Use Only
4.7.2
"Night Service Category" Tab
The Night Service Category tab has the same functions as the "Day Service Category" Tab,
but it handles the night period as specified in the Calendar folder.
"Extension" Field
In the Extension field select an extension to be assigned a Class of Service for external
lines.
"Line Group" Field
In the Line Group field select the group of external lines to be assigned a Class of Service.
"Category" Field
In the Category field select a category for the Group of External Lines.
4.7.3
"Permission Lists"
In the Permission List tab you can configure the Permission Lists. The numbers that can be
dialed are specified in this list.
Note:
Each of the three lists has a field for entering data.
Enter:
In each list a number prefix (e.g., 089722) or an entire phone number to be:
●
registered by clicking
and entering the number;
●
modified by editing the entry in the list field or
●
deleted by selecting the list field to be deleted and clicking
.
All numbers that can be dialed by each extension are entered following this procedure.
"List 1" Field
In the List 1 field enter a number prefix or the entire telephone number that can be accessed by the extension. You can enter up to 10 numbers.
"List 2" Field
In the List 2 field you can enter a number prefix or the entire telephone number that can
be accessed by the extension. You can enter up to 25 numbers.
A31003-K1270-M100-3-76A9, 03/2007
HiPath 1100 Manager, Documentation
4-33
4_Advanced.fm
Advanced Configuration
Class of Service (COS)
For Internal Use Only
"List 3" Field
In the List 3 field enter a number prefix or an entire telephone number that can be accessed by the extension. You can enter up to 25 numbers.
4.7.4
"Denied Lists" Tab
The Denied Lists tab works the same way as the Permission Lists tab. Except in these lists
you specify the number that cannot be dialed by the extension.
Note:
Each of the three lists has a field for entering data.
Enter:
In each list a number prefix (e.g., 089722) or an entire phone number to be:
●
registered by clicking
and entering the number;
●
modified by editing the entry in the list field or
●
deleted by selecting the list field to be deleted and clicking
.
All numbers that can be dialed by each extension are entered following this procedure.
"List 1" Field
In the List 1 field you can enter a number prefix or the entire telephone number that cannot
be accessed by the extension. You can enter up to 10 numbers.
"List 2" Field
In the List 2 field you can enter a number prefix or the entire telephone number that cannot
be accessed by the extension. You can enter up to 25 numbers.
"List 3" Field
In the List 3 field you can enter a number prefix or the entire telephone number that cannot
be accessed by the extension. You can enter up to 35 numbers.
>
4-34
For both Permission Lists and Denied Lists there are some pre-programmed
numbers that can be changed, if necessary.
A31003-K1270-M100-3-76A9, 03/2007
HiPath 1100 Manager, Documentation
4_Advanced.fm
For Internal Use Only
4.8
Advanced Configuration
Groups
Groups
In the Groups subfolder you can configure different types of groups in each of the following
tabs:
●
"Pickup Groups" Tab
●
"Call Groups" Tab
●
"Hunt Group" Tab
●
"External MWI Group" Tab
●
"UCD Groups" Field
●
"Associated Groups" Tab
●
"Music On Hold Groups" Tab
4.8.1
"Pickup Groups" Tab
In this tab you can configure Pickup Groups. This allows an extension to answer calls that ring
at other extensions belonging to the same Group.
Note:
A maximum of 16 Pickup Groups is allowed.
This tab will show only the extensions that are available.
When an extension in the Pickup Group is called, all system telephones set for the group
will signal the call on the display.
Analog telephones and system telephones without a display indicate an incoming call by
sending an Alert Ring Signal
Enter:
The Extensions to be assigned to the Pickup Group in the "Selected" field. To make this
selection place the cursor in the "Available" field, select the Extension then use the ">"
button to move to the "Selected" field. Use the "<" and "<<" buttons to reset selected
items in the "Available" field. You can also make the selection by double-clicking the selected item with the left mouse button.
"Pickup Groups" Column
The Pickup Groups column shows the groups that can be configured.
"Group Extensions" Column
The Group Extensions column displays the extensions assigned to a specific Group.
A31003-K1270-M100-3-76A9, 03/2007
HiPath 1100 Manager, Documentation
4-35
4_Advanced.fm
Advanced Configuration
Groups
For Internal Use Only
"Enable Alert Ring Signal" Checkbox
When the Enable Alert Ring Signal checkbox is selected, you can specify a timeout for
the alert ring (0-59 seconds). When a call is not answered within the specified time, a short
ring will be sent to the Pickup Group.
4.8.2
"Call Groups" Tab
In this tab you can configure Call Groups. In a Call Group an extension can answer calls that
ring at other extensions in the same Group. When the Group receives a call all available extensions in the Group are signaled. A user can sign-off from the Group for the periods of time he/
she is not available.
Note:
A maximum of 10 groups can be configured as Call Groups (Group Access Codes from
770 to 779).
Enter:
The Extensions to be assigned to the Call Group in the "Selected" field. To make this selection place the cursor in the "Available" field, select the Extension then use the ">" button to move to the "Selected" field. Use the "<" and "<<" buttons to reset selected items
in the "Available" field. You can also make the selection by double-clicking the selected
item with the left mouse button.
"Call Groups" Column
The Call Groups column shows the groups that can be configured.
"Access Code" Column
The Access Code column shows the code used to call each group. You can change these
codes, if necessary.
"Name" Column
In the Name column you can enter a name for a Call Group. For system telephones, the
name is used instead of a number or with a number.
Note:
A maximum of 16 characters can be entered in the Name column field. optiPoint telephones display up to 16 character while system telephones (E822 and Profiset 3030) display only up to 15 characters.
"Group Extensions" Column
The Group Extensions column displays the extensions assigned to a specific Group.
4-36
A31003-K1270-M100-3-76A9, 03/2007
HiPath 1100 Manager, Documentation
4_Advanced.fm
For Internal Use Only
4.8.3
Advanced Configuration
Groups
"Hunt Group" Tab
In this tab you can configure Hunt Groups for creating extension groups assigned to answer
calls to a specified number. This specified number identifies the group. When an extension
does not answer an internal or external call within a specified period of time, the call rings consecutively at the other available and busy extensions in the group. When not available, a user
may sign-off from a Hunt Group.
Note:
Extensions can be grouped in a maximum of 10 Hunt Groups (780 to 789).
This tab will show only the extensions that are available.
Enter:
The Extensions to be assigned to the Hunt Group in the "Selected" field. To make this
selection place the cursor in the "Available" field, select the Extension then use the ">"
button to move to the "Selected" field. Use the "<" and "<<" buttons to reset selected
items in the "Available" field. You can also make the selection by double-clicking the selected item with the left mouse button.
"Hunt Groups (HG)" Column
The Hunt Groups column shows the groups that can be configured.
"Access Code" Column
The Access Code column shows the code used to call each group. You can change these
codes, if necessary.
"Name" Column
In the Namecolumn (up to 16 characters) you can enter a name for a Hunt Group. For
system telephones, the name is used instead of a number or with a number.
"Hunt advance timer" column
In the Hunt advance timer column you can set a time interval in which the external or internal call must be answered by the member of the group. Different times may be set for
each group. If the call forwarding times out before the member of the group answers, the
call will ring consecutively in the other free extensions of the group.
The times are set from 01 to 24 in 5-second cycles.
> The Hunt Group will not be forwarded or overflow if the call is not answered.
A31003-K1270-M100-3-76A9, 03/2007
HiPath 1100 Manager, Documentation
4-37
4_Advanced.fm
Advanced Configuration
Groups
For Internal Use Only
"Group Extensions" column
The Group Extensions column displays the extensions assigned to a specific Group.
"Hunt Mode" Field
On the Hunt Mode field you can specify how each group will conduct a search for an available extension: linear search or round-robin search.
●
A linear search always starts from the first extension in the group.
●
A round-robin search starts after the last extension selected.
4.8.4
"External MWI Group" Tab
In this tab you can configure an External WMI Group for a group of extensions assigned to
answer calls for a MWI (Message Waiting Indicator) from an external Voice Mail Server.
Note:
The Message Waiting Indicator is signaled by means of a LED key on system telephones
and by a distinctive audible tone on standard telephones. In the case of a standard telephone enabled for CLIP FSK with MWI service the signal can be configured to show an
icon on the display or some other type of indication.
Enter:
The Extensions that are part of a External MWI Group in the "Selected" field. To make
this selection place the cursor in the "Available" field, select the Extension then use the
">" button to move to the "Selected" field. Use the "<" and "<<" buttons to reset selected items in the "Available" field. You can also make the selection by double-clicking the
selected item with the left mouse button.
"Enable External MWI" Checkbox
The Enable External MWI box enables the MWI feature for an extension group.
4.8.5
"UCD Groups" Field
A UCD Group (Uniform Call Distribution) is a group of extensions assigned to answer calls destined for a specific number that identifies the group. Internal or external calls are then evenly
distributed among the members of a group or among agents, first to the extension that has
been free the longest. Then they are routed to the extension that has been free the longest.
Calls made to a particular extension do not affect the distribution pattern. The calls that are not
answered are not rerouted within the group.
4-38
A31003-K1270-M100-3-76A9, 03/2007
HiPath 1100 Manager, Documentation
4_Advanced.fm
For Internal Use Only
Advanced Configuration
Groups
Note:
Users can add or delete their own extensions in the UCD group (see User Manual: UCD
Group Login and Logout).
You can also view the UCD group call statistics using the Call Center Interaction Center
Smart software.
Extensions can be grouped in a maximum of 10 UCD Groups (790 to 799).
The Columns show the current extension configuration status for each item available in
the fields immediately below.
You can import/export the settings to other items using the Copy and Paste functions.
Enter:
The settings as you want them in the appropriate fields according to the order of the extensions.
"UCD Groups" Column
The UCD Groups column shows the groups that can be configured.
"Access Code" Field
The Access Code column shows the code used to call each group. You can change these
codes, if necessary.
"Name" Field
In the Namefield (up to 16 characters) you can enter a name for a UCD Group. For system
telephones, the name is used instead of a number or with a number.
"Configure Extensions to Create a Group" Field
The Configure Extensions to Create a Group field allows you to select the Extensions
for creating a UCD Group. This is done using the "Selected" field. To make this selection
place the cursor in the "Available" field, select the Extension then use the ">" button to
move to the "Selected" field. Use the "<" and "<<" buttons to reset selected items in the
"Available" field. You can also make the selection by double-clicking the selected item with
the left mouse button.
"Message for Calls on Hold" Field
In the Message for Calls on Hold field select an extension for connecting a message device for playing a message or an external music source for a UCD Group when all extensions are busy and none are available to answer a call.
A31003-K1270-M100-3-76A9, 03/2007
HiPath 1100 Manager, Documentation
4-39
4_Advanced.fm
Advanced Configuration
Groups
For Internal Use Only
"Overflow Timeout" Field
In the Overflow Timeout field you can specify a different period of time for starting a recorded message for each UCD group.
The default setting is for playing a message immediately or as soon as a call is placed in
a queue.
"Previous Message for Calls On Hold" Checkbox
When Previous Message for Calls on Hold box is selected, a message is played to an
incoming call before the call rings at a UCD group.
"Round-robin Distribution" Checkbox
When the Round-robin Distribution box is selected, an incoming call is automatically
rings at the extension of the next available Agent. If no agents are logged in, calls are forwarded to an overflow call destination.
"Collect Call Barring" Checkbox
When the Collect Call Barring box is selected, all collect calls to a UCD Group are automatically rejected by the system. The system bypasses Collect Call Barring for members
of a UCD Group, that is, call barring is only verified for the group.
>
If a call has been answered at least once by the system, Collect Call Barring
cancels the blocking. When an incoming call over a digital line is forwarded for
not being answered (*14) and Collect Call Barring is activated, the call will ring
at the First Attendant for the external line.
"Agent Status after Signaling Timeout" Checkbox
The Agent Status after Signaling Timeout checkbox allows you to determine an Agent
status after the signaling timeout expires.
When this checkbox is selected, a call is transferred to another group member after the
timeout expires, and the agent continues to be available in the UCD Group (see Available/
Unavailable Agent for a UCD Group, in the Users Manual). Otherwise, the agent becomes
unavailable.
"Queue Size" Field
In the Queue Size field you can specify the UCD Queue size for each UCD Group. This
means you can specify how many calls can wait in line when all UCD Group agents are
busy or unavailable.
4-40
A31003-K1270-M100-3-76A9, 03/2007
HiPath 1100 Manager, Documentation
4_Advanced.fm
For Internal Use Only
Advanced Configuration
Groups
Note:
Calls are distributed among group members according to priority and waiting time on the
queue.
"Time for Agent’s Notes" Field
In the Time for Agent’s Notes field you can specify a period of time after each call for the
Agent to stay away from the Group in order to take notes undisturbed.
"Overflow Call Destination" Field
In the Overflow Call Destination field you can specify the destination for a UCD call when:
●
All agents are "logged out"
●
A UCD Queue reaches the maximum number of calls waiting
●
The queue’s overflow timeout expires.
"Minimum Message Timeout for Calls on Hold" Field
In the Minimum Message Timeout for Calls on Hold field you can specify a minimum
timeout for a message playback for the UCD Queue.
"Message Connection Timeout" Field
In the Connection Timeout for Message field you can specify a different period of time
for starting a recorded message for each UCD group.
"Ring Signal Timeout for Agents" Field
In the Agent Signaling Time field you can specify a period of time for an incoming call to
keep ringing at an Agent’s station in the Group.
4.8.6
"Associated Groups" Tab
In this tab you can assign groups to use the Associated Group feature. More than one extension can be assigned to one master-telephone.
Note:
To ensure proper operation all extensions must have system telephones installed.
An extension can belong to many groups simultaneously.
There are 8 groups available with 16 extensions for each group.
A31003-K1270-M100-3-76A9, 03/2007
HiPath 1100 Manager, Documentation
4-41
4_Advanced.fm
Advanced Configuration
Groups
For Internal Use Only
Enter:
The Extensions that will make up the Associated Group in the "Selected" field. To make
this selection place the cursor in the "Available" field, select the Extension then use the
">" button to move to the "Selected" field. Use the "<" and "<<" buttons to reset selected items in the "Available" field. You can also make the selection by double-clicking the
selected item with the left mouse button.
"Slot" Column
The Slot column shows the groups that can be configured.
"Executive" Column
The Executive column shows the extensions that can be assigned as Executive extensions in a specified Associated Group.
"Group Extensions" Column
The Group Extensions column shows the extensions assigned to a specific Associated
Group.
4.8.7
"Music On Hold Groups" Tab
In this tab you can specify groups for the Music on Hold feature. Music from an external source
will be played to external calls that are on hold in these extensions.
●
●
●
Internal: The caller on hold hears music generated by the system;
External: The caller hears music from an external music source (e.g., a radio) connected
directly to the system’s external music input
External connected to an extension: The caller hears music from an external music source
(e.g., a radio) connected directly to an extension.
Note:
The extensions can be entered into two MOH Groups or left unassigned.
Enter:
The Extensions for creating a MOH Group. This is done using the "Selected" field. To
make this selection place the cursor in the "Available" field, select the Extension then use
the ">" button to move to the "Selected" field. Use the "<" and "<<" buttons to reset
selected items in the "Available" field. You can also make the selection by double-clicking
the selected item with the left mouse button.
"MOH Group" Column
The MOH Group column contains two MOH Groups that the user can configure.
4-42
A31003-K1270-M100-3-76A9, 03/2007
HiPath 1100 Manager, Documentation
4_Advanced.fm
For Internal Use Only
Advanced Configuration
Groups
"Type" Column
The "Type" column specifies the source for the Music On Hold.
"Source" Column
The Source column specifies the extension connected to the music source.
"Group Extensions" Column
The Group Extensions column shows the extensions assigned to a specific MOH Group.
A31003-K1270-M100-3-76A9, 03/2007
HiPath 1100 Manager, Documentation
4-43
4_Advanced.fm
Advanced Configuration
ISDN
4.9
For Internal Use Only
ISDN
Each ISDN access provides two communications channels (64 kbps each) as well as a capability for sharing applications such as video conferencing or Internet access. Depending on
your, some facilities may be provided, including Caller ID, Caller ID Blocking, Direct Dialing to
Extensions.
The ISDN subfolder contains the tabs for specifying the data for the S0 module and the TME1
module (with E1 CAS or S2 access) as follows:
●
"Configurations" Tab
●
"Slot S0" Tab
●
"Advanced Configuration" Tab
4.9.1
"Configurations" Tab
The following connection types are available:
●
●
●
Point-to-Multipoint (PMP)
See also Point-to-Multipoint Basic Access
Point-to-Point (PP)
See also Point-to-Point Basic Access and
S0 Internal Bus for ISDN telephone connections
Note:
When you only have ISDN lines to use, the settings for DID Prefix, External Number
Phonebook, Country Code, and Area Code must be configured.
Enter:
You can select the Operation Mode (Point-to-Point, Point-to-Multipoint and S0 Bus) from
the list in the Operation Mode column.
"Slot" Field
The Slot field shows the number of S0 ports available on the system.
"ISDN interface" field
The ISDN Interface field indicates the slot to which the S0 or TME1 module is connected
and the logical number of S0 ports.
●
S0 Module: S0 (slot - logic number)
●
TME1 Module: S2 (slot - logic number)
4-44
A31003-K1270-M100-3-76A9, 03/2007
HiPath 1100 Manager, Documentation
4_Advanced.fm
For Internal Use Only
Advanced Configuration
ISDN
If you want to use Automatic MSN Internal Distribution, you must configure S0 interface for
operating in S0 Bus mode.
"Remote Operation Mode" Field
The Remote Operation Mode field specifies the type of connection between digital lines
and the local carrier lines.
●
Point-to-Multipoint (PMP)
●
Point-to-Point (PP)
●
S0 Internal Bus for ISDN telephone connections
Note:
A TME1 Module can only use a PP connection.
To register all numbers in the system by pressing the Browse button (Basic Menu -> MSN
-> Settings), remote operation mode must be PMP (Point-to-Multipoint).
To register only the system’s number (Advanced Menu -> System Settings -> Language/
Country Settings) by pressing the Browse button (Basic Menu -> MSN -> Settings) the remote operation mode must be PP (Point-to-Point).
4.9.2
"Slot S0" Tab
This setting specifies the operating mode for the S0 module and the TME1 Module maximizing
the system’s port usage. This option is best for the HiPath 1190 due to its high port capacity.
The goal is to obtain the greatest possible number of extensions/external lines allowed according to the following port detection rules:
●
●
●
External line and extension (default): Each port will decrease the number of external line
slots by 2 and extension slots by 1. The connection may be PP, PMP or S0 Bus line
External line only: Each port will decrease the number of external line slots by 2. The connection must be PP or PMP. If it has been previously configured as S0 Bus line, the connection will be automatically reversed to PP (which is the default).
Extension only: Each port will decrease the number of extension slots by 1. The connection
must be a S0 Bus line. If it has been previously configured as PP or PMP, the connection
will be automatically reversed to S0 Bus line.
"S0 Slot" Column
The S0 Slot column shows the slot to which the S0 module or the TME1 module is connected and the logical number for the S0 Port.
A31003-K1270-M100-3-76A9, 03/2007
HiPath 1100 Manager, Documentation
4-45
4_Advanced.fm
Advanced Configuration
ISDN
For Internal Use Only
"Mode" Column
The Mode column shows the type of connection between digital lines.
●
Extension
●
External Line;
●
Extension and External Line
4.9.3
"Advanced Configuration" Tab
In the Advanced Settings tab Support personnel can enter data related to digital lines
based on information provided by the local carrier.
"Layer 1" Field
The Layer 1 field allows you to change some of the default ISDN settings for specified
countries.
"Layer 2" Field
The Layer 2 field allows you to change some of the default ISDN settings for specified
countries.
"Layer 3" Field
The Layer 3 field allows you to change some of the default ISDN settings for specified
countries.
"No SETUP ACK" Checkbox
The No SETUP ACK box is selected or unselected based on your local carrier information.
"Notify Send" Checkbox
The Notify Send box is selected or unselected based on your local carrier information.
"No DIV.LEG Info" checkbox
The No DIV.LEG Info checkbox allows you to choose, for a call forwarded to an external
destination, whether the number shown on the telephone should be the MSN/DID or that
of the original caller.
If this option is disabled and a local carrier provides the "Diversion" service for ISDN lines,
the extension forwarding the external calls to an external line can show the original numbers of the participants to the calling parties.
Otherwise, only the number of the MSN/Attendant of the PABX will be made available.
4-46
A31003-K1270-M100-3-76A9, 03/2007
HiPath 1100 Manager, Documentation
4_Advanced.fm
For Internal Use Only
Advanced Configuration
ISDN
In the default configuration, this option is enabled for the following countries: Australia,
Greece and the Netherlands.
7
This feature only works in ISDN lines in PP or PMP mode and only with T-Reference Point.
"Call Operation" Field
The Call Operation field must specify whether the call is Symmetric or Asymmetric based
on your local carrier information.
Note:
The settings for No SETUP ACK and No NOTIFY as well as the options for Symmetric
and Asymmetric operation are set by default during installation. Since these settings affect the ISDN protocol over the public network (carrier-specific settings), they should only
be modified by trained personnel.
"B Channel" Field
Channel B field must specify whether the channel is Executive or Secretary.
"Seizure Mode" Field
The Seizure Mode field must specify whether the call is Upstream or Downstream based
on your local carrier information.
A31003-K1270-M100-3-76A9, 03/2007
HiPath 1100 Manager, Documentation
4-47
4_Advanced.fm
Advanced Configuration
External Lines
4.10
For Internal Use Only
External Lines
In the External lines subfolder you can configure the characteristics of all of the system’s external lines. There are three tabs:
●
"General" tab
●
"Line Group" Tab
●
"Flexible Number" Tab
4.10.1
"General" tab
Note:
All the Ports of the installed boards are indicated in this guide.
The Columns show the current extension configuration status for each item available in
the fields immediately below.
You can import/export the settings to other entries using the Copy and Paste functions.
Enter:
The settings as you want them in the appropriate fields in the order of the external lines.
"External Line" field
In the External Lines field you can select an external line to configure (this can also be
done by selecting a sequence of external lines).
"Call Direction" field
In the Call Direction field you can configure how external lines can be accessed when
making or receiving a call by selecting one of the following options:
●
Two-way;
●
Incoming or
●
Outgoing.
Note:
This facility is usually contracted with the local carrier to ensure optimal usage of all lines
available.
"Caller ID on an Analog Line" field
The Caller ID on an Analog Line field allows the HiPath 1100 system to receive information about a caller (number and/or name) by means of a signal sent by the local carrier (DTMF or FSK protocol). This information is displayed at the extensions enabled for Caller ID.
4-48
A31003-K1270-M100-3-76A9, 03/2007
HiPath 1100 Manager, Documentation
4_Advanced.fm
Advanced Configuration
External Lines
For Internal Use Only
●
Disabled
●
DTMF 1
●
DTMF 2
●
FSK
Note:
The service specified in this setting must be made available by a local carrier.
When you configure settings for a specific country, the appropriate protocol is automatically selected.
7
The HiPath 1190 has a maximum limit of 16 lines configured with the CLIP
DTMF option, which leads to limitations in the Conference feature depending on
the number of lines being used by the CLIP DTMF at any one time. This is because both the CLIP DTMF and the conference use common system resources.
Thus we have, for example:
●
●
In a system with 16 CLIP DTMF lines, there can be 2 conferences with 3
participants;
In a system with 8 CLIP DTMF lines, there can be 1 conference with 8 participants or 2 conferences with 4 participants;
In a system with no CLIP DTMF lines, there can be 2 conferences with 8
participants.
To release additional ports for use in the Conference feature without depending
on the use of the CLIP DTMF, this function should be disabled for
some lines.
●
"DISA Line" field
The DISA Line field allows you to make an external call from an external telephone (as if
it was an extension) through your system.
●
Never specifies no DISA answering.
●
Night Only
●
Day Only
●
Always
Note:
Only one external call can be made or one feature can be used at a time.
A31003-K1270-M100-3-76A9, 03/2007
HiPath 1100 Manager, Documentation
4-49
4_Advanced.fm
Advanced Configuration
External Lines
For Internal Use Only
After successful activation of a feature, the call is immediately terminated. In the case of a
call, it is terminated right after a caller hangs up.
When there is a DISA call in progress, a second call to a DISA external line or one with a DISA
answering mode is treated as a regular call. If a call is received over an external line configured
as a Fax/DID and DISA, the call is answered by the DISA facility.
7
When a digital line is used for the DISA feature, its MSN number ("MSN DISA"
- Code 019) is always active for answering DISA.
"Dialing Mode" field
The Dialing Mode field is only available for analog lines with a configurable dialing mode
that is to be selected by using one of the following options:
●
Pulse(Dial Pulse mode)
●
Tone (Dual-Tone Multifrequency mode)
"Protocol" field
The Protocol field specifies the protocol to be used by the system for seizing an external
analog line, based on the local carrier’s information.
●
Ground Start (default for Canada).
●
Loop Start (default for other countries)
"Line Present" checkbox
The Line Present checkbox indicates when there is an external line connected to the system. This checkbox (no external line connected) should remain cleared unless all of the
system’s external access lines are going to be used.
Note:
For an external digital line, two interfaces are disabled when this checkbox is not selected.
"Dial Tone Detection" checkbox
When the Dial tone detection checkbox is selected, the system runs two functions on an
external analog line:
4-50
A31003-K1270-M100-3-76A9, 03/2007
HiPath 1100 Manager, Documentation
4_Advanced.fm
For Internal Use Only
Advanced Configuration
External Lines
1.
This setting has the system wait for a dial tone detection on the public exchange before
freeing it up for sending the selected number. If there is no dial tone on the line (for example, line not installed) the system automatically blocks this line.
With MF telephones, the number dialed will be sent to the external line approximately 4 to
5 seconds after the last digit was dialed (1A dialing).
2.
It detects closure of an in coming call using the busy tone (busy tone detection) in the following cases:
–
External call forwarding;
–
External transfer;
–
Incoming for Fax/DID;
–
Incoming for answering machine;
–
Incoming for EVM module;
–
Incoming for VMI.
"Next" button
Use the Next button to go to the next available external line.
"Answer Signal" Field
The Answer Signal field allows you to configure the type of signal that is received trough
the local carrier over an external analog line.
The following types of signal are accepted:
●
None;
●
Polarity Reversal;
●
DTMF Tone.
When the selected signal type is DTMF, a field for selecting a DTMF tone will be available:
A (default), B, C and D.
7
Polarity Reversal and DTMF Tone fields are available only when Protocol is
specified as Loop Start.
A31003-K1270-M100-3-76A9, 03/2007
HiPath 1100 Manager, Documentation
4-51
4_Advanced.fm
Advanced Configuration
External Lines
4.10.2
For Internal Use Only
"Line Group" Tab
Programming allows access to an external line or group of external lines through a code other
than "0." For example, 890 to 899
Note:
This tab displays all connected external lines.
The Columns show the current extension configuration status for each item available in
the fields immediately below.
You can import/export the settings to other items using the Copy and Paste functions.
"External Lines" Field"
The External Lines that are part of a Group of External Lines in the "Selected" field. To
make this selection place the cursor in the "Available" field, select the Extension then use
the ">" button to move to the "Selected" field". Use the "<" and "<<" buttons to reset
selected items in the "Available" field. You can also make the selection by double-clicking
the selected item with the left mouse button.
"Groups" Column
The Groups column shows the groups that can be configured.
"Line Code" Column
The Line Code column shows the codes used to access each group. You can change
these codes, if necessary.
"Connection Type" Field
The Type of Connection field feature specifies whether an external analog line connected
to a HiPath 1100 system is also connected to a local carrier or another PABX:
●
●
Direct (Connection to a local carrier)
Via Satellite PABX (connection to a different PABX system).
"Overflow Group" Field
The Overflow Group field allows you to associate a group of external lines to an overflow
group of external lines.
●
●
4-52
Off, there is no there is no Overflow for a Group of External Lines for the selected
group
Any group (e.g., 0, 890, 891, etc...) - when all configured external lines are unavailable for the group, an external line from the group configured as Overflow for a Group
of External Lines will be used
A31003-K1270-M100-3-76A9, 03/2007
HiPath 1100 Manager, Documentation
4_Advanced.fm
For Internal Use Only
●
Advanced Configuration
External Lines
All, when all configured external lines are unavailable for the group, an external line
from any group configured for the same Connection Type (Direct/Sub-PABX) will be
used.
"Fallback Time" column
The Fallback Time column allows you to activate/deactivate the time so that the call can
be made using the default carrier if the carrier configured in rule LCR is not available (see
"Fallback Time" field).
"Group Lines" Column
The Group Lines column displays the lines assigned to a Group.
4.10.3
"Flexible Number" Tab
In the Flexible Number tab you can change the default internal numbers required for accessing an external line.
Note:
You can enter up to five digits.
This tab displays all connected external lines.
The columns display the current number of external lines.
You can import/export the settings to other items using the Copy and Paste functions.
Enter:
A new external line number in the External Line column.
"External Line" Column
The External Line column displays the logical slot of an external line in the system.
"External Line Number" Column
In the External Line Number column select a line to be configured and enter the new number.
A31003-K1270-M100-3-76A9, 03/2007
HiPath 1100 Manager, Documentation
4-53
4_Advanced.fm
Advanced Configuration
LCR
4.11
For Internal Use Only
LCR
LCR (Least Cost Routing) is designed to lower telephone communications costs. When LCR is
enabled, all outgoing calls are routed to provide the least expensive connection costs. A table
listing all times of the day, days of the week and telephone service providers is created so that
calls can be made when rates are at their lowest. After programming, you can make calls with
no need to enter the carrier code since LCR automatically uses the carrier that provides the
lowest rate at the time the call is being placed.
Note:
When using LCR, you must specify all area codes that should not be dialed using your default carrier. All other codes, which may be dialed using the default carrier may not be included. The area codes configured will be used as an exclusion criterion for occupying the
line directly (if it is not registered in LCR). It is recommended that you create a dedicated
field (Tab) by destination category (mobile, long distance, international). A new field (Tab)
must be created when the destination categories have different call charge structures or
when there are differences within the same category).
It is possible to connect GSM/SIP Boxes to the HiPath 1100 using the S0 module where
the ISDN lines must be set in a line group according to the carrier type: GSM or SIP. The
GSM Boxes work as if the call were sent from a GSM cell phone and the SIP Boxes work
as if the call were made using a PC. Thus the call can be sent by the cheapest route according to the analysis of the destination of the call using the rule configured in the LCR.
"Tab Configuration" field
The Tab Configuration field defines a default carrier for each tab. If it is not possible to
make the call using the carrier set in the time periods table of the rule, the carrier set as
default will make the call.
"Default carrier" field
In the Default carrier field, select a carrier that has been configured for LCR when no external line is available. To warn the user that a different carrier is being used select the
Warning tone check box. The warning tone is audible on standard telephones. For system
telephones, the name of the carrier appears on the display.
"Apply to all regions" button
The Apply to all regions button sets all the tabs with the default carrier of the current tab.
"Create tab" button
The Create tab button creates a new LCR tab. When that button is selected, a popup window will open to define the name of the new tab (for example, cellular, National or International).
4-54
A31003-K1270-M100-3-76A9, 03/2007
HiPath 1100 Manager, Documentation
4_Advanced.fm
For Internal Use Only
Advanced Configuration
LCR
"Delete tab" button
The Delete tab button deletes the current tab. When that button is selected, a warning
message will appear informing the user that if the tab is removed, all the destinations and
rules will also be deleted.
"Time Interval Configuration" field
Use the Time Interval Configuration field to select a time interval according to the desired
carrier. To do this, choose an existing carrier (Carrier field) then define the time interval.
The time interval may also be defined manually by clicking and holding down the left
mouse button in the "Day of the Week" field (then down the time columns) at the starting
time and dragging down to the desired time.
Enter:
●
●
●
●
The list of carriers, with carrier names, area codes and prefixes, to be included in every
tab.
The time interval display comprises three lines for: Weekdays, Saturday and Sunday/Holidays. Above these lines is a time scale in hours (intervals can be set with a
resolution of 15 minutes).
To delete a time interval, click the Delete Time Interval button and select the desired
time interval with
.
Tab fields can be created or deleted using the Create New Tab and Delete Tab buttons.
"Define time interval" field
The Define time interval field allows you to insert or remove a time interval according to
the day of the week.
Use the Start time and End time selection fields to define the time interval desired. In the
Day field, select the desired day and use the Add time interval or Remove time interval
buttons to assign or remove the interval for the chosen day. The time interval is indicated
in the respective predefined carrier color.
Note:
The time resolution for displaying time intervals is 15 minutes. You can specify a maximum
of 8 areas (tabs), 15 carriers, 100 destinations (destinations for all tabs) and 21 time intervals (for all fields).
"Remove time interval" button
Use the Remove time interval button to delete a previously defined time interval.
A31003-K1270-M100-3-76A9, 03/2007
HiPath 1100 Manager, Documentation
4-55
4_Advanced.fm
Advanced Configuration
LCR
For Internal Use Only
The interval can be deleted manually by selecting the button with the mouse and clicking
over the desired interval with
, which will appear in the strip when you press the button,
or using the Define time interval field.
"Add time interval" button
Use the Add time interval button to add a time interval for the time interval defined in the
Define time interval field and the carrier selected in the Carrier column.
Example for LCR settings on a local network
This example shows the destination categories divided into:
Creating a "National" tab
●
Select Create new tab. Enter a name for the new tab, for example, National.
●
Add the carrier(s) to the existing list for long national calls.
●
●
●
Enter all area codes or partial area codes to cover all numbers for national calls within
the country.
Finally, enter the time intervals in the Time interval table.
With time intervals left "empty", the line of the default carrier will be occupied immediately.
Select the line group on which calls will be made and the overflow line group to be used
when the line group is busy.
7
At present, you can specify up to 100 destinations for all the tabs.
"Destination" column
Use the Destination column to define the call destinations. The maximum number of destinations that can be configured is 100.
"Code" column
Use the Code column to define the area codes corresponding to the destinations set.
"Type" column
Use the Type column o set whether the destination is Local, National or International.
4-56
A31003-K1270-M100-3-76A9, 03/2007
HiPath 1100 Manager, Documentation
4_Advanced.fm
For Internal Use Only
Advanced Configuration
LCR
"Carrier" column
The Carrier column is used to insert the cheap carriers and their area codes in the Number column. This table is the same for all Tab fields. All fields can be edited. The maximum
number of carriers is 15.
"Number" column
The Number column is used to insert up to 16 digits. Also in this field, if an external analog
line is used, you can insert a pause between the digits using the character "P". Each "P"
character inserts a 2-second pause in the connection. You can insert long pauses by using
more than one character (e.g., for a 10-second pause, use "PPPPP" between the digits).
The "P" character has no effect on calls over digital lines.
7
Two Number fields can be configured with the same number if the Line Group
fields are different. The opposite is also true.
"Line group" column
In the Line group column, select the Line group that you wish to associate to the carrier.
Note:
If the user makes a call using routes subject to delays of problems making call connections
(for example, SIP Boxes), the call will be made using the external lines set in the default
carrier after LCR fallback time has expired.
Activating the Fallback Time should be done for each Group of external lines (see "Fallback Time" field), when the Fallback Time is configured for the whole system (see "Fallback Time" column).
7
Two Number fields can be configured with the same number if the Line group
fields are different. The opposite is also true.
"Line group overflow" column
In the Line group overflow column, select the group of overflow lines that you wish to access if he first line group associated the carrier is busy.
"Import LCR archive" button
Use the Import LCR archive button to import an LCR archive from a site providing this
service in the .xml-type format. One possible site is www.telefonsparbuch.de.
If a particular carrier is configured, when you import an LCR archive a message box will be
displayed asking whether the rules (Carrier, Number, Line group and Line group overflow)
should be kept or deleted. If you choose to keep them, the configuration of these rules will
be kept. If not, the configuration of the imported file will overwrite the existing settings.
A31003-K1270-M100-3-76A9, 03/2007
HiPath 1100 Manager, Documentation
4-57
4_Advanced.fm
Advanced Configuration
LCR
For Internal Use Only
External lines settings can be included in the LCR archive. If the line is being used for Internet access or the SIP/GSM trunk is being used in parallel, the user can configure the
trunks manually after importing the file.
7
If the user attempts to open a file that is not .xml, a message box will appear
informing that the format of the file is invalid.
The rules can be imported by the Manager in offline mode.
"Export LCR archive"
Use the Export LCR archive button to export an LCR security file with the rules configured.
If one of the area codes registered in the System is dialed from an extension after you have
set the LCR options, the call to be established (for example, 41 + destination number for a
national call) according to the conditions defined (Calendar and Carrier), and the definitions dialed in the subfolder System Settings - "Regional Settings" Tab (Structure of
the number field) will be completed, or changed (for example, in Brazil 021 41 + destination number) and charged according to the new definitions set.
4-58
A31003-K1270-M100-3-76A9, 03/2007
HiPath 1100 Manager, Documentation
4_Advanced.fm
For Internal Use Only
4.12
Advanced Configuration
ACS
ACS
In the ACS subfolder you can configure a plan for an alternative carrier selection.
7
ACS does not affect Emergency Numbers if the user dials directly.
Setting "Conversion Rules"
You must specify the rule name (Rule Name column) and the group of external lines (destination/route) (column: Destination).
"Selected Number" Column
In the Selected Number column enter the number to be converted.
"Alternate Number" Column
In the Alternate Number column enter the number to replace the Selected Number.
"Alternate Number" Column
In the Alternate Destination column select a Group of External Lines for replacing the
Destination as soon as the Selected Number is replaced with an Alternate Number.
When the Alternate Destination column field is disabled, the group of external lines (destination/route) in the Destination field will be used.
"Overflow Destination" Column
In the Overflow Destination column select the Group of External Lines (destination/
route) to be used in place of the Alternate Destination or the Destination in case the
line that is being used is unavailable at the moment of the connection.
"Alternate Overflow Number" Column
In the Alternate Overflow Number column enter the number to replace the Alternate
Number in case the Overflow Destination is used.
Note:
The Alternate Overflow Number column must be completed.
"Name of period"
In the Name of period column select the name of the period when the conversion should
be made. If nothing is selected, the conversion will be made when the number is dialed.
If you want to convert a number that is followed by other numbers, use the "x" character to
indicate each digit ("x" is a number from 0 to 9).
A31003-K1270-M100-3-76A9, 03/2007
HiPath 1100 Manager, Documentation
4-59
4_Advanced.fm
Advanced Configuration
ACS
7
For Internal Use Only
Avoid using ambiguous rules such as "04X" and 041.
However, if you use such a rule, it will have a lower priority.
If you want to insert an inter-digit pause, enter a "P" character in the Selected Number column, the Alternate Number column or the Alternate Overflow Number column. Each
"P" character inserts a 2-second pause in the connection. You can insert long pauses by
using more than one character (e.g., for a 10-second pause, use "PPPPP" between the
digits).
You can use the "P#" character only once in the Alternate Number or Alternate Overflow
Number column to insert a 2-second pause and to dial via MF (on analog lines) or in-band
(on ISDN lines. Other characters ("#" and/or "*") may be added after "P#".
Once ACS options are configured, if a number from the Selected Number column is dialed
by the external line selected in the External Line column, and if it uses any conversion rule
entered in the system, the number will be replaced with the one in the Alternate Numbercolumn. The external line will be replaced with the one in Alternate External Line. If the
external line in the Alternate External Line column is unavailable, it will be replaced with
the external line in the Overflow External Line column. When a group of external lines (destination/route) in the Alternate Destination is not available, it will be replaced with the Alternate Destination entered in the Overflow Destination column.
Configuring the "Name of Period" field
On the right field, in the Name of Period column, you can specify the name of the period
in which to make the conversion. For each conversion rule you must select a specific period. A period can be used for more than one rule.
Create Time Interval Table"
The Period to be used is entered in a Time Interval Table tab. To enter the name of the
period into the table select from a list of existing carrier (bottom right table) Select Start
Time and End Time by clicking on the Time Interval Table column or select the day in the
Set Time Interval (without clicking) field. In the fields Start Time and End Time, set the
time interval and click the Add a Time Interval button to assign a time interval to weekday
being configured. The time interval is color coded to the Period. The period colors are preset.
Note:
The time resolution for displaying time intervals is 15 minutes. You can specify a maximum
of 21 names of periods, 121 conversion rules, and 21 time intervals (for all fields).
Enter:
The Name of Periods list, in which periods and conversion rules are specified.
4-60
A31003-K1270-M100-3-76A9, 03/2007
HiPath 1100 Manager, Documentation
4_Advanced.fm
For Internal Use Only
Advanced Configuration
ACS
The time interval display comprises three lines for: Weekdays, Saturday and Sunday/Holidays. Above these lines is a time scale in hours (intervals can be set with a resolution of
15 minutes).
To delete a time interval, click the Delete Time Interval button and select the desired time
interval with .
Example for ACS settings on a local network
This example shows how the conversion process occurs:
Create a new code
●
●
●
Select the Code Name column and specify a name for a code, for example Single
Carrier.
Enter the Name(s) of Period(s) to be used to substitute the Single Carrier code numbers.
Complete all the fields required for the Single Carrier code.
7
●
The conversion rules slot numbers are automatically generated once the conversion rule is set.
Finally, enter the time intervals in the Time Interval Table.
In the case of time intervals that are blank, the conversion will be done according to
the codes configured in the system.
7
Currently you can configure a maximum of 40 conversion rules.
A31003-K1270-M100-3-76A9, 03/2007
HiPath 1100 Manager, Documentation
4-61
4_Advanced.fm
Advanced Configuration
System Settings
4.13
For Internal Use Only
System Settings
The System Settings subfolder includes the following tabs:
●
"General" Tab
●
"Caller List" Tab
●
"Music On Hold" Tab
●
"Overflow Extension" Tab
●
"Attendant" Tab
●
"Call Charges" Tab
●
"Regional Settings" Tab
●
"Feature Codes" Tab
●
"Date and Time" Tab
●
"Emergency Numbers" Tab
●
"Software Update" Tab
●
"Remote Administration" Tab
●
"Modem" Tab
●
"Passwords" Tab
●
"Tickets" Tab
●
"Message" Tab
●
"Holiday" Tab
●
"Virtual port" tab
4.13.1
"General" Tab
Use the General tab to specify common PABX settings.
Note:
The Fields display the current status of the system settings for each available item.
You can import/export the settings to other items using the Copy and Paste functions.
Enter:
The settings of your choice in the appropriate fields, for each extension.
4-62
A31003-K1270-M100-3-76A9, 03/2007
HiPath 1100 Manager, Documentation
4_Advanced.fm
For Internal Use Only
Advanced Configuration
System Settings
"Company Name" Input Field
In the Company Name field enter your company name (up to 10 characters).
"DISA MSN" Field
In the DISA MSN field specify whether the DISA feature should be used for the HiPath
1100 system. If the feature is to be used, specify the appropriate MSN to execute it. You
may specify which extensions are authorized to access HiPath 1100system functions
when dialing from an external system with DTMF (DISA Permission). This setting is specified in the "General" Tab in the Advanced/Extensions subfolder. You must also specify
a password for the Electronic Lock used for the extension (the default password is 00000)
(see User’s Manual - Electronic Lock).
>
The list of options for this field shows only MSN numbers that are not associated
to an extension or to a local MSN for remote administration.
"No Answer Timeout" Field
Use the No Answer Timeout field to specify a timeout for the First Attendant to answer
an external call. In there is no answer after the timeout expires, the call is forwarded to the
Second Attendant.
"Local Administration Port" Field
Use the Local Administration Port field to specify an ISDN port for Local Administration.
The entry for this field must be copied to the Connection Type« ISDN Connection «
Phone # field under Properties in CommServer when ISDN Connection has been selected.
"MWI Server" Field
In the MWI Server field enter the MSN that is externally dialed when there are messages
waiting (this feature must be provided by the Carrier).
"Second External Access Code" Field
The Second External Access Code field specifies the code to be sent by the Satellite
PABX in accordance with the access code for external lines on the Master PABX. This
code is used to check if there is a dial tone at an external line and to generate a pause
while dialing, redialing or using the speed dialing feature. The default setting for the second
code is "0". The maximum is "99".
> If no value is entered, the line dial tone will not be checked.
A31003-K1270-M100-3-76A9, 03/2007
HiPath 1100 Manager, Documentation
4-63
4_Advanced.fm
Advanced Configuration
System Settings
For Internal Use Only
"Pilot MSN" Field
In the Pilot MSN field enter the MSN that is externally dialed when there is a message without MSN ID. The call will follow the Pilot MSN configured.
"Conditional call forwarding limit per extension" field
In the Conditional call forwarding limit per extension field enter the number of digits
that can be programmed for extensions with permission (default is 5).
7
7
Conditional Call Forwarding Limited by Extension can be configured using a CTI
interface.
●
●
●
The system’s maximum number for Call Forwarding is 50.
Conditional Call Forwarding has priority over an unconditional Call Forwarding.
Conditional Call Forwarding is not available for S0 extensions.
Functions: The extension has permission for Conditional Call Forwarding and
the system is connected to a PC running a TAPI application.
1.
Conditional Call Forwarding rules and conditions for a specified extension
can be defined by using a Windows TAPI application
2.
Apply the settings to the extension desired.
3.
From this moment on the extension will be forwarded.
"Interdigit Pause Time" Field
The Interdigit Pause Time field allows you to configure the duration of the pause tone.
The pause may vary from 1 to 5 seconds (default is 2 seconds).
See also Setting "Conversion Rules".
"Fallback Time" field
The Fallback Time field allows you to configure the time for activating of the LCR fallback
for the required groups of lines (see "Fallback Time" column). As soon as this time expires, the call will be routed to the Default carrier defined in the LCR rule.
"External Line Type Selection" Field
Use the Seizure Priority by Type of External Line field to specify the type of line to have
priority access.
●
4-64
All types of lines - In this case seizure is sequential and cyclic.
A31003-K1270-M100-3-76A9, 03/2007
HiPath 1100 Manager, Documentation
4_Advanced.fm
Advanced Configuration
System Settings
For Internal Use Only
●
Digital lines are seized as first option.
●
Analog line are seized as first option.
"Temporary MSN" Field
In the Temporary MSN field the user can select a temporary MSN from the list (Basic/MSN
Settings) for making an external call or use the Key Assignment feature (see "Key Assignment" Tab) to assign a key to an MSN for monitoring incoming and outgoing calls.
●
●
Enter Index using the information provided in the Index column, for example: 001,
002, etc.
Enter MSN using the information provided in the MSN column, for example: 3415000,
etc.
"Cascaded Call Forwarding Partner"
The Cascaded Call Forwarding Partner field allows you to choose how the call forwarding partner will be displayed on the telephone display in a call forwarding cascade. (See
Programming Manual - A31003-K1270-U100-*-*, chapter on Cascade call forwarding).
In the following situation: Number 1 is set to forward to Number 2 and Number 2 is set to
forward to Number 3. Here, the display can be configured as follows:
●
●
Last: The caller display will indicate: "forwarded to: Number 3” and destination 3 display will indicate: "from: destination 1.
First: The caller display will indicate: "forwarded to: Number 2” and destination 3 display will indicate: "from: destination 2".
>
If Number 3 is a VMI:
●
●
Last: The message is stored in Number 1’s mailbox. If Number 1 does not
have a mailbox, the Voice Mail must request the port for recording the message
First: The message is stored in Number 2’s Mailbox.
"Carrier Selection" field
The Carrier Selection field allows you to select the operating mode that best fits your
needs (LCR or ACS).
●
●
LCR - to make an external call using the carrier that offers the lowest rates.
ACS - to define conversion rules for numbers dialed by the user, such as using always
the same carrier regardless of which carrier is dialed.
A31003-K1270-M100-3-76A9, 03/2007
HiPath 1100 Manager, Documentation
4-65
4_Advanced.fm
Advanced Configuration
System Settings
For Internal Use Only
"Automatic Keypad" Checkbox
Only for countries with keypad dialing.
When the Automatic Keypad checkbox is selected, the systemHiPath 1100 allows activating the ISDN function on the telephone without requiring an external access code (see
the user’s manual for the telephone being used).
In some countries you can call up the carrier’s ISDN functions by dialing a code. Your local
carrier can inform you which ISDN features can be controlled by Code in your Country.
"Speed Dialing without COS Check" Checkbox
When the Speed Dialing without COS Check checkbox is selected all number stored in
the System Speed Dialing subfolder in the Basic folder can be speed-dialed from extensions with No Permission. This means the existing settings (Class of Service) in the Class
of Service (COS) folder are not taken into account for using the entries in System Speed
Dialing.
"False Tone" Checkbox
When the False Tone checkbox is selected, an external line dial tone is generated even
when there is no external line available.
> If LCR or Emergency Numbers are configured, the user will hear a False Tone.
"Serial Printing" Checkbox
When the Serial Printing checkbox is selected Call Charge information is available
through the system’s serial interface.
"Call Forwarding Signal (Call Groups)" Checkbox
When the Call Forwarding Signal (Call Groups) checkbox is selected, the extension (belonging to the Call Group) configured for Call Forwarding can be forwarded. When a call is
routed to a Call Group, it rings at all extensions at the same time. The extension configured
for Call Forwarding will ring at its destination. If the call is answered, the other extensions
in the group stop ringing. Otherwise, the call rings again until one of them answers it.
>
4-66
Do not use external Call Forwarding for an extension belonging to a group when
"Call Deflection" (see page 123 is activated (Code 228). In this case the system
does not receive any information about the forwarded call having been answered or not. Since the system does not have this information it continues to
signal all other group members.
A31003-K1270-M100-3-76A9, 03/2007
HiPath 1100 Manager, Documentation
4_Advanced.fm
For Internal Use Only
Advanced Configuration
System Settings
"Call Forwarding Signal (Hunt Groups)" Checkbox
When the Call Forwarding Signal (Hunt Groups) checkbox is selected, the extension
(belonging to the Hunt Group) configured for Call Forwarding can be forwarded. When a
call is routed to a Hunt Group, it rings at every extension in the manner configured (linear
or round-robin). When it rings at the extension configured for Call Forwarding it will be forwarded to the extension’s destination. If the call is answered, the other extensions in the
group stop ringing. Otherwise, the call rings again at the other extensions that belong to
the Hunt Group, as configured.
>
Do not use external Call Forwarding for an extension belonging to a group when
"Call Deflection" (see page 123) is activated (Code 228). In this case the system
does not receive any information about the forwarded call having been answered or not. Since the system does not have this information it continues to
signal all other group members.
"Direct transfer to the busy extension" checkbox
When the Transfer to a busy extension checkbox is selected, the call can be forwarded to a
busy extension. A warning tone can be heard on the background at the extension that receives
the transfer, meaning that there is a call waiting.
Note:
After a specified time or when a receiving extension is configured for Do Not Disturb or Urgent Call service, the call will ring at the extension that made the transfer.
"Call Deflection" Checkbox
When Call Deflection checkbox is selected an incoming call to a destination extension enabled with Call Forwarding (*11) is forwarded directly to an external destination through the
public network or the HiPath 1100 system.
Note:
This feature must be enabled by a local carrier.
"View Name/Call Number" Field
Select the desired option from the Display call name/number field:
●
Name and number
●
Name (if available)
●
Number.
A31003-K1270-M100-3-76A9, 03/2007
HiPath 1100 Manager, Documentation
4-67
4_Advanced.fm
Advanced Configuration
System Settings
>
For Internal Use Only
If the Name and number option is selected, the Display called number (MSN)
field will not be enabled.
"Display called number" (MSN) field
Select the desired option from the Display called number (MSN) field:
●
None - nothing is displayed
●
Name (if available) - displays the name that was called
●
Number - displays the number that was called
>
To enable that field, the Name and Number options should not be enabled in the
Display call Name/Number field .
"Voice Mail" Field
Use the Voice Mail field to specify the type of Voice Mail to be used by the system and the
UCD Group that will function as interface for the Mail Voice Server equipment.
"Type" Input Field
●
None - no voice mail will be used
●
EVM - Entry Voice Mail - EVM voice mail will be used
●
VMIe - a voice mail equipment associated to the system’s equipment will be used
Internal Voice Mail Server
An internal Voice Mail server works with a UCD Subscriber Group that is configured during
the programming process. This is known as a VMIe Group Interface.
The configuration of a UCD Subscriber Group for the VMIe Group Interface must fulfill
these requirements:
●
It must not be programmed as a DID for an external line
●
It must not be configured for Overflow.
●
The Agent’s auto-notes time interval must be set to at least 5 seconds.
●
Queue size must be set at the maximum allowed (default)
"Group" Input Field
Use the Group field to specify a UCD Group to function as an interface for the Voice Mail
Server equipment.
4-68
A31003-K1270-M100-3-76A9, 03/2007
HiPath 1100 Manager, Documentation
4_Advanced.fm
For Internal Use Only
>
Advanced Configuration
System Settings
If the EVM group is changed and the old group is configured as the second attendant, that group should be removed manually from the second attendant list
and the new group inserted in the list.
"External-to-External Connections" Input Field
The External-to-External input field allows you to specify a timeout between two external
calls when no other extension is involved in the call.
The user hears a warning tone before the timeout expires. The waring tone is sent 10 seconds before the end of the timeout. When the call is between two external lines with no
internal extension involved, the call is terminated once the timeout elapses.
"Timeout On" Checkbox
The Timeout On checkbox enables a timeout for an external-to-external call. This means
that the duration of the call can be configured. The user hears a warning tone before the
timeout expires. The warning tone is sent 10 seconds before the end of the timeout.
"Time" Field
The Time field allows you to set the duration for an external-to-external call. The maximum
time is 23:59:55 and the default time is 1 hour.
"External door extension" field
Use the External entrance telephone field to configure the system with the information
required to control up to 4 of External entrance telephone devices used.
"Open door DTMF sequence" field
In the Open door DTMF sequence field, set the DTMF code for the door opener.
"Release call DTMF sequence" field
In the Release call DTMF sequence field, set the DTMF code to indicate the end of the
call.
"Answer call DTMF sequence" field
In the Answer call DTMF sequence field, set the DTMF code to answer calls from the entrance telephone device.
A31003-K1270-M100-3-76A9, 03/2007
HiPath 1100 Manager, Documentation
4-69
4_Advanced.fm
Advanced Configuration
System Settings
>
4.13.2
For Internal Use Only
The sequence of the DTMF codes sent to all the devices installed is the same
for all and should be configured according to the manual provided by the entrance telephone manufacturer.
Once you have set the DTMF codes and the type of extension in the Advanced
configuration/Extensions/"General" tab/ "Type" field the devices connected to
the respective slots will work normally as entrance telephone devices.
"Caller List" Tab
Use the Caller List tab configure a Caller List for a PABX.
Note:
The Fields display the current status of the system settings for each available item.
You can import/export the settings to other items using the Copy and Paste functions.
Enter:
The settings of your choice in the appropriate fields.
"Caller List Type" Field
In the Caller List Type field you can specify the displaying of external calls only or all internal and external calls. To configure these settings select from the options:
●
External or
●
External and Internal.
"Suppress Digits in Caller List" Field
In the Suppress Digits in Caller List field you can specify the digits that should not be
dialed when using the Caller List.
For example,
The following number is stored in the Caller List: 0893415000. The digits specified for suppression are 089 (area code). The system dials only the number 3415000. The code 089
is not dialed.
4-70
A31003-K1270-M100-3-76A9, 03/2007
HiPath 1100 Manager, Documentation
4_Advanced.fm
For Internal Use Only
4.13.3
Advanced Configuration
System Settings
"Music On Hold" Tab
In the Music On Hold tab you can configure music to be played for calls placed on hold by the
PABX.
Note:
Enter extensions for two MOH groups or do not make any assignments.
The Fields display the current status of the system settings for each available item.
You can import/export the settings to other items using the Copy and Paste functions.
Enter:
The settings of your choice in the appropriate fields.
"Music On Hold" Field
In the Music On Hold field you assign music to be played for external calls that are placed
on hold. The music is played from an external music source.
●
●
●
●
●
4.13.4
No Music - No music is played for calls on hold
Internal - The music played comes from the system software. The music source can
be changed using the HiPath 1100 software (see MOH Transfer).
Internal PCM - The caller hears music that was recorded in a PCM-type system.
External - optional slot - The caller hears music from an external music source (for
example a radio) linked directly to the system’s external music input.
External - extension - The caller hears music from an external source (for example:
a radio) connected to an extension (A/B pair). The extension to which the source is
connected must be selected from the list below.
"Overflow Extension" Tab
Use the Overflow Extension tab to configure an overflow/escape extension for the PABX.
Note:
Select the extensions from the lists or do not make any assignments.
The Fields display the current status of the system settings for each available item.
You can import/export the settings to other items using the Copy and Paste functions.
Enter:
The settings of your choice in the appropriate fields.
A31003-K1270-M100-3-76A9, 03/2007
HiPath 1100 Manager, Documentation
4-71
4_Advanced.fm
Advanced Configuration
System Settings
For Internal Use Only
"Overflow Extension" Field
Use the Overflow Extension field to specify the destination of calls when the extension
called is unavailable. Select an extension for each of the following options:
●
Incorrect Number,
●
Busy and
●
No Answer.
Call Forwarding for Wrong Number, Busy and/or No Answer can be disabled by selecting OFF in the appropriate lists.
4.13.5
"Attendant" Tab
You can configure a PABX Attendant Console for the HiPath 1100. This is useful for streamlining the flow of calls to up to two Attendant Consoles equipped with System Telephones with a
display.
Note:
Extensions assigned for working as Attendant Console can be selected from extension
lists or remain unassigned.
The Fields display the current status of the system settings for each available item.
You can import/export the settings to other items using the Copy and Paste functions.
Enter:
The settings of your choice in the appropriate fields.
"Attendant Console" Column
The Attendant Console column displays the logical slots for the Attendant Console.
"Extension" Column
In the Extension field you can assign an Attendant Console slot to an extension. A System Telephone then is connected to the extension selected.
>
4-72
An Attendant Console cannot receive "Direct Message to Speaker" nor belong
to an Associated Group.
A31003-K1270-M100-3-76A9, 03/2007
HiPath 1100 Manager, Documentation
4_Advanced.fm
For Internal Use Only
4.13.6
Advanced Configuration
System Settings
"Call Charges" Tab
To show call charges in currency units you must specify a Call Charge Factor. Pulses are multiplied by this factor. A Call Charge Unit consists of a pulse sent over a line by a public exchange to provide and display call charge information according to the type of call (area code,
international, etc.) and other criteria determined by the carrier.
Note:
The Call Charges displayed and the Call Charges actually billed may, however, be different
from the Preset Charge Factor (Factor 1 or Factor 2) or Multiplier, depending on the billing method used by the carrier. For example, in the following cases:
●
Special discounts for connections longer than 10 minutes
●
Carrier does not charge for special services
Enter:
A value for the Call Charge Unit and the Call Charge Factor.
"Call Charge Unit" Field
In the Call Charge Unit field enter a value (up to 6 digits) to be multiplied by Factor 1 or
Factor 2.
"Factor 1" Field
In the Factor 1 field enter a value to be used as a multiplier for the Call Charge Unit. This
field may specify a standard rate.
"Factor 2" Field
In the Factor 2 field enter a value to be used as a multiplier for the Call Charge Unit. This
field may specify a different rate.
4.13.7
"Regional Settings" Tab
The following settings can be configured in this tab:
"Prefix" Field
The following information is specified in the Prefix input field:
●
Local Area Code consisting of the local prefix (for example, 415 for San Francisco)
●
Country Code consisting of the country prefix (for example, 55 for Brazil)
●
National Prefix consisting of an access code for the public network (for example, 0
for Brazil)
A31003-K1270-M100-3-76A9, 03/2007
HiPath 1100 Manager, Documentation
4-73
4_Advanced.fm
Advanced Configuration
System Settings
●
For Internal Use Only
International Prefix consisting of a prefix for other countries (for example, 00 for Germany)
"Country Setting" Field
In the Country Setting field you specify the parameters for the countries in the HiPath
1100 system:
●
Country
Once a Country is specified, you can configure country-specific parameters (for example,
tones, time, currency unit, etc.) for the system, if these have not been configured during
HiPath 1100 system setup.
●
7
Once a country is selected, the HiPath 1100 system restarts. While this occurs,
all calls/connections are disabled. The HiPath 1100 Manager then must be reconnected to the system.
>
Country settings can also be configured at the Programming Extensions by using the service code *953199465 and entering the appropriate country code
(see Programming Manual).
Language
Once a language is selected, the text displayed on System Telephones appears in that language.
Portuguese, Spanish, English, French, Italian, Turkish and Custom.
>
●
Select the Custom option for using TTT (Telephone Text Translator) software
for translating text displayed by the system to a specific language. The selected
language is displayed in the Custom Language field.
Currency Unit Field
A currency unit must be selected for enabling the HiPath 1100system to correctly calculate
call charges. This parameter is not automatically set when the country is selected from the
Country drop down list.
"LCR Numbering Plan" Field
In the LCR Numbering Plan field you can enter numerical sequences for each country,
consisting of the digits that must be dialed for making a call. The specified sequence is
used by the LCR feature.
●
Prefix + Carrier Code + Destination Code;
●
Carrier Code + Prefix + Destination Code;
4-74
A31003-K1270-M100-3-76A9, 03/2007
HiPath 1100 Manager, Documentation
4_Advanced.fm
For Internal Use Only
●
Advanced Configuration
System Settings
Prefix + Destination Code + Carrier Code.
"System Number" Field
Use the System Number field to specify a system identification number for the carrier.
In order to have the System Number automatically entered you must press the Browse
button in the Basic -> MSN -> Settings folder and also configure the remote operation
mode as (Point-to-Point).
Note:
The service must be contracted to a carrier in order for that carrier to identify the system
by its number.
"Type of Number" Field
Use the Number Type field to specify how the system’s MSN configuration should be sent
to the carrier.
●
Unknown
●
System number
●
Local Area Code
●
Country Code.
"Internal access code for automatic seizure" field
The Internal access code for automatic seizure field allows any telephone configured for
Automatic seizure of an external line to make internal calls by dialing the number specified in this field followed by an extension number.
4.13.8
"Feature Codes" Tab
The Feature Codes tab displays the codes assigned to specific features of the HiPath 1100
system. These codes are used by the extensions to activate features using the keypad or service menu (when using System Telephones with a display).
.Note:
Feature Codes can be selected from code list and can be changed.
The Fields display the current status of the system settings for each feature code.
For an overview of Feature Codes, refer to the Feature Codes List.
Enter:
The settings of your choice in the appropriate fields.
A31003-K1270-M100-3-76A9, 03/2007
HiPath 1100 Manager, Documentation
4-75
4_Advanced.fm
Advanced Configuration
System Settings
For Internal Use Only
"Feature Name" Column
The Feature Name column displays the names of the features available to the extensions.
"Default Code" Column
The Default Code column displays the standard access codes of the features available to
the extensions.
"Current Code" Column
The Current Code column displays the current feature access codes. To change a Service Codes, edit the appropriate field in this column.
"Substitution" Field
In the Substitution field you can change substitute codes for "*" and"#" for entering
a service code by using a pulse-dialing telephone (default for * = 75 and for # = 76).
"Activation after Timeout" Field
In the Activation after Timeout field you can specify one of the two features, either Urgent Call or Recall, for automatic activation, after approximately 6 seconds, when an internal call from one extension to another gets a busy signal.
4.13.9
"Date and Time" Tab
In the Date and Time tab you can set the date and time for the system.
Note:
It is important to set the correct time/date for recording call details and displaying on System Telephones.
Enter:
Date and time by selecting the appropriate numbers in the calendar and clock.
"Automatic Update via Carrier" Checkbox
When the Automatic Update via Carrier checkbox is selected date and time are automatically synchronized during an external call through the local carrier.
>
4-76
The settings that are automatically updated are: Month, Day, Time and Minute.
Year is not included in the FSK message settings - it is defined as the software’s
manufacturing date and can be manually adjusted.
A31003-K1270-M100-3-76A9, 03/2007
HiPath 1100 Manager, Documentation
4_Advanced.fm
Advanced Configuration
System Settings
For Internal Use Only
4.13.10
"Emergency Numbers" Tab
In the Emergency Numbers tab you can enter up to five emergency telephone numbers. The
default setting displays two emergency telephone numbers (for Brazil, for example, 190 for Police and 193 for Fire Department).
>
If one of these numbers is dialed and all external lines are busy, the first external call
will be interrupted so it can be used for the emergency call.
Note:
Only an incoming call over an analog external line will not be disconnected.
Enter:
The settings of your choice in the appropriate fields.
"Slot" Column
The Index column displays all positions available for Emergency Numbers.
"Name" Column
The Name column displays the name of the emergency service available. Names assigned to Emergency Numbers can have up to 15 characters.
"Number" Column
The Number column displays the Emergency Numbers available. You can enter up to
five emergency numbers with eight digits each.
7
>
The LCR rules configure may affect Emergency Numbers!
Example: If 041 is specified as an Emergency Number but is also the number
entered under Destination Hamburg, in the LCR rules, as a local area code,
when the number is dialed it will make a call to Hamburg.
Emergency calls never use external lines configured for:
●
Internet access
●
No external line is present
●
External line configured for accepting only incoming calls
A31003-K1270-M100-3-76A9, 03/2007
HiPath 1100 Manager, Documentation
4-77
4_Advanced.fm
Advanced Configuration
System Settings
4.13.11
For Internal Use Only
"Software Update" Tab
In this tab you can configure data for performing Automatic Software Updates through an External Server.
Note:
If an External Server number (Service MSN) was entered in the External Number field External Number input field (e.g., Service Center), but the Execute Automatic Software
Update checkbox is not selected, an automatic software update can be performed by the
first Programming Extension entering the service code *992 (see User’s Manual - Remote
Configuration).
Enter:
The required settings in the appropriate fields.
"External Number" Field
In the External Number field, enter the External Server number (Service Center, for example) to be used for updating the software (request the number from your Service Center).
"Execute Automatic Software Update" Checkbox
When the Execute Automatic Software Update checkbox is selected, a system software
update is automatically performed in specified dates and times set in the fields described
below.
"Settings" Field
In the Settings field enter the following information:
●
●
●
●
In the Day field, specify the date for the start of the data transfer (download process).
Start Time specifies the time the system should connect to the External Server (e.g.,
Service Center).
The Frequency (in months) field specifies the time interval for transferring data (during the transfer the telephone operates as usual).
For example, 01= 1 update per month (default) ... 12 = 1 update every 12 months, on
the specified date
The Switch Time field specifies the time for loading the transferred data into the system memoryHiPath 1100.
During the upload (approximately 3 minutes) the telephone operates as usual.
For more information on updating the software see Software Update.
4-78
A31003-K1270-M100-3-76A9, 03/2007
HiPath 1100 Manager, Documentation
4_Advanced.fm
For Internal Use Only
4.13.12
Advanced Configuration
System Settings
"Remote Administration" Tab
In this tab enter the external numbers and passwords required for connecting to an External
Server (e.g., a Service Center) and enabling Remote Administration.
Note:
Remote Administration can be carried out remotely over digital lines or analog lines connected to a modem.
Enter:
The required settings in the appropriate fields.
"Remote Administration by DTMF codes" Checkbox
When the Remote Administration using DTMF Code checkbox is selected, the HiPath
1100 system Remote Administration using DTMF telephones is enabled.
"Remote Administration" Checkbox
When the Remote Administration checkbox is selected, the HiPath 1100 system can be
managed remotely.
"Authorized External Numbers" Field
In the Authorized External Numbers field enter the following information:
●
When the Without Number Verification checkbox is selected, the field Without MSN Verification is enabled to allow Remote Administration for all incoming calls originated by a
remote HiPath 1100 Manager that provides the correct Password as set through the Password button in the Without Number Verification. When the Without Number Verification
checkbox is clear, you must enter Authorized External MSNs in order to connect the remote HiPath 1100 to the PABX.
>
In the event that the user updates the software with Remote Administration
and Without Number Verification checkboxes selected, the password specified in the Without Number Verification field will be reset to 00000 once the
update is completed. Once the update is completed a message will appear
warning the user that the password has been reset to 00000.
A31003-K1270-M100-3-76A9, 03/2007
HiPath 1100 Manager, Documentation
4-79
4_Advanced.fm
Advanced Configuration
System Settings
>
●
For Internal Use Only
When Remote Administration is carried out via an analog modem and the external line is not enabled for CLIP, the user must select this box.
If the external line is enabled for CLIP, the user can choose whether to select
this box or not.
In both cases, one or more passwords must be configured. Any of the configured passwords will be accepted.
It is recommended that the Remote Administration password be different from
the local password.
In the fields 1 to 4 enter the external numbers (Service MSN that do not require access
code 0) authorized to use Remote Administration (these numbers are provided by the
External Server).
The Password buttons open a new dialog window where you can assign or change a Password (up to 5 digits) for Remote Administration of the specific external MSN number
(Service MSN).
"Local MSN for Remote Administration" Field
When there is an incoming call for Remote Administration, the number entered in the Local MSN for Remote Administration field is compared to the numbers in the External
Numbers field. If it matches one of these external numbers and the password supplied
corresponds to the password entered in the dialogue window, the connection is set up.
>
The HiPath 1100 system only accepts Remote Administration via this Remote
MSN.
For more information on Remote Administration and related options see Capítulo 9, "Remote Administration".
"Remote Operation Type" Field
In the Remote Operating Mode field enter the mode of operation for performing Remote
Administration.
●
●
4-80
ISDN is selected when using a digital line.
Analog Modem is selected when using a modem connected to the HiPath 1100serial
input and to an Extension slot.
A31003-K1270-M100-3-76A9, 03/2007
HiPath 1100 Manager, Documentation
4_Advanced.fm
For Internal Use Only
4.13.13
Advanced Configuration
System Settings
"Modem" Tab
Use this tab to enter the settings for the modem to be used. Information about the modem can
be found in the modem’s manual.
If you use the Trendnet v.92 56K - TFM-560X or D-Link v.90 56K - DFM - 560EL modem, you
must use the adapter cable for analog modem (see Service manual - Adapter cable for analog
modem) and set/check the start-up and reboot code of the modem connected to the switch using HiPath 1100 Manager.
If the modem is connected to the PC (remote modem), the modem cable should be used and
the initialization code set usingCommServer.
"Modem control" field
"Reset" field
The Reset field indicates the default values of the system:
●
US-ROBOTICS: ATZH0
●
TrendNet: ATZH0
●
D-LINK: +++,,,ATHATZH0
"Start-up" field
In the Start-up field, the default setting for these modems is as follows:
●
US-ROBOTICS: AT&F0&B1F1S0=0
●
TrendNet: AT&F0&B1F1&D0S0=0.
●
D-LINK: AT&F0&D0S0=0
4.13.14
"Passwords" Tab
This tab is used to configure system passwords for protection against unauthorized use, configuration changes or Consultation.
Note:
The Programming Password required for first accessing the HiPath 1100Manager and
the Night Service Activation Password are both "31994" .
The password must consist of five digits.
Enter:
The settings of your choice in the appropriate fields.
A31003-K1270-M100-3-76A9, 03/2007
HiPath 1100 Manager, Documentation
4-81
4_Advanced.fm
Advanced Configuration
System Settings
For Internal Use Only
"System Password" Field
In the System Password field select the Password button to view the Change Password
dialog box where you can change the password.
"Night Service Activation Password" Field
In the Night Service Activation Password field select the Password button to view the
Change Password dialog box, where you can make changes to the Night Service password.
"Extension Password" Field
Every extension has "00000" as default password (PIN). Using this password the user can
access the settings for the extension. In the event that an extension’s password is changed
and forgotten use the Extension Password field to reset the default password "00000."
●
Select the extension for resetting the password from the Extension list.
●
Use the Reset button to reset the factory default password to "00000".
"Basic Programming Password" Field
In the Basic Programming Password field select the Password button to open the
Change Password dialog box. In this box you can change the password for accessing the
Basic folder (4 digits).
7
4.13.15
It is recommended that you change the basic password after logging in for the
first time.
Make a note of both passwords and keep them in a safe place.
"Tickets" Tab
If the system is enabled for Caller ID over digital (E1 CAS) or analog lines by a local carrier, the
call information will be displayed on the Call Detail Report.
Note:
The Fields display the current status of the system settings for each available item.
Enter:
The settings of your choice in the appropriate fields.
4-82
A31003-K1270-M100-3-76A9, 03/2007
HiPath 1100 Manager, Documentation
4_Advanced.fm
For Internal Use Only
7
Advanced Configuration
System Settings
In the event of a power outage during ticketing, all tickets that were being sent
when the power outage occurred are resent when a connection is once again
established.
Example:
If 300 tickets are stored in the memory then
1.
The user establishes a new connection, sends 100 tickets and terminates
the connection.
2.
Once a new connection is established, to send the remainder 200 tickets, a
power outage occurs
3.
After the power outage, once the user resumes his/her work, a new connection is established. During this connection all 200 tickets that were being
sent when the power outage occurred are resent.
"Call Tickets" Field
In the Call Tickets field select the type of call detail report you want to use.
●
●
●
●
Incoming/Outgoing Calls - Outgoing and incoming calls (with or without Caller ID)
are ticketed at the end of each call.
Outgoing - Outgoing calls are ticketed at the end of the call.
CLIP + Incoming/Outgoing - As Outgoing and incoming calls are ticketed at the end
of the call. Analog CLIP ticketing is also provided (Caller ID for incoming external calls)
CLIP + Outgoing Calls - Outgoing Calls are ticketed at the end of each call. Analog
CLIP (incoming call Caller ID) are also ticketed.
"Digit Suppression in Call Detail Reports" Field
In the Digit Suppression in Call Detail Report field select the number of digits that should
be suppressed on the ticket. These digits are replaced with a "?".
"Call Detail Report Filter" Field
In the Call Detail Report Filter field enter the first digits (up to 4) of the destination number
to be ticketed during an outgoing call.
For example, in order to record only outgoing international calls you must program the digits "00."
"Account Code" Checkbox
When the Account Code check box is selected, the information concerning the Account
code will appear in the ticket.
A31003-K1270-M100-3-76A9, 03/2007
HiPath 1100 Manager, Documentation
4-83
4_Advanced.fm
Advanced Configuration
System Settings
For Internal Use Only
An Account Code is specified by a sequence of up to 10 random digits (0...9). For example,
the number of a lawsuit. For System Telephones this feature is selected before or during
a call, by using the menu, an Account Code or a programmable key. For Standard Telephones this feature must be selected before making a call.
4.13.16
"Message" Tab
This tab allows you assign a message to one of the two B channels on the EVM. Alternatively,
the message can be assigned to a MSN, in the MSN subfolder.
7
If a message is assigned to Channel B, only one Channel B will be available for
other activities on the EVM.
"Port" Column
Port B (default is 7491 or 7492) column specifies the EVM line for the message playback.
"Type" Column
The Type column specifies whether a message will be played only once or repeatedly.
Configure Greeting Message for B channel to specify a message to be played B (default is 7491
or 7492).
See also Entry Voice Mail - EVM.
4.13.17
"Holiday" Tab
In this tab enter the holidays for the system’s calendar.
Note:
The Columns display the holidays specified.
Enter:
Names/dates of holidays in the appropriate fields.
"Holiday" Column
In the Holiday column enter the name of the holiday.
"Date" Column
In the Date column select the holiday dates in the calendar.
4-84
A31003-K1270-M100-3-76A9, 03/2007
HiPath 1100 Manager, Documentation
4_Advanced.fm
For Internal Use Only
4.13.18
Advanced Configuration
System Settings
"Virtual port" tab
The Virtual port tab allows you to define a flexible number for the virtual EVM ports and the
virtual Fax/DID ports.
"Virtual port" field
The virtual port field shows the available slots of the virtual ports.
"Flexible number" field
Use the Flexible number field to change the numbers of the predefined virtual ports.
Note:
You can enter up to five digits.
7
Virtual ports:
●
From 0 to 3 - Virtual Fax/DID ports
●
From 4 to 7 - Virtual EVM ports
A31003-K1270-M100-3-76A9, 03/2007
HiPath 1100 Manager, Documentation
4-85
4_Advanced.fm
Advanced Configuration
Calendar
4.14
For Internal Use Only
Calendar
In the Calendar field set the activation and deactivation time as well as the days of the week
for Night Service.
Note:
Each weekday can be assigned up to 4 intervals.
Enter:
The Calendar field contains a timetable with separate lines for weekdays and holidays.
Above these lines there is a time scale in hours (intervals can be set with a resolution of
15 minutes).
To configure the activation time (up to 20 time intervals) select the start time and specify a
time interval by clicking with the left mouse button on the Timetable column you want to
select. Or select the day and time in the Set Time Interval field (without using the mouse).
In the Start Time, End Time and Weekday fields specify the time interval to be used then
confirm by clicking the Add Time Interval button.
Entries that are not selected are assigned to the deactivation period.
To delete an activation time interval, click the Delete Time Interval button and select the
interval.
.
>
4-86
The activation and deactivation time intervals are the same
for all specified holidays.
A31003-K1270-M100-3-76A9, 03/2007
HiPath 1100 Manager, Documentation
4_Advanced.fm
For Internal Use Only
4.15
Advanced Configuration
Internal entrance telephone
Internal entrance telephone
You may connect up to twenty internal entrance telephones. Each Entrance Telephone occupies an analog extension slot (a/b) and must be individually activated. An interface between
an Entrance Telephones and the PABX, known as TFE Interface, is required. The interface
configuration depends on the type of TFE adaptor used (see Service Manual and Programming
Manual - Entrance Telephone).
The Entrance telephone subfolder contains the following tabs:
●
"Interface Slot" Tab
●
"Attendants" Tab
●
"Permission to Open" Tab
4.15.1
"Interface Slot" Tab
In this tab you can configure the extension slots for connecting TFE Interfaces.
Note:
This tab displays extension slots that are connected and available for configuration.
Enter:
Configuration options for each extension slot are displayed in columns below:
"Entrance Telephone" Column
The Entrance Telephone column displays the settings that can be configured.
"Interface Slot" Column
The Interface Slot column displays the extensions slots that are available for configuration.
"Lock" Checkbox
When the Lock checkbox is selected it means that there is a locking device at the extension slot.
4.15.2
"Attendants" Tab
In the DID tab you can specify the extensions assigned to answer incoming calls from Entrance
Telephones.
Note:
This tab displays all of the extensions that are connected.
A31003-K1270-M100-3-76A9, 03/2007
HiPath 1100 Manager, Documentation
4-87
4_Advanced.fm
Advanced Configuration
Internal entrance telephone
For Internal Use Only
Enter:
In the "Selected" field the Extensions that are assigned to Entrance Telephones. To make
this selection place the cursor in the "Available" field, select the Extension then use the
">" button to move to the "Selected" field. Use the "<" and "<<" buttons to reset selected items in the "Available" field. You can also make the selection by double-clicking the
selected item with the left mouse button.
"Entrance Telephone" Column
The Entrance Telephone column displays the settings that can be configured.
"Extension in the day group" column
The Extension in the day group column displays the extensions that will receive calls
from the entrance telephones during the daytime.
"Extension in the night group" column
The Extension in the night group column, displays the extensions that will receive calls
from the entrance telephones during the night time.
4.15.3
"Permission to Open" Tab
In the Permission to Open tab you can specify extensions authorized to use Door Openers.
Note:
This tab displays all of the extensions that are connected.
Enter:
The Extensions with Permission to Open in the "Selected" field. To make this selection
place the cursor in the "Available" field, select the Extension then use the ">" button to
move to the "Selected" field. Use the "<" and "<<" buttons to reset selected items in the
"Available" field. You can also make the selection by double-clicking the selected item with
the left mouse button.
"Entrance Telephone" Column
The Entrance Telephone column displays the settings that can be configured.
"Group Extensions" Column
The Extension Group column displays the extensions authorized to open doors.
>
4-88
For further information on how to install and operate a door opening device refer
to your TFE adapter documentation.
A31003-K1270-M100-3-76A9, 03/2007
HiPath 1100 Manager, Documentation
4_Advanced.fm
For Internal Use Only
4.16
Advanced Configuration
Sensor and Relay
Sensor and Relay
The Music Module sensor and relay are configured in the Sensors and Relays subfolder. The
module provides 1 Relay, 1 Sensor and one interface for playing audio data from an external
music source(Messages/Music On Hold).
"Relay" Field
In this field you can specify the activation mode (manual or automatic) for the Relay.
Note:
Additional peripheral equipment (such as a Door Opener, Electronic Lock, Alarms and other) can be controlled by means of the contacts.
When the relay is activated, the contacts close. When it is deactivated, the contacts open.
Enter:
The settings of your choice for each item in the following fields:
●
●
●
●
●
Name: Enter a name for the Relay.
Switch: The Relay can only be switched from an extension by entering an appropriate
Feature Code (*90 = on/#90 = off).
Monoflop: The Relay is closed for a specified period of time (entered in the field indicated as Relay Timeout). Alternatively, the Relay can be opened before the specified
time by using an extension to enter the feature code (#90).
Toggle: The current Relay state is inverted with every selection of (*90).
Music on Hold: When this option is selected, the Relay can be used for activating an
externally connected device for playing Messages/Music On Hold from an external
source. This depends on the HiPath 1100system status (external calls on hold, consultation, toggling, etc.).
>
●
When playing music from an external music source it is required that all regulations related to copyrights for the country in question are followed.
External Ringer: When this option is selected, the Relay can be used for controlling
a second ringer tone for an extension selected from the list.
A31003-K1270-M100-3-76A9, 03/2007
HiPath 1100 Manager, Documentation
4-89
4_Advanced.fm
Advanced Configuration
Sensor and Relay
For Internal Use Only
"Sensor" Field
In this field you can specify actions associated with different Sensor contact states.
Note:
The activation logic based on the initial position of the sensor contacts and its resulting actions are programmable.
Additional peripheral equipment (such as a Door Opener, Electronic Lock, Alarms and other) can be controlled by means of the contacts.
Enter:
The settings of your choice for each item in the following fields:
"Name" Field
Enter a name for the Sensor in the Name field.
"Activate Relay" Checkbox
When the Activate Relay checkbox is selected, a Sensor can be assigned to a relay and
activated as needed. In such a case, the following relay functions can be programmed:
●
●
●
●
●
Switch: The Relay can only be switched from an extension by entering an appropriate
Feature Code (*90 = on/#90 = off).
Monoflop: The Relay is closed for a specified period of time (entered in the field indicated as Relay Timeout). Alternatively, the Relay can be opened before the specified
time by using an extension to enter the feature code (#90).
Toggle: The current Relay state is inverted with every selection of (*90).
Music on Hold: The Relay can be used for activating external equipment connected
for playing messages/music.
External Ringer: It is possible to use the Relay to control a second ring for an extension Slot.
"Dial Programmed Number" Checkbox
When the Dial Programmed Number checkbox is selected, the system is enabled for dialing an internal or external number that has been entered in the "Number to be called"
Field.
"Acknowledge Code" Checkbox
When the Detect Code checkbox is selected, the destination number must acknowledge
or ignore an alarm call by sending an acknowledgment code ("#"DTMF signal).
4-90
A31003-K1270-M100-3-76A9, 03/2007
HiPath 1100 Manager, Documentation
4_Advanced.fm
For Internal Use Only
Advanced Configuration
Sensor and Relay
"Number to be called" Field
In the Number to be Called field enter a number to be automatically dialed when the sensor is activated. This number is stored in the System Speed Dialing. When the number
stored in the System Speed Dialing is changed, this field is updated. Similarly, when the
number in the field is changed, the change is reflected in the System Speed Dialing phonebook.
"Use MSN" Field
This Use MSN field specifies the system’s MSN to be used for outgoing calls. Through this
MSN the destination number is able to identify the origin of the call.
"DTMF signals" Field
In the DTMF Signal field you can specify a sequence of digits. This sequence is converted
to DTMF signals and sent after a call is answered.. The call destination must be configured
in the "Number to be called" Field.
"Number of tries:" Field
The Number of Attempts field specifies how many times the system should attempt to establish a connection (from 1 to 100) to an internal or external number entered in the "Number to be called" Field. (See also Time between Attempts for Activating the Sensor
(minutes) field.)
An attempt is made after every call that was not answered (busy signal), or when the "Acknowledge Code" Checkbox is enabled and no acknowledgment is received. When this
occurs, the call is disconnected and a new attempt is made.
"Time between Call Attempts" Field
In the Time between Call Attempts field you can specify the time (in minutes) for retrying
a call to an extension that was busy. This is done if no DTMF code verification has been
configured or no DTMF code has been entered (or if the code specified is incorrect).
"Sensor Logic (Inactive State)" Field
The Sensor Logic (Inactive State) field specifies the state of the sensor. The sensor is
able to detect any changes to the state of the Relay (when contacts open or close, for example) via the Normally Closed and Normally Open fields.
The basic sensor setting can be configured in the following way:
●
●
Normally Closed option means that the sensor is enabled when the connected contact is opened.
Normally Open option means that the sensor is enabled when the connected contact
is closed.
A31003-K1270-M100-3-76A9, 03/2007
HiPath 1100 Manager, Documentation
4-91
4_Advanced.fm
Advanced Configuration
MSN
>
4.17
For Internal Use Only
If an additional security alarm system has been enabled and activated by a configured relay, it can be disabled from any extension with the Service Code #9414
+ Programming Password.
MSN
Use the MSN (Multi Subscriber Number subfolder to assign MSN numbers on the digital line to
extensions or extension groups for answering incoming calls (see also MSN in the "Basic" folder).
Note:
The MSN reserved for DISA access is not displayed in this table.
Enter:
Extensions, extension groups and digital lines in the appropriate fields.
The MSN subfolder contains the following four tabs:
●
"Incoming Day" Tab
●
"Night Service - Incoming" Tab
●
"Day Service - Outgoing" Tab
●
"Night Service - Outgoing" Tab
●
"Line Assignment" Tab
4.17.1
"Incoming Day" Tab
Use this tab to assign Extensions, Call Groups, Hunt Groups and UCD Groups to MSN
numbers as First or Second Attendants for incoming calls for Day Service. You can also assign
"Busy Signal" feature (Busy by Busy group) to MSNs individually or in group (more than one
MSN can be assigned to one Busy Signal Group).
Note:
The system supports up to 140 MSNs. Each of these 140 numbers can be assigned to a
list of up to 10 extensions, 1 group or one mailbox thorough an EVM Virtual Port. The system allows independent configuration for incoming day and night calls. An MSN can have
a maximum of 20 digits.
●
Call Groups (CG) - 770 to 779
●
Hunt Groups (HG) - 780 to 789
●
UCD Subscriber Groups - 790 to 799
4-92
A31003-K1270-M100-3-76A9, 03/2007
HiPath 1100 Manager, Documentation
4_Advanced.fm
For Internal Use Only
●
Advanced Configuration
MSN
EVM Virtual Ports - 744 to 747
Enter:
In the "Selected" field the MSNs to be changed or assigned to Extensions and Extension
Groups as First Attendants and Second Attendants for external lines. To make this selection place the cursor in the "Available" field, select the Extension or Group, and use the
">" button to move to the "Selected" field. Use the "<" and "<<" buttons to reset selected items in the "Available" field. You can also make the selection by double-clicking the
selected item with the left mouse button.
"MSN" Column
The MSN column shows the MSNs available for configuration.
"Busy Signal" Column
The Busy Signal column displays the Groups for the Busy Signal feature. If you would like
to assign more than one MSN to a Group, select the appropriate column field for the MSN
and enter the new group.
This features allows all telephones in the "Busy Signal" Group to automatically switch to a
busy signal when an extension in the group (which activated the call) has a call in progress.
External calls no longer ring (caller hears a busy signal).
This is useful when there is only one person available in the group and this person does
not want to be disturbed by external calls while there is a conversation in progress. The
caller will think that the called person is busy at the moment.
"First Attendant" Column
The First Attendant column contains the same information as the First Attendant field. It
also displays Extensions, Groups and EVM Virtual Ports (mailboxes) available for answering incoming calls.
"Second Attendant" Column
The Second Attendant column contains the same information in the Second Attendant
field. It also displays Extensions, Groups and EVM Virtual Ports (mailboxes) available for
answering incoming calls when the First Attendant is unavailable or does not answer a call
within the timeout specified in the Configuration tab - "Waiting Timeout" Column.
4.17.2
"Night Service - Incoming" Tab
Use this tab to assign Extensions, Call Groups, Hunt Groups and UCD Groups to MSN
numbers as First or Second Attendants for incoming calls for Night Service. You can also assign a Busy Signal feature (Busy by Busy Group) to individual MSNs or groups of MSNs (more
than one MSN in one Busy Signal Group).
A31003-K1270-M100-3-76A9, 03/2007
HiPath 1100 Manager, Documentation
4-93
4_Advanced.fm
Advanced Configuration
MSN
For Internal Use Only
Note:
The system supports up to 140 MSNs. Each of these 140 numbers can be assigned to a
list of up to 10 extensions, 1 group or 1 mailbox through an EVM Virtual Port. The system
allows independent configuration for incoming day and night calls. An MSN can have a
maximum of 20 digits.
●
Call Groups (CG) - 770 to 779
●
Hunt Groups (HG) - 780 to 789
●
UCD Subscriber Groups - 790 to 799
●
EVM Virtual Ports - 744 to 747
Enter:
In the "Selected" field the MSNs to be changed or assigned to Extensions and Extension
Groups as First Attendants and Second Attendants for external lines. To make this selection place the cursor in the "Available" field, select the Extension or Group, and use the
">" button to move to the "Selected" field. Use the "<" and "<<" buttons to reset selected items in the "Available" field. You can also make the selection by double-clicking the
selected item with the left mouse button.
"MSN" Column
The MSN column shows the MSNs available for configuration.
"Busy Signal" Column
The Busy Signal column displays the Groups for the Busy Signal feature. If you would like
to assign more than one MSN to a Group, select the appropriate column field for the MSN
and enter the new group.
This features allows all telephones in the "Busy Signal" Group to automatically switch to a
busy signal when an extension in the group (which activated the call) has a call in progress.
External calls no longer ring (caller hears a busy signal).
This is useful when there is only one person available in the group and this person does
not want to be disturbed by external calls while there is a conversation in progress. The
caller will think that the called person is busy at the moment.
"First Attendant" Column
The First Attendant column contains the same information as the First Attendant field. It
also displays Extensions, Groups and EVM Virtual Ports (mailboxes) available for answering incoming calls.
4-94
A31003-K1270-M100-3-76A9, 03/2007
HiPath 1100 Manager, Documentation
4_Advanced.fm
For Internal Use Only
Advanced Configuration
MSN
"Second Attendant" Column
The Second Attendant column contains the same information in the Second Attendant
field. It also displays Extensions, Groups and EVM Virtual Ports (mailboxes) available for
answering incoming calls when the First Attendant is unavailable or does not answer a call
within the timeout specified in the Configuration tab - "Waiting Timeout" Column.
4.17.3
"Day Service - Outgoing" Tab
In this tab you can configure outgoing calls for Day Service so that an extension in a group can
make calls using a selected MSN.
Note:
This tab will show only the extensions that are available.
Enter:
The Extensions to be assigned to the Group in the "Selected" field. To make this selection
place the cursor in the "Available" field, select the Extension then use the ">" button to
move to the "Selected" field. Use the "<" and "<<" buttons to reset selected items in the
"Available" field. You can also make the selection by double-clicking the selected item with
the left mouse button.
"MSN" Column
The MSNcolumn shows the MSNs available for configuration.
"Group Extensions" Column
The Group Extensionscolumn displays the extensions assigned to a specific MSN.
4.17.4
"Night Service - Outgoing" Tab
In this tab you can configure outgoing calls for Night Service so that an extension in a group
can make calls using a selected MSN.
Note:
This tab will show only the extensions that are available.
A31003-K1270-M100-3-76A9, 03/2007
HiPath 1100 Manager, Documentation
4-95
4_Advanced.fm
Advanced Configuration
MSN
For Internal Use Only
Enter:
The Extensions to be assigned to the Group in the "Selected" field. To make this selection
place the cursor in the "Available" field, select the Extension then use the ">" button to
move to the "Selected" field. Use the "<" and "<<" buttons to reset selected items in the
"Available" field. You can also make the selection by double-clicking the selected item with
the left mouse button.
"MSN" Column
The MSNcolumn shows the MSNs available for configuration.
"Group Extensions" Column
The Group Extensions column displays the extensions assigned to a specific MSN.
4.17.5
"Line Assignment" Tab
In this tab you can assign External Lines to available MSNs.
Note:
This tab displays only the available lines.
Enter:
The Lines for creating a Group in the "Selected" field. To make this selection place the
cursor in the "Available" field, select the Extension then use the ">" button to move to the
"Selected" field. Use the "<" and "<<" buttons to reset selected items in the "Available"
field. You can also make the selection by double-clicking the selected item with the left
mouse button.
"MSN" Column
The MSN column shows the MSNs available for configuration.
"Lines" Column
The Lines column displays digital lines assigned to a specific MSN.
4-96
A31003-K1270-M100-3-76A9, 03/2007
HiPath 1100 Manager, Documentation
4_Advanced.fm
For Internal Use Only
4.18
Advanced Configuration
Fax/DID
Fax/DID
The HiPath 1100 can use a Fax/DID facility (direct dialing to the extension) that provides AutoAnswering for External Call, Message Playback and Fax Signal Detection. A caller can dial
any extension or enter any digit configured in the Answering Menu and be transferred to another extension or group. The maximum number of calls that can be simultaneously answered
is 8.
This feature has three operating modes:
Fax Mode
In this operating mode the module detects only fax signals. A greeting message is played
for all incoming external calls. If the caller wants to send a fax, the transmission can be
started at the end of the message. If no fax signal is detected within 10 seconds of the
greeting message a second message is played and the call is transferred to an Attendant.
DID Mode
In this operating mode the facility detects fax signals and extensions or digits entered.
When an external call is answered, a greeting message is played to guide the caller.
The following is an example of a recorded message: "You have reached Siemens. Dial the
extension number you would like to reach: 22 for Sales Department or 23 for Technical
Support".
If the Fax/DID does not detect a valid MF signal within 10 seconds of the greeting message, a second message is played and the call is transferred to an Attendant.
Fax/DID Mode
In this operating mode the facility detects fax signals and extensions or digits entered.
When an external call is answered a greeting message is played to guide the caller.
The following is an example of a recorded message: "You have reached Siemens. To send
a fax start transmission now. For Sales Department dial 22. For Technical Support dial 23".
If no valid fax signal, digit or extension is detected within 10 seconds of the greeting message, a second message is played and the call is transferred to an Attendant.
Message Mode
When an external call is answered, a greeting message is played and the call is transferred
to an attendant.
The following is an example of a recorded message: "You have reached Siemens. Your
call is being transferred."
Auto-Fax Mode
When this mode is enabled, the system can detect a fax signal during the first ten seconds
of a conversation then transfer the call to a specified extension, such as a Fax/DID. When
no signal is detected the conversation proceeds as usual.
A31003-K1270-M100-3-76A9, 03/2007
HiPath 1100 Manager, Documentation
4-97
4_Advanced.fm
Advanced Configuration
Fax/DID
For Internal Use Only
In the Fax/DID subfolder are assigned numbers for accessing a Fax/DID Module and all its features.
Note:
Messages stored in this module can be programmed as a Second Attendant for external
calls or as a Forwarding Destination for an Extension (see Call Forwarding in the User’s
Manual).
Enter:
Destination numbers for call forwarding, extensions, extension groups and any other settings in the appropriate fields.
The Fax/DID subfolder contains the following four tabs:
●
"Virtual Extension" Tab
●
"Call Answering Menu" Tab
4.18.1
"Virtual Extension" Tab
In the Pseudo Port tab you can assign new numbers to slots and enable Collect Call Barring.
The default configuration includes the following assignments:
●
740 - Fax Mode
●
741 - DID Mode (direct dialing to an extension)
●
742 - Fax/DID Mode
●
743 - Message Mode
Note:
You can enter up to five digits.
This tab displays all ports available.
The columns display the current number and configuration of the slots
You can import/export the settings to other items using the Copy and Paste functions.
Enter:
The new number for the Pseudo Port Slot and Collect Call Barring, if required.
"Pseudo Port" Column
The Pseudo Port column displays the logical slot for the Fax/DID feature ports.
4-98
A31003-K1270-M100-3-76A9, 03/2007
HiPath 1100 Manager, Documentation
4_Advanced.fm
For Internal Use Only
Advanced Configuration
Fax/DID
"Flexible Number" Column
In the Flexible Number column select a Port to configure and enter a new number.
"Collect Call Barring" Checkbox
When the Collect Call Barring checkbox is selected, all collect calls to a Pseudo Port
Slot are automatically rejected by the system.
>
4.18.2
Call Barring does not work for calls transferred to a Fax/DID .
If a call has been answered at least once by the system, Collect Call Barring
cancels the blocking.
If an incoming call over a digital line is forwarded because there was no answered (*14), and Collect Call Barring is activated, the call will ring at the First
Attendant for the external line.
"Call Answering Menu" Tab
In the Call Answering Menu tab you can create a customized Call Answering Menu as well as
transfer a call to a specific extension or group according to the digit entered.
A call is transferred to a preconfigured destination after 3 seconds. If a digit is entered before
this period of time, it will be analyzed and the call will be forwarded to a new destination. The
destination can be an extension or a group.
Note:
When the Call Answering Menu is not configured, the Fax/DID feature can only detect extension and group numbers.
The Music Module RelayHiPath 1120 operation as well as the Remote Administration
feature can also be configured in this tab.
The Columns show the current extension configuration status for Call Forwarding Numbers.
Enter:
The assignments for Extensions, Relay (HiPath 1120 Music Module) and Remote Administration to Call Forwarding Numbers.
"Slot" Column
The Slot column displays digits that can be assigned to the extensions, relay, and remote
administration for forwarding calls.
A31003-K1270-M100-3-76A9, 03/2007
HiPath 1100 Manager, Documentation
4-99
4_Advanced.fm
Advanced Configuration
Fax/DID
For Internal Use Only
"Destination" Column
In the Destination column select an extension, Relay option (HiPath 1120 Music Module)
or Remote Administration to assign to Call Forwarding Numbers.
When an Extension option is assigned to a Call Forwarding Number you can route a call
to a selected extension from the list, once the call has been answered by a Fax/DID feature
and a digit was selected and entered to specify the Call Forwarding Number for the extension.
When a Relay option is assigned to a Call Forwarding Number you can turn the HiPath
1120 Music Module Relay on/off once the call has been answered by a Fax/DID feature
and a digit was selected and entered to specify the Call Forwarding Number for this option
(Relay on/off - *90/#90 + system password) (see Sensor and Relay).
When a Remote Administration option is assigned to a Call Forwarding Number you
can activate it once the call has been answered by a Fax/DID feature and a digit was selected and entered to specify the Call Forwarding Number for this option (see "Remote
Administration" Tab).
4-100
A31003-K1270-M100-3-76A9, 03/2007
HiPath 1100 Manager, Documentation
4_Advanced.fm
For Internal Use Only
4.19
Advanced Configuration
Timers
Timers
In the Timers subfolder you can reset the default times for certain features and signaling according to specific user’s preferences or to a Country.
The Timers subfolder contains the following four tabs:
●
"General" Tab
●
"Extensions" Tab
●
"Lines" Tab
4.19.1
"General" Tab
The following fields are configured in the General tab:
"Line" Field
"Time between Rings" Field
In the Time between Rings field you can change the time period between rings for incoming calls. This is the period of time between two call pulses from the local carrier. After this
pause, the system disconnects the external line and is ready to receive new incoming calls.
>
The call pause time between pulses varies depending on the country. Here you
can specify the setting as you prefer.
"Reseizure Timeout (100ms)" Field
In the Reseizure Timeout field you can change the timeout specified for reseizing an external line. This timeout consist of a time interval during which the line remains blocked after the end of a call.
"External Room Monitor" Field
In the External Room Monitor field you can specify a period of time after which the monitoring call is disconnected. During the period of time specified a user can access the system through a Fax/DID feature for Room Monitoring purposes (Babyphone) from an external telephone.
"Time in Fax/DID Queue" Field
In the Time in Fax/DID Queue field you can specify the maximum time for an external call
to remain in a Queue. When the specified time expires the call is disconnected or forwarded to an overflow extension.
A31003-K1270-M100-3-76A9, 03/2007
HiPath 1100 Manager, Documentation
4-101
4_Advanced.fm
Advanced Configuration
Timers
For Internal Use Only
"External-to-External Transfer" Field
"Disconnect Timeout After Transfer" Field
In the Disconnect Timeout After Transfer field you can set a length of time for disconnecting an external call over an analog line after the call is transferred to an external destination by an authorized extension. This timeout can range from 20 to 600 seconds. The
default setting is 300 seconds.
"Disconnect Timeout Code" Field
In the Disconnect Timeout Code field you can set a code for restart the disconnect timeout for an external call over an analog line after the call is transferred to an external destination by an authorized extension. The maximum number of digits is 2; default setting is
00.
>
4.19.2
Once the call is transferred and answered at the destination, a disconnect timer
is activated (default is 5 minutes). A 20-second warning tone is sent to both parties before the call is disconnected. In order to continue the call without disconnecting, the destination number must enter this code (MF, default "00") to restart
the timeout.,
"Extensions" Tab
In the Extensions tab you can configure a Flash Detection Timeout for each extension.
For analog DTMF telephones with a Flash key, this key (also known as consultation or signal
key) sets up a consultation call (for example, for Toggling, Conference or only Consultation). In
order for the HiPath 1100 system to detect the signal from a Flash key, the setting for Flash
Detection Timeout must be the same as the factory default setting for the analog DTMF telephone used. For more information on Flash Detection Timeout, please refer to the telephone
manual.
"Extension" Column
The Extension column displays the extensions available in the extensions.
"Flash Detection Timeout" Column
In the Flash Detection Timeout column select the maximum period of time (001 ms to 250
ms) required by the system for detecting a Flash signal generated by an internal telephone.
4-102
A31003-K1270-M100-3-76A9, 03/2007
HiPath 1100 Manager, Documentation
4_Advanced.fm
For Internal Use Only
4.19.3
Advanced Configuration
PABX Information
"Lines" Tab
In the Lines tab you can configure a Flash Detection Timeout for each external analog line.
The duration of the Flash signal that is sent by the system to each external analog line can be
configured individually. Flash signal duration depends on the specific setting for each country.
For information on the time required for Flash detection on an external line consult your local
carrier.
"External Line" Column
The External Line column displays all analog lines available in the system.
"Flash Detection Timeout" Column
In the Flash Detection Time column select the time for Flash duration on an external line
that the system requires in order to send to the local carrier.
4.20
PABX Information
The PABX Information subfolder displays the HiPath 1100 system configurations currently accessed by the HiPath 1100 Manager.
The Extensions subfolder contains the following four tabs:
●
"General Information" Tab
●
"PABX Layout" Tab
●
"Slot Allocation" Tab
●
"Board Configuration" Tab
4.20.1
"General Information" Tab
The General Information tab displays the following information:
●
PABX Model
●
PABX Release
●
PABX Version
●
Specific Version Number
●
Country for which it is configured
●
Number of extensions available
●
Maximum number of extensions
A31003-K1270-M100-3-76A9, 03/2007
HiPath 1100 Manager, Documentation
4-103
4_Advanced.fm
Advanced Configuration
PABX Information
●
Number of external lines available
●
Maximum number of external lines
●
Connected modules and occupied slots
For Internal Use Only
HiPath 1100 Systems Set
The HiPath 1100 is comprised of the following systems:
●
HiPath 1120
●
HiPath 1150
●
HiPath 1190
HiPath 1100 Accesses:
●
External lines:
Basic S0 digital (for S0 Module);
Primary access with E1 CAS signaling (for TME1 Modules)
Primary access with S2 signaling (for TME1 Modules)
ADSL access and LAN interface (ADSL, SLIMC, SADSLIM, LIMC or ADSLIM modules);
Analog line
●
Internal extensions:
System Telephones Models E3030, E821 ST and E822 ST
Standard Telephones, Pulse (DP) or Tone (DTMF)
Answering machine
Fax
Entrance Telephone/Door Opener with TFE adaptor
●
One sensor and one relay:
HiPath 1120 - in Music Module
●
V.24 and USB adapter enable system programming with the "HiPath 1100 Manager,"CTI
functions, CDR data printing, configuration report printing, etc.
Expansions
The HiPath 1100 system has the following Expansion Boards available:
●
EB 202: 2 external analog lines and 2 analog extensions
●
EB 204: 2 external analog lines and 4 analog extensions
4-104
A31003-K1270-M100-3-76A9, 03/2007
HiPath 1100 Manager, Documentation
4_Advanced.fm
For Internal Use Only
●
EB 206: 2 external analog lines and 6 analog extensions
●
EB 210: 2 external analog lines and 10 analog extensions
●
EB 200: 2 external analog lines
●
EB 400: 4 external analog lines
●
EB 800: 8 external analog lines
●
EB 010: 10 analog extensions
●
EB 012: 12 analog extensions
Advanced Configuration
PABX Information
Option Modules
●
●
●
S0 Module: This module enables you to request from your local carrier the conversion of
an analog telephone line into a digital telephone line with EDSS1 signaling. This digital line,
by using a basic S0 access, can provide some ISDN features.
TME1 Module: This module enables you to request from your local carrier the conversion
of an analog telephone line into a digital telephone line with E1 CAS access or S2 access.
This digital line, by using a basic access, can enable some ISDN features.
ADSL expansion boards: These provide a LAN Ethernet interface via their RJ45 connectors that allow you to set up a LAN, as well as providing access to and from this network.
The module used may also be equipped with an ADSL (Asymmetric Digital Subscriber
Line) modem, on which it is possible to receive high-speed data and voice (up to 8 Mbit/s)
through a single pair on a standard telephone line (POTS).
●
●
In HiPath 1100 V6.0, there is an ADSL Module equipped with ADSL modem functions
and a LAN interface together on the same slot.
In HiPath 1100 V7.0, there is a LIM module (ADSL expansion board) and the ADSL
modem can be mounted optionally on this slot.
●
HiPath 1120 : SLIMC module and SADSLIM module;
●
HiPath 1150/1190 : LIMC module and ADSLIM module;
>
The ADSL modem used in HiPath 1100 V7.0 is the Siemens SpeedStream
4100. You can consult the configuration instructions in the manual which you
will find in the Setup and Installation CD.
Music module (H1120): This offers the possibility to insert music on hold (MOH) for calls from an
eternal music source (for example, radio) connected directly to the module’s external music input.
●
●
The module also has a relay and a sensor that work individually or in conjunction with other
devices, such as entrance telephones, door openers, alarms, etc.
CDB 16 (H1190) Module: This module is used for connecting up to 16 System Telephones.
A31003-K1270-M100-3-76A9, 03/2007
HiPath 1100 Manager, Documentation
4-105
4_Advanced.fm
Advanced Configuration
PABX Information
4.20.2
For Internal Use Only
"PABX Layout" Tab
The PABX Layout tab displays the schematics for the PABX motherboard and the modules
connected to the system. This layout is dynamic as to the information and diagrams displayed
for the modules connected in each slot. The drawings present an overview of the PABX Main
Distribution Frame (MDF) and a visual illustration of the module locations and the system’s extensions and external lines. You can also see the numbering for extensions and external lines
and the logical numbers for the ports assigned.
For a better view of the schematics and drawings use these controls:
●
More Zoom - Expands the viewing area
●
Less Zoom - Reduces the viewing area
●
Resize Window - Adjusts the drawings to the size of the window
●
Pan View - Move the cursor on the screen and click with the left mouse button to move the
viewing area.
4.20.3
"Slot Allocation" Tab
The Slot Allocation tab displays the available slots and their respective assignments.
"Slot" Field
In the Slot field you can select a slot position to be displayed on the screen.
"Clean Slot" Checkbox
When the Clean All Slots checkbox is selected, all ports assigned to a selected slot are
removed.
"Clean All Slots" Checkbox
When the Clean All Slots checkbox is selected, all assignments between ports and slots
are cleared
4.20.4
"Board Configuration" Tab
The Slot Configuration tab allows you to configure the slots available and the type of board
for each slot.
"Slot" Column
In the Slot column select a slot position to be displayed on the screen.
4-106
A31003-K1270-M100-3-76A9, 03/2007
HiPath 1100 Manager, Documentation
4_Advanced.fm
For Internal Use Only
Advanced Configuration
PABX Information
"Board" Column
In the Board column select the board for each slot position.
"Options" Field
Use the Options field to configure modules for the system. A checkbox for each module
is enabled, according to the system’s capacity.
●
●
●
●
CD - allows you to use more than 16 interfaces for the HiPath 1190 ;
MOH - You can enter music for external calls that are placed on hold (MOH) using a
music source on the HiPath 1120
EVM - allows you to use Voice Mail services with the systems
UPN - provides the system with connection for optiPoint 500 telephones using 8, 4 or
2 interfaces on HiPath 1150/1190 systems and 4 or 2 interfaces on HiPath 1120 systems.
"Available TME1 Ports" Field
In the Available TME1 Ports field you can specify how many ports are available on the
TME1 module.
Note:
To enable this field you must configure a slot with an E1 Board.
A31003-K1270-M100-3-76A9, 03/2007
HiPath 1100 Manager, Documentation
4-107
4_Advanced.fm
Advanced Configuration
PABX Information
4-108
For Internal Use Only
A31003-K1270-M100-3-76A9, 03/2007
HiPath 1100 Manager, Documentation
4_LED_Status.fm
Status Monitor
For Internal Use Only
5
Status Monitor
The Status Monitor application was designed for displaying PABX connection status information. After installing the application from the CD that comes with the system, follow one of these
procedures to start it: Start/Programs/Siemens HiPath 1100/StatusMonitor.
After selecting Start/Programs the
application icon is displayed in the Task Bar, in the
Sys Tray field, indicating that the Status Monitor is active.
Status Indicators
Moving the mouse over the
Status Indicators:
icon and pressing the left button displays a window with four
- This indicates when the HiPath 1100 system is turned on/off
- This indicates that there is an external call in progress
- This indicates that there is a message in the mailbox;
- This indicates that the HiPath 1100 is connected to a remote PC
(for Remote Administration or Software Update)
To minimize the Status Monitor click the “X” on the upper right corner.
A31003-K1270-M100-3-76A9, 03/2007
HiPath 1100 Manager, Documentation
5-1
4_LED_Status.fm
Status Monitor
For Internal Use Only
Sys Tray Menu View
Right-click the
icon to display the Status Monitor Menu:
Item
Description
Status Monitor
Shows/Hides the Status Indicator window.
Connect
Connects/Disconnects the Status Monitor.
Configuration
Opens the configuration window for specifying:
Language - choose the language for the interface
CommServer Configuration - enter the "Address" and
"Port" used.
Help
Enables the application’s Help feature.
About Status Monitor...
This displays information about the Status Monitor application.
Exit
This closes the application.
5-2
A31003-K1270-M100-3-76A9, 03/2007
HiPath 1100 Manager, Documentation
For Internal Use Only
6
5_CommServer.fm
CommServer
CommServer
The CommServer application provides the interface for the HiPath 1100. All applications to be
connected to the HiPath 1100 must first interact with the CommServer.
>
If one of the ADSL expansion boards(SLIMC, SADSLIM, LIMC or ADSLIM modules)
is installed in HiPath 1100 V7.0, it will not be necessary to use the CommServer installed on your machine, as these modules already have an inbuilt CommServer called and CommServer. You may therefore make an authorized LAN access to the
PABX of an external application such as those that use the SNMP platform.
The IP addresses and the port of the ADSL expansion board are configured in the
HiPath 1100 Manager, in the Tools/CommServer Configuration menu.
Default:
●
Port: 3100
●
Default IP of the module: 192.168.254.253;
The following options are available for accessing the CommServer installed on your PC:
●
●
●
Click on the Windows Start Menu to activate CommServer:
Start/Programs/Siemens HiPath 1100/CommServer.
After accessing the HiPath 1100 Manager Menu Bar, configure the CommServer by clicking on:
Tools/CommServer Configuration
After accessing the Task Bar in the Sys Tray field, configure the properties for the CommServer:
●
●
●
●
●
The
icon indicates that the CommServer is active and connected to the HiPath 1100
The
1100.
icon indicates that the CommServer is active and connected to the HiPath
The
icon indicates that the CommServer is inactive and not connected to the HiPath
1100..
The
icon indicates that the CommServer is trying to connect to the HiPath 1100.
The
icon indicates that the CommServer is waiting for a call from the HiPath 1100
to initiate the Server Mode or to perform a Software Update.
On the Sys Tray Menu folder you can configure the CommServer Menu:
●
Sys Tray Menu
A31003-K1270-M100-3-76A9, 03/2007
HiPath 1100 Manager, Documentation
6-1
5_CommServer.fm
CommServer
Sys Tray Menu
6.1
For Internal Use Only
Sys Tray Menu
Right-click the
icon to display the CommServer Menu:
Item
Description
Properties
Open the CommServer Properties configuration window.
About CommServer ...
This displays information about the CommServer application.
Exit
This closes the application.
On the Properties folder you can configure the Sys Tray Menu:
●
Properties
6.1.1
Properties
CommServer properties can be accessed through the Sys Tray Menu or by double-clicking the
icon.
:
"Language Configuration" Field
In the Language field you can specify the language to be used for the CommServer interface.
"CommServer Configuration" Field
The CommServerConfiguration option opens a window where you can specify or select
where the CommServer should be installed:
●
●
The TCP/IP COM Port where the CommServer will connect to the HiPath 1100 Manager so it can perform PABX operations. The valid address is 3100.
The IP address of the location where the CommServer application is installed.
Information entered in this field must match the information entered in the HiPath 1100 Manager in the Tools/CommServer Configuration menu.
6-2
A31003-K1270-M100-3-76A9, 03/2007
HiPath 1100 Manager, Documentation
5_CommServer.fm
For Internal Use Only
CommServer
Sys Tray Menu
"Connection Type" Field
In the Connection Type option you can select how the HiPath 1100 Manager will access the
PABX.
●
USB Connection
Connection is accomplished by using an USB interface (PC → System).
●
optiPoint USB Connection
Connection is accomplished via optiPoint (PC → optiPoint → System).
●
Connection using an external analog modem
Connection between PC (Analog modem) → System (Analog modem) is accomplished by using
an external analog modem. The following parameters need to be configured:
●
General Settings:
–
Enable Server Mode": checkbox
This option enables a connection to the software update server using an external MSN
recorded in the "Phone #" field.
–
"Default Port Detection": checkbox
The system automatically detects the port where the modem is connected, or the user
can select the port where the modem is connected.
●
–
Advanced Configuration:
Use these fields to enter the settings for the modem to be used. This information can
be found in the manual provided with the modem. Otherwise, use the default settings.
–
If you use the Trendnet v.92 56K - TFM-560X or D-Link v.90 56K - DFM - 560EL
modem, you must use the adapter cable for analog modem (see Service manual
- Adapter cable for analog modem) and set/check the start-up and reboot code of
the modem connected to the switch using HiPath 1100 Manager.
–
If the modem is connected to the PC (remote modem), the modem cable should
be used and the initialization code set using CommServer.
"Modem control" field
"Reset" field
The Reset field indicates the default values of the system:
●
US-ROBOTICS: ATZH0
●
TrendNet: ATZH0
●
D-LINK: +++,,,ATHATZH0
A31003-K1270-M100-3-76A9, 03/2007
HiPath 1100 Manager, Documentation
6-3
5_CommServer.fm
CommServer
Sys Tray Menu
For Internal Use Only
"Start-up" field
In the Start-up field, the default setting for these modems is as follows:
●
●
US-ROBOTICS: AT&F0&B1F1S0=0
●
TrendNet: AT&F0&B1F1&D0S0=0.
●
D-LINK: AT&F0&D0S0=0
S0 ISDN Connection
Connection between PC (ISDN card) → System (S0 module) is accomplished by using an
ISDN modem.
●
–
"Enable Server Mode" Checkbox:
This option enables a connection to the software update server using an external MSN
recorded in the "Phone #" field.
–
"Your MSN" field:
Specifies the MSN of the port through which the ISDN card is connected to the PC.
ADSL Connection
The connection between the PC → System (ADSL expansion board) is accomplished via
LAN.
–
Get IP # Automatically" checkbox:
Determines whether or not the system detects the IP address of the ADSL expansion
board automatically.
The "Port" field:
Identifies the default port of the ADSL expansion board (Port 9366).
>
For the HiPath 1100 v 6.0, if one of the ADSL expansion board (SLIMC, SADSLIM, LIMC or ADSLIM modules) is installed, you will need to use the default IP
of the module (192.168.254.253) or the IP configured in the administration SW
of the new modules called Siemens Admin Console (see service Manual HiPath 1100 applications).
For HiPath 1100 v 7.0 if one of the ADSL expansion board is installed (SLIMC,
SADSLIM, LIMC or ADSLIM modules), this option will be disabled and the connection should be made using the module’s eCommServer.
●
Serial Connection
The connection between PC → System is accomplished via a serial interface.
–
6-4
"Port" field:
This tells the system to which port the serial interface is connected.
A31003-K1270-M100-3-76A9, 03/2007
HiPath 1100 Manager, Documentation
5_CommServer.fm
For Internal Use Only
–
CommServer
Sys Tray Menu
"Baud rate" field:
Specifies the data rate for the connection.
"Advanced Configuration" Field
The Advanced Configuration option specifies a TCP/IP COM Port for connecting the
CommServer to the HiPath 1100 Manager in order to perform PABX operations. The valid
address is 3100.
“Issuing and Sending Log Data” field
Use the Issuing and Sending Log Data option to save information from the applications
of the PABX/PC in a particular directory and send them via e-mail.
This is done in the following order:
1.
Select the Start/Stop Log button
2.
The user should reproduce the problem in the system
3.
Select the Start/Stop Log button
4.
Select the Send/Save current informationbutton (depending on the settings;
“Applications” field
In the Applications field, you may choose which applications information is obtained from.
The applications available are:
●
CommServer service
●
CommServer GUI
●
Manager
●
Software Update
●
Telephone Texts Translator
”Settings" Field
Use the Settings field to select whether the information from the applications should be
saved or sent by e-mail.
“Send E-mail” checkbox
With the Send E-mail checkbox selected, you can send a file via e-mail with information
concerning the PABX/PC.
When you select the Send E-mail option, all the information collected will be compressed
in a file and attached to an e-mail. The body of text will contain a message informing that
the user is sending its information.
A31003-K1270-M100-3-76A9, 03/2007
HiPath 1100 Manager, Documentation
6-5
5_CommServer.fm
CommServer
Sys Tray Menu
For Internal Use Only
“Save in a directory” checkbox
With the Save in a directory checkbox selected, you can save the file with the information
in a specific directory.
When you select the Save in a directory option, all the information collected will be compressed in a file and saved in the selected directory. The temporary directory is the default
setting. When the file is saved, a message box will indicate that all the information was
saved.
“Start/Stop log” button
The Start/Stop log button starts or stops the process in order to generate the file with the
PABX/PC information.
Initially, the button appears as Start Log. When you press the button, it will be replaced by
the Stop Log button. The Applications field and Send/Save current information buttons will be disabled.
“Send/Save current information” button
The Send/Save current information button sends or saves the file with the PABX/PC information generated.
The option to send or save the information depends on the configuration of the Settings
field, which defines the destination of the files.
6-6
A31003-K1270-M100-3-76A9, 03/2007
HiPath 1100 Manager, Documentation
For Internal Use Only
7
5_SWUpdate.fm
Software Update
Software Update
The Software Update application is used for updating the HiPath 1100 system software.
There are two ways to start the Software Update:
●
●
Click the Windows Start Menu to activate:
Start/Programs/Siemens HiPath 1100/Software Update.
Access the HiPath 1100 Manager Menu Bar:
Tools/Software Update
This application provides step by step information on how to proceed in the software update.
Use the "Next" button to go to the next step of the configuration procedure. Use the "Back" button to go back to the previous step in the procedure.
The software is updated in two steps:
1.
Transfer data from the system software to the HiPath 1100
.During this procedure the extensions operate as usual.
2.
Load the system software into the memory.
Telephones cannot operate during this procedure (approximately 3 minutes).
Language Configuration
In the Language field you can specify the language to be used for the Software Update interface.
CommServer Configuration
The CommServer Configuration option opens a window where you can specify or select
where the CommServer should be installed:
A31003-K1270-M100-3-76A9, 03/2007
HiPath 1100 Manager, Documentation
7-1
5_SWUpdate.fm
Software Update
For Internal Use Only
Database Configuration
The Database Configuration option opens a window where you can specify whether data
from the PABX should be imported before updating the software. This is provided in case the
data of the accessed system is different from the new database to be loaded. This is important
because the software update may load the default PABX database which will eliminate the precious existing configuration. In the event that the Software Update can identify the differences
between the existing system database and the new database the following options are available:
●
Keep the Database (Manual Mode)
When this option is selected, by clicking "Next," the Software Update starts importing the
switch’s configuration. However, before clicking the button, you must first specify the configuration folder to receive the imported data. This is done in the "Database Path" field.
●
Keep the Database (Automatic Mode)
When this option is selected, two new options are made available for importing the database from the switch.
●
Save the . bup image
The data stored in the switch is automatically saved at the address shown in the ".bup Directory" field.
If an error occurs, the import can be redone by clicking the "Next" button again.
●
Do Not Keep Database
When this option is selected, the system database is not saved.
Before importing data from the PABX, you may enter the database information in an ID window
that is opened at that point.
MOH configuration
This makes it possible to save the MOH of the PABX before the software update. After the data
is updated, the system automatically restores the saved MOH.
●
Save MOH (manual mode);
●
Do not save MOH.
EVM configuration
This makes it possible to save the EVM before the software update. After the data is updated,
the system automatically restores the saved MOH.
●
Save EVM (manual mode);
●
Don’t save EVM.
7-2
A31003-K1270-M100-3-76A9, 20.3.07
HiPath 1100 Manager, Documentation
5_SWUpdate.fm
For Internal Use Only
Software Update
Settings for Downloading APS Versions
The Settings for Downloading APS Versions option opens a window where the user can
configure settings for downloading new PAS versions available at the Siemens home page.
●
Always check for new APS versions.
Each time you use the Software Update a pop-up window will prompt you to check for a
newer version by connecting to the Internet.
●
Ask if I want to check for new APS versions
Each time you use the Software Update you will be prompted to check for a newer version
by connecting to the Internet.
●
Never check for new APS versions
You will not be prompted to check for newer APS versions on the Internet.
●
First check for new versions on:
●
●
●
Siemens Home page: You will be directed to the Siemens Home page where the APS
versions can be downloaded.
In the APS versions directory: Specify the directory in which the APS versions are
stored.
Default Setting
Restores factory settings.
Local SW Update
The Local SW Update option requires a Software Update on the PC connected to the HiPath 1100. The update operation is performed from a local PC.
No settings need to be configured in the HiPath 1100 Manager before doing a Local SW
Update.
Requirements
●
●
The new software package (PABX system software update) must be on the PC where
the Software Update was installed (e.g., CD or Internet download).
To configure default settings check the following information for the CommServer application in the "Connection Type" field:
–
USB Connection
PC → System
A31003-K1270-M100-3-76A9, 03/2007
HiPath 1100 Manager, Documentation
Connection Type: USB
7-3
5_SWUpdate.fm
Software Update
For Internal Use Only
–
S0 ISDN Connection
PC (ISDN card) → System (S0 module)
Connection Type:
ISDN
- Phone #: 800 (default)
- Your MSN: ---
–
ADSL connection
Connection Type: NetPC → LAN network → System (ADSL expansion board) work IP # : localhost
Port: 9366
–
Serial Connection
PC → System
Connection Type: Serial Port: COM 1
Baud Rate: 115200
Procedure
1.
After checking all settings in the first window, click the Next button to proceed with the
configuration.
2.
In the next window you are prompted to enter the path for the directory containing the
*.B86 file with the software update (e.g., the directory where the software update was
saved after being downloaded from the Internet.).
The following update options are available on this screen:
●
Software Update for HiPath 1100
or
●
3.
On the third step you will be prompted to enter a programming password. By default
(Immediate checkbox selected) the system software is downloaded to the system’s
memory immediately after the data transfer.
To execute the download later (Immediate checkbox cleared) specify the date and
time for the procedure (system switchover).
4.
As a last step, you must initiate the data transfer. The status bar shows the progress
of the data transfer.
After the data transfer is completed (approximately 3 minutes), the system software
that has been transferred is prepared for loading into the system’s memory.
5.
To finalize the procedure close the installation window by selecting Finish.
7
7-4
Music on Hold Update (Internal - fixed) for HiPath 1100
After completion of the data transfer, the switch determines whether a specific
time was set for loading the software. In the event that no time was specified the
switch starts to decompress the software. During this process the switch is out
of service (less than 1 minute).
A31003-K1270-M100-3-76A9, 20.3.07
HiPath 1100 Manager, Documentation
5_SWUpdate.fm
For Internal Use Only
Software Update
You can check the current HiPath 1100 version (system software) when you start the HiPath
1100 Manager by selecting PABX Information in the File menu.
Automatic Software Update from an Update Server External
The Software Update is available on an update server running on Server Mode (configured in the CommServer).
7
An automatic software update is supplied for patches only.
Updates with a new software version (for example, with more advanced features) are only provided when using the Software Update or a Remote Administration!
There are three ways of starting an automatic software update with the HiPath 1100 from
an external update server:
●
●
●
By activating a scheduled automatic software update with HiPath 1100 Manager. See
"Software Update" Tab.
By authorizing remote administration by means of the programmers extension slot
(Extension 11) with the service code *992.
By immediately activating the automatic software update by means of the Programming Extension slot (Extension 11) with the service code *9415.
After entering the service code *9415, a connection to the external update server is
established via a service MSN registered in the "Software Update" Tab. The software update is then automatically completed.
Requirements
●
●
●
You obtained a service MSN that must be dialed to start a HiPath 1100 automatic software update.
A service MSN was specified in the External Number field (without external code "0")
in the "Software Update" Tab of the HiPath 1100 Manager.
To program a scheduled automatic software update you specified the settings (dates)
in the "Software Update" Tab for the data transfer and its loading into the memory.
A31003-K1270-M100-3-76A9, 03/2007
HiPath 1100 Manager, Documentation
7-5
5_SWUpdate.fm
Software Update
7-6
For Internal Use Only
A31003-K1270-M100-3-76A9, 20.3.07
HiPath 1100 Manager, Documentation
6_MusicOnHold.fm
MOH Transfer
User Interface
For Internal Use Only
8
MOH Transfer
MOH Transfer is an application designed to convert a MIDI or WAVE file to a format that can
be recognized by the HiPath 1100 then transmitted throughout the system. Once this is done
the PABX has more tunes available for its internal Music On Hold (MOH) feature.
Given the fact that most MIDI files feature a wide range of channels capable of storing many
note lengths, pitches and effects, it is recommended that only monotone MIDI files be converted to the HiPath 1100 format.
After installing the application from the CD that comes with the system, follow one of these procedures to start it: Start/Programs/Siemens HiPath 1100/MOH Transfer.
The Menu Bar can be configured in the User Interface folder:
●
User Interface
8.1
User Interface
Menu Bar
"File" Menu
Option
Description
Shortcut
Open
Opens a MIDI or WAVE file in the selected directory.
Ctrl+O
Transfer music
to PABX
For transferring the converted MIDI or WAVE file to the PABX. Ctrl + T
(system password required)
Configure default melody for
Music on Hold
Specifies the default tune for MOH.
(system password required)
Ctrl + M
Configure default WAVE file
for Music on
Hold
Programs the default Wave tune for MOH.
(system password required)
Ctrl + P
Recent Files
Shows the last files used
Exit
This closes the application.
"Play" Menu
Slot
Description
Play original music
Plays the file in its original format.
Play as HiPath 1000
Plays the file converted to the HiPath 1100 format.
A31003-K1270-M100-3-76A9, 03/2007
HiPath 1100 Manager, Documentation
8-1
6_MusicOnHold.fm
MOH Transfer
User Interface
Stop
For Internal Use Only
Stops the file playback.
Tools Menu
Slot
Description
Shortcut
Configuration
Opens the CommServer configuration box. Ctrl + S
Audio Level
Open the volume control box.
Volume
(for WAVE files only).
Language
This setting lets you chose the language for Language
MOH Transfer.
"Help" Menu
Slot
Description
Shortcut
Help Topics
This opens the program’s Help feature.
F1
About MOH Transfer...
Shows information about the MOH Transfer
application.
8-2
A31003-K1270-M100-3-76A9, 03/2007
HiPath 1100 Manager, Documentation
6_MusicOnHold.fm
For Internal Use Only
MOH Transfer
User Interface
Toolbar
The Toolbar contains shortcut icons for accessing frequently used menu items such as:
- Open ("File" Menu)
- Play original music (from "Play" Menu)
- Transfer music to HiPath 1100 (from "File" Menu);
- Play as HiPath 1100 (do "Play" Menu);
- Stop (from ("Play" Menu);
A31003-K1270-M100-3-76A9, 03/2007
HiPath 1100 Manager, Documentation
8-3
6_MusicOnHold.fm
MOH Transfer
User Interface
For Internal Use Only
"Channel" Field
The Channel field shows the active channels in a MIDI file that have been opened with the
Open option and that can be converted and transferred to the systemHiPath 1100 using
the Transfer music to HiPath 1100.
Note:
It is recommended to hear the playback of the converted file before transmitting it. This can
be done by selecting the Play as HiPath 1100/Stop.
The MIDI Transfer Wizard converts MIDI files to the HiPath 1100 format. This format is limited to 1 MB in size. If the resulting converted file is larger than 1 MB, a message to this
effect will appear. When this occurs, the user has the option of canceling the process or
accepting the file reduced to a smaller size. After the download, the audio files are updated
automatically. Music on Hold is not available while the update is in progress. No tone signal
is audible while calls are on hold during this time (silence).
7
8-4
Only one audio file at a time can be loaded in the HiPath 1100 system. This means
that when you transfer a converted MIDI or WAVE file, the existing audio data in the
HiPath 1100 system will be overwritten. The size of the converted audio file is limited
to 1MB.
While transferring audio content for Music On Hold, make sure that all applicable
copyrights laws are respected.
A31003-K1270-M100-3-76A9, 03/2007
HiPath 1100 Manager, Documentation
7_Other.fm
Miscellaneous
Feature Codes List
For Internal Use Only
9
Miscellaneous
The following options are available:
●
Feature Codes List
●
Numbering Plan
●
Remote Administration
9.1
Feature Codes List
The table below lists the features that can be programmed by codes (numerical sequence). The
Feature Codes Lists in this table can be changed by the user as described in the Current Setting column of the "Feature Codes" Tab. By default, the following feature codes are activated
at startup:
Symbols
ll, r, p...
w
n/t
s
Service Menu
Explanation
Enter numbers, keys, password, internal or external numbers,
etc.
Signaling with a short beep
Lift/Replace the handset
Initiate conversation
Service Menu
Programmable key is ON
Programmable key is OFF
Blinking programmable key
< > and :
Navigation keys
A31003-K1270-M100-3-76A9, 03/2007
HiPath 1100 Manager, Documentation
9-1
7_Other.fm
Miscellaneous
Feature Codes List
For Internal Use Only
Features can be selected as follows:
1.) Using the navigation keys in the Main Menu
2.) Using the Feature key then browsing the feature option list
3.) Using the Feature key and its associated Feature Code
4.) Programmable Key.
Feature
Code
System telephone functions
Mailbox access
Call charge consultation
Key programmed for MWI
Mailbox
qji
p
Call forwarding
Call forwarding
Call forwarding
Deactivating
Call forwarding
Parking
Parking
d a m position
Parking
Resuming a Call
Parking
d a m position
Caller List
Programming a feature for a key
Redial
r lf
q me
list <
> and :
Select a key
feature to be programmed and :
<>
Redial
Activate/deactivate speakerphone
Speaker
Speaker
Activate/deactivate speaker
s
Checking relay status
9-2
Speaker
qmheh
A31003-K1270-M100-3-76A9, 03/2007
HiPath 1100 Manager, Documentation
7_Other.fm
Miscellaneous
Feature Codes List
For Internal Use Only
Feature
Code
Seizure of an external line
External call
dp
External call using a group of
external lines
lmd.lmm p external line
Seizure of an external line
specify
lde.lhi p
Internet access
Activating
qhmg p external line
Internet access
Deactivating
rhmg p external line
1º) Wait for w
external line
t The telephone rings. n
p external line s
External line reservation
Busy
or
2)
qil t
Service Menu
The telephone rings n
p external s
Functions used when making calls
System Speed Dial
qk + ddd . fhm
Individual speed dialing
qk + qd.qh
Individual Speed Dialing
Programming
qmf + qd.qh
p number
SAVE?
Handsfree answerback
Activating
qmj wait for w
Handsfree answerback
Deactivating
rmj wait for w
A31003-K1270-M100-3-76A9, 03/2007
HiPath 1100 Manager, Documentation
CHANGE?
:
:
wait for w
9-3
7_Other.fm
Miscellaneous
Feature Codes List
Feature
Direct communication call
For Internal Use Only
Code
qld p extension with system telephone
wait for w
s speak the message
Internal call
p extension
Calling a Call Group (CG)
kkd.kkm
Calling a Hunt Group (HG)
kld.klm
UCD Subscriber group
kmd.kmm
1) n
p
(currently busy) Wait for w s
p
(currently busy)
or
Urgent Call
(busy extension)
2) n
Service Menu
qil s
Hotline
(if programmed)
ns
Warmline
(if programmed)
n Wait for s
Override
Busy extension
p busy extension
LCR Bypass
qhi + p Carrier + number s
Show Time Account
rji
Silent Monitoring
(busy extension)
qmhh p busy extension s
9-4
Service Menu
qjf s
A31003-K1270-M100-3-76A9, 03/2007
HiPath 1100 Manager, Documentation
7_Other.fm
Miscellaneous
Feature Codes List
For Internal Use Only
Feature
Code
1) p no answer CHANGE?
Callback
Activating
(Extension does not answer or is
busy)
or
qil w Wait. The telephone rings n s
or
2) Wait for w t
Wait. The telephone rings n
Callback
Deactivating
ril
Carrier
m
Using a temporary MSN for
making a call
:
s
qhe p MSN slot or MSN number
p external line p external number
Functions used during calls
Account Code
qjd p cost code r p number
s
Consultation
s
Service Menu
Consultation
(To end a consultation wait for the
call to be disconnected)
s
Consultation
Service Menu
Parking
s
Recovering a parked
call
rij + d.m s
Common Hold
s
Conference
Recovering a parked call
A31003-K1270-M100-3-76A9, 03/2007
HiPath 1100 Manager, Documentation
p number
qg s
p s
qij + d.m
Est. General
qjg + p line
t
s
9-5
7_Other.fm
Miscellaneous
Feature Codes List
For Internal Use Only
Feature
Code
Toggle
(Use after Consultation for answering
a second call or an
urgent call)
s
Suffix Dialing
Recovering a Call on hold
qf s
Service Menu
s p data
s Service Menu
qd
if busy or no answer
Transfer
(when an alternate analog line
Internal:
operates with “Polarity
Reversal" or an external digital line s p extension t
is being used
wait for the call to be answered
External:
for the Transfer. Otherwise,
there is no need to wait for
s < > TRANSFER?
a transfer call without
consultation to be answered)
: p number (s)
Functions used when receiving calls
Mailbox Access
p
Voice Mail Group
qii
Service Menu
or
Answering a call on hold
s
qf s
Service Menu
or
CALL WTNG?
Group pickup
qik
or
CALL PCKP GRP?
Individual pickup
9-6
:
:
qim p extension
A31003-K1270-M100-3-76A9, 03/2007
HiPath 1100 Manager, Documentation
7_Other.fm
Miscellaneous
Feature Codes List
For Internal Use Only
Feature
Code
Call forwarding on an analog
line:
Call forwarding to external
number
qee p external line :
Internal call forwarding
qee p extension, Voice mail group, Call Group
or Fax/DID :
Call forward
Deactivating
ree
Call forward no answer or busy
Activation
qeh p extension, Voice mail group, Call Group
or external line :
Call forward no answer
Deactivation
reh
Do not disturb
Activating
qmk
Do not disturb
Deactivating
rmk
EVM:
Consultation at the extension
being used
Consultation from a different
extension
Consultation from an external
extension
kmd
VM group
p password
kmd
VM group
p password p exten-
sions
s p its external number + q
p password p extension
Miscellaneous functions
Service menu
Entrance telephone
Door opener
A31003-K1270-M100-3-76A9, 03/2007
HiPath 1100 Manager, Documentation
or
Service menu
qje
qje p extension
9-7
7_Other.fm
Miscellaneous
Feature Codes List
For Internal Use Only
Feature
Code
General alarm
Deactivating
rmheh p password
Electronic lock change
qmg p current password p new password
p confirm new password w
Electronic lock
Activating
qjj p password
Electronic lock
Deactivating
rjj p password
Busy signal when extension is
busy
Activating
qmhee :
Busy signal when extension is
busy
Deactivating
rmhee
System programming mode
Activating
qmi p password p codes:
Deactivating a feature (Call
forwarding, Do not disturb, Data
protection, Alarm clock, Callback
and Handsfree answerback)
rd
Language/Country settings
qmhef p country code:
Call Group (CG) and Hunt Group qli p group (if the extension belongs to
(HG) Login
more than one group)
Call Group (CG) and Hunt Group rli p group (if the extension belongs to
(HG) Logout
more than one group)
Room monitor
(Babyphone)
qll
Music on Hold
Activating
qmhed
9-8
Music
A31003-K1270-M100-3-76A9, 03/2007
HiPath 1100 Manager, Documentation
7_Other.fm
Miscellaneous
Feature Codes List
For Internal Use Only
Feature
Code
Music on Hold
Deactivating
rmhed
Remote Configuration
HiPath 1100 Manager
qmmf
1) local programming extension is talking to remote
programmer:
qmme w F
Remote configuration
using a standard MF telephone
Remote programmer must provide:
p password p programming codes
or
2) Remote programmer dials the system and is attended
by the Fax/DID feature:
qmi p password p Programming codes
Data protection
Activating
qhmd
Data protection
Deactivating
rhmd
Relay
Activating
(For HiPath 1120 only)
qmd
Relay
Deactivating
(For HiPath 1120 only)
rmd
Night service
Activating
qhh p password
Night service
Deactivating
rhh p password
Call waiting tone - Activating
n rlk w t
Call Waiting tone - Deactivating
A31003-K1270-M100-3-76A9, 03/2007
HiPath 1100 Manager, Documentation
n qlk w t
9-9
7_Other.fm
Miscellaneous
Feature Codes List
For Internal Use Only
Feature
Code
COS (Class of service)
changeover
qidl p extension p password
qekk
PABX Trace log
Starts
rekk
PABX Trace log
Stops
Extended PABX Trace log
to enable
Extended PABX Trace log
to disable
qekl
rekl
Alarm clock
Alarm clock
(Daily)
qhje p time (for example, 1230):
Alarm clock
(Daily, except weekends )
qhjf p time (for example, 1230):
Alarm clock
(After a specified time)
qhjg p time (e.g. 1230) :
Alarm clock
(For a specified date and time)
qhjh p date/time
(for example, 24121830):
Alarm clock
Deactivating
rhj :
UCD Subscriber group functions
Agent available
qhdf
Agent unavailable
rhdf
UCD subscriber group
kmd.kmm
9-10
A31003-K1270-M100-3-76A9, 03/2007
HiPath 1100 Manager, Documentation
7_Other.fm
Miscellaneous
Feature Codes List
For Internal Use Only
Feature
Code
UCD group login
qhde p group
(If it belongs to more than one )
UCD group logout
rhde
UCD Agent in Service
qhdg
UCD Agent out of service
rhdg
Show queue size to UCD agent
qhdi
Satellite PABX
Flash on external analog line
Operation as Satellite PABX
Service Menu
qie
lmd.lmm p number of the line
Special functions for ISDN Lines
Immediate Call forwarding for
MSN
Activating
qjhe p external line w p MSN
Immediate Call forwarding for
MSN
Deactivating
rjhe w
Forward MSN No Answer
Activating
qjhf p external line w p MSN
Forward MSN Answer
Deactivating
rjhf w
Forward On Busy
Activating
qjhg p external line w p MSN
Call forwarding - Busy, for MSN
Deactivating
rjhg w
Anonymous caller ID (Trace)
A31003-K1270-M100-3-76A9, 03/2007
HiPath 1100 Manager, Documentation
Service Menu
qlh
9-11
7_Other.fm
Miscellaneous
Feature Codes List
For Internal Use Only
Feature
Code
Sending restriction for MSN Activation
qlj
Sending restriction for MSN Deactivation
rlj
Using features provided by a
carrier on ISDN Lines
qidg p external p ISDN code
>
Note:
●
●
9-12
For Korea the numbering plan suffers the following changes:
a)
Access to the group of external lines is done with digit "9" instead of "0";
b)
Calling an operator terminal is done with digit "0" instead of "9";
c)
Group call pickup is done with sequence "*0" instead of "*57";
d)
Recovery of a parked call is done with sequence "*57" instead of "*0";
Feature Codes can be changed in the HiPath 1100 Manager. An expert should
be consulted in this case.
A31003-K1270-M100-3-76A9, 03/2007
HiPath 1100 Manager, Documentation
7_Other.fm
Miscellaneous
Numbering Plan
For Internal Use Only
9.2
Numbering Plan
The following table shows default number allocation in the HiPath 1100 system.
Description
HiPath 1120
HiPath 1150
HiPath 1190
External Line
801 to 808
801 to 832
801 to 845
Extension, including S0
11 to 30
11 to 60
610 to 645
101 to 240
Group of external lines
0, 890 to 899
CG Call Group
770 to 779
HG Call Group
780 to 789
UCD Subscriber Group
790 to 799
Carrier
9
EVM - Default internal number
790
EVM - Message Ports
7491 and 7492
EVM - Virtual Ports
744 to 747
Fax/DID - Virtual Message Ports
740 to 743
USB/CAPI line
Substitution for the key * and #
9.3
10
100
75 and 76 (accordingly)
Remote Administration
Remote Administration allows a technician to configure a HiPath 1100 PABX from a remote PC
(Service Center) using the HiPath 1100 Manager connected to the system over digital or analog
lines or by means of an analog modem.
There are two types of remote administration:
●
Remote Administration by User’s Request to a Service Center (Server Mode);
●
Remote Administration Initiated by the Service Center.
9.3.1
Remote Administration by User’s Request to a Service Center
(Server Mode)
With this type of Remote Administration the HiPath 1100 system can be configured by a Support Technician when requested by the user.
A31003-K1270-M100-3-76A9, 03/2007
HiPath 1100 Manager, Documentation
9-13
7_Other.fm
Miscellaneous
Remote Administration
For Internal Use Only
Requirements
●
●
●
●
●
●
●
●
●
The HiPath 1100 Manager must be locally connected to the HiPath 1100
Open the Basic -> MSN -> Configurations folder and configure the local MSN. that is,
the PABX’s MSN.
Open the Advanced -> System Settings -> Remote Administration folder.
In the "Local MSN Configuration for Remote Administration" field the user must
choose a local MSN for the remote ISDN connection. The Support Technician will use
this MSN for an ISDN connection. This field can be disabled if the connection is made
through an analog modem.
In the Remote Operation Type dialog box, select the type of connection that will be
used for the server (ISDN or analog modem). If Analog Modem is selected, enter in
the Extension field the number for the PABX’s analog extension that is connected to
the external analog modem.
The Service Center must provide the MSN or analog number to be used by a technician for accessing the HiPath 1100 Manager in Server Mode.
No settings were specified in the HiPath 1100 Manager "Remote Administration" tab
(default settings are valid). The Remote Administration field does not affect the connection to the server, thus it can remain disabled.
The PABX PC must have HiPath 1100 Manager deactivated.
To allow the user to update the PABX software remotely using the Software Update
tool, the External Number field in the Advanced -> System Settings -> Software Update folder must be configured as follows:
●
Connection via ISDN: Destination MSN.
●
Connection Using an Analog Modem: 0 + analog destination number.
Remote Administration Activation
Activation of the Remote Administration feature is done using a programming extension (extension 11 or first extension with a system telephone).
Connect to the HiPath 1100 Manager or Software Update as follows:
●
Connecting to the HiPath 1100 Manager:
●
●
9-14
Via ISDN: enter *994 + the destination MSN
Via analog modem: enter *994 + access code for an external line (e.g., 0) + authorized
external number + #.
A31003-K1270-M100-3-76A9, 03/2007
HiPath 1100 Manager, Documentation
7_Other.fm
For Internal Use Only
●
Miscellaneous
Remote Administration
Connecting to the Software Update:
●
Enter *9415.
If a connection to the HiPath 1100 Manager is established, the user will hear a confirmation
tone (if this is a system telephone, Start will appear on the display). Otherwise, the user will
hear a rejection tone (if this is a system telephone, Invalid Entry will appear on the display (for
example, in the event that the Service Center is busy or performing another Remote Administration).
The HiPath 1100 Manager communication server (CommServer) (server mode) in the Service
Center accepts the connection request and sets up a data connection with the HiPath 1100 system that has made the request. As soon as a connection is established, the Service Center is
prompted for a password. If the correct password is entered, Remote Administration will be
enabled, otherwise the call will be disconnected.
Once the connection to the Software Update is established, the Service Center will send the
most updated version of the software, by comparing it to the PABX software version. If the compared versions are different, the update will proceed automatically, otherwise the PABX software will not be updated.
9.3.2
Remote Administration Initiated by the Service Center.
There are two types of Remote Administration that can be initiated directly by the Service Center:
After Authorization by the Client
Requirements
Before the Service Center can establish a remote connection, the user’s PABX must be
configured. To do this follow these steps:
●
●
●
●
The HiPath 1100 Manager must be locally connected to the HiPath 1100.
The local MSN to be used for the remote connection must be specified
in the Basic -> MSN -> Configurations folder (for connection via ISDN).
Open the Advanced -> System Settings -> Remote Administration folder and select
the Remote Administration option.
In the External Numbers Authorized dialog box the "Do not check numbers" field allows you to select a two-level security check for the remote connection. For an ISDN
connection, when this option is disabled the MSN or the analog number and the associated password are verified. When this option is enabled, only the Support Technician’s password is verified.
A31003-K1270-M100-3-76A9, 03/2007
HiPath 1100 Manager, Documentation
9-15
7_Other.fm
Miscellaneous
Remote Administration
For Internal Use Only
For an analog modem connection, this option can be disabled since it does not affect
the connection.
Note: In both cases, a password must be configured.
●
●
●
In the "Local MSN Configuration for Remote Administration" field the user must
choose a local MSN for the remote ISDN connection. The Support Technician will use
this MSN for an ISDN connection. This field can be disabled if the connection is made
through an analog modem.
In the Remote Operation Type dialog box, select the ISDN or Analog Modem option.
If Analog Modem is selected, enter in the Extension field the number for the PABX’s
analog extension that is connected to the external analog modem.
The PC connected to the HiPath 1100 system is turned off.
Remote Administration Activation
A Remote Administration connection is established through the HiPath 1100 Manager CommServer at the Service Center, running on a remote PC. A data communication connection via
ISDN or analog modem is established to the HiPath 1100 system’s remote MSN (see CommServer tab).
Your HiPath 1100 system receives and verifies the connection request then checks to see if
Remote Administration should be allowed, depending on the option selected in the Do Not
Check Numbers dialog box. This is accomplished as follows:
●
Enabled
●
●
●
If an invalid password is entered in the Service Center’s HiPath 1100 Manager, a rejection packet is transferred to Remote Administration and the connection is terminated.
If the correct password is entered, a data link is established and Remote Administration enabled.
disabled
If one or more external MSNs have been configured in the Remote Administration field on the
user’s HiPath 1100 Manager, the following applies:
●
●
If the Service Center number provided (Remote MSN) matches a number stored in the
External Number field, the connection request is accepted.
If the Service Center number provided (Remote MSN) does not match a number
stored in the External Number field, the connection is terminated.
If the connection request is accepted and a data link is established, the Service Center is
prompted to enter a password, which is then sent to the user’s PABX. The password received
by the HiPath 1100 is compared to the password assigned to the specified External Number
(Remote MSN).
9-16
A31003-K1270-M100-3-76A9, 03/2007
HiPath 1100 Manager, Documentation
7_Other.fm
For Internal Use Only
●
●
Miscellaneous
Remote Administration
If the password is not valid, the Service Center will receive a rejection signal and the
connection will be terminated.
If the password is valid, a data link will be established and the Remote Administration
feature enabled.
7
Remote Administration cannot be enabled unless all settings have been configured in the PABX’s HiPath 1100 using HiPath 1100 Manager in the the "Remote
Administration" Tab. It also cannot be enabled if the hardware is not structured
according to specifications (see Service Manual).
When the Enable Remote Administration checkbox is disabled, all attempts
made by the Service Center to dial the Remote MSN HiPath 1100 for the system
to be managed by Remote Administration will be rejected. When this occurs, the
Service Center may request the user to select this box, which can be done by
entering the feature code *992 (extension 11 or first extension with a system
telephone).
A31003-K1270-M100-3-76A9, 03/2007
HiPath 1100 Manager, Documentation
9-17
7_Other.fm
Miscellaneous
Remote Administration
9-18
For Internal Use Only
A31003-K1270-M100-3-76A9, 03/2007
HiPath 1100 Manager, Documentation
Begriffe1.fm
For Internal Use Only
Abbreviations
Abbreviations
Y
This list includes the abbreviations used in this documentation.
Abbreviation
Definition
ACS
Automatic Carrier Selection
ADSL
Asymmetric Digital Subscriber Line
CAPI
Common ISDN Application Programming Interface
CbC
Call by Call
(anticipated prefix)
CDR
Call Detail Recording
(call charge information)
CLIP
Calling Line Identification Presentation
(Caller ID)
CLIR
Calling Line Identification Restriction (SS). Caller ID blocking on called party’s display.
COLP
Connected Line Identification Presentation
(display of accessed number)
COLR
Connected Line Identification Restriction (SS). Caller ID blocking on called
party’s display.
DID
Direct Inward Dialing. This allows forwarding an incoming call from the public
telephone network to specific client’s extensions, without attendant assistance.
DISA
Direct Inward System Access. This allows a party to call the HiPath 1100
from an external (off-system) location and, using a dual-tone multifrequency
(DTMF) keypad, to access system features and capabilities.
DSS1
European Digital Subscriber Signaling No. 1
DTMF
Dual-Tone Multifrequency. A method for sending numerical information using
Specific pairs of voice frequencies to represent the digits 0-9, * and #.
EC
European Community
EVM
Entry Voice Mail (Voice Mail)
FSK
Frequency Shift Keying (Modulation)
FW
Firmware
A31003-K1270-M100-3-76A9, 03/2007
HiPath 1100 Manager, Documentation
Y-19
Begriffe1.fm
Abbreviations
For Internal Use Only
Abbreviation
Definition
HDLC
High-Level Data Link Control
(bit-based control procedure for data transmission)
ISDN
Integrated Services Digital Network
LCR
Least Cost Routing. A system feature that automatically selects the most
cost effective route available for an outgoing call.
MOH
Music On Hold
MSN
Multiple Subscriber Number
PABX
Private Automatic Branch Exchange
S0
ISDN Extension Interface (64 KBit)
SF
Swiss Francs
SW
Software
TFE
Entrance Telephone
VCAPI
Virtual Common ISDN Application Program Interface
(Common Virtual Application Programming Interface ISDN)
XDSL
(General) Digital Subscriber Line
Y-20
A31003-K1270-M100-3-76A9, 03/2007
HiPath 1100 Manager, Documentation
AdminToolIX.fm
Index
For Internal Use Only
Index
Z
A
C
ACS
Conversion Rules 4-59
Example 4-61
ACS - Alternative Carrier Selection 4-51, 457, 4-59
Advanced Configuration 4-1
Class of Service (COS) 4-31
Entry Voice Mail 4-19
MSN 4-92
Advanced configuration
Calendar 4-86
Extension 4-2
Fax/DID 4-97
ISDN 4-44
Sensor and Relay 4-89
Timers 4-101
Advanced configurations
Groups 4-35
Advanced settings
Entrance telephone 4-87
LCR 4-54
Line 4-48
service 4-16
Trace 4-14
Attendant Console 4-72
Auto-Answering 4-5
Automatic Keypad Dialing 4-66
Auto-Seizure for an External Line 4-7
Call Charge
Day for resetting call charge 3-14
Call Charge Alert for Analog Extensions 4-5
Call Charges 4-4, 4-73
Caller List 4-70
Collect Call Barring 4-6, 4-99
CommServer 6-1
Advanced Configuration 6-5
CommServer Configuration 6-2
Connection Type 6-3
Language Configuration 6-2
Properties 6-2
Sys Tray Menu 6-2
COS (Class of Service)
Categories 4-31
COS Changeover 4-6
Currency Unit 4-74
B
Basic Configuration 3-1
Line Attendants 3-1
System Speed Dialing 3-12
Basic configuration
Call Charges 3-14
Call charges with limits 3-14
Extensions 3-13
MSN 3-6
A31003-K1270-M100-3-76A9, 03/2007
HiPath 1100 Manager, Documentation
D
Date and Time 4-76
Default Password 1-2
Denied Lists 4-34
Dial tone detection 4-50
Dialing Mode 4-2
Dialing mode 4-50
DISA MSN 4-63
DISA permission 4-5
Display Text Language 4-74
DTMF (Dual-Tone Multifrequency) Dialing
Mode 4-3
DTMF Dual-Tone Multifrequency 4-3
E
Emergency Numbers 4-77
Entries for speed dialing 3-12
EVM 4-19
Audio Quality 4-21
Backup Copy 4-21
Default Mailbox 4-22
Z-1
AdminToolIX.fm
Index
EVM access 4-25
Greeting 4-20
Maximum length of number 4-21
maximum number of auto-configurable
mailboxes 4-21
Message Settings 4-23
Voice prompt 4-21
External line call direction 4-48
External-to-External Transfer 4-6
F
Feature Codes 4-75
Flash Detection Timeout 4-3, 4-102
Flexible Number 4-13
Folder List 2-1
Folder/Subfolder 2-1
Functions and Features 1-5
Advanced configurations 1-5
Basic configuration 1-5
G
Green Answering Line 4-5
Groups
Associated Group 4-41
Call Groups 4-36
External MWI Group 4-38
Hunt Groups (HG) 4-37
Music on Hold Group 4-42
Pickup Groups 4-35
UCD Group 4-38
Groups of Lines 4-52
H
Holidays 4-84
Hotline
Warmline 4-8
I
Installation Wizard 1-3
L
LCR Least Cost Routing 4-54
Line Present 4-50
Local SW Update 7-3
Z-2
For Internal Use Only
M
Menu Bar 2-1
Modem 4-81
MOH Transfer 8-1
MSN
Point-to-Multipoint Basic Access 3-6
Point-to-Point Basic Access 3-6
Music On Hold 4-71
N
Numbering Plan 9-13
O
Overflow Extension 4-71
Override 4-5
P
Passwords 4-81
Permission Lists 4-33
Point-to-Multipoint (PMP) 4-44
Point-to-Point (PP) 4-44
Protocol 4-50
R
Regional Settings 4-73
Remote Administration 4-79, 9-13
Restore 2-2
Restore Backup Copy 2-2
S
Save Backup Copy 2-2
Shortcut Bar 2-1
Silent Monitoring 4-6
Software Update 4-78, 7-1
CommServer Configuration 7-1
Database Configuration 7-2
Language Configuration 7-1
Settings for downloading APS versions.
7-3
Software update from an external update
server 7-5
Status Monitor 5-1
Structure of the Main Window 2-1
A31003-K1270-M100-3-76A9, 03/2007
HiPath 1100 Manager, Documentation
AdminToolIX.fm
For Internal Use Only
Index
System Settings
General tab
Display name/call number 4-65, 4-67,
4-68
T
Tab 2-1
Ticket 4-82, 4-84
Toolbar 2-1
A31003-K1270-M100-3-76A9, 03/2007
HiPath 1100 Manager, Documentation
Z-3
AdminToolIX.fm
Index
Z-4
For Internal Use Only
A31003-K1270-M100-3-76A9, 03/2007
HiPath 1100 Manager, Documentation