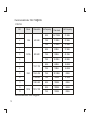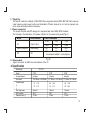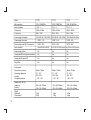
1
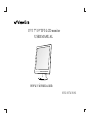
15"/17 " /19" TFT-LCD monitor
USER MANUAL
www.viewera.com
V152/V174/V192
TABLE OF CONTENTS
Important Safety Instructions … … … … … … … … … … … … … … … … … … … … … … … … … … … … … … … … 1
1. Introduction … … … … … … … … … … … … … … … … … … … … … … … … … … … … … … … … … … … … … … 3
1.1 General information … … … … … … … … … … … … … … … … … … … … … … … … … … … … … … … … … 3
1.2 Features … … … … … … … … … … … … … … … … … … … … … … … … … … … … … … … … … … … … … … 3
1.3 package contents …………………………………………………………………………………………………… 3
2. Installing the monitor… … … … … … … … … … … … … … … … … … … … … … … … … … … … … … … … … … 4
2.1 Assembly … … … … … … … … … … … … … … … … … … … … … … … … … … … … … … … … … … … … … … 4
2.2 Signal cable connection … … … … … … … … … … … … … … … … … … … … … … … … … … … … … … … 5
2.3 Power cord connection … … … … … … … … … … … … … … … … … … … … … … … … … … … … … … … … 5
2.4 Audio cable connection … … … … … … … … … … … … … … … … … … … … … … … … … … … … … … … … 5
2.5 Power on … … … … … … … … … … … … … … … … … … … … … … … … … … … … … … … … … … … … … … 5
2.6 Self test pattern … … … … … … … … … … … … … … … … … … … … … … … … … … … … … … … … … … … 5
2.7 Adjust the picture … … … … … … … … … … … … … … … … … … … … … … … … … … … … … … … … … … … 6
3. Operation … … … … … … … … … … … … … … … … … … … … … … … … … … … … … … … … … … … … … … … 6
3.1 Power ON/OFF switch … … … … … … … … … … … … … … … … … … … … … … … … … … … … … … … … … 6
3.2 Power LED indicator… … … … … … … … … … … … … … … … … … … … … … … … … … … … … … … … … … 6
3.3 OSD control keys … … … … … … … … … … … … … … … … … … … … … … … … … … … … …… … … … … … 6
3.4 OSD menu … … … … … … …… … … … … … … … … … … … … … … … … … … … … … … … … … …… … … … 7
3.5 Safety mode …… … … … … … …… … … … … … …… …… … … … … … …… … … … … … … … … … … … … 11
3.6 Timing guide … … … … … … … … … … … … … … … … … … … … … … … … … … … … … … … … … … … … … 11
3.7 Plug & Play… … … … … … … … … … … … … … … … … … … … … … … … … … … … … … … … … … … … … 12
3.8 Power management … … … … … … … … … … … … … … … … … … … … … … … … … … … … … … … … … 12
3.9 Volume adjust… … … … … … … … … … … … … … … … … … … … … … … … … … … … … … … … … … … … 12
4. Specification … … … … … … … … … … … … … … … … … … … … … … … … … … … … … … … … … … … … … … 13
5. Dead Pixel Policy … … … … … … … … … … … … … … … … … … … … … … … … … … … … … … … … … 15
6. Warranty & Customer Service … …… …… … … … … … …… …… …… … … … …… …… … … … … … …… …… … 15
7. Windows setup … … … …… …… …… …… …… … …… …… …… …… …… … … … …… …… …… …… … …… … 15
8. Trouble Shooting …… … … … …… …… …… …… … …… …… …… …… …… … … … …… …… …… …… … … … … 16
Important Safety Instructions
1. Read the manual carefully before using the monitor.
2. Save these user manual for later use.
3. Unplug the monitor from the power source when you clean the monitor. Don't use liquid
cleaners or aerosol cleaners.Use cloth to clean it. If it doesn't do, please use LCD screen
cleaners.
4. Don't use attachment not recommended as they may cause hazards.
5. Please grasp the plug to unplug the connector from the wall outlet. Don't pull the power cord
to unplug it.
6. Don't place anything on the power cord or step on it.
7. Don't place the monitor near water source such as bathtub, washbowl, sink, laundry tub,
swimming pool etc.
8. The slots are designed for ventilation, simultaneously to keep the machinery workable and
protect it from overheating. For the same reason,please do not place the monitor on the bed,
sofa,carpets or other similar surface. Don't place the monitor near or over heat source or
place in built-in installation.
9. Keep 5 cm away from the wall or other goods.
10.This monitor can only use the power source indicated on the label. If you have questions,
please consult your dealer.
11.As safety measure, this monitor is equipped with a three-wire ground style plug.If you can't
insert the plug into outlet, contact your electrician to replace your outlet. Don't defeat the
safety purpose of the grounding-type plug.
1
12. Please make sure that the outlet and power cord can afford the total electricity of the
products.
13. Place the monitor in safe place where the cord will not be abused by persons working on it.
14. Follow all the warnings and instructions illustrated on the manual.
15. Don't overload the wall outlets and extend cords as this can result in fire or electric shocks.
16. Don't remove or open the cover to service this monitor yourself. It may expose you to
dangerous voltage or other hazards before all servicing to qualified service personnel.
17.Unplug this monitor from the outlet and refer servicing to qualified service personnel under
the following conditions.
● The power cord is frayed or damaged.
● The monitor has been dropped or the cabinet has been damaged.
● When the monitor displays a distinct change in performance ,this indicates a need for
service.
18. The power cord is the main device to disconnect the power.
19. Unplug the power cord when you do not use it for a long time..
20. Place the monitor in good ventilation and protect it from strong light,overheating and damp
environment
21. This monitor must be stored in temperature -20 ℃~55 ℃.Otherwise,it may cause permanent
damage.
2
1. Introduction
1.1 General Information
This monitor is a high-performance intelligent multi-scanning color monitor .It is with TFT LCD screen
and MCU digital control without radiation and glary. The shape is tiny and thin adapting to small places,save
your more place.
●
● ● ●
1.2 Features
Color:16.7M
Power saving compliant with EPA energy star and VESA DPMS.
Auto color balance .When connected to different graphic adapter,the monitor can calibrates the white and
black reference voltage.
Plug & play,compatiable with Windows9X&ME&NT&2000&XP and VESA DDC1/2B.
1.3 Check the list
Please make sure that all of the following items are included before operating this monitor.
■ LCD monitor(include base)
■ AC adapter( optional)
■ Power cord,VGA signal cable, DVI-D signal cable( optional), audio cable (optional)
■ User's manual,pass certificate,warranty certification
3
If any of above listed items are missing, please contact your dealer for technical support.
2. Installing the monitor
Please consider the following advice before you install your
monitor.
Position
Choose a place that reflects less to place your monitor.
Generally ,there is a suitable angle with a window.
Highness
The peak of the monitor should be a little lower than your
eyes when you sit down.
Inclination
You will feel comfortable with the sloping screen.
Pow er c ord
VGA cab le
Aud io ca ble
DVI cab le (Optional)
Fig.1
2.1 Assembly
Take the monitor from the carton, fix bas e an d knight head
with screw [Fig .1].
● VESA Hanging style
The clie nt m ay put the m onitor o n the wall . I f you use the style,
you need purch ase the han ging subassembly which accords
with VE SA standard . O peration as these [ Fig.2]:
(1) Take apart t he p lasti c cover of a xis of rotat ion, screw
three bolts .
(2) Clean up the signal cable , pow er cord and audio cab le.
(3) Fix hanging subassemb ly on th e back cover to ha ng up
the monitor on t he wall.
4
Fig.2
2.2 Signal cable connection
Plug one connector of the signal cable into the VGA or DVI port and lock the two bolts to ensure firm
grounding.Then plug the other one into the monitor and lock the two bolts.
2.3 Power cord connection
Plug one side of the power cord into the AC adapter and the other side into AC power source outlet, then plug
the output side of the AC adapter into the power port at the side of monitor.
2.4 Audio cable connection
Plug one side of the audio cable into the PC audio port, then plug the other side into the audio port of the
monitor.
2.5 Power on
Switch on the power to both the monitor and your computer.After the monitor is power on,the LED lights up
green or blue. If the LED becomes red and flashing, please check the video signal cable connection.If the
LED is off, please press power switch slightly.
2.6 Self test pattern
If there is no horizontal or vertical sync.signal, your monitor will display Fig.3 to Indicate no signal input.After
a few seconds, the monitor will come into waiting and saving power mode;if the monitor receives the video
signal,it will return to the normal mode.
+
-
Pow e r
LED Ind i ca tor
AUTO
Fig.3
Fig.4
5
2.7 Adjust the picture
In order to obtain the best visual display, you need adjust it, please refer to chapter 3 " the Operation of the
monitor ".
3.Operation
OSD control panel
Fig.4 is elevation. Other models differ in key-press position and front panel.
3.1 Power on/off switch
This is a slight touch digital control key. It is used to turn the monitor on or off.
3.2 Power LED indicator
When the monitor is working, the power LED is green or blue. If the monitor is in saving power mode,
the power LED will be red and flashing . If you turn off the monitor, the power LED will be off. When the
LED is off , the monitor is off, but the power adapter is on. For security, you should turn off power adpater
while you don't use the monitor.
3.3 OSD control keys
3.3.1 Auto key
This key is used to complete auto- adjusting function ,it make the monitor to be the best visual
display status in VGA mode. This key is used to switch VGA and DVI signal in DVI mode.
3.3.2 +/- key
These two keys can complete the navigate right or left and choose the control of the menu function.
The adjustment value can be set directly by +/- key.
3.3.3
key
Confirmation key can show the menu and complete the confirmation function.
6
3.4 OSD menu
3.4.1 The meaning of the menu in VGA mode [as Fig.5]:
1. auto adjustment 2. brightness 3. contrast
4. H-position 5. V-postion 6. clock
7. phase 8. signal source 9. color adjustment
10. volume (optional) 11. sharpness
12. OSD position/transparence 13. recall
14. language 15. exit 16. selected function name
17. resolution 18. H-frequency 19. V-frequency
20. progressive bar of adjustment
21. percentage of adjustment
22. customer LOGO
23. OSD display time
S
CONTR AST
10 24X 768 H: 48 .0KH Z V:60.0H Z
Fig. 5(DVI MOD EL )
CONTR AST
10 24X 768 H: 48 .0KH Z V:60.0H Z
Fig. 5(VGA MO DE L)
7
3.4.2 The meaning of the menu in DVI mode [as Fig.6]
1. brightness 2. contrast 3.sharpness
4. volume(optional) 5.OSD menu display time
6. transparence 7.OSD position
8. signal source 9. 9300k 10. 7800k
11. 6500k
12. User 13. Recall 14. Language
15. Eixt 16.selected function name
17. resolution 18. H-frequency 19. V-frequency
20. progressive bar of adjustment
21. precentage of adjustment
22. customer LOGO
93 00
78 00
BRIG HTN ESS
65 00
USER
1024X768 H:48.3KH Z V:60.0H Z
Fig. 6
Fig.7
8
Fig.8
3.4.3 Funct ion table
9 3 00
7 8 00
6 5 00
U S ER
W-B
Display conten ts
Function
Auto a djustm ent
Bright ness
Contra st
H-posi tion
V-pos ition
Clock
Phase
Sharp ness
Color
9300K
7800K
6500K
User m ode
Auto c olor balance
Volum e
OSD d isplay time
OSD a djustm ent
OSD H -position
OSD V-posit ion
Au tomati cally a djust t o obta in the best se tting
Ad just the brigh tness
Ad just the contr ast
Mo ve the scree n towa rd left or righ t
Mo ve the scree n towa rd upw ard or down ward
Ad just the frequ ency o f pixe l
Ad just the phas e of pi xel clo ck
Ad just the sharpness of the picture
Ad just the colors of th e pictu re
Se t 9300 K colo r temp eratur e
Se t 7800 K colo r temp eratur e
Se t 6500 K colo r temp eratur e
Se t user m ode
Au to colo r balance
Ad just the volum e
Ad just the OSD displa y time
Ad just the para meter of OSD
Mo ve the menu towar d left o r right
Mo ve the menu towar d upwa rd or d ownward
OSD t ranspa rency
Signa l sourc e
Recal l
Langu age
Exit
Se tting O SD tra nspar ency
Exc hange signa l mod e betw een VGA and DVI
Re set fac tory setting
Lan guage selec tion
Exit the menu
9
3.4.2 Special function
3.4.4
1. Color adjustment(
): when the function is selected, the
monitor will come into the sub-menu [ Fig.7 ], there are
OSD H-POSITION
five functions that can be selected: a,9300k; b,7800k;
c,6500k;d, USER;e,W-B.Selecting USER,you will enter
TEXT
3 0%
user mode and you can make adjustment to R/G/B values
INTERNET
to obtain your satisfying color;Selecting W-B,it will enter
ENTERTAIN
color balance mode,and the monitor will automatically
adjust the white-black color reference voltage to obtain
Fig.9 VG A
optimal color balance.
R
G
B
2. R/G/B adjustment(
): In "USER" mode, the
monitor will automatically enter R/G/B adjustment mode,push
OSD H-POSITION
"
" key,the relative options will flash, then adjust it by "+/- "
key. Then push " " key again to exit.
30%
3.Language(
).
There
sele ct[Fig.8]
There are
are six languages
language totoselect
[Fig.8].
ENG.: English
FRE.: French
Fig.10 DVI
DEU.: German
ITA.: Italian
ESP.: Spanish
PYC.: Russian(TUR.:Turkish or POR.: Portuguese)
4.Position of OSD menu(
): When you select the item, you can adjust H-position and V-position
of OSD menu and transparence [as Fig.9: VGA、Fig10:DVI ].
.
10
5.Sharpness adjustment(
): Adjust the sharpness of the picture on the screen.
3.5 Safety m ode
When the video signal exceeds the frequency range of the monitor , the monitor MCU will stop
horizontal and vertical scanning in order to protect the monitor. Fig.11 will be display on the screen .
After a few seconds, the monitor will enter turn-off mode. You need restart the computer and
reset the frequency range.
OUT O F R ANG E
OUT OF RANGE
W O R K IN G F R E Q U E N C Y R A N G E
H F :3 0 K H z -8 0 K H z
VF :5 5 H z -7 5 H z
M a x. R e s :1 2 8 0 X1 02 4
W O R K I NG F R E Q U E N C Y R A N G E
HF :3 0 K H z -6 0 K H z
V F :5 5H z - 75 H z
Ma x .R es : 12 80 X 76 8
C U R R E N T M OD E:
H F :9 4. 0K H z
V F :8 4 .9 H z
CU R R E N T MO D E :
HF : 6 9 .0 K H z
V F : 85H z
Fig. 11( V152 )
F ig.11(B V174 /V192 )
3.6 Tim ing gui de
V152
NO.
Mode
Resolution
720X400
1
VGA
640 X480
2
3
SVGA
102 4X768
4
5
6
800 X600
XGA
102 4X768
102 4X768
Polarity
H: -
V: -
H: -
V: -
H: +
V: +
H: -
V: -
H: -
V: -
H: +
V: +
Bandwidth
28.322 MHz
25.175 MHz
40.0MHz
65MHz
75MHz
78.75MHz
H-Frequency
H:31.468KHz
V:70.0 Hz
H:31.469KHz
V:60.0 Hz
H:37.879KHz
V:60.3 Hz
H:48.363KHz
V:60.0 Hz
H:56.476KHz
V:70.0 Hz
H:60.023KHz
V:75.0 Hz
11
Rec ommended mode: 1024× 768@6 0Hz
V174/V192
NO .
Mo de
R esolu tion
Pixel clock
Hor.frequen cy
60 Hz
25. 175MHz
31.5KHz
72 Hz
3 1.5MH z
37.9KHz
3
75 Hz
3 1.5MH z
37.5KHz
4
60 Hz
40 MHz
37.9KHz
72 Hz
50 MHz
48.1KHz
75 Hz
4 9.5MH z
46.9KHz
60 Hz
65 MHz
48.4KHz
70 Hz
75 MHz
56.5KHz
1024 ×768
75 Hz
78 .75MHz
60KHz
10
1152×8 64
75 Hz
108 MHz
67.5KHz
11
1280× 960
60 Hz
105 MHz
60KHz
60 Hz
108 MHz
64KHz
75 Hz
135 MHz
80KHz
1
2
5
V GA
SV GA
640 ×480
800 ×600
6
7
1024 ×768
8
9
XGA
12
SXGA
128 0×10 24
13
Reco mmen ded m ode: 1 280X1 024@ 60Hz
12
Ver.freq uency
3.7 P lug & Play
This mo nitor meets the s tanda rd of V ESA DDC. W hen u sing v ideo c ard wi th VESA DDC1/2B ,it will auto- scan
vi deo fr equen cy, ou tput p ower, f unctio n and other data t o PC when compu ter is on .It will g o to proper c onnec tion m ode and pr oper re soluti on fre quenc y.
3. 8 P ower mana gemen t
T his monitor complies with EPA ener gy sta r requ ireme nt and meet s VESA DPM S sta ndard .
T he following is the desc ription of th e power indicator for the pow er sav ing m ode [F ig. 12 ].
MODE
P ower indica tor
Po wer c onsum ption
V1 74
V1 52
V192
On
Green or blue
<30W
<40W
<4 5W
Stand b y/susp end
R ed flashing
Off
Off
<5W
<5 W
<5W
<3W
<3 W
<3W
(includ e pow er ada pter' s cons umpti on)
Fi g.12
3.9 Volume adju st
Adjust the vo lume by OS D me nu an d soft ware of the PC.
4. Specification
Monitor type
Model
Surf ace disposal
Acti ve area
View able angle:
H
V
MAX. Brightness
MAX. contrast
Res ponse time t r /t f
TFT LCD
V152
V174
An ti glary
Anti glary
304. 1 28mm ×228.096mm
-75 °/+75 °
-70°/+70°
250cd/m
400: 1
4/12ms
2
V1 92
337.920mm ×270.336mm
-80 ° /+80°
-70° /+70°
300cd/m
500:1
4/12ms
2
Anti glary
376.32mm ×301.056m m
-80 °/+80°
-80°/+80°
250cd/m
600:1
2/10m s
2
13
14
Mode l
V1 52
Max. resolu tion
1024× 768@75Hz
1280×1024@75Hz
1280×102 4@75Hz
Input resistance
75±3 % Ω
7 5±3 % Ω
75 ±3 % Ω
H-frequency
V-fr equency
30KHz~60KH z
55Hz ~75Hz
30KH z~81KHz
55Hz ~75Hz
30KHz~ 81KHz
55Hz~ 75Hz
Power supply for Adapter
100V-240VAC
V 174
60H z/50Hz 100V-240VAC
V192
60H z/50Hz
100V-240VAC 60Hz/50Hz
Power supply for m onitor
12VDC 3.3A
12VDC 4.2A
1 2VDC 4.2 A
Rat ed voltage and MAX.Consumption
12VDC 3 0W
12VDC 40W
12V DC 45W
Inp ut connector
15 pins D-Sub or D VI-D
pins D- Sub or D VI-D (optio nal) pin s D-Sub or DVI-D(optional)
Power saving control
Yes
Yes
Yes
Comply with EPA energy star standards
Yes
Yes
Yes
Comply with European CE
Yes
Yes
Yes
Plu g & Play
Yes
Yes
Yes
Environment
Atmosphere pressure
Operating temperature
Humidity
Storage temperature
86kpa~104kpa
5℃ ~40℃
20%~80%
-20℃ ~55 ℃
Dimension(L× W× H)
Unpacking
Packing
360×150×3 50mm 3
418×165× 395mm3
393×150× 390mm 3
455 ×165×440mm3
430×150× 420mm
3
490 ×165 ×465mm
Weight
Net weight
Gross weight
3.5kg
5.0kg
5.0kg
7.0kg
6.0kg
8 .0kg
86kpa~104kpa
5℃ ~ 40℃
20% ~80%
-20 ℃ ~55℃
86kpa~104k pa
5℃ ~ 40℃
20%~ 80%
-20℃ ~55℃
3
Not e: This spe cifi cati on i s subject to change without not ices.
5. Dead P ixel Policy
Dead pixels on the TFT LCD panel are sometimes inevitable. ViewEra g uarantees that the monito r will be replaced if
the numb er of d ead pixels on our m onito r is more than 5 pixels. No dead pixel warranty may be pr ovided during the p rom otion period.
6. Warranty & Customer Service
Warranty
Vie wEra warrants the monit or for one ye ar on p arts, l abor a nd the LCD panel from the date of purchase. For detail
warranty information, please refer to our webs ite http://www.viewera.com/warranty.htm
Custome r Service
Contact y our ViewEra retail er or ViewEra for after sale serv ice.
You may contact ViewEra Customer Service for technical s upport or RMA as below:
1.By Mai l: 328 Paseo Tesoro, Walnut, CA 91789
2. By Telephone: (909)595-3624
3. By Fax : (909)595-3 526
4. By E-mail: Tech. Su pport- [email protected]
RMA [email protected]
The busi ness hours are 9:00 am 6 :00 pm PST, Mon Fri.
7. Windows se tup
For the best view, pl ease set the monito r type in Windows.
Please select as following:
Control Panel > Monitor > Setting > Adv ance > Monitor > Change > Sho w all L ist ...> Stand >
For 1280 X10 24, ple ase s et to “ SXGA 1280 X102 4@75H z”
15
For 1024X768, please set to “ XGA 1024 X 768 @75 Hz”
8. Trouble Shooting
1) P ower on but no p icture
→M ake sure the VG A cable i s tightly connect ed from the video output c onnecto r on the video ca rd to the video in put con nector
on the mo nitor.
→ M ake sur e you ar e using t he stand ard pow er adapt er comin g with th e monito r.
→ C heck yo ur video card if the driver is corre ctly insta lled. If th ere is n o video s ignal fro m the vi d eo card , “O INP UT SIG NAL”
w ill show on the s creen.
2) Wrong or abnorm al colors
→ I f any col or (red, g reen, or blue) is missing, check v ideo cab le to ma ke sure i t is secu rely connected. L oose pins in the cable
c onnecto r can cau se a bad connec tion.
3) T he text and icon look blur ry
16
→ LCD mo nitor has a n ative resolut ion which pix els are produced by cells in fixed pos itions. When a resolution different from the native
resolution is chosen, the LCD mo nitor uses va rious interpo lation metho ds to achiev e the pseudo resolution. To achie ve t he optimum viewing quality, ch oose the nat ive resolutio n of the panel is recomme nded.
→ Use “A uto Tuning” function to a djust image quality on the OSD menu or you can hold button 2 for 3 second s to do auto tuning.
4) Display position is in correct
→ Use “A uto Tuning” function to a djust image position on t he OSD men u or you can hold button 2 for 3 secon ds to do auto tuning.
5) Speakers have no so und
→ Make su re the audio cable is tigh tly connecte d from the au dio output jack on the PC to the audio input jack on the monitor.
6) Residue image
→ If an image remains on the scree n for an exten ded period o f time, it ma y be imprinte d in the scre en and leave a residue im age. It is
charact eristic of liqu id crystal and is not malfu nction or deterioration of the liquid crystal. The residue image w ill disappea r after a
period o f time. It is re commended to set up the screen sav er for your LC D monitor.
7) Out of Rang
→ The first thing you need to ch eck is the scr een resoluti on. Usually “ut of Range ” is caused by improper resolution s ettin g. You c an
recover the prop er screen resolution as t he following s teps for Win dows: (Assu med that the optimal resolution and fr equency set t ing
is 1 280x1024@ 60Hz.)
Boo t the comput e r into VGA Mode (F8) [re peatedly] at startup.
Go t o “Control Panel” double click on “ Display”, click on the S ETTINGS TAB, and click on the ADVA NCED butto n.
Then Click on the Adapter TAB, click “Li st All Modes ” and change the screen resolution t o 1280x1024. (You can
sele ct 16 bit or 32 bit color wh ich depends on your vide o card capability.)
Sele ct “1280 by 1024, High Color (16 bi t), Default R efresh”
Click on“OK ”an d“APPLY” .
Afte r clicking “A PPLY” butt on, a message will be dis played “our desktop has been reconf igured. Do y ou want to
keep these settings”
Click “Yes” and “OK”. Then click “OK ” on the D isplay Proper ties window.
Res tart your PC
Afte r you restart , go back to “ List All Mod es”to adjus t your screen refresh rate to 60 Hertz.
The “Out of Ran ge” may happen if you s witch monitor A to monito r B for your P C. Whenever you chang e the monitor for your PC ,
your PC may det ect it as a ne w hardware and automat i cally install a proper driv er for the monitor. So, you will have both monitor A
and monitor B dr ivers on your PC. Sometimes the two monitor drive rs may conf l ict each othe r and cause “Out of Ran ge”. You ca n
reso lve “ut of R ange”by un installing both monitor drivers and reb oot your PC . The Window s will autom atically detec t the new
hard ware and install a proper driver for the monitor. Here is a quick way to unins tall the monitor drivers:
Right click on “M y Compute r”, select “ Properties” and click o n“Hardwar e”. Click on “ Device Ma nager”, select “Monito r”
and click on “+” in front of “ Monitor”. T hen you can see one of t he monitor d rivers called “Plug and Play Monito r ”. A quick w ay
is to uninstall all the monitor d rivers and th en let Windows automatically detect t he new hard ware. (Right click on the monitor driv er
and select “Uninstall ”). Restart your PC .
17