1
Safety • Assembly • Operation • Adjustments • Maintenance • Troubleshooting • Parts Lists • Warranty
A
OF
O
A
AL
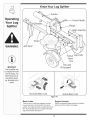
* Model24BF572B729Shown
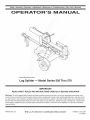
Log Splitter -- Model Series 550 Thru 570
IMPORTANT
READ SAFETY
RULES AND iNSTRUCTiONS
CAREFULLY
BEFORE
OPERATION
Warning: This unit isequippedwithan internalcombustionengineand shouldnot be usedon or nearany unimprovedforest-covered,brushcoveredor grass-coveredland unlesstheengine'sexhaustsystemis equippedwith a sparkarrestermeetingapplicablelocalor statelaws(if any).
If a sparkarresterisused,it shouldbe maintainedineffectiveworkingorder by the operator.In theState of Californiathe aboveisrequiredbylaw
(Section4442 of the CaliforniaPublicResourcesCode). Otherstatesmay havesimilarlaws.Federallaws applyon federallands.A sparkarrester
for the muffleris availablethroughyour nearestengineauthorizedservicedealeror contactthe servicedepartment,RO. Box361131Cleveland,
Ohio 44136-0019.
PRINTEDIN U.S.A
MTD LLC, P.O. BOX 361131 CLEVELAND, OHIO 44136=0019
FORMNO.770-10529F
01/24/2007
This Operator's Manual is an important part of your new log splitter, it will help you assemble,
prepare and maintain the unit for best performance.
Please read and understand what it says.
Table of Contents
Safety Labels .........................................
Safe Operation Practices ......................
Setting UpYour Log Splitter .................
Operating Your Log Splitter ..................
Page
Page
Page
Page
3
4
6
8
Maintaining Your Log Splitter ............ Page 12
Troubleshooting
...................................
Page 16
illustrated Parts List ............................
Page 18
Warranty .........................................
Back Cover
Finding and Recording Model Number
F
BEFOREYOU STARTASSEMBLING
YOUR NEW EQUIPMENT
Model Number
Serial Number
Please locate the model plate on the equipment and copy the
informationto the sample model plate provided to the right.
You can locate the model plate by standing behind the unit
and looking down at the hydraulictank. This informationwill be
necessary to use the web site or obtain assistance from your
MTD dealer.
MTD LLC
P.O. BOX
CLEVELAND,
330-220-4683
, www, rntdproducts.com
800-800-731
361131
OH 44136
0 /
Customer Support
Please do IVOTreturn
purchased,
without
the unit to the retailer from which it was
first contacting
Customer
Support.
If you have difficulty assembling this product or have any questions regardingthe controls, operation, or maintenance of this
unit, you can seek help from the experts. Choose from the options below:
1. Visit mtdproducts.com.
Click on Yardmachinesand then the Customer Support menu option.
2. Phone a Customer Support Representative at 1 (800) 800-7310.
3. The engine manufacturer is responsiblefor all engine-related issues with regards to performance, power-rating,specifications, warranty and service. Please refer to the engine manufacturer'sOwner's/Operator's Manual, packed separatelywith
your unit, for more information.
2
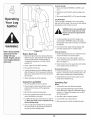
Safety Labels Found On Your Log Splitter
oREVERSE
INEUTRAL
IFORWARD
LOG
DISLODGER
Retract wedge,
lodged wood will be
automatically removed.
WARNING
DO NOT remove safety
{orany) labelsfromlog
;plitter for any reason.
m_AIMOVING
•
•
Do
up
TOWING
J__"
LOG
oc
Lock
Lock
jac
not
or
SPLITTER
s
an
attempt
down
to
a
LOG
beam
beakh
n
_ _"in
slope
BY
own
move
by
HAND
pus
log
•
on,
splitter
hand
.
Attach
.
Do
SPLITTER
horizontal
hd°;iz
_ ........
coup
High
osition._t]i_ ........
_/_"
er
a
jus
men
is
nee
e
,
re
er
o
position,
"
safety
not
tow
speed
Check
ohains
faster
may
to
than
cause
state
j Iooal,
................................
requirements
3
be
and
ore
tow
45
loss
vehiole,
mph.
of
control.
federal
towing
.
on
any
pub
io
road.
WARNING: Engine Exhaust, some of its constituents, and certain vehicle components contain or emit chemicals known to State of Californiato cause cancer and
birth defects or other reproductiveharm.
DANGER: This machine was built to be operated according to the rules for safe operation in this
manual. As with any type of power equipment, carelessness or error on the part of the operator can
result in serious injury. This machine is capable of amputating hands and feet and throwing objects.
Failureto observe the following safety instructions could result in serious injury or death.
General Practices
12.Keepthe operatorzoneand adjacentareaclear for
safe,securefooting.
1. Read,understand,and followall instructionson the
machineand in the manual(s)beforeattempting
to assembleand operate.Keepthis manualin a
safe placeforfuture and regularreferenceand for
orderingreplacementparts.
13.If yourmachineis equippedwith an internalcombustionengineand it is intendedfor usenear any
unimprovedforest,brush,or grass coveredland,
the engineexhaustshouldbe equippedwith a spark
arrester.Makesureyoucomplywith applicablelocal,
state,and federalcodes.Takeappropriatefirefighting
equipmentwith you.
2. Be familiarwith all controlsand properoperation.
Knowhowto stop the machineand disengagethem
quickly.
i WARNING
This symbol points
out important safety
instructions which, if
not followed, could
endangerthe personal
Soafety
and/or property
f yourself and others.
i Read and follow all
I instructions in this manual before attempting to
operate this machine.
Failureto comply with
i these instructions may
I result in personal injury.
Whenyou see this
symbol HEED ITS WARNING
Your
i Responsubuluty
I
=
=
w
Restrict the use
i of this power machine
i to personswho read,
understand
and follow the warnings
and instructions
in this manual.
14.This machineshouldbe usedfor splittingwoodonly,
do not use itfor anyother purpose.
3. Neverallowchildrenunder 16 yearsto operatethis
machine.Children,16yearsand over,shouldread
and understandinstructions
and safety rulesinthis
manualand shouldbe trainedand supervisedbya
parent.
15.Followthe instructionsin the manual(s)providedwith
anyattachment(s)for this machine.
Preparation
4. Neverallowadultsto operatethis machinewithout
properinstruction.
1. Alwayswearsafetyshoes or heavy boots.
2. Alwayswearsafetyglassesor safetygogglesduring
operatingthis machine.
5. Manyaccidentsoccurwhenmorethan one person
operatesthe machine.If a helperisassistingin loadinglogs, neveractivatethe controluntil the helperis
a minimumof 10 feetfrom the machine.
3. Neverwearjewelryor looseclothingthat might
becomeentangledin movingor rotatingparts of the
machine.
6. Keepbystanders,helpers,pets,and childrenat least
20 feet from the machinewhile itisin operation.
.
7. Neverallowanyoneto rideon this machine.
Makesure machineis on levelsurfacebeforeoperating.
5. Alwaysblock machineto preventunintendedmovement,and lock ineither horizontalor verticalposition.
8. Nevertransportcargoon this machine.
9. Hydrauliclog splittersdevelophigh fluidpressures
duringoperation.Fluidescapingthrougha pin hole
openingcanpenetrateyour skinand cause blood
poisoning,gangrene,or death.Giveattentionto the
followinginstructions
at all times:
6. Alwaysoperatethis machinefrom theoperator
zone(s)specifiedin the manual.
Z Logsshouldbe cut with squareendsprior to splitting.
8. Use log splitterin daylightor undergood artificiallight.
a. Do notcheckfor leaks with yourhand.
b. Do notoperatemachinewith frayed,kinked,
cracked,or damagedhoses,fitting, or tubing.
c. Stopthe engineand relievehydraulicsystem
pressurebeforechangingor adjustingfittings,
hoses,tubing,or othersystemcomponents.
d. Do notadjust the pressuresettingsof the pumpor
valve.
9. Toavoidpersonalinjuryor propertydamageuse
extremecare in handlinggasoline.Gasolineis
extremelyflammableand the vaporsare explosive.
Seriouspersonalinjury canoccur whengasolineis
spilledon yourselfor yourclotheswhichcan ignite.
Washyourskin and changeimmediately.
10.Leakscan be detectedby passingcardboardor
wood,whilewearingprotectiveglovesand safety
glasses,overthesuspectedarea. Lookfordiscolorationof cardboardor wood.
11.If injuredby escapingfluid, seea doctor immediately.
Seriousinfection
or reactioncandevelopifproper
medicaltreatmentis not administeredimmediately.
4
a. Use onlyan approvedgasolinecontainer.
b. Extinguishall cigarettes,cigars,pipes,and other
sourcesof ignition.
c. Neverfuel machineindoors.
d. Neverremovegas cap or add fuel whilethe engine
ishot or running.
e. Allowengineto cool at leasttwo minutesbefore
refueling.
15.This machineshouldnot be towedon anystreet,
highwayor publicroadwithoutcheckingthe existing
federal,state,or localvehiclerequirements.Any
licensing
or modificationssuch as taillights,etc.,
neededto comply,is thesole responsibilityof the
purchaser.If a "Statementof Origin"isrequiredin
yourstate, seeyourlocaldealer.
f. Neveroverfillthe fuel tank. Filltank to no more
than 1/2 inch belowbottomof filler neckto provide
spacefor fuelexpansion.
g. Replacegasolinecap and tightensecurely.
h. If gasolineis spilled,wipeit off the engineand
equipment,movemachineto anotherarea.Wait5
minutesbeforestartingthe engine.
i. Neverstorethe machineor fuelcontainerinside
wherethereis an openflame,sparkor pilot lightas
on a waterheater,space heater,furnace,clothes
dryeror othergas appliances.
j. Allow machineto cool5 minutesbeforestoring.
16.Do nottow machinefasterthan45mph.
17.See Transportingthe Log Splittersectionin this
manualfor propertowinginstructionsonceall
federal,local,or staterequirementsare met.
Operation
Maintenance
and Storage
Safe.
o,o,a.,,
Practices
1. Beforestartingthis machine,reviewthe "Safety
1. Stopthe engine,disconnectthe spark plugand
instructions".
Failureto followthese rulesmay resultin
grounditagainstthe enginebeforecleaning,or
seriousinjurytothe operatoror bystanders.
inspecting
the machine.
2. Neverleavethis machineunattendedwith the engine 2. Stopthe engineand relievehydraulicsystem
running.
pressurebeforerepairingor adjustingfittings,hoses,
3. Donot operatemachinewhileunderthe influence
of
alcohol,drugs,or medication.
tubing,or other systemcomponents.
3. Topreventfires,clean debrisand chafffrom the
engineand mufflerareas,if theengine is equipped
with a sparkarrestermuffler,cleanand inspectit
regularlyaccordingto manufacturersinstructions.
5. Alwaysoperatethis machinewith all safetyequipment
Replaceif damaged.
in placeand working.Makesureall controlsare
properlyadjustedfor safeoperation.
4. Periodicallycheckthat all nuts and bolts,hose
clamps,and hydraulicfittingsare tight to be sure
6. Donot changethe enginegovernorsettingsor
equipmentisin safeworkingcondition.
overspeedthe engine.The governorcontrolsthe
4. Neverallowanyoneto operatethis machinewithout
proper instruction.
maximumsafeoperatingspeedof the engine.
5. Checkall safetyguardsand shieldsto be sure
they are inthe proper position.Neveroperatewith
safetyguards,shields,or otherprotectivefeatures
removed.
7. Whenloadinga log,alwaysplaceyourhandson the
sides of the log, noton theends, and neveruseyour
foot to help stabilizea log.Failureto do so, may result
in crushedor amputatedfingers,toes, hand,or foot.
8. Useonly yourhandto operatethe controls.
6. The pressurereliefvalveis presetat thefactory.Do
notadjust the valve.
9. Neverattemptto split morethan one log at a time
unless the ramhasfully extendedand a secondlogis
neededto completethe separationof the first log.
7. Neverattemptto movethis machineoverhillyor
uneventerrainwithouta tow vehicleor adequate
help.
10.Forlogswhich are not cut square,the leastsquare
end and the longestportionof the logshouldbe
placedtowardthe beamand wedge,and the square
end placedtowardthe end plate.
8. Foryour safety,replaceall damagedor wornparts
immediately
with originalequipmentmanufacturer's
(O.E.M.)partsonly."Useof partswhich do notmeet
the originalequipmentspecificationsmay leadto
improperperformanceand compromisesafety!"
11.Whensplittingin theverticalposition,stabilizethe log
beforemovingthecontrol.Splitas follows:
9. Do notalter this machinein any manner,alterations
such asattachinga ropeor extensionto thecontrol
handle,or addingto the widthor heightof the wedge
may resultin personalinjury.
a. Placelog on the end plateand turn untilit leans
againstthe beamand is stable.
b. Whensplittingextra largeor unevenlogs,the log
mustbe stabilizedwith woodenshimsor splitwood
betweenthe logand end plateor ground.
12.Alwayskeepfingers awayfromany cracksthat open
in the log while splitting.They canquicklyclose and
pinch or amputateyourfingers.
Your Responsibility
Restrictthe use of this powermachineto personswho
read,understandand followthe warningsand instructions in this manualand on the machine.Alwaysfollow
directionson safety labelsfoundon yourequipment.
13.Keepyourworkarea clean, immediatelyremovesplit
woodaroundthe machineso youdo notstumbleover
it.
WARNING
This symbol points
out important safety
instructions which, if
not followed, could
endanger the personal
safety and/or property
of yourself and others.
Read and follow all
instructions in this manual before attempt ng to
operate this machine.
Failureto comply with
these instructions may
result in personal injury.
When you see this
symbolHEED ITS WARNING
Your
Responsibility
Restrict the use
of this power machine
to persons who read,
understand
and follow the warnings
and instructions
in this manual.
14.Nevermove this machinewhilethe engine isrunning.
5
"_
,_
WARNING: Useextreme caution
unpacking this machine. Some
components are very heavy and will
require additional people or mechanical
handlingequipment.
__
NOTE:All referencesin this manualto the left or right
sideof thelog splitteris fromthe operatingpositiononly.
Exceptions,if any, will be specified.
YourLog
Assembling
Splitter
the Tongue
i
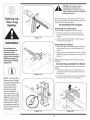
Attaching
the Jack Stand
Thejack stand isshippedinthe transportposition.
1. Removethespringclip and clevispin and pivot
thejack standtowardsthe groundto the operating
position.
Figure 3-1
2. Securethe jack stand in positionwith the clevispin
and springclip. See Figure3-1.
WARNING
Attaching
the Tongue
1. With the log splitterstill standingupright,removetwo
hexbolts and hex nutsfrom the tank bracket.See
Figure3-2.
tion unpackingthis
machinei Some
2. Align theholes in the tonguewith the holesin the tank
bracketand securewith hardwarejust removed.See
Figure3-2.
components
are,e y
heavy and will require
additional
mechanical
people or
NOTE:Highpressurehose mustbe abovethetongue
assembly.
handling
equipmenL
Connecting
Cylinder to Beam
Thelogsplitteris shippedwith the beamin thevertical
position.
1. Pull outthe verticalbeamlock, rotateit back,and
pivotthe beamto the horizontalpositionuntil it locks.
See Figure3-3.
Figure 3=2
2. Disconnectthe dislodgerfrom the beamweld bracket
by removingthe six hex screws.See Figure3-4.
Manual covers a range
of productspecifications
for Variousmodels:
Characteristicsand
featUresdiscussed
and/or illustrated in
this manual
applicable to a!l models:
MTD LLC reSerVesthe
right to ChangeProduct
specifiCatiOns:designs
and equipment Without
notice and with0ut inCur:
ring obligation:
,...
j
k,,
Figure 3=3
Figure 3-4
6
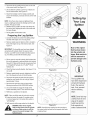
3. Disconnectthe log cradlefromthe beamon the side
of the controlvalve.See Figure3-5.
4. Lift and slidethe cylinderup to the top of beamand
into theweld brackets.See Figure3-6.
5. Attachthe dislodgeroverthe wedgeassemblyand
securewith hardware,previouslyremoved,to the weld
brackets.
NOTE:Oncethe six hexscrewsare tightened,there
may be a slight gap betweenthe dislodgerand the weld
brackets.This gap is normal.
6. Reattachthe log cradleto the sideof the beamwith
the controlvalve,aligningthe ends of the cradlewith
the beamflanges.
7. Rolllog splitteroff the bottomcrate.
Preparing the Log Splitter
,
Lubricatethe beamarea (wherethe splittingwedge
will slide)with engine oil; do not usegrease.
Figure 3=5
f
2. Removeventedreservoirdipstick,which islocatedin
front of the engineon topof the reservoirtank.See
Figure3-7.
Muchof the original
fluid has beendrawn
IMPORTANT:The log splittermay havebeen shipped
and primedwith hydraulicfluid in the reservoirtank.
However,you MUSTcheckthe fluid levelbeforeoperating. If notfilled, proceedwith the followingsteps:
intothe cylinder
hoses: Make certain to
refillthe reservoir to
preventdamage to the
hydraulicpump.
3. Fillthe reservoirtank with hydraulicfluid includedwith
this unit(if equipped)or approvedfluids whichinclude
Dexron®III/ Mercon®IIIautomatictransmissionfluid,
a 10WeightAWhydraulicoil or Pro-MixTM AW-32
HydraulicOil.
4. Checkfluid levelusingthedipstick.See Figure3-7.Do
not overfill.
Figure 3-6
5. Replaceventeddipsticksecurely,tighteningit untilthe
top of the threadsare flush with topof the pipe.
ii _i_i
6. Disconnectthe sparkplug and primethe pumpby
pullingthe recoilstarteras far as it willgo. Repeat
approximately10 times.
7. Reconnectthe spark plugwire and start engine
followinginstructionsin the OPERATIONsection.
8. Usecontrol handleto engagethe wedgeto the
farthestextendedposition.Thenretractthe wedge.
9. Refilltank as specifiedon the dipstick.
NOTE: Failureto refillthe tank willvoid unit'swarranty.
10.Extendand retractthe wedge12 completecycles
to removetrappedair in the system(the systemis
"self-bleeding").
11.Refillreservoirwithin range markedon the dipstick.
Figure 3=7
_
_ii_!iii_iiiii_
TM
iii_
IMPORTANT:
The log splitter may
have been shipped and
primed Withhydraulic
fluid in the reservoir
tan If noL proceed
with the following
steps:
fluid has been drawn into the cylinder
ARNING:Much
of the original
and
hoses. Makecertainto
refill the
NOTE:Somefluidmay overflowfromthe vent plug as
the systembuildsheatand the fluidexpandsand seeks
a balancedlevel.
reservoirto preventdamageto the
hydraulicpump.
NOTE!Some fluid may
overflow from the vent
plug as the system
builds heat and the
fluid expands and
seeks abalanced level:
i_
7
ii
i
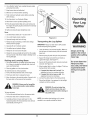
Know Your Log Splitter
Cylinder
i_i_i_iii_i
iiii _iiii_i__ ii_i_!i_
Control Handle
fislod
BeamAssembly
/
Tongue
Jack Stand
Vertical Log Cradle
Beam
Lock
Tail Light
(If Equipped)
IMPORTANT
i
Your log splitter may
be shipped with motor
I oil in the engine. You
MUST check the oil
level before operating. Be careful not to
overfill.
J_
Horizontal Beam Lock
Vertical BeamLock
J
Figure 4=1
Beam Locks
Engine
Thesetwo locks, as theirnamesuggests,are used
to securethe beamin the horizontalor the vertical
position.The verticalbeamlock is locatednextto theoil
filter.Thehorizontalbeamlock is locatedon the beam
supportlatch bracket.See Figure4-1.
See the accompanyingenginemanualforthe location
and functionof the controlson the engine.
8
Controls
Control Handle
The controlhandlehas threepositions.See Figure4-2.
• FORWARD:Movecontrolhandle FORWARDor
DOWNto movewedgeto split wood.
NOTE:Controlhandlewill returnto neutralpositionas
soon as handleisreleased.(ForwardPosition only)
To return
wedge
NEUTRAL:Releasethe controlhandleor movethe
leverto neutralpositionto stop the wedgemovement.
REVERSE:Movecontrol handleBACKor UPto return
)
the wedgetowardthe cylinder.The controlhandle
stays in the return(Reverse)positionand returnsto
neutralautomaticallywhen fully retracted.
To stop
wedge
To split wood
NOTE: Reversepositionmayalso be operatedback to
neutralpositionmanually,if necessary.
Figure 4=2
Stopping
Engine
2. Turnoff the engineswitch,if soequipped.
NOTE:Gasolinecanbe addedto the enginewhenthe
log splitteris in eitherthe horizontalor verticalposition.
However,thereare lessobstructionswhenthe unitis in
the verticalposition.
3. Disconnectsparkplug wireand groundagainstthe
engineto preventunintendedstarting.
Starting
1. Movethrottlecontrol (if equipped)to STOPor OFF
position.
Engine
1. Attachsparkplug wireto sparkplug. Makecertain
the metalcap on the end of the spark plugwire is
fastenedsecurelyovermetaltip of the sparkplug.
,_
follow all instructions and warnings on
WARNING:Read,
the machine and inunderstand,
this manualand
before
2. Turnfuel valve(or engineswitch),if equipped,to the
ON position.
operating.
3. Movechoke lever,if equipped,to CHOKEposition.
4. If theengine is equippedwith a primer,follow
instructionsin the enginemanualto prime it.
__
5. Turnthe throttlecontrol(if equipped)to the FAST
position.
safetyshoes, ear protection,and safety
WARNING:Wearleather
gloves,
glasses when operating awork
log splitter.
Ensure safe footing.
6. Graspstarterhandleand pull rope out slowlyuntil
enginereachesstartof compressioncycle(rope will
pull slightlyharderat this point).
Gas and Oil Fill=Up
7. Pull rope with a rapid,full arm stroke.Keepfirm grip
on starterhandle.Let roperewindslowly.Repeat
untilenginecranks.
1. Servicethe enginewith gasolineand oil as instructed
in the enginemanualpackedwith yourlog splitter.
Readinstructionscarefully.
8. Afterengine starts,movechokelever(if equipped)
to OFF position.Placethrottleleverto the speed
desired.
WARNING:Use extremecare when han-
9. In coldweather,run wedgeup or downbeam6 to 8
timesto circulatethe hydraulicfluid.
dling gasoline.Gasoline is extremely
flammable and the vapors are explosive.
Never fuel machine indoorsor while the
engine is hot or running.
_
IMPORTANT:Your log splittermay be shippedwith motor
oil in theengine.YouMUSTcheckthe oil levelbefore
operating.Be carefulnot tooverfill.
9
engine,the muffler and surrounding
WARNING:When
starting
a warm
areas
are hot and can
cause
a burn.
Do not touch.
WARNING
Read, understand, and
follow all instructions
and warnings on the
machine and in this
manual before operating.
Wear leather work
gloves,safety shoes,
ear protection, and
safety glasses when
operating a log splitter.
Ensure safe footing.
Use extreme care when
handling gasoline.
Gasoline is extremely
flammable and the
vapors are explosive.
Never fuel machine
indoors or while the
engine is hot or running.
When starting a warm
engine, the muffler and
surrounding areas are
hot and can cause a
burn. Do not touch.
Coo,ro,.and,o
//
I
1. Movecontrolhandle FORWARDor DOWNto split
Z_I 1_1
,
wood.
2. Releasethe control handleto stop thewedgemovement.
3. Movecontrolhandle BACKor UPto returnthe wedge.
Log Dislodger
Thelog dislodgerisdesignedto removeany partially
split woodfrom thewedge.This may occur whilesplitting
large diameterwoodor freshlycut wood.
wood from the wedge with your hands.
ARNING:Never remove
partiallysplit
Fingersmaybecome
trapped
between
split wood.
_
1. Toremovepartiallysplit woodfromwedge, move
controlhandleto REVERSEpositionuntilwedgeis
fully retractedto allowsplit woodportionto contactthe
log dislodger.
2. Onceremovedfrom wedgewith log dislodger,split
woodfromoppositeend or in anotherlocation.
Never remove partially
split wood from the
wedge with your
hands. Fingers may become trapped between
split wood.
Figure 4=3
Vertical Position
1. Pull the horizontalbeamlockout to releasethe beam
Before Each Use
and pivotthe beamto the verticalposition.
1. Removethedipstickand checkhydraulicfluidlevel.
Refill if necessary.Approvedfluids includeDexron®
III / Mercon®III automatictransmissionfluid,a
10WeightAWhydraulicoil or Pro-MixTM AW-32
HydraulicOil.
2. Tolock the beamin theverticalposition,pull out
on the verticalbeamlock and rotateit to securethe
beam.See Figure4-1.
3. Standin front of the unit to operatethe controlhandle
and to stabilizethe log. See Figure4-3.
2. Check engineoil level.Refill ifnecessary.
3. Fill up gasolineif necessary.
4. Lubricatethe beamarea wheresplittingwedgewill
slidewith engineoil. Donot usegreaseto lubricate.
Makesureto lubricateboththe front and the backof
the beamface.
Horizontal Position
1. Pull theverticalbeamlock out and rotateit down.See
Figure4-1.Pivot beamto the horizontalposition.The
beamwill lock automaticallyin horizontalposition.
5. Attachsparkplug wireto thespark plug.
2. Standbehindthe reservoirtank to operatecontrol
handleand to stabilizethe log.
Using
Operating
the Log Splitter
1. Placethe logsplitteron level,dry ground.
Tips
Always:
1. Use cleanfluidand checkfluid levelregularly.
2. Placethe beamin eitherthe horizontalor vertical
positionand lockin placewith theappropriate
lockingrod.
2. Use an approvedhydraulicfluid. Approvedfluids
includeDexron®III/Mercon® IIIautomatictransmis-
3. Blockthe front and back of bothwheels.
sionfluid, a 10WeightAWhydraulicoil or Pro-MixTM
AW-32HydraulicOil.
4. Placethe logagainstthe end plateand onlysplit
woodin thedirectionof the grain.
3. Use a filter (cleanor replaceregularly).
5. Tostabilizethe log,placeyour handonly on sidesof
log.Never placehandon the end between the log
and the splittingwedge.
4. Use a breathercapon fluidreservoir.
5. Makesure pumpis mountedand alignedproperly.
6. Onlyone adult shouldstabilizethe logand operate
the controlhandle,so the operatorhasfull control
overthe log and the splittingwedge.
10
6. Usea flexible"spider"type couplingbetweenengine
and pumpdrive shafts.
7. Keephosesclearand unblocked.
8. Bleedair out of hoses beforeoperating.
9. Flushand cleanhydraulicsystembeforerestarting
after servicing.
Operatin
10.Use"pipedope"on all hydraulicfittings.
11.Allowtime for warm-upbeforesplittingwood.
12.Primethe pumpbeforeinitialstart-upby turningover
the enginewith spark plug disconnected(if not already
done at factory).
13.Split woodalongthe grain (lengthwise)only.
Never:
1. Usewhenfluid is below200F or above 1500R
2. Usea solidengine/pump coupling.
Figure 4-4
3. Operatethroughreliefvalvefor long.
4. Attemptto adjust unloadingor reliefvalve settings
withoutpressuregauges.
5. Operatewith air in hydraulicsystem.
Transporting
IMPORTANT:Alwaysturn fuelvalveto OFFposition
beforetransportingthe log splitter.
6. Useteflon tapeon hydraulicfittings.
.
7. Attemptto cut wood acrossthe grain.
8. Attemptto removepartiallysplit woodfrom the wedge
with your hands.Fully retractwedgeto dislodgewood
with log dislodger.
Raising and Lowering
Beam
1. Usecontrol handleto run wedgeup and downbeam
6 to 8 timesto circulatethe hydraulicfluid, whichwill
warm and thinthe fluid.
2. Placelog splitteron a firm,levelsurface.
To raisethe beamfor verticaloperation:
3. Pullout the horizontalbeamlock on the tongue.
4. Pivotbeamlock downto releasethe beam.
5. Move the beamto theverticalposition.Secureit with
the beamlock on the reservoirtank assembly.
_
the Log Splitter
Lowerthe beamto its horizontalposition.Makecertainthe beamislocked securelywith the horizontal
beamlock.
2. Removespringclip and clevispin fromjack stand.
3. Supportthe tongueand pivotthe jackstand up
againstthetongue.See Figure4-4.
4. Securewith the springclip and clevispin previously
removed.See Figure4-4.
5. Attachcouplerhitch to a class I or higher2" ballon a
towingvehicle;latchsecurely.
a. If couplerhitchdoesnot fit on ball:Turn
adjustmentnutone turn counter-clockwise.
b. If couplerhitch is too loose on ball: Turn
adjustmentnutone turn clockwise.
6. Connectthe safetychainsto thetowingvehicle.
7. Plug in the tail lights,ifso equipped,to the tail light
connectoron the tow vehicle.
inARNING:Alwaysuse
the verticalpositionwhen
splitting
the logsplitter
heavy logs.
,__i=
To lowerthe beam:
1. Pullout the verticalbeamlock on the reservoirtank.
45mph and checklocal, state,and
WARNING:Do
not towbefore
fastertowing
than on
federal
requirements
any publicroad.
2. Pivotbeamlock downto releasethe beam.
3. Carefullypull back on beamand lowerit to the
horizontalposition.Thehorizontalbeamlock will lock
automatically.See Figure4-1.
NOTE:Use cautionwhen backingup.It is recommendedto use a spotteroutsidethe vehicle.
11
Do not tow faster than
45mph and check
local, state, and federal
requirements before
towing on any public
road.
Gib Adjustment
Periodicallyremoveand replacethe "gibs" (spacers)
betweenthe wedgeassemblyand the back plate.
NOTE:Thegibs may be rotatedand/orturnedoverfor
evenwear.
1. Loosenthe lock nuts undereach backplateand slide
the gibsout. See Figure5-1.
2. Turnor replacethe gibs.
3. Reassemblethe back plateand securewith the lock
nuts.
4. Readjustthe boltson the sideof the wedgeassembly.
WARNING: Before cleaning,lubricating,
repairing,or inspecting,disengage
the control lever and stop engine.
Disconnect the spark plug wire and
ground it against the engine to prevent
unintended starting. Always wear
safety glasses during operation or while
performingany adjustments or repairs.
Lock Nut
Figure 5=1
WARNING
Do not at anytime
make any adjustments
without first stopping
engine, disconnecting
spark plug wire, and
grounding it against
,the engine. Always
iwear safety glasses
during operation or
while performing any
iadjustments or repairs.
Before cleaning,
i !ubricating, repair=
rag, or inspecting,
,disengage the control
i lever and stop engine.
i Disconnect the spark
plug wire and ground
it against the engine
to prevent unintended
starting. Always wear
safety glasses during
operation or while
__i
any adjustments without first stopping
WARNING:Donot at any time make
engine,disconnecting spark plug wire,
and groundingit against the engine.
Always wear safety glassesduring
operationor while performingany
adjustments or repairs.
Wedge Assembly
Conditions
that Will Void Warranty
1. Failureto maintainproperfluidlevel in reservoir
2. Changingthe reliefvalve settingor pressureadjustmentof control valvewithoutproperknowledgeand
instructionfrom the factory
Adjustment
As normalwearoccursand thereisexcessive"play"
betweenthe wedgeand beam,adjustthe bolts on the
sideof thewedgeassemblyto eliminateexcess space
betweenthe wedgeand the beam.
1. Loosenthejam nutson the two adjustmentboltson
the sideof the wedge.See Figure5-1.
__
cause the hoses to burst, cylinder
WARNING:Nigher
pressurecould
to rupture,and intensefluid
to be
released,which could resultin serious
personalinjury.
2. Turnthe adjustmentbolts in untilsnugand then back
3. Disassemblingthe pump
them off slowly(approximately1.5turns)until the
wedgeassemblywill slideon the beam.
4. Use of incorrecthydraulicfluid
3. Re-tightenthe jam nuts securelyagainstthe side
of the wedgeto securetheadjustmentbolts in this
position.
5. Allowingthe flexiblepumpcouplerto deteriorate
withoutproperand regularinspection
6. Lack of lubricationor improperlubricationof the beam
orunit
7. Improperadjustmentof splittingwedge
8. Excessiveheatingof the hydraulicsystem
9. Attemptingto startunit in temperaturesunder20°F
withoutpre-heatingfluidin reservoir
iperforming any adjustiments or repairs.
10.Unattendedleaks in hydraulicsystem
iHigher pressure could
icause the hoses to
burst, cylinder to rupiture, and intensefluid
to be released, which
could result in serious
ipersonal injury.
12
Hydraulic Fluid and Inlet Filter
• Checkthe hydraulicfluid levelinthe logsplitter
reservoirtank beforeeach use. Maintainfluidlevel
within the rangespecifiedon thedipstickat all times.
• Changethe hydraulicfluid in the reservoirevery 100
hoursof operation.Followthe stepsbelow:
1. Disconnectthe suctionhosefrom the bottomof the
reservoirtank.
2. Carefullyunthreadthe inletfilter and cleanit with
penetratingoil. See Figure5-2.
3. Allowthe fluidto draininto a suitablecontainer.
4. Reinsertthefilter and refillthe reservoirwith three(3)
gallonsof oil. Approvedfluids includeDexron®III/
Mercon®III automatictransmissionfluid, a 10Weight
AW hydraulicoil or Pro-MixTM AW-32HydraulicOil.
•
Maintainfluid levelwithin the rangespecifiedon the
dipstickat all times.Whencheckingthe fluid, always
make sureto tightenthe dipstickuntilthe top of the
threadsare flush with the topof the pipe.
Figure 5=2
• Makecertainto readjustthe adjustmentbolts so
wedgemovesfreely,but no excessspaceexists
NOTE:Alwaysdisposeof used hydraulicfluidand engine
betweenthe wedgeplateand the beam.
oil at approvedrecyclingcentersonly.
Contaminantsin fluid maydamagethehydraulic
components.Flushingthe reservoirtank and hoses
with kerosenewheneverserviceis performedon
the tank, hydraulicpumpor valve is recommended.
Contactan authorizedservicedealer.
Hydraulic Filter
• Changethe hydraulicfilter every 50 hoursof operation. Useonly a 10 micronhydraulicfilter.Orderpart
number723-0405.
Hose Clamps
• Check,beforeeachuse, if hoseclampson the
suctionhose(attachedto the sideof the pump)are
tight.Checkthe hoseclampson the returnhoseat
leastonce a season.
Engine
Referto the separateengine manualfor all maintenance
instructions.
Flexible
Beam and Splitting
•
Wedge
Lubricatebothsides of the beam(whereit comesinto
contactwith the splittingwedge),beforeeachuse,
with engineoil. The wedgeplateon the log splitteris
designedso the gibson the sideof thewedgeplate
can be removedand rotatedand/orturnedoverfor
evenwear.
WARNING
Pump Coupler
Theflexible pumpcoupleris a nylon"spider"insert,
locatedbetweenthe pumpand the engineshaft. Over
time,the couplerwill hardenand deteriorate.
Replacethe couplerif youdetectvibrationor noise
comingfrom thearea betweentheengine and the
pump.If the couplerfails completely,youwill experience
a loss of power.
NOTE: Always dispose
of used hydraulic
fluid and engineoil at
approved recycling
centers only.
IMPORTANT
Never hit the engine
shaft in any manner,
as a blowwill cause
permanent damageto
the engine.
13
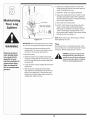
6. Installpumpcouplinghalfand keyon pumpshaft.
Rotatecouplinghalfuntil set screwfaces openingin
shield. Donottighten set screw.
7. Installnylon"spider"onto enginecouplinghalf.
8. Align pumpcouplinghalfwith nylon"spider"by rotating engineusing starterhandle.Slidecouplinghalf
intoplacewhileguidingthree mountingbolts through
holesin pumpsupportbracket.
9. Securewith nuts removedearlier.
10.Set.010"to.060"clearance/gapbetweenthe nylon
"spider"and the enginecouplinghalfby slidinga
feelergaugeor matchbookcover betweenthe nylon
"spider"and the enginecouplinghalfand moving
pumpcouplinghalf as needed.Securepumpcoupling
halfwith set screw.See Figure5-3.
NOTE:Makecertain properclearance/gapis obtained
beforetighteningset screw.
Figure 5=3
WARNING
'Excessive pressure
when seating beads
_may cause tire/rim
_assembly to burst
with force sufficient to
cause serious injury.
Refer to sidewall of
,tire for recommended
;pressure.
IMPORTANT:Neverhit the engineshaft in any manner, Tires
as a blowwill causepermanentdamageto the engine.
See sidewallof tire for recommendedpressure.Under
anycircumstancesdo not exceedmanufacturer'srecom1. Removethreenutsthat securethe pumpto the
mendedpsi. Maintainequalpressureon all tires.
couplingshield.Twonuts are at the bottomcorners
and one is in the topcenter.See Figure5-3.
2. Removethepump.
3. Rotatethe engineby slowlypullingstarterhandle
untilenginecouplinghalfset screwis visible.Loosen
set screwusingallen wrenchand slidecouplinghalf
off engine shaft.
4. Loosenset screwon pumpcouplinghalfand remove
couplinghalf.
5. Slide newenginecouplinghalfontothe engine
shaftuntil theend of the shaftis flush with the inner
portionof the couplinghalf. (Theremustbe space
betweenthe end of the enginesupport bracketand
couplinghalf). Tightenset screw.
14
,_l_k,,
seatingbeads may causetire/rim asWARNING:
Excessive
pressure
whento
sembly to burst
with force
sufficient
cause serious injury.Refer to sidewall
of tire for recommended pressure.
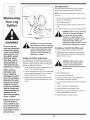
Storing Your Log Splitter
Prepareyourlog splitterfor storageat the end of the
seasonor ifthe log splitterwill not be usedfor 30 daysor
more.
_
fuel in the fuel tank insideof building
WARNING:Never
where
fumes may storemachine
reach an open with
flame
or spark,or where ignitionsources are
presentsuch as hot water and space
heaters, furnaces, clothesdryers,
stoves, electricmotors, etc.
1. Cleanthe log splitterthoroughly.
NOTE:Wedo not recommendthe useof pressurewashers or gardenhoseto cleanyourunit. They maycause
damageto bearingsor the engine.The useof water will
resultin shortenedlifeand reduceserviceability.
4. Start the engineand let it run untilthe fuel linesand
carburetorare empty.
5. Removesparkplug. Holdinga rag overthecylinder
hole,pour approximately1/2ounce (approximately
one tablespoon)of engineoil intocylinderand crank
slowlyto distributetheoil.
6. Replacesparkplug.
7. Do not storegasolinefrom one seasonto another.
Maintaining
8. Replaceyour gasolinecan if it startsto rust.Rust
and/ordirt inthe gasolinewill causeproblems.
9. Storeunitin a clean,dry area. Donot store nextto
corrosivematerials,suchas fertilizer.
NOTE:if storinginan unventilatedor metal storage
shed, be certainto rustproofthe equipmentby coating
with a lighto11or silicone.
2. Wipe unitwith an oiled rag to preventrust,especially
on thewedgeand the beam.
WAR
3. Drainfuel tank.Alwaysdrain fuel intoapproved
containeroutdoors,away fromopen flame.Be sure
that engine iscool beforedrainingthe fuel. Donot
smokewhilehandlingfuel.
Never stor
with fuel in the fuel
tank inside of building
where fumes may
reach an open flame
r sparki 0r where
ignitionsources are
present
such
ashot
water and space heat'
ers, furnaces, clothes
dryers; stoves, electric
motors, etc,
NOTEi we do not
recommendtheuse of
pressure washersor
garden hose to Clean
your UniLThey may
cause damageto bear,
ngSOrthe engine;The
useof water will result
in shortened life and
reduce serviceability.
15
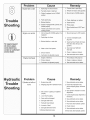
Problem
Enginefails to start
Cause
Remedy
1. Sparkplugwire disconnected.
1. Connectwire to spark plug.
2. Fueltank emptyor stalefuel.
2. Filltank with clean,fresh gasoline.
3. Choke if equipped not in CHOKE
3. Movechoketo CHOKEposition.
position.
Engineruns erratic
For repairs beyond
the minor ad/ustmerits listed hem
Eng neOverheats
I ¸
4. Faultysparkplug.
4 Clean,adjust gap,or replace.
5. Blockedfuel line.
6. Engine(if equippedwith a primer)not
5. Cleanfuel line.
6. Primeengine.
primedproperly.
7. Throttlecontrol levernotin correct
startingposition
7. Movethrottle leverto FASTposition.
1. Unit runningwith CHOKEapplied,if so
equipped.
1. Movechokeleverto OFF position.
2. Sparkplug wireloose.
2. Connectandtighten spark
plugwire.
3. Blockedfuelline or stale fuel.
3. Cleanfuel line;fill tank with clean,
fresh (less than30 daysold)
gasoline.
4. Wateror dirt in fuel system.
4. Drainfuel tank. Refillwith
fresh fuel.
5. Dirty air cleaner.
5. Cleanor replaceair cleaner.
6. Carburetornotadjustedproperly.
6. Seeauthorizedservicedealer.
Engine Oillevel owl
11 FillCrankcaseWithproperoil.
2. Dirty air cleaner.
31 carburetor not adjustedproperlyl
I
I
i
I
I
iii_
i
i
I_ _
i
i
i_
i
i
i
i
i
2. Cleanor replaceair cleaner.
3. Seeauthoiizedservicedealeil
i
i
i
Problem
Cylinder rod will not
move
Remedy
Cause
1. Brokendrive shaft.
1. Seeauthorizedservicedealer.
2. Shippingplugsleft in hydraulichoses.
2. Disconnecthydraulichoses,
removeshippingplugs, reconnect
hoses.
3. Set screwsin couplingnotadjusted
properly.
3. Seeoperator'smanualfor correct
adjustment.
5. Gear sectionsdamaged.
4. Correctengine/pumpalignmentas
necessary.
5. Seeauthorizedservicedealer.
6. Damagedreliefvalve.
6. Seeauthorizedservicedealer.
4. Looseshaftcoupling.
7. Hydrauliclinesblocked.
8. Incorrectoil level.
7. Flushand cleanhydraulicsystem.
8. Checkoil level.
9. Damageddirectionalvalve.
10.Blockeddirectionalvalve.
16
9. Seeauthorizedservicedealer.
lO.Flushand cleanhydraulicsystem.
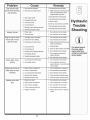
Problem
Slow cy indershaft
Cause
I
1, Gear sectionsdamaged•
I
1.Seeauthorizedservicedealer•
!
I
speed while extending
and retractng
Remedy
2. Excessivepumpinletvacuum.
2. Makecertain pumpinlethosesare
cearand unblocked-useshort,
large diameterinlethoses,
3 See authorzedserv ce dea er
3. Slowenginespeed
4 Seeauthorzedserv ce dea er
4. Damagedreliefvalve•
5 ChecKo eve
5 Incorrectoil level•
6 Dran o c ean reservor and ref
6. Contaminatedoil.
7 See authorzed servce dea er
7. Directionalvalveleakinginternally•
I
Leaking Cylinder
Engineruns but wood
will not split or wood
splits too slowly
8.Seeauthorzedserv ce dea er.
8. Internallydamagedcylinder.
1. Brokenseals.
1. See authorizedservicedealer.
2. Scoredcylinder.
2. See authorizedservicedealer.
1. Smallgear sectiondamaged.
1. See authorizedservicedealer.
2. Pumpcheckvalve leaking.
3. Excessivepumpinletvacuum.
2. See authorizedservicedealer.
3. Makecertain pumpinlethosesare
ydraulic
Trouble
Shootin
clearand unblocked
4 Incorrectoil level.
5. Contaminatedoil.
4. Checkoil level.
5. Dran o c ean reservor,and ref .
6• See authorzed
servce
i
i dea er.
6. Directionalvalveleak ng internally.
•
I
Engine stalls during
splitting
conditions
Leaking pump shaft
seal
.
•
1. Lowhorsepower/weakengine.
2. Overloadedcylinder.
Engine wil! not turn Or
stalls under low load
y
7 Overloadedc
8.
nternallydamagedcylinder.
linder
Engine!PumPmisallgnmenL
2: Frozenor seized pump.
31
LowhorsepOwer/weak
engine,
II
7 Do
aganotattemptto
nstthe gra n sp t wood
8. See authorzed servce dea er.
1. See authorizedservicedealer.
2. Do notattemptto splitwood
againstthe grainor seeauthorized
servicedealer.
1! Collect alignmentas necessa[y!
2 See authorizedservicedealer.
see authorizedservicedealerl
Hydrau!ic!ines bloCk_
d
5, Blocked directionalvalve:
Flushand clean hydrau!icsyste_
5: Flush and clean hydraulicsystem.
1. Brokendriveshaft.
1. See authorizedservicedealer.
2. Engine/pumpmisalignment.
2. Correctalignmentas necessary.
3. Gearsectionsdamaged.
3. See authorizedservicedealer.
4. Poorlypositionedshaft seal.
4. See authorizedservicedealer.
5. Pluggedoil breather.
5. Makecertain reservoiris properly
vented.
17
ments listed here,
contact an authorized
service dealer.
Model
Series 550 Thru 570
i
To secure
ground wire
'L4_,
A
18
:4_
Ref.
No.
PartNo.
Description
Ref.
No.
PartNo.
Description
1.
718-0769A
HydraulicCylinder
43. 681-04040A FrameAssembly
2.
727-04166
HydraulicTube
44.
710-0521
Hex Bolt3/8-16x 3"
3.
710-1018
Hex CapScrew 1/2-20x 2.75
45.
719-0353
CouplingShield
4.
737-0192
90 DegreeSolid Adapter
46.
714-0122
SquareKey3/16" x.75
5.
718-0481A
ControlValve
47.
718-04145
FlexibleCoupling
6.
737-0153
ReturnElbow
48.
712-04063
FlangeLock Nut,5/16-18
7.
737-0238
NipplePipe 1/2-14
49.
781-0097
RearCouplingSupportBracket
8.
710-1806
Hex CapScrew 1/2-13x 3.25
50.
781-1024
FenderMountingBracket
9.
719-0550A
WedgeAssembly
51.
727-04130
Hose
10. 712-3058
Hex Lock Nut, 1/2-20
52.
718-04127
GearPump
11. 712-0711
Hex Jam Nut 3/8-24
53.
737-0329
45 DegreeElbowFitting
12. 710-0459A
Hex CapScrew3/8-24 x 1.5
54.
727-0502
HighPressureHydraulicHose
13. 781-0351
AdjustableGib
55.
781-0788
TongueAssembly
14. 736-0116
FlatWasher.635x.93x.06
56.
747-1261
LatchRod
15. 712-3022
Hex Lock Nut 1/2-13
57.
781-1045
Latch
16. 681-04071A BeamAssembly
58.
732-3127
CompressionSpring
FiatWasher
17. 710-3056
Hex Screw,5/16-18x 3.25
59.
736-0371
18. 710-0654A
Hex WasherScrew3/8-16x 1.0
60.
781-0538At HoseGuard
19. 781-1048A
DislodgerBracket
61.
710-3085
HexCap Screw,3/8-16x 3.50
20.
Back Plate
62.
736-0185
FlatWasher,.375x.738 x.063
21. 737-04093
inlet Filter
63.
747-04539
HydraulicValveControl
22.
ReturnHose3/4" ID x 44" Lg.
64. 681-04030
HitchCouplingAssembly
Hose Clamp5/8"
65.
713-0433A
Chain
24. 737-0316
Filter Housing
66.
731-2496A
Fender(Black)
25.
723-0405
Oil Filter
731-2499A
Fender(Red)
26.
734-0873
Hub Cap
67.
711-0813
ClevisPin
27. 714-0162
CotterPin
68.
720-04088
Grip
28.
712-0359
SlottedNut 3/4-16
69.
732-0194
SpringPin
29.
634-0186
WheelAssembly
70.
781-0789
Jack Stand
30.
736-0351
Fiat Washer.760ID x.500 OD
71.
715-0120
SpiralPin
Adapter3/4-14
72.
710-0650
TT Screw, 5/16-18x0.875"
710-0602
TT Screw,5/16-18x 1.00
23.
781-0790
727-0443
726-0132
31. 737-0312
32.
781-0526At HoseGuard
73.
33.
737-0348A
VentedDipstick
74. 625-0062t
LightKit
34.
711-1587
ClevisPin
75. 681-0164t
LightBracket- LH
35.
781-0690
Lock Rod
36.
714-0470
CotterPin
76.
710-0874t
Screw,5/16-18x 1.25
37. 726-0214
PushCap
77.
712-3008t
Jam Nut,3/8-16
38.
CompressionSpring
78.
726-0201t
SpeedNut, .3125ID
711-04585
ClevisPin
732-0583
781-1027At LightBracket- RH
39.
781-04180
Log TrayBracket
79.
40.
710-0650
TT Screw,5/16-18x.875
80.
713-04036
ValveHandleLink
41. 712-04065
FlangeLock Nut,3/8-16
81.
714-0111
CotterPin
42.
Log Tray
82.
710-0376
HexScrew,5/16-18x 1.00
781-04179
t If Equipped
19
ENUiNE
_FACTORY
PARTS
To order replacement
parts, call
1-800-800-7310
or visit
www.mtdproducts.com
MANUFACTURER'S
LiMiTED WARRANTY
The limitedwarrantyset forth belowisgivenby MTDLLCwith respect
to newmerchandisepurchasedand usedin the UnitedStates,its
possessionsand territories.
"MTD"warrantsthis productagainstdefectsin materialand workmanshipfor a periodof two (2) years commencingon the date of original
purchaseand will, at its option,repairor replace,freeof charge,any
part foundto be defectiveinmaterialsor workmanship.This limitedwarranty shallonlyapply if this product hasbeen operatedand maintained
inaccordancewith the Operator'sManualfurnishedwith the product,
and has notbeen subjectto misuse,abuse,commercialuse, neglect,
accident,impropermaintenance,alteration,vandalism,theft, fire, water,
or damagebecauseof otherperil or naturaldisaster.Damageresulting
fromthe installationor useof any part, accessoryor attachmentnot
approvedby MTDfor use with the product(s)coveredbythis manual
willvoid yourwarrantyas to any resultingdamage.
Normalwearparts are warrantedto be free fromdefects in materialand
workmanshipfor a periodof thirty (30) days fromthe dateof purchase.
Normalwearparts include,butare notlimitedto itemssuch as: batteries,belts,blades,blade adapters,grass bags, riderdeck wheels,seats,
snowthrowerskid shoes,shaveplates,auger spiralrubberand tires.
HOW TO OBTAIN SERVICE: Warranty service is available, WITH
PROOF OF PURCHASE, through your local authorized service
dealer. To locate the dealer in your area, check your Yellow Pages,
or contact MTD LLC at RO. Box 361131,Cleveland, Ohio 441360019, or call 1-800-800-7310 or 1-330-220-4683 or log on to our
Web site at www.mtdproducts.com.
This limitedwarrantydoesnot providecoverageinthe followingcases:
a. Theengineor componentparts thereof.These itemsmaycarry a
separatemanufacturer'swarranty.Referto applicablemanufacturer's
warrantyfor termsand conditions.
b. Log splitterpumps,valves,and cylindershavea separateone year
warranty.
c. Routinemaintenanceitemssuch as lubricants,filters, blade
sharpening,tune-ups,brakeadjustments,clutchadjustments,deck
adjustments,and normaldeteriorationof the exteriorfinish due to
useor exposure.
FOR
e. MTDdoesnot extendanywarrantyfor productssoldor exported
outsideof the UnitedStates,its possessionsand territories,except
those soldthroughMTD'sauthorizedchannelsof export distribution.
f. Replacementparts that are notgenuine MTDparts.
g. Transportationchargesand servicecalls.
No impliedwarranty,includingany impliedwarranty of merchantabilityof fitness for a particular purpose,applies after the
applicable periodof express written warranty above as to the
parts as identified.No otherexpresswarranty, whetherwrittenor
oral, except as mentioned above, givenby any personor entity,
includinga dealeror retailer, with respect to any product,shall
bind MTD.Duringthe periodof the warranty,the exclusiveremedy
is repairor replacementof the productas set forth above.
The provisionsas set forth in this warrantyprovidethe sole and
exclusiveremedy arising from the sale. MTDshallnot be liable
for incidentalor consequentialloss or damage including,without
limitation, expensesincurredfor substituteor replacementlawn
careservicesor for rentalexpensesto temporarily replacea
warranted product.
Somestatesdo notallowthe exclusionor limitationof incidentalor
consequentialdamages,or limitationson howlong an impliedwarranty
lasts, sothe aboveexclusionsor limitationsmaynot applyto you.
In no event shallrecoveryof any kindbe greaterthanthe amountof the
purchasepriceof the productsold.Alterationof safety features of
the productshallvoid this warranty. Youassumethe risk and liability
for loss,damage,or injuryto you and yourpropertyand/orto others and
theirpropertyarisingout of the misuseor inabilityto usethe product.
This limitedwarrantyshallnot extendto anyoneotherthan theoriginal
purchaseror to the personfor whomitwas purchasedas a gift.
HOWSTATELAWRELATESTOTHIS WARRANTY: This limited
warrantygivesyou specificlegal rights,and youmay alsohaveother
rightswhich vary from stateto state.
IMPORTANT:OwnermustpresentOriginal Proofof Purchaseto obtain
warrantycoverage.
d. Servicecompletedby someoneotherthanan authorizedservice
dealer.
IVITD LLC, P.O. BOX 361131 CLEVELAND, OHiO 44136-0019;
GDOO-lO0015 REV.A
Phone: 1=800=800-7310, 1-330=220-4683