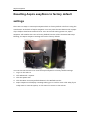
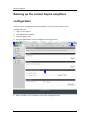
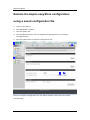
1
Aspire esayStore
User's Guide
Copyright © 2007. Acer Incorporated.
All Rights Reserved.
Aspire easyStore User's Guide
Original Issue: 10/2007
Changes may be made periodically to the information in this publication without obligation
to notify any person of such revisions or changes. Such changes will be incorporated in new
editions of this manual or supplementary documents and publications. Acer Incorporated
makes no representations or warranties, either express or implied, with respect to the
contents hereof and specifically disclaims any implied warranties of merchantability or fitness
for a particular purpose.
For your convenience, we suggest that you enter the model number, serial number, purchase
date, and place of purchase information in the space provided below. The serial number and
model number are recorded on the label affixed to your computer. All correspondence
concerning your unit should include the serial number, model number, and purchase
information.
No part of this publication may be reproduced, stored in a retrieval system, or transmitted, in
any form or by any means, electronically, mechanically, by photocopy, recording, or otherwise,
without the prior written permission of Acer Incorporated.
Acer Aspire easyStore
Model number: __________________________________
Serial number: ___________________________________
Purchase date: ___________________________________
Place of purchase: ________________________________
Acer and the Acer logo are registered trademarks of Acer Incorporated. Other companies'
product names or trademarks are used herein for identification purposes only and belong to
their respective owners.
Regulations and safety notices
FCC notice
This device has been tested and found to comply with the limits for a Class B digital device
pursuant to Part 15 of the FCC rules. These limits are designed to provide reasonable protection
against harmful interference in a residential installation. This device generates, uses, and can
radiate radio frequency energy and, if not installed and used in accordance with the instructions,
may cause harmful interference to radio communications.
However, there is no guarantee that interference will not occur in a particular installation. If this
device does cause harmful interference to radio or television reception, which can be determined
by turning the device off and on, the user is encouraged to try to correct the interference by one
or more of the following measures:
•
Reorient or relocate the receiving antenna.
•
Increase the separation between the device and receiver.
•
Connect the device into an outlet on a circuit different from that to which the receiver is
connected.
•
Consult the dealer or an experienced radio/television technician for help.
Notice: Shielded cables
All connections to other computing devices must be made using shielded cables to maintain
compliance with FCC regulations.
Notice: Peripheral devices
Only peripherals (input/output devices, terminals, printers, etc.) certified to comply with the Class
B limits may be attached to this equipment. Operation with non-certified peripherals is likely to
result in interference to radio and TV reception.
Caution
Changes or modifications not expressly approved by the manufacturer could void the user's
authority, which is granted by the Federal Communications Commission, to operate this computer.
Operation conditions
This device complies with Part 15 of the FCC Rules. Operation is subject to the following two
conditions: (1) this device may not cause harmful interference, and (2) this device must accept any
interference received, including interference that may cause undesired operation.
Notice: Canadian users
This Class B digital apparatus complies with Canadian ICES-003.
Remarque à l'intention des utilisateurs canadiens
Cet appareil numérique de la classe B est conforme a la norme NMB-003 du Canada.
Declaration of Conformity for EU countries
Hereby, Acer, declares that this PC series is in compliance with the essential requirements and
other relevant provisions of Directive 1999/5/EC. (Please visit
http://global.acer.com/support/certificate.htm for complete documents.)
Compliant with Russian regulatory certification
Modem notices
Notice for USA
This equipment complies with Part 68 of the FCC rules. Located on the modem is a label that
contains, among other information, the FCC Registration Number and Ringer Equivalence Number
(REN) for this equipment. Upon request, you must provide this information to your telephone
company.
If your telephone equipment causes harm to the telephone network, the telephone company may
discontinue your service temporarily. If possible, they will notify you in advance. But, if advance
notice is not practical, you will be notified as soon as possible. You will also be informed of your
right to file a complaint with the FCC.
Your telephone company may make changes in its facilities, equipment, operations, or procedures
that could affect the proper functioning of your equipment. If they do, you will be notified in
advance to give you an opportunity to maintain uninterrupted telephone service.
If this equipment should fail to operate properly, disconnect the equipment from the phone line
to determine if it is causing the problem. If the problem is with the equipment, discontinue use
and contact your dealer or vendor.
Caution: To reduce the risk of fire, use only No. 26 AWG or larger UL Listed or CSA Certified
Telecommunication Line Cord.
TBR 21
This equipment has been approved [Council Decision 98/482/EC - "TBR 21"] for single terminal
connection to the Public Switched Telephone Network (PSTN). However, due to differences
between the individual PSTNs provided in different countries, the approval does not, of itself, give
an unconditional assurance of successful operation on every PSTN termination point. In the event
of problems, you should contact your equipment supplier in the first instance.
List of applicable countries
EU member states as of May 2004 are: Belgium, Denmark, Germany, Greece, Spain, France, Ireland,
Italy, Luxembourg, the Netherlands, Austria, Portugal, Finland, Sweden, United Kingdom Estonia,
Latvia, Lithuania, Poland, Hungary, Czech Republic, Slovak Republic, Slovenia, Cyprus and Malta.
Usage allowed in the countries of European Union, as well as Norway, Switzerland, Iceland and
Liechtenstein. This device must be used in strict accordance with the regulations and constraints in
the country of use. For further information, please contact local office in the country of use.
Notice for Australia
For safety reasons, only connect headsets with a telecommunications compliance label. This
includes customer equipment previously labelled permitted or certified.
Notice for New Zealand
1.
2.
3.
The grant of a Telepermit for any item of terminal equipment indicates only that Telecom
has accepted that the item complies with minimum conditions for connection to its
network. It indicates no endorsement of the product by Telecom, nor does it provide any
sort of warranty. Above all, it provides no assurance that any item will work correctly in
all respects with another item of Telepermitted equipment of a different make or model,
nor does it imply that any product is compatible with all of Telecom's network services.
This equipment is not capable, under all operating conditions, of correct operation at the
higher speeds for which it is designed. Telecom will accept no responsibility should
difficulties arise in such circumstances.
Some parameters required for compliance with Telecom's Telepermit requirements are
dependent on the equipment (PC) associated with this device. The associated equipment
shall be set to operate within the following limits for compliance with Telecom's
Specifications:
a. There shall be no more than 10 call attempts to the same number within any 30
minute period for any single manual call initiation, and
b.
4.
5.
6.
7.
8.
9.
The equipment shall go on-hook for a period of not less than 30 seconds
between the end of one attempt and the beginning of the next call attempt.
Some parameters required for compliance with Telecom's Telepermit requirements are
dependent on the equipment (PC) associated with this device. In order to operate within
the limits for compliance with Telecom's specifications, the associated equipment shall be
set to ensure that automatic calls to different numbers are spaced such that there is not
less than 5 seconds between the end of one call attempt and the beginning of another.
This equipment shall not be set up to make automatic calls to Telecom's 111 Emergency
Service.
This device is equipped with pulse dialing while the Telecom standard is DTMF tone
dialing. There is no guarantee that Telecom lines will always continue to support pulse
dialing.
Use of pulse dialing, when this equipment is connected to the same line as other
equipment, may give rise to bell tinkle or noise and may also cause a false answer
condition. Should such problems occur, the user should NOT contact the telecom Fault
Service.
This equipment may not provide for the effective hand-over of a call to another device
connected to the same line.
Under power failure conditions this appliance may not operate. Please ensure that a
separate telephone, not dependent on local power, is available for emergency use.
Laser compliance statement
The CD or DVD drive used with this computer is a laser product.
The CD or DVD drive's classification label (shown below) is located on the drive.
CLASS 1 LASER PRODUCT
CAUTION: INVISIBLE LASER RADIATION WHEN OPEN. AVOID EXPOSURE TO BEAM.
APPAREIL A LASER DE CLASSE 1 PRODUIT
LASERATTENTION: RADIATION DU FAISCEAU LASER INVISIBLE EN CAS D’OUVERTURE. EVITTER
TOUTE EXPOSITION AUX RAYONS.
LUOKAN 1 LASERLAITE LASER KLASSE 1
VORSICHT: UNSICHTBARE LASERSTRAHLUNG, WENN ABDECKUNG GEÖFFNET NICHT DEM STRAHLL
AUSSETZEN
PRODUCTO LÁSER DE LA CLASE I
ADVERTENCIA: RADIACIÓN LÁSER INVISIBLE AL SER ABIERTO. EVITE EXPONERSE A LOS RAYOS.
ADVARSEL: LASERSTRÅLING VEDÅBNING SE IKKE IND I STRÅLEN.
VARO! LAVATTAESSA OLET ALTTINA LASERSÅTEILYLLE.
VARNING: LASERSTRÅLNING NÅR DENNA DEL ÅR ÖPPNAD ÅLÅ TUIJOTA SÅTEESEENSTIRRA EJ IN I
STRÅLEN
VARNING: LASERSTRÅLNING NAR DENNA DEL ÅR ÖPPNADSTIRRA EJ IN I STRÅLEN
ADVARSEL: LASERSTRÅLING NAR DEKSEL ÅPNESSTIRR IKKE INN I STRÅLEN
Digital audio output statement
The optical connector contains no laser or light emitting diode (LED) more than Class I.
Macrovision copyright protection notice
"U.S Patent Nos. 4,631,603; 4,819,098; 4,907,093; 5,315,448; and 6,516,132."
This product incorporates copyright protection technology that is protected by U.S. patents and
other intellectual property rights. Use of this copyright protection technology must be authorized
by Macrovision, and is intended for home and other limited viewing uses only unless otherwise
authorized by Macrovision. Reverse engineering or disassembly is prohibited.
Radio device regulatory notice
Note: Below regulatory information is for models with wireless LAN and/or Bluetooth only.
General
This product complies with the radio frequency and safety standards of any country or region in
which it has been approved for wireless use. Depending on configurations, this product may or
may not contain wireless radio devices (such as wireless LAN and/or Bluetooth modules). Below
information is for products with such devices.
European Union (EU)
R&TTE Directive 1999/5/EC as attested by conformity with the following harmonized standard:
Article 3.1(a) Health and Safety
•
•
EN60950-1:2001
EN50371:2002 (SAR, general RF device).
Article 3.1(b) EMC
•
•
•
EN301 489-1 V1.4.1 (Common Technical Requirements).
EN301 489-3 V1.4.1 (For Short-Range Devices)
EN301 489-17 V1.2.1 (For Wideband Data and HIPERLAN Equipment).
Article 3.2 Spectrum Usages
•
•
•
•
•
EN300 220-1 V1.3.1 (For short range device, 25~1000MHz, part 1).
EN300 220-2 V2.1.1 (For short range device, 25~1000MHz, part 3).
EN300 440-2 V1.1.2 (For short range device, 1G~20GHz, part 2).
EN300 328 V1.6.1 (For Data transmission equipment operating in the 2,4 GHz ISM band).
EN301 893 V1.2.3 (5GHz high performance RLAN).EN300 328 V1.5.1:2004
List of applicable countries
EU member states as of May 2004 are: Belgium, Denmark, Germany, Greece, Spain, France, Ireland,
Italy, Luxembourg, the Netherlands, Austria, Portugal, Finland, Sweden, United Kingdom Estonia,
Latvia, Lithuania, Poland, Hungary, Czech Republic, Slovak Republic, Slovenia, Cyprus and Malta.
Usage allowed in the countries of European Union, as well as Norway, Switzerland, Iceland and
Liechtenstein. This device must be used in strict accordance with the regulations and constraints in
the country of use. For further information, please contact local office in the country of use.
The FCC RF safety requirement
The radiated output power of the wireless LAN Card and Bluetooth card is far below the FCC radio
frequency exposure limits. Nevertheless, the PC series shall be used in such a manner that the
potential for human contact during normal operation is minimized as follows:
1.
2.
3.
This device is restricted to indoor use due to its operation in the 5.15 to 5.25 GHz
frequency range. FCC requires this product to be used indoors for the frequency range
5.15 to 5.25 GHz to reduce the potential for harmful interference to co-channel Mobile
Satellite systems.
High power radar are allocated as primary users of the 5.25 to 5.35 GHz and 5.65 to 5.85
GHz bands. These radar stations can cause interference with and/or damage this device.
An improper installation or unauthorized use may cause harmful interference to radio
communications. Also any tampering of the internal antenna will void the FCC
certification and your warranty.
Canada — Low-power license-exempt radio communication
devices (RSS-210)
a.
b.
c.
Common information
Operation is subject to the following two conditions:
1. This device may not cause interference, and
2. This device must accept any interference, including interference that may cause
undesired operation of the device.
Operation in 2.4 GHz band
To prevent radio interference to the licensed service, this device is intended to be
operated indoors and installation outdoors is subject to licensing.
Operation in 5 GHz band
Acer Computer (Shanghai) Limited
3F, No. 168 Xizang medium road, Huangpu District,
Shanghai, China
Declaration of Conformity
We,
Acer Computer (Shanghai) Limited
3F, No. 168 Xizang medium road, Huangpu District,
Shanghai, China
Contact Person: Mr. Easy Lai
Tel: 886-2-8691-3089/ Fax: 886-2-8691-3120
E-mail: [email protected]
Hereby declare that:
Product:
Trade Name:
Model Number:
Machine Type:
SKU Number:
Server
Acer
Aspire easyStore
Aspire easyStore
Aspire easyStore-xxx (“x” = 0~9, a ~ z, A ~ Z or Blank)
Is compliant with the essential requirements and other relevant provisions of the following EC directives, and
that all the necessary steps have been taken and are in force to assure that production units of the same
product will continue comply with the requirements.
EMC Directive 2004/108/EC as attested by conformity with the following harmonized standards:
-. EN55022:1998 + A1:2000 + A2:2003, AS/NZS CISPR22:2002, Class B
-. EN55024:1998 + A1:2001 + A2:2003
-. EN61000-3-2:2000 +A2:2005, Class D
-. EN61000-3-3:1995 + A1:2001
Low Voltage Directive 2006/95/EC as attested by conformity with the following harmonized standard:
-. EN60950-1:2001 + A11:2004
RoHS Directive 2002/95/EC on the Restriction of the Use of certain Hazardous Substances in Electrical and
Electronic Equipment
R&TTE Directive 1999/5/EC as attested by conformity with the following harmonized standard:
z Article 3.1(a) Health and Safety
-. EN60950-1:2001
-. EN50371:2002 (SAR, general RF device).
z Article 3.1(b) EMC
-. EN301 489-1 V1.4.1 (Common Technical Requirements).
-. EN301 489-3 V1.4.1 (For Short-Range Devices)
-. EN301 489-17 V1.2.1 (For Wideband Data and HIPERLAN Equipment).
z Article 3.2 Spectrum Usages
-. EN300 220-1 V1.3.1 (For short range device, 25~1000MHz, part 1).
-. EN300 220-2 V2.1.1 (For short range device, 25~1000MHz, part 3).
-. EN300 440-2 V1.1.2 (For short range device, 1G~20GHz, part 2).
-. EN300 328 V1.6.1 (For Data transmission equipment operating in the 2,4 GHz ISM band).
-. EN301 893 V1.2.3 (5GHz high performance RLAN).
_______________________________
Easy Lai / Director
Acer Computer (Shanghai) Limited
Federal Communications Comission Declaration of Conformity
This device complies with Part 15 of the FCC Rules. Operation is subject to the following two
conditions: (1) this device may not cause harmful interference, and (2) this device must accept any
interference received, including interference that may cause undesired operation.
The following local Manufacturer /Importer is responsible for this declaration:
Product:
Server
Model number:
Aspire easyStore
Name of responsible party:
Acer America Corporation
Address of responsible party:
333 West San Carlos St.
San Jose, CA 95110
U. S. A.
Contact person:
Acer Representative
Tel:
254-298-4000
Fax:
254-298-4147
Aspire easyStore
Product overview...................................................................................................................... 1
Introduction....................................................................................................................... 1
Package contents .............................................................................................................. 2
System requirements ........................................................................................................ 2
Hardware overview........................................................................................................... 3
Getting started with your Aspire easyStore ......................................................................... 10
Using the easySearch utility ........................................................................................... 10
Storing your first data to Aspire easyStore ................................................................... 15
Using the web user interface ......................................................................................... 19
Managing user accounts and shared folders ....................................................................... 23
Creating user accounts and shared folders using the wizard...................................... 23
Advanced configuration................................................................................................. 25
Advanced services................................................................................................................... 32
FTP services ...................................................................................................................... 32
DHCP services................................................................................................................... 36
UPnP AV services ............................................................................................................. 37
Apple iTunes server......................................................................................................... 39
Advanced system configuration and monitoring ................................................................ 41
i
Aspire easyStore
Product overview
Introduction
Thank you for purchasing Aspire easyStore.
Aspire easyStore is a data storage and digital media content server for your digital home.
Featuring Gigabit Ethernet and IEEE 802.11g wireless LAN, Aspire easyStore can store and
share all your important data while simultaneously streaming digital media content to
multiple applications including Apple iTunes or any UPnP AV or DLNA compliant
appliance. It allows you to consolidate your content library yet maintain instant access to
digital media.
Equipped with 1 TB or 2 TB of storage spaces, Aspire easyStore not only gives you
enormous space for your data, but also provides the highest level of data security. With
advanced RAID technology, you will never fear losing all your data due to a single hard
disk failure. Furthermore, the equipped Acer eBackup backup and recovery software
allows you to easily backup and synchronize all important data from your home
computer to Aspire easyStore.
The small size, ultra-low noise operation and power-saving features of Aspire easyStore
mean you can put it in anywhere you like. Its sleek and elegant design will blend with
your office desk, living room, or even bedroom without any distracting noise or taking up
much space.
Feature highlights
−
Powerful CPU with excellent file sharing performance.
−
Versatile network options. Choose from the high-performance Gigabit Ethernet
interface or convenient IEEE 802.11g wireless interface.
−
UPnP AV and iTunes media server allow you to share photo, music and video
with your family and friends.
−
Advanced RAID technology protects your data from hardware failure.
−
Easy-to-use Acer eBackup software helps you backup and synchronize data
from your home computer to Aspire easyStore.
−
Quota management lets you control how much space your family and friends
1
Aspire easyStore
can use.
−
Advanced network services like FTP and DHCP give you the flexibility to design
your own home network.
−
Upgradeable firmware ensures you can be up-to-date with all the latest
features available.
Package contents
−
Aspire easyStore with 1 TB or 2 TB hard disk preinstalled
−
Wireless antenna
−
Power adapter, 19 V 7.89 A
−
Power cord, European standard
−
CD-ROM with manual and Acer eBackup software
−
Quick Installation Guide
−
Ethernet cable, Cat. 5
If any of the above items is missing, please contact your reseller.
System requirements
For best results, the following system requirements are recommended:
−
Computer with: 1 GHz processor / 512 MB of RAM / 200 MB of available space /
CD-ROM drive.
−
Web browser: Internet Explorer version 7.0 or 6.0; or Mozilla Firefox 1.5 and
above.
−
Windows Vista, Windows XP SP2, Windows 2000 SP6, Linux or MacOS (Acer
eBackup only supports Microsoft Windows).
2
Aspire easyStore
Hardware overview
Front view with front cover in place
Power LED
This LED will be solid blue when you turn on Aspire easyStore.
Status LED
This LED will be solid blue when Aspire easyStore is running without any problems. It will
flash blue when the system boots up or shuts down. It will turn to solid red when the
system fails to detect any hard drives or other components, or the system detects a
non-recoverable software error.
LAN LED
This LED will be solid blue when there is an Ethernet connection, and will flash to indicate
LAN traffic.
WLAN LED
This LED will be solid blue when the wireless LAN function is turned on. It will flash to
indicate wireless LAN traffic.
RAID LED
This LED will be solid blue when hard drives are in RAID5 mode, solid green in RAID1
mode, solid amber in RAID0 mode, and turned off when the drive is in JBOD or Standard
mode.
HDDx LED
3
Aspire easyStore
These LEDs will be solid blue when the drives are connected but inactive. These LEDs will
flash when the drives are being accessed, formatted or synchronized. They will turn off if
the drives are not installed or have failed.
Rear view
Power port
Connect the 19 V 7.89 A power adapter here.
Ethernet port
A Gigabit Ethernet port that connects Aspire easyStore to your home network.
Wireless antenna connector
Connect the included wireless antenna here.
Power switch
Press this switch to turn on or turn off your Aspire easyStore.
Reset button
Pushing this reset button with a paper clip or a ball-point pen for more than 10 seconds
will reset Aspire easyStore back to factory default settings. All system settings, including
user-modified settings, system parameters and access permissions will be reset to factory
default values. However, data stored on the hard disk will not be affected.
Kensington lock slot
You can use any Kensington compatible cable lock to secure your Aspire easyStore.
System fan
This quiet and effective fan is the main heat dissipation channel of Aspire easyStore.
Please ensure the exhaust is never blocked.
4
Aspire easyStore
Front view with front cover and
backplane cage removed
Hard drives
You can remove any failed hard drive after shutting down Aspire easyStore by pressing
the clips on each side of the hard drive and gently sliding out the hard drive. To put in
the replacement hard drive, just slide it into an appropriate slot.
Backplane board
This is the board that connects the hard drives to the system mainboard. You will need to
remove this board and its cage before you replace failed hard drive.
Mainboard connector
Ensure the connector on the backplane board is aligned with the main board connector
when replacing a hard drive.
5
Aspire easyStore
Installation
Hardware setup
1. Remove Aspire easyStore from its packaging.
2. Place Aspire easyStore in a location with hard and solid surface and near a power
outlet.
3. Connect the enclosed Ethernet cable to an available Ethernet port on your computer
or network hub/switch/router. Connect the other side of the cable to the Ethernet
port on the back of Aspire easyStore. Connect this cable first even if you intend to use
the wireless interface of Aspire easyStore.
6
Aspire easyStore
4. Connect the enclosed power cord to the power adapter.
5. Connect the power adapter to the power port on the back of Aspire easyStore.
6. Connect the power cord to a power outlet.
System configuration
7
Aspire easyStore
1. Insert the enclosed Aspire easyStore Document and Software CD-ROM into the
CD/DVD drive in your computer.
2. The autorun menu should be launched on your computer's display. If not,
double-click the CD/DVD Drive icon for the drive containing the Document and
Software CD-ROM in My Computer. Find Setup.exe and double-click it.
3. Click the easySearch utility on the menu and wait for a few seconds to let it complete
searching your network for Aspire easyStore. If you are using Microsoft Windows XP
SP2 or later, Windows Firewall might display a dialog box to ask your permission to
unblock this utility. Click on the Unblock button to ensure this utility functions
correctly.
4. When the easySearch utility has found your Aspire easyStore, it will automatically
create a shortcut to Aspire easyStore on your desktop. Double-click the shortcut on
your desktop; it will open the shared folders on Aspire easyStore. After opening, you
can start storing and sharing all your data and memories.
8
Aspire easyStore
Note: If you would like to configure Aspire easyStore for advanced functions and
services, you can change Aspire easyStore settings by opening the easySearch utility
and then clicking the Configure button. It will launch your web browser
automatically and open the Aspire easyStore login page.
9
Aspire easyStore
Getting started with your Aspire
easyStore
When you power on the Aspire easyStore for the first time, by default, the Aspire
easyStore will look for a DHCP (Dynamic Host Configuration Protocol) server in your
home network and will try to get an IP address from it. Your Internet Gateway/Router is
usually the DHCP server inside your home network. If the Aspire easyStore fails to find a
DHCP server, it will configure itself with the static IP address of 192.168.1.100. Use of the
included easySearch Utility is recommended when accessing and configuring the Aspire
easyStore for the first time. If you want to change the IP address of the Aspire easyStore
or are unable to connect to the Aspire easyStore, you can use the Acer easySearch utility
provided on the product CD to locate the device on your network and make any needed
changes.
Using the easySearch utility
You can launch the easySearch utility by clicking the button on the Autorun menu or
manually browsing for the program in the product CD.
If you are using Windows XP Service Pack 2 or later, or Windows Vista®, Windows Firewall
may ask you if you want to keep blocking this program. Please click Unblock button;
otherwise, the easySearch utility may not function correctly.
The easySearch utility contains three major functions.
10
Aspire easyStore
Search Device
On this page, you can use the easySearch utility to find your Aspire easyStore and create
an easy-to-access shortcut to your desktop.
IP Address Settings
On this page, you can change the IP address settings of your Aspire easyStore.
Drive Mapping
On this page, the easySearch utility will help you to map your favorite shares with a drive
letter inside My Computer.
11
Aspire easyStore
Search Device
Network Storage Device
The easySearch utility will display any Aspire easyStore device it found on the network
with its device name, current IP address and subnet mask here.
Search Device
You can click this button and the easySearch utility will search the network again for
Aspire easyStore devices.
Configure
Select any found Aspire easyStore and click this button to launch your web browser and
bring you to the web login page of the Aspire easyStore you selected.
Create Shortcut
By default, this function is enabled. When the easySearch utility finds any Aspire
easyStore devices on your network, it will automatically create a shortcut for each device
found on your desktop. A small Aspire easyStore icon will represent each shortcut. If you
do not want the easySearch utility to create a shortcut for you, uncheck this box.
OK
By clicking this button, easySearch will open the default share folder window for you.
12
Aspire easyStore
IP Settings
To use this page, you will need to select any Aspire easyStore found by this utility on the
Search Device page first.
DHCP Client
By default, the Aspire easyStore device is configured with the DHCP client function
enabled. It means the Aspire easyStore will automatically look for any DHCP server and
request the server to assign an IP address to it when booting up. If you would like to set
the IP address of your Aspire easyStore manually, you will need to disable this function
first.
IP
Please fill in the IP address you would like to assign to the Aspire easyStore here. This
function cannot be used unless the DHCP Client function is set to disabled.
Netmask
Please fill in the Subnet Mask you would like to assign to the Aspire easyStore here. If you
do not know how to set this value, please check your home network router settings first.
This function cannot be used unless the DHCP Client function is disabled.
Gateway
Please fill in the Gateway IP address of your home network. This IP address is usually your
home network router IP address. This function cannot be used unless the DHCP Client
function is disabled.
Modify
You will need to click this button to send the configuration you updated to the Aspire
easyStore. If you leave this page before clicking the Modify button, all changes you made
13
Aspire easyStore
will be lost.
Drive Mapping
To use this page, you will need to select any Aspire easyStore found by this utility on the
Search Device page first.
Share Names
All available shared folders on the Aspire easyStore you selected on the Search Device
page will be displayed here.
Available Drive Letters
easySearch list all available drive letters on your computer here.
Map Drive
To map a shared folder on Aspire easyStore to a mapped drive inside your computer, you
will need to select an available shared folder displayed in Share Name, then choose an
available drive letter you like, and click the Map Drive button. The easySearch utility will
automatically create a permanent drive inside your computer. Please note, if you change
the IP address after you map a shared folder to drive, the drive will not get updates to
the new IP address automatically. You will need to disconnect it first, then map the drive
again.
Disconnect Drive
To disconnect any mapped drive, you will first need to select the shared folder in the
Share Names page, then click Disconnect Drive. The easySearch utility will remove the
drive mapping from your computer but it will not affect the data you stored on Aspire
easyStore.
14
Aspire easyStore
Storing your first data to Aspire
easyStore
1. Ensure all cables are firmly attached, as described in previous chapter.
2. Power on Aspire easyStore. The power switch is located at the back of the
device.
3. Launch the easySearch utility.
15
Aspire easyStore
4. If the easySearch utility does not find any Aspire easyStore device, please check:
i.
If the Power, Status and LAN LEDs are all in solid BLUE.
ii.
Check your Windows Firewall setting to ensure it is not blocking this
utility.
16
Aspire easyStore
iii.
If you do not have a DHCP server on your network, you may need to
change your computer’s IP address to an IP in the 192.168.1.xx subnet.
For example, 192.168.1.99. Do not set your computer IP address to
192.168.1.100, since Aspire easyStore will use this IP address if it does not
find any DHCP server.
5. If the easySearch utility finds your Aspire easyStore device, please select the
device first and go to the Drive Mapping page.
17
Aspire easyStore
6. You should see a shared folder called Volume_1 in Share Names. Select the
shared folder Volume_1 and click Map Drive.
7. Now there are two ways to start to storing your data to Aspire easyStore.
i.
When easySearch utility found your Aspire easyStore device, it already
created a shortcut on your desktop. You can click the shortcut with an
Aspire easyStore icon and it will open the root folder of your Aspire
easyStore with a folder called Volume_1. You can start to store anything
inside the Volume_1 folder.
ii.
Double click the My Computer icon in your Start menu or on your
desktop. You should see a network drive named Volume_1. Double click
on the network drive and you can start to store your data on your Aspire
18
Aspire easyStore
easyStore.
Using the web user interface
When the easySearch utility finds any Aspire easyStore devices, you can select the Aspire
easyStore device found and click Log In. It will automatically bring you to the login page
of the selected Aspire easyStore.
The default password of the Aspire easyStore web UI is “admin”. Enter it and click the
19
Aspire easyStore
Login button to go to the web configuration page of Aspire easyStore.
When you log in to Aspire easyStore for the first time or immediately after a factory reset,
Aspire easyStore will launch the device setup wizard automatically.
Follow these steps to configure Aspire easyStore from the web UI:
1. Change the web user interface login password. You can enter any password you
like between 5 to 16 characters. Please note, the password is case sensitive and
cannot contain the following special characters \ / : * ? \" < > | . ; + = ~ \' [ ] { } @ #
()!^$%&,_-
2. Choose your time zone. The default time zone is GMT (Greenwich Mean Time).
3. Set the IP address of your Aspire easyStore.
4. Set the device name, description and its workgroup.
20
Aspire easyStore
5. Finally, confirm all changes and restart the Aspire easyStore to effect the changes.
After the system reboots, you will be brought back to the login page of the Aspire
easyStore. Please log in with the new password you set in the first step of the device
setup wizard and click Login.
On the left side of the screen, there are three options:
Wizards
The first page after you login. All current user accounts of Aspire easyStore will be listed
on this page and you can create additional users through the User/Share Folder Wizard.
Advanced
Advanced configuration of Aspire easyStore. Detailed information will be provided in the
next chapters.
21
Aspire easyStore
Logout
Once you finish configuring Aspire easyStore, you can click on Logout to leave the web UI.
Please note, Aspire easyStore will only allow one administrator to log in to the web UI at
any given time. If you did not logout by using the Logout function, you may need to wait
10 minutes to allow the current session to time out before you can log in again in
another computer.
22
Aspire easyStore
Managing user accounts and
shared folders
By default, Aspire easyStore allows full read/write permission for everyone on the default
shared folder Volume_1. This allows users to start using Aspire easyStore more quickly
and easily. However, as data stored on Aspire easyStore increases, you may wish to add
more user accounts and shared folders with different permissions to help you manage
and organize data.
Creating user accounts and shared
folders using the wizard
After you log in to Aspire easyStore, the first page you see is the User/Shared Folder
Wizard. By clicking the User/Shared Folder Wizard button, Aspire easyStore will launch a
wizard to help you create new user accounts and assign permission to shared folders.
User/Shared Folder Wizard
User Name
Enter the user account name you would like to create. The user name must be unique
and should not have more than 16 characters.
23
Aspire easyStore
Password
Enter the password of the user account you would like to create. The password can have
5 to 16 characters.
Confirm Password
Re-enter the password again to avoid mistyping.
Folder
Browse and click the folder you would like to give access to the user account previously
created.
New Folder
If you would like to create a new folder, enter the new folder name here.
Permission
Set the user account permission to Read Only or Read/Write on the disk directory folder
selected or created.
Back
Return to the previous step.
Assign
24
Aspire easyStore
Assign selected permission to the selected disk directory folder for the user account
previously created.
Create
Create a new folder under the selected disk directory folder and assign it with selected
permission for the user account previously created.
Advanced configuration
Users
25
Aspire easyStore
User Name
Enter the user account name you would like to create. The user name must be unique
and should not have more than 16 characters.
Password
Enter the password of the user account you would like to create. The password can have
5 to 16 characters.
Confirm Password
Re-enter the password again to avoid mistyping.
Add
Click this to create a user account based on the information provided.
User Lists
All user accounts on Aspire easyStore are displayed here.
Change Password
Click this icon after the user account name to modify its password.
Delete
Click this icon after the user account name to delete this user account.
Quota
Aspire easyStore supports storage quotas for individual user accounts. Assigning a quota
will limit the amount of storage space that a user account can use. By default, user
accounts do not have any quota limitation.
26
Aspire easyStore
User Quota Setting
User quotas are displayed here. Quotas can be edited by clicking on the notepad icon. By
default, all user accounts are displayed on the Quota Settings page. The default quota
setting is Unlimited. If quota is set on particular user account, it will show the quota
setting for the user account and how much space the user account has already consumed.
27
Aspire easyStore
Quota Status
Displays the current status of the quota feature. The quota function can be enabled or
stopped here.
Shared folder access control
Every disk directory folder may be assigned as a shared folder. A disk directory folder may
contain different permissions for the same user account when accessed from different
shared folders. Below is a typical usage scenario:
Assume that Joe is the owner of the Aspire easyStore and has stored many music files
under the disk directory /Volume_1/music. Joe can access these music files through the
default shared folder \\Volume_1 with Read/Write permission and so can Joe’s sister,
Susan.
One day, Susan accidentally deleted some music files under disk directory
/Volume_1/music. To prevent this from happening again, Joe decided to remove Susan’s
permission to access the default shared folder \\Volume_1 and re-assign the shared folder
\\Volume_1 to Joe only. Susan can no longer access the Aspire easyStore since she now
has no permission right to any shared folder on the Aspire easyStore.
After few weeks, Joe decided to let Susan enjoy the music files on the Aspire easyStore
again. In order to prevent Susan from deleting any file, Joe decided to create a new
shared folder called \\music directly pointed at disk directory folder /Volume_1/music. Joe
assigned Susan with Read Only permission to the \\music shared folder. Now, Susan can
enjoy those music files stored on the Aspire easyStore again by accessing the \\music
shared folder but she will not be able to delete any file because she only has Read Only
permission to the \\music shared folder.
Meantime, Joe can keep storing and organizing those music files through \\Volume_1
shared folder. Any changes Joe makes will also be seen by Susan in the \\music shared
folder.
28
Aspire easyStore
29
Aspire easyStore
User
Pick the user that you are going to assign permission to. The drop-down menu will list
every user account on the Aspire easyStore plus two special accounts. One is All Users,
which represents all created user accounts on the Aspire easyStore. The other is Everyone,
which represents all user accounts on the Aspire easyStore plus any guest users who do
not have user account with Aspire easyStore.
Folder
Browse and click the folder you would like to give access to the user account selected in
User drop-down menu.
New Folder
If you would like to create a new folder, enter the new folder name here.
Permission
Set the user account permission to Read Only or Read/Write on the disk directory folder
selected or created.
Assign
Assign selected permission to the selected disk directory folder for the user account
previously created.
Create
Create a new folder under the selected disk directory folder and assign it with selected
permission for the user account selected in the User drop-down menu.
Delete
Delete the disk directory folder selected.
30
Aspire easyStore
Shared Folder Access List
Lists all defined shared folders and access rules.
Please note: Each disk directory folder can be assigned as a shared folder once. If you
assign one disk directory folder as a shared folder \\sample to user account A with
Read/Write permission, you can later assign the same disk directory folder as a shared
folder to user account B with Read Only permission. The last change you make will
overwrite the first shared folder access rule. This means, user account A will no longer
have access permission to the shared folder \\sample since the shared folder access rule
was overwritten. Only user account B will have the permission to access the shared folder
\\sample.
31
Aspire easyStore
Advanced services
In this chapter, we will explore some exciting services provided on Aspire easyStore.
FTP services
Aspire easyStore is equipped with a built-in FTP server. The server is easy to configure and
allows users access to important data whether they are on the local home network or in
the office. The FTP server can be configured to allow user access to specific directories,
and will allow up to 10 users to access the Aspire easyStore at a time.
The current settings and status of the Aspire easyStore FTP server are displayed here.
32
Aspire easyStore
Max User
Sets the maximum number of users who can connect to the FTP server.
33
Aspire easyStore
Idle Time
Sets the amount of time a user can remain idle before being disconnected.
Port
Sets the FTP port. Default is 21.
Flow Control
Allows you to limit the bandwidth available for each user.
Save settings
Click Save settings for the settings to take effect.
User
Select the user for which the FTP server rule will apply.
Folder
Browse to and select the folder or directory you are granting FTP access to.
Permission
Set the user permission to Read Only or Read/Write.
Save settings
Click Save settings to add the user or group FTP rule.
FTP Access List
Lists all current defined FTP rules.
34
Aspire easyStore
FTP Server Status
The current settings and status of the Aspire easyStore FTP Server are displayed here.
Start FTP Server
Click this button to start or stop the FTP server.
If you are behind a router, you will need to forward the FTP port from the router to the
Aspire easyStore. Additional filtering and firewall settings may need to be modified on
your router to allow FTP access to the Aspire easyStore from the Internet. Once the port
has been forwarded from the router, users on the Internet will access the FTP server
through the WAN IP address of the router. If you use an FTP port other than 21, users
accessing the FTP server using an FTP client will have to specify the non-standard port,
and users who are using a browser will have to specify the port in the URL.
35
Aspire easyStore
DHCP services
Aspire easyStore can also be used as a DHCP Server. As a DHCP server, it can be used to
serve IP addresses to devices on your local network; however, this feature should not be
enabled if you already have a DHCP server, such as a router on your local network.
DHCP Server
Enables or disables the Aspire easyStore DHCP Server.
Starting IP Address
Enter the starting IP address for the range of addresses assigned by the DHCP server.
Ending IP Address
Enter the ending IP address for the range of addresses assigned by the DHCP server.
Lease Time
Sets the duration of time that an IP address will remain assigned to a device.
Save settings
Click Save settings for the settings to take effect.
36
Aspire easyStore
UPnP AV services
Aspire easyStore features a UPnP AV server. This server provides the ability to stream
photos, music and videos to UPnP AV-compatible network media players. If the server is
enabled, Aspire easyStore will be automatically detected by UPnP AV compatible media
players on your local network. Current supported file formats including:
Audio Type
‧MP3,WAV/PCM,WMA,AC3/AAC,OGG,AIF/AIFF
Video Type
‧VOB,AVI,MPEG2,MPEG4,WMV9
PlayList Type
‧M3U,PLS,WPL,RMP,ASX
Photo Type
‧JPG,BMP,GIF,TIF,PNG
UPnP AV Server
Enables or disables the Aspire easyStore UPnP AV server.
37
Aspire easyStore
Folder
Specifies the folder or directory that will be shared by the UPnP AV server. Select root to
share the entire volume, or click Browse to select a specific folder.
Auto Refresh
Select the interval for Aspire easyStore to re-index all media files stored on its hard disk.
Please note that large amounts of media files may need longer time to re-index. Do not
set the time interval too short if you have large amount of media files stored.
Save settings
Click Save settings for the settings to take effect.
Refresh
Click Refresh to manually re-index media files after adding new files.
38
Aspire easyStore
Apple iTunes server
Aspire easyStore features an iTunes server. This server provides the ability to share music
and videos to computers on the local network running the Apple iTunes application. If
the server is enabled, the Aspire easyStore will be automatically detected in iTunes and
the music and videos contained in the specified directory will be available to stream over
the network.
iTunes Server
Enables or disables the Aspire easyStore iTunes server.
Folder
Specifies the folder or directory that will be shared by the iTunes server. Select root to
share the entire volume, or click Browse to select a specific folder.
Password
Sets a password for the iTunes server.
39
Aspire easyStore
Save settings
Click Save settings for the settings to take effect.
Refresh
Click Refresh after adding new files to be used with iTunes.
40
Aspire easyStore
Advanced system configuration
and monitoring
In this chapter, we will discuss some tasks that you may need to perform to configure the
Aspire easyStore system.
Most of these tasks are detailed system configurations — you do not need to change
them normally.
Assigning a new device name to Aspire
easyStore
There may be times when you would like to give your Aspire easyStore a new device
name and description, like if you purchased a second Aspire easyStore for your family.
The default system name and description of Aspire easyStore are easystore. It may cause
confusion if you have multiple Aspire easyStore systems with the same name on your
network.
It is very simple to change the device name and description.
1. Log in to the web UI.
2. Click Advanced -> System
3. Enter the new device name and description in the respective fields.
4. Click the Save settings button on the lower-right corner.
The changes will take effect immediately after you click Save settings.
41
Aspire easyStore
Putting Aspire easyStore in a different network
workgroup
The workgroup is a conceptual collective of computers on a network. In Microsoft
Windows systems, when you click on the Network Neighborhood icon in the Start menu
or desktop, you will see computers with the same workgroup names. The default
workgroup name is mshome for Aspire easyStore and Windows XP Home Edition systems.
For Windows XP Professional Edition and Windows Vista®, the default workgroup name
is workgroup. If the workgroup name of your Aspire easyStore does not match your
computer, you may not able to find or use the Aspire easyStore system by using Network
Neighborhood.
It is very simple to change the device workgroup.
1. Log in to the web UI.
2. Click Advanced -> System.
3. Enter the new device workgroup name.
4. Click the Save settings button on the lower-right corner
The changes will take effect immediately after you click Save settings.
42
Aspire easyStore
Changing the IP address of Aspire easyStore
The IP address is the essential and most critical information that you may need to use the
Aspire easyStore.
You can configure Aspire easyStore in two modes:
-DHCP Client
-Static IP
If you have a DHCP server in your network (besides Aspire easyStore itself), you can
configure Aspire easyStore to get the IP address information from the DHCP server.
1. Log in to the web UI.
2. Click Advanced -> System
3. Click the LAN tab.
4. Select the DHCP Client option.
5. Click the Save settings button on the lower-right corner.
To configure the IP address information of the Aspire easyStore manually:
1. Log in to the web UI.
2. Click Advanced -> System.
3. Click the LAN tab.
4. Select the Static IP option.
5. Fill in every field with the correct information. You will need to enter the IP address
and Subnet Mask information at the very least.
6. Click the Save settings button on the lower-right corner.
43
Aspire easyStore
After you click Save settings, you will be forced to log out. The system will bring you
automatically to the login page of the Aspire easyStore with the new IP address.
44
Aspire easyStore
Configuring the wireless interface of Aspire
easyStore
One of the exciting features of the Aspire easyStore is that it comes with standard IEEE
802.11g interface that can be used with your wireless home network.
To configure the wireless interface of Aspire easyStore:
1. Connect Aspire easyStore to a wired network for configuration.
2. Configure Aspire easyStore with the correct IP address.
3. Log in to the web UI.
4. Click Advanced -> System.
45
Aspire easyStore
5. Click the Wireless tab.
6. Select the Wireless: Enable option to turn on the embedded wireless interface card.
7. After enabling your wireless interface card, if you know all the configuration
information of your wireless home network, you may enter them manually into each
respective column.
8. If you do not know which wireless network you are connecting to, you may click the
Site Survey button on the right of SSID.
9. Aspire easyStore will look for all available access points around your home and list
them.
10. For access points that are protected with WEP or WPA encryption, a lock icon will be
displayed in the WEP column.
11. Select the SSID you would like to connect to and click the Add button.
46
Aspire easyStore
12. For access points with WEP or WPA encryption, you will still need to key in the
respective keys manually.
13. Click the Save settings button on the lower-right corner
14. If everything is configured correctly, a message window appears with the message
Connected Successfully.
47
Aspire easyStore
15. You may remove the Ethernet cable from Aspire easyStore.
16. Switch off Aspire easyStore using the power switch at the back of the device.
17. Power on the Aspire easyStore the using the power switch at the back of the device.
After you have successfully configured the wireless interface, be sure to remove the
Ethernet cable from the Aspire easyStore. Keeping both connections on may cause
unpredictable results.
48
Aspire easyStore
Reformatting the hard drives or changing to a
different RAID level
Aspire easyStore is shipped with disks configured in RAID5 data protection. If you would
like to reformat the hard drives or change to different data protection levels (RAID levels),
please follow the steps in this section.
Before you proceed, please note that you will lost all your data stored on Aspire
easyStore during the process. Please be sure that you understand how different data
protection level works.
Data protection (RAID 5 — three disks minimum)
Aspire easyStore will combine all hard disks you put inside the system to one large
storage area. An amount of disk space equal to one disk is used for data protection, and
the rest is used for data storage. The data is distributed in such a way that it can be
recovered if any one disk fails.
Data duplication (RAID 1 — 2 or 4 disks only)
Aspire easyStore will combine all hard disks you put inside the system to one large
storage area. Half of the disk space is used for data storage, and the other half is used for
a duplicate (mirror) of that data. If one disk fails, you have a backup copy.
Better performance, no data protection (RAID 0 - two disks minimum)
Aspire easyStore will combine all hard disks you put inside the system as one large
storage area. All the disk space is used for data storage. Data stored on the Aspire
easyStore are distributed among all the hard disks. When you read or write data, you will
get better performance; however, if any disk fails, you will lose all data stored on Aspire
easyStore.
Expandable, no data protection (JBOD - one disk minimum)
Aspire easyStore will combine all hard disks you put inside the system as one large
storage area. All the disk space is used for data storage, and you can add more disks later
without affecting your existing data.
Non-expandable, no data protection (Standard - one disk minimum)
Each hard disk is a standalone storage area. You can not expand the storage area of each
disk even if you add more disks into the Aspire easyStore; however, if any disk fails, data
stored on other hard disks will not be affected.
1. Log in to the web UI.
2. Click Advanced -> System.
3. Click the HDD & RAID tab.
49
Aspire easyStore
4. Select the RAID type you would like to use.
5. Click the Next button on the lower-right corner.
6. Aspire easyStore will displays a message telling you that you are about to reformat
the hard drives. If you are sure that you would like to reformat the hard drive, please
click OK. Otherwise, please click Cancel and no changes will be made on your data.
7. Restart Aspire easyStore after it has successfully reformatted the hard drives.
50
Aspire easyStore
Configuring Aspire easyStore to notify you of
critical events
Aspire easyStore may be configured to send you an e-mail when some critical events
happen.
1. Log in to the web UI.
2. Click Advanced -> System.
3. Click the Alerts tab.
4. Fill in your outgoing email configuration. If you don’t need an account to send mail,
you can choose Anonymous. Otherwise, you will need to provide the user name and
passwords of your outgoing e-mail server.
5. Before you click Save settings for the changes to take effect, you may wish to click on
the Test E-Mail button to test your e-mail configuration. If everything’s right, you will
receive a test e-mail.
6. Select events for which you would like Aspire easyStore to send you an email under
Alert Types.
7. Click the Save settings button on the lower-right corner.
51
Aspire easyStore
52
Aspire easyStore
Calibrating the internal clock of Aspire
easyStore
There are three ways to set the internal clock of Aspire easyStore.
1. Read the time settings from your computer.
i.
Log in to the web UI.
ii.
Click Advanced -> System.
iii.
Click the Time tab.
iv.
Click the Set Time button on the lower-right corner of the From My
Computer section.
2. Have the Aspire easyStore synchronized with a public NTP server.
An NTP server is a server running NTP (Network Time Protocol) on the Internet. Usually,
53
Aspire easyStore
these servers are extremely accurate. You can synchronize the Aspire easyStore internal
clock with it.
i.
Log in to the web UI.
ii.
Click Advanced -> System.
iii.
Click the Time tab.
iv.
Select the correct time zone in the Time Zone Settings section.
v.
Enter the NTP server IP address or domain name of your choice in the
NTP Server section. There are many public NTP servers available on the
Internet. An example is pool.ntp.org.
vi.
Click the Set Time button on the lower-right corner of the NTP Server
section.
3. Set the time manually.
i.
Log in to the web UI.
ii.
Click Advanced -> System.
iii.
Click the Time tab.
54
Aspire easyStore
iv.
Adjust each field of the Set the Date and Time Manually section to the
correct value.
v.
Click the Set Time button on the lower-right corner of the Set the Date
and Time Manually section.
55
Aspire easyStore
Upgrading the Aspire easyStore firmware
A new firmware upgrade may be available for your Aspire easyStore. It is recommended
that you keep your Aspire easyStore firmware up-to-date to maintain and improve the
functionality and performance of your storage device.
1. Go to the local support page of the Acer website and download the latest Aspire
easyStore firmware.
2. Log in to the web UI.
3. Click Advanced -> System.
4. Click the Firmware tab.
5. Click the Browse button to select the firmware you just downloaded from the Acer
support page.
6. Click the Save settings button on the lower-right corner
Please do not power-off Aspire easyStore during the upgrade process; otherwise, it may
render your Aspire easyStore useless. After you have successfully upgraded the firmware,
click the Restart button on the lower-right corner to restart the system.
56
Aspire easyStore
Restarting Aspire easyStore
There are two ways to restart Aspire easyStore. The first is using the power switch at the
back of Aspire easyStore. Press the power switch to switch off the Aspire easyStore. After
the Power LED is turned off, wait for another 15 seconds, then press the power switch
again to power on the Aspire easyStore.
You can also use the web UI to restart Aspire easyStore.
1. Log in to the web UI.
2. Click Advanced -> System.
3. Click the System tab.
4. Click the Restart button in the Restart section.
5. Aspire easyStore will display a message asking you to confirm restart. Click Okay if
you really want to restart the system, or click Cancel to return to the web UI.
57
Aspire easyStore
Resetting Aspire easyStore to factory default
settings
There are two ways to reset Aspire easyStore back to factory default. The first is using the
reset button at the back of Aspire easyStore. You can press the reset button with a paper
clip or ballpen head. Press and hold it for over 10 seconds. During power-on, Aspire
easyStore will initialize the reset to factory default function. After the Status LED stops
blinking, the Aspire easyStore settings are back to factory default.
You can also use the web UI to reset the Aspire easyStore to factory default settings.
1. Log in to the web UI.
2. Click Advanced -> System.
3. Click the System tab.
4. Click the Reset to Factory Default button in the Defaults section.
5. Aspire easyStore will display a message asking you to confirm reset. Click Okay if you
really want to reset the system, or click Cancel to return to the web UI.
58
Aspire easyStore
59
Aspire easyStore
Backing up the current Aspire easyStore
configuration
After you have configured the Aspire easyStore, you may want to back up the
configuration file.
1. Log in to the web UI.
2. Click Advanced -> System.
3. Click the System tab.
4. Click the Save button in the Configuration Settings section.
5. Select a folder in your computer to save the configuration file.
60
Aspire easyStore
61
Aspire easyStore
Restore the Aspire easyStore configuration
using a saved configuration file
1. Log in to the web UI.
2. Click Advanced -> System.
3. Click the System tab.
4. Click the Browse button in the Configuration Settings section to find your
configuration file.
5. Click the Load button to load the configuration file.
After you load the configuration file, the Aspire easyStore will restart the system
automatically.
62
Aspire easyStore
Controlling the duration of the administrator
session timeout
1. Log in to the web UI.
2. Click Advanced -> System.
3. Click the System tab.
4. Change the value of the Inactivity Timer. The default value is 10 minutes.
5. Click the Save settings button in the Idle Time section for the changes to take effect.
63
Aspire easyStore
Monitoring the current Aspire easyStore system
status
You can review the basic system settings like current IP address, device name, description
and workgroup; current system temperature and current system hard drive and RAID
information on the Device Info page.
To view this page:
1. Log in to the web UI.
2. Click Advanced -> Status.
64
Aspire easyStore
Finding out what happened to the Aspire
easyStore
Aspire easyStore takes note of every important event that happens on its system. You can
review all the past 50 events on the System Log page.
1. Log in to the web UI.
2. Click Advanced -> Status.
3. Click the System Log tab.
65
Aspire easyStore
66
Aspire easyStore
Backing up the Aspire easyStore system log
Aspire easyStore takes note of every important event that happens on its system. You
may want to save these logs for future use.
1. Log in to the web UI.
2. Click Advanced -> Status.
3. Click the System Log tab.
4. Click the Backup System Log button.
5. Select a folder in your computer to save the log file.
67
Aspire easyStore
68
Aspire easyStore
Checking the hard disk status of Aspire
easyStore
Aspire easyStore provides a hard disk status page to allow you review the hard disk
brands, serial, size and RAID level. If any disk failed, it will be marked as Failed on this
page.
1. Log in to the web UI.
2. Click Advanced -> Status.
3. Click the Physical Disk Info tab.
69