1
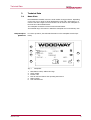
CURVE / CURVE XL
Motorless Treadmill
Translation of the Original German Operating Manual
Version: 08/2013-v1.0en
European representative:
Manufacturer:
WOODWAY GmbH
Steinackerstr. 20
79576 Weil am Rhein
Germany
WOODWAY USA, Inc.
W229 N591 Foster Ct.
Waukesha, WI 53186
USA
Tel.:
+1 262 - 548 - 6235
Fax.:
+1 262 - 522 - 6235
Tel.:
Fax.:
E-Mail:
Web:
+49 (0) 7621 - 940 999 - 0
+49 (0) 7621 - 940 999 - 40
[email protected]
www.woodway.de
Sales:
Tel.
+49 (0) 7621 - 940 999 - 10
E-Mail: [email protected]
Customer Service:
Tel.
+49 (0) 7621 - 940 999 - 14
E-Mail: [email protected]
E-Mail: [email protected]
Web:
www.woodway.com
Contents
Table of Contents
1
Introduction .............................................................................................5
1.1
1.2
1.3
1.4
1.5
2
Safety ......................................................................................................8
2.1
2.2
2.3
2.4
2.5
2.6
3
Safety Notices for Transportation ................................................ 14
Storage ..................................................................................... 14
Transporting the Treadmill .......................................................... 14
Product Description ................................................................................ 15
5.1
5.2
5.3
6
Name Plate ................................................................................ 11
Technical Specifications .............................................................. 12
Dimensions ................................................................................ 13
Transportation and Storage ..................................................................... 14
4.1
4.2
4.3
5
General .......................................................................................8
Description of Warning Notices .....................................................8
Safety Notices on Device ..............................................................9
Health Risks.................................................................................9
Intended Use ............................................................................. 10
Unauthorized Modes of Operation ............................................... 10
Technical Data ....................................................................................... 11
3.1
3.2
3.3
4
Operating Instruction Information .................................................5
Limitation of Liability ....................................................................5
Copyright ....................................................................................6
Replacement Parts .......................................................................6
Customer Service .........................................................................7
Function .................................................................................... 15
Running Surface ........................................................................ 16
Transport System ....................................................................... 16
Commissioning ....................................................................................... 17
6.1
6.2
6.3
General ..................................................................................... 17
Installation ................................................................................ 17
Assembly ................................................................................... 17
6.3.1
6.3.2
6.3.3
6.3.4
7
Positioning the Device ...................................................... 18
Mounting the Side Panels ................................................. 19
Mounting the Railing ........................................................ 21
Mounting the Display ....................................................... 25
Operation .............................................................................................. 26
7.1
7.2
For Your Safety .......................................................................... 26
Safety Equipment ....................................................................... 27
7.2.1 Reverse Brake ................................................................. 27
7.2.2 Safety Railing .................................................................. 28
7.3
Practical Training ....................................................................... 28
7.3.1
7.3.2
7.3.3
7.3.4
7.3.5
7.3.6
7.4
Professional Consultation .................................................. 28
Warm-Up and Cool-Down ................................................. 28
Measuring Pulse .............................................................. 28
Calculating Maximum Heart Rate ...................................... 29
Heart Rate Chart.............................................................. 29
Training Frequency .......................................................... 30
Polar® Heart Rate Monitor .......................................................... 30
7.4.1 Applying the Chest Strap .................................................. 30
7.4.2 Transmitter Function ........................................................ 31
08/2013-v1.0de
3
Table of Contents
7.5
Display ...................................................................................... 31
7.5.1 Display Parameters .......................................................... 32
7.5.2 Display Description .......................................................... 32
7.5.3 Function Key Description .................................................. 32
7.6
Training Process ........................................................................ 33
8
Accessories and Services ......................................................................... 34
9
Maintenance and Cleaning ...................................................................... 35
9.1
9.2
Cleaning .................................................................................... 35
Lubrication ................................................................................ 36
9.2.1 Bearings ......................................................................... 36
9.2.2 Running Surface Belt ....................................................... 36
9.3
9.4
Synchronization Belt ................................................................... 37
Cleaning and Maintenance Intervals ............................................ 37
9.4.1 Weekly Maintenance ........................................................ 38
9.4.2 Annual Maintenance ......................................................... 38
9.5
10
Disposal Notice ...................................................................................... 39
10.1
10.2
4
Troubleshooting ......................................................................... 38
Batteries.................................................................................... 39
Disposal of the Device ................................................................ 39
11
Maintenance Report................................................................................ 40
12
Table of Figures ..................................................................................... 41
08/2013-v1.0de
Introduction
1
Introduction
1.1
Operating Instruction Information
This manual provides information on the safe operation of the CURVE treadmill.
A condition for safe operation is compliance with all safety and operating instructions.
Read and observe the operating instructions!
Read these instructions carefully before beginning any work on the treadmill! It is a
part of the device and must be kept accessible at all times and in the immediate vicinity of the treadmill for operating and maintenance personnel.
CAUTION
Improper operation can cause accidents!
Not using the treadmill as intended according to the manufacturer's instructions can cause accidents and equipment damage.
► These operating instructions must be completely read and understood before using the treadmill.
► Keep these instructions close at hand for all users of the device.
Observe the
instructions!
WOODWAY accepts no liability for accidents, equipment damage and consequences
of equipment failure that are a result of failure to follow the operating instructions.
In addition, the local accident prevention regulations and general safety conditions
for intended use of the treadmill apply.
The manufacturer reserves the right to make technical changes in the context of
improving the performance properties and further development without prior notice.
Illustrations are for basic understanding and may differ from the actual design of
the device.
Accessories from other suppliers have further safety regulations and guidelines.
These must also be observed.
1.2
Limitation of Liability
All information and instructions in this manual have been compiled in accordance
with applicable standards and regulations, the current state of technology and our
knowledge and experience.
WOODWAY accepts no responsibility for damages resulting from:
• Disregarding the operating instructions,
• Improper use,
• Use by non-authorized persons,
• Use of replacement parts which were not approved by WOODWAY,
• Unauthorized modifications to the device or accessories.
The WOODWAY general terms and conditions and delivery conditions apply, as well
as the legal regulations valid at the time of contract conclusion.
08/2013-v1.0de
5
Introduction
1.3
Copyright
The release of the operating instructions to third parties without the written permission of WOODWAY is prohibited.
NOTE
All contents, text, drawings, images or other illustrations are copyright protected and are subject to intellectual property rights.
Any misuse is punishable by law!
Duplication in any manner and form - including excerpts - as well as use and/or
communication of the content are not permitted without written permission from
WOODWAY.
1.4
Replacement Parts
WOODWAY recommends the use of original replacement parts. Original replacement parts have particular qualities and ensure reliable and safe operation;
• Developed for specific use with the device,
• Manufactured in high quality and excellence,
• Ensure the legal warranty period
(excluding wear parts) or other reached agreements.
NOTE
The use of NON-original replacement parts may change the characteristics of
the device and interfere with the safe use!
WOODWAY does not accept liability for damages resulting from this.
Disposal!
Wear parts are considered hazardous waste!
After being replaced, wear parts must be disposed of according to country-specific
waste laws.
For further information on disposal, see section 10 page 39.
6
08/2013-v1.0de
Introduction
1.5
Customer Service
For service questions contact the following:
WOODWAY GmbH
Steinackerstr. 20
79576 Weil am Rhein
GERMANY
Contact:
Tel. .+49 (0) 7621 - 940 999 - 14
Fax. +49 (0) 7621 - 940 999 - 40
Email: [email protected]
For faster processing of your request please have the following data and information available:
• Information on the nameplate (specific model/serial number),
• An accurate description of the circumstances,
• Customer number (if available),
• What action has already been taken?
Servicing:
08/2013-v1.0de
The address of your local service center can be obtained from the manufacturer.
After repair or re-commissioning, the actions listed under "Installation" and "Commissioning" are to be performed as during commissioning.
7
Safety
2
Safety
2.1
General
The treadmill has been reliably designed, manufactured and tested according to the
latest state of technology and is in safe and technically perfect condition. Nevertheless, the device can cause risk to persons and property if it is operated improperly.
For this reason the operating instructions should be read completely and safety instructions must be observed.
Warnings attached directly to the device must be observed and kept in a legible
condition.
Inappropriate use will result in the rejection of any liability or guarantee by
WOODWAY.
2.2
Description of Warning Notices
Warning notices indicate potential hazards or safety risks. They are indicated in this
manual by a color-coded signal word panel (symbol with the appropriate signal
word).
All warning notices have the same design and the same standardized content design.
Sample of a Warning Notice:
SIGNAL WORD
Warning Text, Type and Source of Danger
Description of the consequences of ignoring the danger.
► Measures, instructions and forbidden actions to avoid the hazard,
► Further measures...
Classification:
NOTE
NOTE or WARNING (no danger symbol)
No risk of injury, pertinent information and warning
against material damage.
CAUTION
CAUTION (with danger symbol)
Slight possibility of injury.
WARNING
WARNING (with danger symbol)
In a dangerous situation a serious accident is possible
with the possibility of injury or death.
DANGER
8
DANGER (with danger symbol)
In the event of an accident immediate danger of
death or serious injury.
08/2013-v1.0de
Safety
2.3
Safety Notices on Device
There are two safety stickers on the Curve. It is noted that the treadmill is motorless, that the running surface belt only moves in one direction and that the device
must be mounted from the rear. Reference is also made to health hazards through
overexertion.
Safety relevant information is identified on the device using the following stickers:
Use care when using the motorless treadmill!
Notice on free movement in the
direction of the arrow, and on mounting and dismounting the treadmill.
Ensure proper health condition
before use!
Consult a physician before use and
discontinue training in case of health
problems.
2.4
Health Risks
WARNING
Health Hazards for certain groups of people!
The use of the CURVE treadmill can pose health risks for certain people.
► Before using the device, check the list below for limitations for certain persons which apply to you. If so, the specified measures must be adhered
to.
Persons with
Medical Conditions
Before beginning an exercise program, consult your physician, especially if any of
the following apply to you:
•
•
•
•
•
•
•
Pregnancy
Symptoms during
Training
08/2013-v1.0de
History of heart disease
High blood pressure
Diabetes
Chronic respiratory illness
Elevated cholesterol levels
Smoker
Other chronic illnesses or physical impairments
Pregnant women must consult a physician before starting a training program.
Should you experience dizziness, chest pain, nausea, or any other abnormal symptoms while training on the treadmill, stop training immediately. Consult a physician
prior to continuing training.
9
Safety
2.5
Intended Use
WARNING
Danger from Improper Use!
Any improper use and/or other use of the device can lead to dangerous situations with significant personal injury and/or property damage.
► Only use the CURVE for its intended use.
► Read and strictly adhere to all information in the operating instructions.
The CURVE is a motorless treadmill. It is intended for fitness training, to increase
stamina and physical fitness.
The operating instructions are an integral part of the device and are to be available
to all users at all times. The exact observance of the instructions is a prerequisite
for the intended use of the WOODWAY device.
WARNING
Risk of Injury Through Risk of Falling!
The free-running treadmill presents the danger of falling.
► Familiarize yourself with the CURVE operation and operating principles before the first training.
► Always use the safety handrail when mounting and dismounting and when
starting training.
ATTENTION
Claims to the manufacturer of any kind due to damage from improper use are
excluded.
The representative alone is liable for all damages resulting from improper use!
2.6
Unauthorized Modes of Operation
The Curve treadmill may only be used for the aforementioned purpose. Any additional uses may result in serious personal injury and/or property damage.
The following restrictions and prohibitions must be strictly adhered to:
• The treadmill may not be put into operation without prior instruction by qualified personnel.
• Children may not use the device or be left near the device unattended.
• The use of the CURVE under the influence of alcohol or drugs and/or narcotics
is prohibited.
• The CURVE may not be used for animals.
• Do not jump on or off of the CURVE!
10
08/2013-v1.0de
Technical Data
3
Technical Data
3.1
Name Plate
Each WOODWAY treadmill receives a serial number during production. Depending
on the year of your model, it has an alphanumeric code with 7-8 characters or a
numeric code with 9 digits. The serial number can be found on the nameplate on
the front left of the treadmill frame.
The nameplate contains the device's main technical details.
The treadmill range of functions is stated the nameplate and on the delivery note.
Keep Handy for
Questions!
For service questions, the technical information on the nameplate must be kept
handy.
1
2
5
3
6
4
Fig. 1
1.
2.
3.
4.
5.
6.
08/2013-v1.0de
Nameplate
Manufacturer name, address and logo
Serial number
Product code
Note to read and observe the operating instructions!
Model number
Year manufactured
11
Technical Data
3.2
Technical Specifications
Device designation:
Model: CURVE
Model: CURVE XL
Walking surface (L x W):
172 x 43 cm
218 x 55 cm
Usable walking surface (L x W):
157 x 43 cm
203 x 55 cm
Walking surface / Technology:
Slats (replaceable) / Rubber on aluminum T-sections
Walking surface hardness / Lateral play:
43-47 Shore A / +/- 2 mm
60 slats
77 slats
Frame dimensions (L x W x H):
172 x 73 x 46 cm
218 x 86 x 53 cm
Overall dimensions (L x W x H):
172 x 85 x 173 cm
218 x 97 x 193 cm
Weight:
190 kg
235 kg
Max. user weight (at max. 5 km/h):
225 kg (360 kg)
225 kg (360 kg)
Running surface above floor (deepest
point):
28 cm
28 cm
Ambient conditions for storage and
transport:
Temperature: -10°C to +70°C
Relative humidity: 15 - 85% (not condensed)
Air pressure: 400 - 1060hPa
Ambient conditions for operation:
Temperature: +10°C to +40°C
Relative humidity: 15 - 85% (not condensed)
Air pressure: 700 - 1060hPa
Pulse measurement:
1-channel ECG accurate, chest strap Polar (accessory)
Fuse type
IP2X
Drive motor:
Manually driven
Speed:
0 - X km/h (no maximum speed limitation)
12
08/2013-v1.0de
Technical Data
3.3
Dimensions
Fig. 2
08/2013-v1.0de
Device dimensions
13
Transportation and Storage
4
Transportation and Storage
4.1
Safety Notices for Transportation
Check the treadmill for damage upon arrival. Also check and compare supplied accessories with the corresponding delivery note.
The manufacturer is not liable for damages and missing parts if this information was
not recorded in writing on the delivery note upon delivery of the unit. Damage or
defects must be reported to the carrier and to the responsible WOODWAY dealer
immediately.
WARNING
Risk of Injury by Machine Falling or Falling Over!
Improper transportation of the device may lead to it falling over and causing
injury or equipment damage.
►
►
►
►
WOODWAY Service:
Only transport in compliance with the safety regulations.
Only use the supplied carrying tubes for transport.
Never lift the device using the railing or protective coverings.
Ensure stable center of gravity and steadiness during transportation.
If necessary, transport or relocation can be carried out by authorized WOODWAY
service partners.
For further information please contact WOODWAY customer service.
4.2
Storage
The device may only be stored in closed, dry rooms. It is absolutely necessary to
prevent contact with moisture (rain, fog, etc.)
The following environmental conditions are prescribed for transportation and storage:
• Temperature:
-10°C to +70°C
• Relative humidity: 15 - 85% (not condensed)
• Air pressure:
400 – 1060 hPa
4.3
Carrying Tubes
Transport Rollers!
Transporting the Treadmill
The carrying tubes are to be inserted into the openings provided at the bottom
front of the treadmill frame. Do not pull on or remove coverings. If the treadmill
must be disassembled, the coverings and the railing unit can be removed to facilitate transport.
The CURVE is equipped with two rollers on the bottom front of the device for short
transport distances. A handle is welded to the frame at the back of the device.
Using this handle the entire unit can be lifted and maneuvered like a wheelbarrow.
Warning; the treadmill is very heavy.
The transport rollers are only functional after the device has been lifted and tilted to
a certain height. Note, the railing in the front of the treadmill lowers when the back
of the device is raised. Pull the device away from the wall before lifting so that the
display does not hit anything.
14
08/2013-v1.0de
Product Description
5
Product Description
5.1
Function
The CURVE is a motorless training device. The user controls the desired workout
speed with their running speed on the upwardly curved running surface.
1
Fig. 3
1.
2.
2
CURVE Operation
Basic principle of the rotary drive through moving mass
Operation of the CURVE drive with a running person
The treadmill is accelerated, slowed or stopped through the shifting of weight and
the resulting running speed. The CURVE functions without a motor, so there is no
emergency stop device. The treadmill stops on its own. It can take some time before the device stops depending on the running speed.
Stopping the
Treadmill
To stop the running surface, the runner straddles the running surface on the right
and left sides and lets it coast to a standstill (or they shift their center of gravity and
shift their weight to the rear until the treadmill comes to a standstill).
WARNING
Risk of Injury Through Falling!
During training, especially during the initial use of the device there is a danger
of injury from falling.
► Familiarize yourself with the CURVE operation before the first training. The
shifting of weight to the front curved area causes the speed to increase.
Shifting the weight to the back causes the speed to decrease.
► It is absolutely necessary that you hold on to the safety railing during the
first training program until you can move safely on the treadmill.
08/2013-v1.0de
15
Product Description
5.2
Running Surface
The walking surface belt consists of individual slats which are mounted on a set of
wedged-tooth belts.
Slat Design
The individual slats consist of two components: A rubber surface and a T-shaped
aluminum base. Due to the approximately 1 cm thick rubber surface and the aluminum T-slat, WOODWAY has the "world's most ideal running surface for treadmills".
Due to the rubber running surface the majority of the impact energy is absorbed
and local pain in extremities which is associated with long runs is reduced. The interaction between the belt system and the transport system prevents friction and
heat generation. This increases service life of the running belt and the entire treadmill.
The WOODWAY running surface differs fundamentally from running belts on conventional Treadmills (for which cotton-nylon belts are normally used). On your
WOODWAY treadmill you may initially notice higher surface grip than you have experienced before. The more you use your treadmill, the more you will get used to
the grip. As with all treadmills, it is also important on a WOODWAY treadmill not to
shuffle your feet if possible.
5.3
Transport System
The support system consists of two supporting rails (secondary carrier), which are
equipped with high-performance bearings. Six V-belt guides on each carrier ensure
lateral stability.
The system which consists of a total of 112 ball bearings supports the running surface and distributes the load evenly over the entire treadmill. The running surface
belt (slats and steel wire reinforced toothed V-belt) is guided by a form-fitted guide
roller on the front and back. The guide rollers are coupled by a toothed belt and
thereby synchronized. This makes the curve possible. The combination of running
surface / secondary carrier / guide rollers makes this slat system unique:
• Low friction (energy saving) and low wear
(approx. 240,000 km functional service life)
• High service life (one running surface belt for one treadmill life)
16
08/2013-v1.0de
Commissioning
6
Commissioning
6.1
General
Commissioning is the initial intended use of the device, see sec. 0 Page 10. Ensure
that the conditions applicable to basic safety and health requirements are met.
Read these operating instructions completely before commissioning.
Before commissioning the device, operating and functional safety is to be tested.
This includes correct installation and operator instruction.
6.2
Installation
Only install your treadmill at ground level on a sufficiently firm, stable surface. The
surface should be as flat as possible to ensure that the frame only bends minimally.
Do not place the treadmill directly on a deep pile velour or fleece carpet due to
moving parts on the bottom.
ATTENTION
Maintain the Safety Area
Keep the area behind the treadmill clear.
Ensure that there is a clearance of at least 2 meters between the back of the
treadmill and walls or furniture.
If the installation site has high-pile carpeting, a floor protection mat should be
placed under the treadmill.
WOODWAY also has appropriate mats available.
For more information call +49 (0)7621 - 940 999 - 0.
Using a floor protection mat reduces the production of lint which can enter the
treadmill. This also minimizes carpet wear.
6.3
Assembly
The CURVE slatted treadmill is usually delivered and installed free place of use by
WOODWAY or an authorized carrier.
The handrail assembly and the side panels can be removed to reduce the weight
and facilitating transport.
NOTE
The required assembly tools and materials are included in the scope of delivery.
All screws, parts of the device are in standard American sizes. No metric
screws may be used.
The following section describes device installation.
08/2013-v1.0de
17
Commissioning
6.3.1
Positioning the Device
Fig. 4
•
•
•
Installation step, positioning the device
Position the unit on a sufficiently solid and horizontal surface. For information
see section 6.2 page 17.
There are wheels under the front end of the treadmill. The treadmill can be
moved on the wheels by lifting it using the handle on the back of the device.
The transport rollers are only functional after the device has been lifted and
tilted to a certain height.
To carry the device, use the carrying tubes in the lower part of the treadmill.
The square steel tubes fit into two square brackets to the front of the treadmill.
ATTENTION
The device is very heavy! Ensure that the carrying tubes cannot slip out
of the brackets during transport.
•
18
Remove the tubes from the brackets after transport.
08/2013-v1.0de
Commissioning
6.3.2
Mounting the Side Panels
The CURVE side panels are different from the CURVE XL side panels.
The CURVE XL panels consist of two separate panels on each side. The panels are
separated in the middle (see Fig. 8 page 21), further assembly is identical to the
CURVE.
Fig. 5
•
•
•
•
•
08/2013-v1.0de
Installation step, mounting side panels
Place the left and right side panels on the device. The curved design and the
cutouts for the railing indicate the proper position.
Ensure that they are in the correct position on the frame and not resting on
the drive belts or guide rollers.
Check that the six holes on the top of each side panel are directly above the
underlying holes in the frame.
Do not fix the side panel from the top yet, since the bottom needs to be fixed
to the frame first.
Then make sure that the data wire (in the right running direction) extends
through the handrail cutouts in the side panels. It will be connected to the display wire in a later step. If the wire is not visible, remove the side panel again.
Put the wire through the opening.
19
Commissioning
Fig. 6
•
•
Fix both side panels (on the CURVE XL four pieces) to the frame. Fix the panels to the bottom of the device at the four points in the front and rear with the
supplied Phillips screws and screwdrivers.
Press slightly on the panel from the outside until the holes in the frame and
side panels are aligned and the screw can engage the thread.
Fig. 7
•
20
Installation step, fixing bottom of side panel
Installation step, fixing top/sides of side panel
Now fix the side panels to the frame from the top. Fix the side panels to the
top of the device at the front, middle and rear using the supplied Allen screws
and Allen key (six points on each side).
08/2013-v1.0de
Commissioning
Fig. 8
•
6.3.3
Installation step, fixing top/middle of side panels (CURVE XL)
The screws should tighten easily and without much resistance. If this is not the
case, press slightly on the panel from the outside until the holes in the frame
and side panels are aligned and the screw can engage the thread.
Mounting the Railing
ATTENTION
The CURVE treadmill may not be used without the railing! There is a danger of
injury!
Fig. 9
•
Installation step, positioning railing
Hold the railing as shown and carefully step onto the right and left side panels.
WARNING
Danger of Falling off of Treadmill!
Danger of falling when stepping onto the treadmill while holding the railing.
► Do not step onto the running surface while holding weight.
► To position the railing, stand on the side panels to the left and right of the
running surface.
•
08/2013-v1.0de
Because of the weight of the railing, this step should be performed with two
persons. Position the railing as illustrated.
21
Commissioning
Fig. 10
•
•
Attention!
Do not insert the railing completely into the seat.
Before inserting the railing into the seat, check that the data wire is protruding out of the base of the device and that the connecting wire is protruding
from the opening at the bottom of the railing.
Fig. 11
•
22
Installation step, positioning railing
Installation step, inserting railing - wire
Before the railing is completely inserted, ensure that the data wire plug is not
damaged by the bottom edge of the railing (crimped, cut or twisted). There is
a cutout for the wire in the railing.
08/2013-v1.0de
Commissioning
•
When you have checked the position of the wires, insert the railing into the
seat until it stops. If the railing does not slide in easily, adjust the insertion angle by slightly moving the railing to the left and right or front and back.
Fig. 12
•
Connect the ends of the display and data cable and stow any excess cable in
the opening in the railing.
Fig. 13
•
08/2013-v1.0de
Installation step, connect wires
Installation step, fixing the railing
Fix the railing to the frame. Fix the railing between the two tubes on the right
and left - four points on each side - using the supplied hex screws and the
socket wrench. Screw all four bolts in loosely before tightening them with the
socket wrench.
23
Commissioning
Fig. 14
•
Then place the cover plates over the bolts on both sides and stow the display
wire behind it (on the runner's right).
Fig. 15
•
24
Installation step, mounting cover plate
Installation step, fixing cover plates
Fix the right and left cover plates with a Phillips screw from the top and two
Phillips screws on bottom.
08/2013-v1.0de
Commissioning
6.3.4
Mounting the Display
Open the display box. Unpack the display, two Allen screws and the Allen key.
Connect the two plugs (one from the railing and
one from the display) and ensure that a click is
heard.
Stow the excess wire in the railing tube.
Fig. 16 Mounting the display, connecting the wires
Align the display on the railing bracket so that the
top and bottom holes in the bracket are aligned
with the screw holes in the railing.
Fix the bracket at the top and bottom with the
Allen screws.
Fig. 17 Mounting, fixing the display
Finally, open the battery compartment on the
back of the display and insert two standard AA
batteries.
Close the battery compartment.
Fig. 18 Inserting batteries
08/2013-v1.0de
25
Operation
7
Operation
7.1
For Your Safety
NOTE
CONSULT A DOCTOR!
If you are over 40 years old, have a heart condition, are overweight or have
not been involved in sports for several years, a visit to the doctor is recommended before beginning an intensive training program.
For safe operation and successful training please read the following points for your
own safety before starting to use the CURVE:
• The CURVE does not have a motor and the belt moves freely! Always mount
and dismount the CURVE from the rear. Always hold on to the railing during
mounting.
• Keep hanging clothing and towels away from the running surface. Ensure that
shoelaces do not extend beyond the bottom of the shoe sole.
• Keep the area behind the treadmill clear and make sure that there is a space
of at least 2 meters between the rear of the treadmill and walls or furniture.
• Keep hands away from all moving parts.
• Children and animals may not mount the treadmill! Never leave children or animals near the treadmill unattended.
• Check the treadmill for defective or loose components before use and replace
or repair if necessary.
• WOODWAY treadmills can be used by persons with a maximum weight of 350
kg. Due to the mode of operation there is no guarantee that the treadmill running surface belt will stop immediately if required (e.g. when an object is
caught in the treadmill belt or rollers).
• Mount and dismount the treadmill carefully. Never mount or dismount the
treadmill when the running surfaced is moving. For safety reasons hold on to
the railing and straddle the running surface with your feet on the left and
right. No not dismount the treadmill until the running surface stops moving.
• Wear suitable running shoes with a high degree of grip. Do not use shoes with
heels, leather soles or running shoes with spikes. To protect your device, ensure that there are no stones in the profile of your shoe soles.
• Take a few minutes to get your heart rate in the desired training range. Walk
slowly for some time after a training session to give your body enough time to
cool down. During this time your pulse rate will go back to the normal range.
ATTENTION
The user/owner or representative of the equipment is responsible for ensuring
that regular maintenance and inspection of the CURVE is carried out.
Defective components must be replaced immediately. The treadmill should
not be used until it is repaired by a professional!
26
08/2013-v1.0de
Operation
7.2
Safety Equipment
7.2.1
Reverse Brake
The CURVE non-motorized running face is designed so that the user drives the running surface and controls its speed. This is only possible due to the innovative
curved design combined with gravity.
Only Forwards
Movement!
For the safety of the user the running surface only rotates in one direction, which
only allows use of the device for running forward (not for running in reverse). This
provides for a virtually locked running surface for mounting and dismounting the
treadmill from the rear.
ATTENTION
The CURVE treadmill may only be mounted in the rear from the side! Never
mount from the front!
When the treadmill is mounted from the front the running surface starts to
move immediately. Danger of accident!
Fig. 19
08/2013-v1.0de
Mounting the CURVE
27
Operation
7.2.2
Safety Railing
The CURVE is equipped with a railing that extends along both sides and is bowed
around the front. This allows the user to maintain direct contact, so as to obtain
safety and stability along the entire curvature of the running surface.
For safety reasons the user should hold on to the railing when necessary (e.g. for
stopping).
ATTENTION
Always use the railing for mounting and dismounting!
7.3
Practical Training
7.3.1
Professional Consultation
For all treadmill training beginners, it is recommended to seek the advice of a professional fitness instructor or personal trainer, to obtain an overall fitness assessment before starting an exercise program and developing an optimal training
program.
For optimal use and safety during treadmill training, WOODWAY recommends running on the treadmill in an upright and natural running position and to avoid dragging foot movement.
Before the first training observe the CURVE treadmill function notices in section 5.1
on page 15.
7.3.2
Warm-Up and Cool-Down
A warm-up before each workout and to cool-down after each workout is recommended. If possible, you should always do some basic stretching exercises for the
legs before and after training. The stretching exercises make you more flexible and
this prevents muscle soreness and injury during routine activities.
7.3.3
Measuring Pulse
To select the optimum fitness levels for the workout, it is important to determine
your heart rate and your pulse as accurately as possible. For this, a high quality
heart rate monitor is recommended (included in the scope of delivery).
In the event that you do not have a heart rate monitor, you can feel your pulse by
placing your fingers on the underside of your wrist or on one side of your neck.
Look at the second hand of a clock and count how many beats you feel in 15
seconds. Multiply this number by four to calculate the BPM (beats per minute). Your
heart rate is required when you do your fitness test.
28
08/2013-v1.0de
Operation
7.3.4
Calculating Maximum Heart Rate
To determine your maximum heart rate subtract your age from the number 220
(general formula). The difference is an approximation of your maximum heart rate.
This formula is used by the American Heart Association (AHA) and the American
College of Sports Medicine (ACSM). Your actual maximum heart rate is determined
by a stress test performed by your doctor. The American Heart Association recommends undergoing a stress test if you have a history of heart disease or if you are
over 40 years old and starting an exercise program.
Heart Rate
Recommendation
7.3.5
During training it is recommended not to exceed a value of 85 % of maximum heart
rate. Our programs are designed so that the heart rate remains within the target
range. Your target range is between 60 and 75% of your maximum heart rate. If
you find that your heart rate is above the 75%, you are probably running too fast.
Reduce your speed or stop your workout for a brief moment to bring your heart
rate back to the target range.
Heart Rate Chart
Age
Maximum
heart rate
[BPM*]
60 % of the
maximum heart
rate [BPM*]
75 % of the
maximum heart
rate [BPM*]
85 % of the
maximum heart
rate [BPM*]
20
200
120
150
170
25
195
120
150
160
30
190
110
140
160
35
185
110
130
150
40
180
100
130
150
45
175
100
130
140
50
170
100
120
140
55
165
90
120
130
60
160
90
120
130
65
155
90
110
130
70
150
90
110
120
75
145
80
100
120
* BPM: Beats per minute, source: American College of Sports Medicine
08/2013-v1.0de
29
Operation
7.3.6
Training Frequency
At the beginning of training allow yourself enough time to get into shape. After a
break from training, you should also allow sufficient time to rebuild physical condition.
Endurance training!
Running Shoes!
7.4
The priority is regularity and persistence of training - not the intensity. Fitness
experts recommend in the beginning training three to four times per week within
your target heart rate for at least 20 minutes per workout. Your primary objective
should be, step-by-step to reach a level of fitness with which you can easily keep
your heart rate in the target range for 50 to 60 minutes four to five times per week.
In order to prevent sore feet and sore muscles caused by incorrect footwear, the
use of high quality running or jogging shoes is recommended. Ensure there is
adequate heel and arch support.
Polar® Heart Rate Monitor
The display was designed so that the user's heart rate is indicated when a Polar®measuring device is used. In order display the user's heart rate accurately on
the screen, the built-in receiver display must receive a stable heart rate signal from
the Polar® transmitter.
The
•
•
•
Polar® heart rate system consists of three main elements:
sensor/transmitter
chest strap/belt
measuring device/console
The receiver for the wireless system is installed in the measuring device assembly
or the console display. When in operation the display shows the heart's activity in
beats/minute.
WARNING
Danger of Electrical Disturbance!
Using the transmitter from the heart rate monitor in conjunction with an electric pacemaker may cause electrical interference and influence the functionality. This could cause a health hazard.
► Never use the heart rate monitor together with an electric pacemaker.
7.4.1
Applying the Chest Strap
The sensor / transmitter is to be worn below the chest and above the abdomen,
preferably directly on the skin (not over clothing). The transmitter should be applied
centrally below the chest muscles. After the belt is fastened, pull it away from the
chest by stretching the strap and moistening the conductive electrode strips which
are located below the buttons. The transmitter operates automatically while it is
worn. It does not work if the connection between the transmitter and the body is
broken. After you have removed the transmitter, wash the belt with a mild detergent in warm water and rinse thoroughly with clean water. However, since the
transmitter can be activated by moisture, it should be wiped dry after cleaning.
Never clean the surfaces of the transmitter with force.
30
08/2013-v1.0de
Operation
7.4.2
Transmitter Function
The signal will only be transmitted if the transmitter is within one meter of the receiver. Note that variations in the heart rate display can occur when the transmitter
is too close to other Polar® devices. Maintain at least one meter distance from other
Polar® devices.
NOTE
It is possible that the heart rate measurement reception is irregular or completely disrupted when the Polar® measuring device is too close to strong
sources of electromagnetic radiation, for example, in the vicinity of overhead
power lines, televisions, computers, electric motors or other fitness equipment. Only one transmitter should only be used within range of a receiver
since the receiver might otherwise receive multiple signals and transmit inaccurate readings.
7.5
Display
There are five indicators in the display which show program statistics. The four digit
displays are programmed to display the time in the 88:88 format.
The display also contains three function keys, with which settings can be adjusted
or active display fields can be changed.
Fig. 20
08/2013-v1.0de
Display
31
Operation
7.5.1
Display Parameters
•
•
•
7.5.2
Manual user speed control (SPEED)
Display for TIME, CALORIES, DISTANCE and PULSE
Running surface speed indicator (SPEED)
Display Description
The indicators in the display indicate the following data:
SPEED:
TIME:
Displays the current speed in km/h.
Displays the cumulative training time.
•
•
DISTANCE:
Displays the distance run.
•
CALORIES:
AUTO-ON/OFF
AUTO-START/STOP:
7.5.3
The training distance can be set in advance (see instructions for the function
keys). A beep sounds when the preset distance has been reached.
Displays calories burned during the workout.
•
ALARM:
Displays the elapsed time, from training start to training end. The TIME display
stops automatically when no training activity has been detected for 3 seconds.
The training time can be set in advance (see instructions for the function
keys). A beep sounds when the preset time has elapsed (Countdown).
The calories that should be burnt in a training session can be set in advance
(see instructions above). A beep sounds when the preset calories have been
reached.
The display beeps when the MODE SET or RESET keys are pressed.
The display automatically detects the use of the treadmill and the LCD fields display
the data when the running surface moves. To reset the values, follow the function
key instructions. The display switches off automatically when the treadmill is not in
use for 8 minutes and the running surface does not move for 8 minutes.
Function Key Description
Various parameters can be adjusted to your personal training requirements with the
function keys.
MODE:
Press this key to switch between the display windows and select the window that
you want to program:
• Distance
• Calories
• Time
A diamond symbol appears in the upper left corner. This means that changes can
be made in this window. If the MODE key is pressed, the diamond symbol appears
in the next window.
32
SET:
The value selected with the MODE-diamond is programmed by pressing the SET
key. Each press of the key increases the value appropriate for the particular display.
RESET:
Resets the time entry in normal mode. The window selected with MODE-diamond is
also reset.
08/2013-v1.0de
Operation
7.6
Training Process
Training Start
ATTENTION
Always use the railing for mounting and dismounting!
The CURVE treadmill may only be mounted in the rear from the side! Never
mount from the front!
When the treadmill is mounted from the front the running surface starts to
move immediately. Danger of accident!
Start running slowly and hold on to the railing. The display will be activated by the
movement.
If you are using the motorless CURVE for the first time, continue walking at a slow
speed for a few minutes. In this way you familiarize yourself with the device and
learn the reaction to longer and shorted steps. The railing can always give you the
necessary security.
Active Control Element
Each of the data display windows can be reset during training. For this, change to
the desired window using the MODE key and then press the RESET button.
End Training
ATTENTION
To end training slow the step rate evenly. Hold on to the railing when stopping.
If you want to abruptly interrupt or stop training, support yourself on the railing and
stand on either side of the running surface. Let the running surface come to a stop
on its own.
The display can be reset by using MODE to switch to the desired display window
and then pressing RESET. The display switches off automatically when the running
surface does not move for 8 minutes.
08/2013-v1.0de
33
Accessories and Services
8
Accessories and Services
For questions about accessories and WOODWAY services call WOODWAY customer
service at +49 (0)7621 - 940 999 - 0/ or your responsible WOODWAY dealer.
Protective Floor
Mat:
Polar chest strap
set:
Serves to protect the floor or carpet under the WOODWAY device and at the same
time protects against obstacles such as deep pile carpet.
The Polar T34 transmitter chest strap is a Polar chest strap with extended range.
Transmission to the training device is wireless and serves to measure the heart
rate.
For information about current prices, please contact the above persons.
34
08/2013-v1.0de
Maintenance and Cleaning
9
Maintenance and Cleaning
WARNING
Danger of injury due to lack of qualifications!
If maintenance or repairs are not carried out by professionally qualified personnel, this may cause material damage and serious injury.
► Maintenance and repair work may only be performed by qualified personnel!
► It is the sole responsibility of the representative to assign qualified personnel for maintenance and repair work.
► In case of doubt or questions, always contact the WOODWAY customer
service or dealer!
► The manufacturer is not liable for personal injury and material damage
caused by a lack of qualifications!
9.1
Cleaning
ATTENTION
The use of water and liquid detergents as part of cleaning can cause serious
or fatal electrical shock.
► No liquids may come in contact with electrical components, wires, wire
connections or displays.
► Do not spray the device with a water jet.
The running surface should be thoroughly cleaned at regular intervals, depending
on the intensity of use.
Remove light dirt and dust with a soft cloth. Dirt can be removed with damp cloth
and mild soapy water. After cleaning dry with a dry cloth!
Cleaning Notes:
•
•
•
•
08/2013-v1.0de
Do not use abrasive brushes or abrasive cleaners, as the paint and plastic surfaces can be scratched
Do not use sharp tools for cleaning (knife, metal scraper) or aggressive solvents.
Clean all surfaces with a non-abrasive, mild detergent.
To avoid damage to component surfaces, observe the instructions for detergent use.
35
Maintenance and Cleaning
9.2
Lubrication
9.2.1
Bearings
All bearings in the treadmill have been lubricated at the factory and must not be lubricated except for the axle bearings.
The bearings on the front and rear axle are to be lubricated with a grease gun once
a year (two in the front, two in the rear).
1
4
Fig. 21
1.
2.
3.
4.
3
2
Axle bearing
Aligning bearing (maintenance free)
Inside of the running surface belt
Edges of slats
Lubrication nipple for all four bearings / front and rear axle
The side panels must be removed for lubrication.
9.2.2
Running Surface Belt
The rubbing of the running surface toothed belt on the edges of the guide roller
may cause noises.
For relief, lightly lubricate the sides of the toothed belt (Molykote or equivalent). Also apply lubricant to the teeth on the synchronization belt.
36
08/2013-v1.0de
Maintenance and Cleaning
9.3
Synchronization Belt
The synchronization belt on the right side (in running direction) connects the front
and rear axles. It ensures equal circumferential axle speed and the exact movement
of the running surface belt.
The condition of the toothed belt should be checked (wear, condition of teeth) during inspection measures, when side panel are removed or by excessive noise. The
belt tension should also be checked. A tensioning roller is located above the belt,
see Fig. 22. By loosening the fixing screws (Pos. 4) the tensioning roller and block
can be adjusted along the slots. Increase belt tension when necessary. Then tighten
both fixing screws.
1
2
3
4
Fig. 22
1.
2.
3.
4.
9.4
Synchronization belt
Synchronization Belt
Tensioning roller
Tensioning roller block
Fixing screws
Cleaning and Maintenance Intervals
When the treadmill is in a dirty area or it is heavily used, cleaning and inspection
measures must be performed accordingly.
For proper inspection and regular review, we recommend a WOODWAY maintenance contract.
ATTENTION
Worn or damaged components must be replaced immediately. If the observed
deficiency can cause danger to the user or operator, the CURVE may not be
used until it is repaired.
08/2013-v1.0de
37
Maintenance and Cleaning
9.4.1
Weekly Maintenance
•
•
•
9.4.2
Annual Maintenance
•
•
•
•
•
9.5
Clean the rails, the front display panel and the cover panels.
Check the overall condition of the treadmill.
Vacuum under the treadmill.
Vacuum the inside of the treadmill. For this, remove the railing and the panels.
Check all screw connections for tightness. Tighten loose nuts and bolts.
Clean the running surface.
Check the toothed belt. Replace if teeth are missing or the belt is badly worn.
Lubricate the roller bearings on the front and back as part of annual maintenance.
Troubleshooting
ATTENTION
With the exception of the maintenance work described in this chapter, the
treadmill can only be checked and repaired by qualified personnel.
If necessary the WOODWAY dealer or service center is to be contacted!
For specific consultation during servicing, we require details about your treadmill.
With the following information you can contribute to optimal consultation:
•
•
•
•
•
38
What are the make and model and what is the serial number?
What happened before the problem occurred?
Did the problem occur suddenly or slowly over time?
Was the treadmill in use when the problem occurred?
Explain any the other signs which can provide information for correcting the
error.
08/2013-v1.0de
Disposal Notice
10
Disposal Notice
10.1
Batteries
Always return used batteries.
Discharged batteries can be returned to public collection or retail stores.
Batteries supplied by us can be returned to us at no charge. They can also be sent
by mail.
Returning Batteries:
This symbol indicates that the display batteries may not be disposed of in the
household trash after used.
10.2
Disposal of the Device
The disposal of the equipment must be in accordance with the respective national
regulations.
An appropriate waste disposal company should be contacted. Properly dispose of
the device at the end of its service life (e.g. the local collection point for waste separation):
• The device packaging is disposed of through resource recycling.
• The metal parts of the machine go to scrap metal disposal.
• Plastic parts are given to plastic recycling.
• Rubber parts are disposed of as hazardous waste.
The disposal of the equipment must be in accordance with the respective national
regulations.
Wear parts are considered hazardous waste! After being replaced wear parts must
be disposed of according to country-specific waste laws.
08/2013-v1.0de
39
Maintenance Report
11
D ATE
40
Maintenance Report
M AI NTEN ANCE MEASURES
FROM
REM ARKS
08/2013-v1.0de
Table of Figures
12
Table of Figures
Fig.
Fig.
Fig.
Fig.
Fig.
Fig.
Fig.
Fig.
Fig.
Fig.
Fig.
Fig.
Fig.
Fig.
Fig.
Fig.
Fig.
Fig.
Fig.
Fig.
Fig.
Fig.
08/2013-v1.0de
1
2
3
4
5
6
7
8
9
10
11
12
13
14
15
16
17
18
19
20
21
22
Nameplate ........................................................................................ 11
Device dimensions ............................................................................ 13
CURVE Operation .............................................................................. 15
Installation step, positioning the device .............................................. 18
Installation step, mounting side panels ............................................... 19
Installation step, fixing bottom of side panel ....................................... 20
Installation step, fixing top/sides of side panel .................................... 20
Installation step, fixing top/middle of side panels (CURVE XL) .............. 21
Installation step, positioning railing .................................................... 21
Installation step, positioning railing .................................................... 22
Installation step, inserting railing - wire .............................................. 22
Installation step, connect wires .......................................................... 23
Installation step, fixing the railing ...................................................... 23
Installation step, mounting cover plate ............................................... 24
Installation step, fixing cover plates ................................................... 24
Mounting the display, connecting the wires ......................................... 25
Mounting, fixing the display ............................................................... 25
Inserting batteries............................................................................. 25
Mounting the CURVE ......................................................................... 27
Display ............................................................................................. 31
Axle bearing ..................................................................................... 36
Synchronization belt .......................................................................... 37
41