1
Visara
Master Console Center
Administration Guide
P/N
707130-001
Technical Support
Contacting the Visara Intellicenter
For US domestic customers, Visara provides technical support through its Intellicenter,
8:30 - 5:00 (ET) Monday through Friday at 888-542-7282.
Calls outside these hours are handled by automatic pager, so expect a delay. You can also
call through our switchboard at 919-882-0200. For support outside the US, please contact
the company that has sold the product to you.
Notices
Copyright © 2007 by Visara International.
All rights reserved, including the right of reproduction in whole or in part in any form.
Licensed users of the Master Console Center are granted permission to make copies of this
manual as needed.
Information in this manual is considered confidential by Visara International.
Trademarks and registered trademarks used in this manual are the property of their
respective holders.
The information contained in this document is subject to change without notice. Visara
International makes no warranty of any kind with regard to this material including, but
not limited to, the implied warranties of merchantability and fitness for a particular
purpose. Visara International shall not be liable for errors contained herein or for
incidental or consequential damages in connection with the furnishing, performance, or
use of this material.
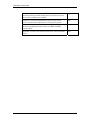
Contents
Technical Support ..................................................................................... 2
Contacting the Visara Intellicenter ............................................................ 2
Notices...................................................................................................... 2
List of Figures ............................................................................................... 9
List of Tables .............................................................................................. 10
Chapter 1 Introduction................................................................................... 11
Purpose of This Guide ................................................................................ 12
Users of This Guide .................................................................................... 12
Organization of this Guide .......................................................................... 13
The MCC Documentation Set ..................................................................... 15
Manual Conventions ................................................................................... 16
Starting the MCC ........................................................................................ 16
Restarting the MCC Software ..................................................................... 16
Shutting Down the MCC ............................................................................. 18
Before Shutting Down the MCC.............................................................. 18
Full Shutdown of the MCC ...................................................................... 18
Structure of the MCC Directories ................................................................ 19
Chapter 2 Administering the License Key ................................................... 21
Understanding the License Key File ........................................................... 21
Renewing an Expired License .................................................................... 22
If the License Key is Invalid or Expired ................................................... 23
Chapter 3 MCC Terminal Configuration ....................................................... 25
Setting up an X Terminal ............................................................................ 26
Customizing the MCC Terminal .................................................................. 29
Displaying Hosts on an XDMCP Menu Through a Router ...................... 29
Disabling Picking up of Other Servers on Same Network ....................... 31
Having Multiple xp.cnf configuration Files............................................... 31
Specifying Primary and Secondary Boot Hosts ...................................... 32
Having an X Terminal Monitor Which Gateway (Router) to Use ............. 32
X Terminal Emulation Software .................................................................. 33
Using Exceed Emulation Software.......................................................... 33
PS/2 Keyboard (101 Key IBM version, manufactured by Lexmark) ........ 38
3270 North American Keyboard (122 Keys) ........................................... 39
Chapter 4 MCC Configuration File Management ......................................... 41
Syntax of Configuration files ....................................................................... 41
Comments .............................................................................................. 41
Sections .................................................................................................. 41
Keys........................................................................................................ 43
Values..................................................................................................... 43
Administration Guide
3
Visara Master Console Center
MCC Configuration Files............................................................................. 44
fonts.cfg: Font Configuration................................................................... 44
keymap.cfg: Keyboard Mappings............................................................ 45
osgroup.cfg: OS Groups ......................................................................... 45
security.cfg: User Security ...................................................................... 45
snmp.cfg: SNMP Agents......................................................................... 45
system.cfg: MCC System........................................................................ 46
swlist=: Software (Task) Definition Lists ................................................. 46
objmgr.cfg: Object Manager.................................................................... 47
status.cfg: Status Colors ......................................................................... 53
gclrund.txt: Defining Maximum Number of Concurrent Scripts ............... 55
icsmaster.txt and masterwnd.txt: Configuring Shutdown ........................ 56
User Defined Message File..................................................................... 57
charset.cfg Character Set File .................................................................... 58
Softkey Files ............................................................................................... 59
Default Telnet Softkey Files .................................................................... 59
Softkeys Mnemonics List ........................................................................ 60
Changing the Default Softkeys ............................................................... 66
Example Softkey Files ............................................................................ 67
Chapter 5 MCC system.cfg Configuration File ............................................ 77
Section Name Length ................................................................................. 78
Valid Key Requirements ............................................................................. 79
Room Section ............................................................................................. 80
Valid Keys............................................................................................... 80
Example.................................................................................................. 80
Group Section............................................................................................. 81
Valid Keys............................................................................................... 81
Example.................................................................................................. 81
CPU Section ............................................................................................... 82
Valid Keys............................................................................................... 82
Example.................................................................................................. 82
OS Section.................................................................................................. 84
Valid Keys............................................................................................... 84
Example.................................................................................................. 86
Console Category Section .......................................................................... 87
Example.................................................................................................. 87
Console Section.......................................................................................... 88
Common Console Section Keys ............................................................. 89
Telnet Console Type............................................................................... 92
Printer Section ............................................................................................ 95
Command Console ..................................................................................... 96
Valid Keys............................................................................................... 96
Examples ................................................................................................ 97
Recommendations on Command Console Implementation .................... 97
Consolidation of Windows NT Consoles via VNC................................... 98
Unit Section .............................................................................................. 101
4
© Visara International 2007
Contents
Valid Keys............................................................................................. 101
Example................................................................................................ 101
MVS Configuration.................................................................................... 102
Valid Keys............................................................................................. 102
MVS Agent Section............................................................................... 103
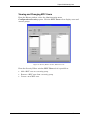
Chapter 6 Defining and Changing OS Groups........................................... 105
Introduction ............................................................................................... 105
Editing OS Groups.................................................................................... 106
Creating a new OS group ..................................................................... 107
Adding an operating system to the selected group ............................... 107
Removing an operating system from the selected group ...................... 107
Modifying an OS group ......................................................................... 107
Deleting an OS group ........................................................................... 108
Chapter 7 Setting Up SNMP ........................................................................ 109
Overview................................................................................................... 110
Definitions ............................................................................................. 111
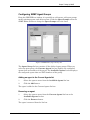
Configuring an SNMP Agent..................................................................... 111
Saving changes to the agent ................................................................ 112
Configuring SNMP Agent Groups ............................................................. 113
Adding an agent to the Current Agents list ........................................... 113
Removing an agent............................................................................... 113
Creating a new agent group.................................................................. 114
Modifying an agent group ..................................................................... 114
Using SNMP from Scripts ......................................................................... 115
MIBs Available with the MCC.................................................................... 115
Adding a MIB ........................................................................................ 117
Chapter 8 Administering Users................................................................... 119
Introduction ............................................................................................... 120
What is the difference between MCC Users and Login Users? ............ 121
Administering Security .............................................................................. 122
Group Security.......................................................................................... 123
Adding Security Groups ........................................................................ 123
Deleting Security Groups ...................................................................... 123
Saving Changes to Group Privileges .................................................... 123
Viewing Security Group Permissions .................................................... 124
Setting Security for Consoles................................................................ 125
Viewing Security Group Members ........................................................ 126
Viewing and Changing MCC Users .......................................................... 127
Creating a new MCC User .................................................................... 128
Adding a MCC User to a Security Group .............................................. 129
Deleting a MCC User ............................................................................ 129
Removing a MCC User from a Security Group ..................................... 129
Viewing and Changing Login Users.......................................................... 130
Modifying Login Users .......................................................................... 131
Administration Guide
5
Visara Master Console Center
Creating New Login Users .................................................................... 132
Adding an Existing Unix User as a MCC User ...................................... 134
Changing a Login User’s Password...................................................... 135
Deleting a Login User ........................................................................... 136
Configuring login Groups ...................................................................... 137
Saving Changes in the Security Editor ................................................. 137
Chapter 9 Managing and Editing Events with Event Manager ................. 139
Overview................................................................................................... 140
How Event Manager Works ...................................................................... 141
Editing Events........................................................................................... 142
Modifying Event Manager Rules ............................................................... 143
Common Rule Fields ............................................................................ 143
Common Action Fields.......................................................................... 144
Additional Action Fields......................................................................... 145
Console Message Event Rules................................................................. 147
Modifying Console Message Event Rules............................................. 147
Searching Console Message Rule Expressions ................................... 148
Modifying Console Message Rule Actions............................................ 149
Building Console Message Parameters ................................................ 150
SNMP Trap Event Rules........................................................................... 152
Modifying SNMP Trap Event Rules ...................................................... 152
Adding, Modifying or Deleting SNMP Trap Rule Actions ...................... 153
Creating or Modifying SNMP Trap Rule Actions ................................... 154
Selecting a Script for the Trap Rule to Execute .................................... 155
Building SNMP Trap Action Rule Parameters....................................... 156
Time Event Rules ..................................................................................... 158
Time Event Specification Requirements ............................................... 158
Modifying Time Event Rules ................................................................. 160
Creating a Time Event Rule Action....................................................... 161
Modifying a Time Event Rule Action ..................................................... 161
Creating or Modifying Time Event Rule Actions.................................... 162
Selecting a Script for the Time Rule to Execute.................................... 163
Building Time Rule Action Parameters ................................................. 164
Chapter 10 Maintaining Log Files ............................................................... 165
Overview................................................................................................... 166
Viewing Logs from the Unix Command Line ............................................. 167
Log File Descriptions ................................................................................ 168
alert.log: Alert Log................................................................................. 168
audit.log: Audit Log ............................................................................... 169
channel.log: Channel Log ..................................................................... 171
Console History Log ............................................................................. 172
Troubleshooting Problems with Console History Logging..................... 175
cpu.log: CPU Log.................................................................................. 175
event.log: Event Log ............................................................................. 176
icsexec.log: MCC Execution Log .......................................................... 179
6
© Visara International 2007
Contents
Icsmaster_YYYY-MM-DD: MCC Startup and Shutdown Error Log....... 180
messages.log: Filtered Message Log ................................................... 180
newmsg.log: New Messages Log ......................................................... 181
software.log: Software Messages Log .................................................. 182
system.log: Host System Messages Log .............................................. 183
unit.log: I/O Unit Messages Log............................................................ 183
Chapter 11 Backing Up and Restoring MCC Software.............................. 185
Overview................................................................................................... 186
Backing Up Files....................................................................................... 186
Restoring Scripts ...................................................................................... 187
Full Restore .......................................................................................... 187
Restoring Other Files ............................................................................ 188
Chapter 12 Setting MCC System Date and Time ....................................... 189
Setting Date and Time .............................................................................. 190
Changing the Time Zone .......................................................................... 191
Chapter 13 Printing from the MCC.............................................................. 193
Overview................................................................................................... 194
Configuring Printing .................................................................................. 194
Chapter 14 Remote Access to the MCC ..................................................... 199
Overview................................................................................................... 200
gwcharcons: Remote Console Access...................................................... 201
Starting gwcharcons ............................................................................. 201
Using gwcharcons ................................................................................ 202
Commands for gwcharcons .................................................................. 202
Chapter 15 Troubleshooting ....................................................................... 205
General Information .................................................................................. 206
Problems................................................................................................... 206
Console Selection Window does not Appear ........................................ 206
Console does not appear...................................................................... 206
Window appears non-functional/non-operable...................................... 206
Window does not appear/has disappeared........................................... 206
MCC stopped/suddenly shut down ....................................................... 207
Console does not function properly ...................................................... 207
ICSMASTER............................................................................................. 208
CFGCHK Program .................................................................................... 210
Scanning Text Files for ASCII Control Characters.................................... 211
Scanning the Configuration Files .......................................................... 211
Scanning Scripts................................................................................... 212
Chapter 16 Integrating Other Products with the MCC............................... 215
Launching a Display of Console Selection window................................... 216
To Display a Standalone Console......................................................... 216
Administration Guide
7
Visara Master Console Center
To Display a Printer Console ................................................................ 216
Implementation Notes ........................................................................... 217
Ataman Telnet .......................................................................................... 218
Appendix A Valid Color Names.................................................................. 219
Index.............................................................................................................. 227
8
© Visara International 2007
Contents
List of Figures
Figure 1 Exceed System Administration Settings for the MCC ................................. 36
Figure 2 Exceed System Transport Settings for the MCC......................................... 36
Figure 3 Exceed System Other Settings for the MCC ............................................... 37
Figure 4 PS/2 Keyboard............................................................................................. 38
Figure 5 3270 North American Keyboard .................................................................. 39
Figure 10 System Configuration Editor window (OS Groups) ................................. 106
Figure 11 Modify OS Group window ........................................................................ 107
Figure 10 SNMP Editor, Agents Tab........................................................................ 110
Figure 11 SNMP Agent window ............................................................................... 111
Figure 12 SNMP Editor, Agent Groups tab.............................................................. 113
Figure 13 Agent List window.................................................................................... 114
Figure 14 Security Editor window, Security Groups tab .......................................... 122
Figure 15 Security Editor window, Groups tab ........................................................ 124
Figure 16 Security Editor window, Group Members ................................................ 126
Figure 17 Security Editor window, MCC Users tab.................................................. 127
Figure 18 Add New MCC User window ................................................................... 128
Figure 19 Security Users window, Login users........................................................ 130
Figure 20 Event Editor, Console Messages tab ...................................................... 142
Figure 21 Console Message Rule window .............................................................. 147
Figure 22 Search Expression Builder window ......................................................... 148
Figure 23 Modify Console Message Rule Action window........................................ 149
Figure 24 Console Message Build Parameters window .......................................... 150
Figure 25 SNMP Trap Rule window......................................................................... 152
Figure 26 Modify SNMP Trap Action window .......................................................... 154
Figure 27 Select Script window................................................................................ 155
Figure 28 Build Parameters window ........................................................................ 156
Figure 29 Time Event Rule window ......................................................................... 160
Figure 30 New/Modify Time Rule Action window .................................................... 162
Figure 31 Build Parameters window ........................................................................ 163
Figure 32 Time Rule Action Build Parameters window............................................ 164
Figure 33 Typical History Log from Console Window.............................................. 173
Administration Guide
9
Visara Master Console Center
List of Tables
Table 1 X Terminal Monitor Settings.......................................................................... 27
Table 2 xp.cnf MCC Terminal Settings ...................................................................... 29
Table 3 Keybindings in both us3270.kbf and mf3270.kbf Files ................................. 35
Table 4 Keybindings in mf3270.kbf File ..................................................................... 35
Table 5 List of MCC Configuration Files .................................................................... 44
Table 6 objmgr.cfg Options Section........................................................................... 47
Table 7 objmgr.cfg Fields Section.............................................................................. 50
Table 8 status.cfg file Default Color Options ............................................................. 54
Table 9 GCL Status Constants Colors....................................................................... 55
Table 10 charset.cfg File Entries .............................................................................. 58
Table 11 Console Section, Default Softkey Files for Telnet ...................................... 59
Table 12 Key Mnemonics Supported by MCC Software ........................................... 66
Table 13 Section Name Length Limits ....................................................................... 78
Table 14 Valid Keys for Room section....................................................................... 80
Table 15 Valid Keys for Group Section...................................................................... 81
Table 16 Valid Keys for CPU Section ........................................................................ 82
Table 17 Valid Keys for OS Section........................................................................... 85
Table 18 Console Section, Common Keys ................................................................ 89
Table 19 Console Section, Icon Section.................................................................... 90
Table 20 Console Section, Icon Console Type.......................................................... 91
Table 21 Console Section, telnet keys ...................................................................... 92
Table 22 Console Section, Command Console Values............................................. 96
Table 23 Console Section, Unit Keys ...................................................................... 101
Table 24 MVS Section, Valid Keys .......................................................................... 102
Table 25 MVS Agent Section, Valid Keys................................................................ 103
Table 26 SNMP Commands in GCL Scripting Language........................................ 115
Table 27 List of Standard MIBs for the MCC ........................................................... 116
Table 28 Typical sudo adduser session .................................................................. 133
Table 29 Typical sudo passwd <username> session .............................................. 135
Table 30 Typical removeuser session ..................................................................... 136
Table 31 Available Substitutions for Console Message Actions.............................. 151
Table 32 Substitutions available for SNMP Traps ................................................... 157
Table 33 MCC Log Files .......................................................................................... 166
Table 34 Table of Valid Key Codes ......................................................................... 170
Table 35 Backup and Restoration Scripts ............................................................... 186
Table 36 gwcharcons Commands ........................................................................... 202
Table 37 ICSMASTER Options................................................................................ 209
Table 38 cfgchk Options .......................................................................................... 210
Table 39 Valid Color Names .................................................................................... 226
10
© Visara International 2007
Chapter 1 Introduction
This chapter discusses:
The purpose of this guide.
Users of this guide.
Organization of this guide.
Manual conventions used.
Starting the MCC.
Restarting the MCC.
Shutting down the MCC.
Administration Guide
11
Visara Master Console Center
Purpose of This Guide
This guide describes how to administer the Master Console Center (MCC).
Users of This Guide
This manual is primarily intended to be read by the administrator of the
MCC. The following list details the skills and experience required by the
administrator:
Trained in MCC use and administration.
Unix experience, preferably Linux.
Basic network concepts and administration knowledge.
X-windows familiarity.
Hardware administration knowledge (if MCC server is installed).
The following list highlights the administrator’s main responsibilities:
Act as primary contact for MCC support between VISARA and
customer.
Interact with various Enterprise systems administrators of legacy,
distributed, and network systems.
Assign and create MCC users and login users. Create and maintain
security groups. Assign users to security groups.
12
Change MCC user passwords and privileges.
Start and restart the MCC system.
Shut down the MCC system.
Back up the system.
Manage MCC configuration files.
Test and implement scripts.
Log file maintenance.
Troubleshooting.
MCC software and maintenance.
License key administration.
Configure MCC X-terminals.
Set up and modify OS groups.
Set up and maintain SNMP, if required.
Set/reset MCC date and time.
© Visara International 2007
Chapter 1 Introduction
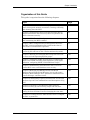
Organization of this Guide
This guide is organized into the following chapters:
Topic
Page
Chapter 1 Introduction discusses the purpose of this guide,
users of this guide, manual conventions, starting, restarting,
and shutting down the MCC.
11
Chapter 2 Administering the License Key describes how to
install and maintain the license key that is required for the
MCC to function correctly.
21
Chapter 3 MCC Terminal Configuration discusses setting up
and customizing the MCC terminal.
25
Chapter 4 MCC Configuration File Management discusses
the MCC system configuration files, and describes how to
edit them to customize MCC operation.
41
Chapter 5 MCC system.cfg Configuration Filedescribes the
system.cfg file and how to edit it for the monitored systems.
77
Chapter 6 Defining and Changing OS Groups discusses how
to create and edit Operating System groups.
105
Chapter 7 Setting Up SNMP discusses how to configure the
MCC to use SNMP, including agent definition, group agent
definition, configuring SNMP, and SNMP from scripts.
109
Chapter 8 Administering Usersdiscusses how to create or
remove MCC users, and administer user security.
119
Chapter 9 Managing and Editing Events with Event
Manager discusses the Event Manager, how to edit events,
modifying Event Manager rules, parameter substitutions for
console messages, and time events.
139
Chapter 10 Maintaining Log Files describes how to view and
interpret logs via Unix command lines and descriptions of log
files.
165
Chapter 11 Backing Up and Restoring MCC Software
discusses backing up and restoring scripts and data files.
185
Chapter 12 Setting MCC System Date and Time discusses
setting the data and time as well as changing the time zone.
189
Chapter 13 Printing from the MCCdiscusses how to configure
the MCC to print files.
193
Administration Guide
13
Visara Master Console Center
14
Chapter 14 Remote Access to the MCC discusses the
gwcharcons facility which enables dial-in and telnet access to
the consoles configured in the MCC.
199
Chapter 15 Troubleshootingdiscusses problems that may
occur, and tools and techniques for recovering the system.
205
Chapter 16 Integrating Other Products with the MCC
discusses integrating Ataman Telnet and BMC PATROL
with the MCC.
215
Appendix A Valid Color Names discusses the colors and RGB
values.
218
© Visara International 2007
Chapter 1 Introduction
The MCC Documentation Set
In addition to this manual, you may need to refer to other manuals in the
MCC documentation suite. These are:
Software Installation Guide. Provides instructions for the initial
installation and configuration of the MCC software.
Getting Started. Contains an initial overview of the MCC, and its
applications.
Operations Guide. Contains procedures for day-to-day operation of
the MCC, including selecting consoles, and managing alerts and
messages.
Scripting Guide. Describes how to write scripts in GCL (Global
Control Language).
Installation Preparation Guide. Contains information on how to
install MCC hardware, and prepare mainframes and servers to
communicate with the MCC.
Troubleshooting Guide. Provides initial troubleshooting steps to
take before contacting Technical Support.
Administration Guide
15
Visara Master Console Center
Manual Conventions
The names of menus, menu options, and window controls are in bold type.
Also, text that you type is a different font. For example:
Type boot and press the Return key.
Text that is placed within the <> symbol should be replaced (including <>)
with the appropriate text. For example:
<ipaddr> <hostname>
ipaddr
Substitute the MCC system’s IP address.
hostname Substitute the MCC system’s host name.
Starting the MCC
To start the MCC:
Note: If starting a “software only” MCC, only step 5 is
applicable.
1. Power on the MCC server and monitor, and let it boot up.
Wait for the “login” prompt. When this prompt appears,
the MCC is fully started and the MCC core programs are
executing. The MCC programs automatically start when
the system boots. Even if a user is not logged, the
interfaces are active, auto-starting scripts are launched
from the #startup script, and scheduled scripts are
executing. Logging in enables the display of, and
interaction with the MCC.
2. Power on the MCC user console (the ThinClient / workstation /
X terminal). Ensure the monitor’s power is also on.
3. Login at the X terminal or Linux Console to use the MCC.
Restarting the MCC Software
For any changes to the configuration take effect, the MCC software must
be shutdown and restarted.
To “cycle” all of the MCC software, including the core programs:
16
1.
All users should logout except for one with shutdown
authority (an administrator).
2.
Shutdown the MCC software by selecting the
Administration menu Shutdown option on the user display.
© Visara International 2007
Chapter 1 Introduction
This stops all MCC programs, including the core MCC
programs.
Note: To only logout of the interactive user display, not the
MCC system, choose the Logout option from the
User menu.
3. When the MCC login window reappears, login as any user. This
will also automatically start the MCC core programs.
To “cycle” only the MCC user interface programs:
Administration Guide
1.
Logout of the system by selecting the Logout option on the
user display.
2.
Login again.
17
Visara Master Console Center
Shutting Down the MCC
Rebooting the MCC is rarely necessary. Changes to the MCC
configuration require a MCC software restart only. Generally, the MCC is
powered down only for hardware installation, hardware maintenance, or
to physically relocate the MCC CPU.
Before Shutting Down the MCC
The administrator should follow the following procedure before shutting
down the MCC:
1.
To make sure all programs are closed on the system, use
‘bin/icsmaster –x’ to see if there are any problems.
2.
Use ‘bin/icsmaster –X’ to shut down any programs.
3. Use ‘bin/icsmaster –x’ to verify the system is clear to shut
down.
For more information about icsmaster, see ICSMASTER on page 208.
Full Shutdown of the MCC
To do a full MCC shutdown and power off:
1. Shutdown the X terminals, or Linux X Desktop:
a. Vary all host consoles off-line (mainframe interfaces).
b. Shutdown the MCC software by selecting the
Administration menu Shutdown option on the user
display. This option stops all MCC programs, including
the core MCC programs.
Note: To log out of the interactive user display only, choose
the User menu Logout option.
c. Wait for the XDMCP menu to be displayed.
d. Power off each MCC user console.
2. Shutdown the MCC CPU from the MCC system console:
a. Login as root, or obtain root permissions.
b. Enter the command shutdown -h now. Alternatively,
enter /usr/sbin/shutdown -h now if /usr/sbin is not
in your path.
c. Wait for the system monitor to prompt you to power
down.
d. Power off the CPU.
18
© Visara International 2007
Chapter 1 Introduction
Note: If you are going to turn the CPU back on again at
this point, wait at least 60 seconds. This allows time
for all of the internal devices to reset.
3. Power off all remaining equipment, for example, the system
console, and switches.
4. Power off the power supply unit.
Structure of the MCC Directories
All of the subdirectories for the MCC are located in /usr/ics/. Some of the
subdirectories include:
Config, which contains the configuration files.
Bin, which contains the executable programs.
Script, which contains the scripts.
Log, which contains the MCC-generated log files.
Etc, which contains manuals and utilities.
Administration Guide
19
Chapter 2 Administering the License Key
The MCC software requires installation of a license key file on your
system before it can run. The file is customized for a specific site and
machine, and cannot be used elsewhere. In certain cases (for example,
evaluation copies), the license is only valid for a limited period, and the
MCC software will cease to operate if the license is not renewed. The
MCC can be shut down if the license has expired, but it will not be
possible to restart it. New and replacement license files can only be
obtained from Visara.
Understanding the License Key File
As part of the MCC installation package, Visara supplies a file called
license.cfg. This is copied into the directory /usr/ics/config. A
typical license key file is shown below.
seed=xyz company
MCCExpires=2006-12-23
BMCExpires=NEVER
MaxMCCUsers=10
MaxAllowedEBusConsoles=600
MaxAllowedIConConsoles=600
MaxAllowedTelnetConsoles=600
MaxAllowedCommandConsoles=600
MaxAllowedTN3270Consoles=600
MaxAllowedTN5250Consoles=600
MaxAllowedMCCStarsConnections=600
MCCKey=2e68092f4d36324a682a51605e7e46317d6a587b1199163468183e56245f
BMCPatrolKey=3a4c300b68364e3877291c3e5e0246683412
where:
seed is a string that was used to generate the MCCKey field. This must
be a minimum of eight characters. It is typically the customer’s name.
MCCExpires is the expiration date of the MCC software. If this is
"NEVER", the license has no expiration date. If this field contains a date
in the format YYYY-MM-DD, this is the date on which the license expires.
BMCExpires is the expiration date of the BMC Patrol option. It may
contain “NEVER” or a date in the same format as MCCExpires.
MaxMCCUsers is the maximum number of users that can log in to the
MCC at the same time.
Administration Guide
21
Visara Master Console Center
MaxAllowedEBusConsoles specifies the maximum number of EBus card
ports.
MaxAllowedIConConsoles specifies the number of Visara Icon 5250
consoles that are allowed.
MaxAllowedTelnetConsoles specifies the number of telnet consoles
allowed.
MaxAllowedCommandConsoles specifies the number of command
consoles allowed.
MaxAllowedTN3270Consoles specifies the number of 3270 sessions or
consoles allowed.
MaxAllowedTN5250Consoles specifies the number of TN5250 sessions
aloowed.
MaxAllowedMCCStarsConnections specifies the number of MCCStars
LPARs allowed.
MCCKey. The public license key required for the MCC software to run on
the specific machine.
BMCPatrolKey. The public license key required for the optional MCC
BMC Patrol integration software to run on the specific machine.
WARNING: If any field in this file is edited inappropriately, the
MCC will no longer function.
Renewing an Expired License
When the license expires, a warning message is displayed every four
hours in the execution log window, indicating the number of hours the
MCC will continue operating. After three days, the MCC system shuts
down, and will not function until a license.cfg file containing a valid
expiration date and license key is installed, and the MCC system
restarted. Any users who attempt to log into the MCC from the MCC
terminal or gwcharcons will receive a message that the MCC is
unavailable because the license has expired.
To keep running the MCC, contact Visara Technical Support as soon as
possible for a new license key. Visara will send a new license.cfg file,
which must be installed on the system in place of the expired file, within
three days of the previous expiration date.
WARNING: Do not change the expiration date or license key
number in the expired license.cfg file, or the MCC will
prevent other users logging in. Also, the MCC will not
restart if shut down. Always copy the complete
license.cfg file as supplied by Visara.
22
© Visara International 2007
Chapter 2 Administering the License Key
If the License Key is Invalid or Expired
If the MCC cannot start because of an invalid or expired license key, error
messages appear in two locations, stderr, and the log/icsexec.log file.
The startup script also displays a dialog window "MCC license is not
valid" when the program cannot be started for one of these reasons.
Contact Visara Technical Support immediately to resolve the problem.
Administration Guide
23
Chapter 3 MCC Terminal Configuration
This chapter discusses:
Setting up the MCC Terminal.
Customizing the MCC Terminal.
Displaying hosts on the XDMCP.
Disabling the pickup of other servers on the same network.
Having an X terminal monitor which gateway to use.
Having multiple xp.cnf configuration files.
Specifying primary and secondary boots.
Using X Terminal emulation software.
Administration Guide
25
Visara Master Console Center
Setting up an X Terminal
To setup the X terminal:
Caution: The X Terminal monitor weighs over 70 lbs.
2.
Follow the manufacturer’s installation instructions included with
unit for correctly cabling the unit.
3.
Power on the monitor and the base unit.
4.
While the blue boot screen is displayed, press the space bar to stop
the X terminal from attempting to boot. If this is not successful,
power off the X terminal and retry. The BOOT> prompt appears.
Enter the information from steps 6 through 14 and 16 at this
prompt. Use the ? key for help; note the “re” command will list
some current settings.
5.
Enter
ia X.X.X.X
where X.X.X.X is the IP address for the terminal. Define this IP
address in your MCC host server’s /etc/hosts file, or the server will
not recognize the X terminal and will not allow it to boot.
6.
Enter
ih Y.Y.Y.Y
where Y.Y.Y.Y is the IP address of the MCC server. Ensure you
can successfully ping Y.Y.Y.Y before doing an NVS (in step 14). If
not, the X terminal will hang on boot.
7.
Enter
im K.K.K.K
Alternatively it is possible to enter the appropriate subnet mask.
26
8.
To set IP address of a gateway (router for T1), enter ig Z.Z.Z.Z
only if one exists. Ensure the gateway can be pinged before you do
an NVS.
9.
Set the X software to execute (set the boot path). For X terminal
Model XP400, use the following settings:
Ethernet X terms: bp /usr/tekxp/boot/os.350
Token Ring X terms: bp /usr/tekxp/boot/os-tr.350
X terminal Test Menu: bp /usr/tekxp/boot/selftest.350
For X terminal Model NC400, use the following:
Ethernet X terms: bp /usr/tekxp/boot/os.500
© Visara International 2007
Chapter 3 MCC Terminal Configuration
Token Ring X terms: No option available.
X terminal Test Menu: bp /usr/tekxp/boot/selftest.500
10.
Set the boot method:
Normal: bm nfs 8192
Over shared (congested) or small fractional T1: bm nfs 1024
11.
The default and recommended resolution is 1600 x 1280. The
following resolutions are available, but not recommended or
supported by VISARA:
Monset Value
Resolution
Frequency
55
1600 X 1280
65 Hz
54
1600 X 1200
69 Hz
53
1600 X 1188
70 Hz
56
1280 X 1024
80 Hz
Table 1 X Terminal Monitor Settings
Use the command se monset xx to change the resolution
(xx = monset value in the table).
12.
Enter k to start the keyboard selection utility. Use the space bar to
select the 3270 keyboard and North America as the location. Press
the Enter key when finished.
13.
If satisfied with all settings, type NVS. This will save the settings
to non-volatile RAM.
14.
Add an entry to /etc/hosts for the X terminal in the MCC server.
The X terminal reads its boot files from the MCC server via the
Network File System (NFS). NFS has simple security that
attempts to validate the IP address of the NFS requestor before
allowing the NFS mounting to occur. Therefore, the MCC server
requires an entry in /etc/hosts or the Domain Name System (DNS)
to resolve the IP address.
15.
Enter b to boot the X terminal.
16.
Once the X terminal has booted and the XDMCP menu screen is
displayed, adjust the picture (width, height, centering, etc.) by
pressing 1 on the monitor control panel (for Tektronix models) and
selecting the correct on-screen options.
17.
Press the right Alt and Set Up keys simultaneously to access the
Tek setup menu. Click the Setup option on the window that
appears.
Administration Guide
27
Visara Master Console Center
18.
Click the Configuration Summaries option. A drop-down list
appears. Select the X Environment option. Confirm the following
settings:
a. Retain X Settings: NO
b. Host Connect Method: XDMCP Direct
c. Enter your server name in the XDMCP Server text box:
19.
Click the Return to Main Menu button.
20.
Click the Network Tables and Utilities button. A drop-down list
appears. Select the NFS Mount option.
a. Enter <MCC>:/usr in the File System Name text box.
Substitute your server name for <MCC>.
b. Enter /usr in the ->Local Directory text box. Click the Add Table Entry
button.
28
21.
Click the Return to Main Menu button.
22.
Click the Save Settings to NVRAM button.
23.
Click the Exit setup button.
24.
Reboot the X terminal.
© Visara International 2007
Chapter 3 MCC Terminal Configuration
Customizing the MCC Terminal
It may be necessary to customize the MCC terminal settings for each
installation site if for example:
Multiple locations are involved in the configuration.
The MCC servers are on subnets other than the MCC terminal’s.
The config file for the customizations is /usr/tekxp/boot/config/xp.cnf.
Each section in the file contains all of the instructions provided by
Tektronix.
Enable the following settings in xp.cnf:
Setting
Value
retain_x_settings
NO
screen_saver
OFF
keyboard_type
3270
Table 2 xp.cnf MCC Terminal Settings
The following sections outline the customizations that may be required.
For additional explanation, refer to the appropriate section in the xp.cnf
configuration file (described later in this Chapter).
Displaying Hosts on an XDMCP Menu Through a Router
There are two methods for displaying MCC servers listed on the XDMCP
which span routers. Both methods require hardcoding MCC hostnames
and IP addresses in configuration files:
Editing the HOSTS.TBL, GATEWAY.TBL, and the XP.CNF files. This
is the recommended method.
Editing the XP.CNF file only.
Recommended Method
This is the easiest and least complex way of displaying all MCC servers
listed on the XDMCP list. It is accomplished by editing the following three
files, all of which reside in the /usr/tekxp/boot/config directory:
HOSTS.TBL
GATEWAY.TBL
XP.CNF
The hosts.tbl should contain a list of all MCC servers and their IP
addresses. Use the following syntax:
Administration Guide
29
Visara Master Console Center
<ipaddr> <hostname>
where <ipaddr> is the MCC system’s IP address, and <hostname> is the
MCC system’s host name.
The gateway.tbl should contain a list of all gateways (routers) at all sites
in the organization. Each gateway definition contains the target network
address and the IP address of the gateway to use for that network, in the
following format:
<network addr> <ipaddr>
where <network addr> is the network address of the remote network (for
example, 200.100.50.0) and <ipaddr> is the IP address of the gateway to
this network (for example, 192.168.11.254).
The xp.cnf file contains a section titled TekHostMenu. In the
TekHostMenu section, all of the MCC server names should be listed,
using the following syntax:
xdmcp_menu_entry <hostname>
where <hostname> is the MCC system’s host name.
Alternate Method
This requires the hardcoding of the MCC hostnames and IP addresses in
the Tek config file /usr/tekxp/boot/config/xp.cnf, as outlined in the steps
below.
1.
Define the hosts, by adding IP Host Table entries in the network
cfg using the following syntax:
ip_host_table <ipaddr> <hostname>
where <ipaddr> is the MCC system’s IP address, and
<hostname>is the MCC system’s host name.
Note: Using this type of entry, there is a limit of four XDMCP
menu selections—the storage limit of NVRAM. Alternately,
the following line can be used:
ip_host_entry <ipaddr> <hostname>
This places the hosts in RAM, providing for a virtually
unlimited number of menu selections.
2.
Define the gateways by adding Gateway Table entries in the
network.cfg section using the following syntax:
gateway_table <0.0.0.0> <gatewayipaddr>
where <gatewayipaddr> is the IP address of the gateway.
3.
30
Define the menu entry by adding the XDMCP section in the
TekHostMenu cfg section:
© Visara International 2007
Chapter 3 MCC Terminal Configuration
xdmcp_menu_entry <hostname> PREFERRED
where <hostname> is the system’s host name, and PREFERRED
(optional) causes the specified MCC system to always be at the top
of the list.
Disabling Picking up of Other Servers on Same Network
When the Tektronix X Terms are on a corporate network and other
servers undesirably appear on the Tek Host Menu, use the following entry
to disable the pickup of other servers:
THM_BROADCAST=DISABLED
Note: Hard code all MCC servers in the xp.cnf file if you do this.
Having Multiple xp.cnf configuration Files
In an installation with multiple MCC networks, the following issues
necessitate separate configuration files based on location:
Secondary boot host (primary is specified by monitor cmds). See
Specifying Primary and Secondary Boot Hosts on page 32.
Network gateways.
The xp.cnf file is read by each X terminal when booting. Due to
customizations, it may be necessary to create separate or specific
configuration files for each location accessing a MCC server. The xp.cnf
file will contain the generic information for all locations. Additional files
will contain the information specific to each location. To do this, use one
or more of the “select” & “include” commands in the xp.cnf file to include
the appropriate specific files.
Example lines in a xp.cnf file based on criteria (for example, IP addresses
or range of IP addresses), include the correct file (“select” & “include”
commands):
include_host_access ""
NFS
select SUBNET=10.2.50.46-62 include "/usr/tekxp/boot/config/xp.cnf.msp"
select SUBNET=10.2.50.78-94 include "/usr/tekxp/boot/config/xp.cnf.top"
select IPADDR=10.2.50.110 include "/usr/tekxp/boot/config/xp.cnf.ftw-msp"
select IPADDR=10.2.50.115 include "/usr/tekxp/boot/config/xp.cnf.ftw-msp"
An example xp.cnf.city file:
boot_method_2 NFS 8192
boot_host_name_2
"<ipaddr>"
boot_path_2
"/usr/tekxp/boot/os.350"
gateway_table "0.0.0.0"
"10.2.50.33"
gateway_table "0.0.0.0"
"10.2.50.34"
Administration Guide
31
Visara Master Console Center
Specifying Primary and Secondary Boot Hosts
The primary boot host is specified on the X terminal with the IH
command. The primary host can also be specified in the xp.cnf file, but
this is not recommended. If specifying an optional secondary boot host is
possible, it must be specified in the xp.cnf file.
boot_method_2 NFS 8192
boot_host_name_2
‘<ipaddr>’
boot_path_2
‘/usr/tekxp/boot/os.350’
Only a maximum of two boot hosts can be specified, due to Tektronix
software limitations. Consider putting site specific information in
separate files. The “select” & “include” command combination can then be
used to include the information specific to a site when the X terminal is
booting. Also, remember to change the ip_host_table section if the entry is
a host name instead of an IP address.
Having an X Terminal Monitor Which Gateway (Router) to Use
An X terminal can monitor the gateway to use. To do this, first define the
gateways, then run ROUTE_MGR.
To define the gateways, use one of the following methods:
Put a list of gateways IP’s in the gateway.tbl file. This file can be
created if it does not exist.
-
Advantages:
“Unlimited” gateway list
-
Disadvantages:
None stay in the X terminal’s NVRAM
Add gateway_table entries in the xp.cnf file.
-
Advantages: Entries stay in the X terminal’s NVRAM
-
Disadvantages:
Maximum of four entries in the file
Make a gateway_table entry in the following format:
gateway_table “0.0.0.0” <gatewayipaddr>
To run ROUTE_MGR, make the following entries in the local clients
section:
32
Uncomment the “start ROUTE_MGR” entry
Change the ‘NO’ to a ‘YES’ to start it at boot time
© Visara International 2007
Chapter 3 MCC Terminal Configuration
X Terminal Emulation Software
The MCC software is designed to work with the Tektronix X terminal.
However, there are various software packages, such as Hummingbird
Exceed, NetManage, and Reflections/X available for desktop PCs that
allow the user to emulate X terminal function. Visara cannot guarantee
the functionality of any third party X terminal emulation software with
the MCC. However, some basic guidelines for configuring emulation
software include:
Set the PC to have a minimum of 1280x1024 resolution with 8-bit
(256) color depth. Because of the amount of information the MCC displays
on the screen, some cutoff can occur at lower resolutions.
Make sure the emulation software has XDMCP broadcast information
set appropriately. If the PC is on a subnet other than the MCC, it may be
necessary to manually enter the MCC IP address.
Some features (such as connecting to Tektronix WinDD servers) may
not work with emulation software.
Default font selections may have to be changed to avoid undersized or
oversized text in some MCC windows. For example, in Reflections/X, set
the font servers option to 100dpi misc, deleting other default selections.
(Select the Settings — Fonts menu option to display the main X Client
Manager, then make this entry in the subdirectories and font servers
line.)
(Please inform Visara of any new problems or tips found with X terminal
emulation software packages, so that we may update this guide.)
Caution: When using emulation software, ensure users log out
from the MCC main menu before closing the emulation
software. Performance problems may occur if the
emulation software is closed without logging out.
Using Exceed Emulation Software
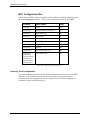
Exceed with a 3270 Keyboard (122-key)
A 3270 keyboard can be emulated with Exceed when used with the MCC.
Many of the PS/2 or AT style 3270 keyboards work with a PC running
Microsoft Windows 3.x, 95/98, or NT without any significant problems.
Available keyboards include Lexmark’s IBM Host Connect 122, Memorex
Telex 4100/4300, Keytronics KB3270 Plus 122, Irma IRMAkey/3270, and
Nokia 122.
Note: Visara does not endorse any particular keyboard or
manufacturer.
Administration Guide
33
Visara Master Console Center
Microsoft Windows requires a keyboard driver for 122-key keyboards,
which may be difficult to find. Windows does not ship with a 122-key
driver, and may use the 83/84 XT keyboard driver as the default.
Configuring a 3270 Keyboard
After installing the 3270 keyboard, test the special keys such as PA1 and
ErEOF. If they do not function correctly, check the following:
Ensure the proper keyboard driver is installed in Microsoft Windows.
The file is located in the Start-Settings-Control Panel-Keyboard-General
directory.
Ensure Exceed is using a 3270 Keyboard mapping. Check the ExceedTools-Configuration…-Input directory, and check the file is us3270.kbf or
mf3270.kbf. If the correct file is not installed, both us3270.kbf and
mf3270.kbf are supplied by Visara in the
/usr/ics/examples/exceed/3270keyboard.zip file. To install the required
file, copy the 3270keyboard.zip file to the Windows PC using FTP, then
unzip the contents of the file into the Exceed user directory (typically,
\Program Files\Exceed\user). The following files should be obtained:
-
us3270.kbf. Contains the mnemonic bindings to the keyboard scan
codes, PC standard.
-
mf3270.kbf. Contains the mnemonic bindings to the keyboard scan
codes, 3270 standard.
-
us3270.kbt. Contains the 122-key layout used in Exceed’s graphical
keybinding configuration program.
Make the required mapping active using the Exceed Exceed-ToolsConfiguration…-Input menu option.
Customizing the Keyboard Layout
The us3270 / mf3270 keybindings supplied by Visara can be reconfigured
to individual requirements. Changes can be made through Exceed’s
keybinding facility, which is accessed through the Exceed-ToolsConfiguration…-Input menu option.
Note: Exceed may display a message stating that “The Windows
keyboard driver failed to recognize a key in this keyboard
file. The key cap may display a scan code”. This may be
because Visara’s 3270 keyboard driver is not from the same
manufacturer as the 3270 keyboard driver, or because the
PC does not have a 3270 keyboard driver installed. The
message can be ignored.
34
© Visara International 2007
Chapter 3 MCC Terminal Configuration
List of Significant Keybindings
Scancode
Keycap
Exceed X Mapping
76
Clear
Clear
5A
PA1
F30
6D
ErEOF
F27
Table 3 Keybindings in both us3270.kbf and mf3270.kbf Files
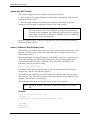
Scancode
Keycap
Exceed X Mapping
101-key Keycap
07
6/¬
6 / (shifted) notsign
6/^
1A
¢/!
cent / (shifted) exclaim
[/{
1B
\/¦
backslash / (shifted)
brokenbar
]/}
2B
{/}
braceleft / (shifted)
braceright
\/¦
56
</>
less / (shifted) greater
No equivalent key
Table 4 Keybindings in mf3270.kbf File
Note: The period and comma keys, when shifted, produce only
period and comma characters.
Implementation Notes
PS/2 Keyboards
SysRq is a shadow key of the Print Screen key. To access the SysRq
key down event, the Alt (alternate) modifier must be down.
Break is a shadow key of the Pause key. To access the Break key
down event, the Ctrl (control) modifier must be down.
XShift (extended shift) is a virtual key with a “E0 2A” key down
sequence. It is used by the Print Screen key.
3270 North American Keyboards
NumLk is a shadow key of the ScrLk key. Shift must be down to
access the NumLk key down event.
XShift (extended shift) is a virtual key with a “E0 2A” key down
sequence. It is used by the Print key.
Optimizing Exceed for Use with the MCC
This section describes how to optimize Exceed’s settings for correct MCC
operation. Illustrations are based on Exceed version 6.1, and may differ
for other versions.
Administration Guide
35
Visara Master Console Center
1.
Disable the
button in the top right corner of the Exceed
window, to prevent users from closing a console window without
logging out correctly. Launch xconfig from the Exceed program
menu, choose Settings — System Administration. Set the
options in the resulting window as follows:
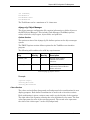
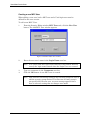
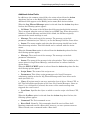
Figure 1 Exceed System Administration Settings for the MCC
Note: 'X Client Native Window Manager Exit' is in the Disabled
box. This is NOT the default setting.
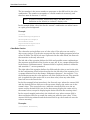
2.
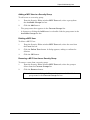
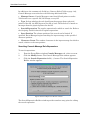
To avoid possible console timeout errors, launch xconfig from the
Exceed program menu, then choose Settings — Transports. Set the
options in the resulting window as follows:
Figure 2 Exceed System Transport Settings for the MCC
Note: Ensure that Keep Alives is checked.
36
© Visara International 2007
Chapter 3 MCC Terminal Configuration
3.
In the win.ini file in the Windows installation directory (WinNT or
Windows, not the Exceed directory), add the following if an Exceed
section does not exist:
[exceed]
custom=1
If an Exceed section already exists, add 'custom=1' if necessary.
4.
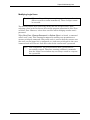
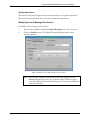
If the MCC is started through the Exceed xstart application,
launch the Exceed XStart application from the Start Menu, then
click the Other button in the upper right corner. Ensure the
resulting Other Settings window is as follows:
Figure 3 Exceed System Other Settings for the MCC
Note: In the section called Timeouts, the 'Close (sec):' field
must be set to -1.
Administration Guide
37
PS/2 Keyboard (101 Key IBM version, manufactured by Lexmark)
Esc
~
`
!
1
F1
F2
F3
F4
@
2
#
3
$
4
%
5
Q
Tab
W
A
Caps Lock
S
Z
Shift
E
Ctrl
R
D
X
F5
^
6
T
F
C
F6
&
7
Y
G
V
F7
*
8
U
H
B
F8
I
J
N
(
9
)
0
O
K
F10
_
-
+
=
{
[
P
:
;
L
<
,
M
F9
>
.
F11
Backspace
}
]
"
'
|
\
Print
Scroll
Screen
Lock
SysRq
Pause
Break
Insert
Home
Page
Up
Num
Lock
Delete
End
Page
Down
Home
Up
PgUp
4
5
6
Enter
?
/
Alt
F12
7
Up
Ctrl
Left
Down
Scan Codes
3B
XShift
3C
3D
3E
3F
40
41
42
43
44
57
58
E0 37
2
3
Down
PgDn
0
02
0F
03
10
04
11
05
12
06
13
07
14
08
15
09
16
0A
17
0B
18
0C
19
0D
1A
0E
1B
2B
.
Ins
+
Right
1
Right
-
9
Enter
Del
E1 1D
Alt
46
E0 52
E0 47
E0 49
E0 45
E0 35
37
E0 53
E0 4F
E0 50
47
48
49
4B
4C
4D
4F
50
51
54
29
*
End
Spacebar
01
8
Left
Shift
Alt
/
Ctrl
E0 46
4A
4E
3A
2A
1E
2C
1F
2D
20
2E
21
2F
22
30
23
31
24
32
25
33
26
34
27
35
28
1C
36
E0 48
E0 1C
1D
38
39
E0 38
E0 1D
Note: See
Imple
ment
ation
Notes
previ
ously
.
Figure 4 PS/2 Keyboard
Administration Guide
38
E0 4B
E0 50
E0 4D
52
53
3270 North American Keyboard (122 Keys)
Attn
SysRq
CrSel
F13
F14
F15
F16
F17
F18
F19
F20
F21
F22
F23
F24
F1
F2
F3
F4
F5
F6
F7
F8
F9
F10
F11
F12
~
`
Clear
Pause
Erinp
ExSel ErEOF
SetUp Record
Print Copy
Play
Ident Test
|
1
Q
Tab
Caps Lock
Shift
Reset
@
2
W
A
>
<
#
3
E
S
Z
$
4
%
5
R
D
X
¬
6
T
F
C
&
7
Y
G
V
*
8
U
H
B
I
J
N
(
9
)
0
O
K
M
_
!
¢
P
:
;
L
,
}
{
?
/
.
Backspace
¦
\
"
'
Alt
Quit
+
=
Return
Up
Shift
Alt
FldMk Jump
PA2
ChgSc PA3
Delete
BkTab Insert
DelWd
Dup
PA1
Left
Rule
Right
BOL
Home
EOL
Enter
Esc
NumLk
ScrLk
,
7
8
9
4
5
6
1
2
3
Space
Tab
+
-
Enter
0
Down
.
Spacebar
Scan Codes
5B
5C
5D
63
64
65
66
67
68
69
6A
6B
3B
3C
3D
3E
3F
40
41
42
43
44
57
58
Shift
71
76
72
45
29
02
0F
03
10
04
11
05
12
06
13
07
14
08
15
09
16
0A
17
0B
18
0C
19
0D
1A
0E
1B
E0 45
37
E0
35
48
49
4E
4B
4C
4D
4A
4F
50
51
5A
E0 49 E0 51
01
E0 4F
E0 52 E0 53
47
E0 48
E0 47 E0 4D
1C
74
6D
E0 37
XShift
6F
75
6C
3A
2A
1D
1E
56
2C
1F
2D
38
20
2E
21
2F
22
30
23
31
24
32
25
33
26
34
39
27
28
2B
35
36
E0 38
0E 1D
Figure 5 3270 North American Keyboard
Administration Guide
E0 4B
39
E0 50
52
53
E0
1C
Chapter 4 MCC Configuration File Management
This chapter discusses:
Directory structure.
Syntax of the configuration files.
MCC Configuration Files.
Most configuration files are processed only at the startup of the MCC.
Caution: If changes are made to any of the configuration files, the MCC
software must be cycled (stopped and restarted). Any active
users should log out before recycling the MCC, or they may see
unpredictable or inaccurate data.
Note: After changing a configuration file in the MCC editor, save the file
and run the configuration checker (cfgchk) program to check for
errors. This program can be run from the Administration menu
Configuration—Check Configuration option, or from the Unix
command line (see CFGCHK on page 210 for details).
Syntax of Configuration files
The syntax of the configuration files consists of comments, sections, keys, and
values.
Comments
When creating or editing the configuration files include plenty of comments. A
comment statement begins with double slashes “//” or a pound sign “#”, and ends
at the end of the line. Double slashes are the preferred method of adding
comments.
A blank line is also considered a comment.
Sections
Sections contain headers, keys, and values. A section begins with the section
header, and ends with the section header of the next section or the end of the file.
A section header contains a keyword and a unique name, enclosed in brackets.
The name must be unique for all section occurrences of the keyword. For
example:
Administration Guide
41
Visara Master Console Center
[cpu 9021]
where
Left bracket “[” begins the definition of the section header.
CPU is a section header keyword.
9021 is the unique name (within all cpu sections) given to the section (spaces are
allowed).
Right bracket “]” ends the definition of the section header.
Notes: The term “section name” refers to only the unique name in the
section header.
Section names are case-insensitive.
42
© Visara International 2007
Chapter 4 MCC Configuration File Management
Keys
Keys are keywords or user-defined field names. They are on the left side of the
equation. For example:
os=Prod2
where
OS is a keyword in a cpu section.
Equals “=”ends the key and begins the value.
Prod2 is the value of the key.
Note: Keys are case-insensitive.
Values
Values are on the right side of the equation and, depending on the section,
contain one or more value definitions. Some keys require a single value, such as
a word or a number, and others require or allow multiple value definitions. For
example:
desired=order:1, type:list, list:mvsstat
where
Desired is a key - a user-defined field name.
Equals “=” ends the key and begins the value.
The example above shows a multiple value definition. The order is #1, the type is
a list, and the list values are defined by the mvsstat definition.
Note: Values are case-insensitive.
Administration Guide
43
Visara Master Console Center
MCC Configuration Files
Add or modify MCC configuration files from the Master window Administration
menu Configuration option. Table 5 lists configuration files for the MCC:
File Name
Menu Option
Page
fonts.cfg
Fonts
44
keymap.cfg
Emulator:Keyboard Index
45
objmgr.cfg
Object Manager
47
osgrp.cfg
OS Groups
45
security.cfg
Security
45
snmp.cfg
SNMP Setup
45
status.cfg
Status Colors
53
system.cfg
System
46
charset.cfg
None (character sets)
58
vt100.kbrd,
vt220.kbrd,
hard3151.kbrd,
as400.kbrd,
ibm3274.kbrd,
hp7009x.kbrd
None (soft keys)
58
Table 5 List of MCC Configuration Files
fonts.cfg: Font Configuration
The fonts configuration file contains all font information necessary for the MCC
programs. User modification of this file is generally unnecessary and not
recommended. If a font problem occurs, contact Visara Technical Support for
assistance before modifying this file.
44
© Visara International 2007
Chapter 4 MCC Configuration File Management
keymap.cfg: Keyboard Mappings
The keymap configuration file contains data necessary for the various hardware
and OS consoles defined in the system.cfg file. Its purpose is to define the
keymap file for X terminal vendors, since manufacturers can implement different
keycode values for each key on the keyboard.
There are three valid formats for defining X terminals:
To add all Tektronix X terminals, add this line:
vendor:Tek=config/keymaps/tek
To add the MCC terminal at IP address 192.1.1.51, add:
display:192.1.1.51=config/keymaps/tek
To use the config/keymaps/default file for all X terminals not otherwise defined,
use this line:
default=config/keymaps/default
The following line must be present for gwcharcons to function properly:
type:char_default=config/keymaps/gwcharcons
osgroup.cfg: OS Groups
The OS Group configuration file contains all necessary information for MCC
operating system groups. All modifications of this file must be made through the
OS Group Editor. Direct editing of this file is not necessary. See Chapter 6
Defining and Changing OS Groups for more information.
security.cfg: User Security
The security configuration file contains all necessary information for MCC security. All
modifications of this file must be made through the Security Editor. Direct editing of this
file is not necessary. See Chapter 8 Administering Users for more information on MCC
Security.
snmp.cfg: SNMP Agents
The SNMP Agent configuration file contains information on SNMP Agents and
SNMP Agent groups. All modification of this file must be made through the
SNMP Setup option of the Administration—Configuration menu. Direct editing
of this file is not necessary. See Chapter 7 Setting Up SNMP for more
information.
Administration Guide
45
Visara Master Console Center
system.cfg: MCC System
The system configuration file contains two major definitions:
The layout of the System Summary window (the organization of the System
Summary window icons).
The host port definitions, including the physical connections to the host
equipment (for example, mainframes, routers, and Unix servers).
Note: Some commands listed in the Scripting Guide, such as ICON( ),
are case-sensitive. An icon’s definition in system.cfg must match
its usage in the command. Any differences will generate a run-time
error. Thus, if the CPU is defined as “RS6000”, the icon command
must use the same capitalization.
Refer to Chapter 5 MCC system.cfg Configuration File for detailed information
about the system.cfg file.
swlist=: Software (Task) Definition Lists
The filename specified by the swlist= key in the system.cfg file may be any name
that the customer chooses. Each OS should have its own swlist file for ease of
future maintenance.
Remembering that the default directory of the MCC is /usr/ics, it is necessary to
specify the residing directory for the swlist files. The swlist files reside in the
/usr/ics/config/swlist directory. Therefore, for a swlist file called SYSA, the
following is the actual swlist= entry:
swlist=config/swlist/SYSA
If multiple swlist files are specified for an OS, the contents of the two files are
merged and sorted on the software display.
The format of the swlist file is a list of tasknames and for each task, the initial
value for any field. This initial value overrides the default value supplied by the
optional “default:value” in objmgr.cfg
The taskname will appear in the task list as typed (case sensitive).
Note: The MCC accepts a maximum of 600 task entries in each swlist
file.
Example:
//use all defaults for this task
[sw RACF]
//override the two specified fields default values
[sw VTAM]
desired=UP
current=UP
46
© Visara International 2007
Chapter 4 MCC Configuration File Management
[sw taskname]
fieldname1=5
fieldname2=“CAT”
fieldname3=UP
The TaskName can be a maximum of 11 characters.
objmgr.cfg: Object Manager
The object manager configuration file contains information to define objects to
the MCC Object Manager. This includes Task Manager (TaskMan) options,
colors, color rules, object types, object fields, and pick lists.
Options Section
The options section of the objmgr.cfg file defines options to the object manager
system.
The TMGUI options section defines options for the TaskMan user-interface
program.
The following table outlines the valid key requirements:
Key
Min Qty
Max Qty
Description
confirm_edit
1
1
On Edit Task window,
confirm Save button
selection.
confirm_desired
1
1
On OS Software window,
confirm Set Desired Status
button selection.
Table 6 objmgr.cfg Options Section
Example:
[options tmgui]
confirm_edit=true
confirm_desired=true
Colors Section
The colors section defines foreground and background color combinations for text
display purposes. Each defined combination is used in the color rules sections.
Each combination is given a unique name and is on the left side of the equation.
The right side of the equation contains the color definition for the name. The first
color represents the color of the text (foreground). The second color represents
the color of the “white space” in the cell (background).
Administration Guide
47
Visara Master Console Center
The last number is the status number to propagate to the OS level for the color
combination. The number corresponds to a status number in status.cfg, and
therefore must be between ‘1’ and ‘16’.
Note: A name of “normal” must always exist. The MCC uses its
definition as the default (or “normal”) display color.
In the example below, the colors for the “normal” combination are white letters
on a pale green background.
Example:
[colors]
normal=white/palegreen/9
warning=white/orange/5
error=white/red/1
inprocess=black/yellow/6
down=white/blue/12
ColorRules Section
The colorrules section defines a set of color rules. Color rule sets are used by
object types (refer to Type Section on page 49) for color display purposes based on
values in fields. The list of rule sets is processed in the order listed; the first rule
that matches is the only rule used.
The left side of the equation defines the fields and possible status combinations
(the statuses are defined in List Section on page 49). It is a comma-delimited list
in the format “fieldname:status”. Statuses must be explicitly defined; wildcards
and asterisks “*” are not permitted.
The right side of the equation defines the fields and the colors to set for the rule,
for the combination of field values described on the left side of the equation. It is
a comma-delimited list in the format “fieldname:colorname”. An asterisk “*” for
the fieldname means the color applies to all of the fields in the row. The asterisk
rule is applied first (the entire row is set to that color), then any other fields
listed are set to the listed color.
In the first example below (mvscolors), the first rule says “when the current field
and the desired field are both set to the up status, display the entire row in the
normal colors.” The second rule says “when the current field is set to the up
status and the desired field is set to the down status, display the entire row in
the normal colors, except for displaying the desired field in the warning colors”.
In the second example (unixcolors), the third rule says “when current field is
down and desired field is up, mark the entire row with the error colors”. If the
current field being unknown and the desired field is up, the fourth rule sets the
colors to warning.
Examples:
[colorrules mvscolors]
48
© Visara International 2007
Chapter 4 MCC Configuration File Management
current:up,desired:up
current:up,desired:down
= *:normal
= *:normal, desired:warning
[colorrules unixcolors]
current:up,desired:up
current:up,desired:down
current:down,desired:up
current:unknown,desired:up
=
=
=
=
*:normal
*:normal, desired:warning
*:error,
*:normal, current:warning
List Section
The list section defines a list of values (an enumerated list). A list in the
definition of the list field type defines the valid entries for the list field.
The left side of the equation is the user-defined name for a valid option in the list
definition. This text appears in pick lists, and sets the field status within scripts.
The right side of the equation is a unique integer assigned to each valid option.
Example:
[list current]
down=0
up=1
starting=2
stopping=3
unknown=4
Type Section
The type section defines object types. Each object type has fields and colorrules.
Example:
[type mvs]
fields=mvsfields
colorrules=mvscolors
[type unix]
fields=unixfields
colorrules=unixcolors
Administration Guide
49
Visara Master Console Center
Fields Section
The fields section defines a set of fields. A set of fields is used for each object
type. The field “taskname” is automatically created by the system and contains
the name of the task. This field cannot be changed.
The left side of the equation is the field name. The field name may be up to 32
characters. The right side of the equation is a comma-separated list of attributes
of the field definition in the format: “attribute:value”.
Table 7 outlines the valid attribute requirements:
Attribute
Legal Values
Description
order
0, 1, 2, ...
The order to display the fields on the
TaskMan screen, left to right. When
set to 0, the field is not displayed on
the OS Software Summary window.
However, it is displayed in the Field
Edit window, according to the order in
which it was defined.
wakeable
true, false
Relates to the OBJEXEC() command.
Defines if waiting scripts wakeup if
this field is changed.
type
list, string, int
The type of field.
list
For list field types, the name of valid
list defined.
length
The maximum string length for string
field types.
default
The default value for the field. This
value can be overridden by specifying
an initial value in the swlist file. If not
specified or overridden, the default
value is zero for integers, null for
strings (“”), and the first list element
for lists.
label
Optional. Specifies the text (label)
displayed at the top of a field’s column
in TaskMan. If not specified, the label
defaults to the fieldname.
locked
true, false
Optional. If set to true, only scripts or
administrators can change the status
of this field. If unspecified or set to
false, operators can also change the
status of the field.
Table 7 objmgr.cfg Fields Section
50
© Visara International 2007
Chapter 4 MCC Configuration File Management
Notes:
A “desired” field must be defined for the Set Desired Status option to function
correctly in the OS task list (TaskMan).
The fields “tmmode” and “moveable” must be defined for the moving software
between OS’s option to work in the OS task list (TaskMan). Refer to Moving
Tasks between Operating Systems on page 52.
Task Manager can track the program which last changed the “desired” field.
This is useful for monitoring scripts in certain environments. To do this, create a
field named “desiredsetby” as a string with length 6. Then, when the “desired”
field is changed by a script or by the Task Manager GUI, “desiredsetby” is
changed to “SCRIPT” or “TMGUI” respectively.
Note: If the length of the “desiredsetby” field is less than 6, only the
specified number of characters is copied to the field.
Example:
[fields mvsfields]
current =order:1, wakeable:true, type:list, list:current
desired =order:2, wakeable:true, type:list, list:desired
desiredsetby =order:3, wakeable:false, type:string, length:6
[fields unixfields]
current =order:1, wakeable:true, type:list, list:current
desired =order:2, wakeable:true, type:list, list:desired
Administration Guide
51
Visara Master Console Center
Moving Tasks between Operating Systems
TaskMan can move tasks from one OS to another. This feature is useful when a
particular task may be handled by more than one OS, and the OS currently
serving the task has failed in some way. Through careful setup and scripting, the
task can be moved automatically to another OS using TaskMan. The relevant
script(s) handle startup of the task on the new OS.
Configuring Movements of Tasks
To allow moving of tasks, several configuration conditions must be met:
All Operating Systems that tasks can move between must be defined as the
same type (the “type=” value).
The type definition must contain two list fields:
-
tmmode
-
moveable
Required tmmode list values must be set:
-
None
-
Zombie
-
At least one other value
Required moveable list values must be set:
-
No
-
Primary
-
Zombie
Moving Tasks
To move a task, the task on the original OS must have:
A tmmode status of neither None nor Zombie.
A moveable status of either Primary or Zombie.
When the move option is chosen for a selected task, the user is presented with a
list of Operating Systems of the same type as the original. Each of these
operating systems has a tmmode status of Zombie and a moveable status of
either Primary or Zombie. After the user selects the destination OS, TaskMan:
Sets the destination OS tmmode status for the selected task to the same as
the original OS tmmode status.
Sets the destination OS desired status to the same as the original OS desired
status.
Sets the original OS tmmode to Zombie.
The task automatically starts on the destination OS when the site-specific
TaskMan monitoring script detects a mismatch between the task’s desired status
and current status fields.
52
© Visara International 2007
Chapter 4 MCC Configuration File Management
For each moveable task, one OS should be marked with a moveable status of
Primary; this is the OS where the task primarily resides. All other OSs should be
marked with a moveable status of Zombie and a tmmode of Zombie; these are the
OSs to which the task could be moved.
status.cfg: Status Colors
The color definition file links a color to a status number. Each MCC object and
message has a status that affects the object’s color. The MCC allows the
definition of 16 status colors. Each status color defines a background color and an
optional foreground color. The status.cfg file allows users to define status colors
that will override the default status colors.
See Table 8 for default status color values. These defaults apply to any status
values that are not defined in the status.cfg file.
Changing the Status Colors
The status.cfg file can override any of the default status colors. To override a
default status color, add a line to the status.cfg file.
To change the background color for a status value the line format is:
status_number
color_name
To change the foreground color of a status value, both the background and
foreground colors must be specified, as follows:
status_number foreground_color_name/background_color_name
For example, to change the background of status 2 to Black, add the following
line to the status.cfg file:
2
Black
To change the foreground of status 2 to Red, add this line:
2
Red/VioletRed
Choose a color name from the list of valid color names in Appendix A Valid Color
Names.
If the status.cfg file is changed from the Administration menu, the cfgchk
program must be run to check all the status color definitions in the file. Any
errors found can be viewed in the Execution Log Window. Refer to CFGCHK
Program on page 210 for detailed information.
Comments can be added to the status.cfg file by placing a # in the first column of
the line. All text following the # is skipped.
Note: The Alert Window uses the foreground and background colors for a
status value. The other MCC programs that use status.cfg color
definitions only implement the background color.
Administration Guide
53
Visara Master Console Center
Table 8 lists default status colors:
Status
Foreground Color
Background Color
1
White
Red
2
White
VioletRed
3
Black
HotPink
4
Black
Orange
5
Black
Yellow
6
Black
Gold
7
Black
White
8
Black
LightSkyBlue
9
Black
PaleGreen
10
Black
Aquamarine
11
Black
Cyan
12
Black
Gray
13
Black
LightSteelBlue
14
White
SteelBlue
15
White
Blue
16
White
Brown
Table 8 status.cfg file Default Color Options
The Status.cfg file shipped with the MCC therefore contains these entries:
1
2
3
4
5
6
7
8
9
10
11
12
13
14
15
16
54
Red
VioletRed
HotPink
Orange
Yellow
Gold
White
LightSkyBlue
PaleGreen
Aquamarine
Cyan
Gray
LightSteelBlue
SteelBlue
Blue
Brown
© Visara International 2007
Chapter 4 MCC Configuration File Management
GCL Status Constants
There are five status numbers represented as manifest constants in GCL, which
should not be changed. They are listed in Table 9:
Status
Color
Manifest Constant
1
Red
STATUS_ERROR
4
Orange
STATUS_WARNING
6
Gold
STATUS_INPROCESS
9
PaleGreen
STATUS_NORMAL
14
SteelBlue
STATUS_DOWN
Table 9 GCL Status Constants Colors
If these colors are modified, take care to pick colors that are meaningful for the
status. These statuses are reserved for displaying MCC information.
For example, when the MCC displays an erro r, it uses the color defined for
STATUS_ERROR, or 1. If the status.cfg file reads:
1
aquamarine
All errors are displayed in aquamarine, which may not be an intuitive error color
for other users.
For a complete list of valid color names, refer to Appendix A Valid Color Names .
gclrund.txt: Defining Maximum Number of Concurrent Scripts
The gclrund.txt file defines the maximum number of scripts that can execute at
the same time on the MCC. The file contains one line, with a number between 2
and 256.
If the file does not exist or contains an invalid number, the default value of 35 is
used.
If more than the defined number of scripts are executed, additional requests are
queued (up to a maximum of 4096).
Note: Reserved scripts are not subject to this limit, but are executed
immediately. A reserved script is any script whose name is
preceded by a # symbol.
Administration Guide
55
Visara Master Console Center
icsmaster.txt and masterwnd.txt: Configuring Shutdown
ICSMASTER is the master MCC program that starts and stops all MCC daemon
programs. Masterwnd is the program associated with the master GUI window
that is used to view active users, log in/out, and administer the MCC.
When the MCC is shut down, ICSMASTER checks that all MCC programs
terminate normally.
At a normal MCC shutdown, the file $ICSHOME/config/icsmaster.txt
contains regular expressions which are searched for in the active process list,
and are stopped. Searching stops when ICSMASTER stops.
At a normal MCC shutdown, the file $ICSHOME/config masterwnd.txt
contains regular expressions which are searched for in the active process list
when masterwnd is exiting. Searching stops when mastrwnd stops.
If any process is found in the regular expression matching, all of its child
processes are also stopped. For instance, if gclrund is stopped, all of its child
script processes are also stopped, including those which may be Unix shell
scripts started as SYSEXEC commands. The only process left running by default
(if it exists) is the screen editor. This way, unsaved files are not discarded
inadvertently.
Caution: The icsmaster.txt and mastrwnd.txt files should only be
modified by Visara personnel.
For information on using ICSMASTER as a command line utility, refer to
ICSMASTER on page 208.
56
© Visara International 2007
Chapter 4 MCC Configuration File Management
User Defined Message File
Each message in a Log Display window can be linked by a keyword to a User
Defined Message (UDM). UDMs are defined in the UDM file, and each consists of
a keyword and up to 250 message lines. To open the User Defined Messages file
for viewing or modification, use the Master Window's Administration—
Configuration-User Messages menu option.
When a message in a Log display window is double-clicked, the UDM file
keywords are processed against the message. For the first UDM entry with its
keyword matching a string in the double-clicked message, its message is
displayed in a pop-up window. If no UDM keyword match is found, the message
“No User-Defined-Message is defined” is displayed in a pop-up window.
An entry in the UDM file is either a keyword or a message line. The following is
the format of a UDM entry:
Keyword
Field
1
2
Columns
1
2-9
Contains
0
Keyword text
Field 1. Each keyword line is represented by the number 0.
Field 2. Eight character keyword. This is the text for matching a message in a
log display window. It can be message ids or general text.
Message
Field
1
2
Columns
1
2-133
Contains
1
Message text
Field 1. Each message line is represented by the number 1.
Field 2. 132 character message line. A maximum of 250 message lines are
permitted per UDM.
Example
The following example uses “IOS000I” as its keyword:
Keyword
Message Lines
Administration Guide
OIOSOOOI
// IO error--better contact engineer.
110 Error occurred!
1Please contact field engineer
1at 612-555-1234
57
Visara Master Console Center
charset.cfg Character Set File
The charset.cfg configuration file contains data necessary for emulation of a
keyset and display set in sessions with the host systems attached to the EBUS.
The associated host systems are defined in the system.cfg file. Direct editing of
these data files is not possible, but it is possible to verify their contents.
The values for keyset and dispset correspond to files of the same name as the
value in /usr/ics/ebus. For example, if keyset=key3278, EBUS looks in file
/usr/ics/ebus/key3278, and emulates the 3278 keyset.
Table 10 outlines the valid key requirements:
Key
Required?
Quantity
Description
keyset
No
0 or 1
Specifies key set for a session.
dispset
No
0 or 1
Specifies display for a session.
Table 10 charset.cfg File Entries
58
© Visara International 2007
Chapter 4 MCC Configuration File Management
Softkey Files
Softkeys can be defined to allow the user to send keys that are not obvious or
present on the MCC keyboard. Examples include the “Start” and “Stop” keys on
mainframe consoles, or the “Break” key on RS232/VT100 consoles. Refer to
Chapter 3 Selecting Consoles in the Operations Guide for information on
selecting and sending softkeys.
Default softkey files are provided for most console types, as listed in Table 11.
Example softkey file formats are shown on page 60.
The default softkey files can be changed to match non-standard applications,
providing the required softkeys are supported by the MCC software.
Caution:
If the default softkey files are changed, test all relevant
applications to ensure they function correctly with the revised
softkeys.
If more than one set of softkey files is maintained on the MCC, ensure each set is
named uniquely and an entry in the system.cfg file points to the files to use, for
example:
softkeyfile=config/softkeys/vt100.kbrd
Default Telnet Softkey Files
Iotype= Value
Default Softkey File
vt100
vt100.kbrd
vt220
vt220.kbrd
as400perle
as400.kbrd
HP700/92
hp7009x.kbrd
Table 11 Console Section, Default Softkey Files for Telnet
Refer to Telnet Console Type on page 92 for more information on Telnet Iotype
entries.
Administration Guide
59
Visara Master Console Center
Softkeys Mnemonics List
Table 12 Key Mnemonics Supported by MCC Software lists all keys that are
supported by the MCC software and the keyboard emulations that support each
key. Not all the keys listed are included in the default files provided; refer to
Adding a New Key on page 67 to enable a key that is listed, but not included in
the default files.
Note: When "3270" is shown in the table, the key is supported in all
emulations of the 327x protocol family.
60
Key
Mnemonic
(for Action
key)
Description
Emulations/Systems
supporting this key
Alt_Clear
Alt + Clear
3270
Alt_CrSel
Alt + Cursor Select
3270
Alt_Insert
Alt + Insert
3080, 3090, 3270, 4381
AssignCons
Assign Console
3090 and 3151
BackSlash
\
All
BackTab
Backwards tab
All but VT100 and
VT220
Break
Sends Break signal to
host
VT100, VT220,
AS/400, HP7009x
Bkwd
Backward
3080, 3090, 3270
converged, and 3151
BrokenPipe
¦
All
Cancel
Cancel
3090, 4381, and
AS/400
Caret
^
VT100, VT220, and
3151
CentSign
¢
All mainframe
emulations but not
AS/400, 3151, VT100,
or VT220
ChgDply
Change Display
3080, 3090, 3270, 4381
Clear
Clear
3080, 3090, 3270,
AS/400, and 3151
Notes
May come out
as a solid pipe
on a VT100,
VT220, or an
AS/400
Also known
as circumflex
© Visara International 2007
Chapter 4 MCC Configuration File Management
Key
Mnemonic
(for Action
key)
Description
Emulations/Systems
supporting this key
ClearDsp
HP7009x
ClearLine
HP7009x
CloseBrace
}
All
CloseBracket
]
3151, VT100, and
VT220
Cmd
Comma
3080, AS/400
,
All
CommReq
3270 converged
Copy
3270 converged, 4381
CrSel
Cursor Select
3270
DeleteChar
HP7009x
DeleteLine
HP7009x
DeleteWrap
HP7009x
DelWord
Delete Word
3270 converged
Delete
Delete
All
Diag
3270 converged
DMsgBkwd
3080
DMsgFrwd
3080
DownArrow
Cursor down arrow
All
Dup
Duplicate
3270 and AS/400
DvCnl
Device Cancel
3090, 3270, and AS/400
End
3090 and 3151
Enter
All
ErEOF
Erase to end of field
3080, 3090, 3270,
4381, and 3151
ErInp
Erase input
All but VT100 and
VT220
ExSel
Extend selection
3270 converged
Administration Guide
Notes
Transmits
information to
the mainframe;
functionally
equivalent to
Return on VT100
and VT220
61
Visara Master Console Center
Key
Mnemonic
(for Action
key)
Description
Emulations/Systems
supporting this key
Exclaim
!
All
F1 through
F12
Same as PF1 through
PF12
All
F13 through
F24
Same as PF13 through
PF24
3270, AS/400, VT100,
VT220
Find
FldMark
Field mark
62
3270
AS/400
Forward
3080, 3090, 3270
converged, 3151
HardReset
HP7009x
Hex
AS/400
Home
3080, 3090, 3270,
4381, and AS/400
HomeDown
HP7009x
HomeUp
HP7009x
Ident
3080, 3090, 3270, 4381
Index
3090, 3151
InitTerm
HP7009x does
not support F9
through F12.
VT220
FldMinus
Frwd
Notes
Initialize terminal
AS/400
Insert
VT220, 3080, 3090,
3270, 4381, AS/400,
and 3151
InsertChar
HP7009x
InsertLine
HP7009x
InsertWrap
HP7009x
Intr
4381
Irpt
3080, 3090, 3270 base
keyboard, and 3151
Istep
3090 and 3151
Jump
3270 converged
KP_0
VT100 and VT220
numeric keypad 0
VT100 and VT220
KP_1
VT100 and VT220
VT100 and VT220
© Visara International 2007
Chapter 4 MCC Configuration File Management
Key
Mnemonic
(for Action
key)
Description
Emulations/Systems
supporting this key
Notes
numeric keypad 1
KP_2
VT100 and VT220
numeric keypad 2
VT100 and VT220
KP_3
VT100 and VT220
numeric keypad 3
VT100 and VT220
KP_4
VT100 and VT220
numeric keypad 4
VT100 and VT220
KP_5
VT100 and VT220
numeric keypad 5
VT100 and VT220
KP_6
VT100 and VT220
numeric keypad 6
VT100 and VT220
KP_7
VT100 and VT220
numeric keypad 7
VT100 and VT220
KP_8
VT100 and VT220
numeric keypad 8
VT100 and VT220
KP_9
VT100 and VT220
numeric keypad 9
VT100 and VT220
KP_Add
VT100 and VT220
numeric keypad +
VT100 and VT220
KP_Decimal
VT100 and VT220
numeric keypad .
VT100 and VT220
KP_Divide
VT100 and VT220
numeric keypad /
VT100 and VT220
KP_Enter
VT100 and VT220
numeric keypad enter
VT100 and VT220
KP_F1
VT100 and VT220
keypad F1
VT100 and VT220
KP_F2
VT100 and VT220
keypad F2
VT100 and VT220
KP_F3
VT100 and VT220
keypad F3
VT100 and VT220
KP_F4
VT100 and VT220
keypad F4
VT100 and VT220
KP_Multiply
VT100 and VT220
numeric keypad *
VT100 and VT220
KP_Subtract
VT100 and VT220
numeric keypad -
VT100 and VT220
Administration Guide
63
Visara Master Console Center
Key
Mnemonic
(for Action
key)
Description
Emulations/Systems
supporting this key
LastCmd
Last command
3090 and 3151
Left
Move cursor left
All
LeftDbl
Move cursor left two
positions
3080, 3090, 3270,
4381, AS/400
LineDisc
4381
Menu
HP7009x
ModeSel
4381
Msg
3080
Newline
AS/400
Next Screen
VT220
NextSess
Move to next session
AS/400
NotSign
¬
3080, 3090, 3270, 4381
OpenBrace
{
All
OpenBracket
[
VT100, VT220, 3151,
AS/400, HP7009x
PA1
Program Attention 1
3090, 3270, 3151
PA2
Program Attention 2
3270, 3151
PA3
Program Attention 3
3270 converged
PageUp
4381, AS/400, HP7009x
PageDown
4381, AS/400, HP7009x
Pause
3270 converged
Play
3270 converged
Prev Screen
VT220
Print
3080, 3090, 3270,
4381, AS/400,
HP7009x
Record
3270 converged
Refresh
3080, 3090, AS/400,
3151
Remove
VT220
Request
64
3090 and 3151
LeftArrow
ReqDisc
Notes
Request disconnect
AS/400
4381
© Visara International 2007
Chapter 4 MCC Configuration File Management
Key
Mnemonic
(for Action
key)
Description
Emulations/Systems
supporting this key
Reset
3080, 3090, 3270,
4381, AS/400, 3151
Restart
3080, 3090, 3151,
HP7009x
Return
All
Right
3090, 3151
RightArrow
Move cursor right
All
RightDbl
Move cursor right two
positions
3080, 3090, 3270,
4381, AS/400
ScrollDown
HP7009x
ScrollUp
HP7009x
Select
HP7009x, VT220
Session1
Switch to session 1
AS/400
Session2
Switch to session 2
AS/400
Session3
Switch to session 3
AS/400
Session4
Switch to session 4
AS/400
Session5
Switch to session 5
AS/400
Session6
Switch to session 6
AS/400
Session7
Switch to session 7
AS/400
Setup
3270 converged, AS/400
Shift F6
through
Shift F20
VT220
SoftReset
HP7009x
SolidPipe
|
All
SpMO
4381
Start
3080, 3090, 4381, 3151
Administration Guide
Session status from
Mainframe –
moves to first
keyable field on
next line. VT100
– functionally
equivalent to
Enter
All but 3151
Space
Status
Notes
AS/400
65
Visara Master Console Center
Key
Mnemonic
(for Action
key)
Description
Emulations/Systems
supporting this key
Notes
Perle box
Stop
3080, 3090, 4381,
3151, HP7009x
SvPCE
3090
SwapCons
Swap Console
3090, 3151
SysReq
System Request
3270, AS/400
System
HP7009x
Tab
All
Test
3080, 3090, 3270,
4381, AS/400
TOD
Time of day
3080, 3090, 3151
Toggle
Toggle status indicators
AS/400
User
HP7009x
UpArrow
Move cursor up
All
ViewLog
View log file
3090, 3151
Table 12 Key Mnemonics Supported by MCC Software
Changing the Default Softkeys
Changing the Functionality of an Existing Key
To change the functionality of the softkeys (for example, its label or the character
sequence sent when selected), edit the relevant section(s) of the files described in
Example Softkey Files on page 67. For example, to change the label on the
“Enter” key of the VT100 softkeys, edit the following entry in the VT100
keypad.bank:
[key]
location=3,4
size=1,2
label=Enter
action=KP_Enter
If the label should read “Send”, the revised entry should appear as follows:
[key]
location=3,4
size=1,2
label=Send
66
© Visara International 2007
Chapter 4 MCC Configuration File Management
action=KP_Enter
However, because the action= is unchanged, KP_Enter is still sent to the host.
Adding a New Key
To add one of the keys listed in Table 12 Key Mnemonics Supported by MCC
Software to the available softkeys, edit the relevant .bank file to include the
required key mnemonic and the label for the key. For example, to add a caret
(circumflex) key to the VT100 keypad softkeys, make the following entry in the
keypad.bank file:
[key]
location=2,6
label=^
action=Caret
The key location selected must be unique, and is typically the next unused
location.
Example Softkey Files
For each softkey “keyboard” layout, several softkey files are necessary, including
a main definition file and one or more files defining available keys.
Each [key] section in a .bank file defines the label or symbol on a key in the Soft
Keys window, and the corresponding action that is sent when the key is selected
in keypad or non-keypad mode.
Example of Main (.kbrd) Softkey File
An example of a main softkey file is shown below, in this case the default file for
VT100 called vt100.kbrd.
Note that this file points to three .bank files that define the operation of the
function keys, arrow keys, and numeric keypad respectively.
[bank function]
keys=config/softkeys/vt100_function.bank
top=form
left=form
right=form
[bank arrows]
keys=config/softkeys/vt100_arrows.bank
top=function
left=form
#right=form
bottom=form
[bank keypad]
keys=config/softkeys/vt100_keypad.bank
Administration Guide
67
Visara Master Console Center
top=function
left=arrows
right=form
bottom=form
68
© Visara International 2007
Chapter 4 MCC Configuration File Management
Example of function.bank Softkey File
An example of the VT100 function.bank file is shown below:
[sizes]
width=60
height=40
# Row 0 -- F1-F12.
[key]
location=0,0
label=F1
action=F1
[key]
label=F2
action=F2
[key]
label=F3
action=F3
[key]
label=F4
action=F4
[key]
label=F5
action=F5
[key]
label=F6
action=F6
[key]
label=F7
action=F7
[key]
label=F8
action=F8
[key]
label=F9
action=F9
Administration Guide
69
Visara Master Console Center
[key]
label=F10
action=F10
[key]
label=F11
action=F11
[key]
label=F12
action=F12
# Row 2 - F13-F24
[key]
location=0,1
label=F13
action=F13
[key]
label=F14
action=F14
[key]
label=F15
action=F15
[key]
label=F16
action=F16
[key]
label=F17
action=F17
[key]
label=F18
action=F18
[key]
label=F19
action=F19
70
© Visara International 2007
Chapter 4 MCC Configuration File Management
[key]
label=F20
action=F20
[key]
label=F21
action=F21
[key]
label=F22
action=F22
[key]
label=F23
action=F23
[key]
label=F24
action=F24
Administration Guide
71
Visara Master Console Center
Example of arrows.bank Softkey File
An example of the VT100 arrows.bank file is shown below:
[sizes]
width=60
height=40
# NOTE: Strings in this file were converted to actions so the #
softkeys would work correctly in both keypad and non-keypad # modes.
# Row 0 -- up
[key]
location=1,0
symbol=uparrow
#string=\e[A
action=UpArrow
# Row 1 -- left home right
[key]
location=0,1
symbol=leftarrow
#string=\e[D
action=LeftArrow
[key]
label=Home
#string=\e[H
action=Home
[key]
symbol=rightarrow
#string=\e[C
action=RightArrow
# Row 2 -- down
[key]
location=1,2
symbol=downarrow
#string=\e[B
action=DownArrow
72
© Visara International 2007
Chapter 4 MCC Configuration File Management
Example of keypad.bank Softkey File
An example of the VT100 keypad.bank file is shown below:
# VT100 numeric keypad definitions
[sizes]
width=80
height=40
[key]
location=0,0
label=KP F1
action=KP_F1
[key]
location=1,0
label=KP F2
action=KP_F2
[key]
location=2,0
label=KP F3
action=KP_F3
[key]
location=3,0
label=KP F4
action=KP_F4
# Break key
[key]
location=0,1
label=Break
action=Break
# Resetkey – Reset Telnet Connection
[key]
location=1,1
label=Reset
action=Reset
[key]
location=2,1
label=*
action=KP_Multiply
Administration Guide
73
Visara Master Console Center
[key]
location=3,1
label=/
action=KP_Divide
[key]
location=0,2
label=7
action=KP_7
[key]
location=1,2
label=8
action=KP_8
[key]
location=2,2
label=9
action=KP_9
[key]
location=3,2
label=+
action=KP_Add
[key]
location=0,3
label=4
action=KP_4
[key]
location=1,3
label=5
action=KP_5
[key]
location=2,3
label=6
action=KP_6
[key]
location=3,3
label=action=KP_Subtract
74
© Visara International 2007
Chapter 4 MCC Configuration File Management
[key]
location=0,4
label=1
action=KP_1
[key]
location=1,4
label=2
action=KP_2
[key]
location=2,4
label=3
action=KP_3
# This should be double-height
[key]
location=3,4
size=1,2
label=Enter
action=KP_Enter
[key]
location=0,5
size=2,1
label=0
action=KP_0
[key]
location=2,5
label=.
action=KP_Decimal
The Reset – Reset Telnet Connection section provides a reset button that may be
used in the unlikely event that a telnet server hangs. If the user selects the reset
button, the hung telnet session is terminated and a new connection opened.
Administration Guide
75
Chapter 5 MCC system.cfg Configuration File
This chapter defines the layout of the MCC system configuration file, which
includes the following sections:
Room section
Group section
CPU section
OS section
Console section
Printer section
Unit section
MVS Agent
This file must be customized for each MCC installation.
Caution: If changes are made to any of the configuration files, the MCC
software must be cycled (stopped and restarted). Any active
users should log out before recycling the MCC, or they may see
unpredictable or inaccurate data.
Note: After changing a configuration file in the MCC editor, save the file
and run the configuration checker (cfgchk) program to check for
errors. This program can be run from the Administration menu
Configuration—Check Configuration option, or from the Unix
command line (see CFGCHK on page 210 for details).
Administration Guide
77
Visara Master Console Center
Section Name Length
Table 13 lists the sections of the system configuration file, and the maximum
length (number of characters) permitted in the section name.
Section
Maximum Length
Room (header)
8
Room Comment
31
Group (header)
8
CPU Name
8
OS Name
11
Hostname
11
Console
30
Unit
8
Printer
30
MVS
64
Table 13 Section Name Length Limits
78
© Visara International 2007
Chapter 5 MCC system.cfg Configuration File
Valid Key Requirements
Each section includes a list of keys that may be required in the system.cfg
section. Some keys that are listed are optional.
The Required? column defines whether this key must be included in this
section or if the key is optional:
Yes
Section must include this key.
No
This key is optional.
The Qty column defines the minimum number of keys to include in this section:
1
Section must have at least one key.
0
Key is optional and may be omitted.
~
May include as many keys as necessary.
Administration Guide
79
Visara Master Console Center
Room Section
The room section defines the top level of the System Summary window. The room
section name determines the name of the room icon. The room name must be
eight characters or less.
The CPU icons and the group icons are displayed left to right in the order in
which they are defined in the file.
CPUs defined within groups should not also be defined in the Room section. See
CPU Section on page 82 for more details.
Valid Keys
Table 14 outlines valid key requirements for the room section:
Key
Required?
Quantity
Description
comment
Yes
1
cpu
No
0 through ~
group
No
0 through ~
startup_status
No
0 or 1
Comment line appearing at the
bottom of the room icon. Must
be thirty-one characters or
less.
CPU definition to display at
the top level.
Group definition to display at
the top level.
The initial color for the room
icon. See status.cfg: Status
Colors on page 53 for more
information. Defaults to 9.
Table 14 Valid Keys for Room section
Example
[room Mpls]
comment=Acme Center
cpu=9021
cpu=9672
cpu=SUN-2000
startup_status=9
80
© Visara International 2007
Chapter 5 MCC system.cfg Configuration File
Group Section
The group section defines a group of CPUs and other groups. This allows creation
of subgroups, creating a hierarchy. The group section name determines the name
of the group icon. The group name must be eight characters or less.
Note: CPUs defined within groups should not also be defined in the room
section. See CPU Section on page 82 for more details.
Valid Keys
Table 15 outlines the valid key requirements for the group section:
Key
Required?
Quantity
Description
cpu
No
0 though ~
CPU definition to display
in the group
group
No
0 though ~
Group (subgroup)
definition to display in
the group
startup_status
No
0 or 1
The initial color for the
group icon. Defaults to
‘9’.
Table 15 Valid Keys for Group Section
Example
[group Unix]
group=SunBoxes
group=AIXBoxes
cpu=HP-9000
[group AIXBoxes]
cpu=PS-340
cpu=M43
cpu=PS-320H
...
[group WebSrv]
cpu=Sparc-1k
cpu=AXPPCI33
cpu=RT_PC
Administration Guide
81
Visara Master Console Center
CPU Section
The CPU section defines a CPU, its console, and its operating systems. The CPU
section name determines the name of the CPU icon. The CPU name must be
unique and eight characters or less. If a CPU name appears in a group, it cannot
be used in the room. For example, having the CPU HP9000 in both a group and a
room is invalid. The system.cfg file can contain a maximum of 600 CPU sections.
Valid Keys
Table 16 lists the valid key requirements for the CPU section:
Key
Required?
Quantity
Description
os
Yes
1 through
unlimited
OS definition to include in
the CPU.
console
No
0 or 1
The system console for the
CPU.
channels
No
0 or 1
The number of channels
defined in the CPU (for
mainframes).
power
No
0 or 1
The power device name for
powering on the system.
unit
No
0 or 1
Unit definition to include in
the CPU.
startup_status
No
0 or 1
The initial color for the CPU
icon. Defaults to ‘9’.
Table 16 Valid Keys for CPU Section
Example
[cpu 9021]
console=9021 SYSTEM
channels=255
os=PROD
os=BETA
os=TEST
[cpu PS-320H]
console=320H-RS232
os=AIX325-320H
startup_status=6
82
© Visara International 2007
Chapter 5 MCC system.cfg Configuration File
[cpu M43]
console=M43-RS232
os=AIX325-M43
[cpu PS-340]
console=PS340-telnet
os=AIX411-340
Administration Guide
83
Visara Master Console Center
OS Section
The OS section of the MCC system.cfg file defines an OS, its type, its consoles,
and software lists. The OS section name determines the name of the OS icon.
VM and server systems such as Unix machines do not require a printer defined,
as neither has the concept of a printer console as does MVS. However, a printer
must be defined if the MCC system is using the “Q” series of commands in scripts
(refer to the QREAD command in the Scripting Guide for more details).
The OS Name must be 11 characters or less, and the system.cfg file can contain a
maximum total of 600 OS sections.
Valid Keys
Table 17 lists valid key requirements for the OS section:
84
Key
Required?
Quantity
Description
console
No
0 or 1
The console definition to use
as the OS console. This is the
name of a console section.
printer
No
0 or 1
The printer definition to use
as the printer console. For
mainframes, it is the name of
a printer section. For nonmainframes, specify the
name of a console section to
use as a printer console.
type
No
0 or 1
The user-defined class for the
OS — the object manager type.
Determines the fields used in
the Object Manager definitions.
Refer to objmgr.cfg: Object
Manager on page 47.
swlist
No
0 through
unlimited
The file that contains
software/task definitions for
the OS.
startup_status
No
0 or 1
The initial color for the OS
icon. Defaults to ‘9’.
© Visara International 2007
Chapter 5 MCC system.cfg Configuration File
hostname
No
0 or 1
Network host name for the
system. Typically, this will
be the same as the OS
name, but the true network
host name may differ due
to character limitations. If
you use the MCC/BMC
PATROL integration
product, the host name
must refer to the name of
the host as reported by
BMC PATROL agents. The
MCC OS name refers to
the name of an OS inside
the MCC.
mvsagent
No
0 or 1
Associates an MVSAGENT
configuration with the OS.
The MVS Agent is a
command path to the
mainframe, and can also be
used as a higher
bandwidth printer output
transport. This alternative
communication requires
VISARA's product on the
MVS LPAR.
It must not be present in
the OS section for
MCCStars.
Table 17 Valid Keys for OS Section
Administration Guide
85
Visara Master Console Center
Example
[os PROD]
type=mvs
console=PROD OS
printer=PROD PRN
swlist=config/swlist/prod
[os AIX325-320H]
type=unix
console=320H-RS232
printer=320H-RS232
swlist=config/swlist/AIX325-320H
[os AIX325-M43]
type=unix
console=M43-RS232
swlist=config/swlist/AIX325-M43
[os op2]
type=unix
hostname=op2
console=Test Console
swlist=config/swlist/test0
[os SHORT]
type=unix
hostname=really_long_hostname
console=Test Console
swlist=config/swlist/test0
[OS OP1]
type=unix
hostname=op1
console=Test Console
swlist=config/swlist/test0
[os KANSAS CITY]
type=unix
hostname=kansas_city
console=Test Console
swlist=config/swlist/test0
86
© Visara International 2007
Chapter 5 MCC system.cfg Configuration File
[os QuuxOS]
type=mvs
console=Quux OS
printer=Quux PRN
mvsagent=QuuxAgent
Console Category Section
It is possible to assign console categories to each console on the Console Selection
window. Each console can have no categories or several categories assigned to it.
Category names listed in the console category section are case-sensitive, and
display in exactly the format typed in the Console Selection window.
Category names listed in the console section are case-insensitive. For example, if
you list ‘Florida’ in the console category section and ‘florida’ in the console section
(categories=florida), ‘Florida’ appears in the Console Selection window.
Any category names specified in console sections but not defined in the category
console section are ignored.
Example
[category console]
Minnesota
Florida
California
MVS
UNIX
Administration Guide
87
Visara Master Console Center
Console Section
The console section defines an OS console connection. The console section name
determines the name of the console emulator icon. Console names can be a
maximum of 30 characters. Consoles types may be:
Telnet
TN3270
TN5250
ICON
Command
Notes: When adding consoles or changing console names, be sure to
update the security group profiles. By default, all groups have
access rights of ‘none’ for a new console—no one can see or use the
console until the access rights to each group are changed.
Console names must not contain a forward slash (/) character.
The Console Manager checks for mismatched specifications when a
console and printer are defined on the same port, for example, if
baud rates, number of bits, parity, or handshaking differ. Any
errors detected are sent to the Execution Log.
If an attempt is made to boot a card for which no consoles or
printers are defined, the firmware download attempt terminates,
but there is no adverse effect on MCC operation. The message
“IFM137M Card <card name> has no consoles or printers specified
for it” also appears in the Execution Log.
88
© Visara International 2007
Chapter 5 MCC system.cfg Configuration File
Common Console Section Keys
Table 18 lists the keys common to all console definitions:
Key
Required?
Quantity
Description
interface
Yes
1
The type of interface. Valid entries are
ICON, Command, Telnet.
lock_timeout
No
0 or 1
The number of seconds to wait before
unlocking the terminal and discarding
user typed text. If set to 0, the terminal
will never automatically unlock. If not
specified, the default is 30 seconds.
audit
No
0 or 1
If “yes”, auditing is enabled for the
console and console messages are copied
to the Audit Log file. Only valid for
ICON and telnet consoles.
softkeyfile
No
0 or 1
The file in which softkey definitions are
found for this console.If not specified, the
default softkey file is as listed in Softkey
Files on page 59. For example,
softkeyfile=config/softkeys/hard3151.kbrd
categories
No
0 or 1
Assigns the console to one or more
categories. User-defined categories are
listed in the Category Console Section.
Category names are not case sensitive,
and appear in the Console Selection
window. If not specified, the console will
only appear in the ALL category.
no_printer
No
0 or 1
If specified, no printer is defined for the
console. Valid for Telnet consoles.
days_history
No
0 or 1
Defines the number of days that the
console history log is retained for this
console before being purged (see
Console History Log on page 172). If “0”
or omitted, no console history log is
kept. Valid for ICON and Telnet
consoles.
Table 18 Console Section, Common Keys
no_printer Key Values
The no_printer flag can be set to save resources. By default, a “printer console
queue” of the incoming screen data is automatically created to facilitate the use
of the Q series of script commands. If an OS section does not have a “printer=”
statement in this section, use this flag to prevent creation of a printer queue for
that section. QREAD and other Q series script commands will then not work on
the affected OS.
Administration Guide
89
Visara Master Console Center
ICON Section
The ICON section of the system.cfg file defines an ICON interface unit, its type,
and IP address. The ICON section name determines the name of the ICON
console icon button. The ICON header name must be 11 characters or less. The
name after the ICON tag must be unique.
Key
Required?
Quantity
Description
type
Yes
1
The type of ICON Interface Unit. Valid
values are 1T for a single connection
unit or one of 4T, 8T, 12T, 16T, 20T, XT
for a multiple connection unit.
The various sizes are used to provide
configuration checking assistance. You
may always just use XT in this field.
ipaddr
Yes
1
IP address of the ICON Interface Unit.
Table 19 Console Section, Icon Section
Example:
[ICON Unit1]
type=1T
ipaddr=192.83.120.207
[ICON Unit2]
type=XT
ipaddr=10.192.32.88
90
© Visara International 2007
Chapter 5 MCC system.cfg Configuration File
ICON Console Type
Table 37 outlines the valid key requirements for the ICON console type, in
addition to those keys listed in Common Console Section Keys, Table 18 Console
Section, Common Keys, Page 89:
Key
Required?
Quantity
Description
iotype
Yes
1
Matches an ICON name tag in the
ICON section.You may always just use
XT in this field.
Host
Yes
1
Host name that the iCON has been
configured to use.
Table 20 Console Section, Icon Console Type
Examples:
AS/400 Session
[console ICON AS400 Session]
interface=Icon
icon=Unit1
host=Lpar1
audit=yes
Example AS/400 printer
[printer ICON My Printer]
interface=Icon
icon=Printer
host=Lpar1
days_history=7
Administration Guide
91
Visara Master Console Center
Telnet Console Type
The telnet section defines a telnet console session. The telnet section name
determines the name of the console emulator icon.
Valid Keys
Table 21 lists the valid key requirements, in addition to those keys listed in
Common Console Section Keys on page 89:
Key
Required?
Quantity
Description
iotype
Yes
1
The interface type—VT100, VT220,
as400perle, or hp700/92, 3270, 3278, 3278-2,
3278-3, 3278-4, 3278-5.
3270 and 3278 are treated as convenient
shorthand for 3278-2
host
Yes
1
The telnet target host name or IP address.
service
No
0 or 1
The service name or number (default=23).
Any port that allows telnet connections can
be used. Valid predefined services are listed
in /etc/services.
screen_buffer_ No
size
0 or 1
Defines the screen buffer size for consoles of
iotype=HP700/92 that can display a window
(screen) of a larger size. Default is “500”. At
least one screen of data (24 lines) is allocated. If
the number entered is not a multiple of 24, it is
rounded up – for example, an entry of 34 is
rounded up to 48. The recommended maximum
is 960 – higher numbers will increasingly affect
performance.
PingThreshold No
0 or 1
If the MCC does not detect activity on the telnet
connection for this number of seconds, it sends
a ping. If not specified or “0”, no ping is sent,
regardless of how long the connection is
inactive. The value is rounded up to the nearest
10 seconds – for example, “PingThreshold=17”
would cause a ping to be sent after 20 seconds
of inactivity.
PingResponse
0 or 1
If the MCC does not receive a response to a ping
it sent on the telnet connection for this number
of seconds, it closes the connection. If not
specified, it defaults to the same value as
PingThreshold. If set to “0”, the ping
functionality is disabled. The value is rounded
up to the nearest 10 seconds – for example,
“PingResponse=23” would cause the connection
to be terminated after 30 seconds without a
response.
No
Table 21 Console Section, telnet keys
92
© Visara International 2007
Chapter 5 MCC system.cfg Configuration File
Telnet service Key Values
If not specified, the service key defaults to 23, the default telnet port. Other ports
that allow telnet connections can be specified using this key.
Example
[console DEC-UNIX-Telnet]
interface=telnet
iotype=VT100
host=localhost
days_history=1
audit=yes
[console PS340-telnet]
interface=telnet
iotype=VT100
host=206.144.7.58
no_printer
#the next example telnets to port 6500 on PS340
[console PS340-telnet]
interface=telnet
iotype=VT100
host=206.144.7.58
service=6500
#this example opens up a telnet connection on port 32145
[console HP Console]
interface=telnet
host=hpuc
iotype=VT100
lock_timeout=5
days_history=5
[console DEC-HITELNET]
interface=telnet
iotype=VT100
host=192.168.1.7
service=32145
days_history=7
[console Terminal Server]
interface=telnet
host=192.168.14.219
service=2001
days_history=5
Administration Guide
93
Visara Master Console Center
iotype=VT100
PingThreshold=20
PingResponse=30
Note: Use interface=telnet-standardclient in place of
interface=telnet to select the DEC telnet client. Both
interface= specifications may be included in the same
system.cfg file if connecting to different console types.
Refer to Chapter 3 Selecting Consoles in the Operations Guide for information on
using HP700 consoles.
94
© Visara International 2007
Chapter 5 MCC system.cfg Configuration File
Printer Section
The printer section defines a printer console connection. The printer section
name determines the name of the printer emulator icon. Printer consoles can be
defined for ICON, and telnet sessions. The printer session must have the same
parameters (for example, stty_flags, newline specification, and operating mode)
as the related glass console session, or error messages will be generated. .
Examples
Printer Console
[printer AS400 PRINTER]
interface=Telnet
Icon=Unit2
host=Lpar1
days_history=1
Administration Guide
95
Visara Master Console Center
Command Console
The Command Console section defines a command console that runs a defined
command or Unix shell script when selected. For example, the Command
Console can be used to:
Provide Windows NT console consolidation using the VNC product (see
http://www.uk.research.att.com/vnc) and Netscape Navigator. The VNC
executable must be configured on the NT workstation or server. The VNC Xwindows viewer or a Java-capable browser such as Netscape Navigator must be
installed on the MCC. Notes and examples on this implementation are given
later in this section.
Run an X windows application on the local MCC host.
Run an X windows application on a remote host.
When the command console starts, a message in the format “Starting Command
Console <specified console>” appears in the Execution Log.
Note: A Command Console permits user updates, and it is not possible to
define read-only access.
Valid Keys
Table 22 lists the valid Command Console section keys in the system.cfg file:
Key
Required?
Quantity
Description
interface
Yes
1
The type of interface.
Always Command.
command
Yes
1
The command or script to
execute when a user selects
the console.
Categories
No
0 or 1
Assign the console to one or
more categories. Category
names are not case
sensitive, and appear in the
Console Selection window. If
not specified, the console
will only appear in the ALL
category.
Table 22 Console Section, Command Console Values
96
© Visara International 2007
Chapter 5 MCC system.cfg Configuration File
Examples
The following example provides console consolidation of a Windows NT server
through Netscape Navigator installed on the MCC. The VNC executable must be
installed on the NT server.
[console NTServer]
interface=command
command=netscape http://NTServer:5800
categories=Command
The following example displays the index of the MCC manuals in a Netscape
Navigator browser on the MCC workstation.
[console MCC Manuals]
interface=command
command=netscape file:/usr/ics/etc/doc/manual/html/index.html
categories=Command
The following example runs an X-windows application called xeyes from the
command console.
[console xeyes]
interface=command
command=exec /usr/bin/X11/xeyes
categories=Command
Recommendations on Command Console Implementation
Using Running Applications
The command must handle multiple requests for the same command console.
This functionality is supported by some applications such as Netscape Navigator,
which has a “-remote openURL(…)” option to use an existing Netscape process.
Refer to examples/commandconsoles/reuse-netscape for more information.
Using Scripts
Whenever possible, implement a command console by calling a script instead of a
command, as it avoids the need to restart the MCC to reread the configuration
file.
Signal Handling
Some applications such as xterm do not exit when SIGHUP is received. In such
cases, use a script that forwards signals to a child process. The child process
takes the same environment variables as the parent. Refer to
examples/commandconsoles/map-signals for a sample script. Since gwconsole
(the process that runs the console window) kills child processes on exit, the
application should be defined as the child process. However, gwconsole uses ksh
to run the command to allow shell quoting, so do one of the following:
Administration Guide
97
Visara Master Console Center
Use exec to have ksh execute the command without forking. This can be
included in the script or in the comand as shown in the preceding example. For
additional examples, refer to examples/commandconsoles/reuse-netscape and
examples/commandconsoles/launch-x-vnc.
Include the command in a script that forwards signals to the child process.
Refer to examples/commandconsoles/map-signals for an example script.
Using Exec
In most cases, exec can be specified in the command. This technique minimizes
the number of processes and may improve signal handling. Every command is
started as “/bin/ksh/ -c command”, and can equally well be started as “/bin/ksh –c
exec command”. However, exec cannot be used if the command has shell-specific
operations. For example, the following command cannot not be used with exec:
ENVVAR=value printenv
Instead, use the following:
Export ENVVAR=value; exec printenv
How the MCC handles Commands
Processes are fork()ed and exec()ed as '/bin/ksh', '-c', ‘<specified command>’.
The command does no substitution of any text or variables, and no additional
arguments are provided.
The child process has the same environment as the parent process, including
environment variables, stdout, and stderr.
The MCC attempts to kill child processes by sending a HUP signal to each
child process when the gwconsole process exits when the user logs out. There
may be cases where gwconsole is killed before it completes this action, for
example, if the user exits an X session without logging out of MCC. The specified
command can take actions that would circumvent the MCC from knowing the
application process, and/or preventing the killing of the application with a
SIGHUP.
Each command is responsible for preventing multiple windows for the same
console for a user. The command is also responsible for preventing concurrent
access by multiple users.
Consolidation of Windows NT Consoles via VNC
Note: Visara does not support or resell VNC. It is freeware available
from and supported by the vendor, AT&T. Visara makes the
customer aware of the VNC product, and the customer assumes all
risks associated with the implementation of VNC-based solutions.
98
© Visara International 2007
Chapter 5 MCC system.cfg Configuration File
VNC (Virtual Network Computing) is a product that allows a computer system
environment to be viewed and manipulated from another system across a highspeed data network. Integrated with the MCC, the VNC product allows a MCC
operator to monitor and control the graphical interface of distributed Windows
NT systems from a single console, namely the MCC terminal. The VNC software:
Accepts connections from the MCC.
Accepts inputs including mouse movements and keystrokes from the MCC
workstation.
Sends the Windows NT GUI interface over the network back to the MCC.
Once installed, the VNC software allows a MCC operator to take full control of
the Windows NT environment from a remote location.
What VNC does in the MCC environment
VNC displays the graphical user interface of Windows NT systems within the
MCC environment, allowing a MCC operator to manage and control distributed
Windows NT systems.
VNC accepts the Ctrl-Alt-Del keystroke combination through a button
integrated in the browser’s graphical interface or a softkey in the X-windows
viewer. This allows the MCC operator to initiate a logon sequence from the
command console, and to securely lock the Windows NT system after the
administration tasks are completed.
Note: VNC does not provide a multi-user environment on Windows NT.
All users share the same environment.
Prerequisites
The VNC executable must be installed on each Windows NT server to be
monitored from the MCC. The executable occupies approximately 175 KB of disk
space on the server. It is installed as a service that runs on start up without
requiring a user to log on.
Each Windows NT server must have its own command console configured in
the system.cfg file. Examples of how to do this are given in the preceding
Examples section.
The optional VNC viewer is contained in a 2.5 MB tar file called VNC.tar
that is installed on the MCC. The tar file includes a readme file that provides
installation instructions.
If a Web browser is used instead of the VNC viewer, the Windows NT
environment is accessed by pointing the browser to
http://<servername>:5800. For example, to access a Windows NT server
called NT4, enter http://NT4:5800.
VNC is intended for use over a LAN, such as a shared 10BaseT network.
Performance over modem links is generally unacceptable.
Administration Guide
99
Visara Master Console Center
Security
VNC is configured with a password during installation. This password must be
supplied at connection time by any MCC user wishing to access the Windows NT
server from the VNC viewer or a Web browser. This stand-alone password is not
associated with an NT user domain account.
Installing the VNC Software
To provide access for monitoring and controlling a Windows NT server from the
MCC:
1.
Obtain the VNC software. Refer to http://www.uk.research.att.com/vnc.
2.
Install the VNC server software on the Windows NT server, following the
instructions in the VNC readme file.
3.
Optionally, install the VNC viewer software on the MCC server, following
the instructions in the VNC readme file. A Java-capable Web browser
may be used as an alternative to the X Windows viewer, if one is installed
on the MCC server.
4.
If using the VNC viewer, enter the command ‘vncviewer
<hostname>:<display>’, where <display> is typically equal to 0
(zero), for example, vncviewer nt4:0. If using a Web browser, enter the
command ‘http://<hostname>:5800’. If either case, ensure the
Windows NT environment is displayed with default parameters.
5.
Enter the required password and verify correct access is available to the
Windows NT environment.
6.
Define a command console for the Windows NT system, as shown in the
Examples on page 97.
7.
If using the VNC viewer, consider defining softkeys (see page 58) for
important Windows NT keystrokes and functions such as Ctrl+Alt+Del. It
is not necessary to define softkeys if using the browser interface, as all
functions should be available.
Note: If the system tray icon is not visible in the Windows NT
environment, run ‘winvnc -settings’. This displays a dialog
that allows VNC settings and the security password to be edited.
100
© Visara International 2007
Chapter 5 MCC system.cfg Configuration File
Unit Section
The unit section defines a unit device for a CPU. The unit section name
determines the name of the unit icon.
Names must be eight characters in length or less.
Valid Keys
Table 23 lists the valid key requirements:
Key
Required?
Quantity
Description
number
Yes
1
The unique unit
number (logical unit
number). Specified in
hex.
address
Yes
1
Specified in hex.
type
Yes
1
Specified in hex.
channel
Yes
1
Specified in hex.
startup_status
No
0 or 1
The initial color for
the unit icon. See
status.cfg: Status
Colors on page 53.
Table 23 Console Section, Unit Keys
Example
[unit DASD1]
number=1
address=320
type=3380
channel=1
[unit MT1]
number=2
address=330
type=3480
channel=1d
Administration Guide
101
Visara Master Console Center
MVS Configuration
The MVSConfig section defines the MCC environmental values for connection to
MCCSTARS.
Valid Keys
Table 24 lists the valid key requirements of the MVSConfig section:
Key
Required?
Quantity
Description
workstationid
Yes
1
The workstation’s
identification to the MVS
Agent.
retrytime
Yes
1
How often to retry failed
connections to the agents.
Specified in seconds.
Table 24 MVS Section, Valid Keys
102
© Visara International 2007
Chapter 5 MCC system.cfg Configuration File
MVS Agent Section
Table 25 lists the valid key requirements for each MVSAgent section:
Key
Required?
Quantity
Description
userid
Yes
1
The userid that identifies the
MCC to the MVS Agent.
password
Yes
1
The password to
authenticate the MCC to the
MVS Agent.
version
Yes
1
The version of the protocol
between the MVS Agent and
the MCC. Set to ‘2’ for the old
version of WatchMVS. Set to
‘3’ for MCCStars
release
Yes
1
The release of the protocol
between the MVS Agent and
the MCC. Set to ‘1’ for this
version of the MCC.
retrytime
Yes
1
How often to try resending
failed commands to the
agent. Specified in seconds.
ipaddress
Yes
1
Ip address of the host
running the WatchMVS /
MCCStars MVS Agent
ipport
Yes
1
Ip port number on which the
WatchMVS / MCCStars
agent is configured to accept
connections.
Table 25 MVS Agent Section, Valid Keys
Administration Guide
103
Visara Master Console Center
Example:
[MVSConfig]
retrytime=10
[MVSAgent QuuxAgent]
userid=WATCHECS
password=0x0123456789ABCDEF
version=3
release=1
retrytime=50
ipaddress=192.168.0.22
ipport=2769
[MVSAgent AlphaAgent]
userid=WATCHECS
password=0x0123456789ABCDEF
version=3
release=1
retrytime=50
ipaddress=192.168.0.23
ipport=2769
104
© Visara International 2007
Chapter 6 Defining and Changing OS Groups
This chapter describes how to assign operating systems to logical groups, and
how to modify existing groups.
Introduction
An OS Group is a logical group of operating systems. There are no predefined
rules for groups, and it is not necessary that all member operating systems are of
the same type or in the same physical location. They may be grouped together
according to purpose, physical location, operating system type, or even physical
CPU height. The only requirement is that all members of OS groups must be
defined in the system.cfg file.
Event Manager uses OS Groups for console message rules. Event Manager can
be configured so that a particular rule applies to an OS group. Thus, the same
console message can be treated differently, depending on which group issued the
message. For example, Operations may wish to treat ABENDs on production
systems differently from ABENDs on test systems. Thus, all test systems would
be in one OS group, and all production systems would be in a different OS Group.
See the Event Manager section for more details on Console Messages.
Administration Guide
105
Visara Master Console Center
Editing OS Groups
To edit OS Groups, select the Administration menu Configuration:OS
Group option. The System Configuration Editor window appears.
Figure 10 System Configuration Editor window (OS Groups)
The System Configuration Editor window displays OS groups configured on the
MCC system. The Members list box contains operating systems that are
members of the currently selected OS group. The Available list box displays
those Operating Systems defined in the system.cfg file that are not members of
the selected group.
106
© Visara International 2007
Chapter 6 Defining and Changing OS Groups
Creating a new OS group
1.
Click the New button.
2.
The Modify OS Group window appears.
Figure 11 Modify OS Group window
3.
Enter the name in the OS Group Name text box.
4.
Click the OK button.
Adding an operating system to the selected group
1.
Select an operating system from the Available list box.
2.
Click the Add button. The operating system is added to the Members list
box.
Removing an operating system from the selected group
1.
Select an operating system from the Members list box.
2.
Click the Remove button. The operating system is removed from the
Members list box.
Modifying an OS group
1.
Select an OS group from the OS Groups list box.
2.
Click the Modify button.
3.
The Modify OS Group window appears (see Figure 11).
4.
Enter a new name in the OS Group Name text box.
5.
Click the OK button.
Administration Guide
107
Visara Master Console Center
Deleting an OS group
1.
Select an OS group from the OS Groups list box.
2.
Click the Delete button.
Note: Do not change the name of or delete an OS group if the group is in
use. Modify all relevant Event Rules before deleting or renaming
the OS Group.
To save changes, from the System Configuration Editor window click the Save
button. The changes are committed to the osgroup.cfg file. Changes become
effective within Event Manager the next time the MCC system starts.
108
© Visara International 2007
Chapter 7 Setting Up SNMP
This chapter describes how to configure the MCC to utilize the optional SNMP
(Simple Network Management Protocol) capability of the MCC, including:
Configuring an SNMP Agent.
Configuring SNMP Agent Groups.
Using SNMP from Scripts.
MIBs available on the MCC.
Administration Guide
109
Visara Master Console Center
Overview
The MCC optionally allows communication with any networked host using the
Simple Network Management Protocol (SNMP). The MCC is capable of sending
and receiving SNMP traps, and getting and setting MIB values.
To utilize SNMP capabilities within the MCC, definitions must first be
configured using the SNMP Editor. The editor is available from the Master
window Administration menu—Configuration:SNMP Setup option. Update
permission for the “Configure: SNMP” security privilege is required to access this
option.
Once SNMP configuration is complete, Event Manager may be configured to
monitor SNMP Traps. Also, scripts capable of sending SNMP Traps, and getting
or setting MIB values on another SNMP agent can be written.
After selecting the SNMP Setup option, a window similar to SNMP Editor
window below appears.
Figure 10 SNMP Editor, Agents Tab
The SNMP Editor window allows you to view agents and agent groups
configured on the system. There are two tabs:
Agents tab displays the Alias, host name, community, MIB port, and trap
port for SNMP agents.
110
Agent Groups displays agents and add agent groups.
© Visara International 2007
Chapter 7 Setting Up SNMP
Definitions
An SNMP agent is a managed host that can communicate using the SNMP
protocol.
SNMP Agent Group. Within the MCC, the concept of SNMP agent groups is
simply a logical grouping of SNMP agents. Agent groups are useful within Event
Manager for limiting an SNMP trap event rule to some, but not all, of the
configured agents.
Configuring an SNMP Agent
To configure a new SNMP agent or modify an existing agent:
Figure 11 SNMP Agent window
1.
From the Agents tab, click the New or Modify button (depending on
what you are trying to accomplish). The SNMP Agent window appears.
2.
Enter the information in the appropriate text boxes:
Alias The name to use within the MCC. It is possible to configure multiple agent
entries for the same SNMP agent, specifying different values for Community,
Trap, and MIB ports.
Note: It is strongly recommended that the Alias name match the OS
name on the host. This makes it possible to use the OS name as
the $alias parameter for SNMP script commands. Otherwise, a
script has no way of knowing what the SNMP agent name is.
Host Name. This is the host name or IP address of the agent.
Administration Guide
111
Visara Master Console Center
Community. The community used when accessing MIB values. The default is
“public”. To identify the required SNMP community, refer to the documentation
for the agent with which the MCC will communicate.
Trap Port. Normally, set to the default port number of 162. However, it is
possible that some agents may communicate on a different port number.
MIB Port. Normally set to the default MIB port number of 161.
3. Click the OK button.
Saving changes to the agent
Click the OK button. The SNMP Editor will perform a few data checks, warning
of potential problems prior to exiting this window. Changes do not become
permanent until Save is selected in the main window.
Clicking the Cancel button at any time will abandon all changes.
112
© Visara International 2007
Chapter 7 Setting Up SNMP
Configuring SNMP Agent Groups
From the SNMP Editor window, it is possible to add agents, add agent groups,
modify existing agents, and delete agents. Click the Agent Groups tab on the
SNMP Editor window to bring the Agent Groups tab to the front.
Figure 12 SNMP Editor, Agent Groups tab
The Agent Group list box contains all the defined agent groups. When you
select an agent group, the Current Agents list box displays the configured
agents that are members of the group. The Available Agents list box displays
the configured agents that are NOT members of the group.
Adding an agent to the Current Agents list
1.
Select the agent to move from the Available Agents list box.
2.
Click the Add button.
The agent is added to the Current Agents list box.
Removing an agent
1.
Select the agent to move from the Current Agents list box or the
Available Agents list box.
2.
Click the Remove button.
The agent is removed from the list box.
Administration Guide
113
Visara Master Console Center
Creating a new agent group
1.
Click the New button. The Agent List window appears.
Figure 13 Agent List window
2.
Type the name of the new agent group.
3.
Click the OK button.
The new agent group is added to the Agent Groups list box.
Modifying an agent group
1.
Click the Modify button. The Agent List window appears (see Figure 15).
2.
Type the new name of the agent group.
3.
Click the OK button.
The name change can be viewed in the Agent Groups list box.
Note: The SNMP Editor ensures the selected name is unique. A warning
is displayed indicating that changing the group name may affect
other configurations. SNMP Editor does not update the Event
configuration, so changing or deleting an agent group (or agent)
may result in errors if changes are not also made in the Event
Editor.
114
© Visara International 2007
Chapter 7 Setting Up SNMP
Using SNMP from Scripts
The SNMP commands available in the GCL scripting language are:
Command
Explanation
SNMP_TRAPSEND
Sends a trap to an agent.
SNMP_GET
Gets a MIB value from an agent.
SNMP_GETNEXT
Gets the next MIB value from an agent (see the
Scripting Guide for a complete description).
SNMP_SET
Sets a MIB value on an agent.
SNMP_GETTABLE
Gets all values from an MIB table.
Table 26 SNMP Commands in GCL Scripting Language
Refer to the Scripting Guide for detailed information on using SNMP from a
script.
MIBs Available with the MCC
To access SNMP variables that are not in the default MIBs that the MCC works
with, it is necessary to add MIB definitions to the MCC. By default, the MCC
understands MIB-II, the Host Resource MIB, and the RMON MIB. The
/usr/ics/mib directory also has many other standard MIBs that may be added to
MIBs the MCC understands. Other MIBs not found in this directory may also be
added. Typically these will be product or vender specific MIBs (for example, a
MIB for HP LaserJet printers). The following table lists the standard MIBs the
MCC ships with and the file in which each MIB may be found.
MIB
File MIB Is Located In
MIB-II
SMUX
Interface Extensions
Token Bus
Token Ring
DS1
DS3
CLNS
AppleTalk
OSPF
OSPF
OSPF
BGP
RMON
Rfc1213.mib
Rfc1227.mib
Rfc1229.mib
Rfc1230.mib
Rfc1231.mib
Rfc1232.mib
Rfc1233.mib
Rfc1238.mib
Rfc1243.mib
Rfc1248.mib
Rfc1252.mib
Rfc1253.mib
Rfc1269.mib
Rfc1271.mib
Administration Guide
115
Visara Master Console Center
MIB
File MIB Is Located In
FDDI SMT 6.2
Bridge
DECnet Phase IV
SIP
Frame Relay
Character
RS-232
Parallel Printer
Party
IP Forwarding Table
Repeater
X.25 LAPB
X.25 Packet Layer
RIP
Ethernet like
DS1/E1
DS3/E3
Identification
Multiprotocol Interconnect over X.25
PPP LCP
PPP SEC
PPP IP NCP
PPP Bridge NCP
Bridge
FDDI 7.3 SMT
Token Ring RMON
Host Resource
MAU
SNMP Repeater
Source Routing
DECnet Phase IV
Ethernet Like
Ethernet Like
AppleTalk
RMON
TCP/IPX
Rfc1285.mib
Rfc1286.mib
Rfc1289.mib
Rfc1304.mib
Rfc1315.mib
Rfc1316.mib
Rfc1317.mib
Rfc1318.mib
Rfc1353.mib
Rfc1354.mib
Rfc1368.mib
Rfc1381.mib
Rfc1382.mib
Rfc1389.mib
Rfc1398.mib
Rfc1406.mib
Rfc1407.mib
Rfc1414.mib
Rfc1461.mib
Rfc1471.mib
Rfc1472.mib
Rfc1473.mib
Rfc1474.mib
Rfc1493.mib
Rfc1512.mib
Rfc1513.mib
Rfc1514.mib
Rfc1515.mib
Rfc1516.mib
Rfc1525.mib
Rfc1559.mib
Rfc1623.mib
Rfc1643.mib
Rfc1742.mib
Rfc1757.mib
Rfc1792.mib
Table 27 List of Standard MIBs for the MCC
116
© Visara International 2007
Chapter 7 Setting Up SNMP
Adding a MIB
1.
Open a Unix shell window.
2.
In that window, change directory by entering
cd /usr/ics/mib
3.
Concatenate together the ANS.1 file along with all the MIBs you want to
be able to access. The ASN.1 file contains the MIB-II definition as well as
some other definitions that must be present. For example:
cat ASN.1 rfc1514.mib rfc1757.mib > customMib.tmp
4.
Enter
run /usr/ics/bin/makemib –out customMib.db customMib.tmp
5.
If error or warning messages occur, they may be due to a non-standard
MIB — fix the MIB or do not use it.
Note: The name of the –out file must be customMib.db and it must be
located in /usr/ics/mib.
6.
Administration Guide
Shut down and restart the MCC. This stops and restarts the Event
Manager so that it can use the new MIB file. Scripts that utilize SNMP
can use the new MIB variables next time they run.
117
Chapter 8 Administering Users
This chapter discusses:
Administering security for groups including changing permissions.
Displaying and modifying MCC users. Adding or deleting users from groups.
Displaying and modifying login users; adding or deleting users.
Administration Guide
119
Visara Master Console Center
Introduction
Administering MCC users includes adding, removing, and maintaining MCC
users and their privileges. Proper administration requires a thorough
understanding of the group-level security used in the MCC.
The MCC uses group-level security. Unlike in operating systems, users have no
individual access rights. All rights are assigned to groups. Users belong to one or
more groups.
There are three levels of security for MCC “items” such as consoles and OSs:
None.
VIEW.
UPDATE.
If a group is given a permission level of NONE for an item, users belonging to
that group do not have any access to that item. For the following examples,
assume there is a security group called “Operator” and an OS called “Prod”:
If the Operator group is given NONE access to Prod, no member of the
Operator group sees any icon from Prod on the Console Selection window.
If the Operator group is given VIEW access to Prod, any member of the
Operator group can view any of the consoles of Prod, but cannot update or type in
them.
If the Operator group is given UPDATE access to Prod, any member of the
Operator group can enter commands on any of Prod’s consoles.
If a group has NONE access to a particular system’s consoles, users in that group
do not see the console icons in the Console Selection Window. However, those
users can see the OS and CPU icons in the System Summary window.
If a user belongs to more than one group, the user has the most permissive level
of security of the two groups. For instance, if group “Operator” has a level of
NONE access for the OS “Prod” and group “Administrator” has a level of
UPDATE for the same OS, any user belonging to both “Operator” and
“Administrator” has a level of UPDATE.
Note: The maximum number of users permitted on the MCC is
determined by the terms of your contract with Visara. If the
number of users needing access to the MCC execeeds the
contracted number, contact Visara technical support for a license
upgrade.
120
© Visara International 2007
Chapter 8 Administering Users
What is the difference between MCC Users and Login Users?
“Users” are normally individuals who access the system. However, within the
MCC programs, it is important to understand the difference between “MCC
Users” and “Login Users”.
“Login Users” correspond to login accounts on the MCC host (that is, Unix
accounts). At a “Login:” prompt, the user enters the Login User’s login name and
password. This level of security is managed by the MCC host operating system,
i.e. RedHat Linux.
“MCC Users” corresponds to the users configured to use the MCC software.
This is a subset of the Login Users. This level of security is managed by the MCC
software.
Note: Each MCC User account must also have a Login User account with
the same name.
Administration Guide
121
Visara Master Console Center
Administering Security
Changes to the MCC security configuration are made from the Security Editor
window. From the MCC master window, select the Administration menu—
Configuration: Security option. The Security Editor window appears.
Figure 14 Security Editor window, Security Groups tab
From the Security Editor window, it is possible to modify, add, and delete:
Security groups.
MCC users.
Login users.
Changes made within the Security Editor window (except for working with Login
Users) are not saved until the SAVE button is clicked. This action then saves the
configuration and exits Security Editor. Login Users changes are effective next
time the user logs in, and changes are permanent.
122
© Visara International 2007
Chapter 8 Administering Users
Group Security
Adding Security Groups
To add a security group:
1.
From the Security Editor window Groups tab, click the New Group
button. The Add/Update Security group window appears.
2.
Enter a name in the Name: text box.
3.
Click the OK button. The Add/Update Security group window asks if you
are sure if you want to create a new security group.
4.
Click the Create Group button. The new group appears in the Security
Groups List.
New groups are created with all privileges set to “None”.
Note: Security Group names cannot have spaces in them. Use an
underscore “_” character instead.
Deleting Security Groups
To delete a security group:
1.
From the Security Editor window Groups tab, select a security group
from the Security Groups list box.
2.
Click the Delete Group button. A dialog appears confirming the deletion.
3.
Click the Delete Group button.
Saving Changes to Group Privileges
From the Security Editor window, click the Save button.
Administration Guide
123
Visara Master Console Center
Viewing Security Group Permissions
To view the security group permissions, from the Master window, select the
Administration menu Configuration—Security option. The Security Editor
window appears. The Groups tab should be in front by default.
The Group Privileges and Users in Group toggle buttons near the bottom of
the Security Editor window modify the display.
Figure 15 Security Editor window, Groups tab
To view security group permissions:
1.
From the Security Editor window Groups tab, select a group from the
Security Groups list box.
2.
Click the Group Privileges toggle button to display the group’s
privileges.
3.
Select the Administration, Operations, Development, or Systems
toggle button for more information.
Note: The Security Editor window Groups tab includes the option to
allow members of a group to send and receive broadcast messages.
Both View and Update permissions allow group members to send
and receive messages.
124
© Visara International 2007
Chapter 8 Administering Users
Setting Security for Consoles
By default, members of a security group do not have access to a console. The
group permissions must be changed to VIEW (read-only access) or UPDATE
(read/write access) to allow access to the console. Changes only take effect when
a user logs out and back in again.
Console for CPU:OS combination:
If a console is defined in both CPU and OS sections of the system.cfg file (see
Chapter 5 MCC system.cfg Configuration File), the cpu and os selections must
be set to Update for members of the security group to have full access to the
console.
Note: Defining both a CPU and an OS for a console is a typical
configuration. It allows the console to be referenced by GCL
scripts, and permits a Console History Log to be generated.
Console for CPU:
If a console is defined in the CPU section of the system.cfg file and not in the OS
section, the cpu selection must be set to Update for members of the security
group to have full access to the console.
Note: If no OS is defined on a CPU, the os selection and drop-down list
are not shown.
Standalone Console:
If a console is not associated with a CPU or an OS, setting the Other selection to
Update allows members of the security group full access to the console.
Console with VIEW Permissions:
A console with VIEW permissions set contains a “View Only” status indication in
the status bar at the bottom of the console window. A console of this type
behaves like a printer console.
Note: A Command Console with VIEW permissions behaves as if
UPDATE permissions are set. The user has full read and write
access to the console.
Administration Guide
125
Visara Master Console Center
Viewing Security Group Members
To view users in a security group:
1.
From the Security Editor window Groups tab, select a security group
from the Security Groups list box.
2.
Select the Users in Group toggle button to display users assigned to the
selected security group.
Users in the selected security group appear in the text box to the right of the
Security Groups list box.
Figure 16 Security Editor window, Group Members
This is a view-only window. It is not possible to add or remove users here—that
must be done in the MCC Users tab.
126
© Visara International 2007
Chapter 8 Administering Users
Viewing and Changing MCC Users
From the Master window, select the Administration menu
Configuration:Security option. Click the MCC Users tab to display users and
current groups.
Figure 17 Security Editor window, MCC Users tab
From the Security Editor window, MCC Users tab it is possible to:
Add a MCC user to a security group.
Remove a MCC user from a security group.
Create a new MCC user.
Administration Guide
127
Visara Master Console Center
Creating a new MCC User
When adding a new user, both a MCC user and a Unix login user must be
defined for the user account.
To add a new MCC User:
1.
From the Security Editor window MCC Users tab, click the New User
button. The Add MCC User window appears.
Figure 18 Add New MCC User window
2.
Enter the new user’s name in the Login Name: text box.
Note: It is critical that the Login Name entered in this window matches
exactly the login name entered when the Login User was created.
3.
Type any comments in the Comments: text box.
4.
Click the OK button. A new MCC user is created.
Note: New users do not initially belong to any security groups. Be sure to
add the security groups desired. If at least one security group is
not specified for the new user, an error message appears when
Save is selected, stating that no changes were made.
128
© Visara International 2007
Chapter 8 Administering Users
Adding a MCC User to a Security Group
To add a user to a security group:
1.
From the Security Editor window MCC Users tab, select a group from
the Available Groups list box.
2.
Click the Add button.
-
The group name then appears in the Current Groups list.
-
A shortcut to clicking the Add button is to double-click the group name in the
Available Groups list box.
Deleting a MCC User
To delete a MCC User:
1.
From the Security Editor window MCC Users tab, select the user from
the Users list box.
2.
Click the Delete User button. A dialog appears, asking to confirm the
deletion.
3.
Click the OK button.
Removing a MCC User from a Security Group
To remove a user from a security group:
1.
From the Security Editor window MCC Users tab, select the group to
delete from the Current Groups list.
2.
Click the Remove button.
Note: A shortcut to clicking the Remove button is to double-click the
group name in the Current Groups list box.
Administration Guide
129
Visara Master Console Center
Viewing and Changing Login Users
Users are created, modified, and deleted from the Security Editor window Login
Users tab. From the Master Console Center master window, select the
Administration menu Configuration: Security option. The Security Editor
window displays. Click the Login Users tab to display a list of login users.
Note: All users in Unix group “ics” are displayed.
Figure 19 Security Users window, Login users
From the Security Editor—window Login Users tab, it is possible to:
130
Create new login users.
Change a user’s login password.
Delete a login user.
© Visara International 2007
Chapter 8 Administering Users
Modifying Login Users
Caution: When working with login users, changes are being made to the
OS user system accounts immediately. These changes cannot
be reversed.
The Security Editor does not directly modify the list of Login Users. Thus,
selecting a user in the list has no effect on the program operation for New User
or Delete User. However, it does have an effect when changing another user’s
password.
When New User, Change Password, or Delete User is selected, a command
called “sudo” runs. This command temporarily modifies user permissions to
execute privileged commands. When sudo runs, it verifies that the current user
(the user account logged in) is configured as a sudo user privileged for the exact
command sudo will execute. Sudo then asks for the current user’s password.
Note: sudo “remembers” for several minutes that a password was
successfully entered. Therefore, running additional commands
from the Login Users window may not always result in a request
for a password.
Administration Guide
131
Visara Master Console Center
Creating New Login Users
To create a new login user:
1.
From the Security Editor window Login Users tab, click the New User
button. The Create Login User informational window appears. This
window display the message “Creating a new user in a separate
window…”
2.
The Create Login User text-entry window appears, running an interactive
session “sudo adduser”.
3.
Answer the questions in the text-entry window. The questions may vary
slightly, depending on the version of program. The typical questions and
the suggested answers are as follows:
Question or Message
Action
Please enter the password for
(current user) (times out after
5 min):
Enter the password of the current user
- your password. This account must
have permission to modify users.
Login name for the new user:
Choose a user name for the new user.
This name must be unique to the
system and be eight characters or less.
Full name for (new user’s
name):
Enter the new user’s full name,
such as John Doe.
The primary group for (new
user’s name) will be ics:
All MCC users should belong to the
group ics. This message confirms that
the new user has been automatically
assigned to that group.
Note: It is not required that the
account of each MCC user has “ics” as
its primary user group. However
each user id must appear in the ics
group for the user to run the MCC.
Another group that (new
user’s name) should be in.
(<cr> when done):
If this user will run the various
commands in the Login Users section,
type icsadmin and press the Return
key to add it to the group.
Most users need not belong to any
additional user groups. If so, press
the Return key without entering a
group name.
Parent of the home directory
for (new user’s name):
132
Type the directory in which the user’s
home directory will be created, and
press the Return key. Alternatively,
just press the Return key to accept
the displayed default.
© Visara International 2007
Chapter 8 Administering Users
Question or Message
Action
Logname: (new user’s name)
This summary allows you to
confirm the entries. Enter y or n.
Fullname: (new user’s full
name)
Primary group: ics
If n, you will start over with the
previous answers as defaults.
Other groups: (group list)
If y, the new user is created.
Home directory: (new user’s home
dir)
Is this correct? [y]
User (user’s name) has been
created.
Please enter the password
for (current user) (times
out after 5 min):
This is your password. If you have
entered it in the last 5 minutes,
you will not be prompted for it
again. You must have permission
to create new users.
Changing password for (new
user).
Enter the initial password for the
new user. When typing, the actual
password is not displayed, so type
carefully! Passwords must be 6
characters or longer, and contain
at least one non-alphabetic
character (a number or a special
character).
New password:
Retype new password:
Re-enter the password to verify.
Press RETURN when ready...
The process is finished. Pressing
the Return key causes the
Console window to disappear.
Table 28 Typical sudo adduser session
4.
Administration Guide
Click the OK button on the Create Login User window. A “Task
Completed” message is displayed.
133
Visara Master Console Center
Adding an Existing Unix User as a MCC User
Instead of creating a new login user for each MCC user (see Creating New Login
Users on page 132), it is possible to add existing users who already have valid
accounts in the OS as MCC users.
1.
Log in as root.
2.
Open the /etc/group file in vi or other editor. Add the name of the existing
user to the ics group by putting “,username” at the end of the line starting
with ics, for example, “,JohnD”. Save and close the file. For Linux
systems, use appropriate administration to add the username to the ics
group.
3.
Log in to a MCC administrator’s account. Create a MCC user for the user
name added in step 2. Refer to Creating a new MCC User on page 128 for
details.
4.
Add the user to the appropriate MCC security group(s). Refer to Adding a
MCC User to a Security Group on page 129 for details.
5.
If the user may run the MCC through gwcharcons, add the following to
the end of the user’s .profile file:
exec /usr/ics/bin/menu
6.
The default .xsession for the new user is obtained from
/usr/ics/skel/.xsession. Add items in /usr/ics/skel/.xsession to the end of the
user’s ~/.xsession file if the MCC is required to autostart when the user
logs in.
7.
If the user’s .xsession was edited in step 6, check the user can log into the
MCC from an X session.
For assistance with the steps listed above, contact your OS system
administrator.
134
© Visara International 2007
Chapter 8 Administering Users
Changing a Login User’s Password
To change a user’s password:
1.
From the Security Editor window Login Users tab, select the user in the
User list box.
2.
Click the Change Password button.
3.
The Create Login User text-entry window appears, running an interactive
session “sudo passwd <username>”.
4.
Answer the questions in the text-entry window. The questions may vary
slightly, depending on the version of program. The typical questions and
the suggested answers are as follows:
Question
Action
Please enter your
password:
Enter the password of the current user your password. This account must have
permission to modify users.
Changing password for
<new user>:
Enter the new password for the user. When
typing, the actual password is not displayed,
so type carefully! Passwords must be 6
characters or longer, and contain at least one
non-alphabetic character (a number or a
special character).
Retype new password:
Re-enter the password to verify. The MCC
ensures the same password was typed both
times.
Press RETURN when
ready...
The process is finished. Pressing the
Return key causes the Console window to
disappear.
Table 29 Typical sudo passwd <username> session
5.
Administration Guide
Click the OK button on the Change Login User Password window.
135
Visara Master Console Center
Deleting a Login User
To delete a user
1.
From the Security Editor window Login Users tab, click the Delete
User button.
2.
The Delete Login User text-entry window appears, running an interactive
session “sudo removeuser”.
3.
Answer the questions in the text-entry window. The questions may vary
slightly, depending on the version of program. The typical questions and
the suggested answers are as follows:
Note: In the following procedure, press Return to select the default
value when instructed. Default values are shown in square
brackets.
Question
Action
Please enter the password for ics
(times out in 5 min):
Enter the password of the current
user - your password, which is
“ics” in this example. This account
must have permission to modify
users.
Login name for the user to be removed:
[johnd]
Enter the login name of the
user to remove, in this example
“johnd”. This name should
match the name as displayed
in the list on the "Login Users"
screen. The default is the user
name selected in the Security
Editor. Alternatively, just press
Return with no name shown
to exit.
Remove the user’s home directory:[y]
This message asks if the user’s
home directory should be
removed. Select y (the default)
to remove the directory and
continue.
Logname: johnd
Remove johnd’s home directory: yes
Is this correct? [y]
Press RETURN when ready...
This message confirms the user
and home directory to remove.
Select y (the default) to remove
the user and home directory.
The process is finished.
Pressing the Return key
causes the Console window to
disappear.
Table 30 Typical removeuser session
136
© Visara International 2007
Chapter 8 Administering Users
4.
Click the OK button on the Delete User window.
Configuring login Groups
The sudo group MCCADMIN contains all users who are members of the login
group called “icsadmin”. Login groups are configured in /etc/group. The MCC
host’s /etc/group file should have a line similar to the following:
icsadmin:*:129:ics
This line defines a login group called “icsadmin”. It has a group ID of 129. In this
example, the only user in the group is “ics”.
Note: Any other users who will run any of the commands from the Login
Users screen must be listed on this line
Creating New Login Users on page 132 explains how to add a new user to the
icsadmin group. However, to add an existing user to this group so that they are
able to run the Login Users commands, this line in /etc/group must be edited by
hand. Contact Visara Technical Support for assistance if necessary.
Saving Changes in the Security Editor
To save changes in the security editor:
1.
From the Security Editor window, click the Save button. A window
appears asking for verification of the changes.
2.
Click the Save Changes button.
Click the Go Back button to return to the Security Editor window without saving
the changes.
The changes are made immediately for users logging in after the changes are
saved. Users already logged in are not affected until the next time they login.
Administration Guide
137
Chapter 9 Managing and Editing Events with
Event Manager
This chapter discusses how to modify event handling rules including:
Console message event rules.
SNMP trap event rules.
Time event rules.
Administration Guide
139
Visara Master Console Center
Overview
The MCC Event Manager watches for user-configurable events to occur,
performing a list of actions based upon the specific event. Event Manager is
configured through the Event Editor, allowing the user to specify event rules and
the actions to perform when a particular rule is triggered. Event Manager
supports three types of event rules:
Console Messages.
SNMP Traps.
Time Events.
The actions that can be performed in response to an event are:
140
Log a message to the Filtered Message window.
Generate an alert in the Alert window.
Execute a script.
Execute a host (OS) command on the MCC System (referred to as SYSEXEC).
Ignore (no action).
Key a command to a console.
© Visara International 2007
Chapter 9 Managing and Editing Events with Event Manager
How Event Manager Works
When the MCC is started, the Event Manager:
Begins scanning the printer queues for console messages.
Asks SNMP Trap Manager to forward all traps to Event Manager.
Begins checking scheduled rules against the current time and date.
When a new console message appears, Event Manager sequentially scans
through the Console Message Rules looking for a match. The first match causes
that rule’s actions to be performed. No additional rules are searched; the first
rule that matches is the only one that is triggered. Thus, event rule ordering is
an important factor.
When a new SNMP trap arrives, Event Manager sequentially scans through the
SNMP Trap Rules in a fashion similar to that for Console Messages.
When the current date and time match those specified in a Time Event, Event
Manager sequentially scans through the Time Event Rules, executing those
actions that are due.
For additional information, see Console Message Rules on page 143, SNMP Trap
Rules on page 152, and Time Event Rules on page 153.
When changes are made to the event rules using the Event Editor, a
configuration file is also changed. Event Manager normally only reads the
configuration file at startup. However, when configuration changes are saved,
Event Manager can be signaled to reprocess the event configuration file. Once
told to reprocess the configuration, Event Manager attempts to reset itself.
However, if there are pending actions to perform, Event Manager may not be
able to immediately reset. In this case, after 2 seconds of delay, the attempt will
fail and Event Editor brings up a screen indicating that Event Manager was too
busy. If this occurs, the choices are:
Attempt an immediate retry.
Initiate periodic retry (with 15 seconds delay between attempts).
Exit. In this case, Event Manager continues to use the old rules—the new
rules take effect at next system start or the next time changes are made and
saved, whichever occurs first.
Administration Guide
141
Visara Master Console Center
Editing Events
From the MCC Master Window, select the Administration menu—
Configuration:Event Editor option. The Event Editor window appears.
Note: Access to this option requires that the user have “Configuration:
Event Manager” security.
Figure 20 Event Editor, Console Messages tab
The Event Editor window displays events and the actions associated with those
events. An event may have more than one action assigned to it.
The Event Editor window has three tabs:
Console Messages.
SNMP Traps.
Time Events.
These tabs determine which rule type is configured. Within the work area is a
list of the event rules of the selected type. To the right of each event is the first
action to perform when the event rule is triggered. When opened, the folder icon
displays any remaining actions if the event rule has multiple actions. The folder
appears open or closed as appropriate, and a closed folder will have a plus sign
(+) on it if there are additional actions to be viewed by opening the folder.
142
© Visara International 2007
Chapter 9 Managing and Editing Events with Event Manager
Modifying Event Manager Rules
The following buttons are located on the Event Editor window:
New Rule. Create a new event rule.
New Action. Add a new action to the currently-selected event rule.
Modify. Modify the currently-selected event rule or action.
Move Up / Move Down. Move the currently-selected event rule or action up
or down in the list.
Delete. Delete the currently selected event rules or actions.
Double-clicking an event rule or action is equivalent to single-clicking and
pressing the Modify button.
Notes: Event Manager processes rules in the order in which they appear
in Event Editor. Only the first rule that matches the event being
processed is used. Thus, more specific event rules must appear
earlier in the list.
Actions are triggered in the order they appear, although they are
not guaranteed to complete before the next action in the list is
started.
Once changes are made, the Save button is enabled. Editing sessions can be
canceled at any time. When changes are saved, Event Manager can be told to
reread the configuration. Any changes do not take effect until the rule set is
saved and reread when Save is selected or when the system is restarted.
Common Rule Fields
To modify a rule, from the Master Console Center main window, select the
Administration menu—Configuration:Event Editor option. From the Event
Editor window, select an action from one of the tabs, then click the Modify
button.
All event rules have these features in common:
Status. How to treat the rule during processing:
-
Act. Active — perform the rule as normal.
-
Sim. Simulated — recognize the rule and log the actions to perform, but do
not actually perform them. This option is mainly used for testing.
-
Int. Inactive — ignore the rule entirely. This option is mainly used for
temporarily disabling a rule without completely deleting it.
Rule ID. Assigned by the system when the rule is first created, the Rule ID
helps to track events in Event Manager’s log file.
Administration Guide
143
Visara Master Console Center
Comment. This text area is for user notes. It can explain what the rule is
trying to do, and may be especially useful if the search criteria are obscure or
confusing. This is set from the Event Rule window.
Actions. The list of actions to perform when the rule is triggered.
Refer to the sections describing the specific rule types later in this chapter for
detailed information.
Common Action Fields
To modify a rule action or rule event, from the MCC Master Window, select the
Administration menu—Configuration:Event Editor option. From the Event
Editor window, select one of the tabs and select an action or event to modify,
then click the Modify button.
All actions have these fields in common:
Action. This field indicates the type of action from the list of available
actions to be performed.
Log Action. Log actions are saved to the /user/ics/log/event.log file.
Status. Active, Simulated, or Inactive. This is similar to the Status field for
event rules.
-
Active means to perform the action normally.
-
Simulated means log the action, but do not actually perform it.
-
Inactive means to skip the action.
Split Words By. This field is only available for actions associated with
Console Message rules. When performing parameter substitution, a word from
the input message can be specified. Normally, words are delimited by white
space—tabs and spaces. However, alternate delimiters can be substituted.
144
© Visara International 2007
Chapter 9 Managing and Editing Events with Event Manager
Additional Action Fields
In addition to the common action fields, the action selected from the Action
drop-down list box on the Modify Rule Action window determines what
additional fields appear on the Modify (action name) Rule Action window.
When the Log Filtered Message option is selected from the Action drop-down
list box, the following options appear:
OS Name. The name of the OS that should be associated with the message.
This is required when the action is linked to an SNMP Trap. When this action is
linked to a Console Message and this field is blank, the OS that originally
generated the console message is used.
Message. The actual text of the message. The message can include
parameter substitution (see Table 31), as can the Message field for Create Alert.
Status. The status number and color that this message should have in the
filtered message window. This field should not be confused with the Action
status.
When the Create Alert option is selected from the Action drop-down list box,
the following options appear:
Message. The actual text of the message. The message can include
parameter substitution.
Status. The status of the message in the alert window. This is similar to the
status option for Log Filtered Message, and should not be confused with the
Action status.
When the EXEC SCRIPT option is selected from the Action drop-down list box,
the following options appear:
Script Name. The name of the script to run.
Parameters. This allows script parameters to be listed. Parameter
substitution similar to that for Log Filtered Message and Create Alert can be
made (see Table 31).
Class. All scripts must be run on a particular class of object—Room, CPU, or
OS. This field allows specification of the class. For Console Messages, “Same as
Source” is a valid option; if selected, the source of the console message that
triggered the event is used.
Icon Name. Specifies the object on which to run the script—the Room, CPU,
or OS.
When the SysExec option is selected from the Action drop-down list box, the
following options appear:
Command. The Unix command to run.
Korn Shell. Normally, Unix commands should be run in a Korn shell.
Running commands outside a Korn shell, however, can save system resources.
When in doubt, run a command inside a Korn shell.
Administration Guide
145
Visara Master Console Center
When the KeyInput option is selected from the Action drop-down list box, the
following options appear:
146
Console Type. Choose a console to which to key the input.
Sort By. How the Console Name drop-down list box is sorted.
Console Name. Selects a console.
Key String. Used to build a parameter.
© Visara International 2007
Chapter 9 Managing and Editing Events with Event Manager
Console Message Event Rules
Console message event rules are edited from the Console Message Rule window.
From the Console Message Rule window, it is possible to add, modify, or delete
console message rules. The Move Up and Move Down buttons allow rule order
manipulation. The OK and Cancel buttons are used for saving and abandoning
changes, respectively. Changes do not become permanent until Save is pressed
in the main window.
From this window:
Modify console message event rules.
Modify console message rule actions.
Build console message scripts.
Modifying Console Message Event Rules
To modify console message event rules:
1.
From the Event Manager window Console Messages tab, select an event
rule.
2.
Click the Modify button. The Console Message Rule window appears.
Figure 21 Console Message Rule window
Administration Guide
147
Visara Master Console Center
In addition to the common rule fields (see Common Rules Fields on page 143),
Console Message event rules have the following additional fields:
Message Source. Console Messages come from OS and printer consoles.
Valid sources are a specific OS, OS Groups, or any OS.
Type. Selects whether the rule should match messages from a physical
printer of the OS, the MVS Agent of the OS, or both. The default is to match on
messages from the physical printer for the OS.
Search Expression. The regular expression for which to search for. Refer to
the Scripting Guide for details of regular expressions.
Start Position. The column position of the search can be limited. If
specified, Event Manager begins searching the input message at the specified
character position.
Character Count. The number characters in the input message for which to
search, relative to the start position.
Searching Console Message Rule Expressions
To search expressions:
1.
From the Event Editor window Console Messages tab, select an event.
2.
Click the Modify button. The Console Message Rule window appears.
3.
Click the Search Expression build (…) button. The Search Expression
Builder window appears.
Figure 22 Search Expression Builder window
The Search Expression Builder window provides another entry point for editing
the search expression.
148
© Visara International 2007
Chapter 9 Managing and Editing Events with Event Manager
Regular Expressions
The search string used for processing console messages is a regular expression.
Refer to the Scripting Guide for a discussion of regular expressions.
Modifying Console Message Rule Actions
To modify console message rule actions:
1.
From the Event Editor window Console Messages tab, select an event.
2.
Click the Modify button. The Modify Console Message Rule Action
window appears.
Figure 23 Modify Console Message Rule Action window
Note: This window changes based on the action type specified in the
Action drop-down list box. See Common Actions Fields on page
144 and Additional Action Fields on page 145 for more information
about this window.
Administration Guide
149
Visara Master Console Center
Building Console Message Parameters
When the Exec Script action option on the Modify Console Message Rule Action
window is selected, a parameter may have to be set, depending on the script
used.
To build time rule parameters:
1.
From the Event Editor window Console Message tab, select an action.
2.
Click the Modify button, or double-click an action. The Modify Console
Message Rule Action window appears.
3.
Click the Parameters build (…) button. The Build Parameters window
appears.
Figure 24 Console Message Build Parameters window
There are a number of action options that allow parameter substitution. For
example, if the following Message option is specified for a Log Filtered Msg
action from an OS named MyOS:
Input Source: &MS&
The following filtered message would result:
Input Source: MyOS
150
© Visara International 2007
Chapter 9 Managing and Editing Events with Event Manager
The Build Parameters window allows parameter substitution based upon the
associated event rule type. For console messages, this window also allows
modification of the “Split Words By” field.
The available substitutions for Console Message actions are listed in Table 31:
Substitution
Description
&M&
The entire console message
&MS&
The message source (OS Name)
&W1&
The first word of the input message as separated by
the “Split Words By” field.
&W2&
The second word of the message.
&Wn&
Word number n. For instance, “&W1&” matches the
first word in the console message. This substitution
is affected by the Split Words By action field.
&S1&
The first word of subexpression.
&S2&
The second word of subexpression.
&S9&
Results of the ninth expression.
Note: A maximum of nine expressions are permitted.
&QID&
Q queue reflecting the message that triggered the
event.
Table 31 Available Substitutions for Console Message Actions
Administration Guide
151
Visara Master Console Center
SNMP Trap Event Rules
SNMP Trap event rules are modified or created from the Trap Event Editor
window.
From this window, it is possible to:
Modify SNMP trap events.
Modify SNMP trap event actions.
Modifying SNMP Trap Event Rules
To modify SNMP trap event rules:
1.
From the Event Manager window SNMP Traps tab, select an event rule.
2.
Click the Modify button. The SNMP Trap Rule window appears.
Figure 25 SNMP Trap Rule window
3.
152
In addition to the common rule fields (see Common Rule Fields on page
143), SNMP Trap Event Rules have these parameters:
© Visara International 2007
Chapter 9 Managing and Editing Events with Event Manager
-
Agent Name. As part of SNMP configuration, the agents with which the
host communicates are specified. Groups of SNMP Agents can also be
created. This field allows specification of an SNMP Agent or an SNMP Agent
Group to associate with the rule. If neither an agent nor group is specified,
the rule applies to all agents.
-
Generic Number. Select a generic SNMP trap number from the drop-down
list. If a trap number is not specified, the rule applies to any trap number.
-
Enterprise OID. Specify an OID to send with the trap.
-
Enterprise Number. One of the generic trap numbers is 6—Enterprise
Trap. In this case, the trap has an additional important field—the enterprise
trap number. If an enterprise number is not specified, the rule applies to any
enterprise trap number.
-
Specific Number. Identifies a specific trap. Several traps may have the
same OID, but can be distinguished by the Specific Number.
Adding, Modifying or Deleting SNMP Trap Rule Actions
From the SNMP Trap window, it is possible to add, modify, or delete SNMP
trap rules associated with the trap. The Move Up and Move Down buttons
allow rule order manipulation. The OK and Cancel buttons save and abandon
changes, respectively. Changes do not become permanent until Save is selected
from the main window.
To add a new SNMP trap rule action to the trap rule:
1.
From the SNMP Trap window, click the New button. The New SNMP
Trap Rule Action window appears (see Figure 27).
2.
Define the entries in the Modify SNMP Trap Rule Action window as
necessary, then click OK.
To modify an SNMP trap rule action:
1.
From the SNMP Trap window, select an action.
2.
Click the Modify button. The Modify SNMP Trap Rule Action window
appears (see Figure 28).
3.
Edit the entries in the Modify SNMP Trap Rule Action window as
necessary, then click OK.
Administration Guide
153
Visara Master Console Center
To delete an SNMP trap rule action:
1.
From the SNMP Trap window, select an action.
2.
Click Delete, and then click OK on the confirmation box.
Creating or Modifying SNMP Trap Rule Actions
When the New or Modify button is selected on the SNMP Trap Rule window,
the New/Modify SNMP Trap Rule Action window appears.
Figure 26 Modify SNMP Trap Action window
Note: See Common Actions Fields on page 144 and Additional Action
Fields on page 145 for information about the Action and Status
field selections.
154
3.
Click the Script Name (…) button to select a script for this trap rule to
run. See the Selecting a Script for the Trap Rule to Execute section
following.
4.
Click the Parameters (…) button to select parameters for this Trap rule.
See the Building SNMP Trap Rule Parameters section following.
© Visara International 2007
Chapter 9 Managing and Editing Events with Event Manager
Selecting a Script for the Trap Rule to Execute
When the Script Name (…) button is selected in the New/Modify SNMP Trap
Rule Action window, the Select Script window appears.
Figure 27 Select Script window
To select a script for the trap rule to execute:
1.
Select a script from the Script list box.
2.
Click the OK button.
Administration Guide
155
Visara Master Console Center
Building SNMP Trap Action Rule Parameters
When the Parameters (…) button is selected in the New/Modify SNMP Trap
Rule Action window, the Build Parameters window appears.
Figure 28 Build Parameters window
Enter the necessary parameters, including substitution symbols if appropriate,
then click OK. The substitutions available for SNMP Traps are listed in Table
32:
156
© Visara International 2007
Chapter 9 Managing and Editing Events with Event Manager
Substitution
Explanation
&THN&
Trap Host Name. Only used if the MCC System can
resolve the hostname. If the IP address is not in the
MCC /etc/hosts file, and the MCC is unable to
determine the hostname through DNS, this value is
null (empty).
&TGN&
Trap generic number.
&TSN&
Trap specific number
&TOID&
Trap Object ID
&TT&
Trap Time / Duration
&TC&
Trap community
&TVBCNT&
Number of variable bindings
&TVBL&
Trap variable binding list
&TVBN<X>&
Name of the xth variable binding.
&TVBV<X>&
Value of the xth variable binding.
Table 32 Substitutions available for SNMP Traps
Administration Guide
157
Visara Master Console Center
Time Event Rules
Time event rules are modified or created from the Time Event rule window.
From this window, it is possible to:
Modify time events.
Modify time event actions.
Time Event Specification Requirements
To specify time events properly, follow these rules:
The start time and end time, if entered, must be in a valid format according
to a 24 hour clock. Midnight is entered as “00:00”, not “24:00”. If both start time
and end time are entered, the end time must be later than the start time.
Events that are run by a certain number of seconds, minutes, or hours cannot
continue past midnight. This is because the start time on the next day might not
match the next time the event is to be run, and the MCC system cannot resolve
this ambiguity. For example, if an event is repeated every 5 hours starting at
3:00 A.M., it runs at 3:00 A.M., 8:00 A.M., 1:00 P.M., 6:00 P.M., and 11:00 P.M. The
next time to run the event would either be at 3:00 A.M., because of the start time
specified for the rule, or 4:00 A.M., which is five hours after the last run time.
Therefore, the latest possible end time for an event is 11:59 P.M.
The start date and end date, if entered, must be valid according to the locale’s
date format.
At least one day of the week must be selected to run an event. In addition, if
an event is specified to run on a weekly basis, that particular day of the week
must be selected. For example, if the start date is 7 February 2007 (a
Wednesday) and the event will be run every two weeks, the checkbox for
Wednesday must be selected.
If an event is run every n days (where n is not a multiple of 7) or by any
number of months, all days of the week must be selected. For example, if an
event is started on a Monday and run every two days, it runs on Monday,
Wednesday, Friday, then Sunday, Tuesday, Thursday, and Saturday of next
week. All these days must be checked.
If an event is being run on the 29th, 30th, or 31st of the month, that event will
be run on the 1st of the next month in months that do not have those days. For
example, if a start date of January 31 is specified along with a repeat interval of
1 month, the task runs on January 31, March 1, March 31, May 1, May 31, and
so on.
158
© Visara International 2007
Chapter 9 Managing and Editing Events with Event Manager
Examples
To run an event every Monday, Wednesday, and Friday during February,
enter an appropriate start time and enter “02/01/2007” for the start date and
“02/28/2007” for the end date (assuming the U.S. locale). Make sure only
Monday, Wednesday, and Friday are selected, and all other days are cleared. It
is not necessary to specify that the event will be run every n days.
To run an event every 45 minutes from 8:00 A.M. until 5:00 P.M., enter “08:00”
for the start time, “17:00” for the end time, “45” in the text box next to “Repeat
every:”, and select “minutes” from the list next to it. It is not necessary to enter a
start date or an end date; if they are not specified, the event runs every day.
To run an event once on February 18 at 6:00 P.M., enter “18:00” for the start
time,“02/18/2007” for the start date, and “02/18/2007” for the end date.
Administration Guide
159
Visara Master Console Center
Modifying Time Event Rules
Modify or create a time event rule from the Time Event Rule window.
To modify time event rules:
1.
From the Event Manager window Time Events tab, select an event rule.
2.
Click the Modify button. The Time Event Rule window appears.
Figure 29 Time Event Rule window
In addition to the common rule fields (see Common Rule Fields on page 143), the
Time Event Rule window displays the following information:
Start Time. The first time of the day an event runs. This must be entered in
24-hour format: 9:15 A.M. is entered as 09:45, and 5:20 P.M. is entered as 17:20,
and so on. This field is required for all events.
End Time. The last time of the day an event runs. This is required if an
event repeats at intervals of a specified number of seconds, minutes, or hours.
Start Date. The first date on which an event is run, as a four-digit year in
the locale’s date format. For example, July 15th 2007 would be entered as
“7/15/2007” in the United States, but as “15/7/2007” in the United Kingdom. This
field is required if an event repeats at a specified number of days, weeks, or
months.
160
© Visara International 2007
Chapter 9 Managing and Editing Events with Event Manager
End Date. The last date on which an event is run. It is entered in the same
format as the start date. This field is optional.
Run on days. The day of the week is checked if an event runs on that day, or
is not checked if the event does not run that day. At least one day of the week
must be checked.
Repeat every. Specify how often an event runs. The first text box specified
the number of units, while the drop down list box to the right specifies the units
in which to repeat it. The options for the repeat units are seconds, minutes,
hours, days, weeks, or months. For example, to specify that an event runs every
45 minutes, enter “45” in the text box at the left and select “minutes” from the
drop down list on the right.
Creating a Time Event Rule Action
To create a new time event rule action for the current rule:
1.
From the Time Event Rule window, click on New. The New/Modify
Time Rule Action window appears (see Figure 32).
2.
Define the entries in the Modify Time Rule Action window as necessary,
then click OK.
Modifying a Time Event Rule Action
To modify a time event rule action for the current rule:
1.
From the Time Event Rule window, select an action, then click on
Modify. The New/Modify Time Rule Action window appears (see Figure
32).
2.
Edit the entries in the Modify Time Rule Action window as necessary,
then click OK.
Administration Guide
161
Visara Master Console Center
Creating or Modifying Time Event Rule Actions
When the New or Modify button is selected on the Time Event Rule window,
the New/Modify Time Rule Action window appears,see Figure 30.
Figure 30 New/Modify Time Rule Action window
Note: See Common Actions Fields on page 144 and Additional Action
Fields on page 145 for information about the Action and Status
field selections.
162
3.
Click the Script Name (…) button to select a script for this time rule
to run. See the Selecting a Script for the Time Rule to Execute section
following.
4.
Click the Parameters (…) button to select parameters for this Time rule.
See the Building SNMP Trap Rule Parameters section following.
© Visara International 2007
Chapter 9 Managing and Editing Events with Event Manager
Selecting a Script for the Time Rule to Execute
When the Script Name (…) button is selected in the New/Modify Time Rule
Action window, the Select Script window appears.
Figure 31 Build Parameters window
1.
Select a script from the Script list box.
2.
Administration Guide
Click the OK button.
163
Visara Master Console Center
Building Time Rule Action Parameters
When the Parameters (…) button is selected in the New/Modify Time Rule
Action window, the Build Parameters window appears. Enter the necessary
parameters, then click OK.
Figure 32 Time Rule Action Build Parameters window
No parameter substitutions are currently available for time events but you can
build your own parameters.
There are no substitutions symbols available for timed events.
164
© Visara International 2007
Chapter 10 Maintaining Log Files
This chapter describes:
The various log files that are created by the MCC.
How to view each log.
How to interpret the log entries.
Administration Guide
165
Visara Master Console Center
Overview
All messages are saved in log files, which fall into two categories:
Output messages from the host systems.
MCC messages, which are usually generated from scripts.
All log files are in standard ASCII format, and reside in the /usr/ics/log directory.
All logs can be accessed through the MCC GUI interface. All logs can be directly
accessed through the Unix operating system.
Note: Exercise caution when directly manipulating these files to avoid
data loss and corruption.
There are ten general MCC log files plus additional files for each optional console
history log, as listed in Table 33:
Active File Name
Backup File Name
Description
audit.log
audit.bak
Audit messages for all
consoles for which
auditing is enabled.
channel.log
channel.bak
Channel messages
history/<Printer
Name>/<date>
If more than one log
file exists for the same
console and day,
additional files have
.00001 (2nd file), .00002
(3rd file) etc. appended
to the name.
Console history logs
cpu.log
cpu.bak
CPU messages
icsexec.log
icsexec.bak
MCC execution messages
icsmaster.log
<none>
MCC startup, shutdown
messages, and internal
error messages.
messages.log
messages.bak
Filtered Message Window
messages
newmsg.log
newmsg.bak
Host messages not defined
in the Event Manager.
software.log
software.bak
Software messages
system.log
system.bak
All attached hosts’
incoming messages
unit.log
unit.bak
I/O unit messages
Table 33 MCC Log Files
166
© Visara International 2007
Chapter 10 Maintaining Log Files
Channel.log, cpu.log, software.log and unit.log each have a maximum length of
500 messages.
icsexec.log, icsmaster.log, messages.log, newmsg.log, and system.log each have a
maximum length of 10,000 messages.
When the active log file reaches the maximum length, the following actions
occur:
1.
The active log file is closed and renamed to the backup filename.
2.
The system runs the Reserved Script #logswap.scr, passing parameters to
it which describe the backup file. #logswap.scr can be modified to perform
a specific action based on those parameters. Refer to the Reserved Scripts
section of Chapter 1 of the Scripting Guide for more information.
3.
A new active log file is created.
Note: #logswap.scr can allow backup logs to be kept indefinitely. If it is
configured in this way, periodically check the logs and delete ones
that are not needed to conserve disk space.
Viewing Logs from the Unix Command Line
1.
Start a Unix console.
2.
Enter the following command:
cd /usr/ics/log
3.
To view additional screens, enter the following command to display the
log file one screen at a time:
less <logfile name>
Administration Guide
167
Visara Master Console Center
Log File Descriptions
alert.log: Alert Log
All actions performed with alerts are logged to alert.log. The format of the lines
in the Alert Log files is:
date
time
user
action AlertNum options
For example:
2007-01-14 14:31 arl
2007-01-14 14:32 arl
2007-01-14 14:33 arl
New 131 New 4 Test message
Mod 131 state Closed
Del 131
These three lines indicate that user arl did the following at the specified times:
Created a new alert, numbered 131. The initial state is new, status is new,
and message is “Test message”.
Modified this alert, changing its state to Closed.
Deleted this alert.
The only actions defined are New (New Alert), Mod (Modification of existing
Alert), and Del (Delete Alert).
Refer to Chapter 2 of the Operations Guide for information on modifying alerts.
168
© Visara International 2007
Chapter 10 Maintaining Log Files
audit.log: Audit Log
The audit log records commands issued manually from the MCC console, and
from MCC scripts. Outputs from all consoles for which auditing is enabled are
combined in the same Audit Log. To activate this option, edit the system.cfg file
and add a line to the console definition of each console to be audited containing
audit=yes
The audit log can be viewed only through the Unix command line.
The format of audit.log is as follows:
YYYYMMDD HHMMSS Console
User
keystrokes
Where YYYYMMDD=Year, Month, Date; HHMMSS=Hour, Minute, Second.
For example:
20070110 150838 MVS Console
oper
d t<Enter>
This line indicates that at 3:08:38 PM, on January 10th 2007, user “oper” issued
the “d t” command on the MVS Console. The command was completed with an
enter keystroke.
Keys that cannot be printed are displayed inside <>. Valid Codes appear in Table
34 Table of Valid Key Codes on page 170.
Administration Guide
169
Visara Master Console Center
Alt Clear
Alt CrSel
Alt_A to _Z
Alt_Backslash
Alt_Backspace
Alt_CentSign
Alt_Comma
Alt_DownArrow
Alt_Enter
Alt_EraseEOF
Alt_Insert
Alt_LeftBrace
Alt_LessThan
Alt_Period
Alt_PF13
Alt_PF16
Alt_PF19
Alt_Return
Alt_Semicolon
Alt_ShiftLock
Alt_SingleQuote
Alt_Slash
Alt_Space
Alt_Tab
Alt_UpArrow
AltCursor
AltGrave
AsgnCons
Attn
Backslash
Backspace
BackTab
Bkwd
Break
BrokenPipe
Cancel
CentSign
ChangeDisplay
Clear
Cmd
CommReq
Control_A to _Z
Control_Null
Copy
CrSel
CursrBlink
Delete
DevCancel
Diag
DMsgBkwd
DMsgFwd
DoubleLeft
DoubleRight
DownArrow
Dup
End
Enter
EraseEOF
EraseInput
Escape
ExSel
ExtColorBlue
ExtColorGreen
ExtColorInherit
ExtColorPink
ExtColorRed
ExtColorTurquoise
ExtColorWhite
ExtColorYellow
ExtHighlightBlink
ExtHighlightInherit
ExtHighlightInvers
e
ExtHighlightUnderline
FileSeparator
FldMark
Frwd
GroupSeparator
Home
Ident
Index
Insert
Intr
Irpt
IStep
Keyclick
LastCmd
Left
LeftArrow
LeftBrace
LineDisc
ModeSel
Msg
NotSign
NotSign
Null
PA1
PA2
PageDown
PageUp
Pause
PF1 to PF24
Play
Print
ProgSymbolA
ProgSymbolB
ProgSymbolC
ProgSymbolD
ProgSymbolE
ProgSymbolF
ProgSymbolInherit
Record
RecordSeparator
Refresh
Req
Reset
Restart
Return
Right
RightArrow
RightBrace
RightBracket
SolidPipe
SPMO
Start
Stop
SvPCE
SwapCons
SysReq
Tab
Test
Tilde
TOD
Underscore
UnitSeparator
UpArrow
ViewLog
VT100_App_DownArrow
VT100_App_LeftArrow
VT100_App_RightArrow
VT100_App_UpArrow
VT100_KP_0 to _9
VT100_KP_Add
VT100_KP_Decimal
VT100_KP_Divide
VT100_KP_F3
VT100_KP_Enter
VT100_KP_F1
VT100_KP_F2
VT100_KP_F4
VT100_KP_Multiply
VT100_KP_Subtract
Table 34 Table of Valid Key Codes
170
© Visara International 2007
Chapter 10 Maintaining Log Files
channel.log: Channel Log
The channel log contains channel messages. The channel log cannot be
deactivated and is populated by scripts. To direct a message into the channel log,
use the LOG script command:
LOG(LOG_CHAN, $Msg)
The channel log can be viewed only through the Unix command line.
When channel colors are manually changed with the Icon command of the MCC,
a message can be entered which is recorded to this log.
The format of channel.log is as follows:
CYYYYMMDD
HHMM Scriptname
Message
Where C=Color/Status; YYYYMMDD=Year, Month, Date; HHMM=Hour,
Minute.
For example:
420071204
420071204
0829 #dilost
0829 #dolost
D/I BOX LOST.
D/O BOX LOST.
This indicates that on December 4th 2007 at 8:29 AM, the #dilost script logged
the message “D/I BOX LOST” in the channel log. At the same time, the #dolost
script logged the message “D/O BOX LOST” into the channel.log. Both messages
were logged as Status Number 4.
Administration Guide
171
Visara Master Console Center
Console History Log
The MCC maintains Console History Logs that contain recent event messages for
selected consoles.
The console history logger program starts each time the MCC is started or
restarted. At startup, it begins reading the MCC message queue for messages
directed to consoles that have history logging configured. Each such message is
copied to the history log file for the particular console.
At the start of each day, the console history logger starts a new log file for
each console. At the same time, it purges any log files that are older than the
number of days specified in the system.cfg file.
For each such console, one log file is created each day. The file name includes
the name of the console to aid identification. However, each time the current log
file exceeds 10 MB, a new file is created. Consequently, several log files may
exist for the same console and the same day.
When viewing console history, all messages are displayed in one viewer,
unless the information for all logs for the console exceeds 10MB. If this limit is
exceeded, each file is displayed in its own window and the PREV and NEXT
options can be used to navigate between the logs.
Console history logs are maintained for consoles that are defined as printer
consoles – this is how messages are placed in the message queue. For mainframe
consoles, logs are maintained for printer consoles only. For non-mainframe
consoles, such as telnet or RS232, logs are maintained for printers defined in the
OS definition with the “printer=” key. In each case, the number of days history to
retain must be defined in the system.cfg file, as shown in the following examples.
If this entry is omitted or days_history=0, no console history log is kept for the
console. The messages in the Console History Log files are copied from the MCC
message queue. When a user views the console history log, the messages are
displayed in the normal format for the console, with a time and date stamp
inserted at the beginning of each message.
Note: If upgrading from a previous MCC release, console history log files
are renamed to include the console name. For example, a file called
/usr/ics/log/history/zeus/2007-07-16.0001 is renamed
/usr/ics/log/history/zeus/zeus 2007-07-16.0001.
Viewing New Console History Messages as Received
New console history messages are added to the bottom of the history log file as
they are received. If the cursor is located on the bottom line of the log, the new
messages can be viewed as they occur. The cursor remains “locked” in the same
position, regardless of how many messages are received. To move the cursor to
the bottom of the log, use the Motif shortcut keys <Ctrl>+End, or the Page Up,
Page Down, or arrow keys. It is also possible to scroll to the end of the log, then
click the mouse to place the cursor on the last line.
172
© Visara International 2007
Chapter 10 Maintaining Log Files
Note: Take care when using the scroll bar to navigate through the log, as
the cursor remains where it was last placed. If the cursor is on the
last line, when a message is received while viewing the middle of
the log, the display jumps immediately to the bottom of the log to
show the new data.
Viewing the History Log from a Console Window
If a history file is maintained for the displayed console, it can be viewed by
selecting the Console History option from the Window menu of the Console
window. If the message data is less than 10MB, all of the available history is
displayed, otherwise the most recent information is shown. If there is more than
10MB of message data, use the Next File and Previous File buttons to view
messages in history logs adjacent to the file that is currently displayed. These
buttons are disabled if there is less than 10MB of data.
Figure 33 Typical History Log from Console Window
Viewing the History Log from a GWCC (gwcharcons) Console
If a history file is maintained for the displayed console, it can be viewed by typing
the Ctrl-O command. The program “more” is used to display the messages. If the
data in the history file is less than 10MB, all of the available history is displayed,
otherwise the most recent information is shown. If the data in the history log
exceeds 10MB, use the “more” program commands Next (:n) and Previous (:p) to
scroll through the messages.
Administration Guide
173
Visara Master Console Center
Sample Console History Log Configuration
The following sample configuration shows the entries required to define an OS with an
telnet console and a printer, then enable console history logging for the printer only. Refer
to Chapter 5 MCC system.cfg Configuration File for more details of where to make these
entries.
[os mccdebugO]
type=unix
console=mccdebugC
printer=MCCdebug printer
[console mccdebugC]
interface=telnet
host=mccdebug
iotype=vt100
lock_timeout=5
[printer mccdebug printer]
interface=telnet
host=mccdebug
iotype-vt100
days_history=10
174
© Visara International 2007
Chapter 10 Maintaining Log Files
Troubleshooting Problems with Console History Logging
The console history log is not displayed if no console history is being maintained
for the associated printer. If console history is unavailable, check the following:
Run the configuration checker (see CFGCHK Program on page 210). The
checker displays warnings if Days History is specified inconsistently or
incorrectly, or if the printer is not referenced.
Check the historylogger.log file for messages indicating why the history
logger is ignoring the relevant printer. Printers are ignored if Days History is
omitted or is 0 days. Printers are ignored if no OS refers to the printer.
Consoles are associated with printers through an OS. There must be an OS
configured that refers to both the console and the printer associated with it.
cpu.log: CPU Log
The CPU log is populated by scripts using the LOG command:
LOG(LOG_CPU, $Msg)
The CPU log can be viewed only through the Unix command line.
When CPU colors are manually changed with the Icon command of the MCC, a
message can be entered which is recorded to this log.
The format of cpu.log is as follows:
CYYYYMMDD
HHMM
[Operator Initials or Script Name] Message
Where C=Color/Status; YYYYMMDD=Year, Month, Date; HHMM=Hour,
Minute.
For example:
220061212
Administration Guide
1349
JDA
GX8 has lost communications.
175
Visara Master Console Center
event.log: Event Log
Event Manager logs its activities into the event.log file. All lines in event.log
begin with a date and time stamp. At startup, Event Manager issues a “--gwEventMgrD Startup ---” message (with more dashes than shown here). After
that, format of the lines is as follows:
YYYY-MM-DD HH:MM:SS eventSeq eventStatus eventType ruleID eventDesc
YYYY-MM-DD HH:MM:SS eventSeq actStatus actType actDesc
Where:
YYYY is the four-digit year with Month (MM) and Date (DD) following, and
the time is in Hour:Minute:Second format. Time is recorded in 24-hour format.
eventSeq is the Event Sequence Number associated with a rule and its
actions. Each rule has a unique Event Sequence Number, and all of the actions
associated with that rule use the same Event Sequence Number.
eventStatus is one of three values: ACTIVE, SIMULATED, or INACTIVE.
eventType will also be one of three values: Console Msg Event, SNMP Trap
Event, or Time Event.
ruleID is the internal identification number that the MCC system uses to
identify the rule. The ruleID is visible in the Event Editor.
eventDesc is a description of the event. For example, if an event rule scans
for the phrase “Connection closed,” eventDesc contains the full text of the
triggering event. Thus, both “Connection closed.” and “Connection Closed by
foreign host.” activate the same event rule, but each event.log entry has different
eventDesc values.
actStatus is the status of the action. It has one of three values: ACTIVE,
SIMULATED or INACTIVE.
actType is the type of the action performed. It can be one of five values:
Create Fltrd Msg Action, Create Alert Action, SYSEXEC Action, Exec Script
Action, or Ignore Action.
actDesc is a full description of the action performed. For Ignore Action
actTypes, this is blank. For Create Fltrd Msg Action & Create Alert Action, this
contains the full text of the alert or filtered message, but no other data. For the
SYSEXEC Action, this lists the exact text of the command executed on the MCC
system. For the Exec Script Action, this is blank.
Each triggered event generates one message of the first type. Each action
associated with the event generates a message of the second type, if the action
has “Log” set.
176
© Visara International 2007
Chapter 10 Maintaining Log Files
Note: Events are logged in the order of initiation. However, it is possible
that the first action associated with a rule may appear in the log
after the entry for the second action associated with that rule. This
indicates that the first action did not fully begin before the second
action.
Administration Guide
177
Visara Master Console Center
Here are some sample Event Log entries:
2006-12-20
2006-12-20
2006-12-20
2006-12-20
2006-12-20
2006-12-20
2006-12-20
2006-12-20
2006-12-20
15:16:16
15:16:16
15:16:16
15:17:00
15:17:00
15:17:00
15:17:01
15:17:00
15:17:01
2
2
1
3
3
4
4
3
4
ACTIVE
ACTIVE
ACTIVE
ACTIVE
ACTIVE
ACTIVE
ACTIVE
ACTIVE
ACTIVE
Console Msg Event 5 - AIX - alpha1
Ignore Action
Ignore Action
Console Msg Event 2 - AIX - $ echo alpha3
System Cmnd Execute Action - mv /tmp/arl1 /tmp/arl2
Console Msg Event 2 - AIX - alpha3
System Cmnd Execute Action - mv /tmp/arl1 /tmp/arl2
Alert Generate Action - AIX $ echo alpha3
Alert Generate Action - AIX alpha3
The first line describes the triggering of event rule 5 -- a Console Message event
from OS AIX. Line two is the only action for rule 5 -- an Ignore. Line 3 is the
continuation of a previous event (identifiable by its Event Sequence number of 1)
-- another Ignore action. The full activities of events 3 and 4 (both Console
Message rule # 2) are displayed.
178
© Visara International 2007
Chapter 10 Maintaining Log Files
icsexec.log: MCC Execution Log
The MCC execution log contains all the messages automatically generated by the
MCC programs, both error messages and normal informational messages. When
the MCC automatically executes a script based on a condition, the details are
recorded here. The Execution Log can also be the target of a LOG statement:
LOG(LOG_EXEC, $Msg, %Status)
The MCC Execution Log can be viewed through the Unix command line, or
through the Execution Log Display window of the MCC GUI.
The format of icsexec.log is as follows:
CYYYYMMDD
HHMM [MsgID or script name] Message
Where C=Color/Status; YYYYMMDD=Year, Month, Date; HHMM=Hour,
Minute.
For example:
220061129
220061129
920061129
1143 PWR102I Power box monitor ended.
1143 CFG102I Configuration manager ended.
1948 MSW102I ics: Master window ended.
In this example, at 11:43 AM on November 29th 2006, the Power box monitor and
Configuration manager processes ended. Both messages were sent to the
Execution Log Window, and displayed as Status Number 2. At 7:48 PM on the
same day, user ics logged out, generating the message concerning Master
Window ending. This message had a Status Number of 9 (STATUS_NORMAL, or
pale green).
Note: Whenever a user logs in or out, the resultant startup and or logout
messages are recorded in the Execution Log, preceded by the
UserId.
Administration Guide
179
Visara Master Console Center
Icsmaster_YYYY-MM-DD: MCC Startup and Shutdown Error Log
Whenever the MCC system is shut down or started up, error messages are
recorded in this log file. The MCC reroutes stderr messages from all programs to
icsmaster_YYYY-MM-DD, adding color/status and date/time to the beginning of
some messages. This file cannot be the target of a LOG command. It can only be
viewed through the OS command line.
messages.log: Filtered Message Log
The Filtered Message log contains all the filtered messages from all hosts
attached to the MCC. It cannot be turned off, but can be the target of a LOG
statement:
LOG(LOG_FLT, $Msg)
The filtered message log can be viewed through the Unix command line, or
through the Filtered Messages window of the MCC GUI.
The format of the messages.log file is:
CYYYYMMDD HHMM [OS or script name]
message
Where C=Color/Status; YYYYMMDD=Year, Month, Date; HHMM=Hour,
Minute.
For example:
120070109 1848 Prod1
JES2 Stopped
The status in this message is the leading 1. On January 9th 2007 at 6:48 PM, the
Prod1 OS issued the message “JES2 Stopped.”
180
© Visara International 2007
Chapter 10 Maintaining Log Files
newmsg.log: New Messages Log
When Event Manager is processing console messages and a console message does
not match any rule in the list of event rules, the message is written to the New
Messages Log, newmsg.log. This log can identify new messages to handle with
automation scripts.
Where possible, this log should be empty—no new messages should be logged
here. Check this file every one or two weeks, and note any new messages the
MCC has received. It may be advisable to check this log more frequently in the
period after initial installation.
To stop a message being logged here, add a rule for it in the Event Manager. For
the messages that are unimportant or are not to be logged to the Filtered
Message Window, code the rule with an action of “ignore”, or with no action at
all. Refer to Chapter 9 Managing and Editing Events with Event Manager for
more information on creating rules and actions.
To view the newmsg.log, select the Administration—Logs—New Messages option
from the Master Window.
The format of the newmsg.log is as follows.
The format of this file is:
OS Message
For instance:
Solaris Login:
AIX $ ls
The OS name is right-justified in an 8-character field, and has been bolded here
for clarity. If the OS name exceeds eight characters, the message text is offset so
that the complete OS name is printed.
Administration Guide
181
Visara Master Console Center
software.log: Software Messages Log
The Software Messages Log contains only those messages that have been
explicitly logged with this syntax:
LOG(LOG_SW, $Msg)
This log may be populated by scripts.
When OS colors are manually changed with the Icon command of the MCC, a
message can be entered which is recorded to this log.
The format of the logged data is:
CYYYYMMDD HHMM [Operator Initials or script name] message
Where C=Color/Status; YYYYMMDD=Year, Month, Date; HHMM=Hour,
Minute.
For example:
420061212 1351 JDA Prod1 restored to normal colors.
182
© Visara International 2007
Chapter 10 Maintaining Log Files
system.log: Host System Messages Log
The Host System Log contains the raw, unprocessed text of all printer messages
received by the MCC from host systems. It can be viewed from the Unix
command line, or by selecting the Other—System Messages Log menu option.
The format is:
2OS
Text
ContFlag
The first character in the line will always be a 2. This is followed by the OS
Name and the message text. Appended to the end of the line is the continuation
flag -- a 0 or 1. Each line has a fixed length of 162 characters. An example with
most of the spaces between the text and continuation flag is:
2PROD1
2PROD1
0E25 CTC OFFLINE
0E26 CTC OFFLINE
1
0
The continuation flag indicates whether the next message is part of the same
burst of traffic from the mainframe. The response to a particular console
message may result in numerous lines of output, with continuation flag of 1
occurring more than once; however, the last line of response to the command will
always have a continuation flag of 0.
unit.log: I/O Unit Messages Log
The Unit Messages log is populated by scripts. It can be updated through the
MCC GUI’s Icon command or through a LOG command:
LOG(LOG_IO, $Msg)
It can only be viewed through the OS command line.
Administration Guide
183
Chapter 11 Backing Up and Restoring MCC
Software
This chapter discusses how to back up and restore MCC files and scripts.
Administration Guide
185
Visara Master Console Center
Overview
It is important to backup the MCC, particularly custom scripts, to safeguard
against unexpected problems. To ease the task of creating backups, MCC scripts
are provided for automatically copying the files to tape.
Full
MCC System
Scripts Only
Backup
fullbackup
MCCbackup
scriptbackup
Restore
See Full Restore on
page 187.
MCCrestore
scriptrestore
Table 35 Backup and Restoration Scripts
Backing Up Files
To backup files:
1.
Insert a tape into the MCC tape drive.
2.
Execute the appropriate script:
-
To backup the entire file system, select /usr/ics/bin/fullbackup. Run this script
as root.
-
To backup all MCC files, including configuration and script files, select
/usr/ics/bin/MCCbackup.
-
To backup only MCC scripts, select /usr/ics/bin/scriptbackup.
3.
Remove the tape, label it, and store it in a safe place.
Note: The tape includes a date stamp and a dump of the disklabel. The
files are /usr/tmp/date and /usr/tmp/disk. They are included in the
tar file at the beginning of the tape.
186
© Visara International 2007
Chapter 11 Backing Up and Restoring MCC Software
Restoring Scripts
Caution: Do NOT try to run scriptrestore except on a tape generated by
scriptbackup. Also, do NOT attempt to do a MCCrestore except
on a tape generated by MCCbackup. Data loss or corruption
may result.
Full Restore
This procedure assumes the MCC has a fully installed operating system with
correctly partitioned files.
1.
Login as root.
2.
Enter the following commands to replace the root partition with the
backup files:
#mt –f /dev/nrmt0h fsf
# cd /
# restore -Yrv
3.
Enter the following commands to move the tape to the third section on the
tape where the /usr partition resides.
# mt –f /dev/nrmt0h fsf 2
# cd /usr
4.
Enter the following command to replace the /usr partition with the
backup files.
# restore –Yrv
5.
Enter the following command to reboot the system and restore the MCC.
# sync; sync; shutdown –rf now
Administration Guide
187
Visara Master Console Center
Restoring Other Files
188
1.
Insert the appropriate tape into the MCC tape drive.
2.
Execute the appropriate script:
-
To restore ALL MCC files, including binaries, configuration, and script files,
select /usr/ics/bin/MCCrestore. This restores the files to the CURRENT
directory. VISARA recommends restoring files to /tmp or /usr/tmp, and then
copying the relevant files to the proper subdirectory under /usr/ics.
-
To restore only MCC scripts, select /usr/ics/bin/scriptrestore. This restores the
files to the CURRENT directory. VISARA recommends restoring files to /tmp or
/usr/tmp, and then copying the relevant files to the proper subdirectory under
/usr/ics.
© Visara International 2007
Chapter 12 Setting MCC System Date and Time
This chapter describes how to adjust the MCC’s date and time when necessary. A
procedure is also given for selecting the correct time zone.
Administration Guide
189
Visara Master Console Center
Setting Date and Time
Occasionally, it may be necessary to reset the MCC system date and/or time.
Unix handles both daylight savings time and leap years by automatically
changing the time or date, so normally no manual time adjustments are
required.
Note: Changing the year requires additional steps. If the year needs to
be changed, consult the Unix man pages on the date command.
To change the date or time:
1.
Enter single user mode by shutting down the system and, at the “>>>”
prompt, entering “boot -s”.
2.
On the MCC system console, log in with user id “root”.
3.
Enter the date command:
date mmddhhnn
where mm=month, dd=day, hh=hour, and nn=minutes
4.
When the prompt returns, verify the date/time is correct by repeating the
date command with no values after it:
date
5.
Logout by typing
exit.
190
© Visara International 2007
Chapter 12 Setting MCC System Date and Time
Changing the Time Zone
To change the time zone information, perform the following steps:
1.
On the MCC system console, log in with user id “root”.
2.
Change to the /etc/zoneinfo directory:
cd /etc/zoneinfo
3.
Use the following command to list and browse through all time zone files:
ls | more
4.
Pick the appropriate time zone and write down the file name. For
example, in the US subdirectory, Mountain is the file name of the
timezone for the US Mountain area.
rm localtime
ln -s ./<appropriatezonefile> ./localtime
(e.g. ln -s ./US/Mountain ./localtime)
Administration Guide
191
Chapter 13 Printing from the MCC
This chapter describes how to configure a printer for use with the MCC. It does
NOT describe how to use printer consoles through the MCC.
Administration Guide
193
Visara Master Console Center
Overview
The ability to print files directly from the MCC may prove useful in some
situations. Configuring the printer (NOT to be confused with printer consoles) is
relatively straightforward. The MCC can print to an LP/LPD capable printer, or
to a printer host which has been configured to accept print requests from other
machines.
Configuring Printing
To configure the MCC for TCP/IP network printing:
1.
Define the print host in /etc/hosts or DNS.
2.
Ping the print host by name to verify name resolution and print host
availability.
3.
Log in as root and execute the following steps. Enter the text in bold and
verify the responses are as shown. <cr> means press the Enter key.
# ping -c2 laserjet5
PING laserjet5.visara.com (204.220.32.90): 56 data bytes
64 bytes from 204.220.32.90: icmp_seq=0 ttl=60 time=4 ms
64 bytes from 204.220.32.90: icmp_seq=1 ttl=60 time=3 ms
----laserjet5.visara.com PING Statistics---2 packets transmitted, 2 packets received, 0% packet loss
round-trip (ms) min/avg/max = 3/3/4 ms
# /usr/sbin/lprsetup
Digital UNIX Printer Setup Program
Command < add modify delete exit view quit help >: a
Adding printer entry, type '?' for help.
Enter printer name to add [0] : <cr>
For more information on the specific printer types
Enter `printer?'
Enter the FULL name of one of the following printer types:
cp382d
fx80
hpIIP
la30w
la424
la88
194
dl1152w
hp4M
hpIV
la30w_a4
la50
la88c
dl5100w
dl510ka
ep1050+
fx1050
hp4MPlus
hp4MPlus_a4 hpIIID
hpIIIP
ibmpro
la280
la30n
la30n_a4
la324
la380
la380cb
la380k
la70
la75
la84
la86
la90
lf01r
lg02
lg04plus
© Visara International 2007
Chapter 13 Printing from the MCC
lg06
lg08plus
lg12
lg12plus lg31
lgl04plus
lgl08plus lj250
ln03
ln03ja
ln03r
ln03s
ln05
ln05ja
ln05r
ln06
ln06r
ln07
ln07r
ln08
ln08r
ln09
ln10ja
ln14
ln17
ln17_a4
ln17ps
ln17ps_a4 ln82r
nec290
ps_level1 ps_level2 remote
xf
unknown
generic_ansi
generic_ansi_a4
generic_text
generic_text_a4
or press RETURN for [unknown] : remote
Enter printer synonym: hp5
Enter printer synonym: laser5
Enter printer synonym: <cr>
Set spooler directory 'sd' [/usr/spool/lpd] ? <cr>
Set printer error log file 'lf' [/usr/adm/lperr] ? <cr>
Set remote system name 'rm' [] ? laserjet5
Set remote system printer name 'rp' [] ? text
Enter the name of the printcap symbol you wish to modify. Other
valid entries are:
'q'
to quit (no more changes)
'p'
to print the symbols you have specified so far
'l'
to list all of the possible symbols and defaults
The names of the printcap symbols are:
af
lp
rp
xs
Ps
br
mc
rs
ya
Sd
cf
mx
rw
yd
Si
ct
nc
sb
yj
Ss
df
nf
sc
yp
Ul
dn
of
sd
ys
Xf
du
op
sf
yt
fc
os
sh
Da
ff
pl
st
Dl
fo
pp
tf
It
fs
ps
tr
Lf
gf
pw
ts
Lu
ic
px
uv
Ml
if
py
vf
Nu
lf
rf
xc
Or
lo
rm
xf
Ot
Enter symbol name: mx
Enter a new value for symbol 'mx'? [1000] 0
New 'mx' is '0', is this correct? [y] <cr>
Enter symbol name: sh
Enter a new value for symbol 'sh'? [off] on
New 'sh' is 'on', is this correct? [y] <cr>
Administration Guide
195
Visara Master Console Center
Enter symbol name: q
Printer #0
---------Symbol type value
------ ---- ----lf STR /usr/adm/lperr
lp STR
mx INT 0
rm STR laserjet5
rp STR text
sd STR /usr/spool/lpd
sh BOOL on
Are these the final values for printer 0 ? [y] <cr>
Adding comments to printcap file for new printer, type '?' for help.
Do you want to add comments to the printcap file [n] ? : <cr>
Set up activity is complete for this printer.
Verify that the printer works properly by using
the lpr(1) command to send files to the printer.
Command < add modify delete exit view quit help >: q
4.
Edit the /usr/ics/bin/setupenv file, changing the value of LPDEST= and
PRINTER= to the name of the print host. In the example above, the value
would be either hp5 or laser5. (This is not necessarily the DNS name of
the printer. The DNS name should also be added to the synonym list for
the printer; although this is not shown in the example.)
5.
Shut down and restart the MCC.
6.
Print a file from the MCC screen editor. If the file does not print, verify
the /etc/hosts or DNS name matches the 'rm' entry in the /etc/printcap
file. Also verify the /usr/icsbin/setupenv variables LPDEST= and
PRINTER= match a printer synonym in the /etc/printcap file. Printer
synonyms reside on the first line of an /etc/printcap stanza delimited by
vertical bars (|). The example /etc/printcap file for the preceeding
example follows:
# cat /etc/printcap
lp|lp0|0|hp5|laser5:\
:lf=/usr/adm/lperr:\
:lp=:\
:mx#0:\
:rm=laserjet5:\
:rp=text:\
:sd=/usr/spool/lpd:\
:sh:
196
© Visara International 2007
Chapter 13 Printing from the MCC
If everything is configured correctly and the file still does not print, contact
Visara Technical Support.
Administration Guide
197
Chapter 14 Remote Access to the MCC
This chapter describes how to connect to the MCC from a remote character-based
terminal for troubleshooting or support purposes.
Administration Guide
199
Visara Master Console Center
Overview
While an X Terminal or emulation is the recommended method of using the
MCC, it is possible that such a terminal will not always be available. In this
situation, gwcharcons allows text-only remote console access from any VT100
terminal. This facility is particularly suited to offsite troubleshooting and
support.
Note: Security privileges for the Login User account and MCC User
account also apply to all remote access sessions.
200
© Visara International 2007
Chapter 14 Remote Access to the MCC
gwcharcons: Remote Console Access
gwcharcons is a non-GUI (character only) console that allows dial-in and telnet
access to the consoles configured in the MCC—the same consoles accessible from
the MCC GUI.
Starting gwcharcons
1.
Dial into or connect by telnet to the MCC.
2.
Log in with a valid MCC Login User account.
3.
When logging into the MCC by telnet or modem a limited menu of choices
is offered. Select one of these options:
1 MCC Character Console
2 MCC GUI Console
3 MCC HMC GUI Console
4 MCC Full GUI Environment
5 Unix Command Shell on MCC host
6 Exit
Select [1-6]:
To use gwcharcons, the Character Console, select option 1. To display a
standalone MCC console or the Console Selection Window, select option 2. To
display a standalone MCC HMC window, select option 3. To access all the
features of the MCC GUI environment, select option 4. To open a new telnet
session, or to work on the MCC system, select option 5. To end the session, select
option 6.
Notes:
For any type of extended work on telnet-enabled hosts (such as
Unix systems), VISARA recommends selecting option 5 and
opening up a telnet session to the host. This may not always be
possible due to technical or network failures.
If an asterisk (*) appears before the name of a console, it is
unavailable. This is equivalent to a red colored icon for that
console on the Console Selection window. The asterisk disappears
if the console later becomes available.
If a question mark (?) appears before the name of a console, an
internal problem is preventing the MCC connecting to the console.
This is equivalent to a yellow colored icon for that console on the
Console Selection window. The question mark disappears if the
console later changes state. Contact VISARA Technical Support if
the condition persists.
Administration Guide
201
Visara Master Console Center
If a non-numeric character is entered at the gwcharcons console
selection prompt, the screen may go blank. Enter a valid numeric
character to continue.
If a user’s console session becomes slow or unresponsive to the
MCC’s console manager program (for example, because of excess
message traffic), the MCC will disconnect from the specific user’s
console session, and log an error message. This prevents negative
effects on other users.
Using gwcharcons
When first entering gwcharcons, a list of the available consoles is displayed. The
following options are available for paging a long list of consoles: P for previous
page and N for next page. At the bottom of the screen is a listing of the control
keys that are available at other points in the system.
To access a console, type the console number and press <Return> or <Enter>
(depending on what sort of keyboard you are using). When using a console, type
normally, using <Return> for the <Enter> key.
Note: 3270-like terminals require extensive use of the softkeys option
discussed below.
Commands for gwcharcons
There are six commands available with gwcharcons.
Command
Description
Ctrl-E
Exit gwcharcons
Ctrl-F
Enter softkeys/function keys
Ctrl-K
Enter a control key
Ctrl-O
Display history log for this console.
Ctrl-R
Display or closes help for gwcharcons.
Ctrl-T
Return to Main Screen
Table 36 gwcharcons Commands
Note: Only Ctrl-E can be used on the initial screen. The other key
commands listed above have no effect when typed from the initial
screen.
Ctrl-E: Exit gwcharcons
Type Ctrl-E to exit the command-line console at any time.
202
© Visara International 2007
Chapter 14 Remote Access to the MCC
Ctrl-F: Enter Softkeys/function keys
The softkeys window lists the available function keys and softkeys. The use of
softkeys allows entry of keystrokes which would normally not be possible with
the keyboard currently being used. Help appears along the bottom. Enter the
number of a particular entry and press <Return>. Ctrl-F has no effect from the
main screen.
Ctrl-K: Enter control key
To send a control key, type Ctrl-K. This pops up a small window where the
alphabetic equivalent of the control key may be typed. For instance, to send CtrlC, type only a C then press <Return>. Ctrl-K has no effect at the main screen.
Ctrl-O: Display console history log
Display the console history log for this console. Refer to Console History Log on
page 172.
Ctrl-R: Remind
Displays help for gwcharcons. Enter the Ctrl-R command again to dismiss the
reminder.
Ctrl-T: Return to Main Screen
From any console, type Ctrl-T to return to the main program window. Ctrl-T has
no effect from the main screen.
Administration Guide
203
Chapter 15 Troubleshooting
This chapter provides basic guidance and steps to take in situations where the
MCC system is not operating correctly. It also provides information on the
following programs that are helpful when troubleshooting:
icsmaster
cfgchk
Administration Guide
205
Visara Master Console Center
General Information
If any errors occur while working with the MCC, contact VISARA Technical
Support. To help VISARA diagnose and correct problems, write down exact error
messages, and any actions you were performing at the time of the error.
The OS prompt for the root account is “#”.
Problems
Console Selection Window does not Appear
If a console does not appear in the All tab of the Console Selection Window, check
the access privileges in the security editor for the user groups in question.
(Administration menu—Configuration:Security option.)
Console does not appear
If, after selecting a console, no console window appears, check the following:
Is the console configured correctly? (Typically only applies to a new console,
or if changes have been made to the MCC.)
Check security to ensure the user has correct permissions to access the
related host system.
Window appears non-functional/non-operable
If a problem occurs with a MCC window, check the following:
Is the network connection between the user console (MCC terminal) and the
MCC host OK?
Is the MCC network hub correctly running?
Is the MCC system console operational?
If you can login as “root”, follow these steps:
1.
Create a backup as described in Backing Up Files on page 186.
2.
Restart the MCC.
Window does not appear/has disappeared
If a MCC window is not displayed, check the following:
206
Are other windows functional/operable?
If so, log in as “root” on the system console and follow these steps:
1.
Create a backup as described in Backing Up Files on page 186.
2.
Restart the MCC.
© Visara International 2007
Chapter 15 Troubleshooting
MCC stopped/suddenly shut down
Login as “root” on the system console and follow these steps:
1.
Create a backup as described in Backing Up Files on page 186.
2.
Restart the MCC.
Console does not function properly
If a problem affects a single console, and other consoles are functioning correctly:
Check the status of the console in the Console Selection window and/or the
GWCC (gwcharcons).
Check the relevant log files. Refer to Chapter 10 Maintaining Log Files for
details.
Is the console cable securely attached to the MCC rack?
Is the other end of the cable securely attached to the controller?
Is the console properly defined in the system.cfg file?
Has the console been properly generated (“genned”)?
Is console varied online, and as a console? If so, try varying off and back
online, and then as a console.
Are there any other consoles to the same OS? If so, are they functional?
Is Sysplex being used? If so, are there more than 99 consoles defined? If yes,
additional configuration of sysplex will be required.
If there is a Multiplexer involved, check if the MUX is plugged in. Is the MUX
properly connected?
Administration Guide
207
Visara Master Console Center
ICSMASTER
ICSMASTER is a troubleshooting aid that:
Identifies all VISARA programs that are running on the MCC server.
Closes the running programs.
Optionally, logs off all active users.
The options listed here are used with the ICSMASTER program. These options
should be used with bin/icsmaster.
208
Option
Description
-a
Display the current system alerts.
-A
Display just the count of current system alerts.
-b <msg>
Broadcast the given message to all system GUI users.
-B
Show the host boot setting.
-B<set>
Change the host boot setting where <set> is ‘on’ or ‘off’
-c
Display the current system console stati.
-C
Display just the count of current system consoles .
-D
Start system background daemons.
-F <num>
Force a cancel of the script on the given initiator
-h
Display help
-i
Display extensive help(advanced options and return codes)
-l
Check license, returning 0 for valid license, otherwise 5.
-l <name>
Check maximum allowed connections for given name, where
name is one of the keywords: System, Patrol, STARS, Users,
EBus, icon, Telnet, Command, TN3270, TN5250.
-n
Show more processing details (opposite of –q)
-q
Keep quit. All messages only go to the log.
-Q <userID>
Force the given user off of the system.
-r <class>
<name>
<script>
<parm1>
<parm2> …
Run script on CLASS (room, cpu, os, mvsagent), the object’s
name within the class (use double quotes if using embedded
spaces. case sensitive), script name (without using any
extension), and any optional parameters.
-s
Display the current system script stati.
-S
Display just the count of the current system scripts.
© Visara International 2007
Chapter 15 Troubleshooting
Option
Description
-t
Check if system is already running, retuning 11 if not,
otherwise 0.
-T
Display the length of time the system has been running.
-u
Display the current system users.
-U
Display just the count of current system users.
-v
This option allows you to verify the name and version of the
VISARA programs.
-V
Display details of the name and version
-x
Using this option identifies running processes and
resources, then exits. It does not start ICSMASTER. When
shutting down the MCC, run this option to verify that all
other programs are shut down prior to shutting down the
MCC.
-X
This option works like –x except that it attempts to remove
phantom processes and resources.
Caution: Using this option will shut down the MCC, log off
all users, and stop all scripts.
Table 37 ICSMASTER Options
Administration Guide
209
Visara Master Console Center
CFGCHK Program
The cfgchk configuration checker program checks the MCC configuration files for
errors, and writes error messages to stdout or the Execution Log. It may be run
either by choosing the Check Configuration option from the Administration
menu, or from the command line to troubleshoot configuration problems.
To run cfgchk from the menu, select the Administration menu—
Configuration:Check Configuration option. This runs the configuration checker,
routing any error messages to the Execution Log window.
cfgchk resides in the /usr/ics/bin directory, and should be executed from the
directory /usr/ics. When cfgchk is executed, it writes any warnings or errors to
stdout by default. Error messages can be rerouted to a file for viewing or
printing.
To run cfgchk, enter:
bin/cfgchk
For a more verbose output, enter:
bin/cfgchk -v
Option
Description
-s
Check the system.cfg file only (see system.cfg: MCC System on page 46). This
data values of each object defined in the system.cfg file. For example, this opt
console object does not have the interface value defined. It would not report a
missing CPU object.
-o
Check the objmgr.cfg file only (see objmgr.cfg: Object Manager on page 47). T
data values of each object defined in the objmgr.cfg file. Error reporting is the
-C
Check the references in all configuration files that have been read. For exam
conjunction with -s would generate a message for a group that references a m
-r
Generate a configuration report that lists the types of objects checked and th
-l
Use the MCC logging functions. If the MCC is running, this option directs all
Execution Log. These messages can be viewed in the Execution Log Window.
-v
Verbose output when checking. This option causes cfgchk to output progress
-e
Checks the event configurations for errors. *
-S
Checks the security file for errors. *
-h
Print the version of cfgchk and lists the available options.
Table 38 cfgchk Options
Note: You may wish to contact Visara Technical Support for assistance
with the options marked *.
210
© Visara International 2007
Chapter 15 Troubleshooting
Scanning Text Files for ASCII Control Characters
The MCC screen editor does not display ASCII control characters in text files
such as configuration (.cfg) files and scripts if the user inadvertently types them.
As these characters may cause errors, the configuration files and scripts should
be scanned after each editing sessions to identify them.
To use scanctrl, call it with a list of file names to scan using a command in the
following format:
/usr/ics/bin/scanctrl <filenames>
For example, the following scans the system.cfg and security.cfg files:
cd /usr/ics
/usr/ics/bin/scanctrl config/system.cfg config/security.cfg
Note: The scancrtl program requires perl to be installed in /usr/local/bin.
For information on installing perl, contact Visara Technical
Support.
The wildcard character (*) may be used.
Non-text files in referenced directories are ignored.
The program shows the files that contain ASCII control characters and prints
the affected line number(s), but takes no action to remove those characters.
Scanning the Configuration Files
To scan all configuration files after an editing session, enter:
/usr/ics/bin/scanctrl /usr/ics/config/*
An example output follows:
hermod:/usr/home/danders/pl> /usr/ics/bin/scanctrl /usr/ics/config/*
/usr/ics/config/charset.cfg, OK
/usr/ics/config/event.cfg, OK
/usr/ics/config/fonts.cfg, OK
/usr/ics/config/gclrund.txt, OK
/usr/ics/config/groups.cfg, OK
/usr/ics/config/icsmaster.txt, OK
/usr/ics/config/icsmaster.txt.bak, OK
/usr/ics/config/keymap.cfg, OK
/usr/ics/config/license.cfg, OK
/usr/ics/config/objmgr.cfg, 187 ******
/usr/ics/config/osgroup.cfg, OK
/usr/ics/config/rgb.txt, OK
/usr/ics/config/security.cfg, OK
Administration Guide
211
Visara Master Console Center
/usr/ics/config/snmp.cfg, OK
/usr/ics/config/status.cfg, OK
/usr/ics/config/system.cfg, 31, 108 ******
/usr/ics/config/MCCsessioncleanup.txt, OK
When no control characters are found, “OK” is appended to the end of the output
line. When control characters are found, the line is appended with the location of
the characters and the string “******”. In the example, control characters were
detected in objmgr.cfg on line 187, and in system.cfg on line 31 and 108.
Scanning Scripts
To scan all scripts after an editing session, enter:
/usr/ics/bin/scanctrl /usr/ics/script/*
An example output follows:
MCCqa:/usr/home/d> /usr/ics/bin/scanctrl /usr/ics/script/qa_*
/usr/ics/script/qa_alarm.scr, OK
/usr/ics/script/qa_alen.scr, OK
/usr/ics/script/qa_alert.scr, OK
/usr/ics/script/qa_areset.scr, OK
/usr/ics/script/qa_ascii.scr, OK
/usr/ics/script/qa_ascrn.scr, OK
/usr/ics/script/qa_asort.scr, OK
/usr/ics/script/qa_asquare_main.scr, OK
/usr/ics/script/qa_asquare_sub.scr, OK
/usr/ics/script/qa_assockeys.scr, OK
/usr/ics/script/qa_atstr.scr, 52, 54 ******
/usr/ics/script/qa_cat_read.scr, OK
/usr/ics/script/qa_charlose.scr, OK
/usr/ics/script/qa_charlose2.scr, OK
/usr/ics/script/qa_charlose3.scr, OK
/usr/ics/script/qa_charlose_call.scr, OK
/usr/ics/script/qa_charlose_sub.scr, OK
/usr/ics/script/qa_class.scr, OK
/usr/ics/script/qa_class_call.scr, OK
/usr/ics/script/qa_codec.scr, 67 ******
/usr/ics/script/qa_conslog.scr, OK
/usr/ics/script/qa_const_check.scr, OK
/usr/ics/script/qa_const_check2.scr, OK
/usr/ics/script/qa_event.scr, OK
/usr/ics/script/qa_event_key.scr, OK
/usr/ics/script/qa_event_log.scr, OK
/usr/ics/script/qa_eventedit.scr, OK
/usr/ics/script/qa_eventedit_sub.scr, OK
/usr/ics/script/qa_formatstr.scr, OK
212
© Visara International 2007
Chapter 15 Troubleshooting
Note: Compiled scripts (.scx files) are ignored.
Administration Guide
213
Chapter 16 Integrating Other Products with the
MCC
This chapter provides an overview of how to integrate some third-party products
for use with the MCC.
Administration Guide
215
Visara Master Console Center
Launching a Display of Console Selection window
To invoke the Console Selection window, the program or user must pass the
following arguments to the wrapper script:
MCC [-d display] gwconsole
where “display” is the name of the display on which the console “console_name”
will appear. If the display is not specified, the current value of the DISPLAY
environment variable is used by default.
Note: For details of how to invoke a Console Selection window from the
full MCC GUI environment, refer to Chapter 3 Selecting Consoles
in the Operations Guide.
To Display a Standalone Console
To invoke a standalone console, the program or user must pass the following
arguments to the MCC:
MCC [-d display] gwconsole –console “console_name”
where “display” is the name of the display on which the console “console_name”
will appear. If the display is not specified, the current display is used by default.
For example, the following command opens a “SysA” console on the display called
“user4:0.0”, where “SysA” is the name of the console as specified in the MCC
configuration:
MCC –d user4:0.0 gwconsole –console SysA
To Display a Printer Console
To invoke a printer console, the program or user must pass the following
arguments to the wrapper script:
MCC [-d display] gwconsole –printer “console_name”
where “display” is the name of the display on which the console “console_name”
will appear. If the display is not specified, the current display is used by default.
For example, the following command opens printer console “SysA PRN” on the
default display:
MCC gwconsole –printer “SysA PRN”
216
© Visara International 2007
Chapter 16 Integrating Other Products with the MCC
Implementation Notes
General
The launching program or user must be added with the proper security
permissions as:
-
A Unix login user.
-
A MCC user.
-
A member of the appropriate security group(s) as required.
Refer to Chapter 8 Administering Users for details.
Access permissions may also be required on the host system to run the
window.
The display can be set before the script is called, in which case it may be
omitted from the command.
Errors and other output messages from the script are routed to the Execution
Log, and are also echoed to the terminal from which the command was entered, if
applicable.
Consoles Only
In each command, “console_name” should be replaced by the actual console
name. This should be enclosed in quotes if the name includes spaces.
If a console name is not specified in the command, the Console Selection
window displays. If no arguments are specified, the MCC master window
displays, and the full MCC GUI environment is launched.
The console name must be entered exactly as specified in the system.cfg file,
for example, “SysA”, “SysA PRN”, or “EB_28_P”.
This feature may also be used to launch a Command Console. See Command
Console on page 96 for information on defining Command Consoles.
If “–printer” and “–console” are included in the same command, the program
does not run and no console is displayed.
Administration Guide
217
Visara Master Console Center
Ataman Telnet
This product may be used in place of the telnet client supplied with Windows NT.
Refer to the Ataman TCP Remote Logon Services User’s Manual which is
installed on the PC when the Ataman TCP Remote Logon Services program is
installed. The file name of this document is “userman.doc”.
218
© Visara International 2007
Appendix A Valid Color Names
Color Name
RGB Numbers
Color Name
RGB Numbers
alice blue
AliceBlue
antique white
AntiqueWhite
AntiqueWhite1
AntiqueWhite2
AntiqueWhite3
AntiqueWhite4
aquamarine
aquamarine1
aquamarine2
aquamarine3
aquamarine4
azure
azure1
azure2
azure3
azure4
beige
bisque
bisque1
bisque2
bisque3
bisque4
black
blanched almond
BlanchedAlmond
blue
blue violet
blue1
blue2
blue3
blue4
BlueViolet
brown
brown1
brown2
brown3
brown4
burlywood
burlywood1
burlywood2
240 248 255
240 248 255
250 235 215
250 235 215
255 239 219
238 223 204
205 192 176
139 131 120
127 255 212
127 255 212
118 238 198
102 205 170
69 139 116
240 255 255
240 255 255
224 238 238
193 205 205
131 139 139
245 245 220
255 228 196
255 228 196
238 213 183
205 183 158
139 125 107
000
255 235 205
255 235 205
0 0 255
138 43 226
0 0 255
0 0 238
0 0 205
0 0 139
138 43 226
165 42 42
255 64 64
238 59 59
205 51 51
139 35 35
222 184 135
255 211 155
238 197 145
burlywood3
burlywood4
cadet blue
CadetBlue
CadetBlue1
CadetBlue2
CadetBlue3
CadetBlue4
chartreuse
chartreuse1
chartreuse2
chartreuse3
chartreuse4
chocolate
chocolate1
chocolate2
chocolate3
chocolate4
coral
coral1
coral2
coral3
coral4
cornflower blue
CornflowerBlue
cornsilk
cornsilk1
cornsilk2
cornsilk3
cornsilk4
cyan
cyan1
cyan2
cyan3
cyan4
dark goldenrod
dark green
dark khaki
dark olive green
dark orange
dark orchid
dark salmon
205 170 125
139 115 85
95 158 160
95 158 160
152 245 255
142 229 238
122 197 205
83 134 139
127 255 0
127 255 0
118 238 0
102 205 0
69 139 0
210 105 30
255 127 36
238 118 33
205 102 29
139 69 19
255 127 80
255 114 86
238 106 80
205 91 69
139 62 47
100 149 237
100 149 237
255 248 220
255 248 220
238 232 205
205 200 177
139 136 120
0 255 255
0 255 255
0 238 238
0 205 205
0 139 139
184 134 11
0 100 0
189 183 107
85 107 47
255 140 0
153 50 204
233 150 122
Administration Guide
219
Visara Master Console Center
Color Name
RGB Numbers
Color Name
RGB Numbers
dark sea green
dark slate blue
dark slate gray
dark slate grey
dark turquoise
dark violet
DarkGoldenrod
DarkGoldenrod1
DarkGoldenrod2
DarkGoldenrod3
DarkGoldenrod4
DarkGreen
DarkKhaki
DarkOliveGreen
DarkOliveGreen1
DarkOliveGreen2
DarkOliveGreen3
DarkOliveGreen4
DarkOrange
DarkOrange1
DarkOrange2
DarkOrange3
DarkOrange4
DarkOrchid
DarkOrchid1
DarkOrchid2
DarkOrchid3
DarkOrchid4
DarkSalmon
DarkSeaGreen
DarkSeaGreen1
DarkSeaGreen2
DarkSeaGreen3
DarkSeaGreen4
DarkSlateBlue
DarkSlateGray
DarkSlateGray1
DarkSlateGray2
DarkSlateGray3
DarkSlateGray4
DarkSlateGrey
DarkTurquoise
DarkViolet
decwblue
DECWBlue
deep pink
deep sky blue
DeepPink
143 188 143
72 61 139
47 79 79
47 79 79
0 206 209
148 0 211
184 134 11
255 185 15
238 173 14
205 149 12
139 101 8
0 100 0
189 183 107
85 107 47
202 255 112
188 238 104
162 205 90
110 139 61
255 140 0
255 127 0
238 118 0
205 102 0
139 69 0
153 50 204
191 62 255
178 58 238
154 50 205
104 34 139
233 150 122
143 188 143
193 255 193
180 238 180
155 205 155
105 139 105
72 61 139
47 79 79
151 255 255
141 238 238
121 205 205
82 139 139
47 79 79
0 206 209
148 0 211
0 171 232
0 171 232
255 20 147
0 191 255
255 20 147
DeepPink1
DeepPink2
DeepPink3
DeepPink4
DeepSkyBlue
DeepSkyBlue1
DeepSkyBlue2
DeepSkyBlue3
DeepSkyBlue4
dim gray
dim grey
DimGray
DimGrey
dodger blue
DodgerBlue
DodgerBlue1
DodgerBlue2
DodgerBlue3
DodgerBlue4
firebrick
firebrick1
firebrick2
firebrick3
firebrick4
floral white
FloralWhite
forest green
ForestGreen
gainsboro
ghost white
GhostWhite
gold
gold1
gold2
gold3
gold4
goldenrod
goldenrod1
goldenrod2
goldenrod3
goldenrod4
gray
gray0
gray1
gray10
gray100
gray11
gray12
255 20 147
238 18 137
205 16 118
139 10 80
0 191 255
0 191 255
0 178 238
0 154 205
0 104 139
105 105 105
105 105 105
105 105 105
105 105 105
30 144 255
30 144 255
30 144 255
28 134 238
24 116 205
16 78 139
178 34 34
255 48 48
238 44 44
205 38 38
139 26 26
255 250 240
255 250 240
34 139 34
34 139 34
220 220 220
248 248 255
248 248 255
255 215 0
255 215 0
238 201 0
205 173 0
139 117 0
218 165 32
255 193 37
238 180 34
205 155 29
139 105 20
192 192 192
000
333
26 26 26
255 255 255
28 28 28
31 31 31
220
© Visara International 2007
Appendix A Valid Color Names
Color Name
RGB Numbers
Color Name
RGB Numbers
gray13
gray14
gray15
gray16
gray17
gray18
gray19
gray2
gray20
gray21
gray22
gray23
gray24
gray25
gray26
gray27
gray28
gray29
gray3
gray30
gray31
gray32
gray33
gray34
gray35
gray36
gray37
gray38
gray39
gray4
gray40
gray41
gray42
gray43
gray44
gray45
gray46
gray47
gray48
gray49
gray5
gray50
gray51
gray52
gray53
gray54
gray55
gray56
33 33 33
36 36 36
38 38 38
41 41 41
43 43 43
46 46 46
48 48 48
555
51 51 51
54 54 54
56 56 56
59 59 59
61 61 61
64 64 64
66 66 66
69 69 69
71 71 71
74 74 74
888
77 77 77
79 79 79
82 82 82
84 84 84
87 87 87
89 89 89
92 92 92
94 94 94
97 97 97
99 99 99
10 10 10
102 102 102
105 105 105
107 107 107
110 110 110
112 112 112
115 115 115
117 117 117
120 120 120
122 122 122
125 125 125
13 13 13
127 127 127
130 130 130
133 133 133
135 135 135
138 138 138
140 140 140
143 143 143
gray57
gray58
gray59
gray6
gray60
gray61
gray62
gray63
gray64
gray65
gray66
gray67
gray68
gray69
gray7
gray70
gray71
gray72
gray73
gray74
gray75
gray76
gray77
gray78
gray79
gray8
gray80
gray81
gray82
gray83
gray84
gray85
gray86
gray87
gray88
gray89
gray9
gray90
gray91
gray92
gray93
gray94
gray95
gray96
gray97
gray98
gray99
green
145 145 145
148 148 148
150 150 150
15 15 15
153 153 153
156 156 156
158 158 158
161 161 161
163 163 163
166 166 166
168 168 168
171 171 171
173 173 173
176 176 176
18 18 18
179 179 179
181 181 181
184 184 184
186 186 186
189 189 189
191 191 191
194 194 194
196 196 196
199 199 199
201 201 201
20 20 20
204 204 204
207 207 207
209 209 209
212 212 212
214 214 214
217 217 217
219 219 219
222 222 222
224 224 224
227 227 227
23 23 23
229 229 229
232 232 232
235 235 235
237 237 237
240 240 240
242 242 242
245 245 245
247 247 247
250 250 250
252 252 252
0 255 0
Administration Guide
221
Visara Master Console Center
Color Name
RGB Numbers
Color Name
RGB Numbers
green yellow
green1
green2
green3
green4
GreenYellow
grey
grey0
grey1
grey10
grey100
grey11
grey12
grey13
grey14
grey15
grey16
grey17
grey18
grey19
grey2
grey20
grey21
grey22
grey23
grey24
grey25
grey26
grey27
grey28
grey29
grey3
grey30
grey31
grey32
grey33
grey34
grey35
grey36
grey37
grey38
grey39
grey4
grey40
grey41
grey42
grey43
grey44
173 255 47
0 255 0
0 238 0
0 205 0
0 139 0
173 255 47
192 192 192
000
333
26 26 26
255 255 255
28 28 28
31 31 31
33 33 33
36 36 36
38 38 38
41 41 41
43 43 43
46 46 46
48 48 48
555
51 51 51
54 54 54
56 56 56
59 59 59
61 61 61
64 64 64
66 66 66
69 69 69
71 71 71
74 74 74
888
77 77 77
79 79 79
82 82 82
84 84 84
87 87 87
89 89 89
92 92 92
94 94 94
97 97 97
99 99 99
10 10 10
102 102 102
105 105 105
107 107 107
110 110 110
112 112 112
grey45
grey46
grey47
grey48
grey49
grey5
grey50
grey51
grey52
grey53
grey54
grey55
grey56
grey57
grey58
grey59
grey6
grey60
grey61
grey62
grey63
grey64
grey65
grey66
grey67
grey68
grey69
grey7
grey70
grey71
grey72
grey73
grey74
grey75
grey76
grey77
grey78
grey79
grey8
grey80
grey81
grey82
grey83
grey84
grey85
grey86
grey87
grey88
115 115 115
117 117 117
120 120 120
122 122 122
125 125 125
13 13 13
127 127 127
130 130 130
133 133 133
135 135 135
138 138 138
140 140 140
143 143 143
145 145 145
148 148 148
150 150 150
15 15 15
153 153 153
156 156 156
158 158 158
161 161 161
163 163 163
166 166 166
168 168 168
171 171 171
173 173 173
176 176 176
18 18 18
179 179 179
181 181 181
184 184 184
186 186 186
189 189 189
191 191 191
194 194 194
196 196 196
199 199 199
201 201 201
20 20 20
204 204 204
207 207 207
209 209 209
212 212 212
214 214 214
217 217 217
219 219 219
222 222 222
224 224 224
222
© Visara International 2007
Appendix A Valid Color Names
Color Name
RGB Numbers
Color Name
RGB Numbers
grey89
grey9
grey90
grey91
grey92
grey93
grey94
grey95
grey96
grey97
grey98
grey99
honeydew
honeydew1
honeydew2
honeydew3
honeydew4
hot pink
HotPink
HotPink1
HotPink2
HotPink3
HotPink4
indian red
IndianRed
IndianRed1
IndianRed2
IndianRed3
IndianRed4
ivory
ivory1
ivory2
ivory3
ivory4
khaki
khaki1
khaki2
khaki3
khaki4
lavender
lavender blush
LavenderBlush
LavenderBlush1
LavenderBlush2
LavenderBlush3
LavenderBlush4
lawn green
LawnGreen
227 227 227
23 23 23
229 229 229
232 232 232
235 235 235
237 237 237
240 240 240
242 242 242
245 245 245
247 247 247
250 250 250
252 252 252
240 255 240
240 255 240
224 238 224
193 205 193
131 139 131
255 105 180
255 105 180
255 110 180
238 106 167
205 96 144
139 58 98
205 92 92
205 92 92
255 106 106
238 99 99
205 85 85
139 58 58
255 255 240
255 255 240
238 238 224
205 205 193
139 139 131
240 230 140
255 246 143
238 230 133
205 198 115
139 134 78
230 230 250
255 240 245
255 240 245
255 240 245
238 224 229
205 193 197
139 131 134
124 252 0
124 252 0
lemon chiffon
LemonChiffon
LemonChiffon1
LemonChiffon2
LemonChiffon3
LemonChiffon4
light blue
light coral
light cyan
light goldenrod
light goldenrod yellow
light gray
light grey
light pink
light salmon
light sea green
light sky blue
light slate blue
light slate gray
light slate grey
light steel blue
light yellow
LightBlue
LightBlue1
LightBlue2
LightBlue3
LightBlue4
LightCoral
LightCyan
LightCyan1
LightCyan2
LightCyan3
LightCyan4
LightGoldenrod
LightGoldenrod1
LightGoldenrod2
LightGoldenrod3
LightGoldenrod4
LightGoldenrodYllw
LightGray
LightGrey
LightPink
LightPink1
LightPink2
LightPink3
LightPink4
LightSalmon
LightSalmon1
255 250 205
255 250 205
255 250 205
238 233 191
205 201 165
139 137 112
173 216 230
240 128 128
224 255 255
238 221 130
250 250 210
211 211 211
211 211 211
255 182 193
255 160 122
32 178 170
135 206 250
132 112 255
119 136 153
119 136 153
176 196 222
255 255 224
173 216 230
191 239 255
178 223 238
154 192 205
104 131 139
240 128 128
224 255 255
224 255 255
209 238 238
180 205 205
122 139 139
238 221 130
255 236 139
238 220 130
205 190 112
139 129 76
250 250 210
211 211 211
211 211 211
255 182 193
255 174 185
238 162 173
205 140 149
139 95 101
255 160 122
255 160 122
Administration Guide
223
Visara Master Console Center
Color Name
RGB Numbers
Color Name
RGB Numbers
LightSalmon2
LightSalmon3
LightSalmon4
LightSeaGreen
LightSkyBlue
LightSkyBlue1
LightSkyBlue2
LightSkyBlue3
LightSkyBlue4
LightSlateBlue
LightSlateGray
LightSlateGrey
LightSteelBlue
LightSteelBlue1
LightSteelBlue2
LightSteelBlue3
LightSteelBlue4
LightYellow
LightYellow1
LightYellow2
LightYellow3
LightYellow4
lime green
LimeGreen
linen
magenta
magenta1
magenta2
magenta3
magenta4
maroon
maroon1
maroon2
maroon3
maroon4
medium aquamarine
medium blue
medium forest green
medium goldenrod
medium orchid
medium purple
medium sea green
medium slate blue
medium spring green
medium turquoise
medium violet red
MediumAquamarine
MediumBlue
238 149 114
205 129 98
139 87 66
32 178 170
135 206 250
176 226 255
164 211 238
141 182 205
96 123 139
132 112 255
119 136 153
119 136 153
176 196 222
202 225 255
188 210 238
162 181 205
110 123 139
255 255 224
255 255 224
238 238 209
205 205 180
139 139 122
50 205 50
50 205 50
250 240 230
255 0 255
255 0 255
238 0 238
205 0 205
139 0 139
176 48 96
255 52 179
238 48 167
205 41 144
139 28 98
102 205 170
0 0 205
107 143 36
235 235 173
186 85 211
147 112 219
60 179 113
123 104 238
0 250 154
72 209 204
199 21 133
102 205 170
0 0 205
MediumForestGreen
MediumGoldenrod
MediumOrchid
MediumOrchid1
MediumOrchid2
MediumOrchid3
MediumOrchid4
MediumPurple
MediumPurple1
MediumPurple2
MediumPurple3
MediumPurple4
MediumSeaGreen
MediumSlateBlue
MediumSpringGreen
MediumTurquoise
MediumVioletRed
midnight blue
MidnightBlue
mint cream
MintCream
misty rose
MistyRose
MistyRose1
MistyRose2
MistyRose3
MistyRose4
moccasin
navajo white
NavajoWhite
NavajoWhite1
NavajoWhite2
NavajoWhite3
NavajoWhite4
navy
navy blue
NavyBlue
old lace
OldLace
olive drab
OliveDrab
OliveDrab1
OliveDrab2
OliveDrab3
OliveDrab4
orange
orange red
orange1
107 143 36
235 235 173
186 85 211
224 102 255
209 95 238
180 82 205
122 55 139
147 112 219
171 130 255
159 121 238
137 104 205
93 71 139
60 179 113
123 104 238
0 250 154
72 209 204
199 21 133
25 25 112
25 25 112
245 255 250
245 255 250
255 228 225
255 228 225
255 228 225
238 213 210
205 183 181
139 125 123
255 228 181
255 222 173
255 222 173
255 222 173
238 207 161
205 179 139
139 121 94
0 0 128
0 0 128
0 0 128
253 245 230
253 245 230
107 142 35
107 142 35
192 255 62
179 238 58
154 205 50
105 139 34
255 165 0
255 69 0
255 165 0
224
© Visara International 2007
Appendix A Valid Color Names
Color Name
RGB Numbers
Color Name
RGB Numbers
orange2
orange3
orange4
OrangeRed
OrangeRed1
OrangeRed2
OrangeRed3
OrangeRed4
orchid
orchid1
orchid2
orchid3
orchid4
pale goldenrod
pale green
pale turquoise
pale violet red
PaleGoldenrod
PaleGreen
PaleGreen1
PaleGreen2
PaleGreen3
PaleGreen4
PaleTurquoise
PaleTurquoise1
PaleTurquoise2
PaleTurquoise3
PaleTurquoise4
PaleVioletRed
PaleVioletRed1
PaleVioletRed2
PaleVioletRed3
PaleVioletRed4
papaya whip
PapayaWhip
peach puff
PeachPuff
PeachPuff1
PeachPuff2
PeachPuff3
PeachPuff4
peru
pink
pink1
pink2
pink3
pink4
plum
238 154 0
205 133 0
139 90 0
255 69 0
255 69 0
238 64 0
205 55 0
139 37 0
218 112 214
255 131 250
238 122 233
205 105 201
139 71 137
238 232 170
152 251 152
175 238 238
219 112 147
238 232 170
152 251 152
154 255 154
144 238 144
124 205 124
84 139 84
175 238 238
187 255 255
174 238 238
150 205 205
102 139 139
219 112 147
255 130 171
238 121 159
205 104 137
139 71 93
255 239 213
255 239 213
255 218 185
255 218 185
255 218 185
238 203 173
205 175 149
139 119 101
205 133 63
255 192 203
255 181 197
238 169 184
205 145 158
139 99 108
221 160 221
plum1
plum2
plum3
plum4
powder blue
PowderBlue
purple
purple1
purple2
purple3
purple4
red
red1
red2
red3
red4
rosy brown
RosyBrown
RosyBrown1
RosyBrown2
RosyBrown3
RosyBrown4
royal blue
RoyalBlue
RoyalBlue1
RoyalBlue2
RoyalBlue3
RoyalBlue4
saddle brown
SaddleBrown
salmon
salmon1
salmon2
salmon3
salmon4
sandy brown
SandyBrown
sea green
SeaGreen
SeaGreen1
SeaGreen2
SeaGreen3
SeaGreen4
seashell
seashell1
seashell2
seashell3
seashell4
255 187 255
238 174 238
205 150 205
139 102 139
176 224 230
176 224 230
160 32 240
155 48 255
145 44 238
125 38 205
85 26 139
255 0 0
255 0 0
238 0 0
205 0 0
139 0 0
188 143 143
188 143 143
255 193 193
238 180 180
205 155 155
139 105 105
65 105 225
65 105 225
72 118 255
67 110 238
58 95 205
39 64 139
139 69 19
139 69 19
250 128 114
255 140 105
238 130 98
205 112 84
139 76 57
244 164 96
244 164 96
46 139 87
46 139 87
84 255 159
78 238 148
67 205 128
46 139 87
255 245 238
255 245 238
238 229 222
205 197 191
139 134 130
Administration Guide
225
Visara Master Console Center
Color Name
RGB Numbers
Color Name
RGB Numbers
sienna
sienna1
sienna2
sienna3
sienna4
sky blue
SkyBlue
SkyBlue1
SkyBlue2
SkyBlue3
SkyBlue4
slate blue
slate gray
slate grey
SlateBlue
SlateBlue1
SlateBlue2
SlateBlue3
SlateBlue4
SlateGray
SlateGray1
SlateGray2
SlateGray3
SlateGray4
SlateGrey
snow
snow1
snow2
snow3
snow4
spring green
SpringGreen
SpringGreen1
SpringGreen2
SpringGreen3
SpringGreen4
steel blue
SteelBlue
SteelBlue1
SteelBlue2
SteelBlue3
SteelBlue4
tan
tan1
tan2
tan3
tan4
thistle
160 82 45
255 130 71
238 121 66
205 104 57
139 71 38
135 206 235
135 206 235
135 206 255
126 192 238
108 166 205
74 112 139
106 90 205
112 128 144
112 128 144
106 90 205
131 111 255
122 103 238
105 89 205
71 60 139
112 128 144
198 226 255
185 211 238
159 182 205
108 123 139
112 128 144
255 250 250
255 250 250
238 233 233
205 201 201
139 137 137
0 255 127
0 255 127
0 255 127
0 238 118
0 205 102
0 139 69
70 130 180
70 130 180
99 184 255
92 172 238
79 148 205
54 100 139
210 180 140
255 165 79
238 154 73
205 133 63
139 90 43
216 191 216
thistle1
thistle2
thistle3
thistle4
tomato
tomato1
tomato2
tomato3
tomato4
turquoise
turquoise1
turquoise2
turquoise3
turquoise4
violet
violet red
VioletRed
VioletRed1
VioletRed2
VioletRed3
VioletRed4
wheat
wheat1
wheat2
wheat3
wheat4
white
white smoke
WhiteSmoke
yellow
yellow green
yellow1
yellow2
yellow3
yellow4
YellowGreen
255 225 255
238 210 238
205 181 205
139 123 139
255 99 71
255 99 71
238 92 66
205 79 57
139 54 38
64 224 208
0 245 255
0 229 238
0 197 205
0 134 139
238 130 238
208 32 144
208 32 144
255 62 150
238 58 140
205 50 120
139 34 82
245 222 179
255 231 186
238 216 174
205 186 150
139 126 102
255 255 255
245 245 245
245 245 245
255 255 0
154 205 50
255 255 0
238 238 0
205 205 0
139 139 0
154 205 50
226
Table 39 Valid Color Names
© Visara International 2007
Index
3
3270 North American keyboard emulation ...........39
A
Add New MCC User window................................128
adding SNMP trap rule actions ...........................153
Alert Log ...............................................................168
alert.log file ...........................................................168
ASCII control characters
scanning text files for .................................................209
Ataman Telnet
integrating ..................................................................216
Audit Log...............................................................169
audit.log file ..........................................................169
B
backing up MCC files ...........................................186
BMC Patrol
integrating ..................................................................216
boot hosts
specifying .....................................................................32
Build Parameters window
description ..................................................................150
Build SNMP Trap Parameters window ...............156
building console message parameters .................150
C
cfgchk ....................................................................208
changing time zone ...............................................191
Channel Log..........................................................171
channel.log file ......................................................171
character set definition...........................................58
charset.cfg file .........................................................58
checking config files..............................................208
command console definition ...................................96
comments
in MCC configuration files...........................................41
configuration file management ..............................41
configuration files
scanning for control characters...................................209
Console History Log..............................................172
console message event rules
modifying ...................................................................147
Administration Guide
console message parameters
building...................................................................... 150
parameter substitution................................................ 150
Console Message rule actions
modifying................................................................... 149
Console Message Rule window
description ................................................................. 147
console message rules
searching expressions ................................................ 148
Console Message rules
modifying rules.......................................................... 147
searching expressions ................................................ 148
consoles
setting security ......................................................... 125
CPU definition ........................................................82
CPU group definition..............................................81
CPU Log ................................................................175
cpu.log file .............................................................175
creating a time event rule action .........................161
creating SNMP trap rule actions .........................154
creating time rule actions.....................................162
customizing the MCC terminal ..............................29
cycling the MCC......................................................17
D
date and time
setting ........................................................................ 190
deleting SNMP trap rule actions .........................153
directories
MCC ............................................................................ 19
E
emulation software
X-terminal.................................................................... 33
Event Log ..............................................................176
Event Manager
additional actions ....................................................... 145
and OS groups............................................................ 105
common actions ......................................................... 144
common rules............................................................. 143
event types supported................................................. 140
modifying rules.......................................................... 143
overview of operation ................................................ 141
event rules
common rules............................................................. 143
modifying................................................................... 143
time event .................................................................. 158
event.log file..........................................................176
Events
227
Visara Master Console Center
editing.........................................................................142
Events Editor window
description ..................................................................142
Exceed emulation software ....................................33
F
Filtered Message Log ...........................................180
font configuration ...................................................44
fonts.cfg file.............................................................44
G
gateway.tbl file .................................................30, 32
GCL status constants .............................................55
gclrund.txt...............................................................55
group definition ......................................................81
gwcharcons............................................................199
gwcharcons)...........................................................198
H
Host System Messages Log ..................................183
hosts
displaying on XDMCP menu .......................................29
hosts.tbl file.............................................................29
I
I/O Unit Messages Log .........................................183
icsexec.log file .......................................................179
ICSMASTER .........................................................206
configuring shutdown...................................................56
icsmaster.err.log file .............................................180
icsmaster.txt ...........................................................56
K
keyboard mappings.................................................45
keymap.cfg file ........................................................45
keys
in MCC configuration files...........................................43
L
license
renewing expired ..........................................................22
license key
file format.....................................................................21
installation ....................................................................21
log files
alert log ......................................................................168
228
audit log ..................................................................... 169
channel log................................................................. 171
console history log ..................................................... 172
CPU log ..................................................................... 175
event log .................................................................... 176
filtered message log ................................................... 180
hot system messages log ............................................ 183
I/O unit messages log................................................. 183
list of.......................................................................... 166
MCC execution log.................................................... 179
new messages log ...................................................... 181
software messages log ............................................... 182
startup/shutdown error log ......................................... 180
viewing ...................................................................... 167
Login Groups
configuring with sudo ................................................ 137
Login User
changing..................................................................... 130
changing password..................................................... 135
creating new............................................................... 132
deleting ...................................................................... 136
modifying................................................................... 131
viewing ...................................................................... 130
login users
defined ....................................................................... 121
M
masterwnd.txt.........................................................56
maximum number of MCC users .........................120
MCC
cycling ......................................................................... 17
restarting ...................................................................... 16
shutting down............................................................... 18
starting ......................................................................... 16
MCC configuration files..........................................44
comments..................................................................... 41
fonts.cfg ....................................................................... 44
keymap.cfg .................................................................. 45
keys.............................................................................. 43
objmgr.cfg.................................................................... 47
objmgr.cfg colorrules section....................................... 48
objmgr.cfg colors section............................................. 47
objmgr.cfg fields section.............................................. 50
objmgr.cfg list section.................................................. 49
objmgr.cfg options section........................................... 47
objmgr.cfg type section................................................ 49
osgrp ............................................................................ 45
sections ........................................................................ 41
security.cfg .................................................................. 45
snmp.cfg ...................................................................... 45
status.cfg file................................................................ 53
swlist............................................................................ 46
syntax........................................................................... 41
system.cfg .................................................................... 46
values........................................................................... 43
MCC directories
structure ....................................................................... 19
MCC Execution Log..............................................179
MCC files
© Visara International 2007
Index
backing up ..................................................................186
restoring .....................................................................187
MCC Startup and Shutdown Error Log ..............180
MCC system configuration.....................................46
MCC system configuration file...............................77
command console section.............................................96
CPU section..................................................................82
group section ................................................................81
MVS agent section .....................................................103
MVS section...............................................................102
OS section ....................................................................84
room section .................................................................80
section names ...............................................................78
unit section .................................................................101
MCC system configuration files
valid keys .....................................................................79
MCC terminal setup ...............................................26
MCC user
changing .....................................................................127
creating.......................................................................128
viewing.......................................................................127
MCC User
adding to security group .............................................129
deleting.......................................................................129
removing from security group ....................................129
MCC users
defined........................................................................121
maximum number of ..................................................120
messages.log file ...................................................180
MIB
adding.........................................................................117
MIBs available with MCC....................................115
modifying a time event rule action ......................161
modifying console message event rules ...............147
modifying console message rule actions ..............149
modifying event rules ...........................................143
additional actions........................................................145
common actions..........................................................144
common rules .............................................................143
modifying SNMP trap event rules .......................152
modifying SNMP trap rule actions ..............153, 154
modifying time event rules...................................160
modifying time rule actions..................................162
multiple xp.cfg configuration files .........................31
MVS agent definition............................................103
MVS definition......................................................102
lists............................................................................... 49
options ......................................................................... 47
types............................................................................. 49
objmgr.cfg file..........................................................47
colorrules section ......................................................... 48
colors section ............................................................... 47
fields section ................................................................ 50
list section .................................................................... 49
options section ............................................................. 47
type section .................................................................. 49
OS (operating system) groups
changing..................................................................... 105
defining...................................................................... 105
OS definition ...........................................................84
OS groups
add OS to ................................................................... 107
creating new............................................................... 107
deleting ...................................................................... 108
editing ........................................................................ 106
modifying................................................................... 107
removing OS from ..................................................... 107
OS groups configuration.........................................45
osgroup.cfg file ........................................................45
N
S
New Messages Log................................................181
newmsg.log file .....................................................181
scripts
maximum number of concurrent.................................. 55
scanning for control characters .................................. 209
searching console message event rule expressions
...........................................................................148
sections
in MCC configuration files .......................................... 41
security
adding MCC user to security group ........................... 129
adminstering .............................................................. 122
changing Login User's password................................ 135
O
object manager configuration.................................47
colorrules......................................................................48
colors............................................................................47
fields.............................................................................50
Administration Guide
P
parameter substitution........................................150
printing
from MCC.................................................................. 194
PS/2 keyboard emulation .......................................38
R
remote console access ...........................................199
restarting the MCC ................................................16
restoring MCC files...............................................187
room definition........................................................80
ROUTE_MGR .........................................................32
rule action (time events)
creating ...................................................................... 161
modifying................................................................... 161
rules (time events)
modifying................................................................... 160
229
Visara Master Console Center
levels of ......................................................................120
removing MCC user from security group...................129
saving changes in security editor................................137
Security Editor window Login Users tab
description ..................................................................130
Security Editor window MCC Users tab
description ..................................................................127
Security Editor window Security Groups tab
description ..................................................................122
security group
adding.........................................................................123
deleting.......................................................................123
saving changes to privileges.......................................123
viewing members .......................................................126
viewing permissions ...................................................124
security.cfg file........................................................45
Select Script window ....................................155, 163
setting date and time............................................190
setting up the MCC terminal .................................26
shutting down the MCC .........................................18
SNMP
adding a MIB..............................................................117
configuring .................................................................109
MIBs available ...........................................................115
using with scripts...................... See also Scripting Guide
SNMP agent
adding to group...........................................................113
configuring .................................................................111
definition ....................................................................111
modifying ...................................................................111
removing from group..................................................113
saving changes............................................................112
SNMP agent configuration.....................................45
SNMP agent group
configuring .................................................................113
creating new ...............................................................114
defined........................................................................111
modifying ...................................................................114
SNMP agent list window......................................114
SNMP agent window
description ..................................................................111
SNMP Editor window agent groups tab
description ..................................................................113
SNMP Editor window agents tab
description ..................................................................110
SNMP Trap Actions
available substitutions ................................................156
SNMP trap event rule actions
adding, modifying or deleting ....................................153
SNMP trap event rules
adding, modifying or deleting rule actions .................153
modifying ...................................................................152
modifying rules ..........................................................152
SNMP trap rule actions
creating or modifying .................................................154
SNMP Trap Rule window
description ..................................................................152
SNMP traps
event rules ..................................................................152
snmp.cfg file ............................................................45
softkeys ...................................................................59
230
adding new................................................................... 67
changing defaults ......................................................... 66
examples ...................................................................... 67
mnemonics list ............................................................. 60
software definition lists ..........................................46
Software Messages Log ........................................182
software.log file.....................................................182
specifying primary and secondary boot hosts........32
specifying time event rules...................................158
starting the MCC....................................................16
status colors
default .......................................................................... 54
status colors changing ............................................53
status colors configuration .....................................53
status.cfg file...........................................................53
changing colors............................................................ 53
default .......................................................................... 54
swlist file .................................................................46
syntax
MCC configuration files .............................................. 41
System Configuration Editor window
description ................................................................. 106
system.cfg file .......................................46, 77, 78, 79
command console section ............................................ 96
CPU section ................................................................. 82
group section................................................................ 81
MVS agent section..................................................... 103
MVS section .............................................................. 102
OS section.................................................................... 84
room section ................................................................ 80
unit section................................................................. 101
system.log file .......................................................183
T
TaskMan
moving tasks ................................................................ 52
tasks
moving between OSs ................................................... 52
Tek host menu, disabling pickup of other servers 31
Telnet
default softkeys............................................................ 59
time and date
setting ........................................................................ 190
time event
rules ........................................................................... 158
specifying................................................................... 158
Time Event Rule window
description ................................................................. 160
time event rules
creating an action ....................................................... 161
modifying a rule action .............................................. 161
modifying rules.......................................................... 160
Time Rule Action Build Parameters window ......164
time rule actions
creating or modifying................................................. 162
time zone
changing..................................................................... 191
traps (SNMP)
© Visara International 2007
Index
event rules ..................................................................152
troubleshooting
general........................................................................204
specific problems........................................................204
U
UDM file..................................................................57
unit device
defining for CPU ........................................................101
unit.log file ............................................................183
Unix user
adding as MCC user ...................................................134
User Defined Messages ..........................................57
user security configuration.....................................45
users
maximum number of ..................................................120
security for .................................................................120
in MCC configuration files .......................................... 43
VCC system character set configuration file .........58
viewing
log files ...................................................................... 167
VNC .........................................................................96
W
Windows NT............................................................96
X
X terminal
monitoring gateway to use ........................................... 32
X terminal emulation software ..............................33
XDMCP menu
displaying hosts on....................................................... 29
xp.cnf file.................................................................30
V
values
Administration Guide
231
707130-001