1
Operating Instructions
About This Machine
1
Getting Started
2
Entering Text
3
Appendix
Read this manual carefully before you use this machine and keep it handy for future reference. For safe and correct use, be sure to read the
Safety Information before using the machine.
Introduction
This manual contains detailed instructions and notes on the operation and use of this machine. For your
safety and benefit, read this manual carefully before using the machine. Keep this manual in a handy
place for quick reference.
Important
Contents of this manual are subject to change without prior notice. In no event will the company be liable for
direct, indirect, special, incidental, or consequential damages as a result of handling or operating the machine.
Notes:
Some illustrations in this manual might be slightly different from the machine.
Certain options might not be available in some countries. For details, please contact your local dealer.
Laser Safety:
This machine is considered a class 1 laser device, safe for office/EDP use. The machine contains multiple
AlGaAs laser diodes, 10-milliwatt, 770-810 nanometer wavelength for each emitter. Direct (or indirect
reflected ) eye contact with the laser beam might cause serious eye damage. Safety precautions and
interlock mechanisms have been designed to prevent any possible laser beam exposure to the operator.
The following label is attached on the internal cover that is revealed when the front cover is opened.
Caution:
Use of controls or adjustments or performance of procedures other than those specified in this manual
might result in hazardous radiation exposure.
Notes:
The model names of the machines do not appear in the following pages. Check the type of your machine before reading this manual. (For details, see p.8 “Machine Type”.)
•
Type 1: 90 copies/minute (A4K, 81/2" × 11"K)
•
Type 2: 110 copies/minute (A4K, 81/2" × 11"K)
•
Type 3: 135 copies/minute (A4K, 81/2" × 11"K)
Certain types might not be available in some countries. For details, please contact your local dealer.
Two kinds of size notation are employed in this manual. With this machine refer to the metric version.
For good copy quality, the supplier recommends that you use genuine toner from the supplier.
The supplier shall not be responsible for any damage or expense that might result from the use of parts
other than genuine parts from the supplier with your office products.
Power Source
220 - 240V, 50/60Hz, 16A
Please be sure to connect the power cord to a power source as above. For details about power source.
See “Power Connection”, Troubleshooting.
Power Supply
The socket-outlet shall be installed near the product and shall be easily accessible.
Manuals for This Machine
Refer to the manuals that are relevant to what you want to do with the machine.
❖ About This Machine
Be sure to read the Safety Information in this manual before using the machine.
This manual provides an introduction to the functions of the machine. It also
explains the control panel, preparation procedures for using the machine,
how to enter text, and how to install the CD-ROMs provided.
❖ General Settings Guide
Explains User Tools settings, and Address Book procedures such as registering e-mail addresses and, user codes. Also refer to this manual for explanations on how to connect the machine.
❖ Troubleshooting
Provides a guide to solving common problems, and explains how to replace
paper, toner, staples, and other consumables.
❖ Security Reference
This manual is for administrators of the machine. It explains security functions that the administrators can use to protect data from being tampered, or
prevent the machine from unauthorized use.
Also refer to this manual for the procedures for registering administrators, as
well as setting user and administrator authentication.
❖ Copy/ Document Server Reference
Explains Copier and Document Server functions and operations. Also refer to
this manual for explanations on how to place originals.
❖ Printer Reference
Explains Printer functions and operations.
❖ Scanner Reference
Explains Scanner functions and operations.
❖ Network Guide
Explains how to configure and operate the machine in a network environment, and use the software provided.
This manual covers all models, and includes descriptions of functions and
settings that might not be available on this machine. Images, illustrations, and
information about operating systems that are supported might also differ
slightly from those of this machine.
i
❖ Other manuals
• Manuals for This Machine
• Safety Information
• Quick Reference Copy Guide
• Quick Reference Printer Guide
• Quick Reference Scanner Guide
• PostScript3 Supplement
• UNIX Supplement
• Manuals for DeskTopBinder Lite
• DeskTopBinder Lite Setup Guide
• DeskTopBinder Introduction Guide
• Auto Document Link Guide
Note
❒ Manuals provided are specific to machine types.
❒ Adobe Acrobat Reader/Adobe Reader must be installed in order to view the
manuals as PDF files.
❒ For “UNIX Supplement”, please visit our Web site or consult an authorized
dealer.
❒ “PostScript3 Supplement” and “UNIX Supplement” include descriptions of
functions and settings that might not be available on this machine.
❒ The following software products are referred to using general names:
Product name
DeskTopBinder Lite
sional
General name
*1
and DeskTopBinder Profes-
DeskTopBinder
ScanRouter EX Professional *1 and ScanRouter EX En- the ScanRouter delivery software
terprise *1
*1
ii
Optional
What You Can Do with This Machine
This section introduces the features of this machine.
Note
❒ For details about options, see “Options”.
Reference
p.11 “Options”
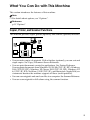
Copier, Printer, and Scanner Functions
This machine provides copier, printer (optional), and scanner (optional) functions.
APF018S
• You can make copies of originals. With a finisher (optional), you can sort and
staple copies. See Copy/Document Server Reference.
• You can print documents created in applications. See Printer Reference.
You can print documents from Windows 95/98/Me (TCP/IP, IPP), Windows
2000 (TCP/IP, IPP), Windows XP/Server 2003 (TCP/IP, IPP), Windows NT
4.0 (TCP/IP, IPP), NetWare, UNIX (TCP/IP), and Macintosh (AppleTalk) environments because the machine supports all these (multi-protocol).
• You can scan originals and send scan files to a computer. See Scanner Reference.
• You can scan originals in full colour using the scanner function.
iii
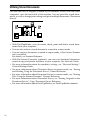
Utilizing Stored Documents
You can store files of originals scanned by this machine, or files sent from other
computers, onto the hard disk of the machine. You can print the stored documents, as well as change print settings and print multiple documents (Document
Server).
APF019S
• With DeskTopBinder, you can search, check, print and delete stored documents from your computer.
• You can also retrieve stored documents scanned in scanner mode.
• You can retrieve documents scanned in copier mode, if the Printer/Scanner
unit is installed.
For details, see Scanner Reference.
• With File Format Converter (optional), you can even download documents
stored in copy and printer functions to your computer. See Network Guide.
• For more information about the machine's settings, see “Network Settings”,
General Settings Guide.
• For more information about Document Server in printer mode, see “Saving
and Printing Using the Document Server”, Printer Reference.
• For more information about Document Server in scanner mode, see “Storing
Files Using the Scanner Function”, Scanner Reference.
• For more information about Document Server, see “Storing Originals in the
Document Server”, Copy/Document Server Reference.
• For more information about DeskTopBinder, see DeskTopBinder manuals.
iv
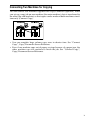
Connecting Two Machines for Copying
You can connect two machines together with Copy Connector (optional). When
you set up a copy job on one machine (the main machine), data is transferred to
the other (the sub-machine) so that copies can be made on both machines simultaneously (Connect Copy).
APG005S
• You can complete large volume copy runs in shorter time. See “Connect
Copy”, Copy/Document Server Reference.
• Even if one machine runs out of paper, or stops because of a paper jam, the
other machine can still continue to finish the job. See “Connect Copy”,
Copy/Document Server Reference.
v
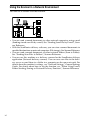
Using the Scanner in a Network Environment
You can use a scanner over the network.
APF021S
• You can send scanned documents to other network computers using e-mail
(Sending stored scan file by e-mail). See “Sending Scan Files by E-mail”, Scanner Reference.
• With the ScanRouter delivery software, you can store scanned documents in
specified destinations on network computers (File storage). See Scanner Reference.
• You can send scanned documents to other network folders (Scan to Folder).
See “Sending Scan Files to Folders”, Scanner Reference.
• You can use this machine as a delivery scanner for the ScanRouter delivery
application (Network delivery scanner). You can save scan files in the delivery server or send them to a folder in a computer on the same network. For
details about the machine's settings, see “Network Settings”, General Settings
Guide. For details about how to use the function, see “When Using E-mail,
Folder Sending, Storing or Network Delivery Function”, Scanner Reference.
vi
Administrating the Machine/Protecting Documents (Security
Functions)
You can prevent information leakage by managing the machine and protecting
documents.
APF015S
• You can protect documents from unauthorized access and stop them from being copied without permission. See Security Reference.
• You can control the use of the machine, as well as prevent machine settings
from being changed without authorization. See Security Reference.
• By setting passwords, you can prevent unauthorized access via the network.
See Security Reference.
• You can erase the data on the hard disk to prevent the information from leaking out. See the manual for the DataOverWriteSecurity Unit (optional) and
Security Reference.
vii
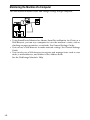
Monitoring the Machine Via Computer
You can monitor machine status and change settings using a computer.
APF017S
• Using SmartDeviceMonitor for Admin, SmartDeviceMonitor for Client, or a
Web browser, you can use a computer to view the machine's status, such as
checking on paper quantities, or misfeeds. See General Settings Guide.
• You can use a Web browser to make network settings. See General Settings
Guide.
• You can also use a Web browser to register and manage items such as user
codes, e-mail addresses, and folders in the Address Book.
See the Web Image Monitor's Help.
viii
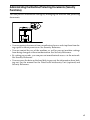
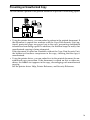
Preventing an Unauthorized Copy
You can embed a pattern in the printed document to prevent it from being copied.
APG006S
• Using the printer driver, you can embed a pattern in the printed document. If
the document is copied on a machine with the Copy Data Security Unit (optional), protected pages are grayed out in the copy, preventing confidential
information from being copied. In addition, the machine beeps to notify that
unauthorized copying is being attempted.
If the document is copied on a machine without the Copy Data Security Unit,
the hidden text becomes conspicuous in the copy, showing that the copy is
unauthorized.
• Using the printer driver, you can embed text in the printed document for unauthorized copy prevention. If the document is copied on this or other machines, the hidden text appears in the copy, discouraging such unauthorized
copying.
See the printer driver Help, Printer Reference, and Security Reference.
ix
TABLE OF CONTENTS
Manuals for This Machine ......................................................................................i
What You Can Do with This Machine..................................................................iii
Copier, Printer, and Scanner Functions .................................................................... iii
Utilizing Stored Documents....................................................................................... iv
Connecting Two Machines for Copying ..................................................................... v
Using the Scanner in a Network Environment .......................................................... vi
Administrating the Machine/Protecting Documents (Security Functions) ................ vii
Monitoring the Machine Via Computer.....................................................................viii
Preventing an Unauthorized Copy ............................................................................ ix
Notice ......................................................................................................................1
Notice To Wireless LAN Interface (optional) Users....................................................1
How to Read This Manual .....................................................................................2
Symbols .....................................................................................................................2
Safety Information .................................................................................................3
Safety During Operation.............................................................................................3
Positions of RWARNING and RCAUTION labels ..............................................6
ENERGY STAR Program .......................................................................................7
Recycled Paper..........................................................................................................8
Machine Type.............................................................................................................8
1. Getting Started
Guide to Components ...........................................................................................9
Options.....................................................................................................................11
Control Panel........................................................................................................13
Display Panel........................................................................................................16
Simplified Display.....................................................................................................17
When the Authentication Screen is Displayed..................................................18
User Code Authentication (Using the Control Panel)...............................................18
User Code Authentication (Using a Printer Driver) ..................................................19
Login (Using the Control Panel) ...............................................................................19
Log Off (Using the Control Panel) ............................................................................20
Login (Using a Printer Driver)...................................................................................20
Login (Using Web Image Monitor) ...........................................................................21
Log Off (Using Web Image Monitor) ........................................................................21
Changing Modes ..................................................................................................22
System Reset...........................................................................................................22
Turning On the Power .........................................................................................23
Turning On the Main Power .....................................................................................23
Turning On the Power ..............................................................................................24
Turning Off the Power ..............................................................................................24
Turning Off the Main Power .....................................................................................25
Saving Energy..........................................................................................................26
x
2. Entering Text
Entering Text ........................................................................................................27
Available Characters ................................................................................................27
Keys .........................................................................................................................28
How to Enter Text ....................................................................................................29
3. Appendix
Dos and Don'ts.....................................................................................................31
Software and Utilities Included on the CD-ROM ...............................................32
Viewing the contents of the CD-ROM ......................................................................33
Printer Drivers for This Printer..................................................................................33
TWAIN Driver ...........................................................................................................34
DeskTopBinder Lite..................................................................................................35
SmartDeviceMonitor for Admin ................................................................................36
DeskTopBinder-SmartDeviceMonitor for Client .......................................................37
Copy Paper ...........................................................................................................38
Recommended Paper Sizes and Types...................................................................38
Unusable Paper .......................................................................................................42
Paper Storage ..........................................................................................................43
INDEX......................................................................................................... 44
xi
xii
Notice
Electromagnetic Interference Conformance Standards Governing Use of This
Machine(Including Optional Accessories)
Warning:
Class A ITE:
This is a Class A product. In a domestic environment this product may cause radio interference in which case user may be required to take adequate measures.
Notice To Wireless LAN Interface (optional) Users
Notice to Users in EEA Countries
This product complies with the essential requirements and provisions of Directive 1999/5/EC of the European Parliament and of the Council of 9 March 1999
on radio equipment and telecommunications terminal equipment and the mutual recognition of their conformity.
The CE Declaration of Conformity is available by accessing the URL:
http://www.ricoh.co.jp/fax/ce_doc/.
This product is only for use in EEA or other authorized countries. Outdoor use
of this product in Belgium, France, Germany, Italy, or the Netherlands is prohibited.
1
How to Read This Manual
Symbols
This manual uses the following symbols:
Indicates important safety notes.
Ignoring these notes could result in serious injury or death. Be sure to read these
notes. They can be found in the “Safety Information” section of this manual.
Indicates important safety notes.
Ignoring these notes could result in moderate or minor injury, or damage to the
machine or to property. Be sure to read these notes. They can be found in the
“Safety Information” section of this manual.
Indicates points to pay attention to when using the machine, and explanations
of likely causes of paper misfeeds, damage to originals, or loss of data. Be sure
to read these explanations.
Indicates supplementary explanations of the machine's functions, and instructions on resolving user errors.
This symbol is located at the end of sections. It indicates where you can find further relevant information.
[]
Indicates the names of keys that appear on the machine’s display panel.
{}
Indicates the names of keys on the machine’s control panel.
2
Safety Information
When using this machine, the following safety precautions should always be followed.
Safety During Operation
In this manual, the following important symbols are used:
R WARNING:
Indicates a potentially hazardous situation which, if instructions
are not followed, could result in death or serious injury.
R CAUTION:
Indicates a potentially hazardous situation which, if instructions are not
followed, may result in minor or moderate injury or damage to property.
R WARNING:
• Connect the machine only to the power source described on the inside front cover of this manual. Connect the power cord directly
into a wall outlet and do not use an extension cord.
• Disconnect the power plug (by pulling the plug, not the cable) if the
power cable or plug becomes frayed or otherwise damaged.
• To avoid hazardous electric shock or laser radiation exposure, do
not remove any covers or screws other than those specified in this
manual.
• Turn off the power and disconnect the power plug (by pulling the
plug, not the cable) if any of the following occurs:
• You spill something into the machine.
• You suspect that your machine needs service or repair.
• The external housing of your machine has been damaged.
• Do not incinerate used toner or toner containers. Toner dust might
ignite when exposed to an open flame. Dispose of used toner containers in accordance with local regulations.
• Do not damage, break or make any modifications to the power
cord. Do not place heavy objects on it. Do not pull it hard nor bend
it more than necessary. These actions could cause an electric
shock or fire.
• If the power cord is damaged (exposure of the core, disconnection,
etc.), contact your service representative to change a new one. Operating the machine with a damaged power cord may cause an
electric shock or fire.
• Disposal can take place at our authorized dealer.
3
R WARNING:
• Dispose of the used toner container in accordance with the local
regulations.
• Keep the machine away from flammable liquids, gases, and aerosols. A fire or an electric shock might occur.
R CAUTION:
• When loading paper, take care not to trap or injure your fingers.
• Our products are engineered to meet high standards of quality and functionality, and we recommend that you use only the expendable supplies
available at an authorized dealer.
• Before moving the machine, be sure to disconnect all external connections, especially the power cord from the wall outlet. Damaged power
cords are a fire and electric shock hazard.
• To disconnect the power code, pull it out by plug. Do not drag the code
itself. Doing so may result in damage to the code, leading to fire or electric shock.
• Protect the machine from dampness or wet weather, such as rain and
snow.
• Keep the machine away from humidity and dust. Otherwise a fire or an
electric shock might occur.
• Do not place the machine on an unstable or tilted surface. If it topples
over, an injury might occur.
• After you move the machine, use the caster fixture to fix it in place. Otherwise the machine might move or come down to cause an injury.
• Make sure the room where you are using the machine is well ventilated
and spacious. Good ventilation is especially important when the machine is used heavily.
• Unplug the power cord from the wall outlet before you move the machine. While moving the machine, you should take care that the power
cord will not be damaged under the machine.
• When you disconnect the power plug from the wall outlet, always pull the
plug (not the cable).
• Do not allow paper clips, staples, or other small metallic objects to fall
inside the machine.
• Keep toner (used or unused) and toner containers out of the reach of
children. See a doctor immediately if you accidentally swallow toner.
• If toner or used toner is inhaled, gargle with plenty of water and move
into a fresh air environment. Consult a doctor if necessary.
• If toner or used toner gets into your eyes, flush immediately with large
amounts of water. Consult a doctor if necessary.
4
R CAUTION:
• If toner or used toner is swallowed, dilute by drinking a large amount of
water. Consult a doctor if necessary.
• Avoid getting toner on your clothes or skin when removing a paper jam
or replacing toner. If your skin comes into contact with toner or used toner, wash the affected area thoroughly with soap and water.
• If toner gets on your clothing, wash with cold water. Hot water will set the
toner into the fabric and may make removing the stain impossible.
• For environmental reasons, do not dispose of the machine or expended
supply waste at household waste collection points. Disposal can take
place at an authorized dealer.
• The inside of the machine could be very hot. Do not touch any parts other than specified in this document when removing misfed paper. Otherwise, it may cause burn injury.
• Do not use aluminum foil, carbon paper, or similar conductive paper to
avoid a fire or machine failure.
• Open toner cartridges carefully. If you open them forcefully, toner can
spill, dirtying your clothes or hands, and possibly resulting in accidental
ingestion.
5
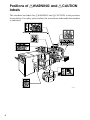
Positions of RWARNING and RCAUTION
labels
This machine has labels for RWARNING and RCAUTION at the positions
shown below. For safety, please follow the instructions and handle the machine
as indicated.
APG007S
6
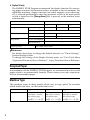
ENERGY STAR Program
As an ENERGY STAR Partner, we have determined
that this machine model meets the ENERGY STAR
Guidelines for energy efficiency.
The ENERGY STAR Guidelines intend to establish an international energy-saving system for
developing and introducing energy-efficient office equipment to deal with environmental issues, such as global warming.
When a product meets the ENERGY STAR Guidelines for energy efficiency, the Partner shall
place the ENERGY STAR logo onto the machine model.
This product was designed to reduce the environmental impact associated with office equipment by means of energy-saving features, such as Low-power mode.
❖ Low-Power mode
This product automatically lowers its power consumption 15 minutes after
the last copy or print job has finished. Printing is still possible in Low Power
Mode, but if you wish to make copies first press the {Energy Saver} key.
❖ Off Mode (Copier only)
To conserve energy, this product automatically turns off 90 minutes (Type 2,
3: 120 minutes) after the last copying or printing job has been completed.
Printing is still possible in Off Mode, but if you wish to make copies first press
the operation switch.
❖ Sleep Mode (Printer, Scanner installed)
If the printer and scanner are installed, this product automatically lowers further its power consumption 90 minutes (Type 2, 3: 120 minutes) after it has
shifted to Low Power Mode. Printing is still possible in Sleep Mode, but if you
wish to make copies first press the operation switch.
7
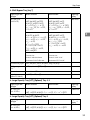
❖ Duplex Priority
The ENERGY STAR Program recommends the duplex function. By conserving paper resources this function reduces a burden to the environment. For
applicable machines, duplex function (one-sided originals→two-sided copies) is selected preferentially when the operation switch or the main power
switch is turned on, the {Energy Saver} key is pressed, or the machine resets
automatically.
Copier only
Type 1
Low-power Mode
Power consumption
113.3W
Default interval
Off Mode
Power consumption
Default interval
Sleep mode
Type 2
129.7W
121.1W
15 minutes
4.1W
4.0W
90 minutes
120 minutes
Power consumption
—
Default interval
—
Duplex priority
Type 3
One-sided→One-sided
Reference
For details about how to change the default interval, see “Timer Settings”,
General Settings Guide.
To change the settings of the Duplex Priority mode, see “User Tools Menu
(Copier and Document Server Features)”, Copy/Document Server Reference.
Recycled Paper
In accordance with the ENERGY STAR Program, we recommend use of recycled
paper which is environmentally friendly. Please contact your sales representative for recommended paper.
Machine Type
This machine comes in three models which vary in copy speed. To ascertain
which model you have, see the inside front cover.
Copy speed
8
Type 1
Type 2
Type 3
90 copies/minute;
180 copies/ minute
for connect copy
110 copies/minute;
220 copies/ minute
for connect copy
135 copies/minute;
270 copies/ minute
for connect copy
(A4K, 81/2" × 11"K)
(A4K, 81/2" × 11"K)
(A4K, 81/2" × 11"K)
1. Getting Started
This section describes how to start using this machine.
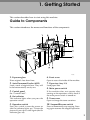
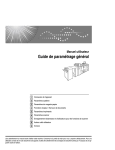
Guide to Components
This section introduces the names and functions of the components.
APG008S
1. Exposure glass
6. Front cover
Place originals face down here.
Open to access the inside of the machine.
2. Auto Document Feeder (ADF)
7. Paper tray (tray 1-3)
Load a stack of originals here. They will
be fed automatically one by one.
Load paper here.
3. Control panel
If the machine does not operate after
turning on the operation switch, check if
the main power switch is turned on.
See “Control Panel”.
4. On indicator
8. Main power switch
This indicator lights when you press the
operation switch.
9. Toner cover
5. Operation switch
10. Suspend/Resume switch
Press this switch to turn the power on
(the On indicator lights up). To turn the
power off, press this switch again (the On
indicator goes off).
Press to momentarily stop copying. Pressing again resumes the stopped operation.
Open to change the toner container.
9
Getting Started
1
APF009S
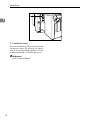
1. Ventilation holes
Prevent overheating. Do not obstruct the
ventilation holes by placing an object
near it or leaning things against it. If the
machine overheats, a fault might occur.
Reference
p.13 “Control Panel”
10
Guide to Components
Options
This section introduces the names and functions of main optional parts.
1
External Options
This section provides explanations about external options.
APG009S
1. Finisher SR5000
5. A3/11" × 17" tray unit
Sorts, stacks, staples and punches copies.
*1: Finisher upper tray
*2: Finisher shift tray
You can load A3L or 11" × 17"L paper
in tray 1 using this unit.
6. Multi bypass tray (Tray 7)
2. Booklet Finisher BK5000
Use when copying or printing onto a
thick paper, OHP transparency, and custom size paper.
The saddle stitch function can staple the
copies in the centre and fold them into
booklets.
*1: Finisher booklet tray
3. Z-folding unit
Makes two parallel folds on the copied
paper, one of which faces in and the other
facing out.
7. Wide Large Capacity Tray (Wide
LCT)
Holds 4,400 sheets of A3 or 11" × 17" sized
paper.
8. Large Capacity Tray (LCT)
Holds 5,000 sheets of paper.
4. Interposer
Inserts cover or slip sheets into the copies.
Note
❒ The punch function is not available for Type 3.
11
Getting Started
Internal Options
This section provides explanations about internal options.
• Printer/Scanner unit
Allows you to use the printer and scanner functions.
• USB Host Interface
Allows you to connect a variety of external devices.
• IEEE 1284 Interface Board
Connects to an IEEE 1284 cable.
• IEEE 1394 interface board
Allows you to connect to an IEEE 1394 cable.
• IEEE 802.11b Interface Unit
Allows you to install a wireless LAN interface.
• File Format Converter
Allows you to download documents from the Document Server stored by copier
and printer functions. See “Downloading Stored Documents”, Copy/Document
Server Reference.
• Bluetooth
Allows you to expand the interface.
• Copy Data Security Unit
If a document containing embedded text for unauthorized copy guard is copied, protected pages are grayed out in the copy.
• DataOverWriteSecurity Unit
Allows you to erase data on the hard disk.
• Copy Connector
Allows you to connect copy function.
• Gigabit Ethernet (1000BASE-TX)
Allows you to communicate with 1000BASE-TX.
1
Note
❒ You cannot simultaneously install two or more of the options below:
IEEE 1284 Interface Board, IEEE 1394 interface board, IEEE 802.11b Interface
Unit, and Bluetooth.
❒ Remove the machine's Ethernet and USB ports before connecting a USB Gigabit Ethernet.
12
Control Panel
Control Panel
This section introduces the names and functions of the components on the control panel.
This illustration shows the control panel of the machine with options fully installed.
1
APG010S
1. Status indicator
2. Operation switch
Machine status is described by this indicator. By default, this indicator is turned
off. You can select the status indicator lit
or not.
Press this switch to turn the power on
(the On indicator lights up). To turn the
power off, press this switch again (the On
indicator goes off). See “Turning On the
Power”.
• Off: The main power switch is turned
off or ready to make copies.
• Flashing green: Scanning originals.
• Lit green: Copying (ready to scan originals).
• Flashing red: Toner has nearly run out.
• Lit red: Paper jam or other malfunction.
If the status indicator is blinking red, paper jam has occurred in the current copy
job. Bring up the current job screen.
3. {Login/Logout} key
Press to log in or log out of the system.
4. {Simplified Display} key
Press to go to the Simplified Display screen.
See “Simplified Display”.
5. {Language Selection} key
Press to change the language of the display.
13
Getting Started
1
6. {Interrupt} key
17. Data In indicator (printer mode)
Press to make interrupt copies during a
copy run. See “Interrupt Copy”, Copy/Document Server Reference.
Lights up when data is coming from the
printer.
7. {Energy Saver} key
Press to shift to and from Low Power mode.
See “Saving Energy”.
Calls up registered functions.
8. {Clear Modes} key
These show the status of the functions.
Press to clear previously entered copy job
settings.
9. {Program} key (copier and scanner
mode)
Press to register frequently used settings,
or to recall registered settings.
10. {Stop} key
Press to stop a job in progress.
11. {Start} key
Press to start copying, or to scan or print
documents stored on the Document Server.
12. {Sample Copy} key
Press to make a single set of copies or
prints to check for print quality before
making multiple sets. See “Sample copy”,
Copy/ Document Server Reference.
13. {Clear} key
19. Function status indicators
• Green: active.
• Red: interrupted. Press the function
key to change the display, and then
follow the displayed instructions.
20. Function keys
Press to display the operation screen of
one of the following functions:
• Copy
• Document Server
• Printer
• Scanner
The indicator of the selected function
goes on. See “Changing Modes”.
21. {Counter} Key
Press to check or print the total number of
copies made. See “Counter”, General Settings Guide.
Press to delete a number entered.
22. {User Tools} key
14. {q} key (Enter key)
Press to change the default settings and
conditions to meet your requirements.
See “Accessing User Tools (System Settings)”, General Settings Guide.
Press to enter a numerical value.
15. Number keys
Use to enter the desired number of copies, or data for a selected function.
23. {Tray Paper Settings} key
16. {New Job} key
24. Display panel
Use this key to set up the next copy job
while a copy job or storing data in the
Document Server is in progress.
14
18. {Registered Program} key/{Other
Function} key
Specify the paper tray settings for delivery.
Shows the operation status, error messages,
and function menus.
Control Panel
Note
❒ You can adjust the angle of the control panel.
1
APF059S
APF060S
Reference
p.26 “Saving Energy”
p.23 “Turning On the Power”
p.17 “Simplified Display”
p.22 “Changing Modes”
“Interrupt Copy”, Copy/Document Server Reference
“Sample copy”, Copy/Document Server Reference
“Counter”, General Settings Guide
“Accessing User Tools (System Settings)”, General Settings Guide
15
Getting Started
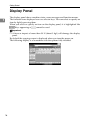
Display Panel
The display panel shows machine status, error messages and function menus.
The function items displayed serve as selector keys. You can select or specify an
item by lightly pressing them.
When you select or specify an item on the display panel, it is highlighted like
. Keys appearing as
cannot be used.
1
Important
❒ A force or impact of more than 30 N (about 3 kgf) will damage the display
panel.
By default the copying screen is displayed when you turn the power on.
The following display is of a machine with the options fully installed.
16
Display Panel
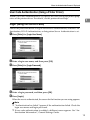
Simplified Display
This section explains how to switch to the simplified display.
When you press the {Simplified Display} key, the screen changes from the initial
display to the simplified display.
Letters and keys are displayed at a larger size, making operations easier.
1
APG011S
❖ Simplified Display
APG012S
1. [Key Colour]
Press to change the key colour and increase the brightness of the display panel.
Note
❒ To return to the initial display, press the {Simplified Display} key again.
❒ Certain keys do not appear on the simplified display.
17
Getting Started
When the Authentication Screen is
Displayed
1
When Basic Authentication, Windows Authentication, LDAP Authentication, or
Integration Server Authentication is set, the Authentication Screen appears on
the screen. Unless a valid user name and password are entered, operations are
not possible with the machine.
Important
❒ Consult the User Administrator about your login user name and login password. For details of the various types of user authentication, consult the respective administrators.
❒ When User Code Authentication is set, the screen for entering a user code is
displayed instead.
Note
❒ “Authentication has failed.” appears if the authentication failed. Check the
login user name and login password.
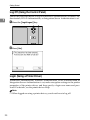
User Code Authentication (Using the Control Panel)
When User Code Authentication is set, the following screen appears:
Enter a user code (up to eight digits), and then press [OK].
Note
❒ To log off, do one of the following:
• Press the Operation switch.
• Press the {User Tools} key, press [System Settings], and then press the {User
Tools} key.
• Press the {Energy Saver} key after jobs are completed.
18
When the Authentication Screen is Displayed
User Code Authentication (Using a Printer Driver)
When User Code Authentication is set, specify the user code in the printer properties of the printer driver. For details, see the printer driver Help.
1
Login (Using the Control Panel)
Follow the procedure below to log on when Basic Authentication, Windows Authentication, LDAP Authentication, or Integration Server Authentication is set.
A Press [Enter] for [Login User Name].
B Enter a login user name, and then press [OK].
C Press [Enter] for [Login Password].
D Enter a login password, and then press [OK].
E Press [Login].
When the user is authenticated, the screen for the function you are using appears.
Note
❒ “Authentication has failed.”appears if the authentication failed. Check the
login user name and login password.
❒ If user code authentication is enabled, a different screen appears. See “Authentication Information”, General Settings Guide.
19
Getting Started
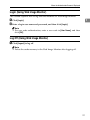
Log Off (Using the Control Panel)
Follow the procedure below to log off when Basic Authentication, Windows Authentication, LDAP Authentication, or Integration Server Authentication is set.
1
A Press the {Login/Logout} key.
APG012S
B Press [Yes].
Login (Using a Printer Driver)
When Basic Authentication, Windows Authentication, LDAP Authentication, or
Integration Server Authentication is set, make encryption settings in the printer
properties of the printer driver, and then specify a login user name and password. For details, see the printer driver Help.
Note
❒ When logged on using a printer driver, you do not have to log off.
20
When the Authentication Screen is Displayed
Login (Using Web Image Monitor)
This section explains how to log onto the machine via Web Image Monitor.
A Click [Login].
B Enter a login user name and password, and then click [Login].
1
Note
❒ For user code authentication, enter a user code in [User Name], and then
click [OK].
Log Off (Using Web Image Monitor)
A Click [Logout] to log off.
Note
❒ Delete the cache memory in the Web Image Monitor after logging off.
21
Getting Started
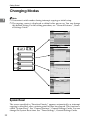
Changing Modes
Note
❒ You cannot switch modes during interrupt copying or initial setup.
1
❒ The copying screen is displayed as default after power on. You can change
this default setting. For the setting procedure, see “General Features”, General Settings Guide.
APG014S
System Reset
The screen specified in “Function Priority” appears automatically or interrupt
copying is cancelled, after a certain period of time has elapsed. This function is
called “System Reset”. See “General Features”, General Settings Guide. You can
change the System Reset time. See “Timer Settings”, General Settings Guide.
22
Turning On the Power
Turning On the Power
This section discusses how to turn on/off the power.
1
❖ Power supply
This machine has two power switches: Operation switch and main power
switch.
• Operation switch (right side of the control panel)
Press to activate the machine. When the machine has finished warming up,
you can make copies.
• Main power switch (left side of the machine)
Turning off this switch will completely turn off power to the machine.
Note
❒ This machine automatically enters Energy Saver mode or turns itself off if you
do not use it for a certain period. See “Timer Settings”, General Settings
Guide.
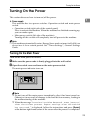
Turning On the Main Power
Turn on the main power as follows:
A Make sure the power code is firmly plugged into the wall outlet.
B Open the switch cover and turn on the main power switch.
The main power indicator turns on.
APF008S
Note
❒ Do not turn off the main power immediately after it has been turned on.
Otherwise it may result in damage to the hard disk or memory, leading to
the malfunctioning of the machine.
❒ When the message “Functional problem detected. Press [Restart]
after the current process. Repeat settings after the machine
has restarted.” is displayed, follow the instructions and press [Restart]
at the bottom right-hand corner of the screen after the process is completed.
23
Getting Started
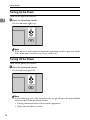
Turning On the Power
Turn on the power as follows:
A Press the Operation switch.
1
The On indicator lights up.
APG015S
Note
❒ If the power is not turned on when the operation switch is pressed, check
if the main power switch is on. If not, turn it on.
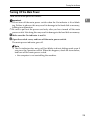
Turning Off the Power
Turn off the power as follows:
A Press the Operation switch.
The On indicator goes off.
APG015S
Note
❒ In the following cases, the indicator will not go off but will instead blink
when you press the operation switch:
• During communication with external equipment.
• When the hard disk is active.
24
Turning On the Power
Turning Off the Main Power
Turn off the main power as follows:
1
Important
❒ Do not turn off the main power switch when the On indicator is lit or blinking. Failure to observe this may result in damage to the hard disk or memory,
leading to malfunction.
❒ Be sure to pull out the power cord only after you have turned off the main
power switch. Not doing this may result in damage to the hard disk or memory.
A Make sure the On indicator is not lit.
B Open the switch cover, and turn off the main power switch.
The main power indicator goes off.
Note
❒ The On indicator does not go off, but blinks in direct dialing mode even if
you press the Operation switch. When this happens, check the items below,
and turn off the main power switch.
• the computer is not controlling the machine.
25
Getting Started
Saving Energy
This machine has the following two energy saving functions.
1
❖ Energy Saver
If you do not use the machine for a certain period after an operation, or when
you press the {Energy Saver} key, the display disappears and the machine
goes into Energy Saver mode. When you press the {Energy Saver} key again,
the machine returns to the ready condition. The machine uses less electricity
in Energy Saver mode.
You can change the amount of time the machine waits before switching to Energy Saver mode after copying has finished or the last operation is performed.
See “Timer Settings”, General Settings Guide.
❖ Auto Off
The machine automatically turns itself off when the job is finished, after a certain period of time has elapsed without any operation. This function is called
“Auto Off”.
You can change the Auto Off time. See “Timer Settings”, General Settings
Guide.
Note
❒ The Auto Off Timer function will not operate in the following cases:
•
•
•
•
•
•
•
•
•
•
•
•
When a warning message appears
When the service call message appears
When paper is jammed
When the cover is open
When the “Add Toner” message appears
When toner is being replenished
When the User Tools/Counter/Enquiry screen is displayed
When fixed warm-up is in progress
When the printer or other functions are active
When operations were suspended during printing
When the Data In indicator is on or blinking
When the sample print or locked print screen is displayed
Reference
“Timer Settings”, General Settings Guide
26
2. Entering Text
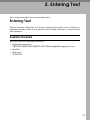
This section describes how to enter characters.
Entering Text
When you enter a character, it is shown at the position of the cursor. If there is a
character already at the cursor position, the entered character is shown before
that character.
Available Characters
You can enter the following characters:
• Alphabetic characters
ABCDEFGHIJKLMNOPQRSTUVWXYZabcdefghijklmnopqrstuvwxyz
• Symbols
• Numerals
0123456789
27
Entering Text
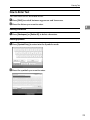
Keys
You can change the entry screen using the keys below.
2
APG016S
Note
❒ When entering uppercase or lowercase letters continuously, use [Shift Lock] to
lock the case.
28
Entering Text
How to Enter Text
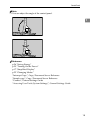
You can enter text as described below.
A Press [Shift] to switch between uppercase and lowercase.
B Press the letters you want to enter.
2
Deleting Characters
A Press [Backspace] or [Delete All] to delete characters.
Entering Symbols
A Press [Symbol Entry] to enter into the Symbols mode.
B Press the symbols you want to enter.
29
Entering Text
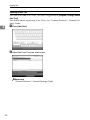
Selecting a User Text
You can select and use a User Text that is registered in [Program / Change / Delete
User Text].
For details about registering User Texts, see “General Features”, General Settings Guide.
A Press [User Text].
2
B Select the User Text you want to use.
Reference
“General Features”, General Settings Guide
30
3. Appendix
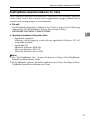
This section describes Dos and Don'ts, key accessories, copy paper, and consumables.
Dos and Don'ts
The following items should be followed during use of this machine.
R WARNING:
• Keep the machine away from flammable liquids, gases, and aerosols.
A fire or an electric shock might occur.
R CAUTION:
• Unplug the power cord from the wall outlet before you move the machine.
While moving the machine, you should take care that the power cord will not
be damaged under the machine.
• Do not turn off the main power switch while the On indicator is lit or blinking. This may cause damage to the hard disk or memory.
• Do not touch areas on or around the fusing unit. These areas get hot.
• After scanning originals continuously, the exposure glass may become
warm—this is not a malfunction.
• When you use this machine for a long time in a confined space without good
ventilation, you may detect an odd smell. To keep the workplace comfortable,
we recommend that you keep it well ventilated.
• The area around the ventilation hole may become warm. This is caused by exhaust air and is not a malfunction.
• Do not turn off the power when the machine is in operation.
• The machine might fail to produce good copy images if condensation forms
inside due to rapid temperature change.
• Do not open the covers of the machine when it is in operation. If you do, misfeeds might occur.
• Do not move the machine when the power is on.
• If you operate the machine improperly or a failure occurs, settings might be
lost. Be sure to make a note of your machine settings.
• The supplier shall not be liable for any loss or damage resulting from a failure
of the machine, loss of settings, or use of the machine.
Reference
p.24 “Turning Off the Power”
p.25 “Turning Off the Main Power”
31
Appendix
Software and Utilities Included on the CDROM
Three CD-ROMs come with this machine: “Printer Drivers and Utilities”, “Scanner/PostScript Drivers and Utilities”, and “Print version Manuals”. PS Driver is
stored in “Scanner/PostScript Drivers and Utilities”. In “Print version Manuals”, manuals are stored in PDF format.
The following are included in the three separate CD-ROMs:
❖ Font Manager 2000
For installing new screen fonts, or organizing and managing fonts already in
the system. For details about Font Manager 2000, see the manual on the CDROM labeled “Printer Drivers and Utilities”.
3
❖ SmartDeviceMonitor for Admin
For the system administrator to manage network printers.
❖ DeskTopBinder-SmartDeviceMonitor for Client
For users to manage their network print status.
❖ 1394 Utility
For the optional IEEE 1394 interface unit. For details, see the Readme file or
the manual provided with the optional IEEE 1394 interface unit.
❖ Acrobat Reader
This utility allows you to read PDF files (Portable Document Format).
❖ Printer Utility for Mac
This utility allows users to download and manage a variety of fonts as well as
manage printers. For details about this utility, see PostScript Supplement.
Note
❒ Documentation about using the machine is included on the CD-ROM in PDF
format. For details about using Acrobat Reader, see Acrobat Reader online
Help.
Reference
SmartDeviceMonitor for Admin Help
DeskTopBinder-SmartDeviceMonitor for Client Help
Acrobat Reader online Help
32
Software and Utilities Included on the CD-ROM
Viewing the contents of the CD-ROM
Follow the procedure below to view the contents of the CD-ROMs.
A Insert the CD-ROM into the CD-ROM drive.
The installer starts.
B Click [Browse This CD-ROM].
Explorer starts and displays the contents of the CD-ROM.
3
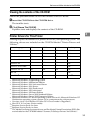
Printer Drivers for This Printer
Printing requires installation of a printer driver for your operating system. The
following drivers are included on the CD-ROM labeled “Printer Drivers and
Utilities”.
Printer Language
PCL 6
PCL 5e
RPCS
PostScript 3
Windows 95
*1
OK
OK
OK
OK *12
Windows 98
*2
OK
OK
OK
OK *12
Windows Me *3
OK
OK
OK
OK *12
Windows 2000 *4
OK
OK
OK
OK *13
Windows XP *5
OK
OK
OK
OK *13
Windows Server 2003 *6
OK
OK
OK
OK *13
Windows NT 4.0 *7
OK *11
OK *10
OK *10
OK *11
Mac OS *8
–
–
–
OK *12
Mac OS X *9
–
–
–
OK *14
*1
*2
*3
*4
*5
*6
*7
*8
*9
*10
*11
*12
*12
Microsoft Windows 95 operating system
Microsoft Windows 98 operating system
Microsoft Windows Millennium Edition
Microsoft Windows 2000 Advanced Server
Microsoft Windows 2000 Server
Microsoft Windows 2000 Professional
Microsoft Windows XP Professional
Microsoft Windows XP Home Edition
Microsoft Windows Server 2003 Standard Edition
Microsoft Windows Server 2003 Enterprise Edition
Microsoft Windows NT Server operating system version 4.0, Microsoft Windows NT
Workstation operating system version 4.0 in a computer using x86 processors.
Versions 8.6 to 9.2 of the Mac OS (Mac OS X Classic mode is supported.)
Mac OS X 10.1 or later (Native mode)
Requires Service Pack 4 or later.
Requires Service Pack 6 or later.
The Adobe PostScript 3 printer drivers and PostScript Printer Description (PPD) files
are included on the CD-ROM labeled “Scanner/PostScript Drivers and Utilities”.
33
Appendix
*13
*14
The PostScript Printer Description (PPD) files are included on the CD-ROM labeled
“Scanner/PostScript Drivers and Utilities”.
The Adobe PostScript Printer Description (PPD) installer is included on the CDROM labeled “Scanner/PostScript Drivers and Utilities”.
❖ PCL printer drivers
Two kinds of PCL printer driver (PCL 5e and PCL 6) are included on the CDROM that comes with this machine. These drivers allow your computer to
communicate with this machine via a printer language.
❖ RPCS printer driver
This printer driver allows the computer to communicate with the printer using a printer language. In addition to the conventional user interface, another
preset user interface is provided.
3
❖ Adobe PostScript Printer Drivers and PPD files
Adobe PostScript printer drivers and the PPD files are included on the CDROM provided with this machine. Adobe PostScript printer drivers allow the
computer to communicate with the printer using a printer language. PPD
files allow the printer driver to enable specific printer functions.
❖ PPD files
PPD files are included on the CD-ROM provided with this machine. PPD files
allow the printer driver to enable specific printer functions.
Note
❒ Some applications may require installation of the PCL 5e printer driver. In
this case, you can install PCL 5e without having to install PCL6.
Reference
“Preparing the Machine”, Printer Reference
PostScript 3 Supplement
TWAIN Driver
This section describes the file path to and system requirements of the TWAIN
driver.
This driver is required to scan an original using a scanner. To use the machine
as a network TWAIN scanner, this driver must be installed.
❖ File path
The following drivers are included on the CD-ROM labeled “Scanner/PostScript Drivers and Utilities” provided with this machine:
\DRIVERS\TWAIN
34
Software and Utilities Included on the CD-ROM
❖ System requirements
• Hardware
PC/AT-compatible machines that support the following operating system
properly
Under Windows NT with RISC-based processors (MIPS R series, Alpha
AXP, or PowerPC), this driver is not supported.
• Operating system
Microsoft Windows 95/98/Me
Microsoft Windows 2000/XP
Microsoft Windows NT 4.0
Microsoft Windows Server 2003
• Display resolution
800 × 600 pixels, 256 colours or higher
3
DeskTopBinder Lite
This section explains the file path and system requirements of DeskTopBinder Lite.
DeskTopBinder is to be installed on the client computers for integration and management of various kinds of files such as scan files, files created with applications, and existing scan files. This software allows you to use various functions for stored scan files such
as viewing stored files. Also, with the ScanRouter delivery software, you can view the
files stored in in-trays of the delivery server or use other functions for stored files.
For details about the software installed with DeskTopBinder Lite, see “DeskTopBinder Lite”, Scanner Reference.
❖ File path
The following drivers are included on the CD-ROM labeled “Scanner/PostScript Drivers and Utilities” provided with this machine:
\UTILITY\DESKV2
❖ System requirements
• Hardware
PC/AT-compatible machines that support the operating system properly
• Operating system
When installing all functions of DeskTopBinder.
Microsoft Windows 98SE/Me/2000 Professional SP1 or later/2000 Server SP1 or
later/2000 Advanced Server SP1 or later/XP Professional/XP Home Edition
Microsoft Windows Server 2003 Standard Edition/Enterprise Edition
When installing only SmartDeviceMonitor for Client
Microsoft Windows 95 SP1/98/98SE/Me/2000 Professional SP1 or later/
2000 Server SP1 or later/XP Professional/XP Home Edition Microsoft
Windows Server 2003 Standard Edition/Enterprise Edition Microsoft
Windows NT 4.0 SP5 or later
Reference
Scanner Reference
35
Appendix
SmartDeviceMonitor for Admin
SmartDeviceMonitor for Admin is an application that uses TCP/IP and
IPX/SPX to monitor network printers. It can monitor multiple network printers
using IP address. We recommend that network administrators use this application.
❖ File path
SmartDeviceMonitor for Admin is stored in the following folder in the CDROM labeled “Printer Drivers and Utilities”:
NETWORK\DEVMON\ADMIN\DISK1
3
Operating system
Protocol stack
Windows 95 / 98 / Me
TCP/IP provided with Windows 95 / 98 / Me
IPX/SPX provided with Windows 95 / 98 / Me
NetWare Client provided with Windows 95 / 98
Novell Client provided with Windows 95 / 98
Windows 2000
TCP/IP provided with Windows 2000
IPX/SPX provided with Windows 2000
NetWare Client provided with Windows 2000
Novell Client provided with Windows 2000 or Windows NT
Windows XP
TCP/IP provided with Windows XP
IPX/SPX provided with Windows XP
NetWare Client provided with Windows XP
Novell Client provided with Windows XP
Windows Server 2003
TCP/IP provided with Windows Server 2003
IPX/SPX provided with Windows Server 2003
NetWare Client provided with Windows Server 2003
Novell Client provided with Windows Server 2003
Windows NT 4.0
TCP/IP provided with Windows NT
IPX/SPX provided with Windows NT
Client Service for NetWare provided with Windows NT
Novell Client provided with Windows 2000 or Windows NT
❖ Available functions
SmartDeviceMonitor for Admin has the following functions to check:
• printer supplies such as paper or toner;
• results of print jobs executed from the computer.
Reference
Network Guide
SmartDeviceMonitor for Admin Help
36
Software and Utilities Included on the CD-ROM
DeskTopBinder-SmartDeviceMonitor for Client
DeskTopBinder-SmartDeviceMonitor for Client allows you to manage and print
various data such as files created with an application, images scanned with a
scanner, and existing images as one document.
❖ File path
DeskTopBinder-SmartDeviceMonitor for Client is stored in the following
folder on the CD-ROM labeled “Printer Drivers and Utilities”:
NETWORK\DEVMON\CLIENT\DISK1
3
❖ Operating environment of the printer driver
• Applicable computer
Machines which properly work with the applicable OS below. PC/AT
compatible machine.
• Applicable OS
Microsoft Windows 98SE/Me
Microsoft Windows 2000/XP
Microsoft Windows Server 2003
Note
❒ See “DeskTopBinder Lite”, Scanner Reference or Help of DeskTopBinderSmartDeviceMonitor for Client.
❒ DeskTopBinder includes SmartDeviceMonitor for Client. See Help of DeskTopBinder-SmartDeviceMonitor for Client.
37
Appendix
Copy Paper
This section describes recommended paper sizes and types, unusable paper, and
paper storage.
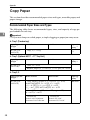
Recommended Paper Sizes and Types
The following table shows recommended types, sizes, and capacity of copy paper loadable in each tray.
3
Important
❒ If you use damp or curled paper, a staple clogging or paper jam may occur.
❖ Tray 1 (Tandem tray)
Paper Type and
Weight
52.3-216 g/m2
(14-57.6 lb.)
Metric Version
*1
Inch Version
A4K, 81/2" × 11"K
Paper Capacity *6
1,000 sheets
×2
❖ Tray 1 (Optional A3/11" × 17" Tray Unit)
Paper Type and
Weight
52.3-216 g/m2
(14- 57.6 lb.)
Metric Version
*2 A3L,
*3
Inch Version
11" × 17"L
Paper Capacity *6
1,000 sheets
B4 JISL, A4KL, 81/2" × 14"L, 81/2" × 11"KL, 12" × 18"L
❖ Tray 2, 3
Paper Type and
Weight
Metric Version
Inch Version
52.3-216 g/m2
(14-57.6 lb.)
A4KL, A5KL, 81/2" × 13"L, 81/4" × 13"L,
B4 JISL, B5 JISKL, 11" × 17"L, 81/2" × 14"L,
81/2" × 11"KL, 51/2" × 81/2"KL, 8" × 13"L,
71/4" × 101/2"KL, 8KL, 16KKL, 12" × 18"L
*2 A3L,
11" × 15"L, 10" × 15"L, 11" × 14"L, 81/4" × 14"L,
10" × 14"L, 8" × 10"L
*3
*4
38
Custom size
*4
Custom size
Vertical: 139.7-330.2 mm
Vertical: 5.5"-13.0"
Horizontal: 139.7-458 mm
Horizontal: 5.5"-18.03"
Paper Capacity *6
500 sheets
Copy Paper
❖ Multi Bypass Tray (tray 7)
Paper Type and
Weight
52.3-216 g/m2
(14-57.6 lb.)
Metric Version
*2
A3L, B4 JISL, A4KL,
B5 JIS K, A5KL, A6L,
11" × 17"L, 81/2" × 11"K,
51/2" × 81/2"L, 12" × 18"L,
8" × 13"L
*3
B5 JIS L, B6 JIS L,
81/2" × 11"L, 51/2" × 81/2"K,
81/2" × 14"L, 81/2" × 13"L,
81/4" × 13"L,
101/2" × 71/4"KL,
11" × 15"L, 10" × 14"L,
81/4" × 14"L, 8" × 10"L,
8KL, 16KKL
*4
Inch Version
*2
Paper Capacity *6
500 sheets
A3L, B4 JISL, A4K,
B5 JISK, A5L, A6L,
11" × 17"L, 81/2" × 11"KL,
51/2" × 81/2"KL, 8" × 13"L,
12" × 18"L
*3
3
A4L, B5 JISL, A5K,
B6 JISL, 81/2" × 14"L,
81/2" × 13"L, 81/4" × 13"L,
101/2" × 71/4"KL,
11" × 15"L, 10" × 14"L,
81/4" × 14"L, 8" × 10"L
*4
Custom size
Custom size
Vertical: 100-330.2 mm
Vertical: 3.94"-13.0"
Horizontal: 139.7-458 mm
Horizontal: 5.5"-18.03"
Translucent paper A3L, B4 JISL, A4L, B5 JISL, A4K, B5 JISK
*7
OHP transparencies *5
A4L, 81/2" × 11"KL, A4K
*7
Postcards *5
100 × 148 mmL
*7
Label paper
(adhesive labels)
B4 JISL, A4L, A4K
❖ Large Capacity Tray (LCT) (Optional) Tray 4, 5
Paper Type and
Weight
52 - 216 g/m2
(14 - 57.6 lb.)
Metric Version
Inch Version
Paper Capacity *6
1,000 sheets
*2
A4K, A5KL, B5 JISK, 81/2" × 11"K, 51/2" × 81/2"KL
❖ Large Capacity Tray (LCT) (Optional) Tray 6
Paper Type and
Weight
52 - 163 g/m2
(14 - 43.4 lb.)
Metric Version
Inch Version
*3
Paper Capacity *6
2,550 sheets
A4K, A5KL, B5 JISK, 81/2" × 11"K, 51/2" × 81/2"KL
39
Appendix
❖ Wide Large Capacity Tray (Wide LCT) (optional) Tray 4, 5, 6
Paper Type and
Weight
52 - 216 g/m2
(14 - 57.6 lb.)
Metric Version
*2
A3L, B4 JISL, A4KL,
B5 JIS K, A5KL,
11" × 17"L, 81/2" × 11"K,
51/2" × 81/2"L, 12" × 18"L,
8" × 13"L
*3
3
B5 JIS L, B6 JIS L, A6L,
81/2" × 14"L, 81/2" × 11"L,
51/2" × 81/2"K, 81/2" × 13"L,
81/4" × 13"L,
101/2" × 71/4"KL,
11" × 15"L, 10" × 14"L,
81/4" × 14"L, 8KL, 16KKL
*4
*1
*2
*3
*4
*5
*6
*7
Inch Version
*2
A3L, B4 JISL, A4K,
B5 JISK, A5L, 11" × 17"L,
81/2" × 11"KL,
51/2" × 81/2"KL, 8" × 13"L,
12" × 18"L
Paper Capacity *6
Tray 4, 6:
1,000 sheets
Tray 5:
2,000 sheets
*3
A4L, B5 JISL, A5K,
B6 JISL, A6L, 81/2" × 14"L,
81/2" × 13"L, 81/4" × 13"L,
101/2" × 71/4"KL,
11" × 15"L, 10" × 14"L,
81/4" × 14"L
*4
Custom size
Custom size
Vertical: 100-330.2 mm
Vertical: 3.94"-13.0"
Horizontal: 139.7-458 mm
Horizontal: 5.5"-18.03"
The paper tray fence is fixed. If you wish to change the size of paper placed in this
tray, contact your service representative.
The paper size is detected automatically.
Select the paper size in System Settings. See “Paper Tray Settings”, General Settings
Guide.
If you want to copy onto custom size paper, select the size using the Tray Paper Setting function. See “Paper Tray Settings”, General Settings Guide.
If you want to copy onto OHP transparencies or thick paper, select “OHP (Transparency)” or “Thick Paper”. See “Paper Tray Settings”, General Settings Guide.
When loading paper, make sure the stack height does not exceed the upper limit
mark of the paper tray. The amount of paper that can be set is 11 mm/100 sheets approximately. See “Placing Originals”, Copy/Document Server Reference.
When setting copy paper, make sure the stack height does not exceed the limit mark.
The maximum number of sheets you can set at once depends on the paper's thickness
and condition.
Note
❒ When loading paper in the paper trays 1-3, place the copy side face down.
❒ When loading paper in the multi bypass tray, the Large Capacity Tray (LCT)
or Wide Large Capacity Tray (Wide LCT), place the copy side face down.
❒ When using the multi bypass tray, the maximum custom width differs depending on which tray is nstalled:
• Large Capacity Tray (LCT): 305.0 mm (12")
• Wide Large Capacity Tray (Wide LCT): 330.2 mm (13")
40
Copy Paper
❒ When you load OHP transparencies, check the front and back of the sheets,
and place them correctly, or a misfeed might occur. Set the paper direction to
L. For details, see Copy/Document Server Reference.
❒ When you use OHP transparencies, fan them for each use.
❒ If multiple sheet feeding occurs, load sheets one by one.
❒ If you load paper of the same size in the same direction in two or more trays,
the machine automatically shifts to the other tray when the first tray in use
runs out of paper. This function is called Auto Tray Switching. (However, if
the Paper Type of one tray is recycled or special paper, the settings of the other trays must be the same for the Auto Tray Switching function to work.) This
saves interrupting a copy run to replenish paper when making a large
number of copies. See “General Features” and “Tray Paper Settings”, General
Settings Guide.
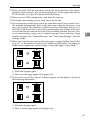
❒ When you want to copy onto translucent paper or paper lighter than 20 lbs,
80 g/m2, set the paper as shown in the following illustration. Not doing so
might cause a paper jam, marked edges or the paper edges to be folded.
3
A
Direction of paper grain
B How to set the copy paper in the paper tray
❒ If you want to set 20 lbs, 80g/m2 or heavier paper, set the paper as shown in
the following illustration.
A
B
Direction of paper grain
How to set the copy paper in the paper tray
41
Appendix
❒ If you load recycled or special paper in the paper trays and use the Tray Paper Settings, this function is not available with these trays unless their settings are identical.
❒ Feeding B5K, A5K, or 81/2" × 51/2"K paper into the machine might cause a
marked edge or a misfeed. In this case, change the orientation or turn over the
paper stack in the paper tray.
❒ When you use the multi bypass tray, it is recommended to set the copy paper
direction to L.
❒ When you load label paper, set the paper direction to K.
Unusable Paper
3
This section describes paper unusable on this machine.
R CAUTION:
• Do not use aluminum foil, carbon paper, or similar conductive paper to
avoid a fire or machine failure.
Important
❒ Do not use any of the following kinds of paper or a fault might occur:
• Paper for inkjet printers
• Thermal fax paper
• Art paper
• Aluminum foil
• Carbon paper
• Conductive paper
• Paper with perforated lines
• Hemmed paper
• Envelopes
❒ Do not copy on the side of paper that has been already copied onto, or misfeed might occur or a fault might occur.
To prevent misfeeds, do not use the following kinds of paper:
• Bent, folded, or creased paper
• Perforated paper
• Slippery paper
• Torn paper
• Rough paper
• Thin paper with low stiffness
• Paper with a dusty surface
If you copy onto rough grain paper, the image might be blurred.
42
Copy Paper
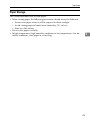
Paper Storage
This section describes how to store paper.
• When storing paper, the following precautions should always be followed:
• Do not store paper where it will be exposed to direct sunlight.
• Avoid storing paper in humid areas (humidity: 70% or less).
• Store on a flat surface.
• Do not store paper vertically.
• In high temperature/high humidity conditions or low temperature/ low humidity conditions, store paper in a vinyl bag.
3
43
INDEX
A
F
A3/11" × 17" tray unit, 11
Administrating the Machine/Protecting
Documents, vii
Auto Off, 26
B
Bluetooth, 12
Booklet Finisher BK5000, 11
File Format Converter, 12
Finisher SR5000, 11
Function keys, 13
Function status indicators, 13
G
Gigabit Ethernet (1000BASE-TX), 12
H
C
CAUTION labels, 6
CD-ROM, 32
Changing Modes, 22
Character, 27, 29
Clear key, 13
Clear Modes key, 13
Components, 9
Connect Copy, v
Control panel, 13
Copier functions, iii
Copy Connector, 12
Copy Data Security Unit, 12
Copy paper, 38, 42, 43
Counter key, 13
D
Data In indicator, 13
DataOverWriteSecurity Unit, 12
Delete, 29
DeskTopBinder Lite, 35
DeskTopBinder-SmartDeviceMonitor for
Client, 37
Display panel, 13, 16
Dos and Don'ts, 31
Duplex Priority, 7
E
44
Energy Saver, 26
Energy Saver key, 13
Energy saving, 7, 26
ENERGY STAR Program, 7
Enter, 27, 29
Entering Symbols, 29
Entering text, 27, 29
Enter key (# key), 13
Entry screen, 28
External option, 11
How to Read This Manual, 2
I
IEEE 1284 Interface Board, 12
IEEE 1394 interface board, 12
IEEE 802.11b Interface Unit, 12
Internal option, 12
Interposer, 11
Interrupt key, 13
Invoke, 30
K
Key arrangement, 28
L
Language Selection key, 13
Large Capacity Tray (LCT), 11
Log in, 18
Login, 19, 20, 21
Login/Logout key, 13
Log Off, 20, 21
Low-Power mode, 7
M
Machine Types, 8
Main power, 23, 25
Manuals for This Machine, i
Monitoring the Machine Via Computer, viii
Multi bypass tray (Tray 7), 11
N
Name, 11
Names of the components, 9
New Job key, 13
Notice, 1
Number keys, 13
O
Off Mode, 7
Operation switch, 13
Option, 11, 12
Other Function key, 13
P
Paper, 38
Paper size, 38
Paper type, 38
Power, 23, 24
Preventing an Unauthorized Copy, ix
Printer Drivers for This Printer, 33
Printer functions, iii
Printer/Scanner unit, 12
Program key, 13
R
Recycled Paper, 8
Registered Program key, 13
S
Safety During Operation, 3
Safety information, 3
Sample Copy key, 13
Scanner functions, iii
Security Functions, vii
Simplified Display, 17
Simplified Display key, 13
Sleep mode, 7
SmartDeviceMonitor for Admin, 36
Software, 32
Software on CD-ROM, 32
Start key, 13
Status indicator, 13
Stop key, 13
Storage, 43
Symbol Entry, 29
Symbols, 2
System Reset, 22
T
Tray Paper Settings key, 13
Turn off, 23, 24, 25
Turn on, 23, 24
TWAIN Driver, 34
U
Unusable, 42
USB Host Interface, 12
User Code Authentication, 18, 19
User Text, 30
User Tools key, 13
Using a Printer Driver, 19, 20
Using the Control Panel, 18, 19, 20
Using the Scanner in a
Network Environment, vi
Using Web Image Monitor, 21
Utilizing Stored Documents, iv
V
Viewing the contents of the CD-ROM, 33
W
WARNING labels, 6
What You Can Do with This Machine, iii
Wide Large Capacity Tray (Wide LCT), 11
Z
Z-folding unit, 11
45
46
GB
GB
B235-7730A
Declaration of Conformity
“The Product complies with the requirements of the EMC Directive 89/336/EEC and its amending directives and the Low Voltage Directive 73/23/EEC and its amending directives.”
In accordance with IEC 60417, this machine uses the following symbols for the main power switch:
a means POWER ON.
b means POWER OFF.
c means STAND BY.
Trademarks
Microsoft®, Windows® and Windows NT® are registered trademarks of Microsoft Corporation in the
United States and/or other countries.
Adobe®, PostScript®, Acrobat®, are registered trademarks of Adobe Systems Incorporated.
The Bluetooth® word mark and logos are owned by the Bluetooth SIG, Inc.and any use of such marks
by Ricoh Company, Ltd. is under license.
NetWare is a registered trademark of Novell, Inc.
PCL® is a registered trademark of Hewlett-Packard Company.
AppleTalk, Macintosh, and Mac OS are registered trademarks of Apple Computer, Inc.
PowerPC is a trademark of International Business Machines Corporation in the United States, other
countries, or both.
UNIX is a registered trademark in the United States and other countries, licensed exclusively through
X/Open Company Limited.
Other product names used herein are for identification purposes only and might be trademarks of their
respective companies. We disclaim any and all rights to those marks.
The proper names of the Windows operating systems are as follows:
•
The product name of Windows® 95 is Microsoft® Windows® 95
•
The product name of Windows® 98 is Microsoft® Windows® 98
•
The product name of Windows® Me is Microsoft® Windows® Millennium Edition (Windows Me)
•
The product names of Windows® 2000 are as follows:
Microsoft® Windows® 2000 Advanced Server
Microsoft® Windows® 2000 Server
Microsoft® Windows® 2000 Professional
•
The product names of Windows® XP are as follows:
Microsoft® Windows® XP Professional
Microsoft® Windows® XP Home Edition
•
The product names of Windows ServerTM 2003 are as follows:
Microsoft® Windows ServerTM 2003 Standard Edition
Microsoft® Windows ServerTM 2003 Enterprise Edition
Microsoft® Windows ServerTM 2003 Web Edition
•
The product names of Windows NT® are as follows:
Microsoft® Windows NT® Server 4.0
Microsoft® Windows NT® Workstation 4.0
Copyright © 2005,2006
Operating Instructions About This Machine
B235-7730A
GB GB