1
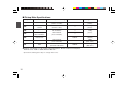
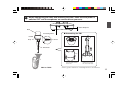
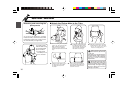
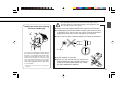
日本語
English
Deutsch
取扱説明書
Owner’s Manual
Bedienungsanleitung
Mode d’emploi
Manual de instrucciones
Español Français
Pickup Mute
Yamaha Silent Brass
Pickup Mute
Thank you for purchasing the Yamaha Silent
Brass Pickup Mute. In order to obtain the
maximum performance and enjoyment from your
Pickup Mute, we urge you to read this Owner’s
Manual thoroughly before using. Please keep
this Owner’s Manual in a safe place for later
reference.
Contents of Set
● Pickup Mute PM9/PM7/PM6/PM5/PM3/PM2/PM1
● Cable
● Owner’s Manual
* Personal Studio ST7 is not included.
* With the exception of the owner’s manual, each attachment can be ordered separately.
11
■ Pickup Mute Specifications
Pickup Mute
Instrument
Dimensions (diameter x length)
Maximum hand rest
Weight width
PM9
Piccolo Trumpet
70 x 145 mm
(2-3/4" x 5-11/16")
—
80g
(2.8oz.)
PM7
Trumpet,
Cornet
70 x 200 mm
(2-3/4" x 7-7/8")
—
120g
(4.2oz.)
PM6
Flugelhorn,
Alto Trombone
PM5
Trombone,
Bass Trombone
PM3
French horn
PM2
Euphonium
PM1
Tuba
108 x 270 mm
(4-1/4" x 10-5/8")
—
—
150mm
300g
(10.5oz.)
190 x 410 mm
(7-1/2" x 16-1/8")
220mm
800g
(1lbs.,12oz.)
380 x 980 mm
(14-15/16" x 38-9/16")
420mm
2900g
(6Ibs.,6oz.)
● Common specifications for all models: Internal Microphone: Electric condenser microphone,
Nominal Level: -25dB to -35dB, Material: ABS resin
* Specifications and design are subject to change without notice.
12
270g
(9.5oz.)
Your Pickup Mute will give you years of
reliable service if you follow the simple rules
given below:
■ Location
Do not expose it to the following conditions to avoid
deformation, discoloration, or more serious damage.
• Direct sunlight (e.g. near a window).
• High temperatures (e.g. near a heat source, out
side, or in a car during the daytime).
• Excessive humidity.
• Excessive dust.
• Strong vibration.
■ Handling and Transport
• Never apply excessive force to the controls, connectors or other parts.
• Always unplug cables by gripping the plug firmly,
not by pulling on the cable.
• Disconnect all cables before moving the unit.
• Physical shocks caused by dropping, bumping, or
placing heavy objects on the unit can result in
scratches and more serious damage.
■ Cleaning
• Clean the cabinet and panel with a dry soft cloth.
• A slightly damp cloth may be used to remove
stubborn grime and dirt.
• Never use cleaners such as alcohol or thinner.
YAMAHA is not responsible for damage caused by
improper handling or operation.
SPECIAL MESSAGE SECTION
SPECIFICATIONS SUBJECT TO CHANGE:
The information contained in this manual is believed to be correct at the time of printing. However, Yamaha reserves the right
to change or modify any of the specifications without notice or
obligation to update existing units.
Do not attempt to service this product beyond that described in
the user-maintenance instructions. All other servicing should be
referred to qualified service personnel.
This product, either alone or in combination with an amplifier and
headphones or speaker/s, may be capable of producing sound
levels that could cause permanent hearing loss. DO NOT operate
for long periods of time at a high volume level or at a level that
is uncomfortable. If you experience any hearing loss or ringing
in the ears, you should consult an audiologist.
IMPORTANT: The louder the sound, the shorter the time period
before damage occurs.
NOTICE:
Service charges incurred due to a lack of knowledge relating to
how a function or effect works (when the unit is operating as
designed) are not covered by the manufacturer’s warranty, and
are therefore the owner’s responsibility. Please study this manual
carefully and consult your dealer before requesting service.
Disposal Notice:
Should this product become damaged beyond repair, or for some
reason its useful life is considered to be at an end, please observe
all local, state, and federal regulations that relate to the disposal
of products that contain lead, batteries, plastics, etc. If your
dealer is unable to assist you, please contact Yamaha directly.
92-BP
13
Set up and Use
■ Personal Studio ST7
Connecting Cable
PICKUP MUTE
1
2
PHONES
1
2
Stereo Earphone
PM7 for TRUMPET
PM6 for FLUGELHORN
Lock Nut
PM5 for TROMBONE
Hand Rest
(P. 17)
PM3 for FRENCH HORN
PM2 for EUPHONIUM
Handle
14
Before connecting the cable and attaching the mute, make sure the power is
switched OFF and the earphones are removed from your ears.
PICKUP MUTE
1
2
PHONES
1
2
Stereo Earphone
Head
Connecting Cable
■ Assembling the PM1
Handle
Lock Nut
Body
1.
Lay the Head on the floor.
Inner Head
hook
2.
PM1 for TUBA
Place the Body on the
Head and fasten with the
three hooks.
3.
Fully extend the Inner
Head that is located in
the center of the Head.
* Refer to pg.16 for instructions on attaching the mute to the instrument.
15
QUICK GUIDE
Attaching and removing the
pickup mute
■ Attach the Pickup Mute to the Tuba
As shown in the illustration, hold the
instrument with your left hand and, while
turning the pickup mute, firmly insert it
into the bell with your right hand.
1.
For Euphoniums,
with the bell facing
up, hold the PM2
by its handle in
your right hand
and firmly insert
it into the bell.
4.
16
2.
After assembling the Pickup Mute
(refer to pg. 15) lay it on its side.
While seated, hold the tuba
between your legs. Hold the
Pickup Mute by its handle and lift
it up.
Attach the mute fixing hooks to
the bell. If necessary, adjust
the length (tension) of the
hook belt.
Holding the Pickup Mute with
both hands, gently insert the
Inner Head into the bell of the
tuba. (Continue holding the
tuba between your legs.)
3.
Adjust the Pickup Mute so that it is
positioned in the center of the bell.
* Noise will result if the Inner
Head is touching the bell.
After removing the mute
from the instrument, lay the mute
on its side.
If the mute is stood vertically, the
Inner Head will collapse causing
a burst of noise in the earphone
that may result in hearing
impairments.
5.
Connect the lock nut equipped
end of the supplied cable to the
Pickup Mute’s output jack and
secure the lock nut.
When putting the mute away,
hold the Inner Head with both
hands and gently collapse it back
into the Body. Strongly dropping
the Inner Head may result in
damage to the Mute.
Holding the mute when playing
the horn standing up
The following cautions are for your own safety and to avoid
possible damage to and malfunctioning of the equipment, and
thus should be observed carefully.
● Firmly insert the PICKUP MUTE into the bell of the instrument.
● Avoid dropping the PICKUP MUTE. Dropping the mute may result
in damage. Also, shock to the ear from the noise produced by
dropping the mute may result in damage to your hearing.
● Do not touch or jab the PICKUP MUTE’s microphone component.
Microphone
As shown in the illustration, lightly support
the hand rest in the middle of the mute with
the ball of your thumb while holding the
instrument at the bell rim with your other
fingers. The hand rest also features a ring
for a wrist band, allowing you to hang the
mute from your wrist (just like any other
mute) while emptying the horn. (Wrist band
is not included.)
* Always remove the mute before emptying the
instrument.
● Avoid stepping on the cable.
● When you are finished playing, remove the
PICKUP MUTE from the instrument. Clean any
moisture on the PICKUP MUTE with a cloth.
DO NOT WASH WITH WATER.
17
QUICK GUIDE
Insert firmly
Signal path
REHEARSAL ROOM
CONCERT HALL
CHURCH
REVERB MODE
From PHONES 1
Tighten the
Lock Nut
AUX IN
REVERB
LEVEL
Connect the supplied cable to the
PICKUP MUTE output jack and
tighten the LOCK NUT.
PLAYER 2
MASTER
VOLUME
PLAYER 1
To PICKUP MUTE 1
Don’t step
on the cable
* Personal Studio ST7 and stereo earphone are not included.
18
Disconnecting the cable
while the power is ON may
result in damage to the unit.
The sudden noise
may also may result in
hearing impairments.
Do not disturb your
neighbours during late hours.