1
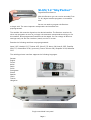
SL65/12 “SkyPacker”
Digital Satellite Receiver
With this Receiver you can receive uncoded (Free
To Air) digital satellite programs via a satellite
dish.
You do not need to program the Receiver
to begin with. The most important transponders and satellites are
preprogrammed.
The satellite dish must be aligned on the desired satellite. The Receiver searches for
other new programs as soon as you begin the automatic transpondersearching run for
this satellite. Nonreprogrammed satellites can be added. You can change all Receiver
settings easily via the user interface (menu) on the TV screen.
Exworks the following satellites are preprogrammed:
Astral 19°E, Hotbird 13°E, Türksat 42°E, Sirius2 5°E, Amos 4°W, Astra2 28°E, EutelSat
W3A 7°E, AtlanticBird 35°W, (previously France Telecom 2D), HispaSat 30°W, HellasSat
39°E.
The multilingual user interface supports the following languages:
German
English
French
Italian
Dutch
Polish
Portuguese
Slovak
Spanish
Czech
Turkish
Hungarian
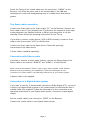
Single scart Model rear panel
Page 1
Other equipment features
Software update via satellite Astrai 190 east, or via the RS232 connection on the rear
panel.
Short Turnon, quick boot process.
Previous channel Memory.
Fully compatibly with MPEG2 and DVB. MPEG video (MP©ML), MPEGi Audio Layerl, Layer
2.
LNB control (tone 0/22 kHz), max. current delivery for LNB 300 mA.
Symbol Rate 135 Mb/s and frequency input 9502150 MHz.
Manual input PID possible.
3 buttons on the front panel. Plug and Play.
External power supply 100240 V, 50/60 Hz, output: 12 volts; 0.75 A.
4,500 program storage memory.
Child protection (preset password: 0000) 1 favourite list and 8 programme groups.
Automatic transpondersearch. Transponderlist editor.
Analogue sound output via Phono plug (In stereo). Volume control by remote control.
AC3 Coaxial output (digital audio, SPDIF).
2 Euro SCART connections, for TV set and VCR. CVBS video output signal.
In Standby mode, a loopthrough facility allows the connection of another satellite
receiver. Super Fast teletext with an 800 page memory.
Digital DVB radio reception with background onscreen display.
On programme change you see other programme information displayed.
DiSEqC 1.0, 1.2, GotoX, is supported if a suitable dish arrangement is connected.
SWAP function (via Recall key).
Screen formats adjustable to 4:3, 16:9 and automatically (letterbox).
8 Multifunction timers coupled to EPG + Sleep timer.
Electronic TV guide EPG (up to 14 days beforehand, dependent on respective
transponder).
SCPC/MCPC reception standard for C/Ku band satellites.
Automatic choice of television standard with Video conversion.
Zoom function. Multipicture function.
Optical/audible Digital Sat finder for the dish alignment.
In addition, you can get a suitable program editor over our hotline. Then, with your
computer, you can work on the program lists of the Receiver.
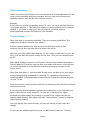
Twin Scart Model
Page 2
Connecting The Receiver
The Receiver must connected via a coaxial cable to the LNB on your satellite dish.
Connect the Receiver to the Mains Power socket only after you have connected
it properly to all devices and to the LNB, otherwise the Receiver can be
damaged. The coaxial cable carries power to the LNB so ensure that the inner
and outer conductors can not touch each other.
Camping or caravan use
The Receiver can be also supplied with 12 volts (i.e. 1115 volts, e.g., from a Solarpanel).
Use the supplied 12 Volt cable to connect it. This cable is fitted with a cigarlighter plug.
If you remove this plug then you should ensure that the source of power is connected
via a suitable safety fuse not exceeding 3 Amps.
Vehicles with 24 volt supply (e.g., TRUCK)
Please, use a 24 V to 12 V DC/DC converter, otherwise the receiver will be
damaged.
LNB cable assembly
To assemble the "F" plugs on the coaxial cable you need a knife (ideally: Wire
stripper) and side cutters.
Remove 10mm of outer plastic sheath at each end to expose the copper braid.
Fold back the braid over the outer sheath, so that it does not touch the copper
centre core. Remove the exposed foil tape.
Remove the white insulation to within 2 mms of the braid.
Twist the "F" plug onto the folded-back braid, until the plug stumbles touches the
white insulation.
Make sure that no strand of copper braid is touching the copper central core
wire.
Shorten the core wire with side cutters, so that it protrudes a maximum of 1 mm from
the plug.
See http://www.satcure.co.uk/tech/fconn.htm
Page 3
Screw the F plug of the coaxial cable onto the connection, "LNB IN" on the
Receiver. You screw the other end of the coaxial cable to the LNB and
weatherproof it with self-amalgamating tape or a rubber boot with silicone
grease.
The Scart cable connection
Connect the Scart cable to the Scart socket "TV" on the Receiver. Connect the
Scart cable to the TV set. Normally the TV will select the respective Scart input
socket whenever the Satellite Receiver is ON but you may prefer to do this
manually. Please follow the operating instructions for the TV set.
If you wish to connect a video device, (VCR or DVD recorder) connect a Scart
cable to the Scart socket "VCR" on the Receiver.
Connect the Scart cable to the video device. Follow the operating
instructions of the video device.
A Scart cable is available separately.
Connection with Phono cable
If you like to connect a stereo audio system, connect the Phono plugs of the
Phono cable to the sockets "AUDIO R" and "AUDIO L" of the Receiver.
Never connect the sensitive "Phono" input of your stereo system to the Satellite
Receiver as this can destroy your equipment. Follow the information for the
connection of a Phono cable in the operating instructions of your stereo system.
A phono cable is not supplied.
Connection of a Digital Audio system
If you want to use the 5 channel audio connection (Dolby Digital AC3), you must
connect your Digital Audio system to the coaxial output of the Receiver with a
suitable cable (not supplied). Follow the information to the connection in the
operating instructions of your Digital Audio system. Connection coaxial digital
output
Put the coaxial cable in the connection, "SPDIF" on the Receiver.
Connect the coaxial cable to your Digital Audio system.
Page 4
Connect the dish and align approximately on the satellite
Before you align the dish, you must connect the coaxial cable to the LN B.
Follow also the operating instructions of your satellite dish, or satellite
equipment.
The Receiver must not be connected to the electricity supply, if you have
already connected the LNB cable to the Receiver.
Screw the F plug onto the connection of the LNB.
If you have not mounted and aligned your satellite dish yet, you must first find a
suitable location for the assembly of the dish. The dish must be pointed south
east. That is, if you stand behind your dish, you must have clear view in the
direction of south east. Please, note that the dish may be never mounted behind
a balcony balustrade, roof, or other obstacles (e.g., trees).
The position of the sun helps to you to determine the southern direction. The
sun stands exactly due south during the summertime at 12 o'clock and during
the wintertime at 1 pm.
Almost all current satellite positions as for example Astral 19° east,
Eutelsat Hotbird 13° east, Türksat 42° east lie within a 90 degree angle.
According to which satellite you want to receive, a clear view is required
without obstacles. Make sure, before you fasten a suitable bracket on your
house wall, that you can turn your dish far enough without its touching the
house wall.
After you have made all connections, you can begin to align the dish. Please,
check again that the Receiver is connected to the LNB on the dish and the
Receiver is connected to your TV set. If these interwirings were made correctly,
you can switch on the equipment.
The first step
Switch on your TV set. Please ensure that your TV set is set to the AV input
for the Receiver.
5
Page 5
The second step
Switch on the Receiver. Please note that the Receiver is preprogrammed for the
most current satellites and their programs and you only need to select the
program numbers with the Receiver remote control:
Example
If you'd like to receive the satellite Astral 19° east, you must put your Receiver
on program position 1. The same also applies to other satellites as for example
Hotbird. If you want to align your dish on Hotbird, you must select a
preprogrammed program for Hotbird in your Receiver.
The third step
Align your dish on the desired satellite. There are several possibilities. The
easiest and cheapest solution is as follows:
Position yourself behind your dish and put the dish quite vertical. Pay
attention to the fact that the dish arm points due south.
Now turn your dish (while observing the TV set) slowly to the east (to your the
left), until the dish arm points exactly to the east. Thus you've turned around
by 90°.
With digital Satellite reception, the Receiver receives the broadcasting signal a
little bit delayed. Therefore turn the dish very slowly and wait at every position
for several seconds, until the Receiver indicates the signal strength on the
screen menu.
Move your dish about 1° east and wait. Gently move the dish so its arm moves
from pointing slightly downwards to pointing 10° upwards and observe the
signal indication. You repeat these steps until you receive the desired program
on your TV set.
Press the remote control buttons CHA CHv to make sure that the other channels
are being received.
If you have the desired satellite, optimize the adjustment of the dish until you
have a clean picture on all channels. You can see a display of the signal
strength and signal quality by pressing of the INFO key. Adjust the dish for
highest signal reading, then adjust the LNB "twist position" (skew) for highest
Signal Quality reading.
Last you tighten all screws carefully, so that the setting of your dish can't
change.
To activate the audible signal you press the INFO button then the 1 button.
Page 6
Operation
The remote control
For the remote control you need two batteries type Micro: LR 03 / AAA / 1.5V
Open the battery compartment.
Insert two batteries, observing the marked polarity in the battery
compartment and close the battery cover again carefully, until the catch
engages.
Exchange weak batteries immediately to avoid misoperation.
Always exchange both batteries at the same time and use batteries of the
same type.
If a battery has run out, wear protective gloves and clean the battery
compartment with a dry cloth.
Warning! Batteries can contain poisonous materials which damage the health
and the environment. Dispose of the batteries according to local regulations.
Never throw the batteries in the normal house garbage.
The remote control transmits infrared signals to the Receiver. Direct the
remote control at the front of the Receiver and press once, briefly, the
appropriate key.
The Receiver
Note Ensure the proper connection of all devices and the LNB, before you
connect the 12 volt cable or the power supply of the Receiver to the mains
supply and start running the Receiver.
Put the power plugs of the connected devices in the power outlet and switch
on the connected devices.
Page 7
Switch on the AV channel on the TV set.
Put the power plug of the Receiver in the power outlet. When the receiver
is in normal ON mode, the red LED shines.
If you want to power the Receiver with 12V, put the 12V cable in the socket
"DC IN" and connect it to the 12V power source.
The Receiver is preprogrammed with television programs and can be used
directly. If you want to find out whether there are new programs, activate a
programsearch run. Read more information below.
To put the receiver into Standby mode you press the red key on the remote
control. Red and green LED5 in the Receiver will light.
Screen inserts on program change
With a program change a strip of information is faded onto the screen for 5
seconds (changeable). In this strip of information you find the following tips:
TXT icon
EPG icon
Heart icon
Programme-Group icon
Info
info
Program name
Received satellite
Current date
Current time
Memory usage
Indicates if the selected transmission offers teletext.
Indicates if the selected transmission offers the
programme schedule
Indicates if you have put the program in your
favourites list.
The relevant program group symbol is shown if
you have put the program in your program list
For Now and Next transmission
About active programme list
Page 8
User interface on the TV screen
Within the menus of the user interface you can change individual settings of your
Receiver. Receiver and TV set must be switched on and be connected with a cable
(SCART or Phono).
Press the MENU key. The main menu is indicated. With the EXIT key or renewed
pressure on the MENU key you can leave this again. Thus you can navigate through the
menus
Above: Menu name (in addition functionsymbols are indicated below) In the following:
Submenu or menu points Below: The strip of information shows you the keys with which
you can move in the current menu. 31
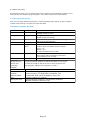
Menu layout
Main menu
Program
(Symbol: Television)
Installation
(Symbol: Dish)
System settings
(Symbol: gearwheel)
Setting
(Symbol: tools)
Sub menu
TV-program list
Radio-program list
Delete All
Dish setting
Auto Scan
Transponder Scan
Search Presets
Language
TV system
Transponder settings
Time/Timer settings
OSD settings
PIN
LNB voltage
Stream/Box Info.
Play
Default
Software upgrade
Page 9
Explanation
See following
See following
See following
See following
See following
See following
See following
See following
See following
See following
See following
See following
See following
See following
See following
See following
See following
See following
text
text
text
text
text
text
text
text
text
text
text
text
text
text
text
text
text
text
Navigating The Menus
In the menus you navigate with the keys CHA, CHv, V+, V
Selected menu points are highlighted. Press the OK key to select. You
can leave the menu with the EXIT key. Changes must also be
confirmed. In addition, the number keys are required in other
submenus.
In every menu an info. line is displayed below, which also offers all choice
options.
Example: Receiver set to summertime. Press MENU, select system settings, select time
& timer setting, press OK, select time, press OK. For the setting "GMT Difference", put
"GMT 02:00". Press EXIT to leave the menu.
Setting for UK:
Summertime: GMT 01:00
Wintertime: GMT 00:00
Program (Symbol: Television)
Sub menu
TV programme list
Radio programme list
Delete All
Description
1. Favourite, 2 Various, 3 Search, 4 ABC, 5 Change, 6 press
^v selection V- V+ group OK input EXIT
as above
Deletion of the complete program list. In addition: Password
input (default setting 0000) and warning announcement.
Confirm with Yes.
1. Favourites
By pressing the 1 key you set your favourites. Beside each of the programs a
heart symbol.
2. Movements
After pressing the 2 key the shiftingsymbol appears behind the marked program.
With CHA and CHv keys the program is pushed to the desired place. The process
must be confirmed with OK.
3. searching
Programsearching function. By input of letter on the OSD keyboard filtered
discovering of transponders is possible.
Page 10
4. Alphabetical Sort
Sorting of the complete program list according to the options provided. The list must
be confirmed with OK. As long as it's not confirmed, you can select "New calculation" to
revert to the previous state.
5. Changes
After password input (default setting 0000) new choice possibilities appear:
Sub Menu
Change
Description
1 deleting, 2 Skip over, 3 Block, 4 changing, 5
Providing, 6 lö, A V dialling, V-V group, P P. Side,
EXIT
Abbr.
5.1 Deleting
Selected transmissions can be marked for deleting by marking with the 1 key . Please
confirm choice with OK key.
5.2 Skipping
By marking with the 2 key, selected transmissions can be marked for skipping over.
Please confirm choice with OK key. Then selected transmissions are jumped over while
surfing. However, by direct input it's still possible to select them.
5.3 Blocking Programmes
By marking with the 3 key, selected transponders can be marked for blocking. Please
confirm choice with OK key. Then selected transponders require a password (child
protection).
5.4 Editing
Enter the Edit mode with the 4 key. Here you can edit individual parameters as
desired. Please confirm choice with OK key.
5.5 New Channel
Press the 5 key to reach the new inputmode. By direct input of frequency and
PID you can add a new program.
Page 11
5.6 Delete Everything
By pressing the 6 key you can mark all programs for deleting. Then individual programs can be
removed from the selection by pressing the 1 key. Please confirm choice with OK key.
6. Types (program group)
Here you can assign selected programs to certain program groups (types) as desired. Please
confirm choice with OK. You leave the menu with EXIT.
Installation (symbol: Sat dish)
Sub menu
Dish setting
Auto Scan
(unique function,
without foreknowledge
available)
TPsearch
(manual
channel search
run)
Search pre-sets
Description
Satellite
Satellite choice,
(example: Astral 19° east)
LNB type
LNB type select
(default setting is universal)
22K
22kHz activation, (Info: with Universal LNB type, this
setting occurs automatically)
DiSEqC
DiSEqC level select
DiSEqC
DiSEqC operation select
switch
Example: Astra and Hotbird double reception
Astra = 1/2
Hotbird = 2/2
For motorised deactivate (invalid)
Positioner
Press OK key to see the DiSEqC - motor control
menu. Please read the operating instructions
of your DiSEqC motor for help.
Polarisation
Horizontally, Vertically, HN (automatic)
Here you can search a selected satellite (example: Astral 19° east)
for new programs. In addition no special information is necessary.
You have the choice to search for free or all TV programs and
Radio programs. The process is begun by "search".
Especially recommended for Türksat
With this searching function you can search the
preset frequency (Transponder) individually. The
Transponder data can be changed by hand. The
process is begun by "search".
Preprogrammed frequency (Transponder) searches.
(Normal automatic-searching run)
Page 12
System settings (symbol: Gearwheel)
Sub Menu
Language
TV System
Transmission
settings
Time & Timer
settings
OSD settings
Sub Menu
Time & Timer
settings
Description
Language
1st Audio Channel
Menu language selection (OSD)
Preselection of the audio-language
(if offered by the transmission )
2nd Audio Channel
Preselection of the audio-language
(if offered by the transmission )
Display mode
Choice of the carrier system.
Default Auto
Relation
Choice of picture format
Default 4:3 LB (letterbox)
Startup channel (select the Switch-on programme).
Time
Timer
Menu Style
Subtitle display
OSD delay
OSD Transparency
OSD default setting
Default is 0000
Close Menu
Description
Time
Timer
OSD settings
Menu Style
Subtitle display
OSD delay
OSD Transparency
OSD default setting
PIN
Default is 0000
Close Menu
Password setting Programme block
New password
Confirm password
LNB voltage
Possibility of the time and time zone input.
(see example: Receiver on summertime
change)
See following table
Menu colour setting
Subtitle activation
Menu-insertion time (OSD time barrier)
Menu transparency
Restore OSD default setting
Switch off the password input in the
installation-Menu
See table on page 14
Menu colour setting
Subtitle activation
Menu-insertion time (OSD time barrier)
Menu transparency
Restore OSD default setting
Switch off the password input in the
installation-Menu
Switch off the password input for blocked
programs (child protection)
Definition of a new password.
Confirm new password
LNB electricity supply turning on and off.
Default is ON.
Page 13
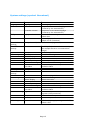
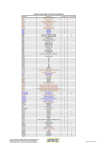
Table of timer settings.
Submenu
Timer
number
Timer Mode
Service
Start Channel
Start Date
On Time
Duration
Description
Choice of timer number 1-8.
Type of repetition (once, daily, weekly, monthly, yearly, from). With
the setting "from" the timer is deactivated.
Switch over between program timer and remember function.
With timer service setting "Announcement".
Options are: Birthday, anniversary, general
With timer service setting "channel".
Program choice
Date input
Time input
Duration of switch-on time
However, the timer can be also programmed in the EPG mode. Example:
EPG key press, then with the 1 key you receive an event list, with CHA and CHv keys
you can select the desired event and pass it with 2 key directly to the timer.
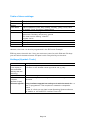
Settings (Symbol: Tools)
Submenu
Stream/Box info.
(This display is
also accessible
directly with the
INFO key)
Play
Default
(requires
password input)
Software upgrade
Description
Display the reception parameters.
Activation of the audible sound signal with the [1] key.
There are three games available: Tetris, Snakes, Othello.
Receiver factory default settings reinstated. All changes are
cancelled.
Note: A software upgrade has nothing to do with the search for
new TV programmes. That requires an automatic transponder
search.
In case of a fault you can load in new Operating System software
via satellite or via the R5232 interface from a PC.
Page 14
Software update via satellite
The update has to do nothing with the finding new television channels, but serves
merely for renewing the receiver's factory software.
The update is not usually necessary for a Receiver which is working normally.
You must align your satellite dish on the satellite Astra-1 19° east to be able to carry
out the software download.
The software download can take up to one hour.
It is recommended you reinstate the default settings after download, in addition.
Note: Your own custom channel list gets deleted.
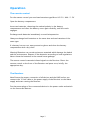
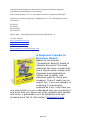
FREE -
Beginners Guide to
Electronics
Easier to understand than
anything you've read previously!
Martin has a knack of explaining
technical subjects in simple
language. Components covered
include resistors, diodes,
transistors and capacitors.
every stage.
As an example, it describes in
detail how to build a flashing LED
circuit on perforated stripboard
("Veroboard") with a photograph of
This is NOT just another boring technical eBook full of
mathematical equations. You'll like it! Ideal for everyone
from the young student to the retired lady looking for a
new hobby. You'll definitely want more! Download it FREE
now!
Page 15
Keys with special functions
TV/SAT
With the TV/SAT key you can switch back and forth between television and satellite
function. (This function must be made available by your television). Press the TV/SAT
key repeatedly, until you have got the desired function.
TV/RADIO
With the TV/Radio key you can switch back and forth between television function
and the DVB radio function. With RADIO selected, the Receiver receives a radio
program and displays a background picture.
To shift back to the television program, press the TV/Radio key.
ZOOM
You can increase a picture window size with the zoom function Press the zoom key
twice. Choose the picture window with the CHv, CHA, V and V+ keys. With every press
on the zoom key the picture window is increased, with a maximum of six steps. With the
seventh keystroke the picture reverts to the source size again. You can leave this mode
with the EXIT key.
LIST
Press the LIST key once. As already described above under menu point "Program",
you get to work on the program list here.
AUDIO
With the audiokey you can select the soundtrack, if the transmission includes multiple
audio tracks. In addition, you can activate the Dolbydigitalmode (you will need to
connect Dolby digital equipment. The COAXIAL socket connection is on the rear panel).
EPG
Electronic TV guide (Electronic Program Guide). To activate the function you press the
EPG key. The program list appears.
16
Page 16
You can select a program with the CH^ and CHv keys. On the right side are indicated the
now and next programmes. For schedule information press the [1] key. The complete
event list is then displayed. With the V+ and V keys you can switch forward through the
days. With the CHA and CHv keys you can switch through the events.
Press the [2] key to display a synopsis of the selected programme.
TEXT
Teletext is a system which displays text information on your television set. For teletext
reception the selected transmission must support this function. On program change the
TXT symbol is indicated. Our teletext is extremely quick comparede with most other
receivers.
To switch on the teletext, press the TEXT key. To switch off the
teletext, press the key EXIT or TEXT key.
Fasttext functions
The coloured keys on the remote control are provided for Fasttext and become active
during display of a teletext page. Press the desired key.
M/P Multipicture
Press the M/P key to get the Multipicture mode. Now on your screen 9 programmes
appear together, beginning with the current programme.
With CHA, CHv, V and V+ keys you can move the yellow cursor. The marked
programme is in realtime; the unmarked programmes are static pictures.
To activate the desired program, mark this and then press the OK key or the EXIT key.
Press the EXIT key to leave Multipicture Mode. The program marked last fills your
screen.
MUTE
The sound is switched off by pressing the MUTE key. The sound is switched on by
pressing the MUTE key again.
FAV
Press the FAV key. The screen displays the favourites selected by you (see above).
Choose a program from the favourites list. Press the OK key to select.. With V+ and V
keys you can switch back and forth between the Program groups.
Page 17
RECALL
By pressing the RECALL key you revert to the previously selected program.
Audible tone for the alignment of the satellite dish
Press in the INFO key. Signal strength and signal quality are displayed, as well as current
reception parameters. You can activate an audible tone by pressing the [1] key.
The TV set loudspeaker produces the audible tone. A pure and higher signal indicates a
better adjustment of the dish on a satellite.
Sleep Timer
Press the [0] key to get the Sleep timer display.
It has the following options: switched off, 10, 30, 60, 90, 120 minutes. After the set
time, the Receiver is automatically switched off.
Pause
Press the PAUSE key. The television picture is then "frozen". Deactivate by pressing
PAUSE key again. The programme continues from the present (there is no memory to
store what you missed. The pause key is merely useful to let you, e.g., copy some
writing from the screen).
How to Use a Multimeter
By popular request this eBook has
been written to explain the most
basic uses of a multimeter with
extensive use of photographs to
show the methods in detail.
There's nothing complicated in this
eBook. It sticks to simple activities
like checking batteries, resistors,
diodes and capacitors; measuring
voltage and current.
http://www.The-Cool-Book-Shop.co.uk
Page 18
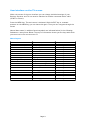
Multi-Satellite Installation
Example: Dish with 3 LNB5 set for Astra-1 (19.2°E), HotBird (13°E), Astra-2 (28.2°E).
LNB5 are connected to a 4 way DiSEqC switch.
Align each LNB by connecting it directly to the receiver without the DiSEqC switch.
When all LNBs are aligned, connect to the receiver via the DiSEqC switch. Note which
LNB is connected to which switch input.
Press MENU > Antenna Setup > OK
Make sure that DiSEqC is set to 1.0
Set Satellite to ASTRA28EAST.
Set DiSEqC Switch to 3/4 (whichever switch input the Astra2 LNB is connected to).
Press EXIT and OK. Select TP Scan and
press OK. Select Search and press OK.
If you see a message "No program found" this means that the LNB input that you
selected is incorrect for the chosen satellite position. Please check your connections
and Set DiSEqC Switch to the correct input.
If the search is successful and produces no error message, the selection was correct.
Press EXIT.
Select Auto Scan and press OK. Select
Search and press OK.
The receiver will now produce a list of TV and Radio channels. This can take ten minutes
or more. A progress bar will be displayed. Please wait until it's finished.
Press EXIT twice.
Press OK and select a programme to watch.
To select a different satellite press LIST then use the V, V+ keys to select the
satellite.
Page 19
Dismantling the System
Disconnect the Receiver and the connected devices from the electricity supply.
Unscrew the LNB cable from the Receiver and from the LNB.
Take the batteries from the remote control, if you do not plan to use the
Receiver for a long time.
Pack the Receiver, the cables and the remote control in the box.
Store the Receiver and all accessories in a dry and dustfree place.
Protect the Receiver against frost.
Cleaning
Warning: The Receiver must not get wet. Never clean it with a wet cloth.
Use no solventcontaining cleaning agents like gasoline or thinners. These
can damage the surface of the case.
Clean the case of the Receiver ONLY with a dry cloth.
How to Fit Extra TV
Points
You already have a working
Freeview system but you want to
add extra TV aerial sockets in
other rooms? This eBook
explains. Download it now.
http://www.The-Cool-Book-Shop.co.uk
Page 20
Troubleshooting
Symptom
Satellite is not found,
or no signal
Front panel dark. No
LED lit.
Read and Green
LED5 shine,
No sound or picture
but menus can be
displayed on screen
Red LED shines but
TV displays no
picture or menu
Picture or sound
breaking up.
No picture, no
sound, signal
strength but no signal
quality.
Bad reception from
certain channels
Remote control not
working.
Programme has
moved to a new
frequency.
Possible Cause and Remedy
Example: ASTRAl 9E
Key 1 (preprogramming: "Das Erste")
Key INFO ("Das Erste ", FRi 1837)
Signal AND quality are both 0%
Set the dish vertical and point roughly south.
Move it a few millimetres left, wait about 3 seconds then move it
again. Repeat until a signal is found and Signal Quality is more
than 0%. When the signal reaches 60% the blank screen will be
replaced with a picture.
Select a current programme from the pre-programmed list and
press the INFO key.
The power cable is disconnected?
There’s a short-circuit in the LNB cable or connectors?
The receiver is in Standby mode. Press the Standby button on
the receiver or the remote (try both)
The dish is not aligned on the correct satellite.
The TV is not in AV mode. Select the appropriate Scart input
with the TV remote control.
The dish is not aImed exactly on the satellite. Press the INFO key
to check the signal quality. Realign the dish. Check for obstruction
such as a tree.
Try a replacement LNB. Try replacing cable. Look for sources of
interference such as a car radar detector nearby or a DECT
telephone
The dish is aligned on the wrong satellite.
Look for sources of interference such as a car radar detector
nearby, a DECT telephone or a light dimmer. Switch them off.
The batteries are used. Renew the batteries.
The remote control is wrongly aimed. Direct the remote control
towards the front panel of the Receiver and make sure that
nothing stands between remote control and Receiver.
Check for sources of interference such as a light dimmer.
Delete the channel then run a new automatic search.
If the problem remains, please contact your supplier.
Page 21
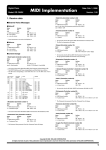
Technical Specification
Receiver
Dimensions in mm (WxDxH): 210x145x45
Weight in grammes:
Receiver: 660 gms
Remote control: 80 gms (without batteries)
Input frequency response: 950 MHz 2,150 MHz
IF range: 55 MHz/8 MHz (under 5MS/s)
Electricity supply: LNB 14 V/18V, 0.30A max. Overload protection
LNB control: 22 kHz ± 2 kHz, 0.6 V pp ± 0.2 V
DiSEqC control: version 1.0, version 1.2, Tone Burst A/B
Symbol rate: 1 35 MS/s
Bitstream: MPEG2 115200 bitstream specification ISO/IEC
Input speed max. 15 MBit/s
Error correction (FEC): 1/2, 2/3, 3/4, 5/6, 7/8, auto
Video: MPEG2 MP©ML
Audio: MPEG1/2 Audio Layer 1 or Layer 2
Height/width ratio: 4:3 Letterbox, 4:3 PanScan, 16:9
Video resolution: 720 x 576 (Pal), 720 x 480 (NTSC)
Audio mode: Left, right, stereo, digital AC3
Understanding Sky Digital & Freesat - FREE eBook
From http://www.The-Cool-Book-Shop.co.uk
Connection ports
LNB IF input: type "F", IEC 16924
TV SCART (only output): video CVBS, audio L, R
VCR SCART (input and output): video CVBS, audio L, R
RCA (Phono): audio L, R
SPDIF, COAXIAL Digital: audio output
Electricity supply
Supply input voltage: 100 - 240 V~, 50/60 hertz
Receiver input voltage: 11 - 15 volts DC
Power requirement: approx. 12 W (with single LNB)
Power requirement: approx. 4 W in Standby
Operating temperature: 0°C - 40°C
Storage temperature -40°C ~ +65°C
Troubleshooting Sky Digital - FREE eBook from
http://www.The-Cool-Book-Shop.co.uk
Page 22
Herewith the manufacturer declares the conformity with the following
guidelines and standards for this product:
Low voltage guideline 73 / 23 / European Economic Community EN 60065
Guideline to the electromagnetic compatibility 89 / 336 / European Economic
Community
EN
EN
EN
EN
55013
55020
6100032
6100033
Device type / Type: Digital Satellite Receiver DVBS SL 65/12
© 2012 SatCure
http://www.satcure.co.uk
http://www.satcure.com
http://www.satcure.net
http://www.The-Cool-Book-Shop.co.uk
A Beginner's Guide to
Receiver Repair
Based on the original
"Screwdriver Expert's Guide to
Satellite Receivers" this book
describes the basic components
and a typical power supply with
diagrams and explanations.
Shows how to solder and
describes what to check and
measure. It won't make you an
expert but, if you are capable of
soldering in components
supplied as a kit, it will take you
one step further so you understand why you are doing it
and even help you figure out other possible fault causes
and cures. I guarantee you'll be delighted with this
amazing book full of information! Download it now.
Page 23
Sky Digibox User Guide
This User Manual is the ideal
solution if you've bought a Sky
Digibox without one.
Explains all the features of a
Standard Digibox including
"secret" menus.
http://www.The-Cool-Book-Shop.co.uk
SatCure Guide to Magic
Eyes (free if you buy a magic
eye)
This User Manual is the ideal
solution if you've bought a
"magic eye" such as "tvLINK",
"slxLINK" etc. without a
manual. Explains how to install
a "magic eye" including
"secret" menu + tips.Includes
Troubleshooting Guide for
fixing problems with your
"magic eye".
Your TV Manual
You should read this book
before you buy a TV and
before your TV goes faulty as it inevitably will! Includes
advice on how to avoid
problems, fix simple faults, fix
remote controls, getting your
TV repaired and buying a new
TV. Includes many moneysaving tips. Intended for the
UK reader but many points are
Page 24
applicable to all countries. (Several repair shop owners
asked me not to publish this booklet because they think
it will lose them business!)
Piping TV Around the
House
How to connect your TV, video,
satellite, DVD, and send the
signals to TVs in other rooms.
An invaluable guide and
reference that explains UHF
channel utilisation without
unnecessary technical terms.
Includes sketches to show
wiring methods. 56 pages.
OK, read more about it here.
This eBook is FREE if you buy a loft box from SatCure!
The Freeview Bible
Everything you need to know
about installing a Freeview box
to receive Terrestrial Digital TV
programmes in the UK.
Installation guide
•Details of many receivers
•What aerial to use and how to
choose it
•Installing an aerial and cable
•60+ pages
OK, read more about it here.
Page 25
Installing Sky Digital TV
and Freesat
Companion eBook to the above
"Understanding..". (Please
read "Understanding.." before
ordering this eBook). Self
installation information.
Essential reading if you want
to move your old system to a
new house, install a brand new
Freesat-HD, Sky-Plus or
standard Sky system, fit a
system to your house,
apartment block, motorhome, caravan or narrow boat or
use it in Europe, this eBook answers your questions.
What size dish, what sort of cable, connectors, which
receiver is best for outside the UK, how to align dish,
How to disguise the dish and special disguised dishes
such as the digiglobe ... 120+ page eBook filled with
colour photographs and easy-to-understand
explanations.
I guarantee you'll be delighted with this amazing eBook
full of information!
Not convinced? OK, read more about it here.
Installing Sky Digital satellite TV - installation guide how to install sky
(Although it refers to "Sky" the information is applicable
to all satellite transmissions.)
FREE BONUS eBook!:
UK Digital Satellite TV in Europe
When you download "Installing..."
Includes tips on receiving ITV in Europe, dish mounting
instructions etc.
© 2012 SatCure
http://www.satcure.co.uk
Page 26