1
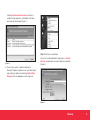
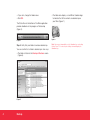
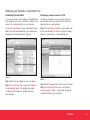
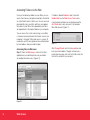
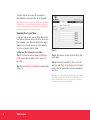
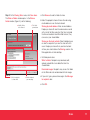
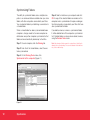
Mirra
Sync and Share
Personal Server
Getting Started
Guide for Windows
Backing Up your Files
The Seagate Mirra Sync and Share Personal Server
continuously backs up your files and folders while you
work as long as it’s turned on. When you back up a
folder, all files and subfolders within that folder are also
automatically backed up.
Note: The Mirra Sync and Share Personal Server is designed to run
in the background, so you can keep working during the initial backup
if you choose. The initial backup takes roughly 20 minutes per GB of
data, because all your selected folders are being backed up at once.
Subsequent backups take less time.
Step 1: Select folders for backup.
a. On the Backup & Restore screen, click New backup
or Recommended backups on the Backup Tasks
menu.
Clicking New backup launches a window that allows
you to browse to the folder you want to back
up (Figure 1).
Try out the Mirra backup process.
If you’d like to get a feel for how a Mirra backup works
before you begin backing up folders from your computer,
create a folder on your desktop named “test” and copy
a few files into it. Then follow the steps below to back
it up. Once you’re comfortable using Mirra’s backup
feature, delete the test folder and begin the initial backup
of your folders.
Figure 1
2
Backup
Clicking Recommended backups launches a
window listing frequently used folders that Mirra
recommends for backup (Figure 2).
Figure 3
Step 2: Confirm your backups.
Figure 2
Once you’ve selected folders for backup, a Confirm
Backup window opens for each folder you selected
(Figure 4).
b. You can also select a folder for backup in
Microsoft Windows Explorer or on your desktop by
right-clicking a folder and selecting Add to Mirra
Backups from the dropdown menu (Figure 3).
Figure 4
Backup
3
• If you wish, change the folder name.
• Click OK.
• The folder icon displays a small Mirra Guardian logo
to indicate that all the contents are backed up on
your Mirra (Figure 7).
The Status Bar on the bottom of the Mirra application
provides feedback on the progress of the backup
(Figure 5).
Figure 7
Figure 5
Step 3: Verify that your folders have been backed up.
You can confirm that a folder is backed up in two ways:
• The folder is listed on the Backup & Restore screen
(Figure 6).
Figure 6
4
Backup
Note: You may not immediately see the Guardian logo on desktop
folders. Press F-5 to refresh your desktop view and display the
Guardian logo.
Restoring your Deleted or Overwritten Files
Undeleting files and folders
Restoring a previous version of a file
If you want to recover a file or folder you’ve deleted from
your computer, you can use the Mirra to undelete it and
restore it to its original location on your computer.
Your Mirra automatically saves up to eight versions of
each backed up file. You can restore any version to its
original location on your computer.
On the Backup & Restore screen, backed up files and
folders that have been deleted from your computer are
displayed with a line through them (Figure 8).
Step 1: On the Backup & Restore screen, double-click
the file to be restored. The history for the file, including
previously saved versions, is displayed (Figure 9).
Figure 8
Figure 9
Step 1: Select the file or folder you wish to undelete.
Step 2: On the Restore Tasks menu, click Undelete
file (or Undelete folder). The deleted file or folder
is automatically restored to its original location on
your computer.
Step 2: Select the version of the file you want to restore.
Step 3: On the Version Tasks menu, click Restore
selected version. The file is automatically restored to
its original location on your computer.
Restore
5
Accessing Folders via the Web
Once you’ve backed up folders on your Mirra, you can
access them from any computer connected to the Internet
via a free Web Account at Mirra.com. You can view and
download files from your Mirra, edit them, and upload
them back to your Mirra. Files uploaded to your Mirra
are copied back to the original folder on your computer.
You can access files via the web as long as your Mirra
is turned on and connected to the Internet—even if your
computer is turned off. Mirra web access is secure. All
connections are SSL-encrypted and user-authenticated
by email address and password for logon.
Accessing files via Mirra.com
Step 1: Check the Web Access screen in the Mirra
application on your desktop to be sure your folders
are enabled for online access (Figure 10).
Figure 10
6
Web Access
If a folder is labeled Disabled, select it and click
Enable folder on the Web Access Tasks menu.
If your backed up folders are not displayed and the
Acct Status bar is red, you haven’t yet created a
Mirra Web Account (Figure 11).
Figure 11
Click Change/Create next to the Account bar and
enter your email address. Seagate will send you a
confirmation message with a link to the Mirra web site
to finish the creation of your account.
Step 2: Sign in at Mirra.com by clicking Member Login.
Use the email address and password you used to create
your Web Account. The Backups page lists your
backed up folders enabled for web access (Figure 12).
Figure 13
Step 3: On either the Backups page or the Shared
Folders page,
Figure 12
• Click the Shared Folders tab to see the folders
you’ve shared with others and folders that others
have shared with you (Figure 13).
• Double-click a folder to view its contents.
• Click the download arrow to download a file
to your computer (Figure 14).
Figure 14
Web Access
7
You don’t need to wait for one file to complete its
download before selecting another file to download.
Note: It can take up to two minutes for the Mirra Sync and Share
Personal Server to connect securely when you access the first file
in a web session. Once the connection has been made, the MIrra
operates more quickly on subsequent downloads.
Uploading files to your Mirra
Using Mirra web services, you can either add new files
to a folder or replace an existing file with a new version.
Files uploaded to your Mirra are copied to the original
folder on your computer and on any other computer
that has synchronized with that folder.
Figure 15
Adding new files for backup to your Mirra
Step 1: On either the Backups page or the Shared
Folders page, open the folder in which the files will
be saved.
Step 2: Click Add file(s). The Add Files window opens
(Figure 15).
Step 3: Click Browse to select up to five files to add
to this folder.
Step 4: When you’ve selected the files you want to
add, click Add File(s). An Upload Successful window
confirms that the selected files have been uploaded to
your Mirra.
Note: When you share folders through Mirra.com, share recipients
can edit, save, and upload shared files to your Mirra using the
process described above. However, they can access only those
folders you have chosen to share with them.
8
Web Access
Overwriting a new version of an existing file
Step 1: On either the Backups page or the Shared
Folders page, click the Overwrite symbol next to
the file you want to upload to your Mirra (Figure 16).
Step 2: Browse to find that file on the local computer
and click Overwrite. An Upload Successful window
confirms that the selected file has been uploaded to
your Mirra. All uploaded files are automatically backed
up to your Mirra and copied to the original folder on
your computer.
Figure 16
The Overwrite page opens (Figure 17).
Figure 17
Web Access
9
Sharing your Folders with Others
The Mirra Sync and Share Personal Server allows you
to share folders both over a local network with people
whose computers are connected to your Mirra and via
the web using email addresses. Sharing is secure and
free for both Mirra owners and the people with whom
you share.
If you’re currently sharing folders or someone is sharing
folders with you, they’re listed on the Sharing screen
(Figure 19).
You can share entire folders or only selected subfolders.
Once you’ve shared a folder, any new files added to
that folder are immediately available to the people with
whom you’ve shared. Since your shared folders are
backed up on your Mirra, they’re accessible even if you
turn off your computer and remove it from the network,
as long as your Mirra remains on.
Step 1: Click the Sharing tab. If this is the first time
you’re sharing a folder and if no other folders have been
shared with you, the Sharing screen is empty (Figure 18).
Figure 19
Figure 18
10
Share
Step 2: On the Sharing Tasks menu, click New share.
The Share a Folder window opens. In the Share a
Folder window (Figure 20), do the following:
a. Identify folder
to be shared
c. Set folder
permissions
a. Click Browse to select a folder to share.
b. Select the people to share with over the web using
email addresses or on the local network:
Sharing by email address: Enter an email address.
People you share with over the web receive an email
with a link to the Mirra web site. After they’ve clicked
the link and created a free Mirra Web Account, they
can access your shared folder.
Sharing on the local network: Select individual users
or select a computer if you want to share with all its
users. People you share with on your local network
will see your share listed on the Sharing screen in the
Mirra application on their desktops.
c. Set folder permissions:
Write to folder: Recipients may download, edit,
upload, and add files to or delete files from the
shared folder.
Download images: Recipients may access this folder
on the Mirra web site and download full-size images.
Figure 20
b. Select recipients
to share with
d. Send recipients
your message
d. If you wish, type a personal message in the Message
to recipients box.
e. Click OK.
Share
11
Synchronizing Folders
The ability to synchronize folders across multiple computers is an advanced feature available when you share
folders with other computers connected to your Mirra.
You synchronize folders by establishing a connection to
a shared folder.
Step 4: Select a location on your computer and click
OK. A copy of the selected folder now resides on this
computer and is synchronized with copies residing on
the other computers connected to your Mirra that have
also synchronized the folder.
When a shared folder has been synchronized between
computers, changes made to it on one computer are
reflected on every other computer synchronized to that
folder and are automatically backed up to the Mirra.
If you delete, rename, or move a synchronized folder,
it will be deleted from all the computers synchronized
to it. Deleted folders can always be restored, however,
using the Restore Tasks menu.
Step 1: On each computer, click the Sharing tab.
Note: Synchronized folders cannot be copied into a folder that is
already selected for backup. Choose a destination folder that has
not yet been backed up.
Step 2: From the list of shared folders, select the one
to be synchronized.
Step 3: On the Sharing Tasks menu, click
Synchronize to this computer (Figure 21).
Figure 21
12
Synchronize
Safety Instructions
This product was designed and manufactured to meet
strict quality and safety standards. There are, however,
some installation and operation precautions of which
you should be particularly aware. Please read these
instructions before operating the equipment and save
them for future reference.
1. Read instructions: All the safety and operating
instructions should be read and understood before
the appliance is operated.
2. Retain instructions: The safety and operating
instructions should be retained for future reference.
3. Heed warnings: All warnings on the appliance and
in the operating instructions should be followed.
4. Follow instructions: All operating and usage
instructions should be followed.
5. Avoid water and moisture: The appliance should
not be used near water (for example, near a bathtub,
washbowl, kitchen sink, or laundry tub; in a wet basement; or near a swimming pool).
6. Provide adequate ventilation: The appliance should
be situated so that its location or position does not
interfere with its proper ventilation. For example, the
appliance should not be situated on a bed, sofa,
rug, or similar surface that may block the ventilation
openings or placed in a built-in installation such as a
bookcase or cabinet that may impede the flow of air
through the ventilation openings.
7. Protect from heat: The appliance should be situated
away from heat sources such as radiators, heat registers, stoves, or other appliances (including amplifiers)
that produce heat.
8. Protect power cords: Power supply cords should
be routed so that they are not likely to be walked on
or pinched by items placed upon or against them,
paying particular attention to cords and plugs,
convenience receptacles, and the point at which
they exit from the appliance.
9. Avoid object and liquid entry: Never push objects
of any kind into this product through cabinet slots;
they may touch dangerous voltage points or short
the parts, resulting in the risk of fire or electric shock.
Never spill liquid of any kind on this product.
Damage requiring service: The appliance should be
serviced by authorized service personnel when
a. The power supply cord or plug is damaged or frayed.
b. Liquid has spilled into the product.
c. The product has been exposed to rain or water.
d. The product does not operate normally when you
follow the operating instructions.
e. The product has been dropped or the cabinet
damaged.
f. The product exhibits a distinct change in
performance.
Servicing: The user should not attempt service to the
appliance beyond that described in the Troubleshooting
section of the Mirra Sync and Share Personal Server
Manual. All other servicing should be referred to authorized
service personnel.
Mirra Sync and Share Personal Server
13
Cleaning: Unplug this product from the wall outlet
before cleaning. Do not use liquid cleaners or aerosol
cleaners; use a damp cloth for cleaning. If the product
comes in contact with any liquid, unplug the power
adapter and let the unit dry thoroughly before plugging
it back in.
Power source: This product should be operated only
from the type of power source indicated on the marking
label or in the Getting Started Guide. If you are not sure
of the type of power supply to your home, consult your
dealer or local power company.
Overloaded power outlets: Do not overload wall
outlets and extension cords; this can result in fire or
electric shock.
Electric shock: To reduce the risk of electric shock,
do not disassemble this product. Take it to a qualified
service person when service or repair work is required.
Opening or removing covers may expose you to
dangerous voltage or other risks. Incorrect reassembly
can cause electric shock when this product is
subsequently used.
Moving: Avoid moving the unit while it is plugged in to
avoid accumulative shock and vibration damage to the
internal hard disk drive.
CAUTION: To prevent electrical shock, match wide
blade of electrical plug to wide slot and insert fully.
14
Getting Started Guide for Windows
Terms and Conditions for MirraGuard™ Data Guarantee
For three years after purchasing a Mirra Sync and Share
Personal Server, Seagate will assist original purchasers
that have experienced a computer hard disk drive failure
to restore, to the same or another computer hard disk,
the data that was backed up on their Mirra Sync and
Share Personal Server in the following way:
1. By providing technical phone support to assist
in the data restoration process from the Mirra to
a replacement PC drive.
2. If the over-the-phone guided data restoration process
fails due to a fault with the Mirra, by paying for shipment of the Mirra to and from Seagate from locations
within the United States only, extracting the backed
up data from the Mirra hard drive, placing it on
DVD-ROM disk(s) or other storage media, and
sending it back to the purchaser. For customers
outside the United States, contact your local
Seagate Dealer for assistance.
The MirraGuard Guarantee is separate from the Limited
Consumer Warranty as it only covers the restore process
and not the purchaser’s Mirra or the data contained on
the purchaser’s Mirra. Seagate’s good faith attempts to
restore and recover the data in accordance with these
terms and conditions shall be the purchaser’s sole and
exclusive remedy under the MirraGuard Guarantee and
Seagate shall not be liable for any damages whatsoever.
Seagate cannot guarantee that any data will be recoverable, nor can it guarantee which data files are on the
Mirra Sync and Share Personal Server. Data restoration
or recovery shall be strictly limited to whatever files are
restorable or recoverable and not to what the purchaser
believes to exist on the Mirra. Only one instance of
data extraction per Mirra is covered by this program.
Other exclusions may apply. See web site for details:
www.seagate.com.
3. If extraction of the data by Seagate personnel fails
due to a fault with the Mirra, by procuring up to US
$1,000.00 of data recovery service from a provider
of Seagate’s choice to extract the data from
the Mirra hard drive, place it on DVD-ROM disk(s)
or other storage media, and send it back to
the purchaser.
Mirra Sync and Share Personal Server
15
Seagate Technology Limited Consumer Warranty
What Does This Warranty Cover?
This warranty covers any defects in material or workmanship in the new Seagate productaccompanied by this
warranty statement. Only consumers purchasing this
Seagate product from an authorized Seagate retailer
may obtain coverage under this warranty.
How Long Does The Coverage Last?
The warranty period is 1 year from the documented date
of your purchase.
What Does This Warranty Not Cover?
This warranty does not cover any problem that is
caused by commercial use; accident; abuse; neglect;
shock; electrostatic discharge; heat or humidity; improper
installation; operation; maintenance or modification; any
product with removed, damaged or tampered labels;
malfunctions caused by other equipment; lost passwords;
or any misuse contrary to the instructions in the user
manual. This warranty does not cover data loss—back-up
the contents of your drive to a separate storage medium
on a regular basis. Also, consequential damages; incidental
damages; and costs related to data recovery, removal,
and installation are not recoverable under this warranty.
What Do You Have To Do?
Seagate will not provide any warranty coverage unless
your claim is in compliance with all terms of this warranty
statement and you follow proper return procedure. To
request warranty service, contact an authorized Seagate
service center or refer to www.seagate.com for more
information regarding customer support within your
16
Getting Started Guide for Windows
jurisdiction. You also may obtain information regarding
the location of authorized Seagate service centers and
access Seagate automated customer service directory
by calling +1-800-SEAGATE. Callers outside the US can
reach this service by dialing +1-405-324-4700. Once
an authorized service center or Seagate determines that
a repair is required, you will be prompted for your name,
address, phone number, e-mail and product serial
number and then issued a Return Material Authorization
(RMA) to use when returning product to Seagate.
Product you return to Seagate must be properly packaged in its original packaging (or packaging providing
the product with protection equivalent to the original
packaging) and shipped, with the shipping charges
prepaid, to the address provided when you received
your RMA. In addition to regular back-ups, if possible,
back-up your data before sending the product for
repair because the product you send to Seagate or an
authorized service provider may not be returned to you.
What Will Seagate Do?
If Seagate authorizes you to return your product to
Seagate or an authorized service provider, Seagate will
replace your product without charge with a functionally
equivalent replacement product. Seagate may replace
your product with a product that was previously used,
repaired and tested to meet Seagate specifications. By
sending product for replacement, you agree to transfer
ownership of the original product to Seagate. Seagate
will not return your original hard drive to you. Data
recovery is not covered under this warranty and is
not part of the repair or exchange process. If you
would like data recovery performed on your product,
it is available from Seagate as a separate service for an
additional charge. Seagate warrants that repaired or
replaced products are covered for the greater of either
the remainder of the original product warranty or 90 days.
Seagate will pay to ship the replacement product to you.
How Does State Law Apply?
The laws of the State of California, USA, govern this
warranty. It gives you specific legal rights, and you may
also have other rights that vary from state to state. This
warranty does not affect any additional rights you have
under laws in your jurisdiction governing the sale of
consumer goods, including, without limitation, national
laws implementing EC Directive 44/99/ EC. Some states
do not allow the exclusion or limitation of incidental or
consequential damages, so the limitations or exclusions
in this warranty statement may not apply to you.
Which Seagate Technology Companies Are
Extending this Warranty?
The Seagate company offering this warranty depends
on where you purchased the product:
US & Americas:
Seagate Technology LLC
920 Disc Drive
Scotts Valley, CA 95066
USA
Make sure you keep...
Please keep your sales receipt or other document
showing proof of purchase. Also keep the original box
and packing material in case you need to return your
product.
Before requesting service...
Please check your Mirra Manual before contacting
Customer Support. Following the troubleshooting tips
contained therein may save time solving your problem.
For warranty service...
If you believe you need service for your Mirra Sync
and Share Personal Server, contact Technical Support
at 1.800.SEAGATE. A representative will go through
a diagnostic checklist with you. If it is determined that
the product needs to be exchanged, you will receive
a return authorization number. The representative will
give you complete shipping details.
For out-of-warranty service...
Out-of-warranty service can be obtained at a nominal
cost for replacement and handling. To obtain outof-warranty service, contact Technical Support at
1.800.SEAGATE for the cost of an out-of-warranty
exchange for your product.
Remember...
Record the model and serial numbers found on the
product below:
MODEL # _______________________________________
SERIAL # ________________________________________
Mirra Sync and Share Personal Server
17
Specifications
All implied warranties, including implied warranties
of merchantability and fitness for a particular purpose,
are limited in duration to the duration of this express
warranty. Some states do not allow limitations on how
long an implied warranty lasts, so the above limitation
may not apply to you. This warranty gives you specific
legal rights. You may have other rights which vary from
state to state (or jurisdiction to jurisdiction). SEAGATE’S
RESPONSIBILITY FOR MALFUNCTIONS AND
DEFECTS IN MIRRA SYNC AND SHARE PERSONAL
SERVERS IS LIMITED TO REPAIR AND REPLACEMENT
AS SET FORTH IN THIS LIMITED WARRANTY. ALL
EXPRESS AND IMPLIED WARRANTIES FOR THE
MIRRA PERSONAL SERVER, INCLUDING BUT NOT
LIMITED TO ANY IMPLIED WARRANTIES OF AND ALL
CONDITIONS OF MERCHANTABILITY AND FITNESS
FOR A PARTICULAR PURPOSE, ARE LIMITED IN
DURATION TO THE LIMITED WARRANTY PERIOD SET
FORTH ABOVE AND NO WARRANTIES, WHETHER
EXPRESS OR IMPLIED, WILL APPLY AFTER SUCH
PERIOD. Some states (or jurisdictions) do not allow
limitations on how long an implied warranty lasts, so the
above limitation may not apply to you. SEAGATE DOES
NOT ACCEPT LIABILITY BEYOND THE REMEDIES SET
FORTH IN THIS LIMITED WARRANTY OR
LIABILITY FOR INCIDENTAL OR CONSEQUENTIAL
DAMAGES, INCLUDING WITHOUT LIMITATION ANY
LIABILITY FOR PRODUCTS NOT BEING AVAILABLE
FOR USE OR FOR LOST DATA. Some states
(or jurisdictions) do not allow limitations on how long
an implied warranty lasts, so the above limitation
may not apply to you.
18
Getting Started Guide for Windows
•
•
•
•
Power: 115-230VAC, 50/60 Hz, 60W
Operating Temperature: 10° C to 35° C
Operating Humidity: 20% to 80%
Dimensions: 8-3⁄4"h x 4-1⁄2"w x 8-3⁄4"d
System requirements
PC requirements:
• Pentium III Processor or newer
• Windows XP Home or Professional Edition, Windows
2000 Pro, Windows 2000 or 2003 Server with latest
service packs
• 256MB RAM and 100MB free hard disk space
Network requirements:
• Broadband internet access—cable or DSL with
always-on access
• Router, hub, or switch with available Ethernet port
If you need assistance
Three ways to reach Seagate:
1. Use self-service at the Seagate web site
• Go to www.seagate.com/support/mirra.
You’ll find frequently asked questions, a
troubleshooting guide, current documentation,
and downloads.
2. Submit a case on line
• Submit a case to the Mirra Support Team at
www.mirra.com/support.
• Enter the serial number and describe the problem.
A member of the Mirra Support Team will respond
within two business days.
3. Call us
• Call 1-800-SEAGATE Monday to Friday,
6 a.m. to 6 p.m. Pacific Standard Time, U.S.A.
• Call +1-405-324-4700 outside the U.S.A.
Mirra Sync and Share Personal Server
19
Seagate Technology
www.seagate.com
Copyright © 2006 Seagate Technology LLC. All rights reserved. Seagate, Seagate Technology and the Wave logo are registered trademarks of Seagate Technology LLC. Other
product names are registered trademarks or trademarks of their owners. Seagate reserves the right to change, without notice, product offerings or specifications. When referring to
drive capacity one gigabyte, or GB, equals one billion bytes and one megabyte, or MB, equals one million bytes. Accessible capacity may vary depending on operating environment
and formatting. No part of this publication may be reproduced in any form without written permission of Seagate Technology LLC. P/N: 1004426864 08/06