1
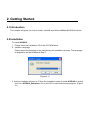
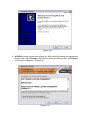
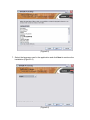
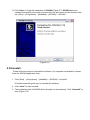
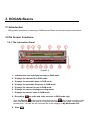
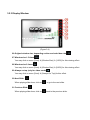
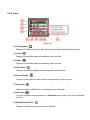
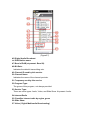
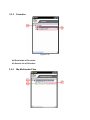
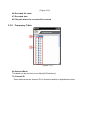
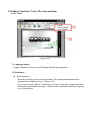
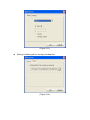
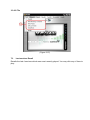
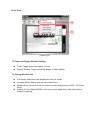
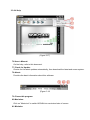
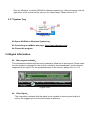
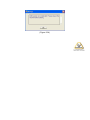
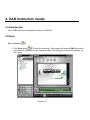
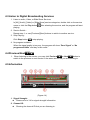
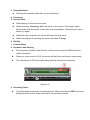
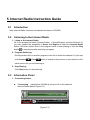
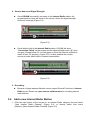
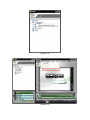
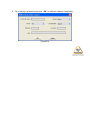
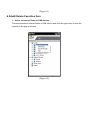
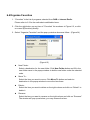
DR 403
USB Receiver for DAB, DMB, AAC+
Preliminary User Manual
1 Introduction
1.1 About This Document
1.1.1. Foreword
Thank you for buying Albrecht DR 403. The manual will introduce Albrecht DR 403
installation and operations. It contains the software framework, the relevant
information, and quickly guides system's basic function.
The present software description is issued for the preliminary working title KOGAN,
produced by DabMate. The description is valid for the Albrecht DR 403
accordingly, until the software issue will be modified to show Albrecht DR 403
instead of Kogan.
1.1.2. Topics
Following is a general introduction to the chapters.
Chapter 1: Introduction - Provide chapters outline and the content of the software
provided on Albrecht DR 403.
Chapter 2: Getting started - Guiding how to install, uninstall and utilize DR 403.
Chapter 3: Albrecht DR 403 basics - Basic operations for listening to DAB/Internet
Radio and relevant system information.
Chapter 4: DAB guide - Introduce DAB functions and operational steps on KOGAN.
Chapter 5: Internet Radio guide - Introduce Internet Radio functions and
operational steps on KOGAN.
Chapter 6: More functions - Introduce other advanced functions, including “Screen
Mode”, “Favorites”, “My Multimedia Files”, and “Recall Last Program”
Functions.
1.1.3. Reference
N/A.
1.2. Preface
Albrecht DR 403, a multimedia digital platform which follows the DAB specification of
Eureka-147, supports digital broadcasting DAB, DMB and DAB + as well as Internet
Radio services to enrich your digital multimedia entertainment experience.
1.2.1. Accessories
The package provides the following accessories:
1. USB Digital Receiver (DR 403)
2. Installation CD (user manual is included)
3. External magnetic telescopic antenna for Band III and L Band
4. User’s quick guide
5. USB cable
1.2.2. Functions
This section provides a summary of KOGAN. The operation of follow-up steps will
be introduced in the following chapters.
1.
Supports playback for audio, video, and slide show programs.
2.
Supports the following bands of frequencies which can be easily adjusted on
screen and no need to re-install.
Eureka147 Band III
Eureka 147 China Band III
Eureka 147 Korea Band III
Eureka 147 L Band
Eureka 147 Canada L Band
3.
Contains over 5,000 Internet Radio stations.
4.
Supports full channel scan/single channel scan in DAB Mode.
5.
Supports my favorite station management.
6.
Simultaneously records an audio or video program in DAB mode.
7.
Easily adjusts the screen size, compact mode or full-screen playing.
8.
On screen volume control.
9.
Previous/Next tuning buttons to quickly switch stations.
10.
Easily switches languages on screen, no need to re-install.
11.
Automatically or manually checks the most up-to-update version and free
download.
1.2.3. Supported Bands for Each Country
1.3.
Country
Band
Australia
Band III
Canada
Canada L Band
China
China Band III + L Band
China-Beijing
China Band III
China-Shanhai
L Band
Denmark
Band III
France
Band III + L Band
German
Band III + L Band
Korea
Korea Band III
New Zealand
Band III
Singapore
Band III
Taiwan
Band III
UK
Band III
System Requirement
Before installing KOGAN software, please make sure your computer fits the system
requirements of the software and hardware.
1.3.1. Hardware Requirements
CPU
:
Intel Pentium IV 750MHz or above
Intel Celeron 750MHz or above
AMD Sempron K8 or above
Memory :
256MB or above
H.D.D. :
32MB free disk space
USB
:
USB 1.1 or above
1.3.2. Software Requirements
OS: Windows® XP ( recommended ) 、Windows 2000
1.4.
Technical Support
Under http://www.dabmate.com You will find much interesting technical background
information to DAB radio, while You will find Albrecht Related technical information on our
technical website http://service.alan-germany.de.
1.5.
Version
The manual is applicable to any version released after dabMate KOGAN V1.0.
2. Getting Started
2.1 Introduction
This chapter will guide you how to install, uninstall and utilize dabMate-KOGAN functions.
2.2 Installation
To Install KOGAN:
1. Please insert the installation CD to the CD ROM drive.
2. Installer Language
Please select the language to be used during the installation process. The language
of application will be selected at Step 7.
(Figure 2.1)
3. Auto-run windows will pop up. Follow the installation steps to install KOGAN or double
click the <KOGAN_Setup.exe> file on the CD to execute the setup program. (Figure
2.1)
(Figure 2.2)
4. KOGAN License Agreement will pop up. After carefully reading the agreement,
please click “Yes, I Accept “check box to accept the terms within. Click Next to
continue the installation. (Figure2.2)
(Figure 2.3)
5. Take the default folder C: \programme\dabMate\KOGAN, or select the destination
folder by Browse button. Click Next to continue. Please note the available storage
space. (Figure2.3)
(Figure2.4)
6. Follow the wizard to select the default shortcut and click Next to continue the
installation. (Figure2.4)
(Figure2.5)
7. Select the language used in the application and click Next to continue the
installation.(Figure 2.5)
(Figure2.6)
8. Select the band frequency by region in band selection window for the application to
receive the digital signal. Or select “others” to manually set up the band frequency.
(Figure 2.6) After this step, you need to plug-in DAB Receiver to configure the
hardware.
(Figure 2.7)
9. Please plug-in the DAB receiver. If the correct DAB receiver is not properly plugged
in, the installer will popup the following message to remind you. If the same problem
occurs again after you plug in the correct DAB receiver, please go to the store where
the receiver is purchased for help.
(Figure2.8)
10. The Device Driver Installation Wizard will show up to help you install the driver. Click
Next to continue.
(Figure 2.9)
11. The wizard will search for the driver and install it. After finished, it will show the
successfully installed message. Click Next to let installer continue the remaining
tasks.
(Figure2.10)
12. Click Close to finish the installation of KOGAN.(Figure 2.7) KOGAN has been
installed successfully and ready to launch from the start menu on the windows task
bar: [Start] →[Programme] →[dabMate] →[KOGAN] →KOGAN
(Figure2.11)
2.3 Uninstall
Please follow the steps to uninstall the software: (For complete uninstallation, please
close the KOGAN application first.)
1. Click [Start] →[Programme] →[dabMate] →[KOGAN] →Uninstall
Uninstall wizard will guide you to uninstall this software.
2. Click “Next” to start uninstall.
3. The installation path of KOGAN will be brought out automatically. Click “Uninstall” to
start.(Figure 2.8)
(Figure2.12)
2.4 Execution of KOGAN
Before executing KOGAN, make sure to:
1. Plug the DAB Receiver into USB port when playing DAB services.
2. Connect to the internet successfully when listening to the Internet Radio services.
3. Click the program [Start] →[Programme] →[dabMate] →[KOGAN] →KOGAN to
execute the program.
4. The details will be introduced in the following chapters.
(Figure2.13)
2.5 KOGAN Folder Structure
After installing KOGAN, the “KOGAN” folder will be automatically created in the destination
folder specified during installation process. To keep system working, please do not move or
delete any file.
The folder structure of KOGAN is as following:
1. Program Home($Home)
[C:/Programme/ dabMate/ KOGAN]
– including the execution files of KOGAN and its libraries
2. Driver
[$Home/driver]
– including all the relevant drivers
3. My Multimedia
[$Home/My multimedia files]
– accessing the list of recorded files
Please note: in German language Windows ® systems the directory will show “Programme”
as folder, while English language computers will show “programs” or “program files”
accordingly.
3. KOGAN-Basics
3.1 Introduction
Noting basic operations for listening to DAB/Internet Radio and relevant system information.
3.2 On Screen Functions
3.2.1 The Information Panel
(Figure3.1)
1. Indicates the received signal strength in DAB mode.
2. Displays the channel ID in DAB mode.
3. Displays the ensemble name in DAB mode.
4. Displays the ensemble frequency in DAB mode.
5. Displays the channel bit rate in DAB mode.
6. Displays the current playing/recording status.
7. Displays the service name in DAB mode.
8. Recording:
(for audio and video services in DAB mode only)
Click the Record
button to start recording and click
again to stop recording. After
that, a file-saving dialog will pop up to request a file name and the folder for saving the
recorded file. You can see the recorded file in the category of My Multimedia File.
9. Stop:
Click the Stop button to stop playing.
10. Play:
Highlight the service name and click the Play button to start playing.
11. Previous Station:
Click to switch to the previous service on the service list.
12. Next Station:
Click to switch to the next service on the service list.
13. Snapshot: (for Slide Show programs in DAB mode only)
Click the button to capture the current playing slide. A file-saving dialog will pop up to
request a file name and the folder for saving the picture. You can see the snapshot in the
category of My Multimedia File.
14. Mute:
Click
once to turn off the sound and click
again to turn the sound back on.
15. Volume Bar:
Indicate the volume status. Adjust the volume by mouse dragging
16. DLS
DLS, means “Dynamic Labeling Service”, the public message will be shown on the
screen simultaneously. When you move cursor to the DLS area, the running message
will be frozen for reading until cursor moves away.
(Figure 3.2)
17. Indicates the received signal strength in Internet Radio mode.
18. Displays the channel name in Internet Radio mode.
19. Displays the channel bit rate and playing status in Internet Radio mode.
3.2.2 Tool Bar
(Figure 3.3)
20. Open:
Click the Open button to open a recorded file, and click the file name to start playing.
21. Full Scan:
Click the Scan button to start full scanning.
22. Delete Item:
to delete the item. If the service is in use,
After selecting a channel or service, click
the window will pop up to ask whether you want to delete the item and stop playing the
service at the same time.
23. Compact Mode:
Click
, it shows only the information pane. Other parts will disappear.
24. Full-Screen Mode:
To show video into full screen. (Only used in playing video)
25. Display Window:
In Audio DAB or Internet Radio mode, click
the KOGAN logo.
In Video or Slide Show DAB mode, click
present video or picture.
to toggle switch displaying or hiding
to toggle switch displaying or hiding the
3.2.3 Display Window
(Figure 3.4)
26. Original window size, depending on the received video size.
27. Window size 1.5 times:
You may click on menu [View]
[Window Size]
[150%] for this viewing effect.
[Window Size]
[200%] for this viewing effect.
28. Window size 2 times:
You may click on menu [View]
29. Always on top (only for video mode)
You may click on menu [View]
[Always On Top] for this effect.
30. Next Slide:
When playing slide show, click on
to go to the next slide.
31. Previous Slide:
When playing slide show, click on
back to the previous slide.
3.2.4 Tuner
(Figure 3.5)
32. All Programs:
Displays all DAB audio, video, slide show services and Internet Radio channels.
33. Audio:
Displays all available digital broadcasting audio services.
34. Video:
Displays all available digital broadcasting video services.
35. Slide Show:
Displays all available digital broadcasting slide show services.
36. Internet Radio:
Displays all the Internet Radio stations categorized by region or genre.
37. Ensemble:
Displays available DAB service list categorized by ensemble.
38. Favorites:
You may bookmark services/stations to Favorites page to easily tune to the channels
you like.
39. My Multimedia Files:
Displays all files that you recorded from KOGAN.
40. Frequency Table:
Displays the channel frequency and channel ID of DAB service.
41. Adjust Displaying Types:
You may adjust the displaying items on screen to easily access to your frequently
used stations.
(Figure 3.6)
42. Full Scan / Single Channel Scan:
Full Scan: Scan for all frequencies listed in the selected Band.
Single Channel Scan:Scan for the specified Channel ID only.
43. Switch to Boundary Mode:
Tuner window will be stuck on left boundary of screen, and disappear when cursor
moves away. It will come back when you move cursor to left boundary of screen.
44. Switch to Stick Mode:
Tuner window and main window are tight closed.
3.3 Items Description
3.3.1 Digital Broadcasting
You may select a service type like [All], [Audio], [Video] or [Slide Show] in
Tuner to see the available services for playing.
(Figure3.7)
45. Digital Audio Broadcast
46. DAB Station name
47. Band of DAB (at present: Band III).
48. Bit Rate:
Indicates the data bit transmitting rate.
49. Channel ID used by this service
50. Channel Name
Indicates the name of the channel provider.
51. Frequency used by this service
52. Program Type:
The genre of this program, not always provided.
53. Service Type:
There are some types: Audio, Video, and Slide Show. At present: Audio.
54. Internet Radio
55. Classifies internet radio by region, genre
56. Slide Show
57. Video ( Digital Multimedia Broadcasting )
3.3.2 Internet Radio
(Figure 3.8)
58. Internet Radio Genre
59. Channel Name
60. Bit Rate:
Indicates the data bit transmission rate.
61. Country/State:
Indicates the country or state where the channel is located.
62. Last Update:
The last time which the Internet Radio record was updated.
63. Region:
Indicates the city where the channel is located.
3.3.3
Favorites
(Figure 3.9)
64. Root folder of Favorites.
65. Service list of Favorites.
3.3.4
My Multimedia Files
(Figure 3.10)
66. Recorded file name.
67. Recorded date.
68. File path where the recorded file is stored.
3.3.5 Frequency Table
(Figure 3.11)
69. Selected Band
This band can be set from menu [tool] [Preference]
70. Channel ID:
These items show the channel ID’s in this band and list in alphabetical order.
3.3.6 Menu Functions: Tools, File, View and Help
3.3.6.1 Tools
(Figure 3.12)
71. Language switch
English, Simplified Chinese, and Traditional Chinese are supported.
72. Preference:
Band Selection
Select the country you are currently located. The corresponded bands will be
automatically brought up for you. (Figure 3.13)
Or you may choose “Others” to select by your own. In this case, please make sure
the bands are provided in the region. Only one band is allowed in the Band III group;
so is L Band group.
(Figure 3.13)
Setting of default path for storing recorded files
(Figure 3.14)
3.3.6.2 File
(Figure 3.15)
73.
Last services Recall
Recalls the last 4 services which were most recently played. You may click any of them to
play.
3.3.6.3 View
(Figure 3.16)
74. Tuner and Display Window Settings
Tuner: Toggle switch the display of tuner
Display Window: Toggle switch the display of video window
75. Change Window Size
Full Screen: Make the video displayed on the full screen
Compact Mode: Display only the Information Pane
Window Size: Functions to let you adjust the video display size to 100%, 150% and
200%
Always On Top: Make KOGAN on the top of every application. Only work when a
program is playing.
3.3.6.4 Help
(Figure 3.17)
76. User’s Manual:
On-line help, refer to this document.
77. Check for Update:
Checks for the latest updates automatically, then download the latest and renew system.
78. About:
Provides the basic information about this software.
(Figure 3.18
79. Closes this program.
80. Maximize:
Click on ”Maximize” to switch KOGAN into maximized size of screen.
81. Minimize:
Click on “Minimize” to switch KOGAN on Windows system tray. After minimized, click the
right button of the mouse on the tray icon for further steps. Please refer to 3.3.7.
3.3.7 System Tray
(Figure 3.19)
82. Opens KOGAN on Windows System tray.
83. Connecting to dabMate web page. (http://www.dabmate.com)
84. Closes this program.
3.4 Signal Information
85. 『No program available』
This information indicates that the tuning channel is failed due to poor signal. Please make
sure the antenna is plugged-in, the area is covered by local broadcaster, and the band is
supported in the region. For the supported bands in the country, please refer to 1.2.3.
(Figure 3.20)
86. 『Poor Signal』
This information indicates that the signal is too unstable to receive good quality of
sound. We suggest you to move the location of antenna.
(Figure 3.21)
87. 『Scanning』
This information indicates that the program is in scanning. The progress is also displayed
in the pane.
(Figure 3.22)
88. 『Connection Fail』
This information indicates that the connection to the internet radio program is failed. The
problem may be caused by the local network situation, the quality of internet traffic or the
invalid hyperlink address of the station.
(Figure 3.23)
89. 『No DAB Receiver』:
This information indicates the DAB receiver is not plugged in. Please check if the DAB
receiver is plugged into the USB port properly.
(Figure 3.24)
4. DAB Instruction Guide
4.1 Introduction
Note DAB functions and operational steps on KOGAN.
4.2 Scan
4.2.1 Full Scan
1. Click Scan button
to start full scanning. The program will scan all DAB services of
each channel frequency on the frequency table. The progress of scanning will show on
the screen.
(Figure 4.1)
4.2.2 Stop Scanning
1. Click Stop Scanning button to stop the process, the program will play the first found
service automatically.
4.2.3 Single Channel Scanning
1. To manually scan one channel i.e. 5A, please follow the steps:
[DAB]→[Frequency Table]→[Band III]→[5A]→Double click
2. You may also select a single channel on the table, then click Scan button
to start
scanning.
(Figure4.2)
4.2.4 Scanning Result
1. When full scanning abandoned or finished, the scanning result will show on the DLS
screen as follow: M ensemble(s), N service(s) found.
2. The scanning result will list in [All], [Audio], [Video] and [Slide Show] categories.
4.3 Listen to Digital Broadcasting Services
1. Listen to audio, Video, or Slide Show Services:
In [All], [Audio], [Video] or [Slide Show] service categories, double click on the service
name or click the Play button
playing.
after selecting the service, and the program will start
2. Service Switch :
Repeat step 1, or use [Previous]/[Next] buttons to switch to another service.
3. Stop Playing :
to stop playing.
Click Stop button
4. No program available :
When the signal quality is too poor, the program will show “Poor Signal” or “No
program available” and stay in idle mode.
4.4 Previous/Next
/
1. When listening to the service, you may click Previous
or Next
button to
switch to the previous or next service in the same service list you are listening to.
4.5 Information
(Figure 4.4)
1. Signal Strength:
Please refer to 3.4 for signal strength information.
2. Channel ID:
Showing the channel ID that you are listening to.
3. Ensemble Name :
Showing the ensemble name that you are listening to.
4. Frequency
5. Service Name
When playing, it shows service name.
When scanning, “Scanning...xx%” will show on the screen. If the signal is poor,
please make sure the area is covered by local broadcasters. Otherwise go to other
area to try again.
When the scan completes, the screen will show the final result.
When the program is switching, the screen will show ”Tuning”.
6. Bit Rate
7. Current Status
8. Dynamic Label Service:
DLS stands for Dynamic Label Service, which comes along with DAB service for
public information.
When you move cursor to DLS, the screen will be frozen until cursor moves away.
The information on DLS will update along with the radio service switching.
(Figure 4.5)
9. Recording Timer:
This information presents the recording interval. While recording the REC icon starts
blinking and the counter starts counting for the recording interval.
4.6 Favorites
(Figure 4.6)
1. Select the service first and click the right button to view the options on the pop up
window. (Figure 4.6)
2. Delete Item:
You may delete the available service by clicking on “Delete Item”, and it can
be recovered by using scan function to search that service.
If the service you want to delete is currently playing, a warning message will
be popped-up to confirm if you really want to delete. If yes, the item will be
deleted and stop playing.
3. Add to Favorites
Repeat step 1, you can click on “Add to Favorites” to add to the Favorites list.
4.7 Recording (Not for Internet Radio Mode)
This function is only supported in DAB and DMB modes.
1. Click Record button
Starts recording while listening to the DAB service. The recording timer will start to count for
the recording interval and the REC icon starts blinking. You can click Stop Recording
button
to stop recording. The file saving dialog will pop out to ask the destination folder
and file name that you want to save the recorded file.
2. The default file name
This is the service name and time which the recording starts. The default file format is
“.mp2” for audio, and “.ts” for video.
3. Default destination path
This is the “My multimedia File” folder under the home directory of KOGAN.
(Figure 4.7)
5. Internet Radio Instruction Guide
5.1
Introduction
Note Internet Radio functions and operational steps on KOGAN.
5.2
Listening to the Internet Radio
1. Listen to the Internet Radio:
Go to the program list table ([Internet Radio] → [Genre/Region], see also Section3.3),
you may expand the categories of Genre and Region to select the Internet Radio
station. And then double click on the program name to start playing or click the Play
button
to start playing after selecting a program.
2. Program Switching:
Directly double click on another program on the list to switch the channel. Or you may
click Previous
or Next
button to switch to the previous or next service in the
same service list you are listening to.
3. Stop Playing :
Click Stop button to stop listening.
5.3
Information Panel
1. Connecting status:
“Connecting” indicate that KOGAN is trying to link to the selected
Internet Radio Station.(Figure 5.1)
(Figure 5.1)
2. Service Name and Signal Strength:
Once KOGAN successfully connects to the Internet Radio station, the
program/station name will show on the screen, where the signal strength
shows full coverage.(Figure 5.2)
(Figure 5.2)
Once failed to link to the internet Radio station, KOGAN will show
“Connection Failed” on the screen and the signal strength mark “@” turns
into gray. Please follow 5.2.1 to link again or check the internet connection
status of your PC properly. (Figure 5.3) It is also possible the remote
service provider has trouble in network transmission.
(Figure 5.3)
3. Recording:
Because of legal reasons Albrecht cannot support Record Functions in Internet
Radio mode. Please use open source software tools for recording internet
radio stations.
5.4
Add a new Internet Radio Station
1. Click the right button of the mouse on an Internet Radio category first and select
“New Internet Radio Channel” (Figure 5.4), or directly select from menu
[Station]→[New Internet Radio Channel] (Figure 5.5).
(Figure 5.4)
(Figure 5.5)
2. Fill in the pop up window and click “OK” to add new channel completely.
(Figure5.6)
6. More Functions
6.1 Introduction
Note other advanced functions, including “Screen Mode”, “Favorites”, “My Multimedia
Files” and “Recall Last Service”.
6.2 Boundary Mode/ Stick Mode
1. Click “Boundary Mode”
on the upper right corner of “Tuner”, the Tuner window will
be reduced to left edge of the screen. When cursor left out Tuner over 3 seconds, the
Tuner will disappear automatically; when cursor move to the left edge, Tuner will slide off
the window automatically. (Figure6.1)
2. When you want to switch Boundary Mode to Stick Mode, click
to turn it back to stick
mode. The Tuner will stick to the main window.
3. You can drag the program window edge to adjust the window size. This function is
supported in any mode.
(Figure 6.1)
6.3 Add/ Delete Favorites Item
1. Select an Internet Radio or DAB service
First select between Internet Radio or DAB service and click the right button to view the
options on the pop up window.
(Figure 6.2)
2. Add selected item:
You can click on “Add to Favorites” and choose the category, as shown in
figure6.3. And then the selected item is added to the favorites list.
(Figure6.3)
3. Delete Selected Item:
Deleting the program/station in this category will only delete the item from
“Favorites” list. It will not delete the program/station from the DAB service list or
Internet Radio program list.
(Figure6.4)
6.4 Organize Favorites
1. “Favorites” is the list of programs selected from DAB or Internet Radio.
Please refer to 6.3 for the methods to add/delete items.
2. Click the right button on any item of “Favorites” list as shown in Figure 6.2, or click
on menu [Favorites] directly.
3. Select “Organize Favorites” and the pop-up window shows as follow : (Figure6.4)
(Figure6.5)
New Folder :
Select a destination for the new folder. Click New Folder button and fill in the
new folder name in the popup window to build a new folder under the selected
node.
Move To :
Select the item you want to move. Click Move To button and select a
destination in the popup window to move the item there.
Delete :
Select the item you want to delete on the right column and click on “Delete” to
delete it.
Rename:
Select the item you want to rename on the right column and click on “Rename”.
The window will pop up as below, you may rename the item.
(Figure6.6)
4. In “Favorites”, the playback functions like Play, Stop, Previous and Next are all
supported. Please refer to CH4 or CH5.
6.5 My Multimedia File
1. All recorded files in DAB mode will be collected with a shortcut in the category of
“My Multimedia File”, providing its file name, recorded time and file path for quick
access.
2. You can operate the program in “My Multimedia File” list by directly clicking Play,
Stop, Previous, Next buttons, etc., as described in the previous chapters.
3. You may delete the shortcut of a recorded file. KOGAN will confirm with you whether
to remove the physical file as well.
4.
6.6 Recall Last Service
KOGAN can recall the last service. After launching KOGAN, you may click Play button
without selecting any station first. The program you played last time before closing will
start playing.
© Alan Electronics GmbH & dabMate Technology, 2007
Service links
http://service.alan-germany.de
Service Hotline
[email protected]
Service Fax
(+49) (0)6103 9481-60
Repair inquiries & spare parts: (+49) (0)6103 9481-22