1
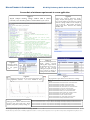
MASSA PRODUCTS CORPORATION
M3 & Digi Gateway Quick Guide on Getting Started
Quick Guide on Getting Started
M3 Sensor & Digi Gateway
Introduction
The Massa Model M3 or M3is Wireless Ultrasonic Sensors used in combination with a Digi ConnectPort X4 Gateway
(or X2) is a solution to non-contact wireless tank level monitoring. This document will guide you to quickly get the
devices integrated and evaluated in your application. For detailed information, see the M3 Sensor Users Guide.
Normal Operating Mode
The basic operating mode is for the M3 Sensor to obtain range (to liquid level surface), temperature and other
information and pack it in a status message then send this message (upon waking up) automatically to the gateway.
The gateway will then push the message to the iDigi Cloud server. When evaluating the application for the first
time, it may be set up to save the status information to a file in the gateway without a cloud server so you can
validate tank level reports.
Overview of Sensor
Sensors supplied from the factory will allow association to any gateway, but with all its settings disabled for
automated messaging. The minimum settings required for tank level measurement and automatic outgoing
messaging to be enabled includes; the sleep time, the awake time (defaulted to 31 sec), and the outgoing message
type. Another noteworthy sensor feature is its ability to obtain diagnostic data (ultrasonic waveforms) that can be
used to evaluate the mounting location (and any issues) and general performance. It is strongly recommended that
each new application (tank model) obtain diagnostic waveforms in an empty or near empty tank. Sensor settings
could require custom sensitivity values and these waveforms will allow you to determine what is best required for
your specific tank. Once an application has been established, it is not necessary to obtain diagnostic waveforms for
the same tank (and mounting location). In general, normal settings will work in most applications. Typical sensor
settings for long battery life have Sleep setting between 1 to 12 hours with the Awake setting at 30 seconds.
Overview of Gateway
The X4 or X2 Gateway details in this guide will only address the use of the Ethernet port and not a cellular
configured X4 gateway (option). You may be required to upgrade gateway firmware and possibly gateway XBee
settings. Massa Products provides python code to allow the sensor’s settings to be easily configured, store sensor
status information within the gateway, store diagnostic waveform data within the gateway, and sending automated
messages to iDigi Cloud server. Up to 10 sensors can be associated to a single gateway but additional sensors can
be added with a Digi Wall Router. For detailed information, see the M3 Sensor Users Guide.
M3 & Digi Gateway Quick Guide on Getting Started
1
060513
Massa Products Corporation assumes no liability for applications assistance or customer product design. Customers are responsible for their products and applications using Massa’s sensors.
MASSA PRODUCTS CORPORATION
M3 & Digi Gateway Quick Guide on Getting Started
Getting started
This guide is used to get you quickly started on setting up your application. For more information, see the M3
User’s Guide. Here are the basic steps (don’t power sensor just yet):
1) Gateway: Obtain a gateway and connect it to your laptop’s Ethernet port
2) Gateway: Gain access by using Digi’s Device Discovery utility (40002265_G.exe)
3) Gateway: Verify the gateway’s firmware is up to date (see Digi’s website).
4) Gateway: Verify the gateway’s XBee firmware is at least version 21A0
5) Gateway: Verify/set the gateway’s XBee registers as follows: Scan Channels (SC)=0x1ffe, Peripheral sleep
count (SN)=2880, Cyclic sleep period (SP): 1000
6) Gateway: Manually set the date and time under the System Configuration UI.
7) Gateway: Obtain latest python files from Massa’s website and load dia.zip, dia.py, python.zip and zigbee.py
into the gateway’s Python Files section. The dia.yml will need to be edited.
8) Gateway: In the Python Auto-start Settings UI, enable command line dia.py dia.yml and keep Action on Exit
as None
9) EDIT: Using a text editor, open the dia.yml file and adjust the following line items show below. Note that
enabling a setting is done by removing the # symbol at the beginning of the line.
extended_address '00:13:a2:00:40:98:13:a3!' # enter your sensor’s MAC address as seen on label
sleep_interval_sec: 120
# example sleep time of 2 minutes
awake_time_sec: 31
# maintain 31 sec
outgoing_message_mode: 5 # 5 sets operation to obtain status (level) then wake up & send message
log_status: ‘true’
# record messages in python files section named status_log.txt
Note: For editing the dia.yml, consider obtaining a free copy of Notepad ++ text editor and configure it for python use.
10) Gateway: Load the edited dia.yml into the gateway’s Python Files section
11) Gateway: Reboot and wait 1 minute
12) Sensor: Power sensor and observe the LED to sequence 3 green blinks followed by a steady red. In
approximately 15 seconds the sensor should start blinking red every 2 seconds indicating it is associated with
the gateway. Since the dia.yml control file has been set up to reprogram the sensor, you may notice
additional blinks other than the steady 2 seconds.
13) Sensor: After the sensor settings have been programmed, it will go to sleep and wake up every 2 minutes to
send and message. Point the sensor to a flat target within the sensor operating sensing range.
14) Gateway: After a few wake-up periods, open the status_log.txt file to view the automated messages that will
include the range (distance) to wall, temperature and other information.
15) EDIT: Obtain diagnostic data on an empty tank (or near empty). Using a text editor, open the dia.yml file and
enable the following line item show below (by removing the '#' symbol. Load this edited file into the
gateway and reboot. After a few minutes, check the Python Manage Files UI for waveform files that will
appear as: M3data_0013a200402c163e_20120229075448.M3. For model M3/150 there will be 2 such files, for
other models there will be 4 files. To view these files, obtain a copy of the M3 Application Software and
recall each one. After you have obtained the files, disable this line (with # symbol) and reload the dia.yml.
This is to avoid obtaining diagnostic data on every gateway boot as this does would draw unnecessary sensor
current draw.
obtain_diagnostic_data: 'true'
NOTE: When a sensor is going to be installed for long term testing or in a final installation, it is recommended that
the setting “comm_fail_boot” be enabled. This enables watchdog operation to reboot sensor in rare cases of a
Zigbee communication failure. See sensor manual for information.
This is the minimum requirements of setting up a gateway and sensor for local observation. The next step is to
obtain an account at Digi’s Device Cloud (by Etherios) that will be used as a server to receive the sensor’s
automated messages.
M3 & Digi Gateway Quick Guide on Getting Started
2
060513
Massa Products Corporation assumes no liability for applications assistance or customer product design. Customers are responsible for their products and applications using Massa’s sensors.
MASSA PRODUCTS CORPORATION
M3 & Digi Gateway Quick Guide on Getting Started
Screen shots of minimum requirements to run an application
Figure 1
Figure 2
dia.yml example showing settings enabled (with # symbol
removed). Note extended_address contains MAC of your sensor
Python files required: python.zip, dia.zip,
dia.py, dia.yml, and zigbee.py. Also shown
here are the diagnostic files that were created
with the settings enabled in the dia.yml as
seen on the left. This includes: dia_log.txt,
status_log.txt and 4 waveform files named
M3data….M3
Figure 4
Connections Management UI
shows
python
properly
running. The dia.py will not
be displayed here if an error
occurs in not properly
editing the dia.yml file. Such
errors include not lining up
settings in the same column.
Figure 3
Autostart settings
command line set
to run python
code.
Figure 7
Figure 6
dia_log.txt file reports driver version and sensor settings
Diagnostic waveforms can be viewed using Massa’s M3
Application Software. See sensor manual for more
d
l
Figure 8
status_log.txt file records automated status
messages that will include time stamp,
distance, temperature, battery voltage, etc.
Sensor 00:13:a2:00:40:30:09:4b!: M3 driver started, version 1.02. Dia version 1.4.14. 2013-05-20
12:14:44
Sensor 00:13:a2:00:40:30:09:4b!: Sensor Firmware Version = 31.8 2013-05-20 12:28:47
Sensor 00:13:a2:00:40:30:09:4b!: Serial Number = 2873 2013-05-20 12:28:47
Sensor 00:13:a2:00:40:30:09:4b!: Sensor Model = M-3/95 2013-05-20 12:28:47
Sensor 00:13:a2:00:40:30:09:4b!: data_collection_interval_sec = 0 2013-05-20 12:28:50
Sensor 00:13:a2:00:40:30:09:4b!: comm_fail_boot = 0 2013-05-20 12:28:50
Sensor 00:13:a2:00:40:30:09:4b!: sleep_interval_sec = 120.0 2013-05-20 12:28:50
Sensor 00:13:a2:00:40:30:09:4b!: awake_time_sec = 30.72 2013-05-20 12:28:50
Sensor 00:13:a2:00:40:30:09:4b!: outgoing_message_mode = 5 2013-05-20 12:28:50
Sensor 00:13:a2:00:40:30:09:4b!: user_comment = 2013-05-20 12:28:52
Sensor 00:13:a2:00:40:30:09:4b!: error code = 0 2013-05-20 12:28:52
Sensor 00:13:a2:00:40:30:09:4b!: auto_message_length = 8 2013-05-20 12:28:55
Sensor 00:13:a2:00:40:30:09:4b!: sensitivity = Normal 2013-05-20 12:28:55
Sensor 00:13:a2:00:40:30:09:4b!: Dist=47.7" Temp=18.1C Batt=4.9V UltrasonicStrength=50% RadioSignal=VeryStrong Event=4062 2013-01-08 04:37:20
Sensor 00:13:a2:00:40:30:09:4b!: Dist=47.7" Temp=18.1C Batt=4.9V UltrasonicStrength=50% RadioSignal=VeryStrong Event=4062 2013-01-08 04:37:40
Sensor 00:13:a2:00:40:91:1c:94!: Dist=54.8" Temp=15.2C Batt=5.3V UltrasonicStrength=75% RadioSignal=VeryStrong Event=1819 2013-01-08 05:24:45
Sensor 00:13:a2:00:40:91:1c:94!: Dist=54.8" Temp=15.2C Batt=5.3V UltrasonicStrength=75% RadioSignal=VeryStrong Event=1819 2013-01-08 05:25:02
M3 & Digi Gateway Quick Guide on Getting Started
3
060513
Massa Products Corporation assumes no liability for applications assistance or customer product design. Customers are responsible for their products and applications using Massa’s sensors.
MASSA PRODUCTS CORPORATION
M3 & Digi Gateway Quick Guide on Getting Started
Troubleshooting
When the gateway’s XBee settings have been adjusted, power the sensor. It will blink green 3 times and then
turn on RED and typically within 18 seconds, it will associate with the gateway. Once associated, the sensor
will blink RED every 2 seconds.
Unassociated indication: If the sensor does not associate within 18 seconds (LED solid red), then it will
continue to search a gateway to associate to for up to 50 seconds. After this power up sequence, sensor with
sleep setting = 0 (factory default) will default to a 1 minute sleep cycle to conserve battery power. Once
associated, then it will blink every 2 seconds.
Reasons a sensor will not associate with a gateway:
a) Gateway’s “Scan Channel (SC)” register not set to “0x1ffe”.
b) Sensor PAN ID is non-zero (previously changed by user) and does not match gateway’s PAN ID.
c) Encryption is enabled (EE=1) with non-matching gateway and sensor “Link encryption key (KY)”.
d) Gateway has more than 10 sensors associated with it. If Number of remaining children (NC) register
(see Xbee Configuration – Device) is 0, then sensor will not associate. You may manually reset this by
changing Scan Channel (SC) register to 0x1 and then return it to 0x1ffe which will reset the NC register
to 10 allowing sensors to rejoin. Also, another option is to reboot the gateway if using Massa python
code version 1.02 which will reset the NC register (upon boot). To expedite sensor rejoining the
gateway, you can re-power the sensor (press commission button after battery removal to discharge any
internal voltage).
e) Sensor is out of RF range with the gateway. Avoid placing a gateway in an all metal building with the
sensor outdoors. In such cases, place gateway by window facing sensor.
f) If gateway was power cycled with sensor that has s Deep Sleep setting = 0 (factory default), then it may
take sensor up to 1 hour to re-associate with gateway. To expedite sensor rejoining the gateway, you
can re-power the sensor (press commission button after battery removal to discharge any internal
voltage).
g) If sensor is sleeping longer than the gateway’s poll timeout setting (0.03 x SN x SP in seconds), then it
will have to rejoin gateway. If the intention is for the gateway to maintain association with sensor,
program the gateway’s poll timeout to at least 3-4 times longer than the sensor’s sleep setting. If the
gateway had dropped a sensor from its association list, the sensor will have to rejoin the gateway
which causes additional battery power usage and should be avoided in most applications. The
gateway maintains individual poll timeout registers for each sensor which, when associated, will reset
for a full poll timeout period.
h) Antennas for both gateway and sensor may not be vertical.
First step is to have the sensor associated with the gateway before you proceed with adjusting any sensor
settings (with sensor’s red LED blinking every 2 seconds).
For additional troubleshooting information, see the M3 Sensor Users Guide Appendix H.
M3 & Digi Gateway Quick Guide on Getting Started
4
060513
Massa Products Corporation assumes no liability for applications assistance or customer product design. Customers are responsible for their products and applications using Massa’s sensors.