1
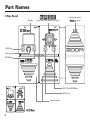
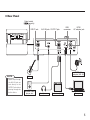
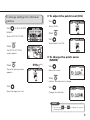
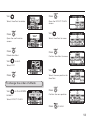
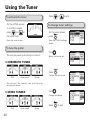
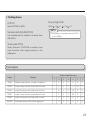
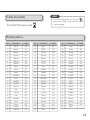
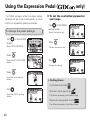
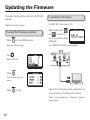
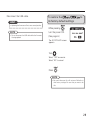
OPERATION MANUAL
Thank you very much for purchasing the ZOOM
.
Please read this manual carefully to learn about all the functions of the
will be able to use it fully for a long time.
Keep this manual in a convenient place for reference when necessary.
so that you
Contents
Usage and Safety Precautions ..................................2
Introduction ..............................................................3
Part Names ...............................................................4
Turning the Power ON ..............................................6
Display Information ...................................................7
Terms Used in This Manual .......................................7
Using Patches ...........................................................8
Adjusting Effects..................................................... 10
Adjusting the Master Level and Tempo...................14
Saving and Swapping Patches ................................15
Changing Various Settings ......................................16
Using the Tuner .......................................................20
Using Rhythms .......................................................22
Using the Looper ....................................................24
only) ........26
Using the Expression Pedal (
Updating the Firmware ...........................................28
Troubleshooting ......................................................30
Specifications .........................................................31
© 2013 ZOOM CORPORATION
Copying or reproduction of this document in whole or in part without permission is prohibited.
Usage and Safety Precautions
SAFETY PRECAUTIONS
In this manual, symbols are used to highlight warnings and cautions
that you must read to prevent accidents. The meanings of these
symbols are as follows:
AC adapter handling
When disconnecting the AC adapter from an outlet, always pull the body of
the adapter itself.
During lightning storms or when not using the unit for a long time,
disconnect the power plug from the AC outlet.
Battery handling
Warning
Something that could cause serious injury or death.
Something that could cause injury or damage to the
Caution equipment.
Other symbols
Required (mandatory) actions.
Use a specified battery type. Do not mix new and old batteries or different
brands or types at the same time. When not using the unit for an extended
period of time, remove the batteries from the unit.
If a battery leak should occur, wipe the battery compartment and the battery
terminals carefully to remove all battery residue.
Connecting cables with input and output jacks
Always turn the power OFF for all equipment before connecting any cables.
Prohibited actions.
Always disconnect all connection cables and the AC adapter before moving
the unit.
Warning
Operation using an AC adapter
Use only a ZOOM AD-16 AC adapter with this unit.
Do not use do anything that could exceed the ratings of outlets and other
electrical wiring equipment. Before using the equipment in a foreign country
or other region where the electrical voltage differs from that indicated on
the AC adapter, always consult with a shop that carries ZOOM products
beforehand and use the appropriate AC adapter.
Operation using batteries
Use 4 conventional 1.5-volt AA batteries (alkaline or nickel-metal hydride).
Read battery warning labels carefully.
Always close the battery compartment cover when using the unit.
Alterations
Never open the case or attempt to modify the product.
Caution
Product handling
Do not drop, bump or apply excessive force to the unit.
Be careful not to allow foreign objects or liquids to enter the unit.
Operating environment
Do not use in extremely high or low temperatures.
Do not use near heaters, stoves and other heat sources.
Do not use in very high humidity or near splashing water.
Do not use in places with excessive vibrations.
Do not use in places with excessive dust or sand.
2
Install the batteries with the correct +/- orientation.
Volume
Do not use the product at a loud volume for a long time.
Usage Precautions
Interference with other electrical equipment
In consideration of safety, the
has been designed to
minimize the emission of electromagnetic radiation from the device and to
minimize external electromagnetic interference. However, equipment that
is very susceptible to interference or that emits powerful electromagnetic
waves could result in interference if placed nearby. If this occurs, place the
and the other device farther apart. With any type of
electronic device that uses digital control, including the
,
electromagnetic interference could cause malfunction, corrupt or destroy data
and result in other unexpected trouble. Always use caution.
Cleaning
Use a soft cloth to clean the panels of the unit if they become dirty. If
necessary, use a damp cloth that has been wrung out well. Never use abrasive
cleansers, wax or solvents, including alcohol, benzene and paint thinner.
Malfunction
If the unit becomes broken or malfunctions, immediately disconnect the AC
adapter, turn the power OFF and disconnect other cables. Contact the store
where you bought the unit or ZOOM service with the following information:
product model, serial number and specific symptoms of failure or malfunction,
along with your name, address and telephone number.
Copyrights
t"MM USBEFNBSLT QSPEVDU OBNFT BOE DPNQBOZ OBNFT NFOUJPOFE JO UIJT
documentation are the property of their respective owners.
Note: All trademarks and registered trademarks mentioned in this manual are
for identification purposes only and are not intended to infringe on the
copyrights of their respective owners.
Introduction
Five simultaneous effects
You can select and arrange the order of up to five effects as you like and use them simultaneously. Use the
cursor keys and view the effects being used on the LCD anytime.
Variety of rhythm patterns
Realistic sounds are provided with updated rhythm patterns and tones.
Looper
The looper can be synchronized with rhythms and record phrases of up to 30 seconds.
Realistic amplifier modeling
With realistic amplifier modeling sounds from our
compression feel of tube amps.
, we have faithfully re-created the rich harmonics and
Long battery operation time
20 hours of continuous operation is possible using alkaline batteries (when the LCD backlight is off).
* A printed list of effect parameters is not included with the
.
Please download a copy from the ZOOM website. ĺ http://www.zoom.co.jp/
3
Part Names
O Top Panel
Display
Cursor keys (up, down, left, right)
Expression pedal
(
only)
HOME key
Parameter knob
ENTER key
RHYTHM/LOOPER key
MENU key
Foot switches
4
O Rear Panel
(
Pedal switch
only)
INPUT jack
NOTE
t Signals input through
the AUX IN jack are
sent directly to the
OUTPUT jack without
passing through the
built-in effects.
AUX IN jack OUTPUT jack
DC9V
AC adapter jack
ZOOM AC
adapter (AD-16)
Guitar
Portable audio
player, etc.
USB
connector
Headphones
Guitar amplifier
Computer
5
Turning the Power ON
Lower the amplifier's volume all the way.
O When using batteries
Insert batteries into the battery compartment.
Plug a guitar cable into the INPUT jack.
(Doing so turns the unit on.)
O When using an adapter
Connect an AD-16 adapter.
Turn the amplifier's power on and raise its
volume.
NOTE
t USB bus power operation is possible.
eco mode
If the eco mode setting is ON and it is left unused for
10 hours, it turns off automatically. (See page 16.)
6
Display Information
O HOME Screen
Bank name
Patch number
Remaining power display
Status icon (ĺP18)
This shows that the patch
contents have been changed.
This shows that the patch
contents have been saved.
Patch settings (ĺP9)
Reorder effects (ĺP13)
Delete effects (ĺP12)
Add effects (ĺP12)
Effect
Patch names
HINT
t Press
to return to the HOME screen from any other screen.
t Effects that are OFF appear gray.
Terms Used in This Manual
Patch
The ON/OFF status and the parameter settings of each effect are stored as "patches".
Use patches to recall and save effects. The
can store 100 patches.
Bank
A set of 10 patches is called a "bank".
The
has 10 banks labeled A–J.
7
Using Patches
To change the patch
To change the bank
Use
Use
and
.
HINT
t For details about using the preselect function to
change directly to patches that are not next in
order, see page 19.
t Press and hold
continuously.
8
or
to change patches
and
.
O To adjust the patch level (LVL)
To change settings for individual
patches
Turn
Turn
.
Select LEVEL.
on the HOME
screen.
Press
Select PATCH SETTINGS.
Turn
Press
.
.
Set between 0 and 120.
.
The PATCH SETTINGS
screen appears.
O To change the patch name
(NAME)
Press
.
The patch editing screen
appears.
only
Turn
.
Move the cursor.
Press
.
Confirm the character to change.
Turn
.
Open the page you want.
Turn
.
Change the character.
HINT
t You can use
and
character/symbol.
to change the type of
9
Adjusting Effects
To select an effect
To select an effect type
Turn
Use
on the HOME
screen.
and
.
Select the effect.
Press
Virtual knob
.
Show the top screen of the
selected effect.
M Effect processing capacity
Graphic for selected effect
HINT
t The virtual knobs are shown with the current
parameter values.
To turn an effect ON or OFF
Press
or
Effect ON
10
.
Effect OFF
The
allows
you to combine five effects
as you like. However, if you
combine effect types that
require great amounts of
processing power (amp models, for example),
the available processing capacity might not be
enough. If this occurs, "PROCESSING LIMIT"
will appear, and the effect will be bypassed.
You can avoid this by changing some of the
effect types.
O To select from a category
Press and hold
or
.
To adjust parameters
Press
.
The editing screen appears.
The categories appear.
Turn
Turn
.
Select the category.
Press
.
Press
NOTE
t The
.
Select the parameter to
adjust.
includes a PEDAL effects category.
To scroll through the effects shown
.
Confirm the parameter to
adjust.
Turn
.
Adjust the parameter value.
When using multiple effects, scroll to switch the
effect shown.
Use
and
.
HINT
t When shipped from the factory, the auto save
function is active. As soon as a parameter is adjusted
this change is automatically saved. (See page 18.)
NEXT
11
Adjusting Effects
To add an effect
Press
.
Add the effect.
Turn
on the HOME
screen.
Turn
Select ADD EFFECT.
Select EXIT.
Press
.
to end.
Press
Open the category
selection screen.
.
HINT
t On the effect screen, you can also press and
hold
Turn
.
Select the category.
.
to add an effect.
To remove an effect
Turn
Press
or
on the HOME
screen.
Select DELETE EFFECT.
Open the added effect
placement screen.
Press
Turn
.
Select where to add the
effect.
12
.
Open the effect deletion
screen.
Turn
.
Press
.
Select the effect to delete.
Open the EFFECT CHAIN
screen.
Press
Turn
.
.
Open the confirmation
screen.
Select the effect to move.
Press
Press
.
Delete the effect.
Turn
.
Confirm the effect to move.
to end.
Select EXIT.
Turn
Press
.
.
Select the new position for
the effect.
To change the order of effects
Turn
on the HOME
screen.
Press
.
Confirm the new position.
Select EFFECT CHAIN.
Press
to end.
13
Adjusting the Master Level and Tempo
To adjust the master level
To adjust the master tempo (BPM)
Press
Press
on the
on the
HOME screen.
HOME screen.
Open the MENU screen.
Open the MENU screen.
Turn
Turn
.
Select MASTER LVL.
.
Select BPM.
Press
Press
.
.
Turn
.
Set between 40 and 250.
Turn
.
Set between 0 and 120.
NOTE
t This tempo setting is shared by all effects, rhythms
and the looper.
Press
to end.
Press
14
to end.
Saving and Swapping Patches
To save the current patch
To swap the current patch
Press
Press
on the
on the
HOME screen.
HOME screen.
Open the MENU screen.
Open the MENU screen.
Turn
Turn
.
Select SAVE.
Press
.
Select SWAP.
.
Press
.
Open the patch SAVE
screen.
Open the patch SWAP
screen.
Turn
Turn
.
.
Select where to save the patch.
Select the other patch to swap.
Press
Press
.
.
Open the confirmation
screen.
Open the confirmation
screen.
Turn
Turn
.
.
Select "YES" to execute.
Select "YES" to execute.
NOTE
Select "NO" to cancel.
Select "NO" to cancel.
t Patches cannot be swapped
if the current patch has not
been saved.
Press
Press
.
.
15
Changing Various Settings
Press
on the
HOME screen.
Open the MENU screen.
Turn
Turn
.
Select ALKALI (alkaline) or Ni-MH (nickel-metal
hydride).
To set the eco mode
.
Select SETTINGS.
Turn
on the
SETTINGS screen.
Press
.
Open the SETTINGS
screen.
To select the battery type
Turn
on the
SETTINGS screen.
Select BATTERY.
Select eco.
Press
Turn
.
.
Select ON or OFF.
HINT
t ON: eco mode is active. If left unused for 10
hours, the power turns off automatically.
t OFF: eco mode is not active.
Press
16
.
To adjust the backlight time
To adjust the display contrast
Turn
Turn
on the
on the
SETTINGS screen.
SETTINGS screen.
Select LCD LIGHT.
Select LCD CNTRST.
Press
Press
Turn
.
.
Select OFF, ON, 15sec or 30sec.
Turn
.
.
Set between 1 and 13.
NEXT
17
Changing Various Settings
To set the auto save function
Turn
Patch changes will not be saved until they are
saved manually.
on the
If a patch has been
changed, a confirmation
screen will appear when
you try to open another
patch.
SETTINGS screen.
Select AUTO SAVE.
Press
O When AUTO SAVE is OFF
.
Turn
Turn
.
Select "YES" to save.
.
Select "NO" to not save.
Select ON or OFF.
O When AUTO SAVE is ON
Press
Patch changes will be saved automatically.
This shows that the
patch has been changed.
.
NOTE
This shows that the
patch has been saved.
t If you select "NO", the patch setting changes will
not be saved and the other patch will open.
Turn
.
Select where to save the
patch.
18
Press
.
Press
.
Open the confirmation
screen.
.
Turn
Turn
Select ON or OFF.
.
Select "YES" to save.
HINT
Select "NO" to cancel.
t ON: The preselect function is active. You can
select the next patch before changing to it.
Press
t OFF: The preselect function is inactive.
.
The patch changes are saved.
HINT
O When PRESELECT is ON
t You can also save from the MENU screen.
On the HOME screen,
t See "To save the current patch". (See page 15.)
use
NOTE
t If a patch has not been saved, patches cannot be
swapped. (See page 15.)
and
.
Select the next patch.
Press
and
at
the same time.
To use the preselect function
Turn
Change to the selected
patch.
on the
SETTINGS screen.
Select PRESELECT.
19
Using the Tuner
To activate the tuner
Press
or
to end.
On the HOME screen
To change tuner settings
or an effect screen,
press
and
On the tuner screen,
at
.
the same time.
press
Open the tuner screen.
Open the TUNER settings
screen.
To tune the guitar
Turn
You can play each open string and tune it.
.
Select the item to set.
O CHROMATIC TUNER
Press
(Flat)
(Correct pitch)
(Sharp)
.
Confirm the item to set.
The name of the nearest note and the pitch
accuracy are shown.
Turn
O OTHER TUNERS
Press
(Flat)
20
(Correct pitch)
.
Change the setting.
(Sharp)
to end.
M Setting items
OUTPUT
Drop tuning (FLAT)
Select BYPASS or MUTE.
Set to
Standard pitch (CALIBRATION)
The standard pitch for middle A can be set from
435-445 Hz.
× 0,
× 1,
× 2 or
× 3.
NOTE
t Drop tuning is not possible when the TYPE is
set to CHROMA.
Tuner types (TYPE)
Select chromatic (CHROMA) or another tuner
type. The other tuner types are shown in the
table below.
Tuner types
Display
Meaning
String number/Note name
7
6
5
4
3
2
1
E
A
D
G
B
E
GUITAR
Standard tuning for guitars, including 7-string guitars
B
OPEN A
In open A tuning, the open strings make an A chord
-
E
A
E
A
C#
E
OPEN D
In open D tuning, the open strings make a D chord
-
D
A
D
F#
A
D
OPEN E
In open E tuning, the open strings make an E chord
-
E
B
E
G#
B
E
OPEN G
In open G tuning, the open strings make a G chord
-
D
G
D
G
B
D
DADGAD
This alternate tuning is often used for tapping, etc.
-
D
A
D
G
A
D
21
Using Rhythms
Turn
To activate a rhythm
.
Change the setting.
On the HOME screen or
an effect screen, press
M Setting items
.
Open the RHYTHM screen.
PATTERN
Select the rhythm pattern. For more about
rhythm patterns. (See page 23.)
HINT
t On the RHYTHM screen, press
to the LOOPER screen.
to switch
Tempo (BPM)
The setting range is 40-250.
To set the pattern, tempo and
volume
t This tempo setting is used by every effect,
rhythms and the looper.
Volume (LVL)
On the RHYTHM
screen, turn
NOTE
.
The setting range is 0-100.
Select the item to set.
To start rhythm playback
Press
.
Confirm the item to set.
On the RHYTHM
screen, press
22
.
HINT
To stop the rhythm
On the RHYTHM screen, press
t On the RHYTHM screen, you can press
to
return to the HOME screen while the rhythm
continues playing.
.
Rhythm patterns
No.
PatternName
TimSig
No.
PatternName
TimSig
No.
PatternName
TimSig
1
GUIDE
4/4
24
R&B1
4/4
47
Jazz2
4/4
2
8Beats1
4/4
25
R&B2
4/4
48
Fusion
4/4
3
8Beats2
4/4
26
70s Soul
4/4
49
Swing1
4/4
4
8Beats3
4/4
27
90s Soul
4/4
50
Swing2
4/4
5
16Beats1
4/4
28
Motown
4/4
51
Bossa1
4/4
6
16Beats2
4/4
29
HipHop
4/4
52
Bossa2
4/4
7
16Beats3
4/4
30
Disco
4/4
53
Samba1
4/4
8
Rock1
4/4
31
Pop
4/4
54
Samba2
4/4
9
Rock2
4/4
32
PopRock
4/4
55
Breaks1
4/4
10
Rock3
4/4
33
IndiePop
4/4
56
Breaks2
4/4
11
ROCKABLY
4/4
34
EuroPop
4/4
57
Breaks3
4/4
12
R'n'R
4/4
35
NewWave
4/4
58
12/8 Grv
12/8
13
HardRock
4/4
36
OneDrop
4/4
59
Waltz
3/4
14
HeavyMtl
4/4
37
Steppers
4/4
60
JzWaltz1
3/4
15
MtlCore
4/4
38
Rockers
4/4
61
JzWaltz2
3/4
16
Punk
4/4
39
Ska
4/4
62
CtWaltz1
3/4
17
FastPunk
4/4
40
2nd Line
4/4
63
CtWaltz2
3/4
18
Emo
4/4
41
Country
4/4
64
5/4 Grv
5/4
19
TomTomBt
4/4
42
Shuffle1
4/4
65
Metro3
3/4
20
Funk1
4/4
43
Shuffle2
4/4
66
Metro4
4/4
21
Funk2
4/4
44
Blues1
4/4
67
Metro5
5/4
22
FunkRock
4/4
45
Blues2
4/4
68
Metro
23
JazzFunk
4/4
46
Jazz1
4/4
23
Using the Looper
Turn
To activate the looper
.
Change the setting.
On the HOME screen or
an effect screen, press
.
M Setting items
Open the LOOPER screen.
Recording time (TIME)
HINT
t On the LOOPER screen, press
to the RHYTHM screen.
to switch
Set to MANUAL or in a range from × 1 to
× 64.
NOTE
t The looper can record up to 30 seconds.
To set the recording time, tempo
and volume
On the LOOPER
screen, turn
.
Select the item to set.
t If the setting (number of quarter notes) would
not fall in this range, it will automatically be
adjusted.
t Changing the recording time will erase the
currently recorded loop.
Tempo (BPM)
The setting range is 40-250.
NOTE
t Changing the tempo will erase the currently
recorded loop.
Press
.
t This tempo setting is used by every effect,
rhythms and the looper.
Confirm the item to set.
Volume (LVL)
The setting range is 0-100.
24
To record and play back a phrase
To overdub a recorded loop
On the LOOPER
During loop playback,
screen, press
.
press
.
Press
to end.
Start recording.
After the recording time
elapses, playback will start.
To stop loop playback
On the LOOPER
O When TIME is set to MANUAL
Loop playback start when you press
screen, press
.
or the
maximum recording time (30 seconds) is reached.
NOTE
t During rhythm playback, recording will start after a
pre-count.
To erase the loop
Stop loop playback and
press and hold
on
the LOOPER screen.
HINT
t On the LOOPER screen, you can press
to
return to the HOME screen while recording a loop
or playing it back.
25
Using the Expression Pedal (
If a PEDAL category effect has been added,
settings will be made automatically to allow
control of expression pedal parameters.
To change the pedal settings
Turn
only)
O To set the controlled parameter
and range
Turn
on the PEDAL
setting screen.
Select the item to set.
on the HOME
screen.
Press
Select PATCH SETTINGS.
Confirm the item to set.
Press
.
.
Open the PATCH SETTINGS
screen.
Press
Turn
.
Change the setting.
.
Open the patch editing
screen.
M Setting items
Controlled parameter
Turn
.
Open the PEDAL setting
screen.
Minimum value (pedal up)
This differs according to the effects type.
Maximum value (pedal down)
This differs according to the effects type.
26
HINT
NOTE
t NO ASSIGN: No function is assigned to the expression
pedal.
t If "Error!" appears, restart calibration from the
beginning.
t AUTO ASSIGN: When using a PEDAL category
effect, a parameter will be assigned to the pedal
automatically.
If multiple PEDAL category effects are used, their
corresponding parameters will all be assigned to
the expression pedal.
To adjust the torque
t INPUT VOL: Controls the input level.
Insert the hex key into the torque adjustment
t OUTPUT VOL: Controls the output level. (Does
not affect the volume of the rhythm or looper.)
screw on the side of the pedal.
t The pedal switch can be used to turn ON/OFF
effects that are assigned to the expression
pedal. (The ON/OFF setting made by the pedal
switch is not saved.)
Turn it clockwise to tighten the pedal, and turn it
counterclockwise to loosen the pedal.
To calibrate its sensitivity
While pressing
, turn
Loosen
Tighten
the unit on. (See page 6.)
Operate the pedal as
the instructions show
and press
each
NOTE
t Be careful when loosening the screw. Loosening
it too much could cause it to come off inside the
unit.
time.
"Complete!" appears when calibration is finished.
27
Updating the Firmware
Download the latest firmware from the ZOOM
website.
http://www.zoom.co.jp/
To view the firmware versions
Press
on the HOME screen.
Open the MENU screen.
Turn
To update the firmware
Confirm that the power is off.
While pressing both
and
, connect the
unit to a computer using a
USB cable.
The FIRMWARE UPDATE screen appears.
.
Select VERSION.
Press
.
The firmware version is
shown.
Press
to end.
Launch the firmware update application on
your computer, and execute the update.
When it finishes updating, ”Complete!” appears
on the display.
28
Disconnect the USB cable.
HINT
To restore the
its factory default settings
to
t Updating the firmware will not erase saved patches.
While pressing
,
NOTE
turn the power ON.
t Do not disconnect the USB cable while the firmware
is being updated.
(See page 6.)
The All INITIALIZE screen
appears.
Turn
.
Select "YES" to execute.
Select "NO" to cancel.
Press
.
NOTE
t Be careful because this will restore all defaults to
their factory settings. Be sure that you want to do
this.
29
Troubleshooting
The unit will not turn ON
t If operating on battery power, connect a cable
to the INPUT jack.
No sound or very low volume
t Check the connections (ĺP5).
t Adjust the levels of the effects being used
(ĺP11).
t Adjust the master level (ĺP14).
t When adjusting the volume with an expression
pedal, make sure that a suitable volume setting
has been set with the pedal.
t Confirm that the TUNER OUTPUT is not set to
"MUTE" (ĺP20).
There is a lot of noise
t Check shielded cables for defects.
t Use only a genuine ZOOM AC adapter (ĺP6).
An effect is not working
t If the effect processing capacity is exceeded,
”PROCESSING LIMIT” appears on the effect
graphic. In this case, the effect is bypassed
(ĺP10).
Batteries lose their charge quickly
t Confirm that you are not using manganese
batteries. Alkaline batteries should provide
about 20 hours of continuous operation.
t Check the battery setting.
Set the type of battery being used to enable the
remaining charge to be shown more accurately
(ĺP16).
t Due to the characteristics of the batteries, they
might be used more quickly in cold.
The expression pedal is not working
well
t Check the expression pedal settings (ĺP26).
t Adjust the expression pedal (ĺP27).
30
Specifications
Effect types
75 types
80 types
Number of simultaneous effects 5
Number of user banks/patches
10 patches x 10 banks
Sampling frequency
44.1kHz
A/D conversion
24-bit with 128x oversampling
D/A conversion
24-bit with 128x oversampling
Signal processing
32-bit floating point & 32-bit fixed point
Display
LCD
Input
Output
INPUT
Standard monaural phone jack
Rated input level:
-20dBm
Input impedance (Line): 470k Ω
AUX IN
Stereo mini jack
Rated input level:
-10dBm
Input impedance (Line): 1k Ω
OUTPUT
Standard stereo phone jack
Maximum output level:
Line
+ 2dBm
(with output load impedance of 10 kΩ or more)
Headphones 17mW + 17mW (into 32 Ω load)
S/N (equivalent input noise)
119dB
Noise floor (residual noise)
-97dBm
Power
AC adapter DC9V (center minus plug), 500 mA (ZOOM AD-16)
20 hours of continuous operation using 4 alkaline AA batteries (with LCD
backlight off)
USB
Firmware update
Dimensions
154.8mm(D) x 146.0mm(W) x 43.0mm (H)
154.8mm(D) x 237.0mm(W) x 50.0mm (H)
Weight
380g (Not including batteries)
640g (Not including batteries)
*0dBm = 0.775Vrms
31
FCC regulation warning (for U.S.A.)
This equipment has been tested and found to comply with the limits for a Class B digital device, pursuant
to Part 15 of the FCC Rules. These limits are designed to provide reasonable protection against harmful
interference in a residential installation. This equipment generates, uses, and can radiate radio frequency
energy and, if not installed and used in accordance with the instructions, may cause harmful interference
to radio communications. However, there is no guarantee that interference will not occur in a particular
installation. If this equipment does cause harmful interference to radio or television reception, which can be
determined by turning the equipment off and on, the user is encouraged to try to correct the interference by
one or more of the following measures:
t3FPSJFOUPSSFMPDBUFUIFSFDFJWJOHBOUFOOB
t*ODSFBTFUIFTFQBSBUJPOCFUXFFOUIFFRVJQNFOUBOESFDFJWFS
tConnect the equipment to an outlet on a circuit different from that to which the receiver is connected.
t$POTVMUUIFEFBMFSPSBOFYQFSJFODFESBEJP57UFDIOJDJBOGPSIFMQ
For EU Countries
Declaration of Conformity:
This product complies with the requirements of
EMC Directive 2004/108/EC and
ErP Directive 2009/125/EC and
RoHS Directive 2011/65/EU
Disposal of Old Electrical & Electronic Equipment
(Applicable in European countries with separate collection systems)
This symbol on the product or on its packaging indicates that this product shall not be treated as household
waste. Instead it shall be handed over to the applicable collection point for the recycling of electrical and
electronic equipment. By ensuring this product is disposed of correctly, you will help prevent potential
negative consequences for the environment and human health, which could otherwise be caused by
inappropriate waste handling of this product. The recycling of materials will help to conserve natural
resources. For more detailed information about recycling of this product, please contact your local city
office, your household waste disposal service or the shop where you purchased the product.
ZOOM CORPORATION
4-4-3 Kanda-Surugadai, Chiyoda-ku, Tokyo 101-0062 Japan
http://www.zoom.co.jp
Z2I-1821-01
Manufacturer names and product names mentioned in this patch list are trademarks or registered trademarks of their respective owners and
do not indicate any affiliation with ZOOM CORPORATION.
All product and artist names are intended only to illustrate sonic characteristics that were used as reference in the development of this product.
COMMENT
0
MUSEUM
Distortion from the DZ DRIVE effect is used to create this modern UK rock sound.
0
METAL RIFF
1
Duermete
Delay, reverb and chorus combine to create a dreamy atmosphere.
1
Wilhelm
Heavy rock sound great for lead and rhythm parts.
2
Blue Lead
A traditional sound like you can hear in the Memphis, Tennessee, part of the blues heartland.
2
MUFFBIG
Big guitar sound, great for big chords, heavy rock/rock tone.
3
AUTOWAH
AutoWah effect, fun sound.
3
Dr.Rock
Straight ahead heavy rock sound.
4
MiraclWyld
Down Heavy This modern heavy sound even works with down-tuning and also cuts noise well.
The StereoCho effect contributes to this majestic reverb sound.
6
PhasrFunk
The settings of this patch add the fluctuating sound of a phaser to a sharp, clean tone.
7
Jazzy Lead
A simple smooth lead tone perfect for light smooth jazz. T Scream and Comp are combined for perfect sustain.
8
Acoustix
9
Supernova
The Aco.Sim was utilized to get a nice clean authentic acoustic sound. HD Hall was added for the space.
This grand sound uses the ParticleR effect.
All purpose clean sound with compression and reverb.
5
High Gain
ChorusPad
5
Professional Settings
4
Another bigger guitar tone for pedal single-tone lines and chug-chug riffs.
Zakk Wylde's doubling style is simulated with this metal sound.
MODERN HVY Modern style big guitar for heavier music.
6
Gilmourish
Pretty obvious homage to a master.
7
FOOFIGHT
This simple setting uses the BG DRIVE effect for a heavy sound in the alternative rock style of the Foo Fighters.
8
JIMI
9
SpeedMetal
0
Green BIG
Use the front pickup on the guitar with this tapping sound that is in the style of the intro to Mr. BIG's Green-Tinted Sixties Mind.
1
LA Metal
A distortion effect is key to the flashy sound of LA metal. Add a little delay to increase the atmosphere.
2
Shred Pick
In the style of Jimi Hendrix, this sound calls up the spirit of Woodstock using FuzzSmile and TheVibe.
As its name suggests, this sound is perfect for shredding speed metal riffs.
0
CLEAN
1
CORONA
Shimmering chorus with pushed clean tone.
2
STRATTY
Cleaner style guitar designed for single coil pickups.
3
Clean Arp
This incredibly clean arpeggio sound uses the Aco.Sim effect. Have fun playing celebrated arpeggios with it.
3
Dist Hell
4
Just Funk
This funky sound will make you want to play rhythmically. The Spring63 effect is the key.
4
MASSIVE LD
5
CrystalVib
This modulation sound uses TheVibe to create a floating feel.
5
MUFFLR
6
Pic Chic
Perfect sound for the country in you. A little slapback delay combined with a little Comp works well.
6
TappinHero
7
Rev Dream
ModReverb gives this sound its depth.
7
OCT GTR
8
TapeSlap
A simple rockabilly slap, but the tape delay sustained chords have a slight warbling modulation.
8
LegatoHero
This patch is specialized for rapid legato playing. If it is still not enough for you, turn the 160 Comp effect ON!
9
Funky Duck
AutoWah is the secret to this funky sound. Add a little SuperCho and Comp and it gets funkier!
9
GtSoloTime
This long delay sound is ideal for guitar solos.
0
Big Rack
The rich and clean tone of this patch resembles that made by a massive rack system. The delay mix is assigned to the pedal.
0
JeanSplice
A complex sound combining four types of powerful effects that is good for beat makers and producers who want to add some guitar.
This sound designed for rapid playing, especially full picking.
This is a 90s sound in the style of Pantera with emphasized highs and lows.
Big lead guitar sound with reverb.
GreatMuff pushed through TONE CITY with some CarbonDly creates this awesome sound.
This volume-boosting sound is perfect for tapping. Turn the Hall ON if you want an even more pleasant tone.
Distorted sound good for octave playing in rock.
RAKE
Clean sound designed for lush raked chords.
1
BassSim
2
TRIPY
FX style guitar for cool bridge and down sections.
2
Harm
3
ACO
3
POGISH
4
StRahht
Ethereal type sound for ambient guitars.
4
PartyViola
5
Natural
This re-creates a natural guitar sound. Turn off its low-key reverb if you want a truly naked tone.
5
Caverns
6
SPAGHETTI
6
PROGRESS
7
GardenRock
7
ARP ONE
SeqFLTR fun combined with CarbonDly.
8
CleanJazz
A mild clean tone just right for jazz.
8
PartSpace
Delay and ParticleR through a Z Clean sound for creating an ethereal soundscape.
9
YELLOW 12
This 12-string guitar sound has a 60s feel.
9
SnacMonstr
Using Octave and Cry, this sound is like an analog synth filter.
0
BritCombo
British style lighter crunch guitar.
0
Comp Clean
This clean sound has a strong sense of compression. You can turn the amp model off to further emphasize a line input feeling.
1
OJ
Great straightforward Orange amp tone.
1
DX CRUNCH
This standby crunch sound uses the DELUXE-R effect. The dotted-eighth note delay effect at the end of the chain is OFF, ready to be turned ON when you need it.
This acoustic sound uses the Aco.Sim effect. By using the 160 Comp, this patch can be used for playing ranging from rapid chord strokes to arpeggios.
Spring63 and Tremolo are used in this tone that evokes a Spaghetti Western atmosphere.
Turn this clean rock sound into a distorted sound by turning the Dist+ effect ON.
Tweak Freak
1
A high-quality bass simulator that can also be used to create loops.
Fun auto harmony tool for guitar—don't go too crazy!
PitchSHFT combined with CoronaTri gives a gorgeous sound like a 12-string guitar.
A slow-attack symphonic sound great for layering and adding warmth to existing guitar parts on a recording.
Soundscape evolving reverb sound.
This octave sound creates an eerie atmosphere with emphasized low frequencies.
2
Talk Funk
Utilizing the Cry pedal and the T Scream together, you get a Frampton-like tone for some funky lead work.
2
TEXAS TONE
Using the FD VIBRO effect, this crunch sound is great for Texas blues. Turn T Scream ON for a perfect lead sound.
3
MS STACK
Marshall type, crunchy tone, another British style option.
3
NASHVILLE
Using the US BLUES effect with some compression, this crunch sound is good for country music.
4
80s Rhythm
A classic 80's distortion tone with a touch of chorus for this perfect nostalgic sound.
4
MERSEYBEAT This Beatles style crunch sound combines VX COMBO with chorus.
This backing sound is good for recording at home. ZNR is used to reduce noise.
5
WHITEBLUES This is a crunch sound in the "white blues" style exemplified by Eric Clapton. Turn the Booster ON for a lead sound.
5
6
Crunch
COMMENT
CATEGORY BANK / PATCH PATCH NAME
REC.POP
FAT RHYTHM Big British style rhythm guitar.
This recreates the distinctive riff sound used by Lenny Kravitz in "Are You Gonna Go My Way". Turn the Flanger ON for the interlude sound before the guitar solo.
7
KRAVITZ
8
Tap Delay
9
GIRL
This dirty rhythm guitar sound uses a NoiseGate.
0
SURF
Plenty of spring reverb for that Dick Dale tone.
1
CLASSIC
2
B.SESSION
This setting is good for blues sessions. By using the built-in rhythm pattern, you can, for example, practice session playing by yourself.
YORKE
Using the VX COMBO model, this re-creates the noted UK sound used in "Creep" by Thom Yorke, vocalist and guitarist of Radiohead.
3
Adjust the tempo to match the song when using this sound for dotted eighth note tap delay performances.
Classic Hiwatt tone with subtle delay.
9
FILTER$
BTQ COMBO
This crunch sound creates the cabinet tone of a compact combo amp. The HD Hall effect adds a rich reverb.
9
ROCK TONE
Use the volume knob on your guitar to control this rock sound that can be transformed from clean to driven.
0
FuzzOrange
The combination of TANGERINE and GreatMuff effects create this alternative rock sound.
1
OCTAVE MS
This octave guitar sound combines MS 1959 and Octave effects.
2
REVERSE HW HW STACK and ReverseDL together make this reverse delay sound.
Using the MATCH 30, Rt Closet, and Hall pedals you get the perfect leslie sound.
Funky auto wah with a rotary twist.
5
MS FLANGER MS DRIVE and Flanger are used together in this jet-like sound.
TapeEcho and Spring63 effects are used in this wet crunch sound.
6
DZ HEAVY
7
LA LEAD
This sound in the style of James Valentine, the guitarist of Maroon 5, re-creates the crunchy, cutting sound with heavy compression that he uses in "This Love".
8
7strBoogie
Use this orthodox seven-string guitar and rectifier sound for a wide range of riffs from fast to groovy.
FilterDly with Delay.
9
Power Lead
Powerful and tons of sustain! The REVO-1 amp feature gets a nice hard rock lead tone.
ORG CRUNCH Another British tone, classic rock.
VALENTINE
This lead sound uses BG CRUNCH and features a long sustain and dense mid-frequencies.
8
Guitorgan
FunkRotary
8
Using VX JMI for a boost, this drive sound evokes 70's British rock. Turn the StereoDly ON to re-create the solo sound of Queen's Brighton Rock.
CA.COMBO
PHASE CITY
5
WHITE
BRIGHTON
7
4
SIMPLETONE Nice simple driven tone with subtle delay.
7
6
3
4
6
Legendary Tone
Professional Settings
Clean
Demo
CATEGORY BANK / PATCH PATCH NAME
This distorted phaser sound, which combines TONE CITY and Phaser effects, can be used to add accents to songs.
This modern high gain sound is perfect for playing heavy riffs.
This re-creates a rich lead tone that is indispensable to the LA sound.
©2013 ZOOM CORPORATION Z2I-1986-01
Manufacturer names and product names mentioned in this patch list are trademarks or registered trademarks of their respective owners and
do not indicate any affiliation with ZOOM CORPORATION.
All product and artist names are intended only to illustrate sonic characteristics that were used as reference in the development of this product.
COMMENT
0
MUSEUM
By combining the modern distortion of the DZ DRIVE effect with bending play using the PDL MnPit, this patch re-creates the modern UK rock sound.
0
METAL RIFF
1
Duermete
Delay, reverb and chorus combine to create a dreamy atmosphere.
1
Wilhelm
Heavy rock sound great for lead and rhythm parts.
2
Blue Lead
A traditional sound like you can hear in the Memphis, Tennessee, part of the blues heartland.
2
MUFFBIG
Big guitar sound, great for big chords, heavy rock/rock tone.
3
Wakapon!
This grand wah sound uses the PedalVx effect.
3
Dr.Rock
Straight ahead heavy rock sound.
4
MiraclWyld
Down Heavy This modern heavy sound even works with down-tuning and also cuts noise well.
The StereoCho effect contributes to this majestic reverb sound.
6
PhasrFunk
The settings of this patch add the fluctuating sound of a phaser to a sharp, clean tone.
7
Jazzy Lead
A simple smooth lead tone perfect for light smooth jazz. T Scream and Comp are combined for perfect sustain.
8
Acoustix
9
Supernova
The Aco.Sim was utilized to get a nice clean authentic acoustic sound. HD Hall was added for the space.
This grand sound uses the ParticleR effect.
All purpose clean sound with compression and reverb.
5
High Gain
ChorusPad
5
Professional Settings
4
Another bigger guitar tone for pedal single-tone lines and chug-chug riffs.
Zakk Wylde's doubling style is simulated with this metal sound.
MODERN HVY Modern style big guitar for heavier music.
6
Gilmourish
Pretty obvious homage to a master.
7
FOOFIGHT
This simple setting uses the BG DRIVE effect for a heavy sound in the alternative rock style of the Foo Fighters.
8
JIMI
9
SpeedMetal
0
Green BIG
Use the front pickup on the guitar with this tapping sound that is in the style of the intro to Mr. BIG's Green-Tinted Sixties Mind.
1
LA Metal
A distortion effect is key to the flashy sound of LA metal. Add a little delay to increase the atmosphere.
2
Shred Pick
In the style of Jimi Hendrix, this sound calls up the spirit of Woodstock using FuzzSmile and TheVibe.
As its name suggests, this sound is perfect for shredding speed metal riffs.
0
CLEAN
1
CORONA
Shimmering chorus with pushed clean tone.
2
STRATTY
Cleaner style guitar designed for single coil pickups.
3
Clean Arp
This incredibly clean arpeggio sound uses the Aco.Sim effect. Have fun playing celebrated arpeggios with it.
3
BIGWAH
4
Just Funk
This funky sound will make you want to play rhythmically. The Spring63 effect is the key.
4
MASSIVE LD
5
CrystalVib
This modulation sound uses TheVibe to create a floating feel.
5
MUFFLR
6
Pic Chic
Perfect sound for the country in you. A little slapback delay combined with a little Comp works well.
6
TappinHero
7
Rev Dream
ModReverb gives this sound its depth.
7
OCT GTR
8
TapeSlap
A simple rockabilly slap, but the tape delay sustained chords have a slight warbling modulation.
8
LegatoHero
This patch is specialized for rapid legato playing. If it is still not enough for you, turn the 160 Comp effect ON!
9
Funky Duck
AutoWah is the secret to this funky sound. Add a little SuperCho and Comp and it gets funkier!
9
GtSoloTime
This long delay sound is ideal for guitar solos.
0
Big Rack
The rich and clean tone of this patch resembles that made by a massive rack system. The delay mix is assigned to the pedal.
0
JeanSplice
A complex sound combining four types of powerful effects that is good for beat makers and producers who want to add some guitar.
This sound designed for rapid playing, especially full picking.
Big guitar wah sound for solos, leads and shredding.
Big lead guitar sound with reverb.
GreatMuff pushed through TONE CITY with some CarbonDly creates this awesome sound.
This volume-boosting sound is perfect for tapping. Turn the Hall ON if you want an even more pleasant tone.
Distorted sound good for octave playing in rock.
RAKE
Clean sound designed for lush raked chords.
1
BassSim
2
TRIPY
FX style guitar for cool bridge and down sections.
2
Harm
3
ACO
3
POGISH
4
StRahht
Ethereal type sound for ambient guitars.
4
PartyViola
5
Natural
This re-creates a natural guitar sound. Turn off its low-key reverb if you want a truly naked tone.
5
Caverns
6
SPAGHETTI
6
PROGRESS
7
GardenRock
7
ARP ONE
SeqFLTR fun combined with CarbonDly.
8
CleanJazz
A mild clean tone just right for jazz.
8
PartSpace
Delay and ParticleR through a Z Clean sound for creating an ethereal soundscape.
9
YELLOW 12
This 12-string guitar sound has a 60s feel.
9
SnacMonstr
Using Octave and Cry, this sound is like an analog synth filter.
0
BritCombo
British style lighter crunch guitar.
0
Comp Clean
This clean sound has a strong sense of compression. You can turn the amp model off to further emphasize a line input feeling.
1
OJ
Great straightforward Orange amp tone.
1
DX CRUNCH
This standby crunch sound uses the DELUXE-R effect. The dotted-eighth note delay effect at the end of the chain is OFF, ready to be turned ON when you need it.
This acoustic sound uses the Aco.Sim effect. By using the 160 Comp, this patch can be used for playing ranging from rapid chord strokes to arpeggios.
Spring63 and Tremolo are used in this tone that evokes a Spaghetti Western atmosphere.
Turn this clean rock sound into a distorted sound by turning the Dist+ effect ON.
Tweak Freak
1
A high-quality bass simulator that can also be used to create loops.
Fun auto harmony tool for guitar—don't go too crazy!
PitchSHFT combined with CoronaTri gives a gorgeous sound like a 12-string guitar.
A slow-attack symphonic sound great for layering and adding warmth to existing guitar parts on a recording.
Soundscape evolving reverb sound.
This octave sound creates an eerie atmosphere with emphasized low frequencies.
2
Talk Funk
Utilizing the Cry pedal and the T Scream together, you get a Frampton-like tone for some funky lead work.
2
TEXAS TONE
Using the FD VIBRO effect, this crunch sound is great for Texas blues. Turn T Scream ON for a perfect lead sound.
3
MS STACK
Marshall type, crunchy tone, another British style option.
3
NASHVILLE
Using the US BLUES effect with some compression, this crunch sound is good for country music.
4
80s Rhythm
A classic 80's distortion tone with a touch of chorus for this perfect nostalgic sound.
4
MERSEYBEAT This Beatles style crunch sound combines VX COMBO with chorus.
This backing sound is good for recording at home. ZNR is used to reduce noise.
5
WHITEBLUES This is a crunch sound in the "white blues" style exemplified by Eric Clapton. Turn the Booster ON for a lead sound.
5
6
Crunch
COMMENT
CATEGORY BANK / PATCH PATCH NAME
REC.POP
FAT RHYTHM Big British style rhythm guitar.
This recreates the distinctive riff sound used by Lenny Kravitz in "Are You Gonna Go My Way". Turn the Flanger ON for the interlude sound before the guitar solo.
7
KRAVITZ
8
Tap Delay
9
GIRL
This dirty rhythm guitar sound uses a NoiseGate.
0
SURF
Plenty of spring reverb for that Dick Dale tone.
1
CLASSIC
2
B.SESSION
This setting is good for blues sessions. By using the built-in rhythm pattern, you can, for example, practice session playing by yourself.
YORKE
Using the VX COMBO model, this re-creates the noted UK sound used in "Creep" by Thom Yorke, vocalist and guitarist of Radiohead.
3
Adjust the tempo to match the song when using this sound for dotted eighth note tap delay performances.
Classic Hiwatt tone with subtle delay.
9
FILTER$
BTQ COMBO
This crunch sound creates the cabinet tone of a compact combo amp. The HD Hall effect adds a rich reverb.
9
ROCK TONE
Use the volume knob on your guitar to control this rock sound that can be transformed from clean to driven.
0
FuzzOrange
The combination of TANGERINE and GreatMuff effects create this alternative rock sound.
1
OCTAVE MS
This octave guitar sound combines MS 1959 and Octave effects.
2
REVERSE HW HW STACK and ReverseDL together make this reverse delay sound.
Using the MATCH 30, Rt Closet, and Hall pedals you get the perfect leslie sound.
Funky auto wah with a rotary twist.
5
MS FLANGER MS DRIVE and Flanger are used together in this jet-like sound.
TapeEcho and Spring63 effects are used in this wet crunch sound.
6
DZ HEAVY
7
LA LEAD
This sound in the style of James Valentine, the guitarist of Maroon 5, re-creates the crunchy, cutting sound with heavy compression that he uses in "This Love".
8
7strBoogie
Use this orthodox seven-string guitar and rectifier sound for a wide range of riffs from fast to groovy.
FilterDly with Delay.
9
Power Lead
Powerful and tons of sustain! The REVO-1 amp feature gets a nice hard rock lead tone.
ORG CRUNCH Another British tone, classic rock.
VALENTINE
This lead sound uses BG CRUNCH and features a long sustain and dense mid-frequencies.
8
Guitorgan
FunkRotary
8
Using VX JMI for a boost, this drive sound evokes 70's British rock. Turn the StereoDly ON to re-create the solo sound of Queen's Brighton Rock.
CA.COMBO
PHASE CITY
5
WHITE
BRIGHTON
7
4
SIMPLETONE Nice simple driven tone with subtle delay.
7
6
3
4
6
Legendary Tone
Professional Settings
Clean
Demo
CATEGORY BANK / PATCH PATCH NAME
This distorted phaser sound, which combines TONE CITY and Phaser effects, can be used to add accents to songs.
This modern high gain sound is perfect for playing heavy riffs.
This re-creates a rich lead tone that is indispensable to the LA sound.
©2013 ZOOM CORPORATION Z2I-1987-01