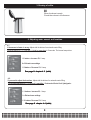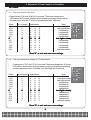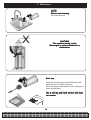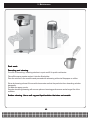
1
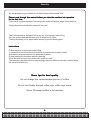
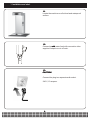
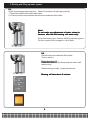
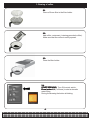
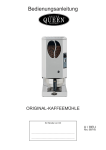
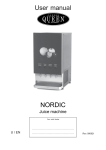
A TASTE OF THE FUTURE
Service manual
COFFEE QUEEN
TQA
Automatic Coffee Brewer
Brewing in thermos
with automatic water filling
S-E-GB
Power saving coffee machines.
Capacity 2,2 litres
Simple installation and easy to use.
Din återförsäljare / Your retail dealer
...............................................................................
...............................................................................
...............................................................................
Rev
Rev..
050920
050506
1234567890123456789012345678901212345678901234567890123456789012123456789012345678901234567890121234567890123456789012345678901212345678901234567890123456789012123456789
1234567890123456789012345678901212345678901234567890123456789012123456789012345678901234567890121234567890123456789012345678901212345678901234567890123456789012123456789
1234567890123456789012345678901212345678901234567890123456789012123456789012345678901234567890121234567890123456789012345678901212345678901234567890123456789012123456789
1234567890123456789012345678901212345678901234567890123456789012123456789012345678901234567890121234567890123456789012345678901212345678901234567890123456789012123456789
1234567890123456789012345678901212345678901234567890123456789012123456789012345678901234567890121234567890123456789012345678901212345678901234567890123456789012123456789
1234567890123456789012345678901212345678901234567890123456789012123456789012345678901234567890121234567890123456789012345678901212345678901234567890123456789012123456789
1234567890123456789012345678901212345678901234567890123456789012123456789012345678901234567890121234567890123456789012345678901212345678901234567890123456789012123456789
1234567890123456789012345678901212345678901234567890123456789012123456789012345678901234567890121234567890123456789012345678901212345678901234567890123456789012123456789
1234567890123456789012345678901212345678901234567890123456789012123456789012345678901234567890121234567890123456789012345678901212345678901234567890123456789012123456789
1234567890123456789012345678901212345678901234567890123456789012123456789012345678901234567890121234567890123456789012345678901212345678901234567890123456789012123456789
1234567890123456789012345678901212345678901234567890123456789012123456789012345678901234567890121234567890123456789012345678901212345678901234567890123456789012123456789
Generally.
We congratulate to your choice of a Coffee Queen coffee brewer TQA
Please read through this manual before you take the machine into operation
for the first time.
The manual contents important instructions for a safe and proper usage of the machine.
Always keep this manual within reach for the user!
The Coffee brewer is equipped with a key set for automatic water filling.
You can choose between brewing a full or a half pot of coffee.
The key set allows you to adjust water amount in pot and brewingtime
Instructions
Coffee machine for automatic water filling.
In the tank there is a float which activates a microswitch when water is filled.
Microswitch activates element unit and brewing starts.
During brewing the membran switch is blinking.
When the tank is empty the current to the boiler is cut off.
The machine is equipped with an overheating protection which is manually restored when
the current has been cut.
Some tip
s for best quality
tips
quality..
Do not change the recommended portion of coffee.
Do not mix freshly brewed coffee with coffee kept warm.
Never fill brewed coffee in the machine.
3.
12345678901234567890123456789012123456789012345678901234567890121234567890123456789012345678901212345678901234567890123456789012123456789012345678901
12345678901234567890123456789012123456789012345678901234567890121234567890123456789012345678901212345678901234567890123456789012123456789012345678901
12345678901234567890123456789012123456789012345678901234567890121234567890123456789012345678901212345678901234567890123456789012123456789012345678901
12345678901234567890123456789012123456789012345678901234567890121234567890123456789012345678901212345678901234567890123456789012123456789012345678901
12345678901234567890123456789012123456789012345678901234567890121234567890123456789012345678901212345678901234567890123456789012123456789012345678901
12345678901234567890123456789012123456789012345678901234567890121234567890123456789012345678901212345678901234567890123456789012123456789012345678901
12345678901234567890123456789012123456789012345678901234567890121234567890123456789012345678901212345678901234567890123456789012123456789012345678901
12345678901234567890123456789012123456789012345678901234567890121234567890123456789012345678901212345678901234567890123456789012123456789012345678901
12345678901234567890123456789012123456789012345678901234567890121234567890123456789012345678901212345678901234567890123456789012123456789012345678901
1. Installation and start.
1.1.
Locate the machine on a flat level and waterproof
surface.
1.2.
Connect to cold water feed with connection tube
supplied. Adapt to a cut-off cock.
1.3.
CAUTION!
Connect the plug to a separate wall socket.
240 V, 10 ampere.
4.
12345678901234567890123456789012123456789012345678901234567890121234567890123456789012345678901212345678901234567890123456789012123456789012345678901
12345678901234567890123456789012123456789012345678901234567890121234567890123456789012345678901212345678901234567890123456789012123456789012345678901
12345678901234567890123456789012123456789012345678901234567890121234567890123456789012345678901212345678901234567890123456789012123456789012345678901
12345678901234567890123456789012123456789012345678901234567890121234567890123456789012345678901212345678901234567890123456789012123456789012345678901
12345678901234567890123456789012123456789012345678901234567890121234567890123456789012345678901212345678901234567890123456789012123456789012345678901
12345678901234567890123456789012123456789012345678901234567890121234567890123456789012345678901212345678901234567890123456789012123456789012345678901
12345678901234567890123456789012123456789012345678901234567890121234567890123456789012345678901212345678901234567890123456789012123456789012345678901
12345678901234567890123456789012123456789012345678901234567890121234567890123456789012345678901212345678901234567890123456789012123456789012345678901
2. Rinsing and filling up water system.
2.1.
Do the first brewings with water only . Detta för att rensa och fylla upp systemet
1. Place filter holder without filter and coffee.
2. Lift the lid on thermos and then place thermos under the filter holder.
Note!
Do not make any adjustments of water volume in
thermos, after the first brewing with water only!
When first brewing, the machine will filling up water system.
For this, machine will use approx. 4 dl of water.
2.2.
Place the thermos under the filter holder.
Turn on switch 1.
Press the button I/I (Full brew) and the water shall
start pouring
When brewing is ready , empty the thermos.
Brewing will take about 6 minutes.
5.
12345678901234567890123456789012123456789012345678901234567890121234567890123456789012345678901212345678901234567890123456789012123456789012345678901
12345678901234567890123456789012123456789012345678901234567890121234567890123456789012345678901212345678901234567890123456789012123456789012345678901
12345678901234567890123456789012123456789012345678901234567890121234567890123456789012345678901212345678901234567890123456789012123456789012345678901
12345678901234567890123456789012123456789012345678901234567890121234567890123456789012345678901212345678901234567890123456789012123456789012345678901
12345678901234567890123456789012123456789012345678901234567890121234567890123456789012345678901212345678901234567890123456789012123456789012345678901
12345678901234567890123456789012123456789012345678901234567890121234567890123456789012345678901212345678901234567890123456789012123456789012345678901
12345678901234567890123456789012123456789012345678901234567890121234567890123456789012345678901212345678901234567890123456789012123456789012345678901
12345678901234567890123456789012123456789012345678901234567890121234567890123456789012345678901212345678901234567890123456789012123456789012345678901
12345678901234567890123456789012123456789012345678901234567890121234567890123456789012345678901212345678901234567890123456789012123456789012345678901
3. Brewing of coffee.
3.1.
Place a 90 mm filter in the filter holder.
3.2.
Add coffee, restaurant / catering grounded coffee).
Make sure that the coffee is evenly spread.
3.3.
Place the filter holder.
3.4.
ST
AR
T BREWING
STAR
ART
BREWING: Turn ON control switch .
Press button I / I (Full brew) to start automatic
water filling.
During the brewing the button is blinking.
6.
12345678901234567890123456789012123456789012345678901234567890121234567890123456789012345678901212345678901234567890123456789012123456789012345678901
12345678901234567890123456789012123456789012345678901234567890121234567890123456789012345678901212345678901234567890123456789012123456789012345678901
12345678901234567890123456789012123456789012345678901234567890121234567890123456789012345678901212345678901234567890123456789012123456789012345678901
12345678901234567890123456789012123456789012345678901234567890121234567890123456789012345678901212345678901234567890123456789012123456789012345678901
12345678901234567890123456789012123456789012345678901234567890121234567890123456789012345678901212345678901234567890123456789012123456789012345678901
12345678901234567890123456789012123456789012345678901234567890121234567890123456789012345678901212345678901234567890123456789012123456789012345678901
12345678901234567890123456789012123456789012345678901234567890121234567890123456789012345678901212345678901234567890123456789012123456789012345678901
12345678901234567890123456789012123456789012345678901234567890121234567890123456789012345678901212345678901234567890123456789012123456789012345678901
12345678901234567890123456789012123456789012345678901234567890121234567890123456789012345678901212345678901234567890123456789012123456789012345678901
3. Brewing of coffee
3.5.
When the brew is ready.
Check the volume in the thermos.
4. Adjusting water amount and brewtime.
4.1.
If the amount of water is wrong: Adjust with the buttons for automatic water filling.
Press the button for I / I (Full) and I /2 (Half) at same time in 5 seconds. The buzzer beeps twice.
I / I button = Increase 5% 1 beep.
0 = Exit and save settings
I / 2 button = Decrease 5% 1 beep.
See page 8. chapter 4.3. (table)
4.2.
If you need to adjust the brewtime: Adjust with the buttons for automatic water filling.
Tryck ned knapparna för I / I (Full) och 0 samtidigt, i 5 sekunder tills du hör 4 ljudsignaler.
I / I button = Increase 5% 1 beep.
0 = Exit and save settings
I / 2 button= Decrease 5% 1 beep.
See page 8. chapter 4.4 (table)
7.
12345678901234567890123456789012123456789012345678901234567890121234567890123456789012345678901212345678901234567890123456789012123456789012345678901
12345678901234567890123456789012123456789012345678901234567890121234567890123456789012345678901212345678901234567890123456789012123456789012345678901
12345678901234567890123456789012123456789012345678901234567890121234567890123456789012345678901212345678901234567890123456789012123456789012345678901
12345678901234567890123456789012123456789012345678901234567890121234567890123456789012345678901212345678901234567890123456789012123456789012345678901
12345678901234567890123456789012123456789012345678901234567890121234567890123456789012345678901212345678901234567890123456789012123456789012345678901
12345678901234567890123456789012123456789012345678901234567890121234567890123456789012345678901212345678901234567890123456789012123456789012345678901
12345678901234567890123456789012123456789012345678901234567890121234567890123456789012345678901212345678901234567890123456789012123456789012345678901
12345678901234567890123456789012123456789012345678901234567890121234567890123456789012345678901212345678901234567890123456789012123456789012345678901
12345678901234567890123456789012123456789012345678901234567890121234567890123456789012345678901212345678901234567890123456789012123456789012345678901
4. Adjustment of water amount and brewtime.
SETTINGS
4.3. Fine tune time for inlet valve:
· Press buttons (Full) and (Half) for 5 seconds. The buzzer beeps twice.
· LED pattern and number of beeps when changing indicates actual setting.
· Increase valve time with ”Full brew” and decrease with ”Half brew”.
Offset
No. of beeps
-25%
-20%
-15%
-10%
-5%
0
5%
10%
15%
20%
25%
·
5
4
3
2
1
0
1
2
3
4
5
Led pattern
½
o
1/1
X
O
O
X
O
O
X
O
O
X
O
O
X
O
O
O
X
O
O
O
X
O
O
X
O
O
X
O
O
X
O
O
X
Note
Led lights steady
Led flashing
Led flashing
Led flashing
Led flashing
Led lights steady
Led flashing
Led flashing
Led flashing
Led flashing
Led lights steady
Press”O” to exit and save new settings.
4.4. Fine tune pause time beeper for ”Coffee Ready”
·
·
·
Press buttons ”Full” and ”O” for 5 seconds.The buzzer beeps four (4) times.
LED pattern and number of beeps when changing indicates actual setting.
Increase pause time with ”Full brew” and decrease with ”Half brew”.
Offset
No. of beeps
Off
-25%
-20%
-15%
-10%
-5%
0
5%
10%
15%
20%
25%
·
6
5
4
3
2
1
0
1
2
3
4
5
Led pattern
½
o
1/1
X
O
O
X
O
O
X
O
O
X
O
O
X
O
O
X
O
O
O
X
O
O
O
X
O
O
X
O
O
X
O
O
X
O
O
X
Note
Led lights steady
Led lights steady
Led flashing
Led flashing
Led flashing
Led flashing
Led lights steady
Led flashing
Led flashing
Led flashing
Led flashing
Led lights steady
Press”O” to exit and save new settings.
8.
12345678901234567890123456789012123456789012345678901234567890121234567890123456789012345678901212345678901234567890123456789012123456789012345678901
12345678901234567890123456789012123456789012345678901234567890121234567890123456789012345678901212345678901234567890123456789012123456789012345678901
12345678901234567890123456789012123456789012345678901234567890121234567890123456789012345678901212345678901234567890123456789012123456789012345678901
12345678901234567890123456789012123456789012345678901234567890121234567890123456789012345678901212345678901234567890123456789012123456789012345678901
12345678901234567890123456789012123456789012345678901234567890121234567890123456789012345678901212345678901234567890123456789012123456789012345678901
12345678901234567890123456789012123456789012345678901234567890121234567890123456789012345678901212345678901234567890123456789012123456789012345678901
12345678901234567890123456789012123456789012345678901234567890121234567890123456789012345678901212345678901234567890123456789012123456789012345678901
12345678901234567890123456789012123456789012345678901234567890121234567890123456789012345678901212345678901234567890123456789012123456789012345678901
12345678901234567890123456789012123456789012345678901234567890121234567890123456789012345678901212345678901234567890123456789012123456789012345678901
5. Maintenance
NOTE!
Before each brewing.
Rinse the thermos.
X
CAUTION!
The machine should not be
Submerged in water orW
ashed in a
orWashed
dishwasher
Each day
day..
Wash the thermos pot and the filterholder with
liquid solution for coffee machines.
Clean the spray nozzle and the surrounding area.
Clean the hot plate.
Use a soft rag and liquid solution that does
not scratch.
9.
12345678901234567890123456789012123456789012345678901234567890121234567890123456789012345678901212345678901234567890123456789012123456789012345678901
12345678901234567890123456789012123456789012345678901234567890121234567890123456789012345678901212345678901234567890123456789012123456789012345678901
12345678901234567890123456789012123456789012345678901234567890121234567890123456789012345678901212345678901234567890123456789012123456789012345678901
12345678901234567890123456789012123456789012345678901234567890121234567890123456789012345678901212345678901234567890123456789012123456789012345678901
12345678901234567890123456789012123456789012345678901234567890121234567890123456789012345678901212345678901234567890123456789012123456789012345678901
12345678901234567890123456789012123456789012345678901234567890121234567890123456789012345678901212345678901234567890123456789012123456789012345678901
12345678901234567890123456789012123456789012345678901234567890121234567890123456789012345678901212345678901234567890123456789012123456789012345678901
12345678901234567890123456789012123456789012345678901234567890121234567890123456789012345678901212345678901234567890123456789012123456789012345678901
12345678901234567890123456789012123456789012345678901234567890121234567890123456789012345678901212345678901234567890123456789012123456789012345678901
5. Maintenance
Each week.
Descaling and cleaning.
Pour 50 ml descaling / cleaning solution in a pot and fill it up with cold water.
Take off the spray nozzle and put it into the filterholder.
Pour the mixture in the machine and proceed with a brewing without a filterpaper or coffee.
Rinse by brewing at least 3 times with clean water so that the particles from descaling solution
disappear.
Put back the spray nozzle.
Regular descaling/cleaning will ensure optimum brewing performance and a longer life of the
machine.
Surface cleaning. Use a soft rag and liquid solution that does not scratch.
10.
12345678901234567890123456789012123456789012345678901234567890121234567890123456789012345678901212345678901234567890123456789012123456789012345678901
12345678901234567890123456789012123456789012345678901234567890121234567890123456789012345678901212345678901234567890123456789012123456789012345678901
12345678901234567890123456789012123456789012345678901234567890121234567890123456789012345678901212345678901234567890123456789012123456789012345678901
12345678901234567890123456789012123456789012345678901234567890121234567890123456789012345678901212345678901234567890123456789012123456789012345678901
12345678901234567890123456789012123456789012345678901234567890121234567890123456789012345678901212345678901234567890123456789012123456789012345678901
12345678901234567890123456789012123456789012345678901234567890121234567890123456789012345678901212345678901234567890123456789012123456789012345678901
12345678901234567890123456789012123456789012345678901234567890121234567890123456789012345678901212345678901234567890123456789012123456789012345678901
12345678901234567890123456789012123456789012345678901234567890121234567890123456789012345678901212345678901234567890123456789012123456789012345678901
7. Important
Important.
Do not make any alterations to the machine. Such measures may cause personal injury and
the
machine to fail.
The machine should stand on a flat surface so that it will function properly.
The machine should be placed on a water-proof surface so that any leakage is easily
noticeable,
make sure there is no bendage on the connection tube when machine is pushed into its place.
The tube connections should be regularly checked. Make sure that no leakage has occurred in
connection with installation.
Do not leave the machine unattended while using. Close water connection when not using
machine.
The machine must be disconnected from electrical supply before any maintenance.
11.
12345678901234567890123456789012123456789012345678901234567890121234567890123456789012345678901212345678901234567890123456789012123456789012345678901
12345678901234567890123456789012123456789012345678901234567890121234567890123456789012345678901212345678901234567890123456789012123456789012345678901
12345678901234567890123456789012123456789012345678901234567890121234567890123456789012345678901212345678901234567890123456789012123456789012345678901
12345678901234567890123456789012123456789012345678901234567890121234567890123456789012345678901212345678901234567890123456789012123456789012345678901
12345678901234567890123456789012123456789012345678901234567890121234567890123456789012345678901212345678901234567890123456789012123456789012345678901
12345678901234567890123456789012123456789012345678901234567890121234567890123456789012345678901212345678901234567890123456789012123456789012345678901
12345678901234567890123456789012123456789012345678901234567890121234567890123456789012345678901212345678901234567890123456789012123456789012345678901
12345678901234567890123456789012123456789012345678901234567890121234567890123456789012345678901212345678901234567890123456789012123456789012345678901
12345678901234567890123456789012123456789012345678901234567890121234567890123456789012345678901212345678901234567890123456789012123456789012345678901
8. Possible solutions.
Fault
Possible Solution
A. Switch does not light.
1. Check plug connection to wall socket.
2. Check fuse in plug.
B. Brewer omits excess steam.
1. Machine may require descaling.
2. Spray nozzel may need unblocking.
3. Hose may be bent?
4. Inlet to boiler may be blocked. Descale
machine - if boiler still defective - replace.
C. Machine will not brew.
1. Trip-switch has activated - reset with button.
For possible fault / solution see B.
2. Check microswicth .
3. Check float .
4. Check connection to boiler .
5. Boiler unit may need replacing
E. The machine does not take in
water.
1. Make sure water-inlet is not closed.
2. Make sure the tube is not bent.
3. Check solenoid.
4. Checkthat thelamp in membran switch is blinking.
F. The machines does not stop
taking in water.
1. Dirt in the solenoid .
G. The machine is giving wrong
amount of water.
1. Check watertap.
2. Bent tube.
3. Dirt in solenoid .
4. Membran switch wrongly adjusted. Adjust according to
installation manual.
12.
12345678901234567890123456789012123456789012345678901234567890121234567890123456789012345678901212345678901234567890123456789012123456789012345678901
12345678901234567890123456789012123456789012345678901234567890121234567890123456789012345678901212345678901234567890123456789012123456789012345678901
12345678901234567890123456789012123456789012345678901234567890121234567890123456789012345678901212345678901234567890123456789012123456789012345678901
12345678901234567890123456789012123456789012345678901234567890121234567890123456789012345678901212345678901234567890123456789012123456789012345678901
12345678901234567890123456789012123456789012345678901234567890121234567890123456789012345678901212345678901234567890123456789012123456789012345678901
12345678901234567890123456789012123456789012345678901234567890121234567890123456789012345678901212345678901234567890123456789012123456789012345678901
12345678901234567890123456789012123456789012345678901234567890121234567890123456789012345678901212345678901234567890123456789012123456789012345678901
12345678901234567890123456789012123456789012345678901234567890121234567890123456789012345678901212345678901234567890123456789012123456789012345678901
12345678901234567890123456789012123456789012345678901234567890121234567890123456789012345678901212345678901234567890123456789012123456789012345678901
9. Sprängskiss
2
1
17
3
5
6
18
19
7
4
9
12
Compl.
10
21
11
8
22
20
24
15
16
13
14
23
13.
12345678901234567890123456789012123456789012345678901234567890121234567890123456789012345678901212345678901234567890123456789012123456789012345678901
12345678901234567890123456789012123456789012345678901234567890121234567890123456789012345678901212345678901234567890123456789012123456789012345678901
12345678901234567890123456789012123456789012345678901234567890121234567890123456789012345678901212345678901234567890123456789012123456789012345678901
12345678901234567890123456789012123456789012345678901234567890121234567890123456789012345678901212345678901234567890123456789012123456789012345678901
12345678901234567890123456789012123456789012345678901234567890121234567890123456789012345678901212345678901234567890123456789012123456789012345678901
12345678901234567890123456789012123456789012345678901234567890121234567890123456789012345678901212345678901234567890123456789012123456789012345678901
12345678901234567890123456789012123456789012345678901234567890121234567890123456789012345678901212345678901234567890123456789012123456789012345678901
12345678901234567890123456789012123456789012345678901234567890121234567890123456789012345678901212345678901234567890123456789012123456789012345678901
12345678901234567890123456789012123456789012345678901234567890121234567890123456789012345678901212345678901234567890123456789012123456789012345678901
10. Spare parts list
Description
Article No.
Detail No.in
Exploded view
view..
Cover and strainer
Non return valve
Plastic tank
Trip switch
Cold water hose
Float
Pin
Spray nozzle
Microswitch
Solenoid singel
Hot water hose
Boiler compl.
Main switch
Membran switch (silicone)
Electronic card
Locking pin
Feet
Angel for spray nozzle
Plastic angel1/8”
Angel head, breadth drain
Grating, back
1204041
120612
120418
160212-03
150502
120402
180170
120427
160821
120620-01
150504
120501
160801-04
1603845
1604090
120313
1203202
180109
180108
180104
120422
1
2
3
4
5
6
7
8
9
10
11
12
13
14
15
16
17
18
19
20
1
1
1
1
1
1
1
1
1
1
1
1
1
1
1
2
4
1
1
1
1
Silicone gasket
Connection lead
Connection tube
Filterholder/stainless
Thermos 2,2 litre
120649-03
160523
1505032
1102016
1103183
21
22
not shown
23
24
1
1
1
1
1
TQA
(Amount per unit)
14.
12345678901234567890123456789012123456789012345678901234567890121234567890123456789012345678901212345678901234567890123456789012123456789012345678901
12345678901234567890123456789012123456789012345678901234567890121234567890123456789012345678901212345678901234567890123456789012123456789012345678901
12345678901234567890123456789012123456789012345678901234567890121234567890123456789012345678901212345678901234567890123456789012123456789012345678901
12345678901234567890123456789012123456789012345678901234567890121234567890123456789012345678901212345678901234567890123456789012123456789012345678901
12345678901234567890123456789012123456789012345678901234567890121234567890123456789012345678901212345678901234567890123456789012123456789012345678901
12345678901234567890123456789012123456789012345678901234567890121234567890123456789012345678901212345678901234567890123456789012123456789012345678901
12345678901234567890123456789012123456789012345678901234567890121234567890123456789012345678901212345678901234567890123456789012123456789012345678901
12345678901234567890123456789012123456789012345678901234567890121234567890123456789012345678901212345678901234567890123456789012123456789012345678901
12345678901234567890123456789012123456789012345678901234567890121234567890123456789012345678901212345678901234567890123456789012123456789012345678901
11. Electrical diagram TQA
Electrical diagram TQA
TQA
B1 Main switch/switch for element E1
B2 Microswitch for element E2
B3 Aut. High limit for element E2
B4 Man. High limit for element E2
S1 Lamp for switch B1
E1 Hot plate element
E2 Brewing element
V1 Solenoid for waterfilling
15.
12345678901234567890123456789012123456789012345678901234567890121234567890123456789012345678901212345678901234567890123456789012123456789012345678901
12345678901234567890123456789012123456789012345678901234567890121234567890123456789012345678901212345678901234567890123456789012123456789012345678901
12345678901234567890123456789012123456789012345678901234567890121234567890123456789012345678901212345678901234567890123456789012123456789012345678901
12345678901234567890123456789012123456789012345678901234567890121234567890123456789012345678901212345678901234567890123456789012123456789012345678901
12345678901234567890123456789012123456789012345678901234567890121234567890123456789012345678901212345678901234567890123456789012123456789012345678901
12345678901234567890123456789012123456789012345678901234567890121234567890123456789012345678901212345678901234567890123456789012123456789012345678901
12345678901234567890123456789012123456789012345678901234567890121234567890123456789012345678901212345678901234567890123456789012123456789012345678901
12345678901234567890123456789012123456789012345678901234567890121234567890123456789012345678901212345678901234567890123456789012123456789012345678901
12345678901234567890123456789012123456789012345678901234567890121234567890123456789012345678901212345678901234567890123456789012123456789012345678901
COFFEE QUEEN
TQA,
FOR SERVICE
Please contact your retail dealer
Your retail dealer
...............................................................................
...............................................................................
...............................................................................
COFFEE QUEEN AB, Box 960, 671 29 ARVIKA, besöksadress; Korpralsv 1B,
Tel vxl; +46 (0)570-47700, service +46 (0)570-47730, lager +46 (0)570-47720, Fax; +46 (0)570-47719
E-mail: [email protected] www.coffeequeen.se
Art. nr 1704475