1
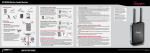
Quick Setup Guide
NS-RSW211 Rocketboost Wireless Subwoofer
Congratulations on your purchase of a
high-quality Insignia product. Your Wireless
Subwoofer represents the state of the art in
powered subwoofers and is designed for
reliable and trouble-free performance. Use this
guide for initial setup of your Wireless
Subwoofer. See your User Guide for more
information on using your Wireless Subwoofer.
Package contents
• NS-RSW211 Wireless Subwoofer
• User Guide
• Quick Setup Guide
Connecting your subwoofer
Setting up and using your subwoofer in wireless mode
Connecting the power
1 Plug the AC power cord into a 120 V wall outlet.
2 Click the Power switch to the right to turn on the wireless subwoofer.
The power indicator turns on.
How does Rocketboost work?
Rocketboost technology can connect all audio devices throughout your home to form a home audio
network.
Rocketboost products include “Senders,” which send or transmit audio streams, and “Receivers,” which
receive the audio. This lets you listen to music from your Sender in other rooms using your Receiver.
Deciding on wired or wireless mode
This product can be used as a standard wired subwoofer or you can upgrade to wireless when the
subwoofer is used with other Rocketboost products. For wired mode, see the next section below. If you
want to setup the subwoofer in wireless mode, see that section in the next column. For more details on
using wireless mode with other Rocketboost product, see your User Guide.
Setting up and using your subwoofer in wired mode
Your subwoofer can be used as a standard wired subwoofer with most AV receivers.
Connecting your subwoofer for wired mode
1 Connect the subwoofer output of your receiver to the Aux input of the subwoofer using a subwoofer
cable.
For a wireless subwoofer application, the wireless subwoofer is a Rocketboost receiver. A Rocketboost
sender device needs to be connected to your AV receiver or other audio source to send the subwoofer
channel to the wireless subwoofer.
Example configuration
Setting up your subwoofer for wireless operation depends on the audio product that you want to use your
subwoofer with. For example, you can use the subwoofer with your AV receiver, a Rocketboost-compatible
soundbar, or even directly with your Rocketboost compatible TV. For additional information on wireless
setup for those products, see the user guides for those products.
The example below shows a typical AV receiver, connected to an RF-RBUSB Rocketboost wireless sender,
connected wirelessly to the subwoofer (this solution is compatible with most AV receivers):
Typical AV Receiver + RF-RBUSB Rocketboost wireless sender/receiver
2 Make sure that the INPUT SELECT switch on the subwoofer is set to Aux (wired).
Setting the low pass filter
Setting the low pass filter lets you select the frequency range of the sound that your subwoofer will
reproduce and amplify. Turning the knob counterclockwise to 80 Hz sets the subwoofer to reproduce
frequencies lower than 80 Hz. Turning the knob clockwise to 150 Hz sets it to reproduce frequencies lower
than 150 Hz. The best setting depends on the other speakers you are using with the subwoofer. If you are
unsure of the best setting, set this at 150 Hz.
Listening to music and setting the volume
1 Turn on your subwoofer and audio source and play music or a movie that you can easily hear the bass
sound on.
2 Adjust the volume level on your wireless subwoofer by turning the volume knob clockwise or
counterclockwise. The level should be set so that the bass volume level best matches the volume level
of the rest of your audio system.
Once you have set this volume level you can leave it at this setting. The subwoofer volume will then
automatically adjust when you change the volume of your audio source.
Connecting your subwoofer for wireless mode
IMPORTANT: Every Rocketboost network must contain one hub device, which helps devices join the
network. The network can have only one hub, which you can enable using the hub switch on the back of all
Rocketboost senders and wireless sender/receivers.
The wireless subwoofer is a Rocketboost wireless receiver and is not a hub device. To add this wireless
receiver to your Rocketboost network, you need to join it to your hub device. This section describes the
joining process.
To establish communication:
1 Press the Power button on the Rocketboost hub device to turn it on.
2 Make sure that the INPUT SELECT switch on the subwoofer is set to Wireless.
3 Make sure that the power switch on your subwoofer is turned on. If the power indicator is red (Standby
mode), briefly press the CONNECT button to turn on your subwoofer (the power indicator turns blue).
4 Press and hold the Power button on the Rocketboost hub device for more than three seconds to put it
into joining mode. The power indicator starts blinking rapidly and the unit will stay in joining mode for
30 seconds.
5 Press and hold the CONNECT button on your subwoofer for more than three seconds to
put it into joining mode.
• When successfully joined, the power indicators on both products will stop
blinking and stay on.
• If joining fails after 30 seconds, the power indicators will begin flashing at a
slower rate. If this occurs, repeat the above steps.
One-year limited warranty
Visit www.insigniaproducts.com for details.
Contact Insignia:
For customer service, call 1-877-467-4289
www.insigniaproducts.com
Setting the low pass filter
Setting the low pass filter lets you select the frequency range of the sound that your
subwoofer will reproduce and amplify. Turning the knob counterclockwise to 80 Hz sets
the subwoofer to reproduce frequencies lower than 80 Hz. Turning the knob clockwise to
150 Hz sets it to reproduce frequencies lower than 150 Hz. The best setting depends on
the other speakers you are using with the subwoofer. If you are unsure of the best setting,
set this at 150 Hz.
If you are using the subwoofer in wireless mode with a Rocketboost enabled AV receiver or
soundbar (for example Insignia NS-AV511 or NS-SBAR/NS-SBAR-A), you don’t need to set
the low pass filter. These products send a pre-filtered audio stream to the subwoofer that
is set to best match the frequency range of those products.
If you are using the subwoofer in wireless mode with Rocketboost-enabled Insignia TV
models NS-32E859A11 or NS-42E859A11, set the low pass filter to 150 Hz.
Listening to music and setting the volume
1 Turn on your subwoofer and audio source. The power indicator LED on the subwoofer
should light steadily. If it is blinking you need to rejoin the subwoofer to your
Rocketboost hub device. For more information on connecting your subwoofer for
wireless mode, refer to your User Guide.
2 Play music or a movie that you can easily hear the bass sound on.
3 Start with the volume level of the sub at its maximum setting. If you are not hearing the
audio that matches the music or movie you are playing, press the Next Source button
on the subwoofer until you can hear it. This is because Rocketboost receivers (including
the subwoofer) can receive audio from any Rocketboost sender in your network. Each
time you press the Next Source button, the wireless receiver (in this case the
subwoofer) moves to the next audio source in your network.
4 Adjust the volume level on your wireless subwoofer by turning the Volume knob
clockwise or counterclockwise. The level should be set so that the bass volume level best
matches the volume level of the rest of your audio system.
5 Note that some Rocketboost enabled devices (for example, the Insignia NS-SBAR/NSSBAR-A soundbar) send both a subwoofer signal (volume controlled by the sending
device) and a second room audio signal (not volume controlled by the sending device).
To confirm you are connected to the subwoofer signal, turn the volume up and down at
the sending device (for example, the Insignia NS-SBAR/NS-SBAR-A soundbar), and
listen to make sure that the subwoofer volume level changes. If it does not, press Next
Source on the subwoofer to select the other audio signal from the sending device.
For more information see your User Guide for your other Rocketboost enabled product.
© 2011 BBY Solutions, Inc. All rights reserved. All rights reserved. INSIGNIA is a trademark of BBY Solutions, Inc.
Registered in some countries. All other products and brand names are trademarks of their respective owners.
ENGLISH 11-0309