1
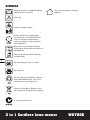
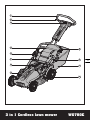
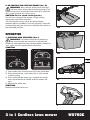
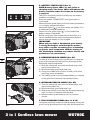
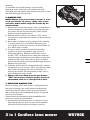
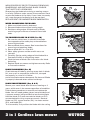
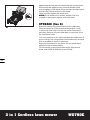
SAFETY AND OPERATING MANUAL
3 in 1 Cordless lawn mower
WG780E
General Power Tool
Safety Warnings
WARNING: Read all instructions when
using electric gardening appliances.
Basic safety precautions should always be
followed to reduce the risk of fire, electric
shock, and personal injury.
Save all warnings and instructions for
future reference.
- This appliance is not intended for use by
persons (including children) with reduced
physical, sensory or mental capabilities, or
lack of experience and knowledge, unless they
have been given supervision or instruction
concerning use of the appliance by a person
responsible for their safety.
- Children should be supervised to ensure that
they do not play with the appliance.
2
TRAINING
a) Read the instructions carefully. Be familiar
with the controls and the proper use of the
equipment;
b) Never allow children or people unfamiliar
with these instructions to use the
lawnmower. Local regulations can restrict
the age of the operator;
c) Never mow while people, especially
children, or pets are nearby;
d) Keep in mind that the operator or user
is responsible for accidents or hazards
occurring to other people or their property.
PREPARATION
a) While mowing, always wear substantial
footwear and long trousers. Do not operate
the equipment when barefoot or wearing
open sandals;
b) Thoroughly inspect the area where the
equipment is to be used and remove
all objects which can be thrown by the
machine;
c) Before using, always visually inspect to
see that the blade, blade bolts and cutter
assembly are not worn or damaged.
Replace worn or damaged blades and bolts
in sets to preserve balance;
OPERATION
a) Mow only in daylight or in good artificial
light;
b) Avoid operating the equipment in wet
grass, where feasible;
c) Always be sure of your footing on slopes;
d) Walk, never run;
e) For wheeled rotary machines, mow across
the face of slopes, never up and down;
f) Exercise extreme caution when changing
direction on slopes;
g) Do not mow excessively steep lopes;
h) Use extreme caution when reversing or
pulling the lawnmower towards you;
i) Stop the blade if the lawnmower has to
be tilted for transportation when crossing
surfaces other than grass, and when
transporting the lawnmower to and from
the area to be mowed;
j) Never operate the lawnmower with
defective guards, or without safety devices,
for example deflectors and/or grass
catchers, in place;
k) Switch on the motor carefully according to
instructions and with feet well away from
the blade;
l) Do not tilt the lawnmower when switching
on the motor, except if the lawnmower has
to be tilted for starting. In this case, do not
tilt it more than absolutely necessary and
lift only the part which is away from the
operator;
m)Do not put hands or feet near or under
rotating parts. Keep clear of the discharge
opening at all times;
n) Not to touch the blades before the disabling
device has been removed and the blades
have come to a complete stop;
o) To remove the disabling device
- Whenever leaving the machine unattended,
- Before clearing a blockage,
- Before checking, cleaning or working on the
machine,
- After striking a foreign object,
- Whenever the machine starts vibrating
abnormally.
Maintenance and storage
a) Keep all nuts, bolts and screws tight to
be sure the equipment is in safe working
3 in 1 Cordless lawn mower
WG780E
condition;
b) Check the grass catcher frequently for wear
or deterioration;
c) Replace worn or damaged parts for safety;
Battery tool use and care
1) Recharge only with the charger
specified by the manufacturer. A
charger that is suitable for one type of
battery pack may create a risk of fire when
used with another battery pack.
2) Use power tools only with specifically
designated battery packs. Use of any
other battery packs may create a risk of
injury and fire.
3) When battery pack is not in use, keep
it away from other metal objects, like
paper clips, coins, keys, nails, screws
or other small metal objects, that can
make a connection from one terminal
to another. Shorting the battery terminals
together may cause burns or a fire.
4) Under abusive conditions, liquid may
be ejected from the battery; avoid
contact. If contact accidentally occurs,
flush with water. If liquid contacts
eyes, additionally seek medical help.
Liquid ejected from the battery may cause
irritation or burns.
ADDITIONAL SAFETY
INSTRUCTIONS FOR YOUR
BATTERY CHARGER
1. Before charging, read the instructions.
2. For charge Lead acid battery pack only.
3. If the supply cord is damaged, it must be
replaced by the manufacturer, its service
agent or similarly qualified persons in order
to avoid a hazard.
4. The battery terminal not connected to the
chassis has to be connected first. The other
connection is to be made to the chassis,
remote from the battery and fuel line. The
battery charger is then to be connected to
the supply mains.
5. After charging, disconnect the battery
charger from the supply mains. Then
remove the chassis connection and then the
battery connection.
6. Do not charge a leaking battery.
7. Do not use chargers for works other than
those for which they are designed.
8. Before charging, ensure your charger is
matching the local AC supply.
9. The charging device must be protected
from moisture.
10.Do not use the charging device in the open.
11.Do not short out the contacts of battery or
charger.
12.Respect the polarity “+/-“ when charging.
13.Do not open the unit and keep out of the
reach of children.
14.Do not charge the batteries of other
manufactures or ill-suited models.
15.Ensure that the connection between the
battery charger and battery is correctly
positioned and is not obstructed by foreign
bodies.
16.Keep battery charger’s slots are free of
foreign objects and protect against dirt and
humidity. Store in a dry and frost-free place.
17.When charging batteries, ensure that the
battery charger is in a well-ventilated area
and away from inflammable materials.
Batteries can get hot during charging.
Do not overcharge any batteries. Ensure
that batteries and chargers are not left
unsupervised during charging.
18.Do not recharge non-rechargeable batteries,
as they can overheat and break.
19.Longer life and better performance can be
obtained if the battery pack is charged when
the air temperature is between 18oC and
24oC. Do not charge the battery pack in air
temperatures below 4.5oC, or above 40.5oC.
This is important as it can prevent serious
damage to the battery pack.
3 in 1 Cordless lawn mower
WG780E
3
SYMBOLS
Read instruction handbook before
operation this machine.
Only use the battery charger
indoors
Warning
Keep bystanders away
Blade continues to rotate after
the machine is switched off. Wait
until all machine components
have completely stopped before
touching them.
Beware of sharp blades. Blades
continue to rotate after the motor is
switched off.
Remove disabling device before
maintenance.
4
Do not expose to rain or water
Do not burn
Do not dispose of batteries. Return
exhausted batteries to your local
collection or recycling point.
Contains Pb battery. Battery must
be recycled or disposed of properly.
C-Tick approval mark
3 in 1 Cordless lawn mower
WG780E
1
2
3
4
5
6
7
6
8
11
9
10
3 in 1 Cordless lawn mower
WG780E
5
1.Upper handle
2. Switch lever
3. Safety key
4.Lower handle
5.Handle height adjustment lever
6.Lock cam lever
7. Safety guard
8. Battery housing cover
9. Side-discharge cover
10.Cutting height adjustment lever
11. Grass collection bag
12. Mulch insert (See K1)
13. Side-discharge insert (See L1)
14. Screw knob (See C)
15. Battery pack *(See B)
16.Charger *(See B)
* Not all the accessories illustrated or described are included in standard delivery.
6
3 in 1 Cordless lawn mower
WG780E
TECHNICAL DATA
Rated power
24 V
Rated no load speed
3500/min
Cutting diameter 46cm
Front wheel diameter
178mm
Rear wheel diameter
210mm
Cut height
38 – 88mm
Cutting height positions
6
Grass collection capacity
55L
Battery capacity 17Ah
Battery type Lead acid
Battery model
WA0032
Charging time
16hrs
Charger model
WA3718
Charger part no. Charger rating
QL-09005-B2401500F
Input: AC 100-240V, 50/60Hz, 1.5A, Output: 24Vdc, 1500mA
Machine weight
36.5kg
7
ACCESSORIES
Side-discharge insert
1
Battery pack
1
Grass collection bag
1
Mulching insert
1
Charger
1
Safety key
1
We recommend that you purchase your accessories from the same store that sold you the tool.
Use good quality accessories marked with a well-known brand name. Choose the type according
to the work you intend to undertake. Refer to the accessory packaging for further details. Store
personnel can assist you and offer advice.
3 in 1 Cordless lawn mower
WG780E
INTENDED USE
This product is intended for domestic lawn mowing.
CHARGER SAFETY RULES
1. Plug charger directly into an electrical outlet. DO
NOT ABUSE THE CORD. Never carry charger by
cord. Do not disconnect the charger from the outlet
or mower by pulling it by the cord.
2.
CAUTION: To reduce the risk of fire, electrical
shock, or personal injury do not attempt to use
this charger with any other product.
Likewise, do not attempt to charge the mower with
any other charger.
3. Do not service mower with charger or safety key
installed.
4. Do not operate a damaged charger. Replace
damaged cords or charger immediately at an
authorized WORX service depot.
5. Always charge the mower in a dry area protected
from the weather. Do not expose the mower or
charger to rain. Do not charge in wet locations. Do
not charge mower when temperature is above 104°F
(40°C) or below 41°F (5°C).
6. Keep the mower and charger away from water,
heat sources, (Such as radiators, heaters, stoves...
etc.) flames, or chemicals. Be careful not to damage
the charger cord, by keeping cord away from sharp
edges.
8
CHARGING PROCEDURE
A
15
16
1. Charging can be carried out either with the battery
FITTED (See A) or REMOVED from the machine
(See B).
2. Plug the charger connector into the receptacle on
the battery.
3. Insert the plug of the charger into the wall
receptacle.
4. The red light on the charger should come on
indicating that you have power and the battery
is being charged. The red light should extinguish
and the green light will come on when charging is
complete (approximately 16 hours to charge a fully
discharged mower).
NOTE: Remove the safety key before charging the
battery in the machine.
B
3 in 1 Cordless lawn mower
WG780E
BATTERY CARE
The battery in your cordless lawnmower is a 24-volt
sealed lead acid system. The mower can be stored in
any position without fear of leakage.
• For optimal battery life and performance the battery
should be fully charged every 2 months during
storage
• For optimal battery life and performance the battery
should be fully charged after each use
• Store the battery in a cool dry location.
• The battery can be safely stored down to - 4°F
(-20°C).
• The battery does not need to be fully discharged
before recharging.
• Initially 2 to 3 charging cycles may be required after
purchase to achieve maximum run time capacity.
ADDITIONAL BATTERIES can be obtained from the
customer helpline.
14
C
ASSEMBLY/ADJUSTMENT
WARNING! Do not connect the battery and/
or the safety key before product is completely
assembled.
D1
1. ASSEMBLING THE HANDLE (See C)
Raise the handle section into place and secure by
tightening the two Lock cam levers.
Check that the handle is FULLY secured.
The cam lever pressure can be adjusted by adjusting
the screw knob (14) clockwise/counter-clockwise. DO
NOT OVER TIGHTEN
2.ASSEMBLING THE GRASSBAG
(See D1, D2 & D3)
1) Before starting to assemble the grass bag to the
frame (b), check that the grass bag is positioned to
slip over the frame.
2) Slide the grass bag onto the frame.
3) Assemble the top clips to the frame, then assemble
the two side clips and the bottom clip last.
9
b
D2
D3
3 in 1 Cordless lawn mower
WG780E
1
2
E1
3. FITTING/REMOVING BATTERY (See E1, E2)
REMOVING BATTERY
Pull out the battery connector, then rotate the battery
locking knob counter-clockwise and then use the battery
handle to remove the battery.
NOTE: Be careful not to drop the battery onto your foot
or on the ground when removing it.
FITTING BATTERY
Put the battery into the battery container, press the
battery connector and then rotate the battery locking
knob.
4. HANDLE ADJUSTMENT (See F)
The upper handle can be adjusted to 3 different height
positions. Release the locking cam lever, set the upper
handle to one of the three height positions, and make
sure to insert the pin (c) into the hole. Then reset the
locking cam lever.
NOTE: Always check that the upper handle is fixed
firmly.
5. INSTALLING THE GRASS BAG
(See G1, G2 & G3)
FITTING
1) Turn the mower off, wait until blade stops and
remove safety key.
2) Raise the safety flap and hold it up, ensure that the
mulching insert has been removed.
3) Pick up the grass bag by the handle, and position
grass bag on the lower hooks (a) on the mower
deck.
4) Release the safety guard to lock the grass bag into
position. Ensure the grass bag is installed securely.
NOTE: Depress the grass bag slightly to ensure that it
is completely installed.
REMOVING/EMPTYING
Lift the safety guard and hold it up. The grass bag will
drop automatically.
E2
10
C
F
a
G1
3 in 1 Cordless lawn mower
WG780E
6. ADJUSTING THE CUTTING HEIGHT (See H)
WARNING! Stop, release switch lever and wait
until the motor stops before adjusting height. The
blades continue to rotate after the machine is switched
off, a rotating blade can cause injury.
CAUTION: Do not touch rotating blades.
For the first cutting of the season, a high cutting
adjustment should be selected.
The lawnmower can be set to 6 cutting heights
between 38mm and 88mm. For this purpose, move the
cutting height adjustment lever outwards then adjust to
the preferred position.
G2
OPERATION
1. STARTING AND STOPPING (See I)
WARNING! The blade continues to rotate for a
few seconds after the machine is switched off.
Allow the motor/blade to stop rotating before switching
“on” again. Do not rapidly switch off and on.
STARTING
TO START ENGINE
2. Push Key
G3
1. Insert Key
3. Pull bar
1) Insert safety key into the housing of the switch box.
2) Push down the key, until safety key is fully seated
inside housing.
3) Press and hold the safety key, squeeze the switch
lever bar towards the handle and the mower will
start.
4) Release the safety key.
STOPPING
Release the switch lever bar.
11
H
1
2
I
3 in 1 Cordless lawn mower
WG780E
J
12
K1
12
12
K2
13
L1
2.BATTERY STATUS LED’S (See J)
NOTE: Battery Status LED’s are not active in
charging mode. The Status LED’s will indicate the
battery condition when the button on the battery
is pressed.
The LED’s constantly senses and displays the battery
condition as follows:
Press the button “POWERTEST”, the light button is
illuminated.
When the three green lights are illuminated, the battery
is in a highly charged condition.
) are illuminated, the battery is in
When two lights (
a moderately charged condition.
When only one green light ( ) is illuminated, the
battery charge is depleted.
Before using your new mower for the first time, it is
recommended that the unit be charged overnight to
ensure that the battery is fully charged.
IMPORTANT
When only one light is illuminated, your battery
is overly discharged, even though the mower
may still be capable of cutting grass. Continuing
to operate your lawnmower with the battery in
this discharged condition may reduce the life and
performance of your battery.
3. REMOVING MULCH INSERT (See K1)
To remove the mulching insert so that you can bag the
grass or discharge with the optional discharge chute,
follow the steps listed below:
1) Shut the mower off, wait until the blade stops and
remove the safety key.
2) Raise the safety guard and hold it up.
3) Grasp the middle of the insert, lift and pull out the
mulching insert completely.
4) The safety guard is spring loaded. When you release
it, the guard will return to the closed position.
4. INSTALLING MULCH INSERT (See K2)
1) Turn the mower off, wait until the blade stops and
remove the safety key.
2) Raise the safety guard and hold it up.
3) Slide the mulching insert into the discharge opening
until it is firmly in contact with the deck.
4) Release safety guard and ensure it is properly
closed.
5. SIDE-DISCHARGE COVER (See L1 & L2)
Using the mulching insert and side-discharge insert, the
grass can be discharged from the side- discharge of the
3 in 1 Cordless lawn mower
WG780E
machine.
To assemble the side-discharge, raise the sidedischarge cover and hold it up, position the sidedischarge onto the hooks, then release the cover to lock
the side-discharge into position.
6. MOWING TIPS
NOTE: Always inspect area where mower is to be
used and remove all stones, sticks, wire, metal
and other debris which might be thrown by the
rotating blade.
1) Mow across the face of slopes, never up-and-down.
Exercise extreme caution when changing direction
on slopes. Do not mow excessively steep slopes.
Always maintain good footing.
2) Release switch lever to turn mower “OFF” when
crossing any graveled area (stones can be thrown by
the blade).
3) Set mower at highest cutting height when mowing
in rough ground or in tall weeds. Removing too
much grass at one time can cause circuit breaker to
trip, which stops mower.
4) If a grass bag is used during the fast growing
season, the grass may tend to clog up at the
discharge opening. Release switch lever to turn
mower “OFF” and remove the safety key. Remove
the grass bag and shake the grass down to the back
end of the bag. Also clean out any grass or debris
which may be packed around the discharge opening.
Replace the grass bag.
5) If mower should start to vibrate abnormally, release
switch lever to turn mower “OFF” and remove safety
key. Check immediately for cause. Vibration is a
warning of trouble. Do not operate mower until a
service check has been made.
6) Always release switch lever to turn mower
“OFF” and remove safety key when leaving it
unattended even for a short period of time.
L2
13
7. MULCHING MOWING TIPS
While mulching, your new mower is designed to cut
the grass clippings into small pieces and distribute
them back into the lawn. Under normal conditions,
the mulched grass will biodegrade quickly to provide
nutrients to the lawn.
Please review the following recommendations for
optimum mulching performance.
1) Avoid mowing when the grass is wet from rain or
dew. Wet grass may form clumps which interfere
with the mulching action and reduce runtime.
3 in 1 Cordless lawn mower
WG780E
14
The best time to mow grass is in the late afternoon
when the grass is dry and the newly cut area will not
be exposed to direct sunlight.
2) For best mulching performance, set the cutting
height to remove about one third of the grass blade
length, ideally no more than 38mm at one time.
If the lawn is overgrown, it may be necessary to
increase the cut height to reduce the pushing effort
and prevent overloading the motor. For extremely
heavy mulching, it is advisable to first cut at a high
cut height setting, and then re-cut to the final cut
height. Otherwise, make narrower cuts and mow
slowly.
3) For best performance, keep the mower housing free
of built-up grass. From time to time turn off mower
and wait for the blade to come to a complete stop.
Then unplug the safety key and turn mower on its
side. Using an object such as a stick, wipe out any
accumulation of grass in the blade area. Be careful
of the sharp edges of the blade. Clean often in wet,
new grass, and always after every use.
4) Certain types of grass or grass conditions may
require that an area be mulched a second time to
fully disperse the grass throughout the lawn.
If cutting a second time, it is advisable to cut
perpendicular (across) the first cut pattern. DO NOT
CHANGE CUT PATTERN IN ANY WAY
THAT WOULD CAUSE MOWING DOWN A HILL.
5) Change your cutting pattern from week to week. This
will help prevent matting and graining of the lawn.
MAINTENANCE
WARNING: Stop the mower and remove the
safety key before removing the grass bag.
NOTE: To ensure long and reliable service, perform the
following maintenance procedures regularly. Check
for obvious defects such as a loose, dislodged or a
damaged blade, loose fittings, and worn or damaged
components. Check that the covers and guards are
all undamaged and are correctly attached to mower.
Carry out any necessary maintenance or repairs before
operating mower. If the mower should happen to fail
despite regular maintenance, please call our customer
helpline for advice.
BLADE SHARPENING
KEEP BLADE SHARP FOR BEST MOWER
PERFORMANCE. A DULL BLADE DOES NOT CUT
GRASS CLEANLY OR MULCH PROPERLY.
3 in 1 Cordless lawn mower
WG780E
WEAR PROPER EYE PROTECTION WHILE REMOVING,
SHARPENING, AND INSTALLING BLADE. ENSURE
THAT SAFETY KEY IS REMOVED.
Sharpening the blade twice during a mowing season
is usually sufficient under normal circumstances. Sand
causes the blade to dull quickly. If your lawn has sandy
soil, more frequent sharpening may be required.
REPLACE BENT OR DAMAGED BLADE IMMEDIATELY.
WHEN SHARPENING THE BLADE:
1. Make sure blade remains balanced.
2. Sharpen blade at the original cutting angle.
3. Sharpen cutting edges on both ends of blade,
removing equal amounts of material from both
ends.
TO SHARPEN BLADE IN A VISE (See M)
1. Be sure the switch lever is released, the blade
has stopped and the safety key removed before
removing the blade.
2. Remove blade from mower. See instructions for
removing and attaching blade.
3. Secure blade M-1 in a vise M-2.
4. Wear safety glasses and be careful not to cut
yourself.
5. Carefully file the cutting edges of the blade with a
fine tooth file M-3 or sharpening stone.
6. Check balance of blade. See instructions for blade
balancing.
7. Replace blade on mower and tighten securely. Refer
to instructions below.
BLADE BALANCING (See N)
Check balance of blade by placing center hole in blade
N-1 over a nail or screwdriver shank N-2, clamped
horizontally in a vise N-3. If either
end of the blade rotates downward, file that end. Blade
is properly balanced when neither end drops.
BLADE MAINTENANCE (See O & P)
Renew your metal blade after 50 hours mowing or 2
years, which ever is the sooner-regardless of condition.
Follow these procedures to remove and replace the
blade. You will need garden gloves (not provided) and
a spanner wrench (not provided) to remove the blade.
Hold the blade (P-2) and unscrew the blade nut (P-5)
counterclockwise using a spanner wrench. Remove
blade nut (P-5), square washer (P-4), insulator washer
(P-3), and blade (P-2).
To re-assemble, first position the blade with the cutting
M-1
M-2
M-3
M
N-1
N-2
N-3
N
15
O
P-0
P-2
P-4
P-1
P-3
P-5
P
3 in 1 Cordless lawn mower
WG780E
edges towards the ground. Assemble the components.
Ensure that the edges of the insulator washer hook
over the edge of the blade. Align the flats on the square
washer (P-4) with the flats on the shaft.
Then securely tighten the blade nut.
NOTE: If the blade and insulator washer (P-3) are
cracked or damaged, replace with new ones.
STORAGE (See Q)
Q
Stop the mower and always remove the safety key.
Clean the exterior of the machine thoroughly using
a soft brush and cloth. Do not use water, solvents or
polishes. Remove all grass and debris, especially from
the ventilation slots.
Turn the machine on its side and clean the blade area. If
grass cuttings are compacted in the blade area, remove
with a wooden or plastic implement.
Store the machine in a dry place. Do not place other
objects on top of the machine.
To aid storage, press the handle height adjustment
knob, and rotate or fold the upper handle.
16
3 in 1 Cordless lawn mower
WG780E
Copyright © 2010, Positec. All Rights Reserved.