1
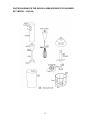
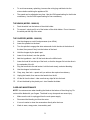
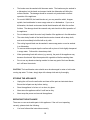
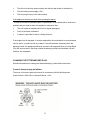
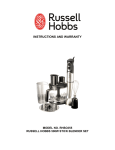
INSTRUCTIONS AND WARRANTY MODEL NO. 18970-56/ 18980-56 DESIRE HAND BLENDER/ HAND BLENDER SET INTRODUCTION Thank you for purchasing the Russell Hobbs Desire Hand Blender/ Hand Blender Set. Each unit has been manufactured to ensure safety, reliability and ease of use. Before use, please read the instructions carefully and keep it for future reference. Should you pass the unit on, please ensure that you also pass the Instruction Manual on. NOTE: USE EXTREME CARE WHEN HANDLING THE BLADE; DO NOT TOUCH THE BLADE WITH YOUR FINGER. THE BLADE IS SHARP AND CAN CAUSE INJURY. FEATURES OF THE RUSSELL HOBBS DESIRE HAND BLENDER Model: 18970-56 Hand Blender perfect for soups, sauces, purees and lots more Choice of 2 speeds, 400W at maximum load Detachable stainless steel mixing leg for easy cleaning Stainless steel blade 0.5 litre capacity beaker included Stylish matt black finish with red accents FEATURES OF THE RUSSELL HOBBS DESIRE HAND BLENDER SET Model: 18980-56 3-in-1 hand blender perfect for blending, chopping, whisking and lots more Choice of 2 speeds, 400W at maximum load Detachable stainless steel mixing leg for easy cleaning Stainless steel blade 0.5 litre capacity beaker, chopper and balloon whisk included Stylish matt black finish with red accents IMPORTANT SAFEGUARDS When using your Russell Hobbs Hand Blender, basic safety precautions should always be followed including the following: 2 CAUTION: Please use your hand blender for no longer than 3-minutes at a time. For model 18980-56, the stick blender set, don’t use the whisk for more than 5-minutes or the chopper for more than 30 seconds. Once using the unit for the max recommended amount of time, switch your hand blender off for 3-minutes to let the motor cool and avoid possible damage. We suggest these usage times to help keep your product working for years to come. 1. Please read the instructions carefully before using any appliance. 2. Always ensure that the voltage on the rating label corresponds to the mains voltage in your home. 3. Incorrect operation and improper use can damage the appliance and cause injury to the user. 4. The appliance is intended for household use only. Commercial use invalids the warranty and the supplier cannot be held responsible for injury or damage caused when using the appliance for any other purpose than that intended. 5. Avoid any contact with moving parts. 6. The blade on the mixing leg is sharp and rotates at a high speed. To avoid serious injury: 7. Don’t switch the unit on until the blade is inside the container. Switch off before lifting the blade from the container. Don’t touch the blade – even when cleaning. Don’t plug in till just before use. Unplug immediately after use. Don’t leave the appliance unattended while plugged in. When using the mixing leg in hot liquids, don’t let the blade break the surface at an angle, in case you spray liquid outside of the container. 8. When using the mixing leg in hot oil – splashes can cause a nasty burn. 9. Don’t try to chip ice or chop raw meat. 10. Rotate the cable so it doesn’t overhang, and can’t be tripped over or caught. 11. Take great care when handling the chopper (model: 18980-56). 12. Close supervision is required when any appliance is used near or by children or invalids. 13. Check the power cord and plug regularly for any damage. If the cord or the plug is damaged, it must be replaced by the manufacturer or a qualified person in order to avoid an electrical hazard. 3 14. Do not use the appliance if it has been dropped or damaged in any way. In case of damage, take the unit in for examination and/or repair by an authorised service agent. 15. To reduce the risk of electric shock, do not immerse or expose the motor assembly, plug or the power cord to water or any other liquid. 16. Never immerse the unit in water or any other liquid for cleaning purposes. 17. Remove the plug from the socket by gripping the plug. Do not pull on the cord to disconnect the appliance from the mains. Always unplug the unit when not in use, before cleaning or when adding or removing parts. 18. The use of accessory attachments that are not recommended or supplied by the manufacturer may result in injuries, fire or electric shock. 19. A short cord is provided to reduce the hazards resulting from becoming entangled in or tripping over a longer cord. 20. Do not let the cord hang over the edge of a table or counter. Ensure that the cord is not in a position where it can be pulled on inadvertently. 21. Do not allow the cord to touch hot surfaces and do not place on or near a hot gas or electric burner or in a heated oven. 22. Do not use the appliance on a gas or electric cooking top or over or near an open flame. 23. Use of an extension cord with this appliance is not recommended. However, if it is necessary to use an extension lead, ensure that the lead is suited to the power consumption of the appliance to avoid overheating of the extension cord, appliance or plug point. Do not place the extension cord in a position where it can be pulled on by children or animals or tripped over. 24. This appliance is not suitable for outdoor use. Do not use this appliance for anything other than its intended use. 25. DO NOT carry the appliance by the power cord. 26. Do not leave this appliance unattended during use. Always unplug the unit when not in use or before cleaning. 27. Always operate the appliance on a smooth, even, stable surface. Do not place the unit on a hot surface. 28. Ensure that the switch is in the “Off” position after each use. 29. The manufacturer does not accept responsibility for any damage or injury caused by improper or incorrect use, or for repairs carried out by unauthorised personnel. 30. In case of technical problems, switch off the machine and do not attempt to repair it yourself. Return the appliance to an authorised service facility for examination, 4 adjustment or repair. Always insist on the use of original spare parts. Failure to comply with the above mentioned pre-cautions and instructions, could affect the safe operation of this machine. 31. This appliance is not intended for use by persons (including children) with reduced physical, sensory or mental capabilities, or lack of experience and knowledge, unless they have been given supervision or instruction concerning use of the appliance by a person responsible for their safety. 32. Children should be supervised to ensure that they do not play with the appliance. PARTS DIAGRAM FOR THE RUSSELL HOBBS DESIRE STICK BLENDER (MODEL: 18970-56) 5 PARTS DIAGRAM FOR THE RUSSELL HOBBS DESIRE STICK BLENDER SET (MODEL: 18980-56) 6 FITTING OR REMOVING ATTACHMENTS 1. Unplug the appliance before fitting or removing the mixing leg. 2. To fit the mixing leg, push it on to the end of the handle, and turn it clockwise to lock it in place. 3. To remove the mixing leg, turn it anti-clockwise, then pull it off the handle. ATTACHMENTS THE MIXING LEG 1. Generally, the mixing leg can do anything a normal blender can do, but faster, and with less washing up – blend, pulp or purée ingredients in the pan or bowl you’re going to cook them in. Remember that this blender is an immersion type blender, therefore all use must be whilst the blade part of the mixing leg is immersed or pressed into the ingredients (inside the container) in which you wish to blend. 2. Whatever container you use, make sure it’s on a stable, flat surface, and support it with your free hand, to prevent it moving. 3. Avoid spraying/splashing: a) hold the mixing leg straight b) don’t switch on till it’s inside the food container c) switch off before lifting it out of the container d) with liquids, switch on and off with the blade under the surface THE BEAKER 1. Don’t fill the beaker more than about half full. 2. Sit it on a stable, flat surface, and support it with your free hand. 3. Don’t lift it off the work surface and hold it in your hand – if it slips, you’ll hurt yourself. OPERATING INSTRUCTIONS 1. Carefully unpack your hand blender and take off any protective wrappings. 2. Clean the mixing leg and blade before using it for the first time with a moist cloth or rinse under the tap. Make sure the unit is unplugged before doing this. 7 3. Fit the mixing leg to the motor body as explained in the FITTING OR REMOVING ATTACHMENTS section. 4. Ensure the hand blender is unplugged or switched off at the wall socket. 5. Put the ingredients into a mixing bowl, beaker or a different durable bowl, which is sufficiently tall and wide enough to avoid splashing. 6. Plug the unit into the mains power supply. 7. Dip the mixing leg and blade as deep as possible into the mixture. NOTE: When choosing not to use the beaker, ensure that the blender is not immersed beyond the point where the mixing leg and blade join with the motor body. 8. Press the top button (1) for low speed, release to switch off. 9. Press the bottom button (2) for high speed, release to switch off. 10. Use low speed for lighter applications (e.g. using mainly liquid ingredients), and high speed for heavier applications (e.g. using mainly solid ingredients). We recommend first starting on a low speed and increasing the speed as needed, depending on the desired consistency of the food being processed. 11. Work the hand blender through the ingredients with a gentle circular movement and up and down movement. NOTE: Do not operate the hand blender before inserting it into the food being mixed. Don’t run the motor for more than 3 minutes, if you have used it for 3 minutes leave it for 3 minutes to cool down before using it again. 12. When you have finished using your hand blender, unplug the appliance and remove the mixing leg and blade by holding the motor body and turning the mixing leg and blade in an anti-clock wise direction. 13. Clean the unit and the attachments thoroughly. NEVER USE YOUR APPLIANCE IN A BOWL OR SAUCEPAN WHILE COOKING. SUGGESTIONS FOR USE Move the mixing leg and blade gently around the mixture to ensure uniform results. If you want to clean the sides and base of the beaker/container with a hand-held utensil, first switch the machine OFF (by switching it off at the wall socket). 8 To avoid unnecessary splashing, immerse the mixing leg and blade into the mixture before switching the appliance ON. The speed can be adjusted at any time. Use the LOW speed setting for the thicker consistency. Use the HIGH speed setting for finer consistency. THE WHISK (MODEL 18980-56) 1. Push the whisk into the bottom of the whisk holder. 2. To remove it, simply pull it out of the bottom of the whisk holder. Do not immerse the whisk past the top of the wires. THE CHOPPER (MODEL 18980-56) 1. Use the chopper as a mini-food processor (max 450ml). 2. Lower the spindle into the bowl. 3. Turn the spindle to engage the slots underneath it with the tabs in the bottom of the bowl, then press it firmly into the bottom of the bowl. 4. Hold the chopper by the plastic part. 5. Lower it into the bowl, over the spindle. 6. Add the ingredients – don’t fill the bowl above the 450ml mark. 7. Lower the bowl lid into the top of the bowl, so that the chopper fits into the drive in the underside of the lid. 8. Plug the handle into the wall socket, hold the bowl steady, and start blending. 9. Use the chopper in short bursts. 10. Chop, stop, then look – repeat until you achieve the required consistency. 11. Unplug the handle, then remove the handle from the lid. 12. Lift the lid from the bowl – take care that any drips fall into the bowl. 13. Lift out the blade by the plastic part – don’t handle the blade. CARE AND MAINTENANCE NOTE: Use extreme care when handling the blade at the bottom of the mixing leg. Do not touch the blade with your fingers. The blade is very sharp and can cause injury. Make sure the unit is unplugged from the main power supply. Disconnect the blending tool from the motor. It is much easier to clean the accessories directly after their use. Wash in warm, soapy water, rinse and dry well. 9 The beaker must be washed with lukewarm water. The beaker may be washed in a dishwasher, but the harsh environment inside the dishwasher will affect the surface finishes. The damage should be cosmetic only and should not affect operation of the appliance. For model 18980-56, the hand blender set, you may wash the whisk, chopper, spindle, bowl and beaker in warm soapy water or in a dishwasher. If you use a dishwasher, the harsh environment inside the dishwasher will affect the surface finishes. The damage should be cosmetic only and should not affect operation of the appliance. Do not attempt to wash the motor body/ handle of the appliance in the dishwasher. The motor body/ handle of the hand blender can be cleaned with a damp cloth, and must immediately be buffed with a dry cloth. The mixing leg and blade can be washed in warm soapy water or can be washed in a dishwasher. To remove stubborn spots wipe the surface with a piece of cloth slightly dampened in soapy water. Follow with a clean damp cloth. When processing foods with colour (e.g. carrots), the parts of the appliance may become discoloured. Wipe these parts with vegetable oil before washing them. Do not use any abrasive cleaning material to clean any part of the hand blender, as it will harm the exterior. CAUTION: The hand blender motor should never be submerged in water or held under running tap water. To clean, simply wipe with a damp cloth and dry thoroughly. STORING THE APPLIANCE Unplug the unit from the wall outlet and clean all the parts as instructed above. Ensure that all parts are dry before storing. Store the appliance in its box or in a clean, dry place. Never store the appliance while it is still wet or dirty. Never wrap the power cord around the appliance. SERVICING THE APPLIANCE There are no user serviceable parts in this appliance. If the unit is not operating correctly, please check the following: You have followed the instructions correctly 10 That the unit has been wired correctly and that the wall socket is switched on. That the mains power supply is ON. That the plug is firmly in the mains socket. If the appliance still does not work after checking the above: - Consult the retailer for possible repair or replacement. If the retailer fails to resolve the problem and you need to return the appliance, make sure that: The unit is packed carefully back into its original packaging. Proof of purchase is attached. A reason is provided for why it is being returned. If the supply cord is damaged, it must be replaced by the manufacturer or an authorised service agent, in order to avoid any hazard. If service becomes necessary within the warranty period, the appliance should be returned to an approved Home of Living Brand (Pty) Ltd service centre. Servicing outside the warranty period is still available, but will, however, be chargeable. CHANGING THE FITTED/MOLDED PLUG Should the need arise to change the fitted/molded plug, follow these instructions: Connect three-pin plug as follows: The wires in this mains lead are coloured in accordance with the following code: Green/Yellow = Earth, Blue = Neutral & Brown = Live 11 RECIPES STRAWBERRY SHAKE (makes one shake) ½ Cup vanilla ice cream ½ Cup milk ½ Cup fresh strawberries (Other type of fruit can be used such as: peaches, pineapple, banana) 1 ½ Tablespoons powdered sugar Attach the mixing leg to the motor body. Place ingredients into the mixing bowl. Blend on the HIGH speed for 25-30 seconds. MAYONNAISE 200-250 ml oil 1 egg (yolk and white) 1 tbsp. lemon juice or vinegar Salt and pepper to taste Put all ingredients into the beaker according to the above-mentioned order. Introduce the hand blender to the base of the beaker. Pressing the On/Off switch, keep the hand blender in this position until the oil emulsifies. Then, without switching off, slowly move it up and down until the mayonnaise is well combined. BUTTERNUT SQUASH & APPLE SOUP WITH CHESTNUTS (serves 6) To speed preparation, this recipe calls for prepared butternut squash puree. A garnish of lightly sweetened whipped cream and chopped roasted chestnuts adds richness and texture to the soup. 2 Tbs. unsalted butter 1 yellow onion, thinly sliced 2 Golden Delicious apples, peeled, cored and thinly sliced 1 jar (32 oz.) butternut squash puree 2 1/2 to 3 cups chicken stock 1 large bay leaf 2 tsp. salt, plus more, to taste 1/2 cup heavy cream Freshly ground pepper, to taste 1/2 cup heavy cream, whipped until just thickened (optional) 12 fresh chestnuts, roasted, peeled and roughly chopped 12 In a small stockpot over medium heat, melt the butter. Add the onion and apples and cook, stirring occasionally, until softened, about 10 minutes. Stir in the butternut squash puree, 2 1/2 cups of the stock, the bay leaf and the 2 tsp. salt. Bring to a simmer, reduce the heat to medium-low and cook, stirring occasionally, about 30 minutes. Remove the bay leaf and discard. Using the hand blender, puree the soup in the pot until smooth. Pour through a finemesh sieve set over a clean stockpot. Stir in the cream and add more stock to reach the desired consistency. Season with salt and pepper. Reheat the soup gently to serving temperature. Ladle the soup into warmed bowls. Garnish each serving with a swirl of whipped cream and sprinkle with chestnuts. Serve immediately. BUTTERNUT SQUASH SOUP WITH HAZELNUT AND CREAM (serves 4) Be sure to toast and skin the hazelnuts before adding them to the cream. Toasting brings out the rich flavour of the nuts and loosens the skins, which can taste bitter. Place the nuts in a dry fry pan over medium heat and toast, shaking the pan or stirring occasionally, until the nuts are fragrant, 10 to 15 minutes. Or spread the nuts in a single layer on a baking sheet and toast in a 325°F oven, stirring occasionally, for 10 to 15 minutes. While the nuts are still warm, wrap them in a kitchen towel and rub vigorously to remove the skins. It’s OK if a few bits of skin still cling to the nuts. 1/3 cup heavy cream 2 Tbs. finely chopped toasted hazelnuts Salt and freshly ground pepper, to taste 2 Tbs. unsalted butter 1 yellow onion, chopped 2 cups unsalted chicken stock, warmed, plus more as needed 1 jar (17 oz.) butternut squash puree Freshly grated nutmeg, to taste In a saucepan over medium heat, warm the cream until steam starts to rise. Remove from the heat, add the hazelnuts and let cool. Season with salt and pepper. Refrigerate for 1 hour. In a soup pot over medium heat, melt the butter. Add the onion and sauté, stirring occasionally, until tender and translucent, 4 to 6 minutes. Add the 2 cups stock and the squash puree and bring to a simmer, stirring, then reduce the heat to medium-low. Cook, stirring, for 12 to 15 minutes. Using the Hand blender puree the soup, adding more stock if the soup is too thick. Season with salt, pepper and nutmeg. Whisk the hazelnut cream until lightly foamy. Ladle the soup into warmed bowls and top each serving with the hazelnut cream. 13 ASPARAGUS SOUP (serves 4) For an ultra smooth soup, strain it through a fine sieve, or a conical strainer that is a favourite in restaurant kitchens. A pestle is used to push the food through the fine-mesh perforations of the sieve. 1 1/2lb. asparagus 4 Tbs. (1/2 stick) plus 2 tsp. unsalted butter 1 yellow onion, diced 3 garlic cloves, minced 1/4 cup dry vermouth 3 cups chicken stock, plus more as needed Salt and freshly ground pepper, to taste 3/4 cup heavy cream Snap off the tough stem ends from the asparagus spears. Cut the tips off 8 of the spears into 2-inch lengths. Set the tips aside. Chop the remaining asparagus into 1-inch pieces. In a heavy soup pot over medium heat, melt the 4 Tbs. (1.2 stick) butter. Add the onion and garlic and sauté, stirring occasionally, until tender and translucent, 3 to 4 minutes. Add the vermouth and cook until most of the liquid has evaporated. Add the chopped asparagus and the 3 cups stock. Season with salt and pepper. Bring to a simmer, then reduce the heat to medium-low. Cover and cook until the asparagus is tender, about 20 minutes. Using the hand blender, puree the soup until smooth, about 2 minutes. Pass the soup through a fine sieve into a clean saucepan. Stir in the cream plus more stock if needed to reach the desired consistency. Season with salt and pepper. Set the pan over low heat and reheat the soup to serving temperature. In a small sauté pan over medium heat, melt the 2 tsp. butter. Add the reserved asparagus tips and cook until just tender, about 2 minutes. Ladle the soup into warmed bowls, garnish with the asparagus tips and serve immediately. 14 PLEASE AFFIX YOUR PROOF OF PURCHASE/RECEIPT HERE IN THE EVENT OF A CLAIM UNDER WARRANTY THIS RECEIPT MUST BE PRODUCED. WARRANTY 1. Home of Living Brand (Pty) Limited warrants to the original purchaser of this product (“the customer”) that this product will be free of defects in quality and workmanship which under normal personal, family or household use and purpose may manifest within a period of 1 (one) year from the date of purchase (“warranty period”). 2. Where the customer has purchased a product and it breaks, is defective or does not work properly for the intended purpose, the customer must notify the supplier from whom the customer bought the product (“the supplier”) thereof within the warranty period. Any claim in terms of this warranty must be supported by a proof of purchase. If proof of purchase is not available, then repair, and/or service charges may be payable by the customer to the supplier. 3. The faulty product must be taken to the supplier's service centre to exercise the warranty. 4. The supplier will refund, repair or exchange the product in terms of this warranty subject to legislative requirements. This warranty shall be valid only where the customer has not broken the product himself, or used the product for something that it is not supposed to be used for. The warranty does not include and will not be construed to cover products damaged as a result of disaster, misuse, tamper, abuse or any unauthorised modification or repair of the product. 5. This warranty will extend only to the product provided at the date of the purchase and not to any expendables attached or installed by the customer. 6. If the customer requests that the supplier repairs the product and the product breaks or fails to work properly within 3 (three) months of the repair and not as a result of misuse, tampering or modification by or on behalf of the customer, then the supplier may replace the product or pay a refund to the customer. 7. The customer may be responsible for certain costs where products returned are not in the original packaging, or if the packaging is damaged. This will be deducted from any refund paid to the customer. HOME OF LIVING BRANDS (PTY) LTD (JOHANNESBURG) JOHANNESBURG CAPE TOWN DURBAN TEL NO. (011) 490-9600 TEL NO. (021) 552-5161 TEL NO. (031) 792-6000 www.homeoflivingbrands.co.za www.russellhobbs.co.za www.facebook.com/RussellHobbsSA 15