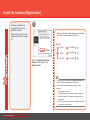
1
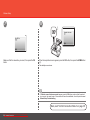
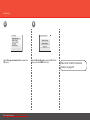
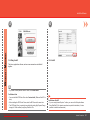
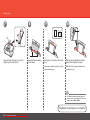
Photo All-In-One
series
Getting Started
Read Me First
Downloaded
Make
sure tofrom
readManualsPrinter.com
this manual beforeManuals
using the machine. Please keep it in hand for future reference.
■ Sym b o l s U s e d i n T h i s D o c u ment
Instructions including important information. Be sure to read these indications.
Instructions as notes for operation or additional explanations.
Descriptions for operations that take some time to complete.
Indicates operations in Windows.
Indicates operations in Macintosh.
• Microsoft is a registered trademark of Microsoft Corporation.
• Windows is a trademark or registered trademark of Microsoft Corporation in the U.S. and/or other countries.
• Windows Vista is a trademark or registered trademark of Microsoft Corporation in the U.S. and/or other countries.
• Internet Explorer is a trademark or registered trademark of Microsoft Corporation in the U.S. and/or other countries.
• Macintosh, Mac, and AirPort are trademarks of Apple Inc., registered in the U.S. and other countries.
• Bonjour is a trademark of Apple Inc., registered in the U.S. and other countries.
• Adobe, Adobe Photoshop, Adobe Photoshop Elements, Adobe RGB and Adobe RGB (1998) are either registered trademarks or trademarks of Adobe Systems Incorporated in the United
States and/or other countries.
Model Number: K10345 (MP990)
Downloaded from ManualsPrinter.com Manuals
Contents
Prepa r a t i o n .. . . . . . . . . . . . . . . . . . . . . . . . . .............. 2
Preparation ...................................................................
Connection Types . ...................................................
Check the Included Items .........................................
Choosing a Location . ...............................................
Unlock the Scanning Unit (Cover) ............................
2
2
3
4
4
Hard w a r e S e t u p . . . . . . . . . . . . . . . . . . . .............. 5
Turn the Power On ....................................................... 5
Install the Print Head .................................................... 6
Install the Ink Tanks ...................................................... 9
Align the Print Head ..................................................... 12
Selec t C o n n e c t i o n M e t h o d .. . . . .............. 14
Select Connection Method ........................................... 14
USB C o n n e c t i o n .. . . . . . . . . . . . . . . . . . .............. 15
Install the Software ....................................................... 15
Network Connection ............................ 21
Select Connection Type ...............................................
Notes on Network Connection . ................................
Wireless Setup .............................................................
Check the Information for Wireless Connection .......
Wireless Setup Using WPS (Wi-Fi Protected Setup) ...
Wired Setup . ................................................................
Confirm Connection Status ..........................................
Install the Software .......................................................
Install the Software (Registration) ................................
Install the Software (Information) .................................
21
21
23
23
27
30
33
35
42
46
After Installing the Machine ................. 48
Loading Paper ..............................................................
Introduction of Manuals ................................................
Solution Menu ..............................................................
Try Using the Machine . ................................................
Print Photos from a Memory Card ................................
Try Copying ..................................................................
Print Photos from a Computer ......................................
48
51
52
53
54
57
58
Reference Information . ....................... 59
Wireless Setup Using WCN
(Windows Connect Now) .............................................. 59
Downloaded from ManualsPrinter.com Manuals
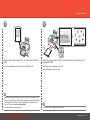
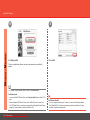
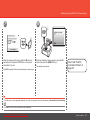
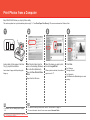
Preparation
Preparation
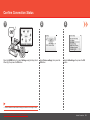
■ Co n n e c t i o n Ty p e s
USB Connection
Network Connection
Wireless
Connection
USB cable
A USB cable is required.
Downloaded
from ManualsPrinter.com Manuals
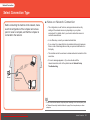
Preparation
Access point or
wireless router
An access point or router that supports IEEE802.11b/g is
required.
Wired
Connection
Router, etc.
Ethernet cable
A network device (router, etc.) and Ethernet cable are
required.
Preparation
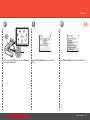
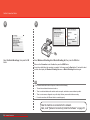
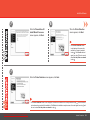
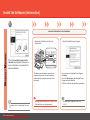
■ Ch e c k t h e I n c l u d e d I t e m s
Before turning on the machine, remove all orange tape and protective sheets from the inside and outside of the machine.
The Print Head is placed inside of the Paper Output Tray (A).
Open the Paper Output Tray and take it out.
Print Head
A
6 ink tanks
(M, BK, GY, PGBK, C, Y)
•
•
•
•
Manuals
Setup CD-ROM (containing the drivers, applications and on-screen manuals)
Matte Photo Paper MP-101 (for Automatic Print Head Alignment)
Warranty
Downloaded from ManualsPrinter.com Manuals
power cord
• A USB cable is necessary to connect the machine with your
computer (USB connection only).
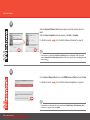
Preparation
Preparation
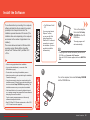
■ Ch o o s i n g a L o c a t i o n
■ Unlock the Scanning Unit (Cover)
B
C
1
2
3
• Do not install the machine where an object may fall on it. The object may fall inside
the machine, resulting in malfunction.
• Do not place any object on top of the machine. It may fall into the machine when
opening covers, resulting in malfunction.
Downloaded
from ManualsPrinter.com Manuals
Preparation
Open the Document Cover (B).
Move the Scanner Lock Switch (C) towards the release mark to
unlock the Scanning Unit (Cover).
Close the Document Cover.
Make sure that the Document Cover is closed and go to the next step.
Hardware Setup
Turn the Power On
4
3
2
1
C
D
B
A
E
F
Plug the power cord into the back
left of the machine, then connect
the other end to the wall outlet.
Open the Operation Unit (B) and
press the ON button (C) to turn on the
machine.
Use the { or } button (D) on the Operation
Panel to select the language for the LCD (E),
then press the OK button.
• The machine may make some operating
noises. This is normal operation.
• If an unintended language is displayed on the LCD, press the Back button (F) to return to
the Language selection screen.
When the above
screen is displayed,
press the OK button
and go to the next
step.
• Do NOT connect the USB cable or
Ethernet cable at this stage.
• Make sure that the Document Cover
(A) is closed.
Downloaded from ManualsPrinter.com Manuals
Hardware Setup
Install the Print Head
2
1
C
B
C
A
Open the Paper Output Tray (A), then lift the Scanning Unit (Cover) (B)
until it stops.
Close the Document Cover (C) and lift it with the Scanning Unit (Cover).
• Handle the Print Head carefully. Do not
drop or apply excessive pressure to it.
• The Print Head Holder makes a noise as it moves. This is normal operation.
• If the Print Head Holder does not move, make sure that the machine is turned on.
Downloaded
from ManualsPrinter.com Manuals
Hardware Setup
D
Make sure that the Print Head Holder
(D) moves to the installation position.
Install the Print Head
3
4
E
5
F
G
H
Firmly raise the Print Head Lock Lever (E) of the Print Head Holder until it
stops.
Remove the Print Head from the
silver package.
Remove the orange protective cap.
• Do not touch the inside (G) or metal parts (H) of the Print Head. The machine may not print
properly if you touch them.
• Do not touch the inside of the Print Head Holder (F). The machine may not print
properly if you touch it.
Downloaded from ManualsPrinter.com Manuals
• There may be some transparent or light blue ink on the inside of the bag the Print Head
comes in, or the inside of the protective cap - this has no effect on print quality. Be careful not
to get ink on yourself when handling these items.
Hardware Setup
Install the Print Head
6
Tilt the Print Head forward and set it in place as shown.
• Do not knock the Print Head against the sides of the holder.
• Install in a well-lit environment.
Downloaded
from ManualsPrinter.com Manuals
Hardware Setup
7
Lower the Print Head Lock Lever
completely.
• Hold the Print Head Lock Lever firmly and
lower it gently.
• Once you have installed the Print Head, do
not remove it unnecessarily.
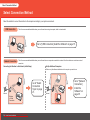
Install the Ink Tanks
2
1
A
C
B
1
2
Pull the orange tape (1) in the direction of the
arrow to peel off the protective film and remove
the film (2) completely.
While pressing down with your left thumb, twist off
the orange protective cap (A) located on the bottom
of the ink tank.
• Handle the ink tanks carefully. Do not drop or
apply excessive pressure to them.
• If the Scanning Unit (Cover) is left open for more
than 10 minutes, the Print Head Holder moves
to the right. In this case, close and reopen the
Scanning Unit (Cover).
• Be sure to use the supplied ink tanks.
• Do not touch the electrical contacts (B) or open ink port (C)
on the ink tank. The machine may not print properly if you
touch them.
• Do not push the sides of the ink tank; ink may splash.
Downloaded from ManualsPrinter.com Manuals
Hardware Setup
Install the Ink Tanks
3
Tilt the ink tank, then insert it under the label and against the back end of the
slot.
Make sure that the color of the label matches the ink tank.
• Install in a well-lit environment.
Downloaded
from ManualsPrinter.com Manuals
Hardware Setup
10
4
Press the PUSH mark on the ink tank firmly until it clicks.
When the installation is completed properly, the Ink lamp lights red.
Install the Ink Tanks
5
6
E
D
Install all the other ink tanks in the same way.
Close the Scanning Unit (Cover) (D).
Install all the ink tanks.
Make sure all the Ink lamps light red.
Make sure the Inner Cover (E) is closed.
• Once you have installed the ink tanks, do not remove them
unnecessarily.
Downloaded from ManualsPrinter.com Manuals
• Wait until the LCD changes as shown in the illustration (about 5 minutes) and go to the next step.
• The machine may make some operating noises when preparing to print. This is normal operation.
• For your safety, always hold the Scanning Unit (Cover) with both hands when closing it.
• If an error message is displayed on the LCD, make sure that the Print Head and the ink tanks are correctly installed.
Hardware Setup
11
Align the Print Head
2
1
A
B
C
Align the Print Head for better print results.
Load a sheet of supplied specialty paper (Matte
Photo Paper MP-101) in the Rear Tray (A) by
to
in "Loading Paper"
referring to steps
on page 50.
This takes about 5 minutes.
Use a sheet of supplied specialty paper (Matte
Photo Paper MP-101) for alignment.
Confirm the message on the LCD and press the OK
button.
Extend the Output Tray Extension (C).
• Print Head Alignment takes about 5 minutes to
complete.
Wait until the pattern is printed, then go to the next
step.
• Be sure to use MP-101 for Automatic Print Head
Alignment.
• MP-101 cannot be fed from the Cassette. Load it in
the Rear Tray.
• MP-101 has front and back sides. Load it so that the
cut corner (B) is at the top right.
Downloaded
from ManualsPrinter.com Manuals
Hardware Setup
12
• For details on media sizes and types you can use, refer to
"Loading Paper" in the on-screen manual: Basic Guide.
Align the Print Head
4
3
E
D
Make sure that a pattern similar to the one shown in the illustration is
printed.
Confirm the message on the LCD, then load plain paper into the Cassette (E) and
press the OK button.
Remove the printed paper, then close the Paper Output Tray (D).
The standby screen is displayed on the LCD.
Print Head Alignment is now complete.
• When an error message is displayed on the LCD, press the OK button to clear
the error, then go to the next step. After the installation is complete, perform Print
Head Alignment by referring to "When Printing Becomes Faint or Colors are
Incorrect" in the on-screen manual: Basic Guide.
• The pattern is printed in black and blue.
Downloaded from ManualsPrinter.com Manuals
• For details, refer to "Loading Paper" on page 48.
Hardware Setup
13
Select Connection Method
Select Connection Method
Select the method to connect the machine to the computer according to your system environment.
USB Connection
This is the recommended installation when you use the machine on single computer, which is not networked.
Go to "[USB Connection] Install the Software" on page 15.
Network Connection
This is the recommended installation when you use the machine on a computer connected to a network. Use the machine over a wireless or wired
connection.
Set Up Additional Computers
Connecting the Machine to the Network (Initial Setup)
Perform only the software installation on the computer you want to use.
Go to "Select
Connection
Type" on page
21.
Internet
Wireless
or Wired
Connection
Downloaded
from ManualsPrinter.com Manuals
Select Connection Method
14
Internet
Go to "[Network
Connection]
Install the
Software" on
page 35.
USB Connection
Install the Software
To use the machine by connecting it to a computer, software including the drivers
needs to be copied (installed) to the computer's hard disk. The installation
process takes about 20 minutes. (The installation time varies depending on the
computer environment or the number of applications to be installed.)
□ If the Found New Hardware or Found New
Hardware Wizard dialog box appears:
The screens below are based on Windows Vista operating system Ultimate
Edition (hereafter referred to as "Windows Vista") and Mac OS X v.10.5.x.
For a USB connection, a USB cable is required.
USB cable
• Quit all running applications before installation.
If you connect a USB cable to the machine before
installation of the drivers, this screen appears.
1
• Log on as the administrator (or a member of the Administrators group).
• Do not switch users during the installation process.
• Internet connection may be required during the installation. Connection fees apply.
• It may be necessary to restart your computer during the installation process. Follow the onscreen instructions and do not remove the Setup CD-ROM during restarting. The installation
resumes once your computer has restarted.
• Mac OS 9, Mac OS X Classic environments, or Mac OS X v.10.3.8 or earlier are not
supported.
Downloaded from ManualsPrinter.com Manuals
Remove the USB cable connected to your
computer.
The dialog box may close. In this case, proceed from
2
3
.
Click Cancel to quit the dialog box.
Proceed from
.
USB Connection
15
Install the Software
□ For Windows Vista/
XP
2
1
If you are using Internet
Explorer 7 or later,
you can use the Web
print software EasyWebPrint EX. An internet
connection is required
for installation. (It is also
possible to install this
software later.)
A
TURN OFF THE
MACHINE (A).
The setup program will start
automatically.
• Operating noise continues
for about 30 seconds until
the machine turns off.
Connect the machine to
the computer with a USB
cable.
Make sure the machine is
turned on.
• The USB Port is located on
the right side at the back of
the machine. The lower port
is for USB.
Downloaded
from ManualsPrinter.com Manuals
USB Connection
• If the program does not start automatically, double-click the CD-ROM
icon in Computer or My Computer.
When the CD-ROM contents appear, double-click MSETUP4.EXE.
2
1
16
Turn on the computer, then
insert the Setup CD-ROM into
the CD-ROM drive.
Turn on the computer, then
insert the Setup CD-ROM into
the CD-ROM drive.
Install the Software
3
Windows Vista
Windows XP/2000
Click Run Msetup4.exe on the AutoPlay screen, then click Continue on the User
Account Control dialog box.
If the User Account Control dialog box reappears in following steps, click Continue.
3
Double-click the Setup icon of the CD-ROM folder to proceed to the following screen.
Enter your administrator name and password, then click OK.
If you do not know your administrator name or password, click Help, then follow the on-screen
instructions.
• If the CD-ROM folder does not open automatically, double-click the CD-ROM icon on the desktop.
Downloaded from ManualsPrinter.com Manuals
USB Connection
17
Install the Software
4
Click Easy Install.
5
Click Install.
The drivers, application software, and on-screen manuals are installed all
together.
• If you want to select particular items to install, click Custom Install.
For Windows Vista
• You can install the XPS Printer Driver from Custom Install (Windows Vista SP1 or
later).
• When installing the XPS Printer Driver, select the MP Drivers at the same time.
• The XPS Printer Driver is a printer driver suitable for printing High Dynamic Range
images (full 16-bit workflow) using Easy-PhotoPrint Pro.
Downloaded
from ManualsPrinter.com Manuals
USB Connection
18
For Windows Vista/XP
• If you are using Internet Explorer 7 or later, you can use the Web print software
Easy-WebPrint EX. An internet connection is required for installation. (It is also
possible to install this software later.)
Install the Software
6
Important Information for the Installation
□ Necessary Information for the User
Registration
□ About Extended Survey Program
B
Select Use the printer via USB, then click Next.
Follow any on-screen instructions to proceed with the
software installation.
Downloaded from ManualsPrinter.com Manuals
The product serial number is required when
registering the product. The serial number is
located inside the machine (as shown in the
illustration).
If you can agree to Extended Survey Program,
click Agree.
If you click Do not agree, the Extended Survey
Program will not be installed.
(This has no effect on the machine's functionality.)
• When opening the Scanning Unit (Cover) (B), the
Print Head Holder moves automatically.
• The screen does not appear on Mac OS X
v.10.3.9.
USB Connection
19
Install the Software
7
Click Exit to complete the installation.
If Restart is displayed, follow the instruction to restart the computer.
After restarting the computer, remove the Setup CD-ROM and keep it in a safe place.
When using Macintosh, it is necessary to restart the computer before scanning using
the Operation Panel on the machine for the first time.
Downloaded
from ManualsPrinter.com Manuals
USB Connection
20
Next, read "Loading Paper" on page 48!
Network Connection
Select Connection Type
Before connecting the machine to the network, make
sure that configuration of the computer and access
point or router is complete, and that the computer is
connected to the network.
■ Notes on Network Connection
• The configuration, router functions, setup procedures and security
settings of the network device vary depending on your system
environment. For details, refer to your device's instruction manual or
contact its manufacturer.
• In an office setup, consult your network administrator.
• If you connect to a network that is not protected with security measures,
there is a risk of disclosing data such as your personal information to a
third party.
• The machine cannot be used over a wireless and wired connection at the
same time.
• If an error message appears or if you have trouble with the
network connection, refer to the printed manual: Network Setup
Troubleshooting.
Internet
Access point or
router, etc.
• To use the machine on additional computers (after connecting it to the first computer), refer
to "[Network Connection] Install the Software" on page 35 and complete setup on those
computers.
Downloaded from ManualsPrinter.com Manuals
Network Connection
21
Select Connection Type
Select the method to connect the machine to the network.
Wireless Connection
An "Ad-hoc connection," which
establishes a direct connection to the
computer over a wireless connection
without using an access point, is not
supported.
Be sure to prepare an access point.
Connect to your network
environment over a
wireless connection.
Go to "Wireless Setup" on page 23.
Internet
Access point or
wireless router
Wired Connection
Connect to your network
environment over a wired
connection.
Go to "Wired Setup" on page 30.
Internet
Router, etc.
Downloaded
from ManualsPrinter.com Manuals
Network Connection
22
Wireless Setup
■ Ch e c k t h e I n f o r m a t i o n f o r Wireless Connection
The following information is required to connect to your access point or router.
Check your access point or router for the following information, then write it down.
For details on how to check the following information, refer to the manual of your access point or router,
or contact its manufacturer.
□ If your access point or router
supports WPS (Wi-Fi Protected
Setup):
Access Point Name/Network Name:
* Also referred to as SSID.
An identifier to identify the specific access point.
A wireless connection can be set up easily
without checking the information to the
left. Go to "Wireless Setup Using WPS
(Wi-Fi Protected Setup)" on page 27.
Network Key:
* Also referred to as encryption key, WEP key or WPA/WPA2 passphrase, Pre-Shared key.
A password required to set to prevent unauthorized access to communication.
You can retrieve your network key by using the Canon PIXMA Wireless Setup Assistant or the instructions
which can be downloaded from the Canon support webpage (www.usa.canon.com/downloadlibrary).
If you are unable to retrieve the network key or other settings, refer to the manual of your access point or
router, or contact its manufacturer.
Downloaded from ManualsPrinter.com Manuals
• If you are using Windows Vista operating
system and have a USB flash drive, you
can configure wireless connection settings
by using the WCN (Windows Connect
Now) function as well. For details, refer
to "Wireless Setup Using WCN (Windows
Connect Now)" in "Reference Information"
on page 59.
Network Connection
23
Wireless Setup
2
1
3
A
B
Use the Easy-Scroll Wheel (A) to select
Settings, then press the OK button.
Downloaded
from ManualsPrinter.com Manuals
Network Connection
24
Select Wireless LAN setup,
then press the OK button.
Select Yes, then press the OK button.
When wireless connection is enabled, the Wi-Fi lamp (B) lights blue.
Wireless Setup
4
Select Easy settings, then press the
OK button.
5
Select the access point name you wrote
down on page 23, then press the OK
button.
6
When one of the above screens is displayed, enter the network key
you wrote down on page 23, then press the OK button.
If the above screen is not displayed, go to step
.
Use the Easy-Scroll Wheel to select the character. Use the ] button to move
the cursor to the right.
• If you are living in an apartment, nearby access
points in use may be detected.
Downloaded from ManualsPrinter.com Manuals
• Enter upper and lower case letters of the alphabet correctly.
Network Connection
25
Wireless Setup
7
Make sure that the network key is correct, then press the OK
button.
8
C
When the completion screen appears, press the OK button, then press the HOME button
(C).
The standby screen returns.
• If Failed to connect to the access point. appears, press the OK button, make sure that the network
key is correct, then enter it again. If a connection still cannot be established, refer to the printed manual:
Network Setup Troubleshooting.
Next, read "Confirm Connection Status" on page 33!
Downloaded
from ManualsPrinter.com Manuals
Network Connection
26
Wireless Setup Using WPS (Wi-Fi Protected Setup)
2
1
3
A
B
Use the Easy-Scroll Wheel (A) to select
Settings, then press the OK button.
Downloaded from ManualsPrinter.com Manuals
Select Wireless LAN setup,
then press the OK button.
Select Yes, then press the OK button.
When wireless connection is enabled, the Wi-Fi lamp (B) lights blue.
Network Connection
27
Wireless Setup Using WPS (Wi-Fi Protected Setup)
4
Select WPS settings, then press the
OK button.
5
Select Push button method, then press the OK button.
6
Press the OK button.
• To use the PIN code method for setup, select PIN method in step , then press the OK button. Follow the on-screen instructions to
operate the machine and access point. When the setup is complete, the completion screen appears. Press the OK button to return to the
Settings screen.
A timeout error occurs if setup is not completed within 10 minutes. If the timeout error screen appears, press the OK button, then perform
the setup again and set the new PIN code displayed on the screen to the access point. If another error appears, refer to the printed
manual: Network Setup Troubleshooting.
Downloaded
from ManualsPrinter.com Manuals
Network Connection
28
Wireless Setup Using WPS (Wi-Fi Protected Setup)
7
When the access point is ready, press the OK button on
the machine, then press the WPS button on the access
point within 2 minutes.
8
C
When the completion screen appears, press the OK
button, then press the HOME button (C).
The standby screen returns.
The Wi-Fi lamp (blue) flashes while searching for an access point.
Next, read "Confirm
Connection Status" on
page 33!
• If the timeout error screen appeared repeatedly, or if another error appeared, refer to the printed manual: Network Setup Troubleshooting.
• For details on WPS, refer to the manual of your access point.
Downloaded from ManualsPrinter.com Manuals
Network Connection
29
Wired Setup
Connect to the network over a wired connection.
A Ethernet cable is required to connect to a
network device (router, etc.). Prepare a Ethernet
cable.
1
A
B
Remove the Cap (A), then connect a network device (router, etc.) with a Ethernet cable (B).
Ethernet cable
Downloaded
from ManualsPrinter.com Manuals
Network Connection
30
Wired Setup
3
2
4
D
C
Use the Easy-Scroll Wheel (C) to select Settings,
then press the OK button.
Downloaded from ManualsPrinter.com Manuals
Select Device settings, then press the OK
button.
Select LAN settings, then press the OK button.
Network Connection
31
Wired Setup
5
Select Change wireless/wired, then press the
OK button.
Downloaded
from ManualsPrinter.com Manuals
Network Connection
32
6
Select Wired LAN active, press the OK button,
then press the HOME button (D).
Next, read "Confirm Connection
Status" on page 33!
Confirm Connection Status
1
2
A
3
B
Press the HOME button (A), select Settings using the Easy-Scroll
Wheel (B), then press the OK button.
Select Device settings, then press the
OK button.
Select LAN settings, then press the OK
button.
• Confirm connection status after installing the machine in the target location.
Downloaded from ManualsPrinter.com Manuals
Network Connection
33
Confirm Connection Status
4
5
C
Select Confirm LAN settings, then press the OK
button.
Select Wireless LAN setting list or Wired LAN setting list, then press the OK button.
Make sure that Connection is set to Active, then press the HOME button.
It may take a while before the connection is complete. In this case, press the Back button (C) and wait for about
a minute, then display the Wireless LAN setting list screen or Wired LAN setting list screen again.
• If the communication status does not improve, make sure of the following.
− The machine and network device are turned on.
− There is no obstacle between the machine and access point, and wireless communication is possible.
− There is no microwave, refrigerator or any other object that may cause radio interference nearby.
− For wired connections, the Ethernet cable is connected properly.
Now the machine is connected to the network.
Next, read "[Network Connection] Install the Software" on page 35.
Downloaded
from ManualsPrinter.com Manuals
Network Connection
34
Install the Software
To use the machine by connecting it to a computer,
software including the drivers needs to be copied
(installed) to the computer's hard disk. The
installation process takes about 20 minutes. (The
installation time varies depending on the computer
environment or the number of applications to be
installed.)
The screens below are based on Windows Vista
operating system Ultimate Edition (hereafter
referred to as "Windows Vista") and Mac OS X
v.10.5.x.
□ For Windows Vista/
XP
If you are using Internet
Explorer 7 or later,
you can use the Web
print software EasyWebPrint EX. An internet
connection is required
for installation. (It is also
possible to install this
software later.)
1
Turn on the computer,
then insert the Setup
CD-ROM into the CDROM drive.
The setup program will
start automatically.
• If the program does not start automatically, double-click the
CD-ROM icon in Computer or My Computer.
When the CD-ROM contents appear, double-click MSETUP4.
EXE.
• Quit all running applications before installation.
• Log on as the administrator (or a member of the
Administrators group).
• Do not switch users during the installation process.
• Internet connection may be required during the installation.
Connection fees apply.
• It may be necessary to restart your computer during the
installation process. Follow the on-screen instructions and
do not remove the Setup CD-ROM during restarting. The
installation resumes once your computer has restarted.
1
Turn on the computer, then insert the Setup CD-ROM
into the CD-ROM drive.
• If the firewall function of your security software is turned
on, a warning message may appear that Canon software is
attempting to access the network.
If such a warning message appears, set the security
software to always allow access.
• Mac OS 9, Mac OS X Classic environments, or Mac OS X
v.10.3.8 or earlier are not supported.
Downloaded from ManualsPrinter.com Manuals
Network Connection
35
Install the Software
2
Windows Vista
Windows XP/2000
Click Run Msetup4.exe on the AutoPlay screen, then click Continue on
the User Account Control dialog box.
If the User Account Control dialog box reappears in following steps, click
Continue.
2
Double-click the Setup icon of the CD-ROM folder to proceed to the
following screen. Enter your administrator name and password, then click
OK.
If you do not know your administrator name or password, click Help, then follow
the on-screen instructions.
• If the CD-ROM folder does not open automatically, double-click the CD-ROM icon on
the desktop.
Downloaded
from ManualsPrinter.com Manuals
Network Connection
36
Install the Software
3
Click Easy Install.
4
Click Install.
The drivers, application software, and on-screen manuals are installed all
together.
• If you want to select particular items to install, click Custom Install.
For Windows Vista
• You can install the XPS Printer Driver from Custom Install. (Windows Vista SP1 or
later.)
• When installing the XPS Printer Driver, select the MP Drivers at the same time.
• The XPS Printer Driver is a printer driver suitable for printing High Dynamic Range
images (full 16-bit workflow) using Easy-PhotoPrint Pro.
Downloaded from ManualsPrinter.com Manuals
For Windows Vista/XP
• If you are using Internet Explorer 7 or later, you can use the Web print software
Easy-WebPrint EX. An internet connection is required for installation. (It is also
possible to install this software later.)
Network Connection
37
Install the Software
5
Select Use the printer on network, then click Next.
6
Read the License Agreement screen carefully and click Yes.
• Follow any on-screen instructions to proceed with the software installation.
Downloaded
from ManualsPrinter.com Manuals
Network Connection
38
Install the Software
8
7
When the Please Allow All
Install Wizard Processes
screen appears, click Next.
When the Printer Detection
screen appears, click Next.
• If the Printer Detection screen
is not displayed, the connection
method is not correctly selected
in step . Click Cancel and start
again from step , then be sure to
select Use the printer on network
in step .
7
When the Printer Detection screen appears, click Next.
• If the Printer Detection screen is not displayed, the connection method is not correctly selected in step . Follow on-screen
instructions and proceed with the installation. Click Exit on the installation complete screen, then start again from step
and
be sure to select Use the printer on network in step .
Downloaded from ManualsPrinter.com Manuals
Network Connection
39
Install the Software
9
When the Detected Printers List dialog box appears, select the machine, then click
Next.
When the Setup Completion dialog box appears, click Next or Complete.
For Wired Connection
Go to "Install the Software (Information)" on page 46.
• If the machine is not detected, Check Printer Settings dialog box is displayed. Refer to the printed
manual: Network Setup Troubleshooting. Make sure there is no problem, then click Next again on the
screen in step .
8
On the Canon IJ Network Tool screen, select MP990 series in Printers, then click Next.
For Wired Connection
Go to "Install the Software (Registration)" on page 42.
• If the machine is not detected, refer to the printed manual: Network Setup Troubleshooting. Make
sure there is no problem, then click Update.
Downloaded
from ManualsPrinter.com Manuals
Network Connection
40
Install the Software
10
Wireless Connection
Wired Connection
P.46
When the Connection Performance Measurement dialog box appears, click
Next.
Confirm the measurement results, then click Finish.
Ensure that
is displayed in Connection Performance between the Printer and the
Access Point.
• You can cancel measuring by clicking Cancel. You also examine the detailed status of the
communication link after setup. For details, refer to the on-screen manual: Advanced Guide.
• If an icon other than
appears, improve the communication status by referring to the displayed
message or the help file, then click Remeasurement.
Next, read "Install the Software (Information)" on page 46!
9
Wireless Connection
Wired Connection
P.42
When the Connection Performance Measurement screen appears, click Next.
Confirm the measurement results, then click Finish.
Ensure that
is displayed in Connection performance between the printer and the
access point.
• You can cancel measuring by clicking Cancel. You also examine the detailed status of the
communication link after setup. For details, refer to the on-screen manual: Advanced Guide.
• If an icon other than
appears, improve the communication status by referring to the displayed
message or the help file, then click Remeasurement.
Next, read "Install the Software (Registration)" on page 42!
Downloaded from ManualsPrinter.com Manuals
Network Connection
41
Install the Software (Registration)
This section describes how
to register the machine on a
Macintosh computer.
Windows users: read "Install the
Software (Information)" on page
46.
1
□ Proceed to the section that relates to your operating
system for further installation instructions.
Mac OS X
When the Register Printer and
Scanner screen appears, click
Register Printer.
v.10.5.x
Go to Step
-
.
v.10.4.x
Go to Step
-
.
v.10.3.9
Go to Step
-
.
• The alphanumeric characters after Canon MP990 series is the
machine's Bonjour service name or MAC address.
• If the machine has not been detected, make sure of the
following.
− The machine is turned on.
− The firewall function of any security software is turned off.
− Wireless Connection: The computer is connected to the
access point.
− Wired Connection: The machine is connected to the network
device with the Ethernet cable.
Downloaded
from ManualsPrinter.com Manuals
Network Connection
42
Install the Software (Registration)
2
-
A
Mac OS X v.10.5.x
Mac OS X v.10.4.x
Mac OS X v.10.3.9
-
2
-
B
Mac OS X v.10.4.x
Mac OS X v.10.3.9
-
1
1
2
3
Select Canon MP990 series and click Add.
When the Printer List
window appears, click Add.
Click More Printers in the
Printer Browser screen.
Select Canon IJ
Network in the pop-up
menu, select Canon
MP990 series in the list
of printers, then click
Add.
Go to Step
.
• When the You have no
printers available. screen
appears, click Add.
Downloaded from ManualsPrinter.com Manuals
Network Connection
43
Install the Software (Registration)
2
-
C
Mac OS X v.10.3.9
4
1
2
3
Make sure that Canon
MP990 series is added
to the list of printers.
When the Printer List window
appears, click Add.
Select Canon IJ Network in
the pop-up menu, select Canon
MP990 series in the list of
printers, then click Add.
Make sure that Canon MP990
series is added to the list of
printers.
Go to Step
.
• When the You have no printers
available. screen appears, click Add.
Downloaded
from ManualsPrinter.com Manuals
Network Connection
44
Go to Step
.
Install the Software (Registration)
4
3
When the Register Printer and
Scanner screen appears, click Register
Scanner.
5
Select Canon MP990 series on the Scan-from-PC Settings
screen, then click OK.
When the Register Printer and Scanner
screen appears, click Next.
Next, read "Install the Software (Information)" on page 46!
Downloaded from ManualsPrinter.com Manuals
Network Connection
45
Install the Software (Information)
1
Important Information for the Installation
□ Necessary Information for the User
Registration
□ About Extended Survey Program
A
When the Load plain paper into the
cassette screen appears, follow the onscreen instructions to proceed with the
software installation.
• For details, refer to "Loading Paper" on page
48.
Downloaded
from ManualsPrinter.com Manuals
Network Connection
46
The product serial number is required when
registering the product. The serial number is
located inside the machine (as shown in the
illustration).
If you can agree to Extended Survey Program,
click Agree.
If you click Do not agree, the Extended Survey
Program will not be installed.
(This has no effect on the machine's functionality.)
• When opening the Scanning Unit (Cover) (A), the
Print Head Holder moves automatically.
• The screen does not appear on Mac OS X
v.10.3.9.
Install the Software (Information)
2
Click Exit to complete the installation.
If Restart is displayed, follow the instruction to restart the computer.
After restarting the computer, remove the Setup CD-ROM and keep it in a safe place.
When using Macintosh, it is necessary to restart the computer before scanning using the Operation Panel on the machine for the first time.
• To use the machine on additional computers, refer to "[Network Connection] Install the Software" on page 35 and complete setup on those computers.
Downloaded from ManualsPrinter.com Manuals
Network Connection
47
After Installing the Machine
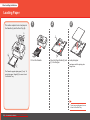
Loading Paper
This section explains how to load paper in
the Cassette (A) and the Rear Tray (B).
B
1
D
2
3
F
A
E
Pull out the Cassette.
C
Move the Paper Guides (E) and
(F) to both edges.
Load plain paper.
Load paper with the printing side
facing down.
The Cassette supports plain paper (C) only. To
print photo paper / Hagaki (D), be sure to load
it in the Rear Tray.
• To print on specialty paper, be sure
to load it in the Rear Tray.
Downloaded
from ManualsPrinter.com Manuals
After Installing the Machine
48
Loading Paper
4
5
6
G
Slide the Paper Guide to align with the actual size of the
paper.
Slide the Paper Guide against left edge of the paper.
Make sure that the paper stack does not exceed the line (G).
Insert the Cassette slowly into the
machine until it clicks into place.
The Paper Guide will stop when it aligns with the
corresponding mark of paper size.
• There may be a little space between the Paper Guide and the
paper stack.
Downloaded from ManualsPrinter.com Manuals
After Installing the Machine
49
Loading Paper
8
7
9
10
3
J
2
H
1
I
Open the Paper Support (H) and pull it
straight up, then slant it back.
Move the Paper Guides (I)
to both edges.
Load paper in the center of the Rear
Tray.
Slide the left and right Paper Guides
against both edges of the paper.
Load paper in portrait orientation with the
printing side facing up.
Make sure that the paper stack does not
exceed the line (J).
• For details on media sizes and types you
can use, refer to "Loading Paper" in the onscreen manual: Basic Guide.
Preparation for printing is now complete!
Downloaded
from ManualsPrinter.com Manuals
After Installing the Machine
50
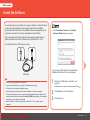
Introduction of Manuals
The fo llowing man u a l s a r e s u p p l i e d w i t h t h e m a c h i n e .
on-screen m a n u a l s
G e t t ing Started
( t h i s manual)
N e t work Setup
Tr o u bleshooting
Describes how to set up and use
your machine. Introduces the
machine and its functions, the
included manuals and application
software.
Downloaded from ManualsPrinter.com Manuals
Basic Guide
Describes basic operations
and media, and gives an
introduction to other functions
available.
Advanced
Guide
Describes various operating
procedures to make full use of
machine.
Tr o u b l e s h o o t i n g
Describes troubleshooting tips
for problems you may encounter
when using the machine.
For details on opening the on-screen manuals, refer to page 52.
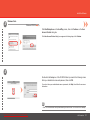
After Installing the Machine
Solution Menu
Solution Menu is a g a t e w a y t o f u n c t i o n s a n d i n f o r m a t i o n t h a t a l l o w y o u t o m a k e f u l l u se of the machine!
Click this button to open the on-screen manuals.
Example: Windows Vista
Open various applications and on-screen manuals with a single click.
You can start Solution Menu from the Canon Solution Menu icon on the desktop (Windows) or on
the Dock (Macintosh).
If you have a problem with machine settings, click the Change settings or find solutions to
problems. in Solution Menu to open My Printer (Windows only).
*The buttons displayed vary depending on the
country or region of purchase.
Downloaded
from ManualsPrinter.com Manuals
After Installing the Machine
52
Try Using the Machine
Easy-PhotoPrin t P r o i s o n e o f t h e a p p l i c a t i o n
software. Easy - P h o t o P r i n t P r o a l l o w s y o u t o
print high qual i t y p h o t o s e a s i l y b y u t i l i z i n g t h e
digital photo co l o r s .
Since ICC prof i l e s a r e a l s o a v a i l a b l e , y o u c a n
print photos in c o l o r s t h a t a r e c l o s e r t o y o u r
ideal colors us i n g c o l o r m a n a g e m e n t .
For details on h o w t o u s e t h e a p p l i c a t i o n
software and t h e m a c h i n e , r e f e r t o t h e o n sc reen manua l s : B a s i c G u i d e a n d A d v a n c e d
Guide .
Downloaded from ManualsPrinter.com Manuals
After Installing the Machine
53
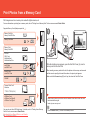
Print Photos from a Memory Card
Print images saved on a memory card used with digital cameras, etc.
For more information on printing from a memory card, refer to "Printing from a Memory Card" in the on-screen manual: Basic Guide.
Supported Memory Cards (Adapter required for
.)
Memory Stick Duo
Memory Stick PRO Duo
Memory Stick Micro
CF
1
B
C
MS
Duo SD
MS
Memory Stick
Memory Stick PRO
SD Card
SDHC Card
MultiMediaCard
MultiMediaCard Plus
miniSD Card
miniSDHC Card
A
CF
MS
Duo SD
MS
microSD Card
microSDHC Card
While the standby screen appears, open the Card Slot Cover (A), insert a
memory card into the Card Slot.
When inserting a memory card into the slot, the photos on the memory card are read
and the screen to specify photos and the number of copies to print appears.
Make sure that the Access lamp (B) has lit up, then close the Card Slot Cover.
RS-MMC
Compact Flash Card*
Microdrive
*TYPE I / TYPE II (3.3V)
xD-Picture Card
xD-Picture Card Type M
xD-Picture Card Type H
CF
MS
Duo SD
MS
• Insert a memory card into the Card Slot in the direction of the arrow on the label, with
the labeled side facing left.
• Insert only one memory card.
You can also print from USB flash drives. For details, refer to "Printing from a Memory
Card" in the on-screen manual: Basic Guide.
Downloaded from ManualsPrinter.com Manuals
54 After Installing the Machine
• Press the HOME button (C) to return to the standby screen.
Print Photos from a Memory Card
3
2
D
Load a sheet of 4" x 6" size photo paper in the Rear Tray (D) in
portrait orientation.
E
Rotate the Easy-Scroll Wheel (E) to display a photo to print.
Alternatively, use the [ or ] button to select a photo.
Load paper with the printing side facing up.
• For details, refer to "Loading Paper" on page 48.
Downloaded from ManualsPrinter.com Manuals
After Installing the Machine
55
Print Photos from a Memory Card
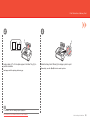
4
6
5
F
Press the [+] or [-] button to specify the number
of copies, then press the OK button.
The Print Settings Confirmation Screen appears.
Press the Color button (F).
Printing will start.
After printing, open the Card Slot Cover, pinch the
memory card and pull it straight out.
After removing the memory card, close the Card Slot Cover.
• Do not remove the memory card while the Access lamp is
flashing. Saved data may be damaged.
Downloaded
from ManualsPrinter.com Manuals
After Installing the Machine
56
Try Copying
You can copy a document by simply placing it on the Platen Glass and pressing the start button.
This section explains with plain paper. For various copying procedures, refer to "Copying" in the on‑screen manual: Basic Guide.
1
2
3
4
C
B
F
E
A
D
Load A4 or Letter-sized plain
paper into the Cassette (A).
Open the Document
Cover (B).
Place the document face-down and align it
with the Alignment Mark (C).
I
G
H
Close the Document Cover, press the HOME
button (E), then press the Black button (F)
twice or the Color button (G) twice.
When the Paper Output Tray (H) opens automatically,
extend the Output Tray Extension (I).
Copying will start. Remove the document after
printing.
• For details, refer to "Loading
Paper" on page 48.
Downloaded from ManualsPrinter.com Manuals
• Do not place objects weighing 4.4 lb / 2.0 kg or
more on the Platen Glass (D), or do not apply
pressure to the document by pressing on it with a
force exceeding 4.4 lb / 2.0 kg. The scanner may
malfunction or the glass may break.
• Do not open the Document Cover until copying is
complete.
After Installing the Machine
57
Print Photos from a Computer
Easy-PhotoPrint EX allows you to print photos easily.
This section explains how to print borderless photos using 4" x 6" size Photo Paper Plus Glossy II. The screens are based on Windows Vista.
2
1
3
4
A
Load a sheet of photo paper in the Rear
Tray (A) in portrait orientation.
Load a sheet of paper with the printing side
facing up.
Start Solution Menu from the
icon on the desktop (Windows)
or on the Dock (Macintosh),
then click One-Click to Photo
Print.
Select the image you want to print,
then click Layout/Print.
When a photo is selected, the number of
copies is set to "1".
Easy-PhotoPrint EX starts.
• For details, refer to "Loading Paper" on page
48.
• For details on starting Solution Menu, refer to "Solution Menu" on page 52.
• For more information, refer to the on-screen manual: Advanced Guide.
Downloaded from ManualsPrinter.com Manuals
58 After Installing the Machine
Click Print.
For Windows:
Printing will start.
For Macintosh:
Click Print on the Print dialog box to start
printing.
Reference Information
Wireless Setup Using WCN (Windows Connect Now)
Set up a wireless connection by using the
WCN (Windows Connect Now) function of
Windows Vista.
• Before setting up by using the WCN, establish
wireless communication between the computer
and the access point.
• Canon assumes no responsibility for any
damage or loss of data stored on your USB flash
drive regardless of the cause even within the
warranty period.
1
From the Start menu of
the Windows side, click
Network.
The Network folder opens.
2
Click Add a wireless device
on the menu.
The Add a wireless device to the
network screen will be displayed.
3
Click I want to add a wireless device
or computer that is not on the list,
using a USB flash drive.
• If your USB flash drive cannot be attached to the
Direct Print Port of the machine, a commercial
extension cord (for USB flash drives) may be
required.
• Operation may not be guaranteed depending on
your USB flash drive.
• USB flash drives with security enabled may not
be used.
• The machine supports "WCN-UFD".
Downloaded from ManualsPrinter.com Manuals
Reference Information
59
Wireless Setup Using WCN (Windows Connect Now)
4
Click Add the device or computer
using a USB flash drive.
5
From the list, select the network
name (SSID), then click Next.
• If the User Account Control dialog box
appears, click Continue. If the same
dialog box reappears in subsequent
steps, click Continue.
Downloaded
from ManualsPrinter.com Manuals
Reference Information
60
6
Connect the USB flash drive to
the computer, make sure that the
drive name is displayed, then
click Next.
7
When the above screen appears,
remove the USB flash drive from the
computer, then click Close.
Wireless Setup Using WCN (Windows Connect Now)
8
9
10
A
B
Use the Easy-Scroll Wheel (A) to select Settings,
then press the OK button.
Downloaded from ManualsPrinter.com Manuals
Select Wireless LAN setup,
then press the OK button.
Select Yes, then press the OK button.
When wireless connection is enabled, the Wi-Fi lamp (B) lights blue.
Reference Information
61
Wireless Setup Using WCN (Windows Connect Now)
11
12
D
C
Select WCN settings, then press the OK
button.
Connect the USB flash drive to the Direct Print Port (USB connector) (C) on the front of the machine, then press
the OK button.
When the completion screen appears, press the OK button, then press the HOME button (D). The standby screen returns.
Remove the USB flash drive from the machine.
Next, read "Confirm Connection Status" on page 33!
Downloaded
from ManualsPrinter.com Manuals
Reference Information
62
Getting Help from Canon
Email Tech Support — www.canontechsupport.com
Toll-Free Live Tech Support— (1-800-828-4040) under warranty
This option provides live telephone technical support, free of service charges,
Monday-Friday (excluding holidays), during the warranty period.
Telephone Device for the Deaf (TDD) support is available at (1-866-251-3752).
Ordering Information
The following ink tanks are compatible with this machine.
CLI-221 M
CLI-221 BK
CLI-221 GY
PGI-220 BK
CLI-221 C
CLI-221 Y
Order #
2948B001
2946B001
2950B001
2945B001
2947B001
2949B001
Call 1-800-OK-CANON to locate a dealer near you, or visit the Canon eStore at
www.canonestore.com
CANON U.S.A. INC.
One Canon Plaza, Lake Success, NY 11042 U.S.A.
www.usa.canon.com
Downloaded from ManualsPrinter.comXXXXXXXX
Manuals
QT5-2674-V01
©CANON INC.2009
PRINTED IN THAILAND