1
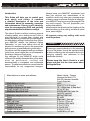
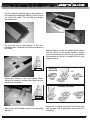
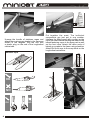
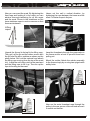
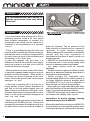
Introduction
This Guide will help you to control your
boat easily and safely. It contains
a detailed description of the boat and
information about its assembly, operation
and maintenance. Please, read it carefully,
view the accompanying DVD and get fully
acquainted with the boat before using it.
This User's Guide is neither a training manual
of sailing safety, nor a sailing course. If this is
your first boat, to ensure your comfort and
safety familiarise yourself with the operation of
the boat before sailing it for the first time. Either
your MINICAT retailer, the National Sailing
Federation, or your local sailing club will be
pleased to recommend you to an appropriate
sailing course, or qualified sailing instructors.
Do not set sail if the expected sailing conditions
(wind force, wave height) do not correspond to
the design category of your boat.
Any changes to your MINICAT which could
influence the safety characteristics of the boat,
must be performed, verified and
documentedby a competent and authorised
person. The boat manufacturer cannot bear the
responsibility for any unapproved changes.
Manufacturer's name and address:
Manufacturer's code:
Name of the model:
Design category of the boat:
Empty weight of the boat:
Maximum permitted load:
Maximum weight of the loaded boat:
Drive:
Sails:
Main sail area:
Foresail area:
Length of the boat:
Width of the boat:
Height of the mast:
Floats operation pressure:
Always keep your MINICAT maintained and
take into account any deterioration of its
condition, which may occur as a consequence
of heavy usage or misuse. Despite its strength,
your MINICAT may be seriously damaged if it is
not used properly. This will jeopardise your
safety when sailing.
Always adjust the speed and the heading of the
boat according to the sailing conditions (wind
force, wave height).
All persons using any sailing craft must
wear life jackets.
Caution !
Please pay special attention to the selection
of your life jacket. It must be equipped with
a label containing the information about the
carrying capacity and reference to the
certificate of safety.
Please keep this User's Guide in a safe
place and give it to the new owner when
selling the boat.
Martin Horák - Design
Václava Kulíška 1174
686 05 Uherské Hradištì
Czech Republic
HOC
MINICAT 420 Emotion
“D“ - Wind max. 4 Beaufort !
44 kg (97 lbs)
450 kg (992 lbs) (see the
carrying capacity)
494 kg (1089 lbs)
By sails
Main sail + fore sail
6.5 sq.m (70 sq.ft)
3.2 sq.m (34.5 sq.ft)
4.2 m (13.8 ft)
2.1 m (6.9 ft)
5.05 m (16.5 ft)
0.025 MPa (3.6 psi)
1
5
Warning !
1
6
2
7
3
8
CZ-HOC
4
1 Norm
2 Permitted loading capacity
(Persons + luggage )
3 Suggested operational pressure
4 Serial number
5 EU design category
6 Max. wind force
7 Permitted human capacity
8 CE-declaration
Warning !
Maximum wind force
4 Beaufort
= 20–28 km/h
13–17 mph
11–15 kn
5.5–7.9 m/s
Maximum number of occupants
4 adults
Warning !
Do not exceed the determined maximum
number of occupants. Regardless of the
number of occupants on the boat the total
weight of occupants and equipment must
not exceed the maximum permitted load.
Carrying capacity
450 kg
The maximum permitted load includes the
weight of all persons onboard and any personal
items, equipment or baggage.
2
Never exceed the maximum permitted load
when loading the boat. Always the boat
carefully and allocate the individual weight
according to the design of the boat. Avoid
the location of heavy objects at the top.
Disregarding these instructions may cause
the boat to capsize and may result in
damage and injury.
Always check your MINICAT before sailing!
Perform a visual check of all parts of the boat
before each sailing.
Protection against falling overboard and
how to get back on the boat:
Sit only in the places made for sitting. These
are the parts of the frame at the rear half of the
floats. The stability of the boat will be reduced if
you sit anywhere else.
It is necessary to protect the trampoline from
damage, especially rupture by sharp objects,
or from careless handling.
For ease of access onto the boat from the
water, there are fabric handles on both sides of
the floats.
Assembly of the boat
1. Carefully remove the individual parts from
the bag on a flat surface, ideally on a grass area
to avoid any damage.
2. Put together the frame with the trampoline as
shown in the figure. Do the assembling in the
upset position (the frame is on the trampoline).
Put the rope through the lugs on the bottom of
the trampoline and tauten it firmly. Fix the end of
the rope it the notch. This will help you stretch
the trampoline.
Fix the keel fins on the bottom of the noninflated floats. Push the fins into the pockets on
the floats.
Before inflation, check the status of the valves.
Set the valves to the closed position, slightly
push on the centre pin, turn the pin and release
the pressure on the pin to enable it to sit in the
higher position.
Opening
the valve
Air
Air
Attach the frame to the non-inflated floats.
Attach the frame by pushing the flags into the
pockets on the floats.
Closing the valve
Now pump up the floats to reach the operating
pressure.
Screw the crossbar onto the front frame pipe
and prepare the longitudinal centre tube for
mounting.
3
Unwrap the bundle of stainless ropes and
attach them using snap hooks to the frame as
shown in the diagram. Slip the end with
a plastic plug on the end of the longitudinal
centre tube.
Stainless ropes
Put together the mast. The individual
components are just put in one another.
Interlace the lifting ropes with a pulley on the
top of the mast. Before erecting the mast, fix the
lateral fastening ropes in its upper part as well
as the front rope. Attach the other ends of
lateral guy-ropes to the frame using shackles.
Attach the front rope to the snap hook on the
longitudinal centre tube.
A
A
OK
B
B
NO
C
C
OK
4
NO
Now you can erect the mast. By tightening the
front rope and locking it in the notch you can
achieve thorough tautening for all the ropes
and the mast. Screw in the stretchers on the
lower stainless ropes in such a manner so that
these are tautened.
Heave out the sail in vertical direction -by
tightening the rope between the boom and the
mast. Fix the taut rope in the jam.
Lifting
ropes
Unpack the jib and to its top fix the lifting rope.
Then pull up the jib and its bottom corner with
the jib furler fix with a carbine as shown on the
photo below. Roll out the mainsail and attach
the lifting rope running from the top of the mast
to it. Insert the sail in the notch in the mast and
pull the lifting rope to lift it up. Then tie up the
rope to the sling on the mast.
Jib
Lace the foresheets through the grommets on
the frame and tie a knot to prevent them from
pulling out.
Mount the rudder. Attach the rudder assembly
to the frame simply by running two spigots with
safety locks.
Main Sail
Now run the main foresheet rope through the
pulley in the rear corner of the sail and secure it
in a notch on the tiller.
5
Warning !
It is recommended after each sailing, to
treat the connections of the mast using
silicone oil.
Warning !
- If you experience a loss of pressure of 20% of
operating pressure inside a 24 hour period
when external temperature is constant it is
considered to be normal and no reason for a
complaint to the manufacturer or a warranty
claim!...................................
- There is a possibility that the flat valve can
become a little lose after the first few pumpings,
and that can result in a little air escape around
the valve (being a result of the stretching and
contracting of the boat skin)........................
In case this happens with your boat, it is
sufficient to turn the valve with the valve key by
about one quarter to one half a turn until the
resistance becomes too great.
- Water should never come inside of the tubes.
In case this happens please empty as soon as
possible and dry throughout . Water inside of
the tubes can cause a damage to the inner
rubber of the tube and this can cause I-beam
damages as well.......................................
- If the boat is standing still on a shore for a
longer periods of time, please dismantle the
keel fins or use the special stands (see our
Spare Parts & Accessories Catalogue) under
the floats which will prevent the pressure on the
floats. You will avoid a possible damage of the
keel fins and floats. ...............................
- Maximum operating pressure in the floats (air
chambers) is 0.025 MPa (3.6 psi). If there is an
increase of the ambient air temperature (due to
the heat of the sun) the air pressure inside the
6
floats can increase. The air pressure of the
floats should be checked and air released if
necessary to avoid eventual damage.
- Before setting sail it is advisable to familiarise
yourself with any local regulations or
restrictions for the piece of water in which you
intend to operate.
- MINICAT is not intended to be towed behind
a motorised craft. It must not be towed, slide
moved, or otherwise extensively loaded.
- Any sharp objects must be securely
packaged.
- Valuable items and personal effects must be
placed in a waterproof package and placed in
the pockets on the trampoline.
- Bright sunlight will eventually have
a deteriorating effect on the rubber surface of
the floats, therefore wherever possible when
your MINICAT is not in use it is advisable to
leave the boat out of direct strong sunlight.
- When sailing on large open water (sea, lake)
pay close attention to the wind directly from the
coast. It is possible to be blown offshore.
- MINICAT must not be used in bad conditions,
for example, low visibility, night, fog, rain.
Instructions for drying, storage, cleaning
and maintenance of your MINICAT
After sailing and before storing your MINICAT it
is necessary to rinse the boat using water and a
mild soap or detergent, and then allow the boat
to dry out thoroughly. After sailing it in salt water
it is necessary to wash the boat with fresh
water. It is recommended to clean all parts from
dirt, sand and other impurities using an
absorbent cloth. Please note that oil, petrol,
acetone, kerosene, paraffin and similar
solvents and chemicals disagree with the
rubber layer on the surface of the boat and
must be avoided.
Before storing your MINICAT and from time to
time, we recommend that you clean the boat
thoroughly and treat the surface of the rubber
floats. The 'MINICAT Maintenance Kit'
includes everything you need for the care of
your MINICAT including cleaning and
preserving fluid, lubricant and silicone oil.
Carefully pack the dry, deflated floats, cleaned
from sand and dust, so that the number of folds
will be as few as possible. The folds especially
at the edges of the packed float have to be
protected to prevent unnecessary wear. Care
should also be taken of the cover of the inflation
valve, and to avoid any damage to the floats
during packaging.
Pay particular attention when putting single
parts into the bag to prevent any damage.
Store the packed boat in a dry space protected
from direct sunlight and adverse temperatures
(rec:10 -25 °C). Avoid any load or strain being
placed on the boat during storage (putting any
heavy objects on top of it, etc.)
Careful treatment and good maintenance can
increase the life of your MINICAT.
Righting a capsized boat (Turning Turtle)
In case of overturning the MINICAT follow
these instructions:
1. Release the jib and the main sail to the
maximum to assure the least possible
resistance of the sails when righting the boat.
On the MINICAT Instinct - wind in the jib.
2. Stand on one float then and pull on the mast
line and the handle on the other float. Be
careful to prevent damage to the keel fins.
After righting the boat use the handles on both
sides of the floats to get back on board.
Repair of your MINICAT
Damage to the MINICAT floats can be easily
repaired using the supplied 'MINICAT Repair
Kit'.
Repair procedure:
- Mark the damaged area on the boat and
select the patch according to the size of the
damage.
- The surface of the patch and of the damaged
area must be dry, clean, dust-free and
without trace of previous adhesive.
- De-grease both the patch and the damaged
area using acetone or petrol.
- Apply a thin layer of adhesive to both
surfaces.
- When the adhesive is dry to touch attach the
patch to the damaged area and apply
pressure.
After minor repairs (punctures), it is possible to
re-inflate the boat and to continue sailing after
just 60 minutes, with larger repairs it is
recommended to wait for 24 hours. With more
complicated repairs you are recommended to
return your MiniCat to your supplier, to the
manufacturer, or to an accredited repair-shop.
Careful treatment and maintenance can
increase the service life of your MINICAT.
The manufacturer's warranty period is 24
months from the date of the sale.
7
All warranty repairs are carried out by
a designated, authorised repairer or by the
manufacturer:
Martin Horák - design
Václava Kulíška 1174
686 05 Uherské Hradištì
Czech Republic
www.minicat.cz
E-mail: [email protected]
CAUTION
Warning !
Sailing can be very dangerous and personally
exhausting. Therefore, the user of this product
must realise, that not following safety
precautions may result in serious injury, or
even in death. Therefore when using this
product pay close attention to following safety
precautions:
-
-
-
8
Get well acquainted with the
operation of this design of boat.
Ensure that you have first aid training
with certification and have
emergency/first aid equipment with
you when you sail.
Always use a quality certified life
jacket.
Before each time you sail check your
equipment for functionality and that it
does not show any signs of damage.
Do not overestimate your abilities on
the water; take care of yourself.Ensure your state of health with
a doctor before you go sailing.
Always observe the manufacturer's
recommendations regarding the use
of this product.
Never use this product after taking
alcohol, drugs or medication.
Before using this product read the
User's Guide carefully.
Always pay attention to sea winds
and currents.
The user of this product must be
familiar with the basic sailing skills
and must be aware of the risks
attached to this sport.
Useful knots
Recommended packing
To avoid unnecessary damage while storing or
transporting your boat please follow the
instructions on recommended packing below:
1. Bag
1. - 1x Frame - rear
2. - 1x Frame - front + Trampoline
3. - 2 x Float
4. - 1x Stainless steel ropes with Jib furler
5. - 1x accessories (DVD, User's guide,
Repair Kit...)
2. Bag
1. - 1x Mast
2. - 1x Bowsprit
3. - 1x Staybold
4. - 1x Tiller extension
5. - 2x Keel fin
6. - 2x Frame - side
7. - 1x Sails
Caution !
The total weight of the assembled boat
is 44 kg.
When counted together with the bags,
inflation pump and spare parts to total
weight comes to 49 kg !
8. - 1x Rudder complet
9. - 1x Inflation pump
9
10
5
4
3
2
1
0
Beauf.
no.
Wind speed
< 1 km/h
< 1 mph
< 1 kn
< 0.3 m/s
1.1–5.5 km/h
1–3 mph
1–2 kn
0.3–1.5 m/s
5.6–11 km/h
4–7 mph
3–6 kn
1.6–3.4 m/s
12–19 km/h
8–12 mph
7–10 kn
3.4–5.4 m/s
20–28 km/h
13–17 mph
11–15 kn
5.5–7.9 m/s
29–38 km/h
18–24 mph
16–20 kn
8.0–10.7 m/s
Description
Calm
Light air
Light breeze
Gentle breeze
Moderate breeze
Fresh breeze
6–9 ft
2–3 m
3.5–6 ft
1–2 m
2–3.5 ft
0.5–1 m
1–2 ft
0.2–0.5 m
0–1 ft
0–0.2 m
0 ft
0m
Wave height
Moderate waves of
some length. Many
whitecaps. Small
amounts of spray
Small waves with
breaking crests.
Fairly frequent
whitecaps.
Large wavelets.
Crests begin to break;
scattered whitecaps
Small wavelets.
Crests of glassy
appearance, not
breaking
Ripples without
crests.
Flat.
Sea conditions
Branches of a moderate
size move. Small trees
in leaf begin to sway.
Dust and loose paper
raised. Small branches
begin to move.
Leaves and small twigs
constantly moving, light
flags extended.
Wind felt on exposed
skin. Leaves rustle,
vanes begin to move.
Smoke drift indicates
wind direction, still
wind vanes.
Calm. Smoke rises
vertically.
Land conditions
Beaufort scale
Giving Way in Sailing
All types of vessels on the water are governed
by the International Regulations for Preventing
Collisions at Sea, frequently abbreviated as
COLREGS. The entire set of rules is highly
complicated, however, when you start sailing, it
is sufficient to be familiar with the basic rules
that are listed here.
The rules for
navigation in
a channel (or canal)
All vessels must stay
to the right side in
channels or canals,
so that they meet on
their port side.
STAR
B
OAR
D
- OK
Overtaking rule
An overtaking vessel
must keep out of the
way of the vessel
being overtaken,
even in the case of a
sailing vessel
overtaking a powerdriven vessel.
AY
E-W
POR
IV
T-G
A vessel that arrives
from the right is given
way in the same way
as on the road.
When power-driven
vessels meet headon, they turn their
course to the right and
meet on their port
side.
The starboard side
vessel alters her
course in order to sail
behind the stern of the
port side vessel.
The windward vessel
shall avoid the
leeward vessel and
navigate in order to
sail behind her.
The port rule A vessel sailing
port side (with the boom on the
port side) has the pass over
a vessel sailing starboard side.
The vessel sailing starboard side
must give way to a vessel sailing
port side.
11
No. 01 - 2009
Manufacturer:
Martin Horák - design
Václava Kulíška 1174
686 05 Uherské Hradištì
Company Registration Number: 66787441
Registered MIC (Manufacturer's Identity Code)
according to ÈSN EN ISO 10087, Art. 42 - "HOC"
declares and certifies on its axclusive responsibility that the product:
Recreational Craft - MINICAT 420
determined for sailing in protected offshore waters, large lakes, river mouths,
bays, etc., is designed and produced in conformity with the requirements of
ÈSN EN ISO 6185, issued by the European Committee for Standardization
(CEN) on 10 November 2001 and is safe under the conditions of the above stated use.
The manufacturer declares that all the products put on the market conform to
the technical documentation and to the basic requirements.
Conformity assessment has been conducted according to:
ÈSN EN ISO 6185
ÈSN EN ISO 10240
ÈSN EN ISO 14945
ÈSN EN ISO 10087
Directive 94/25/ES
The product meets all the requested values and parameters and all the
required tests have been successfully carried out.
In Uherské Hradištì on 25. 3. 2009
12