1
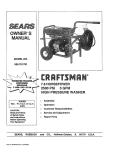
#E/ARSOwner's Manual
CRAFTSMAN°
4.5 HORSEPOWER
1800 PSI
2 GPM
HIGH PRESSURE WASHER
Model No.
580.761800
CAUTION:
_L
PRESSURE WASHER j
CUSTOMER
Before using this
_>
product, read this manual and
follow all Safe_..Rules
and
Operating Instructions.
HOURS:
SEARS, ROEBUCK
_t No.B,8,8D_0 (i_/_n)
Mon.-
HELPLINE
Fri. 8 a.m. to 5 p.m. (CST)
and CO., Hoffman
Estates, IL 60179 U.S.A.
• _
SAFETY RULES ............................
STORAGE
3
...............................
14
ASSEMBLY ..............................
4-5
TROUBLESHOOTING
........................
15
OPERATION .....
6-9
REPLACEMENT PARTS ..................
16-27
MAINTENANCE
i .......................
LIMITED
........................
HOW TO ORDER PARTS ............
10-13
ONE YEAR WARRANTY
ON CRAFTSMAN
HIGH PRESSURE
BACK PAGE
WASHER
For one year from the date of purchase, when this Craftsman High Pressure Washer is maintained and operated according to the instructions in the owner's manual, Sears will repair, free of charge, any defect in material
and workmanship.
If this high pressure washer is used for commercial purposes, this warranty applies for only 90 days from the
date of purchase. If this high pressure washer is used for rental purposes, this warranty applies for only 30
days after date of purchase.
This warranty does not cover:
• Expendable items such as spark plugs and air filters, which become worn during normal use.
• Repairs necessary because of operator abuse or negligence, includingdamage resulting from no water being
supplied to pump or failure to maintain the equipment according to the instructions contained in the owner's
manual.
WARRANTY SERVICE IS AVAILABLE BY RETURNING THE HIGH PRESSURE WASHER TO THE
NEAREST SEARS SERVICE CENTER OR DEALER IN THE UNITED STATES.
This warranty gives you specific legal rights and you may also have other rights, which vary from state to
state.
SEARS,
ROEBUCK
AND CO,, D/817 WA, Hoffman
2
Estates,
IL 60179
CAUTION: ALWAYS DISCONNECT SPARK PLUG WIRE AND PLACE WIRE WHERE IT CANNOT CONTACT SPARK PLUG,TO PREVENT ACCIDENTAL STARTING WHEN SETTING UP,
TRANSPORTING, ADJUSTING OR MAKING REPAIRS TO YOUR HIGH PRESSURE WASHER.
A
•
-_
read this manual and follow all Safety
AUTION: Before using this product,
Rules and Operating Instructions.
Never allow any part of the bodyto come in contact with
the fluid stream. DO NOT come in contactwith a fluid
stream createdby a leak in the high pressurehose.
High pressurestreamsof fluid this equipmentproduces
can pierce skinand its underlyingtissues,leadingto seriousinjuryand possibleamputation.
Never aim the gunat people, animalsor plants.
High pressurespraycan cause paint chipsor other particles to becomeairborneand fly at highspeeds.
Always weareye protectionwhen youuse this equipmentor
when you are in the vicinity where the equipmentis in use.
Operate the pressure at no more than the PSI fluid pressure rated for your pressure washer.
Never move the machine by pulling on the high pressure
hose. Use the handle provided on the top of the unit.
Always be certain the spray gun, nozzles and accessories
are correctly attached.
Never use a spray gun which does not have a trigger lock
or trigger guard in place and in working order.
Use a respirator or mask whenever there is a chance that
vapors may be inhaled. Read all instructions with the mask
so you are certain the mask will provide the necessary
protection against inhaling harmful vapors.
High pressure spray may damage fragile items including
glass. Do not point spray gun at glass when in the jet
spray mode.
Keep the hose connected to machineor the spraygun
while the systemis pressurized.Disconnectingthe hose
while the unitis pressurizedis dangerous.
Hold the spraygunfirmly in yourhand beforeyou startthe
unit.Failureto do so could resultin an injuryfrom a whippingspraygun. Do not leave the spraygun unattended
while the machineis running.
The cleaningarea shouldhave adequate slopesand
drainageto reducethe possibility of a falldue to slippery
surfaces.
Keep water sprayaway from electricwiringor fatal electdc
shock may result.
Do notadjust unloadervalve to a pressurein excess of
machinerating.
Do not securetriggergun in the pull-beck(open)position.
Do not by-passany safety deviceon this machine.
The muffler and engine heat up during operation and
remain hot immediately after shutting it down. Avoid contact with a hot muffler or engine or you could be severely
burned.
•
•
•
•
•
•
Engine exhaustgasescontain DEADLY carbon monoxide
gas. This dangerousgas, if breathed in sufficientconcentrations,can cause unconsciousnessor even death.
Operate thisequipmentonlyin the open air where adequate ventilationis available.
•
Gasoline is highlyFLAMMABLEand itsvaporsare
EXPLOSIVE. Do not permitsmoking,openflames, sparks
or heat in the vicinitywhile handlinggasoline.Avoid
spillinggasolineon a hot engine.Allowunitto coolfor 2
minutesbeforerefueling.Complywith all lawsregulating
storage and handlingof gasoline.
Locate thispressurewasher in areas awayfrom combustiblematerials,combustiblefumes or dust.
•
•
The high pressureequipment is designedto be used with
Sears authorizedpartsonly. If you usethisequipment with
partsthat do notcomply with minimumspecifications,the
user assumesall risks and liabilities.
•
•
•
•
•
•
•
•
•
Some chemicalsor detergentsmay be harmfulif inhaled
or ingested,causingsevere nausea,faintingor poisoning.
The harmfulelementsmay cause propertydamage or
severe injury.
Do not allow CHILDREN to operate the PressureWasher
at any time.
Operate engine onlyat govemed speed. Running the
engineat excessivespeedsincreasesthe hazard of personal injury.Do not tamperwith partswhich may increase
or decrease the governedspeed.
Do notwear loose clothing,jewelry or anythingthat may
be caughtin the starteror other rotatingparts.
Beforestartingthe PressureWasher in coldweather,
check all parts of the equipmentand be sure ice has not
formed there.
Unitswith brokenor missingparts,or withoutprotective
housingor covers shouldNEVER be operated.
The mufflerand air cleaner must be installedand in good
conditionbeforeoperatingthe Pressure Washer. These
componentsact as sparkarrestorsif the engine backfires.
Check the fuel systemfor leaks or signsof deterioration
such as chafed or spongyhose, loose or missingclamps
or damaged tankor cap. Correctall defectsbeforeoperating the PressureWasher.
Do not sprayflammable liquids.
,_
•
•
•
•
•
•
•
•
•
•
•
•
•
MAINTENANCE
AND STORAGE:
• Operate and storethis uniton a stablesurface.
• High pressurehose can developleaks fromwear, kinking,
abuse, etc. Water sprayingfroma leak is capable of injecting materialintoskin.Inspecthose each time before using
it. Check all hosesfor cuts, leaks, abrasionsor bulgingof
cover, or damageor movementof couplings. If any of
these conditions exist, replace hose immediately.Never
repairhigh pressurehose. Replace it with anotherhose
that meets minimumpressureratingof yourpressHre
washer.
LOOK
FOR "A'FrENTION!!!
THIS SYMBOL BECOME
TO POINT ALERT!!!
OUT IMPORTANT
SAFETY
PRECAUTIONS.
IT MEANS
YOUR SAFETY
IS INVOLVED."
3
CARTON
CONTENTS
HOW TO SET UP YOUR
The following parts are shippedloose with your pressure
washer:.
*
•
Manual Bag (which includesthe items listed below)
• Ov_er's Manual
* Nozzle Cleaner Kit
•
Parts Box (which includes items listed below)
• Spray Gun
• Wand Extensionwith Hi/Lo Adjustable Nozzle.
• Wire Form
• Motor Oil
•
WASHER
Forthe most part, yourCraftsman High PressureWasher
has been assembledatthe faclonj. You must, however,
attachthe wire form, assemble the spray gun, and attach
the high pressurehose to the pump and spray gurL
Main Unit -- pressure washer with wheels,
guide handle.
High Pressure Hose
•
PRESSURE
•
While facing the rear of the Pre_;sureWasher, insert
the wire supportwith the longer arm positk)nedon the
left. From this view the hook should resemble a =,r'.
•
Cut _ wrap on chemicalinjecliontube. Remove chamical injectionfilter,threadchemicalinjectiontube through
the wireform and reinsertIilter intotube.
"O"-Ring Kit
Become familiar with each piece before assembling the
pressure washer. Check all contentsagainst the illustration on Page 6. If any parts are missing or damaged, call
the Pressure Washer Helpline at 1-800-222-3136.
TO REMOVE PRESSURE WASHER FROM
CARTON
Removeloose parts and parts box included with pressure washer. The high pressure hose is packed in the
bottom of the carton on the guide handle end.
Remove the hose.
•
Slice two comers at guide handle end of carton from
top to bottom so the panel can be folded down fiat,
then remove all packing material.
•
Raise guide handle, secure in place and 'rollthe pressure washer out the open end of the carton.
Loosen knobs
to raise handle
Tighten knobs
when handle is
straight.
•
Check carton for additionalloose parts.
4
•
Cut the tie wraps on the high pressurehose and
connect high pressure hose to gun. Tightenby
hand.
•
Remove plastic cap and connect high pressure
hose to pump. Tighten by hand.
•
Place assembled spray gun on holder.
CHECKLIST
__
_
Before you operate your new high pressure washer
_
please review the following checklist:
high pressure
hose connections
to the spray
_ The
All assembly
instructionshave
been completed.
gun and to the pump are tight and secure.
_/
'-b _
_
1
While learning how to use your high pressure
(_
washer, pay extra attention to the following important
items:
•
Engine oil is at proper level
Important: Any attempt to crank or start the engine
before it has been properly serviced with the recommended oil may result in an engine failure. See Page
8 for instructionson adding oil and proper oil specifications.
•
Attach nozzle extension to spray gun.
Important: The water supply to your pressure washer must be connected and tumed on priorto starting
your engine.
•
Be sure gas tank is filled properlywith clean,
fresh, unleaded gasoline.
•
Become familiar with all controls- their location
and function. Operate those controlsbefore starting the engine.
5
._
KNOW YOUR HIGH PRESSURE
WASHER
Read this owner's manual and safety rules before operating your high pressure washer. Compare the illustrations with your high pressure washer to familiarize yourself with the locations of various controlsand adjustments.
Save this manual for future reference.
Spray Gun Assembly
Guide Handle
High Pressure Hose
Detergent Pick-Up
tube and Filter
Oil Fill Cap
Recoil Starter
Gas Cap
High Pressure
Outlet
Engine Throttle
Control
Choke Lever
Water Inlet
Spray Gun Assembly - Controls the applicationof water
onto cleaning surface with trigger device. Includes safety
latch.
Pump - Develops high water pressure.
Engine Throttle Control Lever - Sets engine in starting
mode for recoil starter; STOPS running engine.
Detergent Pick-up Tube and Filter - Mixes water and
detergent in outlet water flow.
Recoil Starter - Used for starting the engine manually.
Choke Lever -- Puts a cold engine in starting mode.
High Pressure Outlet - Connectionfor high pressure
hose.
Air Cleaner - Dry type filter element limits the amount of
dirt and dust that gets in the engine,
Water Inlet - Connection for garden hose.
6
HOW TO USE YOUR PRESSURE WASHER
IF YOU HAVE ANY PROBLEMS operating your pressure washer, please call the pressure washer helpline
at 1-800-222-3136.
A
WARNING NEVER adjust spray pattern
when spraying. NEVER put hands in front
of spray nozzle to adjust spray pattern.
You could be injured.
HOW TO USE THE-ADJUSTABLE NOZZLE
On the end of your spray gun is a nozzle that you
can slide forward and backward and that you can
also twist from side to side. With the adjustable nozzle you can adjust the spray pattern to be either high
pressure or low pressure. You can also adjust the
spray so it is concentrated in a stream pattern or
expanded into a fan pattern.
•
•
APPLYING DETERGENT AND CLEANING WITH
ADJUSTABLE NOZZLE
IMPORTANT: Use soaps designed specifically for
pressure washers. Household detergents could damage the pump.
IMPORTANT: You must attach all hoses before you
start the engine. Starting the engine withoutall the
hoses connected and without the water turned ON
willdamage the pump.
To apply detergent follow these steps:
•
Place small filter on the clear, chemical injection
tube into the detergent container.
•
•
Slide Nozzle Forward
for low pressure
mode and detergent
application
Twisting the nozzle adjusts the spray pattern from
a narrow pattern to a fan pattern.
Prepare the detergent solution as required by the
job.
Hang the detergent solutionon the "J" hook on
the wire form on the guide handle.
Slide the nozzle forward when you wish to adjust
the spray to low pressure mode. Slide the nozzle
backward to achieve high pressure.
Nozzle In High
Pressure Mode
If you get spray nozzle too close, especially using
high pressure mode, you may damage the cleaning surface.
Slide the adjustable nozzle forward to low pressure mode. Detergent cannot be applied with
nozzle in high pressure position.
Note: The first step involves applying an appropriate
detergent/solvent solutionto penetrate and loosen
grime. The detergent is applied at low pressure to
avoid splashing,oversprayingand waste. Leave the
solution on surface for 3 to 5 minutes to allow solution to work.
Note: The second step involves cleaning the surface
you have prepared with the pressure washer and
then rinsingit clean.
Review the use of the adjustable nozzle.
Connect garden hose to water inlet (see "TO
START PRESSURE WASHER"), check that high
pressure hose is connected to spray gun and
pump (see ASSEMBLY), and start engine.
Twist nozzle counterclockwise for fan
spray pattern
Twist nozzle clockwise for narrow
spray pattern
For most effective cleaning, keep spray nozzle
between 8 to 24 inches away from cleaning surface.
For cleaning, start at lower portion of area to be
washed and work upward, using long, even overlapping strokes.
Allow the detergent to soak in between 3-5 minutes before washing and rinsing.
RINSING WITH THE PRESSURE WASHER
A
WARNING Be extremely careful if you must
use the pressure washer from ladder, scaffolding or any other relatively unstable location. Pressure in a running washer builds in
the wand as you climb. When you press the
trigger, the recoil from the initial spray could
force you to fall, or if you are too close to the
cleaning surface, high pressure could force
you off a climbing apparatus.
D
Hook up the water supply and start your pressure
washer (see TO START THE PRESSURE WASHER).
Slide adjustable nozzle back to high pressure position
and wait for detergent to clear. Detergent will not flow
when in the high pressure mode.
When detergent has cleared you may want to expand
the spray pattem for a more gentle rinsing action.
Start at top of area to be dnsed, working down with
same action as for cleaning.
Note: When addingoil to the engine crankcase in the
future, use only high quality detergent oil rated with API
service classificationSF or SG rated SAE 30 weight. Use
no special additives.
Select the oil's viscositygrade according to your expected operating temperature.
colder
•
Move the Throttle Control Lever to the 'Slow' position,
32°F
_
warmer
I
5W30
SAE 30
Although multi-viscosityoils (5W30, 10W30, etc.) improve
starting in cold weather, these multi-viscosity oils will
result in increased oil consumption when used above
32°F. Check your engine oil level more frequently to
avoid possible damage from running low on oil.
•
Place pressure washer on a level surface
•
Clean area around oil fill and remove oil dipstick.
•
Wipe dipstick clean.
•
Pour oil from enclosed bottle into the oil fill opening
until oil reaches FULL mark on the dipstick. Stop and
check the oil level periodically. DO NOT OVERFILL.
•
Install oil dipstick, hand tighten securely.
You can also stop detergent from flowing by simply
removing siphon from bottle.
HOW TO STOP YOUR PRESSURE WASHER
_
ADD GASOLINE
WARNING NEVER fill fuel tank indoors.
NEVER fill fuel tank when engine is running
or hot. DO NOT light a cigarette or smoke
when filling the fuel tank.
A
Use regular UNLEADED gasoline with the pressure
washer engine. Regular leaded gasoline may also be
used if UNLEADED is not available. Fuel tank capacity is 1.6 U.S. quart.
Fast
Slow
Stop
•
Wait for the engine to idle down.
•
Move the Throttle Control Lever to the 'Stop' position.
•
Simply shutting off the engine will not release
pressure in the system. Squeeze trigger on the
spray gun to relieve pressure in the hose.
Note: A small amount of water will squirt out when
you release the pressure.
BEFORE STARTING THE PRESSURE WASHER
To operate the engine you will need to do the following:
ENGINE OIL
A 20 oz. bottle of SAE 30 weight oil is included in the
parts carton. Fill engine crankcase with recommended
oil until oil level is at FULL point on dipstick. Do not
overfill above that mark. POUR SLOWLY.
CAUTION: Do not overfill the fuel tank.
Always leave room for expansion.
IMPORTANT: It is importantto prevent gum deposits
from forming in essential fuel system parts such as the
carburetor,fuel filter, fuel hose or tank during storage.
Also, experience indicatesthat alcohol-blended fuels
(called gasohol, ethanol or methanol) can attract moisture
which leads to separation and formation of acids during
storage. Acidic gas can damage the fuel system of an
engine while in storage. To avoid engine problems, the
fuel system shouldbe emptied before storage of 30 days
or longer. See "Storage" on page 13. Never use engine
or carburetorcleaner productsin the fuel tank or permanent damage may occur.
•
Clean area around fuel fill cap, remove cap.
•
Add "UNLEADED" regular gasoline, slowly, to fuel
tank.
•
Install fuel cap and wipe up any spilled gasoline.
TO START YOUR PRESSURE WASHER
•
You have assembled your high pressurewasher and
have prepared the engine for starting.You are now ready
to clean your car, boat or whatever you plan to dean.
Set Choke Lever to "Choke"
multi-positionchoke.
position.Note: This is a
.
Place the pressure washer in an area close enough to
an outside water source that can flow at a rate of at
least 2 gallons per minute. Connect a garden hose to
the water spout.
/
Check that the.high pressure hose is tightlyconnected
to the spray gun and to the pump. See ASSEMBLY
section for illustrations.
Pull back on the locking collar to remove the female
quick-connect from pump.
Assembled
Quick-Connect
Note: For a warm engine, be sure the Throttle Control
Lever is in the 'Fast' position and the Choke Lever is in
the "Run" position.
Pull back on locking
collar to separate
Positionthe nozzle in the low pressure mode (nozzle
slidforward) and squeeze the trigger on the spray gun
to relieve the air pressure caused by turning ON the
water. Water will spew out the gun in a thin stream.
Continue to hold trigger until you have a steady
stream of water and no air remains in the system. This
will make it easier to pull start the engine. Release the
trigger.
/
Disassembled
male end
Engage the safety latch on the gun.
Grasp rope handle and pull slowly until you feel some
resistance. Then pull cord rapidly to overcome compression, prevent kickback and start the engine. Let
rope return to starter slowly.
Disassembled
female end
Note: You will also need to pull back on the lockingcollar
to attach the female quick-connect.
Check inlet screen. If the screen is dirty, clean
before attaching to garden hose. If the screen is
damaged, Do not connect to the garden hose. Call
the pressure washer customer helpline to order a
replacement.
Attach the female quick-connect to garden hose and
then attach the garden hose to the water inlet. Make
sure the quick--connectis lockedtogether.
Note: Always keep the Throttle Control Lever in the 'Fast'
positionwhen operating the pressure washer.
•
When the engine starts, gradually move the Choke
Lever from one position to the next until it is in the
"Run" position.
Note: If after 3 pulls the engine fails to start, move the
Choke Lever to the 'Run' position and pull the recoil
starter handle rapidly (Max. 3 pulls).
SIPHONING
MALE
We recommend that you DO NOT siphon standing water
for your water supply. Contaminated, brackish or dirty
water can damage the pump. Connect only to household
water supply.
TIPS
FEMALE
CONNECTOR
•
Never use the garden hose inlet to siphondetergent or
wax.
•
•
Turn on the water.
IMPORTANT: Do not run pump withoutthe water supply
connected and turned on. You must follow this caution or
the pump will be damaged.
•
Move the Throttle Control Lever to the 'Fast'
position
If you have the spray nozzle too far away, the cleaning
will not be as effective.
CUSTOMER
MAINTENANCE SCHEDULE
RLL IN DATES AS YOU COMPLETE
REGULAR SERVICE
MAINTENANCE TASK
RESPONSIBILITIES
HOURLY OPERATING INTERVAL
BeforeEach
Use
Every 25
Hours or
Yearly
SERVICE DATES
Every 100
Hours or
Yearly
PRESSURE WASHER
Check/clean water inlet screen
on quick-connect.
Xt
Check high pressure hose.
X
Check detergent hose.
X
Check spray gun and assembly for leaks.
X
Purge pump of air and contaminants.
X
ENGINE
Check oil level.
X
Change engine oil.
X*
Service air cleaner.
X°*
Clean/replace spark plug.
X
Prepare for storage.
Prepare unit for storage if it is to
remainidlefor longerthan30 days.
Cleanif clogged. Replace if perforated
ortom.
Changesooner
whenoperating under heavy loador high ambient temperature.
** Cleanmoreoftenunderdirty or dusty conditions.
t
*
GENERAL
RECOMMENDATIONS
Engine Specifications
The warranty of the high pressure washer does not cover
items that have been subjectedto operator abuse or negligence. To receive full value from the warranty, operator
must maintain high pressure washer as instructedin this
manual.
ENGINE MODEL
Briq.qs& Stratton
RATED HORSEPOWER
4.5
DISPLACEMENT
190cc
SPARK PLUG: Type:
Champion J-19LM
or equivalent
0.030 inch (0.76mm)
Some adjustments will need to be made periodicallyto
properly maintain your high pressure washer.
Set Gap to:
All adjustments in the Service and Adjustments section of
this manual should be made at least once each season.
•
Once a year you should clean or replace the spark
plug and clean or replace the air filter and check the
gun and wand assembly for wear. A new spark plug
and clean air filter assure properfuel-air mixtureand
help your engine run better and last longer.
PRODUCT
GASOLINE CAPACITY
1.6 U.S. quart
OIL
SAE 30 weiqht
SOLID STATE IGNITION
AIR GAP
0.0125 inch
In the State of Califomia a spark arrestor is required by
law (Section 4442 of the California Public Resources
Code). Other states may have similar laws. Federal laws
apply on federal lands.
SPECIFICATIONS
Pressure Washer Specifications
PRESSURE
1800 psi
FLOW RATE
2 GPM
DETERGENTMIX
Use undiluteddeterqent
Note: If you equip the engine of your pressure washer
with a spark arrestor muffler, the spark arrestor must be
maintained in effective working order by the owner/operator.
WATER SUPPLY
TEMPERATURE
Not to Exceed 140°F
You can order a spark arrestor through your Sears
Service Center.
10
BEFORE
•
•
•
•
•
•
EACH USE
ENGINE MAINTENANCE
Check water inlet screen for damage.
Check high pressure hose for leaks.
Check detergent inlet hose and filter for damage.
Check gun and wand assembly for leaks.
Purge pump of air and contaminants.
Check engine oil level.
PRESSURE
WASHER
MAINTENANCE
Check and Clean Inlet Screen: Remove quick-connect and examine inlet screen on the female connector, Clean if it is clogged or replace if it is torn.
CHECKING OIL LEVEL
Oil level should be checked prior to each use or at
least every 5 hours of operation, Keep oil level maintained.
CHANGING ENGINE OIL
Change engine oil every 25 hours. If you are using
your pressure washer under extremely dirty or dusty
conditions,or in extremely hot weather, change oil
more often.
Change oil while engine is still warm from running, as follows:
Check High Pressure Hose: High pressure hose
can develop leaks from wear, kinking, abuse. Inspect
hose each time before using it. Check for cuts, leaks,
abrasions or bulging of cover, or damage or movement of couplings. If any of these conditions exist,
replace hose immediately.
_IL
Before you tip the pressure washer to drain oil,
drain fuel tank by running pressure washer until
fuel tank is empty.
Clean area around oil fill, remove oil fill cap/dipstick. Wipe dipstick clean.
DANGER: Water spraying from a leak is
capable of injecting material into skin.
NEVER repair high pressure hose,
Replace with hose that meets minimum
-_ pressure rating of your pressure washer.
Check Detergent Hose: Examine the filter on the
detergent hose and clean if clogged. Hose shouldfit
tightly on barbed fitting. Examine hose for leaks or
tears. Replace the filter or hose if either is damaged.
Check Gun and Wand: Examine hose connectionto
gun and make sure it is secure. Test triggerby pressing it and making sure it springsback into place when
you release it. Put safety latch in UP positionand test
trigger. You shouldnot be able to press trigger.
Purge Pump of Air and Contaminants
To remove the air from the pump, follow these steps:
Tip your pressure washer to drain oil completely
from the oil fill tube into a suitable container.
When crankcase is empty, return the pressure
washer to upright position.
Fill engine crankcase with recommended oil until
oil level is at FULL point on dipstick.Do not overfill above that mark. POUR SLOWLY.
•
When engine crankcase is filled to proper level,
installand tighten oil cap/dipstick.
SERVICE AIR CLEANER
Your engine will not run properly and may be damaged if you run it with a dirty air cleaner.
Clean or replace the air cleaner once every 25 hours
of operation or once each year, whichever comes
first. Clean or replace more often if operating under
dirty or dusty conditions. Replacements are available
at your local Sears Authorized Service Center.
•
Set up the pressure washer as described in the
ASSEMBLY section and connectthe water supply.
•
Remove the wand extension from the gun.
To clean or replace the air cleaner, follow these
steps:
•
Pull the trigger on the gun and hold.
•
Remove screw on the air cleaner cover.
To remove the contaminantsfrom the pump, follow
these steps:
Remove air cleaner carefully to prevent debris
from falling into carburetor.
•
Set up the pressure washer as described in the
ASSEMBLY section, and connectthe water supply.
Take air cleaner apart and clean all parts and service the foam element.
•
Remove the nozzle attachment from the gun.
•
Start the engine according to instructions in
OPERATION section.
•
Wash foam element in liquid detergent and water.
If the element is damaged or very dirty, replace
the element.
Squeeze the element dry in a clean cloth.
Pull the trigger on the gun and hold.
When the water supply is steady and constant,
engage the safety latch and refasten the nozzle
attachment.
Saturate the foam element in engine oil. Squeeze
the saturated element in a clean cloth to remove
excess oil.
•
Reassemble all parts and fasten securely to the
carburetorwith the screw.
I!
CLEAN/REPLACE SPARK PLUG
A
from spark plug and keep wire away from
AUTION:
spark
plug. Disconnect spark plug wire
•
I
Remove nozzle from the end of the wand using the
allen wrench included with the kit or a 2mm or 5/64
allen wrench.
\
Change the spark plug every 100 hours of operation or
once each year, whichever comes first. This will help
your engine to start easier and run better. Replace with
champion J-19LM or equivalenttype spark plug. Set the
spark plug gap to 0.030 inch (0.76mm).
Use the wire included in the kit or a small paper clip
to free the foreign materials cloggingor restrictingthe
nozzle.
SET PLUG GAP AT 0.030 inch
(0.76 mm)
Insert wire into nozzle and turn back and forth to
clear obstruction.
Remove additionaldebris by back flushing water supply through wand. Back flush between 30 to 60 seconds. Turn wand to stream spray and move nozzle
from low to high pressure while flushing.
CARBURETOR
If you think your carburetor needs adjusting, see your
nearest Sears Service dealer. Engine performance may
be affected above 4,000 feet in altitude. To improve
engine performance, see your nearest Sears Service
dealer.
NOZZLE MAINTENANCE
If the nozzle becomes restrictedor clogged with foreign
materials, such as dirt, excessive pump pressure may
develop. A partially cloggednozzle can cause a pulsing
sensation during use. This generally is not a pump related problem, but rather a clogged or partially restricted
nozzle.
If the nozzle becomes clogged or partially restricted,
immediately clean the nozzle with the kit includedwith
your pressure washer by following these instructions:
•
Shut off the engine and turn off the water supply.
•
Separate the wand from the gun.
•
Rotate to stream setting.
/2
•
Reinstall nozzle into wand. DO NOT overtighten.
•
Reconnect wand extension to spray gun.
•
Reconnect the water supply,turn ON the water, and
start the engine.
•
Test the pressure washer by operating with nozzle in
the high and the low pressure positions.
O-RING
1 O-Ring (p/n B2386) for the outside of the Male
Quick-Connect.
MAINTENANCE
Through the normal operation of your pressure washer,
O-Rin_, which keep the connections of the hoses and
gun tight and leak-free may become worn or damaged.
Provided with your pressurewasher is an O-Ring
Maintenance Kit which provides replacement O-Rings,
Rubber Washer and Quick Connect filter.
O
Parts in the O-Ring Kit Include:
•
1 O-Ring (p/n97837) for the end of the spray gun
connection between gun and high/low spray wand.
•
•
1 Water Inlet Screen (pin B2384) for the Female
Quick-_onnect.
2 O-Rings (pin B2264) for the ends of the high pressure hose.
To remove a worn or damaged O-Ring:
•
Note: The above two O-Rings are close in size. Please
match carefully to assure properO-Ring usage.
•
1 Rubber Washer (pin B2385) for the inside of the
Male Quick-Connect.
13
Use a small flathead screwdriverto get undemeath
the O-Ring and pry it off.
It is importantto prevent gum deposits from forming in
essential fuel system parts such as the carburetor,fuel filter, fuel hose or tank during storage. Also, experience
indicates that alcohol-blendedfuels (called gasohol,
ethanol or methanol) can attract moisture which leads to .
separation and formation of acids during storage. Acidic
gas can damage the fuel system of an engine while in
storage.
AFTER EACH USE
Water shouldnot remainin the unitfor longperiodsof time.
Sedimentsof mineralscan depositon pumppartsand
"freeze" pumpaction.Followtheseproceduresalter every
use:
Flush detergent hose by placing the injectorfilter into
a pail _f clear water while running Pressure Washer
with nozzle in low pressure mode. Flush until you can
see clear water runningthrough the tube.
To avoid engine problems, the fuel system should be
emptied before storage of 30 days or longer. Follow these
instructions:
Shut off the engine and let it cool, then remove all
hoses.
A
PROTECT FUEL SYSTEM
CAUTION: Be sure throttle lever is in
"STOP" position before you continue. If
you start engine without the proper water
supply connected, you can damage the
pump.
_k
Remove all gasoline from the fuel tank to prevent gum
deposits from forming on these parts and causing possible malfunctionof engine.
Empty the pump of all pumped liquids by pulling recoil
handle about 6 times. This should remove most of the
liquid in the pump.
Run engine until engine stops from lack of fuel. Make
sure you have water supply to pump inlet connected
and turned ON.
Coil the high pressure hose and inspect it for damage.
Cuts in the hose or fraying of it could result in leaks
and loss of pressure. Should any damage be found,
replace the hose. DO NOT attempt to repair a damaged hose. Replace the hose with the genuine
Craftsman part.
CHANGE OIL
While engine is still warm, drain oil from crankcase. Refill
with recommended grade. (See Changing Oil Level on
Page 11.)
Drain water from hose and properly hang it on the
wire supportprovided on the guide handle.
,_
•
OIL CYLINDER BORE
DANGER:
store engine
with
fuel in II
tank indoorsNEVER
or in enclosed,
poorly
ventilat-
-
Remove
plug and
pour about
ounce
of
enginespark
oil intothe
cylinder.
Cover 1/2
spark
plug(15ml)
hole
ed areas
where
fumeslight
may
an open
flame,
spark
or pilot
asreach
on a furnace,
water heater, clothes dryer or other gas
appliance.
/
A
_
•
with rag. Crank slowly to distributeoil.
Install spark plug. Do not connect spark plug wire.
[I
I
I
Store in a clean, dry area.
CAUTION:
Avoid spray
fromslowly.
spark plug
hole
when cranking
engine
OTHER
WINTER STORAGE
Do not store gasoline from one season to another.
CAUTION: You must protect your unit
from freezing temperatures. Failure to do so
will permanently damage your pump and
render your unit inoperable.
Replace your gasoline can if your can startsto rust.
Rust and/or dirt in your gasolinewill cause problems.
If possible, store your unit indoorsand cover it to give
protectionfrom dust and dirt. BE SURE TO EMPTY
THE FUEL TANK.
To protect the unit from freezing temperatures:
•
DANGER:
Drainaway
fuel from
into approved
container outdoors,
open flame.
Be
sure engine is cool. Do not smoke.
Draw windshieldwasher fluid into the pump by pouring the washer fluid into a 3-foot section of garden
hose connected to the inlet adapter and pullingthe
recoil handle twice.
Cover your unit with a suitable protective cover that
does not retain moisture.
IMPORTANT: NEVER cover your pressure washer while
engine and exhaust area are warm.
LONG TERM STORAGE
Ifyou do not plan to usethe PressureWasher for more than
30 days, you mustprepare the engine for long termstorage.
Note: As always, prepare the pressure washer pump as
you would after each use.
/4
CAUSE
PROBLEM
Pumphasfollowingproblems:
failure to producepressure,or
erraticpressure,chattering,lossof
pressure,lowwatervolume.
Detergentfailstomixwith.
spray.
CORRECTION
1. Nozzlein lowpressuremode.
2. Water inletis blocked.
3. Inadequatewatersupply
1. Pullnozzlebackwardfor high
pressuremode.
2. Clearinlet
4.
Inlet hose is kinked or leaking
5.
Clogged water inlet screen.
3. Provideadequatewaterflow at
least2 gpm.
4. Straighteninlethose,patchleak.
5. Replace/ cleanwaterinletscreen.
6.
7.
Water supply is over 140°F.
Outlet hose is blocked.
6. Providecoolerwatersupply.
7. Clearblocksinoutlethose.
8. Outlethoseleaks.
9. Gun leaks.
10. Nozzleis obstructed.
9. Replace o-ring or gun if necessary.
10. Clear nozzle.
11. Pumpisfaulty.
11. Contact Sears Service Department,
1.
Detergent line is not submerged.
8,
Replace outlet hose if leaking.
1.
Insert chemical line into detergent.
Clean or replace filter/detergent
line.
in detergent spray
2.
Chemical filter is clogged.
2.
3.
Nozzle is in high pressure mode.
3.
Push nozzle forward for
low pressure mode.
Enginerunsgoodwhennotspraying
but dieswhenyoubegintospray.
Engine speed is too slow.
Contact Sears Service Department.
Enginewillnot start;or starts
and runsrough
1. Dirtyair cleaner
2. Out of gasoline.
3. Stalegasoline.
1.
2.
Clean or replace air cleaner.
Fill fuel tank.
3.
Drain gas tank; fill with fresh fuel.
4. Sparkplugwire notconnected
4.
Connect wire to spark plug.
to spark plug.
5.
Bad spark plug.
5.
Replace spark plug.
6.
Water in gasoline.
6.
Drain gas tank; fill with fresh fuel.
7.
Overchoking or flooded
7.
Set engine throttle control lever to
8.
Excessively rich fuel mixture.
8.
Contact Sears Service Department.
9. Intakevalvestuckopenor closed.
9.
Contact Sears Service Department.
10. Enginehaslostcompression.
10. Contact Sears Service Department.
Engine shuts down during
1.
Out of gasoline.
1.
Fillfuel tank.
operation
2.
Air filter dirty
2.
Replace Air filter.
Engine lacks power.
Dirty air filter.
fast position,choke in run position.
Replace air filter.
15
CRAFTSMAN
1800 PSI HIGH PRESSURE
BRIGGS & STRATTON
4-CYCLE
WASHER 580,761800
ENGINE 12F802-2407-E1
615 O
230
616
592
584 _
307
116A _
3O6
337
635
3o78
11058 OWNER'S MANUAL
REF.
NO.
1
2
3
PART
NO.
DESCRIPTION
REF.
NO.
493260 Cylinder Aseambly
293708 Bushing
,299819 Seai-Oil
227
230
284
492349 Lever-Governor
67072 Washer
94511 Sorew.-Shoulder
306
307
224324 Shield-Cylinder
94515 Scmw-Hex.
337
383
523
525
802592
89838
495264
495265
562
584
585
592
615
92613
224328
*272238
231082
94474
5
214626
7 _272916
8
495786
9 -O272481
10
94650
11
13
51
,54
116
116A
Head-Cylinder
Gasket-Cylinder Head
Breetber Aseambly
Gasket-Bmether
Scmw-Hex.
231685 Tube-Breather
94547 Screw-Hex.
,272199 Gasket-Intake
94526 Screw-Hex.
*-280393 Seai-O-Ring
,280966 Seai-O-Ring
PART
NO.
DESCRIPTION
Plug-Spark
Wrench_park
Dipstick
Tube-Oil Fill
REF.
NO.
Plug
PART
NO.
DESCRIPTION
616
625
263175
497465
635
847
66536 Boot-Spark Plug
495263 Dipstick/Tube
Assembly
213512 Seat-Valve
(Intake)
213513 Seat-Valve
(Exhaust)
262001 Bushing-Guide
(Exhaust Valve)
Note
869
Bolt-Carriage
Baffle-Cylinder
Gasket-Breather
Nut-Hex.
Retainer
. Included in Gasket Set-Part Number 497316.
• Induded in Carburetor l_t-.-PartNumber 498260.
I
lit REQUIRES SPECIAL TOOLS
TO INSTALL SEE REPAIR
INSTRUCTION MANUAL
870
871
1058
Crank-Governor
Manifold--Intake
63709 Bushing-Guide
(Intake Valve)
273663 Owner's Manual
• Included in Carburetor Gasket Set-Part Number 498261.
O Included in Valve Overhaul Gasket Set-Part No. 498528.
Assemblies Include all parts shown in frames.
15
CRAFTSMAN
1800 PSI HIGH PRESSURE WASHER 580.761800
BRIGGS & STRATTON
258
4-CYCLE
ENGINE 12F802-2407-E1
27 o
4° )4o
34
33_
24
27
741
146,
REF.
NO.
PART
NO.
DESCRIPTION
16
24
25
498571 Crankshaft
222698 Key-Flywheel
499429 Piston Assembly
2s
(Standard)
499429R_gSet
(Standard)
27
263190 Lock-Piston Pin
REF.
NO.
28
PART
NO.
DESCRIPTION
29
Pin-Piston
(Standard)
499424 Rod--Connecting
32
33
94699 Screw.-Hex.
262651 Valve-Exhaust
RER
NO.
499423
(Standard)
'."Included---in Gasket Set-Pad Number 497316.
• Included in Carburetor Kit-Part Number 498260.
Assemblies
34
35
40
45
146
741
PART
NO.
262652
262224
93312
262204
94388
262598
DESCRIPTION
Valve-Intake
Spring-Valve
Retainer-Valve
Tappet-Valve
Key-'l'm_ing
Gear-Timing
• Included in Carburetor Gasket Set-Pad Number 498261.
2_ Included in Valve Overhaul Gasket Set-Part No. 498528.
include
all milts shown in frames.
17
CRAFTSMAN
1800 PSl HIGH PRESSURE
BRIGGS & STRATTON
WASHER580.761800
4-CYCLE ENGINE 12F802-2407-E1
46
RER
NO.
PART
NO.
DESCRIPTION
REF.
NO.
4
12
493279
.272198
Sump-Engine
Gasket-Crankcase
20
22
15
94720
PART
NO.
.399781
94220
DESCRIPTION
REF.
NO.
Seal-Oil
Screw-Hex_
43
46
PART
NO.
493737
498275
DESCRIPTION
Govemor/Oil Slinger
Gear-Cam
Plug-Oil Drain
. Included in Gasket Set--Part Number 497316.
• Induded in Carburetor Kit-Part Number 498260.
4. Included in Carburetor Gasket Set-Part Number 498261.
Included in Valve Overhaul Gasket Set-Part No. 498528.
Assemblies include all parts shown in frames.
X8
CRAFTSMAN
1800 PSI HIGH PRESSURE WASHER
BRIGGS & STRA'I'FON
580.761800
4-CYCLE ENGINE 12F802-2407-E1
!
I
124
I
634_)
634_
,08
!
I
3
J
137_
11o
I
617
110_
ICHOKE SYSTEM I'
REF.
NO.
94
95
98
104
108
PART
NO.
e493765
94098
398185
e231371
223471
110 eo
117
498978
REF.
NO.
DESCRIPTI()N
VaNe-Idle Adjustment
Screw-Slotted
Screw-Idle Speed
Pin-Float Hinge
Valve-Choke
124
125
94525
499059
127
•
Seal-O-Ring
(Sold in Kit Only)
Jet-Main
130
131
133
134
223470
493267
398187
•398188
(Standard)
497315 Jet-Main
137 •o
DESCRIPTION
RER
NO.
Screw--Hex.
Carburetor
Plug-Welch
(Sold in Kit Only)
Valve-Throttle
Shaft-Throttle
Float-Carburetor
Valve-Needle
PART
NO.
DESCRIPTION
141
494218
617 e_,270344
634 eo
Shaft-Choke
Seal-Intake Manifold
Washer
975
(Sold in Kit Only)
Bowl-Roar
493640
(Includes Seat)
Gasket-Float Bowl
(Sold_ _ O_y)
(High Altitude)
.
•
PART
NO,
Included in Gasket Set-Part Number 497316.
InckKled in Carburetor Ed-Part Number 498260.
4, Included in Carburetor Gasket Set-Part Number 498261.
Included in Valve Overhaul Gasket Set-Part No. 498528.
Assemblies include all parts shown in frames.
/9
CRAFTSMAN 1800 PSI HIGH PRESSURE WASHER 580.761800
BRIGGS & STRATTON 4-CYCLE ENGINE 12F802-2407-E1
843
621
265
670
REF.
NO.
65
181
187
PART
NO.
REF.
NO.
DESCRIPTION
PART
NO.
DESCRIPTION
94696
397974
298049
Screw-Phillips
Cap-Fuel Tank
Une.--Fuel
265
267
284
213146
94694
94511
Clamp-Casing
Screw-Slotted Hex.
Screw-Shoulder
333
334
802574
94731
Armature-Magneto
Screw-Hex.
188
188A
202
94644
398540
262579
(Cut To Required
Length)
Screw-Hex.
Screw-Shoulder
Link-Mechanical Gov.
356
601
497833
95162
Wire-Stop
Clamp-Hose
(Green)
209
692488
Spring-Governor
_r Included in Gasket Set-Part Number 497316.
• Included in Carburetor Irut--PartNumber 498260.
REF.
NO.
PART
NO.
620
499737
621
670
670A
843
396847
*493823
280512
272616
930
972
497233
495224
DESCRIPTION
Bracket-Control
SwitclPStop
Spacer
Spacer-Fuel Tank
Sleeve-Lever
Cover-Blower Housin_
Tank-Fuel
Included in Carburetor Gasket Set-Part Number 498261.
O Included in Valve Overhaul Gasket Set-Part No. 498528.
Assemblies include all parts shown in frames.
2O
CRAFTSMAN
1800 PSI HIGH PRESSURE
BRIGGS & STRATTON
WASHER 580.761800
4-CYCLE ENGINE 12F802-2407-E1
971
16.
f
967
968
971A_
332_
455
30
23
11036 LABEL KIT-EMISSION
REF.
NO.
PART
NO.
DESCRIPTION
23
492893
37
224511
81
223664
161
496116
163.e.272693
300
496106
Flywheel
Guard-Fill
Lock-Muffler Screw
Base-Air Cleaner
Gasket-Air Cleaner
Muffler-Exhaust
304
305
Housing-Blower
Screw-Hex.
493294
94744
RER
NO.
I
PART
NO.
332
346
92284
94602
455
529
613
832
967
225121
281299
94231
494224
491588
1
DESCRIPTION
Nut--Flywheel
Screw-Hex.
Cup-Flywheel
Grommet
Screw-Shoulder
Guard-Muffler
Filter--Air
. Included in Gasket Set-Part Number 497316.
• Included in CadxJ,reto¢ Ir-.d--PertNumber 498260.
REF.
NO.
968
969
971
971A
974
976
1036
PART
NO.
DESCRIPTION
281340
94872
94873
04749
Cover-Air Cleaner
Screw-Slotted Hex.
Screw-Hex.
Screw-Hex.
224815
496115
499341
Bracket-Support
Palmer-Carburetor
Lable Kit-Emission
4, Included in Carburetor Gasket Set-Part Number 498261.
O Included in Valve Overhaul Gasket Set-Part No. 498528.
Assemblies Include all parts shown in frames.
2!
CRAFTSMAN
1800 PSI HIGH PRESSURE WASHER 580.761800
BRIGGS & STRATrON
4-CYCLE ENGINE 12F802-2407-E1
65A
55
373 _)
i
4o9 I
i
I
I
I
6O
I
689 _=_
!
•
•
RER
NO.
PART
NO.
55
497440
Housing-Rewind
Starter
60
65A
281434
94686
Gdp-Starter
Screw-Hex.
58
280399
Rope-Starter
(Cut To Required
Length)
144
373
498144
92987
Pulley-Rope Start
Nut-Hex.
456
281503
Retainer-Spring
DESCRIPTION
RER
NO.
PART
NO.
DESCRIPTION
Included in Gasket Set--Part Number 497316.
Included in Carburetor Kit-Part Number 498260.
REF.
NO.
Rope
459
461
608
689
PART
NO,
281505
94943
497680
263073
DESCRIPTION
PawI-Ratchet
Screw-Shoulder
Starter-Rewind
Spring-Friction
Indudedin CarburetorGasketSet-Part Number498261.
Induded in Valve OverhaulGasketSet-Part No. 498528.
Assemblies Include all parts shown In frames,
22
CRAFTSMAN
1800 PSI HIGH PRESSURE WASHER 580.761800
BRIGGS & STRAI-FON
4-CYCLE ENGINE 12F802-2407-E1
358 GASKET
SET
670
7
9
116A
1095 VALVE OVERHAUL
GASKET SET
3_)
20_
121 CARBURETOR
977 CARBURETOR
GASKET SET
941
i
_,li
104_
V
[
163_
RER
NO.
3
PART
NO.
.299819
7 _D272916
9 ._272481
12 .272198
20 ,399781
51 .272198
94 e493765
104 e231371
110e4,
116
116A
*280393
.280966
PART
NO.
Seal-Oil
121
Gasket-Cylinder Head
Gasket-Breather
Gasket-Crankcase
Seal-Oil
Gasket--Intake
127
•
134
•398188
Valve-idle Adjustment
Pin--FIoet Hinge
Washer-Bowl
(Sold in Kit Only)
Seal-O-Ring
Seal-O-Ring
634
110 (_
163
110_
634 _)
REF.
NO.
DESCRIPTION
127 _
_,
137 3
617 _
9
KIT
498260
137 •_
163_4,272653
358
497316
585 .272238
DESCRIPTION
REF.
NO.
Carburetor Kit
Plug-Welch
(Sold in Kit Only)
Valve-Needle
(Includes Seat)
Gasket-Bowl
(Sold in Kit Only)
Gasket-Air Cleaner
Gasket Set
Gasket-Breather
Passage
. Included in Gasket Set-Part Number 497:,;16.
• Included in Carburetor Kit-Part Number 498260.
PART
NO.
617 e4,270344
634 •4k
670
*493823
977
498261
1095
498528
DESCRIPTION
Seal-intake Manifold
Washer-Shaft
(Sold in Kit Only)
Spacer
(includes 2)
Gasket SetCarburetor
Gasket Set-Valve
Overhaul
<_ Included in Carburetor Gasket Set-Part Number 498261.
Included in Valve Overhaul Gasket Set-Part No. 498528.
Assemblies include all parts shown in frames.
23
CRAFTSMAN
1800 PSI HIGH PRESSURE WASHER 580.761800
2
1
36
I1
37
10
40
41
42
26
17
18
19
16
20
29
21
23
46
24
CRAFTSMAN
1800 PSI HIGH PRESSURE
ITEM
PART
NO.
1
2
3
4
5
6
7
8
9
10
11
12
13
14
15
16
17
18
19
20
21
22
23
24
25
26
27
28
29
30
"_
32
33
34
35
36
37
38
39
40
41'
42
43
44
21416D
B2200
96307
B1793D
97998
97769
20441
B1819
81895
B1024D
30809
B1786
97741
21206
75402
52858
A1408
21782
21781
87841
39414
B1735
B1880
A1040B
A1041
B1820
98300
B1797
48031G
B1262A
97100
91373
79552
B2157D
97178
9936a
97082
97912
B1969
97566
98317B
98541
B1459
21208
WASHER 580,761800
DESCRIPTION.
QTY.
LEG, VS PW
DECAL, Instructions
DECAL, 1-800 Number
BASE, VSPW
BOLT, Eye
CUP, Gun
SCREW, 1/4" - 14 Self Driller
DECAL, Logo 1800 PSi
CAP, Tubing 3/4"square
GUARD, Hose
GROMMET, Chem Hose
BILLBOARD
ASSY, PW Axle
TIRE, 2" X 8" Black Mag
PUSHNUT, 1/2"
NUT, M8 Locking Flange
CAP, Quick Disconnet
QUICK DISCONNECT, Female
QUICK DISCONNECT, Male
MOUNT, Rubber Foot
HHCS, M8 X 1.25 X 35 Long
STUD, Double Ended
NUT, with Washer
HOSE, Chemical
FILTER, Chemical Hose
ENGINE, B & S 4.5 HP Quantum
SEAL, Engine Donut
FASTENER, Clip
CLAMP, Hose 3116"
ASSY. Pump EG w/Thermal
CAP, High Pressure
DECAL, Data
OVERLAMINATE, Decal
HANDLE, VS PW
KNOB, PW Handle
PLATE, S.S. Wear
CLIP, Holding Handle
BOLT, 1141-20X 2.25" Carriage
HOSE, 1/4" X 25'
HANG TAG, Nozzle
WAND, Adjustable Nozzle
GUN, High Pressure
CAP, Vinyl Black
WlREFORM
2
1
1
1
1
1
16
1
4
1
1
1
1
2
2
2
1
1
1
2
2
3
3
1
1
1
1
4
1
1
45
46
B2382
B1818
KIT, Maintenance O-Ring ,=
MANUAL
47
97009
KIT, Cleaning Nozzle
25
1
1
1
2
2
2
1
1
1
1
1
2
1
1
1
1
CRAFTSMAN
1800 PSI HIGH PRESSURE
WASHER 580.761800
59
0
26
CRAFTSMAN
1800 PSI MAQUINA
LAVADORA
DE ALTA PRESION
580.761800
PARA LISTE DE PARTES
VEA PAGINA 2 7
VERSION DE INGLES
2?
f
Sears se complace en ofrecer a sus clientes servicio de reparaci6n de aparatos electro-domdsticos y electr6nicos de todas las marcas.
En Sears, usted puede contar con operadores en
espafiol, a los que puede Ilamar sin cargo
alguno.
Para pedir servicio de reparaci6n
a domicilio,
Llamme 24 horasaldfa.,7 diasa lasemana
1-800-676-5811
Para ordernar piezas con entrega
a domicilio,
Llame de 7 am a 7 pro, 7 dias a la semana
1-800-659-7084
America's Repair Specialists