1
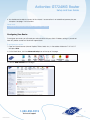
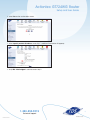
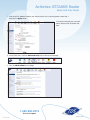
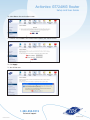
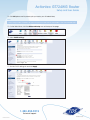
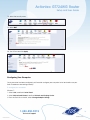
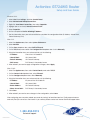
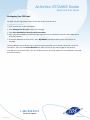
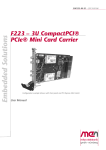
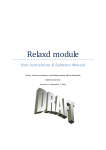
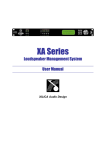
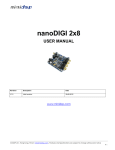
Actiontec GT724WG Router
Setup and User Guide
Helpful instructions on how to Set-up
your new Static IP DSL Service
Table of Contents
General Information........................................ 1
Verify Computer Settings................................. 1
Router Installation............................................ 4
Configuring Your Router................................... 5
Configuring Your Computer........................... 10
Configuring Your Email ................................. 13
1-888-850-5915
Technical Support
103948/3-11/6960
Actiontec GT724WG Router
Setup and User Guide
General Information
Router Kit Components
Your router kit should include the following:
• Actiontec GT724WG modem/router
• Power cord
• Two (2) Ethernet cables
• Phone cord
• DSL filters
Please note:
In order to connect the router to your computer, your computer must have an Ethernet Network Interface
(NIC) installed.
Powercycling
If you’re experiencing trouble getting an Internet connection, follow the following steps:
1. Turn off the Actiontec GT724WG router.
2. Shut down your computer.
3. Wait 60 seconds.
4. Turn on the Actiontec GT724WG router.
5. Wait 1–3 minutes for all lights to stop flashing on the router.
6. Turn on your computer.
7. If your problem is not resolved, please contact our Technical Support team.
Verify Computer Settings
For All Windows Computers
To verify connection configurations:
1. Select Start, then Control Panel.
Note:
If you do not see Control Panel, select Settings, then Control Panel.
1-888-850-5915
1
Technical Support
103948/3-11/6960
Actiontec GT724WG Router
Setup and User Guide
2. Select Network and Internet Connections.
Note:
If you do not see Network and Internet Connections, skip to Step 3.
3. Click Internet Options.
4. Select the Connections tab.
5. Select Never Dial a Connection.
6. Click LAN Settings.
7. Verify all boxes are unchecked and click OK.
8. Click OK.
9. Verify that your computer is set to Obtain an IP Address Automatically (follow the steps for your OS below).
To verify Local Area Network (LAN) configurations:
Windows 7:
1. Select the Start Circle, then in the Start Search field, type “Network and Sharing”.
2. Select Network and Sharing Center.
3. Select Change adapter settings.
4. Right-click Local Area Connection and click Properties.
5. Highlight (do not uncheck) Internet Protocol TCP/IP Version 4.
6. From the dropdown list, select Properties.
7. Make sure Obtain IP Address Automatically and Obtain DNS Server Addresses Automatically are
selected, and then click OK.
8. Click Close.
Windows Vista:
1. Select the Start Circle. Then type “Network and Sharing” in the Start Search field.
2. Select Choose Network and Sharing Center.
3. Select View Status next to Local Area Connection.
4. Select Properties.
5. Highlight (do not uncheck) Internet Protocol TCP/IP Version 4.
6. Select Properties.
7. Make certain Obtain IP Address Automatically and Obtain DNS Server Addresses Automatically
are selected, and then click OK.
8. Click Close.
1-888-850-5915
2
Technical Support
103948/3-11/6960
Actiontec GT724WG Router
Setup and User Guide
Windows XP:
1. Select Start, then Control Panel.
Note:
If you do not see Control Panel, select Settings, then Control Panel.
2. Select Network and Internet Connections.
Note:
If you do not see Network and Internet Connections, skip to Step 3.
3. Click Network Connections.
4. Right-click Local Area Connection, then select Properties.
5. Highlight (do not uncheck) Internet Protocol TCP/IP.
6. Select Properties.
7. Make certain Obtain IP Address Automatically and Obtain DNS Server Addresses Automatically
are selected, and then click OK.
8. Click Close.
Windows 2000:
1. Select Start, then Settings, and then Control Panel.
2. Select Network and Dialup Connections.
3. Right-click Local Area Connection, then select Properties.
4. Highlight (do not uncheck) Internet Protocol TCP/IP.
5. Select Properties.
6. Make certain Obtain IP Address Automatically and Obtain DNS Server Addresses Automatically
are selected, and then click OK.
7. Click Close.
1-888-850-5915
3
Technical Support
103948/3-11/6960
Actiontec GT724WG Router
Setup and User Guide
For All Macintosh Computers:
To verify connections and Local Area Network (LAN) configurations:
Mac OS X:
1. Select the Apple menu, then select System Preferences.
2. Select Network.
3. On the Show dropdown box, select Built-In Ethernet.
4. On the TCP/IP tab, make sure the Configure IPv4 dropdown menu is set to Using DHCP.
5. Click Close.
6. When asked if you want to apply configuration changes, select Apply.
Mac OS 8/9:
1. Select the Apple menu, then select Control Panels, and select TCP/IP.
2. On the Connect via dropdown menu, select Ethernet.
3. On the Configure dropdown menu, select Using DHCP Server.
4. Click Close.
5. When asked if you want to save changes to the configuration, select Save.
Router Installation
The router needs proper ventilation to function. Be sure to set up your router in a ventilated area,
away from any heat sources.
To wire a single computer:
1. Plug the power cord into the power port on the back of the router.
2. Plug the other end of the power cord into a power outlet. A power strip with surge protection is recommended.
3. Plug one end of the supplied phone cord into the gray phone port the back of the router.
4. Plug the other end of the phone cord directly into the phone jack in the wall.
5. Plug one end of the yellow Ethernet cable into the Ethernet Network Interface Card (NIC) in your computer.
6. Plug the other end of the Ethernet cable into any yellow Ethernet port on the back of the Actiontec router.
7.The following lights should be lit on the router:
• Power light on solid green.
• DSL light on solid green.
• Ethernet light on solid green (may flash somewhat).
1-888-850-5915
4
Technical Support
103948/3-11/6960
Actiontec GT724WG Router
Setup and User Guide
8.You should now be able to connect to the Internet. If a connection is not established, powercycle your computer. See page 1 for instructions.
Please note:
If setting up more than one computer, repeat Steps 5 and 6.
Configuring Your Router
To configure your router, you will need your welcome letter with your Static IP Address settings. If you do not
have this, please contact our Technical Support team.
To configure your router:
1. Open an Internet browser (Internet Explorer, Firefox, Safari, etc.). In the address field enter “192.168.0.1”
and press Enter.
2. On the Main Menu, click the Advanced Setup icon at the top of the page.
3. Click the WAN IP Address link to begin.
1-888-850-5915
5
Technical Support
103948/3-11/6960
Actiontec GT724WG Router
Setup and User Guide
4. Select Yes on the confirmation screen.
5. Select Specify a Static IP Address under Step 1 (additional information will appear).
6. Verify RFC 1483 Bridged is selected under Step 2.
1-888-850-5915
6
Technical Support
103948/3-11/6960
Actiontec GT724WG Router
Setup and User Guide
7. Enter the WAN IP address listed on your welcome letter in the matching boxes under Step 3 and click the Apply button.
If the devices behind your computer
do not need a static IP, please stop
here.
8. On the Main Menu, click the Advanced Setup icon at the top of the page.
9. Click the LAN IP Address link to begin.
1-888-850-5915
7
Technical Support
103948/3-11/6960
Actiontec GT724WG Router
Setup and User Guide
10. Select Yes on the confirmation screen.
11. Enter the LAN IP address and Subnet Mask listed on your welcome letter.
12. Click Apply.
13. You will then see:
1-888-850-5915
8
Technical Support
103948/3-11/6960
Actiontec GT724WG Router
Setup and User Guide
14. Click OK (please wait to powercycle your router; you will reboot later).
Note:
When using a Static IP address on your LAN you must also shut off the modem’s DHCP server and NAPT.
15. On the Main Menu, click the Advanced Setup icon at the top of the page.
16. Select DCHP Settings.
17. Turn the DHCP settings off and click Apply.
1-888-850-5915
9
Technical Support
103948/3-11/6960
Actiontec GT724WG Router
Setup and User Guide
18. Select the Security menu.
19. Select NAT.
20. Turn NAT off and click Apply.
Configuring Your Computer
Once your router has been configured, you’ll need to configure your computer to test and make sure your
Static IP addresses are working correctly.
To configure your computer:
Windows 7:
1. Select Start, and then Control Panel.
2. Select Network and Internet, and then Network and Sharing Center.
3. From the Tasks list on the left, select Change Adapter Settings.
1-888-850-5915
10
Technical Support
103948/3-11/6960
Actiontec GT724WG Router
Setup and User Guide
4. Right-click Local Area Connection.
5. From the dropdown list, select Properties.
6. Highlight Internet Protocol Version 4.
7. Select Properties.
8. Select Use the following IP address.
9. Use the information from your welcome letter to complete the configuration fields (IP Address, Subnet Mask, Default Gateway, DNS).
Windows Vista:
1. Select the Start Circle. Then type “Network and Sharing” in the Start Search field.
2. Select Choose Network and Sharing Center.
3. Select View Status next to Local Area Connection.
4. Select Properties.
5. Highlight (do not uncheck) Internet Protocol TCP/IP Version 4.
6. Select Properties.
7. Set the computer to Use the Following IP Address.
8. Use the information from your welcome letter to complete the configuration fields (IP Address, Subnet Mask, Default Gateway, DNS).
Windows XP:
1. Select Start, then Control Panel.
Note: If you do not see Control Panel, select Settings, then Control Panel.
2. Select Network and Internet Connections.
Note: If you do not see Network and Internet Connections, skip to Step 3.
3. Click Network Connections.
4. Right-click Local Area Connection, then select Properties.
5. Highlight (do not uncheck) Internet Protocol TCP/IP and select Properties.
6. Set the computer to Use the following IP Address.
7. Use the information from your welcome letter to complete the configuration fields
(IP Address, Subnet Mask, Default Gateway, DNS).
1-888-850-5915
11
Technical Support
103948/3-11/6960
Actiontec GT724WG Router
Setup and User Guide
Windows 2000:
1. Select Start, then Settings, and then Control Panel.
2. Select Network and Dialup Connections.
3. Right-click Local Area Connection, then select Properties.
4. Highlight (do not uncheck) Internet Protocol TCP/IP.
5. Select Properties.
6. Set the computer to Use the following IP Address.
7. Use the information from your welcome letter to complete the configuration fields (IP Address, Subnet Mask,
Default Gateway, DNS).
Mac OS X:
1. Select the Apple menu, then select System Preferences.
2. Select Network.
3. On the Show dropdown box, select Built-In Ethernet.
4. On the TCP/IP tab,make certain the Configure IPv4 dropdown box is set to Manually.
5. Using the information from your welcome letter, set the following:
• IP Address:
One of the LAN Usable IPs
• Subnet Mask:
LAN Subnet Mask
• Default Gateway: LAN Default Gateway
• DNS Servers: DNS Primary & Secondary Servers
6. When asked if you want to apply configuration changes, select Apply.
Mac OS 8/9:
1. Select the Apple menu, then select Control Panels, and select TCP/IP.
2. On the Connect via dropdown box, select Ethernet.
3. On the Configure dropdown box, select Manually.
4. Using the information from your welcome letter, set the following:
• IP Address:
Any one of the LAN Usable IPs
• Subnet Mask:
LAN Subnet Mask
• Router Address:
LAN Default Gateway.
• Name Server Addr.: DNS Primary & Secondary Servers
5. Click Close.
6. When asked if you want to save changes to the configuration, select Save.
After configuring your computer, reboot your router by turning it off and then back on. Finally, open a browser
and verify that you can access the Internet. If you cannot, please contact our Internet Technical Support team.
1-888-850-5915
12
Technical Support
103948/3-11/6960
Actiontec GT724WG Router
Setup and User Guide
Configuring Your TDS Email
Included with your High-Speed Internet service are 20 free email accounts.
To configure your email:
1. Enter “www.tds.net” in your Web browser.
2. Select Manage Your Account at the top of the page.
3. Select View and Modify Internet Account Information.
4. Log in using the temporary username and password found on your Welcome Letter (this was mailed to you
for security reasons).
5. To activate additional email accounts, select My Mailbox and add email accounts at the bottom of
the page.
Once established, your email accounts can be accessed anywhere with an Internet connection. Simply visit
www.tds.net. Then, click the Check TDS Email box. Make www.tds.net your home page for easy access!
If you prefer to use an email client (such as Outlook) to access your email, please visit www.tdstelecom.com/pop
for setup instructions.
1-888-850-5915
13
Technical Support
103948/3-11/6960