1
Agilent IO Libraries Suite
E2094S
Agilent VISA
User’s Guide for IO
Libraries Suite 15.5
Agilent Technologies
Notices
© Agilent Technologies, Inc. 71995-1996,
1998, 2000-2009
No part of this manual may be reproduced
in any form or by any means (including
electronic storage and retrieval or translation into a foreign language) without prior
agreement and written consent from Agilent Technologies, Inc. as governed by
United States and international copyright
laws.
Manual Part Number
E2094-90013
Edition
First edition, October 2009
Agilent Technologies, Inc.
815 14th Street SW
Loveland, CO 80537 USA
Trademark Information
Visual Studio is a registered trademark of
Microsoft Corporation in the United States
and other countries.
Windows NT is a U.S. registered trademark of Microsoft Corporation.
Windows and MS Windows are U.S. registered trademarks of Microsoft Corporation.
Software Revision
This guide is valid for Revisions 15.xx of
the Agilent IO Libraries Suite software,
where xx refers to minor revisions of the
software that do not affect the technical
accuracy of this guide.
#
Warranty
The material contained in this document is provided “as is,” and is
subject to being changed, without
notice, in future editions. Further,
to the maximum extent permitted
by applicable law, Agilent disclaims
all warranties, either express or
implied, with regard to this manual
and any information contained
herein, including but not limited to
the implied warranties of merchantability and fitness for a particular purpose. Agilent shall not be
liable for errors or for incidental or
consequential damages in connection with the furnishing, use, or
performance of this document or of
any information contained herein.
Should Agilent and the user have a
separate written agreement with
warranty terms covering the material in this document that conflict
with these terms, the warranty
terms in the separate agreement
shall control.
Government will receive no greater than
Restricted Rights as defined in FAR
52.227-19(c)(1-2) (June 1987). U.S. Government users will receive no greater than
Limited Rights as defined in FAR
52.227-14 (June 1987) or DFAR
252.227-7015 (b)(2) (November 1995), as
applicable in any technical data.
Safety Notices
CAUTION
A CAUTION notice denotes a
hazard. It calls attention to an
operating procedure, practice, or
the like that, if not correctly performed or adhered to, could result
in damage to the product or loss
of important data. Do not proceed
beyond a CAUTION notice until
the indicated conditions are fully
understood and met.
Technology Licenses
The hardware and/or software described in
this document are furnished under a
license and may be used or copied only in
accordance with the terms of such license.
Restricted Rights Legend
If software is for use in the performance of
a U.S. Government prime contract or subcontract, Software is delivered and
licensed as “Commercial computer software” as defined in DFAR 252.227-7014
(June 1995), or as a “commercial item” as
defined in FAR 2.101(a) or as “Restricted
computer software” as defined in FAR
52.227-19 (June 1987) or any equivalent
agency regulation or contract clause. Use,
duplication or disclosure of Software is
subject to Agilent Technologies’ standard
commercial license terms, and non-DOD
Departments and Agencies of the U.S.
WA RNING
A WARNING notice denotes a
hazard. It calls attention to an
operating procedure, practice,
or the like that, if not correctly
performed or adhered to, could
result in personal injury or
death. Do not proceed beyond a
WARNING notice until the
indicated conditions are fully
understood and met.
Agilent VISA User’s Guide
Agilent VISA User’s Guide
1
Introduction
What’s in This Guide?
8
VISA Overview
9
Using VISA, VISA COM, and SICL
VISA Support
10
VISA Documentation
10
Contacting Agilent
2
9
12
Building a VISA Application in Windows
Building a VISA Program (C/C++)
14
Compiling and Linking VISA Programs (C/C++)
Sample VISA Program (C/C++) 15
14
Building a VISA Program (Visual Basic) 18
Visual Basic Programming Considerations 18
Sample VISA Program (Visual Basic) 20
Logging Error Messages
25
Using the Event Viewer 25
Using the Debug Window 25
3
Programming with VISA
VISA Resources and Attributes
VISA Resources 28
VISA Attributes
29
28
Using Sessions
30
Including the VISA Declarations File (C/C++) 30
Adding the visa32.bas File (Visual Basic) 30
Opening a Session
31
Addressing a Session
33
Agilent VISA User’s Guide
3
Closing a Session
37
Searching for Resources
Sending I/O Commands
40
Types of I/O
40
Using Non-Formatted I/O
37
44
Using Events and Handlers
46
Events and Attributes 46
Using the Callback Method
54
Using the Queuing Method
62
Trapping Errors
68
Trapping Errors
68
Exception Events 69
Using Locks
74
Lock Functions 74
viLock/viUnlock Functions
VISA Lock Types 75
4
74
Programming via GPIB and VXI
GPIB and VXI Interfaces Overview
80
General Interface Information
80
GPIB Interfaces Overview
81
VXI Interfaces Overview
84
GPIB-VXI Interfaces Overview
85
Using High-Level Memory Functions
88
Programming the Registers 88
High-Level Memory Functions: Sample Programs
Using Low-Level Memory Functions
94
Programming the Registers 94
Low-Level Memory Functions: Code Samples
Using Low/High-Level Memory I/O Methods
4
90
97
100
Agilent VISA User’s Guide
Using Low-Level viPeek/viPoke
100
Using High-Level viIn/viOut
101
Using High-Level viMoveIn/viMoveOut
Using the Memory Access Resource
Memory I/O Services
106
MEMACC Attribute Descriptions
Using VXI-Specific Attributes
113
Using the Map Address as a Pointer
Setting the VXI Trigger Line 114
5
101
106
109
113
Programming via LAN
LAN and Remote Interfaces Overview
118
Direct LAN Connection versus Remote IO Server/Client
Connection 118
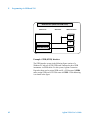
Remote IO Server/Client Architecture
118
Addressing LAN-Connected Devices
121
Using the TCPIP Interface Type for LAN Access
Using a Remote Interface for LAN Access
124
6
121
Programming via USB
USB Interfaces Overview
128
Communicating with a USB Instrument Using VISA
129
Glossary
Agilent VISA User’s Guide
5
6
Agilent VISA User’s Guide
Agilent IO Libraries Suite
Agilent VISA User’s Guide
1
Introduction
This Agilent VISA User’s Guide describes the Agilent Virtual Instrument
Software Architecture (VISA) library and shows how to use it to
develop I/O applications and instrument drivers on Windows PCs.
NOT E
Before you can use VISA, you must install and configure VISA on your
computer. See the Agilent IO Libraries Suite Connectivity Guide with
Getting Started for installation on Windows systems.
Note that using VISA functions and SICL functions in the same I/O
application is not supported.
This chapter includes:
• What’s In This Guide?
• VISA Overview
• Contacting Agilent
Agilent Technologies
7
1
Introduction
What’s in This Guide?
This guide shows VISA programming techniques using C/C++ and
Visual Basic. This chapter provides an overview of VISA and shows
how to contact Agilent Technologies. Subsequent chapters in this guide
address the following topics:
• Chapter 2 - Building a VISA Application in Windows describes how
to build a VISA application in a Windows environment. A sample
program is provided to help you get started programming with VISA.
• Chapter 3 - Programming with VISA describes the basics of VISA
and lists some sample programs. The chapter also includes
information on creating sessions, using formatted I/O, events, etc.
• Chapter 4 - Programming via GPIB and VXI provides guidelines for
using VISA to communicate over the GPIB, GPIB-VXI, and VXI
interfaces to instruments.
• Chapter 5 - Programming via LAN provides guidelines for using
VISA to communicate over a LAN (Local Area Network) to
instruments.
• Chapter 6 - Programming via USB provides guidelines for using
VISA to communicate over a USB (Universal Serial Bus) to
instruments.
• Glossary includes a glossary of terms and their definitions.
See “VISA Documentation" on page 10 for other sources of information
on VISA programming.
8
Agilent VISA User’s Guide
Introduction
1
VISA Overview
VISA is an application programming interface (API) for instrument
control. It allows you to programmatically send commands and receive
data from instruments and other test and measurement devices (such as
sources and switches).
VISA is a part of the Agilent IO Libraries Suite product. The Agilent IO
Libraries Suite includes three libraries: Agilent Virtual Instrument
Software Architecture (VISA), VISA for the Common Object Model
(VISA COM), and Agilent Standard Instrument Control Library (SICL).
This guide describes Agilent VISA for supported Windows
environments.
For information on VISA COM, see the online Help on VISA COM,
available by clicking the blue IO Control icon on your screen (if you
have installed Agilent IO Libraries Suite). For information on using
SICL in Windows, see the Agilent SICL User’s Guide for Windows. For
information on Agilent IO Libraries Suite, see the Agilent IO Libraries
Suite Connectivity Guide with Getting Started and the Agilent IO
Libraries Suite Online Help.
Using VISA, VISA COM, and SICL
Agilent Virtual Instrument Software Architecture (VISA) is an I/O
library designed according to the VXIplug&play System Alliance that
allows software developed from different vendors to run on the same
system.
If you are using new instruments or are developing new I/O applications
or instrument drivers, and you have chosen to use direct I/O rather than
instrument drivers, we recommend you use Agilent VISA or VISA
COM. See the Agilent IO Libraries Suite Online Help for an in-depth
discussion of your programming options.
Agilent Standard Instrument Control Library (SICL) is an I/O library
developed by Agilent that is portable across many I/O interfaces and
systems. You can use Agilent SICL if you have been using SICL and
want to remain compatible with software currently implemented in
SICL.
Agilent VISA User’s Guide
9
1
Introduction
VISA Support
This 32-bit version of VISA is supported on Microsoft Windows 2000,
Windows XP and Windows Vista. (For information on support of older
operating systems, see the Agilent IO Libraries Suite Online Help.) C,
C++, and Visual Basic are supported on these Windows versions. C#
and Visual Basic .NET are also supported via the visa32.cs and
visa32.vb header files that are included with the Agilent VISA
library.
VISA is supported on the GPIB, VXI, GPIB-VXI, Serial (RS-232),
LAN, and USB interfaces. LAN support from within VISA occurs via
an address translation such that a GPIB interface can be accessed
remotely over a computer network.
Agilent VISA provides support for version 3.0 of the VISA specification.
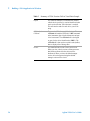
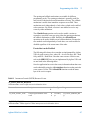
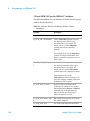
VISA Documentation
This table shows associated documentation you can use when
programming with Agilent VISA.
Table 1
10
Agilent VISA Documentation
Document
Description
Agilent IO Libraries Suite
Connectivity Guide with Getting
Started
Shows how to install, configure, and
maintain Agilent IO Libraries Suite.
VISA Online Help
A function reference and other
programming information is provided in
the form of Windows Help.
VISA Sample Programs
Sample programs are provided online to
help you develop VISA applications.
VXIplug&play System Alliance
VISA Library Specification 4.3
Specifications for VISA.
IEEE Standard Codes, Formats,
Protocols, and Common
Commands
ANSI/IEEE Standard 488.2-1992.
Agilent VISA User’s Guide
Introduction
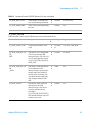
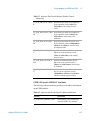
Table 1
Agilent VISA Documentation
VXIbus Consortium
specifications (when using VISA
over LAN)
Agilent VISA User’s Guide
1
TCP/IP Instrument Protocol
Specification - VXI-11, Rev. 1.0
TCP/IP-VXIbus Interface Specification VXI-11.1, Rev. 1.0
TCP/IP-IEEE 488.1 Interface
Specification - VXI-11.2, Rev. 1.0
TCP/IP-IEEE 488.2 Instrument Interface
Specification - VXI-11.3, Rev. 1.0
11
1
Introduction
Contacting Agilent
• In the USA, you can reach Agilent Technologies by telephone at:
USA: 1-800-829-4444
• Outside the USA, contact your country’s Agilent support
organization. A list of contact information for other countries is
available on the Agilent Web site:
http://www.agilent.com/find/assist
• The Agilent Developer Network (ADN),
http://www.agilent.com/find/adn
is a one-stop web resource that supports your connectivity needs with
software downloads, sample code, technical notes and white papers.
12
Agilent VISA User’s Guide
Agilent IO Libraries Suite
Agilent VISA User’s Guide
2
Building a VISA Application in
Windows
This chapter provides guidelines for building a VISA application in a
Windows environment.
The chapter contains the following sections:
• Building a VISA Program (C/C++)
• Building a VISA Program (Visual Basic)
• Logging Error Messages
For information on building a VISA application in Visual Studio .NET,
see the VISA Online Help.
Agilent Technologies
13
2
Building a VISA Application in Windows
Building a VISA Program (C/C++)
This section provides guidelines for building VISA programs using the
C/C++ language, including:
• Compiling and Linking VISA Programs (C/C++)
• Sample VISA Program (C/C++)
Compiling and Linking VISA Programs (C/C++)
This section provides a summary of important compiler-specific
considerations when developing Win32 applications.
Linking to VISA Libraries
Your application must link to the VISA import library as follows,
assuming default installation directories and Microsoft compilers:
C:\VXIPNP\WinNT\lib\msc\visa32.lib
The following steps will help you do this. This information is specific to
your development environment.
Microsoft Visual C++ Version 6.0 Development Environment
1 Use the File menu to create a new project or open an existing project.
2 Select Project > Settings from the menu and click the C/C++ tab.
3 Select Code Generation from the Category list box and select
Multi-Threaded using DLL from the Use Run-Time Libraries list
box. (VISA requires these definitions for Win32.) Click OK to close
the dialog box.
4 Select Project > Settings from the menu. Click the Link tab and add
visa32.lib to the Object/Library Modules list box. Optionally,
you may add the library directly to your project file. Click OK to
close the dialog box.
5 You may want to add the include files and library files search paths.
They are set as follows:
• Select Tools > Options from the menu.
• Click the Directories tab to set the include file path.
• Select Include Files from the Show Directories For list box.
14
Agilent VISA User’s Guide
2
Building a VISA Application in Windows
• Click at the bottom of the list box and type:
C:\Program Files\IVIfoundation\IVI\VISA\
winnt\include
(This assumes that you used the default installation location for
VISA. If VISA had been installed previously, it may be in a
different location.)
• Select Library Files from the Show Directories For list box.
• Click at the bottom of the list box and type:
C:\VXIPNP\WinNT\lib\msc
(This assumes that you used the default installation location for
VISA.)
6 Add or create your C or C++ source files. For example, to build the
sample described below, select Project > Add to Project > Files...
and type or browse to C:\Program Files\Agilent\
IO Libraries Suite\ ProgrammingSamples\C\VISA\
idn.c.
7 Click Build > Rebuild All to build the VISA program.
Microsoft Visual Studio .NET
For information on building a VISA application in Visual Studio .NET,
see the VISA Online Help.
Sample VISA Program (C/C++)
This section lists a sample program called idn that queries a GPIB
instrument for its identification string. This sample assumes a Win32
console application using Microsoft Visual Studio® on Windows.
The idn sample files are in the ProgrammingSamples directory
under the Agilent IO Libraries Suite installation directory. By default,
the sample files are in
C:\Program Files\Agilent\IO Libraries Suite\
ProgrammingSamples\C\VISA.
Sample C/C++ Program Source Code
The source file idn.c follows. An explanation of the various function
calls in the sample is provided directly after the program listing. If the
program runs correctly and your PC is connected to a 54622A
oscilloscope, the following is an example of the program output.
Agilent VISA User’s Guide
15
2
Building a VISA Application in Windows
AGILENT TECHNOLOGIES,54622A,987654312,A.01.50
If the program does not run, see the Event Viewer for a list of run-time
errors.
/*idn.c
This example program queries a GPIB device for
an identification string and prints the
results. Note that you must change the address.
*/
#include <visa.h>
#include <stdio.h>
void main () {
ViSession defaultRM, vi;
char buf [256] = {0};
/* Open session to GPIB device at address 22 */
viOpenDefaultRM(&defaultRM);
viOpen(defaultRM,
"GPIB0::22::INSTR",VI_NULL,VI_NULL,
&vi);
/* Initialize device */
viPrintf(vi, "*RST\n");
/* Send an *IDN? string to the device */
viPrintf(vi, "*IDN?\n");
/* Read results */
viScanf(vi, "%t", buf);
/* Print results */
printf("Instrument identification string:
%s\n", buf);
/* Close session */
viClose(vi);
viClose(defaultRM);}
16
Agilent VISA User’s Guide
2
Building a VISA Application in Windows
C/C++ Sample Program Contents
A summary of the VISA function calls used in the preceding sample
C/C++ program follows. For a more detailed explanation of VISA
functionality, see Chapter 3, “Programming with VISA.” See the VISA
Online Help for more detailed information on these VISA function
calls.
Table 2
Summary of VISA Function Calls Used in the C/C++ Sample
Function(s)
Description
visa.h
This file is included at the beginning of the program to
provide the function prototypes and constants defined by
VISA.
ViSession
The ViSession is a VISA data type. Each object that will
establish a communication channel must be defined as
ViSession.
viOpenDefaultR You must first open a session with the default resource
manager with the viOpenDefaultRM function. This
M
function will initialize the default resource manager and
return a pointer to that resource manager session.
Agilent VISA User’s Guide
viOpen
This function establishes a communication channel with
the device specified. A session identifier that can be used
with other VISA functions is returned. This call must be
made for each device you will be using.
viPrintf and
viScanf
These are the VISA formatted I/O functions that are
patterned after those used in the C programming
language. The viPrintf call sends the IEEE 488.2 *RST
command to the instrument and puts it in a known state.
The viPrintf call is used again to query for the device
identification (*IDN?). The viScanf call is then used to
read the results.
viClose
This function must be used to close each session. When
you close a device session, all data structures that had
been allocated for the session will be deallocated. When
you close the default manager session, all sessions opened
using that default manager session will be closed.
17
2
Building a VISA Application in Windows
Building a VISA Program (Visual Basic)
This section provides guidelines for building a VISA program in the
Microsoft Visual Basic (VB) language, including:
• Visual Basic Programming Considerations
• Sample VISA Program (Visual Basic)
Visual Basic Programming Considerations
Some considerations for programming in Visual Basic follow. This
information applies to Microsoft Visual Basic version 6.0; for
information on building a VISA application in Microsoft Visual Studio
.NET, see the VISA Online Help.
Required Module for a Visual Basic VISA Program
Before you can use VISA specific functions, your application must add
the visa32.bas VISA Visual Basic module found in C:\VXIPNP\
WinNT\include\ (assuming default installation directories).
Adding the visa32.bas File to Your Project
To install visa32.bas:
1 Select Project > Add Module from the Visual Basic 6.0 menu.
2 Select the Existing tab.
3 Browse and select the visa32.bas file from the applicable
directory (by default, C:\VXIPNP\WinNT\include\).
4 Click the Open button.
VISA Limitations in Visual Basic
VISA functions return a status code that indicates success or failure of
the function. The only indication of an error is the value of a returned
status code. The VB Error variable is not set by any VISA function.
Thus, you cannot use the ON ERROR construct in VB or the value of
the VB Error variable to catch VISA function errors.
18
Agilent VISA User’s Guide
Building a VISA Application in Windows
2
VISA cannot call back to a VB function. Thus, you can only use the
VI_QUEUE mechanism in viEnableEvent. There is no way to
install a VISA event handler in VB.
VISA functions that take a variable number of parameters (viPrintf,
viScanf, viQueryf) are not callable from VB. Use the
corresponding viVPrintf, viVScanf and viVQueryf functions
instead.
You cannot pass variables of type Variant to VISA functions. If you
attempt this, the Visual Basic program will probably crash with a
'General Protection Fault' or an 'Access Violation.'
Format Conversion Commands
The functions viVPrintf, viVscanf and viVqueryf can be
called from VB, but there are restrictions on the format conversions that
can be used. Only one format conversion command can be specified in a
format string (a format conversion command begins with the %
character).
For example, the following is invalid:
status = viVPrintf(vi, "%lf%d" + Chr$(10),
...)
Instead, you must make one call for each format conversion command,
as shown in the following example:
status = viVPrintf(vi, "%lf" + Chr$(10),
dbl_value)
status = viVPrintf(vi, "%d" + Chr$(10),
int_value)
Numeric Arrays
When reading from or writing to a numeric array, you must specify the
first element of a numeric array as the params parameter. This passes
the address of the first array element to the function. For example, the
following code declares an array of 50 floating point numbers and then
calls viVPrintf to write from the array.
Dim flt_array(50) As Double
status = viVPrintf(id, "%,50f", dbl_array(0))
Agilent VISA User’s Guide
19
2
Building a VISA Application in Windows
Strings
When reading in a string value with viVScanf or viVQueryf, you
must pass a fixed length string as the params parameter. To declare a
fixed length string, instead of using the normal variable length
declaration:
Dim strVal as String
use the following declaration, where 40 is the fixed length.
Dim strVal as String * 40
Sample VISA Program (Visual Basic)
This section lists a sample program called idn that queries a GPIB
instrument for its identification string. This sample builds a standard
.exe application for WIN32 programs using the Visual Basic 6.0
programming language.
Assuming default installation directories, the idn sample files are in C:\
Program Files\Agilent\IO Libraries Suite\
ProgrammingSamples\VB6\VISA\IDN
Steps to Running the Program
The steps to building and running the idn sample program follow.
1 Connect an instrument to a GPIB interface that is compatible with
IEEE 488.2.
2 Start the Visual Basic 6.0 application.
NOT E
This example assumes you are building a new project (no .vbp file
exists for the project). If you do not want to build the project from
scratch, from the menu select File > Open Project... and select and
open the idn.vbp file. Then skip to Step 7.
3 Start a new Visual Basic Standard .exe project. VB 6.0 will open a
new project, Project1, with a blank Form, Form1.
4 From the menu, select Project > Add Module, select the Existing
tab, and browse to the idn directory. If you used default installation
paths, this directory is C:\Program Files\Agilent\IO
20
Agilent VISA User’s Guide
Building a VISA Application in Windows
2
Libraries Suite\ProgrammingSamples\VB6\VISA\
idn.
5 Select the file idn.bas and click Open. Since the Main()
subroutine is executed when the program is run without requiring
user interaction with a Form, you may delete Form1 if desired. To do
this, right-click Form1 in the Project Explorer window and select
Remove Form1.
6 VISA applications in Visual Basic require the VISA Visual Basic
(VB) declaration file visa32.bas in your VB project. This file
contains the VISA function definitions and constant declarations
needed to make VISA calls from Visual Basic. To add this module to
your project in VB 6.0, from the menu select Project > Add
Module, select the Existing tab, browse to the directory containing
the VB declaration file (by default, this is C:\VXIPNP\WinNT\
include\), select visa32.bas, and click Open.
7 At this point, you can run and debug the Visual Basic project. You
may need to change the VISA interface name and address in the code
to match your device’s configuration.
8 If you want to compile to an executable file, from the menu select
File > Make idn.exe... and click OK. This will create idn.exe in
the idn directory.
Sample Program Source Code
An explanation of the various function calls in the sample is provided
after this program listing. If the program runs correctly, the following is
an example of the output that appears in a message box if your PC is
connected to a 54601A oscilloscope.
HEWLETT-PACKARD,54601A,0,1.7
Agilent VISA User’s Guide
21
2
Building a VISA Application in Windows
If the program does not run, see the Event Viewer for a list of run-time
errors. The source file idn.bas follows.
Option Explicit
''''''''''''''''''''''''''''''''''''''''''''''''
'''''''''''''''''''
' idn.bas
' This example program queries a GPIB device for
' an identification string and prints the
' results. Note that you may have to change the
' VISA Interface Name and address for your
' device from "GPIB0" and "22",respectively.
''''''''''''''''''''''''''''''''''''''''''''''''
'''''''''''''''''''
Sub Main()
Dim defrm As Long 'Session to Default
Resource Manager
Dim vi As Long
'Session to instrument
Dim strRes As String * 200 'Fixed length
string to hold results
' Open the default resource manager session
Call viOpenDefaultRM(defrm)
' Open the session to the resource
' The "GPIB0" parameter is the VISA Interface
' name to a
' GPIB instrument as defined in
' Connection Expert.
' Change this name to what you have defined
' for your VISA Interface.
' "GPIB0::22::INSTR" is the address string
' for the device.
' this address will be the same as seen in:
' Connection Expert)
22
Agilent VISA User’s Guide
2
Building a VISA Application in Windows
Call viOpen(defrm, "GPIB0::22::INSTR", 0, 0,
vi)
' Initialize device
Call viVPrintf(vi, "*RST" + Chr$(10), 0)
' Ask for the device's *IDN string.
Call viVPrintf(vi, "*IDN?" + Chr$(10), 0)
' Read the results as a string.
Call viVScanf(vi, "%t", strRes)
' Display the results
MsgBox "Result is: " + strRes, vbOKOnly,
"*IDN? Result"
' Close the vi session and the resource
manager session
Call viClose(vi)
Call viClose(defrm)
End Sub
Sample Program Contents
A summary of the VISA function calls used in the preceding sample
Visual Basic program follows. For a more detailed explanation of VISA
functionality, see Chapter 3, “Programming with VISA.” See the VISA
Online Help for more detailed information on these VISA function
calls.
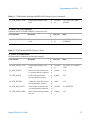
Table 3
Agilent VISA User’s Guide
Summary of VISA Function Calls in Visual Basic Sample
Function(s)
Description
viOpenDefaultRM
You must first open a session with the default
resource manager with the viOpenDefaultRM
function. This function will initialize the default
resource manager and return a pointer (defrm) to that
resource manager session.
23
2
Building a VISA Application in Windows
Table 3
24
Summary of VISA Function Calls in Visual Basic Sample
viOpen
This function establishes a communication channel
with the device specified. A session identifier (vi) that
can be used with other VISA functions is returned.
This call must be made for each device you will be
using.
viVPrintf and
viVScanf
These are the VISA formatted I/O functions. The
viVPrintf call sends the IEEE 488.2 *RST command
to the instrument (plus a linefeed character) and puts
it in a known state. The viVPrintf call is used again
to query for the device identification (*IDN?). The
viVScanf call is then used to read the results (strRes)
that are displayed in a Message Box.
viClose
This function must be used to close each session.
When you close a device session, all data structures
that had been allocated for the session will be
deallocated. When you close the default manager
session, all sessions opened using that default
manager session will be closed.
Agilent VISA User’s Guide
Building a VISA Application in Windows
2
Logging Error Messages
When developing or debugging your VISA application, you may want
to view internal VISA messages while your application is running. You
can do this by using the Event Viewer utility or the Debug Window.
There are three choices for VISA logging:
• Off (default) for best performance
• Event Viewer
• Debug Window
Using the Event Viewer
The Event Viewer utility provides a way to view internal VISA error
messages during application execution. Some of these internal messages
do not represent programming errors; they indicate events which are
being handled internally by VISA. The process for using the Event
Viewer is:
• Enable VISA logging from the Agilent IO Control by clicking the
blue IO icon on the taskbar and then clicking Agilent VISA Options
> VISA Logging > Event Viewer.
• Run your VISA program.
• View VISA error messages by running the Event Viewer. From the
Agilent IO Control, click Event Viewer. VISA error messages will
appear in the application log of the Event Viewer utility.
Using the Debug Window
When VISA logging is directed to the Debug Window, VISA writes
logging messages using the Win32 API call OutputDebugString(). The
most common use for this feature is when debugging your VISA
Agilent VISA User’s Guide
25
2
Building a VISA Application in Windows
program using an application such as Microsoft Visual Studio. In this
case, VISA messages will appear in the Visual Studio output window.
The process for using the Debug Window is:
1 Enable VISA logging from the Agilent IO Control by clicking the
blue IO icon on the taskbar and then clicking Agilent VISA Options
> VISA Logging > Debug Window.
2 Run your VISA program from Microsoft Visual Studio (or
equivalent application).
3 View error messages in the Visual Studio (or equivalent) output
window.
26
Agilent VISA User’s Guide
Agilent IO Libraries Suite
Agilent VISA User’s Guide
3
Programming with VISA
This chapter describes how to program with VISA. The basics of VISA
are described, including formatted I/O, events and handlers, attributes,
and locking. Example programs are also provided and can be found in
the ProgrammingSamples subdirectory
(C:\Program Files\Agilent\IO Libraries Suite\
ProgrammingSamples in a default installation).
Click the IO Control and select Installation Information to see the
specific installation directories used on your PC. For specific details on
VISA functions, see the VISA Online Help.
This chapter contains the following sections:
• VISA Resources and Attributes
• Using Sessions
• Sending I/O Commands
• Using Events and Handlers
• Trapping Errors
• Using Locks
Agilent Technologies
27
3
Programming with VISA
VISA Resources and Attributes
This section introduces VISA resources and attributes, including:
• VISA Resources
• VISA Attributes
VISA Resources
In VISA, a resource is defined as any device (such as a voltmeter) with
which VISA can provide communication. VISA defines six resource
classes that a complete VISA system, fully compliant with the
VXIplug&play Systems Alliance specification, can implement. Each
resource class includes:
• Attributes to determine the state of a resource or session or to set a
resource or session to a specified state.
• Events for communication with applications.
• Operations (functions) that can be used for the resource class.
Table 4describes each resource class supported by Agilent VISA. See
VISA Resource Classes in the VISA Online Help for a description of the
attributes, events, and operations for each resource class.
NOT E
Although the Servant Device-Side (SERVANT) resource is defined by
the VISA specification, the SERVANT resource is not supported by
Agilent VISA. The SERVANT Resource is intended for advanced users
who need to write code that causes a computer to function as an
instrument rather than as a controller.
Table 4
Resource Classes Supported by Agilent VISA
Resource Class
28
Interface Types
Resource Class Description
Instrument
Control (INSTR)
Generic, GPIB,
GPIB-VXI, Serial,
TCPIP, USB, VXI
Device operations (reading,
writing, triggering, etc.).
GPIB Bus
Interface
(INTFC)
Generic, GPIB
Raw GPIB interface
operations (reading, writing,
triggering, etc.).
Agilent VISA User’s Guide
Programming with VISA
Table 4
3
Resource Classes Supported by Agilent VISA (continued)
Memory Access
(MEMACC)
Generic, GPIB-VXI,
VXI
Address space of a
memory-mapped bus such as
the VXIbus.
VXI Mainframe
Backplane
(BACKPLANE)
Generic, GPIB-VXI,
VXI (GPIB-VXI
BACKPLANE not
supported)
VXI-defined operations and
properties of each backplane
in a VXIbus system.
TCPIP Socket
(SOCKET)
Generic, TCPIP
Operations and properties of
a raw network socket
connection using TCPIP.
VISA Attributes
Attributes are associated with resources or sessions. You can use
attributes to determine the state of a resource or session, or to set a
resource or session to a specified state.
For example, you can use the viGetAttribute function to read the state
of an attribute for a specified session, event context, or find list. There
are read only (RO) and read/write (RW) attributes. Use the
viSetAttribute function to modify the state of a read/write attribute for
a specified session, event context, or find list.
The pointer passed to viGetAttribute must point to the exact type
required for that attribute (ViUInt16, ViInt32, etc.). For example, when
reading an attribute state that returns a ViUInt16, declare a variable of
that type and use it for the returned data. If ViString is returned, allocate
an array and pass a pointer to that array for returned data.
Example: Reading a VISA Attribute
This example reads the state
of the VI_ATTR_TERMCHAR_EN attribute and changes it if it is false.
ViBoolean state, newstate;
newstate=VI_TRUE;
viGetAttribute(vi, VI_ATTR_TERMCHAR_EN, &state);
if (state err !=VI_TRUE) viSetAttribute(vi,
VI_ATTR_TERMCHAR_EN, newstate);
Agilent VISA User’s Guide
29
3
Programming with VISA
Using Sessions
This section shows how to use VISA sessions, including:
• Including the VISA Declarations File (C/C++)
• Adding the visa32.bas File (Visual Basic)
• Opening a Session to a Resource
• Addressing a Session
• Closing a Session
• Searching for Resources
Including the VISA Declarations File (C/C++)
For C and C++ programs, you must include the visa.h header file at
the beginning of every file that contains VISA function calls:
#include "visa.h"
This header file contains the VISA function prototypes and the
definitions for all VISA constants and error codes. The visa.h header
file also includes the visatype.h header file.
The visatype.h header file defines most of the VISA types. The
VISA types are used throughout VISA to specify data types used in the
functions. For example, the viOpenDefaultRM function requires a
pointer to a parameter of type ViSession. If you find ViSession in the
visatype.h header file, you will find that ViSession is eventually
typed as an unsigned long. VISA types are also listed in VISA System
Information in the VISA Online Help.
Adding the visa32.bas File (Visual Basic)
You must add the visa32.bas Basic module file to your Visual Basic
project. The visa32.bas file contains the VISA function prototypes
and definitions for all VISA constants and error codes.
30
Agilent VISA User’s Guide
Programming with VISA
3
Opening a Session
A session is a channel of communication. Sessions must first be opened
on the default resource manager, and then for each resource you will be
using.
• A resource manager session is used to initialize the VISA system. It
is a parent session that knows about all the opened sessions. A
resource manager session must be opened before any other session
can be opened.
• A resource session is used to communicate with a resource on an
interface. A session must be opened for each resource you will be
using. When you use a session you can communicate without
worrying about the type of interface to which it is connected. This
insulation makes applications more robust and portable across
interfaces.
Resource Manager Sessions
There are two parts to opening a communications session with a specific
resource. First, you must open a session to the default resource manager
with the viOpenDefaultRM function. The first call to this function
initializes the default resource manager and returns a session to that
resource manager session. You only need to open the default manager
session once. However, subsequent calls to viOpenDefaultRM return a
unique session to the same default resource manager resource.
Resource Sessions
Next, open a session with a specific resource using the viOpen function.
This function uses the session returned from viOpenDefaultRM and
returns its own session to identify the resource session. The following
shows the function syntax.
viOpenDefaultRM(sesn);
viOpen(sesn, rsrcName, accessMode, timeout,
vi);
The session returned from viOpenDefaultRM must be used in the sesn
parameter of the viOpen function. The viOpen function then uses that
session and the resource address specified in the rsrcName parameter to
open a resource session. The vi parameter in viOpen returns a session
identifier that can be used with other VISA functions.
Agilent VISA User’s Guide
31
3
Programming with VISA
Your program may have several sessions open at the same time after
creating multiple session identifiers by calling the viOpen function
multiple times. The following table summarizes the parameters in the
previous function calls.
Table 5
Parameters Used in Function Calls
Parameter
Description
sesn
A session returned from the viOpenDefaultRM function
that identifies the resource manager session.
rsrcName
A unique symbolic name of the resource (resource address).
accessMode
Specifies the modes by which the resource is to be accessed.
The value VI_EXCLUSIVE_LOCK is used to acquire an
exclusive lock immediately upon opening a session. If a lock
cannot be acquired, the session is closed and an error is
returned. The VI_LOAD_CONFIG value is used to
configure attributes specified by some external
configuration utility. If this value is not used, the session
uses the default values provided by this specification.
Multiple access modes can be used simultaneously by
specifying a “bit-wise OR” of the values.
timeout
If the accessMode parameter requires a lock, this parameter
specifies the absolute time period (in milliseconds) that the
resource waits to get unlocked before this operation returns
an error. Otherwise, this parameter is ignored.
vi
This is a pointer to the session identifier for this particular
resource session. This pointer will be used to identify this
resource session when using other VISA functions.
Example: Opening a Resource Session This code sample shows
one way of opening resource sessions with a GPIB multimeter and a
GPIB-VXI scanner. The sample first opens a session with the default
resource manager. The example then uses the session returned from the
resource manager, and a VISA address, to open a session with the GPIB
device at address 22. You can now identify that session as dmm when
you call other VISA functions.
32
Agilent VISA User’s Guide
Programming with VISA
3
The example again uses the session returned from the resource manager,
with another VISA address, to open a session with the GPIB-VXI
device at primary address 9 and VXI logical address (secondary
address) 24. You will now identify this session as scanner when calling
other VISA functions. See the following section, “Addressing a
Session”, for information on addressing particular devices.
ViSession defaultRM, dmm, scanner;
.
viOpenDefaultRM(&defaultRM);
viOpen(defaultRM, "GPIB0::22::INSTR",VI_NULL,
VI_NULL,&dmm);
viOpen(defaultRM, "GPIB-VXI0::24::INSTR",
VI_NULL, VI_NULL,&scanner);
.
viClose(scanner);
viClose(dmm);
viClose(defaultRM);
Addressing a Session
As shown in the previous section, the rsrcName parameter in the
viOpen function is used to identify a specific resource. This parameter
consists of the VISA interface ID and the resource address. The
interface ID is determined when you run the Agilent Connection Expert
utility. The interface ID is usually the VISA interface type followed by a
number.
The following table illustrates the format of the rsrcName for different
VISA interface types. INSTR is an optional parameter that indicates that
you are communicating with a resource that is of type INSTR, meaning
instrument. The keywords are:
• ASRL - used for asynchronous serial devices.
• GPIB - used for GPIB devices and interfaces.
• GPIB-VXI - used for GPIB-VXI controllers.
• TCPIP - used for LAN instruments.
• VXI - used for VXI instruments.
• USB - used for USB instruments.
Agilent VISA User’s Guide
33
3
Programming with VISA
Table 6 The Format of the rsrcName (VISA Address) for Different
Interface Types
Interface
Typical Syntax
ASRL
ASRL[board][::INSTR]
GPIB
GPIB[board]::primary address[::secondary address][::INSTR]
GPIB
GPIB[board]::INTFC
GPIB-VXI
GPIB-VXI[board]::VXI logical address[::INSTR]
GPIB-VXI
GPIB-VXI[board]::MEMACC
GPIB-VXI
GPIB-VXI[board][::VXI logical address]::BACKPLANE
TCPIP
TCPIP[board]::host address[::LAN device name]::INSTR
TCPIP
TCPIP[board]::host address::port::SOCKET
USB
USB[board]::manufacturer ID::model code::serial
number[::USB interface number][::INSTR]
VXI
VXI[board]::VXI logical address[::INSTR]
VXI
VXI[board]::MEMACC
VXI
VXI[board][::VXI logical address]::BACKPLANE
The following table describes the parameters used above.
Table 7
Description of Parameters
Parameter
34
Description
board
This optional parameter is used if you have more
than one interface of the same type. The default
value for board is 0.
host address
The IP address (in dotted decimal notation) or the
name of the host computer/gateway.
LAN device name
The assigned name for a LAN device. Device
Name depends on LAN Host Device (see
documentaiton that came with your LAN Host
device such as E5810A). The default is inst().
Agilent VISA User’s Guide
Programming with VISA
Table 7
3
Description of Parameters (continued)
manufacturer ID
Manufacturer’s ID for a USB Test & Measurement
class device
model code
Model code of a USB device.
port
The port number to use for a TCP/IP Socket
connection.
primary address
The primary address of the GPIB device.
secondary address
This optional parameter is the secondary address of
the GPIB device. If no secondary address is
specified, none is assumed.
serial number
Serial number of a USB device.
USB interface
number
Interface number of a USB device.
VXI logical address
Logical address of a VXI instrument within a
mainframe.
Some examples of valid VISA addresses follow.
Table 8
Examples of Valid VISA Addresses
Address String
Agilent VISA User’s Guide
Description
VXI0::1::INSTR
A VXI device at logical address 1 in VXI
interface VXI0.
GPIB-VXI::9::INSTR
A VXI device at logical address 9 in a
GPIB-VXI controlled VXI system.
GPIB::1::0::INSTR
A GPIB device at primary address 1 and
secondary address 0 in GPIB interface 0.
ASRL1::INSTR
A serial device located on port 1.
VXI::MEMACC
Board-level register access to the VXI
interface.
GPIB-VXI1::MEMACC
Board-level register access to GPIB-VXI
interface number 1.
35
3
Programming with VISA
Table 8
Examples of Valid VISA Addresses (continued)
GPIB2::INTFC
Interface or raw resource for GPIB
interface 2.
VXI::1::BACKPLANE
Mainframe resource for chassis 1 on the
default VXI system, which is interface 0.
GPIB-VXI2:: BACKPLANE
Mainframe resource for default chassis on
GPIB-VXI interface 2.
GPIB1::SERVANT
Servant/device-side resource for GPIB
interface 1.
VXI0::SERVANT
Servant/device-side resource for VXI
interface 0.
TCPIP0::1.2.3.4::999::SOCK
ET
Raw TCPIP access to port 999 at the
specified address.
TCPIP::devicename@compa
ny.
com::INSTR
TCPIP device using VXI-11 located at the
specified address. This uses the default
LAN Device Name of inst0.
USB::0x1234::125::A22-5::I
NSTR
USB Test & Measurement class device
with manufacturer ID 0x1234, model code
125, and serial number A22-5. This uses
the device's first available USBTMC
interface, which is usually numbered 0.
Example: Opening a Session This sample shows one way to open a
VISA session with the GPIB device at primary address 23.
ViSession defaultRM, vi;
.
.
viOpenDefaultRM(&defaultRM);
viOpen(defaultRM, "GPIB0::23::INSTR", VI_NULL,
VI_NULL,&vi);
.
.
viClose(vi);
viClose(defaultRM);
36
Agilent VISA User’s Guide
Programming with VISA
3
Closing a Session
You must use the viClose function to close each session. Closing the
specific resource session frees all data structures that had been allocated
for the session. If you close the default resource manager session, all
sessions opened using that resource manager session will close.
Since system resources are also used when searching for resources
(viFindRsrc), the viClose function needs to be called to free up find
lists. See the following section, “Searching for Resources”, for more
information on closing find lists.
Searching for Resources
When you open the default resource manager, you are opening a parent
session that knows about all the other resources in the system. Since the
resource manager session knows about all resources, it has the ability to
search for specific resources and open sessions to these resources. You
can, for example, search an interface for devices and open a session with
one of the devices found.
Use the viFindRsrc function to search an interface for device resources.
This function finds matches and returns the number of matches found
and a handle to the resources found. If there are more matches, use the
viFindNext function with the handle returned from viFindRsrc to get
the next match:
viFindRsrc(sesn, expr, findList, retcnt,
instrDesc);
.
.
viFindNext(findList, instrDesc);
.
.
viClose (findList);
Agilent VISA User’s Guide
37
3
Programming with VISA
The parameters are defined as follows.
Table 9
Parameter
Definitions of Parameters
Description
sesn
The resource manager session.
expr
The expression that identifies what to search (Table 10).
findList
A handle that identifies this search. This handle will then be
used as an input to the viFindNext function when finding
the next match.
retcnt
A pointer to the number of matches found.
instrDesc
A pointer to a string identifying the location of the match.
Note that you must allocate storage for this string.
The handle returned from viFindRsrc should be closed to free up all the
system resources associated with the search. To close the find object,
pass the findList to the viClose function.
Use the expr parameter of viFindRsrc to specify the interface to search.
You can search for devices on the specified interface. Use the following
table to determine what to use for your expr parameter.
NOT E
Because VISA interprets strings as regular expressions, the string
GPIB?*INSTR applies to both GPIB and GPIB-VXI devices.
Table 10 Determining What to Use for the expr Parameter
Interface
38
expr Parameter
GPIB
GPIB[0-9]*::?*INSTR
VXI
VXI?*INSTR
GPIB-VXI
GPIB-VXI?*INSTR
GPIB and GPIB-VXI
GPIB?*INSTR
All VXI
?*VXI[0-9]*::?*INSTR
ASRL
ASRL[0-9]*::?*INSTR
All
?*INSTR
Agilent VISA User’s Guide
Programming with VISA
3
Example: Searching the VXI Interface for Resources This code
sample searches the VXI interface for resources. The number of
matches found is returned in nmatches, and matches points to the string
that contains the matches found. The first call returns the first match
found, the second call returns the second match found, etc.
VI_FIND_BUFLEN is defined in the visa.h declarations file.
ViChar buffer [VI_FIND_BUFLEN];
ViRsrc matches=buffer;
ViUInt32 nmatches;
ViFindList list;
.
.
viFindRsrc(defaultRM, "VXI?*INSTR", &list,
&nmatches, matches);
..
.
viFindNext(list, matches);
.
.
viClose(list);
Agilent VISA User’s Guide
39
3
Programming with VISA
Sending I/O Commands
This section provides guidelines for sending I/O commands, including:
• Types of I/O
• Using Formatted I/O
• Using Non-Formatted I/O
Types of I/O
Once you have established a communications session with a device, you
can start communicating with that device using VISA's I/O routines.
VISA provides both formatted and non-formatted I/O routines.
• Formatted I/O converts mixed types of data under the control of a
format string. The data is buffered, thus optimizing interface traffic.
• Non-formatted I/O sends or receives raw data to or from a device.
With non-formatted I/O, no format or conversion of the data is
performed. Thus, if formatted data is required, it must be done by the
user.
You can choose between VISA's formatted and non-formatted I/O
routines. However, you should not mix formatted I/O and non-formatted
I/O in the same session. See the following sections for descriptions and
code examples using formatted I/O and non-formatted I/O in VISA.
The VISA formatted I/O mechanism is similar to the C stdio
mechanism. The VISA formatted I/O functions are viPrintf, viQueryf,
and viScanf. Two non-buffered and non-formatted I/O functions,
viRead and viWrite, synchronously transfer data. Two additional
functions, viReadAsync and viWriteAsync were intended for
asynchronous data transfer but are imlemented synchronously in
Agilent VISA.
These are raw I/O functions and do not intermix with the formatted I/O
functions. See “Using Non-Formatted I/O” in this chapter for details.
Refer to the VISA Online Help for more information on how data is
converted under the control of the format string.
40
Agilent VISA User’s Guide
3
Programming with VISA
Using Formatted I/O
As noted, the VISA formatted I/O functions are viPrintf, viQueryf, and
viScanf.
• viPrintf formats data according to the format string (writeFmt) and
sends the data to a device. viPrintf sends separate arg parameters,
while the viVPrintf function sends a list of parameters in params:
viPrintf(vi, writeFmt[, arg1][, arg2][, ...]);
viVPrintf(vi, writeFmt, params);
• viScanf receives and converts data from a device according to the
format string (readFmt). The viScanf function receives separate arg
parameters, while the viVScanf function receives a list of parameters
in params:
viScanf(vi, readFmt[, arg1][, arg2][, ...]);
viVScanf(vi, readFmt, params);
• viQueryf formats and sends data to a device and then immediately
receives and converts the response data. Hence, viQueryf is a
combination of both viPrintf and viScanf functions. Similarly,
viVQueryf is a combination of viVPrintf and viVScanf. viQueryf
sends and receives separate arg parameters, while the viVQueryf
function sends and receives a list of parameters in params:
viQueryf(vi, writeFmt, readFmt[, arg1]
[, arg2][, ...]);
viVQueryf(vi, writeFmt, readFmt, params);
Formatted I/O Conversion
Formatted I/O functions convert data under the control of the format
specifier. The format specifier consists of a % (percent) symbol, optional
modifier, and a format code. Both readFmt and writeFmt have the form:
%[modifier]formatCode
Example: Receiving Data From a Session The following example
uses viScanf to receive data from the session specified by the vi
parameter and converts the data to a string.
char data[180];
viScanf(vi, "%t", data);
Agilent VISA User’s Guide
41
3
Programming with VISA
Formatted I/O Buffers
The VISA software maintains both a read and write buffer for formatted
I/O operations. Occasionally, you may want to control the actions of
these buffers. You can modify the size of the buffer using the viSetBuf
function. See the VISA Online Help for more information on this
function.
The write buffer is maintained by the viPrintf or viQueryf (writeFmt)
functions. The buffer queues characters to send to the device so that they
are sent in large blocks, thus increasing performance. The write buffer
automatically flushes when it sends a newline character from the format
string. It may occasionally be flushed at other non-deterministic times,
such as when the buffer fills.
When the write buffer flushes, it sends its contents to the device. If you
set the VI_ATTR_WR_BUF_OPER_MODE attribute to
VI_FLUSH_ON_ACCESS, the write buffer will also be flushed every
time a viPrintf or viQueryf operation completes. See “VISA
Attributes” in this chapter for information
on setting VISA attributes.
The read buffer is maintained by the viScanf and viQueryf (readFmt)
functions. It queues the data received from a device until it is needed by
the format string. Flushing the read buffer destroys the data in the buffer
and guarantees that the next call to viScanf or viQueryf reads data
directly from the device rather than data that was previously queued.
If you set the VI_ATTR_RD_BUF_OPER_MODE attribute to
VI_FLUSH_ON_ACCESS, the read buffer will be flushed every time a
viScanf or viQueryf operation completes. See “VISA Attributes” in this
chapter for information on setting VISA attributes.
You can manually flush the read and write buffers using the viFlush
function. Flushing the read buffer also includes reading all pending
response data from a device. If the device is still sending data, the flush
process will continue to read data from the device until it receives an
END indicator from the device.
42
Agilent VISA User’s Guide
3
Programming with VISA
Example: Sending and Receiving Formatted I/O
The following
C sample program demonstrates sending and receiving formatted I/O.
The program opens a session with a GPIB device and sends a comma
operator to send a comma-separated list. This program shows specific
VISA functionality and does not include error trapping.
This example program is installed on your system in the
ProgrammingSamples subdirectory.
/*formatio.c
This example program makes a dmm measurement
with a comma-separated list passed with
formatted I/O and prints the results. You may
need to change the device address. */
#include <visa.h>
#include <stdio.h>
void main () {
ViSession defaultRM, vi;
double res;
double list [2] = {1,0.001};
/* Open session to GPIB device at address 22*/
viOpenDefaultRM(&efaultRM);
viOpen(defaultRM, "GPIB0::22::INSTR",
VI_NULL,VI_NULL, &vi);
/* Initialize device */
viPrintf(vi, "*RST\n");
/* Set-up device,send comma-separated list */
viPrintf(vi, "CALC:DBM:REF 50\n");
viPrintf(vi, "MEAS:VOLT:AC? %,2f\n", list);
/* Read results */
viScanf(vi, "%lf", &res);
/* Print results */
printf("Measurement Results: %lf\n", res);
/* Close session */
viClose(vi);
viClose(defaultRM);
}
Agilent VISA User’s Guide
43
3
Programming with VISA
Using Non-Formatted I/O
There are two non-buffered, non-formatted I/O functions that
synchronously transfer data called viRead and viWrite. Also, there are
two non-formatted I/O functions that asynchronously transfer data
called viReadAsync and viWriteAsync. These are raw I/O functions
and do not intermix with the formatted I/O functions.
Non-Formatted I/O Functions
The non-formatted I/O functions follow. For more information, see the
viRead, viWrite, viReadAsync, viWriteAsync, and viTerminate
functions in the VISA Online Help.
viRead. The viRead function synchronously reads raw data from the
session specified by the vi parameter and stores the results in the
location where buf is pointing. Only one synchronous read operation
can occur at any one time.
viRead(vi, buf, count, retCount);
viWrite. The viWrite function synchronously sends the data pointed
to by buf to the device specified by vi. Only one synchronous write
operation can occur at any one time.
viWrite(vi, buf, count, retCount);
Refer to the Agilent VISA help file for specific infomraiton on these
and other VISA functions such as viReadAsync and viWriteAsync.
Example: Using Non-Formatted I/O Functions This sample
program illustrates using non-formatted I/O functions to communicate
with a GPIB device. This example program is intended to show specific
VISA functionality and does not include error trapping. Error trapping,
however, is good programming practice and is recommended in your
VISA applications. See “Trapping Errors” in this chapter for more
information.
44
Agilent VISA User’s Guide
3
Programming with VISA
/*nonfmtio.c
This example program measures the AC voltage on
a multimeter and prints the results. You may
need to change the device address. */
#include <visa.h>
#include <stdio.h>
void main () {
ViSession defaultRM, vi;
char strres [20];
unsigned long actual;
/* Open session to GPIB device at address 22 */
viOpenDefaultRM(&defaultRM);
viOpen(defaultRM, "GPIB0::22::INSTR",
VI_NULL,VI_NULL, &vi);
/* Initialize device */
viWrite(vi, (ViBuf)"*RST\n", 5, &actual);
/* Set up device and take measurement */
viWrite(vi, (ViBuf)"CALC:DBM:REF 50\n", 16,
&actual);
viWrite(vi, (ViBuf)"MEAS:VOLT:AC? 1, 0.001\n",
23, &actual);
/* Read results */
viRead(vi, (ViBuf)strres, 20, &actual);
/* NULL terminate the string */
strres[actual]=0;
/* Print results */
printf("Measurement Results: %s\n", strres);
/* Close session */
viClose(vi);
viClose(defaultRM);
}
Agilent VISA User’s Guide
45
3
Programming with VISA
Using Events and Handlers
This section provides guidelines to using events and handlers,
including:
• Events and Attributes
• Using the Callback Method
• Using the Queuing Method
Events and Attributes
Events are special occurrences that require attention from your
application. Event types include Service Requests (SRQs), interrupts,
and hardware triggers. Events will not be delivered unless the
appropriate events are enabled.
NOT E
VISA cannot call back to a Visual Basic function. Thus, you can only
use the queuing mechanism in viEnableEvent. There is no way to
install a VISA event handler in Visual Basic.
Event Notification
There are two ways you can receive notification that an event has
occurred:
• Install an event handler with viInstallHandler, and enable one or
several events with viEnableEvent. If the event was enabled with a
handler, the specified event handler will be called when the specified
event occurs. This is called a callback.
NOT E
VISA cannot call back to a Visual Basic function. This means that you
can only use the VI_QUEUE mechanism in viEnableEvent. There is
no way to install a VISA event handler in Visual Basic.
• Enable one or several events with viEnableEvent and call the
viWaitOnEvent function. The viWaitOnEvent function will
suspend the program execution until the specified event occurs or the
specified timeout period is reached. This is called queuing.
46
Agilent VISA User’s Guide
3
Programming with VISA
The queuing and callback mechanisms are suitable for different
programming styles. The queuing mechanism is generally useful for
non-critical events that do not need immediate servicing. The callback
mechanism is useful when immediate responses are needed. These
mechanisms work independently of each other, so both can be enabled
at the same time. By default, a session is not enabled to receive any
events by either mechanism.
The viEnableEvent operation can be used to enable a session to
respond to a specified event type using either the queuing mechanism,
the callback mechanism, or both. Similarly, the viDisableEvent
operation can be used to disable one or both mechanisms. Because the
two methods work independently of each other, one can be enabled or
disabled regardless of the current state of the other.
Events that can be Enabled
The following table shows the events that are implemented for Agilent
VISA for each resource class, where AP = Access Privilege, RO - Read
Only, and RW = Read/Write. Note that some resource classes/events,
such as the SERVANT class, are not implemented by Agilent VISA and
are not listed in the following tables.
Once the application has received an event, information about that event
can be obtained by using the viGetAttribute function on that particular
event context. Use the VISA viReadSTB function to read the status
byte of the service request.
.
Table 11 Instrument Control (INSTR) Resource Events
VI_EVENT_SERVICE_REQUEST
Notification that a service request was received from the device.
Event Attribute
VI_ATTR_EVENT_TYPE
Description
Unique logical identifier of the
event.
A
P
R
O
Data Type
ViEventTy
pe
Range
VI_EVENT_SERVICE_RE
Q
VI_EVENT_VXI_SIGP
Notification that a VXIbus signal or VXIbus interrupt was received from the device.
Agilent VISA User’s Guide
47
3
Programming with VISA
Table 11 Instrument Control (INSTR) Resource Events (continued)
Event Attribute
Description
A
P
Data Type
Range
VI_ATTR_EVENT_TYPE
Unique logical identifier of the
event.
R
O
ViEventTy
pe
VI_EVENT_VXI_STOP
VI_ATTR_SIGP_STATUS
_ID
The 16-bit Status/ID value
retrieved during the IACK cycle
or from the Signal register.
R
O
ViUInt16
0 to FFFFh
VI_EVENT_TRIG
Notification that a trigger interrupt was received from the device. For VISA, the only triggers that can be sensed are VXI
hardware triggers on the assertion edge (SYNC and ON trigger protocols only).
Event Attribute
Description
A
P
Data Type
Range
VI_ATTR_EVENT_TYPE
Unique logical identifier of the
event.
R
O
ViEventTy
pe
VI_EVENT_TRIG
VI_ATTR_RECV_TRIG_I
D
The identifier of the triggering
mechanism on which the
specified trigger event was
received.
R
O
ViInt16
VI_TRIG_TTL0 to
VI_TRIG_TTL7;
VI_TRIG_ECL0 to
VI_TRIG_ECL1*
* Agilent VISA can also return VI_TRIG_PANEL_IN (exception to the VISA Specification)
VI_EVENT_IO_COMPLETION
Notification that an asynchronous operation has completed.
Event Attribute
Description
A
P
Data Type
Range
VI_ATTR_EVENT_TYPE
Unique logical identifier of the
event.
R
O
ViEventTy
pe
VI_EVENT_IO_COMPLE
TION
VI_ATTR_STATUS
Return code of the asynchronous
I/O operation that has completed.
R
O
ViStatus
N/A
VI_ATTR_JOB_ID
Job ID of the asynchronous
operation that has completed.
R
O
ViJobId
N/A
VI_ATTR_BUFFER
Address of a buffer that was used
in an asynchronous operation.
R
O
ViBuf
N/A
48
Agilent VISA User’s Guide
Programming with VISA
3
Table 11 Instrument Control (INSTR) Resource Events (continued)
VI_ATTR_RET_COUNT
Actual number of elements that
were asynchronously transferred.
VI_ATTR_OPER_NAME
Name of the operation generating
the event.
R
O
ViUInt32
0 to FFFFFFFFh
ViString
N/A
VI_EVENT_USB_INTR
Notification that a vendor-specific USB interrupt was received from the device.
Event Attribute
Description
A
P
Data Type
Range
VI_ATTR_EVENT_TYPE
Unique logical identifier of the
event.
R
O
ViEventTy
pe
VI_EVENT_USB_INTR
VI_ATTR_USB_RECV_IN
TR_
SIZE
Specifies the size of the data that
was received from the USB
interrupt-IN pipe. This value will
never be larger than the sessions
value of VI_ATTR_USB_MAX_
INTR_SIZE.
R
O
ViUInt16
0 to FFFFh
VI_ATTR_USB_RECV_IN
TR
_DATA
Specifies the actual data that was
received from the USB
interrupt-IN pipe. Querying this
attribute copies the contents of
the data to the users buffer. The
users buffer must be sufficiently
large enough to hold all of the
data.
R
O
ViBuf
N/A
VI_ATTR_STATUS
Specifies the status of the read
operation from the USB
interrupt-IN pipe. If the device
sent more data than the user
specified in
VI_ATTR_USB_MAX_INTR_S
IZE, then this attribute value will
contain an error code.
R
O
ViStatus
N/A
Agilent VISA User’s Guide
49
3
Programming with VISA
Table 12 Memory Access (MEMACC) Resource Event
VI_EVENT_IO_COMPLETION
Notification that an asynchronous operation has completed
Event Attribute
Description
A
P
Data Type
Range
VI_ATTR_EVENT_TYPE
Unique logical identifier of the
event.
R
O
ViEventTy
pe
VI_EVENT_IO_COMPLE
TION
VI_ATTR_STATUS
Return code of the asynchronous
I/O operation that has completed.
R
O
ViStatus
N/A
VI_ATTR_JOB_ID
Job ID of the asynchronous
operation that has completed.
R
O
ViJobId
N/A
VI_ATTR_BUFFER
Address of a buffer that was used
in an asynchronous operation.
R
O
ViBuf
N/A
VI_ATTR_RET_COUNT
Actual number of elements that
were asynchronously transferred.
R
O
ViUInt32
0 to FFFFFFFFh
VI_ATTR_OPER_NAME
Name of the operation generating
the event.
R
O
ViString
N/A
Table 13 GPIB Bus Interface (INTFC) Resource Events
VI_EVENT_GPIB_CIC
Notification that the GPIB controller has gained or lost CIC (controller in charge) status
Event Attribute
Description
A
P
Data Type
Range
VI_ATTR_EVENT_TYPE
Unique logical identifier of the
event.
R
O
ViEventTy
pe
VI_EVENT_GPIB_CIC
VI_ATTR_GPIB_RECV_CIC_
STATE
Controller has become
controller-in-charge.
R
O
ViBoolean
VI_TRUE
VI_FALSE
VI_EVENT_GPIB_TALK
Notification that the GPIB controller has been addressed to talk
50
Agilent VISA User’s Guide
Programming with VISA
3
Table 13 GPIB Bus Interface (INTFC) Resource Events (continued)
Event Attribute
VI_ATTR_EVENT_TYPE
Description
Unique logical identifier of the
event.
A
P
R
O
Data Type
ViEventTy
pe
Range
VI_EVENT_GPIB_TAL
K
VI_EVENT_GPIB_LISTEN
Notification that the GPIB controller has been addressed to listen.
Event Attribute
VI_ATTR_EVENT_TYPE
Description
Unique logical identifier of the
event.
A
P
R
O
Data Type
ViEventTy
pe
Range
VI_EVENT_GPIB_LIST
EN
VI_EVENT_CLEAR
Notification that the GPIB controller has been sent a device clear message.
Event Attribute
VI_ATTR_EVENT_TYPE
Description
Unique logical identifier of the
event.
A
P
Data Type
Range
R
O
ViEventTy
pe
VI_EVENT_CLEAR
VI_EVENT_TRIGGER
Notification that a trigger interrupt was received from the interface.
Event Attribute
Description
A
P
Data Type
Range
VI_ATTR_EVENT_TYPE
Unique logical identifier of the
event.
R
O
ViEventTy
pe
VI_EVENT_TRIG
VI_ATTR_RECV_TRIG_ID
The identifier of the triggering
mechanism on which the
specified trigger event was
received.
R
O
ViInt16
VI_TRIG_SW
VI_EVENT_IO_COMPLETION
Notification that an asynchronous operation has completed.
Agilent VISA User’s Guide
51
3
Programming with VISA
Table 13 GPIB Bus Interface (INTFC) Resource Events (continued)
Event Attribute
Description
A
P
Data Type
Range
VI_ATTR_EVENT_TYPE
Unique logical identifier of the
event.
R
O
ViEventTy
pe
VI_EVENT_IO_
COMPLETION
VI_ATTR_STATUS
Return code of the
asynchronous I/O operation that
has completed.
R
O
ViStatus
N/A
VI_ATTR_JOB_ID
Job ID of the asynchronous
operation that has completed.
R
O
ViJobId
N/A
VI_ATTR_BUFFER
Address of buffer used in an
asynchronous operation.
R
O
ViBuf
N/A
VI_ATTR_RET_COUNT
Actual number of elements that
were asynchronously
transferred.
R
O
ViUInt32
0 to FFFFFFFFh
VI_ATTR_OPER_NAME
The name of the operation
generating the event.
R
O
ViString
N/A
Table 14 VXI Mainframe Backplane (BACKPLANE) Resource Events
VI_EVENT_TRIG
Notification that a trigger interrupt was received from the backplane. For VISA, the only triggers that can
be sensed are VXI hardware triggers on the assertion edge (SYNC and ON trigger protocols only).
Event Attribute
Description
A
P
Data Type
Range
VI_ATTR_EVENT_TYPE
Unique logical identifier of the
event.
R
O
ViEventTy
pe
VI_EVENT_TRIG
VI_ATTR_RECV_TRIG_I
D
The identifier of the triggering
mechanism on which the
specified trigger event was
received.
R
O
ViInt16
VI_TRIG_TTL0 to
VI_TRIG_TTL7;
VI_TRIG_ECL0 to
VI_TRIG_ECL1
VI_EVENT_VXI_VME_SYSFAIL
Notification that the VXI/VME SYSFAIL* line has been asserted.
52
Agilent VISA User’s Guide
Programming with VISA
3
Table 14 VXI Mainframe Backplane (BACKPLANE) Resource Events (continued)
VI_ATTR_EVENT_TYPE
Unique logical identifier of the
event.
R
O
ViEventTy
pe
VI_EVENT_VXI_VME_
SYSFAIL
VI_EVENT_VXI_VME_SYSRESET
Notification that the VXI/VME SYSRESET* line has been reset
Event Attributes
VI_ATTR_EVENT_TYPE
Description
Unique logical identifier of the
event.
A
P
R
O
Data Type
ViEventTy
pe
Range
VI_EVENT_VXI_VME_
SYSRESET
Table 15 TCPIP Socket (SOCKET) Resource Event
VI_EVENT_IO_COMPLETION
Notification that an asynchronous operation has completed
Event Attribute
Description
A
P
Data Type
Range
VI_ATTR_EVENT_TYPE
Unique logical identifier of the
event.
R
O
ViEventTy
pe
VI_EVENT_IO_COMPLE
TION
VI_ATTR_STATUS
Return code of the asynchronous
I/O operation that has completed.
R
O
ViStatus
N/A
VI_ATTR_JOB_ID
Job ID of the asynchronous
operation that has completed.
R
O
ViJobId
N/A
VI_ATTR_BUFFER
Address of a buffer that was used
in an asynchronous operation.
R
O
ViBuf
N/A
VI_ATTR_RET_COUNT
Actual number of elements that
were asynchronously transferred.
R
O
ViUInt32
0 to FFFFFFFFh
VI_ATTR_OPER_NAME
Name of the operation generating
the event.
R
O
ViString
N/A
Agilent VISA User’s Guide
53
3
Programming with VISA
Example: Reading Event Attributes Once you have decided
which attribute to check, you can read the attribute using the
viGetAttribute function. The following example shows one way you
could check which trigger line fired when the VI_EVENT_TRIG event
was delivered.
Note that the context parameter is either the event context passed to your
event handler, or the outcontext specified when doing a wait on event.
See “VISA Attributes” in this chapter for more information on reading
attribute states.
ViInt16 state;
.
.
viGetAttribute(context, VI_ATTR_RECV_TRIG_ID,
&state)
Using the Callback Method
The callback method of event notification is used when an immediate
response to an event is required. To use the callback method for
receiving notification that an event has occurred, you must do the
following.
• Install an event handler with the viInstallHandler function
• Enable one or several events with the viEnableEvent function
When the enabled event occurs, the installed event handler is called.
Example: Using the Callback Method This example shows one
way you can use the callback method.
ViStatus _VI_FUNCH my_handler (ViSession vi,
ViEventType eventType, ViEvent context, ViAddr
usrHandle) {
/* your event handling code here */
return VI_SUCCESS;
}
main(){
ViSession vi;
ViAddr addr=0;
54
Agilent VISA User’s Guide
Programming with VISA
3
.
.
viInstallHandler(vi, VI_EVENT_SERVICE_REQ,
my_handler, addr);
viEnableEvent(vi, VI_EVENT_SERVICE_REQ,
VI_HNDLR, VI_NULL);
.
/* your code here */
.
viDisableEvent(vi, VI_EVENT_SERVICE_REQ,
VI_HNDLR);
viUninstallHandler(vi, VI_EVENT_SERVICE_REQ,
my_handler, addr);
.
}
Installing Handlers
VISA allows applications to install multiple handlers for an event type
on the same session. Multiple handlers can be installed through multiple
invocations of the viInstallHandler operation, where each invocation
adds to the previous list of handlers.
If more than one handler is installed for an event type, each of the
handlers is invoked on every occurrence of the specified event(s). VISA
specifies that the handlers are invoked in Last In First Out (LIFO) order.
Use the following function when installing an event handler:
viInstallHandler(vi, eventType, handler,
userHandle);
These parameters are defined as follows.
Table 16 Parameters Used to Install a Handler
Parameter
Agilent VISA User’s Guide
Description
vi
The session on which the handler will be installed.
eventType
The event type that will activate the handler.
handler
The name of the handler to be called.
userHandle
A user value that uniquely identifies the handler for the
specified event type.
55
3
Programming with VISA
The userHandle parameter allows you to assign a value to be used with
the handler on the specified session. Thus, you can install the same
handler for the same event type on several sessions with different
userHandle values. The same handler is called for the specified event
type.
However, the value passed to userHandle is different. Therefore the
handlers are uniquely identified by the combination of the handler and
the userHandle. This may be useful when you need a different handling
method depending on the userHandle.
Example: Installing an Event Handler This example shows how
to install an event handler to call my_handler when a Service Request
occurs. Note that VI_EVENT_SERVICE_REQ must also be an enabled
event with the viEnableEvent function for the service request event to
be delivered.
viInstallHandler(vi, VI_EVENT_SERVICE_REQ,
my_handler, addr);
Use the viUninstallHandler function to uninstall a specific handler, or
you can use wildcards (VI_ANY_HNDLR in the handler parameter) to
uninstall groups of handlers. See viUninstallHandler in the VISA
Online Help for more details on this function.
Writing the Handler
The handler installed needs to be written by the programmer. The event
handler typically reads an associated attribute and performs some sort of
action. See the event handler in the example program later in this
section.
Enabling Events
Before an event can be delivered, it must be enabled using the
viEnableEvent function. This function causes the application to be
notified when the enabled event has occurred, where the parameters are:
viEnableEvent(vi, eventType, mechanism,
context);
56
Agilent VISA User’s Guide
3
Programming with VISA
Using VI_QUEUE in the mechanism parameter specifies a queuing
method for the events to be handled. If you use both VI_QUEUE and
one of the mechanisms listed above, notification of events will be sent
to both locations. See the next subsection for information on the
queuing method.
Table 17 Description of Parameters Used to Install a Handler
Parameter
Description
vi
The session on which the handler will be installed.
eventType
The type of event to enable.
mechanism
The mechanism by which the event will be enabled. It can
be enabled in several different ways. You can use
VI_HNDLR in this parameter to specify that the installed
handler will be called when the event occurs. Use
VI_SUSPEND_HNDLR in this parameter, which puts the
events in a queue and waits to call the installed handlers
until viEnableEvent is called with VI_HNDLR specified in
the mechanism parameter. When viEnableEvent is called
with VI_HNDLR specified, the handler for each queued
event will be called.
context
Not used in VISA 1.0. Use VI_NULL.
Example: Enabling a Hardware Trigger Event
This example
illustrates enabling a hardware trigger event.
viInstallHandler(vi, VI_EVENT_TRIG,
my_handler,&addr);
viEnableEvent(vi, VI_EVENT_TRIG, VI_HNDLR,
VI_NULL);
The VI_HNDLR mechanism specifies that the handler installed for
VI_EVENT_TRIG will be called when a hardware trigger occurs.
If you specify VI_ALL_ENABLE_EVENTS in the eventType
parameter, all events that have previously been enabled on the specified
session will be enabled for the mechanism specified in this function call.
Use the viDisableEvent function to stop servicing the event specified.
Agilent VISA User’s Guide
57
3
Programming with VISA
Example: Trigger Callback This sample program installs an event
handler and enables the trigger event. When the event occurs, the
installed event handler is called. This program is intended to show
specific VISA functionality and does not include error trapping. Error
trapping, however, is good programming practice and is recommended
in your VISA applications. See “Trapping Errors” in this chapter for
more information.
This sample program is installed on your system in the
ProgrammingSamples subdirectory. See the IO Libraries Suite
Online Help for locations of example programs.
/* evnthdlr.c
This example program illustrates installing an
event handler to be called when a trigger
interrupt occurs. Note that you may need to
change the address. */
#include <visa.h>
#include <stdio.h>
/* trigger event handler */
ViStatus _VI_FUNCH myHdlr(ViSession vi,
ViEventType eventType, ViEvent ctx, ViAddr
userHdlr){
ViInt16 trigId;
/* make sure it is a trigger event */
if(eventType!=VI_EVENT_TRIG){
/* Stray event, so ignore */
return VI_SUCCESS;
}
/* print the event information */
printf("Trigger Event Occurred!\n");
printf("...Original Device Session = %ld\n",
vi);
/* get the trigger that fired */
viGetAttribute(ctx, VI_ATTR_RECV_TRIG_ID,
&trigId);
printf("Trigger that fired: ");
switch(trigId){
case VI_TRIG_TTL0:
58
Agilent VISA User’s Guide
Programming with VISA
3
printf("TTL0");
break;
default:
printf("<other 0x%x>", trigId);
break;
}
printf("\n");
return VI_SUCCESS;
}
void main(){
ViSession defaultRM,vi;
/* open session to VXI device */
viOpenDefaultRM(&defaultRM);
viOpen(defaultRM, "VXI0::24::INSTR", VI_NULL,
VI_NULL, &vi);
/* select trigger line TTL0 */
viSetAttribute(vi, VI_ATTR_TRIG_ID,
VI_TRIG_TTL0);
/* install the handler and enable it */
viInstallHandler(vi, VI_EVENT_TRIG, myHdlr,
(ViAddr)10);
viEnableEvent(vi, VI_EVENT_TRIG, VI_HNDLR,
VI_NULL);
/* fire trigger line, twice */
viAssertTrigger(vi, VI_TRIG_PROT_SYNC);
viAssertTrigger(vi, VI_TRIG_PROT_SYNC);
/* unenable and uninstall the handler */
viDisableEvent(vi, VI_EVENT_TRIG, VI_HNDLR);
viUninstallHandler(vi, VI_EVENT_TRIG, myHdlr,
(ViAddr)10);
/* close the sessions */
viClose(vi);
viClose(defaultRM);
}
Agilent VISA User’s Guide
59
3
Programming with VISA
Example: SRQ Callback This program installs an event handler
and enables an SRQ event. When the event occurs, the installed event
handler is called. This sample program is intended to show specific
VISA functionality and does not include error trapping. Error trapping,
however, is good programming practice and is recommended in your
VISA applications. See “Trapping Errors” in this chapter for more
information.
This program is installed on your system in the
ProgrammingSamples subdirectory. See the IO Libraries Suite
Online Help for locations of example programs.
/* srqhdlr.c
This example program illustrates installing an
event handler to be called when an SRQ interrupt
occurs. Note that you may need to change the
address. */
#include <visa.h>
#include <stdio.h>
#if defined (_WIN32)
#include <windows.h> /* for Sleep() */
#define YIELD Sleep( 10 )
#elif defined (_WINDOWS)
#include <io.h>
/* for _wyield */
#define YIELD
_wyield()
#else
#include <unistd.h>
#define YIELD sleep (1)
#endif
int srqOccurred;
/* trigger event handler */
ViStatus _VI_FUNCH mySrqHdlr(ViSession vi,
ViEventType
eventType, ViEvent ctx, ViAddr userHdlr){
ViUInt16 statusByte;
/* make sure it is an SRQ event */
if(eventType!=VI_EVENT_SERVICE_REQ){
/* Stray event, so ignore */
60
Agilent VISA User’s Guide
Programming with VISA
3
printf( "\nStray event of type 0x%lx\n",
eventType );
return VI_SUCCESS;
}
/* print the event information */
printf("\nSRQ Event Occurred!\n");
printf("...Original Device Session = %ld\n",
vi);
/* get the status byte */
viReadSTB(vi, &statusByte);
printf("...Status byte is 0x%x\n",
statusByte);
srqOccurred = 1;
return VI_SUCCESS;
}
void main(){
ViSession defaultRM,vi;
long count;
/* open session to message based VXI device */
viOpenDefaultRM(&defaultRM);
viOpen(defaultRM, "GPIB-VXI0::24::INSTR",
VI_NULL, VI_NULL, &vi);
/* Enable command error events */
viPrintf( vi, "*ESE 32\n" );
/* Enable event register interrupts */
viPrintf( vi, "*SRE 32\n" );
/* install the handler and enable it */
viInstallHandler(vi, VI_EVENT_SERVICE_REQ,
mySrqHdlr,
(ViAddr)10);
viEnableEvent(vi, VI_EVENT_SERVICE_REQ,
VI_HNDLR, VI_NULL);
srqOccurred = 0;
Agilent VISA User’s Guide
61
3
Programming with VISA
/* Send a bogus command to the message-based
device to cause an SRQ. Note: 'IDN' causes the
error -- 'IDN?' is the correct syntax */
viPrintf( vi, "IDN\n" );
/* Wait a while for the SRQ to be generated and
for the handler to be called. Print something
while we wait */
printf("Waiting for an SRQ to be generated.");
for (count = 0 ; (count < 10) &&
(srqOccurred == 0);count++) {
long count2 = 0;
printf( "." );
while ( (count2++ < 100) && (srqOccurred ==0)
){YIELD;
}
}
printf( "\n" );
/* disable and uninstall the handler */
viDisableEvent(vi, VI_EVENT_SERVICE_REQ,
VI_HNDLR);
viUninstallHandler(vi, VI_EVENT_SERVICE_REQ,
mySrqHdlr, (ViAddr)10);
/* Clean up - do not leave device in error
state */
viPrintf( vi, "*CLS\n" );
/* close the sessions */
viClose(vi);
viClose(defaultRM);
printf( "End of program\n" );}
Using the Queuing Method
The queuing method is generally used when an immediate response
from your application is not needed. To use the queuing method for
receiving notification that an event has occurred, you must do the
following:
• Enable one or several events with the viEnableEvent function.
62
Agilent VISA User’s Guide
Programming with VISA
3
• When ready to query, use the viWaitOnEvent function to check for
queued events.
If the specified event has occurred, the event information is retrieved
and the program returns immediately. If the specified event has not
occurred, the program suspends execution until a specified event occurs
or until the specified timeout period is reached.
Example: Using the Queuing Method This example program
shows one way you can use the queuing method.
main();
ViSession vi;
ViEventType eventType;
ViEvent event;
.
.
viEnableEvent(vi, VI_EVENT_SERVICE_REQ,
VI_QUEUE, VI_NULL);
.
.
viWaitOnEvent(vi, VI_EVENT_SERVICE_REQ,
VI_TMO_INFINITE, &eventType, &event);
.
.
viClose(event);
viDisableEvent(vi, VI_EVENT_SERVICE_REQ,
VI_QUEUE);
}
Enabling Events
Before an event can be delivered, it must be enabled using the
viEnableEvent function:
viEnableEvent(vi, eventType, mechanism,
context);
These parameters are defined as follows:
Agilent VISA User’s Guide
63
3
Programming with VISA
Table 18 Descriptions of Parameters Used to Enable Events
Parameter
Description
vi
The session the handler will be installed on.
eventType
The type of event to enable.
mechanism
The mechanism by which the event will be enabled. Specify
VI_QUEUE to use the queuing method.
context
Not used in VISA 1.0. Use VI_NULL.
When you use VI_QUEUE in the mechanism parameter, you are
specifying that the events will be put into a queue. Then, when a
viWaitOnEvent function is invoked, the program execution will
suspend until the enabled event occurs or the timeout period specified is
reached. If the event has already occurred, the viWaitOnEvent function
will return immediately.
Example: Enabling a Hardware Trigger Event
This example
illustrates enabling a hardware trigger event.
viEnableEvent(vi, VI_EVENT_TRIG, VI_QUEUE,
VI_NULL);
The VI_QUEUE mechanism specifies that when an event occurs, it will
go into a queue. If you specify VI_ALL_ENABLE_EVENTS in the
eventType parameter, all events that have previously been enabled on
the specified session will be enabled for the mechanism specified in this
function call. Use the viDisableEvent function to stop servicing the
event specified.
Wait on the Event
When using the viWaitOnEvent function, specify the session, the event
type to wait for, and the timeout period to wait:
viWaitOnEvent(vi, inEventType, timeout,
outEventType, outContext);
The event must have previously been enabled with VI_QUEUE
specified as the mechanism parameter.
64
Agilent VISA User’s Guide
Programming with VISA
3
Example: Wait on Event for SRQ This example shows how to
install a wait on event for service requests.
viEnableEvent(vi, VI_EVENT_SERVICE_REQ,
VI_QUEUE, VI_NULL);
viWaitOnEvent(vi, VI_EVENT_SERVICE_REQ,
VI_TMO_INFINITE, &eventType, &event);
.
.
viDisableEvent(vi, VI_EVENT_SERVICE_REQ,
VI_QUEUE);
Every time a wait on event is invoked, an event context object is
created. Specifying VI_TMO_INFINITE in the timeout parameter
indicates that the program execution will suspend indefinitely until the
event occurs. To clear the event queue for a specified event type, use the
viDiscardEvents function.
Example: Trigger Event Queuing This program enables the
trigger event in a queuing mode. When the viWaitOnEvent function is
called, the program will suspend operation until the trigger line is fired
or the timeout period is reached. Since the trigger lines were already
fired and the events were put into a queue, the function will return and
print the trigger line that fired.
This program is intended to show specific VISA functionality and does
not include error trapping. Error trapping, however, is good
programming practice and is recommended in your VISA applications.
See “Trapping Errors” in this chapter for more information.
This example program is installed on your system in the
ProgrammingSamples subdirectory. See the IO Libraries Suite
Online Help for locations of example programs.
/* evntqueu.c
This sample program illustrates enabling an
event queue using viWaitOnEvent. Note that you
must change the device address. */
#include <visa.h>
#include <stdio.h>
Agilent VISA User’s Guide
65
3
Programming with VISA
void main(){
ViSession defaultRM,vi;
ViEventType eventType;
ViEvent eventVi;
ViStatus err;
ViInt16 trigId;
/* open session to VXI device */
viOpenDefaultRM(&defaultRM);
viOpen(defaultRM, "VXI0::24::INSTR", VI_NULL,
VI_NULL, &vi);
/* select trigger line TTL0 */
viSetAttribute(vi, VI_ATTR_TRIG_ID,
VI_TRIG_TTL0);
/* enable the event */
viEnableEvent(vi, VI_EVENT_TRIG, VI_QUEUE,
VI_NULL);
/* fire trigger line, twice */
viAssertTrigger(vi, VI_TRIG_PROT_SYNC);
viAssertTrigger(vi, VI_TRIG_PROT_SYNC);
/* Wait for the event to occur */
err=viWaitOnEvent(vi, VI_EVENT_TRIG, 10000,
&eventType, &eventVi);
if(err==VI_ERROR_TMO){
printf("Timeout Occurred! Event not
received.\n");
return;
}
/* print the event information */
printf("Trigger Event Occurred!\n");
printf("...Original Device Session = %ld\n",
vi);
/* get trigger that fired */
viGetAttribute(eventVi, VI_ATTR_RECV_TRIG_ID,
&trigId);
printf("Trigger that fired: ");
switch(trigId){
case VI_TRIG_TTL0:
66
Agilent VISA User’s Guide
Programming with VISA
3
printf("TTL0");
break;
default:
printf("<other 0x%x>",trigId);
break;
}
printf("\n");
/* close the context before continuing */
viClose(eventVi);
/* get second event */
err=viWaitOnEvent(vi, VI_EVENT_TRIG, 10000,
&eventType, &eventVi);
if(err==VI_ERROR_TMO){
printf("Timeout Occurred! Event not
received.\n");
return;
}
printf("Got second event\n");
/* close the context before continuing */
viClose(eventVi);
/* disable event */
viDisableEvent(vi, VI_EVENT_TRIG, VI_QUEUE);
/* close the sessions */
viClose(vi);
viClose(defaultRM);
}
Agilent VISA User’s Guide
67
3
Programming with VISA
Trapping Errors
This section provides guidelines for trapping errors, including:
• Trapping Errors
• Exception Events
Trapping Errors
The example programs in this guide show specific VISA functionality
and do not include error trapping. Error trapping, however, is good
programming practice and is recommended in all your VISA application
programs. To trap VISA errors you must check for VI_SUCCESS after
each VISA function call.
If you want to ignore WARNINGS, you can test to see if err is less than
(<) VI_SUCCESS. Since WARNINGS are greater than VI_SUCCESS
and ERRORS are less than VI_SUCCESS, err_handler would only be
called when the function returns an ERROR. For example:
if(err < VI_SUCCESS) err_handler (vi, err);
Example: Checking for VI_SUCCESS This example illustrates
checking for VI_SUCCESS. If VI_SUCCESS is not returned, an error
handler (written by the programmer) is called. This must be done with
each VISA function call.
ViStatus err;
.
.
err=viPrintf(vi, "*RST\n");
if (err < VI_SUCCESS) err_handler(vi, err);
.
.
Example: Printing Error Code
The following error handler prints
a user-readable string describing the error code passed to the function:
void err_handler(ViSession vi, ViStatus err){
68
Agilent VISA User’s Guide
3
Programming with VISA
char err_msg[1024]={0};
viStatusDesc (vi, err, err_msg);
printf ("ERROR = %s\n", err_msg);
return;
}
Example: Checking Instrument Errors When programming
instruments, it is good practice to check the instrument to ensure there
are no instrument errors after each instrument function. This example
uses a SCPI command to check a specific instrument for errors.
void system_err(){
ViStatus err;
char buf[1024]={0};
int err_no;
err=viPrintf(vi, "SYSTEM:ERR?\n");
if (err < VI_SUCCESS) err_handler (vi, err);
err=viScanf (vi, "%d%t", &err_no, &buf);
if (err < VI_SUCCESS) err_handler (vi, err);
while (err_no >0){
printf ("Error Found: %d,%s\n", err_no,
buf);
err=viScanf (vi, "%d%t", &err_no, &buf);
}
err=viFlush(vi, VI_READ_BUF);
if (err < VI_SUCCESS) err_handler (vi, err);
err=viFlush(vi, VI_WRITE_BUF);
if (err < VI_SUCCESS) err_handler (vi, err);
}
Exception Events
An alternative to trapping VISA errors by checking the return status
after each VISA call is to use the VISA exception event. On sessions
where an exception event handler is installed and
VI_EVENT_EXCEPTION is enabled, the exception event handler is
called whenever an error occurs while executing an operation.
Agilent VISA User’s Guide
69
3
Programming with VISA
Exception Handling Model
The exception-handling model follows the event-handling model for
callbacks, and it uses the same operations as those used for general
event handling. For example, an application calls viInstallHandler and
viEnableEvent to enable exception events. The exception event is like
any other event in VISA, except that the queueing and suspended
handler mechanisms are not allowed.
When an error occurs for a session operation, the exception handler is
executed synchronously. That is, the operation that caused the exception
blocks until the exception handler completes its execution. The
exception handler is executed in the context of the same thread that
caused the exception event.
When invoked, the exception handler can check the error condition and
instruct the exception operation to take a specific action. It can instruct
the exception operation to continue normally (by returning
VI_SUCCESS) or to not invoke any additional handlers in the case of
handler nesting (by returning VI_SUCCESS_NCHAIN).
As noted, an exception operation blocks until the exception handler
execution is completed. However, an exception handler sometimes may
prefer to terminate the program prematurely without returning the
control to the operation generating the exception. VISA does not
preclude an application from using a platform-specific or
language-specific exception handling mechanism from within the VISA
exception handler.
For example, the C++ try/catch block can be used in an application in
conjunction with the C++ throw mechanism from within the VISA
exception handler. When using the C++ try/catch/throw or other
exception-handling mechanisms, the control will not return to the VISA
system. This has several important repercussions:
1 If multiple handlers were installed on the exception event, the
handlers that were not invoked prior to the current handler will not be
invoked for the current exception.
2 The exception context will not be deleted by the VISA system when
a C++ exception is used. In this case, the application should delete
the exception context as soon as the application has no more use for
the context, before terminating the session. An application should
use the viClose operation to delete the exception context.
70
Agilent VISA User’s Guide
Programming with VISA
3
3 Code in any operation (after calling an exception handler) may not be
called if the handler does not return. For example, local allocations
must be freed before invoking the exception handler, rather than after
it.
One situation in which an exception event will not be generated is in the
case of asynchronous operations. If the error is detected after the
operation is posted (i.e., once the asynchronous portion has begun), the
status is returned normally via the I/O completion event.
However, if an error occurs before the asynchronous portion begins (i.e.,
the error is returned from the asynchronous operation itself), then the
exception event will still be raised. This deviation is due to the fact that
asynchronous operations already raise an event when they complete,
and this I/O completion event may occur in the context of a separate
thread previously unknown to the application. In summary, a single
application event handler can easily handle error conditions arising from
both exception events and failed asynchronous operations.
Using the VI_EVENT_EXCEPTION Event
You can use the VI_EVENT_EXCEPTION event as notification that an
error condition has occurred during an operation invocation. The
following table describes the VI_EVENT_EXCEPTION event
attributes.
Table 19 VI_EVENT_EXCEPTION Event Attributes.
Attribute Name
Access Privilege
Data Type
Range
Default
VI_ATTR_EVENT_TYPE
RO
Global
ViEventType
VI_EVENT_EXCEPTIO
N
N/A
VI_ATTR_STATUS
RO
Global
ViStatus
N/A
N/A
VI_ATTR_OPER_NAME
RO
Global
ViString
N/A
N/A
Example: Exception Events /* This is an example of
how to use exception
events to trap VISA errors. An exception event
Agilent VISA User’s Guide
71
3
Programming with VISA
handler must be installed and exception events
enabled on all sessions where the exception
handler is used.*/
#include <stdio.h>
#include <visa.h>
ViStatus __stdcall myExceptionHandler (
ViSession vi,
ViEventType eventType,
ViEvent context,
ViAddr usrHandle
) {
ViStatus exceptionErrNbr;
char
nameBuffer[256];
ViString functionName = nameBuffer;
char
errStrBuffer[256];
/* Get the error value from the exception
context */
viGetAttribute( context, VI_ATTR_STATUS,
&exceptionErrNbr );
/* Get the function name from the exception
context */
viGetAttribute( context, VI_ATTR_OPER_NAME,
functionName );
errStrBuffer[0] = 0;
viStatusDesc( vi, exceptionErrNbr,
errStrBuffer );
printf("ERROR: Exception Handler reports\n"
"(%s)\n","VISA function '%s' failed with
error 0x%lx\n", "functionName,
exceptionErrNbr, errStrBuffer );
return VI_SUCCESS;
}
void main(){
ViStatus status;
ViSession drm;
ViSession vi;
ViAddr
myUserHandle = 0;
72
Agilent VISA User’s Guide
3
Programming with VISA
status = viOpenDefaultRM( &drm );
if ( status < VI_SUCCESS ) {
printf( "ERROR: viOpenDefaultRM failed with
error = 0x%lx\n", status );
return;
}
/* Install the exception handler and enable
events for it */
status = viInstallHandler(drm,
VI_EVENT_EXCEPTION, myExceptionHandler,
myUserHandle);
if ( status < VI_SUCCESS )
{
printf( "ERROR: viInstallHandler failed
with error 0x%lx\n", status );
}
status = viEnableEvent(drm, VI_EVENT_EXCEPTION,
VI_HNDLR, VI_NULL);
if ( status < VI_SUCCESS ) {
printf( "ERROR: viEnableEvent failed with
error 0x%lx\n", status );
}
/* Generate an error to demonstrate that the
handler will be called */
status = viOpen( drm, "badVisaName", NULL,
NULL, &vi );
if ( status < VI_SUCCESS ) {
printf("ERROR: viOpen failed with error
0x%lx\n"
"Exception Handler should have been
called\n"
"before this message was printed.\n",status
);
}
}
Agilent VISA User’s Guide
73
3
Programming with VISA
Using Locks
In VISA, applications can open multiple sessions to a VISA resource
simultaneously. Applications can, therefore, access a VISA resource
concurrently through different sessions. However, in certain cases,
applications accessing a VISA resource may want to restrict other
applications from accessing that resource.
Lock Functions
For example, when an application needs to perform successive write
operations on a resource, the application may require that, during the
sequence of writes, no other operation can be invoked through any other
session to that resource. For such circumstances, VISA defines a
locking mechanism that restricts access to resources.
The VISA locking mechanism enforces arbitration of accesses to VISA
resources on a per-session basis. If a session locks a resource, operations
invoked on the resource through other sessions either are serviced or are
returned with an error, depending on the operation and the type of lock.
If a VISA resource is not locked by any of its sessions, all sessions have
full privilege to invoke any operation and update any global attributes.
Sessions are not required to have locks to invoke operations or update
global attributes. However, if some other session has already locked the
resource, attempts to update global attributes or invoke certain
operations will fail.
viLock/viUnlock Functions
The VISA viLock function is used to acquire a lock on a resource.
viLock(vi, lockType, timeout, requestedKey,
accessKey);
The VI_ATTR_RSRC_LOCK_STATE attribute specifies the current
locking state of the resource on the given session, which can be either
VI_NO_LOCK, VI_EXCLUSIVE_LOCK, or VI_SHARED_LOCK.
The VISA viUnlock function is then used to release the lock on a
resource. If a resource is locked and the current session does not have
the lock, the error VI_ERROR_RSRC_LOCKED is returned.
74
Agilent VISA User’s Guide
3
Programming with VISA
VISA Lock Types
VISA defines two different types of locks: Exclusive Lock and Shared
Lock.
Exclusive Lock - A session can lock a VISA resource using the lock
type VI_EXCLUSIVE_LOCK to get exclusive access privileges to
the resource. This exclusive lock type excludes access to the resource
from all other sessions.
If a session has an exclusive lock, other sessions cannot modify
global attributes or invoke operations on the resource. However, the
other sessions can still get attributes.
Shared Lock - A session can share a lock on a VISA resource with
other sessions by using the lock type VI_SHARED_LOCK. Shared
locks in VISA are similar to exclusive locks in terms of access
privileges, but can still be shared between multiple sessions.
If a session has a shared lock, other sessions that share the lock can
also modify global attributes and invoke operations on the resource
(of course, unless some other session has a previous exclusive lock
on that resource). A session that does not share the lock will lack
these capabilities.
Locking a resource restricts access from other sessions, and in the case
where an exclusive lock is acquired, ensures that operations do not fail
because other sessions have acquired a lock on that resource. Thus,
locking a resource prevents other, subsequent sessions from acquiring
an exclusive lock on that resource. Yet, when multiple sessions have
acquired a shared lock, VISA allows one of the sessions to acquire an
exclusive lock along with the shared lock it is holding.
Also, VISA supports nested locking. That is, a session can lock the
same VISA resource multiple times (for the same lock type) via
multiple invocations of the viLock function. In such a case, unlocking
the resource requires an equal number of invocations of the viUnlock
function. Nested locking is explained in detail later in this section.
Some VISA operations may be permitted even when there is an
exclusive lock on a resource, or some global attributes may not be read
when there is any kind of lock on the resource. These exceptions, when
applicable, are mentioned in the descriptions of the individual VISA
functions and attributes.
Agilent VISA User’s Guide
75
3
Programming with VISA
See the VISA Online Help for function descriptions to determine which
are applicable for locking and which are not restricted by locking.
Example: Exclusive Lock This example shows a session gaining an
exclusive lock to perform the viPrintf and viScanf VISA operations on
a GPIB device. It then releases the lock via the viUnlock function.
/* lockexcl.c
This example program queries a GPIB device for
an identification string and prints the results.
Note that you may need to change the address. */
#include <visa.h>
#include <stdio.h>
void main () {
ViSession defaultRM, vi;
char buf [256] = {0};
/* Open session to GPIB device at address 22 */
viOpenDefaultRM (&defaultRM);
viOpen (defaultRM, "GPIB0::22::INSTR",
VI_NULL,VI_NULL, &vi);
/* Initialize device */
viPrintf (vi, "*RST\n");
/* Make sure no other process or thread does
anything to this resource between viPrintf and
viScanf calls */
viLock (vi, VI_EXCLUSIVE_LOCK, 2000, VI_NULL,
VI_NULL);
/* Send an *IDN? string to the device */
viPrintf (vi, "*IDN?\n");
/* Read results */
viScanf (vi, "%t", &buf);
/* Unlock this session so other processes and
threads can use it */
viUnlock (vi);
76
Agilent VISA User’s Guide
3
Programming with VISA
/* Print results */
printf ("Instrument identification string:
%s\n", buf);
/* Close session */
viClose (vi);
viClose (defaultRM);}
Example: Shared Lock This example shows a session gaining a
shared lock with the accessKey called lockkey. Other sessions can now
use this accessKey in the requestedKey parameter of the viLock
function to share access on the locked resource. This example then
shows the original session acquiring an exclusive lock while
maintaining its shared lock.
When the session holding the exclusive lock unlocks the resource via
the viUnlock function, all the sessions sharing the lock again have all
the access privileges associated with the shared lock.
/* lockshr.c
This example program queries a GPIB device for
an identification string and prints the results.
Note that you must change the address. */
#include <visa.h>
#include <stdio.h>
void main () {
ViSession defaultRM, vi;
char buf [256] = {0};
char lockkey [256] = {0};
/* Open session to GPIB device at address 22 */
viOpenDefaultRM (&defaultRM);
viOpen (defaultRM, "GPIB0::22::INSTR",
VI_NULL,VI_NULL,&vi);
/* acquire a shared lock so only this process
and processes that we know about can access
this resource */
viLock (vi, VI_SHARED_LOCK, 2000, VI_NULL,
lockkey);
Agilent VISA User’s Guide
77
3
Programming with VISA
/* at this time, we can make 'lockkey'
available to other processes that we know
about. This can be done with shared memory or
other inter-process communication methods.
These other processes can then call
"viLock(vi,VI_SHARED_LOCK, 2000, lockkey,
lockkey)" and they will also have access to
this resource. */
/* Initialize device */
viPrintf (vi, "*RST\n");
/* Make sure no other process or thread does
anything to this resource between the
viPrintf() and the viScanf()calls Note: this
also locks out the processes with which we
shared our 'shared lock' key. */
viLock (vi, VI_EXCLUSIVE_LOCK, 2000,
VI_NULL,VI_NULL);
/* Send an *IDN? string to the device */
viPrintf (vi, "*IDN?\n");
/* Read results */
viScanf (vi, "%t", &buf);
/* unlock this session so other processes and
threads can use it */
viUnlock (vi);
/* Print results */
printf ("Instrument identification string:
%s\n", buf);
/* release the shared lock also*/
viUnlock (vi);
/* Close session */
viClose (vi);
viClose (defaultRM);
}
78
Agilent VISA User’s Guide
Agilent IO Libraries Suite
Agilent VISA User’s Guide
4
Programming via GPIB and VXI
VISA supports three interfaces you can use to access GPIB (General
Purpose Interface Bus) and VXI (VME eXtension for Instrumentation)
instruments: GPIB, VXI, and GPIB-VXI.
This chapter provides information to program GPIB and VXI devices
via the GPIB, VXI or GPIB-VXI interfaces, including:
• GPIB and VXI Interfaces Overview
• Using High-Level Memory Functions
• Using Low-Level Memory Functions
• Using High/Low-Level Memory I/O Methods
• Using the Memory Access Resource
• Using VXI-Specific Attributes
See Chapter 3, “Programming with VISA”, for general information on
VISA programming for the GPIB, VXI, and GPIB-VXI interfaces. See
the VISA Online Help for information on the specific VISA functions.
Agilent Technologies
79
4
Programming via GPIB and VXI
GPIB and VXI Interfaces Overview
This section provides an overview of the GPIB, GPIB-VXI, and VXI
interfaces, including:
• General Interface Information
• GPIB Interfaces Overview
• VXI Interfaces Overview
General Interface Information
VISA supports three interfaces you can use to access instruments or
devices: GPIB, VXI, and GPIB-VXI. The GPIB interface can be used to
access VXI instruments via a Command Module. In addition, the VXI
backplane can be directly accessed with the VXI or GPIB-VXI
interfaces.
What is an I/O Interface?
An I/O interface can be defined as both a hardware interface and as a
software interface. Connection Expert is used to associate a unique
interface name with a hardware interface. Agilent IO Libraries Suite
uses a VISA interface name to identify an interface. This information
is passed in the parameter string of the viOpen function call in a VISA
program.
Connection Expert assigns a VISA interface name to the interface
hardware, and other necessary configuration values for an interface
when the interface is configured. See the Agilent IO Libraries Suite
Online Help for details.
VXI Device Types
When using GPIB-VXI or VXI interfaces to directly access the VXI
backplane (in the VXI mainframe), you must know whether you are
programming a message-based or a register-based VXI device
(instrument).
A message-based VXI device has its own processor that allows it to
interpret high-level commands such as Standard Commands for
Programmable Instruments (SCPI). When using VISA, you can place
the SCPI command within your VISA output function call. Then, the
80
Agilent VISA User’s Guide
Programming via GPIB and VXI
4
message-based device interprets the SCPI command. In this case you
can use the VISA formatted I/O or non-formatted I/O functions and
program the message-based device as you would a GPIB device.
However, if the message-based device has shared memory, you can
access the device's shared memory by doing register peeks and pokes.
VISA provides two different methods you can use to program directly to
the registers: high-level memory functions or low-level memory
functions.
A register-based VXI device typically does not have a processor to
interpret high-level commands. Therefore, the device must be
programmed with register peeks and pokes directly to the device's
registers. VISA provides two different methods you can use to program
register-based devices: high-level memory functions or low-level
memory functions.
GPIB Interfaces Overview
As shown in the following figure, a typical GPIB interface consists of a
Windows PC with one or more GPIB cards (PCI and/or ISA) cards
installed in the PC, and one or more GPIB instruments connected to the
GPIB cards via GPIB cable. I/O communication between the PC and the
instruments is via the GPIB cards and the GPIB cable. The following
figure shows GPIB instruments at addresses 3 and 5.
Agilent VISA User’s Guide
81
4
Programming via GPIB and VXI
GPIB Interface (82350 PCI GPIB Cards)
Windows PC
GPIB Cable
GPIB Instruments
5
82350 GPIB Card #1
82350 GPIB Card #2
3
3
Example: GPIB (82350) Interface
The GPIB interface system in the following figure consists of a
Windows PC with two 82350 GPIB cards connected to three GPIB
instruments via GPIB cables. For this system, Agilent Connection
Expert has been used to assign GPIB card #1 a VISA name of GPIB0
and to assign GPIB card #2 a VISA name of GPIB1. VISA addressing
is as shown in the figure.
82
Agilent VISA User’s Guide
Programming via GPIB and VXI
4
GPIB Interface (82350 PCI GPIB Cards)
Windows PC
Interface VISA Names
GPIB Cable
GPIB Instruments
5
VISA Name
"GPIB0"
82350 GPIB Card #1
"GPIB1"
82350 GPIB Card #2
3
3
VISA Addressing
viOpen (... "GPIB0::5::INSTR"...)
viOpen (... "GPIB0::3::INSTR"...)
viOpen (... "GPIB1::3::INSTR"...)
Agilent VISA User’s Guide
Open IO path to GPIB instrument at address 5 using 82350 Card #1
Open IO path to GPIB instrument at address 3 using 82350 Card #1
Open IO path to GPIB instrument at address 3 using 82350 Card #2
83
4
Programming via GPIB and VXI
VXI Interfaces Overview
As shown in the following figure, a typical VXI (E8491) interface
consists of an E8491 PC Card in a Windows PC that is connected to an
E8491B IEEE-1394 Module in a VXI mainframe via an IEEE-1394 to
VXI cable. The VXI mainframe also includes one or more VXI
instruments.
VXI (E8491) Interfaces
Windows PC
E8491 PC Card
VXI Mainframe
IEEE-1394
to VXI
E
8
4
9
1
B
V
X
I
V
X
I
I
n
s
t
r
. . I.
n
s
t
r
V
X
I
..
I
n
s
t
r
Example: VXI (E8491B) Interfaces
The VXI interface system in the following figure consists of a Windows
PC with an E8491 PC card that connects to an E8491B IEEE-1394 to
VXI Module in a VXI Mainframe. For this system, the three VXI
instruments shown have logical addresses 8, 16, and 24. The
Connection Expert utility has been used to assign the E8491 PC card a
VISA name of VXI0. VISA addressing is as shown in the figure.
For information on the E8491B module, see the Agilent E8491B User’s
Guide. For information on VXI instruments, see the applicable VXI
instrument User’s Guide.
84
Agilent VISA User’s Guide
Programming via GPIB and VXI
4
VXI Interface (E8491B IEEE-1394 to VXI Module)
Interface VISA Name
Windows PC
IEEE-1394 to VXI
VISA Name
"VXI0"
E8491 PC Card
VXI Mainframe
E
8
4
9
1
B
V
X
I
I
n
s
t
r
LA 8
V
X
I
V
X
I
I
. .n.
s
t
r
LA 24
..
I
n
s
t
r
LA 16
VISA Addressing
viOpen (... "VXI0::24::INSTR"...)
Open IO path to VXI instrument at logical address 24 using
E8491 PC Card and E8491 IEEE-1394 to VXI Module
GPIB-VXI Interfaces Overview
As shown in the following figure, a typical GPIB-VXI interface consists
of a GPIB card (82350 or equivalent) in a Windows PC that is
connected via a GPIB cable to an E1406A Command Module. The
E1406A sends commands to the VXI instruments in a VXI mainframe.
There is no direct access to the VXI backplane from the PC.
Agilent VISA User’s Guide
85
4
Programming via GPIB and VXI
NOT E
For a GPIB-VXI interface, VISA uses a DLL supplied by the Command
Module vendor to translate the VISA VXI calls to Command Module
commands that are vendor-specific. The DLL required for Agilent
Command Modules is installed by the Agilent IO Libraries Suite
installer. This DLL is installed by default when Agilent VISA is
installed.
GPIB-VXI (E1406A) Interfaces
Windows PC
GPIB Card
GPIB
VXI Mainframe
E
1
4
0
6
A
V
X
I
V
X
I
I
n
s
t
r
. . I.
n
s
t
r
V
X
I
..
I
n
s
t
r
Example: GPIB-VXI (E1406A) Interface
The GPIB-VXI interface system in the following figure consists of a
Windows PC with an Agilent 82350 GPIB card that connects to an
E1406A command module in a VXI mainframe. The VXI mainframe
includes one or more VXI instruments.
When Agilent IO Libraries Suite was installed, a GPIB-VXI driver with
GPIB address 9 was also installed, and the E1406A was configured for
primary address 9 and logical address (LA) 0. The three VXI
instruments shown have logical addresses 8, 16, and 24.
86
Agilent VISA User’s Guide
Programming via GPIB and VXI
4
The Connection Expert utility has been used to assign the GPIB-VXI
driver a VISA name of GPIB-VXI0 and to assign the 82350 GPIB card
a VISA name of GPIB0. VISA addressing is as shown in the figure.
For information on the E1406A Command Module, see the Agilent
E1406A Command Module User’s Guide. For information on VXI
instruments, see the applicable instrument’s User’s Guide.
GPIB-VXI Interface (E1406A Command Module)
Interface VISA Name
Windows PC
VXI Mainframe
VISA Name
"GPIB-VXI0"
"GPIB0"
GPIB-VXI Driver
GPIB Address 9
Primary
Address 9
82350 GPIB Card
E
1
4
0
6
A
GPIB
LA 0
V
X
I
I
n
s
t
r
LA 8
V
X
I
V
X
I
I
. . n.
s
t
r
..
LA 24
I
n
s
t
r
LA 16
VISA Addressing
viOpen (... "GPIB-VXI0::24::INSTR"...)
Agilent VISA User’s Guide
Open IO path to VXI instrument at logical address 24 using
82350 GPIB Card and E1406A VXI Command Module at
GPIB primary address 9
87
4
Programming via GPIB and VXI
Using High-Level Memory Functions
High-level memory functions allow you to access memory on the
interface through simple function calls. There is no need to map
memory to a window. Instead, when high-level memory functions are
used, memory mapping and direct register access are automatically
done.
The trade-off, however, is speed. High-level memory functions are
easier to use. However, since these functions encompass mapping of
memory space and direct register access, the associated overhead slows
program execution time. If speed is required, use the low-level memory
functions discussed in “Using Low-Level Memory Functions” on
page 94.
Programming the Registers
High-level memory functions include the viIn and viOut functions for
transferring 8-, 16-, or 32-bit values, as well as the viMoveIn and
viMoveOut functions for transferring 8-, 16-, or 32-bit blocks of data
into or out of local memory. You can therefore program using 8-, 16-, or
32-bit transfers.
High-Level Memory Functions
This table summarizes the high-level memory functions.
Table 20 Summary of High-Level Memory Functions
88
Function
Description
viIn8(vi, space, offset, val8);
Reads 8 bits of data from the specified
offset.
viIn16(vi, space, offset, val16);
Reads 16 bits of data from the specified
offset.
viIn32(vi, space, offset, val32);
Reads 32 bits of data from the specified
offset.
viOut8(vi, space, offset, val8);
Writes 8 bits of data to the specified
offset.
Agilent VISA User’s Guide
Programming via GPIB and VXI
4
Table 20 Summary of High-Level Memory Functions
viOut16(vi, space, offset,
val16);
Writes 16 bits of data to the specified
offset.
viOut32(vi, space, offset,
val32);
Writes 32 bits of data to the specified
offset.
viMoveIn8(vi, space, offset,
length, buf8);
Moves an 8-bit block of data from the
specified offset to local memory.
viMoveIn16(vi, space, offset,
length, buf16);
Moves a 16-bit block of data from the
specified offset to local memory.
viMoveIn32(vi, space, offset,
length, buf32);
Moves a 32-bit block of data from the
specified offset to local memory.
viMoveOut8(vi, space, offset,
length, buf8);
Moves an 8-bit block of data from local
memory to the specified offset.
viMoveOut16(vi, space, offset,
length, buf16);
Moves a 16-bit block of data from local
memory to the specified offset.
viMoveOut32(vi, space, offset,
length, buf32);
Moves a 32-bit block of data from local
memory to the specified offset.
Using viIn and viOut
When using the viIn and viOut high-level memory functions to
program to the device registers, all you need to specify is the session
identifier, address space, and the offset of the register. Memory mapping
is done for you. For example, in this function:
viIn32(vi, space, offset, val32);
vi is the session identifier and offset is used to indicate the offset of the
memory to be mapped. offset is relative to the location of this device's
memory in the given address space. The space parameter determines
which memory location to map the space. Valid space values are:
• VI_A16_SPACE - Maps in VXI/MXI A16 address space
• VI_A24_SPACE - Maps in VXI/MXI A24 address space
• VI_A32_SPACE - Maps in VXI/MXI A32 address space
Agilent VISA User’s Guide
89
4
Programming via GPIB and VXI
The val32 parameter is a pointer to where the data read will be stored. If
instead you write to the registers via the viOut32 function, the val32
parameter is a pointer to the data to write to the specified registers. If the
device specified by vi does not have memory in the specified address
space, an error is returned. The following code sample uses viIn16.
ViSession defaultRM, vi;
ViUInt16 value;
.
viOpenDefaultRM(&&defaultRM);
viOpen(defaultRM, "VXI::24", VI_NULL, VI_NULL,
&vi);
viIn16(vi, VI_A16_SPACE, 0x100, &value);
Using viMoveIn and viMoveOut
You can also use the viMoveIn and viMoveOut high-level memory
functions to move blocks of data to or from local memory. Specifically,
the viMoveIn function moves an 8-, 16-, or 32-bit block of data from
the specified offset to local memory, and the viMoveOut functions
moves an 8-, 16-, or 32-bit block of data from local memory to the
specified offset. Again, the memory mapping is done for you.
For example, in this function:
viMoveIn32(vi, space, offset, length, buf32);
vi is the session identifier and offset is used to indicate the offset of the
memory to be mapped. offset is relative to the location of this device's
memory in the given address space. The space parameter determines
which memory location to map the space and the length parameter
specifies the number of elements to transfer (8-, 16-, or 32-bits).
The buf32 parameter is a pointer to where the data read will be stored. If
instead you write to the registers via the viMoveOut32 function, the
buf32 parameter is a pointer to the data to write to the specified
registers.
High-Level Memory Functions: Sample Programs
Two sample programs follow that use the high-level memory functions
to read the ID and Device Type registers of a device at the VXI logical
address 24. The contents of the registers are then printed out.
90
Agilent VISA User’s Guide
4
Programming via GPIB and VXI
The first program uses the VXI interface; the second program accesses
the backplane with the GPIB-VXI interface. These two programs are
identical except for the string passed to viOpen.
Sample: Using VXI Interface (High-Level) Memory
Functions
This program uses high-level memory functions and the VXI interface
to read the ID and Device Type registers of a device at VXI0::24.
/* vxihl.c
This example program uses the high-level memory
functions to read the id and device type
registers of the device at VXI0::24. Change this
address if necessary. The register contents are
then displayed.*/
#include <visa.h>
#include <stdlib.h>
#include <stdio.h>
void main () {
ViSession defaultRM, dmm;
unsigned short id_reg, devtype_reg;
/* Open session to VXI device at address 24 */
viOpenDefaultRM(&defaultRM);
viOpen(defaultRM, "VXI0::24::INSTR", VI_NULL,
VI_NULL, &dmm);
/* Read instrument id register contents */
viIn16(dmm, VI_A16_SPACE, 0x00, &id_reg);
/* Read device type register contents */
viIn16(dmm, VI_A16_SPACE, 0x02,
&devtype_reg);
/* Print results */
printf ("ID Register = 0x%4X\n", id_reg);
printf ("Device Type Register = 0x%4X\n",
devtype_reg);
Agilent VISA User’s Guide
91
4
Programming via GPIB and VXI
/* Close sessions */
viClose(dmm);
viClose(defaultRM);
}
Sample: Using GPIB-VXI Interface (High-Level) Memory
Functions
This program uses high-level memory functions and the GPIB-VXI
interface to read the ID and Device Type registers of a device at
GPIB-VXI0::24.
/*gpibvxih.c
This example
functions to
registers of
this address
contents are
program uses the high-level memory
read the id and device type
the device at GPIB-VXI0::24. Change
if necessary. The register
then displayed.*/
#include <visa.h>
#include <stdlib.h>
#include <stdio.h>
void main ()
{
ViSession defaultRM, dmm;
unsigned short id_reg, devtype_reg;
/* Open session to VXI device at address 24 */
viOpenDefaultRM(&defaultRM);
viOpen(defaultRM, "GPIB-VXI0::24::INSTR",
VI_NULL,VI_NULL, &dmm);
/* Read instrument id register contents */
viIn16(dmm, VI_A16_SPACE, 0x00, &id_reg);
/* Read device type register contents */
viIn16(dmm, VI_A16_SPACE, 0x02,
&devtype_reg);
92
Agilent VISA User’s Guide
Programming via GPIB and VXI
4
/* Print results */
printf ("ID Register = 0x%4X\n", id_reg);
printf ("Device Type Register = 0x%4X\n",
devtype_reg);
/* Close sessions */
viClose(dmm);
viClose(defaultRM);
}
Agilent VISA User’s Guide
93
4
Programming via GPIB and VXI
Using Low-Level Memory Functions
Low-level memory functions allow direct access to memory on the
interface just as do high-level memory functions. However, with
low-level memory function calls, you must map a range of addresses
and directly access the registers with low-level memory functions, such
as viPeek32 and viPoke32.
There is more programming effort required when using low-level
memory functions. However, the program execution speed can increase.
Additionally, to increase program execution speed, the low-level
memory functions do not return error codes.
Programming the Registers
When using the low-level memory functions for direct register access,
you must first map a range of addresses using the viMapAddress
function. Next, you can send a series of peeks and pokes using the
viPeek and viPoke low-level memory functions. Then, you must free
the address window using the viUnmapAddress function. A process
you could use is:
1 Map memory space using viMapAddress.
2 Read and write to the register's contents using viPeek32 and
viPoke32.
3 Unmap the memory space using viUnmapAddress.
Low-Level Memory Functions
You can program the registers using low-level functions for 8-, 16-, or
32-bit transfers. This table summarizes the low-level memory functions.
Table 21 Summary of Low-Level Memory Functions
94
Function
Description
viMapAddress(vi,
mapSpace, mapBase,
mapSize, access, suggested,
address);
Maps the specified memory space.
viPeek8(vi, addr, val8);
Reads 8 bits of data from address specified.
Agilent VISA User’s Guide
4
Programming via GPIB and VXI
Table 21 Summary of Low-Level Memory Functions (continued)
viPeek16(vi, addr, val16);
Reads 16 bits of data from address specified.
viPeek32(vi, addr, val32);
Reads 32 bits of data from address specified.
viPoke8(vi, addr, val8);
Writes 8 bits of data to address specified.
viPoke16(vi, addr, val16);
Writes 16 bits of data to address specified.
viPoke32(vi, addr, val32);
Writes 32 bits of data to address specified.
viUnmapAddress(vi);
Unmaps memory space previously mapped.
Mapping Memory Space
When using VISA to access the device's registers, you must map
memory space into your process space. For a given session, you can
have only one map at a time. To map space into your process, use the
VISA viMapAddress function:
viMapAddress(vi, mapSpace, mapBase, mapSize,
access, suggested, address);
This function maps space for the device specified by the vi session.
mapBase, mapSize, and suggested are used to indicate the offset of the
memory to be mapped, amount of memory to map, and a suggested
starting location, respectively. mapSpace determines which memory
location to map the space. The following are valid mapSpace choices:
VI_A16_SPACE - Maps in VXI/MXI A16 address space
VI_A24_SPACE - Maps in VXI/MXI A24 address space
VI_A32_SPACE - Maps in VXI/MXI A32 address space
A pointer to the address space where the memory was mapped is
returned in the address parameter. If the device specified by vi does not
have memory in the specified address space, an error is returned. Some
sample viMapAddress function calls follow.
/* Maps to A32 address space */
viMapAddress(vi, VI_A32_SPACE, 0x000, 0x100,
VI_FALSE,
VI_NULL,&address);
Agilent VISA User’s Guide
95
4
Programming via GPIB and VXI
/* Maps to A24 address space */
viMapAddress(vi, VI_A24_SPACE, 0x00, 0x80,
VI_FALSE,
VI_NULL,&address);
Reading and Writing to Device Registers
When you have mapped the memory space, use the VISA low-level
memory functions to access the device's registers. First, determine
which device register you need to access. Then, you need to know the
register's offset. See the applicable instrument’s user manual for a
description of the registers and register locations. You can then use this
information and the VISA low-level functions to access the device
registers.
Sample: Using viPeek16
A code sample using viPeek16 follows.
ViSession defaultRM, vi;
ViUInt16 value;
ViAddr address;
ViUInt16 value;
.
.
viOpenDefaultRM(&&defaultRM);
viOpen(defaultRM, "VXI::24::INSTR", VI_NULL,
VI_NULL,
&vi);
viMapAddress(vi, VI_A16_SPACE, 0x00, 0x04,
VI_FALSE,
VI_NULL, &address);
viPeek16(vi, addr, &value)
Unmapping Memory Space
Make sure you use the viUnmapAddress function to unmap the
memory space when it is no longer needed. Unmapping memory space
makes the window available for the system to reallocate.
96
Agilent VISA User’s Guide
Programming via GPIB and VXI
4
Low-Level Memory Functions: Code Samples
Two sample programs follow that use the low-level memory functions
to read the ID and Device Type registers of the device at VXI logical
address 24. The contents of the registers are then printed out. The first
program uses the VXI interface and the second program uses the
GPIB-VXI interface to access the VXI backplane. These two programs
are identical except for the string passed to viOpen.
Sample: Using the VXI Interface (Low-Level) Memory
Functions
This program uses low-level memory functions and the VXI interface to
read the ID and Device Type registers of a device at VXI0::24.
/*vxill.c
This example program uses the low-level memory
functions to read the id and device type
registers of the device at VXI0::24. Change this
address if necessary. The register contents are
then displayed.*/
#include <visa.h>
#include <stdlib.h>
#include <stdio.h>
void main () {
ViSession defaultRM, dmm;
ViAddr address;
unsigned short id_reg, devtype_reg;
/* Open session to VXI device at address 24 */
viOpenDefaultRM(&defaultRM);
viOpen(defaultRM, "VXI0::24::INSTR", VI_NULL,
VI_NULL, &dmm);
/* Map into memory space */
viMapAddress(dmm, VI_A16_SPACE, 0x00, 0x10,
VI_FALSE,VI_NULL, &address);
/* Read instrument id register contents */
viPeek16(dmm, address, &id_reg);
Agilent VISA User’s Guide
97
4
Programming via GPIB and VXI
/* Read device type register contents */
/* ViAddr is defined as a void so we must cast
/* it to something else to do pointer
arithmetic */
viPeek16(dmm, (ViAddr)((ViUInt16 *)address +
0x01),
&devtype_reg);
/* Unmap memory space */
viUnmapAddress(dmm);
/* Print results */
printf ("ID Register = 0x%4X\n", id_reg);
printf ("Device Type Register = 0x%4X\n",
devtype_reg);
/* Close sessions */
viClose(dmm);
viClose(defaultRM);
}
Sample: Using the GPIB-VXI Interface (Low-Level) Memory
Functions
This program uses low-level memory functions and the GPIB-VXI
interface to read the ID and Device Type registers of a device at
GPIB-VXI0::24.
/*gpibvxil.c
This example program uses the low-level memory
functions to read the id and device type
registers of the device at GPIB-VXI0::24. Change
this address if necessary. Register contents are
then displayed.*/
#include <visa.h>
#include <stdlib.h>
#include <stdio.h>
void main () {
ViSession defaultRM, dmm;
ViAddr address;
unsigned short id_reg, devtype_reg;
98
Agilent VISA User’s Guide
4
Programming via GPIB and VXI
/* Open session to VXI device at address 24 */
viOpenDefaultRM(&defaultRM);
viOpen(defaultRM, "GPIB-VXI0::24::INSTR",
VI_NULL,
VI_NULL,&dmm);
/* Map into memory space */
viMapAddress(dmm, VI_A16_SPACE, 0x00, 0x10,
VI_FALSE,
VI_NULL, &address);
/* Read instrument id register contents */
viPeek16(dmm, address, &id_reg);
/* Read device type register contents */
/* ViAddr is defined as a void so we must
cast it to something else to do pointer
arithmetic */
viPeek16(dmm, (ViAddr)((ViUInt16 *)address +
0x01),
&devtype_reg);
/* Unmap memory space */
viUnmapAddress(dmm);
/* Print results */
printf ("ID Register = 0x%4X\n", id_reg);
printf ("Device Type Register = 0x%4X\n",
devtype_reg);
/* Close sessions */
viClose(dmm);
viClose(defaultRM);
}
Agilent VISA User’s Guide
99
4
Programming via GPIB and VXI
Using Low/High-Level Memory I/O Methods
VISA supports three different memory I/O methods for accessing
memory on the VXI backplane, as shown. All three of these access
methods can be used to read and write VXI memory in the A16, A24,
and A32 address spaces. The best method to use depends on the VISA
program characteristics.
• Low-level viPeek/viPoke
• viMapAddress
• viUnmapAddress
• viPeek8, viPeek16, viPeek32
• viPoke8, viPoke16, viPoke32
• High-level viIn/viOut
• viIn8, viIn16, viIn32
• viOut8, viOut16, viOut32
• High-level viMoveIn/viMoveOut
• viMoveIn8, viMoveIn16, viMoveIn32
• viMoveOut8, viMoveOut16, viMoveOut32
Using Low-Level viPeek/viPoke
Low-level viPeek/viPoke is the most efficient in programs that require
repeated access to different addresses in the same memory space.
The advantages of low-level viPeek/viPoke are:
• Individual viPeek/viPoke calls are faster than viIn/viOut or
viMoveIn/viMoveOut calls.
• Memory pointers may be directly de-referenced in some cases for the
lowest possible overhead.
The disadvantages of low-level viPeek/viPoke are:
• A viMapAddress call is required to set up mapping before
viPeek/viPoke can be used.
• viPeek/viPoke calls do not return status codes.
100
Agilent VISA User’s Guide
4
Programming via GPIB and VXI
• Only one active viMapAddress is allowed per vi session.
• There may be a limit to the number of simultaneous active
viMapAddress calls per process or system.
Using High-Level viIn/viOut
High-level viIn/viOut calls are best in situations where a few widely
scattered memory accesses are required and speed is not a major
consideration.
The advantages of high-level viIn/viOut are:
• It is the simplest method to implement.
• There is no limit on the number of active maps.
• A16, A24, and A32 memory access can be mixed in a single vi
session.
The disadvantage of high-level viIn/viOut calls is that they are slower
than viPeek/viPoke.
Using High-Level viMoveIn/viMoveOut
High-level viMoveIn/viMoveOut calls provide the highest possible
performance for transferring blocks of data to or from the VXI
backplane. Although these calls have higher initial overhead than the
viPeek/viPoke calls, they are optimized on each platform to provide the
fastest possible transfer rate for large blocks of data.
For small blocks, the overhead associated with viMoveIn/viMoveOut
may actually make these calls longer than an equivalent loop of
viIn/viOut calls. The block size at which viMoveIn/viMoveOut
becomes faster depends on the particular platform and processor speed.
The advantages of high-level viMoveIn/viMoveOut are:
• They are simple to use.
• There is no limit on number of active maps.
• A16, A24, and A32 memory access can be mixed in a single vi
session.
• They provide the best performance when transferring large blocks of
data.
• They support both block and FIFO mode.
Agilent VISA User’s Guide
101
4
Programming via GPIB and VXI
The disadvantage of viMoveIn/viMoveOut calls is that they have
higher initial overhead than viPeek/viPoke.
Sample: Using VXI Memory I/O
This program demonstrates using various types of VXI memory I/O.
/* memio.c
This example program demonstrates the use of
various memory I/O methods in VISA. */
#include <visa.h>
#include <stdlib.h>
#include <stdio.h>
#define VXI_INST "VXI0::24::INSTR"
void main () {
ViSession defaultRM, vi;
ViAddr
address;
ViUInt16
accessMode;
unsigned short *memPtr16;
unsigned short id_reg;
unsigned short devtype_reg;
unsigned short memArray[2];
/*Open default resource manager and session
to instr*/
viOpenDefaultRM (&defaultRM);
viOpen defaultRM, VXI_INST, VI_NULL,VI_NULL,
&vi);
/*
================================================
==
Low level memory I/O = viPeek16 = direct
memory dereference (when allowed)
================================================
*/
/* Map into memory space */
viMapAddress (vi, VI_A16_SPACE, 0x00, 0x10,
VI_FALSE,VI_NULL, &address);
102
Agilent VISA User’s Guide
4
Programming via GPIB and VXI
/*
================================================
=
Using viPeek
================================================
*/
Read instrument id register contents */
viPeek16 (vi, address, &id_reg);
/* Read device type register contents
ViAddr is defined as a (void *) so we must
cast it to something else in order to do
pointer arithmetic. */
viPeek16 (vi, (ViAddr)((ViUInt16 *)address +
0x01),&devtype_reg);
/* Print results */
printf ("
viPeek16: ID Register = 0x%4X\n",
id_reg);
printf ("
viPeek16: Device Type Register =
0x%4X\n",devtype_reg);
/* Use direct memory dereferencing if
supported */
viGetAttribute( vi, VI_ATTR_WIN_ACCESS,
&accessMode );
if ( accessMode == VI_DEREF_ADDR ) {
/* assign pointer to variable of correct
type */
memPtr16 = (unsigned short *)address;
/* do the actual memory reads */
id_reg =
*memPtr16;
devtype_reg = *(memPtr16+1);
/* Print results */
printf ("dereference: ID Register =
0x%4X\n",id_reg);
printf ("dereference: Device Type Register
=0x%4X\n", devtype_reg);
}
Agilent VISA User’s Guide
103
4
Programming via GPIB and VXI
/* Unmap memory space */
viUnmapAddress (vi);
/*==============================================
High Level memory I/O = viIn16
==============================================*/
/* Read instrument id register contents */
viIn16 (vi, VI_A16_SPACE, 0x00, &&id_reg);
/* Read device type register contents */
viIn16 (vi, VI_A16_SPACE, 0x02,&devtype_reg);
/* Print results */
printf (" viIn16: ID Register = 0x%4X\n",
id_reg);
printf (" viIn16: Device Type Register =
0x%4X\n", devtype_reg);
/*==============================================
======
High Level block memory I/O = viMoveIn16
The viMoveIn/viMoveOut commands do both block
read/write and FIFO read write. These commands
offer the best performance for reading and
writing large data blocks on the VXI backplane.
For this example we are only moving 2 words at a
time. Normally, these functions would be used to
move much larger blocks of data.
If the value of VI_ATTR_SRC_INCREMENT is 1 (the
default),viMoveIn does a block read. If the
value of VI_ATTR_SRC_INCREMENT is 0, viMoveIn
does a FIFO read.
If the value of VI_ATTR_DEST_INCREMENT is 1 (the
default),viMoveOut does a block write. If the
value of VI_ATTR_DEST_INCREMENT is 0, viMoveOut
does a FIFO write.
============================================= */
104
Agilent VISA User’s Guide
4
Programming via GPIB and VXI
/* Demonstrate block read.
Read instrument id register and device type
register into an array.*/
viMoveIn16 (vi, VI_A16_SPACE, 0x00, 2,
memArray);
/* Print results */
printf (" viMoveIn16: ID Register = 0x%4X\n",
memArray[0]);
printf (" viMoveIn16: Device Type Register =
0x%4X\n", memArray[1]);
/* Demonstrate FIFO read.
First set the source increment to 0 so we will
repetitively read from the same memory
location.*/
viSetAttribute( vi, VI_ATTR_SRC_INCREMENT, 0
);
/* Do a FIFO read of the Id Register */
viMoveIn16 (vi, VI_A16_SPACE, 0x00, 2,
memArray);
/* Print results */
printf (" viMoveIn16: 1 ID Register =
0x%4X\n",
memArray[0]);
printf (" viMoveIn16: 2 ID Register =
0x%4X\n",
memArray[1]);
/* Close sessions */
viClose (vi);
viClose (defaultRM); }
Agilent VISA User’s Guide
105
4
Programming via GPIB and VXI
Using the Memory Access Resource
For VISA 1.1 and later, the Memory Access (MEMACC) resource type
has been added to VXI and GPIB-VXI. VXI::MEMACC and
GPIB-VXI::MEMACC allow access to all of the A16, A24, and A32
memory by providing the controller with access to arbitrary registers or
memory addresses on memory-mapped buses.
The MEMACC resource, like any other resource, starts with the basic
operations and attributes of other VISA resources. For example,
modifying the state of an attribute is done via the operation
viSetAttribute (see VISA Resource Classes in the VISA Online Help for
details).
Memory I/O Services
Memory I/O services include high-level memory I/O services and
low-level memory I/O services.
High-Level Memory I/O Services
High-level memory I/O services allow register-level access to the
interfaces that support direct memory access, such as the VXIbus,
VMEbus, MXIbus, or even VME or VXI memory through a system
controlled by a GPIB-VXI controller. A resource exists for each
interface to which the controller has access.
You can access memory on the interface bus through operations such as
viIn16 and viOut16. These operations encapsulate the map/unmap and
peek/poke operations found in the low-level service. There is no need to
explicitly map the memory to a window.
Low-Level Memory I/O Services
Low-level memory I/O services also allow register-level access to the
interfaces that support direct memory access. Before an application can
use the low-level service on the interface bus, it must map a range of
addresses using the operation viMapAddress.
106
Agilent VISA User’s Guide
4
Programming via GPIB and VXI
Although the resource handles the allocation and operation of the
window, the programmer must free the window via viUnMapAddress
when finished. This makes the window available for the system to
reallocate.
Sample: MEMACC Resource Program
This program demonstrates one way to use the MEMACC resource to
open the entire VXI A16 memory and then calculate an offset to address
a specific device.
/* peek16.c */
#include <stdio.h>
#include <stdlib.h>
#include <visa.h>
#define EXIT1
#define NO_EXIT 0
/* This function simplifies checking for VISA
errors. */
void checkError( ViSession vi, ViStatus status,
char
*errStr,int doexit){
char buf[256];
if (status >= VI_SUCCESS)
return;
buf[0] = 0;
viStatusDesc( vi, status, buf );
printf( "ERROR 0x%lx (%s)\n ’%s’\n", status,
errStr,
buf );
if ( doexit == EXIT )
exit ( 1 );
}
void main() {
ViSession drm;
ViSession vi;
ViUInt16inData16 = 0;
ViUInt16peekData16 = 0;
ViUInt8*addr;
Agilent VISA User’s Guide
107
4
Programming via GPIB and VXI
ViUInt16*addr16;
ViStatusstatus;
ViUInt16offset;
status = viOpenDefaultRM ( &drm );
checkError( 0, status, "viOpenDefaultRM",
EXIT );
/* Open a session to the VXI MEMACC Resource*/
status = viOpen( drm, "vxi0::memacc",
VI_NULL, VI_NULL,
&vi );
checkError (0, status, "viOpen", EXIT );
/* Calculate the A16 offset of the VXI
REgisters for
the device at VXI logical address 8. */
offset = 0xc000 + 64 * 8;
/* Open a map to all of A16 memory space. */
status =
viMapAddress(vi,VI_A16_SPACE,0,0x10000,
VI_FALSE,0,(ViPAddr)(&addr));
checkError( vi, status, "viMapAddress", EXIT
);
/* Offset the address pointer returned from
viMapAddress for use with viPeek16. */
addr16 = (ViUInt16 *) (addr + offset);
/* Peek the contents of the card’s ID register
(offset
0 from card’s base address. Note that
viPeek does
not return a status code. */
viPeek16( vi, addr16, &peekData16 );
/* Now use viIn16 and read the contents of the
same
register */
status = viIn16(vi, VI_A16_SPACE,
ViBusAddress)offset, &inData16 );
checkError(vi, status, "viIn16", NO_EXIT );
108
Agilent VISA User’s Guide
4
Programming via GPIB and VXI
/* Print the results. */
printf( "inData16 : 0x%04hx\n", inData16 );
printf( "peekData16: ox%04hx\n", peekData16
);
viClose( vi );
viClose (drm );
}
MEMACC Attribute Descriptions
Generic MEMACC Attributes
The following read-only attributes (VI_ATTR_TMO_VALUE is
read/write) provide general interface information.
Table 22 Attributes That Provide General Interface Information
Agilent VISA User’s Guide
Attribute
Description
VI_ATTR_INTF_TYPE
Interface type of the given session.
VI_ATTR_INTF_NUM
Board number for the given interface.
VI_ATTR_TMO_VALUE
Minimum timeout value to use, in
milliseconds. A timeout value of
VI_TMO_IMMEDIATE means operation
should never wait for the device to respond.
A timeout value of VI_TMO_INFINITE
disables the timeout mechanism.
VI_ATTR_INTF_INST_NA
ME
Human-readable text describing the given
interface.
VI_ATTR_DMA_ALLOW_
EN
Specifies whether I/O accesses should use
DMA (VI_TRUE) or Programmed I/O
(VI_FALSE).
109
4
Programming via GPIB and VXI
VXI and GPIB-VXI Specific MEMACC Attributes
The following attributes, most of which are read/write, provide memory
window control information.
Table 23 Attributes That Provide Memory Window Control
Information
Attribute
Description
VI_ATTR_VXI_LA
Logical address of the local controller.
VI_ATTR_SRC_INCREMENT
Used in viMoveInxx operation to specify
how much the source offset is to be
incremented after every transfer. The
default value is 1 and the viMoveInxx
operation moves from consecutive
elements.
If this attribute is set to 0, the viMoveInxx
operation will always read from the same
element, essentially treating the source as a
FIFO register.
VI_ATTR_DEST_INCREMEN
T
Used in viMoveOutxx operation to specify
how much the destination offset is to be
incremented after every transfer. The
default value is 1 and the viMoveOutxx
operation moves into consecutive elements.
If this attribute is set to 0, the
viMoveOutxx operation will always write
to the same element, essentially treating the
destination as a FIFO register.
110
VI_ATTR_WIN_ACCESS
Specifies modes in which the current
window may be addressed: not currently
mapped, through the viPeekxx or viPokexx
operations only, or through operations
and/or by directly de-referencing the
address parameter as a pointer.
VI_ATTR_WIN_BASE_ADD
R
Base address of the interface bus to which
this window is mapped.
VI_ATTR_WIN_SIZE
Size of the region mapped to this window.
Agilent VISA User’s Guide
4
Programming via GPIB and VXI
Table 23 Attributes That Provide Memory Window Control
Information
VI_ATTR_SRC_BYTE_ORDE
R
Specifies the byte order used in high-level
access operations, such as viInxx and
viMoveInxx, when reading from the
source.
VI_ATTR_DEST_BYTE_ORD
ER
Specifies the byte order used in high level
access operations, such as viOutxx and
viMoveOutxx, when writing to the
destination.
VI_ATTR_WIN_BYTE_ORD
ER
Specifies the byte order used in low-level
access operations, such as viMapAddress,
viPeekxx, and viPokexx, when accessing
the mapped window.
VI_ATTR_SRC_ACCESS_PRI
V
Specifies the address modifier used in
high-level access operations, such as
viInxx and viMoveInxx, when reading
from the source.
VI_ATTR_DEST_ACCESS_P
RIV
Specifies the address modifier used in
high-level access operations such as
viOutxx and viMoveOutxx, when writing
to destination.
VI_ATTR_WIN_ACCESS_PR
IV
Specifies the address modifier used in
low-level access operations, such as
viMapAddress, viPeekxx, and viPokexx,
when accessing the mapped window.
GPIB-VXI Specific MEMACC Attributes
The following read-only attributes provide specific address information
about GPIB hardware.
Table 24 Attributes that Provide Specific Address Information
Agilent VISA User’s Guide
Attribute
Description
VI_ATTR_INTF_PARENT_NUM
Board number of the GPIB board to
which the GPIB-VXI is attached.
111
4
Programming via GPIB and VXI
Table 24 Attributes that Provide Specific Address Information
VI_ATTR_GPIB_PRIMARY_ADD
R
Primary address of the GPIB-VXI
controller used by the session.
VI_ATTR_GPIB_SECONDARY_A
DDR
Secondary address of the GPIB-VXI
controller used by the session.
MEMACC Resource Event Attribute
The following read-only events provide notification that an
asynchronous operation has completed.
Table 25 Events Providing Notification About Asynchronous
Operations
112
Attribute
Description
VI_ATTR_EVENT_T
YPE
Unique logical identifier of the event.
VI_ATTR_STATUS
Return code of the asynchronous I/O operation that
has completed.
VI_ATTR_JOB_ID
Job ID of the asynchronous I/O operation that has
completed.
VI_ATTR_BUFFER
Address of a buffer used in an asynchronous
operation.
VI_ATTR_RET_COU
NT
Actual number of elements that were
asynchronously transferred.
Agilent VISA User’s Guide
4
Programming via GPIB and VXI
Using VXI-Specific Attributes
VXI-specific attributes can be useful to determine the state of your VXI
system. Attributes are read-only and read/write. Read-only attributes
specify things such as the logical address of the VXI device and
information about where your VXI device is mapped. This section
shows how you might use some of the VXI-specific attributes. See VISA
Resource Classes in the VISA Online Help for information on VISA
attributes.
Using the Map Address as a Pointer
The VI_ATTR_WIN_ACCESS read-only attribute specifies how a
window can be accessed. You can access a mapped window with the
VISA low-level memory functions or with a C pointer if the address is
de-referenced. To determine how to access the window, read the
VI_ATTR_WIN_ACCESS attribute.
VI_ATTR_WIN_ACCESS Settings
The VI_ATTR_WIN_ACCESS read-only attribute can be set to one of
the following:
Table 26 Settings for the VI_ATTR_WIN_ACCESS Attribute
Setting
Description
VI_NMAPPED
Specifies that the window is not mapped.
VI_USE_OPERS Specifies that the window is mapped and you can only use
the low-level memory functions to access the data.
VI_DEREF_AD
DR
Agilent VISA User’s Guide
Specifies that the window is mapped and has a
de-referenced address. In this case you can use the
low-level memory functions to access the data, or you can
use a C pointer. Using a de-referenced C pointer will
allow faster access to data.
113
4
Programming via GPIB and VXI
Sample: Determining Window Mapping
ViAddr address;
Vi UInt16 access;
ViUInt16 value;
.
.
.
viMapAddress(vi, VI_A16_SPACE, 0x00, 0x04,
VI_FALSE,
VI_NULL, &address);
viGetAttribute(vi, VI_ATTR_WIN_ACCESS, &access);
.
.
If(access==VI_USE_OPERS) {
viPeek16(vi, (ViAddr)(((ViUInt16 *)address) +
4/sizeof(ViUInt16)), &value)
}else if (access==VI_DEREF_ADDR){
value=*((ViUInt16
*)address+4/sizeof(ViUInt16));
}else if (access==VI_NMAPPED){
return error;
}
.
.
Setting the VXI Trigger Line
The VI_ATTR_TRIG_ID attribute is used to set the VXI trigger line.
This attribute is listed under generic attributes and defaults to
VI_TRIG_SW (software trigger). To set one of the VXI trigger lines, set
the VI_ATTR_TRIG_ID attribute as follows:
viSetAttribute(vi, VI_ATTR_TRIG_ID,
VI_TRIG_TTL0);
114
Agilent VISA User’s Guide
Programming via GPIB and VXI
4
The above function sets the VXI trigger line to TTL trigger line 0
(VI_TRIG_TTL0). The following are valid VXI trigger lines. (Panel In
is an Agilent extension of the VISA specification.)
Table 27 VXI Trigger Lines and Values
VXI Trigger
Line
VI_ATTR_TRIG_ID Value
TTL 0
VI_TRIG_TTL0
TTL 1
VI_TRIG_TTL1
TTL 2
VI_TRIG_TTL2
TTL 3
VI_TRIG_TTL3
TTL 4
VI_TRIG_TTL4
TTL 5
VI_TRIG_TTL5
TTL 6
VI_TRIG_TTL6
TTL 7
VI_TRIG_TTL7
ECL 0
VI_TRIG_ECL0
ECL 1
VI_TRIG_ECL1
Panel In
VI_TRIG_PANEL_IN
Once you set a VXI trigger line, you can set up an event handler to be
called when the trigger line fires. See “Using Events and Handlers” on
page 46 for more information on setting up an event handler. Once the
VI_EVENT_TRIG event is enabled, the VI_ATTR_TRIG_ID becomes
a read only attribute and cannot be changed. You must set this attribute
prior to enabling event triggers.
The VI_ATTR_TRIG_ID attribute can also be used by viAssertTrigger
function to assert software or hardware triggers. If VI_ATTR_TRIG_ID
is VI_TRIG_SW, the device is sent a Word Serial Trigger command. If
the attribute is any other value, a hardware trigger is sent on the line
corresponding to the value of that attribute.
Agilent VISA User’s Guide
115
4
116
Programming via GPIB and VXI
Agilent VISA User’s Guide
Agilent IO Libraries Suite
Agilent VISA User’s Guide
5
Programming via LAN
This chapter provides guidelines for programming via a LAN (Local
Area Network). A LAN allows you to extend the control of
instrumentation beyond the limits of typical instrument interfaces.
The chapter contents are:
• LAN Interfaces Overview
• Communicating with LAN-Connected Devices
NOT E
This chapter describes programming using the VISA TCPIP interface
type to communicate directly with a LAN-connected device, as well as
using a remote interface (also known as a LAN client) to emulate a
GPIB, serial (ASRL), or USB interface on the local machine to
communicate with a LAN-connected device.
See the Agilent IO Libraries Suite Online Help for information on how
to start and stop the Remote IO Server software, and on how to create
and configure LAN interfaces and remote GPIB/USB/serial interfaces.
See the Connectivity Guide for detailed information on connecting
instruments to a LAN, and for a discussion of network protocols.
Agilent Technologies
117
5
Programming via LAN
LAN and Remote Interfaces Overview
This section provides an overview of LAN (Local Area Network)
interfaces. A LAN is a way to extend the control of instrumentation
beyond the limits of typical instrument interfaces. To communicate with
instruments over the LAN, you must first configure a LAN interface or
a remote GPIB, USB, or serial interface, using the Agilent Connection
Expert.
Direct LAN Connection versus Remote IO Server/Client
Connection
Some instruments support direct connection to the LAN. These
instruments include an RJ-45 or other standard LAN connector and
software support for operating as an independent device on the network.
Some of these instruments are Web-enabled, meaning that they host a
Web page which you can access over the LAN.
With the Agilent IO Libraries Suite, you can connect to instruments
across the LAN even if they do not have direct LAN capability, if they
are connected to gateways (such as the Agilent E5810A) or to another
PC running the Remote IO Server software.
Refer to the IO Libraries Suite and the Connectivity Guide for
information on connecting and configuring different types of LAN
instrument connections.
Remote IO Server/Client Architecture
The Remote IO Server and Client software provided with Agilent IO
Libraries Suite allows instrumentation to be controlled over a LAN.
Using standard LAN connections, instruments can be controlled from
computers that do not have special interfaces for instrument control.
Client/Server Model
The IO Libraries Suite software uses the client/server model of
computing. Client/server computing refers to a model in which an
application (the client) does not perform all necessary tasks of the
application itself. Instead, the client makes requests of another
computing device (the remote I/O server) for certain services.
118
Agilent VISA User’s Guide
Programming via LAN
5
As shown in the following figure, a remote I/O client (a Windows PC)
makes VISA requests over the network to a remote I/O server (such as a
Windows PC, an E5810 LAN/GPIB Gateway, or a Series 700 HP-UX
workstation).
Gateway Operation
The remote I/O server is connected to the instrumentation or devices to
be controlled. Once the remote I/O server has completed the requested
operation on the instrument or device, the remote I/O server sends a
reply to the client. This reply contains the requested data and status
information that indicates whether or not the operation was successful.
The remote I/O server acts as a gateway between the LAN software that
the client system supports and the instrument-specific interface that the
device supports.
Agilent VISA User’s Guide
119
5
Programming via LAN
Windows PCs
Client
LAN
E5810
LAN/GPIB
Gateway
Remote
I/O
Server
Series 700
workstation or
Windows PC
GPIB
Instrument
120
GPIB
bus
GPIB bus
(or other)
LAN Instruments
(VXI-11.2 GPIB Emulation
or
VXI-11.3 LAN Instruments)
GPIB
Instruments
Agilent VISA User’s Guide
Programming via LAN
5
Addressing LAN-Connected Devices
VISA can communicate with LAN-connected devices in one of two
ways:
• TCPIP interface type
• Remote interface type (available only with Agilent IO Libraries
Suite)
Using the TCPIP Interface Type for LAN Access
VISA provides the TCPIP interface type to communicate with
LAN-connected devices. These can be devices connected directly to the
LAN, or they can be connected to the LAN through a LAN gateway
such as the Agilent E5810 LAN/GPIB gateway or through Remote IO
Server software running on a remote computer with instruments
connected to it.
The format of a TCPIP VISA resource string is:
TCPIP[<board>]::<hostname>[::<LAN device
name>][::INSTR]
where:
• <board> = board number (default is 0)
• <hostname> = the hostname or IP address of the LAN device or
server
• <LAN device name> = the remote device name (case sensitive
with default name of inst0)
Using Connection Expert, you can configure a LAN interface to use
either the VXI-11 protocol or the SICL-LAN protocol. The protocol(s)
you will use depends upon the devices you are using and the protocol(s)
that they support.
The VXI-11 protocol constrains the LAN device name to be of the form
inst0, inst1, … for VXI-11.3 devices and gpib0,n, gpib1,n, … for
VXI-11.2 (GPIB Emulation) devices.
The SICL-LAN protocol allows any valid SICL name for the LAN
device name. A valid SICL name must be a unique string of
alphanumeric characters, starting with a letter.
Agilent VISA User’s Guide
121
5
Programming via LAN
Some examples of TCPIP resource strings follow.
Table 28 Example TCPIP Resource Strings
String
Description
TCPIP0::[email protected]::gpib0,2::INST
R
A VXI-11.2 GPIB device at hostname
[email protected].
TCPIP0::123.456.0.21::gpib0,2::INSTR
A VXI-11.2 GPIB device at a machine whose IP address is
123.456.0.21.
TCPIP0::myMachine::inst0::INSTR
A VXI-11.3 LAN instrument at hostname myMachine.
TCPIP::myMachine
A VXI-11.3 LAN instrument at hostname myMachine. Note that
default values for board = 0, LAN device name = inst0, and the
::INSTR resource class are used.
TCPIP0::testMachine1::COM1,488::INSTR
An RS-232 device connected to a LAN server or gateway at
hostname testMachine1. This device must use SICL-LAN
protocol since RS-232 devices are not supported by the VXI-11
protocol.
TCPIP0::myMachine::gpib0,2::INSTR
A GPIB device at hostname myMachine. This device must use
SICL-LAN protocol since gpib0,2 is not a valid remote name
with the VXI-11 protocol.
TCPIP0::myMachine::UsbDevice1::INSTR
A USB device with a SICL alias of UsbDevice1 connected to a
LAN server at hostname myMachine. Note that the SICL alias is
defined on the remote machine, not on the local machine.
Although the SICL and VISA alias names are normally the same,
if they are not, you must be sure to use the SICL alias and not the
VISA alias.
This device must use the SICL-LAN protocol since USB devices
are not supported by the VXI-11 protocol.
122
Agilent VISA User’s Guide
5
Programming via LAN
Table 28 Example TCPIP Resource Strings
String
Description
TCPIP0::myMachine::usb0[2391::1031::SN_00123
::0]::INSTR
A USB device with:
Manufacture ID = 2391
Model Code = 1031
Serial Number = 'SN_00123'
USBTMC Intfc # = 0
connected to a LAN server at hostname myMachine.
This device must use SICL-LAN protocol since USB devices are
not supported by the VXI-11 protocol.
NOT E
A LAN session to a remote interface provides the same VISA function
support as if the interface were local, except that VXI-specific functions
are not supported over LAN.
Addressing a Session Using the TCPIP Interface Type
This sample shows one way to open a device session with a GPIB
device at primary address 23 on a remote PC that is running a LAN
server. The hostname of the remote PC is myMachine. See Chapter 3,
“Programming with VISA”, for more information on addressing device
sessions.
ViSession defaultRM, vi;.
.
viOpenDefaultRM(&defaultRM);
viOpen(defaultRM,
"TCPIP0::myMachine::gpib0,23::INSTR", VI_NULL,
VI_NULL, &vi);
.
.
viClose(vi);
Agilent VISA User’s Guide
123
5
Programming via LAN
viClose(defaultRM);
Using a Remote Interface for LAN Access
Agilent VISA provides three types of VISA LAN Client interfaces,
implemented in Agilent IO Libraries Suite as remote interfaces:
• Remote serial interface (ASRL VISA LAN Client)
• Remote GPIB interface (GPIB VISA LAN Client)
• Remote USB interface (USB VISA LAN Client)
Remote interfaces are configured using Connection Expert; they
provide virtual GPIB, serial, or USB interfaces. They make it possible
to remotely access a LAN-connected device as if it were connected to a
local interface. If, for example, the GPIB2 interface is configured as a
remote GPIB interface, a program controlling the devices
GPIB2::5::INSTR and GPIB2::7::INSTR would not be aware of the
fact that these devices are actually connected via LAN and not to a
GPIB interface connected to the local machine.
See the Agilent IO Libraries Suite Online Help for specific information
on configuring remote interfaces.
Remote Serial Interface (ASRL VISA LAN Client)
A remote serial interface can use only the SICL-LAN protocol. A
remote serial interface can be configured to use the serial port on the
Agilent E5810 LAN/GPIB gateway or the serial ports on a PC running
the Remote IO Server software.
Remote GPIB Interface (GPIB VISA LAN Client)
A remote GPIB interface can use both the VXI-11 and SICL-LAN
protocols. Typical uses for remote GPIB interfaces are with LAN/GPIB
gateways (e.g. Agilent E5810), PCs with GPIB interfaces that are
running a LAN server, and VXI-11.2 LAN-based instruments.
A remote GPIB interface can only be used to communicate with
VXI-11.2 (GPIB Emulation) devices. This is because the VISA GPIB
interface type requires a primary and (optionally) a secondary address
when communicating with a device. VXI-11.3 devices do not support
the concept of a primary address, so they cannot be accessed with a
remote GPIB interface.
124
Agilent VISA User’s Guide
5
Programming via LAN
Remote USB Interface (USB VISA LAN Client)
A remote USB interface can use only the SICL-LAN protocol. It can
communicate with USB devices attached to a remote PC running the
Remote IO Server software.
Note that if you have defined a VISA alias for a USB device on the
remote I/O server, you must either define the same (or another) alias for
the remote USB device on the client PC, or use the full USB resource
string. Alias definitions are not shared between the remote I/O server
and the client.
Addressing a Session Using a Remote Interface
In general, the rules to address a remote session are the same as to
address a local session. The only difference for a remote session is that
you use the VISA interface ID (provided during I/O configuration via
Connection Expert) that relates to the remote interface.
The following sample shows one way to open a device session with a
GPIB device at primary address 23 on a remote PC that is running
Remote IO Server software. A remote GPIB interface has been
configured at GPIB2 to communicate with that machine. See Chapter 3,
“Programming with VISA”, for more information on addressing device
sessions.
ViSession defaultRM, vi;.
.
viOpenDefaultRM(&defaultRM);
viOpen(defaultRM, "GPIB2::23::INSTR", VI_NULL,
VI_NULL, &vi);
.
.
viClose(vi);
viClose(defaultRM);
Agilent VISA User’s Guide
125
5
126
Programming via LAN
Agilent VISA User’s Guide
Agilent IO Libraries Suite
Agilent VISA User’s Guide
6
Programming via USB
This chapter provides guidelines for VISA programming of USB
instruments that conform to USBTMC (Universal Serial Bus Test and
Measurement Class) and/or USBTMC-USB488 (Universal Serial Bus
Test and Measurement Class, Subclass USB488 Specification).
The chapter contents are:
• USB Interfaces Overview
• Communicating with a USB Instrument Using VISA
Agilent Technologies
127
6
Programming via USB
USB Interfaces Overview
USBTMC/USBTMC-USB488 instruments are detected and
automatically configured by Agilent VISA when they are plugged into
the computer. The Agilent IO Libraries Suite Online Help describes the
USB instrument configuration process in more detail.
NOT E
Do not confuse the Agilent 82357 USB/GPIB Interface with a
USBTMC device. The 82357 is automatically configured as a GPIB
interface, not as a USBTMC device, when it is plugged into the
computer. Only USBTMC/USBTMC-USB488 devices are configured
as USB devices by Agilent VISA.
Due to the complexity of the VISA USB resource string, a VISA alias
(simple name) is assigned to each USB instrument when it is plugged
into the computer. You can use either the alias or the full VISA resource
string when opening a VISA resource, but using the alias is
recommended because it is simpler and because it allows substitution of
USB instruments without the need to change the VISA program.
You can also create VISA aliases for other (non-USB) instruments,
using the Agilent Connection Expert.
128
Agilent VISA User’s Guide
6
Programming via USB
Communicating with a USB Instrument Using VISA
To establish communications with a USB device using VISA, you can
either use the full VISA resource string for the device or use the alias
provided by VISA. Using the alias is recommended, for reasons
described below.
Using the full VISA resource string, a viOpen call would look
something like this:
viOpen( . . .,
"USB0::2391::1031::0000000123::0::INSTR", . . .
);
Following is a summary of the components of this call.
Table 29 Summary of Full-String viOpen Call
Value
Description
Data Type
2391
Manufacturer ID
16-bit unsigned integer
1031
Model Code
16-bit unsigned integer
0000000123
Serial Number
string value
0
USBTMC Interface
Number
8-bit unsigned integer
This string uniquely identifies the USB device. The values needed for
the resource string are displayed in a dialog box when the device is
plugged into the computer.
To simplify the way a USB device is identified, Agilent VISA also
provides an alias which can be used in place of this resource string. The
first USB device that is plugged in is assigned a default alias of
UsbDevice1. Additional devices are assigned aliases of UsbDevice2,
UsbDevice3, etc. You can modify the default alias name at the time a
device is plugged in, or by running Agilent Connection Expert and
changing the properties of the VISA alias.
Agilent VISA User’s Guide
129
6
Programming via USB
Although the case of a VISA alias is preserved, case is ignored when the
alias is used in place of the full resource string in a viOpen call. For
example, UsbDevice1, usbdevice1 and USBDEVICE1 all refer to
the same device.
Using the alias, a viOpen call would look something like this:
viOpen( . . ., "UsbDevice1", . . . );
As you can see, this is much simpler than having to use the full resource
string for a USB device.
Using the alias in a program also makes it more portable. For example,
two identical USB function generators have different resource strings
because they have different serial numbers. If these function generators
are used in two different test systems and you use the full resource string
to access the function generator in the test program, you cannot use that
same program for both test systems, since the function generators’ full
resource strings are different. By using the alias in the program,
however, you can use the same program in both test systems. All you
need to do is make sure the same alias is used for the function generator
in both systems.
130
Agilent VISA User’s Guide
Agilent IO Libraries Suite
Agilent VISA User’s Guide
Glossary
access board
The GPIB interface to which a particular device is connected.
Active Controller
See "Controller in Charge".
address
A string (or other language construct) that uniquely locates and
identifies a resource. VISA defines an ASCII-based grammar that
associates address strings with particular physical devices or
interfaces and VISA resources.
Agilent 488
An I/O library provided in Agilent IO Libraries Suite for
compatibility with existing test & measurement programs that were
developed using National Instruments’ NI-488 or other similar
libraries. Agilent 488 supports communication with GPIB devices
and interfaces, but does not support USB, LAN, RS-232, or VXI
communications.
alias
See VISA alias.
API
Application Programming Interface. The interface that a programmer
sees when creating an application. For example, the VISA API
consists of the sum of all of the operations, attributes, and events of
each of the VISA ResourceClasses.
Agilent Technologies
131
Glossary
attribute
In VISA and SICL, a value that indicates the operational state of a
resource. Some attributes can be changed; others are read-only.
board
A GPIB interface. It may be a physical board, an adapter (such as the
82357 USB/GPIB adapter), or a remote GPIB interface.
board descriptor
A handle, returned from ibfind, that uniquely identifies a GPIB
interface (board) in Agilent 488 original API calls. Also called an
interface descriptor or board unit descriptor.
board-level
Refers to Agilent 488 functions that operate on an interface (board),
rather than on a device.
bus error
An error that signals failure to access an address. Bus errors occur in
conjunction with low-level accesses to memory, and usually involve
hardware with bus mapping capabilities. Bus errors may be caused
by non-existent memory, a non-existent register, an incorrect device
access, etc.
bus error handler
Software that runs when a bus error occurs.
CIC
Controller in Charge.
command bytes
GPIB commands encoded as individual bytes. Also called GPIB
commands or interface messages.
132
Agilent VISA User’s Guide
Glossary
commander
In test-system architectures, a device that has the ability to control
another device. In a specialized case, a commander may also be the
device that has sole control over another device (as with the VXI
Commander/Servant hierarchy).
commander session
A session that communicates to the interface’s commander.
Commander sessions are used when an interface is in a
non-Controller role.
communication channel
A communication path between a software element and a resource.
In VISA, “communication channel” is synonymous with “session.”
Every communication channel in VISA is unique.
Connection Expert
An Agilent software utility that helps you quickly establish
connections between your instruments and your PC. It also helps you
troubleshoot connectivity problems. Connection Expert is part of the
Agilent IO Libraries Suite product.
Controller
A device (typically a computer) used to communicate with another
device or devices (typically instruments). The Controller is in charge
of communications and device operation; it controls the flow of
communication and performs addressing and other bus management
functions.
Controller in Charge
The device currently in control of the GPIB.
Agilent VISA User’s Guide
133
Glossary
device
A unit that receives commands from a Controller. A device is
typically an instrument, but can also be a computer acting in a
non-Controller role or another peripheral such as a printer or plotter.
In VISA, a device is logically represented by the association of
several VISA resources.
device descriptor
A handle, returned from ibdev or ibfind, that uniquely identifies a
device in Agilent 488 original API calls. Also called a device unit
descriptor.
device driver
Software code that communicates with a device: for example, a
printer driver that communicates with a printer from a PC. A device
driver may either communicate directly with a device by reading to
and writing from registers, or it may communicate through an
interface driver.
device session
A session that communicates as a Controller with a single, specific
device such as an instrument.
device-level
Refers to Agilent 488 functions that operate on a device (instrument),
rather than on an interface.
direct I/O
Programmatic communication with instruments not involving an
instrument driver. Direct I/O may be accomplished by using an IO
Library (VISA, VISA COM, SICL, or Agilent 488) or by using
direct I/O tools such as those provided by Agilent VEE.
driver
See instrument driver and device driver.
134
Agilent VISA User’s Guide
Glossary
explorer view
The tree view within the Connection Expert window that shows all
devices connected to a test system.
handler
A software routine that responds to an asynchronous event such as an
SRQ or an interrupt.
instrument
A device that accepts commands and performs a test and
measurement function.
instrument driver
Software that runs on a computer to allow an application to control a
particular instrument.
Interactive IO
An Agilent application that allows you to interactively send
commands to instruments and read the results. Interactive IO is part
of the Agilent IO Libraries Suite product.
interface
A connection and medium of communication between devices and
controllers. Interfaces include mechanical, electrical, and protocol
connections.
interface descriptor
A handle, returned from ibfind, that uniquely identifies a GPIB
interface (board) in Agilent 488 original API calls. Also called a
board descriptor or board unit descriptor.
interface driver
Software that communicates with an interface. The interface driver
also handles commands used to perform communications on an
interface.
Agilent VISA User’s Guide
135
Glossary
interface messages
GPIB commands encoded as individual bytes. Also called GPIB
commands or command bytes.
interface session
A session that communicates and controls parameters affecting an
entire interface.
interrupt
An asynchronous event that requires attention and actions that are
out of the normal flow of control of a program.
IO Control
The icon in the Windows notification area (usually the lower right
corner of your screen). The IO Control gives you access to Agilent
I/O utilities such as Connection Expert, Agilent I/O documentation,
and VISA options.
IO Libraries
Application programming interfaces (APIs) for direct I/O
communication between applications and devices. There are four
Agilent IO Libraries in the Agilent IO Libraries Suite: VISA, VISA
COM, SICL, and Agilent 488.
Listener
A device that can receive data from the bus when instructed
(addressed to listen) by the System Controller.
lock
A state that prohibits other users from accessing a resource such as a
device or interface.
136
Agilent VISA User’s Guide
Glossary
logical unit
A number associated with an interface. A logical unit, in SICL and
Agilent VEE, uniquely identifies an interface. Each interface on the
controller must have a unique logical unit.
mapping
An operation that returns a reference to a specified section of an
address space and makes the specified range of addresses accessible
to the requester. This function is independent of memory allocation.
non-Controller role
A computer is in a non-Controller role when it acts as a device
communicating with a computer that is in a Controller role.
notification area
The area on the Windows taskbar where notifications are posted,
typically in the lower right corner of the screen. Also called taskbar
notification area or Windows notification area.
operation
A defined action that can be performed on a resource.
primary VISA
The VISA installation that controls the visa32.dll file. The primary
VISA will be used by default in VISA applications. See also
secondary VISA.
process
An operating system component that shares a system's resources. A
single-process computer system allows only a single program to
execute at any given time. A multi-process computer system allows
multiple programs to execute simultaneously, each in a separate
process environment.
Agilent VISA User’s Guide
137
Glossary
programming alias
See VISA alias.
refresh
In Connection Expert, the action that invokes the discovery
mechanism for detecting interfaces and instruments connected to
your computer. The explorer view is then refreshed to show the
current, discovered state of your test system.
register
An address location that contains a value that represents the state of
hardware, or that can be written into to cause hardware to perform a
specified action or to enter a specified state.
resource (or resource instance)
In VISA, an implementation of a resource class (in object-oriented
terms, an instance of a resource class). For example, an instrument is
represented by a resource instance.
resource class
The definition of a particular resource type (a class in object-oriented
terms). For example, the VISA Instrument Control resource classes
define how to create a resource to control a particular capability of a
device.
resource descriptor
A string, such as a VISA resource descriptor, that specifies the I/O
address of a device.
SCPI
Standard Commands for Programmable Instrumentation: a standard
set of commands, defined by the SCPI Consortium, to control
programmable test and measurement devices in instrumentation
systems.
138
Agilent VISA User’s Guide
Glossary
secondary VISA
A VISA installation that does not install visa32.dll in the standard
VISA location. The secondary VISA installation names its VISA
DLL with a different name (agvisa32.dll) so that it can be accessed
programmatically. The primary VISA will be used by default in
VISA applications. See also primary VISA.
session
VISA term for a communication channel. An instance of a
communications path between a software element and a resource.
Every communication channel in VISA is unique.
SICL
Standard Instrument Control Library. SICL is an Agilent-defined
API for instrument I/O. Agilent SICL is one of the IO Libraries
installed with Agilent IO Libraries Suite.
side-by-side
A side-by-side installation allows two vendors' implementations of
VISA to be used on the same computer. See also primary VISA and
secondary VISA.
SRQ
An IEEE-488 Service Request. This is an asynchronous request (an
interrupt) from a remote device that requires service. In GPIB, an
SRQ is implemented by asserting the SRQ line on the GPIB. In VXI,
an SRQ is implemented by sending the Request for Service True
event (REQT).
Standby Controller
A device or interface that has Controller capability, but is not
currently the Active Controller.
Agilent VISA User’s Guide
139
Glossary
status byte
A byte of information returned from a remote device that shows the
current state and status of the device. If the device follows IEEE-488
(GPIB) conventions, bit 6 of the status byte indicates whether the
device is currently requesting service.
symbolic name
A name corresponding to a single interface. This name uniquely
identifies the interface on this Controller or gateway. When there is
more than one interface on the Controller or gateway, each interface
must have a unique symbolic name.
System Controller
One Controller on a GPIB is the System Controller. This is a master
Controller; it has the ability to demand control and to assert the IFC
(Interface Clear) and REN (remote enable) lines.
system tray
See notification area.
Talker
A device that transmits data onto the bus when instructed (addressed
to talk).
task guide
The information and logic represented in the left pane of the
Connection Expert window. The task guide provides links to actions
and information that help guide you through the most common I/O
configuration tasks.
taskbar notification area
See notification area.
140
Agilent VISA User’s Guide
Glossary
test system
An entire test setup including a controller (often a PC), instruments,
interfaces, software, and any remote controllers, instruments, and
interfaces that are configured to be used as part of the system.
thread
An operating system object that consists of a flow of control within a
process. A single process may have multiple threads, each having
access to the same data space within the process. Each thread has its
own stack, and all threads may execute concurrently (either on
multiple processors, or by time-sharing a single processor).
ViFind32
A console application that uses the viFindRsrc and viFindNext VISA
functions to enumerate all resources visible to VISA. This
application is useful for verifying that all expected interfaces have
been configured by Connection Expert, and that the expected devices
have been attached. ViFind32 is part of the Agilent IO Libraries
Suite.
virtual instrument
A name given to the grouping of software modules (such as VISA
resources with any associated or required hardware) to give them the
functionality of a traditional stand-alone instrument. Within VISA, a
virtual instrument is the logical grouping of any of the VISA
resources. The VISA Instrument Control Resources Organizer serves
as a means to group any number of any type of VISA Instrument
Control Resources within a VISA system.
VISA
Virtual Instrument Software Architecture. VISA is a standard I/O
library that allows software from different vendors to run together on
the same platform. Agilent VISA is part of the Agilent IO Libraries
Suite.
VISA address
A resource descriptor that can be used to open a VISA session.
Agilent VISA User’s Guide
141
Glossary
VISA alias
A string that can be used instead of a resource descriptor in VISA
programs. Using VISA aliases rather than hard-coded resource
descriptors makes your programs more portable. You can define
VISA aliases for your instruments in Connection Expert.
VISA COM
The VXIplug&play specification for a COM-compliant VISA I/O
library and its implementation. Agilent VISA COM is part of the
Agilent IO Libraries Suite.
VISA Instrument Control Resources
The VISA definition of device-specific resource classes. VISA
Instrument Control Resources include all VISA-defined device and
interface capabilities for direct, low-level instrument control.
VISA name
The prefix of a VISA address, also called the VISA interface ID.
The VISA name specifies the interface.
VISA resource manager
The part of VISA that manages resources. This management includes
support for opening, closing, and finding resources, setting attributes,
retrieving attributes, and generating events on resources.
VISA resource template
The part of VISA that defines the basic constraints and interface
definition for the creation and use of a VISA resource. Each VISA
resource must derive its interface from the VISA resource template.
VXI Resource Manager
A software utility that initializes and prepares a VXI system for use.
The VXI Resource Manager is part of the Agilent IO Libraries Suite.
142
Agilent VISA User’s Guide
Glossary
Windows notification area
See notification area.
Agilent VISA User’s Guide
143
Glossary
144
Agilent VISA User’s Guide
Index
A
addressing
addressing device sessions, 33
devices, 33
Agilent 488, 131
Agilent web site, 12
attributes
setting VXI trigger lines, 114
VXI, 113
B
buffers
formatted I/O, 42
C
callbacks and events, 46, 54
closing device sessions, 37
conversion, formatted I/O, 41
D
declarations file, 30
default resource manager, 31
device sessions
addressing, 33
closing, 37
opening, 31
E
enable events for callback, 56
enable events for queuing, 63
event handler, 56
events
callback, 46, 54
enable for callback, 56
enable for queuing, 63
handlers, 46
hardware triggers, 46
Agilent VISA User’s Guide
interrupts, 46
queuing, 46, 62
SRQs, 46
wait on event, 64
examples
Checking Instrument Errors, 69
Determining Window
Mapping, 114
Enabling a Hardware Trigger
Event, 57, 64
Example C/C++ Source Code, 15
Exception Events, 71
Exclusive Lock, 76
GPIB-VXI (E1406A)
Interface, 86
Installing an Event Handler, 56
MEMACC Resource
Program, 107
Opening a Device Session, 121
Opening a Resource Session, 32
Opening a Session, 36
Printing Error Code, 68
Reading a VISA Attribute, 29
Receiving Data From a
Session, 41
Searching VXI Interface for
Resources, 39
SRQ Callback, 60
Trigger Callback, 58
Trigger Event Queuing, 65
Using Non-Formatted I/O
Functions, 44
Using the Callback Method, 54
Using the GPIB-VXI Interface
(Low-Level) Memory
Functions, 98
Using the Queuing Method, 63
Using the VXI Interface
(High-Level) Memory
Functions, 91
Using the VXI Interface
(Low-Level) Memory
Functions, 97
Using viPeek16, 96
VXI (E8491B) Interfaces, 84
F
finding resources, 37
formatted I/O
buffers, 42
conversion, 41
G
GPIB interfaces, introduction, 80
GPIB-VXI
attributes, 113
high-level memory functions, 90
low-level memory functions, 94
register programming, 88, 94
setting trigger lines, 114
GPIB-VXI interfaces overview, 85
H
handlers, 46
event, 56
installing, 55
prototype, 56
hardware triggers and events, 46
header file, visa.h, 30
high-level memory functions, 88
high-level memory functions for
VXI, 88, 90
I
installing handlers, 55
interrupts and events, 46
145
Index
L
LAN
hardware architecture, 118
interfaces overview, 118
locking, 32, 74
locks
using, 74
low-level memory functions, 94
low-level memory functions for
VXI, 94
M
MEMACC attribute
descriptions, 109
memory functions, high-level, 88
memory functions, low-level, 94
N
NI-488, 131
non-formatted I/O
mixing with formatted I/O, 44
See also examples
searching for resources, 37
sessions
device, 31
opening, 31
resource manager, 31
SRQs, 46
starting the resource manager, 31
T
timeout, 32, 65
trigger lines, 115
triggers and events, 46
U
USB
communicating with instruments
using VISA, 129
interfaces overview, 128
V
queuing and events, 46, 62
VISA
description, 10
visa.h header file, 30
VXI
attributes, 113
high-level memory functions, 90
low-level memory functions, 94
register programming, 88, 94
setting trigger lines, 114
R
W
raw I/O, 44
register programming
high-level memory functions, 88
low-level memory functions, 94
resource manager, 31
resource manager session, 31
resources
finding, 37
locking, 74
wait on event, 64
web site, Agilent, 12
O
opening sessions, 31
overview, guide, 8
Q
S
sample code
146
Agilent VISA User’s Guide