1
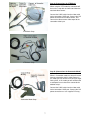
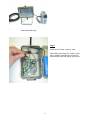
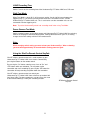
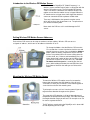
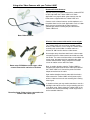
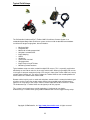
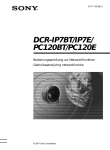
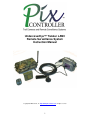
UndercoverEye™ Trekker LANC
Remote Surveillance System
Instruction Manual
Copyright ©, PixController, Inc. http://www.pixcontroller.com, all rights reserved
1
Introduction
The PixController UndercoverEye™ Trekker LANC is a complete all-in-one groundhog video
surveillance recording system. Simply turn the internal power switch to the “on” position, close the
case, and wait the 1.5 minute motion control warm up time and the UndercoverEye™ Trekker
LANC will be ready for motion event video recording. The unit is powered by a rechargeable 12V
Li-Ion 4.5 AH battery, which under normal use can last up to 3 weeks of unattended use.
The UndercoverEye™ Trekker LANC system box can be buried into the ground for the ultimate
covert setup. Simply make sure the RF antenna is above the ground and has good line of sight to
the wireless sensors. You may use a SMA Cable extender to position the RF antenna higher if
needed. Note, you will need to supply a waterproof case for the camcorder for outdoor setups.
We suggest a Pelican case, see www.pelican.com for more information.
The UndercoverEye™ Trekker LANC is not limited to “groundhog” type setups. Because of its
small size it can be used for indoor or in-vehicle applications for covert recording operations. The
UndercoverEye™ Trekker LANC can be hidden in a false ceiling, desk drawer, or in a car trunk.
Sound can also be recorded with your UndercoverEye™ Trekker LANC which is a very important
feature. However, in situations where sound recording is not permitted you can simply unplug the
sound MIC cable from the UndercoverEye™ Trekker LANC unit.
The UndercoverEye™ Trekker LANC can accept any 12V NTSC/PAL video camera. The system
is sold with a waterproof day color/nigh IR bullet camera, but any video camera such as board
cameras, pinhole cameras, or wireless video cameras can be used.
The UndercoverEye™ Trekker LANC included one wireless PIR motion sensors which can cover
a wide sensing area. If you are recording a trail area for example simply place one PIR sensor up
the trail and one down the trail, and one in the center where UndercoverEye’s video camera is
placed. In this scenario you can pre-trigger the UndercoverEye’s recording system before the
subject walks into the video camera range.
2
What’s included with your UndercoverEye™ Trekker LANC System
Your UndercoverEye™ Trekker LANC system contains the following items:
•
•
•
•
•
•
•
•
UndercoverEye™ Trekker LANC water proof system case/motion control electronic
Removable Tilt-Swivel RF Antenna w/ SMA connector
Low-light Covert Bullet Video Camera
16’ Video/LANC Cable
RF Wireless Remote Control
12V 4.5AH Removable Li-Ion Battery
12V battery charging unit
PixController UndercoverEye™ Trekker LANC CD with manuals
Inspection/Acceptance of received products
The buyer shall be responsible for inspecting all products shipped prior to acceptance; provided,
however, that if Buyer shall not have given PixController, Inc. written notice via email of rejection
or shorted items to [email protected] within ten (10) days following receipt by Buyer, the
products shall be deemed to have been accepted by Buyer.
All electronic products sent back for a full refund are subject to a 15% restocking within thirty (30)
days from purchase. Products authorized for return must be in their original unopened packaging
to receive credit. Unauthorized returns will not be accepted. After thirty (30) days from purchase
items may not be returned for a full refund. Your electronics are covered for a full 6 month period
coving all part failure under normal use.
Contact Information
Address:
PixController, Inc.
1056 Corporate Lane
Murry Corporate Park
Export, PA 15632
Phone: 724-733-0970
FAX: 724-733-0860
Email: [email protected]
Web: http://www.pixcontroller.com
3
UndercoverEye™ Trekker LANC System Components
UndercoverEye™ Trekker LANC Exterior Components
UndercoverEye™ Trekker LANC Interior Components
4
Compatible Camcorders
Does my Camcorder have a LANC port?
If you have either a Sony or Canon camcorder it may have a LANC port. The LANC port is
normally marked with this symbol:
, but older Sony models may be marked by a "REMOTE"
in blue letters. Some models are marked by "Control-L".
What is a LANC Port?
LANC was developed by Sony, but Sony has licensed LANC to other manufactures of 8mm, Hi8,
MiniDV, DVD, and other recording media camcorders. LANC support is found many of the older
8mm and Hi8 Sony camcorders, and on most high end Sony/Canon camcorders. LANC
connectors are usually 2.5mm stereo mini plugs - about the size of a Walkman headphone. Some
devices use a circular 5-pin DIN jack.
LANC connectors are normally labeled LANC, Control-L, Remote, or designated with a special
LANC symbol that resembles an "L" inscribed in a circle (see photo above). To determine
whether or not your camcorder is LANC compatible check the camcorder users’ manual, ask your
dealer, or contact the manufacturer directly.
Digital Camcorders with LANC (or Remote) jacks:
Please Note: The models listed represent the first year in production, and subsequent production
years of the same model may not be LANC compatible. You should always further verify the
actual presence of a LANC (Remote) jack.
Canon:
Elura, Elura 2 MC, Elura 40 MC, Elura 50
GL1, GL2
Optura, Optura 100 MC, Optura 200 MC, Optura PI
ZR10, ZR20, ZR25 MC, ZR30 MC, ZR40 MC, ZR45 MC, ZR50 MC
Sony DCR-Series:
DVD92, DVD100, DVD101, DVD103, DVD105, DVD200, DVD201, DVD203, DVD205, DVD300,
DVD301, DVD305, DVD308, DVD403, DVD405, DVD408, DVD505, DVD508
HC16, HC20, HC21, HC26, HC30, HC32, HC40, HC42, HC65, HC85, HC90, HC96, HC1000
IP45, IP55, IP210, IP220
PC1, PC2, PC3, PC4, PC5, PC6, PC7, PC8, PC9, PC10, PC100, PC101, PC105, PC109,
PC110, PC115, PC120BT, PC300, PC330, PC350, PC1000
SR62, SR80, SR82, SR100, SR200,SR300
TR7000
TRV6, TRV7, TRV8, TRV9, TRV10, TRV11, TRV15, TRV16, TRV17, TRV18, TRV19, TRV20,
TRV22, TRV25, TRV27, TRV30, TRV33, TRV38, TRV39, TRV40, TRV50, TRV80, TRV85,
TRV103, TRV110, TRV115, TRV230, TRV240, TRV310, TRV320, TRV330, TRV340, TRV350,
TRV350 D8, TRV530, TRV720, TRV740, TRV820, TRV900, TRV940, TRV950
VX700, VX7000
DVR-TRV-7 (DVR Series)
Sony HDR-Series:
HC1, HC3, HC5, HC7
SR1
UX1, UX5, UX7
5
Setting up the UndercoverEye™ Trekker LANC
Step 1
Connect the RF antenna to the SMA antenna
connector as shown. The RF antenna is a tiltswivel antenna and should be pointed up when
installed. The Trekker case can be oriented in
any direction.
Step 2
Connect the video cable to the Trekker box as
shown. The connection is keyed. Once the
connection is made twist the cable end to make
a tight fit.
Step 3
Plug the LANC connector into the LANC port of
your camcorder.
The video power connector fits most standard
12V video camera. The cable comes complete
with a male 12V power connector (2.1mm
barrel with center positive),
6
Step 4a (Connections for VTR Mode)
When using the VTR mode the camcorder will
be used as a tap deck and will record from the
attached video camera.
Connect the LANC cable from the video cable
to the camcorders LANC port. Connect the 12V
power connection to the video camera, and
connect the video camera video output to the
camcorder video input.
VTR Mode Setup
VTR Mode Setup
Step 4b (Connections for Camcorder Mode)
When in Camcorder mode the setup will record
from the camcorders built in video camera. In
this mode you can connect an IR array for night
filming. Also, in this mode you will need to build
a waterproof case to house the camcorder for
outdoor setups.
Connect the LANC cable from the video cable
to the camcorders LANC port. Connect the 12V
power connection an “user supplied” IR array..
Camcorder Mode Setup
7
Camcorder Mode Setup
Step 5
Power on the Trekker system as show.
Note: Before powering up the Trekker system
please read the remainder of the manual to
become familiar with the settings and sensors.
8
Powering up the UndercoverEye™ Trekker LANC
Before turning power on to the UndercoverEye™ Trekker LANC you must connect the LANC
cable between the Trekker LANC controller box and your camcorder (see above). Be sure that
power is turned off to both the Trekker LANC controller box and the camcorder. Next turn your
camcorder on into recording mode or VTR mode (depending on setup), and power on the Trekker
LANC controller box. You will hear a short melody from the PixController RF board letting you
know it's powered on. Next there will be a 30 second delay. After this time expires you will hear 4
quick beeps which let you know the system is going into a 1 minute auto walk test phase. If you
walk past the Wireless PIR motion sensors at this point you will hear 1 beep for a "A" Sensor or
trigger sensor, and 2 beeps for a "B" sensor or power up sensor. You may want to keep the case
open so you can hear this from a distance. After this 1 minute walk test phase expires you will
hear 4 quick beeps again letting you know the system is going "active". After this point the system
is active.
If you hear a constant 10 beeps from the Trekker LANC this means there is a problem with the
connection between the Trekker LANC controller box and the camcorder. Please check to make
sure the LANC cable is connected correctly.
How to customize the Trekker LANC settings
RF Board User DIP Switch
The RF Sensor DIP Switch will let you customize how the remote sensors will trigger the LANC
controller. Here you can adjust the address of which sensors to respond to (trigger the LANC),
Walk-Test mode, use KeyFob or PIR sensor, and camera test mode.
Sensor Address
“A” Address
“B” Address
“C” Address
“D” Address
Switch 1
Down
Down
Down
Down
Switch 2
Down
Down
Up
Up
Camcorder Mode
VTR Mode
Camcorder Mode
Switch 3
Down
Up
Wireles PIR or KeyFob Mode
Use Wireless PIR Sensor
Use KeyFob
Switch 4
Down
Up
Recording Time
30 Sec./Cont.
1 Minute
3 Minutes
5 Minutes
Switch 5
Down
Down
Down
Down
Switch 6
Down
Down
Up
Up
Setting the Address Code
9
Walk-Test Mode
Test Mode Off
Test Mode On
Switch 7
Down
Up
Power Camera
Camera test off
Camera test on
Switch 8
Down
Up
Switches 1 & 2 control the address code of the UndercoverEye™ Trekker LANC controller box.
Both the SlimFire Remote Control or Wireless PIR Sensor, and UndercoverEye™ Trekker LANC
controller box need to be set to the same address code in order for the unit to function properly.
There are 4 unique address codes you can set the UndercoverEye™ Trekker LANC to respond
to.
The UndercoverEye™ Trekker LANC is compatible with the SlimFire remote and PIR wireless
motion sensors. The address code here is the “house code” from A-P, however, the
UndercoverEye™ Trekker LANC only will recognize “house codes” A-G. For more information
about setting the house code on your SlimFire remote or Wireless PIR Motion Sensor.
Out of the box both the SlimFire remote, Wireless PIR sensor, and Remote VideoEye™ will
be defaulted to the “A” Address Code.
Why set different address codes? There may be a situation when you want to have several
UndercoverEye™ Trekker LANC units in a recording session. You may want to only have several
UndercoverEye ™ units respond to SlimFire or Wireless PIR motion sensors. For this you have
the ability to set the address between each of these devices. It is a good idea to use a marking
pen and write the address code on your SlimFire remote or Wireless PIR motion sensor if not set
in the default “A” address code.
Camcorder Mode
Switch 3 is the setting the mode to operate the camcorder. The default setting, switch 3 down, is
VTR mode. In this mode the camcorder will act as a tape deck and you will need to connect a
video camera to the camcorder video input such as the supplied bullet camera. When in this
mode the camcorder will record the incoming video signal from the bullet camera. Note, in this
mode you may have to set your camera into VTR mode. Camcorders such as the Sony HC-40 do
not have a VTR switch and the UndercoverEye™ Trekker LANC will automatically put the
camcorder into VTR mode.
By setting switch 3 up you are recording from the camcorders built in camera. The bullet video
camera will not be used in this mode; however, you can connect an IR array for a night covert
setup. When using an IR array be sure to put your Sony camcorder in NightShot mode. You will
also have to build a small waterproof housing for the camcorder for outdoor setups in this mode.
Wireless PIR Sensor or KeyFob Mode
Switch 4 is the setting to let the UndercoverEye™ Trekker LANC know if you are using the
KeyFob or PIR sensor.
In the Wireless PIR sensor mode, DIP switch 3 in the DOWN position the Trekker LANC will
respond wireless PIR sensors. Note, the unit will still respond to the KeyFob by pressing the “on”
button on the KeyFob unit, however, it will not respond to the KeyFob “off” button. If using the
KeyFob in this mode the recording time is setup by switches 4, 5, and 6.
In the KeyFob mode, DIP switch 3 in the UP position the Trekker LANC will respond to the “on”
button from the KeyFob to turn the Trekker LANC on into recording mode, and by pressing the
“off” button on the KeyFob will power down the Trekker LANC. Note, you can still trigger the unit
via the wireless PIR sensor but the unit will power down when the “off” command is sent by the
wireless PIR sensor. In default mode this is one minute after a PIR trigger, but this time can be
adjusted manually in the PIR sensor. Please see the paper instructions inside the PIR sensor for
more information.
10
LANC Recording Time
Switch 5 and 6 sets the recording time of the UndercoverEye™ Trekker LANC on a PIR event
Walk-Test Mode
When Test Mode is set to “On” it will let you test out the “line of sight” distance between the
triggering unit, i.e., the SlimFire remote control or Wireless PIR motion sensors, and the
UndercoverEye™ Trekker LANC unit. This is useful to be sure the camcorder units can see
commands from the triggering units.
Note: To put the UndercoverEye back into “recording mode” when using Test Mode.
Power Camera Test Mode
Switch 8 controls powers up the video camera and UndercoverEye™ Trekker LANC for reviewing
video in the field with a hand held video monitor, viewing video at home on your TV, or making
changes to the DVR settings with the DVR remote control.
.
Note:
When changing switch setting you must re-boot your UndercoverEye. When re-booting
you must wait approximately 30 seconds before turning power on again.
Using the SlimFire Remote Control KeyFob
Your RF wireless remote control unit is used to power up your
UndercoverEye™ Trekker LANC via a wireless command by
pressing the buttons on the remote control.
By pressing the “On” button, note there are 2 sets of “On” and
“Off” buttons which are redundant. This will power up the
camcorder and start it recording. By pressing the “Off” button the
camcorder will stop recording and power down the camcorder.
Your RF wireless remote control can control your
UndercoverEye™ Trekker LANC from a distance up to about 180
feet “line of sight”. For best reception be sure to have a clear view
of the Remote VideoEye™ from your controlling location.
11
RF Wireless Remote Control
KeyFob
Introduction to the Wireless PIR Motion Sensor
The PixController DigitalEye RF (Radio Frequency) is a
wireless camera controller which works in conjunction with the
wireless PIR motion sensor. The PixController RF boards
"listens" for wireless commands sent from the wireless PIR
motion sensor when the motion sensor is tripped. When the
RF board receives a trigger event it will trigger the attached
camera or camcorder to take a photo or record video.
There are 2 AAA batteries that power the motion sensor
which will last for a year of continuous use. To replace them
just remove the battery door.
Never touch the PIR lens as this could damage the PIR
sensor
Setting Wireless PIR Motion Sensor Addresses
Each wireless PIR sensor can be setup to send out a unique address. Wireless PIR sensors are
assigned an 'address', which consists of addresses between “A” to “P.
To change the Address that the Wireless PIR transmits:
First, remote the 4 screws from the back of the case and
take off the cover as shown. Press and hold the Address
button (under the battery compartment lid) the red LED
flashes first and then blinks the current setting (once for
A, twice for B, etc.). Release and immediately press the
button the desired number of times for the House Code
you want to set (once for A, twice for B, etc.) and hold
the button on the last press. 3 seconds after the last
press (while holding the button) the red LED blinks back
the number of times for the code you set. Release the
button.
Mounting the Wireless PIR Motion Sensor
To mount the Wireless PIR motion sensor first remove the
battery door and remove the AAA batteries. You will see 2
screw holes in which you can mount a small mounting plate or
screw it to the surface of the mounting area.
Try to keep the sensors at 2’ to 3’ from the ground if you want
to get the best detection of targets on the ground.
The range of the PIR detection is 40’ to 80’ depending on air
temperature and temperature of the target. The hotter the target
the longer detection range you will have. For example a car can
be seen at a greater distance.
The RF wireless range back to the DigitalEye unit is about 100’
to 150’ depending on line of sight.
12
UndercoverEye™ Trekker LANC 12V Battery & Charger
Included with your UndercoverEye unit is a
rechargeable 12V Li-Ion battery and 12V charger.
The 12V battery is completely removable from the
UndercoverEye unit for replacing or recharging.
To recharge the 12V battery simply connect the
barrel connector to the 12V wall charger unit.
When charging the red LED on the wall charger
will be lit and will change to green when the 12V
SLA battery is fully charged.
Replacement 12V Li-Ion batteries can be
purchased from www.pixcontroller.com.
Trekker LANC CCD Bullet Video Camera Specs
•
•
•
•
•
•
•
•
•
•
•
Sony 1/4"CCD Color Bullet Camera
Color Day, IR Night
420TVL Resolution
Shutter Speed NTSC: 1/50th to 1/120,000th
Weatherproof, mini-compact Bullet Camera
Lens 3.6mm 90° Field of View
0.05 LUX Rating 0.5 AGC Auto Gain Control
Dimensions 1" (D) x 3"(L)
Signal to Noise Ratio >45dB
12V DC Power Input – 2.1mm x 5.5mm center positive
NTSC Output – BCN connection
13
Using other Video Cameras with your Trekker LANC
Board and Pinhole Cameras
You can use any 12V video camera with a standard NTSC
or PAL output with the Trekker LANC unit. Some
applications may require other video cameras than the
bullet camera supplied with the Trekker LANC unit.
Cameras such as board cameras and microphones as in
the photo shown can be used. Applications such as indoor
where you may need to hide the video camera in
something for covert recording are possible with the
Trekker LANC unit.
Board Video Cameras
Wireless video cameras with motion sensor trigger
The Trekker LANC unit can also be used with various
wireless video cameras. In this setup the Trekker LANC
recording unit can be hidden in another room or a
distance of 100’ from the wireless video camera.
An example setup show here would consist of one room
setup with a wireless video camera connected to a video
transmitter. The camera and transmitter can be hidden for
covert setup, but power must be supplied to the video
camera and transmitter. Simply setup the PIR motion
sensor or motion sensors within the room.
Room setup: PIR Motion sensor trigger, video
camera connected to a wireless transmitter
Next, in another location setup the Trekker LANC by
connecting the video receiver to the video input cable of
the Trekker LANC unit. Connect the power and video
output connections to the cable.
Upon motion detection from the room with the wireless
video camera the Trekker LANC unit will power up the
wireless video receiver and start recording the incoming
video signal.
In situations where you may need to monitor an area of a
building but do not have access to the recording area this
is the ideal setup. Simply setup the Trekker LANC in the
basement our outside the building in order to get access
to the recorded video files.
Recording Setup: Video receiver connected to the
Trekker LANC video input
14
Wireless video cameras with KeyFob trigger
The Trekker LANC unit can also be used with a wireless
video camera and a KeyFob for manual triggering of the
Trekker LANC recording unit.
An example setup show here would consist of one room
setup with a wireless video camera connected to a video
transmitter. The camera and transmitter can be hidden for
covert setup, but power must be supplied to the video
camera and transmitter.
Room setup: PIR Motion sensor trigger, video
camera connected to a wireless transmitter
Next, in another location setup the Trekker LANC by
connecting the video receiver to the video input cable of
the Trekker LANC unit. Connect the power and video
output connections to the cable.
In situations where you may need to record covert
operations such as in a car this is the ideal setup. Simply
setup the Trekker LANC in the trunk of the car and press
the “on” button on the remote control KeyFob to start the
Trekker LANC recording. Press the “off” key to stop the
recording.
Recording Setup: Video receiver connected to the
Trekker LANC video input with manual KeyFob
trigger
15
Typical Field Setups
The PixController UndercoverEye™ Trekker LANC Surveillance Camera System is an
unattended groundhog video surveillance system can be used for unattended covert outdoor
surveillance of targets ranging from, but not limited to:
•
•
•
•
•
•
•
•
•
•
•
Marijuana fields
Drug/meth labs
Metal theft including copper theft
Anhydrous ammonia theft
Illegal dumping
Graffiti
Vandalism
Construction site theft
Sting operations
Illegal/Trespassing ATV riders
Monitoring remote locations
Typical outdoor setups are often used with multiple PIR sensors. This is especially useful when
monitoring an area into our out of a site to catch vehicle traffic. When using multiple PIR sensors
in this type of setup we recommend using a PIR sensor in front of the Trekker LANC unit, one up
and one down from the unit. This will pre-trigger the Trekker LANC to start recording before the
vehicle enters the Trekker LANC camera view.
Remote criminal activity such as metal and anhydrous ammonia theft is among the hardest types
of crimes to solve. Due to the random nature and the timing needed to get law enforcement
agencies on site to witness the crime it makes it almost impossible to catch criminals in action.
The UndercoverEye™ Trekker LANC was designed just for this purpose.
This system is very simple to use and fast to deploy. A single person can deploy
UndercoverEye™ Trekker LANC giving audible feedback from sensors triggers during setup.
Copyright ©, PixController, Inc. http://www.pixcontroller.com, all rights reserved.
PixController, Inc.
16