1
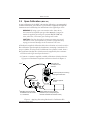
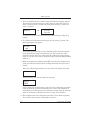
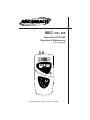
MGC 100/200 MGC 100 / 200 Instruction 0019-9322 Operation & Maintenance Rev. 2 – May 2010 MGC 2 3 Instruction 0019-9322 Product Leadership • Training • Service • Reliability MGC 100/200 WARRANTY Bacharach, Inc. warrants to Buyer that at the time of delivery this Product will be free from defects in material and manufacture and will conform substantially to Bacharach Inc.’s applicable specifications. Bacharach’s liability and Buyer’s remedy under this warranty are limited to the repair or replacement, at Bacharach’s option, of this Product or parts thereof returned to Seller at the factory of manufacture and shown to Bacharach Inc.’s reasonable satisfaction to have been defective; provided that written notice of the defect shall have been given by Buyer to Bacharach Inc. within one (1) year after the date of delivery of this Product by Bacharach, Inc. Bacharach, Inc. warrants to Buyer that it will convey good title to this Product. Bacharach’s liability and Buyer’s remedy under this warranty of title are limited to the removal of any title defects or, at the election of Bacharach, to the replacement of this Product or parts thereof that are defective in title. THE FOREGOING WARRANTIES ARE EXCLUSIVE AND ARE GIVEN AND ACCEPTED IN LIEU OF (I) ANY AND ALL OTHER WARRANTIES, EXPRESS OR IMPLIED, INCLUDING WITHOUT LIMITATION THE IMPLIED WARRANTIES OF MERCHANTABILITY AND FITNESS FOR A PARTICULAR PURPOSE: AND (II) ANY OBLIGATION, LIABILITY, RIGHT, CLAIM OR REMEDY IN CONTRACT OR TORT, WHETHER OR NOT ARISING FROM BACHARACH’S NEGLIGENCE, ACTUAL OR IMPLIED. The remedies of the Buyer shall be limited to those provided herein to the exclusion of any and all other remedies including, without limitation incidental or consequential damages. No agreement varying or extending the foregoing warranties, remedies or this limitation will be binding upon Bacharach, Inc. unless in writing, signed by a duly authorized officer of Bacharach. Register Your Warranty by Visiting www.mybacharach.com Notice: Product improvements and enhancements are continuous, therefore the specifications and information contained in this document may change without notice. Bacharach, Inc. shall not be liable for errors contained herein or for incidental or consequential damages in connection with the furnishing, performance, or use of this material. No part of this document may be photocopied, reproduced, or translated to another language without the prior written consent of Bacharach, Inc. BACHARACH® is a registered trademark of Bacharach, Inc. All other trademarks are the property of their respective owners. Copyright © 2010, Bacharach, Inc., all rights reserved. A Instruction 0019-9322 Instruction 0019-9322 MGC 100/200 MGC 100/200 Contents 1.0 INTRODUCTION ................................................................................1 1.1 General ....................................................................................... 1 1.2 Features...................................................................................... 1 1.3 Applications ................................................................................ 2 1.4 Instruction Manual .................................................................... 2 1.5 Measuring Ranges ..................................................................... 2 2.0 OPERATION .......................................................................................3 2.1 Important Note .......................................................................... 3 2.2 Switching the Instrument ON/OFF .......................................... 3 2.3 Connecting Instrument to Medical Gas Outlet ........................ 4 2.4 Starting and Ending a Test ....................................................... 5 2.5 Current Reading Display Mode................................................. 5 2.6 Peak Reading Display Mode (MGC 200) .................................. 5 2.7 Storing Readings ........................................................................ 6 2.7.1 MGC 100 – Snapshot ..................................................... 6 2.7.2 MGC 200 – Snapshot & Data-Logging ......................... 7 2.8 Battery Low Display .................................................................. 7 2.9 Battery Charge Display (MGC 100) .......................................... 7 2.10 Fault Condition Warning .......................................................... 8 2.11 Gas Alarm .................................................................................. 8 2.12 Powering Instrument from Charger ......................................... 8 3.0 MAINTENANCE .................................................................................9 3.1 Cleaning ..................................................................................... 9 3.2 Sunlight ...................................................................................... 9 3.3 Servicing ..................................................................................... 9 3.4 Software Version / ID Number .................................................. 9 3.5 Factory Settings ......................................................................... 9 3.6 Battery Charging ..................................................................... 10 3.7 Zeroing the N2O Sensor (MGC 100) ....................................... 11 3.8 Zeroing the CO2 & CO Sensors (MGC 200) ........................... 12 3.9 Span Calibration (MGC 100) ................................................... 13 4.0 PARTS & SERVICE .........................................................................15 4.1 Replacement Parts and Accessories........................................ 15 4.2 Bacharach Service Centers ..................................................... 16 Instruction 0019-9322 Instruction 0019-9322 i MGC 100/200 Notes Instruction 0019-9322 MGC 100/200 1.0 INTRODUCTION 1.1 General Bacharach analyzers are easy to use, but it is essential that these Operating Instructions be read and understood by all operators and maintenance personnel prior to using or servicing the instrument. The Bacharach MGC series of monitors are versatile handheld instruments that are designed to measure N2O, CO2 and CO from piped medical-gas outlets. Available in two models: • MGC 100 – Measures N2O • MGC 200 – Measures CO2 and CO Both models feature data-logging, run-and-charge capability, and a userzero function for all gases. Power is provided by a long-life NiMH battery, which is capable of providing up to 10 hours of continuous operation from one charge. The MGC 100 has built-in memory that allows it to store ‘snapshot’ readings (pressing the f1 button stores the current reading in memory), while the MGC 200 can automatically store up to 200 sets of gas readings in memory at predetermined intervals. Readings can later be downloaded to a personal computer for analysis via its integral IrDA communications link and the optional BACH-COM software. 1.2 Features • Up to 10 hours of operation on one charge • Convenient zero function for all gas sensors • Internal pump • Battery capacity display • Quick charge capability—2 hours • IrDA link for downloading stored data to a personal computer • Charge-and-run capability for long-term monitoring • Flow restrictor that limits inlet pressure to 2 psig • Manual storage (snapshot) of current gas reading (MGC 100) • Both snapshot and automatic data-logging of up to 200 sets of readings (MGC 200) • Peak reading mode (MGC 200) Instruction 0019-9322 1 MGC 100/200 1.3 Applications • Piped medical gas checking 1.4 Instruction Manual Unless otherwise noted, all paragraphs in this instruction manual describe the operation and maintenance of both the MGC 100 and MGC 200. For example, the heading 2.9 Battery Charge Display (MGC 100) indicates that the information under this heading pertains only to the MGC 100. 1.5 Measuring Ranges Measurement Range / Resolution N2O (MGC 100)*....................................................... 40 to 100% / 0.1% CO2 (MGC 200) .............................................0 to 10,000 ppm / 10 ppm CO (MGC 200) .....................................................0 to 500 ppm / 1 ppm * Although the MGC 100 can display readings below 40% N2O, the instrument is most accurate between 40 and 100%. 2 Instruction 0019-9322 MGC 100/200 2.0 OPERATION 2.1 Important Note Always ensure that the instrument’s gas outlet (Figure 1, Item B) is unobstructed and open to the atmosphere. 2.2 Switching the Instrument ON/OFF Switch ON the instrument by momentarily pressing the button (Figure 1, Item F). Switch the instrument OFF by pressing the button for at least 3 seconds, or until the display goes blank. When first switched ON, there is a warm-up period of approximately 5 minutes for the MGC 100 and a 1 minute warm-up period for the MGC 200 before gas readings are displayed. Note that normal fresh-air background readings of CO2 is approximately 340 ppm. A - Gas inlet fitting B - Gas outlet fitting (MGC 200 only) C - LCD Display A B D - IrDA link E - Pump ON light / Alarm indicator D C MGC H I J E G - Battery charging socket F H - MGC 100/200: Press once to store ‘snapshot’ of gas reading MGC 200: Press and hold to start and stop data-logging (f1 ) G 2 3 F - Press once to switch instrument ON; press once to start and stop pump; hold 3 seconds to switch instrument OFF ( ) I - Press once for battery level; hold to start calibration (f2) J - MGC 100: Button is enabled only during a span calibration MGC 200: Press once to toggle between CO2 and CO displays; hold for peak gas reading (f3) Figure 1. Components of the MGC 100/200 Instruction 0019-9322 3 MGC 100/200 2.3 Connecting Instrument to Medical Gas Outlet Before proceeding, turn ON the instrument and allow it warm-up per Section 2.2. The pump should be OFF at this time. After warming up, connect the instrument’s gas inlet through the supplied flow restrictor to the medical gas outlet as follows: CAUTION: Never apply gas directly from the medical gas outlet to the instrument, as internal damage to the instrument can result. The maximum pressure that can be applied to the instrument is 2 psig, which corresponds to a flow of between 100–200 cc/min. 1. Attach the threaded end of the flow restrictor (supplied with instrument) to a standard medical gas outlet fitting, then attach fitting to gas outlet on wall. 2. Connect a 2 to 3 foot length of clear, flexible 1/8" tubing (user supplied) to the barbed end of the flow restrictor . 3. Attach the other end of the plastic tubing to the instrument’s gas inlet fitting (Figure 1, Item A). Important! If the quality of the gas sample is suspect, protect the instrument by inserting the supplied PTFE particulate filter in-line using appropriate fittings and tubing. FLOW RESTRICTOR 2 TO 3 FOOT SECTION OF 1/8" TUBING Attach Flow Restrictor to a standard Medical Gas Outlet Fitting, then attach fitting to gas outlet on wall. MGC 2 3 Figure 2. Connecting Instrument to a Medical Gas Outlet 4 Instruction 0019-9322 MGC 100/200 2.4 Starting and Ending a Test With the instrument turned ON and connected to the medical gas outlet per Sections 2.2 and 2.3, begin testing with the pump OFF. Read the display as described in Sections 2.5 and 2.6. After completing a test, disconnect the sample tubing from the gas outlet. Purge out any residual gas by first disconnecting the flow restrictor, and then turning ON the pump by momentarily pressing the button. Allow the pump to run for approximately 2 minutes before proceeding to the next test. 2.5 Current Reading Display Mode Depending on which model of the MGC is being used, the instrument is capable of displaying the current N2O, or CO2 and CO gas readings on its LCD (Figure 1, Item C) as follows: MGC 100 – Displays N2O plus battery capacity. N2O % 99.9 MGC 200 – Displays either CO2 or CO. Each measurement is displayed separately on the instrument’s LCD. Toggle the display between the two gas readings by momentarily pressing the f3 button. CO2 ppm 340 2.6 CO ppm f3 0 Peak Reading Display Mode (MGC 200) The MGC 200 can display either current or peak gas readings. Note that a peak reading is the highest reading taken since the instrument was switched ON. Instruction 0019-9322 5 MGC 100/200 Activate the peak-reading mode by pressing and holding the f3 button for 3 seconds. Once in the peak-reading mode, toggle the display between “peak CO2” and “peak CO” by momemtarily pressing the f3 button. peakCO2 1,530 f3 peakCO 200 To return the instrument to its current-reading mode, again press and hold the f3 button for 3 seconds. To reset the peak gas readings back to the current readings, switch the instrument OFF and then back ON. 2.7 Storing Readings There are two data storage modes availiable: • Snapshot • Continuous Data Logging Readings can be stored by either saving the currently displayed reading (MGC 100 and 200), or starting a continuous data-logging process that saves the readings at predetermined intervals (MGC 200 only). The stored data can later be downloaded to a personal computer for analysis using the instrument’s IrDA link and the optional BACHCOM software. This software can also be used to alter the data-logging interval, and save the data to a file for further analysis. The procedures for storing gas readings for both the MGC 100 and 200 are described in Sections 2.7.1 and 2.7.2. 2.7.1 MGC 100 – Snapshot After obtaining a steady reading, momentarily press the f1 button to store (take a snapshot of) the reading shown on the display along with the current time and date. N2O % Clock icon is displayed once for a snapshot. 28.7 6 Instruction 0019-9322 MGC 100/200 2.7.2 MGC 200 – Snapshot & Data-Logging After obtaining a steady reading, momentarily press the f1 button to store (take a snapshot of) the reading shown on the display along with the current time and date. Pressing and holding down the f1 button for at least 3 seconds starts continuous data logging of the readings at a preset interval (factory set at 15 minutes). To stop data-logging, momentarily press the f1 button. CO2 ppm 340 Clock icon is displayed once for a snapshot, and flashes during continuous logging. The instrument can store up to 200 readings. Once the instrument’s storage capacity has been exceeded, the data-logging is terminated. 2.8 Battery Low Display When the battery voltage falls below a pre-determined level, the display will alternate between its current or peak display and BattLow 340 In addition, the beeper will emit three rapid notes every 30 seconds. At this time the instrument should be given a full charge per Section 3.6 as soon as possible. 2.9 Battery Charge Display (MGC 100) An indication of the battery’s charge level is obtained by momentarily pressing the f2 button. A bar graph in the lower part of this screen shows an approximation of the battery’s remaining charge. As the charge reduces, the bar graph decreases in size. Typical operating time from a full charge is approximately 10 hours. Battery = represents full charge Level = represents low charge Instruction 0019-9322 7 MGC 100/200 2.10 Fault Condition Warning Both instruments are capable of alerting the operator of an internal fault condition (i.e., a sensor failure or blockage in the infrared path). If a fault occurs, the instrument’s beeper will sound continuously, and the following message is displayed until the instrument is switched OFF. FAULT If the fault warning is displayed at any time, then the instrument must be returned to Bacharach for evaluation. 2.11 Gas Alarm (MGC 200) When the detected gas percentage exceeds a predetermined level, the alarm indicator (Figure 1, Item E) flashes and the beeper sounds. The instrument is shipped with the alarm disabled. An operator, however, can activate the alarm function and set the alarm trip-point using the optional BACH-COM software. 2.12 Powering Instrument from Charger Both the MGC 100 and 200 can be continuously powered by the charger by connecting the charger to the instrument in the following sequence: 1. Switch ON the instrument without the charger attached. Note: Connecting a charger to an instrument that is switched OFF causes the instrument to enter its charging mode, which in turn prevents the instrument from being switched ON. 2. Plug the charger into the appropriate AC wall socket (or 12 VDC when using the optional in-car charger). Then plug the charger’s output connector into the instrument’s charging socket (Figure 1, Item G). The instrument will now continuously run, until the charger is removed and the instrument switched OFF —the monitor will not turn OFF with the charger attached. 8 Instruction 0019-9322 MGC 100/200 3.0 MAINTENANCE 3.1 Cleaning Keep the instrument clean by wiping it with a soft cloth dampened with a mild detergent solution. 3.2 Sunlight The unit should not be left out in direct sunlight, or in other areas where excessive heat exists, for long periods since component damage due to overheating may result. 3.3 Servicing There are no user-serviceable parts inside the instrument. Unauthorized disassembly of the unit will invalidate the warranty. 3.4 Software Version / ID Number With the instrument switched OFF, and while holding down the f1 button, switch ON the instrument to display its software version and issue date. Releasing the f1 button displays the instrument’s ID number for 5 seconds. PMG100.5 25/04/01 3.5 ID No. xxxxx Factory Settings Important! The instrument should only be returned to its factory settings when advised by a Bacharach Service Representative. With the instrument switched OFF, and while holding down the f2 button, switch ON the instrument. The display will show: FACTORY SETTINGS Keep the f2 button depressed until the display shows: RESET OK Instruction 0019-9322 9 MGC 100/200 Release the f2 button and zero the gas sensor(s) as described in either Section 3.7 or 3.8. WARNING! Failure to zero the sensor(s) after resetting the instrument to its factory settings may cause incorrect gas readings to be displayed. 3.6 Battery Charging When the “BattLow” message is displayed (refer to Section 2.8), the instrument must be recharged using the supplied battery charger. Important! The battery has a long shelf life, but it is recommended that the battery be recharged once a month if left unused. Batteries that have not been charged for several months should be given at least two charge/discharge cycles before using the instrument. As with all rechargeable batteries, there are guidelines that should be observed: The battery should normally be charged at room temperature. Charging at temperatures below 54 °F (12 °C) should be avoided since this may cause a false indication of when the battery is charged, and could also damage the battery. Before beginning the charging process, first ensure that the instrument is switched OFF. Next, plug the supplied charger into the appropriate AC wall socket (an optional 12 VDC charger with cigarette lighter adapter is also available). Then plug the charger’s output connector into the instrument’s charging socket (Figure 1, Item G). The word “CHARGING” appears while the battery is being charged. Charging time is approximately 2 hours. Note: If the battery is deeply discharged, the display will remain blank for a few minutes before the battery begins charging. Once the battery is fully recharged, the instrument will emit a beeping tone for 30 seconds and display the word “CHARGED”. At this time unplug the charger and remove its output connector from the instrument. CHARGING >>>>>>>> 10 CHARGED Instruction 0019-9322 MGC 100/200 3.7 Zeroing the N2O Sensor (MGC 100) Zero the N2O sensor of the MGC 100 as follows: 1. Turn ON the instrument and allow it to warm up per Section 2.2. 2. With the instrument sampling fresh air, turn ON the pump by momentarily pressing the button and allow the pump to run to purge out any resident gas. Then turn OFF the pump once a steady reading is obtained (approx. 60 seconds). WARNING! It is essential that the instrument is in fresh air before attempting to zero the sensor. If this condition is not ensured, incorrect gas readings will occur. 3. Press and hold down the f2 button until the following displays appear. Note that the instrument beeps 5 times when it enters the User Cal mode, and then emits a steady tone indicating that the f2 button can now be released. User Cal f1-> Air f3-> Gas An operator can abort this procedure by momentarily pressing the f2 button. 4. To zero the sensor in ambient air, momentarily press the f1 button. The instrument will display “Air Cal OK” for 2 seconds if the sensor was successfully zeroed and then reads 0.0%. AirCal OK N2O % 0.0 If the procedure was unsuccessful, the message AirCal Failed will be displayed. If this happens, retry this procedure. If the procedure is still unsuccessful, then return the instrument to a Bacharach Service Center for evaluation. Instruction 0019-9322 11 MGC 100/200 3.8 Zeroing the CO2 & CO Sensors (MGC 200) Zero both the CO2 and CO sensors of the MGC 200 as follows: 1. Turn ON the instrument and allow it to warm up per Section 2.2. 2. With the instrument sampling fresh air, turn ON the pump by momentarily pressing the button and allow the pump to run to purge out any resident gas. Then turn OFF the pump once a steady reading is obtained (approx. 60 seconds). WARNING! It is essential that the instrument is in fresh air before attempting to zero the sensors. If this condition is not ensured, incorrect gas readings will occur. 3. Press and hold down the f2 button until the “Air Cal” screen is displayed. Note that battery status is first displayed for approximately 2 seconds. Air Cal 4. Keep the f2 button depressed until the display shows: Air Cal OK If the procedure was unsuccessful, or if the f2 button released prematurely, then the message Air Cal Failed will be displayed. If this happens, retry the Air Calibration procedure, ensuring that the instrument is only exposed to fresh air. If the procedure is still unsuccessful, then the instrument must be returned to a Bacharach Service Center for evaluation. 12 Instruction 0019-9322 MGC 100/200 3.9 Span Calibration (MGC 100) A span calibration of the MGC 100 consists of flowing a recommended certified calibration gas of 99.5% N2O (customer supplied) through the instrument and calibrating the instrument to the applied gas level. WARNING! If using a gas concentration other than 99.5%, the instrument’s default span gas value must be changed to match the applied gas using the optional BACH-COM software; otherwise, inaccurate gas readings will result. CAUTION: Gas flow through the instrument must not exceed 100–200 cc/min. (corresponds to a pressure of approximately 2 psig), as internal damage to the instrument can occur. A Bacharach supplied calibration kit (refer to Section 4.0) can be used to flow calibration gas through the instrument, assuming a standard 17 liter gas cylinder is being used. If a different size cylinder is used, then a flow regulator that fits the cylinder must be supplied by the customer. 1. First zero the N2O sensor per Section 3.7. 2. Connect a customer supplied certified calibration cylinder of 99.5% N2O gas to a Bacharach regulator and hose as shown in Figure 3. * Push hose over the analyzer’s inlet connector HOSE Ensure that pump is not running. Pump light must be OFF. * REGULATOR * Regulator and Hose are part of Calibration Kit. See Section 4.1, Accessories. 2 3 N2O Calibration Cylinder 17 Liter Adjust regulator knob for an outlet pressure of 2 psi (corresponding to a flow rate of between 100 and 200 cc/min.) Figure 3. Applying Gas using Bacharach’s Calibration Kit Instruction 0019-9322 13 MGC 100/200 3. Press and hold down the f2 button until the following displays appear. Note that the instrument beeps 5 times when it enters the User Cal mode, and then emits a steady tone indicating that the f2 button can now be released. User Cal f1-> Air f3-> Gas An operator can abort this procedure by momentarily pressing the f2 button. 4. To calibrate the instrument using span gas, press the f3 button. The following display will appear. f1> 99.5 0.0 The top line represents the preset calibration value that corresponds to the applied percentage of calibration gas. The bottom line represents the current N2O level. (Note that the calibration level is preset to 99.5%, but this level can be changed using the optional BACH-COM software.) 5. With the instrument’s pump turned OFF, open the gas regulator and allow gas to flow until the bottom reading stabilizes; then press the f1 button. If the gas calibration procedure was successful, the display will show Cal OK If the procedure was unsuccessful, the message GasCal Failed will be displayed. If this happens, retry the Gas Calibration procedure, ensuring that the analyzer is exposed to the correct concentration of calibration gas. If the procedure is still unsuccessful, then the analyzer must be returned to a Bacharach Service Center for evaluation. 6. This completes the Gas Calibration procedure. Turn off the regulator; then remove and store the calibration accessories. 14 Instruction 0019-9322 MGC 100/200 4.0 PARTS & SERVICE 4.1 Replacement Parts and Accessories Complete Kits MGC 100 – Includes instrument capable of measuring N2O, a battery charger, particulate filter, and a flow restrictor ............0019-8058 MGC 200 – Includes instrument capable of measuring CO2 and CO, a battery charger, particulate filter, and a flow restrictor ...................................................................................0019-8059 Replacement Parts 110/240 VAC USA & European Plug Charger ...............................0019-3312 Particulate Filter .............................................................................0054-0548 Flow Restrictor .......................................................................................... TBA Accessories Calibration Kit (with regulator and tubing) ...................................0019-8027 Carrying Case, Large (13 1/2"L x 10 13/16"W x 4"H) .........................0019-3311 Carrying Case, Small (10 5/8"L x 8 1/2"W x 3 3/16"H) ........................0019-3337 In-Car Charger .................................................................................0019-3302 IrDA Interface Kit & BACH-COM Software: MGC 100 ....................................................................................0019-3301 MGC 200 ....................................................................................0019-3254 Protective Rubber Boot (MGC 100 only).........................................0019-3304 Instruction 0019-9322 15 MGC 100/200 4.2 Bacharach Service Centers United States 621 Hunt Valley Circle New Kensington, PA 15068 Phone: 1-800-736-4666 Fax: 724-334-5001 E-mail: [email protected] Canada Bacharach of Canada, Inc. 20 Amber St. Unit #7 Markham, Ontario L3R SP4 Canada Phone: 905-470-8985 Fax: 905-470-8963 Toll Free: 800-328-5217 E-mail: [email protected] 16 Instruction 0019-9322 MGC 100/200 Instruction 0019-9322 MGC 100/200 Headquarters: 621 Hunt Valley Circle, New Kensington, PA 15068 Ph: 724-334-5000 • Fax: 724-334-5001 • Toll Free: 1-800-736-4666 Website: www.mybacharach.com • E-mail: [email protected] Printed in U.S.A. Instruction 0019-9322