1
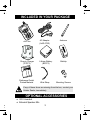
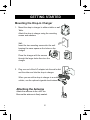
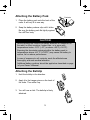
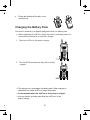
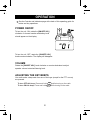
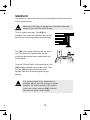
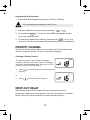
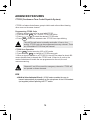
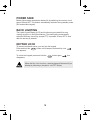
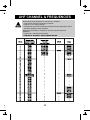
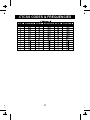
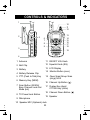
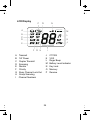
uh073sx
Operating Guide
To bring outstanding wireless communication products
to people's lives throughout the world.
WARNING!
WATERPROOF: JIS7
Uniden's uh073sx radio is designed to meet the water proofing
standard of JIS7.
This Means:
Being defined as having no ingress of water when immersed at 1
metre for 30 minutes.
The uh073sx will only meet this rating if fully assembled and all
rubber seals and bungs are well maintained and correctly fitted.
This means that the speaker microphone bung is inserted, and
the battery pack and antenna are attached and securely
fastened.
LITHIUM ION BATTERY PACK WARNING
M This equipment contains a Lithium Ion Battery Pack.
M The Lithium Ion Battery Pack contained in this equipment may
explode if disposed of in a fire.
M Do not short-circuit the Battery Pack.
M Do not charge the Lithium Ion Battery Pack used in this
equipment in any charger other than the one designed to
charge this Battery Pack. Using another charger may damage
the Battery Pack or cause the Battery Pack to explode.
M Lithium Ion batteries must be disposed of properly.
USER LICENSE INFORMATION
The citizen band radio service is licenced in Australia by
ACMA Radio-communications (Citizen Band Radio
Stations) Class Licence and in New Zealand by MED
General User Licence for Citizen Band Radio and
operation is subject to conditions contained in those
licenses.
i
CONTENTS
Introduction
Features ..................................................................................................2
Included in your Package ........................................................................3
Optional Accessories ............................. .................................................3
Getting Started
Mounting the Drop-in Charger ................................................................4
Attaching the Antenna .............................................................................4
Attaching the Battery Pack ......................................................................5
Attaching the Beltclip ...............................................................................5
Charging the Battery Pack.......................................................................6
Battery Level Display...............................................................................7
Operation
Power On/Off ...........................................................................................8
Volume.....................................................................................................8
Adjusting the Key Beeps .........................................................................8
Roger Beep .............................................................................................9
Selecting Channel ...................................................................................9
Squelch..................................................................................................10
To Transmit and Receive ......................................................................11
Using a Repeater Channel ....................................................................12
To Operate uh073sx in Duplex Mode ....................................................13
Scanning................................................................................................13
Open Scan (OS) Mode.....................................................................13
Group Scan (GS) Mode....................................................................14
Programming Scan Channels ..........................................................15
Priority Channel .....................................................................................15
Choosing a Priority Channel.............................................................15
Drop-Out Delay......................................................................................15
Advanced Features ...............................................................................16
CTCSS ............................................................................................16
VOX .................................................................................................16
Power Save ...........................................................................................18
Back Lighting .........................................................................................18
Keypad Lock .........................................................................................18
Busy Channel Lock-out (BCL) ...............................................................19
Monitor ..................................................................................................19
UHF Channel and Frequencies.................................................................20
CTCSS Codes and Frequencies ..............................................................21
Warranty .....................................................................................................22
Controls and Indicators ...........................................................................23
1
INTRODUCTION
The uh073sx is a JIS7 Waterproof, portable two-way UHF-CB radio.
It is compact, rugged and fits easily in your hand. This hand held
UHF radio will give you consistent, outstanding performance in
virtually all conditions and situations. To ensure that you get the
most from the uh073sx features, please read this operating guide
carefully before using the unit.
FEATURES
! 40 UHF CB Channels
! 3W Max TX Power
! 1W/3W Switchable TX Power
! Waterproof (meets JIS7 waterproof specifications)
! Rubber Grips/Seal
! 38 Built-in CTCSS codes
! Backlit Keypad & LCD Display
! Duplex Mode
! Open and Group Scan
! Busy Channel Lockout Function
! VOX Function
! Headset Jack
! Keypad Lock
! Battery Type: Lithium-lon Rechargeable
! Low Battery Alert
! Battery strength Indicator
! Auto Battery Save
! Battery Cover with charge contacts
! Roger Beep
2
INCLUDED IN YOUR PACKAGE
073
UH
SX
3
uh073sx
Drop-in Charger
(DT073)
Reference Guide/
Printed Material
AC Adapter
(AAD-075S)
Lithium Battery
(BP075)
Wrist Strap
Antenna
Beltclip
Mounting Screws
If any of these items are missing from the box, contact your
Uniden Dealer, immediately.
OPTIONAL ACCESSORIES
M VOX Headset
M External Speaker Mic
3
GETTING STARTED
Mounting the Drop-in Charger
1. Mount the drop-in charger to either a table or wall.
Table:
Attach the drop-in charger using the mounting
screws and washers.
Wall:
Insert the two mounting screws into the wall
keeping the same space as the holes on the
charger.
Place the charger with the screws
through the larger holes then turn the
charger.
2. Plug one end of the AC adapter into the wall outlet
and the other end into the drop-in charger.
When you mount the drop-in charger in a mobile
vehicle, use the optional cigarette lead instead.
Attaching the Antenna
Attach the antenna to the uh073sx.
Be sure the antenna is firmly seated.
4
Attaching the Battery Pack
Contacts
1. Place the battery pack onto the back of the
radio. It will only fit in one way.
2. Snap the battery release clip until it clicks.
Be sure the battery pack fits tightly against
the uh073sx body.
CAUTION!
Avoid exposing the Lithium Ion battery, attached or unattached to
the radio, in direct sunshine, heated cars, or in areas with
temperatures below –20°C (–4°F) or above +60°C (+140°F).
Exposing the chemicals contained within the battery pack to
temperatures above +60 °C (+140° F) may cause the battery to
rupture, fail or reduce performance.
In case of exposure to cell contents, wash the affected area
thoroughly, and seek medical attention.
Additional battery cautions should be applied as described on page
i of your Owner ’s Manual.
Attaching the Beltclip
1. Hold the beltclip in the direction.
2. Apply it to the hanger piece on the back of
the radio. Then slide it up.
3. You will hear a click. The beltclip is firmly
attached.
5
4. To take the beltclip off the radio, turn it
and slid it up.
Charging the Battery Pack
Your radio is powered by a specially designed Lithium Ion battery pack.
!
Before operating the uh073sx, charge the Lithium Ion battery pack for 5
hours without interruption in the drop-in charger.
1. Place the uh073sx in the drop-in charger.
2. The red LED illuminates and stays ON, until fully
charged.
! The charger won’t overcharge the battery pack. When charging is
completed, the charge LED is no longer illuminated.
! Do not transmit when the uh073sx is in the drop-in charger!
! You can monitor incoming calls while the uh073sx is in the
drop-in charger.
6
Battery Level Display
The BATTERY icon in the top right hand corner of the screen indicates the
uh073sx current battery voltage level at all times. The battery level is displayed in
4 levels.
LEVEL 4
Battery 100% full
LEVEL 3
Battery approx. 40% capacity
LEVEL 2
Low Battery
LEVEL 1 (flashing)
Empty Battery
When PTT is pressed at Level Empty, battery icon and
channel number will flash, transmission is disabled.
Recharge the battery at any time. From empty the battery
will take up to 5 hours to fully charge.
Battery Life : 12 Hours (Typical)
This is based on the following Duty Cycle:
Transmit (Low Power)
5%
Receive
5%
Stand-by
90%
7
OPERATION
See the Controls and Indicators page at the back of this operating guide for
button and key operations.
POWER ON/OFF
To turn the unit ON, rotate the [ON/OFF VOL]
clockwise. A channel number and battery level
should appear on the display.
UH073SX
To turn the unit OFF, rotate the [ON/OFF VOL]
knob counter-clockwise. The display will disappear.
VOLUME
Rotate the [ON/OFF VOL] knob clockwise or counter-clockwise to adjust
speaker volume to desired listening level.
ADJUSTING THE KEY BEEPS
Your radio emits a beep each time-one of the keys (except for the PTT or mon)
are pressed.
To turn OFF this beep: Press and hold dup while turning on the radio.
To turn ON this beep: Press and hold dup while turning on the radio.
8
ROGER BEEP
Roger Beep is a BEEP that is sent to notify the end of transmission (both PTT
and VOX transmission.) Roger Beep can be heard through the speaker when
Key Beep is on. Roger Beep is transmitted even if key beep is turned off.
However Roger Beep will not be heard from the speaker.
To turn OFF Roger Beep: Press and hold
To turn ON Roger Beep: Press and hold
while turning on the radio.
while turning on the radio.
SELECTING CHANNEL
Press
or
to select the desired channel.
If you press and hold the
or
channel number will scroll rapidly.
9
,
SQUELCH
The squelch is used to eliminate any annoying background noise when there
are no signals present.
Make sure to first select a channel not in use before setting the
squelch in your uh073sx UHF-CB radio.
Think of squelch as a gate. Turn [SQ] fully
clockwise. This raises the "Squelch Gate" so high
that only the very strong signals can get through.
Strong Signals
Medium Signals
Weak Signals
Noise
Turn [SQ] fully counter clockwise until you hear a
hiss. This opens the "Squelch Gate" so that
everything gets through noise, weak signal, and
strong signals.
To set the "Squelch Gate" to the desired level, turn
[SQ] counter-clockwise until you hear noise. Then
turn the [SQ] clockwise just until the noise
stopped. Now only the desired signal can get
through.
If an incoming signal is very weak there is a
possibility that you will have a choppy or broken
reception, due to the sensitivity of the squelch.
In this case, simply rotate the [SQ] clockwise
until the weak signal is heard clearly.
10
UH073SX
TO TRANSMIT AND RECEIVE
The uh073sx uses the 40 UHF-CB Channels. For your reference a list of the
available channels and corresponding frequencies is printed at the end of this
manual.
1. The maximum RF transmit power of uh073sx is 3 Watts.
To switch to low power, press 1/3w
appears on the LCD.
. LOW
To switch back to higher power, press 1/3w
again. LOW indicator disappears from the LCD.
2. Before you transmit, listen for activity on the
selected channel.
3. When the channel is clear, press and hold the
PTT to transmit. TX appears on the LCD.
Hold the radio with microphone approximately
five cms in front of your mouth with the
antenna at approximately 45* angle away from
your head. Speak in a clear, normal
conversational voice.
4. When you have finished speaking, release the
PTT and listen for a response. TX indicator
then disappears on the LCD.
The display shows BUSY when a transmission
is being received by your radio.
11
USING A REPEATER CHANNEL
UHF CB Repeaters are used to retransmit or relay your signal. Repeaters will
extend the range of your radio and overcome the shielding effect caused by
solid obstructions.
In normal Simplex operation, your radio transmits on one particular frequency
and receives on that same frequency. If there is a barrier (i.e. a Tall Building)
that partially blocks your transmitted signal, the possibility of the other radio
receiving the signal is very slim. Valleys, metallic structures, etc., tend to act as a
screen between radios.
Standard Operation without the aid of a Repeater Station
Normal Simplex Operation
Transmitting on CH 01
No signal being
received
Operation with the aid of a Repeater
Repeater Station
CH 01
CH 31
With Duplex operation, the signal coming from your radio is received by the
Repeater station and then re-transmitted at the same time on another channel.
Your uh073sx is designed with duplex capability on Channels 1 to 8. When any
of these channels are set to operate in duplex mode during transmission, the
uh073sx automatically sends the signal at a frequency 30 channels above the
original in order to access the repeater station. After transmitting, the radio
reverts back to its original operating frequency.
For example:
1. CH01 is on Duplex Mode
- will receive on CH01 but Transmit on CH31
2. CH02 is on Duplex Mode
- will Receive on CH02 but Transmit on CH32, etc….
Refer to UHF Channel & Frequencies table on page 20.
12
TO OPERATE uh073sx IN DUPLEX MODE
Eg. CH01 is being used in your area for repeater use.
Press dup
momentarily. The DUP icon appears.
Press dup again to deactivate the duplex operation.
uh073sx will return to simplex operation.
Check with your local retailer for available repeaters.
SCANNING
The uh073sx has two types of scanning; Open Scanning (OS) and Group
Scanning (GS).
Scanning allows you to search for active channels
programmed in the OS or GS memory.
To initiate scanning;
1. Assuming the unit is on CH17 when switched on.
2. Press scan and scanning starts. Scan icon flashes during scanning.
Open Scan (OS) Mode (the absence of GS icon indicates that the unit is on
OS mode)
Allows continuous scanning of channels stored in the Open Scan (OS) memory.
If an active channel is found, scanning will stop on that channel.
The factory has preprogrammed all the 40 UHF channels into the
Open Scan channel memory. However, you can change or
customize the channels by following the steps on programming
Scan Channels on page 15.
Example: CH40 becomes active
If the received signal cease, the unit will wait for at least 3 seconds for the
signal to return, otherwise scanning resumes.
To skip the active channel, press mem momentarily. Scanning resumes.
To deactivate SCAN, press scan or PTT
13
.
If SCAN is deactivated while in an active channel, the uh073sx will
stay on that active channel. If no other channels are active, the
uh073sx will reinstate the starting channel.
Group Scan (GS) Mode
Allows you to monitor a Priority Channel while scanning.
To use GS Mode Scanning, press the
display.
os/gs
key. GS icon
. appears on the
GS Scanning checks the Priority channel activity regularly.
If GS Scanning is initiated when there are no channels
programmed in GS memory, an error tone will be heard and
scanning will not start.
If the Priority channel becomes active the radio will stay on that channel for as
long as the signal is present. If the received signal ceases, Priority scanning
continues after 3 seconds.
If scanning stops on a channel which is not a Priority Channel the
uh073sx will continue monitoring the Priority Channel for activity
while listening to the active one.
To deactivate SCAN, press the scan or PTT
.
If SCAN is deactivated while it is turned to an active channel, the
uh073sx will stay on that active channel. If none of the channels are
active, the uh073sx will reinstate the Priority channel.
14
Programming Scan Channels
1. Select which Scanning Mode you wish to use OS or GS Mode.
OS is indicated by the absence of the GS icon.
2. Select the channel you want to store by pressing
or
.
3. Press and hold mem for 1.5 secs. to store. MEM icon appears and two
short tone beeps are heard.
4. To remove the channels from Memory, press and hold mem for 1.5 secs.
once more. Two short tone beeps are heard and the MEM icon disappears.
PRIORITY CHANNEL
The Priority Channel feature allows user to monitor one of 40 channels in the
uh073sx, monitoring it every 1.5 secs. during Group Scanning.
Choosing a Priority Channel
The starting channel, when Group Scanning is
initiated, is always the Priority Channel. To change
the priority channel setting while scanning, (eg. PRI
Channel is CH17 (476.825 MHz ));
a.
press
pauses).
, to select a higher channel (scanning
press
, to select a lower channel.
or
b.
DROP-OUT DELAY
While scanning, the uh073sx stops at a busy channel and receives a
transmission. When the received signal is over, the unit will wait for 3 seconds
for the return of the signal, otherwise, the radio resumes scanning.
15
ADVANCED FEATURES
CTCSS (Continuous Tone Coded Squelch System)
CTCSS is a feature that allows a group to talk to each other without hearing
other users on the same channel.
Programming CTCSS Code
1. Select a desired channel to be used with CTCSS.
2. Press and hold ctcss for 1.5 secs. CTCSS icon blinks.
3. Press
or
to select the desired CTCSS code.
4. Press ctcss to save the selected code. CTCSS icon stops blinking.
The uh073sx will return to standby mode after 10 secs. of no
activity. CTCSS code can be programmed on every channel. There
are 38 available CTCSS tone per channel.
CTCSS Scan Operation
1. Press scan to start scanning (GS or OS) mode.
2. Press and hold ctcss to change to CTCSS scan mode.
3. When a signal is sensed on a CTCSS CH, the uh073sx stops for about 400
msecs (decode time) to decode the CTCSS code. If there is no code or the
receive code does not match the one programmed on the unit, the unit
resumes scanning.
Channels 5 and 35 are used for emergency channels. CTCSS will
not operate on these channels.
VOX
MBuilt-in Voice Activated Circuit
(VOX) feature enables the user to
transmit automatically by speaking on the microphone of the VOX headset
(not supplied) without pressing the PTT switch.
16
VOX feature will not work without the Vox Headset Microphone.
The built in mic of uh073sx is temporarily disabled, however
accidental pressing of PTT will cause the unit to transmit briefly.
To activate VOX
1. Press and hold
vox
for 1.5 secs. "VOX" icon blinks.
2. Press either
or
within 10 secs. to select the desired
VOX sensitivity level (9 with the lowest sensitivity to 1 with the
highest sensitivity).
3.
Press vox
4.
Install VOX Headset (not supplied) to uh073sx.
to save the selected level. "VOX" icon stops blinking.
To De-activate VOX
1. Remove VOX Headset from uh073sx.
2. Press and hold vox for 1.5 secs. until "VOX" blinks.
3. Press
4. Press
repeatedly and until "oF" is displayed.
vox
to save the setting. "VOX" icon disappears.
Changing the VOX sensitivity setting to "oF" without removing the
microphone will cause the unit to transmit continuously.
17
POWER SAVE
Battery Save feature extends the battery life by switching the receiver circuit
power ON and OFF. This feature automatically activates during standby mode
(RX mode without signal).
BACK LIGHTING
The Liquid Crystal Display (LCD) and function keys are backlit for easy
viewing at night or in low light situations. The back lighting automatically
switches ON every time a key (except PTT) is pressed. It turns OFF 5 secs
after the last key is pressed.
KEYPAD LOCK
To prevent accidental entries, you can lock the keypad.
Press and hold the lock button until it beeps to activate Key Lock.
icon appears.
To unlock the keypad, press and hold the
disappears.
lock button again.
icon
When the Key Lock is active, a warning beep will be heard if you
attempt to press keys. (except for the PTT button)
18
BUSY CHANNEL LOCK-OUT (BCL)
This feature prevents accidental transmission on a busy channel.
This is recommended on channels where CTCSS is being used. If the
channel is "active" and the signal is coming from a non or different CTCSS
code user the BCL feature will prevent you from transmitting.
To activate BCL
Press and hold bcl
for 1.5 secs. until "BCL" appears on display.
To De-activate BCL
Press and hold bcl for 1.5 secs. until "BCL" disappears from the display.
MONITOR
This feature enables users to listen in for weak signals on the current channel
at the press of a button.
To use monitor
For brief listening, press mon .
For continuous listening. Press and hold mon for 2 sec. A two tone
beep will be heard and the receiver circuit will stay open letting in both
the noise & weak signals.
Display shows MON and BUSY icons.
To return to normal receive mode press mon .
!
!
!
!
19
UHF CHANNEL & FREQUENCIES
Please follow these guidelines for channel use in Australia:
• Channels 05 and 35 are Emergency Channels.
• Channel 11 is a Calling Channel.
• Channels 22 and 23 are for telemetry and telecommand applications and TX
should be avoided on these channels.
General communication is accepted on all other channels with these
guidelines:
• Channel 40 - road channel (Australia).
• Channels 01- 08 (and 31- 38) are repeater channels.
20
CTCSS CODES & FREQUENCIES
21
WARRANTY
UNIDEN UH073SX UHF CB TRANSCEIVER RADIO
Two Year Limited Warranty
Note: Please keep your sales docket as it provides evidence of warranty.
Warrantor: Uniden Australia Pty Limited ABN 58 001 865 498 Uniden New Zealand Limited
Warranty only available in original country of purchase
Elements of Warranty: Uniden warrants to the original retail owner for the duration of this
warranty, its uh073sx UHF CB Transceiver Radio (hereinafter referred to as the Product)
to be free from defects in materials and craftsmanship with only the limitations or
exclusions set out below.
Warranty Duration: This warranty to the original retail owner only, shall terminate and be
of no further effect TWO (2) years after the date of original retail sale. This warranty will
be deemed invalid if the Product is;
(A) Damaged or not maintained as reasonable and necessary,
(B) Modified, altered or used as part of any conversion kits, subassemblies, or any
configurations not sold by Uniden,
(C) Improperly installed,
(D) Repaired by someone other than an authorized Uniden Repair Agent for a defect or
malfunction covered by this warranty,
(E) Used in conjunction with any equipment or parts or as part of a system not
manufactured by Uniden, or
(F) Where the Serial Number label of the product has been removed or damaged beyond
recognition.
Warranty only valid in the country of original retail/sale.
Parts Covered: This warranty covers for TWO (2) years, the Product and included
accessories.
Statement of remedy: In the event that the Product does not conform to this warranty at
any time while this warranty is in effect, the warrantor at its discretion, will repair the
defect or replace the Product and return it to you without charge for parts or service. This
warranty does not provide for reimbursement or payment of incidental or consequential
damages.
This EXPRESS WARRANTY is in addition to and does not in any way affect your rights
under the TRADE PRACTICES ACT 1974 (Cth) (Australia) or the CONSUMER
GUARANTEES ACT (New Zealand).
Procedure for obtaining performance of warranty: In the event that the Product does
not conform to this warranty, the Product should be shipped or delivered, freight prepaid,
with evidence of original purchase, (eg. a copy of the sales docket) to the warrantor at:
UNIDEN AUSTRALIA PTY
Service Division
345 Princes Highway,
Rockdale NSW 2216
Fax (02) 9599 3278
www.uniden.com.au
LIMITED UNIDEN NEW ZEALAND LTD
Service Division
150 Harris Road, East Tamaki,
Auckland
Fax (09) 274 4253
www.uniden.co.nz
Customers in other states should ship or deliver the Product freight pre-paid to the
nearest Uniden Authorized Repair Centre. (Contact Uniden for the Warranty Agent
nearest you.)
22
CONTROLS & INDICATORS
1
10
11
12
UH073SX
2
5
6
7
8
9
1/3w
3
13
14
15
16
17
18
19
4
1 Antenna
2 Belt Clip
3 Battery
4 Battery Release Clip
5 PTT (Push to Talk) Key
6 Memory Key (MEM)
7 Scan Button (SCAN)/
Busy Channel Lock-Out
Mode (bcl)
11 ON/OFF VOL Knob
12 Squelch Knob (SQ)
13 LCD Display
14 Monitor Button (mon)
15 Open Scan/Group Scan
(os/gs)/VOX
16 Channel Up Button ( )
17 Duplex Key (dup)/
CTCSS Key (ctcss)
18 Channel Down Button ( )
8 TX Power/Lock Button
19 Speaker
9 Microphone
10 Speaker MIC (Optional) Jack
23
LCD Display
P
O
N
A
M
B
C
D
K
E
J
L
F G H
A Transmit
B 1W Power
C Duplex Transmit
D Scanning
E Monitor
F Priority
G Busy Channel Lock Out
H Group Scanning
I Channel Numbers
I
J
K
L
M
N
O
P
24
CTCSS
VOX
Roger Beep
Battery Level Indicator
Key Lock
Memory
Receive
Note:
25
©2007 Uniden Australia Pty Limited/Uniden New Zealand Limited
Part Code UTZZ01936ZA(0). Printed in China