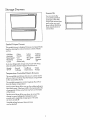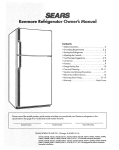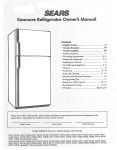
1
Kenmore
Refrigerator
Owner's
Manual
Contents
o Safety _nstructions ..................................................................
2
- Grounding
Requirements ..................................... 2, 3
- Starting the Refrigerator
..................................
................
3
• Adjusting the Controls ..........................................................
4
• Energy-Saving Tips ..............................................................
4
- Food Storage Suggestions .........................................
5-7
• Features .......................................................... : ...................
8
• ice &Water
Dispenser ...............................................
9-11
° Care and Cleaning ...............................................
12, 13
° Before You Call For Service ............................. ] 4, 15
• Vacation and Moving Precautions ........................ 15
• Warranty
....................................................Back Cover
Please record the model number, serial number and date you purchased your Kenmore refrigerator in the
space below_ See page 8 For model and serial number location
Model Number
Serial Number
SEARS,ROEBUCK AND CO, Chicago, IL 60684 UrSA
Date oF Purchase
53071, 53078
with Ice and Water
Service
IMPORTANT SAFETYINSTRUCTIONS
• Don't refreeze
frozen foods which have thawed
Read all instructions before using
this appliance.
completely. The United States Department of Agriculture
in Home and Garden Bulletin No. 69 says:
WARNING-When
using this appliance, always
exercise basic safety precautions, including the
following:
"..You may safety refreeze frozen foods that have
thawed if they still contain ice crystals or if they ore still
cold-below 40 ° E
".,Thawed ground meats, poultry or fish that have any
off-odor or off-color should not be refrozen and should
not be eaten, Thawed ice cream should be discarded° if
the odor or color of any food is poor or questionable, get
rid of it_The food may be dangerous to eoL
"Even partial thawing and refreezing reduce the eating
quality of foods, particularly fruits, vegetables and
prepared foods The eating quality of red meats is
affected less than that of many other foods. Use refrozen
foods as soon as possible to save as much of their eating
quality as you can/'
damaged. Do not use a cord that shows cracks or
abrasion damage along itslength or at either the plug or
connector end.
• If your old refrigerator
is still around the
house but not in use, be sure to remove the doors.
This will reduce the possibility of danger to children.
- When moving your refrigerator away from the
wall, be careful not to roll over or damage the
powercord.
• Unplug your refrigerator before cleaning and
making repairs. NOTE: We strongly recommend that
any servicing be performed by a qualified individual.
• After your refrigerator is in operat'on, do not
touch the cold surfaces in freezer compartment,
particularly when hands are damp or wet. Skin
may adhere to the extremely cold surfaces_
- Before replacing a burned-out light bulb, unplug
the refrigerator
or turn off power at the circuit breaker
or fuse box in order to avoid contact with a live wire
• Do not place fingers or hands on the automatic
icemaking mechanism while the refrigerator is
plugged in. This will help protect you from possible
injury. It witl also prevent interference with the moving
paris of the ejector mechanism, or with the heating
element that releases the cubes.
- Do not store or use gasoline or other flammable
vapors and liquids in the vicinity of this or any
otl_er appliance.
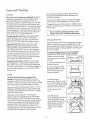
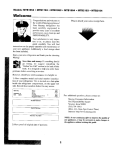
Grounding Requirements
The power cord of this
appliance is equipped
with a three-prong
(grounding) plug which
mates with a standard
• Do not allow children to climb, stand or hang on
the shelves in the refrigerator°
They could damage
the refrigerator and seriously injure themselves°
SAVETHESEINSTRUCTIONS
Important-Please
read carefully.
Have walt outlet and circuit checked by a qualified
electrician to make sure outlet is properly grounded
To connect electricity
For personal safety,
this appliance must be
properly grounded.
filamenL (A burned_out Jight bulb may break when being
replaced) NOTE: Moving control to OFF position does
not remove power to the light circuit
iPREFERRED
Where a standard two-prong wall outlet is encountered,
it is your personal responsibi}ity and obligation to hove it
replaced with a properly grounded three-prong wail
outIet
NSUF_E PF_OPE_
three-prong (grounding) wall oullet (Fig 1) to minimize the
possibility of electric shock hazard from thisappliance
DO NOT, UNDER ANY CIRCUMSTANCES, CUT OR
REMOVE THE THIRD (GROUND) PRONG FROM
THE POWER CORD.
Starting the Refrigerator
Use of adapter
Location
plug
Because of potential safely hazards under certain
conditions, we strongly recommend against use of an
adapter plug However, if you still elect to use an
adapter, where local codes permit, o TEMPORARY
CONNECTION
may be made to a properly grounded
two-prong wall outlet by use of a UL listed adapter
(Fig 2) available at most local hardware stores
o Install the refrigerator on a floor strong enough to
support it when it is fully loaded
,, Do not install it where the temperature will go
below 60 ° F. because it will not run often enough to
maintain proper temperatures
- Do not install it next to your range, a heating vent
or where the sun will shine directly on it
TEMPORARY METHOD
tADAPTER PLUGS NOT
The larger slot in the adapter PERMIt"lED
IN CANADA)
JJ_,_,
must be aligned with the
ALIGN
U_RG_
]lf_, !
larger slot in the wall outtet to
I, J
provide proper polarity in the
connection of the power
L_t I 1 _
INSUR_PAO_Ea
cord
D ROUND AND
_i9 2 II
._____[i
FIRMCONNECTIOH
BEFORE
use
CAUTION: Attaching an adapter ground terminal to the
wall outlet cover screw does not ground the appliance
untess the cover screw is metal, and not insulated, and
the walt outlet is grounded through the house wiring You
should have circuit checked by a qualified electrician to
make sure the outlet is properly grounded
When disconnecting the power cord from the
adapter, always hold the adapter with one hand
if this is not done, the adapter ground terminal is
very likely to break with repeated use
Should the adapter ground terminal break,
DO NOT USE the appliance until a proper
ground has again been established.
Use of Extension
Cords
Because of potential safely hazards under certain
conditions, we strongly recommend against the use
oFan extension cord However, if you stilt elect to use
an extension cord, it is absolutely necessary that it
be a UL listed 3-wire grounding type appliance
extension cord having a grounding type plug and
outlet and that the electrica! rating of the cord be
15 amperes (minimum) and 120 volts
Electrical
Requirements
The refrigerator
should always be plugged into its
own individual electrical outlet which has a voltage
rating that matches the rating plate. This provides the
best perf'ormance and also prevents overloading house
wiring circuits, which could cause a fire hazard From
overheating wires
Clearances
AItow the following clearances For ease oJ_installation,
proper air circulation, and plumbing and electrical
connections:
Sides ...... 5/8"
Allow 3/4"
Top ............. 1"
Back
........... t"
for door clearance at each side.
Railers
Adjustable rollers behind the base grille enable
you to move the refrigerator away from the wan for
cleaning These ro!Jers should be set so the refrigerator
rests firmly on the floor To assure that the doors will
close automatically from a halfway-open position,
there is a buiiNn tilt from the front to the back of the
cabineL Side-by-side refrigerators atso have specially
designed door hinges that lift both doors slightly
when opened, allowing the force of gravity to help
close them securely
To adjust the rollers:
• Remove the base grille
Grasp it at the bottom and
puiJ it out
o Turn the roller adjusting
screws clockwise to raise
the refrigerator, counterclockwise to lower it. Use
an adjustable wrench or
pliers on the 3/8" bolts
Both doors should close
properly when Bottom
front edge of refrigerator
cabinet is about 5/8"
from the floor
• To replace the
base grille, llne up
the prongs on the gritle
with the damps an the
refrigerator and push
Forward until the grille
snaps into place.
_'_
Adjusting the Controls
ALLOW
24HOURS
BETWEEN
ADJUSTMENTS FRESH FOOD CONTROL
FREEZER CONTROL
COLD
INITIAL
SET[TING
COLDEST
Two controls let you regulate the temperature in the fresh
food and freezer compartments
At first, set both controls at "initial
Setting".
Allow 24 hours for the temperature to stabilize, whether
you are setting the controls for the first time or adjusting
them later., Then, if you want colder or warmer
temperatures in either compartment, adjust the controls
one step at a time,
NOTE: Moving the fresh food control to OFF turns off
cooling in both compartments-fresh food and freezerbut does not shut off power to the refrigerator
How
to Test Temperatures
Use the milk test for the fresh food
compartment.
Place a container of milk on the top
shelf in the fresh food compartment, Check it a day
later. If the milk is too warm or too cold, adjust the
temperature controls.
Use the ice cream test for the freezer
compartment.
Place a container of ice cream in
the center of the freezer compartmenL Check it
after a day If it's too hard or too soft, adjust the
temperature controls
OFF
COLD
INITIAL
SETTING
COLDEST
Turning Your Household Thermostat
Below 60°E at Night?
You may want to move the freezer control one step
colder. Cooler temperatures in the house may cause the
compressor to operate less frequently, thus allowing the
freezer compartment to warm somewhaL
To protect your frozen food supply, leave your freezer
control at this new, colder setting for the entire winter or
for as long as you keep your thermostat turned down
Moving the freezer control to a colder setting should
have no effect on your fresh food compartment.
However, if freezing occurs, move the numbered control
one step warmer
When you stop turning the household thermostat down at
night, move the refrigerator temperature controls back to
their regular settings
Energy-Saving Tips
o Don't open the doors more often than necessary
° Close the doors as soon as possible, particularly in hot,
humid weather,
Q'Be sure the doors are closed tightly Before leaving the
house or retiring for the night, check to be sure the doors
haven't Been left open accidentally.
o Store only those foods requiring refrigeration in your
refrigerator
° Wipe moisture from bottles and cartons before putting
them in the refrigerator
*' Keep foods covered to reduce moisture buildup inside
the refrigerator
° lfyou move the controls to the coldest position for
quick chilling or freezing, be sure to move them back to
regular seltings
° Don't overcrowd your refrigerator Overcrowding can
require extra electrical energy to keep everything coot
Fresh Food Storage Tips
Food Storage Suggestions
To store unfrozen
meats, fish and poultry:
• Always remove store wrappings
Suggested Storage Times
Eating quality drops
after time shown
Fresh Meats
Roasts(Beef&Lamb)
.......
Roasts (Pork & Veal) .........
Steaks (Beef) ............................
Chops (Lamb) ..............................
Chops (Porkt .............
Ground & Stew Meats ...............
Variety Meats ......................
Sausage (Pork) ................
Processed Meats
Bacon ..................................
Frankfurters ...........
Ham (Whole) ........................
Ham (Half) ..........................
Ham (Slices) ................
Luncheon Meats ............
Sausage (Smoked) .....................
Sausage (Dry & Semi-Dry)
......
Cooked Meats
Cooked Meats and
Meat Dishes .............
Gravy & Meat Broth .......
• Rewrap in foil, film or wax paper and refrigerate
immediately.
DAYS
MONTHS
IN
IN
REFRIGERATOR FREEZER
AT
AT
35° to40°F.
0°F,
3to5
3 to 5
3 to 5
3 to 5
3 to 5
1 to 2
1 to 2
1 to 2
61o12
4 to 8
6 to 12
6 to 9
3 to 4
3 to 4
3 to 4
1 to 2
7
7
7
3 to 5
3
3 to 5
7
14 to 2 l
1
t/2
1 to 2
t to 2
1 to 2
Freezing
nat recommended
3 to 4
I to 2
2 to 3
2 to 3
Fresh Poultry
Chicken & T_;rkey (Whole) ......
Chicken (Pieces)
...........
Turkey (Pieces) ............................
Duck & Goose (Whale) ............
Giblets ....................
! to
1 to
1 lo
! to
1 to
2
2
2
2
2
t2
9
6
6
3
Cooked Poultry
Pieces (Covered with Broth) .....
Pieces {Not Covered) ..........
Cooked Poultry Dishes ......
FHed Chicken ............................
!
3
3
3
2
4
4
4
6
]
.4 to 6
4
to
to
to
to
(Other than for meats & poultry}
FREEZER
Most Fruitsand vegetables
.........
8-12 months
Lean fish ..................................................
6-8 months
Fa|b' fish, rolls and breads,
soups, stew, casseroles ............................
2-3 months
Cakes, pies, sandwiches,
leftovers (cooked),
Ice cream (original carton) .................
1 month max
To store cheese, wrap well with wax paper or aluminum
foil, or put in a plastic bag
• Carefully wrap to expel air and help prevent mold.
• Store pre-packaged cheese in its own wrapping
wish.
if you
To store vegetables,
use the vegetable drawersthey've been designed to preserve the natural moisture
and freshness of produce,
• Covering vegetables with a moist towel helps maintain
crispness
• As a further aid to freshness, pre-packaged vegetables
can be stored in their original wrapping.
Tips on freezing foods
There are three essential requirements for efficient home
freezing
1. Initial quality. Freeze only top-quality foods Freezing
retains quality and flavor; it cannot improve quality,
2. Speed. The quicker fruits and vegetabfes are frozen
after picking, the better the frozen product will be. You'II
save time, too, with less culling and sorting to do.
3, Proper packaging, Use food wraps designed
especially for freezing; they're readily available at most
food stores
To store ice cream-Fine-quality
ice cream, with high
cream content, will normally require slightly lower
temperatures than more "airy" already-packaged
brands with low cream content
" It will be necessary to experiment to determine the
freezer compartment location and temperature control
setting to keep your ice cream at the right serving
temperature
• The rear of the freezer compartment is slightly colder
than the front
Meats, fish and poultry purchased from the store vary in
quality and age; consequently, safe storage times in your
refrigerator will vary
New techniques are constantly being developed,
Consult the College or County Extension Service or
your local Utility Company for the latest information
on freezing and storing foods
(continued next page)
To replace shelves, select desired shelf height With the
shelf front raised slightly, engage the top hooks in the
tracks at the rear of the cabinet Then lower the front of
the shelf until it ]ocks into position
Food Storage Suggestions
Tips on Freezing
(continued)
Foods
Multi-Position Freezer Compartment
To freeze meat, fish and poultry, wrap welt in
freezer-weight foil (or other heavy-duty wrapping
material) forming it carefully to the shape of the
contents. This expels air Fold and crimp ends of the
package to provide o good, lasting seal
Shelf supports at various levels in the freezer
compartment let you reposition the shelves from
time to time to better
I
Don't refreeze meat that has completely thawed; meat,
whether raw or cooked, can be frozen successfully only
once
For Convenience°,.
• Store like things together. This saves both time and
electricity because you can find foods faster.
• Place the oldest items up front so they can be used
up promptty
• Use shelves or bins on the door for most often used
sauces and condiments
• Use the meat drawer, if your refrigerator has one, for
meats you do not freeze
To Save Money
t
accommodate your variable
inventory of frozen foods..
To reposition
shelves:
1_While pressing tabs on
shelf supports on the right
wall, lift the shelf out of the
grooves in the supports
2. Pull the shelf
sideways until shelf rods
come out of the hobs on
the le[t wail
3. Select desired shelf
height and insert the rods
into holes on the le_ wall
in Energy and Food Costs
• Cover moist foods with tight lids, plastic film or foil
• Leaf vegetables and fruits placed in drawers wilt last
longer when stored in closed plastic containers or
wrapped in plastic film
• Do not overload your fresh food or freezer
compartment with a lot of warm food at one time
• Open the door the fewest times possible to save
electrical energy
• When going out of town for several days, leave as
few perishables as possible in the refrigerator.
Move the icemaker feeler arm to the STOP (up)
position and shut off water to the refrigerator,
Shelves
Adjustable
Shelves
Compartment
Adjustable shelves in the fresh faod compartment enable
you to make efficient shelf arrangements to fit your
family's food storage needs
rear wall of the refrigerator.
s
/
[-_ Li{I up
_
_-1
LmSandoutliiI _
_
grooves on the support while I
pressing the tabs. Be sure the .........
shelf wire is fuliy inserted into
the grooves
J
._t
If the shelf supports at the
desired level on the right
wall do not have tabs,
merely lower the shelf into
place on the supports
Dividers
Dividers are designed to give you storage flexibility in
door bins on your fresh food door Items such as salad
dressings, steak sauces and other condiments can now
be kept securely against the door liner to help prevent
tipping, spilling or s_iding
Shelves in the Fresh Food
• To remove shelves, tilt the
shelf up at front, then lift it up
and out of the tracks on the
If the shelf supports at the desired level on
the right wall have tabs, lower the shelf into the
L4J
_
Tilt up
Place index finger and
middle finger on either
side of the divider near
the front and simply move
it back and forth to
fit your needs,
Divider
Storage Drawers
Freezer
Bin
You can store bulky
and odd-shaped food
packages in this slider
out bin and remove them
easily when you want
them without disturbing
foods stored above or
next to them
Sealed
Crisper
Drawer
This sealed drawer is designed to keep unwrapped foods
fresh by retaining the natural moisture content of foods
suchas:
•Artichokes
• Asparagus
oBeets,topped
•Blueberries
° Carrots
•Celery
oCherries
•Corn
"Currants
•Greens, lea[y
" Le_uce
• Parsley
" Peas,green
oPlums
"Radishes
"Rhubarb
_Spinach
°Tgmatoes,
ripe
As in any refrigerated storage area, foods with strong
odors should be stored wrapped-foods
such as:
• Brussels
Sprouts
• Broccoli
• Cabbage
Temperature
oCauliflower
"Green Onions
Controlled
•Turnips
_Parsnips
Meats Drawers
The convertible meat drawer has its own cold air duct to
allow a stream of cold air from the Freezer compartment
to flow around the drawer_
The variable temperature control regulates the air flow
from the freezer compartment.
Set the control lever at! the way up-the coldest setting-to
store fresh meats If the lever is left in the meat position for
a long period of time, some frost may form on the inside
of the drawer
Set the control lever all the way down to convert the
drawer to normal refrigerator temperature and
provide extra vegetable storage space The cold
air duct is turned off
Variable settings between these extremes
can be selected
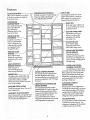
Features
ICE ACCESS DOOR
Lift it to turn icemaker on or off, or
to level ice cubes in storage bin
from time to time.
_ERATURE CONTROLS
both controls to
They may need adjusting
See "Adjusting the Controls"
ICE STORAGE
CO/V
Ice is made and stored
here until called for
Door stays open while bin is
•n use, provides easy access
to dairy products°
by pressing the
dispenser pad on the
front of the door.
CARE LABEL
Information you'll want
to know is right on the
refrigerator, including
everyday care,
WATER AND ICE
DISPENSER
Located on outside of
Freezer compartment
door, it dispenses ice
cubes and (on models
so equipped) water
througl_ ihe door.
)R SHELVES
Door shelves keep
frequenlly-used food
items within easy reach.
"_'-ADJU STABLE TEMPERED
GLASS SHELVES
FREEZER DOOR
SHELVES-Door she_ves keep
frequently used frozen
food itemswithin easy
reach.
MULTI-POSITION
FREEZER SHELVES
Shelf supports at
various levels give you
extra storage flexibility.
FREEZER BIN-This slide-out bin holds bulky and
odd-shaped food packages and
makes them easily accessible
without disturbing frozen food next
to or on top of them.
TEXTURED STEELDOORS
Touch the textured doors; they won't
show fingerprints,
MAGNETIC DOOR GASKETS
Doors dose quietly, and gaskets seal
tightly when the refrigerator islevelsee " Starh"ngthe Refrigerator"
LITY BIN
Dual-usage bin holds two dozen
eggs in their cartons, or storeson
extra supply of ice cubes in the
freezer for special occasions.
These shelves let you
arrange-and rearrange-the
interior of your refrigerator to
meet your ever-changing food
storage needs.
MODEL AND SERIAL
NUMBER LOCATION
You'll findthese numbers either
SEALED CRISPER DRAWER
This sealed drawer isdesigned to
maintain higher humidity levels
recommended for unwrapped foods
and most vegetables. See "Storage
Drawers".
--TEMPE
RATURE CONTROLLED
MEATS DRAWER
The variable temperature control
regulates the flow of cold air from the
freezer. Set the control lever all the
an the side wall or an the bottom front
of the cabinet. To order repair parts,
see the parts llstthat came with your
refrigerator, or take thesenumbers to
your nearest Sears Service Center
and they wilt help you.
AUTOMATIC EN ERGY
SAVER SYSTEM
Warm liquid from the refrigerator's
condenser is automatically circulated
around the front edge of the freezer
way up to the coldest setting to store
meats Set t all the way down
to convert thedrawer to normal
compartment to help keep moisture
from forming on the outside of the
refrigerator du ring humid weather.
refrigerator temperature and provide
extra vegetab e storage space_
NO DEFROSTING
It is not necessary to defrostthe freezer
or fresh food corn partments. Your
refrigerator is designed and equipped
to defrost itself automatically
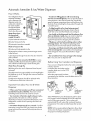
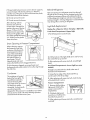
Automatic Icemaker & Ice/Water Dispenser
How it Works
Your refrigerator has an
automatic icemaker
• Avoid over filling glasses with ice and using
narrow or extra-tall glasses. This can jam the chute or
cause the door in the chute to freeze shut Periodically
open the freezer compartment door and look down into
the chute If ice is blocking the chute, poke it through with
a wooden spoon
and a dispenser that
dispenses water, ice
cubes and crushed ice
(on some modelsl
through the freezer
compartment door
Here's how they work
• To help keep bits of ice from being sprayed
beyond the glass, place the glass dose to the ice
chute-but not so dose that it blocks out coming ice
Water flows from
the household
supply through
• Ice should not be dispensed into thin glasses, fine
china or delicate crystal-they
can crack or chip from
the combined pressure of your hand pressing them
against the pad and ice dropping into the container
a
(1 } dual sotenoid valve to the
(2) water tubing and to the
• Fill glasses with ice before adding soda or other
beverage mixes. This will prevent splashing which
could cause the ice and water selector switch to stick
(3) automatic icemaker as needed
Water is frozen
in the
(4) cube mold and ejected into the
(5) storage bin where a motor-powered
cubes forward
auger moves
- Beverages and foods should not be quick-chilled
in the ice storage bin. Cans, bottles or food packages
in the storage bin may cause the icemaker or auger
to jam
Cubes dispense through the chute in the door when the
pad is pressed
• Do not add ice from trays or bags to the storage
bin. It may not crush or dispense wel!
When the switch is moved to CRUSHED (on some
models), a baffle channels cubes through the crusher
and crushed ice falls through a chute into the glass
Before Using Your Icemaker and Dispenser
Water flaws through
the
(6) tubing in the door and is dispensed when the pad
is pressed
(7) A light switch (on some models) turns the night light in
the dispenser on or off The light also comes on when the
pad is pressed
The light in the dispenser should be replaced with a
7 watt maximum bulb when it burns out
Important
if you use your refrigerator before the water connection
is made, raise the
ice access door and make sure the
icemaker feeler arm is in the STOP
(up) position
When the water supply has been
connected to the icemaker, move the feeler arm to ON
(down) position
Facts about Your Ice & Water
Dispenser
• If this is your first icemaker you'll hear occasional
sounds that may be unfamiliar. These are normal
icemaking sounds and are not cause for concern
• Your icemaker will produce eight cubes per cycleapproximately t20 cubes in a 24-hour perioddepending on freezer compartment temperature, room
temperature, number of door openings and other use
conditions
• Intermittent dispensing of ice is normal, if ice flow
interruption is more than brief, ice clump(s) may be the
cause and should be removed fol{owing instructions in
this section
erin
STOP (up)
position
Feeter arm in
ON (down)
position
Select WATER, then press the dispenser pad for about
two minutes to remove trapped air from the water line
and to fil) the water reservoir The ice cube mo_d
automatically fins with water after cooling to freezing
temperatures First cubes normaJty freeze after several
hours
NOTE: With a newty4nstaHed refrigerator, allow about
24 hours for the freezer compartment to cool down to
the proper ice-making temperature
Once 'four Icemaker & Dispenser
To Stop Dispensing
Are in Operation
Release pressure from the pad and
wait a few seconds to catch the last
Throw away the first few botches of ice cubes ( ] 6 or 24
cubes) This will flush away any impurities in the water line
Do the same thing after vacations or extended periods when
ice isn't used
bits of ice or drops of water There
may be some dripping after
dispensing of crushed ice or water
if there is a lot of dripping, the spill
should be wiped dry right away.
Do not pour water in the spill shelf because it is not self
draining-pour it in the kitchen sink The shelf and its grille
should be cleaned regularly according to Care
and Cleaning instructions.
Press here to
To clean out the line, pour the first six glassfuls of water in the
kitchen sink. The first water through the system picks up a
slight "plastic" taste from the water tubing
TO make sure the bin fills with ice, level the cubes
occasionally, When cubes fall into the bin they may pile up
close to the icemaker and push the feeler arm to the STOP
position before the bin gets full Keeping the cubes level
allows the icemaker to fill the bin
remove
If Ice Clumps Form in the Storage Bin...
Caution:
Under certain rare circumstances, ice cubes may be
discolored, usually appearing with a green-bluish color
The cause of this unusual discoloration is apparently due
to a combination of factors such as certain characteristics
The icemaker ejects cubes in groups of eight, and it is
normal for severaI cubes to be joined together. However, if
you don't use the ice very often ice dumps may form in the
storage bin and can clog the dispenser If this happens:
of local waters, household plumbing and the
accumulation of copper salts in an inactive water supply
Iine which feeds the icemaker Continued consumption of
such discobred ice cubes may be injurious to health. If
such discobration is observed, discard the ice cubes and
contact your Sears Service Center
To Dispense
grill
The grille is easi}y removed by
pressing on the back right corner.
• Remove the storage bin from the freezer
• Break up ice dumps with your hands. Throw away any
dumps that you can't break up
• Replace the bin before the remaining cubes melt and
fuse together
To Remove Ice Storage Bin
Ice and Water
o Set the selector switch to CUBES, CRUSHED ICE
(on some models) or WATER.
Lift the left corner to kee the bin From
the shelf Pull the bin straight out while
supporting it at front and back.
o Grip the glass or other container near the rim and press
the rim against lhe center of the pad
When Dispensing Ice:
To Replace Ice Storage Bin
o Some crushed ice may be
dispensed even though you selected
CUBES This happens occasionally
when a few cubes get channeled
to the crusher
Slide the bin back until the tab on the
o Sometimes a mound of snow wilt
form on the door in the ice chute
This condition is normal, and usually
occurs when you have dispensed
crushed ice repeatedly The snow
wilt eventually evaporate
1/4 turn Then push the bin back again
until the tab on the Bin lacks into the
slot in the shelf
When Dispensing Water:
"Old" ice cubes will become cloudy and taste stale Empty
ice storage bin periodically and wash it in lukewarm water
Be sure to allow storage bin to cool before replacing itotherwise ice cubes will stick to the metal auger
bin locks into the slot in the shelf
tf the bin does not go all the way back,
remove it and turn the drive mechanism
Mechanism _,.'"
If Ice ts Not Used Often ....
• The first glass of water dispensed
may be warmer than the following
ones This is normal
o Dispensed water is cool, not iced
For colder water, simpiy odd crushed
ice or cubes before dispensing water
Move Feeler Arm to STOP(up) Position When .....
CAUTION: Never put fingers or other
objects into the dispenser opening
• Ice storage bin is to be removed for a period of time
• Home water supply is to be turned off for several hours..
• Going away on vacation, at which time you should also
turn off the valve in the water supply line to your refrigerator.
t0
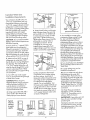
Icemaker Water Line
Installation
PtPE
Requirements
_I
t--'-
-WASHER
t/4"
TUBE TO SHUTOFF
VALVE
SHUTOFF
You will need a shutoff valve, two
1/4" O D compression nuts, two
compression sleeves and enough
1/4" OD copper tubing to connect
refrigerator to water source (Your
Sears Stare or Catalog Sales Office
has a kit available with a saddler
type shutoff valve and copper
tubing Before purchasing, make
sure a saddle-type valve complies
with your local plumbing codes )
CAUTION: Do not install icemaker
tubing in areas where temperatures
fall below Freezing.
1. Find a 3/8" to 1" vertical COLD
water pipe near the refrigerator
When it is necessary to connect into
a horizontal water pipe, make the
connection to the tap or side, rather
than at the bottom to avoid drawing
off any sediment from the water pipe
2. Measure from INLET on rear of
refrigerator to water pipe Add 7
feet to alfow for moving refrigerator
for cleaning This is the length of
1/4" O D copper tubing you will
need for the job (length from water
valve to water pipe PLUS 7 feet)
Be sure both ends of copper tubing
are cut square
3. Turn OFF main water supply
Turn on nearest I:aucet long enough
to clear line of water
CAUTION: When using any
electrical device (such as a power
drill) to facilitate installation, be
sure the device is insulated or
wired in a manner to prevent the
hazard of electrical shock
4. Using a grounded drill, drill a
3/16" hole in the vertical cold
water pipe you have selected
N UT
VALVE_"i
VERTICAL
COLD WATER
PiPE
TUBING
5. Fasten shutoff valve to cold water
pipe with pipe damp Be sure inlet
end is solidly in 3/16" dri!led hole
in water pipe and washer is under
pipe clamp Tighten packing nut
Tighten pipe clamp screws carefully
and evenly so washer makes a
watertight connection Do not
overtighten or you may cru_,h
copper tubing, especially if soft
copper tubing is used Now you are
ready to connect the copper tubing
I'
COMPRESSION
S
PACKING
NUT
/
OUTLET
COMPRESSION
SLEEVE
VALVE
6. Slip compression sleeve and
compression nut on copper tubing
as shown above Insert end of
tubing into outlet end squarely as far
as it will go Screw compression nut
to outlet end with adjustable
wrench. Do not overtighten. Turn
ON main water suppty and flush out
tubing until water is clear Turn OFF
shutoff valve on water pipe You are
now ready to connect other end of
]/4" copper tubing to water valve
on back of refrigerator
CLAMP
REFRIGERATOR
CONNECTION
7. Your model has a water valve
compression fitting coming through
the rear walt oFthe refrigerator
Assembie compression nut on
compression fitting as shown above
insert end of tubing into connector
and tighten compression nut Be sure
end of tubing is square in connector
and isinserted asfar as itwill go Do
not overtighten Be sure there is
enough extra tubing (coiled into
three turns oFabout 10" diameter) to
aIIow refrigerator to move out from
waft after installation Secure tubing
in metal clamp at top right corner of
compressor compartment cover
8. Turn shutoff valve ON TIGHTEN
ANY CONNECTIONS
OR NUTS
THAT LEAK
9. Copper tubing may now be
fastened to baseboard
10. Your ice cubes can only be as
fresh-tasting as the water that
produces them That's why it isa
good idea ta purify the water with
a water filter The water fitter is an
optional part at extra cast and is
available from the Sears Service
Center Order Filter No. 978488
and instaiJat the inlet water tube
connection,
11. Water Pressure Limitations:
Nat below {15 P S I ) or above
(125 P.S1.). Ira problem occurs,
call your Utility Company
IMPORTANT: It may take up to 24
hours for your icemaker to begin
producing ice
The first few batches of ice cubes
should be thrown away, so that
remaining impurities in the water
line will be flushed out
ways to
connect
to water
Typical
supply
Through floor
_obasemenl
cold water pipe
Under sinklo
Through walt
Ie crawl
cold wc_er
pipe
1outili_ room
ca_d wa_er pipe
space ur_de_
house
1l
Care and Cleaning
Outside
Avoid cleaning cold glass shelves with hot water
because the extreme temperature difference may
cause them to break
The water and ice dispenser spill shelf should be
wiped dry immediately to prevent spotting. Water
left on the shelf may leave deposits that you can
remove by soaking in undiluted vinegar You can also
use a paste of non-precipitating water softener (such
as Calgon brand) and water, or one teaspoon of citric
acid powder per pint of hot tap water.. Soak until the
deposit disappears or becomes bose enough to rinse
away. Usually 30 minutes soaking time is adequate
Avoid using wax on the spill shetf and trim
To help prevent odors, leave an open box of baking
soda in the rear of the refrigerator, on the top shelf
Change the box every three months _naddition, put an
open box of baking soda in the freezer to absorb stale
freezer odors
Do not wash any plastic parts from your
refrigerator
in your automatic dishwasher.
The door handles and trim can Be cleaned with
a cloth dampened with a solution of mild liquid
dishwashing detergent and water_ Dry with a soft
cloth Don't use wax on the door handles and trim.
Storage Drawers
Drawers at bottom of Fresh food compartment will stop
before coming all the way out of refrigerator to help
prevent contents from spilling onto floor The drawers can
be removed easily by tilting up slightly and pu!ling past
the "stop" iocafion
Keep the finish clean_ Wipe with a clean cloth
lightly dampened with kitchen appliance wax or
mild liquid dishwashing detergent Dry and polish
with a clean, soft cloth Do not wipe the refrigerator
with a soiled dishwashing cloth or wet towel, These
may leave a residue that can harm the paint. Do not
use scouring pads, powdered cleaners, bleach or
cleaners containing bleach because these products
can scratch and weaken the paint finish
To remove storage drawers when fresh food
compartment
door cannot be opened fully:
1. Remove food from shelf
above top drawer and take
out shelf.
Protect the paint flnish_ The finish on _he outside
of the refrigerator is a high quality, baked-on paint
finish With proper care, it w_ll stay new-!ooking and
rust-free for years. Apply a coat of kitchen/appliance
wax when the refrigerator is new and then at least
twice a year
20 Take food off glass cover
and out of drawerr
3. Put your fingers behind
the gasket at the rear of the
drawer and pull forward
Remove the gasket
Inside
The fresh food and freezer compartment
interiors should be cleaned at least once a year_
Unplug the refrigerator before cleaning If this is not
practical, wring excess moisture out of sponge or cloth
when cleaning around switches, lights or controls
4. Pull the drawer
partway out. Reach in, push
the rear of the glass up; at the
same time, push it back until it
clears front-corner retainers
Use warm water and baking soda solution-about a
tablespoon of baking soda to a quart of water This
both cleans and neutralizes odors. Rinse thoroughly
with water and wipe dry
5_ Tilt and remove the
cover,
Other parts of the refrigerator-including
door
gaskets, meat and vegetable drawers, ice storage
bin and aLtplastic parts-can be cleaned the same
way Do not use cleansing powders or other abrasive
cleaners. Door gaskets are factory-lubricated with
petroleum jeIty on the hinge side. If the Iubricant is
excessive, wipe it off but leave a thin film an the
gasket to help insure a proper hinge_side seal. When
you clean the door gaskets, relubricate them
60 Pull the drawer
forward, lift the front to dear
stops, and pull the drawer
out until it hits the door. Then
Jilt the drawer up until it is
higher than the drawer
supports, tilt it and take
it ouL
12
7oif tapeholdsbottomdrawer
Behind Refrigerator
8, Tilt and remove the cover
Take care moving your refrigerator away from the wall
All types of floor coverings can be damaged, particularly
cushioned coverings and those with embossed surfaces
Pull the refrigerator slraight out and return it to position by
pushing it straight in Moving refrigerator in a side direction
may damage floor covering or refrigerator
cover to drawer supports,
remove the tape Pull drawer partway out. Reach in,
push the rear of the glass up and, at the same time, back,
until it clears front-corner retainers,
9. Tilt and remove the drawer
After cleaning, replace
drawers and covers in
reverse order Reinstall the
Light Bulb Replacement
gasket at the rear of the top
drawer. Fit the end of the
plastic drawer support into
the slot on the gasket, with
the rubber gasket flap facing
you Make sure the gasket
snaps into place
Drain Opening
Unplug the refrigerator before changing a llght bulb,
Fresh Food Compartment--Upper
Light
!. Pull off temperature control knobs
Pin
in Freezer Compartment
When cleaning, remove
the freezer bin and flush
a solution of baking soda
(one teaspoon) and two
cups of hot [not boiling)
water through the drain
fine with the help of a
meat baster This will
2. Pull the bottom of the light shield down and forward,
then rotate the top up and off
help eliminate odor and
reduce the likelihood of a clogged drain line
3o After replacing with same size bulb, reinstall light
shiefd
If drain becomes dogged, use a meat baster and
baking-soda-and_water solution to force the clog through
the drain line,
Fresh Food Compartment--Lower
models)
Light (on some
This light is Iocated behind a shield atthe rear of
the _:reshbad compartment
Condenser
1. Grasp the top edge of the shield and llft it up
and forward to Freeits top edge
The condenser is located
behind the base grille, For
most efficient operation,
remove the base grille
and sweep away or vacuum
up dust that [s readily
accessible For best results,
use a brush special}y
designed for this purpose. It is available at your Sears
store or service center. This easy cleaning operation
should be done at least once a year
2. After replacing with same size bulb, hook the top
of the shield back in place
Freezer Compartment
1_ Remove she}f iust below
light panel (Shelf will be
easier to remove if it is
emptied first )
2. Pull plastic light panel
toward you, (It will bend to
free tabs from grooves,)
3, After replacing with same size bulb, reinstall panel
and shelf.
13
Before You Call for Service
Vibration or rattling
Savetime and money CheckthisIistof causesof minoroperating
problems you can correct yourself
Refrigerator does not operate
• ff refrigerator vibrates,morethan likely it is notresting solidly on
lhe floor The front roller screwsneed adjusting,or floor isweak or
uneven Referto StarlingYourRefrigeratorsection
• May be in defrostcycM when motor does not operate for about
30 minutes
• If dishesvibrate on shelves,try moving them Slightvibration is
normal
.,Temperaturecontrol inOFF position
Foodsdry out
"If interiorlight is not on, refrigerator may not be plugged in at
waif oullet
• Foodsnot covered,wrapped or sealed properly
• If plug issecureand refrigerator fails to operate, plug [amp into
sameoutletto determineifthere istripped circuitbreaker or
burned out [use
Freshfood or freezer compartment temperature
too warm
• Temperaturecontrol not setcold enough
Motor operates for long periods
• Warm wealher-frequent door openings
• Modern refrigeratorswith morestorage space and a larger
freezer require more operating time
• Door left open for long time
• Packagemay be holding door open
• Normal when refrigerator isfirst deliveredIo your home- usuaIly
requires24 hoursto completely cool down
Frostor icecrystals on frozen food
• Largeamountsof food placed in refrigerator to be cooled or
• Door may havebeen left ajar or package holding door open
frozen
• Too frequentor too long door openings
• Hot weather-frequent door openings
• Frostwithin package isnormal
• Door leftopen
• Temperaturecontrolsset too cold
Slow icecube freezing
. Condenserneedscleaning
• Door may have been left ajar
. Check ENERGY-SAVING
TIPS
• Settemperatureof freezer compartmentcolder
Operating sounds
Ice cubes have odor/taste
• Thehigh speed compressormotor required to maintainnear zero
temperaturesin lhe large freezer compartmentmay produce
higher soundlevelsthan yourold refrigerator
• Old cubes need to be discarded Emptyice bin every 30 days
• Ice storage bin needsto be washed
• Unsealed packagesin refrigeratorand!or freezer compartments
may be Iransmillingodor!taste to ice cubes
, Normal fan air flow-one FanBlowscold air lhrough lhe
refrigeratorand freezer compartments-anotherfan cools the
compressormotor
TheseNORMAL soundswilf atso be heard from time to time:
• Interiorof refrigerator needscleaning
Automatic icemaker does not work
• Defrosttimerswitch clicksat defrost
• Icemakerfeelerarm in STOP(up) position
• Defrostwater dripping
•'Watersupplyturned off or not connected
• Temperaturecontrol clicksON or OFF
• Freezercompartmenttoo warm
• Refrigerantboiling or gurg!ing
• Cubes1oosmall-water shutoffvalve connecting
refrigerator to homewater line may be clogged
• Cracking or popping of cooling coilscaused by expansionand
......
contractionduring
defrostand refrigeration following defrost
• Sometimescubesfuseto the sideof theice mold and hold the
Meier armin theSTOP(up) posilion Removethisiceto restartIhe
icemaker
• Ice cubesdropping intothe bin and water runningin pipesas
icemakerrefilts
• Piledup cubes instorage bin may cause icemakerto shut
off prematurely With icemakerfeeler arm in STOP(up)
position,level cubesin bin by hand
Motor starts & stops frequently
• Temperaturecontrol startsand stopsmotor to maintain even
temperatures Thisisnormal
• When levelingcubesby hand, you may have pushedthefeeler
arminto the STOP(up) position by mistake
Door not closing properly
• Door gasketon hinge sidestickingor folding over Tocorrect,put
o smallamount of pelroleumjellyon face of gasket
14
Cube dispenserdoes not work
Refrigerator has odor
• No icecubes Removestorage container tf cubes are frozen to
wire arm, removecubes
• Foodwith strongodors shouldbe tightlycovered
• No ice cubes lcemokeror water supply turnedoff
• interior needscleaning Referto Care and Cleaning section
• Irregular ice clumpsinstorage container Breakup asmany as
you can with fingertip pressureand discard theremainingclumps
• Defrostwater systemneedscleaning
• Checkfor spoiled Food
• Keep open box of baking sodain refrigerator; replace every
threemonths
Water has poor taste/odor
If water dispenserhasnot been usedfor an extended period,
dispenseseveral glassfulsofwater to eliminatetastetemporarily
impartedby thewater line
Accessories
• PooNastingincomingwater Installa water filter
Water Filter Accessory
(optional at extra cost)
Your ice cubes can only be as fresh4asting as the water
that produces them That's why it's a good idea to purify
the water with a water filter
Water dispenser does not work
• Water supply line turned off or not connected
• Supply linemay be clogged with sediment
The water filter is an optionaI part at extra cost and is
available from your Sears Service Center Order Filter
No 978488 and it may be installed in minutes when
attached to the inlet water tube connection
Moisture forms on outside of refrigerator
• Not unusualduring periodsof high humidity
Moisture collects inside
• Toofrequent or too long door openings
Water Supply Accessory
• Inhumidweather, air carriesmoistureinto refrigerator when
doors are opened
(optional at extra cost)
A water supply kit containing copper tubing, shut-off
valve, fittings and instructions needed to connect the
icemaker to your cold water line is also available from
your Sears store or Sears Service Center
Water on floor
• Thedrain inthe bottom of the freezermay be clogged Remove
any iceon thefreezer bottomand clean thedrain ReferIo Care
and Cleaning section
Kit
Moving Precautions
Hot air from bottom of refrigerator
Disconnect the power cord from the wall outlet, remove
all food and clean and dry the interior Secure all loose
items by taping them securely in place Keep the
refrigerator in an upright position during actual moving
and in the van Secure the refrigerator in the van to
_revent movement, and protect the outside with a
lanket
• Normal air flow cooling motor In therefrlgeration process,
it isnormal that heat be expelled in thearea under the refrigerator
Somefloor coveringswill discolor at thesenormal and safe
operating temperaturesYourFloorcovering suppliershouldbe
consultedifyou object to this discoloration
Interior light does not work
• No power at outbt
Vacation Precautions
. Lightbulb needsreplacing SeeCare and Cleaning section
For extended vacations or absences, shut off power to
the refrigerator, turnthe Fresh Food control to the OFF
position, and clean the interior with a baking soda solution
of one tablespoon of baking soda to one quart of water
Wipe dry To prevent odors, leave an open box of baking
soda in the refrigerator Leave the doors open
For shorter vacations, remove perishable foods and
leave controls at their regular settings However, if room
temperature is expected to drop below 60°F, follow the
same instructions as for extended vacations
Set icemaker to the STOP position and shut off water supply
to refrigerator
15
FULL ONE YEAR
WARRANTY ON REFRIGERATOR
For one year from date of purchase, when this refrigerator is operated and maintained
according to instructions attached to or furnished with the product, Sears will repair this
refrigerator, free of charge, if defective in material or workmanship.
FULL RVE-YEAR WARRANTY
ON SEALED REFRIGERATION SYSTEM
For five years from date of purchase, when this refrigerator is operated and
maintained according to owner's instructions attached to or furnished with the product,
Sears will repair the sealed system (consisting of refrigerant, connecting tubing and
compressor motor), free of charge, if defective in material or workmanship.
The above warranty coverage applies only to refrigerators which
are used for storage of food for private household purposes.
WARRANTY SERVICE IS AVAItABLE BY CONTACTING THE
NEAREST SEARS SERVICE CENTER/DEPARTMENT IN THE UNITED STATES.
This warranty applies only while this product is in use in the United States.
This warranty gives you specific legal rights,
and you may also have other rights which may vary from state to state.
SEARS, ROEBUCK AND CO., Depto 731CR-W, Sears Tower, Chicago, IL 60684
SEARS SERVICE IS AT YOUR SERVICE
Your Kenmore has added value when you consider
that Sears has nationwide service units staffed by
Sears-trained technicians...professional technicians
specifically trained to service SEARSappliances,
having the parts, tools and equipment to insure that we
meet our pledge to you..."We Service What We Sell."
ADD TO THE VALUE OF YOUR KENMORE,
BUY A SEARS MAINTENANCE AGREEMENT
Sears Kenmore refrigerators are designed, built and
tested for years of dependable use_Yet any modern
appfiance may need service from time to time. The
Sears warranty plus the Sears maintenance
agreement give protection from unexpected repair
bills. Contact your salesperson or nearest service
center for details.
SEARS, ROEBUCK AND CO., Dept. 731CR*W, Sears Tower, Chicago, IL 60684
This book is printed on recycled paper,,
IPartNo.
143
SR6116
CG
1
Printed in U.S.A.
162D3806P006
53071
53078