1
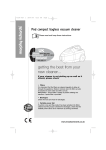
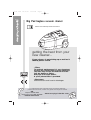
73195 rev2 24/10/05 11:55 AM Page 1 Big Pod bagless vacuum cleaner Please read and keep these instructions getting the best from your new cleaner... If your cleaner is not picking up as well as it should, please check • Filters To maintain performance,it is very important to clean the, pleated filter at every emptying. The filter may also be washed but must be fully dry before re-fitting. See page 5 for more details. A spare pleated filter is provided. • Blockages Check the tools and hose for blockages. For replacement parts, help with using your Morphy Richards products and lots more, contact us by phone or through our website UK 2615 Helpline: 0870060 2604 6646 Replacement parts: 0870 167 6635 Ireland 1800 409119 www.morphyrichards.com 73195 rev2 24/10/05 11:55 AM Page 2 Important safety instructions • The appliance should never be left running unsupervised. Product safety The use of any electrical appliance requires the following common sense safety rules. Primarily there is danger of personal injury and secondly danger of damage to the appliance and property. These are indicated in the instructions text by the following two conventions: WARNING: Danger of personal injury IMPORTANT: Damage to the appliance In addition we offer the following essential safety advice. • Never use the appliance without the filter installed. • Never use the appliance to vacuum hot ashes, broken glass, sharp objects or liquids. • Never modify the cleaner in any way. • Repairs to electrical appliances are only to be undertaken by trained personnel. Unprofessional repairs can be dangerous for users. • Use only genuine Morphy Richards spare parts and accessories. Location Electrical requirements • Do not use or keep this product outside when it is raining. • Do not store the appliance near hot ovens or heating appliances. Check that the voltage on the rating plate of your appliance corresponds with your house electricity supply which must be A.C. (Alternating Current). If the socket outlets in your home are not suitable for the plug supplied with this appliance, the plug should be removed and the appropriate one fitted. If you cut off the plug and let go of the cable it will rewind into the machine. Therefore you must pull out a length of cable and secure it before cutting off the plug and refitting a new one. WARNING: The plug removed from the mains lead, if severed, must be destroyed as a plug with bared flexible cord is hazardous if engaged into a live socket outlet. Should the fuse in the 13 amp plug require replacement, a BS1362 13 amp fuse must be fitted. Mains lead • Do not allow the mains lead to become strained or run this appliance over it. • If the electrical cable becomes damaged the complete cable assembly must be replaced. Do not attempt this task yourself, contact us using the helpline number. Children • Children do not understand the dangers associated with operating electrical appliances. Never allow children to use this appliance. Other safety considerations • Never use in the presence of explosive liquids or vapours. • Never pick up inflammable or poisonous liquids such as petrol, copier toner, or other volatile substances. Never pick up acids, asbestos or asbestos dust. • Always disconnect the appliance from the mains supply after use or prior to cleaning or emptying. 2 73195 rev2 24/10/05 11:55 AM Page 3 Features ⁄ ¤ ‹ › fi fl ‡ · ‚ „ ‰ Pod release latch Cable rewind button Handle Power on/off switch Wheels Dust pod Hose inlet Hose connector release button Storage hook Exhaust filter and cover Tube storage slot Accessories you should have  Floor nozzle Ê Hose/handle with airflow control Á Upholstery nozzle Ë Telescopic metal tube È Tool storage clip Í Filter assembly Î Pleated filter Ï Mesh filter Ì Small cleaning brush Ó Motor inlet filter A Í „ Ê Î ‰ Ï Á È Ì Ë ¤ ⁄ ‚ Ó ‹ · › ‡ fi fl 3  73195 rev2 24/10/05 11:55 AM Page 4 Assembly Controls IMPORTANT: Switch off before fitting or removing accessories. On/off control Press the on/off switch › to start the machine, press again to turn off. Fitting the flexible hose Insert the flexible hose connector · in the hose inlet duct ‡ at the front of the product. Press until it clicks into position B. Suction control on the handle Removing the flexible hose Press the hose connector release button to release the flexible hose. Pull the hose firmly from the hose inlet duct. The suction power can be adjusted using the fingertip control on the handle C. Closed: full suction Open: low suction Fitting the telescopic tube and accessories 2-position wheeled floor nozzle Attach the telescopic tube Ë to the handle end Ê of the hose A. Extend to the required length by pressing down the slider release and pulling out the tube. Attach the floor nozzle  to the telescopic tube and set the floor nozzle lever to the appropriate position.  The brushes should be retracted for use on carpets and extended for use on hard floors, by adjusting the lever on top of the floor nozzle. Use Other accessories include: • Crevice tool for awkward places, corners and behind radiators etc. • Brush attachment for pelmets, delicate objects etc. • Upholstery nozzle Á for sofas, armchairs etc. • Tools can be stored on the tool storage clip È that slides onto the telescopic tube. 1 Assemble the cleaner as required. 2 While holding the cleaner, use the plug to pull out the full length of cable. A red mark indicates the maximum length. Do not try to pull the cable past this mark. 3 Connect plug to mains supply 4 Press the on/off button 5 Check the suction control and floor nozzle controls are set as required. 6 Start vacuuming Do not use the cleaner in an upright position. B C Release button 4 73195 rev2 24/10/05 11:55 AM Page 5 inside the mesh filter to shake loose the dust. E 11 Lift out the pleated filter Ï then empty out the dust from the mesh filter Î into the bin E 12Re-assemble filter assembly by placing the pleated filter inside the mesh filter then place the filter holder on top in the correct position. Rotate the mesh filter assembly anti-clockwise to lock the assembly together H. 13 Place the filter assembly back inside the dust pod making sure the filter assembly is placed level and that the filter holder seal is seated neatly. 14 Re-attach the dust pod to the cleaner by hooking the bottom of the dust pod in first, then closing the pod until it clicks and the pod release catch ⁄. is fully down and secured I. After use 1 Switch off the vacuum cleaner. 2 Unplug from the mains. 3 Rewind the cable by pressing the rewind button ¤. WARNING: When using the cable rewind, always hold the plug as the cable will rewind quickly. Emptying the pod WARNING: Never operate the cleaner without the dust pod filter assembly Ï or motor protection filter fitted. 1 Disconnect the cleaner from the mains socket. 2 Disconnect the hose from the cleaner. 3 Remove the dust pod fl from the cleaner by pushing the release latch ⁄D. 4 Take the dust pod to the bin. 5 Raise the filter assembly Í handle then lift out the filter assembly from the dust pod flE. 6 Empty the dust pod into the bin. 7 Place dust pod safely to one side. 8 Use the small brush Ì provided (located on filter assembly) to remove any fluff from the outside of the mesh filter G. 9 Rotate the mesh filter Î clockwise to release the mesh filter and pleated filter Ï assembly from the filter holder G. 10 Rotate and flick the pleated filter E D F 5 73195 rev2 24/10/05 11:55 AM Page 6 If there is resistance when you re-fit the pod onto the cleaner, remove and carefully reseat the filter assembly back into the pod, ensuring the filter assembly seal is located fully and neatly. G Washing the pleated filter For total cleaning of the pleated filter it should be washed with warm water with no detergents. Allow filter to air dry. A SPARE FILTER IS PROVIDED. This allows continued use of the cleaner whilst the other filter is drying. IMPORTANT: The filter must be completely dry before re-fitting. 73195 rev2 24/10/05 11:55 AM Page 7 To clean the motor protection filter Motor protection filter 1 Remove the filter from the filter grille J. 2 Rinse the filter in luke warm water and Dry the filter completely. 3 Put the filter back into the filter grille and reassemble. This cleaner is fitted with a motor protection filter. IMPORTANT: NEVER USE THE VACUUM CLEANER WITHOUT THIS IN PLACE. Storage position The vacuum cleaner can be stored in an upright position. Slide the storage hook ‚ on the floor nozzle into the slot on the base of the product ‰ and the tubes, hose and floor nozzle are held securely K. G J I K 6 73195 rev2 24/10/05 11:55 AM Page 8 Exhaust filter Care and maintenance This filter should be replaced every 12 months or sooner if required. Remove the exhaust filter grille by pulling the locking tabs towards you L. Remove the used filter. Insert the clean micro exhaust filter and replace the filter grille. Your cleaner is manufactured to withstand normal day-to-day use, but an occasional wipe over with a damp cloth will help maintain its good looks. Abrasive cleaners should not be used. IMPORTANT • Always disconnect the cleaner from the mains when checking filters. • All filters should be checked regularly for signs of damage, preferably after each cleaning task. The filters must be replaced immediately if they become damaged. • Always make sure all filters are fitted before use. Failure to do so may result in damage to your product. • If the sound of the cleaner changes slightly, clean the filters and check for blockages. Purchasing filters Use original filters. Replacement filters can be purchased from specialist retailers or directly from our Replacement Parts telephone number shown below. Helpline If you have any difficulty with your appliance do not hesitate to call us. We are likely to be more help than the store from where it was bought. Please have the following information ready to enable our staff to help you. • Name of product • Model number as shown on the underside of the appliance. Safety cut-out If the cleaner overheats a motor protection thermostat will automatically switch the cleaner off. If this happens, switch the cleaner off, unplug from power supply and leave the cleaner to cool for at least 45 minutes. Check the airways for blockages, empty dust canister and clean the filters before restarting. L 7 73195 rev2 24/10/05 11:55 AM Page 9 Your two-year guarantee • It is important to retain the retailers receipt as proof of purchase. Staple your receipt to this back cover for future reference. Please quote the following information if the product develops a fault. These numbers can be found on the base of the product. Model no. Serial no. All Morphy richards products are individually tested before leaving the factory. In the unlikely event of any appliance proving to be faulty within 28 days of purchase it should be returned to the place of purchase for it to be replaced. If the fault develops after 28 days and within 24 months of original purchase, you should contact the helpline number quoting model number and serial number on the product, or write to Morphy Richards at the address shown. You may be asked to return a copy of proof of.purchase Subject to the exclusions set out below (1-5), the faulty appliance will then be repaired or replaced and dispatched usually within seven working days of receipt. If you suspect a fault, follow the simple checks detailed below before returning the appliance or calling the helpline. • Check the filters for blockages. • Check the hose and tubes for blockages. • Check the plug is firmly in the socket and the supply is switched on. • Make sure the socket is working by trying another appliance. If for any reason this item is replaced during the two-year guarantee period, the guarantee on the new item will be calculated from original purchase date. Therefore it is vital to retain your original receipt or invoice to indicate the date of initial purchase. To qualify for the two-year guarantee the appliance must have been used according to the manufacturers instructions. For example filters must be cleaned regularly and replaced if damaged. Morphy richards shall not be liable to replace or repair the goods under the terms of the Guarantee where: 1 The fault has been caused or is attributable to accidental use, mis-use such as neglecting to regularly clean filters or used contrary to the manufacturers recommendations or where the fault has been caused by power surges or damage caused in transit. 2 The appliance has been used on a voltage supply other than that marked on the products. 3 Repairs have been attempted by persons other than our service staff (or authorised dealer). 4 Where the appliance has been used for hire purposes or non-domestic use. 5 The guarantee excludes consumables such as some filters. This guarantee does not confer any rights other than those expressly set out above and does not cover any claims for consequential loss or damage. This guarantee is offered as an additional benefit and does not affect your statutory rights as a consumer. • This guarantee is valid in the UK and Ireland only. Morphy richards products are intended for household use only. Morphy richards has a policy of continuous improvement in product quality and design. The company, therefore reserves the right to change the specification of its models at any time. The After Sales Division Morphy richards Ltd, Mexborough South Yorkshire, England, S64 8AJ Helpline (office hours) UK 0870 060 2604 Republic of Ireland 1800 409119 VC73195MUK Rev 2 10/05