1
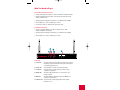
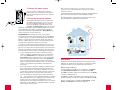
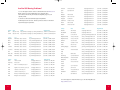
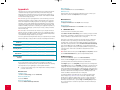
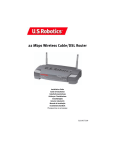
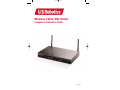
Wireless Cable/DSL Router
Companion Reference Guide
R24.0262.00
What You Need to Begin
For Broadband Router Functions:
• PC with an Ethernet NIC installed or an 802.11b Wireless Adapter installed
• A functioning Ethernet-based cable or DSL modem OR an RS-232-based
analog or ISDN modem
• Operating system installation CD-ROM (i.e., your Windows XP CD-ROM)
• Internet Explorer 4 or later OR Netscape 4 or later
• If you have an analog or ISDN modem, an RS-232 cable
For Wireless Functions:
• 802.11b compatible Wireless PC Card, PCI Adapter, and/or USB
Adapter installed and configured
• Operating system installation CD-ROM (i.e., your Windows XP CD-ROM)
• Internet Explorer 4 or later OR Netscape 4 or later
2
1
4
3
6
5
Wireless Cable/DSL Router
LAN
Power
Status
WAN
Config
W.LAN
Link/Activity
SPEED
1
2
3
Front View
1. Power LED:
The green Power LED stays lighted to indicate the system is
functioning properly and flashes during the self-test phase
or firmware upgrade process.
2. Status LED:
This LED blinks to indicate normal system status.
3. Config LED:
This LED blinks to indicate that the product is being
configured or upgraded.
4. W.LAN LED:
This LED is lighted when there is a connection to the
wireless network.
5. WAN LED:
The green WAN port LED flashes when the WAN port is
sending or receiving data.
6. LAN Port LED: This green LED is always lighted when each specific
LAN port is in use.
1
Connecting a cable or DSL modem to the
Wireless Cable/DSL Router
1
RESET
2
PRINTER
3
COM
4
6
5
WAN
3
2
1
12VDC
1. Connect your modem to the
Wireless Cable/DSL Router
RESET
PRINTER
COM
WAN
3
2
1
12VDC
Turn off your PC and your cable or DSL modem.
Back View
1. RESET Button:
Press in and hold the RESET button. While holding the
RESET button, unplug then plug back in the power
supply. When the Wireless Cable/DSL Router has
power again, continue to hold the RESET button for
about five seconds to reset the Wireless Cable/DSL
Router to the factory default settings.
2. PRINTER:
This parallel port is used to attach a printer to the
local area network.
3. COM:
This serial port can be used to connect an analog modem.
4. WAN:
The RJ-45 WAN port is used to connect the Wireless
Cable/DSL Router to a broadband modem.
Locate the Ethernet cable from your cable or DSL
modem that is connected to your PC’s Ethernet
adapter. Disconnect that Ethernet cable from
your PC’s Ethernet adapter, and connect it to the
WAN port on the rear of the Wireless Cable/DSL
Router.
Note: If your cable or DSL modem is connected to
USB
ENET
PWR
RF
your PC using a USB cable, disconnect the USB
cable from both your PC and from your cable or
DSL modem.
RESET
5. LAN Ports 1 - 3: The LAN ports are used to connect devices to the local
area net work. The green Link/Act LEDs flash when the
specific LAN port is sending or receiving data. The
green 10/100 LEDs are lighted to indicate a speed
of 100 Mbps and not lighted to indicate a speed
of 10 Mbps.
6. 12VDC:
This connection port is for the power supply of the
Wireless Cable and DSL Router.
The U.S. Robotics Wireless Cable/DSL Router can be easily connected to
any Ethernet-based cable modem or DSL modem, or an RS-232-based
analogue or ISDN modem. You can verify compatibility by checking to see
if your cable or DSL modem is connected to the network adapter in your
computer using an Ethernet cable. If you have an analog or ISDN Internet
connection, proceed to the “Connecting an Analog or ISDN modem to the
Wireless Cable/DSL Router” section of this Guide.
2
2. Connect your Wireless Cable/DSL
Router to your computer
RESET
PRINTER
COM
WAN
3
2
1
PRINTER
COM
WAN
3
12VDC
To make an Ethernet connection: Connect one
end of the supplied Ethernet cable to your PC's
Ethernet adapter. Connect the other end to one
of the LAN ports on the Wireless Cable/DSL
Router.
To make a Wireless connection: Make sure each
Wireless Card that will be connecting to the network is set to Infrastructure mode. If necessary,
refer to your Wireless Card manual to determine
how to change this setting.
USB
ENET
PWR
RF
Note: Each Wireless Access PC Card or PCI Adapter
in the wireless network must have the
Infrastructure mode selected within the
Configuration Utility. Refer to your Wireless Access
PC Card or PCI Adapter documentation for information on selecting
Infrastructure mode.
3
3. Connect the power supply
RESET
PRINTER
COM
WAN
3
2
1
12VDC
Turn on your cable or DSL modem. Connect
the included power cord to the power jack on
the Wireless Cable/DSL Router. Plug the
power cord into a standard power outlet.
Turn on your PC.
Congratulations! The installation procedure is
now complete.
USB
ENET
PWR
You should now have secure and shared Internet
access. To verify your connection, launch a Web
browser and go to www.usr.com. If the page
loads, you are finished with the installation
procedure.
RF
If you have any difficulties connecting to the Wireless Cable/DSL Router,
check the top three issues below and see if they apply to your situation.
• If you are attempting to create a wireless connection, but cannot connect to the Wireless Cable/DSL Router, make sure each Wireless Card
is set to Infrastructure mode. If the Wireless Cards are set to 802.11b
AdHoc mode, you will not be able to connect to the Wireless
Cable/DSL Router. When each Wireless Card is set to Infrastructure
mode, it should automatically connect to the Access Point of the
Wireless Cable/DSL Router. If the Wireless Cards do not automatically
connect, rescan until they detect the Wireless Cable/DSL Router
and connect.
• If you create a wireless connection to the Wireless Cable/DSL Router,
but are experiencing poor link quality, check the positioning of the
Wireless Cable/DSL Router. Long distances, multiple floors, or steel
or concrete walls can diminish the link quality. If possible, reposition
the Wireless Cable/DSL Router to reduce the
effect of any of these obstacles.
•
Model-2415
Wireless Access
PCI Adapter
wall
Model-2410
Wireless Access
PC Card
If you have the Wireless Cable/DSL Router
properly connected and can access the
Internet, but are experiencing difficulties
connecting with special applications (e.g.,
ICQ, Battle.net, etc.), you must assign
specific ports in order to bypass the firefunction. For more information about how
to configure this function, refer to the
"Special Applications" section within the
"Configuring the Wireless Cable/DSL
Router" chapter of the User Guide.
Connecting an Analog or ISDN modem to the
Wireless Cable/DSL Router
There are two main reasons why you would want to use either an
analog or ISDN modem with the Wireless Cable/DSL Router:
• You use dial-up Internet service instead of cable or DSL
Internet service.
• You have cable or DSL Internet service but want to have an analog
or ISDN backup in case your broadband Internet service is unavailable.
Perform the following steps to connect an analog or ISDN modem,
manually change the WAN type, and properly configure the Wireless
Cable/DSL Router:
1. Connect your modem to the Wireless
Cable/DSL Router
Turn off your PC and your analog or ISDN modem.
Connect a serial modem cable to your analog or ISDN modem and to the
COM port on the Wireless Cable/DSL Router.
Note: If your analog or ISDN modem is connected to your PC using a USB
cable, disconnect the USB cable from both your PC and from your analog or
ISDN modem.
2 Connect your Wireless Cable/DSL
Router to your computer
RESET
PRINTER
COM
WAN
3
2
1
12VDC
To make an Ethernet connection: Connect one end
of the supplied Ethernet cable to your PC's Ethernet
adapter. Connect the other end to one of the LAN
ports on the Wireless Cable/DSL Router.
To make a wireless connection: Make sure each
Wireless Card that will be connecting to the network
is set to Infrastructure mode.
Note: Each Wireless Access PC Card or PCI Adapter in the
wireless network must have the Infrastructure mode
selected within the Configuration Utility. Refer to your
Wireless Access PC Card or PCI Adapter documentation
for information on selecting Infrastructure mode.
Note: If you want to attach a printer to your
network, refer to the Print Server section of the
User Guide for installation instructions.
Model-7900
10/100 Mbps Network Card
4
Model-8011
Wireless Access Point Router
Cable/DSL/ISDN/
or Analog Modem
For troubleshooting and support information,
refer to the Companion Reference Guide or to
the User Guide on the U.S. Robotics
Installation CD-ROM.
5
3. Connect the power supply
RESET
PRINTER
COM
WAN
3
2
1
12VDC
Turn on your analog or ISDN modem. Connect the
included power cord to the power jack on the Wireless
Cable/DSL Router. Plug the power cord into a standard
power outlet.
4. Select the connection method
Note: If you want to attach a printer to your network, refer to the Print
Server section of the Companion Reference Guide and the User Guide for
installation instructions.
For troubleshooting and support information, refer to the Companion Reference
Guide or to the User Guide on the U.S. Robotics Installation CD-ROM.
The following graphic is a representation of a typical system topology
after the installation of the Wireless Cable/DSL Router.
Launch a Web browser. In the location or address line
of your Web browser, type http:// 192.168.123.254 to
access the Configuration Utility. There is no default
password for the Wireless Cable/DSL Router, so just
click Login. Click Primary Setup and follow the on-screen
instructions. You will need to enter the network information for your ISP
account, including your username, your password, and your dial-up
number. When prompted, select the WAN type as Dial-up Modem, and
continue to follow the on-screen instructions.
Congratulations! The installation procedure is now complete.
You should now have secure and shared Internet access. Click Connect
to initiate a dial-up session with your ISP. The Status page will indicate
whether or not the call was successful. If the settings are correct, the
analogue or ISDN modem can be used to connect to the Internet. If the
connection fails, verify that you entered the correct values.
Model-2415
Wireless Access
PCI Adapter
Model-2410
Wireless Access
PC Card
To verify your connection, launch a Web browser and go to www.usr.com.
If the page loads, you are finished with the installation procedure. If the
page does not load, proceed to the Troubleshooting section of this Guide.
If you have any difficulties connecting to the Wireless Cable/DSL Router,
check the top three issues below and see if they apply to your situation.
• If you are attempting to create a wireless connection, but cannot
connect to the Wireless Cable/DSL Router, make sure each Wireless
Card is set to Infrastructure mode. If the Wireless Cards are set to
802.11b AdHoc mode, you will not be able to connect to the Wireless
Cable/DSL Router. When each Wireless Card is set to Infrastructure
mode, it should automatically connect to the Access Point of the
Wireless Cable/DSL Router. If the Wireless Cards do not automatically
connect, rescan until they detect the Wireless Cable/DSL Router
and connect.
• If you create a wireless connection to the Wireless Cable/DSL Router,
but are experiencing poor link quality, check the positioning of the
Wireless Cable/DSL Router. Long distances, multiple floors, or steel or
concrete walls can diminish the link quality. If possible, reposition the
Wireless Cable/DSL Router to reduce the effect of any obstacles.
• If you have the Wireless Cable/DSL Router properly connected and
can access the Internet, but are experiencing difficulties connecting
with special applications (e.g., ICQ, Battle.net, etc.), you must assign
specific ports in order to bypass the firewall function. For more
information about how to configure this function, refer to the "Special
Applications" section within the “Configuring the Wireless Cable/DSL
Router" chapter of the User Guide.
6
Model-7900
10/100 Mbps Network Card
Model-8011
Wireless Access Point Router
Cable/DSL/ISDN/
or Analog Modem
Print Server
The Wireless Cable/DSL Router can function as a network print server
in Windows 95, 98, Me, NT, and 2000. After you complete the software
installation procedure, you can enable the print server function.
Windows 95, 98, and Me Users
Insert the Installation CD-ROM into your CD-ROM drive, click Software,
select Install Print Server Drivers on the CD-ROM, and click Next.
Select Next to install the software to the default location or click Browse
to install to a different directory.
Click Finish to complete the installation of the Print Server Drivers. You
will then be prompted to restart your computer. Select Yes and click OK.
After your computer restarts, click Windows Start, Settings, and then
Printers. Click Add Printer to begin printer installation.
7
Click Next to launch the Add Printer Wizard.
When prompted to choose how your printer is attached to your computer,
select Local Printer.
Select USRPRTSHR for the printer port and click Next. You will then
need to supply Windows with the correct printer drivers provided by
the printer’s manufacturer.
Enter a name for the printer and click Next.
When you are prompted to print a test page, select Yes and click Finish.
When you are prompted, click Yes if the page printed correctly. The printer
is now successfully installed and will appear in the Printers menu. If the
page did not print correctly, click No to begin the Troubleshooting Wizard.
printer’s manufacturer. When you are prompted to print a test page,
select Yes.
Enter a name for the printer and click Next.
When you are prompted, select Do not share this printer from the menu
and click Next.
If you were not prompted to print a test page, right-click the printer, select
Properties, and then select Print Test Page in the menu. When you are
prompted, click Yes if the page printed correctly. The printer is now
successfully installed and will appear in the Printers menu. If the page
did not print correctly, click No to begin the Troubleshooting Wizard.
Windows NT Users
Click Windows Start, Settings, and then Printers. Double-click Add Printer.
Troubleshooting
When the Add Printer Wizard launches, select My Computer and click Next.
I can’t access the Internet.
Select the USRPRTSHR port from the list and click Next.
Possible Solution:
Make sure the power cord and all of the Ethernet cables are connected
correctly. This includes the cables connecting the Wireless Cable/DSL
Router, the modem, and all of the computers.
If the drivers for the printer were not previously installed, select Have
Disk to install the drivers now.
Enter a name for the printer and click Next.
Since the printer is not physically connected to the computer, select Not
Shared from the menu and click Next. The printer will be shared when all
of the computers that will be on the network install the print server software, the printer drivers, and connect to the Wireless Cable/DSL Router.
When you are prompted to print a test page, select Yes and click Finish.
When you are prompted, click Yes if the page printed correctly. The printer
is now successfully installed and will appear in the Printers menu. If the
page did not print correctly, click No to begin the Troubleshooting Wizard.
Windows 2000 Users
Insert the Installation CD-ROM into your CD-ROM drive, click Software,
select Install Print Server Drivers on the CD-ROM, and click Next.
Select Next to install the software to the default location or click Browse
to install to a different directory.
Click Finish to complete the installation of the Print Server Drivers.
Select Yes to restart the computer and then click OK.
After your computer restarts, click Windows Start, Control Panel, and
then Printers. Click Add Printer to begin printer installation.
When the Add Printer Wizard window launches, click Next to begin the
Installation Wizard.
When prompted to choose how your printer is attached to your computer,
select Local Printer. Make sure that Automatically detect and install my
Plug and Play printer is not selected.
Possible Solution:
Make sure that your PC is using an IP address that is within the default
range of 192.168.123.xxx. Make sure the address of the subnet mask is
255.255.255.0. The Default Gateway should be the IP address of the
Wireless Cable/DSL Router, which is 192.168.123.254. To verify all of
these settings, perform the following steps:
Windows 95, 98, or Me Users:
Click Windows Start and then Run. Type winipcfg and click OK. Check
the IP Address, Subnet Mask, Default Gateway, and DNS server data to
make sure they are correct. If the information is not correct, click
Release All and then click Renew All.
Windows NT, 2000, or XP Users:
Click Windows Start and then Run. Type cmd and click OK. At the DOS
prompt, type ipconfig /all. Check the IP Address, Subnet Mask, Default
Gateway, and DNS server data to make sure they are correct. If the
information is not correct, type ipconfig /release and press ENTER.
Then, type ipconfig /renew and press ENTER.
Possible Solution:
You can reboot the Wireless Cable/DSL Router by unplugging and
plugging in the power supply.
If you are still unable to access the Internet, refer to the Troubleshooting
Ping Procedure section in the User Guide on the U.S. Robotics Installation
CD-ROM and refer to the documentation for your modem.
Select USRPRTSHR for the printer port and click Next. You will then need
to supply Windows with the correct printer drivers provided by the
8
9
I do not know if my assigned IP Address is Static or Dynamic.
My Cable or DSL service is not working, but I need to access the Internet.
Possible Solution:
If you have cable or DSL service, you most likely have a Dynamic IP
address. You should always check with your service provider to verify this
information, since some providers will assign Static IP addresses. If you
have a Dynamic IP address, select Dynamic IP Address in the WAN Setup
area of the Configuration Utility, and the Wireless Cable/DSL Router will
automatically obtain the information it needs from your service provider.
If you have a Static IP address, select Static IP Address in the WAN Setup
area of the Configuration Utility. You will need to refer to Appendix A or
Appendix B in this guide to collect the necessary configuration information.
Possible Solution:
If you have an external analog modem and dial-up Internet service, you
can still access the Internet. Connect the external analog modem according
to the procedure described in this Guide. Open a Web browser and type
http://192.168.123.254 to access the Configuration Utility. Click Setup,
WAN, and then select Dial-up Modem. Enter the appropriate information
for your dial-up Internet Service Provider settings.
I can’t connect to the Configuration Utility of the Wireless Cable/DSL Router.
Possible Solution:
The Web-based Configuration Utility is where you can go to make any
changes to the settings of the Wireless Cable/DSL Router. Make sure all
of the Ethernet cables are properly and securely connected and that the
power cord is plugged in.
Possible Solution:
If you have a Static IP address, make sure that you correctly performed all
of the steps in Appendix A or Appendix B of this guide. If you have a Static
IP address and did not select the Obtain an IP address automatically
option for your computer, you will not be able to connect to the Wireless
Cable/DSL Router.
Possible Solution:
You need to verify the connection setting of your Web browser and that
the HTTP Proxy feature of your Web browser is disabled. You need to do
this so that your Web browser can read the configuration pages inside
your Wireless Cable/DSL Router. Launch your Web browser.
Internet Explorer users: Click Tools, Internet Options, and then the
Connections tab. Select Never dial a connection, click Apply, and then
click OK. Click Tools again, then click Internet Options. Click the
Connections tab, and click the LAN Settings button. Clear all of the
check boxes, and click OK. Click OK.
Netscape Navigator users: Click Edit, Preferences, and then double-click
Advanced in the Category window. Click Proxies, select Direct connection to the Internet, and then click OK. Click Edit again, then click
Preferences. Under Category, double-click Advanced, then click Proxies.
Select Direct connection to the Internet, and click OK.
My Configuration Utility is not responding, but I can still access
the Internet.
Possible Solution:
If your Configuration utility stops responding, unplug and then plug back
in the power supply of the Wireless Cable/DSL Router. This will reboot the
Wireless Cable/DSL Router. If you are still unable to communicate with the
Configuration Utility, press in and hold the RESET button for five seconds.
This will reset the Wireless Cable/DSL Router to the factory default settings. If you applied any personal configuration settings, you will need to
make the changes again.
10
While trying to check my network configuration settings in Windows Me
or XP, I can’t find the Network icon.
Possible Solution:
The default setting in Windows Me and XP is to not show all of the icons
within the Control Panel. Click Windows Start, Settings, and then Control
Panel. Within Control Panel, click View all Control Panel options on the
left side of the screen. All the Control Panel icons should now be visible.
My computer does not recognize the Access Point function of the
Wireless Cable/DSL Router after I changed the settings.
Possible Solution:
Ensure that you are contacting the correct Access Point and using the
correct MAC address. Ensure that the correct passphrase and encryption
option are being used. If you changed the settings in the configuration of
the Access Point, you must also change the settings of every PC Card or
PCI Adapter attached to this network. The settings of the PC Cards or PCI
Adapters must match the new settings of the Wireless Cabl/DSL Router.
I am unable to connect to the Access Point function of the Wireless
Cable/DSL Router.
Possible Solution:
Be certain that you have each Wireless PC Card or PCI Adapter set to
Infrastructure mode. If your PC Cards or PCI Adapters are set to 802.11b
AdHoc mode, you will not be able to use the Access Point function. Refer
to the User Guide for your Wireless PC Card or PCI ADapter to determine
how to change this setting.
Note: Each Wireless Access PC Card or PCI Adapter in the wireless network
must have the Infrastructure mode selected within the Configuration Utility.
Refer to your Wireless Access PC Card or PCI Adapter documentation for
information on selecting Infrastructure mode.
My Wireless Cable/DSL Router is not appearing in the list when
I scan for it.
Possible Solution:
You may be on a computer that is too far away from the Wireless
Cable/DSL Router. Try moving closer to the Wireless Cable/DSL Router
and repeating the scan procedure.
Note: It is important that you have your serial number written down for future
reference. If you ever need to call our Technical Support department, you will
need this number, plus your model number, which is 8011, to receive assistance.
11
Are You Still Having Problems?
1. Go to the Support section of the U.S. Robotics Web site at www.usr.com.
Many of the most common difficulties users experience have
been addressed in the FAQ and Troubleshooting Web pages for your
specific product.
Indonesia
001 803 65 7402
[email protected]
9:00 A.M. – 5:00 P.M., M-F
Japan
(03) 5495 9408
[email protected]
9:00 A.M. – 5:00 P.M., M-F
[email protected]
9:00 A.M. – 5:00 P.M., M-F
Korea
Malaysia
1800 80 1554
[email protected]
9:00 A.M. – 5:00 P.M., M-F
Philippines
1800 1 651 0215
[email protected]
9:00 A.M. – 5:00 P.M., M-F
2. Call the U.S. Robotics Technical Support Department.
Singapore
65 784 9910
[email protected]
9:00 A.M. – 5:00 P.M., M-F
Technical questions about U.S. Robotics products can also be answered
by technical support specialists.
South Korea
00798 651 7135
[email protected]
9:00 A.M. – 5:00 P.M., M-F
Taiwan
0080 65 1349
[email protected]
9:00 A.M. – 5:00 P.M., M-F
Thailand
001 800 65 6252
[email protected]
9:00 A.M. – 5:00 P.M., M-F
Country
Voice
Online
Support Hours
USA
(801) 401-1143
http://www.usr.com/support/s-online_emailtechie.asp
9:00A.M. – 5:00P.M. CST, M-F
Canada
(801) 401-1146
http://www.usr.com/support/s-online_emailtechie.asp
9:00A.M. – 5:00P.M. CST, M-F
Country
Voice
Online
Support Hours
Australia
1800 125030
[email protected]
9:00 A.M. – 5:00 P.M., M-F
New Zealand
0800 449535
[email protected]
9:00 A.M. – 5:00 P.M., M-F
Austria
07 110 900 116
[email protected]
8:00 A.M. – 6:00 P.M., M-F
Country
Voice
Online
Support Hours
Belgium (Flemish)
+32 (0) 70 233 545
[email protected]
9:00 A.M. – 6:00 P.M., M-F
Argentina
AT&T Direct + (877) 643-2523
[email protected]
9:00A.M. – 5:00P.M. CST, M-F
Belgium (French)
+32 (0) 70 233 546
[email protected]
9:00 A.M. – 6:00 P.M., M-F
Brazil
AT&T Direct + (877) 487-6523
[email protected]
9:00A.M. – 5:00P.M. CST, M-F
Denmark
+45 7010 4030
[email protected]
9:00 A.M. – 5:00 P.M., M-F
México
AT&T Direct + (877) 643-2523
[email protected]
9:00A.M. – 5:00P.M. CST, M-F
Finland
+358 98 171 0015
[email protected]
10:00 A.M. – 6:00 P.M., M-F
Chile
AT&T Direct + (877) 643-2523
[email protected]
9:00A.M. – 5:00P.M. CST, M-F
France
080 307 0693
[email protected]
9:00 A.M. – 6:00 P.M., M-F
Colômbia
AT&T Direct + (877) 643-2523
[email protected]
9:00A.M. – 5:00P.M. CST, M-F
Germany/Hungary
01805671548
[email protected]
8:00 A.M. – 6:00 P.M., M-F
Costa Rica
AT&T Direct + (877) 643-2523
[email protected]
9:00A.M. – 5:00P.M. CST, M-F
Ireland
+44 870 844 4546
[email protected]
9:00 A.M. – 6:00 P.M., M-F
Peru
AT&T Direct + (877) 643-2523
[email protected]
9:00A.M. – 5:00P.M. CST, M-F
Israel
[email protected]
9:00 A.M. – 5:30 P.M., M-F
Puerto Rico
AT&T Direct + (877) 643-2523
[email protected]
9:00A.M. – 5:00P.M. CST, M-F
Italy
848 80 9903
[email protected]
9:00 A.M. – 6:00 P.M., M-F
Venezuela
AT&T Direct + (877) 643-2523
[email protected]
9:00A.M. – 5:00P.M. CST, M-F
Luxembourg
+352 342 080 8318
[email protected]
9:00 A.M. – 6:00 P.M., M-F
Middle East/Africa
+44 870 844 4546
[email protected]
9:00 A.M. – 6:00 P.M., M-F
Country
Voice
Online
Support Hours
Netherlands
0900 20 25 857
[email protected]
9:00 A.M. – 6:00 P.M., M-F
China
10800 650 5108
[email protected]
9:00 A.M. – 5:00 P.M., M-F
Norway
+47 (0) 23 50 0097
[email protected]
9:00 A.M. – 5:00 P.M., M-F
[email protected]
8:00 A.M. – 6:00 P.M., M-F
Portugal
+35 11 415 4034
[email protected]
9:00 A.M. – 5:00 P.M., M-F
Spain
902 117 964
[email protected]
9:00 A.M. – 5:00 P.M., M-F
Sweden
+46 (0) 851 992 035
[email protected]
8:00 A.M. – 5:00 P.M., M-F
Switzerland
+0848 840 200
[email protected]
8:00 A.M. – 6:00 P.M., M-F
UK
0870 8444 546
[email protected]
9:00 A.M. – 5:30 P.M., M-F
Hong Kong
800 90 3191
[email protected]
9:00 A.M. – 5:00 P.M., M-F
India
Delhi - 11 6284198/ 99/ 18/ 19
[email protected]
9:00 A.M. – 5:00 P.M., M-F
India
Hyperbad - 40 6261600/ 01/ 02/ 03
[email protected]
9:00 A.M. – 5:00 P.M., M-F
India
Calcutta - 33 216 1800/ 01
[email protected]
9:00 A.M. – 5:00 P.M., M-F
India
Chennai - 44 851 5273/ 74
[email protected]
9:00 A.M. – 5:00 P.M., M-F
India
Bombay - 22 8252188/ 93/ 94/ 95
[email protected]
9:00 A.M. – 5:00 P.M., M-F
India
Bangalore - 80 2380303/ 04
[email protected]
9:00 A.M. – 5:00 P.M., M-F
Poland
For current support contact information, go to the following Web site:
http://www.usr.com/
12
13
Appendix A
Windows NT Users:
Double-click Network and then click the Protocols tab.
This guide covers most cable and DSL installations that are configured for Dynamic
or Static IP addressing. This guide assumes that you have active and properly
functioning cable or DSL Internet service. If you are uncertain about which type of
configuration you have, refer to the User Guide located on the Installation CD-ROM
for more advanced setup procedures.
All Windows Users:
Select the TCP/IP option for the network adapter that is used to connect to your
cable or DSL modem and click Properties. Proceed to Step B.
Note: DSL users, if you use a login application to access the Internet, you are more
than likely using a PPPoE connection. Refer to the appropriate section of the User
Guide on the Installation CD-ROM for information on collecting your configuration
information. If you use Dial-Up Networking and a VPN adapter, you are most likely
using a PPTP connection. Refer to the appropriate section of the User Guide on the
Installation CD-ROM for information on collecting your configuration information. If
you are unsure about what type of connection you are using, contact your Internet
Service Provider (ISP).
Macintosh Users
Note: Your Cable or DSL modem must be connected to your computer via an RJ-45
Ethernet connection. The Wireless Cable/DSL Router is not compatible with Cable or
DSL modems with only a USB connection. You must have an Ethernet adapter (NIC)
or 802.11b Wireless Adapter installed in your computer.
You need to gather the following information about your computer from your Internet
Service Provider (ISP). Contact your ISP for assistance in obtaining this information.
IP Address: _____________– ______________– ______________–_________________
Subnet Mask: _____________– ______________– ______________–_________________
Gateway/Router: _____________– ______________– ______________–_________________
DNS Servers/ _____________–______________–______________–_________________
Name Servers: _____________– ______________– ______________–_________________
Host Name/DHCP
Client ID:____________________________________________________________________________________________________________________________________________________________________________________________________________________________
Macintosh OS 9.x Users:
Click Apple, Control Panels and then TCP/IP. Proceed to Step B.
Macintosh X Users :
Click Apple, System Preferences and then Network. Proceed to Step B.
B.
All Windows Users:
You should now be in the TCP/IP Properties window.
If the Obtain an IP address automatically option is selected, you may proceed with
the installation of the Wireless Cable/DSL Router in the Connecting a cable or DSL
modem to the Wireless Cable/DSL Router section of this guide.
If this option is not selected, you will need to collect the necessary configuration
information if it was not provided by your Service Provider. Depending on your
operating system, you may need to click multiple tabs within the TCP/IP window to
obtain all the necessary information. Select the Obtain an IP address automatically
option and click OK. If necessary, click OK again to close the Network Properties
page. If you are prompted to restart your computer, click No. You may proceed to the
Connecting a cable or DSL modem to the Wireless Cable/DSL Router section
of this guide.
Note: Windows 2000 users must right-click My Computer, click Properties, and then
click the Network Identification tab to get the Computer Name/Host Name.
All Macintosh Users:
Ensure that the Connect via: option is set to Connect via: Ethernet.
Check to see what the Configure: option is set to and if any information is supplied by
your service provider for the IP address, DHCP Client ID, or Name Servers.
Not all of this information may be required for the installation of the Wireless
Cable/DSL Router. If your ISP cannot provide you with this information, the following
basic steps will assist you in gathering most of the required information.
A.
You need to perform these steps on the computer that is currently connected to
your cable or DSL modem.
Windows Users
All Windows Users:
Click Windows Start, Settings, and then Control Panel.
Windows 95/98/Me Users:
Double-click Network.
Windows 2000 and XP Users:
Double-click Network and Dial-up Connections.
14
If the Configure: option is set to Using DHCP, you may proceed to the Connecting section.
If the Configure: option is not set to Using DHCP, you will need to collect the necessary
configuration information if it was not provided by your Service Provider. You may
need to click multiple tabs within the TCP/IP or Network window to obtain all the necessary information. Set the TCP/IP Configure: option to Using DHCP. Click Save and close
the TCP/IP or Network window. You may proceed to the Connecting a cable or DSL
modem to the Wireless Cable/DSL Router section of this guide.
To configure the Wireless Cable/DSL Router for your specific ISP, launch a Web
browser and type http://192.168.123.254 to access the Configuration Utility.
The Web-based Configuration Utility is where you can go to make any changes to
the settings of the Wireless Cable/DSL Router. There is no default password for
the Wireless Cable/DSL Router, so just click Login. Click Primary Setup and follow
the on-screen instructions. You will need any network connection information you
collected earlier.
15
Note: If you collected any network information, you will need to enter this
information into the WAN configuration screens of the Primary Setup section
of the Configuration Utility.
Note: Write down the settings for your Wireless Cable/DSL Router for future reference.
You can view the settings in the Wireless Cable/DSL Router Configuration Utility by
logging in at http:// 192.168.123.254.
Appendix B
This guide covers most dial-up or remote access connections that are configured
for Dynamic or Static IP addressing. This Guide assumes that you have active and
properly functioning analog or ISDN Internet service. If you are uncertain about
which type of configuration you have, refer to the User Guide located on the
U.S. Robotics Installation CD-ROM for more advanced setup procedures.
Note: The Wireless Cable/DSL Router requires an external analog or ISDN modem
for dial-up functionality. Your analog or ISDN modem must be connected to your
computer via an RS-232 serial connection. The Wireless Cable/DSL Router is not
compatible with analog or ISDN modems with only a USB connection. You must
also have an Ethernet adapter (NIC) or 802.11b Wireless Adapter installed in
your computer.
You need to gather the following information about your Dial-up or Remote Access
connection to your Internet Service Provider (ISP). Contact your ISP for assistance
in obtaining this information.
IP Address: _____________– ______________– ______________–_________________
Subnet Mask: _____________– ______________– ______________–_________________
Gateway/Router: _____________– ______________– ______________–_________________
DNS Servers/ _____________–______________–______________–_________________
Name Servers: _____________– ______________– ______________–_________________
User Name:____________________________________________________________________________________________________________________________________________________________________________________________________________________________
Password:____________________________________________________________________________________________________________________________________________________________________________________________________________________________
Dial-up Access
Number*:____________________________________________________________________________________________________________________________________________________________________________________________________________________________
Windows 95 and 98 Users:
Right-click My Computer and then click Explore. Double-click Dial-Up
Networking. Right-click your ISP connection and click Properties. Click
the Server Types tab and then click the TCP/IP Settings button. Proceed
to Step B.
Windows 2000 Users:
Click Windows Start, Settings, and then Control Panel. Double-click Network
and Dial-up Connections. Right-click your ISP connection and click Properties.
Click the Networking tab and then scroll down in the list of components.
Select Internet Protocol (TCP/IP) and click Properties. Proceed to Step B.
Windows NT Users:
Right-click My Computer and then click Explore. Double-click Dial-Up
Networking. Select your ISP connection from the Phonebook entry drop-down
menu. Click More and select Edit entry and modem properties. Click the
Server tab and then click the TCP/IP Settings button. Proceed to Step B.
Windows Me Users:
Click Windows Start, Settings, and then Dial-Up Networking. Right-click your
ISP connection and click Properties. Click the Networking tab and then click
the TCP/IP Settings button. Proceed to Step B.
Windows XP Users:
Click Windows Start and then Control Panel. Double-click Network
Connections. Right-click your ISP connection and click Properties. Click the
Networking tab, select Internet Protocol (TCP/IP) from the menu, and click
Properties. Proceed to Step B.
Macintosh OS 9.x Users:
Click Apple, Control Panels, and then TCP/IP. Proceed to Step B.
Macintosh X Users:
Click Apple, System Preferences, and then Network. Proceed to Step B.
B. All Windows Users:
You should now be in the TCP/IP Properties window.
If the Server assigned IP address and Server assigned name server addresses
options are selected, you have a Dynamic IP address. Close any open
Properties windows and proceed with the installation of the Wireless
Cable/DSL Router.
If these options are not selected, you have a Static IP address and will need to
check for the following information: IP Address, Subnet Mask, and Default
Gateway. You may proceed to the Connecting an Analog or ISDN modem to the
Wireless Cable/DSL Router section in this guide.
All Macintosh Users:
*If you are using Windows, go to your Dial-up Networking or Network and Dial-up Connections
folder to get this information. If you are using a Macintosh, enter Remote Access through Control
Panels to get this information.
If the Configure: option is set to Manually, write any of the supplied information in the previous table. Set the Configure: option to Using DHCP Server.
Not all of this information may be required for the installation of the Wireless
Cable/DSL Router. If your ISP cannot provide you with this information, the following
basic steps will assist you in gathering most of the required information.
If the Configure: option is set to any other selection, change it to Using
DHCP Server.
A.
Click Save and close the TCP/IP or network window. You may proceed to the
Connecting an Analog or ISDN modem to the Wireless Cable/DSL Router section in this guide.
You need to perform these steps on the computer that is currently connected
to your analog or ISDN modem.
16
Ensure that the Connect via: option is set to Connect via: Ethernet.
17
In the location or address line of your Web browser, type http://192.168.123.254 to
access the Configuration Utility. The Web-based Configuration Utility is where you
can go to make any changes to the settings of the Wireless Cable/DSL Router. There
is no default password for the Wireless Cable/DSL Router, so just click Login. Click
Primary Setup and follow the on-screen instructions. You will need any network
information you collected earlier. When prompted, select the WAN type as Dial-up
Modem and continue to follow the on-screen instructions.
Regulatory Approvals
Federal Communications Commission Statement
CE Declaration of Conformity
We, U.S. Robotics Corporation of 935 National parkway, Schaumburg, Illinois, 601735157, USA, declare under our sole responsibility that the U.S. Robotics Wireless
Cable/DSL Router to which this declaration relates is in conformity with the following standards
and/or other normative documents:
EN60950
EN55022
EN55024
EN61000-3-2
EN61000-3-3
We hereby declare that this product is in conformity to all the essential requirements and other
relevant provisions of Directive 1995/5/EC. The conformity assessment procedure referred to in
Article 10(3) and detailed in Annex II of Directive 1999/5/EC has been followed.
This product has been approved for use in the following countries: France, Germany, Italy, Spain,
Portugal, The Netherlands, Austria, Denmark, Switzerland, and the United Kingdom.
This device complies with FCC Rules Part 15. Operation is subject to the following two conditions:
This device may not cause harmful interference.
U.S. Robotics Corporation Limited Warranty
This device must accept any interference received, including interference that may cause
undesired operation.
HARDWARE: U.S. Robotics warrants to the end user (“Customer”) that this hardware product will
be free from defects in workmanship and materials, under normal use and service, for the following
length of time from the date of purchase from U.S. Robotics or its authorised reseller:
This equipment has been tested and found to comply with the limits for a Class B digital device, pursuant
to Part 15 of the FCC Rules. These limits are designed to provide reasonable protection against harmful
interference in a residential installation. This equipment generates, uses and can radiate radio frequency
energy. If this equipment is not installed and used in accordance with the manufacturer’s instructions, it
may cause harmful interference to radio communications. However, there is no guarantee that interference will not occur in a particular installation. If this equipment does cause harmful interference to radio
or television reception, which can be determined by turning the equipment off and on, the user is encouraged to try to correct the interference by one or more of the following measures:
• Reorient or relocate the receiving antenna.
• Increase the separation between the equipment and receiver.
• Connect the equipment to an outlet on a circuit different from that to which the
receiver is connected.
• Consult the dealer or an experienced radio/TV technician for help.
The use of shielded cables for connection of the monitor to the graphics card is required to assure
compliance with FCC regulations. Modifications to this unit not expressly approved by the party
responsible for compliance could void the user’s authority to operate this equipment.
FCC Radiation Exposure Statement
This equipment complies with FCC radiation exposure limits set forth for an uncontrolled environment.
This equipment should be installed and operated with minimum distance 20cm between the
radiator and your body.
Manufacturer’s Disclaimer Statement
The information in this document is subject to change without notice and does not represent a
commitment on the part of the vendor. No warranty or representation, either expressed or implied,
is made with respect to the quality, accuracy or fitness for any particular purpose of this document.
The manufacturer reserves the right to make changes to the content of this document and/or the
products associated with it at any time without obligation to notify any person or organization of
such changes. In no event will the manufacturer be liable for direct, indirect, special, incidental or
consequential damages arising out of the use or inability to use this product or documentation,
even if advised of the possibility of such damages.
UL Listing/CUL Listing or CSA Certified
This information technology equipment is UL-Listed and CUL Listed or CSA-Certified for the uses
described in the users guide.
18
Two (2) years
U.S. Robotics’ sole obligation under this express warranty shall be, at U.S. Robotics’ option and
expense, to repair the defective product or part, deliver to Customer an equivalent product or part
to replace the defective item, or if neither of the two foregoing options is reasonably available,
U.S. Robotics may, in its sole discretion, refund to Customer the purchase price paid for the
defective product. All products that are replaced will become the property of U.S. Robotics.
Replacement products may be new or reconditioned. U.S. Robotics warrants any replaced or
repaired product or part for ninety (90) days from shipment, or the remainder of the initial
warranty period, whichever is longer.
SOFTWARE: U.S. Robotics warrants to Customer that each software program licensed from it will
perform in substantial conformance to its program specifications, for a period of ninety (90) days
from the date of purchase from U.S. Robotics or its authorised reseller. U.S. Robotics warrants the
media containing software against failure during the warranty period. No updates are provided.
U.S. Robotics’ sole obligation under this express warranty shall be, at U.S. Robotics’s option and
expense, to refund the purchase price paid by Customer for any defective software product,
or to replace any defective media with software which substantially conforms to applicable
U.S. Robotics published specifications. Customer assumes responsibility for the selection of the
appropriate applications program and associated reference materials. U.S. Robotics makes no
warranty or representation that its software products will meet Customer’s requirements or work in
combination with any hardware or applications software products provided by third parties, that
the operation of the software products will be uninterrupted or error free, or that all defects in the
software products will be corrected. For any third-party products listed in the U.S. Robotics
software product documentation or specifications as being compatible, U.S. Robotics will make
reasonable efforts to provide compatibility, except where the noncompatibility is caused by a
“bug” or defect in the third party’s product or from use of the software product not in accordance
with U.S. Robotics’ published specifications or User Guide.
THIS U.S. ROBOTICS PRODUCT MAY INCLUDE OR BE BUNDLED WITH THIRD-PARTY SOFTWARE, THE
USE OF WHICH IS GOVERNED BY A SEPARATE END-USER LICENSE AGREEMENT. THIS U.S. ROBOTICS
WARRANTY DOES NOT APPLY TO SUCH THIRD-PARTY SOFTWARE. FOR THE APPLICABLE WARRANTY,
PLEASE REFER TO THE END-USER LICENSE AGREEMENT GOVERNING THE USE OF SUCH SOFTWARE.
OBTAINING WARRANTY SERVICE: Customer must contact a U.S. Robotics Corporate Service Centre or
an Authorised U.S. Robotics Service Centre within the applicable warranty period to obtain warranty
service authorisation. Dated proof of purchase from U.S. Robotics or its authorised reseller may be
required. Products returned to U.S. Robotics’ Corporate Service Centre must be pre-authorised by
U.S. Robotics with a Service Repair Order (SRO) number marked on the outside of the package, and
sent prepaid and packaged appropriately for safe shipment, and it is recommended that they be
insured or sent by a method that provides for tracking of the package. The repaired or replaced
item will be shipped to Customer, at U.S. Robotics’ expense, not later than thirty (30) days after
U.S. Robotics receives the defective product. Return the product to:
In the United States:
USR-Walnut
528 Spanish Lane
Walnut, Ca. 91789
In Canada:
U.S. Robotics
Unit-100 13751 Mayfield Pl.
Richmond, B.C. Canada V6V 2G9
In Europe:
FRS Europe BV.
Draaibrugweg 2
1332 AC Almere
The Netherlands
19
U.S. Robotics shall not be responsible for any software, firmware, information, or memory data
of Customer contained in, stored on, or integrated with any products returned to U.S. Robotics for
repair, whether under warranty or not.
WARRANTIES EXCLUSIVE: IF A U.S. ROBOTICS PRODUCT DOES NOT OPERATE AS WARRANTED
ABOVE, CUSTOMER’S SOLE REMEDY FOR BREACH OF THAT WARRANTY SHALL BE REPAIR,
REPLACEMENT, OR REFUND OF THE PURCHASE PRICE PAID, AT U.S. ROBOTICS’ OPTION. TO THE
FULL EXTENT ALLOWED BY LAW, THE FOREGOING WARRANTIES AND REMEDIES ARE EXCLUSIVE
AND ARE IN LIEU OF ALL OTHER WARRANTIES, TERMS, OR CONDITIONS, EXPRESS OR IMPLIED,
EITHER IN FACT OR BY OPERATION OF LAW, STATUTORY OR OTHERWISE, INCLUDING WARRANTIES,
TERMS, OR CONDITIONS OF MERCHANTABILITY, FITNESS FOR A PARTICULAR PURPOSE, SATISFACTORY
QUALITY, CORRESPONDENCE WITH DESCRIPTION, AND NON-INFRINGEMENT, ALL OF WHICH ARE
EXPRESSLY DISCLAIMED. U.S. ROBOTICS NEITHER ASSUMES NOR AUTHORISES ANY OTHER
PERSON TO ASSUME FOR IT ANY OTHER LIABILITY IN CONNECTION WITH THE SALE, INSTALLATION,
MAINTENANCE OR USE OF ITS PRODUCTS. U.S. ROBOTICS SHALL NOT BE LIABLE UNDER THIS
WARRANTY IF ITS TESTING AND EXAMINATION DISCLOSE THAT THE ALLEGED DEFECT OR
MALFUNCTION IN THE PRODUCT DOES NOT EXIST OR WAS CAUSED BY CUSTOMER’S OR ANY
THIRD PERSON’S MISUSE, NEGLECT, IMPROPER INSTALLATION OR TESTING, UNAUTHORISED
ATTEMPTS TO OPEN, REPAIR OR MODIFY THE PRODUCT, OR ANY OTHER CAUSE BEYOND THE
RANGE OF THE INTENDED USE, OR BY ACCIDENT, FIRE, LIGHTNING, OTHER HAZARDS, OR
ACTS OF GOD.
LIMITATION OF LIABILITY: TO THE FULL EXTENT ALLOWED BY LAW, U.S. ROBOTICS ALSO EXCLUDES
FOR ITSELF AND ITS SUPPLIERS ANY LIABILITY, WHETHER BASED IN CONTRACT OR TORT (INCLUDING
NEGLIGENCE), FOR INCIDENTAL, CONSEQUENTIAL, INDIRECT, SPECIAL, OR PUNITIVE DAMAGES OF
ANY KIND, OR FOR LOSS OF REVENUE OR PROFITS, LOSS OF BUSINESS, LOSS OF INFORMATION
OR DATA, OR OTHER FINANCIAL LOSS ARISING OUT OF OR IN CONNECTION WITH THE SALE,
INSTALLATION, MAINTENANCE, USE, PERFORMANCE, FAILURE, OR INTERRUPTION OF ITS
PRODUCTS, EVEN IF U.S. ROBOTICS OR ITS AUTHORISED RESELLER HAS BEEN ADVISED OF
THE POSSIBILITY OF SUCH DAMAGES, AND LIMITS ITS LIABILITY TO REPAIR, REPLACEMENT,
OR REFUND OF THE PURCHASE PRICE PAID, AT U.S. ROBOTICS’ OPTION. THIS DISCLAIMER OF
LIABILITY FOR DAMAGES WILL NOT BE AFFECTED IF ANY REMEDY PROVIDED HEREIN SHALL
FAIL OF ITS ESSENTIAL PURPOSE.
DISCLAIMER: Some countries, states, or provinces do not allow the exclusion or limitation of
implied warranties or the limitation of incidental or consequential damages for certain products
supplied to consumers, or the limitation of liability for personal injury, so the above limitations and
exclusions may be limited in their application to you. When the implied warranties are not allowed
to be excluded in their entirety, they will be limited to the duration of the applicable written
warranty. This warranty gives you specific legal rights which may vary depending on local law.
GOVERNING LAW: This Limited Warranty shall be governed by the laws of the State of Illinois,
U.S.A. excluding its conflicts of laws principles and excluding the United Nations Convention on
Contracts for the International Sale of Goods.
This document contains materials protected by copyright. All rights are reserved. No part of this
manual may be reproduced or transmitted in any form, by any means or for any purpose without
expressed written consent of its authors. Product names appearing in this document are mentioned
for identification purchases only. All trademarks, product names or brand names appearing in this
document are registered property of their respective owners.
20
Printed in Taiwan
21